

Page 1
INSTRUCTION MANUAL
BASICS
VPC-X1200EX
VPC-X1200
Digital Camera
VPC-X1200GX
Important note
This manual explains how to safely operate the VPC-X1200EX, VPC-X1200
and VPC-X1200GX.
Any information regarding only one of these products will be labeled as such.
Please read these instructions carefully before using the camera.
Make sure to read and understand the separate booklet “
Keep this manual in a safe place for later reference.
Two additional instruction manuals (both PDF files) are stored in the included CDROM (SANYO Software Pack).
• “INSTRUCTION MANUAL: ADVANCED” explains detailed particulars of the
camera functions.
• “SANYO Software Pack INSTRUCTION MANUAL” explains how to use your
camera in conjunction with a computer.
SAFETY MANUAL”.
Page 2

Warning
Declaration of Conformity
Model number: VPC-X1200
Trade Name: SANYO
Responsible party: SANYO FISHER COMPANY
Address: 21605 Plummer Street, Chatsworth, California 91311
Telephone No.: (818) 998-7322
This device complies with Part 15 of the FCC Rules. Operation is subject
to the following two conditions:
(1) this device may not cause harmful interference, and
(2) this device must accept any interference received, including
interference that may cause undesired operation.
TO PREVENT THE RISK OF FIRE OR ELECTRIC SHOCK, DO NOT
EXPOSE THIS APPLIANCE TO RAIN OR MOISTURE
kFOR AMERICAN USERS
The following advisory is included in accordance with the laws of the State of
California (USA):
WARNING:
This product contains chemicals, including lead, known to the State of
California to cause cancer, birth defects or other reproductive harm. Wash
hands after handling.
i This equipment has been tested and found to comply with the limits for a
Class B digital device, pursuant to Part 15 of the FCC Rules. These limits
are designed to provide reasonable protection against harmful interference
in a residential installation. This equipment generates, uses and can
radiate radio frequency energy and, if not installed and used in accordance
with the instructions, may cause harmful interference to radio
communications. However, there is no guarantee that interference will not
occur in a particular installation. If this equipment does cause harmful
interference to radio or television reception, which can be determined by
turning the equipment off and on, the user is encouraged to try to correct
the interference by one or more of the following measures:
h Reorient or relocate the receiving antenna.
h Increase the separation between the equipment and receiver.
h Connect the equipment into an outlet on a circuit different from that to
which the receiver is connected.
h Consult the dealer or an experienced radio/TV technician for help.
i Changes or modifications not expressly approved by the party responsible
for compliance could void the user’s authority to operate the equipment.
i English
Page 3

FOR USERS IN THE USA
About the battery charger
IMPORTANT SAFETY
INSTRUCTIONS – SAVE THESE
INSTRUCTIONS
DANGER – TO REDUCE THE RISK
OF FIRE OR ELECTRIC SHOCK,
CAREFULLY FOLLOW THESE
INSTRUCTIONS
h For connection to a supply not in the U.S.A., use an attachment plug
adapter of the proper configuration for the power outlet.
h Power Supply Cord:
Use UL Listed detachable power supply cord - No. 18 AWG, two
conductors, rated 10 A, VW-1, 105 ºC, 125/250 V, minimum 1.8 m,
maximum 3 m long. Provided with a molded-on, non-polarized attachment
plug with a 15 A, 250 V (NEMA 2-15P) configuration or a 15 A, 125 V
(NEMA 1-15P) configuration and a molded-on connector which mates with
the Power Inlet.
Cord Type
Basic Cord Type Other Suitable Types
TS TST
SP-2 SPE-2, SPT-2
SP-3 SPE-3, SPT-3
SV SVE, SVO, SVOO, SVT, SVTO, SVTOO
SJ SJE, SJO, SJOO, SJT, SJTO, SJTOO
S SE, SO, SOO, ST, STO, STOO
h This device complies with Part 15 of the FCC Rules. Operation is subject
to the following two conditions: (1) this device may not cause harmful
interference, and (2) this device must accept any interference received,
including interference that may cause undesired operation.
English ii
Page 4

PARA LOS USUARIOS DE EE.UU.
Acerca del cargador de baterías
INSTRUCCIONES IMPORTANTE
SOBRE DE SEGURIDAD - GUARDE
ESTAS INSTRUCCIONES
PELIGRO - PARA REDUCIR EL
RIESGO DE INCENDIO O
DESCARGAS ELÉCTRICAS, SIGA
CUIDADOSAMENTE ESTAS
INSTRUCCIONES
h Para la conexión a una red de alimentación que no sea de EE.UU., utilice
el adaptador de enchufe apropiado para la toma de la red.
h Cable de alimentación:
Utilice el cable de alimentación UL desenchufable indicado en la lista - N.°
18 AWG, dos conductores, amperaje nominal de 10 A, VW-1, 105 ºC, 125/
250 V, mínimo 1,8 m, máximo 3 m de longitud. Provisto de enchufe
moldeado, adaptador de enchufe no polarizado con configuración de 15 A,
250 V (NEMA 2-15P), o configuración de 15 A, 125 V (NEMA 1-15P) y
conector moldeado que se adapta a la toma de corriente de la red.
Tipo de cable
Tipo de cable básico Otros tipos adecuados
TS TST
SP-2 SPE-2, SPT-2
SP-3 SPE-3, SPT-3
SV SVE, SVO, SVOO, SVT, SVTO, SVTOO
SJ SJE, SJO, SJOO, SJT, SJTO, SJTOO
S SE, SO, SOO, ST, STO, STOO
h Este dispositivo cumple con lo estipulado en la Parte 15 de las Normativas
de la FCC. La operación está sujeta a las dos condiciones siguientes: (1)
este dispositivo no puede provocar interferencias nocivas, y (2) este
dispositivo debe aceptar las interferencias recibidas, incluidas las
interferencias que puedan provocar un funcionamiento no deseado.
iii English
Page 5
kFOR CANADIAN USERS
SANYO FISHER Sales (Europe) GmbH
Stahlgruberring 4, D-81829 München, Germany
SANYO Electric Co., Ltd.
1-1, Sanyo-cho, Daito City, Osaka 574-8534, Japan
i This Class B digital apparatus complies with Canadian ICES-003.
kFOR EU USERS
The symbol mark and recycling systems described below apply to EU
countries and do not apply to countries in other areas of the world.
Your SANYO product is designed and manufactured with high quality
materials and components which can be recycled and/or reused.
The symbol mark means that electrical and electronic equipment, batteries
and accumulators, at their end-of-life, should be disposed of separately from
your household waste.
Note:
If a chemical symbol is printed beneath the symbol mark, this chemical
symbol means that the battery or accumulator contains a heavy metal at a
certain concentration. This will be indicated as follows: Hg: mercury, Cd:
cadmium, Pb: lead
In the European Union there are separate collection systems for used
electrical and electronic equipment, batteries and accumulators.
Please, dispose of them correctly at your local community waste collection/
recycling centre.
Please, help us to conserve the environment we live in!
kFOR RUSSIAN USERS
This product is certified by an official certification company
which is authorized by the Russian Federation.
English iv
Page 6

HOW TO READ THIS MANUAL
This instruction manual for your camera is organized into the following
sections.
k SETUP
Before taking pictures with your camera, you will need to familiarize
yourself with a few of its functions and complete some setup steps.
k BASIC OPERATION
An explanation of the fundamental operation for capturing images and
viewing images.
k APPENDICES
The camera specifications are found here.
kSymbols used in this manual
HINT Points giving some extended instructions or special points to pay
CAUTION Points that require special attention.
(page xx) Refer to the page indicated for detailed information.
You may find the answers to questions or problems concerning camera
operation in the ADVANCED INSTRUCTION MANUAL.
kHow to view the “INSTRUCTION MANUAL:
ADVANCED” and “SANYO Software Pack
INSTRUCTION MANUAL” files
attention to.
1 Insert the CD-ROM (SANYO Software Pack) that was included with
your camera in your computer's CD-ROM drive.
2 Install the Adobe Reader 9 on your computer.
3 On the installation screen, click on “Instruction Manuals (PDF)”.
4 Click on the desired instruction manual.
v English
Page 7
SHOOT, PLAY BACK AND SAVE
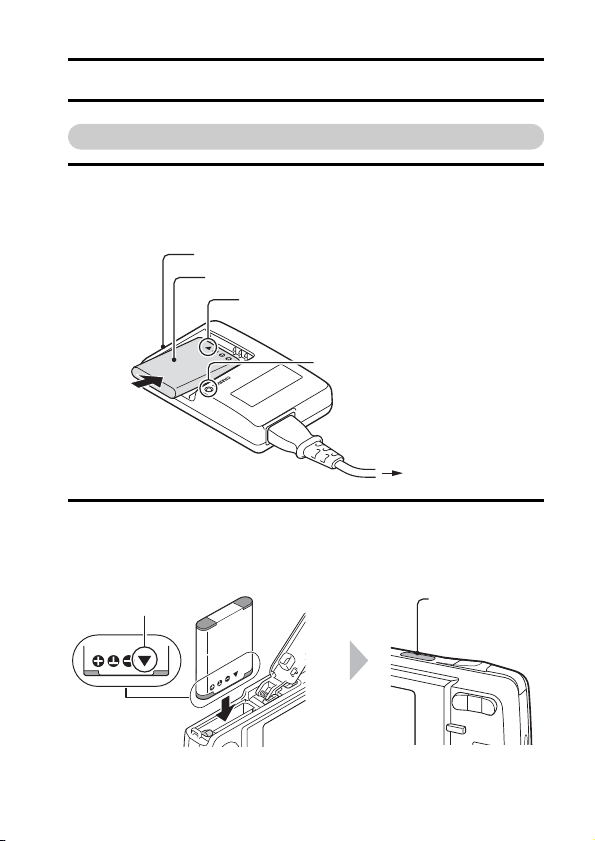
CHARGE indicator
Battery pack
To power outlet
[o] mark
Battery pack charger
[o] mark
ON/OFF button
Install the battery pack
1 Use the supplied charger to charge the battery pack.
h The CHARGE indicator is lit during charging.
h The CHARGE indicator will turn off when the battery pack is fully charged.
h Charging takes approximately 120 min.
2 Open the battery/card compartment cover, and insert the battery pack.
h The battery/card compartment cover is located on the bottom of the
camera.
h Press the ON/OFF button to turn the camera on.
English vi
Page 8
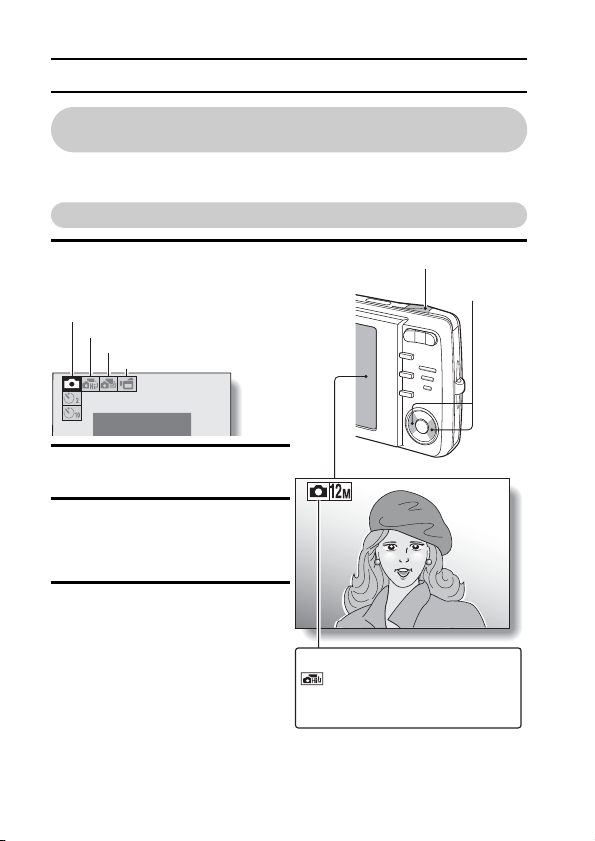
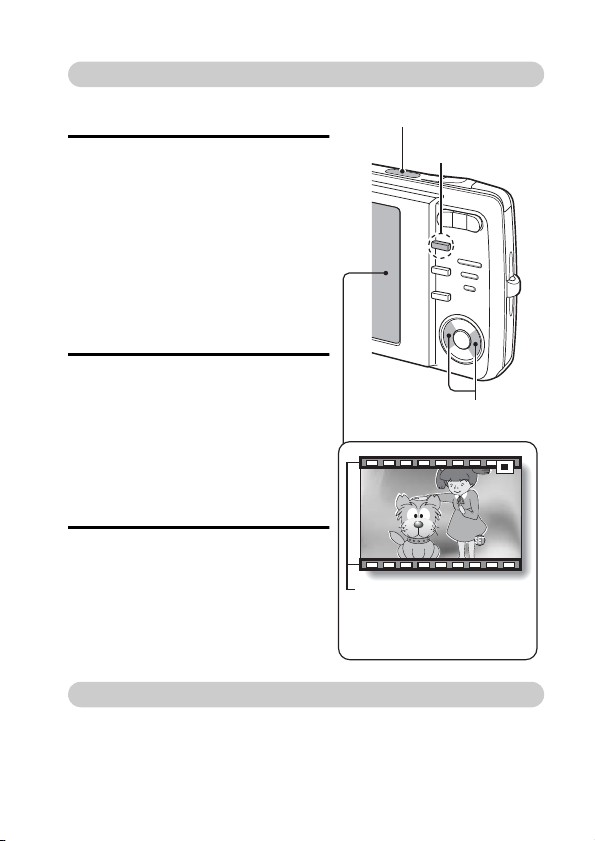
SHOOT, PLAY BACK AND SAVE
Shutter button
[l] / [m]
buttons
s:
Single-shot mode
:
High-speed sequential shots mode
O:
Sequential shots mode
X:
Video clip recording mode
<Recording mode>
PHOTOGRAPH 1 IMAGE
Single-shot
Video clip recording
Sequential shots
High-speed sequential shots
Before capturing those important shots, be sure to first take a
test shot to confirm that your camera is set up and ready to go
i
Sanyo declines any claim for compensation for recorded contents etc. in case
of photographing or recording failure due to a chance camera or card flaw.
Shooting
1 Press the [m] button.
h The recording mode menu
appears.
2 Press the [l] or [m] button to
select the recording mode.
3 Press the SET button.
h The recording mode is
indicated by an icon in the
upper left area of the monitor.
4 Press the shutter button.
Single-shot mode:
A still image is captured.
High-speed sequential shots
mode/sequential shots mode:
Shooting begins. Release the
shutter button to discontinue
shooting.
Video clip recording mode:
Recording begins. To stop
recording, press the shutter
button again.
vii English
6
Page 9
Playback
ON/OFF button
Video clip pattern
[l] / [m] buttons
<Video Clip Playback
Screen>
Playback button
[=]
kStill image playback
1 Press the playback button [=].
h The display switches to the
Playback Screen.
h To view other images, press the
[l] or [m] button.
h If the playback button [=] is
pressed, the display returns to
the Shooting Screen.
kVideo clip playback
1 Press the playback button [=].
h The display switches to the
Playback Screen.
h Press the [l] or [m] button to
display the video clip you wish to
play back.
h Video clips are indicated by a
video clip pattern along the top
and bottom of the screen.
2 Press the SET button.
h Playback of the selected video
clip begins.
h If the playback button [=] is
pressed again, the display
changes to the Shooting Screen.
When you are finished taking pictures...
Press the ON/OFF button to turn the camera off.
PLAY
English viii
Page 10

CONTENTS
CONTENTS ........................................................................................... 1
CHECKING THE INCLUDED ACCESSORIES ...................................... 3
Attaching the handstrap ..................................................................... 4
Media cards that can be used with this camera ................................. 4
What “card” means in this manual .....................................................4
Installing/removing the DC adaptor (Model VAR-A3: sold
separately)
SETUP
PARTS NAMES ..................................................................................... 6
CHARGING THE BATTERY PACK ....................................................... 8
Charging the battery pack .................................................................. 9
INSTALL THE BATTERY PACK AND CARD ...................................... 12
Installation ........................................................................................ 12
Warning concerning battery pack temperature ................................ 13
TURNING THE CAMERA ON AND OFF ............................................. 14
Turning on the camera ..................................................................... 14
Turning off the camera ..................................................................... 14
About the auto power off function .................................................... 15
DATE AND TIME SETTING ................................................................. 16
BASIC OPERATION
BEFORE TAKING PICTURES ............................................................. 19
Switching between the recording mode and playback mode ........... 19
How to switch the recording mode ................................................... 20
Switching the display mode ............................................................. 21
Adjust the monitor brightness .......................................................... 22
Hints for taking pictures ................................................................... 23
CAPTURING AND PLAYING BACK STILL IMAGES .......................... 24
Shooting single shots ....................................................................... 24
Shooting sequential shots ................................................................ 26
Viewing still images ......................................................................... 28
9-image/20-image display playback ................................................29
Folder playback ............................................................................... 30
Magnifying (zooming in) the image .................................................. 31
Zoom jump playback ........................................................................ 32
Deleting files .................................................................................... 33
VIDEO CLIP RECORDING AND PLAYBACK ..................................... 35
Recording a video clip ..................................................................... 35
Playing back the video clip .............................................................. 36
......................................................................................... 5
1 English
Page 11

USING THE SCENE FUNCTION .........................................................39
Capture a still image with a voice memo ..........................................41
How to use the best shot feature ......................................................42
How to use the face chaser feature ..................................................43
How to shoot using Smile Detection .................................................44
OTHER RECORDING FUNCTIONS ....................................................46
Using the zoom ................................................................................46
Flash setting .....................................................................................48
Self-timer ..........................................................................................50
Focus range .....................................................................................52
APPENDICES
SPECIFICATIONS ................................................................................55
Camera ............................................................................................. 55
Camera connectors ..........................................................................58
Battery life ........................................................................................58
Possible Number of Images/Video Recording Time/Audio
Recording Time ................................................................................59
Supplied battery pack charger ..........................................................60
Supplied Li-ion battery pack .............................................................60
Others ...............................................................................................61
Before capturing those important shots, be sure to first take a test
shot to confirm that your camera is set up and ready to go .............62
English 2
Page 12
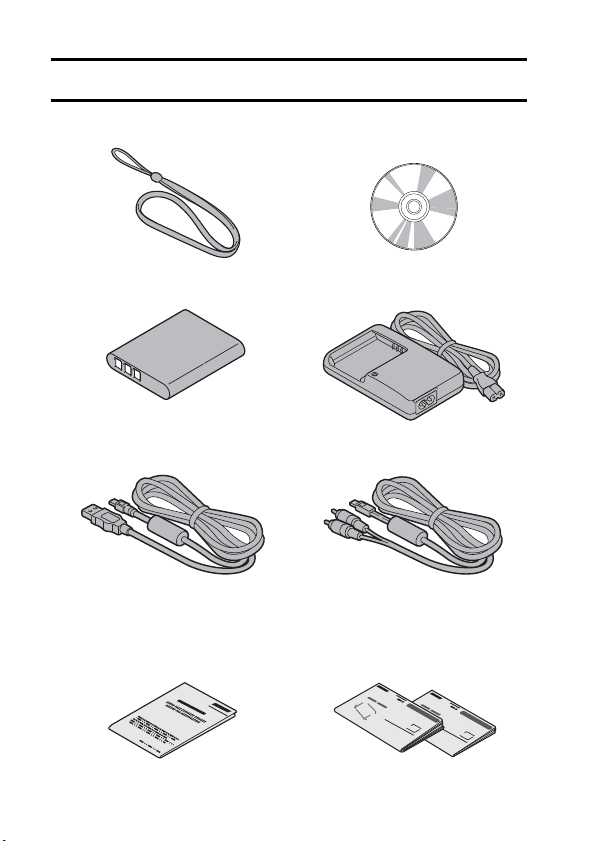
CHECKING THE INCLUDED ACCESSORIES
i Handstrap: 1 i SANYO Software Pack
i Lithium-ion battery pack
(battery pack): 1
i Dedicated USB interface cable:
1
i “SAFETY MANUAL”
(safety precautions booklet)
Please read this booklet
carefully before using the
digital camera.
(CD-ROM): 1
i Lithium-ion battery pack
charger and power cord
i Dedicated AV interface
cable: 1
i Quick Guide
3 English
Page 13

Attaching the handstrap
Media cards that can be used with this camera
The types of card that can be inserted into and used with this camera are:
i SD Memory Card
i SDHC Memory Card
What “card” means in this manual
i In this manual, SD Memory Cards and SDHC Memory Cards that can be
used in this digital camera are referred to as “card”.
English 4
Page 14
CHECKING THE INCLUDED ACCESSORIES
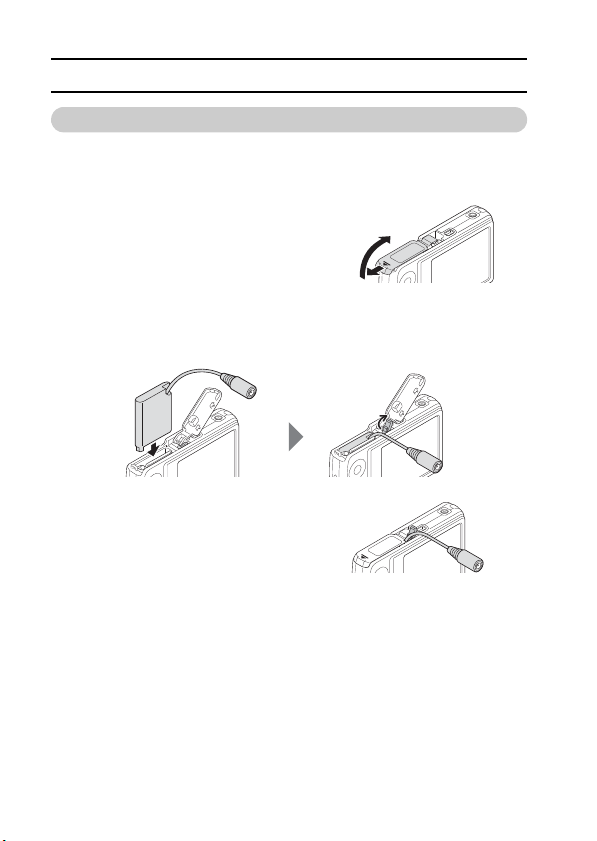
Installing/removing the DC adaptor (Model VAR-A3: sold separately)
Install in the camera's battery slot, and connect the AC adaptor. Use in
conjunction with the AC adaptor.
Attaching the DC adaptor
1 Open the camera's battery/card
compartment cover.
2 Insert the DC adaptor into the battery slot.
h Make sure that the DC adaptor is correctly oriented when inserting,
and insert it firmly all the way.
3 Close the battery/card
compartment cover.
4 Connect the AC adaptor.
Removing the DC adaptor
1 Turn off the camera.
2 Remove the AC adaptor.
3 Open the camera's battery/card compartment cover, and remove the
DC adaptor.
5 English
Page 15
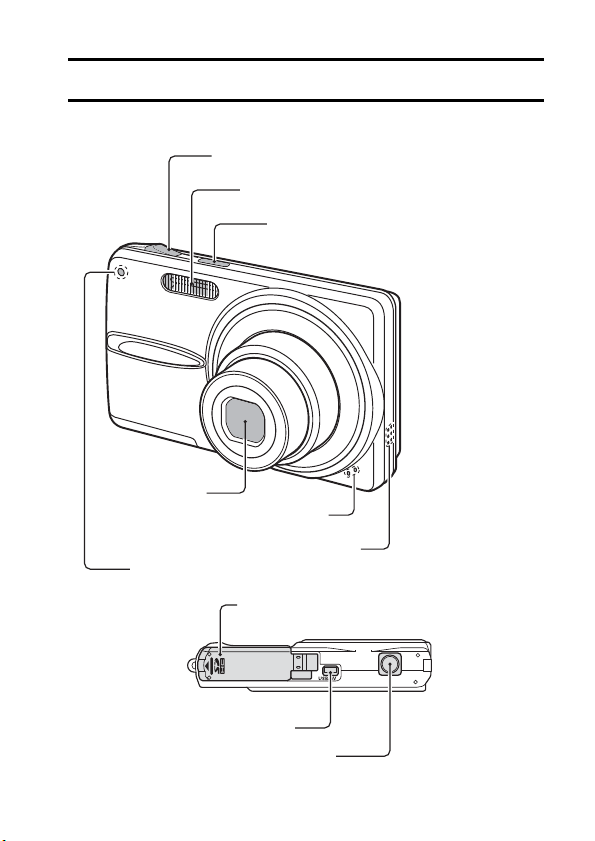
Lens
Self-timer indicator
Battery/card compar tment cover
ON/OFF button
Flash
Shutter button
USB/AV terminal
Tripod stand hole
Bottom
Microphone
Speaker
SETUP
PARTS NAMES
Front
English 6
Page 16
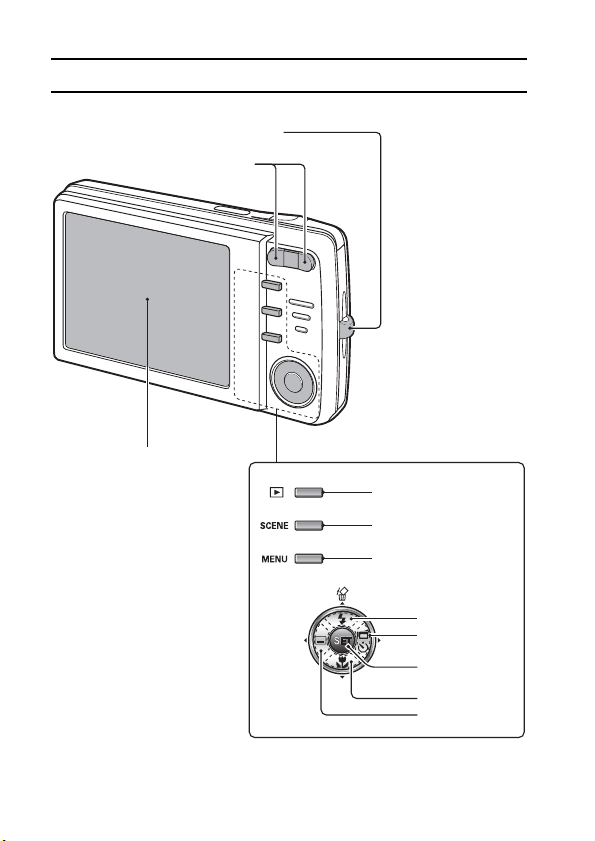
PARTS NAMES
Zoom switch
Monitor
SET button
Playback button [=]
[n] button
[o] button
[l] button
[m] button
Strap holder
SCENE button
MENU button
Rear
7 English
Page 17
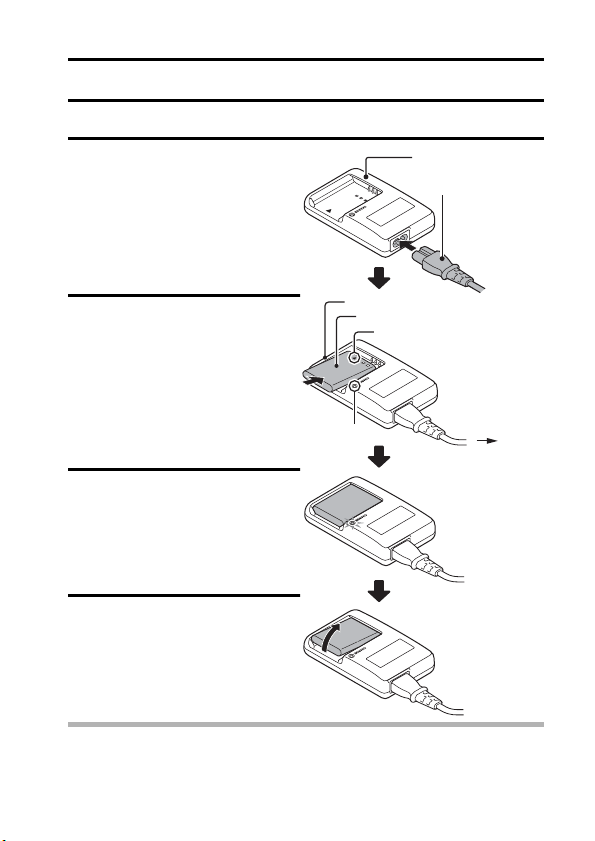
CHARGING THE BATTERY PACK
Battery pack
[o] mark
To power outlet
Battery pack charger
Power cord
CHARGE
indicator
Battery pack charger
Please charge the supplied battery pack before using it.
1 Connect the supplied power
2 Insert the battery pack in the
3 Plug the power plug into a
4 When the CHARGE indicator
cord to the socket on the
battery pack charger.
h Insert the connector straight
and securely.
battery charger.
h Insert it in the direction
indicated by the [o] mark
on the battery pack.
power outlet (AC 100 V to
240 V).
h Charging begins.
h The CHARGE indicator is lit
during charging.
turns off, unplug the power
cord from the power outlet,
and remove the battery pack
from the charger.
HINT
i Charging takes approximately 120 min.
English 8
Page 18

CHARGING THE BATTERY PACK
Charging the battery pack
Be sure to fully charge the supplied or separately sold battery pack before
using it in your camera. For charging the battery pack, use the supplied
charger.
Charge the battery pack if it is being used for the first time, and recharge it
whenever the remaining charge is low.
Does the battery pack feel hot?
i During charging, the charger and battery pack will be warm. This is normal
and does not indicate a malfunction.
If there is interference to your TV or radio during charging...
i Move the battery pack and charger further away from the TV or radio.
Ambient temperature during charging
i It is recommended that the ambient temperature during charging be
between about 10°C and 35°C (50°F and 95°F). Due to the characteristics
of the battery pack, at temperatures below 0°C (32°F), it may not be
possible to sufficiently charge it.
i When the battery pack temperature is high, the safety function may be
activated and halt charging.
Charge a battery pack in the following cases
i A battery pack which has not been used for a long time
i Newly purchased battery pack
FOR AMERICAN USERS:
i Use a UL Listed, 1.8-3m (6-10ft), Type SPT-2 or NiSPT-2, AWG No.18
power supply cord, rated for 125V 7A, with a non-polarized NEMA 1-15P
plug rated for 125V 15A.
9 English
Page 19

About the CHARGE indicator
The CHARGE indicator shows the status of the battery pack and the charger.
Please refer to the following table if the indicator flashes abnormally.
CHARGE indicator
Not lit Not connected properly
Lit Charging
Flashing Problem with the battery pack or battery pack charger
CAUTION
Do not charge the battery pack immediately after the camera has been
in continuous use for a long time
i The battery pack becomes hot when the camera is used continuously for a
long time. If you attempt to charge the battery pack in this state, the safety
function may be activated and it may not be possible to charge the battery
pack. Wait until the battery pack has cooled down before attempting to
charge it.
Does the battery pack appear swollen?
i The lithium-ion battery used in this camera may expand slightly when
stored in a hot environment or repeatedly used, but this is not a safety
hazard.
i To recharge the battery pack, the power cord of the
charger must be connected to a power outlet, and the
plug at the other end inserted in the charger’s power
socket (page 8).
i The battery pack is not installed, or it is not installed
correctly (page 8).
Charging finished
i Immediately remove the battery pack from the charger.
i Do not use an abnormal battery pack. (The usable life of
the battery pack has probably expired.)
English 10
Page 20

CHARGING THE BATTERY PACK
HINT
About the internal backup battery
i This camera’s internal battery serves to maintain the date and time
settings, as well as the shooting settings. The backup battery will be fully
charged when the battery pack is kept in the camera continuously for about
2 days. In the fully charged state, the backup battery will maintain the
camera settings for about 7 days.
When not using the camera for a long time, remove the battery pack
i A small amount of power is still used even if the digital camera is turned off,
and it is therefore recommended that the battery pack be removed from the
camera if it is not going to be used for a long time. Note that when the
battery pack is removed for a long period, the time and date settings may
be cleared. Before using your camera again, be sure to confirm that the
camera settings are correct.
To prolong the life of the battery pack
i Although the battery pack is an expendable item, you can maximize the life
of the battery by heeding the following suggestions.
h Do not leave the battery under the hot summer sun or exposed to other
high-temperature environments.
h Do not continually recharge the battery when it is already fully charged.
After fully charging it once, for example, use it for a while to partially
discharge it before charging it again.
h When the battery is not to be used for a long time, if possible store the
partially charged (not fully charged) battery in a cool environment.
11 English
Page 21
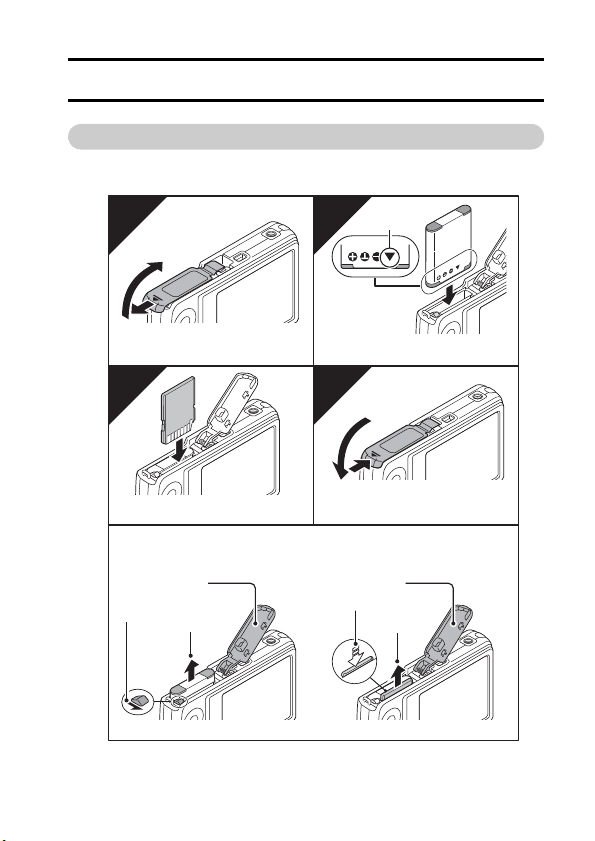
INSTALL THE BATTERY PACK AND CARD
Open battery/card compartment cover
on the bottom of the camera.
Insert the bat tery pack.
Insert the card all the way until it
clicks.
3 Pull out
2 Push down
1 Open
[o] mark
2 Push
<Battery pack>
Close the battery/card compartment
cover.
To remove...
<Card>
1 Open
3 Pull out
Installation
i The card can be used after it has been formatted with the camera.
i Make sure that the battery pack and card orientation are correct.
21
43
English 12
Page 22

INSTALL THE BATTERY PACK AND CARD
CAUTION
Be careful when removing the card
i Do not attempt to forcibly remove the card.
i Never remove the card when the camera is connected to a computer or
printer, or when the self-timer indicator is flashing quickly. In doing so, you
risk losing the data stored in the card.
Keep your finger on the card until it is completely inserted or released
i If you remove your finger too soon, the card may spring out and become
lost or hit someone in the eye.
HINT
Shooting without a card installed
i When a card is installed, images are recorded to and played back from the
card. When no card is installed, images are recorded to and played back
from the camera’s internal memory. When the camera is turned on with no
card installed, the internal memory icon is shown on the monitor to let
you know that the images you capture will be saved to the camera’s
internal memory.
Warning concerning battery pack temperature
i If the battery pack in the camera becomes too hot, a blinking temperature
warning icon \ will appear on the monitor. If the blinking icon does
appear, the camera should be turned off as soon as possible and the
battery pack allowed to cool before the camera is turned on again.
i Note that the camera will turn off automatically if it continues to be used
with the battery pack temperature elevated.
13 English
Page 23

TURNING THE CAMERA ON AND OFF
Monitor
ON/OFF button
Playback button [=]
Turning on the camera
In the recording mode
1 Press the ON/OFF button.
h The camera turns on.
h The camera turns on in the
recording mode that was active
before it was last turned off.
In the playback mode
1 Press the playback button [=] for
at least one second.
h The Playback Screen appears on
the monitor (pages 28 and 36).
Turning off the camera
1 Press the ON/OFF button.
h The camera turns off.
<If the camera was turned on by pressing the playback button [=]>
h When the playback button [=] or ON/OFF button is pressed, the
camera turns off.
English 14
Page 24

TURNING THE CAMERA ON AND OFF
About the auto power off function
In order to preserve battery pack power when, for example, the camera has
accidentally been left on, the camera is furnished with an “auto power off”
function by which the camera automatically turns off after a certain period of
inactivity (about 1 minute during shooting or about 3 minutes during playback
[factory default settings]).
i If the auto power save function has operated to turn the camera off, press
the ON/OFF button to turn it back on.
i You can change the setting for the time elapsed before the camera
automatically turns off.
i When the camera is connected to a computer or printer using the
dedicated USB interface cable, the auto power save function is disabled,
and the camera turns off after about 12 hours.
HINT
If the K icon appears...
i When a picture is taken, the date and time it was captured is recorded with
it. When the date and time cannot be recorded with the image because the
date and time have not yet been set (page 16), the K icon appears. To
have the date and time recorded with images, please make this setting
before capturing images.
15 English
Page 25

DATE AND TIME SETTING
3 tab
The camera will record the date and time an image is captured so that you
can display them during playback. Therefore, before capturing images, make
sure the correct date and time are set.
Example: To set the clock to 7:30 p.m. on December 24, 2009
1 Press the ON/OFF button to turn
the camera on, and press the
MENU button.
h The Recording Menu appears.
2 Press the [o] button to select the
3 tab, and press the [m] button.
h The Option Menu appears.
3 Press the [n] or [o] button to
select “CLOCK SET”, and press
the SET button or the [m] button.
h The Clock Set Screen appears.
h The current date and time
settings are shown.
h Follow the procedures below to
enable or disable the date display
during playback, to set the display
format for the date, and to set the
date and time.
h To return to the Option Menu,
press the MENU button.
RESOLUTION
COMPRESSION
FOCUS MODE
EXP MEASURE
ISO
WHITE BALANCE
OK EXIT
OPTION MENU
CLOCK SET
STARTUP DISPLAY
SOUND
POST VIEW
BRIGHTNESS
OK EXIT
DATE
TIME
DISP
OK
1/2RECORDING MENU
1/2
LANGUAGE
CLOCK SET
2009/02/01
12:00
Y / M / D
12
1sec
M
0
English 16
Page 26

DATE AND TIME SETTING
2009/12/24
19:30
OK
Y / M / D
CLOCK SET
DATE
TIME
DISP
Y / M / D → M / D / Y → D / M / Y → DISP OFF
4 Set the date and time.
1 Press the [n] or [o] button to
change the year indication.
h You can press the [m] button to
select the indication you wish to
change.
h Repeat these steps to select the
month indication and day
indication, and set the date to
December 24, 2009.
2 Press the [m] button to select the
time indication.
3 Press the [n] or [o] button to
change the time setting.
4 Press the [m] button to select the
Y/M/D indication.
5 Press the [n] or [o] button to
change the displayed date order.
h Press the [o] button to change the displayed date order as follows:
h Press the [n] button to change it in the reverse order.
CLOCK SET
DATE
TIME
DISP
OK
CLOCK SET
DATE
TIME
DISP
OK
2009/12/24
12:00
Y / M / D
2009/12/24
19:30
Y / M / D
17 English
Page 27

5 Press the SET button.
h The date and time setting is completed, and you are returned to the
Option Menu.
h The Option Menu is canceled when the MENU button is pressed.
HINT
i Under normal conditions, while the battery pack is being replaced, an
internal battery will maintain the date and time settings. However, there is a
small chance the settings may be lost. (The backup will last for about
7 days.) It is recommended to check that the date and time settings are still
correct after replacing the battery pack and before shooting or recording of
any type (follow steps 1 to 3).
To correct the date and time settings
i In step 4, select the indication that you want to change, and follow the
procedure to change the indication.
English 18
Page 28

BASIC OPERATION
149
100-0001
2008.12.24
2008.12.242009.12.24
ON/OFF button
Playback button
[=]
<Recording mode>
<Playback mode>
BEFORE TAKING PICTURES
Switching between the recording mode and
playback mode
Switch between shooting and playing.
1 Press the ON/OFF button to turn
the camera on.
2 Press the playback button [=].
h Each time the playback button is
pressed, the camera switches
between the recording mode and
the playback mode.
HINT
To turn the camera on in the playback mode
i Press the playback button [=] for at least 1 second, and the camera will
turn on in the playback mode.
19 English
Page 29

How to switch the recording mode
ON/OFF button
[m] button
SET button
<Recording mode>
s: Single-shot mode
:
H
igh-speed sequential shots mode
O: Sequential shots mode
X: Video clip recording mode
Your camera can capture single still photos (single-shot mode), record video
clips (video clip recording mode), and also capture a series of still photos
(sequential shots mode).
1 Press the ON/OFF button to
2 Press the [m] button.
3 Press the [m] button to select
4 Press the SET button.
turn the camera on.
h The screen to set the
recording mode and the selftimer appears.
the recording mode.
h The selected recording mode
is set.
h An icon in the upper left area
of the monitor indicates the
active recording mode
setting.
149
English 20
Page 30

BEFORE TAKING PICTURES
ON/OFF button
SET button
<Settings display mode>
<Normal display mode>
Switching the display mode
In the recording mode, you can select the either the “settings display mode”
which allows you to confirm the shooting settings on the monitor while you
shoot, or the “normal display mode” in which the setting indications are turned
off, providing a full view of the subject.
1 Press the ON/OFF button to turn
the camera on.
2 Press the SET button.
h Each time the SET button is
pressed, the camera switches
between the settings display
mode and the normal display
mode.
149
21 English
Page 31

Adjust the monitor brightness
ON/OFF button
MENU button
[n] and [o] buttons
Monitor
The brightness of the monitor is adjustable. Adjust the brightness to the
optimum readability in the ambient light.
1 Press the ON/OFF button to
turn the camera on.
2 Press the MENU button for at
least 1 second.
h The monitor brightness menu
appears.
3 Press the [n] and [o] buttons
to adjust the brightness.
4 Press the MENU button.
h The monitor brightness is
set, and the monitor
brightness menu is canceled.
HINT
i You can also adjust the monitor brightness by selecting “BRIGHTNESS”
from the Option Menu.
English 22
Page 32

BEFORE TAKING PICTURES
149 149
[l]
Half-press shutter
button to focus
<Guidance display ON> <Guidance display OFF>
Hints for taking pictures
Muting the camera sounds
i The operation sounds that are generated, for example, when the shutter
button, MENU button or SET button is pressed, can be muted.
Where is the image data saved?
i All the image and sound data is recorded in the camera’s internal memory
or on the card installed in the camera.
i When a card is installed in the camera, the data is recorded on the card. If
no card is installed, the data is recorded in the camera’s internal memory.
Taking pictures in backlight conditions...
i When taking pictures with the light coming from behind the subject, due to
the characteristics of the CCD, light lines or ghost patterns (flare effect)
may appear in the captured image. In this situation, it is recommended that
you avoid taking pictures with the subject lit from behind.
Switching the guidance display ON/OFF
i Press the [l] button. Each time the [l] button is pressed, the guidance
display switches between ON and OFF.
HINT
i Images captured in the still image shooting mode can be rotated when
they are played back.
i When the optical zoom is used or when the autofocus is operating, the
image may appear to waver, but this is not a malfunction.
23 English
Page 33

CAPTURING AND PLAYING BACK STILL IMAGES
F5.2
1/102
<Single-Shot Screen>
Shutter button
Single-shot icon
There are two modes for capturing still images. In the single-shot mode, one
image is captured each time the shutter button is pressed. In the sequential
shots mode, when you press the shutter button, several successive images
are captured. For more information about taking sequential shots, please see
page 26.
Shooting single shots
1 Set the camera to the single-
shot mode (page 20).
2 Rest your finger on the
shutter button.
h Engage the autofocus by
pressing the shutter button
halfway (focus lock).
3 Gently press the shutter
button.
h Press the shutter button
gently, taking care not to
move the camera.
h The image that was
captured appears on the
monitor as long as the
shutter button is kept
pressed (post view).
F5.2
F5.2
1/102
1/102
English 24
Page 34

CAPTURING AND PLAYING BACK STILL IMAGES
Shutter speed
Aperture
Target mark
Motion alert icon
Focus indicator
4 Release your finger from the shutter button.
h The captured image is recorded.
HINT
About the target mark
i A target mark & on the monitor shows
the area the camera is focusing on.
i The camera automatically determines
the correct focus by measuring from 9
different focus points within the
shooting area. If the target mark is at a
position that is different from the point
you wish to focus on, you can refocus,
for example, by changing the shooting
angle.
i The large target mark appears when
the camera focuses on a wide area in
the center of the screen.
About the focus indicator
i A green focus indicator appears when
the subject is successfully focused, or
a red focus indicator when the camera
was not able to focus the subject.
The shutter speed and aperture are
displayed
i The shutter speed and aperture
settings are also displayed on the
monitor. You can use them as a
reference when shooting.
If the motion alert icon appears...
i During still image shooting, if the shutter speed is slow and the possibility
that the image may be blurred due to camera shake becomes high, the
motion alert icon may appear on the monitor. In this case, use a tripod to
stabilize the camera when shooting, or set the flash operation mode to
automatic (page 48).
i When shooting with the fireworks H scene function, the motion alert icon
always appears, but this is normal.
F5.2
1/102
F5.2
1/2
25 English
Page 35

Shooting sequential shots
When the shutter button is pressed, still images are captured in succession.
1 Set the camera to the sequential
shots mode or the high-speed
sequential shots mode (page 20).
O: Sequential shots icon
: High-speed sequential
shots icon
4
2 Press the shutter button to start
shooting.
h Shooting sequential shots begins.
■ Estimated maximum number of
sequential shots
<Sequential shots mode>
Resolution Max. no. of shots Resolution Max. no. of shots
I Approx. 3 shots
j
D Approx. 7 shots
z Approx. 11 shots
t Approx. 22 shots
[ Approx. 121 shots
h The quantities indicate the number of shots when the compression
rate is set to j.
h The maximum number of sequential shots will differ depending on the
subject.
h Note that if the shutter button is released during shooting, shooting
stops immediately.
Approx. 4 shots
<High-speed sequential shots mode>
z Approx. 25 shots
143
English 26
Page 36

CAPTURING AND PLAYING BACK STILL IMAGES
HINT
About the focus when shooting sequential shots
i When sequential shots are captured, the autofocus operates when the
focus lock is activated, fixing the focus.
Can the self-timer and/or flash be used?
i The self-timer and flash do not operate when shooting sequential shots.
i The following scene functions cannot be set.
\]H_a5n
27 English
Page 37

Viewing still images
100-0001
2009.12.24
Playback button [=]
The steps for viewing both single shots and sequential shots are the same.
1 Press the playback button
[=].
h If the playback button [=]
was pressed to turn the
camera on, however, press the
playback button [=] for at
least 1 second.
h The image most recently
captured appears on the
monitor.
2 View other images.
h Press the [l] or [m] button to
display the previous or next
image.
To display the previous image:
Press [l].
To display the next image:
Press [m].
h To return to the Shooting
Screen, press the playback
button [=].
<If the camera was turned on by
pressing the playback button
=
]>
[
h When the playback button
[=] or ON/OFF button is
pressed, the camera turns off.
2009.12.24
2009.12.24
100-0001
100-0001
When you are finished viewing images...
i Press the ON/OFF button to turn the camera off.
HINT
For still images with voice memo (pages 40 and 41)...
i When the shutter button is pressed, the voice memo is played back.
English 28
Page 38

CAPTURING AND PLAYING BACK STILL IMAGES
Zoom switch [W]/[T]
100
0001
0002
0003
0007
0008
0005
0006
0004
0009
Video clip
SET button
Orange frame
Still image
Arrow buttons
Image numberAudio recording
Folder number
9-image/20-image display playback
1 Press the playback button
[=].
2 Press [W] ([P]) on the
zoom switch.
h The 9-image display
appears.
3 Select the image to play
back.
h Press the arrow buttons to
move the orange frame to
the desired image, and
press the SET button.
Instead of pressing the
SET button, you can press
[T] ([]]) on the zoom
switch to show the image
full screen.
h If [W] ([P]) on the zoom
switch is pressed while the
9-image display is shown,
the display changes to the
20-image display.
100
100
0001 0002
0001
0002 0003
0003
29 English
0004
0005 0006
00060004
0005
0007
0007 0008
0008
0009
0009
Page 39

Folder playback
SELECT
SELECT FOLDER
A convenient way to search through multiple folders, or to search for an image
that was recorded using Screen Capture.
1 Access the 9-image display screen (page 29).
2 Press [W] ([P]) on the zoom
switch 2 times.
h The screen to select the playback
folder appears.
h If [T] ([]]) on the zoom switch is
pressed, the camera changes to
the 20-image display (page 29).
3 Select the desired folder, and press
the SET button.
h The first image in the selected
folder is displayed.
h At this time, if you press [W] ([P])
on the zoom switch, the images in
the selected folder are shown in the
9-image display.
SELECT FOLDER
SELECT FOLDER
100SANPH
1
2
101SANPH
3
102SANPH
OKOKOK
SELECT
SELECT
English 30
Page 40

CAPTURING AND PLAYING BACK STILL IMAGES
111%
Press shutter to save
Move
100%
Magnifying (zooming in) the image
1 Display the image that you want to magnify.
2 Press [T] ([]]) on the zoom
switch.
h Magnification is enabled.
h The image is magnified, and the
central portion of image is
displayed.
h Press the arrow buttons to view
different parts of the magnified
image.
To magnify:
Magnification increases with each
press of [T] ([]]) on the zoom
switch.
To g o bac k:
Magnification decreases with each
press of [W] ([P]) on the zoom
switch.
h Press the SET button to return to
the normal (100%) view.
HINT
The magnified portion of the image can be saved as a separate image
i Press the shutter button. The magnified portion is saved as a new still
image.
Press shutter to save
Press shutter to save
100%
100%
Move
Move
111%
122%
31 English
Page 41

Zoom jump playback
SET button
Zoom switch [W]/[T]
Arrow buttons
You can magnify a portion of a still image to check the accuracy of the focus.
1 Display a still image to view
using zoom jump playback.
2 Press the SET button.
h The image is magnified.
h If the magnified view appears
to be in focus, then the
overall image will be in focus.
3 Press the arrow buttons to
move to the part you wish to
magnify, and press [T] ([]])
on the zoom switch.
h The displayed area is further
magnified.
To magnify further:
Magnification increases with
each press of [T] ([]]) on the
zoom switch.
To g o bac k:
Magnification decreases with
each press of [W] ([P]) on the
zoom switch.
h Press the SET button again
to return to the normal size
(100%) screen.
1250%
Press shutter to save
100%
Move
English 32
Page 42

CAPTURING AND PLAYING BACK STILL IMAGES
Zoom I/O
DELETE
DELETE
Deleting files
You can delete files if you no longer need them. You can delete the files one
at a time, or all at once.
1 To delete files from the card, perform the delete procedure with the
card installed in the camera. To delete files from the camera’s
internal memory, remove the card before performing the delete
procedure.
2 Set the camera to the playback
mode, and press the [n] button.
h The Delete Screen appears.
ALL FILES:
Deletes all the files.
1 FILE:
Deletes one file at a time.
3 Delete the files.
<To delete all the files>
1 Use the [l] and [m] buttons to view the images and check if it is OK
to delete all the files.
2 Press the [n] or [o] button to select “ALL FILES”.
3 Press the SET button.
h The Delete Confirmation Screen appears. To delete the files,
select “YES”, and press the SET button. When the file delete is
completed, “No image” is shown.
33 English
DELETE
DELETE
ALL FILES
DELETE
DELETE
1 FILE
Zoom I/O
Zoom I/O
Page 43

<To delete one file>
1 Use the [l] and [m] buttons to display the file you wish to delete.
2 Press the [n] or [o] button to select “1 FILE”.
h There is no confirmation screen when deleting single files. Before
pressing the SET button in step 3, please make sure that the
displayed image is one you wish to delete.
3 Press the SET button.
h The currently displayed file is deleted.
h To delete other files, repeat steps 1 to 3.
CAUTION
About protected images
i Files that are protected from accidental delete cannot be deleted. To delete
protected files, set the protect setting for the file to off, and then follow the
file delete procedure.
English 34
Page 44

VIDEO CLIP RECORDING AND PLAYBACK
00:45:00
00:45:00
Shutter button
Video clip recording icon
Recorded length (time) of
video clip
Remaining recording time
available
Recording a video clip
1 Set the camera to the video
clip recording mode
(page 20).
2 Press the shutter button.
h Video clip recording
begins. During recording,
the length of the video clip
and the remaining
recording time available
are shown on the monitor.
h It is not necessary to
continue pressing the
shutter button while
recording.
3 End the recording.
h Press the shutter button
again to stop recording and
save the video clip.
TV
00:45:00
00:45:00
00:45:00
00:00:30
35 English
Page 45

Playing back the video clip
PLAY
Playback button [=]
Video clip pattern
[o] button
SET button
4 Press the playback button
[=].
h If the playback button [=]
was pressed to turn the
camera on, however, press
the playback button [=] for
at least 1 second.
h The video clip just recorded
appears on the monitor.
h Video clips are indicated by
a video clip pattern along
the top and bottom of the
screen.
5 Press the SET button.
h Video clip playback begins.
h To stop playback, press the
[o] button.
English 36
Page 46

VIDEO CLIP RECORDING AND PLAYBACK
Outline of playback operation
To do this... Do this
Stop playback During playback, press the [o] button.
Pause
To extract a still image
To play back
one image
at a time
(single-
frame step)
Slow
playback
To
accelerate
playback
Return to normal playback
Adjusting the volume
Forward
Reverse
Forward
Reverse
Forward
Reverse
speed
During playback, press the SET button.
During accelerated or slow playback, press
the [n] button.
While playback is paused, press the shutter button.
While playback is paused, press the [m]
button.
While playback is paused, press the [l]
button.
While playback is paused, press and hold the
[m] button.
While playback is paused, press and hold the
[l] button.
During forward playback, press the [m] button.
iThe playback speed changes each time the
[m] button is pressed, as follows:
Normal playback
Press the [l] button to resume normal
playback speed.
During forward playback, press the [l] button.
iThe playback speed changes each time the
[l] button is pressed, as follows:
15× ← 10× ← 5×
Press the [m] button to resume normal
playback speed.
Press the SET button.
Louder: During playback, press [T] on the
zoom switch.
Softer: During playback, press [W] on the
zoom switch.
→ 2× → 5× → 10× → 15×
37 English
Page 47

When you are finished viewing video clips...
i Press the ON/OFF button to turn the camera off.
CAUTION
How to save one frame from a video clip as a still image
1 Play back the video clip. Pause the playback at the point you wish to
“snap” a photo.
2 Press the shutter button.
i The currently displayed frame is saved as a still image.
The data for a video clip is very large
i Therefore, be aware that if the video clip is uploaded to a computer to be
played back, the computer may not be able to play back the video fast
enough, making it appear jerky. (The video will always be displayed
properly on the camera monitor.)
If video clip recording stops even when there is card memory
remaining…
i Depending on the card you are using, recording may stop even if there is
remaining memory in the card.
i For video clip recording, it is recommended that a high-speed memory
card be used.
If no audio is heard...
i The audio is not played back when the video clip is played back in the
frame-by-frame, slow playback, fast playback or reverse playback mode.
During video clip playback, the sound of a motor is audible...
i During recording, the sound of the optical zoom movement or autofocus
movement was recorded. This is not a malfunction.
Does video clip playback stop when you adjust the volume?
i If you adjust the volume during video clip playback, the playback may
temporarily pause. This is not a malfunction.
English 38
Page 48

USING THE SCENE FUNCTION
AUTOAUTOAUTO
Use auto settings
Use auto settingsUse auto settings
<Example: In the single-
shot mode>
You can select from a variety of preset settings (aperture, shutter speed, etc.)
for specific shooting conditions.
1 Set the camera to the recording
mode (page 19), and press the
SCENE button.
h The screen to select a scene
function appears.
2 Use the arrow buttons to select the
desired setting.
<Features of each scene function>
Scene function Features
X
Auto
Y
Sports
G
Por trait
\
Landscape
]
Night view
portrait
n
Smile detection
H
Fireworks
The camera makes the
optimum settings.
Capture a split-second image
of a fast-moving subject.
Enhance the threedimensional feel of the
subject by blurring the
background. (With face
chaser function)
For beautiful shots of distant
scenery.
Photograph the subject while
keeping the background
night scenery.
Capture a photo at the
instant the subject smiles.
For capturing fireworks at
night.
Recording mode setting
s O X
mmmm
mmmm
*m*m*m*
m
mnnm
mnnm
mnnn
mnnm
39 English
Page 49

Scene function Features
Scene function setting
(X is not displayed)
_
Lamp
a
Still image with
audio
5
Best shot
r
Face chaser
8
Monochrome
9
Sepia
>
Contrast
@
Vivid
m: Available n: Not available
*
: Disabled during recording
Photograph in low-light
conditions.
Shoot a still image and add a
voice memo.
Four successive still images
are captured as the exposure
changes.
The subject’s face is kept in
focus and the exposure
adjusted as the image is
captured.
Create black-and-white
photos.
Create sepia-tone photos. mmmm
Accentuates the light and
dark areas in the image.
Accentuates the colors in the
image.
Recording mode setting
s O X
mnnm
mnnn
mnnn
*m*m*
mm
mmmm
mmmm
mmmm
3 Press the SET button.
h This completes the scene select
setting.
h The display returns to the Shooting
Screen.
h The scene function setting is shown
on the monitor.
6
English 40
Page 50

USING THE SCENE FUNCTION
00:00:02
00:00:08
Recorded length of
audio track
Remaining recording time
available
Capture a still image with a voice memo
With the still-image-plus-audio a scene function, you can add an audio
track (about 10 seconds maximum) to a captured still image. This audio track
is called a “voice memo”.
1 On the screen to select a scene function (page 39), select a, and
press the SET button.
2 Press the shutter button to take the
picture, then speak into the
microphone.
h During recording, be careful not to
obstruct the microphone with your
fingers, for example.
h Audio recording begins. During
recording, the length of the audio
track and the remaining recording
time available are shown on the
monitor.
h The maximum recording time for a
voice memo is about 10 seconds.
h To end the recording before
10 seconds has elapsed, press the
shutter button.
41 English
Page 51

How to use the best shot feature
SAVE ALL
SELECT
OK
Delete other images?
1 Set the camera to the single-shot mode; on the screen to select a
scene function (page 39), select 5; and press the SET button.
2 Press the shutter button.
h While the settings change, four still
images are shot in sequence.
h After the images are captured, the
four still images are displayed on
the monitor.
<To save all four images>
h With all four images showing on the
monitor, press the MENU button.
SELECT
SELECT
OKOKOK
SAVE ALL
SAVE ALL
3 Use the arrow buttons to move the orange frame to the image you
wish to save.
h For a full-size view of the selected image, press the SET button.
h With the full-size view active, you can use the [l] and [m] buttons to
view the previous or next image.
h To return to the screen in step 2, press the MENU button.
4 With the full-size view of the image
you wish to save, select “YES”, and
press the SET button.
h The image currently displayed is
saved, and the other images are
deleted.
Delete other images?
Delete other images?
YES
EXIT
OK
OK
English 42
Page 52

USING THE SCENE FUNCTION
Green frame
How to use the face chaser feature
To attain the best possible face shots, the camera automatically focuses on
the face and adjusts the exposure.
1 On the screen to select a scene function (page 39), select r, and
press the SET button.
2 Aim the camera lens at the subject.
h The camera searches for the
subject’s face. When it detects the
face, a green frame appears.
h Do not touch the shutter button while
the camera is searching. The
camera cannot search when the
autofocus is activated.
2 2143
3 The focus locks on the subject (page 24).
h The camera focuses on the subject and the exposure is adjusted.
h When the face is in focus, the green frame changes to orange.
4 Press the shutter button.
h The image is captured.
CAUTION
i The digital zoom is disabled.
i The face chaser function does not work when zooming in or out.
i The face chaser function may not work when the subject’s face in the
monitor is relatively small or appears dark.
For images captured using the face chaser feature
i On the Playback Screen, when zooming in, the face that was defined by
the double frame during capture becomes the zoom center.
43 English
Page 53

How to shoot using Smile Detection
Capture a photo at the instant the subject smiles.
Normal shooting
1 On the screen to set the scene function (page 39), select n, and
press the SET button.
2 Aim the camera lens at the subject.
h The camera searches for the subject's face. When it detects the face,
a green frame appears. The image is automatically captured when the
subject smiles.
Selecting the shooting area of the desired subject
From the multiple faces, select the area that frames the targeted face, and
capture the image when the selected subject smiles.
1 On the screen to set the scene function (page 39), select n, and
press the SET button.
2 Aim the camera lens at the subject.
3 Press the SET button.
h An orange frame appears, and the screen for you to select the area
that encompasses the target subject's face appears.
English 44
Page 54

USING THE SCENE FUNCTION
4 Use the arrow buttons to move the orange frame to the area that
encompasses the target subject's face.
5 Press the SET button.
h The orange frame changes to yellow, and the Smile Detection area is
fixed.
h The camera adjusts the focus and exposure for the framed face.
h When the face is in focus, the green frame changes to a double frame.
h The image is automatically captured when the subject in the selected
area smiles.
HINT
The camera can't detect the smiling face?
i The camera cannot detect the subject's smile when zooming in or out.
i Smile Detection may not work accurately when the face in the monitor
appears small or dim.
For best results with Smile Detection
i Smile Detection works best when the subject is directly facing the camera
and showing his/her teeth when smiling.
Can't use the self-timer?
i The self-timer cannot be used with Smile Detection.
To cancel Smile Detection...
i Select a different scene function.
45 English
Page 55

OTHER RECORDING FUNCTIONS
Zoom switch [W]/[T]
Zoom bar
Monitor
Pointe r
When both optical
and digital zoom
are enabled
Digital zoom (yellow)
Optical zoom
When optical zoom
only is enabled
Using the zoom
Your camera has two zoom functions: optical zoom and digital zoom.
1 Set the camera to the recording
mode (page 19), and point the
camera lens at the subject.
2 Press the zoom switch to
compose the desired image.
[T]: Zoom in on the subject.
[W]: Zoom out.
h When the zoom switch is
pressed, the zoom bar appears
on the monitor.
h When the optical zoom factor is
at maximum, zooming stops
temporarily. When [T] on the
zoom switch is pressed again,
the mode changes to the digital
zoom mode and zooming
continues.
3 Take the picture.
English 46
Page 56

OTHER RECORDING FUNCTIONS
HINT
Can’t access the digital zoom?
i The digital zoom cannot be used when the face chaser r, smile
detection n or portrait mode G scene function is active, or the focus
mode is set to AF seeker p.
Can’t access the optical zoom?
i When the focus range is set to pan o or during video clip recording, the
optical zoom cannot be used.
47 English
Page 57

Flash setting
[n] (?) button
Flash menu
The flash is used not only for taking pictures where there is insufficient light,
but also when the subject is in shade or in backlight conditions. Your camera’s
flash has four modes of operation (auto mode, forced flash mode, flash off
mode and red-eye reduction mode). Select the flash mode that is appropriate
for the surrounding conditions. The flash can be enabled only when taking
single-shot still images.
1 Set the camera to the single-shot
mode (page 20), and press the [n]
(?) button.
h The flash menu appears.
k: The camera will detect the
subject brightness and use the
flash only when required. In a
backlight situation, if only the
center of the image is very dark,
the flash will operate to
compensate (auto).
m: The flash will operate with every
image captured regardless of the
conditions. Use this setting
under backlight conditions, when
the subject is in shade, under
fluorescent lighting conditions,
etc. (forced flash).
l: The flash will not operate even in
dark situations. Use this setting
when capturing an image in a
location where flash
photography is prohibited, or
when shooting a night landscape
scene (flash off).
J: The digital camera will detect the subject brightness and use the
flash only when required. At this time the flash will operate in a
manner that reduces the red reflection (“red-eye”) in the subject’s
eyes (red-eye reduction).
FLASH
AUTO
English 48
Page 58

OTHER RECORDING FUNCTIONS
2 Press the [n] or [o] button to select the desired flash mode, and
press the SET button.
3 Press the shutter button.
h The picture is snapped and the flash operates according to the
selected mode.
HINT
When auto is selected...
i The k icon indicating the flash setting is not shown on the Shooting
Screen.
When auto or red-eye reduction is selected...
i When the shutter button is pressed, if the camera determines that the flash
is necessary, a k or J icon appearing on the monitor indicates that
the flash will operate.
49 English
Page 59

Self-timer
Self-timer menu
[m] ( ) button
1
Self-timer photography is available in the single-shot mode.
1 Set the camera to the single-shot
mode (page 20), and press the
[m] ( ) button.
h The self-timer menu appears.
y: The image is captured about
2 seconds after the shutter
button is pressed.
x: The image is captured about
10 seconds after the shutter
button is pressed.
2 Use the [n] and [o] buttons to
select the desired self-timer
setting, and press the SET
button.
h The self-timer is set, and you are
returned to the Shooting Screen.
PHOTOGRAPH 1 IMAGE
English 50
Page 60

OTHER RECORDING FUNCTIONS
Self-timer indicator
HINT
i The countdown time until shutter
release is shown graphically on the
monitor.
F5.2
1/102
To pause or cancel the self-timer function...
i If the shutter button is pressed again before the shutter is released, the
self-timer countdown temporarily stops. Press the shutter button one more
time to restart the self-timer.
i To cancel self-timer photography, set the self-timer setting to off s.
i After the self-timer picture is snapped, the self-timer is automatically reset
to off.
When x is selected...
i When the shutter button is pressed,
the self-timer indicator flashes for
approximately 10 seconds, after
which shooting begins.
i About 3 seconds before shooting,
the self-timer indicator flashes
faster.
51 English
Page 61

Focus range
[o] (R) button
Focus range menu
1 Set the camera to the recording
mode (page 19), and press the [o]
(R) button.
h The focus range menu appears.
o: The focus operates within the
ranges shown below (pan).
<Still image shooting>
i At maximum aperture setting:
2.5 m (8.20 ft.) to ∞
i At minimum aperture setting:
2 m (6.56 ft.) to ∞
<Video clip recording>
i Wide end:
At maximum aperture setting:
80 cm (31.50 in.) to ∞
At minimum aperture setting:
52 cm (20.47 in.) to ∞
i Tele end:
At maximum aperture setting:
3.3 m (10.83 ft.) to ∞
At minimum aperture setting:
2.2 m (7.22 ft.) to ∞
*: The camera automatically
focuses on the subject within a
range of 10 cm (3.94 in.) (Wide
end) or 60 cm (23.62 in.) (Tele
end) to infinity (auto).
+: You can focus on a subject within
the following ranges (macro):
Wide end: 5 cm (1.97 in.) to
80 cm (31.50 in.)
Tele end: 60 cm (23.62 in.) to
80 cm (31.50 in.)
-: The focus can be manually set to
any distance from 5 cm (1.97 in.)
to 8 m (26.25 ft.), as well as to
infinity (manual).
FOCUS
AUTO
English 52
Page 62

OTHER RECORDING FUNCTIONS
2 Press the [n] or [o] button to select the desired focus range, and
press the SET button.
h The specified focus range is set, and the camera returns to the
Shooting Screen.
HINT
i In the single-shot mode and sequential shots mode, when the focus range
is set to macro +, the zoom is automatically set to one step from the
wide end. When the focus range is set to pan o, the zoom is
automatically set to the Wide end.
53 English
Page 63

How to use the manual focus
1 Select manual - from the focus
range menu, and press the SET
button.
h The focus distance adjustment bar
appears.
70cm
2 Press the [l] or [m] button to adjust
the focus distance, and press the
SET button.
h The focus distance is set, and you
are returned to the Shooting
Screen.
HINT
About the focus range
i The focus distance indication shows the distance between the lens surface
and the subject.
i In some cases there may be a slight variance between the distance
(numerical figure) you set in the manual focus mode and the actual
distance. Use the monitor to confirm the focus and compose the photo.
About zoom movement when using the manual focus
i If the focus distance is set to 50 cm (19.69 in.) or less, the zoom changes
to the largest setting that is suitable for that focus distance.
i When the focus distance is set to 50 cm (19.69 in.) or less, the zoom will
function only within the range at which the image is focused.
English 54
Page 64

APPENDICES
SPECIFICATIONS
Camera
Image file format Still images: JPEG format (DCF, DPOF, Exif
Note: Designed mainly by the Japan
Video clips:QuickTime Movie (Photo-JPEG)
Data storage media Internal memory: Approx. 52 MB
Camera effective number
of pixels
Image sensor 1/2.3-inch (1.1 cm) CCD
Recording resolution <Still image shooting>
White balance Full-auto TTL, manual setting possible
Audio recordings:WAVE format (monaural)
External memory: SD Memory Card
(equivalent to a 32 GB SDHC Memory Card)
Approx. 12.1 million pixels
Virtual number of pixels: Approx. 12.70 million
pixels, interlace scan, primary color filter
I: 4000 × 3000 pixels
j: 4000 × 2256 pixels (16:9 aspect ratio)
D: 2816 × 2112 pixels
z: 2288 × 1712 pixels
t: 1600 × 1200 pixels
[: 640 × 480 pixels
<Video clip recording>
d: 640 × 480 pixels, 30 frames/second
5: 320 × 240 pixels, 15 frames/second
2.2 compliant)
Electronics and Information Technology
Industries Association (JEITA), DCF
(Design rule for Camera File system) is
standard for digital still camera image
files to provide interoperability between
digital photography devices for the
images stored on removable memory
cards. However, it is not guaranteed that
all devices will support the DCF standard.
55 English
Page 65

Lens 3.0× optical
Aperture Open F=3.1 (Wide) to 5.9 (Tele)
Exposure control type Programmable AE
Light-measuring modes Multi-section measuring, center-weighted
Range Normal photography: 10 cm (3.94 in.) to ∞
Digital zoom For shooting: 1× to 4×
Shutter speed Single-shot mode: 1/2 to 1/1,500 sec.
Sensitivity (standard
output sensitivity)
zoom lens
Exposure correction available from the
Recording Menu (0±1.8EV in 0.3EV steps)
measuring, spot measuring
(Wide), 60 cm (23.62 in.) to ∞ (Tele)
Macro photography: 5 cm (1.97 in.) to 80 cm
(31.50 in.) (Wide), 60 cm (23.62 in.) to 80 cm
(31.50 in.) (Tele)
For playback: 1× to 62.5× (varies with resolution)
(Maximum approx. 2 seconds when the
scene function is set to fireworks Hetc.)
(During flash: 1/30 to 1/1,500 sec.)
Sequential shots mode:
1/2 to 1/1,500 sec.
Video clip recording mode:
1/30 to 1/2,500 sec.
Single-shot mode/sequential shots mode
(standard output sensitivity):
Auto (ISO64 to 400)/ISO64, ISO100,
ISO200, ISO400, ISO800, ISO1600, and
ISO3200 (switchable from Recording Menu)
Video clip recording mode:
Auto (ISO384 to 2400)/ISO384, ISO600,
ISO1200, ISO2400, ISO4800
(switchable from Recording Menu)
* Sensitivity measured in compliance with
the ISO standard (ISO 12232:2006).
f=6.3 mm to 18.9 mm
(35 mm film camera
conversion: 35 mm to
105 mm)
Autofocus, 5 groups,
6 elements (4 with aspheric
surfaces)
English 56
Page 66

SPECIFICATIONS
Monitor 2.7-inch (6.9 cm) TFT color LCD
Flash working range GN = 5.2
Flash modes Auto-flash, forced flash, flash off, red-eye
Focus TTL-type AF (9-point range finder/spot focus/
Self-timer Approx. 2-second delay, 10-second delay
Ambient
environment
Power supply Lithium-ion battery pack (DB-L80) × 1
Dimensions (at narrowest
part, not including grip or
lens protrusion)
Weight Approx. 98 g (3.46 oz.) (camera only [without
Temperature
Humidity 30 to 90% (operating, no condensation)
Approx. 230,000 pixels
(Frame coverage: Approx. 100%)
Brightness adjustment: 5-step
Approx. 60 cm (23.62 in.) to 3.3 m (10.83 ft.)
(Wide)
Approx. 60 cm (23.62 in.) to 1.7 m (5.58 ft.)
(Tele)
reduction
AF seeker), manual focus (14 steps)
0 to 40°C (32 to 104°F) (operation),
–20 to 60°C (–4 to 140°F) (storage)
10 to 90% (storage, no condensation)
92.8 (W) × 55.2 (H) × 17.0 (D) mm
3.65" (W) × 2.17" (H) × 0.67" (D)
battery pack and card])
Approx. 115 g (4.06 oz.) (including battery pack
and card)
57 English
Page 67

Camera connectors
USB/AV
(communication/audio
and video output)
terminal
Dedicated regrouped jack
Audio
output
Video
output
USB USB 2.0 Full Speed
180 mVrms (–12 dBs), 2.2 kΩ or less,
monaural
1.0 Vp-p, 75 Ω unbalanced, sync
negative, composite video, NTSC
color TV system/PAL TV system
(switchable from the Option Menu)
PC camera: USB video class
Battery life
Maximum recording time 220 images:
Maximum playback time 320 minutes:
i Until battery pack runs out when using a fully charged battery pack at a
25°C (77°F) ambient temperature.
i The operation time may vary depending on the conditions of the battery
pack and the conditions of use. Especially when used at temperatures
below 10°C (50°F), the battery pack operation time is drastically reduced.
CIPA standard (when a Toshiba 128 MB
SD Memory Card is used)
LCD monitor on, continuous playback
English 58
Page 68

SPECIFICATIONS
Possible Number of Images/Video Recording
Time/Audio Recording Time
Recording
Single-shot
Sequential
shots mode
Video clip
recording
Audio file
i Up to 9 hours of continuous audio recording is possible.
i When recording a video clip using an 8 GB card, recording terminates
when the size of the file currently being recorded reaches approx. 4 GB.
i The values were determined using an SD Memory Card by Sandisk.
i Even with cards of the same capacity, the amount of data that can actually
be stored may differ depending on the card brand, etc.
i The continuous shooting time for each video clip will differ depending, for
example, on the card capacity, environmental conditions (temperature and
shooting conditions, etc.).
mode
setting
mode/
mode
mode
Resolution
Compression
setting
rate setting
I
j
D
z
O
t
[
d —
5 —
——
j
0
j
0
j
0
j
0
j
0
j
0
Internal
memory
13 images 488 images 1,960 images
19 images 721 images 2,890 images
19 images 729 images 2,920 images
29 images 1,060 images 4,290 images
26 images 984 images 3,950 images
38 images 1,440 images 5,790 images
39 images 1,470 images 5,920 images
58 images 2,130 images 8,580 images
79 images 2,950 images 11,800 images
115 images 4,130 images 16,600 images
417 images 15,500 images 62,200 images
556 images 20,600 images 83,000 images
36 sec.
2min. 46sec.
1 hr. 51 min.
SD Memory Card
2GB 8GB
22 min. 20 sec. 1 hr. 30 min.
1 hr. 43 min.
68 hr. 50 min. 99 hr. 50 min.
6 hr. 54 min.
59 English
Page 69

Supplied battery pack charger
Par t N o. VAR-L80
Power source AC 100 to 240 V, 50 to 60 Hz, 5 W
Rated output DC 4.2 V, 550 mA
Compatible batteries Supplied or separately sold Lithium-ion
Ambient
environment
Dimensions
Weight (without power cord) Approx. 49 g (1.73 oz.)
Power cord
rated value
i The VPC-X1200GX model is supplied with a power cord that is appropriate
for the region of destination.
i When using the supplied battery pack charger abroad, the power cord may
need to be replaced in accordance with local requirements. Please contact
your local dealer for details.
Temperature
Humidity 20 to 80% (no condensation)
VPC-X1200 AC 125 V, 7 A
VPC-X1200EX
battery pack (DB-L80)
0 to 40°C (32 to 104°F) (recharge),
–20 to 60°C (–4 to 140°F) (storage)
84 (W) × 22.5(H) × 50.5 (D) mm
3.31" (W) × 0.89" (H) × 2.00" (D)
AC 250 V, 2.5 A
Supplied Li-ion battery pack
Model number DB-L80
Vol ta ge 3. 7 V
Capacity 700 mAh
Ambient
environment
Dimensions 39.2 (W) × 5.9 (H) × 31.4 (D) mm
Weight Approx. 15 g (0.5 oz.)
Temperature 0 to 40°C (32 to 104°F) (dur ing use)
–10to30°C (14to86°F) (storage)
Humidity 10 to 90% (no condensation)
1.54 (W) × 0.23 (H) × 1.24 (D) in.
English 60
Page 70

SPECIFICATIONS
Others
Mac OS and QuickTime are trademarks of Apple Inc., registered in the U.S.
and other countries.
Microsoft and Windows are registered trademarks of Microsoft Corporation in
the USA and other countries.
Intel and Pentium are registered trademarks of Intel Corporation (USA).
In this manual, the Microsoft
®
Windows
system are collectively referred to as “Windows”.
Software Red Eye by FotoNation
Inc.
Red Eye software
U.S. Patent No. 6,407,777. Other patents Pending.
SDHC is a trademark.
All other company and product names are registered trademarks or
trademarks of their respective owners.
CAUTION
i It is forbidden to copy this manual, whole or in part, without prior written
i All images and illustrations given in this manual are for explanation
XP operating system, and Microsoft® Windows® Vista operating
©
permission.
purposes and may differ slightly from that of the actual product. Also,
actual specifications are subject to change without prior notice and
therefore may differ from the contents of this manual.
®
Windows® 2000 operating system, Microsoft®
TM
2003-2005 is a trademark of FotoNation®
2003-2005 FotoNation In Camera Red Eye - covered by
61 English
Page 71

Before capturing those important shots, be sure to first take a
test shot to confirm that your camera is set up and ready to go
i Sanyo Electric shall not be held responsible for any problems resulting
from the use of this camera.
i Sanyo Electric declines all responsibility for damages due to improper use
of the camera, failure to adhere to the instructions given in this manual, or
repairs or changes done by those other than a technician authorized by the
manufacturer.
i Sanyo Electric shall not be held responsible for any damage caused by
optional devices or consumable items used with the camera other than
those supplied with the camera or those specified by Sanyo Electric.
i Sanyo Electric shall not be held responsible for any losses or loss of
revenue resulting from the loss of data caused by the malfunction, or the
repairing of a malfunction, of the camera.
i The images captured with this camera will differ in quality from pictures
taken with a standard film camera.
English 62
Page 72

SANYO Electric Co., Ltd.
 Loading...