

Page 1

INSTRUCTION MANUAL
VPC-PD1EX
VPC-PD2
Dual Camera
VPC-PD1GX
VPC-PD1PX
VPC-PD1TA
Important note
This manual explains how to safely operate the VPC-PD1EX, VPC-PD2,
VPC-PD1GX, VPC-PD1PX and VPC-PD1TA.
Any information regarding only one of these products will be labeled as such.
Please read these instructions carefully before using the camera.
Make sure to read and understand the separate booklet “SAFETY MANUAL”.
Keep this manual in a safe place for later reference.
Page 2

Warning
TO PREVENT THE RISK OF FIRE OR ELECTRIC SHOCK, DO NOT
EXPOSE THIS APPLIANCE TO RAIN OR MOISTURE
kFOR AMERICAN USERS
The following advisory is included in accordance with the laws of the State of
California (USA):
WARNING:
This product contains chemicals, including lead, known to the State of
California to cause cancer, birth defects or other reproductive harm. Wash
hands after handling.
i This equipment has been tested and found to comply with the limits for a
Class B digital device, pursuant to Part 15 of the FCC Rules. These limits
are designed to provide reasonable protection against harmful interference
in a residential installation. This equipment generates, uses and can
radiate radio frequency energy and, if not installed and used in accordance
with the instructions, may cause harmful interference to radio
communications. However, there is no guarantee that interference will not
occur in a particular installation. If this equipment does cause harmful
interference to radio or television reception, which can be determined by
turning the equipment off and on, the user is encouraged to try to correct
the interference by one or more of the following measures:
h Reorient or relocate the receiving antenna.
h Increase the separation between the equipment and receiver.
h Connect the equipment into an outlet on a circuit different from that to
which the receiver is connected.
h Consult the dealer or an experienced radio/TV technician for help.
i Changes or modifications not expressly approved by the party responsible
for compliance could void the user’s authority to operate the equipment.
Declaration of Conformity
Model number: VPC-PD2
Trade Name: SANYO
Responsible party: SANYO North America Corporation
Address: 21605 Plummer Street, Chatsworth, California 91311
Telephone No.: (818) 998-7322
This device complies with Part 15 of the FCC Rules. Operation is subject
to the following two conditions:
(1) this device may not cause harmful interference, and
(2) this device must accept any interference received, including
interference that may cause undesired operation.
i English
Page 3

kFOR CANADIAN USERS
i This Class B digital apparatus complies with Canadian ICES-003.
kFOR EU USERS
The symbol mark and recycling systems described below apply to EU
countries and do not apply to countries in other areas of the world.
Your SANYO product is designed and manufactured with high quality
materials and components which can be recycled and/or reused.
The symbol mark means that electrical and electronic equipment, batteries
and accumulators, at their end-of-life, should be disposed of separately from
your household waste.
Note:
If a chemical symbol is printed beneath the symbol mark, this chemical
symbol means that the battery or accumulator contains a heavy metal at a
certain concentration. This will be indicated as follows: Hg: mercury, Cd:
cadmium, Pb: lead
In the European Union there are separate collection systems for used
electrical and electronic equipment, batteries and accumulators.
Please, dispose of them correctly at your local community waste collection/
recycling centre.
Please, help us to conserve the environment we live in!
SANYO Sales & Marketing Europe GmbH
Stahlgruberring 4, D-81829 München, Germany
SANYO Electric Co., Ltd.
1-1, Sanyo-cho, Daito City, Osaka 574-8534, Japan
kFOR RUSSIAN USERS
This product is certified by an official certification company
which is authorized by the Russian Federation.
English ii
Page 4

HOW TO READ THIS MANUAL
Symbols used in this manual
HINT Points giving some extended instructions or special points to pay
CAUTION Points that require special attention.
(page xx) Refer to the page indicated for detailed information.
attention to.
iii English
Page 5
SHOOT, PLAY BACK AND SAVE
PREPARE THE BATTERY PACK AND CARD
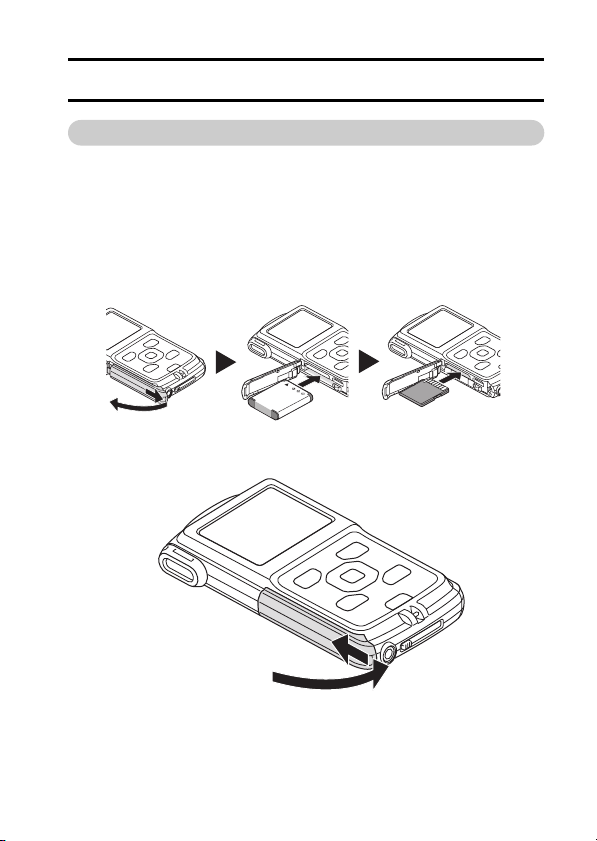
Installing the battery pack and card
Install the card and the supplied battery pack.
i The card is not an included accessory. Please purchase a commercially
sold card.
i The camera has an internal memory, which means that you can record and
save the recorded data even if no card is installed.
<
To cl os e
>
English iv
Page 6

<Remove the battery pack> <Remove the card>
2 Pull out 2 Pull out
1 Press
1 Push in
Charging the battery pack
1 Press the ON/OFF button to turn off the camera.
h It is not possible to charge the battery pack while the camera is on.
2 Use the dedicated USB interface cable (supplied) to connect the
camera to a computer.
3 Turn on the computer.
h Charging begins.
h During charging, the multi-indicator is lit red.
h When charging is completed, the indicator turns off.
h The charging time is approx. 180 minutes.
Multi-indicator
Push
To USB terminal
Supplied dedicated USB interface cable
To USB connector on the computer
Camera on/off switch
• OFF
Computer power switch
• ON
v English
Page 7

CAUTION
During charging...
i Do not turn on the camera while the battery pack is charging. It is not
possible to charge the battery pack while the camera is on.
i Do not turn off the computer while the battery pack is charging. It is not
possible to charge the battery pack while the computer is off.
i With certain computers, it may be possible to charge the battery pack even
when the computer is turned off.
Insert and pull out the cable and USB plug carefully
i When connecting the cables, make sure that the plugs are correctly
oriented and that they match the shapes of the terminal sockets on the
devices. Push the plugs in straight when connecting them. If undue force is
used to connect a cable, it may permanently damage the terminal or the
camera.
i If excessive force is used to pull the USB plug, it may damage the cable
and/or connector.
English vi
Page 8
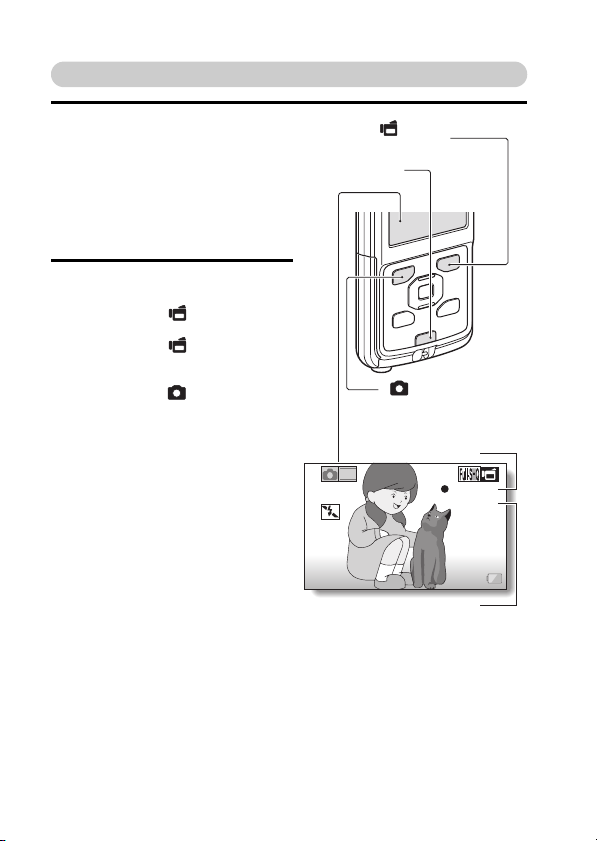
Shooting
1 Press the ON/OFF button for at
least 1 second to turn the
camera on.
h If the screen to set the date
and time appears, press the
[?] button to cancel it.
For how to set the date and
time, see page 14.
2 Record.
To record a video clip:
h Press the [ ] button to
begin recording a video clip.
h Press the [ ] button again
to end the recording.
To take a photo:
h Press the [ ] button.
h A still image is captured.
(Video recording button)
ON/OFF button
[] button
[] button
(Photo shooting button)
Recording time
2
M
REC 00:09
5
Available recording
time remaining
vii English
Page 9
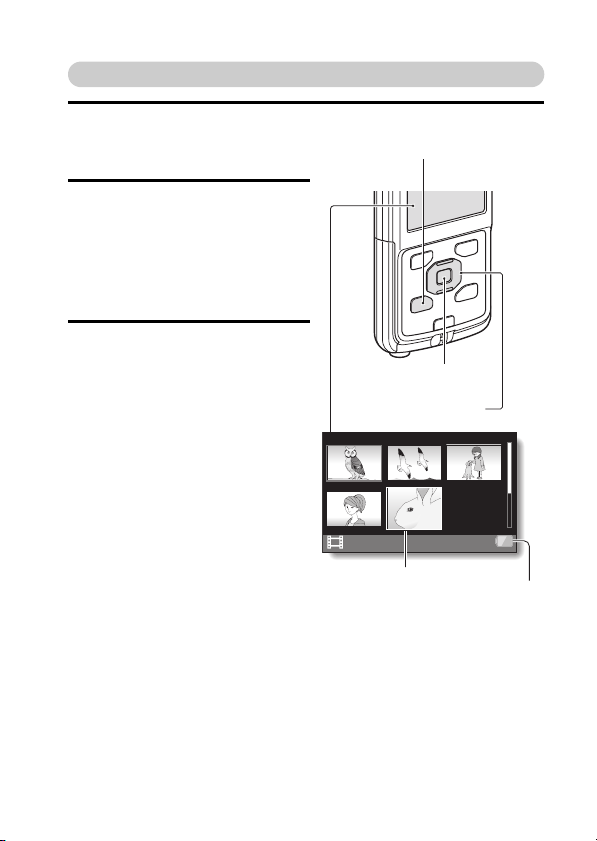
Playback
1 Press the REC/PLAY button.
h The display changes to the
Playback Screen.
2 Select the image to play back.
h Use the arrow keys to move
the orange frame to the
image you wish to play back.
h The image information for the
framed image is shown in the
bottom part of the monitor.
3 Press the SET button.
h The file you selected is
played back.
<To return to the recording
mode>
h Press the REC/PLAY button.
REC/PLAY button
SET button
Arrow keys
2010.12.24 14:25 100-0011
Orange frame
Remaining battery
power indication
English viii
Page 10

Deleting files
1 On the screen in step 2, move the orange frame to the file you wish
to delete, and press the [?] button.
2 Select “DELETE SINGLE”, and press the SET button.
h If you press [G] or [H], the screen to delete a different file will appear.
3 When you are finished deleting files, press the [?] button.
When you are finished using the camera...
Press the
ON/OFF button
for at least 1 second to turn the camera off.
ix English
Page 11
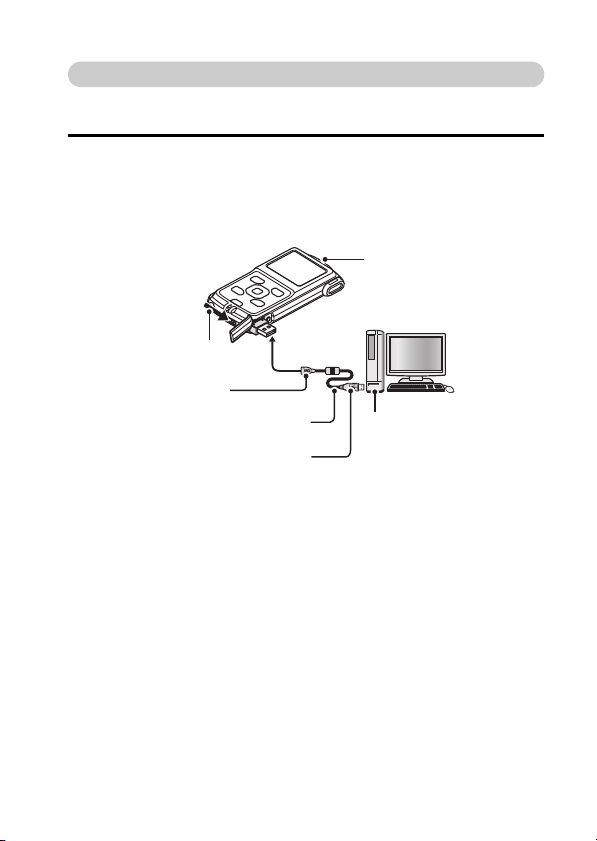
Copy data from your camera to the computer
Connect your camera to a computer, and copy the desired data to the
computer.
1 Turn on the computer, and use the supplied dedicated USB interface
cable to connect your camera to the computer.
h Connect the cable between the camera’s USB terminal and the
computer’s USB connector.
Camera on/off switch
• OFF
Push
To USB terminal
Supplied dedicated USB interface cable
To USB connector on the computer
<Insert and pull out the cable and USB plug carefully>
i When connecting the cables, make sure that the plugs are correctly
oriented and that they match the shapes of the terminal sockets on the
devices. Push the plugs in straight when connecting them. If undue force is
used to connect a cable, it may permanently damage the terminal or the
camera.
i If excessive force is used to pull the USB plug, it may damage the cable
and/or connector.
Computer power switch
• ON
English x
Page 12

2 Turn on the camera (page 11).
h The USB Connection Screen
appears on the camera’s
monitor.
USB CONNECTION
CARD READER
MTP
CANCEL
CANCEL
OK
3 Select “CARD READER”, and press the SET button.
h The window for automatic playback of XACTI_INT (internal memory)
and XACTI (card) opens.
h If the Access Menu appears, click the Access Menu [EXIT] button.
4 In the automatic playback window, click [Open folder and display
files].
h To copy files from the internal memory: Click on the XACTI_INT [Open
folder and display files].
h To copy files from the card: Click on the XACTI [Open folder and
display files] .
5 Copy data from your camera to a computer.
h Copy files to a computer.
CAUTION
For VPC-PD1EX
i It is not possible to copy files from the computer side (a hard disk, etc.) to
the camera’s internal memory or installed card.
xi English
Page 13

Uploading camera files to a file-sharing website
i Your camera’s internal memory contains the Xacti Simple Uploader
application with which you can upload camera files to a file-sharing
website.
i For information on how to use Xacti Simple Uploader, please refer to the
Xacti Simple Uploader user’s manual, which can be obtained from the
SANYO website.
<How to launch Xacti Simple Uploader>
1 Connect your camera to a computer.
2 Turn on the computer and the camera.
3 On the USB Connection Screen, select “CARD READER”, and press the
SET button.
i The window for automatic playback of XACTI_INT (internal memory)
and XACTI (card) opens, and the Access Menu appears.
i If the Access Menu does not appear, double-click "Autorun.Exe" in
XACTI_INT.
4 In the Access Menu, click on [Install Xacti Simple Uploader].
i The Xacti Simple Uploader installation begins.
i Follow the instructions of the installation wizard to complete the
installation.
<How to obtain the manual>
i On the Xacti Simple Uploader screen, click the [?] icon.
English xii
Page 14

Software operating environment
1
Xacti Simple
Uploader *
Windows
Windows
Windows
with standard
USB port
®
2
®
7
®
Vista
®
XP
Operating
System *
Video playback *
Xacti Simple
Uploader *
Windows®7
Windows
Windows
3
with standard
USB port
for Windows
2
®
Vista
®
XP
Core 2 Duo
E4400 2.0GHz or
faster
CPU
RAM
Core Duo T2600
2.16GHz or faster
Athlon X2 4600+
2.4GHz or faster
1GB or greater
(Recommended
2GB or greater)
Video
RAM
128MB or greater
(Recommended
256MB or greater)
Others —
*1In some cases, images may not show correctly on your computer,
depending on your computer’s operating environment.
2
It is necessary that your computer be connected to the Internet. To
*
upload images, please establish an account with a file-sharing service
(YouTube, for example).
3
Pre-installed model only.
*
Windows is a registered trademark of Microsoft Corporation.
Mac OS is a trademark of Apple Inc., registered in the U.S. and other
countries.
SDXC is a trademark of SD-3C,LLC. All trademarks mentioned are the
properties of their respective owners.
Celeron,
Pentium4 1GHz or
faster
Core Duo, Core 2
Duo or faster
1GB or greater
(Recommended
2GB or greater)
— 256MB or greater
.NET Framework
3.5 SP1 or later
for Mac OS
Video playback
Mac OS X 10.3.9
Mac OS X 10.4.9 or
later
with standard USB
port
Core 2 Duo or faster
1GB or greater
(Recommended 2GB
or greater)
—
xiii English
Page 15

Dismounting the camera
CAUTION
i To disconnect your camera, be sure to follow the procedure below. Failure
to follow this procedure may cause faulty operation of your computer or
corrupt the files in your camera.
1 Left-click on the icon for safely removing hardware in the task tray.
h A list appears showing the devices connected to the computer’s USB
connector.
2 Left-click on the camera drive.
h The camera can now be disconnected.
English xiv
Page 16

CONTENTS
HOW TO READ THIS MANUAL ............................................................ iii
CHECKING THE INCLUDED ACCESSORIES ...................................... 3
How to use the accessories ............................................................ 4
ABOUT THE CARD ............................................................................... 5
Media cards that can be used with this camera .............................. 5
What “card” means in this manual .................................................. 5
SETUP
PARTS NAMES ..................................................................................... 6
ABOUT THE BATTERY AND THE CARD ............................................. 8
About recharging ............................................................................ 8
About the temperature alert icon \ ............................................ 9
To format a card ........................................................................... 10
Shooting without a card installed .................................................. 10
TURNING THE CAMERA ON AND OFF ............................................. 11
Turning on the camera .................................................................. 11
Turning off the camera .................................................................. 11
Turning on the camera when the power save (sleep)
mode is active .......................................................................... 12
DATE AND TIME SETTING ................................................................. 14
ACCESSING THE SETUP MENU SCREEN ....................................... 16
SHOOTING
VIDEO CLIP RECORDING .................................................................. 18
SHOOTING SINGLE SHOTS .............................................................. 20
SHOOT A STILL IMAGE WHILE RECORDING A VIDEO CLIP .......... 23
MACRO-PHOTOGRAPHY (ZOOM) .................................................... 25
SHOOTING WITH THE SELF-TIMER ................................................. 26
PLAYING BACK VIDEO CLIPS AND STILL IMAGES ......................... 27
How to save one frame from a video clip as a still image ............. 29
CONNECTING TO A TV
CONNECTING TO A TV ...................................................................... 31
Connecting to the HDMI terminal .................................................. 32
PLAYING BACK ON A TV ................................................................... 33
1 English
Page 17

APPENDICES
FREQUENTLY ASKED QUESTIONS ..................................................34
OVERVIEW OF THE SETUP MENU SCREEN ....................................39
SPECIFICATIONS ................................................................................41
Camera ..........................................................................................41
Camera connectors .......................................................................44
Battery life .....................................................................................44
Possible No. of Images/Possible Shooting Time/
Possible Recording Time ..........................................................45
Concerning the multi-indicator .......................................................46
Supplied Li-ion battery pack ..........................................................46
Others ............................................................................................47
Before capturing those important shots, be sure to
first take a test shot to confirm that your camera is
set up and ready to go ..............................................................48
About the MPEG-4 Standard license ............................................48
English 2
Page 18

CHECKING THE INCLUDED ACCESSORIES
i Li-ion battery pack: 1 i Dedicated USB interface
i SAFETY MANUAL
(safety precautions booklet)
Please read this booklet
carefully before using the
camera.
i Obtaining the PDF instruction
manual and cautions
cable (page v, x): 1
i QUICK GUIDE
3 English
Page 19

How to use the accessories
k Handstrap (Please purchase a commercially available handstrap.)
i To avoid dropping the camera, it is recommended that you attach a
handstrap.
English 4
Page 20

ABOUT THE CARD
Media cards that can be used with this camera
The type of card that can be inserted into and used with this camera is:
i SD Memory Card
i SDHC Memory Card
i SDXC Memory Card
What “card” means in this manual
i In this manual, SD Memory Cards, SDHC Memory Cards and SDXC
Memory Cards that can be used in this camera are referred to as “card”.
5 English
Page 21

PART S N A M E S
Front
SETUP
SETUP
Microphone
Bottom
Connector lever
Speaker
Lens
LED
Flash
SETUP
Microphone
Slot cover
Tripod stand hole
Strap holder
English 6
Page 22

Rear
SET button
[] button
(Photo shooting
button)
REC/PLAY button
Multi-indicator
Monitor
[] button
(Video recording
button)
Arrow keys
[?] button
ON/OFF button
7 English
Page 23

ABOUT THE BATTERY AND THE CARD
About recharging
Recharging takes place only when the camera is turned off, or when the
power save function or the sleep function has been activated. Recharging
does not take place when the camera is in the recording mode or playback
mode.
CAUTION
Do not charge the battery pack immediately after the camera has been
in continuous use for a long time
i The battery pack becomes hot when the camera is used continuously for a
long time. If you attempt to charge the battery pack in this state, the multiindicator may flash red and it may not be possible to charge the battery
pack. Wait until the battery pack has cooled down before attempting to
charge it.
Does the battery pack appear swollen?
i The lithium-ion battery used in this camera may expand slightly when
stored in a hot environment or repeatedly used, but this is not a safety
hazard. However, a battery that is difficult to insert because it has become
swollen may then be impossible to extract from the battery compartment.
In this case, please discontinue its use and replace it with a new battery.
Do not use the battery with the outer covering or label removed
i Doing so may result in malfunction.
HINT
About the internal backup battery
i This camera’s internal battery serves to maintain the date and time
settings, as well as the shooting settings. The backup battery will be fully
charged when the battery pack is kept in the camera continuously for about
2 days. In the fully charged state, the backup battery will maintain the
camera settings for about 7 days.
When not using the camera for a long time, remove the battery pack
i A small amount of power is still used even if the camera is turned off, and it
is therefore recommended that the battery pack be removed from the
camera if it is not going to be used for a long time. Note that when the
battery pack is removed for a long period, the time and date settings may
be cleared. Before using your camera again, be sure to confirm that the
camera settings are correct.
SETUP
English 8
Page 24

HINT
Recharging when connected to the USB terminal
i The battery can be recharged while the camera is connected to a
computer.
i Note, however, that the time it takes to recharge will differ depending on
the camera’s operating condition.
i Connect the dedicated USB interface cable to the USB connector on your
computer. Do not connect it to the USB connector on the monitor or the
keyboard, or to the USB hub.
i If the camera is not going to be used for an extended period of time, please
disconnect the dedicated USB interface cable from the camera.
About the temperature alert icon \
During camera use, if the temperature of the battery or inside the camera
(excluding the battery) rises, a temperature alert icon \ will appear as
described below.
k When the battery or internal camera (excluding battery) temperature
rises during use
h During camera use, if the temperature of the battery or inside the
camera (excluding the battery) rises, a \ icon lights on the monitor. It
is still possible to record and play back even when the \ icon is lit;
however it is advised that you discontinue use as soon as possible and
turn the camera off.
h If the temperature rises further, the \ icon will start to flash, and the
camera will turn off automatically.
The camera cannot be turned on until the temperature has dropped (or
as long as the \ icon remains flashing). Please wait until the
temperature has dropped before resuming use.
h During video recording, a countdown indicator will show the time
starting about 15 seconds before shutdown. When the indicator shows
0 seconds, recording stops.
h If the camera is turned off while the temperature is high (that is, while
the \ icon is flashing), it cannot be turned on again until the
temperature has dropped (or as long as the \ icon remains flashing).
9 English
Page 25

To format a card
1 Insert the card in the camera, and press the ON/OFF button
(pages iv and 11).
2 Press and hold the [?] button for at least 1 second.
3 Select “FORMAT” and press the SET button.
h The Format Screen appears. Follow the instructions on the screen to
format the card.
Shooting without a card installed
i When a card is installed, images are recorded to and played back from the
card. When no card is installed, images are recorded to and played back
from the camera’s internal memory. When the camera is turned on with no
card installed, the internal memory icon is shown on the monitor to let
you know that the images you capture will be saved to the camera’s
internal memory.
SETUP
English 10
Page 26

TURNING THE CAMERA ON AND OFF
Turning on the camera
1 Press the ON/OFF button for at least
1 second.
ON/OFF button
Turning off the camera
1 Press the ON/OFF button for at least 1 second.
h The camera turns off.
HINT
To adjust the operation sounds
i If you turn on the camera by pressing the ON/OFF button while holding
down the [I] arrow key, the screen to change the operation sounds will
appear.
11 English
Page 27

Turning on the camera when the power save (sleep) mode is active
In order to preserve battery pack power, the power save (sleep) function will
automatically turn off the camera after about 2 minutes of no use during
shooting, or about 2 minutes of no use during playback.
i When the power save mode is active, you can restore the power by any of
the following methods:
h Press the ON/OFF button.
h Press the SET button.
SETUP
English 12
Page 28

CAUTION
If the K icon appears...
i When a picture is taken, the date and time it was captured are recorded
with it. If the date and time settings have not been completed (page 14),
the date and time cannot be recorded with the captured images. For this
reason, immediately after the camera is turned on, the “Set date and time”
reminder briefly appears, after which the K icon is shown on the
Recording Screen. To have the date and time recorded with the images,
please complete this setting before capturing images.
<Caution>
i Due to the characteristics of the camera, the outer surface may
become warm during use, but this does not indicate a malfunction.
i If the camera starts to feel uncomfortably hot during use, you might
temporarily discontinue use until it cools down, or try holding it in your
other hand for a while.
Please use a tripod or other support when using the camera for a
long time.
13 English
Page 29

DATE AND TIME SETTING
When the camera is first turned on after purchase, the Clock Set Screen
appears. Proceed from step 4 to set the date and time.
1 Press the ON/OFF button to turn on the camera.
2 Press and hold the [?]
button for at least 1 second.
h The Setup Menu appears.
3 Use the [I] and [J] arrow keys
to select “CLOCK SET”, and
press the SET button.
h The Clock Set Screen
appears.
4 Set the date and time.
h To select the desired setting:
Press the [G] and [H] arrow
keys.
h To change the assigned
value: Press the [I] and [J]
arrow keys.
5 Press the SET button.
h Assign the desired value to
each setting.
6 Press the [?] button.
h The date and time settings
are completed, and you are
returned to the Setup Menu.
ON/OFF button
[?] button
CLOCK SET
DATE
TIME
DISP
SET button
Arrow keys
2010/07/01
00:00
D / M / Y
OK
SETUP
English 14
Page 30

HINT
i Under normal conditions, while the battery pack is being replaced, an
internal battery will maintain the date and time settings. However, there is a
small chance the settings may be lost (the backup will last for about
7 days). It is recommended to check that the date and time settings are still
correct after replacing the battery pack and before shooting or recording of
any type (follow step 1).
To correct the date and time settings
1 Turn on the camera.
2 Press and hold the [?] button for at least 1 second.
3 Select “CLOCK SET” and press the SET button.
h The screen to set the date and time appears.
h The current date and time settings are shown.
4 Select the line you wish to change, and make the correction.
15 English
Page 31

ACCESSING THE SETUP MENU SCREEN
1 Turn on the camera (page 11).
2 Press and hold the [?] button for at least 1 second.
h The Setup Menu appears.
h To cancel the Setup Menu, press the [?] button.
SETUP
VIDEO STABILIZER
OPTICAL ZOOM
CLOCK SET
LANGUAGE
TV OUTPUT
FORMAT
OK
[?] button
SETUP
English 16
Page 32

3 Press [I] or [J] to select the item you wish to change, and press the
SET button.
h The Setting Screen for the selected item appears.
h To return to the Setup Menu, press the [?] button.
Select an item
to change
SETUP
VIDEO STABILIZER
OPTICAL ZOOM
CLOCK SET
LANGUAGE
TV OUTPUT
Press
[I]/ [J]
Press SET button
FORMAT
CLOCK SET
DATE
TIME
DISP
<Setting Screen>
OK
2010/07/01
00:00
D / M / Y
OK
17 English
Page 33

SHOOTING
SHOOTING
VIDEO CLIP RECORDING
1 Turn on the camera (page 11).
2 Press the [ ] button.
h Recording begins.
h It is not necessary to keep the
[ ] button pressed while
recording.
h When the remaining recording
time available for the currently
recording clip becomes little, a
countdown of the remaining
recording time appears on the
display.
3 End the recording.
h Press the [ ] button again
to stop recording.
(Video recording button)
2
[] button
ON/OFF button
Recording time
M
REC 00:09
5
Available recording
time remaining
SHOOTING
English 18
Page 34

HINT
To change the video settings
1 With the Recording Screen displayed, press the [H] arrow key.
h The screen to change the video settings appears.
h To return to the Recording Screen without changing the settings, press
the [?] button.
VIDEO
1920x1080 30fps SHQ
2 Use the [G] and [H] arrow keys to select a setting, and press the SET
button.
h The video settings are changed, and you are returned to the recording
screen.
19 English
Page 35

SHOOTING SINGLE SHOTS
Capture a still image (single-shot).
1 Turn on the camera (page 11).
2 Press the [ ] button.
1 Press the [ ] button
halfway.
h The autofocus operates,
and the image is focused
(focus lock).
2 Continue to gently press
the [ ] button all the
way.
h The shutter releases and
the image is captured.
h You can view the captured
image on the monitor by
keeping the [ ] button
depressed when you
capture the image.
[] button
(Photo shooting button)
ON/OFF button
SHOOTING
English 20
Page 36

To change the photo settings
1 With the recording screen displayed, press the [G] arrow key.
h The screen to change the photo settings appears.
h To return to the recording screen without changing the settings, press
the [?] button.
PHOTO
4000x3000
2 Use the [G] and [H] arrow keys to select a setting, and press the SET
button.
h The photo settings are changed, and you are returned to the recording
screen.
To change the flash operation
1 While the Recording Screen is shown, press the [?] button.
h The screen to select the flash operation appears.
h To return to the Recording Screen without changing the setting, press
the [?] button.
FLASH
AUTO
2 Use the [G] and [H] arrow keys to select the desired setting, and press
the SET button.
h The flash operation setting is modified, and you are returned to the
Recording Screen.
HINT
Did the Setup Menu appear?
i The Setup Menu appears when the [?] button is kept pressed for at least
1 second.
i Press the [?] button to cancel the Setup Menu, and then briefly press
the [?] button again.
21 English
Page 37

HINT
What is the camera focusing on?
i A target mark & on the monitor
shows the area the camera is
focusing on.
i The camera automatically
determines the correct focus by
measuring from 9 different focus
points within the shooting area. If the
target mark is at a position that is
different from the point you wish to
focus on, you can refocus, for
example, by changing the shooting
angle.
i The large target mark appears when
the camera focuses on a wide area
in the center of the screen.
If the camera shake icon > appears...
i During still image shooting, if the shutter speed is slow and the possibility
that the image may be blurred due to camera shake becomes high, the
camera shake icon may appear on the monitor. In this case, use a tripod to
stabilize the camera when shooting.
Does it seem to take a long time to save images?
i When shooting in dimly lit conditions, it may take some time to save the
data to the card.
Target mark
F3.1
1/4
Camera shake icon
Shutter speed
Aperture
SHOOTING
English 22
Page 38

SHOOT A STILL IMAGE WHILE RECORDING A VIDEO CLIP
You can capture a still image (a single-shot) while recording a video clip.
1 Turn on the camera (page 11).
(Video recording button)
[] button
2 Press the [ ] button.
3 When you see a scene you’d
like to capture as a still image,
press the [ ] button.
4 Press the [ ] button to end
the video clip recording.
HINT
i When the remaining video recording time becomes approximately
30 seconds, it will no longer be possible to capture a still image while
recording a video clip. The exact remaining recording time at which this
occurs will differ depending on the subject and on the recording size, as
well as on the video clip recording mode. If you intend to capture a still
image while recording a video clip, it is suggested that you take note of the
remaining video recording time.
[] button
(Photo shooting button)
2
M
REC 00:09
23 English
Page 39

About the recording size of still images
i The size of a still image captured during video clip recording depends on
the video clip recording size.
Video clip recording size setting Still image recording size
Y 1920 × 1080 pixel
" 1280 × 720 pixel
& 1280 × 720 pixel
) 640 × 480 pixel
SHOOTING
English 24
Page 40

MACRO-PHOTOGRAPHY (ZOOM)
1 Point the camera lens at the
subject.
2 Press [I] or [J].
[I]: Zoom in on the subject.
[J]: Zoom out.
h When the zoom switch is
pushed, the zoom bar appears
on the monitor.
3 Take the picture.
For video clip recording, see
page 18.
For shooting single shots, see
page 20.
Press [I]/[J]
Monitor
25 English
Page 41

SHOOTING WITH THE SELF-TIMER
1 While the Recording Screen is shown, press and hold the SET
button for at least 1 second.
h The screen to select the self-timer operation appears.
h To return to the Recording Screen without changing the setting, press
the [?] button.
2 Use the [G] and [H] arrow keys to select the desired setting, and
press the SET button.
h The self-timer operation setting is modified, and you are returned to
the Recording Screen.
HINT
To pause or cancel the self-timer function...
i If the [ ] button or [ ] button is pressed again before the shutter is
released, the self-timer countdown temporarily stops. Press the [ ]
button or [ ] button one more time to restart the self-timer.
When x is selected...
i When the [ ] button or [ ]
button is pressed, the multi-indicator
will blink for about 10 seconds, and
then the image is captured. Also,
4 seconds before the shutter
releases, the indication shown in the
illustration appears on the monitor.
i The LED next to the front lens
begins blinking when the shutter
button is pressed. About 4 seconds
before the shutter opens, the LED
begins to blink rapidly.
SHOOTING
English 26
Page 42

PLAYING BACK VIDEO CLIPS AND STILL IMAGES
1 Press the REC/PLAY button.
h The display changes to
the Playback Screen.
2 Select the image to play back.
h Use the arrow keys to
move the orange frame to
the image you wish to
play back.
h The image information for
the framed image is
shown in the bottom part
of the monitor.
REC/PLAY button
3 Press the SET button.
h The file you selected is
played back.
<To return to the recording
mode>
h Press the REC/PLAY button.
2010.12.24 14:25 100-0011
HINT
Slideshow playback
i In step 3, if you press the SET button for about 1 second or more, a
slideshow playback will start.
i The slideshow playback will stop when any button is pressed.
SET button
Arrow keys
Orange frame
Remaining battery
power indication
27 English
Page 43

Video clip playback operation
To do this... Do this
Normal forward playback Press the SET button.
Stop playback During playback, press [J].
Pause During playback, press the SET button.
To play back
one image
at a time
(single-
frame step)
Slow
playback
To
accelerate
playback
Return to normal playback
Adjusting the volume
HINT
If the a appears on the playback Screen...
i The a icon appears when playing back a file that was saved in
segments.
speed
Forward
playback
Reverse
playback
Forward
playback
Reverse
playback
Forward
playback
Reverse
playback
After pausing playback, press [H].
After pausing playback, press [G].
After pausing playback, press and hold [H].
After pausing playback, press and hold [G].
During forward playback, press [H].
h The playback speed changes each time [H]
is pressed, as follows:
Normal playback → 2× → 5× → 10× → 15×
Press [G] to resume normal playback speed.
During forward playback, press [G].
h The playback speed changes each time [G]
is pressed, as follows:
15× ← 10× ← 5× ← 2×
Press [H] to resume normal playback speed.
Press the SET button.
Louder: During playback, press [ ].
Softer: During playback, press [ ].
SHOOTING
English 28
Page 44

How to save one frame from a video clip as a still image
1 Play back the video clip. Pause the playback at the point you wish to
“snap” a photo.
2 Press the [ ] button.
HINT
The file size for a video clip is very large
i Therefore, be aware that if the video clip is uploaded to a computer to be
played back, the computer may not be able to play back the video fast
enough, making it appear jerky. (The video will always be displayed
properly on the camera monitor or a television.)
i Depending on the card, recording may end even before the possible
recording time indicated.
29 English
Page 45

CAUTION
During video clip playback, the sound of a motor is audible...
i During recording, the sound of the optical zoom movement or autofocus
movement was recorded. This is not a malfunction.
If no audio is heard...
i The audio is not played back when the video clip is played back in the
frame-by-frame, slow-motion, fast playback or reverse playback mode.
SHOOTING
English 30
Page 46

CONNECTING TO A TV
CONNECTING TO A TV
CONNECTING TO A TV
By connecting the camera to a TV, you can play back the recorded files on the
TV.
CAUTION
Insert and pull out the cable carefully
i When connecting the cables, make sure that the cable plugs are correctly
oriented and that they match the shapes of the terminal sockets on the
devices. Push the plugs in straight when connecting them. If undue force is
used to connect a cable, it may permanently damage the connector pins in
the terminal socket.
i Do not use excessive force when connecting and disconnecting cables.
About image output: The image output destination differs depending on the
camera status.
Connection
cable
HDMI cable*
m: Images are output n: Images are not output
* When an HDMI cable is used to connect the camera to a TV, 1080p video
mode images are output as 1080i images.
Separately sold or commercially available mini-HDMI cable.
Image output
destination
Camera monitor
TV
Recording mode
Recording
mn
nm
Playback mode
31 English
Page 47

Connecting to the HDMI terminal
Use a separately sold or commercially available mini-HDMI cable to connect
to a TV.
Set the input to [HDMI]
CONNECTING TO A TV
To HDMI terminal
Mini HDMI cable
(VCP-HDMI02)
To HDMI terminal
on the TV
English 32
Page 48

PLAYING BACK ON A TV
i After connecting the camera to the television, switch the TV input to the
terminal to which the camera is connected.
i The playback method is the same as when viewing images on the
camera’s monitor. (Use the TV controls to adjust the volume.)
i The same playback procedure as when playing back with the camera is
used to play back audio recordings as well.
CAUTION
Insert and pull out the cable carefully
i When connecting the cables, make sure that the cable plugs are correctly
oriented and that they match the shapes of the terminal sockets on the
devices. Push the plugs in straight when connecting them. If undue force is
used to connect a cable, it may permanently damage the connector pins in
the terminal socket.
i Do not use excessive force when connecting and disconnecting cables.
33 English
Page 49

APPENDICES
APPENDICES
FREQUENTLY ASKED QUESTIONS
If you have a question about the camera operation, you might find the answer
in this compilation of frequently asked questions.
Question Answer Action
Place the camera in
your pocket to war m
it up before using it.
Keep the battery
pack in an
environment of 10 to
40 °C (50 to 104 °F).
If a battery becomes
depleted quickly even
after it was sufficiently
charged, it should be
assumed that the
battery has reached
the end of its service
life. Please replace it
with a new battery.
Replace with a new
battery pack. If this
is not effective,
consult your dealer.
Recharge the
battery pack.
Not a malfunction.
Wait until the multiindicator turns off.
Power
Shooting
Why doesn’t the
power turn on?
Why is the battery
pack consumed
so quickly even
after it was fully
recharged?
Why doesn’t
recharging end?
Why does the
icon
appear?
Why does the
multi-indicator
flash red?
Due to cold
temperatures, the
battery pack
temporarily lost its
power.
The ambient
temperature is
very low.
The battery pack
life has expired.
The battery pack
life has expired.
The remaining
battery pack
power is low.
A recorded file is
being saved on
the card.
APPENDICES
English 34
Page 50

Shooting
Monitor
Question Answer Action
Are the settings
retained even
after the camera
is turned off?
Which resolution
setting should I
use?
When used in
cold weather, why
does the image
seem to leave
traces as it
moves?
Why does the
displayed image
contain some red,
blue and green
dots, or why are
black spots
visible?
— The settings are
— Select the resolution
Condition due to
the monitor
characteristics.
retained even after
the camera is turned
off.
setting according to
the intended use.
w, v, u:
Appropriate for
printing letter-size or
larger, and for
printing a close-up
of part of a photo
(trimming).
1, t: For
printing standard
photo (photo
service) sizes.
Not a malfunction.
Spots that appear in
the monitor only
appear in the
monitor and will not
be recorded with the
images.
35 English
Page 51

Viewing
images
Question Answer Action
Why is the image
too bright?
Why is there no
image (z is
shown)?
Why is the
playback image
distorted?
Why isn’t the
magnified image
clear?
Can I play back
image and sound
files that I edited
using my
computer?
The subject was
too bright.
This may happen
when trying to
play back images
stored on a card
from a different
digital camera.
If the subject
moves or the
camera is moved
during recording,
a distorted image
may sometimes
occur.
Due to the
characteristics of
the camera,
magnified images
appear less clear.
— We cannot
When capturing an
image, devise a way
to compensate for a
bright subject, for
example, by
changing the
shooting angle.
Play back images
that were recorded
on a card using this
camera.
Not a malfunction.
This is a
characteristic of the
CMOS sensor.
Not a malfunction.
guarantee the
accurate playback of
files that have been
edited using a
computer.
APPENDICES
English 36
Page 52

Viewing
images
Connecting
to a TV
Misc.
Question Answer Action
Why is there a
motor-like sound
during video clip
playback?
Why is there no
sound?
Why does the
“Insufficient card
memory” or
“Insufficient
internal memory”
message appear?
Why does the
“Card is
protected”
message appear?
Why can’t the
camera be
operated?
A problem such
as inability to
record or play
back occurs.
The sound of the
camera’s
mechanical action
was recorded.
The volume on
the TV is set to
the minimum.
There is no more
available memory
on the card or in
the camera’s
internal memory.
The lock switch on
the card is in the
locked (protect)
position.
A temporary
internal circuitry
problem may be
the cause.
The card contains
files that were
saved using a
device other than
this camera.
Not a malfunction.
Adjust the volume
on the TV.
Delete unnecessary
files, or use a card
that has more
memory available.
Move the lock switch
to the unlocked
position.
Remove the battery
pack from the
camera, wait a few
minutes, then
reinstall the battery
pack and try again.
After saving your
files to a different
medium, format the
card.
37 English
Page 53

Misc.
Question Answer Action
Can I use my
camera abroad?
Why does the
“System error”
message appear?
— When the camera is
A problem has
occurred within
the camera or
card.
connected to a TV,
you can switch the
camera’s video
output to NTSC or
PAL. If you have
questions about
accessories etc.,
please consult with
a dealer near you for
advice.
Check the following
items:
1 Remove the
2 Remove the
3 Install a different
If “System error” still
appears after
performing the
above steps, then
take the camera to
the dealer for
service.
card and then
install it again.
battery pack and
then install it
again.
card.
APPENDICES
English 38
Page 54

OVERVIEW OF THE SETUP MENU SCREEN
The Setup Menu appears when you press and hold the [?] button for at
least 1 second while the camera is on.
Use the arrow keys to select the desired parameter, and press the SET button
to display the setting screen for the specified parameter.
The Setup Menu is canceled when the [?] button is pressed.
SETUP
VIDEO STABILIZER
OPTICAL ZOOM
CLOCK SET
LANGUAGE
TV OUTPUT
FORMAT
OK
1
2
3
4
5
6
7
39 English
Page 55

1 Photo stabilizer
h Compensate for camera shake
during video clip recording.
2 OPTICAL ZOOM
h Select whether or not to enable
the optical zoom during video
clip recording.
3 CLOCK SET setting
h Set the camera’s clock.
4 LANGUAGE setting
h Select the language in which
the monitor messages are
displayed.
5 TV OUTPUT setting
6 FORMAT
7 Remaining battery power
indication
APPENDICES
English 40
Page 56

SPECIFICATIONS
Camera
Recorded image
file format
Data storage
media
Image sensor/
camera effective
number of pixels
Still images:
JPEG format (DCF, DPOF, Exif 2.2 compliant)
Note: Designed mainly by the Japan Electronics
and Information Technology Industries
Association (JEITA), DCF (Design rule for
Camera File system) is standard for digital
still camera image files to provide
interoperability between digital photography
devices for the images stored on removable
memory cards. However, it is not
guaranteed that all devices will support the
DCF standard.
Video clips:
ISO standard MPEG-4 AVC/H.264 (.MP4)
Audio: 48 kHz sampling, 16bit, 2ch, AAC
compression
Internal memory: Approx. 80 MB
SD Memory Card
SDHC Memory Card (up to 32 GB)
SDXC Memory Card (up to 64 GB)
1/2.33-inch (1.1 cm) CMOS sensor 10.7 mega pixels
Still images: Approx. 10.0 million pixels
Videos (HD mode): Approx. 8.3 million pixels
Videos (SD mode): Approx. 10.0 million pixels
41 English
Page 57

Still image
shooting mode
(recording
resolution)
Video clip
recording mode
(recording
resolution)
White balance Full-auto TTL
Lens Focal length: f = 6.3 mm to 18.9 mm, Optical 3×
Exposure control
type
Light-measuring
mode
Range 10 cm (3.94 in.) to infinity
Digital zoom For shooting:
Shutter speed Still image shooting mode: 1/2 to 1/1,500 sec.
Sensitivity Still image shooting (standard output sensitivity*)/
Minimum subject
illumination
w: 4000 × 3000 pixels (approx. 12 million pixels)
v: 3648 × 2736 pixels (approx. 10 million pixels)
u: 2592 × 1944 pixels (approx. 5 million pixels)
1, t: 1600 × 1200 pixels (approx. 2 million
Y: 1920 × 1080 pixels, 30 fps (30p)
": 1280 × 720 pixels, 60 fps (60p)
&: 1280 × 720 pixels, 30 fps (30p)
): 640 × 480 pixels, 30 fps (30p)
h The 60 fps frame rate of this camera is 59.94 fps,
zoom
Open: F = 3.1 (wide) to 5.9 (tele)
5 groups, 6 elements (4 aspheric elements,
6 aspheric surfaces)
35 mm film camera conversion
Still image shooting: 36 mm to 108 mm (Optical
zoom 3×)
Video clip recording:
Programmable AE
Multi-section measuring
Sequential shots mode: 1/15 to 1/1,500 sec. (no
Video clip recording mode: 1/30 to 1/10,000 sec.
video clip recording mode:
14 lux (1/30 sec.)
pixels)
and the 30 fps frame rate is 29.97 fps.
37 mm to 111 mm (Optical Zoom 3×)
1× to approx. 4×
(During flash: 1/30 to 1/1,500 sec.)
flash)
Auto (video clip recording: ISO 50 to 800; still
image shooting: ISO 50 to 400)
h Sensitivity measured in compliance with the
ISO standard (ISO 12232:2006).
APPENDICES
English 42
Page 58

Image stabilizer Video: Electronic
Monitor 2.0 inch Low-temperature polysilicon
Flash working
range
Flash modes Auto-flash, forced flash, flash off, red-eye reduction
Focus Auto (9-point AF)
Self-timer Approx. 2-second delay, 10-second delay
Ambient
environment
Power supply Battery pack
Power consumption 3.4 W (When using the Li-ion
Dimensions (excluding protrusions) 63.1 (W) × 22.0 (D) × 110.8 (H) mm
Weight Approx. 122 g (4.3 oz.) (including
Still image: Multi-calculation electronic
TFTcolor screen LCD,
Approx. 150,000 dots
GN = 5.5
Approx. 50 cm (19.69 in.) to 3.5 m (11.48 ft.)
(wide)
Approx. 60 cm (23.62 in.) to 1.9 m (6.23 ft.) (tele)
Temperature 0 to 40 °C (32 to 104°F) (operation)
Humidity 30 to 90% (operating, no
(supplied)
–20 to 60 °C (–4 to 140°F) (storage)
condensation)
10 to 90% (storage, no
condensation)
Li-ion battery pack (DB-L80) ×1
battery during recording)
2.48 (W) × 0.87 (D) × 4.36 (H) in.
(Maximum dimensions)
Volumetric capacity: Approx. 104 cc
battery pack and card)
Approx. 105 g (3.7 oz.) (camera
only [without battery pack and
card])
43 English
Page 59

Camera connectors
USB terminal Dedicated regrouped jack
USB 2.0 High Speed
mini HDMI terminal Video output
Total number of scan lines (effective number of
scan lines): 750p (720p)/1125i (1080i)/525p
(480p)
Audio output: L-PCM 48 kHz sampling
Battery life
Shooting Still image
Playback Approx. 240 minutes:
i Until battery pack runs out when using a fully charged battery pack at a
25 °C (77 °F) ambient temperature.
i The operation time may vary depending on the conditions of the battery
pack and the conditions of use. Especially when used at temperatures
below 10 °C (50 °F), the battery pack operation time is significantly
reduced.
shooting mode
Video clip
recording mode
Approx. 170 images:
CIPA standard (when a SanDisk
2 GB SD Memory Card is used)
Approx. 65 minutes:
Recorded in Y mode
Monitor on, continuous playback
APPENDICES
English 44
Page 60

Possible No. of Images/Possible Shooting Time/ Possible Recording Time
Shooting/
recording
mode
Still image
mode
Video clip
mode
i The continuous recording time of a video clip is approximately 30 minutes.
i The above values apply when an SD Memory Card by SanDisk is used.
i Even with cards of the same capacity, the amount of data that can actually
be stored may differ depending on the card brand, etc.
i The continuous shooting time for each video clip will differ depending, for
example, on the card capacity, environmental conditions (temperature and
shooting conditions, etc.).
Resolution
setting
w
v
u
1
t 124 images 11,300 images 22,700 images
Y
"
&
)
Internal
Memory
21 images 2,000 images 3,910 images
25 images 2,390 images 4,670 images
50 images 4,690 images 9,160 images
124 images 11,300 images 22,700 images
53 sec. 1 hr. 26 min. 2 hr. 48 min.
1 min. 8 sec. 1 hr. 52 min. 3 hr. 38 min.
1 min. 8 sec. 1 hr. 52 min. 3 hr. 38 min.
3 min. 16 sec. 5 hr. 18 min. 10 hr. 22 min.
SD Memory Card
8 GB 16 GB
45 English
Page 61

Concerning the multi-indicator
The camera’s multi-indicator will light, flash, or be off, depending on the
different camera operations.
Multi-indicator status Camera status
Connected to a computer
Charging
Battery charge error or rise in internal
temperature
Connected to a computer
Connected to a TV
Flashing
Lit
Slow
Slow/Fast During sleep mode
Fast
Very fast Accessing card
Supplied Li-ion battery pack
Model number DB-L80
Vol tag e 3. 7 V
Capacity 700 mAh
Ambient
environment
Dimensions 39.2 (W) × 5.9 (D) × 31.4 (H) mm
Weight Approx. 15 g (0.5 oz.)
Temperature 0 to 40 °C (32 to 104 °F) (during use)
Humidity 10 to 90% (no condensation)
–10 to 30 °C (14 to 86 °F) (storage)
1.54 (W) × 0.23 (D) × 1.24 (H) in.
APPENDICES
English 46
Page 62

Others
Mac OS is a trademark of Apple Inc., registered in the U.S. and other
countries.
Microsoft and Windows are registered trademarks of Microsoft Corporation in
the USA and other countries.
Intel and Pentium are registered trademarks of Intel Corporation (USA).
In this manual, the Microsoft
®
Windows
system, and Microsoft
referred to as “Windows”.
Software Red Eye by FotoNation
Inc.
Red Eye software
U.S. Patent No. 6,407,777. Other patents Pending.
SDXC logo is a trademark of SD-3C, LLC.
HDMI, the HDMI logo and High-Definition Multimedia Interface are
trademarks or registered trademarks of HDMI Licensing, LLC.
XP operating system, Microsoft® Windows® Vista operating
©
®
Windows® 2000 operating system, Microsoft®
®
Windows® 7 operating system are collectively
TM
2003-2005 is a trademark of FotoNation®
2003-2005 FotoNation In Camera Red Eye - covered by
Eye-Fi is a registered trademark of Eye-Fi, Inc.
All other company and product names are registered trademarks or
trademarks of their respective owners.
47 English
Page 63

CAUTION
i It is forbidden to copy this manual, whole or in part, without prior written
permission.
i All images and illustrations given in this manual are for explanation
purposes and may differ slightly from that of the actual product. Also,
actual specifications are subject to change without prior notice and
therefore may differ from the contents of this manual.
Before capturing those important shots, be sure to first take a test shot to confirm that your camera is set up and ready to go
i Sanyo Electric shall not be held responsible for any problems resulting
from the use of this camera.
i Sanyo Electric declines all responsibility for damages due to improper use
of the camera, failure to adhere to the instructions given in this manual, or
repairs or changes done by those other than a technician authorized by the
manufacturer.
i Sanyo Electric shall not be held responsible for any damage caused by
optional devices or consumable items used with the camera other than
those supplied with the camera or those specified by Sanyo Electric.
i Sanyo Electric shall not be held responsible for any losses or loss of
revenue resulting from the loss of data caused by the malfunction, or the
repairing of a malfunction, of the camera.
i The images captured with this camera will differ in quality from pictures
taken with a standard film camera.
About the MPEG-4 Standard license
“This product is licensed under AT&T patents for the MPEG-4 standard and
may be used only for personal and non-commercial purposes for encoding
video and/or decoding video that was encoded (1) for a personal and noncommercial purpose or (2) by a video provider licensed under the AT&T
patents to provide MPEG-4 compliant video. No license is granted or implied
for any other use.”
APPENDICES
English 48
Page 64

SANYO Electric Co., Ltd.
 Loading...