

Page 1

INSTRUCTION MANUAL
Xacti Library
About Xacti Library
i A camera that includes the Xacti Library feature allows you to connect the
camera to an external hard disk (commercially sold) and copy files from
your camera directly to the hard disk. Enjoy seeing the superior quality of
high definition images recorded with your camera on your TV.
i Check your camera’s instruction manual to see if your camera has the Xacti
Library feature.
i See “SPECIFICATIONS” on page 34 in this manual for details about which
hard disks can be connected.
i The appearance of the camera and/or external hard disk shown in this
manual’s illustrations may be different from the devices that you are using.
Thank you for purchasing this product.
Please read this Instruction Manual carefully before using the Xacti Library. Make
sure to also read and understand the separate booklet “SAFETY MANUAL”. Keep
it along with this manual in a safe place for future reference.
Page 2

How to read this manual
Symbols used in this manual
HINT Indicates further instructions or special points of practical
CAUTION Points that require special attention.
(page xx) Refer to the page indicated for detailed information.
interest.
i English
Page 3
GETTING STARTED USING THE
Xacti Library
Setup
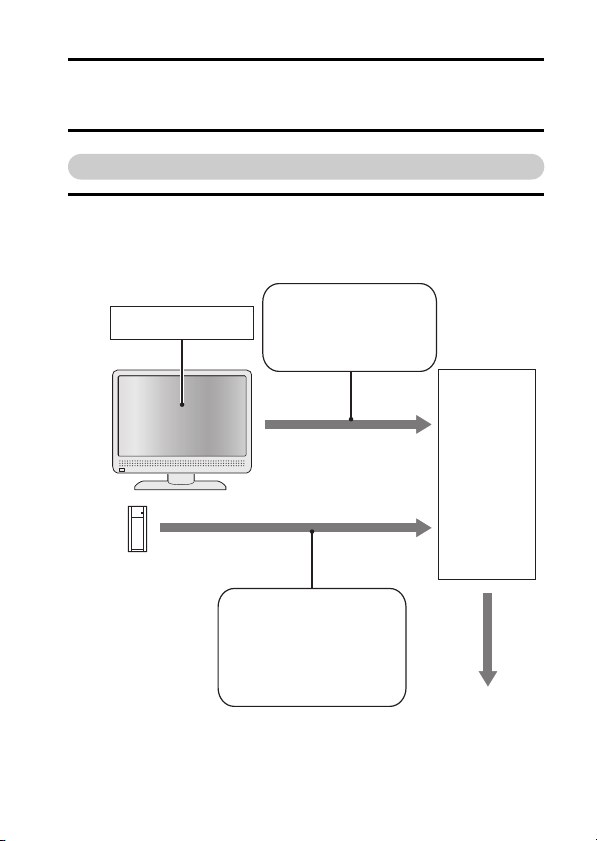
1 Connect the camera to the other devices.
h Please make sure that the camera and all devices are turned OFF
before proceeding.
h For detailed information, please see the camera’s Instruction Manual.
Use the cable included
Set input “VIDEO”
Hard disk
with your camera to
connect the docking
station or the camera to a
TV.
Use the USB cable and the
USB converter cable
included with your camera
to connect the docking
station or the camera to the
hard disk.
Camera or
docking
station
To power outlet
English ii
Page 4

GETTING STARTED USING THE Xacti Library
Create a library
When using a hard disk for the first time with Xacti Library, a library is created
on the hard disk.
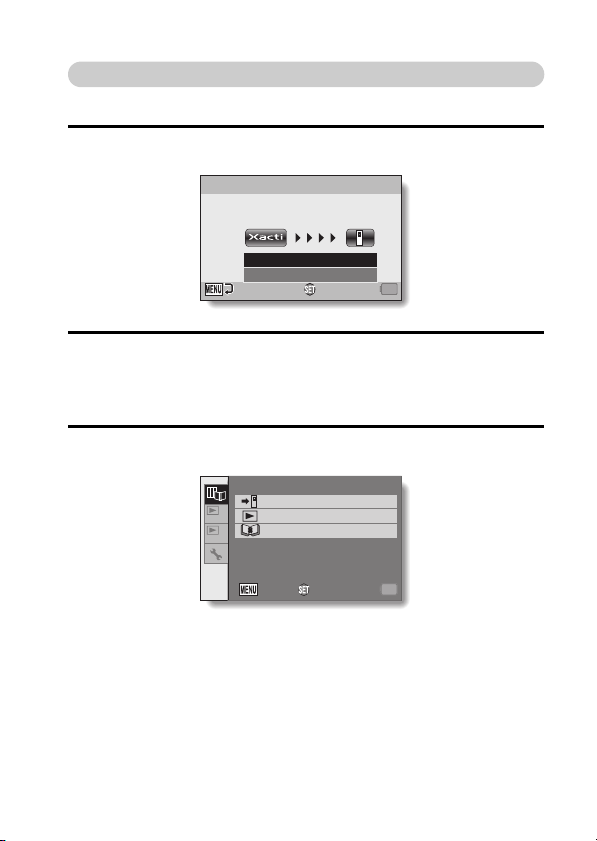
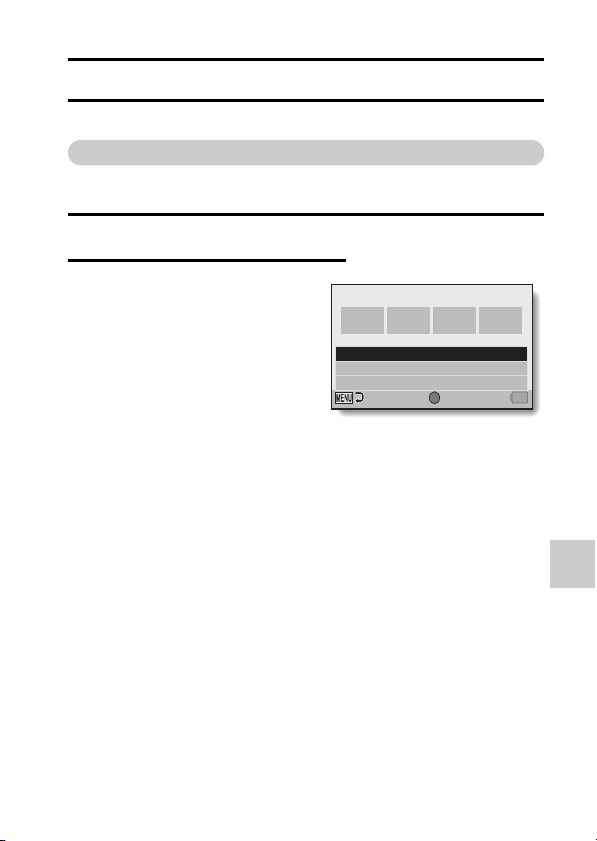
2 Turn on the power to the devices in the following order: camera →
hard disk → TV.
h The Create Library Confirmation Screen appears.
Xacti Library
Create Library?
YES
NO
OKEXIT
3 Select “YES” and press the SET button.
h A library is created.
h The Transfer Files Confirmation Screen appears.
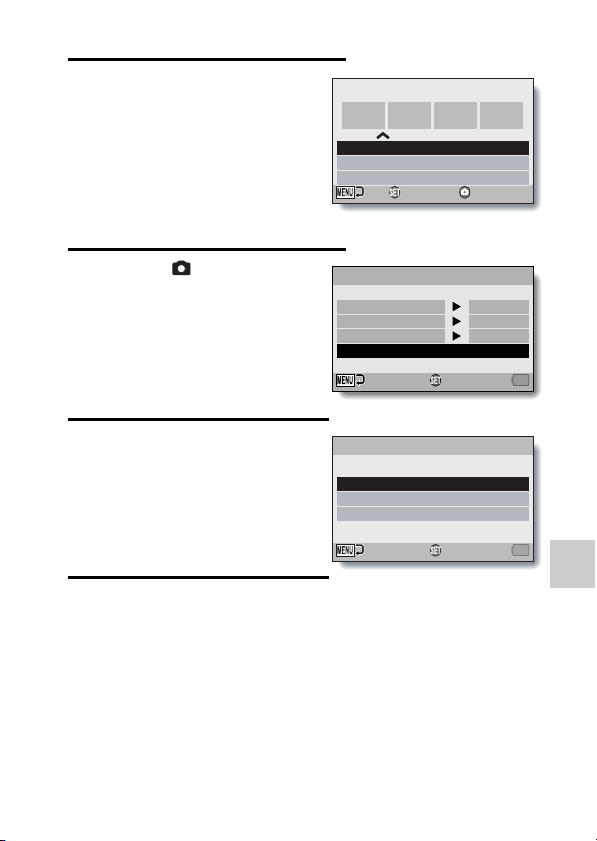
Xacti Library
Transfer data to hard disk
YES
NO
OK
iii English
Page 5
Copy files
Copy files from the card to the hard disk.
4 Select “YES” and press the SET button.
h The Data Transfer Screen appears.
DATA TRANSFER
16File
173MB
BEGIN TRANSFER
TRANSFER SETTINGS
Free:4.8GB
OK
5 Select “BEGIN TRANSFER” and press the SET button.
h File copying begins.
h When copying is completed, the Transfer Complete Confirmation
Screen appears.
6 Press the SET button.
h The Xacti Library Menu appears.
Xacti Library MENU
DATA TRANSFER
SELECT PLAY FILE
1
EDIT ALBUM
2
OKEXIT
English iv
Page 6

GETTING STARTED USING THE Xacti Library
Playback
7 Select “SELECT PLAY FILE”, and press the SET button.
h The screen to select the playback file appears.
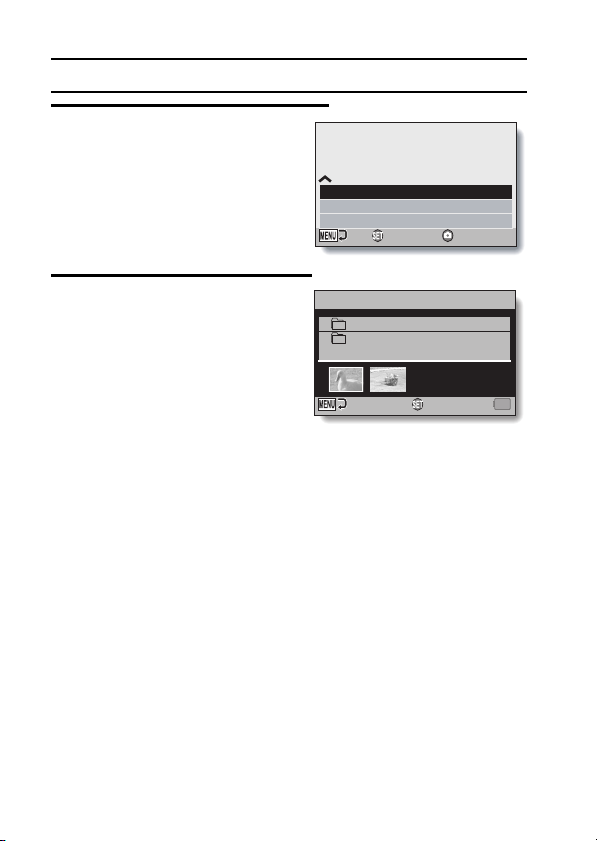
SELECT PLAY FILE
Library ROLL
Library CALENDAR
ALBUM
SD
CARD
OK
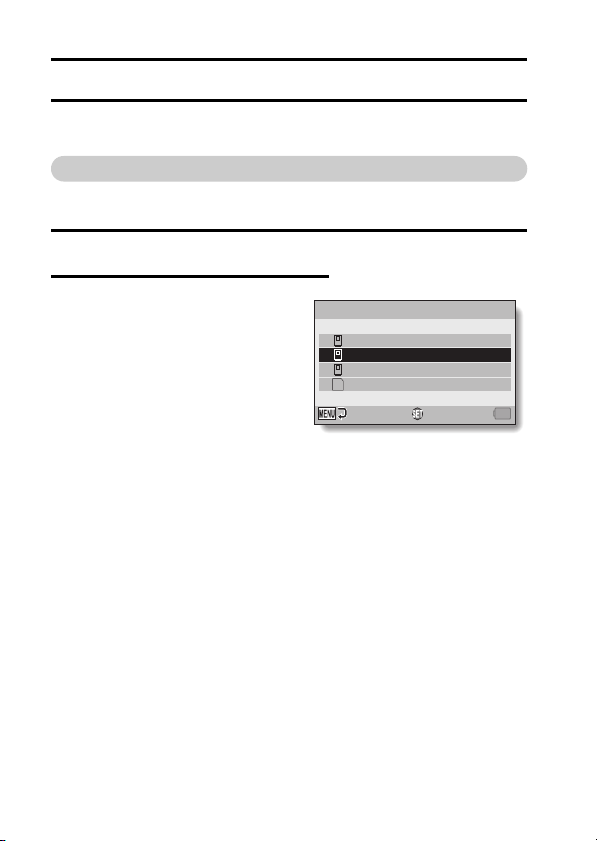
8 Select “Library ROLL”, and press the SET button.
h The list of rolls appears.
SELECT PLAY FILE
2009.12.26 ROLL001
OK
9 Select the desired roll to play back, and press the SET button.
h The rest of the playback procedure is the same as normal camera
operation.
h When you have finished, turn off the camera before turning off the
hard disk and TV power.
v English
Page 7

CONTENTS
HOW TO ENJOY THE Xacti Library FEATURE .................................... 2
SETUP
ASSEMBLE THE DEVICES ................................................................... 5
CONNECTIONS .................................................................................... 8
COPY
Copy files from the camera to the hard disk ......................................... 10
Display the Xacti Library Menu ..................................................... 10
Copy files ...................................................................................... 11
Copy files after sorting them into folders by date .......................... 12
Copy single files ............................................................................ 14
PLAYBACK
PLAY HARD DISK FILES .................................................................... 15
Display the screen to select playback files ................................... 15
Select a roll to play ....................................................................... 16
Select playback files from the calendar ........................................ 17
Play back an album ...................................................................... 18
Play back camera files .................................................................. 19
ORGANIZE (ALBUM)
CREATE AND EDIT ALBUMS ............................................................. 20
Create a new album ...................................................................... 20
Add files from other folders/rolls ................................................... 23
Confirming the playback settings (slideshow settings) ................. 24
Edit an album ................................................................................ 25
Move album files ........................................................................... 27
Remove album files ...................................................................... 29
DELETE AN ALBUM ............................................................................ 31
FORMAT HARD DISK ......................................................................... 32
APPENDICES
SPECIFICATIONS ............................................................................... 34
Xacti Library compatible hard disks .............................................. 34
Hard disk directory configuration .................................................. 35
1 English
Page 8
HOW TO ENJOY THE Xacti Library
FEATURE
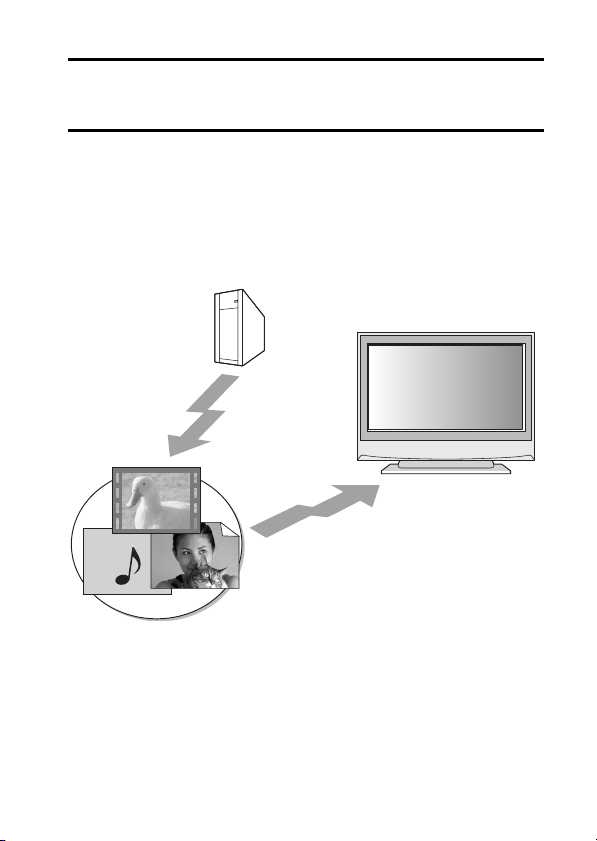
The Xacti Library feature is a system that allows you to save the files stored in
your camera’s card to a large-capacity hard disk—all without using a
computer.
Copying files between the camera and hard disk
made easy
You can copy files recorded with your camera to a hard disk, as well as
transfer files from the hard disk to your camera’s card.
Camera files
English 2
Page 9

HOW TO ENJOY THE Xacti Library FEATURE
Reproduce the high quality of captured images
Because the files from your hard disk can be output directly to your TV, you
can enjoy watching video clips without losing any of the recorded high
definition. You can also play back the files from the camera’s card.
3 English
Page 10

Use the album feature to organize your files
Organizing your files into albums is a snap. By storing the files copied to the
hard disk into albums, you can play a slideshow of just those files you stored.
001 002 003
CREATE NEW ALBUM
EDIT ALBUM
DELETE ALBUM
OK
HINT
i The original meaning of “roll” comes from conventional cameras, in which
rolls of film are used. In a digital camera, however, recorded files are stored
on a card (or the internal memory), and so one card (or one internal
memory) is said to comprise a virtual “roll”. For example, when copying
files by rolls, all the files from the camera are copied to the hard disk at one
time.
English 4
Page 11

SETUP
ASSEMBLE THE DEVICES
You will need the following devices in order to use the Xacti Library.
Camera
To check if your camera has the Xacti Library feature, please refer to the
instruction manual that accompanied the camera.
Use the docking station (included with some models).
Remote control unit
Use the remote control unit that was included with your camera.
5 English
Page 12
Hard disk
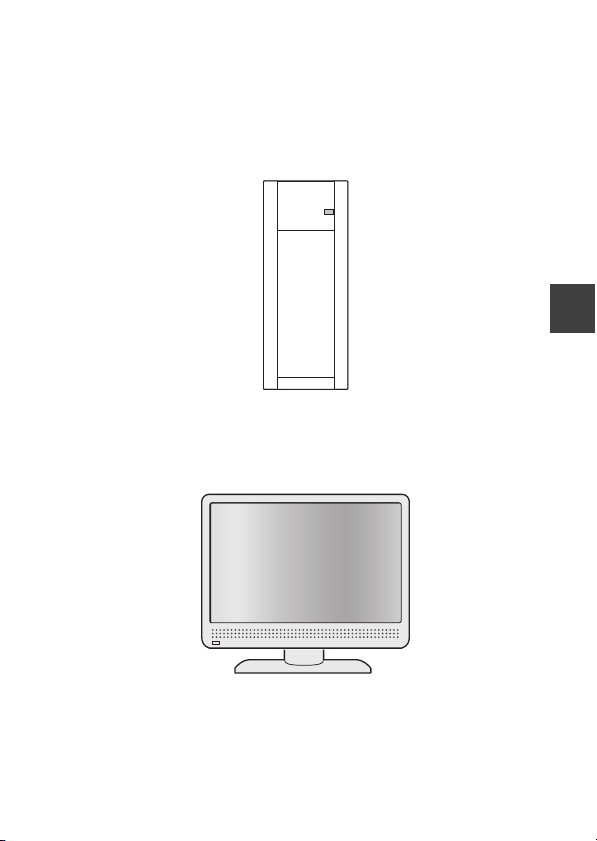
The hard disk should have a USB terminal that is USB 2.0 High Speed
compatible. For more information about compatible hard disks, please see
page 34 and visit our website at: http://www.sanyo-dsc.com/
TV
By using a full HD (high definition) compatible TV, you will be able to enjoy the
excellent image quality of video clips recorded in the full HD mode.
SETUP
English 6
Page 13

ASSEMBLE THE DEVICES
Others
i A TV connection cable (example: S-AV interface cable, component cable,
HDMI cable, etc.) is necessary.
i A hard disk connection cable (example: USB interface cable, USB
converter cable, etc.) is necessary.
7 English
Page 14
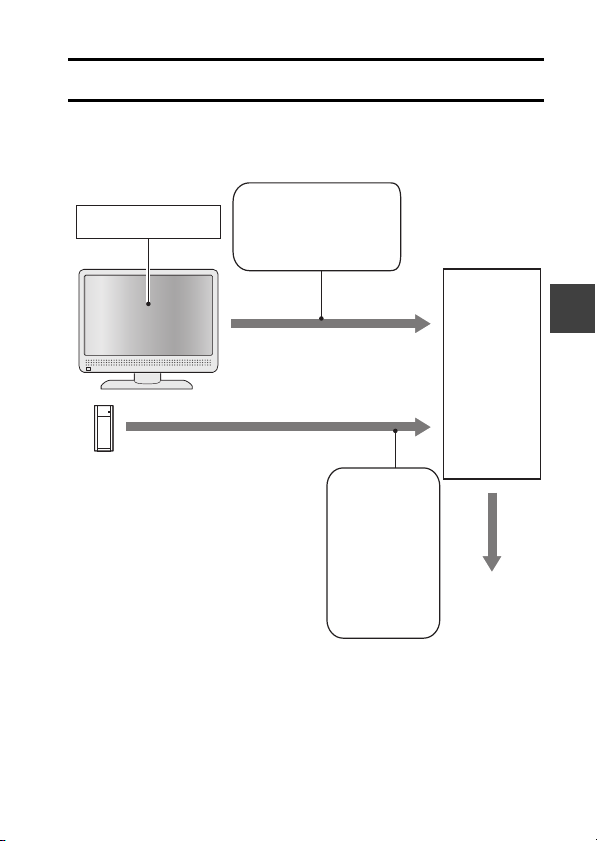
CONNECTIONS
Connect all the devices.
h Please make sure that the camera and all devices are turned OFF before
proceeding.
h For detailed information, please see the camera’s Instruction Manual.
Use the cable included
Set input to “VIDEO”
with your camera to
connect the docking
station or the camera to
a TV.
Camera or
docking
station
SETUP
Hard disk
Use the USB
cable and the
USB converter
cable included
with your
camera to
connect the
docking station
or the camera
to the hard
disk.
To power outlet
English 8
Page 15

CONNECTIONS
CAUTION
Caution when disconnecting cables
i When using the Xacti Library, do not remove the camera or disconnect the
USB cable. If the USB cable is disconnected while accessing the media,
not only may the stored files be damaged, but it may also become
necessary to reformat the media, and in doing so, lose all the data.
i Be sure to turn off the camera before removing it from the docking station.
By turning off the camera, you will be able to safely disconnect the drive.
9 English
Page 16
COPY
Copy files from the camera to the
hard disk
Copy files from the card installed in the camera, or from the camera’s internal
memory, to the hard disk.
h The Xacti Library can also be operated using the camera’s controls, but it
is recommended that you use the remote control unit while watching your
TV screen. In the following explanation, the remote control unit is used.
■ When using the hard disk for the first time
When using a hard disk for the first time with the Xacti Library, files can be
copied after a library is created.
Please see pages ii through iii for the procedure to create a library.
Display the Xacti Library Menu
The Xacti Library operations are performed from the Xacti Library Menu.
1 Turn on the power to the devices in the following order: camera →
hard disk → TV.
h If your hard disk is one that can turn ON/OFF automatically, it will do
so when the camera is turned ON/OFF.
h The Playback Screen for the last roll that was copied appears.
COPY
English 10
Page 17
Copy files from the camera to the hard disk
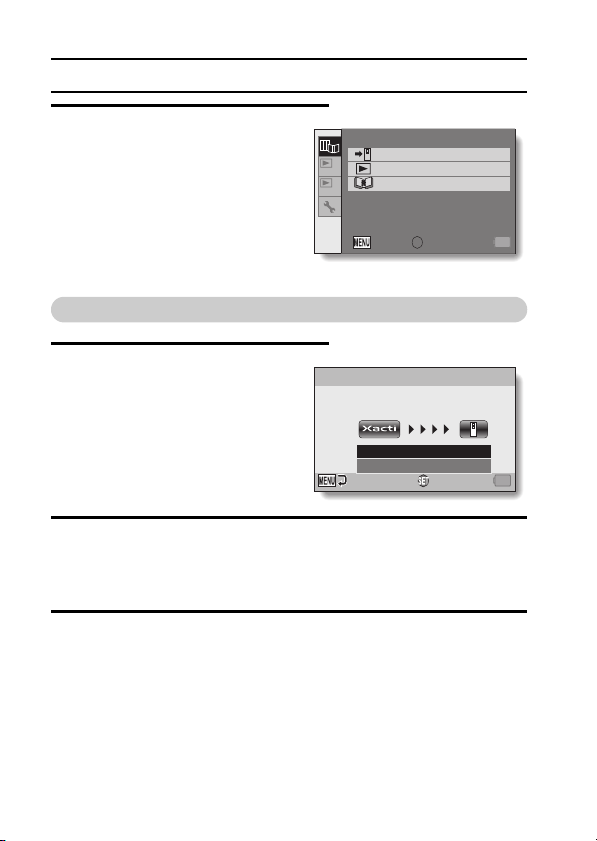
2 Press the MENU button.
h The Xacti Library Menu appears.
DATA TRANSFER:
Copy files from the card to the hard
disk.
SELECT PLAY FILE:
Play back files that were copied to
the hard disk.
EDIT ALBUM:
Create and edit albums.
Xacti Library MENU
DATA TRANSFER
SELECT PLAY FILE
1
EDIT ALBUM
2
SET
OKEXIT
<Xacti Library Menu>
Copy files
3 Select “DATA TRANSFER”, and
press the SET button.
h The Data Transfer Screen
appears.
BEGIN TRANSFER:
Begin file copying (page 11).
TRANSFER SETTINGS:
Set the transfer settings (page 12).
4 Select “BEGIN TRANSFER” and press the SET button.
h File copying begins.
h When copying is completed, the Transfer Complete Confirmation
Screen appears.
DATA TRANSFER
16File
173MB
BEGIN TRANSFER
TRANSFER SETTINGS
5 Press the SET button.
h When copying is completed, you are
returned to the Xacti Library Menu.
Free:4.8GB
OK
11 English
Page 18
Copy files after sorting them into folders by
date
Create a folder for each capture date, and copy files into the respective
folders according to their capture date.
1 In step 3 of “Copy files”
(page 11), select “TRANSFER
SETTINGS”, and press the SET
button.
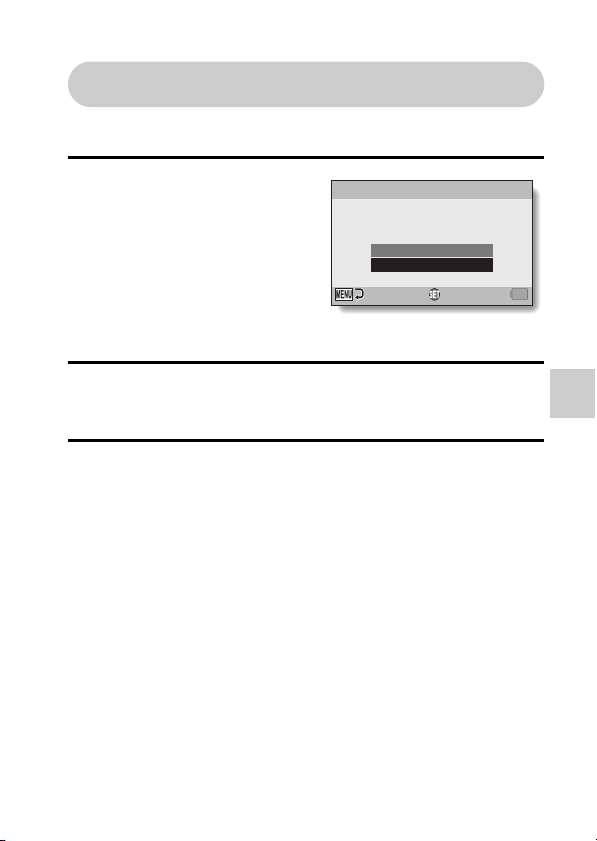
h The Transfer Settings Screen
appears.
YES:
Sort files into dated folders and
copy them.
NO:
Copy files to folders by rolls.
TRANSFER SETTINGS
Sort by date and transfer?
YES
NO
OK
2 Select “YES” and press the SET button.
h The setting to sort and copy files into dated folders is set, and you are
returned to the Data Transfer Screen.
3 Select “BEGIN TRANSFER” and press the SET button.
h File copying begins.
h When copying is completed, you are returned to the Xacti Library
Menu.
COPY
English 12
Page 19

Copy files from the camera to the hard disk
HINT
Sort files into folders by date after they have been copied
i To sort files by date into dated folders you have already created, from
“PLAYBACK MENU 2” of the Xacti Library Menu, select “SORT BY DATE”,
and press the SET button.
13 English
Page 20
Copy single files
Copy individual or multiple files while using the TV or the monitor to confirm
the file.
1 Display the file from the copy source.
Hard disk file: page 15
Card file: page 19
2 Access the Xacti Library Menu (page 10).
3 From “PLAYBACK MENU 2” select “COPY”, and press the SET
button.
4 Display the file you wish to copy.
5 Copy the file.
h The procedure to copy a file is the same as when using the camera.
HINT
To delete files
i The procedure to delete files is performed from the Playback Screen. The
procedure to delete files is the same as that for deleting files from the
camera.
COPY
English 14
Page 21
PLAYBACK
PLAY HARD DISK FILES
Play back files that were copied to the hard disk using the Xacti Library’s copy
function.
Display the screen to select playback files
You can specify whether to play back files by rolls or by calendar date. The
operation to play back albums (page 20) is also performed from this screen.
1 Display the Xacti Library Menu (page 10).
2 Select “SELECT PLAY FILE”, and
press the SET button.
h The screen to select the
playback files appears.
Library ROLL:
Specify a roll from the list of rolls
(page 16).
Library CALENDAR:
Specify a capture date from the
calendar (page 17).
ALBUM:
Play back an album (page 18).
CARD:
Play back the files on a card (page 19).
15 English
SELECT PLAY FILE
Library ROLL
Library CALENDAR
ALBUM
SD
CARD
OK
<Select Play File Screen>
Page 22

Select a roll to play
3 Select “Library ROLL”, and press
the SET button.
h The list of rolls appears.
4 Select the desired roll to play
back, and press the SET button.
h The rest of the playback
procedure is the same as normal
camera operation.
SELECT PLAY FILE
2009.12.26 ROLL001
OK
PLAYBACK
English 16
Page 23
PLAY HARD DISK FILES
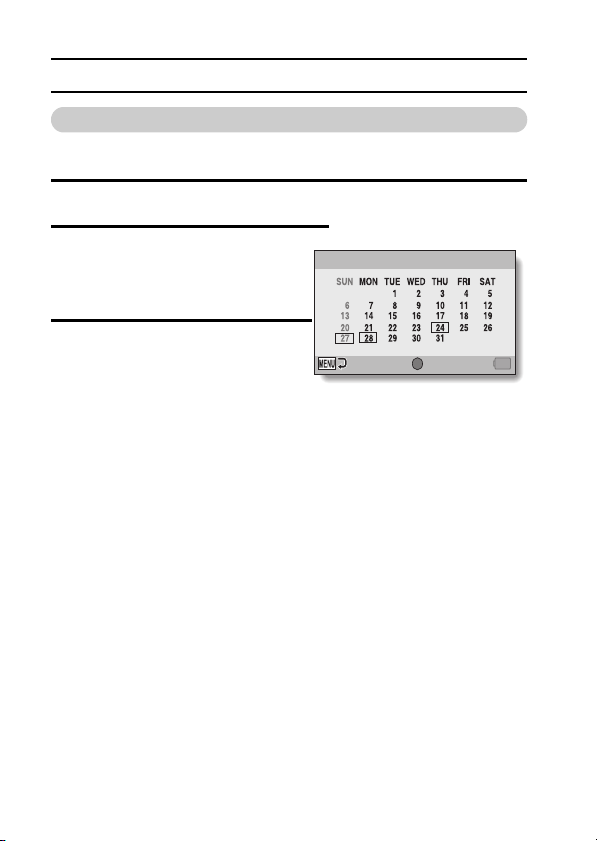
Select playback files from the calendar
Select a capture date from the calendar, and play back the corresponding
files.
1 Display the screen to select playback files (page 15).
2 Select “Library CALENDAR”, and
press the SET button.
h The calendar month for the most
recently copied files appears.
3 Press the SET button, select the
desired calendar date, and press
the SET button.
h The files captured on the
selected date appear.
h The rest of the playback procedure is
the same as normal camera
operation.
17 English
SELECT PLAY FILE
SET
OK
2009.12
Page 24
Play back an album
Play back files in a Xacti Library album (page 20).
1 Display the screen to select playback files (page 15).
2 Select “ALBUM”, and press the SET button.
h A list of albums appears.
3 Select the desired album to play back, and press the SET button.
h Album playback begins.
h Playback is discontinued if a remote control unit button or a camera
button is pressed during playback.
HINT
Did the images in the album change?
i If you edit images that are stored in an album and then overwrite them, the
album images change to the edited images. Be careful when editing
images that are stored in multiple albums.
i If you don’t remember which photos were stored in which albums, it is
suggested that you save edited images under new names.
PLAYBACK
English 18
Page 25

PLAY HARD DISK FILES
Play back camera files
Play back files from your camera.
1 Display the Xacti Library Menu (page 10).
2 Select “SELECT PLAY FILE”, and press the SET button.
3 Select “CARD”, and press the SET button.
h The rest of the playback procedure is the same as normal camera
operation.
19 English
Page 26
ORGANIZE (ALBUM)
CREATE AND EDIT ALBUMS
Files that were copied to the hard disk can be stored in “albums”.
Create a new album
Create an album in which you can organize selected files from various dates
and rolls.
1 Display the Xacti Library Menu (page 10).
2 Select “EDIT ALBUM” and press
the SET button.
h The Edit Album Screen appears.
CREATE NEW ALBUM:
Create a new album (page 20).
EDIT ALBUM:
Edit the contents of an album that
has already been created
(page 25).
DELETE ALBUM:
Delete album(s) (page 31).
CREATE NEW ALBUM
EDIT ALBUM
DELETE ALBUM
<Edit Album Screen>
SET
OK
ORGANIZE (ALBUM)
English 20
Page 27
CREATE AND EDIT ALBUMS
3 Select “CREATE NEW ALBUM”,
and press the SET button.
h The Edit Album Menu appears.
4 Select “ADD”, and press the SET
button.
h The screen to select data to add
appears.
ALBUM 001
ADD
MOVE
DELETE
OK
<Edit Album Menu>
SELECT DATA
OTHER FOLDERS
100SANYO
0001 0002
NEXT
OK
21 English
Page 28
5 Select files to add to the album,
and press the SET button.
h The selected files are added to
the album, and you are returned
to the Edit Album Screen.
h Repeat steps 4 and 5 to add
more files to the album as
desired.
h When you have finished adding
files, proceed to step 6.
ALBUM 001
ADD
MOVE
DELETE
OK NEXT
6 Press the [ ] button.
h The screen to confirm the
playback settings appears.
To change the playback settings,
see page 24.
7 Select “SAVE SCREEN”, and
press the SET button.
h The Save Album Screen
appears.
SAVE AS NEW:
Save the album that you created.
CANCEL:
Do not save the new album.
8 Select “SAVE AS NEW”, and
press the SET button.
h The album is saved, and you are
returned to the Edit Album Menu
Screen.
CONFIRM PLAY SETTINGS
TIME
EFFECT
BGM
SAVE SCREEN
SAVE ALBUM
SAVE AS NEW
OVERWRITE
CANCEL
OK
OK
1sec
OFF
OFF
English 22
ORGANIZE (ALBUM)
Page 29
CREATE AND EDIT ALBUMS
Add files from other folders/rolls
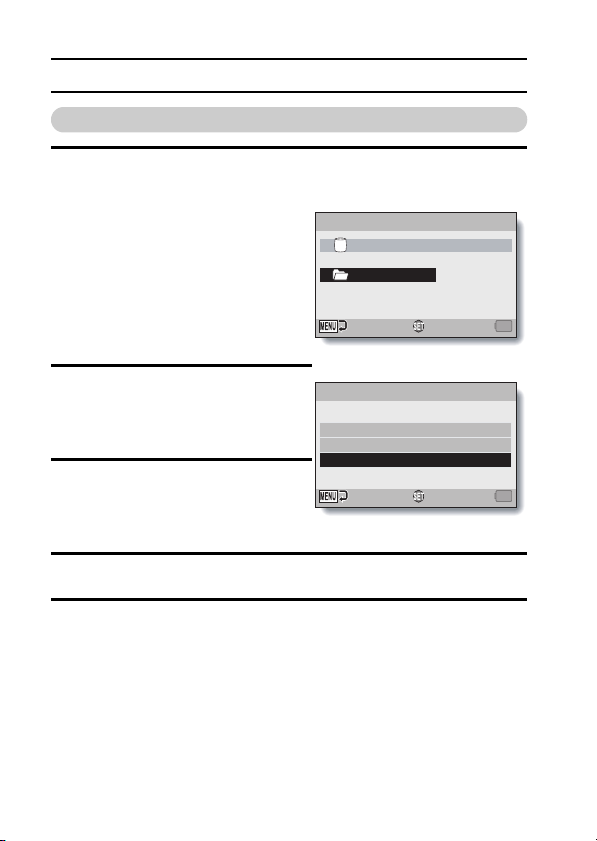
1 On the screen in step 4 on page 21, select “OTHER FOLDERS”, and
press the SET button.
h The screen to select a folder appears.
<To add files from a folder>
1 Select the desired folder, and
press the SET button.
2 Select the desired file, and
press the SET button.
<To add files from a roll>
h Proceed to step 2.
SELECT DATA
ROLL
OTHER DATA
2009.12.26 ROLL001
100SANYO
OK
2 Select “OTHER ROLLS”, and
press the SET button.
h The screen to select a roll
appears.
SELECT DATA
2009.12.24 ROLL001
2009.12.25 ROLL001
2009.12.26 ROLL001
3 Select the desired roll, and press
the SET button.
h The screen to select a folder
appears.
4 Select the desired folder, and press the SET button.
5 Select the desired file, and press the SET button.
23 English
OK
Page 30
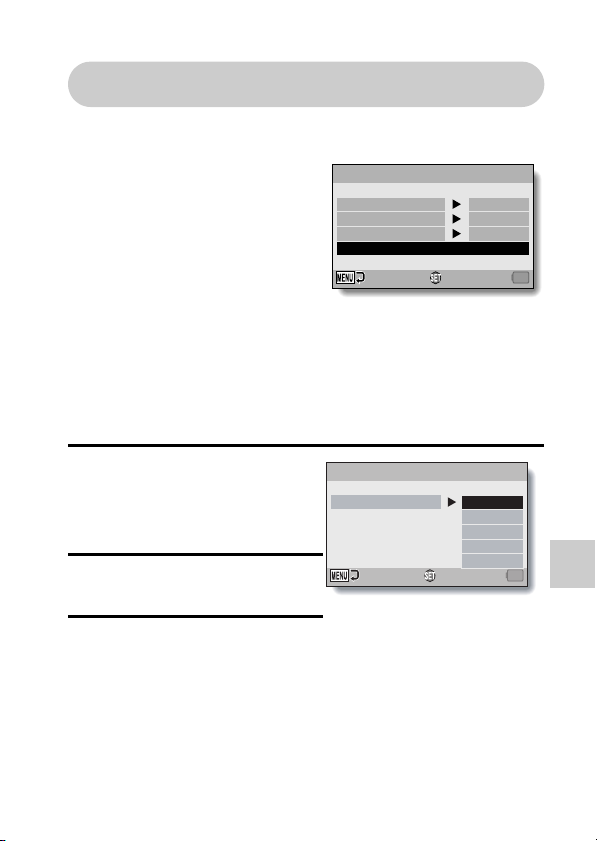
Confirming the playback settings (slideshow
settings)
Use the Playback Settings Confirmation Screen to manage the album
playback settings.
TIME:
When still images are played back,
adjust the transition speed (the
period that an image is displayed
before it changes to the next
image).
EFFECT:
When still images are played back,
select a transition effect as one
image changes to the next image.
BGM:
Specify the settings for playing
background music during playback
of still images.
CONFIRM PLAY SETTINGS
TIME
EFFECT
BGM
SAVE SCREEN
<Playback Settings
Confirmation Screen>
OK
1 sec
OFF
OFF
To change the settings
ORGANIZE (ALBUM)
1 Select the item you wish to
change, and press the SET
button.
h The screen to change the
selected item appears.
2 Select the desired setting, and
press the SET button.
3 Select “SAVE SCREEN”, and
press the SET button.
h The Save Album Screen
appears.
CONFIRM PLAY SETTINGS
OK
1 sec
2 sec
3 sec
5 sec
10 sec
TIME
<“TIME” is selected>
English 24
Page 31
CREATE AND EDIT ALBUMS
Edit an album
Once an album has been created, you can add files to it, remove files from it,
rearrange the order in which files will be played back, as well as change the
playback settings.
Add files to an album
Add files to an album that is already created.
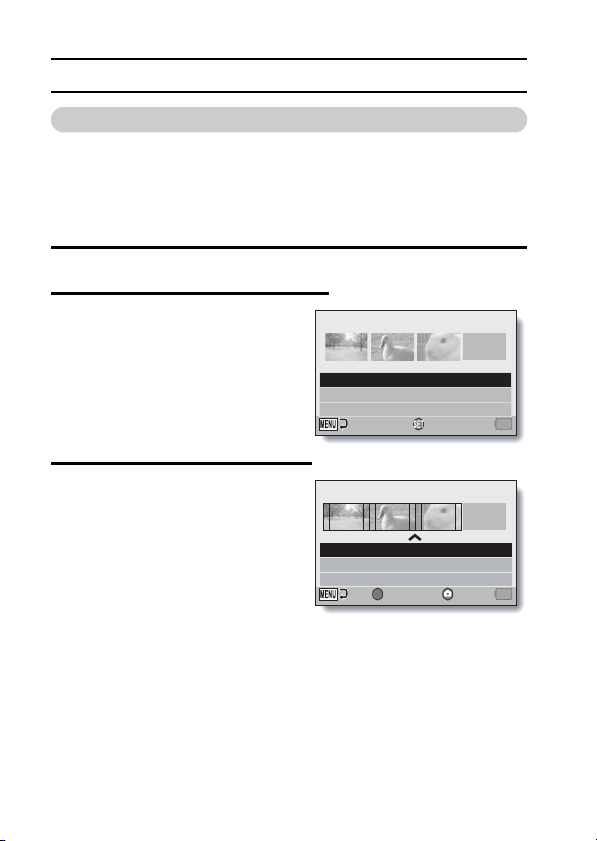
1 Display the Xacti Library Menu (page 10).
2 Select “EDIT ALBUM” and press
the SET button.
h The Edit Album Screen appears.
3 Select “EDIT ALBUM”, move the
orange frame to the album you
wish to add files to, and press the
SET button.
h The Edit Album Menu appears.
25 English
001 002 003
CREATE NEW ALBUM
EDIT ALBUM
DELETE ALBUM
ALBUM 001
ADD
MOVE
DELETE
OK
SET
OK NEXT
Page 32
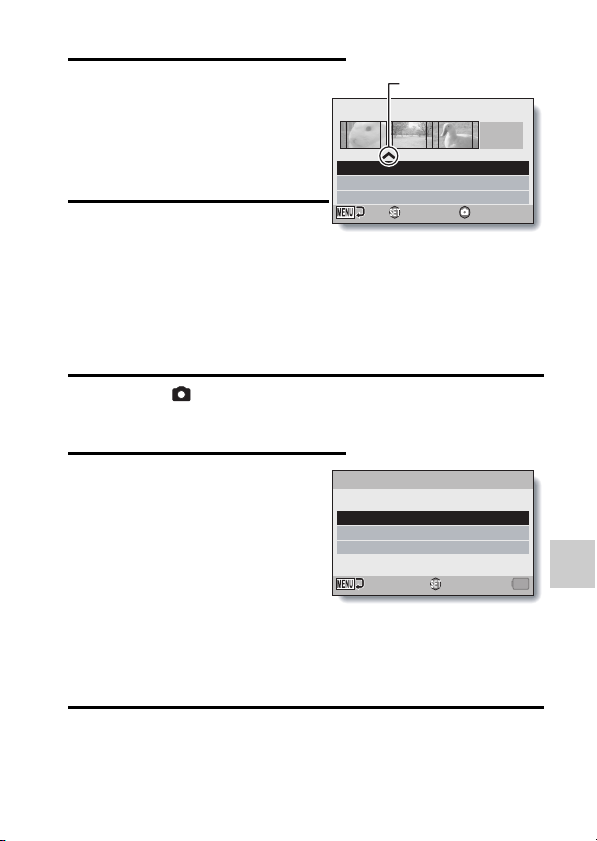
4 Select “ADD”, move the pointer
to the place you wish to add files,
and press the SET button.
h The screen to select files to add
appears.
h To select files from other folders
or rolls, please see page 23.
5 Select files to add to the album,
and press the SET button.
h The selected files are added at
the place indicated by the
pointer.
h Repeat steps 4 and 5 to add more
files to the album as desired.
h When you have finished adding
files, proceed to step 6.
6 Press the [ ] button.
h The screen to confirm the playback settings appears.
To change the playback settings, see page 24.
ALBUM 003
ADD
MOVE
DELETE
Pointer
OK NEXT
ORGANIZE (ALBUM)
7 Select “SAVE SCREEN”, and
press the SET button.
h The Save Album Screen
appears.
SAVE AS NEW:
The edited album will be saved as a
new album. The original album
remains unchanged.
OVERWRITE:
The original album will be deleted.
Only the edited album will be
saved.
CANCEL:
Do not save the edited album.
SAVE ALBUM
SAVE AS NEW
OVERWRITE
CANCEL
OK
8 Select the desired save option, and press the SET button.
h The album is saved, and you are returned to the Edit Album Screen.
English 26
Page 33
CREATE AND EDIT ALBUMS
Move album files
Change the order of files in an album.
1 Display the Xacti Library Menu (page 10).
2 Select “EDIT ALBUM” and press
the SET button.
h The Edit Album Screen appears.
3 Select “EDIT ALBUM”, move the
orange frame to the file you wish
to move, and press the SET
button.
h The Edit Album Menu appears.
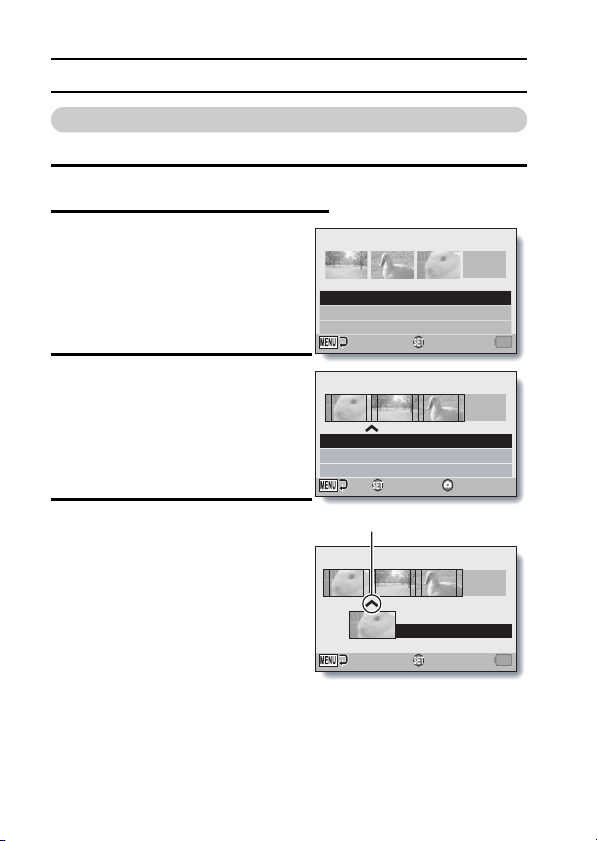
4 Select “MOVE”, move the orange
frame to the file you wish to
move, and press the SET button.
h The screen to specify the
desired file position appears.
27 English
001 002 003
CREATE NEW ALBUM
EDIT ALBUM
DELETE ALBUM
ALBUM 003
ADD
MOVE
DELETE
Pointer
ALBUM 003
PLAY
OK NEXT
MOVE TO
OK
Page 34
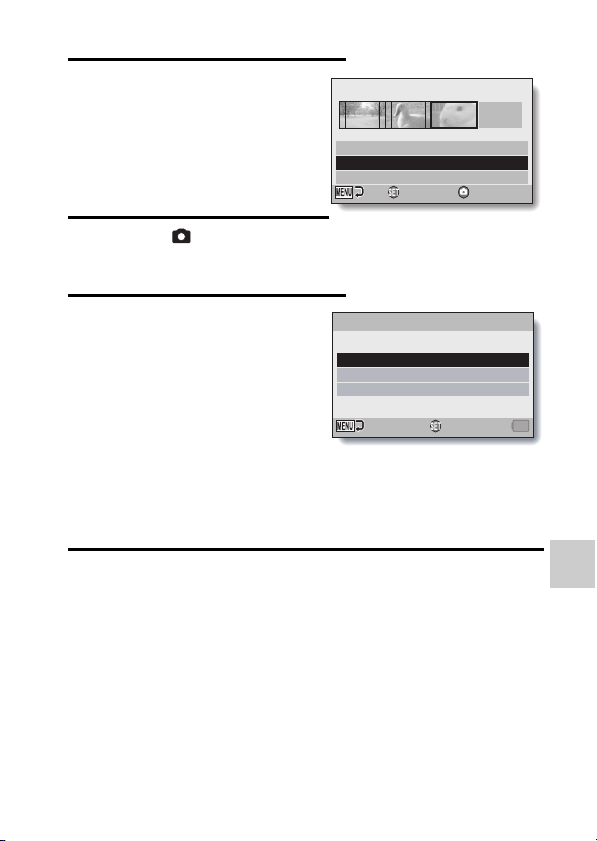
5 Place the pointer over the desired
position, and press the SET
button.
h The selected file is moved, and
you are returned to the Edit
Album Screen.
6 Press the [ ] button.
h The screen to confirm the playback settings appears.
To change the playback settings, see page 24.
ALBUM 003
ADD
MOVE
DELETE
OK NEXT
7 Select “SAVE SCREEN”, and
press the SET button.
h The Save Album Screen
appears.
SAVE AS NEW:
The edited album will be saved as a
new album. The original album
remains unchanged.
OVERWRITE:
The original album will be deleted.
Only the edited album will be
saved.
CANCEL:
Do not save the edited album.
8 Select the desired save option, and press the SET button.
h The album is saved, and you are returned to the Edit Album Screen.
SAVE ALBUM
SAVE AS NEW
OVERWRITE
CANCEL
OK
English 28
ORGANIZE (ALBUM)
Page 35
CREATE AND EDIT ALBUMS
Remove album files
Remove files from an album (deregister).
1 Display the Xacti Library Menu (page 10).
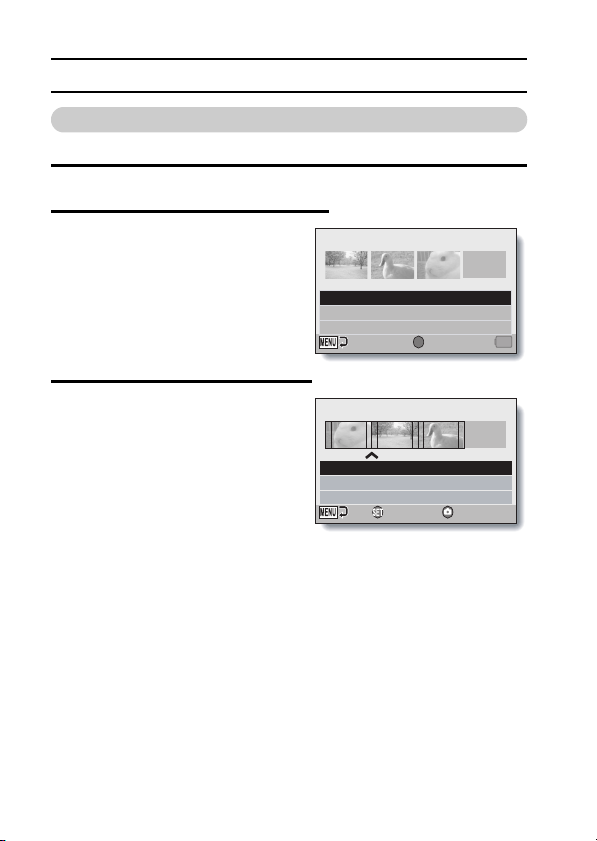
2 Select “EDIT ALBUM” and press
the SET button.
h The Edit Album Screen appears.
3 Select “EDIT ALBUM”, move the
orange frame to the album from
which you wish to delete files,
and press the SET button.
h The Edit Album Menu appears.
29 English
001 002 003
CREATE NEW ALBUM
EDIT ALBUM
DELETE ALBUM
ALBUM 003
ADD
MOVE
DELETE
SET
PLAY
OK NEXT
Page 36
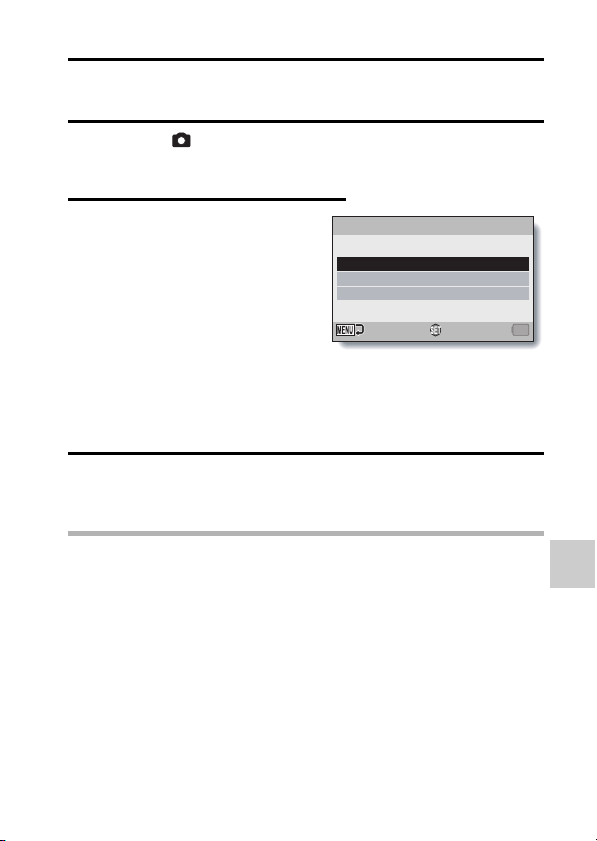
4 Select “DELETE”, move the orange frame to the file you wish to
delete, and press the SET button.
5 Press the [ ] button.
h The screen to confirm the playback settings appears.
To change the playback settings, see page 24.
6 Select “SAVE SCREEN”, and
press the SET button.
h The Save Album Screen
appears.
SAVE AS NEW:
The edited album will be saved as a
new album. The original album
remains unchanged.
OVERWRITE:
The original album will be deleted.
Only the edited album will be
saved.
CANCEL:
Do not save the edited album.
7 Select the desired save option, and press the SET button.
h The album is saved, and you are returned to the Edit Album Screen.
HINT
Can’t save the album?
i If all the files have been removed (deregistered) from an album, it is not
possible to proceed from step 5, and it is not possible to save the album. To
remove all the files from an album, follow the procedure to delete the
album (page 31).
SAVE ALBUM
SAVE AS NEW
OVERWRITE
CANCEL
OK
ORGANIZE (ALBUM)
English 30
Page 37
DELETE AN ALBUM
Once an album is deleted, it cannot be recovered. Before deleting an album,
be sure to carefully check its contents.
1 Display the Xacti Library Menu (page 10).
2 Select “EDIT ALBUM” and press the SET button.
h The Edit Album Screen appears.
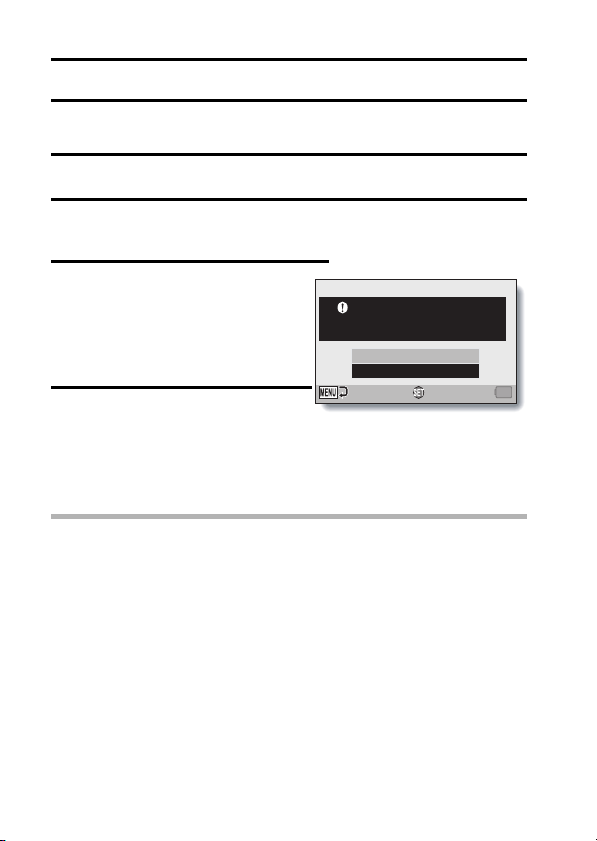
3 Move the orange frame to the
album you wish to delete, select
“DELETE ALBUM”, and press the
SET button.
h The screen to confirm the album
delete appears.
4 Select “YES”, and press the SET
button.
h The album is deleted and you
are returned to the Edit Album
Screen.
HINT
What happens to the files when an album is deleted?
i Even when an album is deleted, the original files remain. The procedure to
delete files is performed from the Playback Screen.
ALBUM 002
Delete this album?
YES
NO
OK
31 English
Page 38
FORMAT HARD DISK
To format the hard disk, use the following procedure.
1 Display the screen to play back files on the hard disk using the Xacti
Library feature (page 15).
2 From the OPTION MENU select “FORMAT”, and press the SET
button.
h A confirmation screen appears.
3 Select “YES”, and press the SET button.
h A confirmation screen appears again.
4 Select “YES”, and press the SET button.
h Formatting begins.
h Do not turn off the power to the camera or the hard disk during
formatting.
<About the format specifications>
h The entire hard disk will be allocated to one partition (single partition).
h The file format used is FAT32.
English 32
ORGANIZE (ALBUM)
Page 39

FORMAT HARD DISK
CAUTION
Before formatting the hard disk
i Formatting the hard disk will erase all the files stored in it. You should first
copy any data you want to keep to another storage medium.
If “Format?” appears when Xacti Library is launched...
i The camera is connected to a hard disk whose file system cannot be used
with Xacti Library. If you select “YES” and press the SET button, hard disk
formatting will begin.
33 English
Page 40

APPENDICES
SPECIFICATIONS
Xacti Library compatible hard disks
A hard disk that meets the following conditions can be used with the Xacti
Library.
i USB 2.0 compatible
A USB 1.x compatible hard disk cannot be used.
i Powered by self power
A hard disk that is powered through the USB cable (bus power) cannot be
used.
i Please back up your files!
As a precaution against losing data in case of a problem with your hard
disk that prevents you from accessing your saved files, it’s a good practice
to regularly make backup copies, on a DVD for example, of the files in the
hard disk you are using for the Xacti Library.
Sanyo Electric shall not be held responsible for loss of files/data due to
failure of your hard disk.
i Hard disks initialized in the FAT32 format only
Only a hard disk that has been initialized in the FAT32 format can be used
with the Xacti Library. Hard disks initialized in other formats cannot be
used.
i For a disk with multiple partitions
It is recommended that an unpartitioned disk be used. In case of a
partitioned disk, only the higher priority partition can be used. Other disk
partitions cannot be used. For example, in a hard disk having D: and E:
partitions, only the “D:” partition can be used for the Xacti Library.
i What is the maximum capacity?
A maximum 1 TB hard disk can be used.
Additional information can be found on the Sanyo website at
http://www.sanyo-dsc.com/
APPENDICES
English 34
Page 41
SPECIFICATIONS
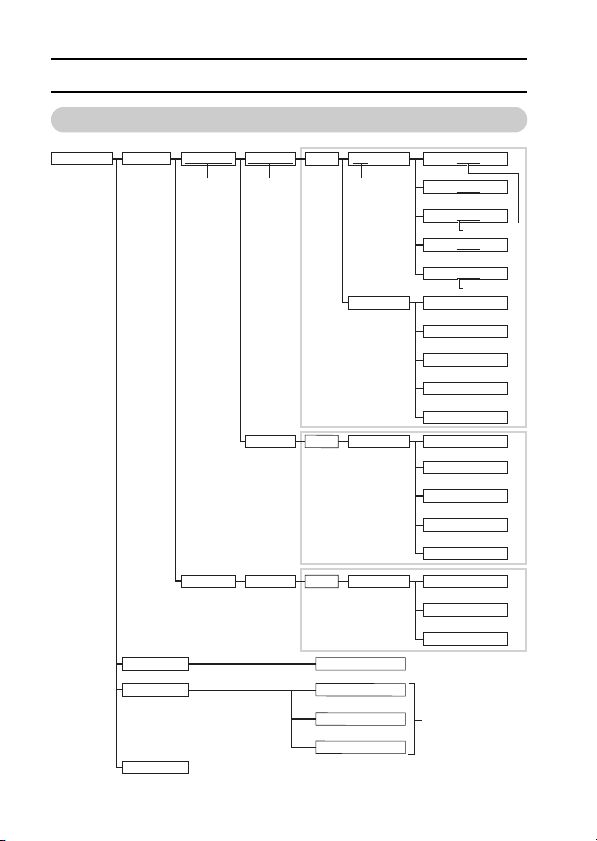
Hard disk directory configuration
ROOT
20061107
ASSETS
Copy date Roll name Folder number
20061108
RESOURCE
ALBUM
INDEX.PVM
ROLL001
ROLL002
ROLL001
100SANYO
DCIM
101SANYO
100SANYO
DCIM
100SANYO
DCIM
BGM
ALBUM001.PVM
ALBUM002.PVM
ALBUM003.PVM
SANY0001.JPG
SANY0002.JPG
SANY0003.MP4
Image number
SANY0004.MP4
SANY0005.M4A
Sound number
SANY0001.JPG
SANY0002.JPG
SANY0003.MP4
SANY0004.MP4
SANY0005.M4A
SANY0001.JPG
SANY0002.JPG
SANY0003.MP4
SANY0004.MP4
SANY0005.M4A
SANY0001.JPG
SANY0002.JPG
SANY0003.MP4
BGM sound files
Album files
35 English
Page 42

SANYO Electric Co., Ltd.
 Loading...