

Page 1
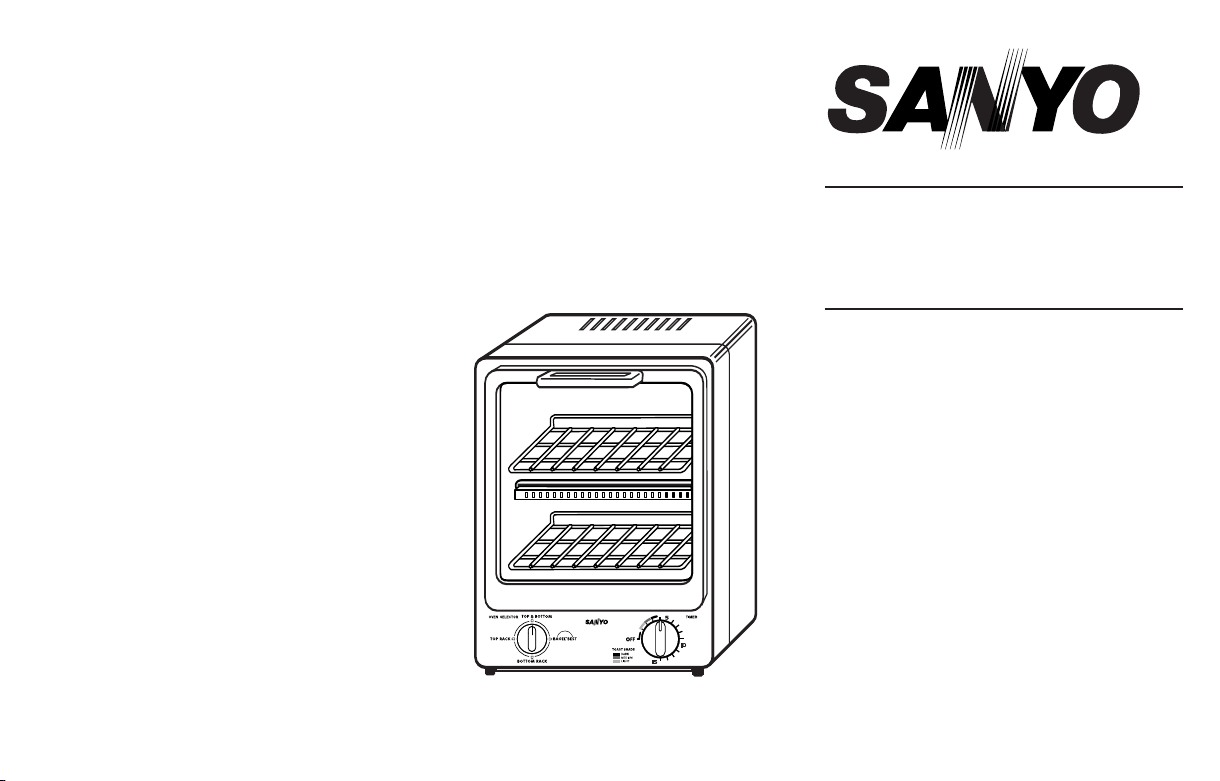
INSTRUCTION MANUAL
TOASTER OVEN
SK-7S
SK-7W
Page 2

Table of Contents
Thank you for purchasing a SANYO TOASTER
OVEN/SNACK MAKER. Please read these instructions carefully before using the unit, and keep them
for future reference.
Important Safeguards 3
Names of Oven Parts 4
Unpacking and Installation 5
General Directions 5
Oven Selector Settings 6
How to Use:
Toasting Bagels 7
Toasting Other Bakery Items 8
Cooking and Reheating 9
Cooking Containers 9
Cooking Guide 10
Cleaning and Storage 11
Specifications 11
Warranty 12
2
Page 3

IMPORTANT SAFEGUARDS
When using electrical appliances, basic safety precautions should always be
followed, including the following:
1. Read all instructions.
2. Do not touch hot surfaces. Use handles or knobs.
3. To protect against electrical shock, do not immerse cord, plugs, or body
in water or other liquid.
4. Close supervision is necessary when any appliance is used by or near
children.
5. Unplug from outlet when not in use and before cleaning. Allow to cool
before putting on or taking off parts.
6. Do not operate if the appliance has been damaged in any manner. Return
appliance to the nearest authorized service facility for examination,
repair, or adjustment.
7. The use of accessory attachments not recommended by the appliance
manufacturer. Will risk damaging the appliance and may cause injuries.
8. Do not use outdoors.
9. Do not let cord hang over edge of table or counter, or touch hot surfaces.
10. A short power-supply cord is provided to reduce the risk resulting from
becoming entangled in or tripping over a longer cord.
11. Longer extension cords may be used if care is exercised in their use.
12. A longer extension cord may be used only if: (1) the marked electrical
rating of the cord set or extension cord is equal to or greater than the
electrical rating of the appliance and (2) the longer cord is arranged so
that it will not drape over the countertop or tabletop where it can be
pulled on by children or tripped over unintentionally.
13. Do not operate with a damaged cord or plug.
14. Do not place on or near a hot gas or electric burner, or in a heated oven.
15. Make sure the TIMER switch is set to the OFF position before inserting or
removing plug from the wall outlet.
16. Oversized foods or utensils must not be inserted in the toaster/snack
maker as they may create a fire or electrical shock.
17. A fire may occur if the toaster/snack maker is covered or touching flammable material, including curtains, draperies, walls, and the like, when in
operation.
18. Do not clean with metal scouring pads. Metal pieces can break off the
pad and touch electrical parts involving a risk of electrical shock.
19. Do not use appliance for other than intended use. This product is
designed for household use only.
SAVE THESE INSTRUCTIONS
Note: "This appliance has a polarized plug (one blade is wider than the other is). As a safety fea-
ture, this plug will fit in a polarized outlet only one way. If the plug does not fit fully in the
outlet, reverse the plug. If it still does not fit, contact a qualified electrician. Do not attempt
to defeat this safety feature".
3
Page 4

NAMES OF OVEN PARTS
4
Page 5

UNPACKING AND INSTALLATION:
1. Remove contents from the carton.
2. Read all instructions carefully.
3. When using the trays, place trays on top of racks.
4. Make sure that the removable crumb tray (located in the bottom of the
unit) is inserted properly and pushed in until it locks.
GENERAL DIRECTIONS
1. Each toasting rack must securely be held in place by the rack holding
rods all the time.
2. When using trays, always position trays on top of toasting racks. Do not
use trays unless toasting racks are in the toaster/snack maker.
3. Do not overcrowd trays, as food will not cook evenly or completely.
Trays may warp due to excess weight.
4. Trays may be lined with aluminum foil for quick and easy cleanup. This
will also help prevent the food from discoloring or staining the trays.
5. Food residues left on the trays and toasting racks may burn. Be sure to
wash the trays and racks after use.
6. The timer knob should be set in the OFF position when food is placed in
the toaster/snack maker.
7. When using only one toasting rack, set the oven selector knob to the TOP
RACK position and place the food on the top toasting rack.
8. When using both toasting racks, set the oven selector knob to the TOP &
BOTTOM position and place food on both toasting racks.
9. The crumb tray must be kept clean.
10. The automatic thermostat will maintain the correct temperature by turning the heating elements on and off. The elements will change from
white to bright red when in use.
11. To prevent overcooking of foods, do not leave the appliance unattended.
12. Do not place anything on top of the unit.
13. Do not use paper, cardboard, plastic or Styrofoam in the oven.
5
Page 6
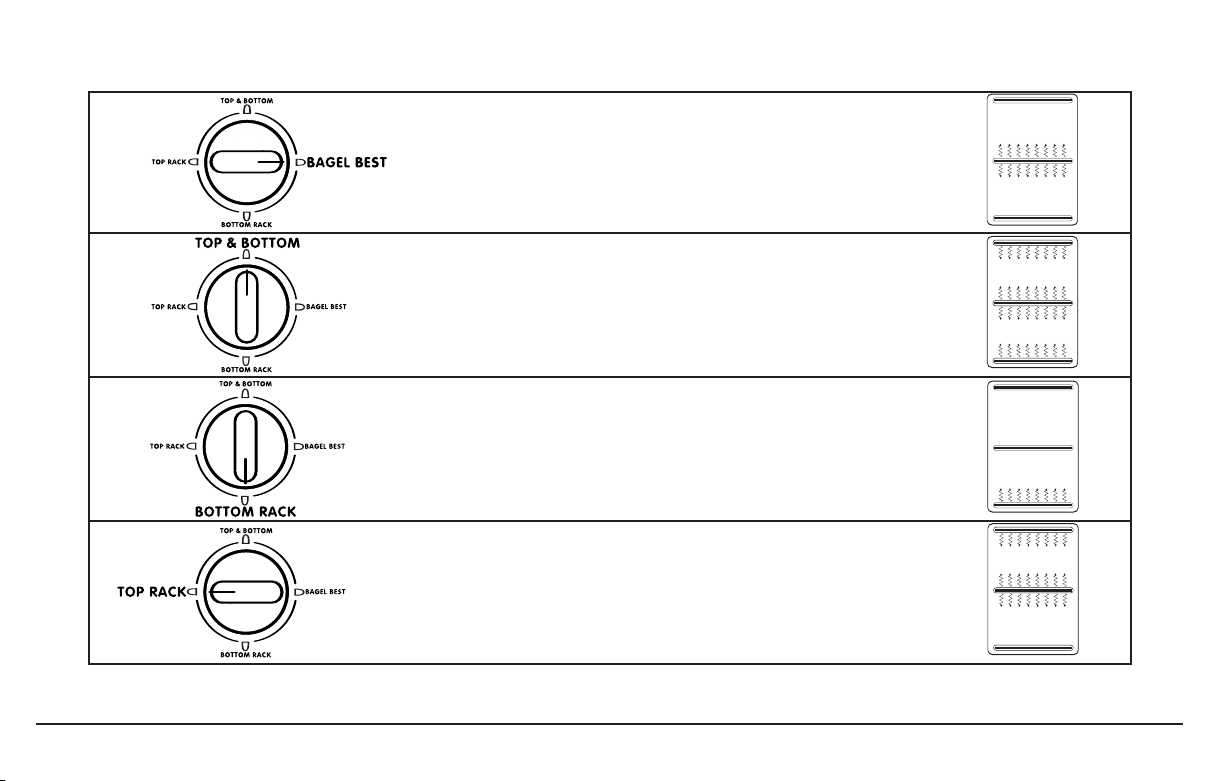
OVEN SELECTOR SETTINGS
Bagel Best:
Only the middle element is operating in Bagel Best mode.
Best for toasting bagels and English muffins.
Top & Bottom:
All three elements are operating in this mode.
Best for toasting, cooking and reheating using both racks.
Bottom Rack:
Only the bottom rack is operating in this mode.
Best for warming foods.
Top Rack:
The top and middle elements are operating in this mode.
Best for toasting, cooking and reheating using TOP RACK.
Note: The middle element may turn red when the toaster is in operation. The bottom element may not be as vibrant in color, while the top element may remain white. Variation in color of the
heating elements is not a malfunction.
6
Page 7

HOW TO USE:
TOASTING BAGELS
The BAGEL BEST feature of the Sanyo toaster oven is perfect for toasting
bagels. Bagels are toasted crisp on the cut side, while the outside stays
soft and warm.
To use this Feature:
1. Make sure the crumb tray is in place.
2. Make sure the TIMER knob is set to the OFF position.
3. Plug into 120-volt AC electrical outlet.
4. Place one half of the sliced bagel on the bottom toasting rack, cut side
FACING UP.
5. Place the other half of the bagel on the top toasting rack, cut side
FACING DOWN.
6. Close the door.
7. Set the oven selector knob to the BAGEL BEST position. (Fig. 1)
(Fig. 1)
8. For SK-7W, set the TIMER knob to the BAGEL BEST position. (Fig. 2)
For SK-7S, set the TIMER knob for approximately 4
1
/2minutes. (Fig. 3)
SK-7SSK-7W
(Fig. 2)
9. When the timer has expired, the oven stops automatically with the chime.
10. Open the door and remove the toasted bagels.
11. After use, unplug the cord from the wall outlet. Allow unit to cool before
cleaning and storing unit.
NOTES:
• The BAGEL BEST setting on the TIMER is the recommended time to toast
bagels. The unit will toast faster if it has been in use and is still hot. You
should adjust the TIMER knob accordingly to your personal preference.
• You can stop the oven any time by simply turning the timer knob to the
OFF position.
• To prevent overtoasting, do not leave oven unattended while it is in
operation.
• The BAGEL BEST feature is also excellent for toasting English muffins,
crumpets, hot dog buns, and hamburger buns.
(Fig. 3)
7
Page 8

TOASTING OTHER BAKERY ITEMS
1. Make sure the crumb tray is in place.
2. Make sure the TIMER knob is set to the OFF position.
3. Plug into 120-volt AC electrical outlet.
4. For one piece of toast, set the oven selector knob to the TOP RACK setting
(Fig. 4) and place bread slice on top toasting rack.
(Fig. 4)
(Fig. 5)
7. Set the TIMER knob to the desired toast color (Fig. 6).
SK-7SSK-7W
(Fig. 6)
8. When the timer has expired, the oven stops automatically with the
chime.
9. Open the door and remove items.
10. After use, unplug the cord from the wall outlet. Allow unit to cool before
cleaning and storing unit.
5. For two pieces, use the TOP & BOTTOM setting (Fig. 5) and place one
piece of bread on top toasting rack and the second piece on the bottom
toasting rack.
6. Close the door.
NOTES:
• These are the recommended times for toasting. However, you should
adjust the TIMER knob accordingly to the thickness of the bread and
your personal preference.
• To prevent bread from toasting too long and over-browning, do not leave
oven unattended during toasting.
• When removing food while the unit is still in operation, be sure to turn
the TIMER knob to the OFF postition. Now it is safe to remove the toasted
item(s).
• Condensation may form on the oven door when toasting moist or fresh
breads. This is normal.
• Always use the trays (placed on the toasting racks) for bakery items such
as buttered toast, raisin bread with sugar icing glaze, or filled pastries.
8
Page 9

COOKING AND REHEATING
1. Make sure the crumb tray is in place.
2. Use the trays (placed on racks) when cooking or reheating foods that
contain a sauce that may spill or bubble over, such as creamed chicken
or macaroni and cheese.
3. Make sure the TIMER knob is set to the OFF position.
4. Plug into 120-volt AC electrical outlet.
5. Set the oven selector knob to the position suited to your cooking needs.
6. When warming or reheating food, the oven selector knob should be set to
the BOTTOM RACK position. Place food on the bottom rack or tray.
NOTE: When using the chart on page 10, the oven selector knob may be
set to the TOP RACK position or the TOP & BOTTOM position, depending
on the type and amount of food being cooked.
7. Place the food to be cooked or reheated in the toaster/snack maker.
8. Close the door.
9. Set the TIMER knob for the proper cooking time.
10. A chime will sound when the time has elapsed. Open the door and
remove the cooked food from the toaster/snack maker.
• When removing food while the unit is still in operation, be sure to turn
the TIMER knob or the oven selector knob to the OFF position. Now it is
safe to remove the cooked food.
11. After use, unplug the cord from the wall outlet. Allow unit to cool before
cleaning and storing unit.
COOKING CONTAINERS
• Metal, ovenproof glass or glass ceramic bakeware may be used in this
toaster/snack maker.
• The top edges of ovenproof glass or glass ceramic bakeware should be
at least 1" below the upper heating element.
• Always check instructions of prepackaged convenience foods to make
sure they are suitable for use in a toaster oven or range oven.
• Some prepackaged foods in paper or cardboard dishes are suitable for
both the microwave and the range oven. Check instructions to make
sure it is recommended for both.
• Always remove plastic wrap or paperboard covers that are suitable for
microwave use only. Replace with aluminum foil, making sure the foil
does not touch the heating element.
• Place food containers on the oven trays when cooking or reheating.
Items that should not be used in the toaster oven:
• Airtight packages such as sealed pouches or unopened cans.
• Plastic wrap or paperboard covers. Replace with foil.
• Containers, which barely fit inside the oven and touch the sides of the
oven, interfering with air circulation inside the oven.
• Any containers that have specific warnings against use in a range or
toaster oven.
9
Page 10

COOKING GUIDE
TYPE OF FOOD OVEN SELECTOR COOKING TIME REMARKS
Toast/Waffles TOP RACK or TOP 2 - 4 min. Use racks.
English muffins BAGEL BEST Approximately Use racks.
Grilled cheese TOP RACK or TOP Approximately Use trays
Tuna melt sandwich & BOTTOM 2 - 4 min. Use trays.
Bagels BAGEL BEST 3 - 5 min. Use racks.
Pizza slice TOP RACK or TOP
Hot dogs TOP RACK or TOP 9 - 12 min. Use trays and cover
Hamburgers TOP RACK or TOP 10 - 13 min. Use trays and cover
French fries TOP RACK or TOP 10 - 15 min. Use trays and cover
Frozen fish sticks & BOTTOM with aluminum foil.
Frozen chicken nuggets
ozen hash browns
Fr
Patties
& BOTTOM
2 min.
& BOTTOM 6 - 8 min. Use trays and cover
& BOTTOM with aluminum foil.
& BOTTOM with aluminum foil.
with aluminum foil.
• Watch carefully as overheating may cause the food to burn.
• After turning food or checking on cooking progress, do not reset the
timer longer than indicated in the recipe to prevent smoking or burning
of foods.
• When reheating foods that may 'splatter', place a piece of aluminum
foil on the rack and over the food to prevent juices from hitting the hot
element, and creating smoke.
• When baking or reheating packaged convenience foods, follow the
recommended time on package directions. Since toaster ovens will vary
in temperatures, you may need to adjust the time and temperature to
achieve your personal preference.
• Frozen or slightly frozen foods will require longer cooking times than
foods which are thawed. If the food is in a dish, the top may be loosely
covered with aluminum foil. Make sure foil does not touch the top heating
elements. Remove the foil the last 5-10 minutes of cooking to achieve top
browning.
• The thickness and temperature of bread products will determine the
cooking time. For example, frozen bread takes longer to cook. Use the
lowest time setting when reheating foods, such as pastries.
10
Page 11

CLEANING AND STORAGE
It is important to keep the toaster oven clean. Food residues inside the unit
can impair the unit's ability to cook foods properly.
1. Before cleaning the outside or inside of the oven, make sure the unit is
turned off, unplugged and sufficiently cooled.
2. DO NOT IMMERSE APPLIANCE IN WATER.
3. Oven trays and racks should be washed in hot, sudsy water or in the
dishwasher.
4. When breadcrumbs have accumulated on the bottom of the unit, pull the
crumb tray and clean the inside with a wet cloth.
5. The crumb tray may also be washed in hot, sudsy water or in the
dishwasher.
6. Use a sponge-scrubber designed for non-stick surfaces to remove
stubborn spots on the racks, oven trays or crumb tray.
7. The glass door should be cleaned often with a damp, sudsy cloth.
Stubborn spots can be removed using a sponge-scrubber. Wipe again
with a damp cloth, and dry thoroughly.
8. The painted metal body of the appliance should be wiped after each use
with a soft, damp, sudsy cloth. Rinse off with damp cloth or sponge and
dry thoroughly. This will prevent build up of food residue and help prevent
the discoloration of paint.
9. DO NOT USE ABRASIVE CLEANSERS ON ANY PART OF THE OVEN.
A paste made from baking soda and a small amount of water can be
helpful in removing persistent spots.
10. Do not place any parts of the toaster oven in a self-cleaning oven.
11. Clean oven before storage.
SPECIFICATIONS
Power source 120V AC
Power consumption 950 W Total
250 W Top element
420 W Middle element
280 W Bottom element
Outer dimensions (WxDxH) 235 mm x 214 mm x 327 mm
(9 1/4" x 8 7/16" x 12 7/8 ")
Net weight 3.4 kg (7 lbs 8 oz)
Chatsworth, CA 91311, USA
0700
11
21605 Plummer Street
www.sanyousa.com
Printed in China
Page 12

SANYO TOASTER OVEN / SNACK MAKER
SK-7S, SK-7W LIMITED WARRANTY
OBLIGATIONS
In order to obtain factory warranty service, call the toll-free number below. The unit must be
packed in the original carton or a well padded sturdy carton in order to avoid shipping damage.
Note: Do not return this unit to the retail store for service.
To obtain factory warranty service, product operation information or for problem resolution,
Weekdays 8:00 AM - 5:00 PM Pacific Time
Or visit our web site at www.sanyoservice.com
THIS WARRANTY IS VALID ONLY ON SANYO PRODUCTS PURCHASED AND USED IN THE
UNITED STATES OF AMERICA.
THIS WARRANTY APPLIES ONLY TO THE ORIGINAL RETAIL USER AND DOES NOT APPLY TO
PRODUCTS USED FOR ANY INDUSTRIAL, PROFESSIONAL OR COMMERCIAL PURPOSE. THE
ORIGINAL DATED BILL OF SALE OR SALES SLIP MUST BE SUBMITTED TO THE AUTHORIZED
SANYO SERVICE CENTER AT THE TIME WARRANTY SERVICE IS REQUESTED.
Subject to the OBLIGATIONS above and EXCLUSIONS below, SANYO FISHER COMPANY (SFC)
warrants this SANYO product against defects in materials and workmanship for the periods of
LABOR and PARTS specified below. SFC will repair or replace (at its option) the product and
any of its parts which fail to conform to this warranty. The warranty period commences on the
date the product was first purchased at retail.
LABOR
1 YEAR
call
1-800-421-6382
PARTS
1 YEAR
EXCLUSIONS
This warranty does not cover (A) the adjustment of customer-operated controls as explained
in the appropriate model's instruction manual, or (B) the repair of any product whose serial
number has been altered, defaced or removed.
This warranty shall not apply to setup, installation, removal or the product for repair or
reinstallation of the product after repair.
This warranty does not apply to repairs or replacements necessitated by any cause beyond
the control of SFC including, but not limited to, any malfunction, defect or failure caused by or
resulting from unauthorized service or parts, improper maintenance, operation contrary to
furnished instructions, shipping or transit accidents, modification or repair by the user, abuse,
misuse, neglect, accident, incorrect power line voltage, fire, flood or other Acts of God, or
normal wear and tear.
The foregoing is in lieu of all other expressed warranties and SFC does not assume or authorize
any party to assume for it any other obligation or liability.
THE DURATION OF ANY WARRANTIES WHICH MAY BE IMPLIED BY LAW (INCLUDING THE
WARRANTIES OF MERCHANTABILITY AND FITNESS) IS LIMITED TO THE TERM OF THIS WARRANTY. IN NO EVENT SHALL SFC BE LIABLE FOR SPECIAL, INCIDENTAL OR CONSEQUENTIAL
DAMAGES ARISING FROM OWNERSHIP OR USE OF THIS PRODUCT, OR FOR ANY DELAY IN
THE PERFORMANCE OF ITS OBLIGATIONS UNDER THIS WARRANTY DUE TO CAUSES
BEYOND ITS CONTROL. SOME STATES DO NOT ALLOW LIMITATIONS ON HOW LONG AN
IMPLIED WARRANTY LASTS AND/OR DO NOT ALLOW THE EXCLUSION OR LIMITATION OF
CONSEQUENTIAL DAMAGES, SO THE ABOVE LIMITATIONS AND EXCLUSIONS MAY NOT
APPLY TO YOU.
THIS WARRANTY GIVES YOU SPECIFIC LEGAL RIGHTS. YOU MAY HAVE OTHER RIGHTS,
WHICH VAR
For your protection in the event of theft or loss of this product, please fill in the information
below for your own personal r
Model No.
Date of Purchase Purchase Price
Where Purchased
Y FROM STATE TO STATE.
ecords.
Serial No.
(Located on back or bottom side of unit)
12
Page 13

MANUEL D'INSTRUCTIONS
GRILLE-PAIN FOUR
SK-7S
SK-7W
Page 14

Table des matières
Nous vous remercions d'avoir acheté ce
grille-pain four de SANYO. Veuillez lire ces
instructions attentivement avant d'utiliser
l'appareil et conservez-les afin de pouvoir
vous y reporter.
Importantes mesures de sécurité 3
Nom des pièces 4
5Déballage et installation
Instructions générales 5
Réglages du four 6
Utilisation du four
7Comment griller les baguels
Comment griller d’autres produits de boulangerie 8
Cuisson et réchauffage 9
9Récipients pour la cuisson
01Guide de cuisson
11Nettoyage et entreposage
11Fiche technique
Garantie 12
2
Page 15

IMPORTANTES MESURES DE SÉCURITÉ
Quand vous utilisez un appareil électroménager, vous devez suivre des
consignes de sécurité de base, dont celles-ci :
1. Lisez toutes les instructions.
2. Ne touchez pas les surfaces chaudes. Utilisez les poignées ou les boutons.
3. Pour vous protéger contre les risques de chocs électriques, n'immergez pas le
cordon, ni la fiche, ni le corps de l'appareil dans de l'eau ou un autre liquide.
4. Une étroite supervision s'impose quand l'appareil est utilisé par des
enfants ou près d'enfants.
5. Débranchez l'appareil de la prise murale quand il ne sert pas et avant de
le nettoyer. Laissez refroidir l'appareil avant d'y monter ou démonter des
pièces.
6. Ne faites pas fonctionner l'appareil s'il a été endommagé. Retournez-le au
centre de service agréé le plus proche pour examen, réparation ou réglage.
7. L'utilisation d'accessoires non recommandés par le fabricant risque
d'endommager l'appareil et de causer des blessures.
8. N'utilisez pas l'appareil à l'extérieur.
9. Ne laissez pas le cordon pendre du bord de la table ou du comptoir, ni
toucher des surfaces chaudes.
10. Le court cordon d'alimentation, fourni, réduit le risque de s'empêtrer
dans le cordon ou de trébucher sur un long cordon.
11. Si l'on fait attention, on peut utiliser une rallonge.
12. On ne peut utiliser une rallonge que si : 1) la puissance nominale,
marquée sur le cordon ou la rallonge, est au moins égale à la puissance
nominale de l'appareil et 2) le long cordon est disposé de façon à ne pas
pendre du dessus du comptoir ou de la table, où des enfants pourraient le
tirer et où il pourrait faire trébucher.
13. N'utilisez pas l'appareil si le cordon ou la fiche en est endommagé.
14. Ne placez pas l'appareil sur un brûleur électrique ou à gaz chaud, ni à
proximité, ni non plus dans un four chauffé.
15. Veillez à ce que le bouton de la MINUTERIE soit à OFF (hors tension)
avant d'insérer la fiche dans la prise murale ou de l'enlever de celle-ci.
16. Il ne faut introduire dans le grille-pain four ni aliments ni ustensiles
trop gros, qui risqueraient de provoquer un feu ou un choc électrique.
17. Un feu peut survenir si le grille-pain four est recouvert de matières
inflammables ou qu'il les touche (rideaux, tentures, murs et éléments
analogues) quand il fonctionne.
18. Ne nettoyez pas l’appareil avec des tampons à récurer métalliques. Des
fragments métalliques peuvent se détacher du tampon et toucher des
pièces électriques, d'où un risque de choc électrique.
19. N'utilisez l'appareil qu'aux fins prévues. Le présent appareil est
réservé à l'usage ménager.
CONSERVEZ CES INSTRUCTIONS
REMARQUE :
Le présent appareil possède une fiche polarisée (une des lames en est plus large que
l'autre). Cette fiche de sécurité ne s'adapte dans une prise polarisée que d'une seule
façon. Si la fiche s'y adapte mal, tournez-la. Si elle s'adapte encore mal, adressez-vous
à un électricien qualifié. Ne tentez pas d'invalider ce dispositif de sécurité.
3
Page 16

Nom des pièces
Éléments chauffants à quartz
Plaque de protection
Bouton de sélection du four
Grilles
Tiges du porte-grille
Porte de verre
Poignée de la porte
Bouton de la minuterie
Plateaux (2)
Fiche et cordon
Plateau ramasse-miettes
4
Page 17

Déballage et installation
1. Enlevez le contenu de la boîte.
2. Lisez attentivement toutes les instructions.
3. Quand vous utilisez les plateaux, placez-les sur les grilles.
4. Veillez à ce que le plateau ramasse-miettes amovible (situé dans le
fond de l'appareil) soit bien introduit et poussé jusqu'à ce qu'il
s'enclenche.
Instructions générales
1. Chaque grille doit à tout moment être fermement maintenue en place
par les tiges du porte-grille.
2. Quand vous utilisez les plateaux, placez-les toujours sur les grilles.
N'utilisez les plateaux que si les grilles sont dans le grille-pain four.
3. N'encombrez pas les plateaux, car la cuisson ne serait ni uniforme, ni
complète. Un poids trop élevé risque de gauchir les plateaux.
4. Pour accélérer et faciliter le nettoyage, vous pouvez recouvrir les
plateaux de feuille d'aluminium, ce qui contribuera à empêcher les
aliments de se décolorer ou de tacher les plateaux.
5. Les résidus alimentaires laissés sur les plateaux et les grilles risquent
de brûler. Veuillez laver les plateaux et les grilles après l'usage.
6. Le bouton de la minuterie doit être réglé à la position OFF (hors tension)
quand vous placez des aliments dans le grille-pain four.
7. Quand vous n'utilisez qu'une seule grille, réglez le bouton de sélection
du four à la position TOP RACK et placez les aliments sur la grille du haut.
8. Quand vous utilisez les deux grilles, réglez le bouton de sélection du four
à la position TOP & BOTTOM et placez les aliments sur les deux grilles.
9. Le plateau ramasse-miettes doit être tenu propre.
10. En allumant et en éteignant les éléments chauffants, le thermostat
automatique maintiendra la bonne température. En fonctionnant, les
éléments passent du blanc au rouge vif.
11. Pour ne pas trop cuire les aliments, ne laissez pas l'appareil sans surveillance.
12. Ne placez rien sur le dessus de l'appareil.
13. N'utilisez pas de papier, ni de carton, ni de plastique, ni de styromousse
dans le four.
5
Page 18

Réglages du four
Bagel Best :
Au mode Bagel Best, seul l'élément du milieu fonctionne.
Idéal pour griller les baguels et les muffins.
Grilles du haut et du bas :
À ce mode, tous les trois éléments fonctionnent.
Idéal pour griller, cuire et réchauffer.
Grille du bas seulement :
À ce mode, seul l'élément du bas fonctionne.
Idéal pour réchauffer les aliments.
Grille du haut seulement :
À ce mode, les éléments du haut et du milieu fonctionnent.
Idéal pour griller, cuire et réchauffer.
Remarque : L’élément du milieu peut passer au rouge lorsque l’appareil fonctionne. L’élément du bas ne sera peut-être pas aussi vif, et l’élément du haut demeurera blanc. À noter que la
variation de couleur des éléments chauffants n’est pas une indication de mauvais fonctionnement.
6
Page 19

Utilisation du four
COMMENT GRILLER LES BAGUELS
8. SK-7W : Réglez le bouton de la MINUTERIE à la position BAGEL BEST (Fig. 2).
SK-7S : Réglez le bouton de la MINUTERIE à 4 ½ minutes environ (Fig.3).
La fonction BAGEL BEST du grille-pain four de SANYO est idéale pour griller
les baguels. Le côté coupé devient croustillant, mais l'extérieur reste moelleux
et chaud.
Pour utiliser cette fonction :
1. Veillez à ce que le plateau ramasse-miettes soit en place.
2. Veillez à ce que le bouton de la MINUTERIE soit à la position OFF (hors tension).
3. Branchez sur une prise de courant alternatif de 120 volts.
4. Placez une moitié du baguel tranché sur la grille du bas, le côté
coupé étant TOURNÉ VERS LE HAUT.
5. Placez l'autre moitié du baguel sur la grille du haut, le côté coupé étant
TOURNÉ VERS LE BAS.
6. Fermez la porte.
7. Réglez le bouton de sélection du four à la position BAGEL BEST (Fig. 1).
(Fig. 1)
7
SK-7SSK-7W
(Fig. 2)
9. Quand la minuterie aura terminé son cycle, le four s'arrêtera
automatiquement avec le carillon.
10. Ouvrez la porte et enlevez les baguels grillés.
11. Après l'utilisation, débranchez le cordon de la prise murale. Laissez
refroidir l'appareil avant de le nettoyer et de le ranger.
REMARQUES :
• Pour griller des baguels, nous conseillons le réglage BAGEL BEST de la
MINUTERIE. L'appareil grillera plus vite s'il a servi et qu'il est encore chaud.
Réglez la MINUTERIE selon vos préférences.
• Vous pouvez arrêter le four à tout moment, en tournant simplement le
bouton de la minuterie à la position OFF (hors tension).
• Pour prévenir un grillage excessif, ne laissez pas le four sans surveillance
pendant qu'il fonctionne.
• La fonction BAGEL BEST est aussi excellente pour griller les muffins,
les petites crêpes épaisses et les petits pains à hambourgeois et à
hot-dogs.
(Fig. 3)
Page 20

COMMENT GRILLER D’AUTRES PRODUITS
DE BOULANGERIE
1. Veillez à ce que le plateau ramasse-miettes soit en place.
2. Veillez à ce que le bouton de la MINUTERIE soit à la position OFF (hors tension).
3. Branchez sur une prise de courant alternatif de 120 volts.
4. Pour une rôtie, réglez le bouton de sélection du four à TOP RACK (Fig. 4) et
placez la tranche de pain sur la grille du haut.
7. Réglez le bouton de la MINUTERIE à la couleur désirée pour la rôtie (Fig. 6).
SK-7SSK-7W
(Fig. 6)
8. Quand la minuterie aura terminé son cycle, le four s'arrêtera
automatiquement avec le carillon.
9. Ouvrez la porte et enlevez les aliments.
10. Après l'utilisation, débranchez le cordon de la prise murale. Laissez
refroidir l'appareil avant de le nettoyer et de le ranger.
(Fig. 4)
5. Pour deux rôties, utilisez le réglage TOP & BOTTOM (Fig. 5). Placez une
tranche de pain sur la grille du haut, l'autre sur la grille du bas.
6. Fermez la porte.
(Fig. 5)
REMARQUES :
• Il s'agit des durées conseillées pour griller. Réglez toutefois le bouton de la
MINUTERIE selon l'épaisseur du pain et vos préférences.
• Pour empêcher que le pain ne grille trop longtemps ou ne brunisse trop, ne
laissez pas le four sans surveillance pendant le grillage.
• Pour enlever des aliments quand l'appareil est en cours de fonctionnement,
assurez-vous de tourner le bouton de la MINUTERIE à la position OFF (hors
tension). Vous pourrez alors enlever sans danger le ou les aliments grillés.
• Quand vous grillez des pains humides ou frais, il peut se former de la vapeur
sur la porte du four. C'est normal.
• Utilisez toujours les plateaux (placés sur les grilles) pour des produits de
boulangerie comme une rôtie beurrée, du pain aux raisins secs glacé au
sucre ou des pâtisseries garnies.
8
Page 21

Cuisson et réchauffage
1. Veillez à ce que le plateau ramasse-miettes soit en place.
2. Utilisez les plateaux (placés sur les grilles) pour cuire ou réchauffer des
aliments contenant une sauce qui risque de couler ou de déborder, comme
du poulet à la crème ou du macaroni au fromage.
3. Veillez à ce que le bouton de la MINUTERIE soit réglé à la position OFF
(hors tension).
4. Branchez sur une prise de courant alternatif de 120 volts.
5. Réglez le bouton de sélection du four à la position qui correspond aux
besoins de cuisson.
6. Quand vous chauffez ou réchauffez des aliments, le bouton de sélection
du four doit être réglé à la position BOTTOM RACK. Placez les aliments
sur la grille ou le plateau du bas.
REMARQUE : Quand vous utilisez le tableau de la page 10, vous pouvez
régler le bouton de sélection du four à la position TOP RACK ou TOP &
BOTTOM, selon le type et la quantité d’aliments à cuire.
7. Placez dans le grille-pain four les aliments à cuire ou à réchauffer.
8. Fermez la porte.
9. Réglez le bouton de la MINUTERIE à la durée de cuisson voulue.
10. Un carillon retentira quand la durée de cuisson se sera écoulée. Ouvrez
la porte et enlevez les aliments cuits de l’appareil.
Pour enlever des aliments quand l'appareil est encore en cours de
•
fonctionnement, veillez à tourner le bouton de la MINUTERIE ou le
bouton de sélection du four à la position OFF (hors tension). Vous
pouvez alors enlever sans danger les aliments cuits.
11. Après l'utilisation, débranchez le cordon de la prise murale. Laissez
refroidir l'appareil avant de le nettoyer et de le ranger.
Récipients pour la cuisson
• Vous pouvez utiliser des récipients de métal, de verre allant au four ou
de vitrocéramique pour le grille-pain four.
• Les bords supérieurs des récipients de vitrocéramique ou de verre allant
au four devraient être au moins à 1 po au-dessous des éléments chauffants
supérieurs.
• Reportez-vous toujours aux instructions des aliments cuisinés
préemballés pour vous assurer qu'ils conviennent à la cuisson au
grille-pain four ou au four d'une cuisinière.
• Certains aliments préemballés dans des plats de papier ou de carton
conviennent tant à un four à micro-ondes qu'au four d'une cuisinière.
Lisez les instructions pour établir si le produit est conseillé pour les
deux sortes de fours.
• Enlevez toujours le couvercle en carton ou en pellicule de plastique,
qui ne convient qu'au four à micro-ondes.
Remplacez-le par une feuille d'aluminium, laquelle ne doit pas toucher
l'élément chauffant.
• Placez les récipients de cuisson sur les plateaux du four pour la cuisson
ou le réchauffage.
Articles à ne pas utiliser dans le grille-pain four :
• Emballages hermétiques comme les sachets scellés ou les boîtes non
ouvertes.
• Couvercles en carton ou en pellicule de plastique. Remplacez par une
feuille d'aluminium.
• Récipient qui tient à peine dans le four et touche les côtés de celui-ci, ce
qui entrave la circulation d'air à l'intérieur de l'appareil.
• Tout récipient déconseillé pour le four d'une cuisinière ou le
grille-pain four.
9
Page 22

Guide de cuisson
ALIMENTS SÉLECTION DURÉE DE CUISSON REMARQUES
Muffins BAGEL BEST Env. 2 min. Utilisez les grilles
Sandwich au fromage fondu TOP RACK ou Env. 2 - 4 min. Utilisez les plateaux
ou au thon
Hambourgeois TOP RACK ou 10 - 13 min.
Frites
Bâtonnets de poisson
congelés
Pépites de poulet
congelées
Pommes de terre
rissolées
congelées
Galettes
TOP & BOTTOM
MOTTOB & POT
MOTTOB & POT
MOTTOB & POT
TOP RACK ou 10 - 15 min.
MOTTOB & POT
MOTTOB & POT
.nim 8 - 6 ou KCAR POTPointe de pizza
.nim 21 - 9 ou KCAR POT toHot-dogs
Utilisez les grilles.nim 4 - 2 ou KCAR POTRôties/gaufres
Utilisez les grilles.nim 5 - 3TSEB LEGABBaguels
Utilisez les plateaux et
recouvrez de feuille
d’aluminium
Utilisez les plateaux et
recouvrez de feuille
d’aluminium
Utilisez les plateaux et
recouvrez de feuille
d’aluminium
Utilisez les plateaux et
recouvrez de feuille
d’aluminium
• Surveillez bien la cuisson, car une cuisson excessive peut faire
brûler les aliments.
• Après avoir tourné les aliments ou avoir vérifié l'état de cuisson,
ne réglez pas la minuterie de nouveau à une durée supérieure
à celle qui figure dans la recette et ce, pour éviter que les aliments
ne fument ou ne brûlent.
• Afin de réchauffer des aliments qui peuvent éclabousser,
placez un morceau de feuille d'aluminium sur la grille et par-dessus
ces aliments pour empêcher que les jus n'atteignent l'élément
chauffant et n'engendrent de la fumée.
• Pour cuire ou réchauffer des aliments cuisinés emballés, observez
la durée conseillée sur le mode d'emploi figurant sur l'emballage.
Comme les grille-pain four varient en températures, il vous faudra
peut-être régler la durée et la température pour obtenir votre
cuisson préférée.
• Les aliments congelés ou légèrement congelés nécessitent un
temps de cuisson plus long que les aliments décongelés. Si les
aliments se trouvent dans un plat, vous pouvez en recouvrir le dessus
de feuille d'aluminium, mais sans serrer. Assurez-vous que la feuille
d'aluminium ne touche pas les éléments chauffants du haut. Enlevez-la
pendant les 5 à 10 dernières minutes de cuisson pour faire dorer le
dessus.
• L'épaisseur et la température du pain déterminent la durée
de cuisson. Par exemple, le pain congelé prend plus de temps à cuire.
Utilisez le réglage de durée le plus bas pour réchauffer des aliments
comme des pâtisseries.
10
Page 23

Nettoyage et entreposage
Il est important de conserver le grille-pain four propre. Les résidus
alimentaires qui se trouvent dans l'appareil peuvent entraver la cuisson.
1. Avant de nettoyer l'extérieur ou l'intérieur du four, assurez-vous
que l'appareil est hors tension, débranché et assez refroidi.
2. N'IMMERGEZ PAS L'APPAREIL DANS DE L'EAU.
3. Il faut laver les plateaux et les grilles dans de l'eau chaude
savonneuse ou au lave-vaisselle.
4. Quand des miettes de pain se sont accumulées au fond de
l'appareil, sortez le plateau ramasse-miettes en le tirant et
nettoyez-en l'intérieur avec un linge humide.
5. Le plateau ramasse-miettes peut aussi se laver dans de l'eau
chaude savonneuse ou au lave-vaisselle.
6. Utilisez une éponge-brosse à récurer conçue pour les surfaces
non-adhérentes, afin d'enlever les taches rebelles des grilles,
des plateaux ou du plateau ramasse-miettes.
7. Il faut nettoyer souvent la porte de verre avec un linge humide
et savonneux. Vous pouvez enlever les taches rebelles avec une
éponge-brosse à récurer. Essuyez de nouveau avec un linge
humide et séchez bien.
8. Après chaque utilisation, il convient d'essuyer le corps en métal
peint de l'appareil avec un linge doux, humide et savonneux. Rincez
avec une éponge ou un linge humides et séchez bien. Vous éviterez
ainsi l'accumulation de résidus alimentaires et contribuerez à
empêcher que la peinture ne se décolore.
9. N'UTILISEZ PAS DE DÉTERGENTS ABRASIFS SUR AUCUNE PARTIE
DU FOUR. Une pâte faite de bicarbonate de soude et d'un peu
d'eau peut aider à enlever les taches rebelles.
10. Ne placez aucune pièce du grille-pain four dans un four
autonettoyant.
11. Nettoyez le four avant de le ranger.
Fiche technique
Source d'alimentation CA de 120 V
Consommation de courant Total de 950 W
Élément du haut de 250 W
Élément du milieu de 420 W
Élément du bas de 280 W
Dimensions extérieures (lxpxh) 235 mm x 214 mm x 327 mm
(9 1/4" x 8 7/16" x 12 7/8 ")
3,4 kg (7 lb 8 oz)Poids net
0700
11
1-300 Applewood Cres.
Concord, ON L4K 5C7
www.sanyo.ca
Imprimé en Chine
Page 24

Garantie limitée SANYO
Pour le grille-pain four SK-7S et SK-7W
OBLIGATIONS
Pour se prévaloir du recours en garantie, veuillez composer le numéro sans frais
ci-dessous. L’appareil doit être emballé dans la boîte d’expédition originale ou dans
une boîte solide et bien rembourrée afin d’éviter tout dommage durant l’expédition.
Remarque : Veuillez ne pas retourner l’appareil au magasin où vous l’avez acheté
pour le faire réparer.
Pour le recours en garantie, des renseignements sur le fonctionnement de l’appareil ou tout
LA PRÉSENTE GARANTIE NE S’APPLIQUE QU’AUX APPAREILS SANYO ACHETÉS ET UTILISÉS AU CANADA.
LA PRÉSENTE GARANTIE NE S’APPLIQUE QU’À L’ACHETEUR AU DÉTAIL ORIGINAL ET NE S’APPLIQUE PAS
AUX APPAREILS INDUSTRIELS, PROFESSIONNELS ET COMMERCIAUX. VOUS, L’ACHETEUR AU DÉTAIL ORIGINAL,
DEVEZ SOUMETTRE AU CENTRE DE SERVICE SANYO AGRÉÉ LA FACTURE ORIGINALE DATÉE OU LE REÇU DE
VENTE ORIGINAL LORSQUE VOUS VOULEZ VOUS PRÉVALOIR DU RECOURS EN GARANTIE.
En vertu des OBLIGATIONS susmentionnées et des EXCLUSIONS énoncées ci-dessous, SANYO Canada Inc.
atteste que le présent appareil est garanti, pièces et main-d’oeuvre, contre tout défaut de matériaux et de
fabrication pendant la période indiquée ci-dessous. SANYO Canada réparera ou, à sa discrétion, remplacera
tout appareil ou toute pièce dudit appareil présentant un défaut dans le cadre de cette garantie. La présente
garantie entre en vigueur à compter de la date d’achat au détail originale.
problème, composez sans frais le 1-800-577-2696,
du lundi au vendredi, de 8 h 30 à 17 h heure normale de l’Est.
Ou visitez notre site Web au www.sanyo.ca
La présente garantie ne couvre pas (A) les réglages effectués par le consommateur tel qu’il est
expliqué dans le manuel d’instructions ou (B) la réparation de tout appareil dont le numéro de
série a été modifié, effacé ou enlevé.
La présente garantie exclut toute installation, réglage ou enlèvement de l’appareil aux fins de
réparation ou de réinstallation dudit appareil une fois les réparations effectuées.
La présente garantie ne s’applique pas non plus à toute réparation ou remplacement nécessité
par des circonstances indépendantes de SANYO Canada Inc., et ne se limite pas à tout mauvais
fonctionnement, défaut ou défaillance de l’appareil résultant de réparations non autorisées ou de
l’utilisation de toute pièce non autorisée, d’un entretien incorrect, d’une utilisation contraire aux
instructions données, des accidents survenus durant le transport et en transit, de toute modification
ou réparation effectuée par le consommateur, de tout abus, mauvaise utilisation, négligence, accident,
tension incorrecte, incendie, inondation, catastrophe naturelle ou usage normal.
Ce qui précède vient remplacer toute autre garantie émise et SANYO Canada Inc. n’est en aucun cas
tenue responsable et n’autorise aucune autre partie à être responsable en son nom de toute autre
obligation ou responsabilité.
LA DURÉE DE TOUTE GARANTIE SUGGÉRÉE PAR LA LOI (Y COMPRIS LES GARANTIES SUR LA
QUALITÉ MARCHANDE ET LE BON ÉTAT) SE LIMITE AUX TERMES DE LA PRÉSENTE GARANTIE.
SANYO CANADA INC. N’EST NULLEMENT RESPONSABLE DES DOMMAGES SPÉCIAUX ET
INDIRECTS RÉSULTANT DE LA POSSESSION OU DE L’UTILISATION DUDIT APPAREIL, OU DE TOUT
RETARD DANS L’EXÉCUTION DE SES OBLIGATIONS EN VERTU DE LA PRÉSENTE GARANTIE EN
RAISON DE CAUSES INDÉPENDANTES DE SA VOLONTÉ. CERTAINES PROVINCES NE PERMETTENT
AUCUNE RESTRICTION QUANT À LA DURÉE D’UNE GARANTIE IMPLICITE ET(OU)AUCUNE
RESTRICTION OU EXCLUSION AFFÉRENTE AUX DOMMAGES INDIRECTS. DANS UN TEL CAS, LES
RESTRICTIONS ET EXCLUSIONS SUSMENTIONNÉES PEUVENT NE PAS S’APPLIQUER.
LA PRÉSENTE GARANTIE VOUS DONNE DES DROITS JURIDIQUES PRÉCIS. IL SE PEUT QUE VOUS
JOUISSIEZ ÉGALEMENT D’AUTRES DROITS, LESQUELS VARIENT D’UNE PROVINCE À L’AUTRE.
En cas de perte ou de vol de votre appareil, veuillez remplir les renseignements demandés
ci-dessous et les conserver pour usage ultérieur.
EXCLUSIONS
MAIN-D’OEUVRE
1 AN
PIÈCES
1 AN
No de modèle No de série
(à l’arrière ou sous l’appareil)
Date d’achat Prix d’achat
Magasin
12
 Loading...