

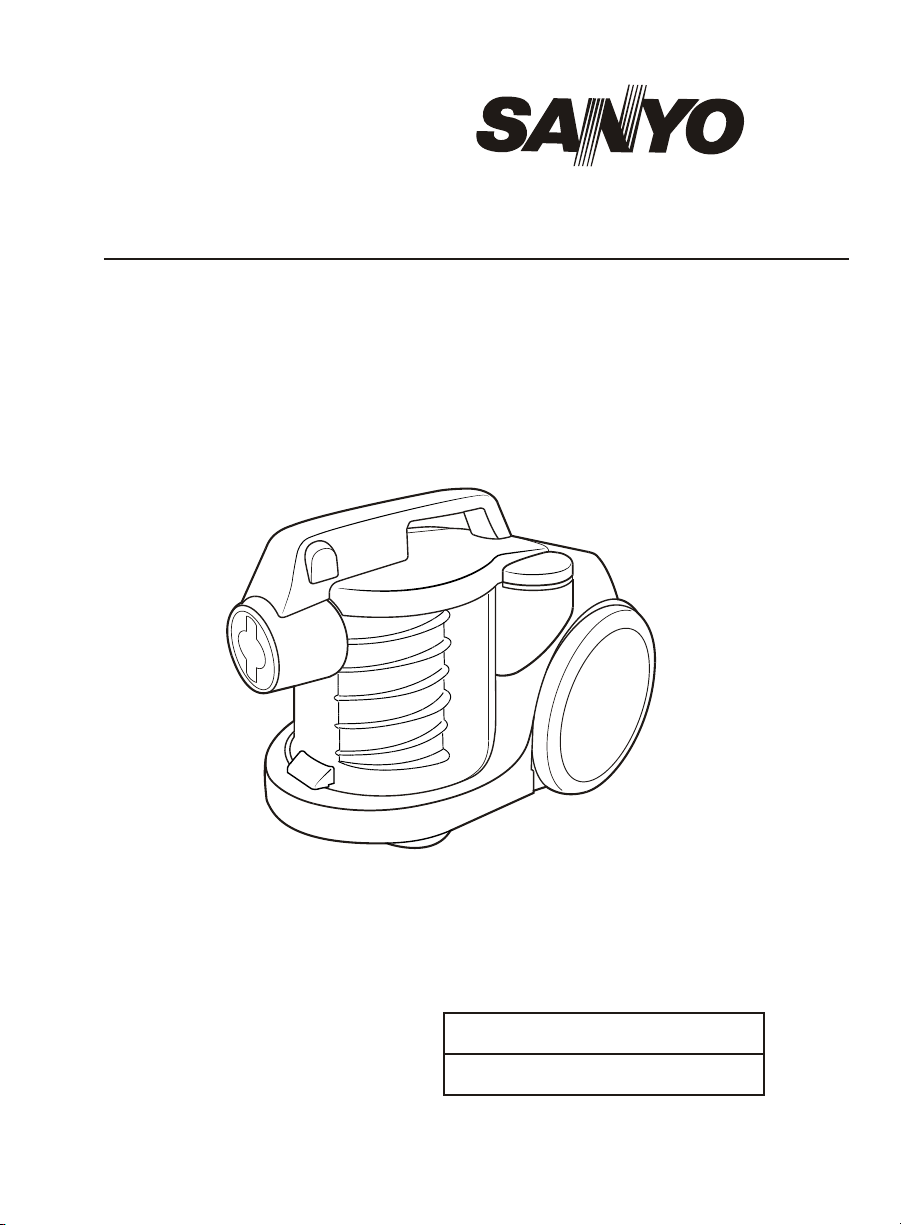
INSTRUCTION MANUAL
MANUAL DE INSTRUCCIONES
SC-X1010
VACUUM CLEANER
ASPIRADORA DE POLVO
HOUSEHOLD USE ONLY
SOLO PARA USO DOMESTICO
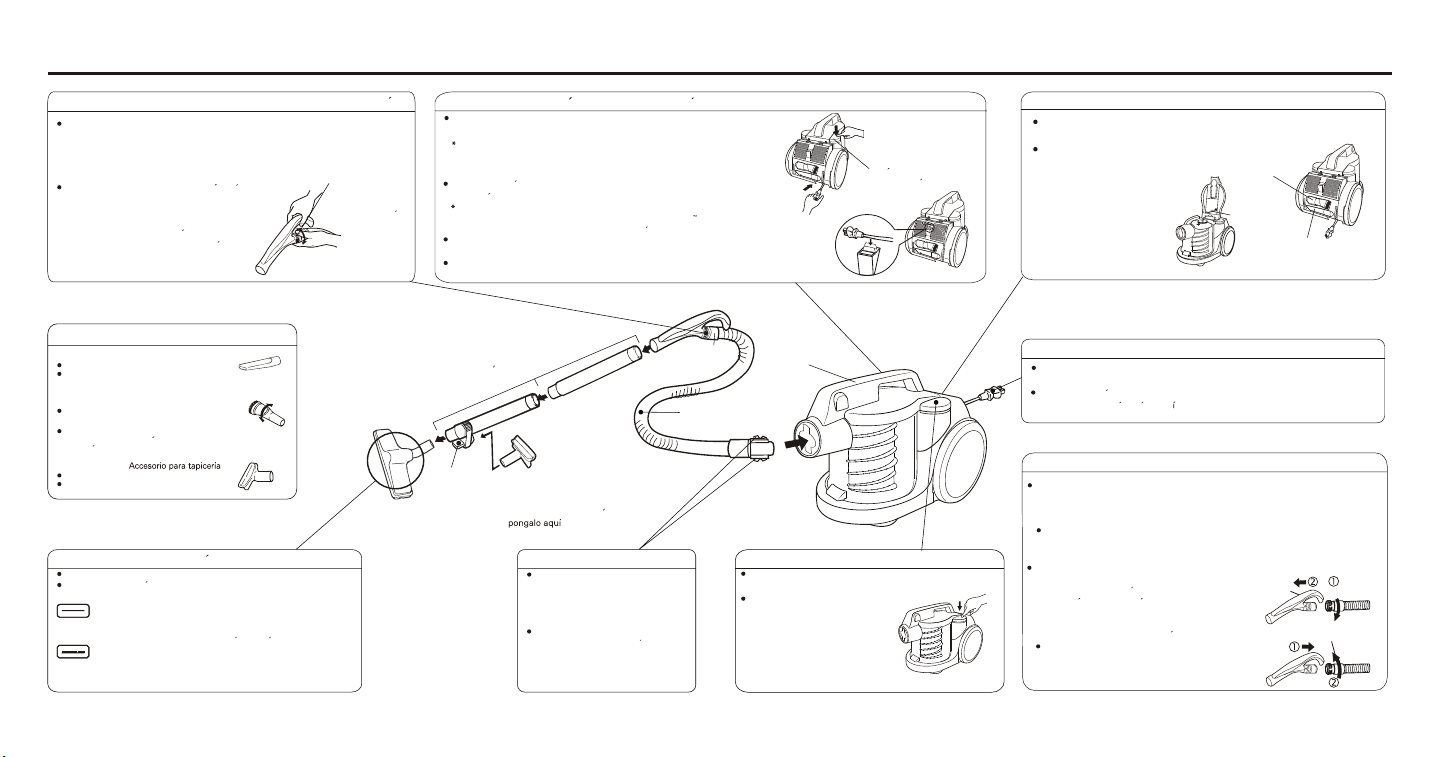
NAME AND FUNCTION OF PARTS (Assemble as indicated in the center illustration.)/ NOMBRE Y FUNCION DE CADA PIEZA (La figura en el centro muestra la forma de armar la aspiradora.)
Vacuum Power Adjustment Ring / Anillo de ajuste de fuerza de succion
The full vacuum power of the cleaner may be too strong in certain cases, for
instance when vacuuming curtains and draperies. In these cases, turn the
vacuum power adjustment ring (on the hose) to control the vacuum power.
Match the hole in the ring with the hose hole to reduce the power.
En algunos casos la fuerza de succion maxima
de la aspiradora puede ser demasiada, por
ejemplo cuando aspira el polvo adherido a
cortinas o tapizados. En ese caso, gire el anillo
de ajuste de fuerza de succion (en la manguera)
para controlar la intensidad de succion. Haga
coincidir el agujero en el anillo con el agujero
en la manguera para reducir la fuerza.
Vacuum power
adjustment ring
Anillo de ajuste de
fuerza de succion
Attachments / Accesorios
Crevice tool / Herramienta para esquinas
For vacuuming edges and gaps.
Para aspirar el polvo de los
bordes y grietas.
Round brush / Cepillo redondo
The head of the brush can rotate.
For vacuuming fragile or easily scratched items.
La cabeza del cepillo puede girar.
Para limpiar objetos fragiles o que se puedan
rayar facilmente.
Upholstery tool /
For vacuuming furniture
Para aspirar los muebles
Floor Nozzle / Boca de aspiracion del piso
The two-way floor nozzle has lever with two positions.
La boca de aspiracion del suelo de dos posiciones tiene una palanca
para hacer el cambio.
FLOOR:
For vacuuming wooden floors, linoleum or plastic covered floors.
SUELO:
Para limpiar suelos de madera, linoleo o plastico.
CARPET:
For vacuuming rugs and carpets.
ALFOMBRA:
Para aspirar el polvo de las alfombras y moquetas.
Wand holder
Gancho del tubo
Cord Rewind Button / Boton de recogecable automarico
To pull the cord back into the unit, press the cord rewind button.
Caution:
Hold the plug when rewinding the cord so that the plug does not damage
furniture, hands, the vacuum cleaner or the cord by hitting them.
Holding the plug will make rewinding smoother.
Presione el boton de rebobinado del cable para enrollar el cable e en el aparato.
Precaucion:
Sujete el enchufe con la mano para que el enchufe no golpee contra los
muebles, las manos, la aspiradora o el cable resulte danado.
Si se sujeta del enchufe, el rebobinado se hara con menos problemas.
To avoid damaging the floor, please hook the power cord over the clip before
moving the unplugged cleaner.
Para evitar da r el suelo, una vez desenchufada la aspiradora, coloque el cable
en el gancho antes de moverla.
Insert securely by
turning
Inserte firmemente
girandolos
Put the Upholstery Tool
here when not in use.
Cuando no use el
accesorio para tapiceria
Hose Stopper / Tope de la manguera
Insert the hose all the way
hose stopper.
To detach it, press the hose stopper
and pull the hose toward you.
Coloque la manguera hasta el tope.
Para soltar, oprima el boton de la
manguera y tire de la manguera.
Angled pipe
Cierre oscilante
Hose
Manguera
up to the
Switch / Interruptor
Start or stop vacuum cleaner by
pushing on the switch.
Presione el interruptor para
hacer funcionar o parar la
aspiradora.
Handle
Mango
Cord rewind button
Boton de rebobinado
del cable electrico
Handy Attachment Compartment/Compartimiento para accesorios
The compartment stores a crevice tool, round
brush and cleaning utensil.
En el compartimiento para accesorios
se encuentra la herramienta
para esquinas, cepillo redondo
y el utensilio de limpieza.
Round brush
Cepillo redondo
Cleaning Utensil
Utensilio de limpieza
Crevice tool
Herramienta
para esquinas
Cord and Plug / Cable y enchufe
Pull out the cord and
beyond the red marker line.
Tire del cable electrico y conecte el enchufe.
No tire del cable mas alla de la l nea roja.
connect the plug. D
o not extend the cord from the unit
Unclogging the Hose / Como destapar la manguera
When the hose is clogged with dust, remove it in the following manner:
1)Pu ll out the angled pipe by turning the removal ring in either dir
2)Us e a vinyl garden hose to push out
3)In sert the angled pipe in place and return
Do not use the hose without the angled pipe in place. If the hose is used
without the angled pipe, the hose will bend excessively, causing it to break.
Cuando la manguera se satura con polvo:
1) Desconecte el brazo angular girando el anillo
removible en direccion a las flechas.
2) Use algun objeto de plastico redondo para
destapar la manguera.
3) Conecte el brazo angular en su lugar y regrese
el anillo removible a su posicion original.
No use la manguera sin el brazo angular. Si la
manguera se utiliza sin el brazo angular,
puede doblarse excesivamente, hasta
fracturarse.
the dust cloggingth
the ring to its
Angled pipe
Brazo angular
ection.
ehose.
original position.
Removal ring
Anillo Removible
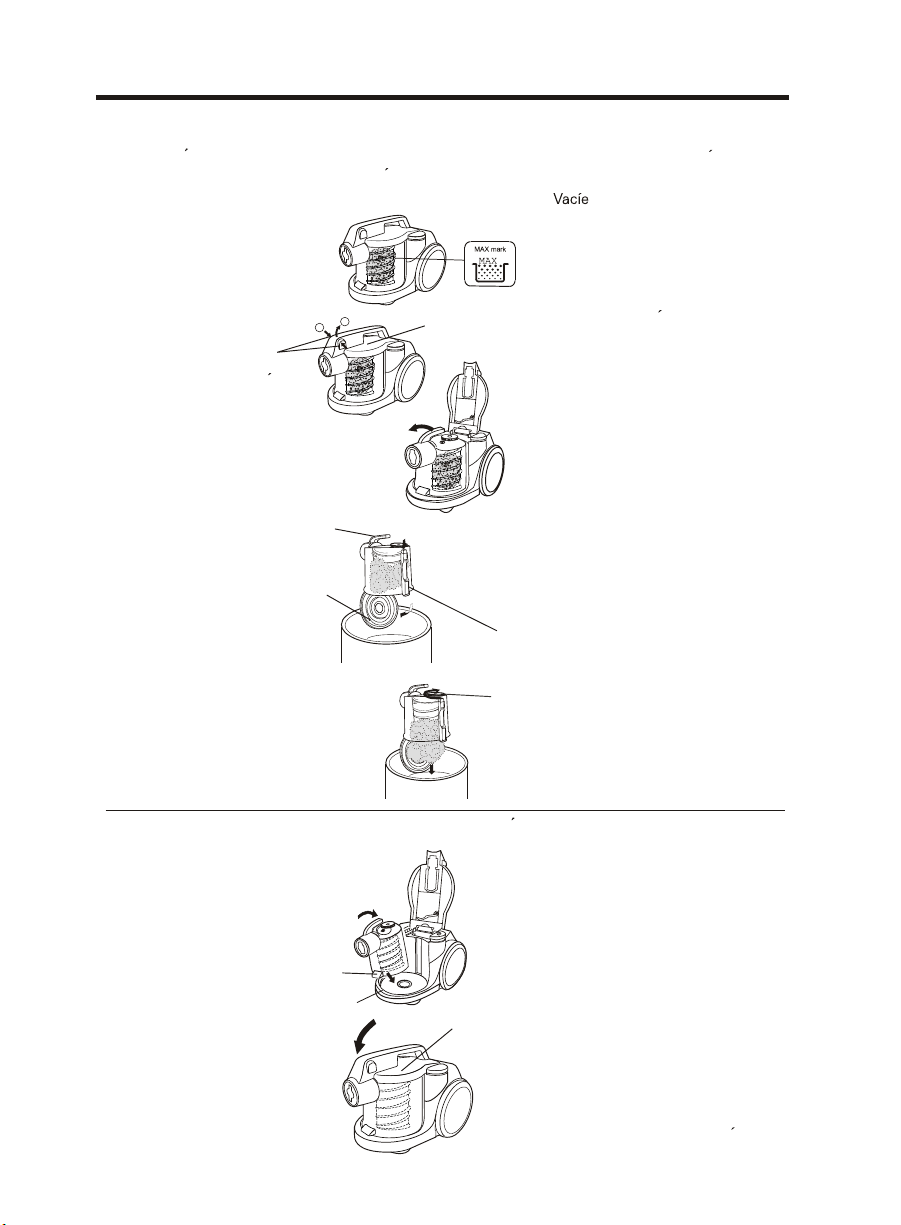
EMPTYING THE DUST COMPARTMENT/ PARA VACIAR EL COMPARTIMENTO DE POLVO
Caution: Be sure to turn the ON/OFF switch to the "OFF" position and disconnect
the power cord from the wall outlet before cleaning.
Precaucion: Coloque el interruptor de ENCENDIDO/APAGADO en posicion "OFF" y
desconecte el cable de alimentacion de la toma de la pared antes de limpiar.
1. Empty the dust compartment when
contents reach the MAX mark.
el compartimento de polvo
1.
Cuando el contenido llegue
a la marca MAX.
2. Press release button to
open the dust box cover.
Release Button
2
1
Dust box cover
Cubierta del
compartimento
de polvo
2. Presione el boton para soltar
el compartimento de polvo.
Libere el Boton
3. Remove the dust compartment
with handle.
3. Saque el compartimiento de
polvo usando el mango.
Handle
4. Press the release lever to
open the trapdoor.
Mango
Trapdoor
Tap a
Push
Empujar
4. Presione la palanca
de soltar para abrir la tapa.
Release Lever
Palanca de soltar
Duster handle
Rueda superior
5. Turn the duster handle several times
in the direction shown to empty the
dust compartment.
5. Gire varias veces la rueda superior
en el sentido indicado para vaciar
el compartimento del polvo.
Reattaching the Dust Compartment/Reinstalacion del compartimento de polvo
1. Close the trapdoor and insert the
hook on the dust compartment
into the groove on the main body.
1. Cierre la tapa e inserte el gancho
del compartimento de polvo en la
ranura del cuerpo principal.
Hook
Gancho
Groove
Ranura
2. Push the dust box cover as shown
to reattach.
Dust box cover
Cubierta del
compartimento
de polvo
2. Empuje el compartimento de
polvo hacia el cuerpo principal
como se indica en la ilustracion.

CARE OF FILTER / CUIDADO DEL FILTRO
1. Remove the dust compartment.
(refer to EMPTYING THE DUST
COMPARTMENT PAGE)
2. Pull the duster handle upward
to remove it,and then open the
trapdoor.
3. Pinch the ribs of the main filter
and pull out main filter.
The main filter and prefilter will
be removed at the same time.
4. Clean the main filter and prefilter
with a soft-bristled brush and
rinse with cold water. Allow both
items to dry completely.
Caution:
Do not use a hard-bristled brush to clean filters.
This may result in damage to the filters.
Do not attempt to dry with a hair dryer or by
placing in a clothes dryer .Hot air may cause the
filters to warp.
Cleaning utensil / Utensilio de limpieza
To maintain optimum suction power, the dust filter fins should be kept clean of dirt.
Para mantener una potencia de aspiracion optima, las aletas del filtro para polvo deben
mantenerse libres de suciedad.
Clean the filter fins free of dirt with the end of cleaning utensil as shown.
Limpie las aletas del filtro usando el extremo horquillado del utensilio de limpieza, el cual posee
la forma de un peque tenedor, tal y como se muestra en la ilustracion.
Duster handle
Rueda superior
Trapdoor
Tap a
Prefilter
Prefiltro
Push
Empujar
Ribs
Varillas
Main filter
Filtro principal
1. Retire el compartimento de polvo
(refierase a la PAGINA DE VACIADO
DEL COMPARTMENTO DE POLVO).
2. Empuje hacia arriba la rueda
superior para retirarla,
y luego abra la tapa.
3. Pinche las varillas del filtro
principal y saquelo.
Se extrae el filtro principal y el
prefiltro al mismo tiempo
Limpie el filtro principal y el prefiltro
4.
con un cepillo blando y enjuague
con agua fria. Deje que ambos filtros
se sequen por completo.
Precaucion:
No limpie los filtros con un cepillo duro
porque puede danarlos.
No trate de secar con secador de cabello o
secadora de ropa. El aire caliente
puede danar los filtros.
Cleaning Utensil
Utensilio de limpieza
Reattaching the filters / Reinstalacion de los filtros
1. Insert the main filter into the
prefilter as shown.
2. Hold onto the main filter and
insert into the dust compartment.
3. Close the trapdoor, and then
attach the duster handle.
Align the ribs of the main filter
to match the shape of the opening
in the dust compartment and press
firmly to insert.
Duster handle
Rueda superior
Opening
Aberture
Prefilter
Prefiltro
Dust Compartment
Compartimento del polvo
Trapdoor
Tap a
Mainfilter
Filtro principal
1. Inserte el filtro principal en el prefiltro
como se indica.
2. Sostenga el filtro principal e inserte
en el compartimento de polvo.
Ribs
Varillas
3. Cierre la tapa y luego instale la
rueda superior.
Alinee las varillas del filtro principal para
que se correspondan con la forma de la
abertura del compartimento del polvo y
presione con fuerza para insertar.

Thank you for your purchase of the Sanyo Vacuum Cleaner.
Please read these instructions carefully before using.
A FEW PRECAUTIONS
1. Operation without the dust compartment and /or filters in place will allow
dust to enter the motor and could damage the vacuum cleaner.
2. Keep the vacuum cleaner away from stoves and other heat sources.
Heat can deform and discolor the plastic parts of the unit.
3. Keep the vacuum cleaner free of insecticides. Do not wipe with benzine,
thinner, petrol or other oils which might cause discoloration or cracking.
To clean the body and hose, dampen a cloth with a mild detergent and
wipe clean.
4. Blocking the suction inlet or allowing the dust to clog the hose will
decrease the efficiency of the motor.
5. Be sure not to push the release button while carrying the vacuum cleaner.
6. Never try to vacuum the following objects. They may damage the unit or
cause a fire.
* Wet things, mud, soil, and fluids
* Burning cigarettes
* Needles and razor blades
* Inflammable materials such as gasoline and thinner
7. The following kinds of treatment shorten hose life:
* Bending hose at an acute angle when storing
* Pulling the hose with excessive force
* Placing heavy objects on, or stepping on the hose
8. Pull out the plug from the power source after use. Grasp the plug-not
the cord-when pulling out the plug.
Pulling on the cord may lead to shortcircuiting.
9. Long and continuous use causes the exhaust air and the body of the
vacuum cleaner to become warm. This, however, does not denote
malfunction.
10.When vacuuming places that are very dusty, and also when vacuuming
regularly, empty the dust compartment before it becomes completely
filled.
Frequent emptying lengthens the life of the motor and maintains strong
suction power.
11.
If the supply cord of this appliance is damaged, it must only be replaced
by a repair shop appointed by the manufacturer, because special purpose
tool are required.
12.Do not allow it to be used as a toy. Close attention is necessary when
used by or near children or infirm persons.

HOW TO USE THE HOSE STAND/COMO USAR EL SOPORTE DE LA MANGUERA
The vacuum cleaner with
the floor nozzle ,wands and
hose can be stored while
still connected.
Wind
Envuelva
Hold here
Sostenga aqui
Insert the wand holder into
the wand holder hole.
Hold the hose and wind it
around the pipe.
Caution:
Do not carry the vacuum
wand holder
Gancho del tubo
cleaner while it is in the
storage position .
(lnjury or damage may result
if the hose or coupling pipe
becomes unattached.)
Wand-holder hole
Ranura
Para insertar gancho
CARE OF FILTER / CUIDADOS DEL FILTRO
1. Unscrew and pull the filter
cover away from the vacuum
cleaner by driver or coin.
2. Pressing "open" and "close"
marks with your thumbs,
while removing the dust cover
by pulling upward as shown.
Filter cover
Cubierta del filtro
Open
Abrir
La aspiradora de polvo
puede ser guardada con la
boca de aspiracion del suelo
tubo telescopico y
manguera conectadas.
Inserte el gancho del tubo
en la ranura correspondiente.
Sostenga la manguera y
envuelvala alrededor del
tubo.
Precaucion:
No transporte la aspiradora
de polvo mientras se
encuentra en la posicion de
almacenamiento.
(Se podrla danar o sufrir
heridas si la manguera o el
acople del tubo se sueltan.)
1. Para sacar la cubierta del filtro,
gire el tornillo hasta la posicion
vertical. Finalmente, tire de dicha
cubierta para sacarla.
2. Presione las marcas "close" y "open"
con los pulgares mientras retira la
cubierta del filtro tirando hacia arriba
como se indica.
2. Remove the HEPA-TYPE filter.
3. Insert a new HEPA-TYPE filter
with the seal to the
inside of the vacuum
cleaner.
Reattach the filter
cover.
4. Remove the sub-filter and rinse
it with water
* Refer to UNCLOGGING THE LOWER CASE
COMPARTMENT
Seal
Cote pellicule
face lisse
Caution:
The filter cover should be correctly
oriented when it is reattached.
Never insert the filter into the vacuum cleaner
unless it is completely dry.
1
Sub-filter
Sub-filtro
2. Desmonte el filtro HEPA-TYPE.
3. Coloque un nuevo filtro HEPA-TYPE
con el sello en el interior de la
aspiradora. Vuelva a colocar la
cubierta del filtro.
2
2
Close
Cerrar
4.
Desmonte el sub-filtro y lavelo
con agua.
* Consulte la LIMPIEZA DEL COMPARTIMIENTO
DE LA CAJA INFERIOR
Precaucion:
La cubierta del filtro debe estar orientada
correctamente al volver a instalar.
Nunca inserte un filtro en la aspiradora
que no este completamente seco.

UNCLOGGING THE CASE LOWER COMPARTMENT / DESATASCO DEL CONJUNTO DE TUBO DE DESVIACION
When the case lower compartment is clogged with dust, remove it in the following manner.
Cuando el conjunto de tubo de desviacion quede atascado por el polvo, desmontelo de la siguiente forma.
1. Unscrew and pull the bottom
lower case away from the
vacuum cleaner by driver or coin.
1. Desatornille y retire la cubierta de
Open
Abrir
inspeccion de polvo de la aspiradora.
Open
Abrir
2. Push out the dust clogging in the
lower case compartment.
3. Reattach the bottom lower case. 3. Vuelva a colocar la cubierta de
Sub-filter
Caution:
The bottom lower case should be
correctly oriented when it is reattached.
Sub-filtro
CARE AND MAINTENANCE
If you have a problem with your vacuum cleaner, consult the handy guide below. If the vacuum cleaner is
malfunctioning, do not operate it. Contact your dealer or the nearest Sanyo Service Center.
Bottom lower case
Cubierta inferior
2. Elimine el polvo que atasca el conjunto
del tubo de desviacion.
Close
inspeccion de polvo.
Cerrar
Close
Cerrar
Bottom lower
case
Cubierta inferior
Precaucion:
Al volver a instalar la cubierta de
inspeccion de polvo, esta deberia
quedar bien orientada.
CUIDADO Y MANTENIMIENTO
Si tiene un problema con su aspirador , consulte el cuadro a continuacion. Si la aspiradora funciona mal,
apaguela. Consulte en la tienda donde la compro o en el centro de servicio de Sanyo mas cercano.
Problema
(1)El aspirador no funciona.
(2)Despues de usar el
aspirador la fuerza de
succion no es suficiente.
(3)El cable no se enrolla
completamente dentro del
aparato.
Causa posible
1. No esta bien enchufado.
2. El enchufe no
suministra electricidad.
1. El filtro esta sucio.
2. La boca de succion o la
manguera esta tapada.
1. El cable esta torcido o
mal enrollado.
Solucion posible
1. Enchufela bien.
2. Verifique el fusible o el
tomacorriente.
1. Limpie el filtro.
2. Limpie la boca de succion
o la manguera.
1. Tire del cable para afuera
y vuelva a enrollarlo.
9BF-D-P111-00657 0403-
E/SPA
SANYO Electric Co., Ltd.
OSAKA, JAPAN
 Loading...