

Page 1
INSTRUCTION MANUAL
SC-CX910
VACUUM CLEANER
HOUSEHOLD USE ONLY
Page 2
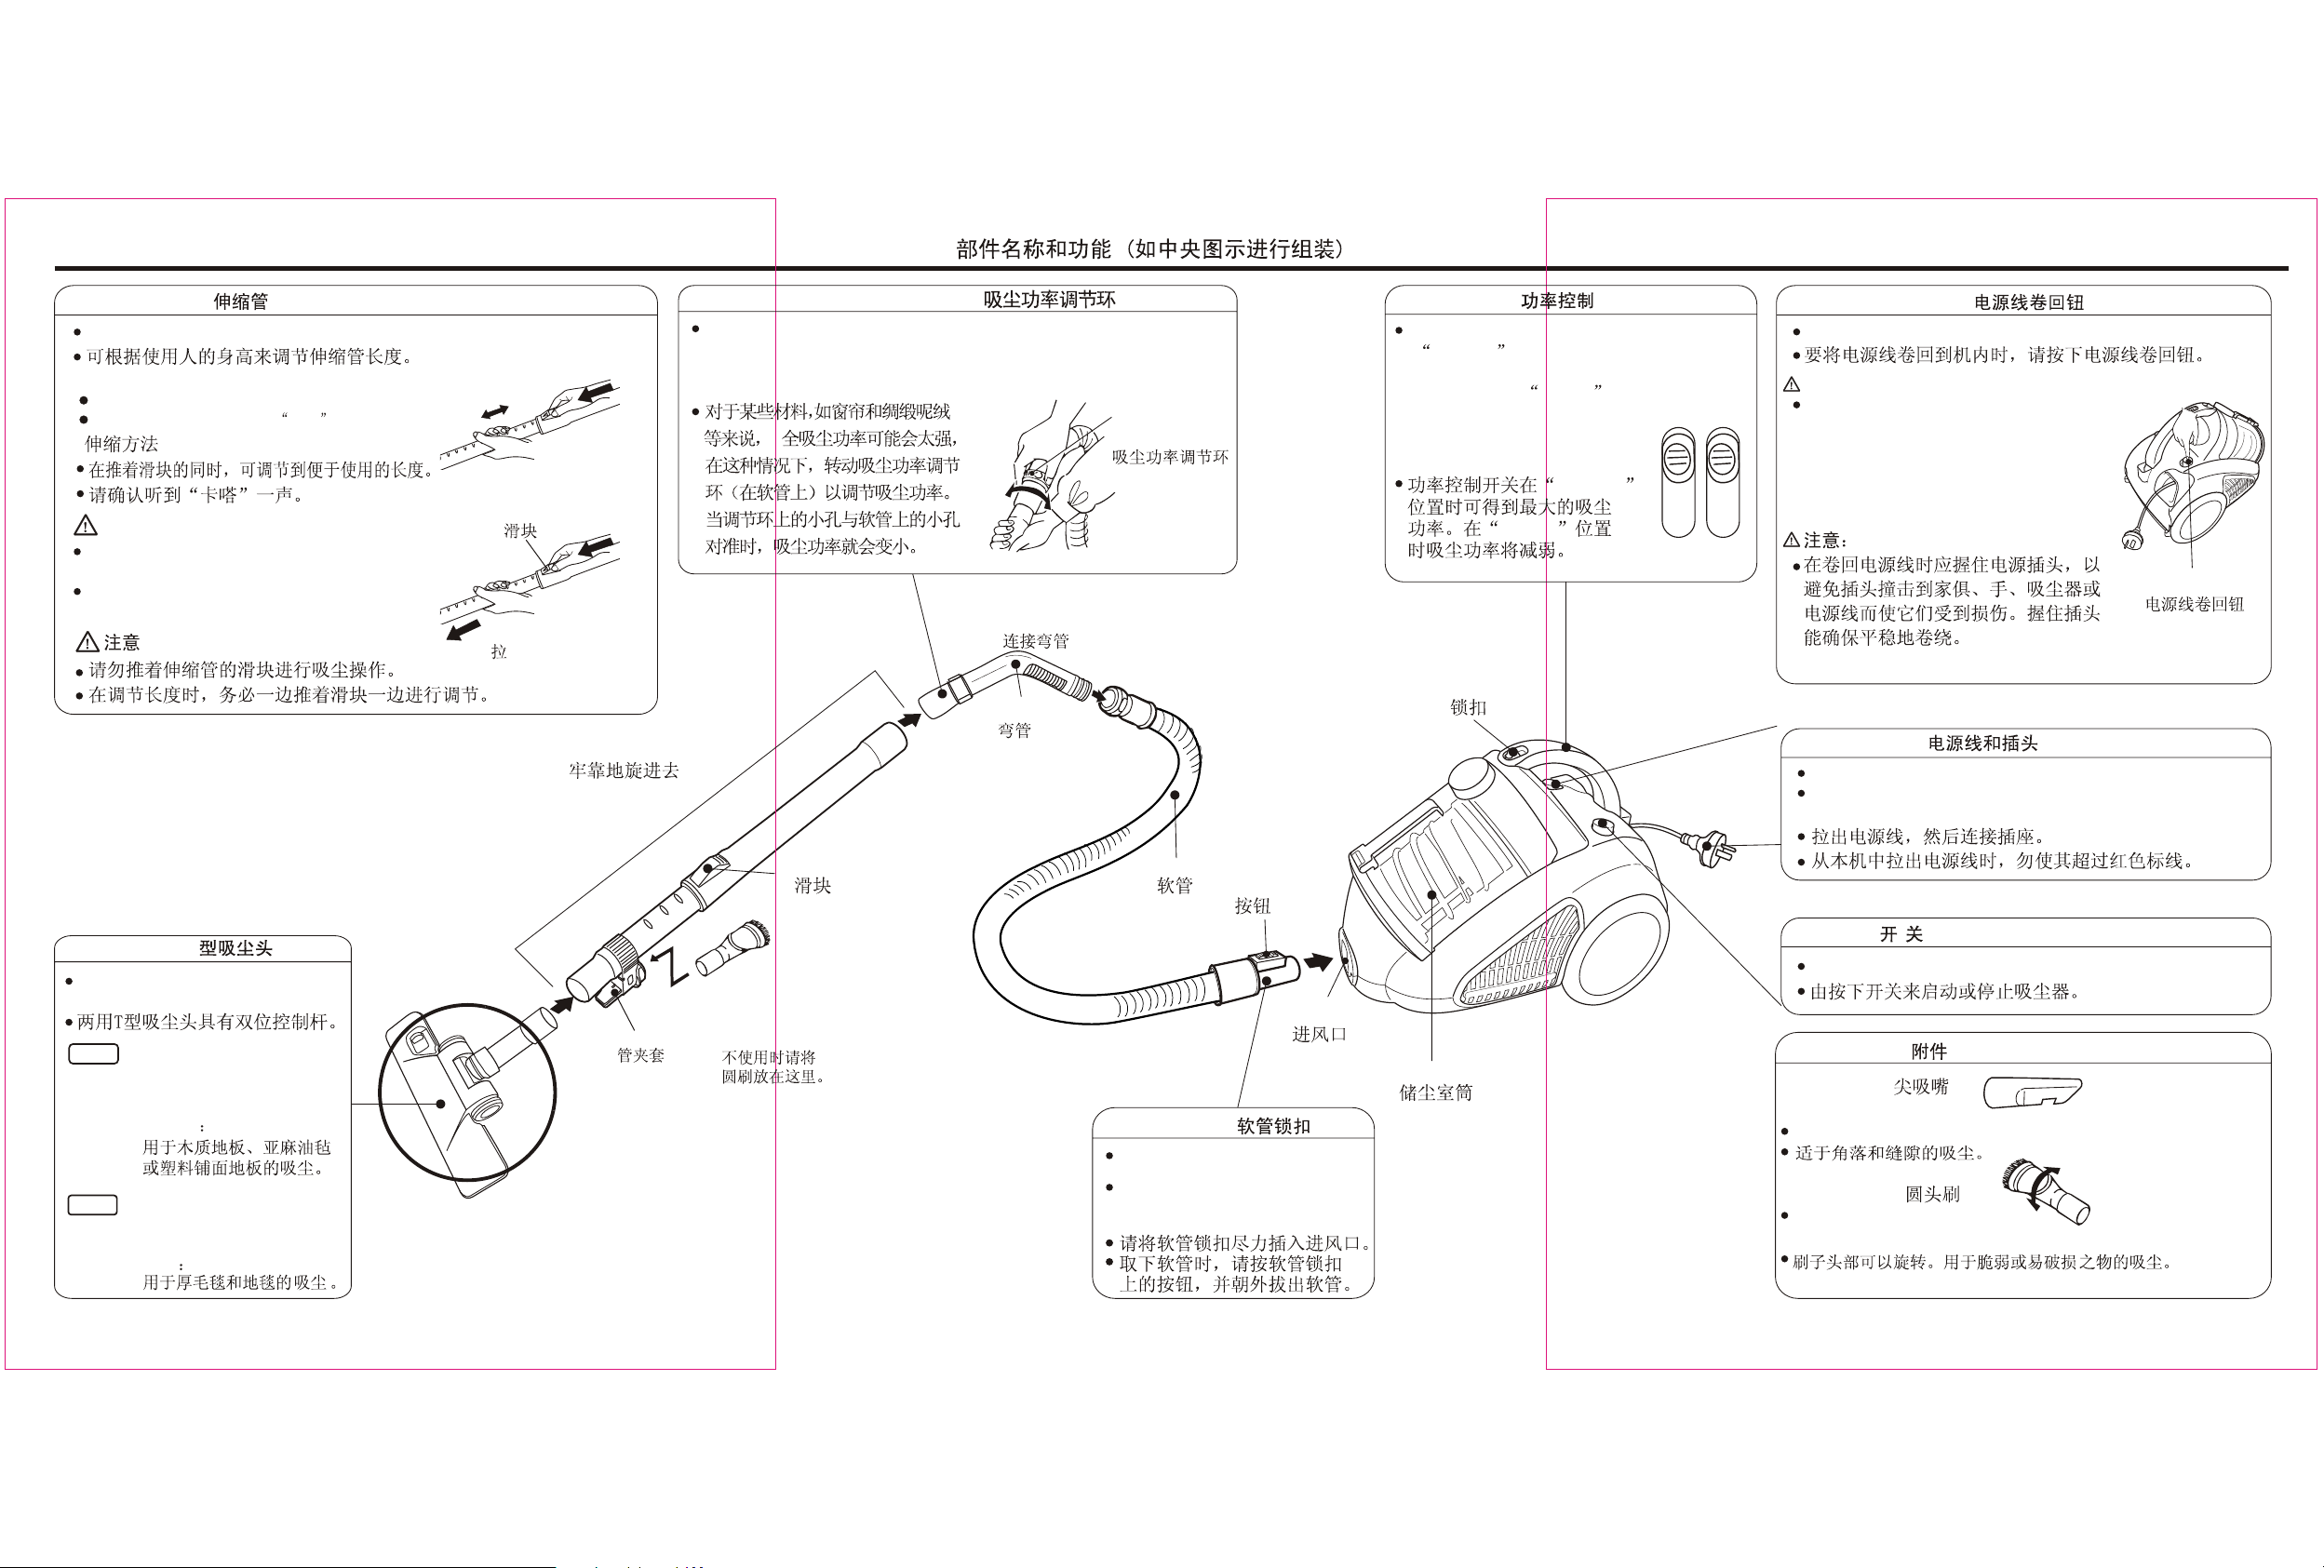
NAME AND FUNCTION OF PARTS (Assemble as indicated in the center illustration.) /
Extension Pipe/
The pipe is adjustable according to the height of the user.
(How to expand / contract the pipe)
Adjust the length of the pipe while pushing the slider.
Make sure that you hear a click sound.
<>
Slider
Caution
Please do not place your hand on the
expansion pipe slider during operation.
Please do push the slider in when
adjusting the length.
Pull
Insert securely by turning
Vacuum Power Adjustment Ring /
The full vacuum power of the cleaner may be too strong in certain cases, for
instance when vacuuming curtains and draperies. In these cases, turn the
vacuum power adjustment ring (on the hose) to control the vacuum power.
Match the hole in the ring with the hose hole to reduce the power.
Vacuum power
adjustment ring
Connect the angled pipe
Angled pipe
Power Control /
Set the POWER CONTROL to
+ / MAX for maximum
suction.
In the position - / MIN the
suction power is decreased.
+ / MAX
- / MIN
Clamp button
MAX
MIN
Cord Rewind Button /
To pull the cord back into the unit, press the cord rewind button.
Caution:
+
Hold the plug when rewinding the
cord so that the plug does not
damage furniture, hands, the vacuum
cleaner or the cord by hitting them.
Holding the plug will make rewinding
smoother.
-
Cord rewind button
Cord and Plug /
Pull out the cord and
Do not extend the cord from the unit beyond the red
marker line.
connect the wall outlet.
Floor Nozzle /
T
The two-way floor nozzle has lever with
two positions.
FLOOR
FLOOR:
For vacuuming wooden floors,
linoleum or plastic covered
floors.
FLOOR
RUG
RUG:
For vacuuming rugs and
carpets.
RUG
Pipe holder
Slider
Put the round
brush here
when not in use.
Hose
Button
Air inlet
Hose Stopper /
Insert the hose stopper all the
way up to the air inlet.
To detach it, press button on
the hose stopper and pull the
hose toward you.
Dust Compartment
Switch
/
Start or stop vacuum cleaner by pushing on the switch.
Attachments /
Crevice tool /
For vacuuming edges and gaps.
Round brush /
The head of the brush
can rotate for vacuuming fragile or easily scratched items.
Page 3
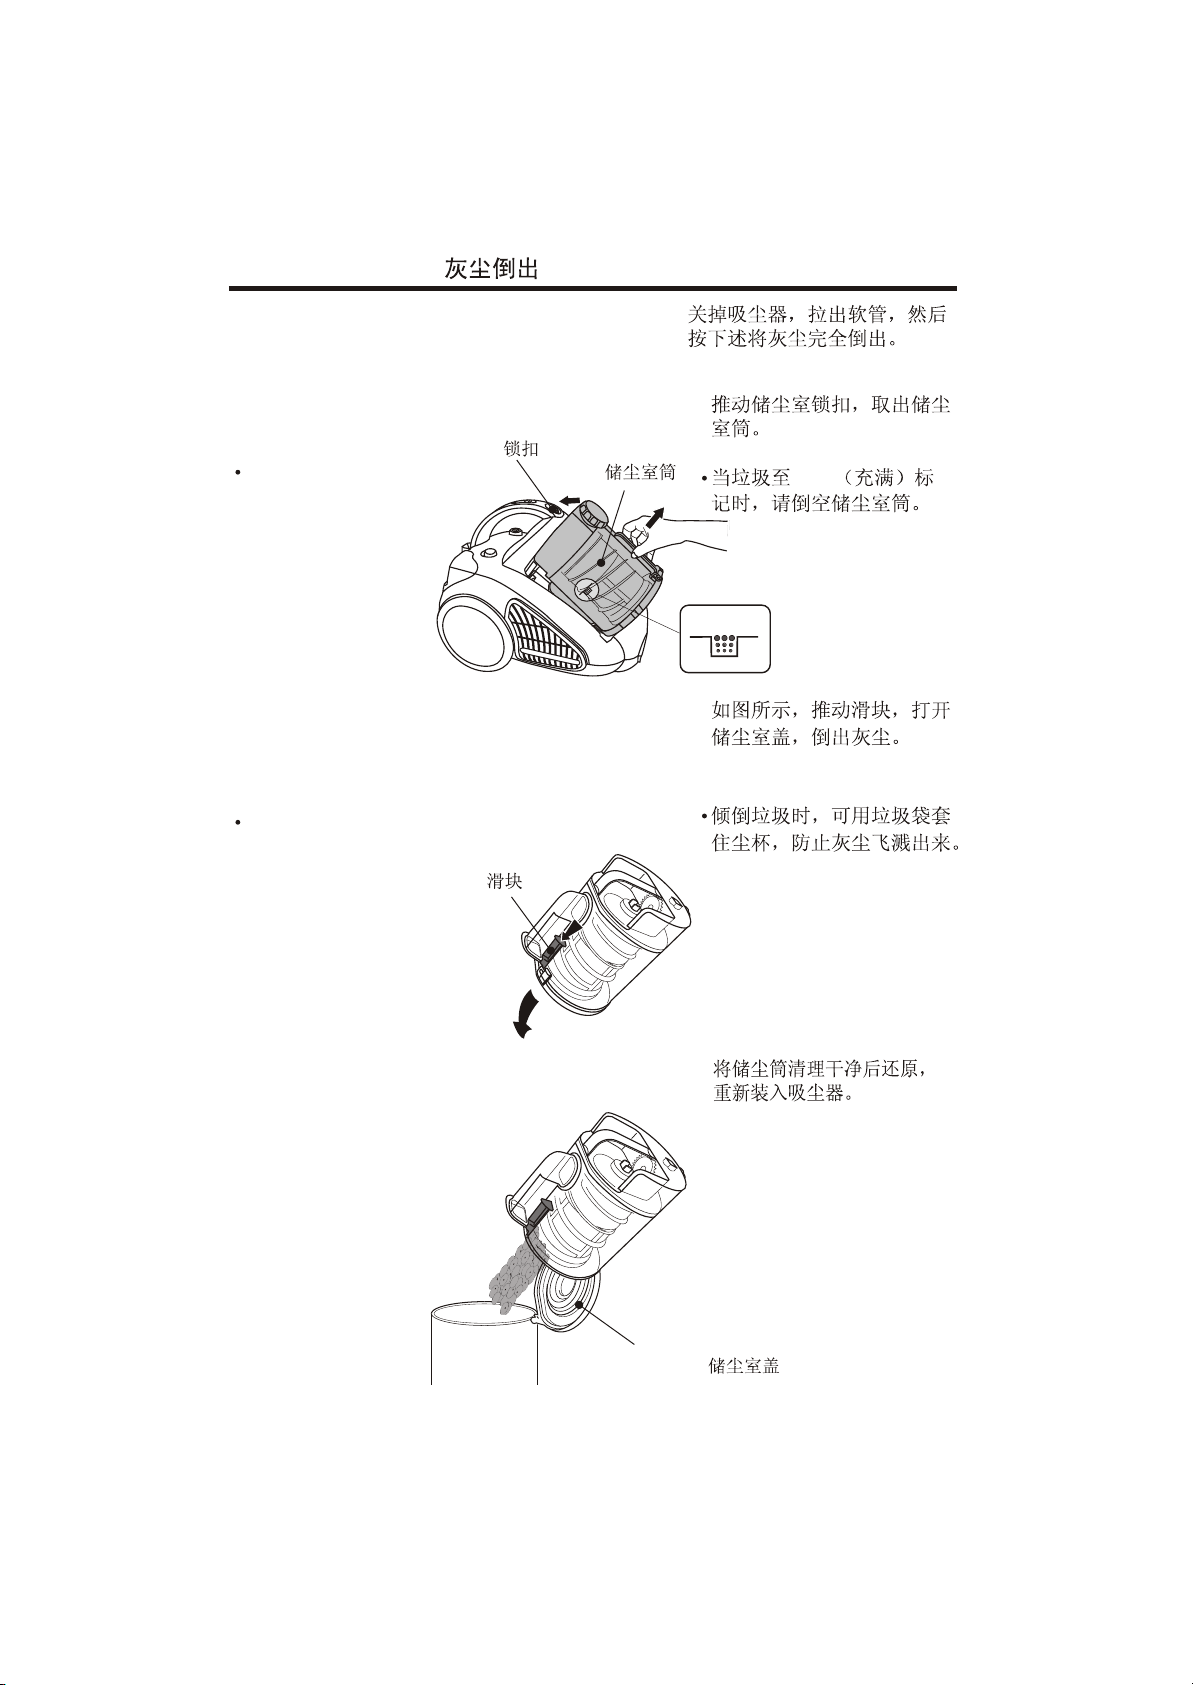
DUST DISPOSAL /
Turn the vacuum cleaner off, pull
the hose out of the unit and empty
out the dirt as follows:
1. Press the clamp button
and take out the dust
compartment.
Empty the dust
compartment when
contents reach the
MAX mark.
2. In figure, push the
slider, open the dust
cover and empty the
dust compartment.
Use the garbage bags
to cover the dust cup
to prevent dust splash
when you empty the
compartment.
Clamp button
Slider
1.
Dust compartment
X
MA
2.
MAX
MAX
3. Clean the dust
compartment then
reattach the vacuum
cleaner.
3.
Dust compartment cover
Page 4

CLEAR THE DUST COMPARTMENT /
Remove the dust compartment
and empty dust compartment
as follows.
1. As the arrow shown, turn the
duster knod several times and
waste in dust compartment
will drop out.
Duster Knod
1.
2. In figure, push the duster
holder and take the pre-filter
and main filer.
Pre-Filter
3. Clean the pre-filter and main
filter with water.
Allow each parts to dry
completely after cleaning.
Caution:
Do not attempt to dry with a
hair dryer or by placing in a
clothes dryer. Hot air may
cause the filters to warp.
Don't need to wash after
use each time.
4. Insert the main filter into
the pre-filter as shown.
Pre-Filter
2.
Duster holder
3.
Main filter
4.
5. Align the ribs of the main filter
to match the shape of the
hole in the dust compartment
and press firmly to insert.
5.
Hole
Ribs
Page 5

A FEW PRECAUTIONS
1. Operating without the dust compartment in place will allow dust to enter
could damage the vacuum cleaner. the motor and
2. Keep the vacuum cleaner away from stoves and other heat sources.
Heat can deform and discolor the plastic parts of the unit.
3. Keep the vacuum cleaner free of insecticides. Do not wipe with benzene,
thinner, petrol or other oils which might cause discoloration or cracking.
To clean the body and hose, dampen a cloth with a mild detergent and
wipe clean.
4. Blocking the suction inlet or allowing the dust to clog the hose will
decrease the efficiency of the motor.
5. Be sure not to push the clamp button while carrying the vacuum cleaner.
6. Never try to vacuum the following objects. They may damage the unit or
cause a fire.
* Wet things, mud, soil, and fluids
* Burning cigarettes
* Needles and razor blades
* Inflammable materials such as gasoline and thinner
Construction waste.
*
8. Please do not hold the hose to lift the vacuum cleaner and sway or move it,
otherwise, it will be caused the damage for human body or vacuum cleaner.
9. Pull out the plug from the power source after use. Grasp the plug-not
the cord-when pulling out the plug.
Pulling on the cord may lead to short circuiting.
10. Long and continuous use causes the exhaust air and the body of the
vacuum cleaner to become warm. This, however, does not denote
malfunction.
11.When vacuuming places that are very dusty, and also when vacuuming
regularly, empty the dust compartment before it becomes completely
filled.
Frequent emptying lengthens the life of the motor and maintains strong
suction power.
12.If the supply cord of this appliance is damaged, it must only be replaced
by a repair shop appointed by the manufacturer, in order to avoid a
hazard.
13.This appliance is not intended for use by persons (including children)
with reduced physical, sensory or mental capabilities, or lack of experience
and knowledge, unless they have been given supervision or instruction
concerning use of the appliance by a person responsible for their safety.
14.Young children should be supervised to ensure that they do not play with the
appliance.
Page 6

Page 7

REPLACING THE HEPA FILTER /
HEPA
Under normal usage, the HEPA Filter will require replacement once every one year;
however, vacuuming large amounts of extremely fine dust, powder or similar material
over a long period of time may decrease airflow performance through the filter. If this
occurs, it may become necessary to replace the HEPA Filter more often. Only use
genuine Sanyo replacement filters.
1. Open the filter cover.
Filter cover
2. Remove the HEPA Filter.
3. Insert a new HEPA Filter,
close the filter cover.
HEPA Filter
HEPA
1.
2. HEPA
3. HEPA
Please take the filter cover
jut insert into the groove,
then press the filter cover.
Groove
Jut
Caution:
Be sure the HEPA Filter is
facing the right direction.
To assure the best results, we recommend cleaning the filters once every
one (1) year, depending on usage.
CLEANER OF FILTER /
Filter
Take out the filter and
cleaned by water.
Caution:
Never insert the filter into
the vacuum cleaner unless
it is completely dry.
Filter
CAUTION /
Please do not use the vacuum cleaner without properly fixing the filter, otherwise, it may
cause the motor to smoke, even burn into fire since the filter is part of functional components.
Page 8

HOW TO USE THE HOSE STAND /
The vacuum cleaner with
the floor nozzle, wands and
hose can be stored while
still connected.
Wand holder
Insert the wand holder
into the wandholder hole.
Wand-holder hole
Caution:
Do not carry the vacuum cleaner
while it is in the storage position.
(Injury or damage may result if
the hose or extonsion pipe
becomes unattached.)
CARE AND MAINTENANCE
If you have a problem with your vacuum cleaner, consult the handy guide below. If the
vacuum cleaner is malfunctioning, do not operate it. Contact your dealer or the nearest Sanyo
Service Center.
9BF-D-P111-09604 1005-
E/CHN
0
 Loading...