

Page 1
INSTRUCTION MANUAL
MANUAL DE INSTRUCCIONES
SC-780
VACUUM CLEANER
ASPIRADORA DE POLVO
HOUSEHOLD USE ONLY
SOLO PARA USO DOMESTICO
Page 2
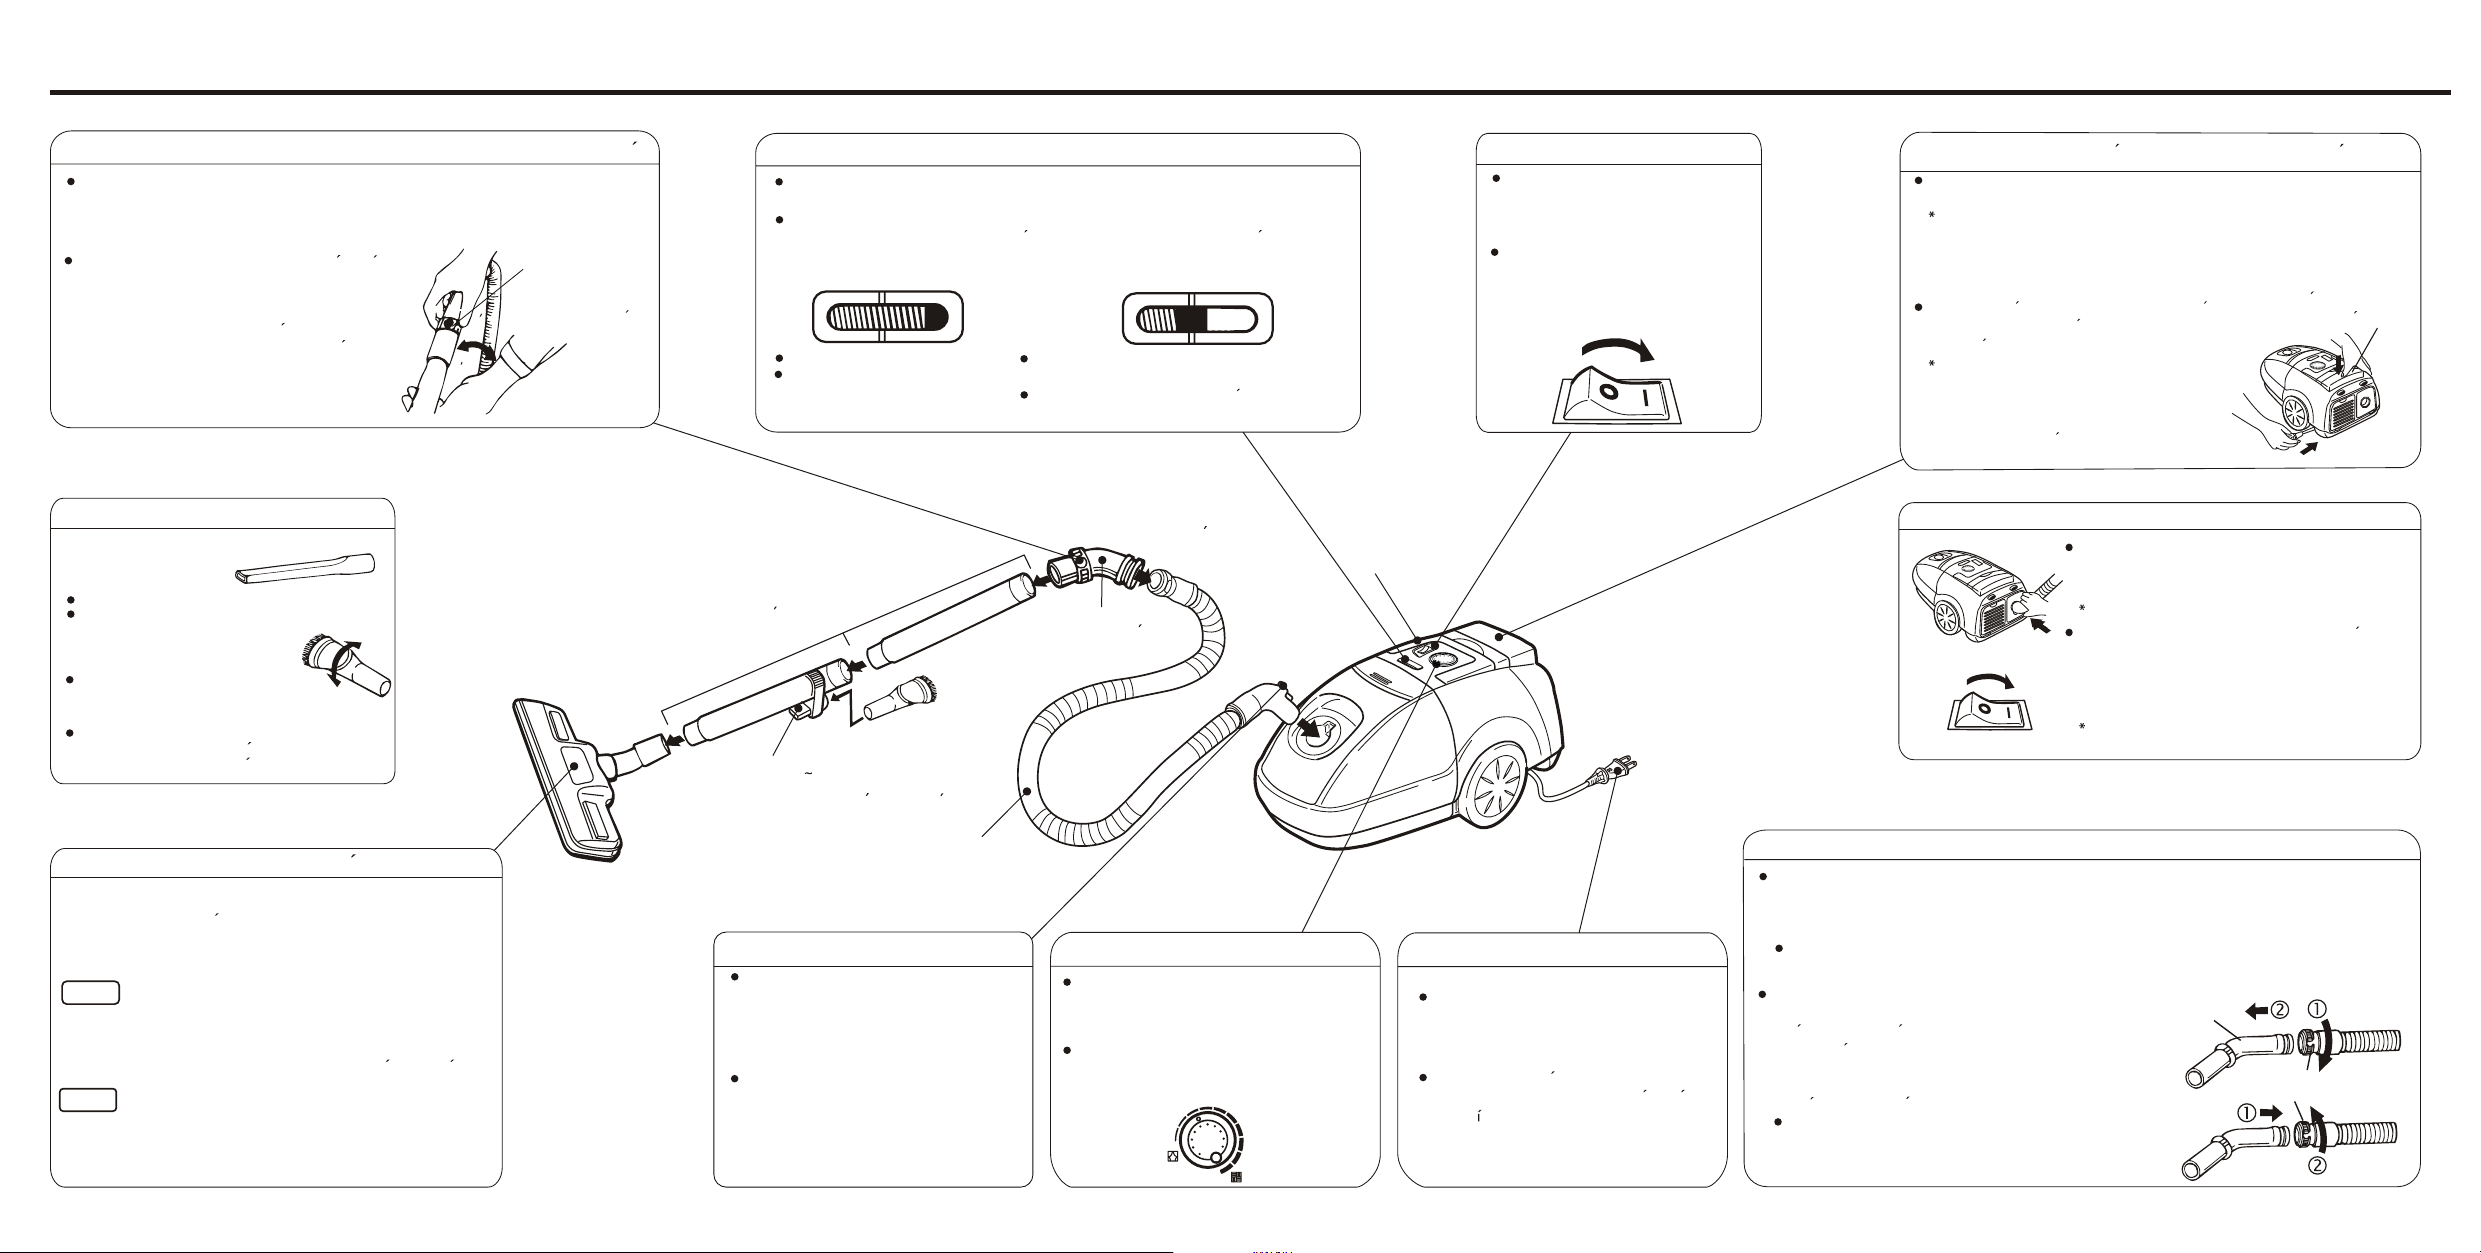
NAME AND FUNCTION OF PARTS (Assemble as indicated in the center illustration.) / NOMBRE Y FUNCION DE CADA PIEZA (La figura en el centro muestra la forma de armar la aspiradora.)
Vacuum Power Adjustment Ring / Anillo de ajuste de fuerza de succion
The full vacuum power of the cleaner may be too strong in certain cases, for
instance when vacuuming curtains and draperies. In these cases, turn the
vacuum power adjustment ring (on the hose) to control the vacuum power.
Match the hole in the ring with the hose hole to reduce the power.
En algunos casos la fuerza de succion maxima
de la aspiradora puede ser demasiada, por
ejemplo cuando aspira el polvo adherido a
cortinas o tapizados. En ese caso, gire el anillo
de ajuste de fuerza de succion (en la manguera)
Vacuum power
adjustment ring
Anillo de ajuste de
fuerza de succion
para controlar la intensidad de succion. Haga
coincidir el agujero en el anillo con el agujero
en la manguera para reducir la fuerza.
Attachments / Accesorios
Crevice tool / Herramienta para esquinas
For vacuuming edges and gaps.
Para aspirar el polvo de los
bordes y grietas.
Round brush / Cepillo redondo
The head of the brush can rotate.
For vacuuming fragile or easily
scratched items.
La cabeza del cepillo puede girar.
Para limpiar objetos fragiles o
que se puedan rayar facilmente.
Floor Nozzle / Boca de aspiracion del piso
The two-way floor nozzle has lever with two positions.
La boca de aspiracion del piso de dos posiciones tiene
una palanca para hacer el cambio.
FLOOR
RUG
FLOOR:
For vacuuming wooden floors, linoleum or
plastic covered floors.
PISO:
Para limpiar pisos de madera, linoleo o plastico.
RUG:
For vacuuming rugs and carpets.
ALFOMBRA:
Para aspirar el polvo de las alfombras.
Dust Indicator / Indicador de polvo
The dust indicator shows the amount of dust that has collected in the dust
compartment. Hold the floor nozzle away from the floor, while operating to check.
El indicador de polvo muestra la cantidad de polvo en el compartimiento para
polvo. Levante la boca de aspiracion del piso para hacer la verificacion.
DUST INDICATOR DUST INDICATOR
INDICADOR DE POLVO INDICADOR DE POLVO
Vacuuming can continue.
Puede seguirse limpiando.
Insert securely by
turning
Inserte firmemente
girandolos
Put the round brush
Pipe holder
Suporte del cano
Hose Stopper / Tope de la manguera
Insert the hose all the way
hose stopper.
To detach it, press the hose stopper
and pull the hose toward you.
Coloque la manguera hasta el tope.
Para soltar, oprima el tope de la
manguera y tire de la manguera.
here when not in use.
Cuando no use el
cepillo redondo
pongalo aqui.
Hose
Manguera
up to the
Suction power decreases.Dust
compartment. should be empited.
Disminuye la fuerza de succion.
Debe vaciarse el compartimiento para polvo.
Connect the angled pipe
Conecte el tubo en angulo
Angled pipe
Tubo en angulo
Power Control/Control de alimentacion
Set the POWER CONTROL to MAX for
maximum suction. In the position MIN
the suction power is decreased.
Ajuste el POWER CONTROL a MAX para
lograr el maximo de succion. En la
posicion MIN el poder de succion es
menor.
MIN
MAX
Handle
Mango
Switch / Interruptor principal
Press the O N side of the switch to start
the motor.
To stop the motor, p
ress th O
side of the switch.
Oprima el lado del interruptor principal
con la marca ON para que empiece a
funcionar el motor.
Oprima el lado OFF del interruptor
principal para parar el motor.
OFF ON
Cord and Plug / Cable y enchufe
Pull out the cord and
Do not extend the cord from the unit
beyond the red marker line.
Tire del cable electrico y conecte el
enchufe. No tire del cable mas alla
de la l nea roja.
connect the plug.
Cord Rewind Button / Boton de rebobinado del cable electrico
To pull the cord back into the unit, press the cord rewind button.
FF
e
Caution:
Hold the plug when rewinding the cord so that the plug does not
damage furniture, hands, the vacuum cleaner or the cord by hitting
them. Holding the plug will make rewinding smoother.
Cord rewind button
Oprima el boton de rebobinado del cable electrico
para enrollar el cable electrico en el aparato.
Boton de rebobinado
de cable electrico
Precaucion:
Tome el enchufe con la mano para que el
enchufe no golpee contra los muebles, las
manos, la aspiradora o el cable cuando golpee
contra ellos. Si se sujeta del enchufe, el
rebobinado se hara con menos problemas.
Blower (Exhaust outlet) / Soplador (salida del escape)
Use blower to blow dust behind furniture, etc.
1. Insert the hose into the exhaust outlet.
2. Press the ON side of the switch.
The crevice attachment can be used to blow dust.
Utilice el soplador para limpiar el polvo detras de los
muebles, etc.
1.Introduzca la manguera en la salida del escape.
2.Oprima el lado del interruptor principal con la
OFF ON
marca ON.
Se puede utilizar el accesorio para esquinas para
soplar mejor el polvo.
Unclogging the Hose / Como destapar la manguera
When the hose is clogged with dust, remove it in the following manner:
1)Pu ll out the angled pipe by turning the removal ring in either di
2) Use a vinyl garden hose to push out the dust clogging the hose.
3)Ins ert the angled pipe in place and return
the ring
to
its
Do not use the hose without the angled pipe in place. If the hose is used without the
angled pipe, the hose will bend excessively, causing it to break.
Cuando la manguera se satura con polvo:
1) Desconecte el brazo angular girando el anillo
Angled pipe
Brazo Angular
reten en direccion a las flechas.
2) Use algun objeto de vinyl redondo para destapar la
manguera.
3) Conecte el brazo angular en su lugar y regrese el anillo
reten a su posicion original.
No use la manguera sin el brazo angular. Si la
manguera es utilizada sin el brazo angular, la
manguera va a doblarse excesivamente, hasta
fracturarse.
rection.
original position.
Removal ring
Anillo Removible
Page 3
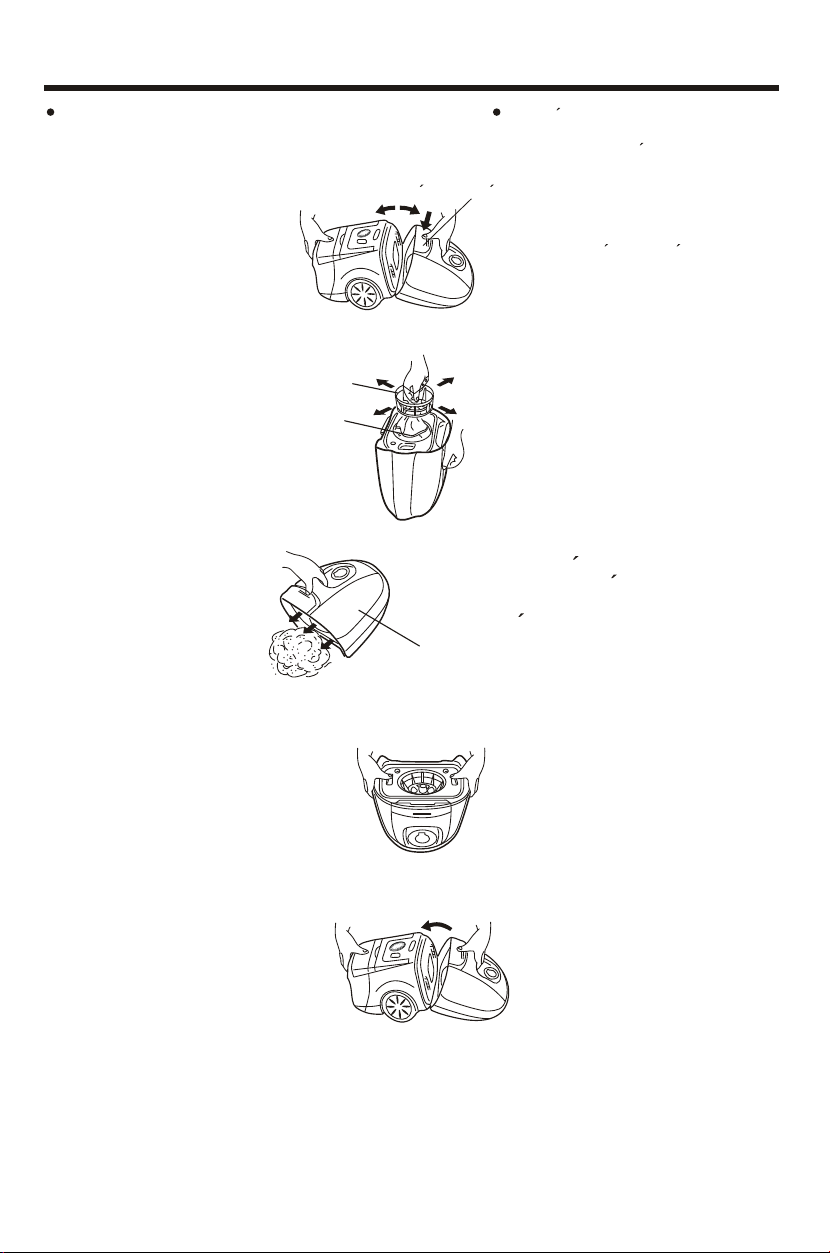
DUST DISPOSAL / ELIMINACION DE RESIDUOS
After turning off the cleaner using
the on/off switch, disconnect the
hose and proceed as follows:
1. Separate off the dust
compartment.
push the clamp button.
2. Pull up the knob cage. Shake
the knob a number of times
so that the dust com es away
from the filter bag.
3. Take out the filter and
dispose of the dirt.
Caution:
If the dust is tightly
packed and difficult to
remove, lightly tap the
dust compartment.
Knob
Perilla
Filter
Filtro
Dust compartment
Compartimiento para
polvo
Despues de apagar la aspiradora con el
interruptor principal, desconecte la
manguera y continue con lo siguiente.
Clamp button
Boton de fijacion
1. Abra el compartimiento para
polvo.
Oprima el boton de fijacion.
2. Levante la jaula de la perilla. Agite la
perilla varias veces para que el polvo
se suelte de la bolsa del filtro.
3. Retire el filtro y arroje el polvo a
la basura.
Precaucion:
Si el polvo esta muy
comprimido y no sale
facilmente, golpee ligeramente
el compartimiento para polvo.
4. Insert the filter in the dust
compartment.
5. Reassemble the unit.
4. Coloque el filtro sobre el
compartimiento para polvo.
5. Vueva a cerrar el aparato.
Page 4

HOW TO USE THE HOSE STAND/COMO USAR EL SOPORTE DE LA MANGUERA
The vacuum cleaner with
the floor nozzle , expansion pipe
and hose can be stored while
still connected.
Stand the vacuum cleaner
up and insert the pipe
holder into the pipe-holder
hole.
Hold the hose and wind it
around the pipe.
Pipe holder
Suporte del cano
Wand-holder hole
Orificio del
soporte del cano
Wind
Envuelva
<BEFORE>
Hold here
Sostenga aqui
La aspiradora de polvo
puede ser guardada con la
boca de aspiracion del suelo
tubo telescopico y
manguera conectadas.
Ponga la aspiradora de polvo
e inserte el soporte del
cano en el orificio del
soporte del cano.
Sostenga la manguera y
envuelvala alrededor del
cano.
Caution:
Do not carry the vacuum
cleaner while it is in the
storage position.
(lnjury or damage may result
if the hose or coupling pipe
becomes unattached.)
<AFTER>
Precaucion
No transporte la aspiradora
de polvo mientras se
encuentra en la posicion de
almacenamiento.
(Se podria danar o sufrir
heridas si la manguera o el
acople del cano se sueltan.)
Page 5

CARE OF FILTER / CUIDADO DEL FILTRO
Cloth bag/Bolsa de tela
A severely soiled or clogged filter should be thoroughly washed with fresh tepid water.
A neutral detergent could be used if required.
Un filtro muy sucio o tapado debe lavarse a fondo en agua tibia limpia.
Puede utilizarse un detergente neutro si estuviera muy sucio.
1.Washing / Lavado
2.Drying / Secado
Cloth filter
Filtro de tela
Note
Never insert the cloth filter into the body of the unit unless it is completely dry.
Never wash the filter with boiling water or expose it to an open flame to dry.
Nota
No coloque el filtro de tela en la aspiradora hasta tanto no se haya secado completamente.
No lave el filtro en agua hirviendo o exponga al fuego para secarlo.
Filter
Remove the filter and
rinse it with water.
(Caution)
Never insert the cloth bag or
filter into the vacuum cleaner
unless it is completely dry.
Filter
filtro
Filtro
Retire el filtro y lavelo con agua.
(Precaucion)
Nunca coloque la bolsa de tela o
el filtro en la aspiradora a menos
que esten bien secos.
Be sure the bag is
facing the right
direction.
Asegurese que la
bolsa esta en la
direcccion correcta.
Page 6

Thank you for your purchase of the Sanyo Vacuum Cleaner.
Please read these instructions carefully before using.
A FEW PRECAUTIONS
1. Operation without the dust compartment and /or filters in place will allow
dust to enter the motor andcould damage the vacuum cleaner.
2. Keep the vacuum cleaner away from stoves and other heat sources.
Heat can deform and discolor the plastic parts of the unit.
3. Keep the vacuum cleaner free of insecticides. Do not wipe with benzine,
thinner, petrol or other oils which might cause discoloration or cracking.
To clean the body and hose, dampen a cloth with a mild detergent and
wipe clean.
4. Blocking the suction inle t o r allowing the dus t to clog the hose wil l
decrease the efficiency o f the motor.
5. Be sure not to push the release button while carrying the vacuum cleaner.
6. Never try to vacuum the following objects. They may damage the unit or
cause a fire.
* Wet things, mud, soil, and fluids
* Burning cigarettes
* Needles and razor blades
* Inflammable materials such as gasoline and thinner
7. The following kinds of treatment shorten hose life:
* Bending hose at an acute angle when storing
* Pulling the hose with excessive force
* Placing heavy objects on, or stepping on the hose
8. Pull out the plug from the power source after use. Grasp the plug-not
the cord-when pulling out the plug.
Pulling on the cord may lead to shortcircuiting.
9. Long and continuous use causes the exhaust air and the body of the
vacuum cleaner to become warm. This, however, does not denote
malfunction.
10.When vacuuming places that are very dusty, and also when vacuuming
regularly, empty the dust compartment before it becomes completely
filled.
Frequent emptying lengthens the life of the motor and maintains strong
suction power.
11.
If the supply cord of this appliance is damaged, it must only be replaced
by a repair shop appointed by the manufacturer, because special purpose
tool are required.
12.Do not allow it to be used as a toy. Close attention is necessary when
used by or near children or infirm persons.
Page 7

CARE AND MAINTENANCE
If you have a problem with your vacuum cleaner, consult the handy guide below. If the
vacuum cleaner is malfunctioning, do not operate it. Contact your dealer or the nearest Sanyo
Service Center.
Problem
(1) Cleaner won't run.
(2) Suction doesnot increase
after cleaningou t the dirt.
(3) Cord doesn't fullyrew ind.
Possible cause
1. Not firmly plugged in.
2. No voltage in wall outlet.
1. Filter dirty.
2. Clogged floor nozzle or
hose.
1. Cord twisted orune ven.
Possible solution
1. Plug unit in firmly.
2. Check fuse or breaker.
1. Clean out the filter.
2. Clean out floor nozzle or
hose.
1. Pull out cord and rewind.
CUIDADO Y MANTENIMIENTO
Si tiene un problema con su aspiradora de polvo, consulte el cuadro a continuacion. Si la
aspiradora de polvo funciona mal, apaguela. Consulte en la tienda donde la compro o en el
centro de servicio de Sanyo mas cercano.
Problema
(1)La aspiradora no funciona.
(2)Despues de usar la
aspiradora la fuerza de
succion no es suficiente.
(3)El cable no se enrolla
completamente dentro del
aparato.
Causa posible
1. No esta bien enchufada.
2. El tomacorriente no
suministra electricidad.
1. El filtro esta sucio.
2. La boca de succion o la
manguera esta tapada.
1. El cable esta torcido o
mal enrollado.
Solucion posible
1. Enchufela bien.
2. Verifique el fusible o el
ruptor de circuito.
1. Limpie el filtro.
2. Limpie la boca de succion
o la manguera.
1. Tire del cable para afuera
y vuelva a enrollarlo.
9BF-D-P111-00620 0203-
E/SPA
0
SANYO Electric Co., Ltd.
OSAKA, JAPAN
 Loading...