

Sanyo SC-296T,SC-297T,SC-298T Instruction Manual
INSTRUCTION MANUAL
VACUUM CLEANER
-296T/
SC 297T/298T
HOUSEHOLD USE ONLY
With power control/
Without power control/
SPECIFICATION
Model
Power Control
SC-296T/297T
In the illustration the SC-298T is show.
SC-298T
SC-298T

NAME AND FUNCTION OF PARTS (Assemble as indicated in the center illustration.) /
Cleaning Utensil /
To clean the filter, remove the
cleaning utensil from the filter
and use.
Cleaning utensil
Cord and Plug /
Pull out the cord and
connect
the plug.
Do not extend the cord from
the unit beyond the red marker
line.
Handle
Cord Rewind Button /
To pull the cord back into the unit, press the cord rewind button.
Caution
Hold the plug when rewinding the cord so that the
plug does not damage furniture, hands, the vacuum
cleaner or the cord by hitting them. Holding the plug
will make rewinding smoother.
Cord rewind button
Switch
/
Start or stop vacuum
cleaner by pushing on
the switch.
Power Control /
Set the POWER CONTROL to
MAX for maximum suction.
In the position MIN the suction
power is decreased.
MAX
MIN
Insert securely by turning
Wands
Hose
Angled pipe
Connect the angled pipe
Put the round brush or
crevice tool here when
not in use.
Attachments /
Crevice tool /
For vacuuming edges and gaps.
Round brush /
The head of the brush can rotate.
For vacuuming fragile or easily scratched
items.
MAX MIN
In the illustration the SC-298T is show.
SC-298T
SC-298T only / SC-298T
*
The two-way floor nozzle has lever with two positions.
FLOOR:
For vacuuming wooden floors, linoleum
or plastic covered floors.
RUG:
For vacuuming rugs and carpets.
Floor Nozzle /
T
FLOOR
RUG
FLOOR
RUG
Floor Nozzle/T
SC-296T only/ SC-296T
Hose Stopper /
Insert the hose stopper all
the way up to the air inlet.
To detach it, press button
on the hose stopper and
pull the hose toward you.
Button
Air inlet
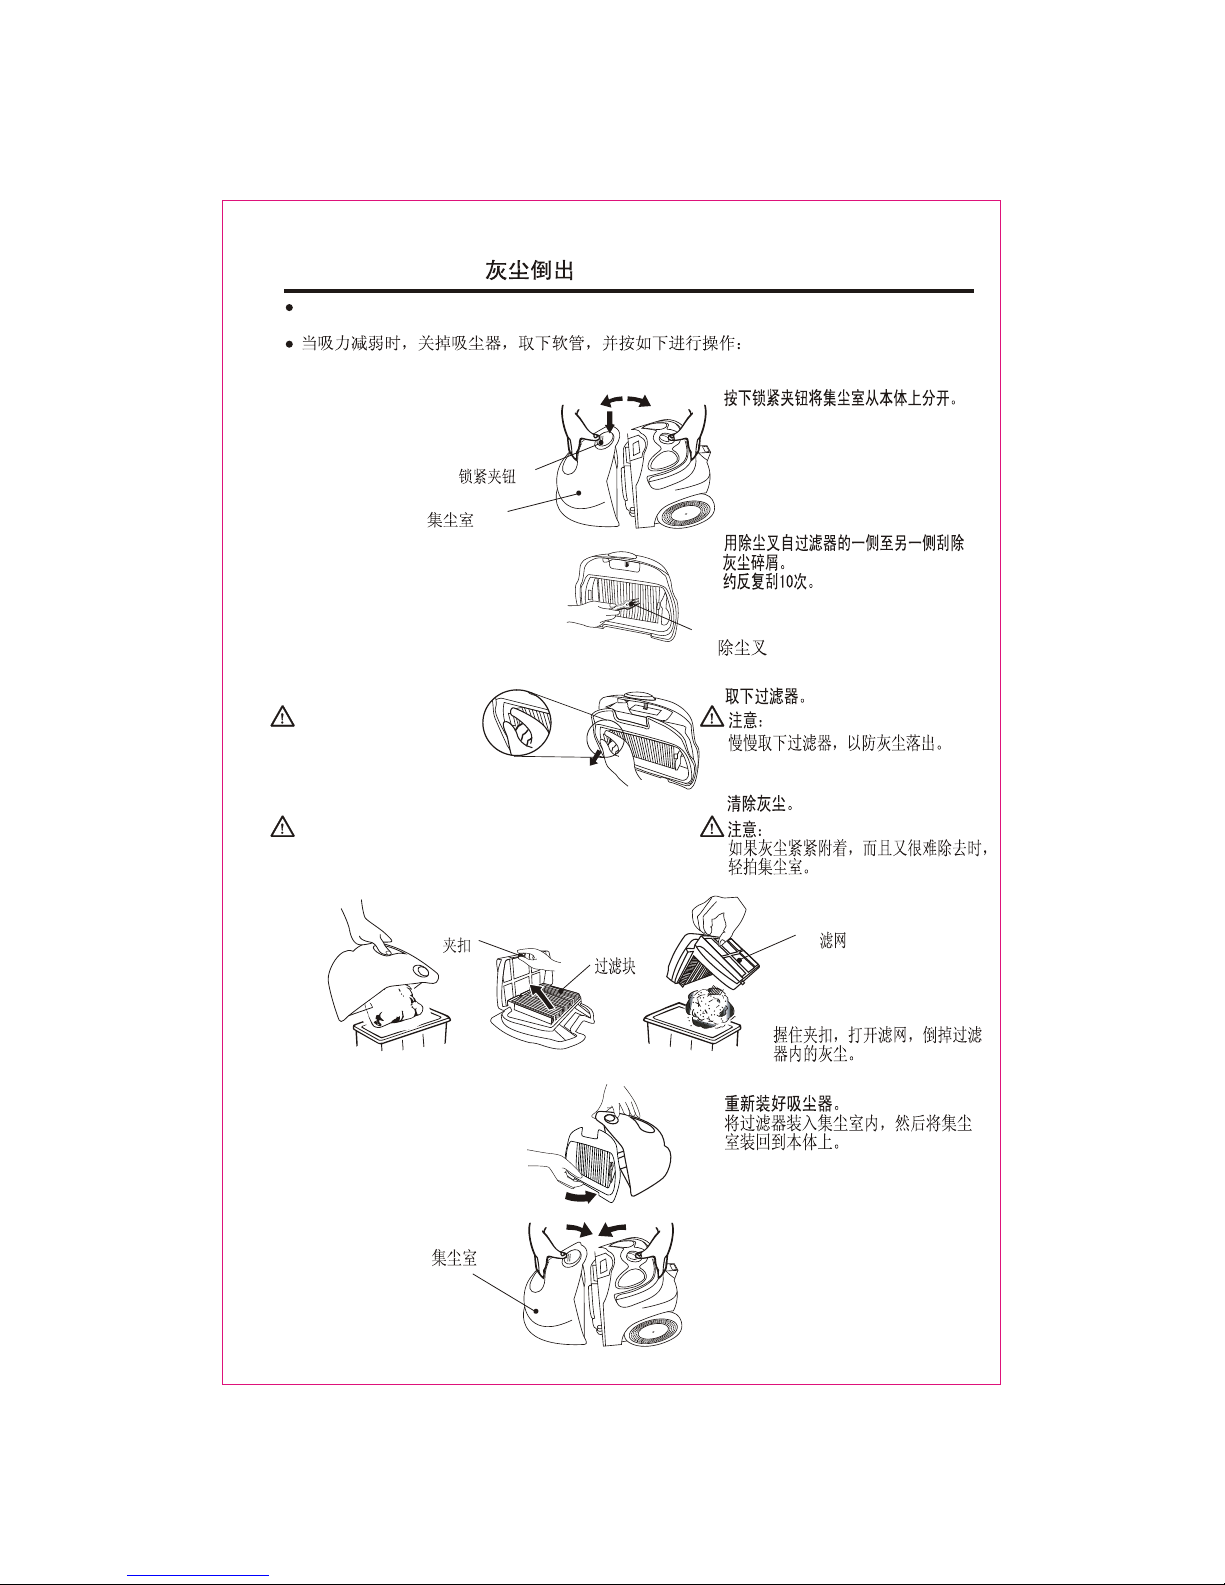
Caution:
If the dust is packed tightly and
difficult to remove, lightly tap the
dust compartment.
DUST DISPOSAL /
1.
2.
3.
4.
Clamp button
Dust compartment
5.
If there is a reduction in suction power, turn off the vacuum cleaner, disconnect the hose and
proceed as follows:
1. To separate the dust compartment
from the vacuum cleaner, push the
clamp button as shown.
2. To remove dust, scrape the filter
from side to side with the
cleaning utensil.
Repeat approximately ten times.
3. To remove the filter.
Caution:
Remove the filter slowly
to prevent the dust
from falling out.
4. Removing the dirt.
5. To reassemble the unit.
Insert the filter in the dust
compartment.
Then attach the dust
compartment section
to the motor section.
Filter
Dust compartment
Cleaning utensil
Pre-filter
Clamp
Hold the clamp to open up the
pre-filter and empty the dirt out
of the filter.
 Loading...