

Page 1

32
Preface
Thank you for purchasing the S103 colour LCD mobile phone. To obtain
the best results from your new phone we advise you to use only Sanyo
approved accessories. Please read this guide before attempting to use
the phone. In particular, be sure to read “Safety Precautions” on pages XX
to XX. Failure to comply with the instructions in the guide may cause
serious harm or violate local laws. It is recommended that you keep the
guide in a safe place for future reference.
Declaration of conformity
We, SANYO Electric Co., Ltd. of 1-1 Sanyo-cho, Daito City, Osaka Japan,
declare under our sole responsibility that the product S103 complies with
the requirements of Article 3.1 (a), 3.1 (b) and 3.2 of the R&TTE 1999/5/
EC Directive, which is based on the following standards, if used for its
intended use.
Applied standards: EN 50360, EN 50361, EN 60950, EN 301 489-1, EN
301 489-7, EN 301 489-17, EN 301 489-24, EN 301 511, EN 301 908-1,
EN 301 908-2, EN 300 328-2
Useful features
This sliding type phone with large TFT colour LCD display enables you to:
• Make and receive video calls.
• Take and send video images or colour, sepia or even black and
white photos using either of the two built-in smart cameras (1.3
megapixel rear camera and 310 kilopixel front camera).
• Send and receive messages with video images, photos, or sound
attached using MMS.
• Send and receive long messages with attached files using Email.
• Use as a video player or an audio player.
• Take video images and photos in the dark using the built-in LED flash
and spotlight.
• Use a wide variety of data formats.
• Display a Worldclock.
• Access SmarTone ‘in’ or other web sites.
• Enjoy Java™ games.
• Transmit data via Bluetooth™, Infrared, or USB.
• Store data on a SD Memory Card.
Page 2

54
Getting started ..................................
Installing the SIM/USIM card and
the battery ............................................
Removing the battery and the SIM/USIM
card
Charging the battery
Using the main menu
Display saving mode
Basic operations..............................
Making a voice call or video call ...........
Receiving a call ......................................
Operations just before you answer.......
Operations during a call ........................
Call Log ..................................................
Profiles....................................................
Hands-free function ...............................
Text entry................................................
Video call ...........................................
Making a video call ................................
Receiving a video call ............................
Operations just before you
answer the video call ...........................
Operations during a video call ..............
Using the still and video camera ........
Still camera (Digital Camera) ..................
Video camera .........................................
Display settings ......................................
Phone settings .......................................
Call settings ............................................
Video calls...............................................
Memory settings .....................................
Connectivity ...........................................
Browser settings....................................
Security settings ....................................
Re-initialising your phone ......................
Organiser ...........................................
Calendar .................................................
Schedule ................................................
To Do list .................................................
Alarm ......................................................
Calculator................................................
Voice recorder.........................................
Notes ......................................................
Worldclock ..............................................
Media player ...........................................
Opening the SIM toolkit menu ................
Using the help guide ...............................
SmarTone ‘in’ ....................................
Web browsing ........................................
Downloading ..........................................
Java™ ................................................
Java™ settings ......................................
Operations while taking a photo
or recording a video ............................
Managing stored images.......................
Call manager .....................................
Creating a new phonebook entry ..........
Assigning the phonebook entry to a
group ....................................................
The Phonebook List ...............................
My numbers ............................................
Displaying the call time ...........................
Messaging .........................................
General information ...............................
Creating a new message .......................
Opening messages ................................
Message settings...................................
Gallery ...............................................
Editing photos/videos............................
Using the SD memory card ..............
Inserting or removing an SD card .........
Formatting the SD card .........................
Using the SD card..................................
DPOF Printing ........................................
Settings .............................................
Opening the settings menu ...................
Settings menu details ............................
Connectivity ......................................
Bluetooth™ transmission ......................
Infrared transmission .............................
Synchronising phonebook entries or
to do tasks ...........................................
Printing ...................................................
Safety Precautions ...........................
Specifications ...................................
Index ..................................................
Table of contents Table of contents
Page 3

76
Getting started
Your SANYO S103
What's inside the box:
S103 phone
AC Adaptor
Lithium-ion battery
User Guide
Stereo headset
Page 4
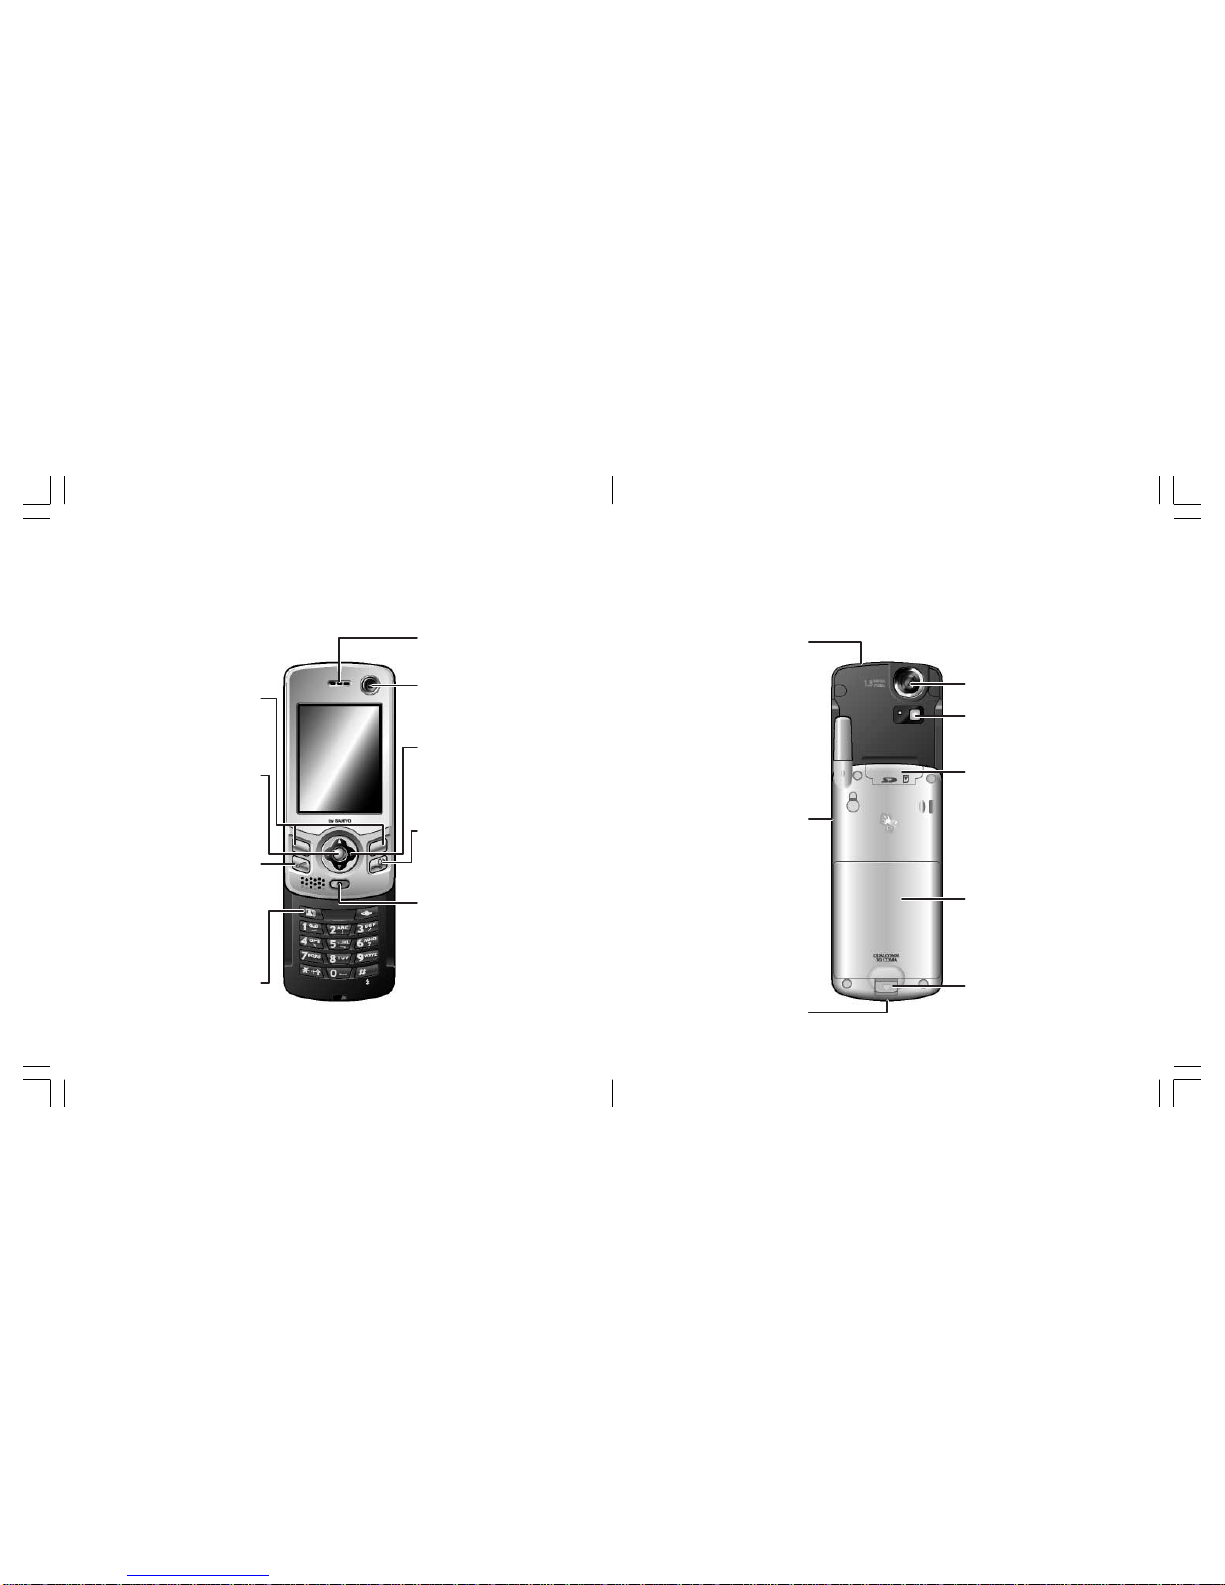
98
Getting started Getting started
Incoming call and charge
indicator LED
Front camera lens
Back/Clear key
Press to silence an incoming
call/video call. Press and hold
to turn Etiquette mode On/Off
from the standby screen. Press
to return to the previous
display or clear numbers/text
when editing/inputting text or
numbers.
Soft keys
Can be used for available
functions when a function
menu option is displayed
on the bottom of the screen.
O key
Press to access the main
menu from the Standby
screen. Press to confirm
after selecting menu items.
Talk key
Makes or receives calls. A
quick press of this key displays
up to 20 received or previously
made calls.
Video Call key
Press to make or receive a
video call.
Navigation pad keys
Use to navigate munus, scroll,
move the cursor position,
adjust the volume etc.
Power/End key
Press and hold to turn the
phone Off/On.
Rear camera lens
Infrared port
Flash & illumination LED
SD card slot cover
Battery
Battery open/close latch
Charger/USB port
Headset/
Earpiece terminal
Page 5

1110
Installing the SIM/USIM
card and the battery
The USIM card is a type of SIM
card for 3rd generation phones
which you get from your operator.
It must be installed first, followed
by the battery.
Handle the SIM/USIM card
carefully because it has metal
contacts which can be easily
damaged by scratching or
bending. Ensure the SIM/USIM
card is kept out of the reach of
small children.
1. Remove the battery as indicated in the diagram.
2. Insert your
SIM/USIM
Card by sliding
it into the card
slot until it clicks into place.
Make sure that the gold
contacts are face down.
3. Ensure that the gold contacts
on the battery are meeting the
gold contacts on the phone.
Slide the battery onto the
contact points using the guides
and press it down until it clicks
into place.
4. Slide the upper part of the
phone upwards so you can see
the LCD display and keypad.
5. Press and hold y for more
than 2 seconds to turn the
power On. The message
“PIN1?” appears.
6. Enter the PIN1 of your SIM/
USIM card and press O.
Note: SIM/USIM cards are sold with a
PIN1 (Personal Identity Number)
already set. Although you can
use the card with the preset
PIN1, if you want to protect the
card from unauthorized use you
should change the number to
one of your own choice. (See p.
XX.)
Caution: If you repeatedly enter an
incorrect PIN1 three times,
the correct PIN will become
locked. Enter the PUK
(Personal Unblocking Key)
when requested and then
enter a new PIN twice to
activate the SIM/USIM card.
(Please contact your retailer
for details about PIN and
PUK.)
Removing the battery
and the SIM/USIM card
1. Turn the power Off by pressing
and holding y.
2. While pressing down and
holding the battery open/close
latch, remove the battery.
3. Push in the SIM/USIM card
slightly and on release the card
will spring out from the card
slot.
4. Pull out the SIM/USIM card.
Charging the battery
The battery is not fully charged at
the time of purchase. Be sure to
charge the battery until the charge
indicator light goes out on the
initial charge.
Pull the latch.1
Remove the battery2
Getting started Getting started
Page 6
1312
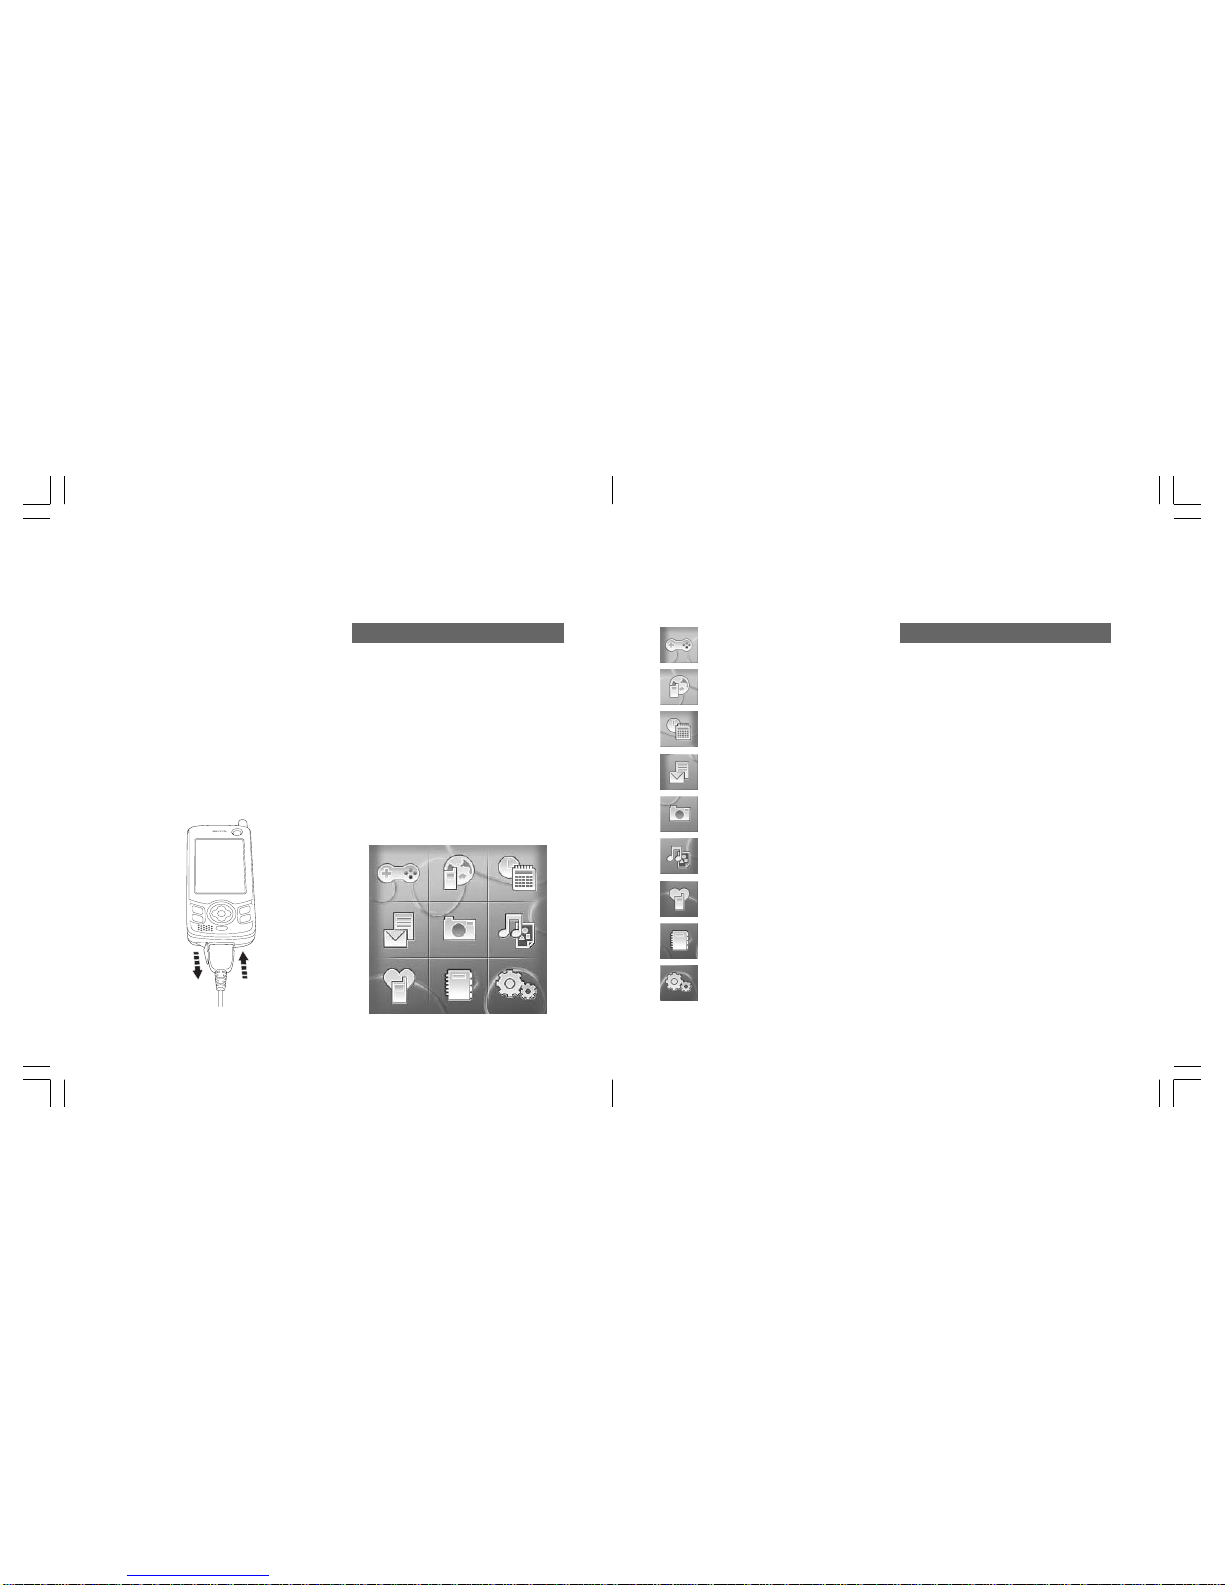
1. Insert the AC plug into an AC
power socket.
2. Insert the connector into the
recharging/USB terminal on the
bottom of the phone.
Note: To remove the AC Adaptor,
press the release buttons on
both sides of the connector of
the AC Adaptor and pull it out
from the phone.
Using the main menu
The main menu is displayed when
O is pressed from the Standby
display.
Use the navigation pad keys (l/r
and u/d), then press [Select] or
O to select a function. The cursor
is initially placed in the middle of
the icons and if you press O
again, the phone accesses the
Camera menu.
Java™ (See p. xx)
Browser (See p. xx)
Organiser (See p. xx)
Messages (See p. xx)
Camera (See p. xx)
Gallery (See p. xx)
Profiles (See p. xx)
Call Manager (See p. xx)
Settings (See p. xx)
Display saving mode
If no key operations are performed
for a certain period of time, the
S103 switches to the Display
saving mode. In the display saving
mode, the display’s light is Off. By
pressing any key the mode is
cancelled and the screen returns
to the previous display. See p. XX
for details about how to set the
time before switching to the
display saving mode.
Getting started Getting started
Page 7

1514
Basic
operations
Status icons CSD packet communication in
progress
Infrared transmission in
progress
Bluetooth™ transmission in
progress
USB communication in
progress
Synchronisation in progress
Secret setting is On
Secret setting is temporarily On
In Silent Profile
In Personal Profile
In Car Profile
In Meeting Profile
In Loud Profile
In Activity Profile
Alarm is On
Connecting to SmarTone ‘in’ or
other WAP sites
In Java™ application mode
Java™ application is
suspended
Getting started
Battery charge indicator
Call in progress
Video call in progress
SD Card (write protection lock
is on) is inserted in the phone
SD Card (write protection lock
is off) is inserted in the phone
There is a voice message
stored at the voicemail service
centre
There is a new message
The message Inbox memory is
full
There is an unread message
There is an unread Push
Service Message
PS packet communication in
progress
Page 8

1716
Making a voice call or
video call
1 Slide open the phone and enter
the phone number you want to
call using the numeric keys.
• To erase a digit, use B.
Press and hold B to erase
all digits.
• Press l after entering a
number and a cursor
appears. Use l / r to move
the cursor where required.
2 Press t to make a voice call
or press v to make a video
call.
3 Press y to end the call.
Receiving a call
1 When you are alerted to a call
press t or O to answer.
2 Press y to end the call.
Making a call by pressing a
numeric key once (Speed dial)
To make a call, just press a singledigit corresponding to the Quick
Dial Number between 2-9 in the
Phonebook.
1 Enter the Quick Dial Number
(from 2 to 9) in the Phonebook.
2 Press and hold t to make a
voice call, or press and hold
v to make a video call.
Operations just before
you answer
Before answering the phone, you
can decrease or mute the ringer
volume, or disconnect the call
when the phone rings.
• To adjust the ringer volume,
press u / d when the phone
rings. To mute the ringer, press
B.
• To disconnect the incoming call
if you do not want to answer it,
press y.
• To divert your calls to another
number, press [Divert] when an
incoming call is detected. See p.
XX for how to set the destination
number.
Basic operations Basic operations
Page 9

1918
Operations during a call
You can adjust the speaker
volume, change the sensitivity of
the microphone, or take a note
during a call.
• To adjust the volume, press u /
d while on the phone.
• To access the Main menu, press
O while on the phone.
• To access other function options
such as whisper or mute etc.
press [Options].
Activating/Releasing call hold
This service enables you to hold
the call until you are ready to
resume talking.
Muting your voice
This function enables you to speak
to another person close by while
listening in on a phone conversation at the same time.
• Press [Options], select Mute and
press O. To release mute, press
[Options] and select Unmute.
Anti-Nuisance function
This function enables you to reject
the incoming call by sending the
caller’s voice back.
• Press [Options], select Echo
Party Voice and press O.
Note: An empty black screen is
transmitted when you use this
function during a video call.
• Press [Hold] to put the call on
hold. To resume the call, press
[Answer].
Whisper Mode
You can raise the microphone
sensitivity to enable yourself to
speak in a soft voice and still be
heard.
• Press [Options] and select
Whisper and press O. To
cancel the Whisper Mode, press
[Cancel].
Notes: Whisper Mode is automatically
cancelled after a call.
This function is not available for
video calls and when using a
headset or hands-free car kit.
Entering a phone number in Dial
Note or Phonebook
You can directly enter a phone
number and store it in Dial Note or
Phonebook during a call.
1 Directly enter a number using
the numeric keys.
2 Press O, select Phonebook or
Dial Note, and press O.
Notes: Up to five numbers can be
stored in Dial Note.
For details about storing
numbers in the Phonebook,
see p. XX.
For retrieving the stored
numbers, see p. XX.
Basic operations Basic operations
Page 10

2120
Call Log
The following instructions explain
how to redial or return calls using
the Call Log.
Opening the Call Log
• In standby mode, press t. The
Call Log appears displaying all
calls. You can also check the
dialled calls or received calls log
by pressing l or r.
Redialling or calling back using
the Call Log
• In Standby mode, press t,
select the number you want to
redial or call back and press t
to make a voice call.
Profiles
When in public areas set up your
profiles so you can receive
incoming calls or messages
without disturbing others with loud
ringer sounds. This phone has six
types of Profiles, and the one
called Silent is selected at the time
of purchase. You can easily mute
the ringer sound or change the
keypad tone volume to suit your
surroundings. For example,
“Loud” and “Activity” are useful
when in noisy surroundings.
Activating or deactivating
Profiles
• Press and hold B.
Call Log options
• Press [Options] from the Call
Log display, select the option
you want to perform and press
O. Note that menu options vary
according to the Call Log menu
type.
Selecting the Profile type
1 Open the Profile display.
• Press O →
2 Select On and press O, and
then select the profile to use
and press O.
Normal
: Ringtone volume, key
pad tone volume,
sound effects volume
and melody volume
can be customised.
Press [Edit] and select
settings for each
option.
Meeting
: All incoming call or
message tones are set
to the quietest. Beep
sounds are generated
when an incoming
voice call or video call
arrives.
Basic operations Basic operations
Page 11

2322
Activity : Caller’s voice volume is
set to the loudest.
Car : Ringers and vibration
are Off.
Loud : All tone volumes are
set to the loudest.
Silent
: Vibration is On, and all
incoming call or
message tones are Off.
Text entry
You can enter Traditional Chinese,
Simplified Chinese and English with
your S103. There are 5 input
methods - Standard, T9 English,
T9 Stroke, T9 PinYin, and Numeric.
The Standard and T9 are used for
entering text, and the Numeric is
used for entering numbers. The
indicators at the bottom left of the
display show the language and the
input mode you are currently using,
except in the numeric mode. For
key assignment, see the table on
p. XX.
Changing the display language
1 In Standby mode, press O,
highlight
and press O.
2 Select Phone Settings and
press O.
Hands-free function
This function raises the sensitivity of
the microphone and the volume of the
speaker so that you can talk handsfree.
Activating the Hands-free
function
1 Press [Options] on the phone
while talking on the phone.
2 Select Hands-free On and
press O.
• To deactivate hands-free,
repeat step 1 and select
Hands-free Off.
Basic operations Basic operations
3 Select Language and press O.
4 Select the language you want
to use from Automatic,
Traditional Chinese, Simpli-
fied Chinese or English.
Changing the Input Language
It is possible to enter text in
another language without changing the current language mode
setting default.
• Press [Options] in the text input
mode, select Input Language,
select the desired language, and
then press O.
Changing the font size
• Press [Options] in text input
mode, select Character Size
and press O, select the desired
font size and press O.
Page 12
2524
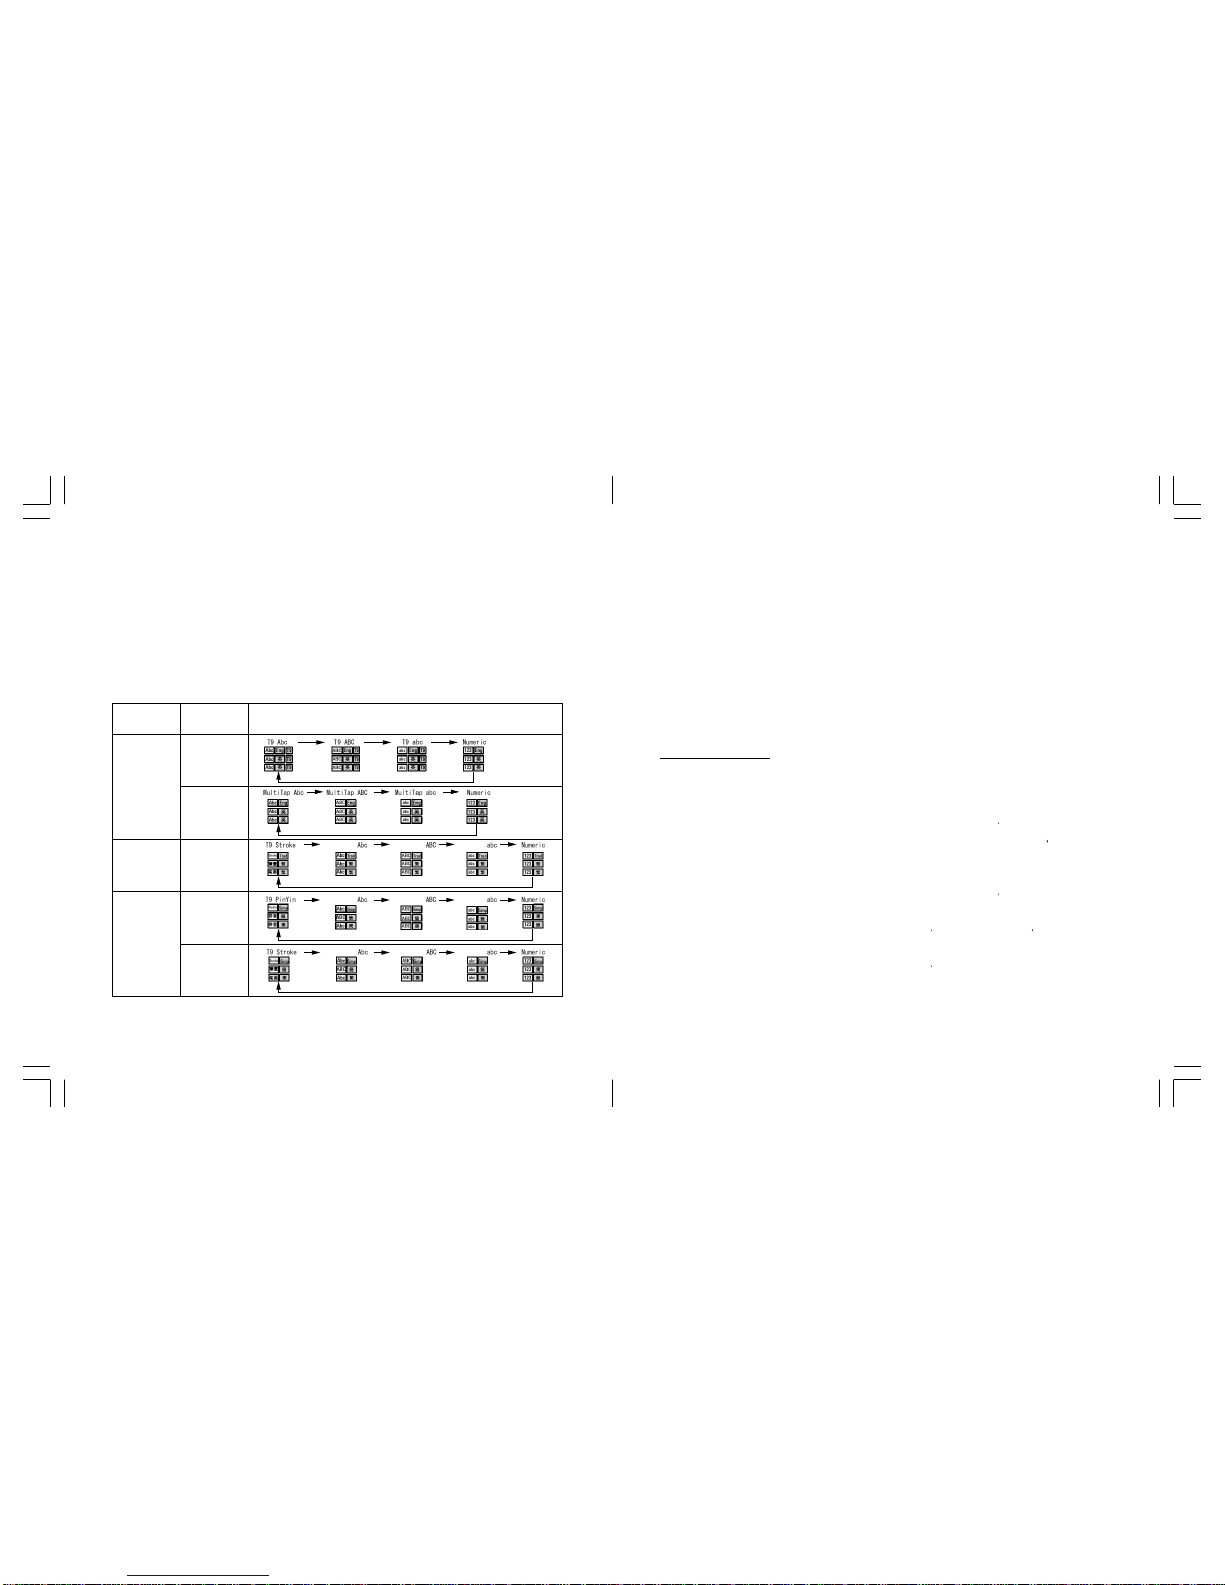
Changing the input mode
Press ; to change the input
mode. The input mode changes
as follows according to the input
Tip: You can also change the input
mode by pressing [Options] and
selecting Input Method or
Numeric Input in text input
mode.
Entering Chinese text
T9 Stroke method
The S103 supports a predictive
text input (T9) system that
automatically searches for and
predicts the best appropriate word
by frequency of use. You can
thereby enter words much faster
and easier.
T9 Stroke is available in Traditional
Chinese and Simplified Chinese.
Press the 1 to 5 keys on
which the stroke is labeled and the
corresponding Chinese characters
appear. Use the navigations keys
to search for the desired charac-
ter. Press O to input the character, and the related character list
to the entered character are
shown. To delete the character
list, you can either press B or
press the numeric key for the next
stroke.
For example:
(Change the input method to T9
Stroke)
• To enter “
部署
”: Press 41,
and O. Search for “部”, press
O, then press d. Confirm the
character by pressing O.
• To enter “
認定
”: Press 41,
and press O twice to confirm
“
言
”. Search for “認”, press
445, then press r select
“
定
” and press O to confirm.
Basic operations Basic operations
Display
Language
Input
Method
English
T9
Standard
Traditional
Chinese
T9 Stroke
Standard Standard Standard
Standard Standard Standard
Standard Standard Standard
Simplified
Chinese
T9 PinYin
T9 Stroke
Input Mode and Language Indicator*
* Upper line: English is used as display language
Middle line: Traditional Chinese is used as display language.
Lower line: Simplified Chinese is used as display language.
language and display language
situations. The Input Mode and
Language Indicators below appear
at the bottom left of the display.
Page 13

2726
T9 PinYin method
In Simplified Chinese, use the 2
to 9 keys on which alphabets
are labeled. When you press the
numeric key, the corresponding
PinYin is displayed according to
the frequency of use. Search for
the desired PinYin using the
navigation keys. When you enter a
character, the related character list
to the entered character are
shown.
For example:
(Change the input method to T9
PinYin)
• To enter “ ”:
• To enter “ ”:
Tip: You can press [Tone] while in T9
PinYin method, to use four tones
to enter a character.
• To enter the word “dog,” press
3, 6 6 6, 4.
• To enter the word “cat,” press
222, wait for a second,
press 2, and then press 8.
T9 method
When you are in T9 mode, just
press each numeric key once that
contains the letters you want to
form a word. T9 then analyses
your key presses and attempts to
complete the word.
For example:
(Change the input mode to T9.)
• To enter the word “Home”, press
4, 6, 6, 3. If your
desired word does not appear,
press d or 0 to display the
word selection window. Use the
navigation keys to select
“home,” and press O.
Entering English text
Standard method
You can enter a letter in Standard
text input mode by pressing the
numeric key on which the letter is
printed. To enter the first letter
indicated on the numeric key,
press the key once. To enter the
second letter, press the key twice,
and so on. If you want to enter
letters that are on the same
numeric key, wait for a second
until the bar cursor appears before
entering the next letter so that
your phone can process the
previous letter.
For example:
(Change the input method to Standard
input.)
• To enter the letter “o,” press 6
6 6.
Notes: To accept the word as it is
before the word selection
window appears, the most
common way is to enter a
space by pressing n.
If you do not see the right word
after pressing d from the T9
word selection window, press
the right Soft key [Spell] to add
the word to the T9 dictionary.
See below for details.
Adding a word to the T9
dictionary
If you cannot find the right word in
T9 mode use the following
procedures to enter the word. The
word is added to the T9 dictionary
at the same time so that you can
find it the next time you perform
the same keystrokes.
Basic operations Basic operations
Page 14

2928
1 After pressing d to display the
word selection window in T9
mode, press [Spell]. The Add
New Word window appears
and the input mode is changed
to Standard text input mode.
2 Enter the word following the
Standard text input procedure.
3 Press [Insert]. The word is
entered and also stored in the
T9 dictionary.
Tip: It is also possible to add a word to
the T9 dictionary after the word is
entered. Placing the cursor at the
beginning or end of the word you
want to add to the T9 dictionary,
press [Range], highlight the word
using the navigation keys, and
press [End]. Select Save to
Dictionary and press O. Press
the left soft key O to confirm.
Entering symbols
1 Press and hold n in text input
mode. The symbol selection
window appears.
2 Select the symbol and press O
to accept it and return to the
message entry field. Or you can
press [CONT] to enter the
selected symbol and retain the
symbol selection window to
enter another symbol.
Tip: From the window displaying a list
of symbols, press n to display
emoticons. Emoticons are
categorized and listed in another
window. Press l / r or [Next PG]
to switch to a different emoticon
category.
Tip: You can re-select the accepted
word. Move the cursor backward
and the word becomes underlined. Press d while underlined
and the word selection window
re-appears.
Entering numbers
The following indicate three
different methods of number entry.
• Press and hold ; repeatedly
until the numeric mode indicator,
123, appears. To enter numbers
in Numeric mode, just press the
corresponding numeric key(s).
• In Standard text input mode,
press the desired numeric key
repeatedly until it appears.
• You can also enter numbers by
pressing and holding the
numeric keys both in Standard
text input or in T9 modes.
Deleting letters
• Press B to backspace and
delete a single letter.
• Press and hold B to back-
space and delete an entire text
field.
Tip: You have another option to delete
letters. Place the cursor at the
point to or from where you wish to
delete letters. Then press
[Options], select Delete and press
O, and then select Delete before
cursor, Delete after cursor or
Delete All.
Basic operations Basic operations
Page 15

3130
Basic operations Basic operations
Other key functions
Entering a space
• In Standard text input or T9
mode, press 0.
Starting a new line
• In Standard text input or T9
mode, press n twice.
Entering punctuation
• In Standard text input or T9
mode, press 1v repeatedly
to scroll through commonly used
punctuation.
Entering the plus (+) sign for
international calls
• Press and hold 0.
Copying and cutting
Copying or cutting a word
1 Place the cursor at where you
want to start copying or cutting
from, and press [Range].
2 Highlight the range you want to
copy or cut using the navigation keys, and press [End]. A
menu selection window
appears.
3 Select Copy or Cut and press
O. The selected data is saved
in the Paste List.
Pasting a word
1 After copying or cutting a word
or sentence, place the cursor
to where you want to paste the
copied/cut part.
2 Press [Options], select Paste
List, and press O. The data
you just copied or cut appears
at the top of the Paste List.
3 Select the data and press O.
The selected data is pasted.
Undo feature
Press [Undo] after you have
performed a pasting or deleting
operation. This cancels the
operation and you are returned to
the previous display.
Page 16

3332
Basic operations
Video call
Key assignment on numeric keys
Note 1: When using T9 mode, you can press 0 key while the word is being input (before its accepted)
and when you move the cursor back over an accepted word to display another list of selectable
words.
Chinese input mode English input mode
T9 Stroke input
T9 PinYin input
Mode
Key
During
message
input
Chinese
Character
?
Chinese
Character
PinYin
Shengd
iao
English
Standard
T9
Numeric
input
mode
1
Stroke input
or symbols
. ,-?!’@:;/_1*#+ . ,- ?!’@:;/_1 1
2 abc abc2 abc2 2
3 def def3 def3 3
4 hg ghi4 ghi4 4
5 lkj jkl5 jkl5 5
6 onm mno6 mno6 6
7 psrq pqrs7 pqrs7 7
8 t tuv8 tuv8 8
9
PinYin
or Stroke
yzwx
wxyz9 wxyz9 9
0 Space 0
; Switch mode
n Special Character List
v
? ! ’ “ – / ·
. ,-?!’@:;/_1
*#+
. ,- ?!’@:;/_1
-?!’ “ @:;/ · _1*#+
w Character input mode / Switch mode
? ! ’ “ – / ·
Page 17

3534
Making a video call
1 Slide open the phone and enter
the phone number you want to
call using the numeric keys.
2 Press v. When the other
party answers the call, images
of the other party and yourself
appear on the display.
• You may not receive an image
of the other party if his or her
phone is not correctly set for
video calls even though their
phone supports them.
3 Press y to end the call.
Tip: You can make a call from
Phonebook (See p. XX.) or from
the Call Log (See below.). When
using Phonebook or a Call Log,
you can call with the phone
closed.
Note: If the other party’s phone does
not support video calls or the
settings are incorrect, the video
call can automatically or
manually be switched to a voice
call. You can set this beforehand by selecting Auto or
Manual in Redial as voice call
Settings. (See p. XX.)
Redialling or calling back using
the Call Log
• In Standby mode press t,
select the number and press
v.
Making a call pressing a
numeric key once (Speed Dial)
To make a video call, just press a
single-digit corresponding to the
Quick Dial Number between 2-9 in
the Phonebook.
Video call Video call
1 Enter the Quick Dial Number
(from 2 to 9) in the Phonebook.
2 Press and hold v to make a
video call.
Note: If you press and hold t instead
of v key in step 2, you can
make a voice call. (See p. XX.)
Receiving a video call
1 When you are alerted to a video
call, press t or O to answer.
• It may take about 10 seconds
for images of the other party
and yourself to appear on the
display.
2 Press y to end the call.
Operations just before
you answer the video call
The same operations are available
before you answer the video call
as in the voice call.
• To adjust the ringer volume,
press
u / d
.
• To mute the ringer, press B.
• To disconnect the incoming call
if you do not want to answer it,
press y.
• To divert your calls to another
number, press [Divert]. See p. XX
for how to specify the destination number.
Page 18

3736
Operations during a
video call
During a video call, you can adjust
brightness, white balance, and
image quality. You can zoom and
switch the sent image between
your own-image and the available
image as well as choose and send
video images stored in the Gallery.
Switching the size and position
of the images
The size and position of your ownimage can be switched to those of
the other party.
• Press [Options], select Swap
Images and press O.
3 Select from High, Medium or
Low and press O.
Note: Select a low frame rate for the
best possible video image
quality.
Cancelling image transmission
Although, by default, your image is
sent in a video call, you have the
choice not to send your ownimage. The alternate image set at
Alternate Video is sent instead.
See p. XX for setting the Alternate
Image.
• Press [Options], select Tur n
Camera Off / Turn Camera On
and press O to cancel image
transmission or to resume image
transmission.
Muting your voice
This function deactivates the
microphone to mute your voice.
This enables you to speak with
another person close by and still
listen in on the conversation at the
same time.
• Press [Options], select Mute and
press O. To release mute,
repeat the same step above and
select Unmute.
Adjusting the frame rate
You can adjust the image frame
refresh rate as desired for display
or when sending an image.
1 Press [Options], select Video
Call and press O
2 Select Frame Rate and press
O.
Switching the front/rear camera
The camera can be switched from
front to rear or vice versa.
• Press [Options], select Switch
Camera and press O.
To reverse the setting, repeat the
same step above.
Note: You cannot use this function
when the phone is closed.
Zooming
You can zoom in or out on the
image you are sending.
1 Press [Options], select Settings
and press O.
2 Select Zoom and press O.
3 Select Enlarge or Normal and
press O.
Video call Video call
Page 19

3938
Adjusting the brightness or
white balance
You can adjust the brightness or
white balance of the image you
are sending.
1 Press [Options], select Settings
and press O.
2 Select Brightness or White
Balance and press O.
3 Adjust the brightness using u /
d, or adjust the white balance
by selecting Auto, Sunny,
Cloudy, Electric Lamp,
Fluorescent 1, or Fluorescent
2 and pressing O.
Sending a video stored in the
Gallery
You can retrieve a video or picture
stored in the phone and send it to
the other party during a video call.
See p. XX for details about the
Gallery.
1 Press [Options], select Send
and press O.
2 Select either Picture or Video
and press O.
3 Select a video or picture from
the Gallery and follow the
instructions on your S103.
Note: Copyright restricted images may
not be displayable.
Activating Hands-free
This function raises the sensitivity
of the microphone and increases
Reducing flicker
Occasionally the image may flicker
due to less than optimal local
frequency. You can use the
“Flicker-free” function to reduce
this problem. Flicker is likely to
occur when you move between
areas using different frequencies
(50 hertz or 60 hertz).
Note: It is possible that the flicker may
not be removed completely
even after you changed this
setting. However, this is not
considered to be a problem with
the phone.
1 Press [Options], select Settings
and press O.
2 Select Flicker-free and press
O.
3 Select 50Hz or 60Hz to best
suit your local environment.
the volume of the speaker
temporarily so that you can talk
hands-free. The setting changed
here returns to the previous one
when you finish the video call.
(See also p. XX)
• Press [Options], select Hands-
free On and press O. To
deactivate hands-free, repeat
the same step above and select
Hands-free Off.
Activating/Releasing Call hold
• Press [Hold]. Puts the con-
nected caller on hold until you
are ready to resume talking.
Note: After putting the call on hold,
press (or O or [Answer]) to
resume talking.
Video call Video call
Page 20

4140
Video call
Using the still
and video
camera
aeraG3aeraG3nihtiW
sutatsllacoediVllacoedivagniruD
etarhserferegamI
hgiH
muideM
woL
sutatsegamignidneS
tnesgniebsiegaminworuoY
tnesgniebsiegamievitanretlA
FFO
sutatsecioV
NOecioV
FFOecioV
desuaremaC
snelaremactnorF
snelaremacraeR
gnimooZ
noitacifingamlamroN
noitacifingameciwT
noitcnufeerf-sdnaH
nociehT.detavitcasinoitcnufeerf-sdnaH
.desutonsinoitcnufehtnehwsraeppasid
oitcnufecnasiun-itnA
nociehT.detavitcasinoitcnufecnasiun-itnA
.desutonsinoitcnufehtnehwsraeppasid
Video call icon indicators
Page 21

4342
You can take still colour photos or
videos with the built-in front or rear
camera. Sending photos or videos
via MMS or Email is also available.
You can use both the phone or
removable memory (SD Card) to
save your favourites. For how to
use a SD Card, see p. XX.
Notes: Set the clock before using any
camera functions. Unless it is
set, the camera will not work.
See p. XX and XX for setting
the clock.
When the phone is closed, the
rear camera is not available.
Still camera (Digital
Camera)
Besides taking and sending a
single photo, you can take
continuous-frame photos, select
the best one and send it.
Taking a photo
1 Slide open the phone and
press and hold O.
2 Press the left soft key
.
3 Aim at a subject using the
display as a viewfinder. If the
phone is closed, the display
shows yourself as if reflected in
a mirror using the front camera
lens.
4 Press O to take a photo. A
shutter tone sounds and the
LED flashes red. A preview is
displayed before saving.
Parts and names
A) Front camera
Use the front camera lens to
display an image of yourself.
The image on the display appears
mirror-reversed.
B) Rear camera
Use the rear camera lens to
display images in front of you.
C) Flash/spotlight
• To re-take but not save the
current photo, press B and
press [YES] to a confirmation
dialogue. The display returns
to the viewfinder in the
camera mode.
4 Press [Save] to save the photo.
• To view the photo you have
saved, go to the Picture
Gallery from [Options].
• The photo may not be stored
depending on the size of the
data and the remaining
memory. It is recommended
that you delete any unneeded
data in the Picture Gallery
before taking a photo.
Tip: If you press [Save] to save a
photo in step 3 above, the folder
selection window appears, and
you can select a Picture Gallery
folder or create your own folders.
(See p. XX.)
Using the still and video camera Using the still and video camera
MEGA
PIXEL1.3
A B
C
Page 22

4544
Sending a photo attached to an
MMS or an Email before saving
it
As soon as you have taken a
photo you can attach it to an
MMS or an Email.
1 Press O after taking the photo.
2 Select MMS or Email and
press O. The display turns into
a message creation screen.
Sending a photo via
Bluetooth™ or Infrared
1 Press [Options] after taking the
photo, select Send and press
O.
2 Select Send via Bluetooth or
Send via Infrared and press
O.
3 Press [YES] to begin sending.
To select and save a photo from
the continuous-frame taken
photos
If you want to only select a
specific photo to save, select the
desired thumbnail photo after
taking the continuous frame
photos and press O before
pressing [Save All]. The selected
photo is displayed enlarged. Use
l / r (or n or ;) from this
display to view the other continuous frame photos taken. Press O
again to save the displayed photo.
Note: Soft key indicators are removed
from the display if that photo is
saved so that you can tell which
photos are already saved.
Taking Continuous-frame
photos (for still camera only)
This feature is not available for
image sizes VGA and SXGA. The
number of shots can be selected
from 16 or 9. For 9 shots, there
are 3 levels of continuous-frame
shooting speeds.
1 Press [Options] while focused a
subject, select Continuous and
press O.
2 Select a number of shot
combinations and continuousframe shooting speeds. The
display changes to a viewfinder.
3 Press O to take the photos.
After all the photos are processed, they are displayed in a
thumbnail format.
4 Press [Save All] to save.
To save all the photos in one file
You can save continuous-frame
taken photos in thumbnail form in
one file. This enables you to view
all the continuous-frame photos at
once.
• Press [Options], select Save as
One Image and press O.
Using the still and video camera Using the still and video camera
Page 23

4746
Video camera
Recording a video
1 Slide open the phone and
press and hold O.
2 Aim at a subject using the
display as a viewfinder.
3 Press O to start recording.
• To stop the video camera,
press
.
• You can press O while
shooting to pause the
recording. Press O again to
continue recording.
4 Press [Save] to save the video.
• To view the video you have
saved, go to the Video Album
from [Options].
Sending a video via Bluetooth™
or Infrared
As soon as you finish shooting a
video you can transmit it via
Bluetooth™ or Infrared.
1 Press [Options] after shooting
the video, select Send and
press O.
2 Select Send via Bluetooth or
Send via Infrared and press
O.
3 Press [YES] to begin sending.
Saving the video in the Gallery
1 Press and hold [Save] just after
shooting a video.
2 Select Video Gallery or a
folder you created and press
O.
Note: You can change the video
recording default time. See p.
XX for details.
The video may not be stored
depending on the size of the
data and the remaining memory.
It is recommended that you
delete any unneeded data in the
Video Album before recording.
Tip: If you press and hold [Save] to
save a video in step 4 above, the
folder selection window appears,
and you can select from the
Video Gallery or folders you have
created. (See p. XX.)
Taking photos while recording a
video
While shooting a video, you can
capture a still image just by
pressing [Capture]. It is automatically saved in the Picture folder
even if you eventually don’t save
the video. Up to 9 still images can
be captured from a video recording.
Sending a video attached to an
MMS or an Email before saving
it
As soon as you finish shooting a
video you can attach it to an MMS
or an Email.
1 Press O after shooting the
video.
2 Select MMS or Email and
press O. The display turns into
a message creation screen.
Using the still and video camera Using the still and video camera
Page 24

4948
Operations while taking a
photo or recording a video
You can adjust brightness, adjust
zoom or white balance, adjust the
Showing the image in the
viewfinder at full-screen size
• Press 0 while monitoring a
subject when the icon is
displayed.
Switching the camera
If the phone is closed, only the
front camera lens can be used.
When the phone is open, you can
select either the camera lens.
Taking a self portrait using the
front camera lens
1 Press [Options] while monitor-
ing a subject, select Switch
Camera and press O.
2 Select Front and press O.
3 Select either camera or video
recording using the soft keys.
photo or video data quality, and
other features using the keys
indicated in the table below.
Note: You can also Press v to
change the camera lens.
Using the flash or spotlight
Various lighting functions are
available. “Auto Flash” enables the
phone to automatically switch on
the light when a photo is being
taken in dark surroundings.
1 Press [Options] while monitor-
ing a subject, select Camera
Settings and press O.
2 Select Lighting Effects and
press O.
3 Select a flash function (for still
camera only) from Auto Flash
and Flash On, or select the
illumination duration.
Note: You can also press n in the
still or video camera mode to
activate the flash/spotlight.
Using the still and video camera Using the still and video camera
yeK
)gnirotinomelihW(
noitcnuF
l /r
senthgirB
)slevel11(
r
.rethgirbyalpsidehtsekaM:
l
.rekradyalpsidehtsekaM:
u /d
mooZ
ezisAGXSehtrofelbaliavatoN(
)otohp
u
nimooZ:
d
tuomooZ:
dlohdnasserP• u /d moozot
.tsaftuo/ni
;
ecnalabetihwehtstsujdA
n
:swollofsathgilrohsalfehtsehctiws,edomaremacllitsehtnI
hsalFotuA → NOhsalF → thgiL → FFO → .niagahsalFotuAotkcaB
:swollofsathgilehtsehctiws,edomaremacoedivehtnI
thgiL → FFO → .niagathgiLotkcaB
w
.AGXSdna,AGV,AGVQ,AGVQQneewtebezisegamiehtsegnahC
.elbaliavanusiAGXS,desusiaremactnorfehtelihW•
neewtebdehctiwsebnacezisegamieht,oedivagnitoohselihW•
.FICQdnaFICQS
v
.aremacehtsehctiwS
0
.deyalpsidsinehwelbaliava;ezisyalpsidehtsegnahC
Shortcut keys for adjusting zooming or brightness and other items
Page 25

5150
Setting the image quality
1 Press [Options] while monitor-
ing a subject, select Image
Settings (Video Settings) and
press O.
2 Select Quality and press O.
3 Select Superfine, Fine, or
Normal and press O.
Superfine: Highest image quality but
large file size. Not recommended if you want to save
many files as it consumes
more memory.
Fine: Highly detailed image qual-
ity.
Normal: Standard image quality and
relatively small file size so
you can save many files.
Adjusting lighting compensation
(For still camera only)
Your S103 is able to adjust the
lens exposure to suit various
scenes.
1 Press [Options] while monitor-
ing a subject, select Image
Settings and press O.
2 Select Scene and press O.
3 Select Normal, Night Scene,
or Light Shielding and press
O.
Using the Self-timer
1 Press [Options] while monitor-
ing a subject, select Camera
Settings and press O.
2 Select Self-timer and press O.
3 Select a time before the shutter
is released and press O.
4 Press O to start the count-
down.
Note: A beep sounds once every
second starting 3 seconds
before the shutter is released.
The flashing LED colour
changes from green to red 3
seconds before the shutter is
released.
Setting the Shooting Time (For
video camera only)
This function allows you to set the
duration of a video recording time.
The recording stops automatically
after the set time.
1 Press [Options] while monitor-
ing a subject in the video
camera mode, select Shooting
Time and press O.
2 Select a recording time and
press O.
Using the still and video camera Using the still and video camera
Adjusting the brightness or
white balance
The colour of a photo can differ
depending on the lighting source,
be it natural or incandescent light.
You can compensate for the
difference by using the white
balance to adjust the colour.
1 Press [Options] while monitor-
ing a subject, select Image
Settings (Video Settings) and
press O.
2 Select White Balance and
press O.
3 Select the white balance type
and press O.
Note: You can also adjust the white
balance by pressing v while
monitoring the subject.
Page 26

5352
Note: The recording time options vary
according to the video data
quality. If Maximum is selected,
the available maximum
recording time is displayed while
recording.
Taking a photo with a frame (For
still camera only)
You can add a frame to a photo
before it is taken. Note that when
a photo is taken with a frame, you
cannot remove the frame afterwards. Image setting must be on
QQVGA, or QVGA.
1 Press [Options] while monitor-
ing a subject, select Image
Settings and press O.
2 Select Frame and press O.
3 Select On and press O. A
frame appears.
• In the still camera mode: QQVGA
(120*160) → QVGA (240*320) →
VGA (640*480) → SXGA
(1280*960, unavailable for the
front camera lens) → Back to
QQVGA (120*160) again.
• In the video camera mode: SQCIF
(128*96) → QCIF (176*144) →
Back to SQCIF (128*96) again.
Adding special effects to a
photo/video
You can make the subject look
different by adding special and
artistic effects.
1 Press [Options] while monitor-
ing a subject, select Image
Settings (Video Settings) and
press O.
2 Select Special Effects and
press O.
4 Press [Prev.] or [Next] to
change the frame pattern and
press O to select.
Changing the photo (video data)
saving size
You can select photo (video data)
size to store. The larger the size is,
the better the data quality is.
1 Press [Options] while monitor-
ing a subject, select Image
Settings (Video Settings) and
press O.
2 Select Image Size and press
O.
3 Select a photo size (video data
size) and press O.
Note: You can also press w while
the still camera or video camera
is activated, and the data size
will change as follows:
3 Select On and press O. The
screen turns to Sepia colour.
4 Press [Prev.] or [Next] to
change the special effects and
press O to select.
• The available patterns are:
Sepia, Black and white, Red,
Green, Blue, Purple, and
Negative.
Inserting time and date (Date
Stamp) (For still camera only)
This function enables you to add
time and date to a QQVGA or
QVGA sized still image.
1 Press [Options] while monitor-
ing a subject, select Image
Settings and press O.
2 Select Date Stamp and press
O.
Using the still and video camera Using the still and video camera
Page 27

5554
3 Select a pattern and press O. If
you select Off, no date stamp
is made.
• You can also change the date
stamp colour. To do this,
press [Prev.] or [Next].
Recording a video without
sound (For video camera only)
1 Press [Options] while monitor-
ing a subject, select Video
Settings and press O.
2 Select Voice and press O,
then select Off and press O.
Setting a shutter capture tone
1 Press [Options] while monitor-
ing a subject, select Camera
Settings and press O.
2 Select Shutter Tone and press
O.
3 Select a shutter tone pattern
and press O.
• Each preset tone sounds
when highlighted for you to
confirm before selecting.
Reducing flicker
Occasionally the image may flicker
due to less than optimal local
frequency. You can use the
“Flicker-free” function to reduce
this problem. Flicker is likely to
occur when you move between
areas using different frequencies
(50 hertz or 60 hertz).
Note: It is possible that the flicker may
not be eliminated completely
even after the setting is
changed. However, this is not
considered to be a problem with
the phone.
1 Press [Options] while monitor-
ing a subject, select Camera
Settings and press O.
2 Select Flicker-free and press
O.
3 Select 50 Hz or 60 Hz and
press O.
Adding a Theme to the edge of
the photo or video
You can add or change the Theme
(frame) of a photo or video.
1 Press [Options] while monitor-
ing a subject, select Camera
Settings and press O.
2 Select Theme and press O.
3 Press [Prev.] or [Next] to
change the Theme type and
press O to select.
Selecting the storage location
(SD Card or Handset)
Before saving, you can select to
save your photos or videos either
on the handset or on the inserted
SD Card.
1 Press [Options] while monitor-
ing a subject, select Camera
Settings and press O.
2 Select Storage Device and
press O.
3 Select Handset or Memory
Card and press O.
Checking the remaining memory
You can check how much memory
has been used and remains for
storing as a percentage and in
megabytes.
Using the still and video camera Using the still and video camera
Page 28
5756
Managing stored
images
Accessing the Picture Gallery
and the Video Gallery
• In Standby mode, press O,
highlight
and press O.
For details about operations on
stored photos or videos, see pp.
XX to XX in the Gallery section.
• Press [Options] while monitoring
a subject, select Memory
Status and press O.
Note: You can switch between
checking the remaining memory
on the handset and on the SD
Card by pressing [Handset] or
[Mem. Crd.].
Referring to the on-screen Key
Guide
• Press [Options] while monitoring
a subject (or recording a video),
select Key Guide and press O.
Use u / d to view other
guidance items. Press O or B
to return to the monitoring (or
recording) display.
Using the still and video camera Using the still and video camera
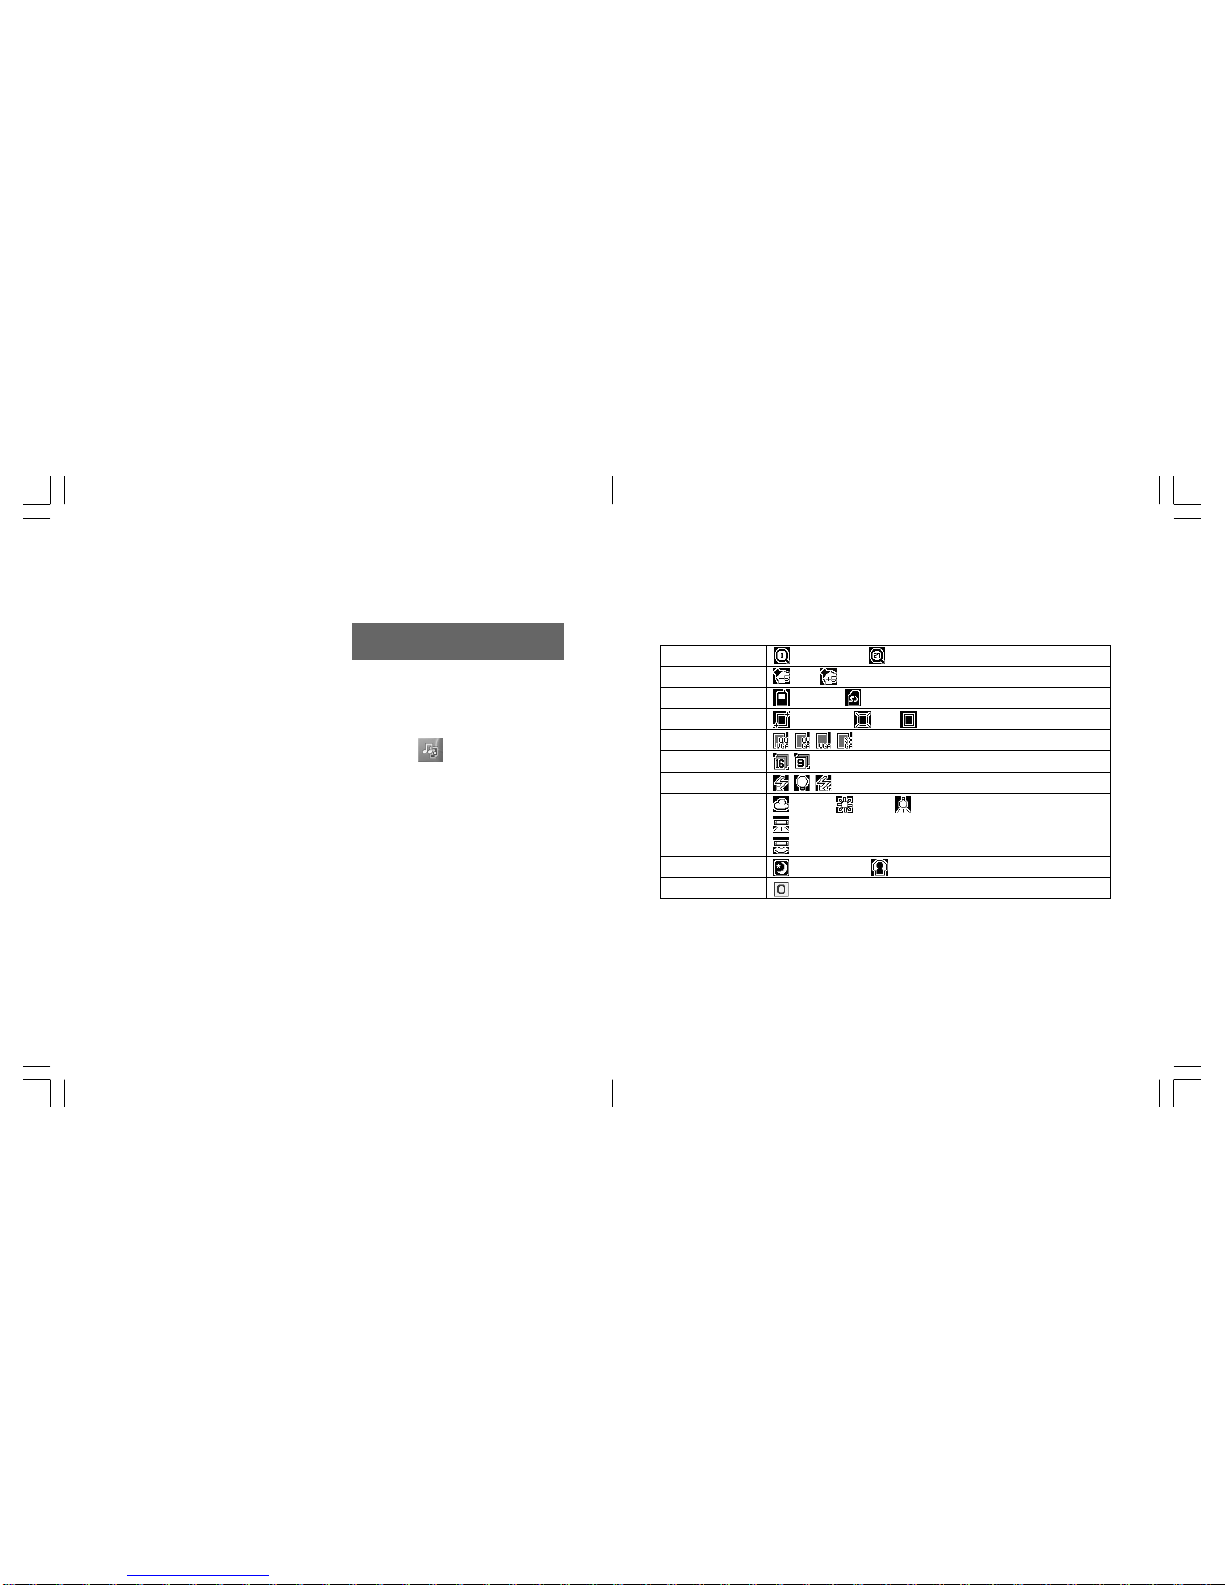
Still and video camera icons
* For still camera only
Zoom
Brightness
Storage Device
Quality
Image Size
Continuous*
Lighting Effects
White Balance
Scene
Display Size
Zoom in ←→ Zoom out
←→
Handset SD card
Supersine Fine Normal
Cloudy Sunny Electric Lamp
Fluorescent light (white colour)
Fluorescent light (daylight colour)
Night Scene Light shielding
(Changing size available using 0)
Page 29

5958
Call manager
Page 30

6160
The Call Manager consists of
Phonebook entries, Call Logs and
My Numbers (Personal information).
You can store information about
people you frequently call in the
Phonebook and your own
information in My Numbers. In the
Phonebook you can store multiple
phone numbers, Email addresses,
and so on. You can also use the
Phonebook to dial phone numbers
and compose Email, SMS or MMS
directly. Phonebook entries on the
SIM/USIM card are stored in the
Contact Location (Quick Dial
Numbers) 0 to 249. The numbers
from 250 to 749 are preset to
SmaTone service numbers.
Entry items and icons in a
phonebook entry
Main contact page
Creating a new
phonebook entry
1 In Standby mode, press d,
press [Options], select Add
New, and then press O.
2 Select the desired item and
press O to enter the information for the new phonebook
entry.
• Phonebook entry information
stored on the phone consists
of the default phonebook
entry screen, Personalised
screen, and Other screen.
Press l / r, to display the
Other screen. Phonebook
entries on the SIM/USIM card
are limited to the default
contact information screen
only.
3 Press [Save] when finished
entering.
Personalised page
Call manager Call manager
Other page
• For phonebook entry saved on
the SIM/USIM card, you cannot
store the last name and the
company name as well as items
in the Personalised page and
Other page as shown on left.
• When assigning a Contact
Location (Quick Dial No.), the
smallest available number is
automatically assigned when
you start creating a new
phonebook entry. If you want to
edit the number, use u / d or
enter numbers directly into the
entry fields. (Limited to 3 digits).
Quick Dial No.
First Name
Last Name
First name reading
Last name reading
Company Name
Phone Number
Email Address
Group
Image
Contact Location (Quick Dial No.)
Sets a ringtone for a voice call when On.
Sets a ringtone for a video call when On.
Sets a ringtone for SMS when On.
Sets a ringtone for MMS when On.
Sets a ringtone for Email when On.
Nickname
Job Title
Birthday
Street address
URL (Web page)
Note
Sets/indicates a secret entry
Page 31

6362
Viewing or editing a phonebook
entry
1 In Standby mode, press d to
access the Phonebook.
2 Select the entry to view, press
O, and press [Edit].
3 Select the item to change and
press O. Use l / r to
navigate your way to other
phonebook entry display
screens and u / d to move up
and down phonebook entry list.
4 Make the changes and press
[Save].
2 Select Phonebook Settings
and press O, and then select
Manage Groups and press O.
3 Select the group you want to
edit and press O. The Group
Details display appears.
• Refer to steps described on
p. XX for how to set a
notification pattern.
4 Press [Save] to complete the
setting.
Changes the icon to your
favourite
Edits the group name
Assigns a notification pattern
to the group for when you
receive a voice call from the
group.
Assigns a notification pattern
to the group for when you
receive a video call from the
group.
Assigning the phonebook
entry to a group
If you assign each phonebook
entry to a group, searching
phonebook entries becomes a lot
easier. You can set the same type
of notification sound to the same
group of people.
1 Open a phonebook entry,
select
and press O.
2 Select the group that you want
to assign the phonebook entry
to and press O.
Editing the group name or
assigning a group notification
pattern
1 Open the Phonebook entry list
display and press [Options]
Assigns a notification pattern
to the group for when you
receive a SMS from the
group.
Assigns a notification pattern
to the group for when you
receive a MMS from the
group.
Assigns a notification pattern
to the group for when you
receive an Email from the
group.
Note: You can set sound, volume,
display pattern, and notification
durations for the notification
pattern.
Call manager Call manager
Page 32

6564
The Phonebook List
The Phonebook List displays the
names of your phonebook entries
in alphabetical order. If you want,
you can sort the Phonebook List
in several other ways to make
searching easier according to the
situation.
Caution: Always keep a hard copy of
the phonebook entry
information separately or
transfer them to your PC
using Bluetooth™ or
Infrared, since data stored in
phonebook entry in your
phone memory may be lost
in rare cases of accidental
malfunction or if the battery
is not installed for a long
time.
Using English Search to call
someone from the Phonebook
List
1 In Standby mode, press d to
open the Phonebook List.
2 Press the numeric key on which
the first letter of the entry’s first
name is printed. For example,
for “John,” press 5. The
cursor moves to the corresponding name group J, K, and
L in alphabetical order.
3 Select the entry to call and,
• Press t to make a voice call.
Or
• Press
or v to make a
video call. Your phone will call
the person’s default number.
To call other phone numbers
the person has, open the
entry and select a number.
Refer to “Calling someone
Accessing the Phonebook
• In Standby mode, press d.
• In standby mode, press O,
select
and press O, then
select Phonebook and press O.
Searching the Phonebook
1 Press [Options] in the
Phonebook entry list display,
select Search, and then press
O.
2 Select the desired search
parameters and press O.
3 Select the desired phonebook
entry.
from the Phonebook display”
as indicated below.
Tip: You also can open the Phonebook
in alphabetical order by pressing
and holding the corresponding
numeric key from the Standby
display. For example, for “John,”
press and hold 5 in Standby
mode.
Calling someone from the
Phonebook display
1 In Standby mode, press d to
access the Phonebook.
2 Select the phonebook entry
and press O to open the entry.
3 Select the number to call, and;
• Press t to make a voice call.
Or
• Press
or v to make a
video call.
Call manager Call manager
Page 33

6766
Finding a phonebook entry by
entering a name
You can enter the person’s first
name, last name, or company
name to search and make a call.
Even entering part of the name
can be used to perform this
search.
1 In Standby mode, press d to
open the Phonebook.
2 Press [Options], select Search
and press O, and then select
Name Search and press O.
3 Enter the name (either first
name, last name, or company
name) and press O.
Phonebook entries corresponding to the name are displayed.
Note: If secret phonebook entries are
included, another selection
window appears. Mark Secret
Data and Normal Data to
delete both, or mark Normal
Data only, if you do not want to
delete secret entries. See below
for how to set the phonebook
entry as a secret entry.
Setting the phonebook entry as
a secret entry
Use this feature after setting
Secret mode to On. If Secret
mode is set to Off, the secret
setting icon
will not appear in
the phonebook entries’ “Other”
display. For details about Secret
mode, see p. XX.
1 Open the phonebook entry
display you want to hide from
others.
Deleting a phonebook entry, all
entries or selecting an entry to
delete
1 In Standby mode, press d to
open the Phonebook.
2 Select the entry to delete, press
[Options], then select Delete
and press O. A selection
window appears.
3 • To delete one, select Delete
One and press O. Then
press [YES] to confirm.
• To delete all, select Delete
ALL and press [YES] to
confirm.
• To delete selected, select
Delete Selected, use the
navigation padkeys to mark
the entries to delete by
pressing O, and then press
[Execute]. Press [YES] to
confirm.
2 Press r to go to the screen
titled Other, and then select
and press O.
3 Select On and press O. Now
the entry is saved as a secret
entry.
Note: To hide the phonebook entry, go
to Secret mode and select Off.
If you want to display these
secret phonebook entries, set
Secret mode to On.
Sending a message from a
phonebook entry
1 Open the phonebook entry to
which you want to send a
message, or select the
phonebook entry in the
Phonebook.
2 Press [Options], select Create
Message and press O.
Call manager Call manager
Page 34

6968
3 Select a phone number or
Email address you want to
send the message to and press
O.
4 Select SMS, MMS, or Email.
Follow the steps described on
p. XX.
Registering a phonebook entry
as a schedule entry
You can r egister a future event for notification such as a birthday etc.
1 Open the phonebook entry you
want to register as a Schedule
entry.
2 Press [Options], scroll down to
Save to Schedule, and then
press O. You have two saving
options; Save as Normal and
Save as Secret.
My numbers
Saving your personal data (My
Numbers)
1 In Standby mode, press O,
highlight
and press O.
2 Select My Numbers and press
O. The My Numbers display
(My Numbers 1 page) appears
with the number of your phone
inserted.
3 Press [Options], select Edit and
press O.
4 Enter your security code and
press O.
5 Select the item and press O to
edit each item.
6 After editing each item, press
O.
7 Press [Save] to finish.
3 Select Save as Secret if you
want to save it as a secret entry
or select Save as Normal if
you want to save as a general
entry.
Entry items and icons
• Use l / r to change between
pages.
My Numbers main page
First Name
Last Name
First name reading
Last name reading
Company
Job Title
Phone number 1
Email Address 1
Image
My Numbers secondary page
Phone number 2
Phone Number 3
Phone Number 4
Phone Number 5
Email Address 2
Address 1
Additional Info page
Address 2
Note
Birthday
URL
Call manager Call manager
Page 35

7170
Messages
Sending your own personal data
(My Numbers)
1 Open the My Numbers display
and press [Options].
2 Select vCard and press O.
3 Select Attach to Message and
press O.
4 Select [Yes], then select either
SMS, MMS or Email and press
O.
5 Select With Image or Without
Image and press O.
6 Enter your message in the
message and subject fields if
necessary and press O after
each.
7 Press [Send] to finish.
Displaying the call time
You can check the last call time
or total call time.
1 Open the Call Timers display.
• Press O → → Call Log
→ Call Timers
2 Select Total Call or Last Call
and press O.
Note: The times are displayed in
hours, minutes, and seconds.
Call manager
Page 36

7372
General information
The S103 supports various types
of messaging services such as
SMS, MMS, and Email. With MMS
you can create, insert and send
pictures or videos. Using Email,
you can attach several files such
as pictures, videos, or sound files
and send them to any desired
Email address. You may need to
subscribe for an Email account in
order to use Email. Contact your
nearest SmarTone representative.
You need to first setup your Email
account in order to use Email.
Setting up an Email account
1 In Standby mode, press
[Messages], select Message
Settings and press O.
2 Select Email and press O.
Creating a new message
1 In Standby mode press
[Messages] and select Create
Message and press O.
2 Select MMS, SMS or Email
and press O.
3 Enter the required necessary
information into each field and
press O once your finished
each.
4 Press [Send]. Refer to Creating
an MMS to add picture, video
or sounds to your MMS
message.
Tip: To Cc: or Bcc: your message in
MMS or Email, when entering the
recipients phone # into the To:
field, press [Options] and select
Add Field.
3 Select Account and press O.
4 Select Email Address and
press O.
5 Enter your Email address and
press O.
6 Select POP3 Server and press
O.
7 Select Login and press O.
8 Select POP3 Server Address,
Port Number, POP3 Account
Name or Password, press O
and enter each item.
9 Press [Save].
10Press B, select SMTP
Server and press O.
11Select Login and press O.
12Select SMPT Server Address,
Port Number, SMPT Account
Name or Password press O
and enter each item.
13Press [Save]. Your settings are
now complete.
Creating an MMS
You can send a message with a
picture, video, sound, or with
slides.
Messages Messages
Press [Options] from this display
for the following functions.
Page 37

7574
Inserting a still image into a
message
1 Press [Options], select Picture
and press O.
2 Select From Gallery to retrieve
a stored photo or select Take
Picture to take a photo and
insert it into the message.
Inserting video/sound into a
message
1 Press [Options], select Video or
Sound and press O.
2 Select From Gallery to retrieve
a stored video/sound clip or
select Record Video and press
O to shoot a video and insert
into the message or select
Voice Recorder and press O
to make a voice recording and
insert into the message.
Changing the text colour or size
1 Press [Options], select Text
Options and press O, and
then select Text Colour or Text
Size and press O.
2 Select the desired colour or
size using the navigation keys
and press O.
Sending a message from
Phonebook
1 Select or open the phonebook
entry to which you want to
send message.
2 Press [Options], select Create
Message and press O. S
3 Select the message address
and press O.
4 Select SMS, MMS, or Email
and press O.
5 Enter your message in the
message field and press O.
Inserting slide pages
1 Press [Options], select Slide
and press O.
2 Select New Slide and press O.
3 Select Insert Before or Insert
After and press O.
Insert Before: Inserts a slide before the
current slide.
Insert After: Inserts a slide after the
current slide.
Setting the transition time for
slides
By default, the transition time for
slides is set to one second. You
can change this duration.
1 Press [Options], select Slide
and press O.
2 Select Slide Interval and press
O.
3 Enter the time in seconds and
press O.
6 Press [Send] to send the
message.
Useful message functions
Adding a signature to the message
Your name, company, job title,
phone number or Email address
can be added to your message as
a signature.
• While entering your message,
press [Options], select Signa-
ture and press O.
Note: To edit the signature, go to Look
& Feel settings. (See p. XX.)
Select Signature and press O,
and then select Edit Signature
and press O. After entering/
editing your signature, set On/
Off on the Personalisation
display to Always.
Messages Messages
Page 38

7776
Messages Messages
Adding multiple recipients
You can add up to a maximum of
20 recipients to any one message
using MMS and Email.
1 At the address input display,
press [Options], select Add
Field and press O.
2 Select “To:”, “Cc:”, or “Bcc:”
and press O. The correspond-
ing new address input field
appears.
Adding attachments
You can attach files to the
message you are sending using
MMS and Email.
1 Press [Options] from the MMS
or Email display, select Attach-
ments and press O.
2 Select Attach Image, Attach
Sound, Attach Video, or
Attach File and press O.
3 Select the file you want to
attach to the message.
Note: You can also attach a new file
(Picture, video or voice
recording) to the message by
selecting Take Picture, Voice
Recorder, or Record Video in
step 2 above.
Requesting a Delivery Report or a
Read Report for a MMS message
you are creating
1 Before sending, from the input
display, press [Options], select
Settings and press O.
2 Select Read Report or
Delivery Report and press O.
3 Select On and press O to
activate.
Read Report:
Requests notification that the
recipient has opened the
message.
Delivery Report:
Requests notification that the
message has been delivered.
Tip: You can also define these settings
before starting to create a
message. Go to Message
Settings from the Messaging
menu. See p. XX for details.
Assigning a notification sound for
message arrival
You can assign a notification
pattern to be heard when you
receive a message and to
distinguish the sender of the
message. See p. XX for details.
Saving the message as a draft
• Press [Options] from the input
display, select Save Draft and
press O. The message is saved
in the Drafts folder.
Opening messages
1 When a message arrives, press
O to view right away.
2 Select the message and press
[View].
3 When finished reading or
displaying the message, press
B to return to the Inbox and
check other new messages or
press y to return to the
Standby display.
Page 39

7978
Replying to the received message
1 Open the Inbox and select the
message you want to reply to.
2 Press [Options], select Reply or
Reply All and press O.
3 Enter the message text and
press O.
4 Press [Send] to send the
message.
Forwarding the message to
another person
1 Open the Inbox and select the
message you want to forward.
2 Press [Options], select Foward
and press O.
3 Fill in the “To:” and/or “cc:”
fields and press O after each.
4 Enter the message text and
press O.
5 Press [Send] to send the
message.
Managing Sent or Draft messages
1 To open sent or draft mes-
sages, press O in Standby
mode, highlight
and press
O.
2 Select Send As or Drafts and
press O.
3 Select the message you want
to open and press O.
Message settings
Changing your Message
Settings
1 Press O, highlight
and
press O.
2 Select Message Settings and
press O.
3 Select SMS, MMS, Email, or
Look & Feel and press O.
SMS settings
Message Centre: Selects or edits
the message centre
number for SMS
messages.
Sending: Selects the following
items.
Messages Messages
Message Format: Selects whether
to send the SMS
message as a normal
SMS message or fax or
voicemail.
Reply Path: Selects to switch On
or Off.
Expiry Time: Selects a pre-set
time limit for delivery of
SMS messages.
Delivery Report: Switch to On to
request notification that
a SMS message has
been delivered.
MMS settings
Sending:
Expiry Time: Sets the duration for
how long messages
are saved on the
server.
Page 40

8180
Delayed Delivery: Selects the
amount of time to
delay messages when
sending.
Reports: To request notification
that an MMS message
has been opened by
the recipient, set Read
Report to On. To
request notification that
an MMS message has
been delivered, set
Delivery Report to On.
Receiving:
Download Msg.: Selects whether
or not to defer mes-
sage reception
according to the
message capacity.
Options are Immedi-
ate, Deferred, or
Defer if over 1 KB
(10KB, or 50KB).
Intl. Download Msg.: Selects
whether or not to defer
message reception
when you are travelling
overseas (roaming)
according to the
message capacity.
Options are Immedi-
ate, Deferred, or
Defer if over 1 KB
(10KB or 50KB).
Anonymous Reject: Switch to On
to reject messages
coming from phone
numbers not saved in
your Phonebook.
Reports: Selects how to respond
to an MMS message if
the sender is requesting a Delivery Report or
Read Report notification upon receipt of an
MMS message. Select
from Delivery Report
Allow or Read Report
Allow.
Email settings
Polling Interval: Selects the time
frequency for polling
Emails.
Polling Size: Selects how many
messages are to be
downloaded when
polling.
Max Message Size: Sets a limit to
the Email size for
downloading, or
downloads messages
without any restriction
on the Email size.
Delete Preference: Selects From
Phone Only if you
want to keep messages on the server
when deleting messages, or From Phone
& Server if you don't
want to keep messages on the server
and phone.
Account: Creates or edits Email
account details. Select
from Email Address,
Incoming Server,
Outgoing Server.
Look & Feel settings
Use this setting to change the look
of message contents. For example, you can enter or edit a
signature (Personalized text
template), or change message
fonts.
Messages Messages
Page 41

8382
Gallery
Font Size: Selects a small or
standard font size for
the message you are
reading.
Slide Interval: Sets the default
slide duration time in
MMS messages.
Signature: Select Edit Signature
to edit the signature or
Signature Setting to
turn the signature On
or Off.
Messages
Page 42

8584
Gallery Gallery
The Gallery is a data management
function. It uses folders to manage
various kinds of data stored in the
phone or on the SD Card.
Accessed from the main menu,
you can go to the Gallery to sort,
preview, move, copy, or delete
files, or edit file names. You can
also associate an image with a
Phonebook entry or attach it to a
message from the Gallery.
Opening stored files
1 Open the Gallery display.
• Press O →
2 Select a folder from the list and
press O.
3 Select a file you want to open
and press O.
Creating a new folder
1 Press O, highlight and
press O.
2 Press [Options], select Create
Folder and press O.
3 Edit the folder name and press
O.
Using files for other functions
You can set a file in the Gallery to
be used as wallpaper, an incoming
call notification, or a message
arrival notification.
1 From the Gallery display folder
select and open the file you
want to use for another
function.
2 Press [Options], select Settings
and press O.
3 Select the function item from
Wallpaper, Ringtones, Hold
Settings, Alternate Img/
Video, Phonebook, Calendar,
Schedule, or Alarms and
press O.
Notes: Additional functions that use
Ringtones are:
Incoming Call, Incoming
SMS, Incoming MMS,
Incoming Email, Incoming
Delivery Report, Incoming
WAP Alert, or Incoming Video
Call.
Additional functions that use
Sound Effects are Slide
Opening (Sound made when
sliding the phone open) and
Slide Closing (Sound made
when sliding the phone closed).
Importing vObjects for use in
your phone
Any vObject transmitted via
Bluetooth™ or Infrared can be
imported into the Phonebook,
Schedule or Notes.
vCard → Phonebook entry
vCalendar → Schedule entry,
ToDo entry
vNote → Note entry
1 Open the Documents folder in
the Gallery.
2 Select a vCard, vCalendar, or
vNote and press O.
3 Press [Options], select Import
and press O.
4 Select Import One, Import
Selected or Import All and
press O.
Page 43

8786
Saving data into folders from
other functions
You can save data into the Gallery
immediately after taking photos or
shooting videos or when opening
attached files.
Saving a photo/video you just
took/shot
• Press [Save] immediately after
taking/shooting a photo/video.
The data is saved in the Picture
Gallery/Video Gallery.
Tip: Immediately after taking a photo
or video, follow the steps
indicated below to save to a
specific folder on your phone.
Press and hold [Save] (Or press
[Option] → Save to) → Picture
Gallery, Video Gallery or a user
folder.
Editing photos/videos
You can edit photos or videos
stored in the Gallery.
Editing photos
1 Open a photo in the Picture
Gallery folder.
2 Press [Options], select Edit
Image, and then select one of
the following items and press
O.
Scaling: Presses [Enlarge]/
[Reduce] to enlarge or
reduce the image by
5%.
Stamp: Selects Original or
Gallery to find a
desired marker stamp.
Frame: Select a frame by
pressing [Next]
repeatedly until desired
one is found.
Text: Selects Small or
Standard as the text
size and allows you to
enter text which is
placed into the picture.
Paste Image: Selects up to 20
photos sized smaller
than QQVGA from the
Picture Gallery folder
and displays them as
overlays.
Rotate: Rotates the photo 90
degrees each time you
press
or .
Special Effects: Adds an effect to
the picture from Sepia,
Black and White, Tile,
Portrait, Fade-out,
Spotlight, Poster, and
Soft Focus.
Mirror Reverse: Mirror-reverses a
photo.
Image Format: Changes the file
format between JPEG
and PNG.
Note: File formats available for editing
are JPG, PNG and GIF.
Editing a video
1 Open a video in the Video List
folder.
2 Press [Options], select Edit
Video, and then select one of
the following items and press
O.
Gallery Gallery
Page 44

8988
Rerecord Voice: Records sound
onto a video that has
no sound or over-
records new sound
onto a pre-recorded
video.
Caption: Inserts a caption onto
the video (Up to 10
captions available for
each video).
• To create the text, press
[Options], select New and
press O, and then enter the
text.
• To edit the text, select the
desired caption, press
[Options], select Edit, then
select Input Caption, press
O and edit the text.
• To insert the text at the
desired point, select the
caption, press [Options],
select Edit, then select Start/
End Time and press O to
start playing the selected
video. Press [Start] from
where the text is desired and
press [End] at the desired
point.
Capture: Freeze-frames an
image in the video and
stores it in the Picture
Gallery folder.
Clip: Clips a segment of the
video for moving to
another point.
Cut: Deletes a segment of
the video.
Combine Video: Joins the
currently viewed video
with another retrieved
from the Video Gallery
folder.
Chapter: Adds chapter titles to
video files in the Video
Gallery folder.
Previewing a video with a
chapter title (For video camera
only)
This function enables you to
preview a video with a chapter
title.
1 Open the video you want to
preview.
2 Press [Options], select Play
Chapter and press O.
3 Select a chapter from the
Chapter List and press O.
Resizing a photo
This function enables you to resize
a still photo in the Picture Gallery
folder.
1 Open the photo, press [Op-
tions], select Resize and press
O.
2 Select QVGA (240 × 320) or
QQVGA (120 × 160) and press
O.
3 Press [Reduce] to reduce the
size by 5%. Press [Reduce]
repeatedly until the desired size
is reached.
4 To enlarge a reduced image,
press [Enlarge].
Gallery Gallery
Page 45

9190
Zooming a photo in or out
This function enables you to zoom
in or out on a still photo in the
Picture Gallery folder. The function
is available only for photos of
QVGA size or larger.
1 Open a photo, press [Options],
select Zoom and press O.
2 Press [In] to zoom in by 5%.
Press [In] repeatedly until the
desired zooming is reached.
3 To zoom out after zooming in,
press [Out].
Sending a photo/video attached
to a message or via Infrared
1 Highlight the desired photo or
video in the Picture Gallery or
Video Gallery, press [Options],
select Send and press O.
2 Select Attach to Message or
Send via Infrared and press
O.
Changing the display format of
photos or videos (Change
Display Format)
This function enables you to
change display formats. A 9thumbnail-image display of the
Picture Gallery folder or Video
Gallery folder is initially shown. If
you change the screen setting to
25 Image View, a 25-thumbnailimage display is shown. If you
want to see a list of data file
names, select List View.
1 Highight the desired photo or
video.
2 Press [Options], select Change
Display Format and press O.
3 Select 25 Image View, 9
Image View, or List View and
press O.
Notes: 25 Image View, 9 Image View,
or List View is available for the
Picture Gallery folder.
9 Image View or List View is
available for the Video Gallery
folder.
Moving or copying photos or
videos to a User Folder
1 Open a photo or video.
2 Press [Options], select Move to
Other Folder or Copy to
Other Folderand press O.
3 Select the destination User
folder and press [Execute].
Sorting data in the Picture
Gallery folder or Video Gallery
folder
1 Open the Picture Gallery folder
or Video Gallery folder.
2 Highlight the desired file and
press [Options], then select
Sort and press O.
3 Select Sort by Name, Sort by
Category, Sort by Size or Sort
by Date and press O.
4 Select Ascend or Descend
and press O.
Gallery Gallery
Page 46

9392
Using the SD
memory card
Creating stamps and frames
using data in the Picture Gallery
folder
1 Open a picture, press [Options],
select Create and press O.
2 Select Stamp or Frame and
press O.
3 Select one and press O.
4 Press [Save], enter a file name
and press O.
Gallery
Page 47

9594
A Secure Digital Memory card (SD
Card) is a compact and portable
memory storage device. The S103
enables you to use an SD Card to
store photos, video images,
sounds, phonebook entries, and
downloaded data that does not
have copyright restrictions. This is
convenient for transferring to a
personal computer as well as
printing images directly from the
SD Card using the DPOF printing
function. You can also access the
SD Card content by pressing the
left soft key when using the
Gallery.
Notes: An SD Card which has been
formatted by another device
such as a personal computer
may not operate correctly with
the S103. Try re-formatting
from the handset. (See p. XX
“Formatting the SD Card”)
The SD Card has a lock to
prevent the overwriting of
stored data.
To lock the card,
move the tab down
to the closed
position.
Inserting or removing an
SD card
Inserting the SD Card
1 Be sure that the phone is
turned off.
2 Open the cover of the SD Card
slot as shown in the diagram.
3 With the label side facing
towards the front, insert the SD
Card slowly into the card slot.
4 Push the card in gently until a
click is heard.
5 Close the card cover.
6 Turn the phone on.
7 Check if the icon
has
appeared on the display to
indicate that a card is inserted.
If not, try inserting the card
again from the beginning.
Removing the SD Card
1 Be sure that the phone is
turned off.
2 Open the cover of the SD Card
slot.
3 Push the card slightly in and
then release. The card will then
spring out from the card slot.
4 Pull out the card and close the
card cover.
Using the SD memory card Using the SD memory card
LOCK
LOCK
Page 48

9796
Formatting the SD card
Before using a new SD Card
which has not yet been formatted
or a card which has been used in
a PC or other device, use this
function to format the card. Note
that all the data stored on the card
is deleted when you format it.
1 Press O, highlight
and
press O.
2 Select Memory Settings and
press O.
3 Select Memory Card and
press O, then select Format
and press O.
4 Enter your security code and
select [YES] at the confirmation
display.
Caution: Do not try to remove the SD
Card while formatting it.
Icons related to data on the SD
Card
An SD Card is inserted. (write
protect lock is off)
An SD Card is inserted. (write
protect lock is on)
Note: If an unsupported SD Card is
inserted into the phone, the
icons shown above will not
appear.
Using the SD card
Transfer (Backup) functions
You can transfer (backup) data to
or from the phone and the SD
Card. Take care while performing a
backup as in either case data in
the saving location is overwritten.
1 Press O, highlight
and
press O,
2 Select Memory Settings,
Memory Card, then Backup
and press O.
• A data selection window
appears. Select backup data
from All, Picture Gallery,
Video Gallery, Sound
Gallery, and other similar
items.
3 Select the type of data for
backup and press O.
4 Select Save to Memory Card
or Read from Memory Card
and press O.
Save to Memory Card: Saves the
selected type of data in
the phone’s memory
onto the SD Card as
backup data. Enter
your security code to
proceed.
Read from Memory Card: Saves
the selected type of
data on the SD Card in
the phone as backup
data. Enter your
security code, and then
select [YES] at the
confirmation display.
Using the SD memory card Using the SD memory card
Page 49

9998
Moving or copying data from
the SD Card to the phone
• To move the data from the SD
Card into the phone, access the
SD Card and select Move to
Handset from the option menu
items. To copy the data from the
SD Card into the phone, select
Copy to Handset, select the
desired file(s) and folder destination and press O.
Moving data among folders on
the SD Card
• To move the data from one
location to another within the SD
Card, access the SD Card and
select Copy to Other Folder or
Move to Other Folder from the
option menu items.
Checking the memory usage of
the SD Card
• Select Memory Status from the
Memory Card display and press
O.
Editing the name of the SD Card
1 Select Rename Memory Card
from the Memory Card display
and press O.
2 Edit the name and press O.
Note: To go to the Memory Card
display: Press O → →
Memory Settings → Memory
Card
DPOF Printing
Digital Print Order Format (DPOF)
is a convenient print selection
format which makes ordering
prints at a print shop easy. Before
you go to the print shop or use the
DPOF compatible printer, you can
specify which photos and how
many of them you want to print
from the photos you have stored
on the card.
Specifying photos for DPOF
Print
1 In Standby mode, press O,
highlight
and press O.
2 Select Memory Settings and
press O.
3 Select Memory Card and
press O, then select DPOF
Print and press O.
4 Select either Standard Print,
or Index Print and press O.
5 Press [Options], select Set as
Print and press O.
6 Select Digital Camera Folder
in the Gallery and press O.
7 Select photo(s) and press
[Execute] to save.
8 Use the Print Mode function
(See below “Printing out DPOF
photos (Print mode)”) to print
out or eject the Memory Card
and take it to a print shop.
Using the SD memory card Using the SD memory card
Page 50

101100
Specifying the number of DPOF
Standard Print copies
1 In Standby mode, press O,
highlight
and press O.
2 Select Memory Settings and
press O.
3 Select Memory Card and
press O, then select DPOF
Print and press O.
4 Select Standard Print and
press O.
5 Press [Options], select Set
Copies for All, press O and
press [YES].
6 Specify the number of copies
using the navigation keys and
press O.
Specifying the number of DPOF
Index Print copies
1 In Standby mode, press O,
highlight
and press O.
2 Select Memory Settings and
press O.
3 Select Memory Card and
press O, then select DPOF
Print and press O.
4 Select Index Print and press
O.
5 Press [Options], select Set
Copies and press O.
6 Specify the number of copies
using the navigation keys and
press O.
Printing out DPOF photos (Print
Mode)
1 In Standby mode, press O,
highlight
and press O.
2 Select Connectivity and press
O.
3 Select Print Mode and press
O, then select Execute and
press O.
4 Once the “Please connect to
printer” message is displayed
connect the USB cable to the
phone and printer.
5 Select DPOF Print and press
O.
6 Press [Yes] to print.
Cancelling all prints requested
1 Press O, highlight
and
press O.
2 Select Memory Settings and
press O.
3 Select Memory Card and
press O.
4 Select DPOF Print and press
O, and then select Cancel
Print Order and press O.
5 Select [YES] at the confirmation
display.
Using the SD memory card Using the SD memory card
Page 51

103102
Settings
Page 52

105104
Opening the settings
menu
To open the Settings menu, press
O in Standby mode, highlight
and press O.
Display
Changes the display settings such
as character input mode or light,
or Standby display.
Phone Settings
Sets the clock, ringtones, sound
effects for various situations, and
other similar items.
Call Settings
Selects Call settings such as Call
diverting, Call rejecting, Auto
Answer, Call waiting, Restrict Calls
or Voicemail feature.
Video Call
Selects settings for video calling.
Memory Settings
Checks memory status of the SD
Card or phone and allows you to
reset and clear all handset
memory as well as format the SD
Card.
Connectivity
Selects how Bluetooth™ and
Infrared functions are used.
Browser Settings
Sets various web related browser
settings such as scrolling, security,
and cookies etc.
Security
Selects settings for locking the
phone and changing the security
code or PIN of the phone.
Master Reset
Re-initialises your phone.
Settings menu details
Display (p. XX)
Wallpaper: Sets the wallpaper for
the Standby display.
Character Input: Changes the
input mode and
character size, and
enables editing of Text
Templates or smileys.
Display Saving: Sets the display’s
idle time.
Light: Sets the light durations
for the display backlight and the keypad
backlight.
Standby Display: Sets wallpaper,
time, display operator
name and display
greeting.
Settings Settings
Select
Settings
Display
Phone Settings
Call Settings
Video Call
Memory Settings
Connectivity
Browser Settings
Security
Page 53

107106
LED: Customises the LED
colour pattern for
missed calls, unread
messages and alarms.
Phone Settings (p. XX)
Date & Time: Sets the clock.
Ringtones:Sets ringtones to
incoming calls or
messages.
Melody Volume: Sets the melody
volume.
Flight Mode: Cuts off the line with
the phone switched on.
Language: Sets the display
language and the
answering language.
Accessibility: Makes the display
more visible and the
phone more audible.
Network Settings: Selects the
network area.
WAP Settings: Displays a list of
the stored WAP profiles
to select and edit
them.
Sound Effects: Customises effect
tones for various
situations.
Vibrate on Connection: Vibrates to
confirm the line
connection.
Video Call Tone: Selects a melody
instead of the videocall ringing tone.
Auto Power On/Off: Turns the
phone on or off at the
time you set.
Slide Activation: Answers or ends
a call by sliding the
phone open or closed.
Call Settings (p. XX)
Diverts: Specifies the numbers
to be forwarded.
Reject Calls: Specifies the
numbers to be
automatically rejected.
Hold Settings: Selects a picture or
video to display while
you have someone on
hold.
Voice Call Auto Answer: Sets
whether to receive
voice calls automatically or not.
Call Quality Alarm: Sets an alarm
to warn of weak signal
strength.
Reduce Noise: Reduces ambient
noise to make the
other party’s voice
clearer.
Restrict Calls: Blocks outgoing
and incoming calls.
Call Waiting: Answers a call from a
third party while
holding the current call.
Voicemail: Uses the phone
answering service.
Fixed Dialling Number: Specifies
the available numbers
for dialling.
Service Dialling Numbers: Selects
provided services that
are encoded on the
SIM/USIM card.
Hands-free Setting: Activates the
Hands-free function.
Video Call (p. XX)
Redial as voice call: Sets the
method to switch a
video call to a voice
call.
Settings Settings
Page 54

109108
Image Settings: Sets if your image
is to be sent and its
image quality.
Voice Setting: Sets if your voice is
sent.
Auto Answer: Sets whether to
receive video calls
automatically or not.
Camera Settings: Sets zoom in or
out and the rear or
front camera.
Backlight: Selects the backlight
brightness, minimum,
or normal.
Memory Settings (p. XX)
Memory Status: Displays how
much space remains
for data on the phone
and the SD Card.
Memory Card: Synchronises or
backs up data in the
Address Book,
Schedule, or To Do
List.
Handset: Resets the memory
settings and clears
memory in the phone.
Connectivity (p. XX)
Infrared: Sends or receives files
via Infrared.
Bluetooth™: Sends or receives
files via Bluetooth™.
Synchronise: Synchronises files
with another device or
a network server.
Print Mode: Prints out still images
via USB.
USB Storage Mode: Transmits SD
Card data to a
personal computer.
Software Update: Checks for
software updates and
downloads the update
file(s) automatically.
Browser Settings (p. XX)
Downloads: Disables images,
sounds, or other files
that are loaded
automatically when you
download a web page.
Look & Feel: Selects the character
size, text wrap, scroll
mode and internet
connection time out.
Security: Selects various security
settings for browsing.
Certificate:Selects the current
certificate or root
certificate.
Advanced:Selects if you want to
show the title of the
page while browsing or
selects to convert
service messages that
load automatically into
requests for service
messages, or ignore
any WAP based
service inquiries.
Security (p. XX)
Restriction Settings: Selects the
option to bar calls.
Select Mode: Sets the secret
mode On/Off to protect
privacy in Phonebook.
Change Handset Code: Changes
your security code.
PIN: Allows you to set or
change a PIN (Personal
Identification Number).
Settings Settings
Page 55

111110
Display settings
Setting the Wallpaper
Photos or videos that have been
taken or downloaded pictures
saved in the Gallery as well as
preset pictures can be set as
wallpaper.
1 Open the Wallpaper display.
• Press O →
→ Display
→ Wallpaper
The current wallpaper information is displayed. Press O to
proceed.
2 Select Original or Gallery and
press O.
3 Select the desired image and
press O.
Note: See p. XX for details about the
Gallery.
Changing input modes and
character size
1 Open the Character Input
display.
• Press O →
→ Display→
Character Input
2 Select an item and press O.
Input Method: Selects input mode
from Traditional
Chinese, Simplified
Chinese, or English.
Edit Text Templates: Enables the
editing of text in 16
categories, Internet,
Greeting, Message,
Response, Business,
and Free (a blank page
to use as desired).
Edit Smileys: Enables the editing
of various emoticons.
Character Size: Selects the size
from Small or Stan-
dard for each of the
Input Character,
Phonebook, List and
Input Phone.
Word List: Up to 160 words can
be registered.
Setting the Display Saving
mode
The S103 is set to turn off the
display illumination after a set idle
time. The default time is set to 30
seconds. The display illumination
is restored if you press any key.
1 Open the Display Saving
display.
• Press O →
→ Display
→ Display Saving
2 Select Show Subdisplay or No
Subdisplay and press O.
3 Enter an idle time (30 to 300
seconds) and press O.
Setting the display backlight
and the keypad backlight
You can set the backlight for the
display and the keypad separately.
1 Open the Light display.
• Press O →
→ Display
→ Light
2 Select from the following
options and press O.
Backlight: Sets the illumination
duration from 5 to 99
seconds. Selects the
brightness from
Minimum or Normal.
Settings Settings
Page 56

113112
Key Light: Sets the illumination
duration from 5 to 99
seconds if On is
selected. Turns the
keypad light off all the
time if Off is selected.
See below for Auto
Key Light.
Notes: When setting Key Light to On,
if you also set Auto Key Light
to On, the phone will automatically determine if the keypad
light should be turned on or off
according to the brightness of
the surroundings to save
battery power.
The display backlight settings
during a video call are defined
separately from these settings.
See p. XX.
Customising the Standby
display
You can customise various
settings for the Standby display:
Wallpaper On/Off, Time On/Off,
and Display Operator Name On/
Off.
1 Open the Standby Display.
• Press O →
→ Display
→ Standby Display
2 Select from the following
options and press O.
Wallpaper: Displays wallpaper on
the Standby display if
On is selected.
Changes to a default
background if Off is
selected. For how to
select the wallpaper,
see p. XX.
Time: Displays the time in the
24-hour time system
on the Standby display
if On is selected.
Display Operator Name: Displays
the name of the
operator if On is
selected.
Changing LED illumination
notification patterns
This function is used to select
different LED colour patterns to
notify you of missed calls, unread
messages, or alarm time occurrence (Schedule alarm).
1 Open the LED display.
• Press O →
→ Display
→ LED
2 Select On and press O, and
then select from either Missed
Calls (Voice Call, Video Call),
Messages (SMS, MMS, and
Email) or Alarm (Schedule
alarm) and press O.
3 Select a colour or Off and
press O.
4 Press [Save] to finish the
setting.
Settings Settings
Page 57

115114
Phone settings
Setting the clock
It is recommended that you set
the clock before starting to use
the phone so that all time-related
information is displayed correctly.
You will need to set the clock to
use the camera functions.
1 Open the Date & Time display.
• Press O →
→ Phone
Settings → Date & Time
2 Select from the following
options and press O.
Set Date/Time: Enters or edits the
year, day, and time.
Set Time Zone: Selects a city for
your home area.
Time Difference: Selects a city for
the time you want to
display on the screen.
Daylight Saving: Displays the clock
in Day Light Saving
time.
Setting home Time Zone and Time
Difference
This is an optional function for
those who travel between
countries or those who want to
show the time in other cities
without having to adjust the clock.
You should set the Time Zone of
your phone’s clock first, and then
set the city to display the time
difference. Your Time Zone and
the other area can be selected
from 36 cities around the world.
1 Select Set Time Zone and
press O.
2 Select the city for your home
area and press [Set] or O.
3 Select Time Difference and
press O.
4 Select On and press O.
5 Select the city corresponding to
the time you want to display on
your screen, and then press
[Set] or O.
Adjusting the clock to Daylight
Saving Time
If you set Daylight Saving to On,
your phone will show Daylight
Saving Time without having to
adjust the clock. If you set this to
Off, the time shown on the screen
returns to the normal time.
1 Select Daylight Saving and
press O.
2 Select On and press O.
Setting Ringtones for incoming
calls or messages
You can set ringtones for a
notification of incoming voice calls
or video calls, incoming messages
or other notices such as incoming
Delivery Report or incoming
PUSH.
1 Open the Ringtones display.
• Press O →
→ Phone
Settings → Ringtones
2 Select the notification for which
to set the ringtone and press
O.
3 Set each item and press O.
Settings Settings
Page 58

117116
• Press [Play] to play the
sounds. Press [Set] after you
finish the selection.
Example: To set a ringtone for a
voice call
(Ringer Volume): Adjusts the
ringtone volume for an incoming
call.
(Assign Melody): Selects a
sound or melody pattern to be
heard when there is a call either
from the Preset Melodies or by
searching through the Gallery.
(Vibration): Selects a vibration
pattern and its strength when
there is a call.
(LED): Selects an LED pattern
and colour to be displayed when
there is a call.
(Picture Display): Selects an
image to be displayed on the
screen when there is a call either
from the preset (Original) patterns
or by searching through the
Gallery.
Tip: If you press [Options] in step 1 on
the Ringtones display, you can
select All Incomings or All
Messages, which enables you to
set the ringtone for all incoming
voice and video calls, or for all
incoming SMS, MMS and Emails.
Note: While setting the ringtone for an
incoming message, the ringing
time can also be set by
selecting the icon (Call Time)
in step 3 above. The choices
are Ring and Set Time. If Ring
is selected, the entire piece of
music plays; if Set Time is
selected, you can specify how
long to play the music when a
message is received.
Setting the Melody Volume
You can set the melody volume to
one of five levels for the following
situations.
• When playing sound data saved
in the Gallery.
• When playing sound data
attached to MMS or Emails.
• When playing downloaded data.
1 Open the Melody Volume
display.
• Press O →
→ Phone
Settings → Melody Volume
2 Adjust the melody volume using
u / d and press O.
Setting the phone to offline
(Flight Mode)
Flight Mode enables you to set the
phone so that it will not receive or
make calls although it is switched
on. This function is useful for when
you want to play a Java™
application on an aircraft, where
the phone should not generate a
radio signal. When the mode is
activated,
appears on the
display.
1 Open the Flight Mode display.
• Press O →
→ Phone
Settings → Flight Mode
2 Select On and press O.
• To release the setting, select
Off at this point.
Settings Settings
Page 59

119118
Setting the display language or
date format
1 Open the Language display.
• Press O →
→ Phone
Settings → Language
2 Select the item from the
following options and press O.
Display Language: Enables you to
select the language
from Automatic,
Traditional Chinese,
Simplified Chinese,
and English.
Date Format: Enables you to
select from DD/MM/
YYYY, DD.MM.YYYY
or YYYY-MM-DD.
Setting heightened audibility
and better readability (Accessibility)
This function sets the character
size to the largest for situations
such as when you enter phone
numbers, read messages, search
in Phonebook, or browse web
pages. Also, the speaker volume
is set to the highest level so you
can hear the other party’s voice
better.
1 Open the Accessibility display.
• Press O →
→ Phone
Settings → Accessibility
2 Press [Execute] or O.
Selecting network area (Select
Network)
This function enables you to select
the mobile phone network area.
The S103 can roam dual network
areas. So you can use the phone
in the UMTS network area and/or
the GSM network. Making a list of
network operators and editing that
list is also possible. While editing
you can also prioritise the access
order among these operators.
Opening the Network Settings
display
• Press O →
Phone Settings
→ Network Settings
Setting the network area
1 Select Search Mode on the
Network Settings display and
press O.
2 When the current network
mode is displayed, press O.
3 Select Automatic, 3G Pre-
ferred, GSM Only, or PCS
Only and press O.
• If you select 3G Preferred,
the phone always goes to the
UMTS network first.
4 Select Auto or Manual and
press O.
• If you select Manual , you will
always be required to select a
network service operator from
the list. If you select Auto,
selection of network service
operators depends on the
setting in the Set Preferred
(See below).
Settings Settings
Page 60

121120
Putting priority on the order of
network operator access
1 Select Set Preferred on the
Network Settings display and
press O. A list of network
operators appears.
2 Select an operator, press
[Options], edit the list using the
options Add, Insert, Change
Order or Delete and press O.
WAP Settings
Selecting the type of WAP profile
1 Open the WAP Settings display.
• Press O → → Phone
Settings → WAP Settings
2 Select the profile type and
press O.
Editing the profile
1 Select the WAP profile you
want to edit, press [Options],
then select Edit Profile and
press O.
2 Select Browser Settings or
MMS Settings and press O.
3 Enter the following items to edit
and press O.
• IP Address: Sets the IP
address
• Port Number: Sets the port
number
• Connectivity Set: Sets Access
point name, User ID, Password, and Linger time.
• Home Page: Sets the web
site URL (Browser Settings
Only)
• Centre URL: Sets the MMS
URL (MMS Settings Only)
Deleting the profile
1 Select the WAP profile you
want to delete and press
[Options].
2 Select Delete and press O.
Setting the Sound Effects
You can customize an effect tone
for each setting described below.
1 Open the Sound Effects
display.
• Press O →
→ Phone
Settings → Sound Effects
2 Select an occurrence for which
to use the effect tone and press
O. Use u / d to adjust the
volume and press O to set.
Press [Tone] to select other
available tone patterns.
Keypad Tone: Selects the confir-
mation sound pattern
and the volume on
pressing keys.
Completion: Selects the confirma-
tion sound pattern and
the volume on completing setting or
registration.
Warning Tone: Selects the warning
sound pattern and the
volume on performing
a wrong operation.
Side Opening: Selects the sound
pattern and the volume
on sliding open the
phone.
Side Closing: Selects the sound
pattern and the volume
on sliding the phone
closed.
Settings Settings
Page 61

123122
Tip: To set the tone volumes for all the
situations above, press [Set All] in
step 1 above.
Setting vibration to confirm the
connection
This function enables the phone to
vibrate when the other party’s
phone has detected your call. It is
set to Off by default.
1 Open the Vibrate on Connec-
tion display.
• Press O →
→ Phone
Settings → Vibrate on
Connection
2 Select On and press O.
Setting the melody played until
your video call is connected
This function enables you to listen
to a melody instead of a ringing
tone until the other party answers
your video call.
1 Open the Video Call Tone
display.
• Press O →
→ Phone
Settings → Video Call Tone
2 Select On and press O to
activate the function. Two menu
items appear with icons. Press
[Set] after you finish completing
the settings below.
(Melody): Selects a sound or
melody pattern for a
Video Call Tone either
from the preset
(Original) patterns or by
searching through the
Gallery.
(Volume): Adjusts the volume
for the Video Call Tone.
Setting Auto Power On/Off
You can set your phone to be
turned on or off automatically at a
set time.
Caution: Please make sure that Auto
Power On is deactivated
before boarding an aircraft.
1 Open the Auto Power On/Off
display.
• Press O → → Phone
Settings → Auto Power On/
Off
2 Select Auto Power On or Auto
Power Off and press O.
3 Select On and press O, and
then enter the time to turn on
or off.
4 Press [Set] or O after you finish
the setting.
Answering or ending a call with
a sliding motion (Slide Activation)
This function enables you to
answer a call by sliding the phone
open or end a call by sliding the
phone closed.
1 Open the Slide Activation
display.
• Press O →
→ Phone
Settings → Slide Activation
2 Select Open to Talk or Close
to End and press O.
3 Select On and press O.
• To release the setting, select
Off at this point.
Settings Settings
Page 62

125124
Call settings
Call diverting service
Subscribing to this service enables
you to divert incoming calls to the
numbers you have specified.
Setting numbers for both video
calls and voice calls is available.
1 Open the Diverts display.
• Press O →
→ Call
Settings → Diverts
2 Select Voice or Video Call and
press O.
3 Select All Calls, When Busy,
No Answer, or Not Reachable
Status, and then select On and
press O.
4 Enter the destination number
and press O.
Setting Reject Calls
You can reject calls according to
the settings described below.
1 Open the Reject Calls display.
• Press O →
→ Call
Settings → Reject Calls
2 Select On and press O.
3 Enter your security code.
4 Select a rejecting method and
press O.
Specific Numbers: Rejects calls
from the numbers
registered in the list.
You can add or edit
numbers to be rejected
by pressing [List].
Anonymous: Rejects calls from the
numbers intentionally
set as No Caller ID
number by the caller.
Payphone:Rejects calls from a
pay phone.
Unidentified: Rejects caller-
unidentified calls.
Non-registered No: Rejects calls
whose numbers are
not stored in
Phonebook.
Setting the Hold Settings
This function enables you to select
a picture or video to display while
you have someone on hold.
1 Open the Hold Settings display
• Press O →
→ Call
Settings → Hold Settings
2 Select Original or Gallery,
press O, and specify the
location of the file.
Setting the Auto Answer (Video
Call Auto Answer)
This function (available with the
use of a headset) enables you to
receive calls automatically without
touching any keys after a preset
ringing time. For setting the Auto
Answer for the video call function,
refer to “Auto Answer” under the
Video Call settings section. (See p.
XX.)
1 Open the Voice Call Auto
Answer display.
• Press O →
→ Call
Settings → Voice Call Auto
Answer
2 Select On and press O.
• To release the setting, select
Off.
3 Enter the answering time (1 to
29 seconds) and press O.
Settings Settings
Page 63

127126
Setting Call Quality Alarm On
If this function is activated (it is set
On by default), a beep sounds
when the signal strength falls
below the level suitable for
communication.
1 Open the Call Quality Alarm
display.
• Press O →
→ Call
Settings → Call Quality
Alarm
2 Select On and press O.
• To release the setting, select
Off.
Ambient noise reduction
By activating this feature (it is set
On by default), the phone tries to
reduce ambient noise to make the
other party’s voice clearer. Note
that when this function is activated, the volume of the other
party’s voice may become lower.
1 Open the Reduce Noise
display.
• Press O →
→ Call
Settings → Reduce Noise
2 Select On and press O.
• To release the setting, select
Off.
Setting restrictions on calls
Restrict Calls enables blocking of
outgoing and/or incoming calls.
The Restrict Calls password is
initially set to 1111. You can make
an emergency call even if Restrict
Calls is set to On. Subscribing to
the service centre is required for
the service.
1 Open the Restrict Calls display.
• Press O →
→ Call
Settings → Restrict Calls
2 Select Outgoing Calls or
Incoming Calls and press O,
and then select whether to
block the following types of
calls.
Outgoing Calls: Bar All Outgoing
Calls, Only Local &
Home, or Bar Interna-
tional Calls
Incoming Calls: Bar All Incoming
Calls or Bar if Abroad
Notes: If you want to confirm the
current settings of both Restrict
Calls services, select Check
Setting in step 2 above.
If you want to set a new
password for roaming another
service network, select Set
Password in step 2 above.
Call Waiting
This supplementary service
notifies you of an incoming call
from a third party while talking with
a second party and enables you to
answer the third party by putting
the second party on hold.
1 Open the Call Waiting display.
• Press O →
→ Call
Settings → Call Waiting
2 Select Voice or Video Call and
press O.
3 Select On and press O.
• To release the setting, select
Off.
Tip: You can confirm the current
settings by selecting “Status”.
Settings Settings
Page 64

129128
Checking your voicemail
1 Open the Voicemail display.
• Press O →
→ Call
Settings → Voicemail
2 Select Get Voicemail and
press O.
3 Select Home Mailbox or
Roam Mailbox.
4 Press t or [Call]. The call is
connected to the message
centre after which you can
listen to the answer phone
messages.
Tip: You can access the service centre
from the Standby display by
pressing and holding 1. See
also p. XX.
Cancelling display of the answer
phone icon
1 Open the Voicemail display,
select Hide Voicemail Icon,
and press O.
2 Select YES and press O.
• To release the setting, select
NO.
Fixed Dialling Number
When the Fixed Dialling Number is
set to On, you can limit your calls
to only the phone numbers
registered on the SIM/USIM card.
You can add or edit the phone
numbers (up to 40 digits). You
must subscribe for this service.
Activating or deactivating the
Fixed Dialling Number function
1 Open the Fixed Dialling Number
display.
• Press O →
→ Call
Settings → Fixed Dialing
Number
2 Select On or Off and press O.
3 Enter the PIN if you are
prompted to do so.
Note: If no Fixed Dialling Numbers are
registered on the SIM/USIM
card, this function is not
available.
Adding a Fixed Dialling Number
1 Open the Fixed Dialling Number
display.
• Press O →
→ Call
Settings → Fixed Dialing
Number
2 Press [Options] then select
New and press O.
Note: You can delete numbers by
pressing [Options] then
selecting Delete One, Delete
Selected, or Delete All and
pressing [YES] to confirm.
Setting the Service Dialling
Numbers
You can select from a default list
of provided services (phone
numbers) that are encoded on the
SIM/USIM card.
1 Open the Service Dialling
Numbers display.
• Press O →
→ Call
Settings → Service Dialing
Numbers
2 Select the desired service and
press t.
Settings Settings
Page 65

131130
Setting the Hands-free function
The Hands-free function enables
you to talk with the phone placed
on a flat and stable surface. The
sound coming from the speaker is
made louder and the microphone
sensitivity increased.
1 Open the Hands-free Setting
display.
• Press O →
→ Call
Settings → Hands-free
Setting
2 Select Voice Call or Video Call
and press O.
3 Select On and press O.
Note: If the Silent, Car, or Meeting
Profile is set (see p. XX), you
cannot activate the Hands-free
setting.
Video calls
Setting the method to switch a
video call to a voice call
If you have made a video call to a
person whose phone does not
have the function, you must
switch to a voice call. You can set
the switching method to automatic
or manual.
1 Open the Redial as voice call
display.
• Press O →
→ Video
Call → Redial as voice call
2 Select Auto or Manual and
press O.
• If you select Manual, you will
be asked if you want to
switch to a voice call. If you
select Auto the call is
automatically switched to a
voice call.
Setting an image to send
1 Open the Image Settings
display.
• Press O →
→ Video
Call → Image Settings
2 Select an image setting option
and press O.
Frame Rate: Changes the image
quality based on
transmission options,
High Speed, Normal
or High Quality.
Send Own Image: Specifies if your
own image is sent to
callers.
Alternate Img/Video: Sets the
alternative video to
send instead of your
own image.
Setting whether your voice is
sent or not
1 Open the Voice Setting display.
• Press O →
→ Video
Call → Voice Setting
2 Select an option and press O.
On: Sends your voice to the
other party.
Off: Cancels sending your voice
to the other party.
Setting the Auto Answer for a
video call
This function (available with the
use of a headset) enables you to
receive video calls without
touching any keys after the preset
ringing time. Registering callers’
numbers is required before
activating this function. Unless
Settings Settings
Page 66

133132
registered, the incoming calls are
treated as an ordinary voice call.
For setting the Auto Answer for
the voice call function, refer to
“Setting the Auto Answer (Voice
Call Auto Answer)” under the Call
settings section. (See p. XX.)
1 Open the Auto Answer display.
• Press O →
→ Video
Call → Auto Answer
2 Press [List], select New and
press O.
3 You can copy phone numbers
from the Call Log, Phonebook,
and so on, by pressing
[Options] and selecting Refer
to.
4 When you finished entering a
number, a list of the registered
Auto Answer numbers appears.
5 Select the number you selected
or entered previously and press
[Done].
6 Select On and press O.
7 Select Auto Answer Tone
pattern icon
, Tone Volume
icon or Answer Time icon
, and press O to set each
item.
8 Press [Set] to finish the setting.
Using camera functions during
a video call
These functions enable you to
zoom the subject and switch the
camera between the front and the
back during a video call. You can
also set them before making a
video call.
1 Open the Camera Settings
display.
• Press O →
→ Video
Call → Camera Settings
2 Select Zoom or Switch
Camera and press O.
Zoom: Enlarge or Normal
Switch Camera: Front or Back
Adjusting the backlight level
during a video call
This function enables you to adjust
the brightness of the backlight to
Normal (the default value) or
Minimum.
1 Open the Backlight display.
• Press O →
→ Video
Call → Backlight
2 Select Minimum or Normal for
the brightness and press O.
Memory Settings
See p. XX for details on Memory
Settings.
Connectivity
See p. XX for details on connectivity.
Browser settings
1 Open the Browser Settings
display.
• Press O →
→ Browser
Settings
2 Select from the following items
and press O.
Settings Settings
Page 67

135134
Downloads: Disables images,
sounds, or other files
that are automatically
loaded when you
download a web page.
Select from the
following to switch
disable On or Off.
Disable Images: Select On to
block images from
automatically downloading to make
viewing faster.
Disable Sounds: Select On to
block sounds from
automatically downloading to make
viewing pages faster.
Disable Objects: Select On to
block objects from
automatically downloading to make
viewing pages faster.
Look & Feel: Sets the character
size, text wrap
boundaries, scrolling
attribute and linger
time.
Character Size: Select the
character size from
Small or Standard.
Text Wrap: Select to wrap words
at the end of a line.
Select On to automatically wrap words to the
next line at the end of a
line boundary, or select
Off to not wrap words
at the end of a line
boundary.
Scroll Mode: Selects the scrolling
unit from Single Line,
Half Page, or Whole
Page.
Linger time: Selects the time to
wait for the internet
connection from No
Wait Time, 60
seconds, or 90
seconds.
Security: Sets the following
various security
settings for browsing.
Secure Prompt: Select On or Off if
you want or don’t want
the phone to notify you
with a prompt when
the connection turns
from a protected one
to an unprotected one.
Authentication: Select On or Off to
save or not save
authentication to cache
(temporary memory
storage used by the
phone).
Cookies: Select On or Off to
save or not save
cookies. A cookie is
text file containing user
information that a web
server automatically
sends to your phone
when you access a
web site. This file may
be retrieved by the
server at a later point.
Send Referrer: Select On or Off if
you want or don’t want
to send HTTP Referrer
header information
when using the
browser.
Certificate:Select to display the
current certificate or
root certificate.
Settings Settings
Page 68

137136
Current Certificate: Select to
display the current
certificate.
Root Certificate: Select to display
the CA certificate
details.
Advanced:Select to display page
titles while browsing.
Select to accept or
reject WAP based
service inquiries.
View Title Region: Select On or Off
to display or not
display the title of page
while browsing.
WAP Push: Select Confirm to
convert service
messages that load
automatically into
requests for service
messages, or select
Ignore to ignore any
WAP based service
inquiries.
Security settings
Locking the phone
The S103 provides several locking
modes which are described
below. When the restriction is set,
you will have to enter your security
code to proceed. This is so you
can prevent others from using
your phone.
Note: As for Restrict Calls on the
network service, see p. XX.
1 Open the Restriction Settings
display.
• Press O →
→ Security
→ Restriction Settings
2 Select a restriction option and
press O.
Key Lock: Locks all the keys and
restricts use of the
phone except for
receiving calls, making
emergency calls and
diverting calls.
Lock Phonebook: Locks use of
the Phonebook or
other related functions.
Restrict Dial: Restricts use of Call
Logs or direct number
input to make outgoing
calls. Use of the
Phonebook is available.
Auto Keypad Lock: Sets Dial Lock
automatically every
time you turn the
power on.
Setting the Secret mode
You can assign “Secret” status to
a phonebook entry and make the
entry secret, preventing others
from seeing the information. First,
you have to set Secret Mode On.
Then you must make the entry in
the Phonebook (or Schedule) a
secret entry. Finally, if you set
Secret Mode Off, the secret
entries will not be shown on the
display.
Setting the Secret mode On
1 Open the Secret Mode display.
• Press O →
→ Security
→ Secret Mode
2 Select On and press O.
Settings Settings
Page 69

139138
• When this setting is On,
secret entries become
accessible. When this setting
is Off, secret entries are not
displayed on the screen.
3 Enter your security code.
Making a phonebook entry a
secret data item
1 Display the phonebook entry
you want to keep secret.
2 Select the secret setting icon
and press O.
3 Select On and press O.
Settings Settings
Setting your own code
The phone’s security code is
essential to protect your phone
from unauthorised use or to avoid
accidental operation. At the time
of purchase the security code is
set to “9999”. We strongly advise
you to change the initial security
code to one of your own choosing
to keep your secret data secure in
case the phone is lost or stolen.
Keep your new security code
secret and if you make a note of it,
store that in a safe place separate
from your phone.
1 Open the Change Handset
Code display.
• Press O →
→ Security
→ Change Handset Code
2 Select YES and press O.
3 Enter your security code
(initially 9999).
4 Enter a new 4-digit security
code and press O. Your
security code is changed.
Setting your own PIN code
This function enables you to
change the preset PIN. SIM/USIM
cards that are sold with a preset
PIN. You can use the card with the
preset PIN. However, it is recommended that you change it to a
PIN you have chosen yourself to
protect the card from unauthorized use. There are two types of
PIN codes, the PIN1 Code and the
PIN2 Code. The PIN1 Code is
used for locking use of the SIM/
USIM card while the PIN2 code is
used for restricting some network
services.
1 Open the PIN display.
• Press O →
→ Security
→ PIN
2 Select Change PIN and press
O.
3 Select PIN1 or PIN2 and press
O.
4 Enter the current PIN code and
press O.
5 Enter your new PIN code and
press O.
6 Enter your new PIN code again
to confirm and press O.
PIN Entry
If this is set to On, you will be
asked to enter the PIN every time
you turn the phone on. Conversely, if it is set to Off, PIN entry
will not be requested any time you
turn the phone on.
Page 70

141140
Settings Settings
1 Open the PIN display.
• Press O → → Security
→ PIN
2 Select PIN Entry and press O.
3 Select On or Off and press O.
• You must enter your PIN to
change the setting. Enter the
PIN and press O to finish.
Note: Some SIM/USIM cards may not
support this function. For these
types you will be asked to enter
the PIN every time you turn the
phone on. Make sure you enter
the correct PIN as you will have
to enter the PUK if you
repeatedly enter the wrong PIN.
See p. XX for details.
Re-initialising your
phone
Resetting all data or phone
functions
Caution: Be sure to make a copy of
any important data before
performing a reset operation.
1 Open the Master Reset display.
• Press O → → Master
Reset
2 Select the desired resetting
method and press O.
Reset Setting: Resets the settings
of the phone to the
initial settings at the
time of purchase.
Clear All Memory: Clears all the
memory contents such
as phonebook entries
or Call Logs.
Reset All: Resets all the function
settings and clears all
the memory contents.
3 Enter your security code and
press [YES].
Note: Data on a SIM card or SD Card
is not reset by this function.
Page 71

143142
Organiser
Page 72

145144
Calendar
The phone comes with a calendar
that enables you to organize
information by month, week and
day. You can attach selected
photo or video data to particular
dates manually to assist in
remembering the corresponding
item. You can manage your
appointments by making Schedule
entries for chosen days, and
assign an alarm for each entry so
the alarm sounds at the set time
and date. Up to 100 Schedule
entries, 100 To Do tasks and 10
Notes can be registered in the
Calendar.
Opening the Monthly calendar
and viewing a day’s schedule
1 In Standby mode, press O,
highlight
and press O.
2 Select Calendar and press O
highlight the day and press O
and the daily calendar is
displayed.
The following icons are displayed
on the right side of the day.
: Means you have a To Do task
on the day.
: Means you have a Schedule
entry on the day.
: Means you have another thing
to be aware of on the day.
Opening the weekly calendar
• Press [Options] on the monthly
calendar display, select Week
View and press O.
• To go back to the monthly
calendar, press [Options], and
select Month View.
Opening the daily calendar
Select the day for which you want
to see detailed information on the
weekly calendar or monthly
calendar displays and press O.
The daily calendar appears.
Opening or editing Schedule
entries, Notes, or To Do tasks
1 Select an item on the daily
calendar display of which to
enter or edit information and
press O. The entry display
appears.
2 Press [Options], select Edit and
press O.
3 Enter or edit information and
press O to finish each item.
Note: To create a new Schedule entry
or To Do task, see p. XX or p.
XX.
Icons used in the Calendar
Note
Birthday
Task completed
Task uncompleted
Task expired but uncompleted
Organiser Organiser
Page 73

147146
Schedule
Creating a new schedule entry
1 In Standby mode, press O,
highlight
, select Calendar
and press O.
2 Press [Options], select Sched-
ule List and press O.
3 Press [Options], select New
and press O. A new Schedule
entry screen appears.
4 Enter information under the
items described below. Press
[Save] after you finish entering
the desired information.
Schedule items
Starting date/time, Ending
date/time: Use u / d or
the numeric keys to
enter the date/time. You
cannot set the same
starting time more than
once each day.
Repeat: Sets the repeating
pattern for the Schedule
entry; Every Day, Every
Week, Every Month,
Every Year, or Off.
Category: Sets the category
icon chosen from the
category icon list.
Summary: Enters a summary
of the entry.
Place: Enters the location of
the entry.
Alarm:Activates/Deactivates
the alarm by selecting
[On] or [Off]. Sets time/
date, sound pattern,
sound volume, image
for the alarm and
vibration On/Off.
URL: Enters the URL.
Details: Enters the content of
the entry.
Image: Pastes an image from
the Gallery.
Secret: Indicates Secret Mode
is On or Off.
Opening a schedule entry
1 Open the weekly calendar.
2 Press [Options], select Sched-
ule List and press O.
3 Select an entry and press O.
The entry display appears.
Operation options
If you store phone numbers,
message addresses and URLs in
Schedule entries, you can use
them to make calls, create
messages addressed for the
specified destinations, and access
web sites.
Making a voice call or a video call
1 Select an entry in the Schedule
list or open a Schedule entry.
2 Press [Options], select Call and
press O. A list of phone
numbers registered in the
selected Schedule entry
appears.
3 Select the number you want to
call and press t to make a
voice call or press v or the
left Soft key
to make a
video call.
Organiser Organiser
Page 74

149148
Accessing a web site
1 Select an entry in the schedule
list or open a schedule entry.
2 Press [Options], select URL
and press O. A list of URLs
registered in the selected
Schedule entry appears.
3 Select a URL and press O.
4 Press [YES].
Synchronising your schedule
entries with those on a network
server or computer
1 Open the schedule list, press
[Options], select Synchronise
and press O.
2 Refer to the procedures in
Connectivity (see p. XX).
Copying a schedule entry to the
Gallery
1 Select an entry in the schedule
list and press [Options].
2 Select Copy to Gallery and
press O.
3 Press [YES], select Copy One,
Copy Selected, or Copy All
and press O.
Registering a schedule entry in the
Phonebook
1 Select an entry in the schedule
list or open a schedule entry.
2 Press [Options], select Save to
Phonebook and press O.
3 Select Phone Number, Email
Address, or URL and press O.
Transmitting a schedule entry to
another phone, PC or other device
1 Select an entry in the schedule
list or open a schedule entry.
2 Press [Options], select
vCalendar and press O.
3 Select Attach to Message,
Send via Bluetooth or Send
via Infrared and press O.
Storing a schedule entry on the
SD card
1 Select an entry in the schedule
list.
2 Press [Options], select Backup
and press O.
Storing a schedule entry from the
SD Memory Card in the phone
1 Open the schedule list, press
[Options], select Backup and
press O.
Deleting schedule entries
1 Select an entry in the schedule
list.
2 Press [Options], select Delete
and press O.
Select Delete One, Delete
Selected, Delete All, or Delete
until Prev. Day and press
[YES].
Displaying images in the Schedule
entries
1 Open the schedule list, press
[Options], select Setting and
press O.
2 Select Image Display and
press O.
Select On and press O.
Organiser Organiser
Page 75

151150
Sending a DTMF tone
1 Select an entry in the schedule
list or open a schedule entry.
2 Press [Options], select Send
DTMF and press O.
3 Highlight a number and press
O.
To Do list
This function enables you to
manage tasks. Once you register
a task with a due time, the To Do
system automatically categorizes it
with one of the labels “Completed”, “Uncompleted”, and
“Expired” based on how you have
set up the To Do List.
Creating a new To Do task
1 In Standby mode, press O,
highlight
and press O.
2 Select Calendar and press O.
The monthly calendar appears.
3 Press [Options], select To D o
List and press O.
4 Press [Options], select New
and press O. A new task entry
screen appears.
5 Enter information under the
items described below. Press
[Save] after you finish entering
the desired information.
Task items
Summary: Enters a summary
of the task.
Content: Enters the content of
the task.
Category: Sets the category
icon chosen from the
category icon list.
Due Date: Enters the due date.
Alarm:Sets alarm, melody or
vibration or no notifica-
tion.
Repeat: Sets cycle, term,
times and expected
days for the task
Organiser Organiser
Status: Shows the
current status of the
task to the set due date;
Completed, Uncompleted, Expired.
Completed Date: Enters the
task completed date.
Secret: Sets Secret Mode On/
Off.
Opening the To Do list
1 In Standby mode, press O,
highlight
and press O.
2 Select Calendar and press O.
The monthly calendar appears.
3 Press [Options], select To D o
List and press O.
You can change the displays of
the different categories All Data,
Expired, Uncompleted, and
Completed by pressing l / r.
Page 76

153152
All Data: Displays all the tasks
registered on the To Do
list.
Expired: Displays tasks which
have yet to be done
and have already
passed their due date.
Uncompleted: Displays tasks
which have yet to be
completed and are still
due.
Completed: Displays tasks which
have been completed
already.
Editing tasks
1 Open the To Do list display,
select the category you want to
display, select the task you
want to edit and press O.
2 Press [Options], select Edit and
press O.
3 Select the desired item from the
list and edit.
4 Press [Save] after you finish
entering information.
Alarm
In addition to the alarm clock, this
phone has a convenient feature
called “Snooze mode”, which
sounds an alarm every specified
number of minutes (1 to 5) up to
six times after the first alarm is
turned off. You can set up to 8
Alarm entries. Each entry can be
allocated a customised Alarm
sound or vibration, image, and
repetition pattern.
Setting the alarm clock
1 In Standby mode, press O,
highlight
and press O.
2 Select Alarm and press O. A
list of 8 vacant entries appears.
• When an entry has already
been stored, its set time and
repetition pattern are displayed.
3 Select an entry and press O.
4 Select On and press O to set
the alarm. The entry display
shown below appears.
• To deactivate the alarm clock
temporarily, select Off.
Alarm name: Enters a name.
Alarm time: Enters an alarm
time.
Repetition pattern: Selects
Every Day, Mon - Fri,
Mon - Sat, Except
Holidays, Set Day of
the Week or No
Repeat.
“Snooze mode” setting: (See
p. XX.)
Alarm sound: Selects a sound
from the Media Album.
Alarm sound volume: Adjusts
the alarm sound volume.
Organiser Organiser
Page 77

155154
Image displayed when the
Alarm goes off: Selects
an image from the
preset images or images
in the Media Album.
Vibration setting: Selects a
vibration pattern and its
strength, High, Me-
dium, or Low.
Priority Alarm/Profiles: Puts a
priority on Alarm or
Profiles. If Profiles is
selected, only the
vibrator operates in
place of the alarm
sound.
5 Select an item and press O.
6 Edit the item and press O.
Setting the alarm for the time
you have specified every minute
(Snooze mode)
Opening Snooze mode setting
display.
1 Open an Alarm entry.
2 Select
(Snooze mode
setting) and press O.
Specifying the time to sound
1 Select On Fixed Sound at the
Snooze mode setting display
and press O.
2 Enters the time and press O.
Setting the sound pattern
You can allocate sounds to the six
alarm tones individually by
selecting sounds from the Gallery.
1 Select On Selected Sound at
the Snooze mode setting
display and press O. The Six
alarm tone entries appear.
• The entry for the first alarm
sound is at the top of the list.
Select entries from the top to
the bottom of the list to
allocate them to the six alarm
tones.
2 Select one of the six alarm
tones and press O.
3 Select a sound from the Media
Album and press O.
4 Repeat the procedure until
sounds have been selected for
all the entries.
5 Press [Set] to finish the setting.
Releasing Snooze mode setting
• Select Off at the Snooze mode
setting display and press O.
When the set time arrives
The alarm sounds for up to 60
seconds. Press [Stop] or any other
key to silence the alarm.
• The alarm sound stops and the
phone goes into Snooze Mode.
• Press [OK] or press and hold O
to cancel the Snooze mode.
• If you receive an incoming call or
any other alarm sounds during
Snooze Mode, the mode is
automatically cancelled.
Resetting Alarm entries
1 In Standby mode, press O,
highlight and press O.
2 Select Alarm and press O. A
list of eight Alarm Clock entries
appears.
3 Select the entry you want to
reset and press [Reset].
Organiser Organiser
Page 78

157156
Calculator
You can perform the addition,
subtraction, multiplication, and
division on numbers consisting of
up to 10 digits.
Note: If an incoming call or an alarm is
detected while you are using the
calculator, the calculation is
automatically terminated without
storing the result.
1 In Standby mode, press O,
highlight and press O.
2 Select Calculator and press
O. The initial display of the
calculator appears.
3 Perform your calculation.
4 Press y to return to the
Standby display.
Notes: The calculator can display up
to 10 digits. (Nine digits if a
decimal point is used)
If the result of a calculation is
more than “9,999,999,999” or
less than “-9,999,999,999”, “E”
is shown at the right end of the
display. Press [C/AC] to clear.
If the result of a calculation is
negative “-” appears above of
the number.
Voice recorder
You can record voice sounds up
to the total storage capacity of the
phone’s Gallery and SD Card. If a
SD Card is inserted, the voice
sound is automatically recorded
onto that card.
Recording your voice
1 In Standby mode, press O,
highlight
and press O.
2 Select Voice Recorder, press
O.
3 Select Record and press O.
The phone is now in Voice
Recorder mode.
4 Press [Record] to start record-
ing.
5 Press [Stop] to stop the
recording.
Setting the sensitivity of the
microphone
The sensitivity of the microphone
can be adjusted for recording your
voice or the voices of people
further away, such as on stage or
on conference speakers.
1 Press [Options] in the Voice
Recorder mode.
2 Select For Conference or For
Dictation and press O.
Playing back voice data
1 In Standby mode, press O,
highlight
and press O.
2 Select Voice Recorder, press
O.
3 Select Play and press O to go
to the Melody & Ringtones
folder in the Gallery.
yeKnoitpircseD
0 ot 9
.9ot0slaremunehtsretnE
;
.tnioplamicedasretnE
O
.noitaluclacasmrofreP
]CA/C[
sraelC/srebmunderetneehtsraelC
.atadrotaluclaclla
u
)noitiddA(+
d
)noitcartbuS(-
l × )noitacilpitluM(
r
)noisiviD(÷
Organiser Organiser
Page 79

159158
4 Select a data file and press O.
The phone is now in Voice
Recorder mode.
5 Press [Play] to start playing the
file.
Convenient key operations during
playback
Sound volume control up/down:
Press u / d.
Fast-forward: Press r.
Rewind: Press l.
Scroll up: Press ;.
Scroll down: Press n.
Notes
This function enables you to use
the phone as a notepad. Up to 10
note entries each of up to 256
bytes can be stored. You can link
an entry to a specified day in the
Calendar. Once they are linked, an
icon
is attached to the day on
the Calendar display, so that you
can easily check what you have to
do on the day.
Creating a Note entry
Note entries can be registered
with category icons added to
them. There are over 40 kinds of
category icons, including
Work,
Private, School, Days
Off, Meeting, etc.
1 In Standby mode, press O,
highlight
and press O.
2 Select Notes and press O. The
list of Notes appears.
3 Select an unregistered item and
press O. A note entry screen
appears.
4 Enter characters as desired and
press O.
Opening a Note entry
1 Open the list of Notes.
• Press O →
→ Notes →
Note
2 Select a Note entry and press
O.
Editing a Note entry
1 Open the list of Notes.
• Press O → → Notes →
Note
2 Select a Note entry, press
[Options], then select Edit and
press O.
3 Edit the entry and press O. A
list of category icons appears.
4 Select an icon and press O.
Using the Dial Note
Storing the phone number during
a call
1 Enter the number using the
numeric keys during a call and
press O.
2 Press [Options], select Dial
Notes, and press O. The
phone number is stored and
you can continue talking.
Organiser Organiser
Page 80

161160
Retrieving the Dial Note after the
call
1 In Standby mode, press O,
highlight
and press O.
2 Select Notes, press O, select
Dial Note, and press O.
Stored Dial Note numbers
appear in the display. Select the
desired number.
Worldclock
You can display the time of a
specified city on the Standby
display. There are 36 major world
cities to choose from.
Setting the Worldclock
1 In Standby mode, press O,
highlight
, press O.
2 Select Worldclock and press
O. The Worldclock display
appears.
• Use l / r to select the city
for which you want to display
the time.
• The selected city location
flashes on the world map on
the display.
• Press [DST] for daylight
saving time.
3 Press O after you finish the
setting.
Media player
• With the Media Player you can
play compatible audio or video
files (See p. XX), insert a caption
into a video file, create playlists,
skip to other songs or videos
and so on. Media Player is easy
to use, and the controls are
similar to the buttons on a
compact disc player. You can
also send video or audio files via
MMS or Email.
Playing a video or audio file
1 From the Standby display,
highlight
and press O.
2 Select Media Player, and then
press O.
3 Select Play Video (or Play
Audio) and press O.
4 Select a video (audio) file from
the All Videos (All Audios) folder
or a Playlist folder of your own
making and press O. (See p.
XX for making a Playlist.)
• This display is referred to as the
“Play Video (Audio) mode” in this
guide.
Organiser Organiser
Options
00:00:00/00:00:00
020805_1336〜00.3
Page 81

163162
Icons used
Play
Pause
Random Play
Repeat
Repeat All
Change the display size
available using the 0 key
Original size display is set
Large size display is set
Playing or pausing a file
• Press O. ( for Play or for
Pause)
Stopping a file
• Press .
Adjusting the volume
• Press u / d.
Skipping to the next file or going
back to the previous file
• Press l / r.
Forwarding or rewinding a file
• Press and hold l / r while
playing the file.
Enlarging the file display size
• Press the 0 key in Play Video
(Audio) mode. If you press the
0
key when the file display
size is enlarged, it will return to
the normal size.
Playing one file or all files
repeatedly
1 Press [Options] in Play Video
(Audio) mode, select Play
Settings, and then press O.
2 Select Repeat Playback,
select Repeat One or Repeat
All, and then press O.
Playing files randomly
1 Press [Options] in Play Video
(Audio) mode, select Play
Settings, and then press O.
2 Select Random Playback,
select On, and then press O.
Sending a video/audio file
You can send a video/audio file
attached to an MMS or Email
message. You can also use the
Infrared function to send a file to a
PC. (See also p. XX and p. XX)
Setting the file as an incoming
notification pattern
You can set the file as a notification pattern for an incoming call or
an arriving message. The settings
available for use vary according to
the file format displayed.
• Press [Options] in Play Video
(Audio) mode, select Settings,
and then press O.
Using Playlists
The All Videos (All Audios) folder in
the Video Playlist (Audio Playlist) is
automatically created by default.
You can create your own Playlists
with files included in the order you
desire.
Organiser Organiser
Page 82

165164
Creating a new Playlist
1 Open the Media Player.
• Press O → → Media
Player
2 Select Play Video and press
O.
3 Press [Options], select New,
and press O.
4 Edit the Playlist name and
press O. The Video (Audio) file
selection display appears.
5 Select a file you want to include
in your new Playlist, and press
O. The selected file is placed in
the first line.
6 Press O to go back to the
Video (Audio) file selection
display to choose another file.
7 Select the next file and press
O. The selected file is added to
the second line.
8 Repeat this step for all the files
you want to add to the Playlist.
9 Press [Complete] to finish
creating the new Playlist.
Editing a Playlist
You can add or insert a file into a
Playlist, or change the file order in
a Playlist. You can also move or
copy video data in a Playlist as a
whole between the phone and the
inserted SD Card.
1 Open the Media Player.
• Press O →
→ Media
Player
2 Select Play Video and press
O.
3 Select the Playlist you want to
edit and, press [Options], select
Edit, and then press O. The
Playlist editing screen appears.
From this display, you have
more optional items as described below. Highlight the file
to move or remove and press
[Options].
Streaming audio and video
The S103 enables you to receive a
continuous stream of music or
video by connecting to a streaming site on the web. Using
streaming technology, you can
instantly listen to audio files or
view video files without having to
download the entire file.
Key operations while streaming
audio/video
• To adjust the volume, press u /
d.
• To play or pause a file, press O
(
for Play for Pause).
• To perform a Seek operation,
press
l / r
. Note that the Seek
function is not available if the
total playback time information
cannot be obtained by the
phone.
Opening Player Settings
1 Open the Media Player.
• Press O →
→ Media
Player
2 Select Player Settings and
press O.
Keeping the backlight illuminated
while streaming
The phone is set to illuminate the
backlight for a certain time after
there are no key presses by
default. You can change the
backlight setting just for streaming.
Organiser Organiser
Page 83

167166
1 Select Backlight in Player
Settings and press O.
2 Select Always On and press
O.
Changing the Media Player’s skin
while streaming
1 Select Theme in Player
Settings and press O.
2 Press [Prev.] or [Next] to
preview the Skin, and then
press O to set.
Opening the SIM toolkit
menu
You can access the SIM toolkit
menu if your SIM/USIM card
supports this additional service.
Menu names and contents vary
depending on the SIM/USIM card
you purchase. Contact your
mobile phone stockist for details.
1 Open the SIM Toolkit display.
• Press O →
→ SIM
Toolkit
2 Select the desired menu and
follow the instructions.
Using the help guide
This phone’s on-screen HELP
enables you to quickly confirm key
operations for various functions.
1 Open the HELP display.
• Press O →
→ Help List
2 Select a function by scrolling
with u / d.
SmarTone ‘in’
Organiser
Page 84

169168
SmarTone In provides you with a
variety of services for browsing
news, downloading ringtones,
pictures, and games, as well as
finding nearby cash points, taxis,
or restaurants.
Web browsing
Accessing the SmarTone portal
on the web
1 Press [IN] in Standby mode. A
list of service menu items
appears.
Or in Standby mode, press O,
highlight
and press O.
• While browsing pages, use u
/ d to scroll up or down, and
O to select an item to
execute the command. Press
B to return to the previous
display.
Using bookmarks
The phone enables you to save
URLs in the Bookmarks folder
within the Gallery, and attach
bookmarks to messages as well
as manage them, for example,
editing or moving them to different
folders.
Opening the Bookmarks folder
from the Gallery
1 In Standby mode, press O,
highlight
and press O. A list
of folders appears.
2 Select Bookmarks and press
O.
Accessing a web site from the
Bookmarks folder
1 Open the Bookmarks folder
display.
2 Select a bookmark and press
O.
Using the Options function
1 Open the Bookmarks folder
display.
2 Select a bookmark and press
[Options].
3 Select an Option item and
press O.
Using web pages saved in the
Saved Page folder
You can access web pages and
update them from the Saved Page
folder.
Opening the Saved Page folder in
the Gallery
1 In Standby mode, press O,
highlight
and press O. A list
of folders appears.
2 Select Saved Page and press
O.
Accessing a web page from the
Saved Page folder
1 Open the Saved Page folder
display.
2 Select the web page you want
to access and press O.
Browser Settings
See p. XX.
SmarTone ‘in’ SmarTone ‘in’
Page 85

171170
Downloading
Downloading files
1 Select the file you want to save
and press O.
2 Press [Download] to start
downloading the file from the
web site.
3 Press [Save] to save it to the
phone.
• To confirm the file content,
press [Play] before saving.
SmarTone ‘in’
Java™
Page 86

173172
Your phone enables you to play
various preset, downloadable,
WAP and text based games.
Open Java™ from the main menu
to start saved applications
(Java™ Gallery), set a wallpaper
(Java™ Wallpaper), play WAP or
text games or download new
applications (Download More), or
define the settings (Java™
Settings).
Playing Java™ games
You can start Java™ games from
the Game application list (Preset
and downloaded applications) or
by accessing the SmarTone
homepage or other WAP enabled
homepage.
Starting from the application list
1 In Standby mode, press O,
highlight and press O.
2 Select Java™ Gallery and
press O.
3 Select an application and press
O to start.
Starting or downloading Java™
applications from the SmarTone
homepage or other WAP
enabled homepage
1 In Standby mode, press O,
highlight
and press O.
2 Select Download More and
press O.
3 Connect to the SmarTone
homepage or other WAP
enabled homepage and
download or start the desired
Java™ application by following
the on-screen instructions.
Java™ Java™
Note: You can also transfer Java™
applications that do not have
transfer restrictions from your
SD card to your phone.
Deleting applications
1 Open Java™ Gallery, select
the application you wish to
delete, and then press [Options].
2 Select Delete, press O and
then confirm you want to delete
by pressing [YES].
Note: Maximum of 50 games can be
stored in memory (including
preset games).
Setting Java™ wallpaper for
your background screen
1 In Standby mode, press O,
highlight
and press O.
2 Select Application and press
O.
3 Select the desired application
and press O.
Other wallpaper menus include:
• Wallpaper On/Off
• Resume Time
• Auto Connect On/Off
Page 87

175174
Java™ settings
Opening the Java™ Settings
1 In Standby mode, press O,
highlight
and press O.
2 Select Java™ Settings and
press O.
Setting the play volume and
vibration
You can adjust the play volume of
the Java™ application to one of 5
levels or set it to Off. You can also
set whether or not to vibrate the
phone as programmed in some
Java™ applications.
1 Open Java™ Settings, select
Sound Volume/Vibration and
press O.
2 Select Sound Volume or
Vibration and press O.
Sound Volume: Select the level
using u / d and press
O.
Vibration: Select Enable or
Disable and press O.
Setting the backlight and
blinking pattern
You can set the backlight to
always be On or Off or set the
duration to illuminate the display
while running a Java™ application.
You can also define whether to
enable or disable the backlight
control as programmed in some
Java™ applications from the Blink
settings.
1 Open Java™ Settings, select
Backlight and press O.
2 Select On/Off and press O.
Java™ Java™
3 Select from the following
options.
On: Turns on the backlight
while a Java™
application is running.
Off: Turns off the backlight
while a Java™
application is running.
Normal Settings: Turns on the
backlight when a key is
pressed.
4 After completing On/Off Setting
in step 2, the display returns to
the Backlight display. Select
Blink and press O.
5 Select On or Off and press O.
On: Enables a Java™ application
to control flashing of the
backlight.
Off: Disables a Java™ applica-
tion from controlling flashing
of the backlight.
Re-setting all Java™ Settings or
Deleting all Java™ applications
1 Open Java™ Settings, select
Delete Java™ Settings and
press O.
2 Select Java™ Reset or Clear
All Memory and press O.
Enter your security code when
asked.
Java™ Reset: Resets all the
Java™ settings.
Clear All Memory: Deletes all the
Java™ applications
saved in Java™
Games except the preinstalled applications.
Page 88

177176
Connectivity
Page 89

179178
Bluetooth™ transmission
Bluetooth™ is a radio technology
that enables you to use a wireless
connection to send or exchange
data such as indicated in Table 1-
1. The phone detects all
Bluetooth™ compatible devices
that are turned on and set to
transmittable within a maximum
range of 10 metres and displays a
list of them on the screen when
search is used. However, transmissions must be performed one
device at a time.
Table 1-1
Note: No incoming calls or messages
can be received during
Bluetooth™ transmission.
Data protected by copyright or
copy guards cannot be
transmitted or exchanged.
Sending vCard, vNote, vToDo or
vCalendar via Bluetooth™
Sending Phonebook information
(vCard)
1 Press O → → Phonebook
→ [Options] → Send vCard →
Send via Bluetooth
• To send a vCard
Step1 → Send → [YES]
• To send multiple vCards
Step1 → Send Selected →
Check desired entries →
[Execute] → [YES] to search
the device
Sending a Note (vNote)
1 Press O → → Notes →
Note → [Options] → vNote →
Send via Bluetooth
Sending a To Do task (vToDo)
1 Press O →
→ Calendar →
Select the day in the Calendar
→ [Options] → ToDo List →
[Options] → vToDo → Send
via Bluetooth
Sending a schedule event
(vCalendar)
1 Press O → → Calendar →
Select the day in the Calendar
and press O → Select an entry
→ [Options] → Send → Send
via Bluetooth
Sending My Numbers
1 Open My Numbers from the
Call Manager (see p. XX).
2 Press [Options], select vCard
and press O.
3 Select Send via Bluetooth and
press O.
4 Press [Search] to search for a
target device.
5 Select a connectable device
and press O.
• Entries that are not connectable are unselectable.
• To register devices, press
[Options], select Add to
Connection List and press
O.
• Input the Bluetooth™
password when prompted
and press O.
• Up to 20 devices can be
registered.
Connectivity Connectivity
tamroF
/elbattimsnarT
tnetnoCelbaegnahcxE
draCv
My Numbers (Electronic
Business Cards), Phonebook
vTo Do To Do tasks
vNote Entries in the Notes
vCalendar Schedule events
Page 90

181180
Receiving data (Data Reception
Mode)
This function enables the phone to
be ready to receive data transferred from another device.
1 In Standby mode, press O,
highlight
and press O.
2 Select Connectivity and press
O.
3 Select Bluetooth and press O.
4 Select Data Reception Mode,
press O and press [YES]. The
other device then starts
transmitting data into your
phone.
Note: Just after receiving the data, a
selection window appears and
requests you to select Save or
Cancel.
Exchanging My Numbers
1 Open the Bluetooth display.
• Press O →
→ Connec-
tivity → Bluetooth
2 Select Exchange My Numbers
and press O.
Go to the steps below.
Receiving second party My
Numbers
3 Select Receive after step 2
above, press O, and press
[YES]. Receiving starts.
Sending your My Numbers
3 Select Send after step 2 above,
press O and press [YES].
4 Press [Search] to search for a
target device and press O
once found.
5 Select the device and press O.
Connectivity Connectivity
Using the Handsfree Mode via
Bluetooth™
The hands-free device can be
wirelessly connected to the phone
via Bluetooth™.
You can make and receive a call
operating the hands-free device.
Read your Handsfree Mode user
manual before using.
Configure both devices
1 Turn on the Bluetooth™
reception mode on the
Handsfree Mode.
• On the S103, press O →
→ Connectivity →
Bluetooth → Handsfree
Mode
2 Select Connect to Hands-free
or Connect to Headset and
press O.
3 Press [Search] and O once the
device is found.
4 Select the device and press O.
5 Enter the Bluetooth™ pass-
word when prompted and
press O.
Tip: If the Hands-free device is already
on standby for receiving, you can
immediately try connecting the
phone to the Hands-free device.
Press [OK] to start the connection
operation.
Cancelling/disconnecting the
connection
You can cancel “standby for
receiving” and disconnect the
already established connection.
1 On the S103, press O →
→ Connectivity → Bluetooth
→ Handsfree Mode
Page 91

183182
2 Select Cancel or Disconnect
and press O.
3 Press [YES].
Connecting the phone and your
laptop PC to use the Internet
You can use the Internet anywhere
as long as you have your phone
and a portable laptop personal
computer. This function enables
the phone to work as a modem for
the PC connecting them together
via Bluetooth™.
1 Open the Dial-up Mode display.
• Press O →
→ Connec-
tivity → Send via Bluetooth
→ Dial-up Mode
2 Press [YES].
Using the PC display for
transferring the phone data to
the PC
This function enables you to
transfer data in the Gallery from
the phone to your personal
computer. You can use the
computer to perform transfer
operations easily once the devices
are connected via Bluetooth™.
The data on both the phone and
the personal computer can be
viewed simultaneously on the
computer display, while the
keyboard and mouse can be used
to facilitate faster operation.
1 Open the File Transfer Mode
display.
• Press O →
→ Connec-
tivity → Bluetooth → File
Transfer Mode
2 Select [YES] to connect the
phone to your personal
computer.
3 Transfer data in the Gallery from
the phone to the personal
computer, using the personal
computer.
4 Press y to disconnect the
devices.
Bluetooth settings
1 Open the Bluetooth Setting
display.
• Press O →
→ Connec-
tivity → Bluetooth →
Bluetooth Setting
Displaying the address of registered devices
1 Select Paired Devices from
the Bluetooth Setting display
and press O. A list of regis-
tered devices appears.
2 Press [Options], select Device
Address and press O.
Editing the names of registered
devices
1 Select Paired Devices from
the Bluetooth Setting display
and press O. A list of regis-
tered devices appears.
2 Select an entry, press [Options],
select Rename and press O.
3 Edit the name and press O.
Connectivity Connectivity
Page 92

185184
Protecting registered devices from
deletion
1 Select Paired Devices from
the Bluetooth Setting display
and press O. A list of registered devices appears.
2 Press [Options], select Protect/
Unprotect and press O.
3 Highlight the entry you want to
protect by pressing O. A key
icon appears to the left of the
entry. Repeat for all those you
want to protect.
• To apply the protection, press
[Execute].
• To release the protection,
highlight the key icons by
pressing O and pressing
[Execute] to finish.
Deleting entries of registered
devices
1 Select Paired Devices from
the Bluetooth Setting display
and press O. A list of registered devices appears.
2 Select an entry, press [Options],
select one of the following
options, Delete One, Delete
Selected, or Delete All and
press O.
Setting the period to search for
connectable devices
1 Select Search Time from the
Bluetooth Setting display and
press O.
2 Enter a time (10 to 30 seconds)
using u / d and press O.
Setting whether authentication of
a password of the other device is
required
With the function set On, you can
establish a Bluetooth™ connection by authenticating passwords
of both your phone and the other
Bluetooth™ compatible device.
Entering the same password in
both devices enables the authentication. Your phone requests the
other device to provide the
password before completing the
connection.
1 Select Authentication From
the Bluetooth Setting display
and press O.
2 Select On and press O.
Editing your own Device Name
1 Select Device Name from the
Bluetooth Setting display and
press O.
2 Edit the current name and
press O.
Changing the Password
1 Select Password on the
Bluetooth Setting display and
press O.
2 Select Change and press O.
3 Enter the security code.
4 Enter a new password the
same as that of the other
device.
5 Press O.
Connectivity Connectivity
Page 93

187186
Confirming the detailed information in the Bluetooth settings
• Select Check Setting on the
Bluetooth Setting display and
press O. The following information is displayed: The name of
your mobile phone, the device
address, the device type of the
other device, and the current
setting status in Authentication
and supported services.
Infrared transmission
Infrared is a wireless infrared
transmission system to transfer
data on your phone with another
device with a built in infrared port.
Infrared technology enables your
phone to send and receive
phonebook entries, your phone’s
information (My Numbers),
calendar events, To Do tasks,
pictures and videos, etc.
Cautions: Video files in the Video
folder can only be received.
SD Card data cannot be
transmitted.
No incoming calls or
messages can be received
during Infrared transmission.
Infrared transmission is possible
when:
• The two devices are turned on
and set to transmittable.
• The infrared ports of the devices
are pointing at each other and
are within 1 metre of each other.
• There are no line of sight
obstructions between the
devices.
Sending Gallery folders
1 Open the list of Media Album
folders.
2 Press [Options], select Send
via Infrared and press O.
3 Select Send One Folder, Send
Selected Folders, or Send All
and press O.
Send One Folder: Press [YES].
The currently selected
folder is sent.
Send Selected Folders: Put a
checkmark in the box
next to each folder you
want to send by
pressing O. After you
have placed a check
mark for all of the
desired folders, press
[Execute] to finish.
Press [YES] to confirm.
Send All: Press [YES].
Sending data files from the Gallery
folder
1 Open a list of Gallery folders.
2 Select a folder and press O.
3 Press [Options], select Send
and press O.
4 Select Send via Infrared and
press O.
5 Select Send One, Send
Selected, or Send All in
Folder and press O.
Connectivity Connectivity
Page 94

189188
Sending all data files from
Settings (Send All Mode)
You can transmit categorised data
in the phone to another device via
Infrared.
1 Open the Send All Mode
display.
• Press O →
→ Connec-
tivity → Infrared → Send All
Mode
2 Enter the phones security code
and press O.
3 A list of data categories such
as Contacts, Schedule events,
Notes and Bookmarks appears.
4 Put a checkmark in the box
next to each category you want
to send by pressing O. After
you have placed a check mark
for all of the desired folders
press [Execute] to finish. Enter
the password and press [YES].
Note: The security code is provided
with the phone at time of
purchase.
Receiving data (Receiving
Mode)
This function enables the phone to
be ready to receive data from
another device via infrared.
1 Open the Receiving Mode
display.
• Press O →
→ Connec-
tivity → Infrared → Receiving Mode
2 Press [YES].
Note: Just after receiving data, a
selection window appears and
requests you to select Save or
Cancel.
Changing the Password
1 Open the Password display.
• Press O →
→ Connec-
tivity → Infrared→ Password
2 Select Change and press O.
3 Enter the security code.
4 Enter a new password which is
the same as the other device.
Synchronising phonebook
entries or to do tasks
You can exchange, update or
replace data in the Phonebook,
Schedule and To Do tasks
between the phone and a network
server or between the phone and
a computer.
Opening the Synchronise
display
• Press O →
→ Connectivity
→ Synchronise
Synchronising data between the
phone and a network server
1 Select Network on the
Synchronise display and press
O.
Connectivity Connectivity
Page 95

191190
2 Select a network profile and
press O. The items described
below for the current setting
status appear.
Note: If you want to define a new
profile, select No entries and
press O and enter each item.
Using the synchronisation
function requires an additional
service subscription. For
detailed information, consult the
SmarTone web site. Once you
have completed the required
information, you will be sent an
SMS to confirm your subscription.
Profile: Displays the profile
name of your Infrared
system.
Server URL: Displays the server
URL.
User Name: Displays the phone
manufacturer’s name.
Password: Displays the current
password.
Method: Displays the following
synchronisation
methods
Mobile → Server (Normal):
Only data that has been changed
is exchanged between the
phone and the server.
Mobile → Server (Replace):
All data on the server is replaced
with the phone data.
Selected Data: Selects data in the
Phonebook, Schedule,
and To Do list.
Database (Phonebook): Registers
a database name for
Phonebook.
Database (Schedule): Registers a
database name for
Schedule.
Database (To Do): Registers a
database name for To
Do.
3 Select an item and edit it if
desired.
4 Press [Start] and press [YES] to
start synchronization.
Synchronises data between the
phone and a computer
You can synchronize data via
Bluetooth™, Infrared, or USB.
1 Select Local on the
Synchronise display and press
O.
2 Select a network profile. The
items of the current setting
status appear as follows,
Profile, User Name, Password, Communication
Method, and Selected Data.
• If you want to define a new
profile, select No entries,
press O and enter each item.
• For an explanation of all the
above items except Method,
see p. xx “To synchronise
data between the phone and
a network server”.
• Communication Method:
Select Bluetooth, Infrared,
or USB.
3 Select other items and edit if
desired.
4 Press [Start] and press [YES] to
start synchronization.
Connectivity Connectivity
Page 96

193192
Note: When you are indicating your
password and user name, both
must match on the phone and
your PC.
To utilize this function, make sure
you are using Microsoft Outlook
on your PC.
Setting a regular period for
synchronization between the
phone and the network server
1 Select Auto Synchronisation
on the Synchronise display,
then On and press O.
2 Select an item with an icon, set
the starting time and select the
period.
: Enters the time using u / d.
: Selects Every Day, Every
Week, Every Month or No
Repeat.
Printing
You can print out photos stored
on the handset or Memory Card.
Select from Standard Print, Printer
Default, Index Print or DPOF Print.
Standard Print: Prints each photo
on one sheet.
Index Print: Prints multiple
thumbnail photos on
one sheet.
Printer Default: Prints the photo
according to the
default printer settings.
DPOF Print: Prints the indicated
photos.
Printing from your digital photo
printer (Not included)
Note: Read the digital photo printer
(not included) manual before
using.
1 In Standby mode, press O,
select highlight and press
O.
2 Select Connectivity and press
O, select Print Mode and
press O, then select Execute
and press O.
3 Once the “Please connect to
printer” message is displayed
connect the USB cable (not
included) to the phone and
printer.
4 Select either Standard Print,
Index Print, or Printer Default.
Select Set as Print and select
the folder where your photo(s)
are stored and press O, then
select the photo(s) to print and
press O.
Note: Press [Mem.Crd] if you want to
select data stored on the
inserted Memory Card.
5 Press [Execute].
6 Select Copies, and press O.
Use the navigation keys to
select the number of copies
and press O.
7 Select Print Size, select the
desired print size and press O.
8 Select Date Print, select On or
Off and press O.
9 Press [Print].
Connectivity Connectivity
Page 97

195194
Transmitting data on the SD
Card to a PC via USB
You can transmit all the SD Card
data from the phone to a personal
computer through a USB cable
and edit the data from the
computer.
Do not remove the USB cable
when using this function. Refer to
page xx regarding precaution
concerning this function.
1 Open the USB Storage Mode
display.
• Press O →
→ Connec-
tivity → USB Storage Mode
2 Connect the phone to the
personal computer with a USB
cable.
3 Select Execute and press O.
Cautions: While the phone is in the
USB Storage Mode, no
incoming calls or messages
can be received.
Only USB1.1 is available.
Data may become
corrupted if you do not
follow the proper procedures or instructions that
appear as a dialog
messages in the task tray.
Precautions when using the SD
card and the USB Storage
Mode
• Disconnecting the USB cable or
removing the SD card while the
SD card is being accessed may
cause serious damage to the SD
card, S103 and computer. There
may be some cases on Windows Me/98SE computers in
which the S103 device is not
indicated in the task tray but it is
connected and being accessed.
Make sure the SD card is not
being accessed before removing
either the USB cable or SD card.
• Do not remove the battery pack
while transferring data.
• Do not use a computer to
modify, move, or add data on
the SD card.
• Ensure there is ample battery
charge remaining before using.
Not doing so may result in data
errors or damage, as well as
possible problems with your
S103.
• Use an SD card that has been
formatted on your S103. SD
cards that have been formatted
on a computer etc. may not be
recognizable on your S103.
Connectivity Connectivity
• Do not turn off the computer’s
power switch or change to the
standby mode when using USB
Storage Mode. Doing so may
result in not being able to
perform data transfer even after
rebooting your computer.
Page 98

197196
Safety
precautions
Page 99

199198
Do not use near medical
devices or on board aircraft
Do not use a mobile phone near a
heart pacemaker or any other
medical device. Radio frequency
(RF) signals may interfere with the
functionality of medical or aircraft
equipment.
• Always maintain a suitable
distance between the phone and
a pacemaker if the phone is
switched On.
• Turn Off the phone immediately if
you have any reason to suspect
that interference is taking place.
• Turn Off the phone in health care
facilities and request permission
before using the phone near
medical equipment.
• Consult the manufacturer of any
personal medical devices (such
as hearing aids) to determine if
they are adequately shielded
from external RF signals.
• Do not hold the receiver near
your ear except during a call, as
a sudden sound from the ringing
speaker may result in damaging
your hearing.
Should you use the phone
orientated with its back adjacent
to your body (e.g., when using the
headset), maintain a suitable
distance between phone and your
body.
• Before boarding an aircraft, be
sure to first cancel Auto Power
On and any other alarm settings,
and then turn the phone off.
When not to use in or
around your vehicle
• Do not use your phone near
combustible fuels or flammable
chemicals.
• To avoid traffic accidents, do not
use a mobile phone while
driving. Park the vehicle first and
then use the phone. Always
secure the phone in its holder;
do not place the phone on the
passenger seat or where it can
become dislodged in a collision
or sudden stop.
General warnings
• Do not use the phone outside on
a rainy day or near any source of
water.
• Do not leave the phone in
extremely hot or cold places,
such as in a closed [or open] car
in summer or winter conditions,
or allow it to be exposed to
direct sunlight.
• Do not make any changes or
modifications to your phone not
expressly approved.
• Do not use the phone in high
humidity or with wet hands to
prevent electric shock or shortcircuiting.
• Be careful not to drop or
damage the phone. Rough
handling can damage the
internal circuit boards causing
malfunction.
• Keep the phone out of the reach
of small children. They could
hurt themselves or others.
Safety precautions Safety precautions
Page 100

201200
Notes
• Use only in the normal position
(applied to ear). Do not touch or
hold the antenna unless
absolutely necessary.
• It is normal for the mobile phone
to become warm when used for
extended periods.
• The temperature near the phone
should be kept between 5°C
and 35°C.
• Keep the metal contacts on the
phone and battery clean.
• Do not use harsh chemicals,
cleaning solvents, or strong
detergents to clean the phone.
• Wipe it with a soft cloth. (Avoid
using a cloth which is too dry
because it may generate static
electricity.)
• Use only Sanyo approved
accessories and batteries. To
prevent fire or damage to the
phone, do not connect incompatible products.
• If a home telephone, TV, or radio
is turned On, keep the phone
away from it.
• Have your phone serviced only
by authorised personnel.
Solving problems
• If a problem occurs, you should
turn Off the phone, remove the
battery and then contact your
nearest qualified repair shop.
• You should also contact a repair
shop promptly if the phone is
dropped or damaged.
• To prevent the risk of fire or
injury, never attempt to repair the
equipment yourself.
Battery safety precautions
The S103 uses a lithium ion
battery. To avoid any risk or
danger, you should observe the
following precautions.
• Use only Sanyo approved
batteries, AC adaptors and
accessories recommended for
use with this specific model.
Using other batteries or AC
adaptors may cause damage
and invalidate your warranty.
• Batteries should be recycled or
disposed of correctly. They
should not be disposed of in
municipal waste.
• Do not dispose batteries in a
fire.
• Do not charge or leave the
batteries in areas subject to high
temperatures (near a fire, heater
etc.).
• Do not short-circuit the battery.
Note that short-circuiting could
occur accidentally if a metallic
object (coin, pen, jewellery, or
similar) caused a direct connection between the + and terminals of the battery.
• Never use an AC adaptor or
battery which is damaged or
worn out.
• Do not attempt to disassemble
the battery.
Safety precautions Safety precautions
 Loading...