

Page 1
INSTRUC TI O N MANU AL
AM/FM Clock Radio
RM-7970
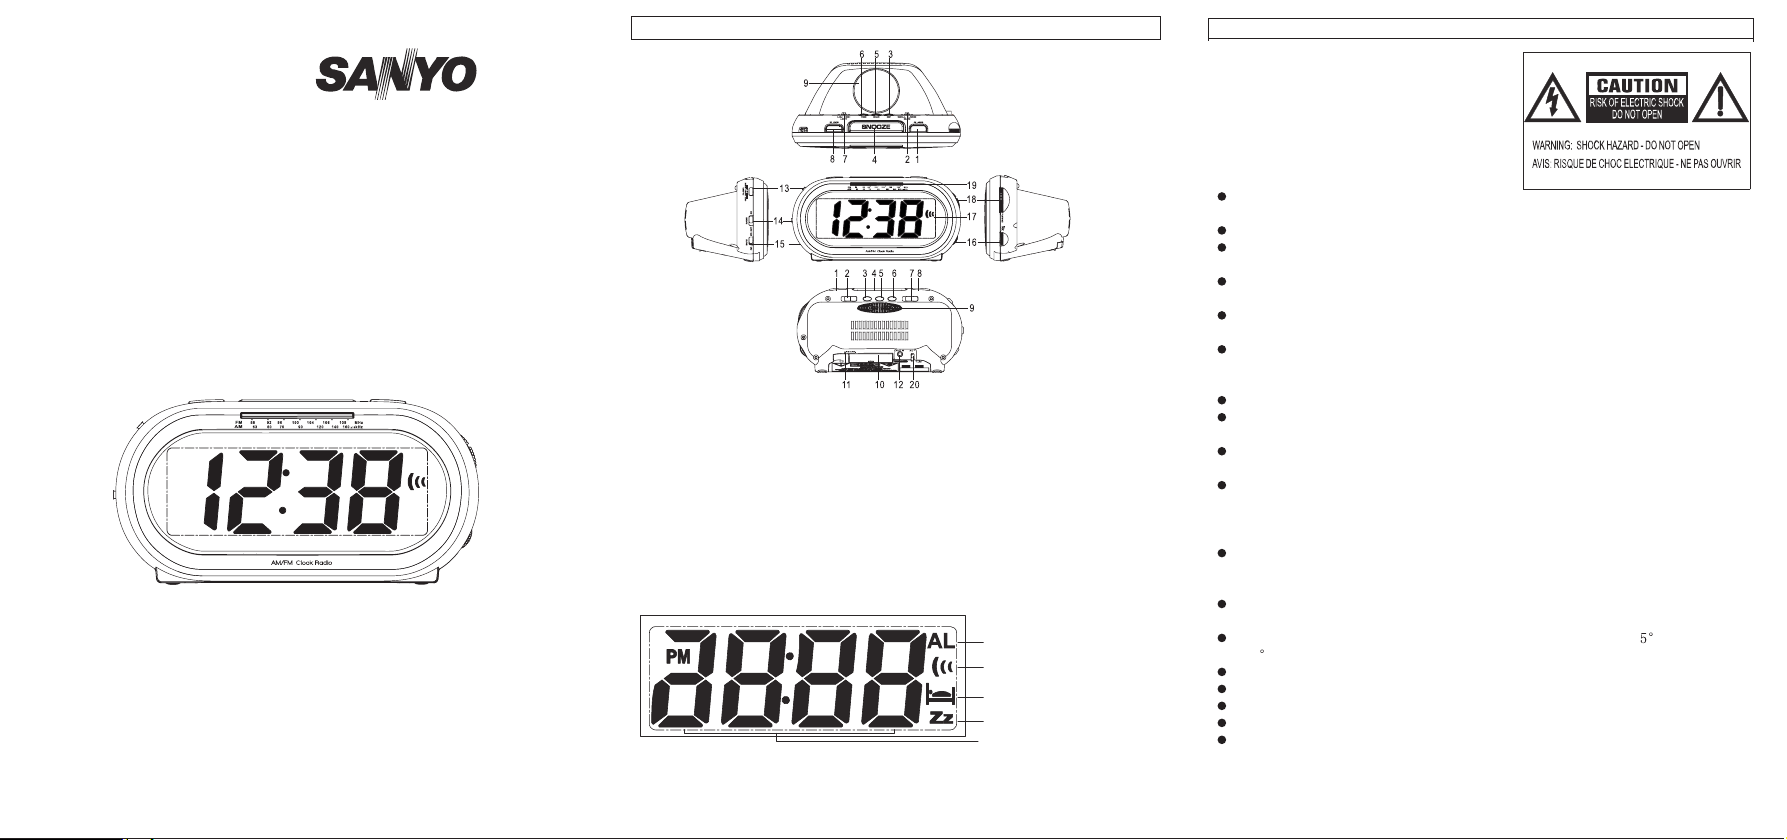
CONTROLS
1. ALARM button
2. BUZZ SMALL/LARGE switch
3. MIN button
4. SNOOZE button
5. HOUR button
6. TIME button
7. LIGHT LOW/HIGH switch
8. SLEEP button
9. Speaker
10. Battery compartment
11. FM Wire aerial
12. AUX IN jack
13. ALARM OFF/RADIO/BUZZ switch
14. RADIO ON/OFF switch
15. BAND AM/FM switch
16. VOLUME knob
17. LCD display
18. Tuning knob
19. Dial scale
20. AC cord
Setting Alarm icon
Alarm icon
Sleep icon
Snooze icon
Displa y time
Page 2
SAFETY PRECAUTIONS
To achieve the utmost in enjoyment and
performance, please read this manual
carefully before attempting to operate the
unit in order to become familiar with its
features, and assure you years of faithful,
trouble free performance and listening
pleasure.
Important notes
All the safety and operating instructions
should be read before the apparatus is operated.
The safety and operating instructions should be retained for future reference.
Unplug this product from the wall outlet before cleaning. Do not use liquid
cleaners or aerosol cleaners. Use a damp cloth for cleaning.
The apparatus should be connected to a power supply only of the type described
in the operating instructions of as marked on the apparatus.
To be completely disconnected the power input, the mains plug of apparatus
shall be disconnected from the mains.
Power supply cords should be routed so that they are not likely to be walked on
or pinched by items placed upon or against them, paying particular attention to
cords at plugs.
The mains plug of apparatus should be easily accessed.
The power cord of the apparatus should be unplugged from the outlet when left
unused for a long period of time.
This apparatus shall not be exposed to dripping or splashing water and that no
object filled with liquids such as vases shall be placed on the apparatus.
The apparatus should be situated so that its location or position does not
interfere with its proper ventilation. The ventilation should not be impeded by
covering the ventilation openings with items such as newspaper, table-cloths,
curtains etc.
Do not install this apparatus in a confined space, such as a book case or built-in
cabinet. Minimum distance (about 100mm) around the apparatus for sufficient
ventilation.
No naked flame sources such as lighted candles should be placed on the
apparatus.
Do not use where there are extremes of temperature (below C or exceeding
35
C).
Battery shall not be exposed to excessive heat such as sunshine, fire or the like.
Attention should be drawn to the environmental aspects of battery disposal.
The caution marking was located at the bottom of the apparatus.
The nameplate marking was located at the bottom of the apparatus.
The use of apparatus in moderate climates.
For safety reasons, do not remove any covers or attempt to gain access to the inside
of the product.
Page 3
Page 2

Refer any servicing to qualified personnel.
Do not attempt to remove any screws, or open the casing of the unit; there are no
user serviceable parts inside, refer all servicing to qualified service personnel.
POWER SUPPLY
Connect the mains lead to an AC 240V 50Hz wall outlet.
-- The RADIO ON/OFF switch is mounted on the secondary side. The unit is not
disconnected from the mains even switched off.
BATTERY INSTALLATION
1. Open the battery compartment cover.
2.
Insert two fresh “AAA” batteries (not included) into the battery compartment,
be sure to follow the polarity (+/-) markings on the bottom of the unit.
Replace the battery compartment cover.
3.
Note:
1. The batteries can also be exhausted and we recommend that you replace the
batteries every year.
2. Please leave the unit connected to the AC outlet while replacing the battery to
avoid losing all of your setting.
Caution:
All batteries must be installed with the proper polarity (see diagram on the
bottom of the unit).
Do not mix new with old or used batteries.
Only use batteries of the same type and brand.
Remove the batteries to avoid leakage if they are not be used for a prolonged
period.
In the interest of environmental safety, dispose of battery safely.
BATTERY BACK-UP SYSTEM
This unit includes a battery back-up system which protects the clock, sleep timer and
wake-up alarm functions from the mains failure with the battery installed. During the
mains interruption, the clock display will go out, but the clock movement remains in
operation. The time display will be resumed when the mains return.
Reset the time if the display time is incorrect.
When the mains lead is connected to the AC outlet for the first time, or when the
mains returns after a failure longer than the battery life. In this case, set the clock and
alarm again.
ADJUSTING THE CLOCK
1. While holding the TIME button down, then press HOUR button repeatedly, to set
the correct hour. Be sure to observe the word to confirm that the hour is set
Page 4
correctly.
2. While holding the TIME button down, then press MIN (Minute) button repeatedly,
to set the correct minute.
3. Release the TIME button.
LISTENING TO THE RADIO
1. Set the RADIO ON/OFF switch to ON (No AUX IN cable insertion).
2. Slide the BAND switch to AM or FM.
3. Turn the TUNING control to tune in a station.
4. Adjust the VOLUME control as desired.
5. To turn the radio off, set the RADIO ON/OFF switch to OFF. .
Aerials
- For AM reception, rotate or relocate the unit to a different position to improve the
reception of a distant or weak station.
- For FM reception, a short wire aerial is provided. Unwind the short wire aerial
and extend it to full length. You may also have to vary the direction of this
antenna until you find the position that pro
vides the best reception.
SETTING THE ALARM
1. Set the RADIO ON/OFF switch to OFF.
2.
Set the ALARM OFF/RADIO/BUZZ switch to ALARM-BUZZ or ALARM-RADIO.
Alarm icon ((( appears.
3. If you set alarm by BUZZER, slide BUZZ SMALL/LARGE switch to desired
location.
4. While holding the ALARM button down, AL appears on the top-right of the LCD,
then press the HOUR or MIN(Minute) button respectively to select the wake-up
time.
5. Release the ALARM button.
Note: If you want to check the alarm time setting, simply push the ALARM button.
USING THE ALARM
1. If you want to wake up with the radio, tune in the station and adjust the volume
level first.
2. Set the wake-up time. (See “SETTING THE ALARM”.)
3. Set the ALARM OFF/BUZZ/RADIO switch to ALARM-RADIO or
ALARM-BUZZ.
4. The alarm icon ((( appears on the LCD.
At the preset alarm time, the alarm sounds, then turns off after 1 hour and 59
minutes. The alarm timer will function every day unless ALARM switch is set to OFF.
To temporarily silence the alarm buzzer or radio, press SNOOZE. This silences the
alarm for about 9 minutes. You can repeat this cycle as many times as you
To turn off the alarm so it does not sound again, set ALARM OFF/BUZZ/ RADIO to
Page 5
like.
OFF.
To reset the alarm to sound again at the same time the next day, set it back to BUZZ
or RADIO.
USING THE SLEEP TIMER
1. Set the RADIO ON/OFF switch to OFF.
2. Push the SLEEP button. “00:59” (59 minutes) appears. The radio turns on.
3. Hold SLEEP button then press HOUR once, the sleep hour digit will be “01”.
4. Hold SLEEP button then press MIN button repeatedly, the sleep minute digit will
change from 59 to 00. The sleep timer up to 01:59.
5. Release the SLEEP button.
6. When the sleep timer is reached, it will turn off the radio automatically. If you
want to cancel the SLEEP function when the sleep timer is not reached, press
SNOOZE button to turn off the radio.
NOTES:
release the sleep timer while in operation, set the sleep time to 00:00.
- To
- If you push the SLEEP button after sleep time setting, the sleep time w
to 00:59.
ill return
LIGHT HIGH/LOW FUNCTION
Slide LIGTH HIGH/LOW switch to select the desired brightness of the display.
AUX IN FUNCTION
1. Set the RADIO ON/OFF to ON.
2. Connect the external audio equipment to AUX IN jack on the back of the unit.
The connection cable is not included.
3. Rotate the VOLUME knob to select the desired sound level.
SPECIFICATIONS
Power source: AC: ~240V, 50 Hz
Back-up battery: 2 x 1.5V 2 x ”AAA” size battery (not included)
Power consumption: 3W
Output power: 250 m Watts (AC max.)
Speaker: 16 ohm
Tuning ranges: AM: 530 – 1620 kHz
Specifications subject to change without notice.
FM: 87.5 – 108 MHz
Page 6
Made in China
 Loading...