


Sprint PCS®Service
www.sprint.com
© 2005 Sprint Nextel. All rights reserved. No reproduction in whole or in part
without prior written approval. Sprint, the “Going Forward”logo and other
trademarks are trademarks of SprintNextel. Sanyo is a registered trademark of
Sanyo Electric Co.,Ltd.
Sprint PCS VisionSMReady Link Phone
RL-4930 by Sanyo
®


Table of Contents
Welcome to Sprint . . . . . . . . . . . . . . . . . . . . . . . . . . . . . . . . . . . . . . .i
Introduction . . . . . . . . . . . . . . . . . . . . . . . . . . . . . . . . . . . . . . . . . . . . .ii
Section 1: Getting Started . . . . . . . . . . . . . . . . . . . . . . . . . . . . . . .1
1A. Setting Up Service . . . . . . . . . . . . . . . . . . . . . . . . . . . . . . . . . . . . . . .3
Getting Started With Sprint PCS Service . . . . . . . . . . . . . . . . . . . . . . . . . . .4
Setting Up Your Voicemail . . . . . . . . . . . . . . . . . . . . . . . . . . . . . . . . . . . . . . . . . . .5
Sprint PCS Account Passwords . . . . . . . . . . . . . . . . . . . . . . . . . . . . . . . . . . . . . .6
Getting Help . . . . . . . . . . . . . . . . . . . . . . . . . . . . . . . . . . . . . . . . . . . . . . . . . . . . . . . . . .7
Section 2: Your Sprint PCS Phone . . . . . . . . . . . . . . . . . . . . . . .11
2A. Your SprintPCS Phone: The Basics . . . . . . . . . . . . . . . . . . . . . .13
FrontView of Your Phone . . . . . . . . . . . . . . . . . . . . . . . . . . . . . . . . . . . . . . . . . .14
Viewing the Display Screen . . . . . . . . . . . . . . . . . . . . . . . . . . . . . . . . . . . . . . . .16
Features of Your Sprint PCS Phone . . . . . . . . . . . . . . . . . . . . . . . . . . . . . . . .19
Turning Your Phone On and Off . . . . . . . . . . . . . . . . . . . . . . . . . . . . . . . . . . . .21
Using Your Phone’s Battery and Charger . . . . . . . . . . . . . . . . . . . . . . . . .22
Displaying Your Phone Number . . . . . . . . . . . . . . . . . . . . . . . . . . . . . . . . . . .25
Making and Answering Calls . . . . . . . . . . . . . . . . . . . . . . . . . . . . . . . . . . . . . .26
Entering Text . . . . . . . . . . . . . . . . . . . . . . . . . . . . . . . . . . . . . . . . . . . . . . . . . . . . . . . .44
2B. Controlling Your Phone’s Settings . . . . . . . . . . . . . . . . . . . . . .53
Sound Settings . . . . . . . . . . . . . . . . . . . . . . . . . . . . . . . . . . . . . . . . . . . . . . . . . . . . .54
Display Settings . . . . . . . . . . . . . . . . . . . . . . . . . . . . . . . . . . . . . . . . . . . . . . . . . . . .62
Location Settings . . . . . . . . . . . . . . . . . . . . . . . . . . . . . . . . . . . . . . . . . . . . . . . . . . .72
Messaging Settings . . . . . . . . . . . . . . . . . . . . . . . . . . . . . . . . . . . . . . . . . . . . . . . .73
Airplane Mode . . . . . . . . . . . . . . . . . . . . . . . . . . . . . . . . . . . . . . . . . . . . . . . . . . . . . .79
TTY Use With SprintPCS Service . . . . . . . . . . . . . . . . . . . . . . . . . . . . . . . . . .80
Phone Setup Options . . . . . . . . . . . . . . . . . . . . . . . . . . . . . . . . . . . . . . . . . . . . . .82

2C. Setting Your Phone’s Security . . . . . . . . . . . . . . . . . . . . . . . . . .91
Accessing the Security Menu . . . . . . . . . . . . . . . . . . . . . . . . . . . . . . . . . . . . . .92
Using Your Phone’s Lock Feature . . . . . . . . . . . . . . . . . . . . . . . . . . . . . . . . . .93
Restricting Calls . . . . . . . . . . . . . . . . . . . . . . . . . . . . . . . . . . . . . . . . . . . . . . . . . . . .95
Using Special Numbers . . . . . . . . . . . . . . . . . . . . . . . . . . . . . . . . . . . . . . . . . . . .96
Erasing Phone Content . . . . . . . . . . . . . . . . . . . . . . . . . . . . . . . . . . . . . . . . . . . . .97
Resetting Your Phone . . . . . . . . . . . . . . . . . . . . . . . . . . . . . . . . . . . . . . . . . . . . . .98
Resetting and Locking Your Phone Through SMS . . . . . . . . . . . . . . . .99
Security Features for SprintPCS Vision
SM
. . . . . . . . . . . . . . . . . . . . . . . . . 10 1
2D. Controlling Your Roaming Experience . . . . . . . . . . . . . . . .103
Understanding Roaming . . . . . . . . . . . . . . . . . . . . . . . . . . . . . . . . . . . . . . . . .104
Setting Your Phone’s Roam Mode . . . . . . . . . . . . . . . . . . . . . . . . . . . . . . . .107
Using Call Guard . . . . . . . . . . . . . . . . . . . . . . . . . . . . . . . . . . . . . . . . . . . . . . . . . .108
2E. Navigating Through Menus . . . . . . . . . . . . . . . . . . . . . . . . . . .111
Menu Navigation . . . . . . . . . . . . . . . . . . . . . . . . . . . . . . . . . . . . . . . . . . . . . . . . .112
Menu Structure . . . . . . . . . . . . . . . . . . . . . . . . . . . . . . . . . . . . . . . . . . . . . . . . . . .112
Viewing the Menus . . . . . . . . . . . . . . . . . . . . . . . . . . . . . . . . . . . . . . . . . . . . . . .114
2F. Managing Call History . . . . . . . . . . . . . . . . . . . . . . . . . . . . . . . .117
Viewing History . . . . . . . . . . . . . . . . . . . . . . . . . . . . . . . . . . . . . . . . . . . . . . . . . .118
Call History Options . . . . . . . . . . . . . . . . . . . . . . . . . . . . . . . . . . . . . . . . . . . . . .119
Making a Call From Call History . . . . . . . . . . . . . . . . . . . . . . . . . . . . . . . . . .120
Saving a Phone Number From Call History . . . . . . . . . . . . . . . . . . . . . .121
Prepending a Phone Number From Call History . . . . . . . . . . . . . . . .122
Erasing Call History . . . . . . . . . . . . . . . . . . . . . . . . . . . . . . . . . . . . . . . . . . . . . . .123
2G. Using the Contacts Directory . . . . . . . . . . . . . . . . . . . . . . . . .125
Displaying the Contacts List . . . . . . . . . . . . . . . . . . . . . . . . . . . . . . . . . . . . . .126
Adding a New Contacts Entry . . . . . . . . . . . . . . . . . . . . . . . . . . . . . . . . . . . .126
Finding Contacts ListEntries . . . . . . . . . . . . . . . . . . . . . . . . . . . . . . . . . . . . .127
Contacts List Entry Options . . . . . . . . . . . . . . . . . . . . . . . . . . . . . . . . . . . . . .129

Adding a Phone Number to a Contacts Entry . . . . . . . . . . . . . . . . . . .130
Editing a Contacts Entry . . . . . . . . . . . . . . . . . . . . . . . . . . . . . . . . . . . . . . . . . .131
Erasing a Contacts Entry From the List . . . . . . . . . . . . . . . . . . . . . . . . . .131
Assigning Speed Dial Numbers . . . . . . . . . . . . . . . . . . . . . . . . . . . . . . . . . .132
Selecting a Ringer or an Image for an Entry . . . . . . . . . . . . . . . . . . . . .133
Secret Contacts Entries . . . . . . . . . . . . . . . . . . . . . . . . . . . . . . . . . . . . . . . . . . .135
Dialing SprintPCS Services . . . . . . . . . . . . . . . . . . . . . . . . . . . . . . . . . . . . . . .136
2H. Using the Phone’s Calendar and Tools . . . . . . . . . . . . . . . .137
Using Your Phone’s Calendar . . . . . . . . . . . . . . . . . . . . . . . . . . . . . . . . . . . . .138
Displaying Personal Information . . . . . . . . . . . . . . . . . . . . . . . . . . . . . . . .150
Using Your Phone’s Tools . . . . . . . . . . . . . . . . . . . . . . . . . . . . . . . . . . . . . . . . .152
2I. Using Your Phone’s Voice Services . . . . . . . . . . . . . . . . . . . .157
Using Automatic Speech Recognition . . . . . . . . . . . . . . . . . . . . . . . . . . .158
Using the Voice Recorder . . . . . . . . . . . . . . . . . . . . . . . . . . . . . . . . . . . . . . . . .170
Setting Up Screen Call . . . . . . . . . . . . . . . . . . . . . . . . . . . . . . . . . . . . . . . . . . . .178
2J. Using SprintPCS Ready LinkSM . . . . . . . . . . . . . . . . . . . . . . . . . 18 3
Getting Started With Sprint PCS Ready Link . . . . . . . . . . . . . . . . . . . .184
Making and Receiving a Sprint PCS Ready Link Call . . . . . . . . . . . . .187
Adding and Editing Ready Link Contacts . . . . . . . . . . . . . . . . . . . . . . . .194
Erasing Ready Link List Entries . . . . . . . . . . . . . . . . . . . . . . . . . . . . . . . . . . .202
Updating Sprint PCS Ready Link Lists . . . . . . . . . . . . . . . . . . . . . . . . . . . .204
Managing SprintPCS Ready Link Settings . . . . . . . . . . . . . . . . . . . . . .205
Section 3: Sprint PCS Service Features . . . . . . . . . . . . . . . .211
3A. Sprint PCS Service Features: The Basics . . . . . . . . . . . . . . .213
Using Voicemail . . . . . . . . . . . . . . . . . . . . . . . . . . . . . . . . . . . . . . . . . . . . . . . . . . .214
Using Text SMS Messaging . . . . . . . . . . . . . . . . . . . . . . . . . . . . . . . . . . . . . . .224
Using Voice SMS Messaging . . . . . . . . . . . . . . . . . . . . . . . . . . . . . . . . . . . . .228
Using Caller ID . . . . . . . . . . . . . . . . . . . . . . . . . . . . . . . . . . . . . . . . . . . . . . . . . . . . .230
Responding to Call Waiting . . . . . . . . . . . . . . . . . . . . . . . . . . . . . . . . . . . . . .231

Making a Three-Way Call . . . . . . . . . . . . . . . . . . . . . . . . . . . . . . . . . . . . . . . . .232
Using Call Forwarding . . . . . . . . . . . . . . . . . . . . . . . . . . . . . . . . . . . . . . . . . . . .233
3B. Sprint PCS VisionSM . . . . . . . . . . . . . . . . . . . . . . . . . . . . . . . . . . . . . 23 5
Getting Started With Sprint PCS Vision . . . . . . . . . . . . . . . . . . . . . . . . .236
Accessing Messaging . . . . . . . . . . . . . . . . . . . . . . . . . . . . . . . . . . . . . . . . . . . . .243
Downloading Premium Services Content . . . . . . . . . . . . . . . . . . . . . .248
Exploring the Web . . . . . . . . . . . . . . . . . . . . . . . . . . . . . . . . . . . . . . . . . . . . . . . .252
Sprint PCS Vision FAQs . . . . . . . . . . . . . . . . . . . . . . . . . . . . . . . . . . . . . . . . . . . .258
3C. Sprint PCS Voice CommandSM . . . . . . . . . . . . . . . . . . . . . . . . . .2 61
Getting Started With Sprint PCS Voice Command . . . . . . . . . . . . . .262
Creating Your Own Address Book . . . . . . . . . . . . . . . . . . . . . . . . . . . . . . . .263
Making a Call With Sprint PCS Voice Command . . . . . . . . . . . . . . . .264
Accessing Information Using Sprint PCS Voice Command . . . . .265
Section 4: Safety and Warranty Information . . . . . . . . .267
4A . S a fet y . . . . . . . . . . . . . . . . . . . . . . . . . . . . . . . . . . . . . . . . . . . . . . . . . 26 9
Getting the Most Out of Your Reception . . . . . . . . . . . . . . . . . . . . . . . .270
Maintaining Safe Use of and Access to Your Phone . . . . . . . . . . . .272
Caring for the Battery . . . . . . . . . . . . . . . . . . . . . . . . . . . . . . . . . . . . . . . . . . . . .274
Acknowledging Special Precautions and the FCC Notice . . . . . .275
Owner’s Record . . . . . . . . . . . . . . . . . . . . . . . . . . . . . . . . . . . . . . . . . . . . . . . . . . .277
Phone Guide Proprietary Notice . . . . . . . . . . . . . . . . . . . . . . . . . . . . . . . . .277
4B. Manufacturer’s Warranty . . . . . . . . . . . . . . . . . . . . . . . . . . . . .279
Manufacturer’s Warranty . . . . . . . . . . . . . . . . . . . . . . . . . . . . . . . . . . . . . . . .280
Index . . . . . . . . . . . . . . . . . . . . . . . . . . . . . . . . . . . . . . . . . . . . . . . . . .285

i
Welcome to Sprint
Sprint is committed to bringing you the best wireless
technology available. We builtour complete, nationwide
network from the ground up, so all your services – whether
it’s Voicemail, Caller ID, email, or Sprint PCS Picture Mail –
will work the same wherever you go on the nationwide
Sprint PCS network.
This guide will familiarize you with our technology and your
new Sprint PCS Phone through simple, easy-to-follow
instructions. It’s all righthere – from setting up your account
passwords and voicemail to using the mostadvanced
features of Sprint PCS Vision
SM
.
Welcome and thank you for choosing Sprint.

ii
Introduction
This Phone Guide introduces you to SprintPCS Service and
all the features of your new phone. It’s divided into four
sections:
Section 1: Getting Started
Section 2: Your Sprint PCS Phone
Section 3: Sprint PCS Service Features
Section 4: Safety and Warranty Information
Throughout this guide, you’ll find tips that highlightspecial
shortcuts and timely reminders to help you make the most
of your new phone and service. The Table of Contents and
Index will also help you quickly locate specific information.
You’ll getthe mostout of your phone if you read each
section. However, if you’d like to getright to a specific
feature, simply locate that section in the Table of Contents
and go directly to that page. Follow the instructions in that
section, and you’ll be ready to use your phone in no time.

Getting Started
Section 1

2

Section 1A: Setting Up Service 3
Section 1A
Setting Up Service
In This Section
Getting Started With Sprint PCS Service
Setting Up Your Voicemail
SprintPCS Account Passwords
Getting Help
Setting up service on your new Sprint PCS Phone is quick and
easy. This section walks you through the necessary steps to
unlock your phone, set up your voicemail, establish
passwords, and contact Sprintfor assistance with your
Sprint PCS Service.
Setting Up Service

4 Section 1A: Setting Up Service
Getting Started With Sprint PCS Service
Determining if Your Phone is Already Activated
If you purchased your phone at a Sprint Store, it is probably
activated, unlocked, and ready to use. If you received your
phone in the mail, it probably has been activated; all you need
to do is unlock it.
If your phone is not activated, please refer to the Activation
Guide brochure included with your phone.
Unlocking Your Phone
To unlock your phone, follow these easy steps:
1. Press and hold E to turn the phone on.
2. Press Unlock (leftsoftkey).
Note:To selecta softkey, press the softkey button directly below the softkey
text thatappears at the bottom left and bottom right of your phone’s
display screen. Softkey actions change according to the screen you’re
viewing and will not appear if there is no corresponding action available.
3. Enter your four-digit lock code. (For security purposes,
the code is not visible as you type.)
Tip:If you can’t recall your lock code, try using the last four digits of
either your Social Security number or Sprint PCS Phone number or try 0000
or NATL (6285). If none of these work, call Sprint Customer Service at: 1-888211-4PCS (4727).

Section 1A: Setting Up Service 5
Setting Up Your Voicemail
All unanswered calls to your Sprint PCS Phone are
automatically transferred to your voicemail, even if your
phone is in use or turned off. Therefore, you will wantto set
up your voicemail and personal greeting as soon as your
Sprint PCS Phone is activated.
To setup your voicemail:
1. Press and hold 1.
2. Follow the system prompts to:
Create your pass code
Record your name announcement
Record your greeting
Choose whether or notto activate One-Touch
Message Access (a feature thatlets you access
messages simply by pressing and holding
1,
bypassing the need for you to enter your pass code)
Note: If you are concerned aboutunauthorized access to your voicemail
account, Sprint recommends you enable your voicemail pass code.
For more information about using your voicemail, see “Using
Voicemail”on page 214.
Setting Up Service

6 Section 1A: Setting Up Service
Sprint PCS Account Passwords
As a Sprint PCS customer, you enjoy unlimited access to your
personal account information, your voicemail account, and
your Sprint PCS Vision account. To ensure that no one else has
access to your information, you will need to create passwords
to protect your privacy.
AccountPassword
If you are the accountowner, you’ll have an accountpassword
to sign on to
www.sprint.com and to use when calling Sprint
Customer Service. Your default accountpassword is the last
four digits of your Social Security number. If you are notthe
accountowner (if someone else receives the invoice for your
Sprint PCS Service), you can geta sub-account password at
www.sprint.com.
Voicemail Password
You’ll create your voicemail password (or pass code) when you
set up your voicemail. See “Setting Up Your Voicemail”on
page 5 for more information on your voicemail password.
Sprint PCS Vision Password
With your RL-4930 by Sanyo, you may electto setup a
Sprint PCS Vision Password. This optional password
may be used to authorize purchase of Premium Services
contentand to protect personal information on multi-phone
accounts.
For more information, or to change your passwords, sign
on to
www.sprint.com or call Sprint Customer Service at
1-888-211-4PCS (4727).

Section 1A: Setting Up Service 7
Getting Help
Visit www.sprint.com
You can go online to:
Access your account information
Check your minutes used (depending on your SprintPCS
Service Plan)
View and pay your bill
Make your life easier by enrolling in Sprint PCS Online
Billing and Automatic Payment
Purchase accessories
Shop for the latest Sprint PCS Phones
View available Sprint PCS Service Plans and options
Learn more aboutSprint PCS Vision and other great
products like SprintPCS Picture Mail
SM
, games, ringers,
screen savers, and more
Reaching Sprint Customer Service
You can reach SprintCustomer Service many differentways:
Dial *2Ton your Sprint PCS Phone
Sign on to your account at www.sprin t.com
Call us toll-free at 1-888-211-4727 (Consumer customers)
or 1-888-788-4727(Business customers)
Write to us at SprintCustomer Service, P.O. Box 8077,
London, KY 40742
Setting Up Service

8 Section 1A: Setting Up Service
Receiving Automated Invoicing Information
For your convenience, your phone gives you access to
invoicing information on your SprintPCS Account. This
information includes balance due, paymentreceived,
invoicing cycle, and an estimate of the number of minutes
used since your lastinvoicing cycle. (Normal airtime usage will
apply.)
To access automated invoicing information:
Press *4T.
Note: This service may notbe available in all Affiliate areas.
Sprint PCS Directory Assistance
You have access to a variety of services and information
through Sprint PCS Directory Assistance, including
residential, business, and government listings; assistance
with local or long-distance calls; movie listings; and hotel,
restaurant, shopping, and major local eventinformation.
There is a per-call charge, and you will be billed for airtime.
To call Sprint PCS Directory Assistance:
Press 411T.

Section 1A: Setting Up Service 9
Sprint PCS Operator Services
Sprint PCS Operator Services provides assistance when
placing collect calls or when placing calls billed to a local
telephone calling card or third party.
To access Sprint PCS Operator Services:
Press 0T.
For more information or to see the latest in products and
services, visit us online at
www.sprint.com.
Note:Sprint PCS Operator Services may notbe available in all Affiliate areas.
Setting Up Service

10

Your Sprint PCS Phone
Section 2

12

Section 2A: Your Sprint PCS Phone – The Basics 13
Section 2A
Your Sprint PCS Phone: The Basics
In This Section
FrontView of Your Phone
Viewing the Display Screen
Features of Your Sprint PCS Phone
Turning Your Phone On and Off
Using Your Phone’s Battery and Charger
Displaying Your Phone Number
Making and Answering Calls
Entering Text
Your SprintPCS Phone is packed with features thatsimplify
your life and expand your ability to stay connected to the
people and information thatare important to you. This
section will guide you through the basic functions and
calling features of your phone.
Phone Basics
14 Section 2A: Your Sprint PCS Phone – The Basics
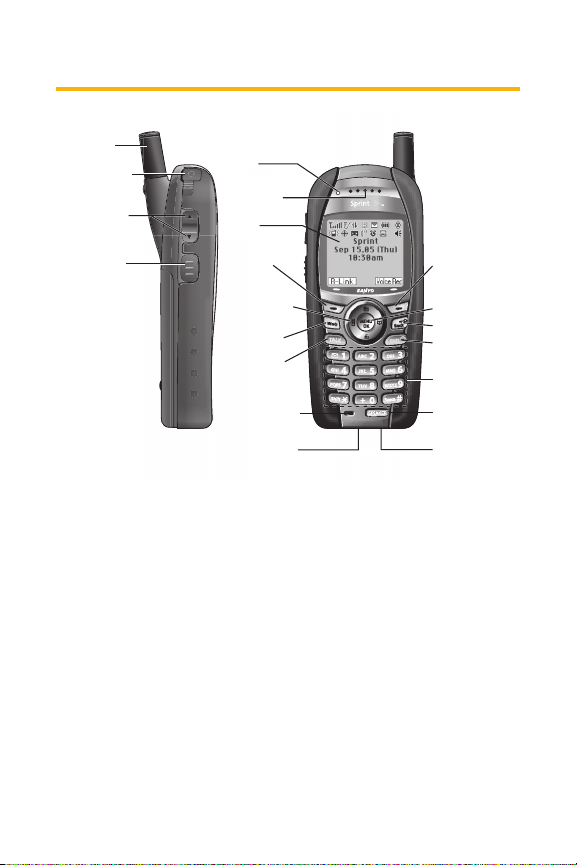
FrontView of Your Phone
Key Functions
1. Antenna : Fully extend the antenna for the best
reception.
2. Headset Jack : Lets you insert the plug of a headset (sold
separately) for hands-free phone use.
3. Side Volume Key : Lets you adjust the receiver volume
during a call or ringer volume in standby mode.
You can also use it to scroll up or down to navigate
through the different menu options.
1. Antenna
2. Headset Jack
3. Side Volume
Key
4. Ready Link/
Voice Recorder
Button
5. LED
Indicator
6. Earpiece
7. LCD
(display)
8. Softkey
(left)
9. Navigation
Key
10. Web Key
11. TALK Key
12. Microphone
13. Accessories
Connector
20. Softkey
(right)
19. MENU/OK Key
18. Back Key
17. END/POWER
Key
16. Keypad
15. SPEAKER Key
14. Charger Jack

Section 2A: Your Sprint PCS Phone – The Basics 15
4. Ready Link / Voice Recorder Button : Allows you to
access the Sprint PCS Ready Link Listor Voice Recorder
menu. (See “Using SprintPCS Ready Link
SM
”on page 183
or “Using the Voice Recorder”on page 170.)
5. LED Indicator : Shows your phone’s connection status at
a glance.
6. Earpiece : Lets you hear the caller and automated
prompts.
7. LCD (display) : Displays the phone’s main menu,
features, modes, etc.
8. Softkey (left) : Lets you select the menu corresponding
to the bottom leftline on the LCD.
9. Navigation Key : Lets you navigate quickly and easily
through the menu options. You can access menu
shortcuts by pressing Right: Contacts, Left: My Shortcut,
Up: Messaging, and Down: My Content.
10. Web Key : Lets you launch the Web.
11. TALK Key : Lets you place or answer calls, answer Call
Waiting, or use Three-Way Calling and ASR.
12. Microphone : To speak into or record your voice.
13. Accessories Connector : Connects optional accessories,
such as a USB cable.
14. Charger Jack : Connects the travel charger (included).
15. SPEAKER Key : Lets you place or receive calls in
speakerphone mode. You can also use itto activate
Automatic Speech Recognition.
Phone Basics

16 Section 2A: Your Sprint PCS Phone – The Basics
16. Keypad : Lets you enter numbers, letters, and characters,
and navigate within menus. Press and hold keys 2-9 for
speed dialing.
17. END/POWER Key : Lets you turn the phone on and off,
end a call, or return to standby mode.
18. Back Key : Lets you clear characters from the screen or
display the previous page. Press and hold for setting Key
Guard in standby mode.
19. MENU/OK Key : Lets you access the phone’s menus and
select menu options. Press and hold to activate
Automatic Speech Recognition (ASR).
20. Softkey (right) : Lets you select the menu corresponding
to the bottom rightline on the LCD.
Viewing the Display Screen
Your phone’s display screen provides a wealth of
information about your phone’s status and options.
This listidentifies the symbols you’ll see on your phone’s
display screen:
shows your current signal strength. The more lines
you have, the stronger your signal.
means your phone cannot find a signal.
indicates the call is on hold.
tells you a call is in progress.
indicates the SprintPCS Ready Link service is
enabled.

Section 2A: Your Sprint PCS Phone – The Basics 17
indicates the SprintPCS Ready Link service is
enabled and the speakerphone mode is setto on.
indicates the SprintPCS Ready Link service is
disabled.
indicates Sprint PCS Vision / Sprint PCS Ready Link
access is dormant.
indicates Sprint PCS Vision / Sprint PCS Ready Link
access is active.
indicates Sprint PCS Vision / Sprint PCS Ready Link
access is disabled.
indicates you are “roaming”off of the nationwide
Sprint PCS network.
indicates you have missed voice calls.
indicates you have missed Ready Link calls.
indicates you have scheduled events or call alarms.
indicates you have alarm clock notifications.
indicates you have new picture messages, voicemail
messages, text messages, and/or Voice SMS.
indicates you have urgent messages.
indicates you have received 2 or more different
types of notifications.
shows the level of your battery charge. The more
black you see, the more power you have left.
shows your battery is charging (appears when the
phone is turned off).
indicates the vibrate feature is set.
Phone Basics
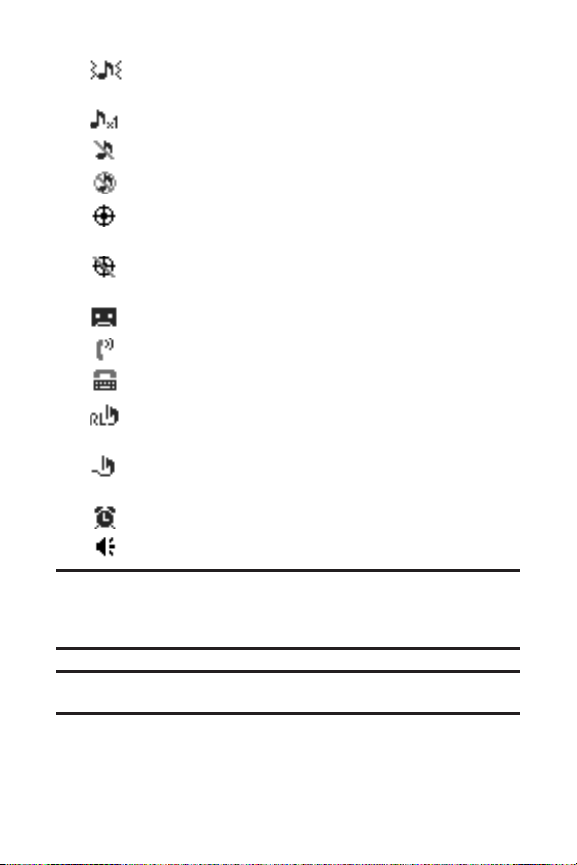
18 Section 2A: Your Sprint PCS Phone – The Basics
indicates volume level 4 or 1 and vibrate feature are
set.
indicates 1 beep feature is set.
indicates the voice call ringer setting is off.
indicates all the sound settings are off.
indicates the Location Service of your phone is
enabled.
indicates the Location Service of your phone is
disabled.
indicates you have a new screen call memo.
indicates the Screen Call Auto setting is on.
indicates your phone is in TTY mode.
indicates Headset mode is set to Sprint PCS Ready
Link and a headsetis connected.
indicates Headset mode is set to Voice Calls and a
headset is connected.
indicates the Alarm Clock setting is on.
indicates the speakerphone mode is set to on.
Note:Display indicators help you manage your roaming charges by letting
you know when you’re off the nationwide Sprint PCS network and whether
you’re operating in digital or analog mode. (For more information, see
Section 2D: Controlling Your Roaming Experience on page 103.)
Tip:To view a list of your phone’s icons and descriptions, from the main
menu selectSettings >Phone Info > Help.

Section 2A: Your Sprint PCS Phone – The Basics 19
Features of Your Sprint PCS Phone
Congratulations on the purchase of your SprintPCS Ready Link
Phone. The RL-4930 by Sanyo is lightweight, easy-to-use, and
reliable, and italso offers many significantfeatures and
service options. The following list previews some of those
features and options and provides page numbers where you
can find out more:
Digital Dual-band/tri-mode capability allows you to make
and receive calls while on the nationwide SprintPCS
network and to roam on other analog and 800 and 1900
MHz digital networks where Sprint has implemented
roaming agreements (page 103).
Sprint PCS VisionSMprovides access to the wireless Internet
in digital mode (page 235).
Sprint PCS Mail and Textand Voice SMS Messaging
provide quick and convenient messaging capabilities
(pages 243, 224, and 228 respectively).
Sprint PCS Voice CommandSMlets you dial phone numbers
by speaking someone’s name or the digits of their phone
number (page 261).
Games, ringers, screen savers, and other applications can
be downloaded to your phone to make your Sprint PCS
Phone unique, just like you (page 248). Additional charges
may apply.
The built-in Calendar offers several personal information
management features to help you manage your busy
lifestyle (page 138).
Speed dial lets you dial phone numbers with one key press
(page 42).
Phone Basics

20 Section 2A: Your Sprint PCS Phone – The Basics
The Contacts directory (page 125) can store up to 700
numbers and 500 email and Web addresses in 500 entries
(entries can store up to seven numbers each). A separate
Sprint PCS Ready Link Contacts List(page 187) provides
easy access to up to 200 personal contacts and 200
company-provided contacts.
Sprint PCS Ready Link allows you to enjoy quick, two-way,
“walkie-talkie-style”communication with one or several
Sprint PCS Ready Link users (page 183).
The Automatic Speech Recognition (ASR) lets you place
and receive calls by speaking to your phone (page 158).

Section 2A: Your Sprint PCS Phone – The Basics 21
Turning Your Phone On and Off
Turning Your Phone On
To turn your phone on:
Press and hold E for approximately 2 seconds.
Once your phone is on, it may display “Looking for Service...,”
which indicates thatyour phone is searching for a signal.
When your phone finds a signal, itautomatically enters
standby mode – the phone’s idle state. At this point, you are
ready to begin making and receiving calls.
If your phone is unable to find a signal after 15 minutes of
searching, a Power Save feature is automatically activated.
When a signal is found, your phone automatically returns to
standby mode.
In Power Save mode, your phone searches for a signal
periodically withoutyour intervention. You can also initiate a
search for Sprint PCS Service by pressing any key (when your
phone is turned on).
Tip: The Power Save feature helps to conserve your battery power when you
are in an area where there is no signal.
Turning Your Phone Off
To turn your phone off:
Press and hold E for two seconds until you see the
powering down animation on the display screen.
Your screen remains blank while your phone is off (unless the
battery is charging).
Phone Basics

22 Section 2A: Your Sprint PCS Phone – The Basics
Using Your Phone’s Battery and Charger
Battery Capacity
Your SprintPCS Phone is equipped with a Lithium Ion (LiIon)
battery. Itallows you to recharge your battery before it is fully
drained. The battery provides up to 5.5 hours of continuous
digital talk time (up to 3 hours in analog).
When the battery reaches 5% of its capacity, the battery icon
blinks. When there are approximately 5 minutes of talk time
left, the phone sounds an audible alertand then powers
down.
Note: Long backlightsettings, searching for service, vibrate mode, and
browser use affect the battery’s talk and standby times.
Tip: Be sure to watch your phone’s battery level indicator and charge the
battery before itruns out of power.
Installingthe Battery
To install the LiIon battery:
1. Place the battery into the
space beneath the
antenna with the metal
contacts at the bottom,
facing downward.
2. Gently press down until
it’s in place and the battery
release latch snaps.

Section 2A: Your Sprint PCS Phone – The Basics 23
Removingthe Battery
To remove your battery:
1. Make sure the power is
off so thatyou don’tlose
any stored numbers or
messages.
2. Push the battery release
latch up and hold the
battery.
3. Pull the battery up and
out ata 45-degree angle.
Chargingthe Battery
Your SprintPCS Phone’s LiIon battery is rechargeable and
should be charged as soon as possible so you can begin using
your phone.
Keeping track of your battery’s charge is important. If your
battery level becomes too low, your phone automatically
turns off and you will lose all the information you were
currently working on. For a quick check of your phone’s
battery level, glance at the battery charge indicator located in
the upper-right corner of your phone’s display screen. If the
battery charge is getting too low, the battery icon
appears and the phone sounds a warning tone.
Always use a Sprint-approved desktop charger, travel charger,
or vehicle power adapter to charge your battery.
Warning: Using the wrong battery charger could cause damage to your
phone and void the warranty.
Phone Basics

24 Section 2A: Your Sprint PCS Phone – The Basics
Using the Charger
To use the travel charger provided with your phone:
1. Plug the travel charger into a wall outlet.
2. Plug the other end of the travel charger into the charger
jack on the bottom of your phone (with the battery
installed).
When your phone is turned on:
The battery icon animates while charging.
> > > >
The battery icon turns to when charging is
complete.
When your phone is turned off:
The battery icon appears while charging.
The battery icon turns to when charging is
complete.
It takes approximately 5.5 hours to fully recharge a
completely rundown battery. With the Sprint-approved LiIon
battery, you can recharge the battery before itbecomes
completely run down.

Section 2A: Your Sprint PCS Phone – The Basics 25
DisplayingYour Phone Number
Just in case you forgetyour phone number, your SprintPCS
Phone can remind you.
To display your phone number:
1. Press M to access the main menu.
2. Select Contactsand press M.
3. Select My Phone# and press M .
Note: To access the phone’s main menu, press
M
from standby mode.
Menu items may be selected by highlighting them with the navigation key
and pressing M, or you can press the number corresponding to the menu
item on your keypad.
Tip: You can also display your phone number from the Phone Info menu.
Press M, selectSettings, select Phone Info, and select Phone#/User ID.
Phone Basics

26 Section 2A: Your Sprint PCS Phone – The Basics
Making and Answering Calls
Making Calls
Placing a call from your Sprint PCS Phone is as easy as making
a call from any land line phone. Just enter the number and
press
Tor S, and you’re on your way to clear calls.
To place a call using your keypad:
1. Make sure your phone is on.
2. Enter a phone number from standby mode. (If you make
a mistake while dialing, press
Bto erase one digit ata
time. Press and hold
Bto erase the entire number.)
3. Press T or S. (To place a call when you are
roaming and Call Guard is enabled, see “Using Call
Guard”on page 108.)
4. When you’re finished, press Eto end the call.
Tip: To redial the last outgoing call, press T or Stwice.
Tip: When making calls off of the nationwide SprintPCS network, always
dial using 11 digits (1 + area code + phone number).
You can also place calls from your SprintPCS Phone by using
Sprint PCS Voice Command
SM
(page 264), Speed Dialing (page
42), your Call History listings (page 120), Automatic Speech
Recognition (page 160), and your Contacts directory (page 41).
Important: To maximize performance
when using your Sprint PCS Phone, extend
the antenna before a call and do not touch
the antenna during a call.
Correct Incorrect

Section 2A: Your Sprint PCS Phone – The Basics 27
Dialing Options
Dialing options are displayed when you press Options (right
softkey) after entering numbers in the phone’s standby mode.
To selectan option, highlight it and press
M.
Call to dial the phone number.
Call:Speaker On to dial the phone number in speakerphone
mode.
Send Messageto send a Text SMS message or a Voice SMS
message (mobile numbers only). (See page 224 or 228 for
details.)
Save Phone# to save the phone number in your Contacts
list. (See “Saving a Phone Number”on page 37.)
Find to display Contacts list entries that end with the
digits you entered. (See “Finding a Phone Number”on
page 38.)
Hard Pause to insert a hard pause. (See “Dialing and
Saving Phone Numbers With Pauses”on page 39.)
2-Sec. Pause to insert a 2-second pause. (See “Dialing
and Saving Phone Numbers With Pauses”on page 39.)
Hyphen to insert a hyphen. (Hyphens are generally for
visual appeal only; they are not necessary when entering
numbers.)
Abbrev. Dialto dial the phone number in your Contacts list
that ends with the digits you entered. (See “Using
Abbreviated Dialing”on page 43.)
Tip: To speed dial a phone number, press and hold the appropriate speed
dial key (locations 2-9). See “Assigning Speed Dial Numbers”on page 132.
Tip: Press Tor Sto display the Recent Calls list. Highlight a
number and press Tor Sto make a call.
T
H
Phone Basics

28 Section 2A: Your Sprint PCS Phone – The Basics
Answering Calls
To answer an incoming call:
1. Make sure your phone is on. (If your phone is off,
incoming calls go to voicemail.)
2. Press T or Sto answer an incoming call.
(Depending on your phone’s settings, you may also
answer incoming calls by pressing any number key. See
“Setting Any Key Answer”on page 84 for more
information.)
Your SprintPCS Phone notifies you of incoming calls in the
following ways:
The phone rings and/or vibrates.
The indicator lightflashes.
The backlight illuminates.
The screen displays an incoming call message.
If available, the phone number of the caller is displayed.
If the phone number is in your Contacts list, the contact’s
name is displayed.
The following options are also displayed by pressing Options
(right softkey). To select an option, highlight itand press
M.
Call Guard to answer the call when you are in roaming
mode. (See page 108for setting Call Guard.)
Answer to answer the call.
Answer: Speaker to answer the call in speakerphone mode.
Answer on Holdto put the call on hold. (See “Setting
Answer on Hold”on page 30.)

Section 2A: Your Sprint PCS Phone – The Basics 29
Screen Call to answer the call by using a pre-recorded
announcement. (Appears when you are in a Sprint PCS
Service area or digital roaming area. See page 178for the
setting.)
Quiet Ringerto mute the ringer. (Appears when the ringer
is set.)
Tip: Your Sprint PCS Phone offers additional ways to answer calls. (See page
83 for Auto Answer and see page 84 for Any Key Answer.)
Answering a Roam Call With Call Guard Enabled
Call Guard is an option that helps you manage your roaming
charges when making or receiving calls while outside the
nationwide Sprint PCS network. Please see Section 2D:
Controlling Your Roaming Experience on page 103 for more
information about roaming.
To answer a call when you are roaming and Call Guard is enabled:
1. Press T or S.
2. Press 1 to proceed while the pop-up message is
displayed.
Note: When your phone is off, in an active Sprint PCS Vision Connection, or
on a Sprint PCS Ready Link call, incoming calls go directly to voicemail.
Phone Basics

30 Section 2A: Your Sprint PCS Phone – The Basics
Setting Answer on Hold
This feature allows you to hold an incoming call when you
cannot answer immediately.
To setAnswer on Hold:
1. When you receive an incoming call, press Options (right
softkey).
2. Highlight Answer on Hold and press M. (The caller
hears a message to wait for you to answer. will
display on the screen while the call is on hold.)
To resume the call:
Press Answer (leftsoftkey) or T.
- or -
Press Options (rightsoftkey), highlight Answer or
Answer: Speaker and press
M.
Note: Answer on Hold is not available in analog areas.
Ending a Call
To disconnecta call when you are finished:
Press E.
Tip: Time/Date is displayed when you press Bwhile the phone is
in use.

Section 2A: Your Sprint PCS Phone – The Basics 31
Using the Speakerphone
The speakerphone feature lets you hear audio through the
speaker and talk without holding the phone. When the
speakerphone is activated, use the volume control keys on the
side of the phone to adjustthe volume.
To turn the speakerphone on during a call:
Press S.
- or -
Press Options (rightsoftkey), highlight Speaker On, and
press
M.
To turn the speakerphone off during a call:
Press S.
- or -
Press Options (rightsoftkey), highlight Speaker Off, and
press
M.
Tip: You can adjustthe speakerphone volume using the Side Volume key or
the navigation key.
Warning! Due to higher volume levels, do not place the phone near your ear
during speakerphone use.
Phone Basics

32 Section 2A: Your Sprint PCS Phone – The Basics
Changing the Ringer Volume
To change the ringer volume, press the Side Volume key when
the phone is in standby mode.
Note: To change the ringer volume from the main menu, see “Adjusting the
Phone’s Volume Settings”on page 58.
Adjusting Volume During a Conversation
When you need to adjust the receiver volume during a
conversation, use the Side Volume key, or press the navigation
key up or down while a call is in progress.
Muting a Call
There are times when it’s necessary to mute a call so that your
caller does not hear you or certain background noise.
To use this function during a call:
Press Options (rightsoftkey), highlight Mute, and press
M.
(When the phone is muted, “Muted”appears on the
display.)
To unmute a call:
Press Options (rightsoftkey), highlight Unmute, and
press
M.

Section 2A: Your Sprint PCS Phone – The Basics 33
Missed Call Notification
When an incoming call is not answered, the Missed Call log
and the icon are displayed on your screen.
To call the Missed Call entry:
Press T, Sor Call (leftsoftkey). (For a missed
Ready Link call, press and hold
".)
Tip: If you have two or more notifications, the event listwill appear.
To clear the Missed Call display:
Press Dismiss (rightsoftkey).
Tip: If you press Ebefore checking your notification, Events (right
softkey) appears in standby mode. Press Events (rightsoftkey) to display the
notification list. To call the entry, highlight the entry and press Call (left
softkey), Tor S.
Calling Emergency Numbers
You can place calls to 911 (dial 911 and press
T), even if your phone is locked or your accountis
restricted. Once you dial the numbers, your phone will enter
Emergency mode. To exit Emergency mode, follow the
instructions on the following page.
Press Options (rightsoftkey) to display the options.
To selectan option, highlight it and press
M.
Speaker On to activate speakerphone mode. (If you are in
speakerphone mode, the option will appear as Speaker Off
to deactivate.)
Unlock Phoneto unlock your phone (appears only if the
phone is locked).
Close Menuto close the pop-up menu (appears only if the
phone is unlocked).
Phone Basics

34 Section 2A: Your Sprint PCS Phone – The Basics
Tip: Press My Phone (left softkey) to display your phone number while in
Emergency mode.
To exitEmergency mode:
1. Press E during a 911 call.
2. Press Options (rightsoftkey) to display the options.
3. Highlight Exit Emergencyand press M.
Note: When you are in Emergency mode, you can only exit from the options
menu.
To selectEmergency mode options:
1. Press E during a 911 call.
2. Press Options (rightsoftkey).
3. To selectan option, highlight it and press M.
Call 911 to call 911.
Call 911: Speakerto call 911 in speakerphone mode.
Exit Emergency to exit Emergency mode.

Section 2A: Your Sprint PCS Phone – The Basics 35
In-Call Options
During a call, your phone displays menu options when you
press Options (rightsoftkey).
To selectan option, highlight it and press
M.
Flash to answer an incoming Call Waiting call or to connect
a third party during Three-Way Calling.
Mute or Unmute to mute or reactivate your phone’s
microphone.
Speaker On or Speaker Offto activate or deactivate
speakerphone mode. You can adjust the speakerphone
volume using the Side Volume key.
Warning! Due to higher volume levels, do not place the phone near your ear
during speakerphone use.
Three-Way Callto call a third party.
Call History to access the Call History menu. (See
“Managing Call History”on page 117.)
Contacts to access the Contacts menu. (See “Using the
Contacts Directory”on page 125.)
Messaging to access the Messaging menu. (See
“Using Text SMS Messaging”on page 224.)
Settings to access the Settings menu. (See “Controlling
Your Phone’s Settings”on page 53.)
Tools/Extras to access the Tools/Extras menu. (See “Using
the Phone’s Calendar and Tools”on page 137.)
Note: The Flash menu appears only for Call Waiting and Three-Way Calling.
The Mute menu does notappear during a 911 call. The Three-Way Call menu
does notappear in Roaming areas.
Phone Basics

36 Section 2A: Your Sprint PCS Phone – The Basics
End-of-Call Options
To display the following options, press Options (rightsoftkey)
within 10 seconds after disconnecting a call.
To selectan option, highlight it and press
M.
Call Again to dial the phone number.
Call:Speaker On to dial the phone number in speakerphone
mode.
Save Phone# to save the phone number in your Contacts
list.
Go to PhoneBook appears when the number is
already in your Contacts list. (See “Saving a Phone
Number”on the next page.)
Note: The End-of-Call options are not displayed for calls identified as
No Caller ID, Private or Unavailable ID.

Section 2A: Your Sprint PCS Phone – The Basics 37
Savinga Phone Number
Your SprintPCS Phone can store up to 700 phone numbers
in up to 500 Contacts entries (an entry may contain up to
seven numbers). Each entry’s name can contain 16 characters.
Your phone automatically sorts the Contacts entries
alphabetically. (For more information, see Section 2G: Using
the Contacts Directory on page 125.)
To save a number from standby mode:
1. Enter a phone number.
2. Press Options (rightsoftkey).
3. Highlight Save Phone#and press M.
4. Select a label by highlighting Mobile, Home,Work, Pager,
Fax, Other, or No Label and press
M.
5. Enter a name and press M. If you have already stored
entries in the Contacts list, you are prompted to select
the following entry modes:
New Nameto enter a new name.
From Ph. Bookto select a name from the Contacts
entry list.
6. Press Save (left softkey).
Phone Basics

38 Section 2A: Your Sprint PCS Phone – The Basics
Findinga Phone Number
You can search Contacts list entries for phone numbers that
contain a specific string of numbers.
To find a phone number:
1. Enter the lastfour or more digits of the number and
press Options (rightsoftkey). (The more numbers you
enter, the more specific the search becomes.)
2. Highlight Findand press M. (The Contacts entry that
ends with the digits you entered appears.)
3. Scroll to your desired entry.
Press M to display the entry details.
Press T or Sto dial.

Section 2A: Your Sprint PCS Phone – The Basics 39
Dialing and Saving Phone Numbers With Pauses
You can dial or save phone numbers with pauses for use with
automated systems, such as voicemail or credit card billing
numbers.
There are two types of pauses available on your phone:
Hard Pause sends the next setof numbers when you
press
T.
2-Sec. Pause automatically sends the next setof numbers
after two seconds.
Note: You can have multiple pauses in a phone number and combine
2-second and hard pauses.
To dial or save phone numbers with pauses:
1. Enter the phone number and press Options(right
softkey).
2. Highlight either Hard Pauseor 2-Sec. Pauseand press
M. (Hard pauses are displayed as an “H”and 2-second
pauses as a “T”.)
3. Enter additional numbers (for example, a passcode or an
extension).
4. To dial the number, press T or S . (When dialing
a number with a hard pause, press
Tto send the next
set of numbers.)
– or –
To save the number in your Contacts list, press Options
(right softkey), highlight Save Phone#, and press
M.
Phone Basics

40 Section 2A: Your Sprint PCS Phone – The Basics
Plus (+) Code Dialing
When placing international calls, you can use Plus Code
Dialing to automatically enter the international access code
for your location (for example, 011 for international calls
made from the United States).
To make a call using Plus Code Dialing:
1. Press and hold 0 until a “+”appears on your phone
display.
2. Dial the country code and phone number you’re calling
and press
T. (The access code for international
dialing will automatically be dialed, followed by the
country code and phone number.)
Tip: Plus Code Dialing cannot be used when entering an address for
messaging. (See “Using Text SMS Messaging”on page 224 to send a Text
SMS message.)

Section 2A: Your Sprint PCS Phone – The Basics 41
Dialing From the Contacts Directory
To dial directly from a Contacts entry:
1. Press M to access the main menu.
2. Select Contactsand press M.
3. Select Find/Add Entry and press M.
Shortcut: Press the navigation key right to list entries.
4. Scroll to the desired entry in the Contacts listand
press
M.
5. Select the number you want to call.
6. Press Options (rightsoftkey) for the menu options.
7. Highlight Call or Call:Speaker On and press Mto place a
call.
Tip: You can also place a call by pressing T, S, or Call (left softkey)
during step 5 above.
Note: The icons nextto each entry representthe Contacts labels (for
example, Mobile, Home, Work, etc.). A triangle next to an icon means there is
another label for the entry. Press the navigation key rightor left to select the
desired label.
Phone Basics

42 Section 2A: Your Sprint PCS Phone – The Basics
Using Speed Dialing
With this feature, you can dial your favorite entries using one
key press for locations 2-9. (See “Assigning Speed Dial
Numbers”on page 132.)
To use speed dial for voice calls:
From standby mode, press and hold the appropriate key
for approximately two seconds.
- or -
From standby mode, press the appropriate key and press
Tor S.
The display confirms that the number has been dialed when it
shows “Connecting...”.
To use speed dial for SprintPCS Ready Link calls:
From standby mode, press the appropriate key and
press
". (See “Assigning Speed Dialing for Sprint PCS
Ready Link Entries”on page 205.)
The display confirms that the number has been dialed when it
shows “R-Link calling...”.
Note: Speed dialing is notavailable when you are roaming off the
nationwide Sprint PCS network; when you are roaming, you have to dial
using eleven digits (1 + area code + number).

Section 2A: Your Sprint PCS Phone – The Basics 43
Using Abbreviated Dialing
Abbreviated Dialing is another form of speed dialing. It allows
you to dial a number by entering the last 3-6 digits of any
number in your Contacts directory. This feature becomes
available when you enable Abbreviated Dialing and enter the
appropriate digits of a phone number. (See page 86 for the
setting.)
To place a call using Abbreviated Dialing:
1. Dial the last 3-6 digits of a contact’s phone number.
2. Press Options (rightsoftkey) to display the dialing
options.
3. Highlight Abbrev. Dial and press M, T, or S.
Tip: You can also place a call by pressing Tor Sduring step 2
above.
Note: If there is no matching number, your phone dials the number you set
for abbreviated dial with the lastfour or five digits you entered. If there are
matching numbers in your Contacts list, the abbreviated dial listwill be
displayed. To place a call, selecta number and press T.
Phone Basics

44 Section 2A: Your Sprint PCS Phone – The Basics
Entering Text
Selecting a Character InputMode
Your SprintPCS Phone provides convenient ways to enter words,
letters, punctuation, and numbers whenever you are prompted
to enter text(for example, when adding a Contacts entry or
when sending Sprint PCS Mail and Text SMS messages).
To change the character input mode:
1. When you display a screen where you can enter text,
press Mode (rightsoftkey).
2. Select a character input mode:
Add Wordto store words thatyou use frequently
(see page 46).
Preset Messagesto enter preset messages (see
page 75.)
Recent Messages to enter messages you have used
recently.
Signature to enter your signature (see page 74).
T9 Wordto enter characters using predictive T9 Text
Input (see the nextpage).
Alphabet to enter characters by tapping the keypad
(see page 48).
SYMBO L to enter symbols.
NUMBERto enter numbers.
PRESET SUFFIXto enter a preset suffix.
SMILEYS to enter smile pictures.
Emoticons to enter an emotion icon.
Note: PresetMessages, RecentMessages, Signature and Emoticons are only
available when composing text messages.

Section 2A: Your Sprint PCS Phone – The Basics 45
Select Languageto select the language (English or
Spanish).
Erase All to erase all text (if applicable).
Paste to paste copied or cut text(if applicable).
Select Text to selectstored text for copying or cutting.
Tip: When entering text, press the * key to change letter capitalization
(Abc >ABC >abc).
Entering Characters Using T9 TextInput
T9 Text Inputallows you to enter a desired word easier by pressing
the corresponding number key for the letters of the word just
once per letter. (To selectthe T9 Wordmode when entering text,
see “Selecting a Character Input Mode”on the previous page.)
T9 Text Inputanalyzes the letters you enter using an intuitive
word database and creates a suitable word. ( The word may
change as you enter more letters.)
To enter a word using T9 Text Input:
1. Select the T9 Wordcharacter input mode. (See “Selecting
a Character InputMode”on the previous page.)
2. Press the corresponding keys once per letter to enter a
word (for example, to enter the word “Bill,”press
2,4,5,5). (If you make a mistake, press
Bto erase a single character. Press and hold Bto
delete word by word.)
3. To accepta word and insert a space, press #
or M.
Tip:
M
is available during step 3 above only when the Auto Space setting
is on (see page 86).
Phone Basics

46 Section 2A: Your Sprint PCS Phone – The Basics
Adding a Wordto the T9 Database
If a word you want to enter does not display as an option
when you are using T9 TextInput, you can add itto the
database.
To add a word to the T9 TextInput database:
1. Select the Add Wordmode. (See “Selecting a Character
Input Mode”on page 44.)
2. Enter the word using multi-tap (Alphabet) textentry
and press Save (leftsoftkey).
– or –
1. Press M to access the main menu.
2. Select Settingsand press M.
3. Select Othersand press M.
4. Select Tex t En tr y and press M.
5. Select Add Word and press M.
6. Enter the word using multi-tap (Alphabet) textentry
and press Save (leftsoftkey).
To editor erase the words you have added:
1. Follow steps 1-4 above.
2. Select My Words and press M.
3. Select your desired word and press Options(right
softkey).
4. To selectan option, highlight it and press M.
Edit to edit a word in My Words.
Erase to erase a word in My Words.

Section 2A: Your Sprint PCS Phone – The Basics 47
Customizingthe T9 Settings
To customize the T9 Settings:
1. PressMto access the main menu.
2. Select Settingsand press M.
3. Select Othersand press M.
4. Select Tex t En tr y and press M.
5. Select T9 Settings and press M.
6. Select your desired option and press M.
Predict.Text Mode to allow T9 text input to recognize
words you have added to the T9 database.
Word Choice List to display the word choice list.
Show after enterto select when (after 1-3 digits) to
display the word choice list. The word choice list will
display based on the number of digits you selected.
Show after wait to select how many seconds the
phone should wait to display the word choice list.
For more information about T9 Text Input, visit the Tegic Web
site at
www.t9.com.
Phone Basics

48 Section 2A: Your Sprint PCS Phone – The Basics
Entering Characters by Tapping the Keypad
To enter characters by tapping the keypad:
1. Select the Alphabet mode. (See “Selecting a Character
Input Mode”on page 44.)
2. Press the corresponding keys repeatedly until the
desired letter appears (for example, to enter the word
“Bill,”press
2twice, 4three times, 5three
times, and
5three times again).
(If you make a mistake, press
Bto erase a single
character. Press and hold
Bto delete word by word.)
By default, the first letter of an entry is capitalized and the
following letters are lowercase. After a character is entered,
the cursor automatically advances to the next space after two
seconds or when you enter a character on a different key.
Tip: The beginning of the word after the space is changed to upper/lower
case depending on shift mode. You can change the shift mode by pressing
*.

Section 2A: Your Sprint PCS Phone – The Basics 49
Characters scroll in the following order:
In Spanish mode, characters scroll in the following order:
To selectSpanish mode for textentry, select Mode >
Select Language > Spanish. (See “Selecting a Character Input
Mode”on page 44.)
Phone Basics
Key
. , @ 1 ? !
A B C 2
D E F 3
G H I 4
J K L 5
M N O 6
P Q R S 7
T U V 8
W X Y Z 9
0
Space
One-character- shifted Caps Lock Unshifted
English Sequence
Upper Case
# /
*
Lower Case
a b c 2
d e f 3
g h i 4
j k l 5
m n o 6
p q r s 7
t u v 8
w x y z 9
Key
. , @ 1 ¿ ? ¡ !
A Á B C 2
D E É F 3
G H I Í 4
J K L 5
M N Ñ O Ó 6
P Q R S 7
T U Ú Ü V 8
W X Y Z 9
0
Space
One-character- shifted Caps Lock Unshifted
Spanish Sequence
Upper Case
*
# /
Lower Case
a á b c 2
d e é f 3
g h i í 4
j k l 5
m n ñ o ó 6
p q r s 7
t u ú ü v 8
w x y z 9

50 Section 2A: Your Sprint PCS Phone – The Basics
Entering Symbols, Numbers, PresetSuffixes, and
Smileys
To enter symbols:
1. In a text entry field, press Mode(right softkey).
2. Highlight SYMBOL and press M.
3. Highlight the line thatincludes your desired symbol.
4. Press the corresponding key (1-8) to select the desired
symbol.
- or -
Highlight your desired symbol by using the navigation
key and press
M.
5. Press Done (leftsoftkey) to return to the text entry field.
To enter numbers:
1. In a text entry field, press Mode(right softkey).
2. Highlight NUMBERand press M.
3. Press the corresponding number key to enter the
number.
Shortcut: In alphabet mode or T9 Word mode, press and hold the key
matching the number you want to enter.

Section 2A: Your Sprint PCS Phone – The Basics 51
To enter preset suffixes:
The Preset Suffix menu is a preprogrammed listof common
prefixes, suffixes, and punctuation strings (for example,
“www.”, “.com”, and “//”) designed to make textentry easier
and more efficient.
1. In a text entry field, press Mode(right softkey).
2. Highlight PRESET SUFFIX and press M.
3. Highlight your desired item by using the navigation key
and press
M.
To enter smileys:
1. In a text entry field, press Mode(right softkey).
2. Highlight SMILEYSand press M.
3. Highlight the line thatincludes your desired smiley.
4. Press the corresponding key (1-4) to select the desired
smiley.
- or -
Highlight your desired smiley by using the navigation
key and press
M.
5. Press Done (leftsoftkey) to return to the text entry field.
Phone Basics

52

Section 2B: Controlling Your Phone’s Settings 53
Section 2B
Controlling Your Phone’s Settings
In This Section
Sound Settings
Display Settings
Location Settings
Messaging Settings
Airplane Mode
TTY Use With Sprint PCS Service
Phone Setup Options
Using the menu options available on your SprintPCS Phone,
you can customize your phone to sound, look, and operate just
the way you want itto.This section describes how you can
change your phone’s settings to best suit your needs. Take a
few moments to review these options and to adjust or add
settings that are right for you.
Your Phone’s Settings

54 Section 2B: Controlling Your Phone’s Settings
Sound Settings
Ringer Types
Ringer types help you identify incoming calls and messages.
You can assign ringer types to individual Contacts entries,
types of calls, and types of messages.
Preprogrammed Ringers include a variety of standard
ringer types and familiar music.
Vibrating Ringer alerts you to calls or messages without
disturbing others.
Downloaded Ringerscan be downloaded right to your
phone. (See “Downloading Premium Services Content”on
page 248.)
Selecting Ringer Types for Voice Calls
Your SprintPCS Phone provides a variety of ringer options that
allow you to customize your ring and volume settings. These
options allow you to identify incoming calls by the ring.
To selecta ringer type for voice calls:
1. Press M to access the main menu.
2. Select Settingsand press M.
3. Select Soundsand press M.
4. Select Ringer Type and press M.
5. Select Voice Calls and press M.
6. Select With Caller ID or No Caller ID and press M.
7. Scroll to your desired ringer type and press M.
To confirm the ringer, press Play(right softkey).

Section 2B: Controlling Your Phone’s Settings 55
To selecta distinctive ringer for voice calls while roaming:
1. Follow steps 1-5 on the previous page.
2. Select Roamingand press M.
3. Select Distinctiveand press M.
To confirm the ringer, press Play(right softkey).
If you want to deactivate this feature, select Normal
during step 3 above.
Note: When you are in an analog area, the Distinctive ringer will be played
even if your voice call setting of roaming is Normal.
Selecting Ringer Types for SprintPCS Ready Link Calls
To selecta ringer type for SprintPCS Ready Link calls:
1. Press M to access the main menu.
2. Select Settingsand press M.
3. Select Soundsand press M.
4. Select Ringer Type and press M.
5. Select Ready Link and press M.
6. Select Ready Link Calls, R-Link Missed, or R-Link Floor Tone,
and press
M.
7. Scroll to your desired ringer type and press M.
To confirm the ringer, press Play(right softkey).
Your Phone’s Settings

56 Section 2B: Controlling Your Phone’s Settings
Selecting Ringer Types for Voicemail, Messaging, or
Calendar/Alarm
To selecta ringer type for voicemail,or calendar/alarm:
1. Press M to access the main menu.
2. Select Settingsand press M.
3. Select Soundsand press M.
4. Select Ringer Type and press M.
5. Select Voicemail, or Calendar/Alarm, and press M.
6. Press M, scroll to your desired ringer type, and
press
M.
To confirm the ringer, press Play(right softkey).
To selecta ringer type for messaging:
1. Follow steps 1-4 above.
2. Select Messagingand press M.
3. Select Tex t, Pict.Mail, or Voice SMS and press M.
4. Scroll to your desired options and press M. (If you
choose Tones, Melodies, My Content or PC Sync, scroll to
your desired ringer type and press
M.)
To confirm the ringer, press Play(right softkey).
Selecting a Tone Length
Longer tone lengths may be better for tone recognition when
dialing voicemail or other automated systems.
To selecta tone length:
1. Press M to access the main menu.
2. Select Settingsand press M.

Section 2B: Controlling Your Phone’s Settings 57
3. Select Soundsand press M.
4. Select Othersand press M.
5. Select Tone Length and press M.
6. Select Shortor Longand press M.
Setting a Start-up/Power-off Tone
1. Follow steps 1-4 in “Selecting a Tone Length.”
2. Select Start-up Toneor Power-off Toneand press M.
3. Scroll to your desired tone and press M.
To confirm the tone, press Play (rightsoftkey).
Using Voice Prompt
This feature allows you to hear voice prompts at Automatic
Speech Recognition (ASR), Voice Recorder, Screen Call setting,
etc. (default setting is Off).
To enable or disable voice prompt:
1. Press M to access the main menu.
2. Select Settingsand press M.
3. Select Soundsand press M.
4. Select Othersand press M.
5. Select Voice Prompt and press M.
6. Select Onor Off and press M.
Tip: When ringer volume is setto “Silence All,”voice prompts cannotbe
heard.
Your Phone’s Settings

58 Section 2B: Controlling Your Phone’s Settings
Setting Up Key Press Echo
With this feature, you can hear a voice say the numbers when
you press the keypad. This feature is available when you are in
standby mode.
To turn Key Press Echo on or off:
1. Press M to access the main menu.
2. Select Settingsand press M.
3. Select Soundsand press M.
4. Select Othersand press M.
5. Select Key Press Echo and press M.
6. Select Onor Off and press M.
Adjusting the Phone’s Volume Settings
You can adjust your phone’s volume settings to suityour
needs and your environment.
To adjustthe ringer and key volume:
1. Press M to access the main menu.
2. Select Settingsand press M.
3. Select Soundsand press M.
4. Select Ringer/Key Vol.and press M.
5. Select Ringer Volume, Calendar/Alarm, Start-up/Pw-off,
or Key Beep and press
M.
6. Adjust a volume level by pressing the navigation key up
or down and press
M.

Section 2B: Controlling Your Phone’s Settings 59
To adjustthe earpiece or speaker volume:
1. Press M to access the main menu.
2. Select Settingsand press M.
3. Select Soundsand press M.
4. Select Receiver Vol.and press M.
5. Select either Earpiece or Speakerand press M.
6. Adjust a volume level by pressing the navigation key up
or down and press
M.
Tip: You can adjustthe ringer volume in standby mode (or the earpiece
volume during a call) by using the Side Volume key .
To adjustthe application volume:
This setting is available for the volume of PC Sync, Java,
downloaded data, and browser.
1. Follow steps 1-3 above.
2. Select Application Vol. and press M.
3. Press M, selecta volume level by pressing the
navigation key up or down, and press
M.
To selectthe vibrate pattern:
1. Follow steps 1-3 above.
2. Select Vibrate Pattern and press M.
3. Select Voice Calls, Ready Link, Voicemail, Messagingor
Calendar/Alarmand press
M.
4. Select your desired vibrate pattern and press M.
Your Phone’s Settings

60 Section 2B: Controlling Your Phone’s Settings
Alert Notification
Your SprintPCS Phone can alert you with an audible tone
when you change service areas, once a minute during a voice
call, for incoming or missed Sprint PCS Ready Link calls, or
when a call has been connected.
To setalerts:
1. Press M to access the main menu.
2. Select Settingsand press M.
3. Select Soundsand press M.
4. Select Alertsand press M.
5. Select your desired option and press M.
Service sets an alert to notify you of network services
parameter changes.
Ready Link sets an alertto notify you of Ready Link
calls. SelectReady Link Callsfor incoming Sprint PCS
Ready Link calls, R-Link Missedfor missed Sprint PCS
Ready Link calls, or Headset Alert when you use a
headset.
Voicemailsets an alertto notify you of voice
messages. SelectRinger Length to set the ringer
length of Voicemail notification.
Messaging sets an alert to notify you of Tex t, Picture
Mail, and Voice SMS. SelectRinger Lengthto set the
ringer length of Messaging notification.
Minute Beepsets a minute reminder thatbeeps ten
seconds before the end of each minute during a call.
Signal Fade sets an alert to notify you when your
phone loses a signal during a call.

Section 2B: Controlling Your Phone’s Settings 61
6. Use your navigation key to select a setting and press M.
Tip: You can selectOnce or RepeatAlert if you select Ready Link Calls,
R-Link Missed, Voicemail, or Messaging. RepeatAlert sounds an alert every
two minutes for twenty minutes. For Ready Link Calls, it sounds for 20
seconds continuously.
Silence All
There may be times when you need to silence your phone
entirely. The phone’s Silence All option allows you to mute all
sounds withoutturning your phone off.
To activate Silence All:
1. Press M to access the main menu.
2. Select Settingsand press M.
3. Select Soundsand press M.
4. Select Ringer/Key Vol.and press M.
5. Select Ringer Volume and press M.
6. Press the navigation key down until Silence All appears
on the display and press
M.
Tip: When Ringer Volume is set as Silence All, other items are changed to Off
and cannotbe highlighted.
To deactivate Silence All:
Press the Side Volume key up repeatedly to select a
desired volume level.
Your Phone’s Settings

62 Section 2B: Controlling Your Phone’s Settings
Display Settings
Changing the Text Greeting
The text greeting can be up to fifteen characters and is
displayed on your phone’s screen in standby mode.
You may choose to display a custom greeting or you may
display “Sprint”on the phone’s screen.
To display or change your custom greeting:
1. Press M to access the main menu.
2. Select Settingsand press M.
3. Select Displayand press M.
4. Select Greetingand press M.
5. Select Customand press M.
You can customize the greeting by entering a
personalized greeting.
(See “Entering Text”on page 44.)
6. Enter a custom greeting using your keypad and
press
M.
To display the defaultgreeting (“Sprint”):
1. Follow steps 1-4 above.
2. Select Defaultand press M.

Section 2B: Controlling Your Phone’s Settings 63
Changing the BacklightTime Length
The backlight setting lets you selecthow long the display
screen and keypad are backlit after any key press is made.
To change the LCD backlight setting:
1. Press M to access the main menu.
2. Select Settingsand press M.
3. Select Displayand press M.
4. Select Backlightand press M.
5. Select LCD and press M.
6. Select Always On, Always Off, or your defined time length
and press
M.
Always Offalways turns the backlight off.
Always On keeps the backlight on indefinitely.
Note: The Always On setting returns to the previous value the next time you
turn on the phone.
To change the Keypad backlight setting:
1. Select Key during step 5 above, and press M.
2. Select Always Offor your defined time length and
press
M.
Note: Long backlightsettings affect the battery’s talk and standby times.
Your Phone’s Settings

64 Section 2B: Controlling Your Phone’s Settings
Changing the Display Screen Animation
Your new Sprint PCS Phone offers options for whatyou see on
the display screen during various phone functions.
To change the animation display:
1. Press M to access the main menu.
2. Select Settingsand press M.
3. Select Displayand press M.
4. Select Animationand press M.
5. Select Standby, Outgoing Calls, or Service Search, and
press
M.
6. Press M, scroll to your desired option, and press M.
To confirm the animation, press Preview (right
softkey).
For Standby, you can also set the animation start
time. Selectafter, highlight your desired start time,
and press
M.
To deactivate this feature, selectOffduring step 6
above.

Section 2B: Controlling Your Phone’s Settings 65
Changing the Display for Incoming Calls
You can set the color or downloaded image to be shown on
the Incoming Calls display.
To change the incoming calls display:
1. Press M to access the main menu.
2. Select Settingsand press M.
3. Select Displayand press M.
4. Select Incoming Calls and press M.
5. Press M, scroll to your desired option, and press M.
6. Select your desired color or image, and press OK(left
softkey) twice.
To confirm the color or the image, press Preview
(right softkey).
Your Phone’s Settings

66 Section 2B: Controlling Your Phone’s Settings
Changing the Display for Area Name
This feature enables you to show the area of the phone
number you are calling or are called from when the number is
not registered in your Contacts list. For example, a call to or
from 213-555-5555 will display “California.”
To setyour area name display:
1. Press M to access the main menu.
2. Select Settingsand press M.
3. Select Displayand press M.
4. Select Match Area Codeand press M.
5. Select Onor Off and press M.
This feature is available only when the phone
number is 10 digits, or 11 digits beginning with 1
and matches an area code.
The area name will not be displayed when the
number of an incoming call is saved in your Contacts
list.

Section 2B: Controlling Your Phone’s Settings 67
Changing the Display for Standby Mode
This feature enables you to select a variety of items to display
in standby mode.
To setyour standby display:
1. Press M to access the main menu.
2. Select Settingsand press M.
3. Select Displayand press M.
4. Select Standby Display and press M.
5. Select your desired item and press M.
Screen Saver displays the screen saver.
Calendar displays the Calendar.
Digital Clockdisplays the local time in digital view.
World Clock displays the time of the selected city or
country along with the local time. You can scroll the
World Clock list by pressing the navigation key right
or left. Press Summer (left softkey) or Standard(right
softkey) to change between Daylight Savings and
standard time if applicable. (The “ ”icon indicates
DaylightSavings time.)
Tip: You can also display the World Clock from Tools/Extras menu. (See
“Using the World Clock”on page 153.)
Default returns the standby display to its default
setting.
6. Press M to save the setting to follow each system
prompt or when confirming the preview display.
Tip: In an area without service, Screen Saver, Calendar, Digital Clock, or
World Clock cannotbe shown on the standby display.
Your Phone’s Settings

68 Section 2B: Controlling Your Phone’s Settings
Changing the Screen Saver
Your new Sprint PCS Phone offers you the option of displaying
a screen saver while in standby mode.
To change the screen saver:
1. Press M to access the main menu.
2. Select Settingsand press M.
3. Select Displayand press M.
4. Select Standby Display and press M.
5. Select Screen Saver and press M.
6. Press M, scroll to your desired option, and press M.
7. Select your desired screen saver and press OK (left
softkey) twice.
8. Press Save (left softkey) to save.
Changing the Background
You can customize your phone display’s appearance by
selecting a color scheme to reflect your personality.
To selecta background color scheme:
1. Press M to access the main menu.
2. Select Settingsand press M.
3. Select Displayand press M.
4. Select Backgroundand press M.
5. Select your desired color and press M.

Section 2B: Controlling Your Phone’s Settings 69
Changing the Contrast
You can adjust your screen’s contrast (brightness) to suit your
surroundings.
To adjustthe display’s contrast:
1. Press M to access the main menu.
2. Select Settingsand press M.
3. Select Displayand press M.
4. Select Contrast and press M.
5. Select your desired brightness and press M.
Changing the Font Size
You can change the font size settings for the message and
browser.
To change the fontsize:
1. Press M to access the main menu.
2. Select Settingsand press M.
3. Select Displayand press M.
4. Select FontSize and press M.
5. Select either Messaging or Browserand press M.
6. Select your desired fontsize.
Press Preview (rightsoftkey) to display a font size
example.
7. Press M to set the selected font.
Tip: From the font example display, select your desired fontsize by pressing
the navigation key right or left.
Your Phone’s Settings

70 Section 2B: Controlling Your Phone’s Settings
Setting Return to Standby Mode
This feature allows you to select the way to return to standby
mode.
To setthis feature:
1. Press M to access the main menu.
2. Select Settingsand press M.
3. Select Displayand press M.
4. Select Return to Idle and press M.
5. A message appears. Press OK (left softkey) to continue.
6. Select Automaticallyor End Key and press M.
Automatically to return to standby mode
automatically in 30 seconds.
End Key to return to standby mode by
pressing
E.
Note: End Key setting affects the battery’s talk and standby times.

Section 2B: Controlling Your Phone’s Settings 71
Sleep Mode
This feature helps conserve your battery power by restricting
the display.
To setsleep mode:
1. Press M to access the main menu.
2. Select Settingsand press M.
3. Select Displayand press M.
4. Select Sleep Mode and press M.
5. Select your desired option and press M.
To deactivate this feature, selectOffduring step 5
above.
Your Phone’s Settings

72 Section 2B: Controlling Your Phone’s Settings
Location Settings
Your SprintPCS Phone is equipped with a Location feature for
use in connection with location-based services thatmay be
available in the future.
The Location feature allows the network to detect your
position. Turning Location off will hide your location from
everyone except911.
Note: Even if the Location feature is enabled, no service may use your
location withoutyour expressed permission.
To turn your phone’s Location feature on or off:
1. Press M to access the main menu.
2. Select Settingsand press M.
3. Select Locationand press M. (You will see a message on
the display.)
4. Press OK (leftsoftkey) to continue.
5. Select Onor Off and press M.
When the Location feature is on, your phone’s standby screen
will display the icon. When Location is turned off, the
icon will display.

Section 2B: Controlling Your Phone’s Settings 73
Messaging Settings
Staying connected to your friends and family has never been
easier. With your phone’s advanced messaging capabilities,
you can send and receive many differentkinds of Text SMS
messages and Voice SMS messages withoutplacing a voice
call. (For more information, see “Using Text SMS Messaging”
on page 224, “Using Voice SMS Messaging”on page 228, and
“Accessing Messaging”on page 243.)
Your phone’s messaging settings make using messaging even
faster and easier by letting you decide how you would like to
be notified of new messages, create a signature with each
sent message, and create your own preset (canned) messages,
to name just a few.
Displaying Pop-up Messages
When you receive a TextSMS or Voice SMS message, your
phone notifies you by displaying an icon on your display
screen. You can also choose to be notified with a larger pop-up
message on your display screen.
To display pop-up messages:
1. Press M to access the main menu.
2. Select Settingsand press M.
3. Select Messagingand press M.
4. Select Notificationand press M.
5. Select Msgs and Icon or Icon Onlyand press M.
Your Phone’s Settings

74 Section 2B: Controlling Your Phone’s Settings
Adding a Customized Signature
Each text message you send can have a customized signature
to reflect your personality.
To add a customized signature to each sentmessage:
1. Press M to access the main menu.
2. Select Settingsand press M.
3. Select Messagingand press M.
4. Select Tex t and press M.
5. Select Signatureand press M.
6. Press M and select Onand press M.
7. Select Tex t and press M.
8. Enter your signature and press OK(left softkey).
9. Press Save (left softkey) to save your signature.
Note:You can insert your signature even when your signature setting is
off.Press Mode (rightsoftkey) and select Signaturewhile composing your
message.
Setting Drafts Alert
With this feature, you are notified to edit your draft messages
when you have messages in the drafts folder and make a
message.
To setDrafts Alert:
1. Press M to access the main menu.
2. Select Settingsand press M.
3. Select Messagingand press M.

Section 2B: Controlling Your Phone’s Settings 75
4. Select Tex t and press M.
5. Select Drafts Alertand press M.
6. Select Onand press M.
ManagingPreset Messages
Your phone is pre-set with twenty canned messages each in
English and Spanish to help make sending text messages
faster and easier. These messages, such as “Where are you?,”
“Let’s get lunch.,”and “Meetme at,”can be customized or
deleted to suit your needs. You can even add your own preset
messages to the list.
To edita preset message:
1. Press M to access the main menu.
2. Select Settingsand press M.
3. Select Messagingand press M.
4. Select PresetMsgs and press M.(The listof preset
messages displays.)
5. Select the message you want to edit and press M.
6. Use your keypad to edit the message and press OK (left
softkey) to save your changes. (“PresetMsgs Saved”will
display.)
To reset all messages, press Options(right softkey)
and selectReset All Msgs during step 6 above.
Your Phone’s Settings

76 Section 2B: Controlling Your Phone’s Settings
To change the language of the preset messages:
1. Follow steps 1-4 on the previous page .
2. Press Options (rightsoftkey) and select SelectLanguage
and press
M.
3. Select Englishor Spanishand press M.
Note:For information on editing text, see “Entering Text”on page 44.
Setting a Callback Number
With this feature, you can notify your recipients of your
callback number with the text message.
To setthe callback number:
1. Press M to access the main menu.
2. Select Settingsand press M.
3. Select Messagingand press M.
4. Select Tex t and press M.
5. Select Send Callback# and press M.
6. Press M, then select an option and pressM.
None to send no callback number.
My Phone# to send your phone number.
Other to send a specific callback number. To seta
number, enter a phone number and press
M.
7. Press Done (leftsoftkey).

Section 2B: Controlling Your Phone’s Settings 77
Setting the Speakerphonefor Voice SMS
Messaging
You can set the speakerphone on or off for Voice SMS
messaging. By default, the speakerphone is setto on.
To setthe speakerphone on or off:
1. Press M to access the main menu.
2. Select Settingsand press M.
3. Select Messagingand press M.
4. Select Voice SMSand press M.
5. Select Speakerphoneand press M.
6. Select Onor Off and press M.
Setting the Sender’s Name for Voice SMS
Messaging
With this feature, you can identify yourself to people who
receive your Voice SMS message.
To setthe sender’s name:
1. Press M to access the main menu.
2. Select Settingsand press M.
3. Select Messagingand press M.
4. Select Voice SMSand press M.
5. Select From Name and press M.
6. Enter your name and press OK (leftsoftkey).
Your Phone’s Settings

78 Section 2B: Controlling Your Phone’s Settings
Setting an Alert Notificationfor Voice SMS
Messaging
Voice SMS Messaging uses your phone’s data services.
You can set your phone to play an audible alertto letyou know
you are connecting to data services each time you access a
Voice SMS message.
To setalerts for Voice SMS messaging:
1. Press M to access the main menu.
2. Select Settingsand press M.
3. Select Messagingand press M.
4. Select Voice SMSand press M.
5. Select ConnectionAlertand press M.
6. Press Mark (rightsoftkey) to alertyou whenever you
access Voice SMS messaging.
7. Press Done (leftsoftkey) to save the setting.

Section 2B: Controlling Your Phone’s Settings 79
Airplane Mode
Airplane Mode allows you to use many of your phone’s
features, such as Games, Voice Recorder, etc., when you are in
an airplane or in any other area where making or receiving
calls or data is prohibited. When your phone is in Airplane
Mode, itcannot send or receive any calls or access online
information.
To turn Airplane Mode on or off:
1. Press M to access the main menu.
2. Select Settingsand press M.
3. Select Othersand press M.
4. Select Airplane Mode and press M. (You will see a
message on the display.)
5. Press OK (leftsoftkey) to continue.
6. Select Onor Off and press M.
While in Airplane Mode, your phone’s standby screen will
display “Phone Off.”
Your Phone’s Settings

80 Section 2B: Controlling Your Phone’s Settings
TTYUse With Sprint PCS Service
A TTY (also known as a TDD or Text Telephone) is a
telecommunication device that allows people who are
deaf, hard of hearing, or who have speech or language
disabilities, to communicate by telephone.
Your phone is compatible with variety of TTY devices. Please
check with the manufacturer of your TTY device to ensure that
it supports digital wireless transmission. Your phone and TTY
device will connectvia a special cable that plugs into your
phone’s headset jack. If this cable is notprovided with your
TTY device, contactyour TTY device manufacturer to purchase
the connector cable.
When establishing your SprintPCS Service, please call Sprint
Customer Service via the state Telecommunications Relay
Service (TRS) by first dialing
711T. Then
provide the state TRS with this number: 866-727-4889.

Section 2B: Controlling Your Phone’s Settings 81
To turn TTY Mode on or off:
1. Press M to access the main menu.
2. Select Settingsand press M.
3. Select Othersand press M.
4. Select TTYand press M. (You will see a message on the
display.)
5. Press OK (leftsoftkey) to continue.
6. Select Enableor Disableand press M.
Note: When you connectTTY devices, your phone will display the icon in
TTY mode. If TTY mode is enabled, the audio quality of non-TTY devices
connected to the headset jack may be impaired.
IMPORTANT NOTICE: 911 Emergency Calling
Sprint recommends thatTTY users make emergency calls by other means,
including Telecommunications Relay Services (TRS), analog cellular, and
landline communications. Wireless TTY calls to 911 may be corrupted when
received by public safety answering points (PSAPs) rendering some
communications unintelligible. The problem encountered appears related
to TTY equipmentor software used by PSAPs. This matter has been brought
to the attention of the FCC, and the wireless industry and PSAP community
are currently working to resolve this.
Your Phone’s Settings

82 Section 2B: Controlling Your Phone’s Settings
Phone Setup Options
Shortcut
Your phone offers you the option of assigning a shortcut key
to a favorite or often-used function. Pressing the navigation
key to the left in standby mode will launch your personally
designated shortcut.
To assign your shortcut key:
1. Press the navigation key left.
2. Select an unassigned number and press Add(right
softkey).
3. Select your desired menu and press Set(rightsoftkey).
To edita shortcut name:
1. Press the navigation key left.
2. Select your desired menu and press Options(right
softkey).
3. Highlight EditName and press M.
4. Edit the name and press OK(left softkey).
5. Press Save (left softkey) to save the name.

Section 2B: Controlling Your Phone’s Settings 83
To unassign one shortcut or all shortcuts:
1. Press the navigation key left.
2. Select your desired menu and press Options(right
softkey).
3. Highlight Reset or Reset alland press M.
4. Select Yes and press M.
To unassign all shortcuts, select Resetall during
step 3 above.
Auto Answer Mode
You may set your phone to automatically pick up incoming
calls in speakerphone mode or when connected to an optional
hands-free car kitand headset.
To setAuto Answer mode:
1. Press M to access the main menu.
2. Select Settingsand press M.
3. Select Othersand press M.
4. Select Auto Answer and press M.
5. Select Car Kit/Headset or Speakerphoneand press M.
6. Select 5 Seconds, 15 Seconds, or Off and press M.
Your Phone’s Settings

84 Section 2B: Controlling Your Phone’s Settings
Display Language
You can choose to display your SprintPCS Phone’s onscreen
menus in English or in Spanish.
To assign a language for the phone’s display:
1. Press M to access the main menu.
2. Select Settingsand press M.
3. Select Othersand press M.
4. Select Languageand press M.
5. Select Englishor Español and press M.
Setting Any Key Answer
This feature allows you to answer incoming calls by pressing
any key (except
E, B, softkeys and sidekeys).
To turn any key answer on or off:
1. Press M to access the main menu.
2. Select Settingsand press M.
3. Select Othersand press M.
4. Select Any Key Answer and press M.
5. Select Onor Off and press M.

Section 2B: Controlling Your Phone’s Settings 85
Setting Key Guard
Setting Key Guard helps you avoid accidental key presses
without blocking incoming calls or messages. This feature can
only be activated when your phone is in standby mode.
To activate Key Guard:
Press and hold B.
- or -
1. Press M to access the main menu.
2. Highlight Key Guard and press M.
To deactivate Key Guard:
Press and hold B.
Tip: When Key Guard is set, only Emergency numbers (911,
#911, or *911) may be dialed.
Your Phone’s Settings

86 Section 2B: Controlling Your Phone’s Settings
Setting TextEntry Options
To setyour text entry options:
1. Press M to access the main menu.
2. Select Settingsand press M.
3. Select Othersand press M.
4. Select Tex t En tr y and press M.
5. Select your desired option and press M.
Auto-Capital to set the auto-capital On or Off.
My Words to setyour original words (see page 46).
Input Language to select the language (English or
Spanish).
Auto-Space to set the auto-space On or Off after T9
words you enter.
T9 Settingsto customize the T9 settings (see
page 47).
Add Wordto store words thatyou use frequently (see
page 46).
Help to see the T9 instruction page.
Setting Abbreviated Dialing
Abbreviated Dialing is another form of speed dialing. It allows
you to dial a number by entering 3-6 digits of any number in
your Contacts Directory. If the digits you enter do not match
any stored Contacts entry, your phone will automatically
prepend the digits you specify.
To activate this feature:
1. Press M to access the main menu.

Section 2B: Controlling Your Phone’s Settings 87
2. Select Settingsand press M.
3. Select Othersand press M.
4. Select Abbrev. Dial and press M.
5. Select Ph. Book Match and press M.
6. Select Enableand press M.
Tip: With the Phone Book matching feature, your phone displays the
Contact’s name and phone number if the incoming call or outgoing call is in
your Contacts list.
To setyour prepend number:
1. Follow steps 1-4 above.
2. Select Prependand press M.
3. Select Enableand press M.
4. Select Prepend#and press M.
5. Enter a five- or six-digitnumber (for example, an area
code and prefix) and press OK (left softkey).
To deactivate this feature, highlightDisable during
step 3 above.
Tip: To dial the prepend number, see “Using Abbreviated Dialing”on
page 43.
Note: This setting does notapply to 911 or Directory Assistance.
Your Phone’s Settings

88 Section 2B: Controlling Your Phone’s Settings
Using a Stereo Headset
You can use your phone with an optional headset for handsfree operation. Set the headset mode to Voice Call or Ready
Link and press the Turbo Button (the operation button) on the
headset to activate useful functions.
To connectthe headset:
Simply plug the headset into your phone’s headset jack.
To setheadset mode:
1. Press M to access the main menu.
2. Select Settingsand press M.
3. Select Othersand press M.
4. Select HeadsetMode and press M.
5. Select Turbo Buttonor Ringer Soundand press M.
6. If you selectTurbo Button, selectan option from the
following and press
M.
Voice Call: Press the Turbo Button to activate ASR
(Automatic Speech Recognition). Press the button
twice to redial the last call. Press and hold the button
to activate the Voice Recorder. (See page 158for
ASR.)
Ready Link: Press the Turbo Button to make a Ready
Link call by using ASR (Automatic Speech
Recognition). Press twice to redial the last Ready Link
call. (See page 158for ASR.)
Off: Turns this feature off.
If you selectRinger Sound, select an option from the
following and press
M.

Section 2B: Controlling Your Phone’s Settings 89
Normal: Ringers and all other sounds will be heard
as usual even when you use the headset.
Headset Only:Ringers and all other sounds will be
heard only from your headsetearpiece.
Note: Please make sure to insertthe headset plug into the headset jack as
far as itgoes. Improper connection of the headsetplug can cause abnormal
sounds.
Note: When using the headset, DO NOTset the volume too high. Listening
at high volume for an extensive period of time may cause hearing loss.
Setting the CurrentTime
To setthe current time when you are roaming in an area with no
digital network:
1. Press M to access the main menu.
2. Select Settingsand press M.
3. Select Othersand press M.
4. Select SetTime/Date and press M.
5. Set the current time and date and press M.
Note: This feature is only available when you are in an area with no digital
network available.
Your Phone’s Settings

90

Section 2C: Setting Your Phone’s Security 91
Section 2C
Setting Your Phone’s Security
In This Section
Accessing the Security Menu
Using Your Phone’s Lock Feature
Restricting Calls
Using Special Numbers
Erasing Phone Content
Resetting Your Phone
Resetting and Locking Your Phone Through SMS
Security Features for Sprint PCS Vision
SM
By using the security settings on your SprintPCS Phone, you
receive peace of mind withoutsacrificing flexibility. This
section will familiarize you with your phone’s security
settings. With several options available, you can customize
your phone to meet your personal needs.
Your Phone’s Security

92 Section 2C: Setting Your Phone’s Security
Accessing the Security Menu
All of your phone’s security settings are available through the
Security menu. You must enter your lock code to view the
Security menu.
To access the Security menu:
1. Press M to access the main menu.
2. Select Settingsand press M.
3. Select Securityand press M.
4. Enter your four-digit lock code. (The Security menu is
displayed.)
Tip: If you can’t recall your lock code, try using the last four digits of
either your Social Security number or Sprint PCS Phone number or try 0000
or NATL (6285). If none of these work, call Sprint Customer Service at:
1-888-211-4PCS (4727).
 Loading...