

Page 1
INSTRUCTION MANUAL
Internet Radio
R227
ENGLI SH
Page 2
SAFETY PRECAUTIONS
TO PREV ENT FIR E OR SH OCK HAZARD, DO NOT U SE THIS PLUG W ITH AN EXTENSIO N CORD, RECEPTACLE OR O THER
OUTLET UNLESS THE BLADES CAN BE FULLY INSERT ED TO PREVENT BLADE EXPOS URE. TO PREVE NT FIRE OR SHOC K
HAZARD , DO NOT EXPOSE THIS APPLIANCE TO RAIN OR MOISTUR E.
CAUT ION
RISK OF ELECTRIC SHOCK
DO NOT OPEN
CAUTION: TO REDUCE THE RISK OF ELECTRIC
SHOCK, DO NOT REMOVE COVER(OR BACK). NO
US ER - S E RV IC E A BLE PA RT S IN SI D E. R EF E R
SERVICING TO QUALIFIED SERVICE PERSONNEL.(The
Caution Marking and Rating Plate is located at the bottom
enclosure of the unit.)
DANGEROUS VOLTAGE
The lightning fash with arrowhead symbol
within an equilateral triangle is intended to alert
the user to the presence of uninsulated
dange rous volt age withi n the produc t’s
enclosure that may be of sufficient magnitude
to constitute a risk of electric shock to persons.
ATTENTION
The exclamation point within an equilateral
triangle is intended to alert the user to the
pr ese nce of i mp or ta nt o per atin g an d
maintenance (servicing) instructions in the
literature accompanying the appliance.
FCC WARNING:
This equipment may generate or use radio frequency
energy. Changes or modifications to this equipment
ma y ca us e ha rm ful int er fe ren ce u nl es s th e
modifications are expressly approved in the instruction
manual. The user could lose the authority to operate
this equ ipme nt i f an una uthorized change or
modification is made.
Changes or modifications to this unit not expressly
approved by the party responsible for compliance
could void the user’s authority to operate the
equipment.
Shielded cables must be used this unit to ensure
compliance with Class B FCC limits.
Caution: To maintain compliance with the FCC’s RF
exposure guidelines place the base unit at least 20 cm
from the nearby persons.
Use only the supplied a nten na. Unautho rize d
antennas, modifications, or attachments could damage
the transmitter and may violate FCC regulations.
INFORMATION:
This equipment has been tested and found to comply with
the limits for a Class B digital device, pursuant to Part 15
of the FCC Rule s. These limits are designed to provide
reasonable protection against harmful interference in a
residential installati on. This equipment generates, uses
and can radiate radio frequency energy and, if not
installed and used in accordance with the instructions,
may cause harmful interference to radio communications.
However, th ere is no guarantee that interference will not
occur in a particular installation. If this equipment does
cause harmful interference to radio or television reception,
which can be determined by turning the equipment off
and on, the user is encouraged to try to correct the
interference by one or more of the following measures:
● Reorient or relocate the receiving antenna.
● Increase the separation between the equipment and
receiver.
● Connect the equipment into an outlet on a circuit
different from that to which the receiver is connected.
● Consult the dealer or an experienced radio / TV
technician for help.
This device complies with Part 15 of the FCC Rules.
Operation is subject to the following two conditions:
(1) this device may not cause harmful interference, and
(2) this device must accept any interference received,
including interference that may cause undesired operation.
SURG E PR OT EC TO RS :
It is recommended to use a surge protector for AC
connection. Li gh tn in g an d power s ur ge s ARE NO T
covered under warranty for this product.
US- 1
Page 3

IMPORTANT SAFETY INSTRUCTIONS
1.) Re ad t hese in struc ti ons.
2.) Ke ep t hese in struc ti ons.
3.) He ed a ll warn ings.
4.) Fo ll ow all in struc ti ons.
5.) Do n ot u se this a ppara tu s near wa te r.
6.) Cl ea n only wi th dry cl ot h.
7.) Do n ot b lock an y venti la tion op en ings. I nstal l in a ccord an ce with t he manu fa cture r ’s
inst ru ction s.
8.) Do n ot i nstal l near an y he at sour ce s such as r adiat or s, heat r eg ister s, stov es , or othe r
appa ra tus(i nclud in g ampli fi ers) th at prod uc e heat.
9.) Do n ot d efeat t he safe ty p urpos e of t he pola rized o r gr oundi ng -type p lug. A po lariz ed p lug has
two bl ad es with o ne wide r th an the ot he r. A groundi ng type p lu g has two b la des and a t hird
grou nd ing pro ng. Th e wid e bl ade or th e th ird pro ng i s pro vi ded for y ou r safet y. If t he p rovid ed
plug d oe s not fit i nto you r ou tlet, c on sult an e lectr ic ian for r ep lacem ent of th e ob solet e ou tlet.
10.) P ro tect th e power c or d from be in g walke d on or pin ch ed part ic ularl y at plug s, c onven ie nce
rece pt acles , and the p oi nt wher e th ey exit f rom the a pp aratu s.
11.) Only u se a ttach me nts/a ccess or ies spe ci fied by t he manu fa cture r.
12.) U se o nly wit h a cart, s ta nd, tri po d, brac ket, or t ab le spec if ied by
the ma nu factu rer, or so ld w ith the a pp aratu s. When a c ar t is used ,
use ca ut ion whe n movin g th e cart/ ap parat us comb in ation t o av oid
inju ry f rom tip -over.
13.) U np lug thi s appar at us duri ng l ightn ing sto rm s or when u nu sed f or l ong per io ds of tim e.
14.) R ef er all se rvici ng t o quali fi ed serv ice per so nnel. S er vicin g is requ ir ed when t he a ppa ra tus
has be en d amage d in any wa y, such a s power -s upply c or d or pl ug i s damag ed , liqui d ha s
been s pi lled or o bject s ha ve fall en i nto the a ppara tu s, the ap pa ratus h as been e xp osed to r ai n
or moi st ure, do es not op er ate nor ma lly, or has be en d roppe d.
15.) The a pp aratu s sh all n ot b e expos ed t o dripp in g or sp la shing a nd t hat no ob jects f il led wit h
liqu id s, such a s vases , sh all be pl ac ed on app aratu s.
16.) M ai n plug is u sed as di sc onnec t de vice an d it shou ld r emain r ea dil y op erabl e du ring in te nde d
use. I n or der to di sconn ec t the app ar atus fr om the ma in s compl et ely, the mai ns p lug sho uld
be dis co nnect ed form t he m ains so ck et outl et comp le tely.
When u si ng your e quipm en t, basi c sa fety pr ecaut io ns shou ld a lways b e follo we d to redu ce t he
risk o f fi re, ele ctric s ho ck and in ju ry to per sons, i nc ludin g th e follo wing:
17.) Avoi d us ing a equ ipmen t du ring an e le ctric al stor m. The re may be a r em ote ris k of
elec tr ic shoc k from li gh tning .
18.) U se o nly the p ower co rd a nd batt er ies ind icate d in t his man ua l. Do not d ispos e of b atter ie s
in a fir e. T he y may exp lo de. Che ck with l oc al code s fo r possi ble spe ci al disp os al in st ructi on s.
US- 2
Page 4

In troduc tion
Than k you for c hoosi ng this S ANYO pr oduct w hich ha s been de signe d and man ufact ur ed to g iv e
you ma ny y ears of t roubl e- free se rv ice.
Due to the relativ el y n ew conce pt of a s tanda lo ne inter ne t r adio, please tak e t im e t o r ead thes e
inst ru ction s they ha ve b een wri tt en to ens ure you g et t he very b es t from yo ur purc ha se.
Pati en ce
Inte rn et Rad io is a fast- gr owing but young phenome no n, and is onl y g oing t o g et bet te r as tim e
goes b y. So metim es a co nn ectio n, stat ion, or n etwor k glitc h may f ru strat e you, bu t wor ki ng th ro ugh
the is su e will be w ell wor th t he effort .
Powe r so urce
● 100- 24 0V AC 60/5 0Hz.
Serv ic ing
● This u ni t conta ins no us er s ervic ea ble par ts. Ref er t o quali fi ed serv ice per so nnel.
● Cons ul t y our d ealer if you are ever in doub t a bo ut the i nstal la tio n, op er ation or safe ty of th is
prod uc t.
US- 3
Page 5

Co ntents
Intr od uctio n…………… …… …………… …… …………… …… ……… …… …………… …… ….... . . 3
Cont en ts.... ..... .. ..... .. ..... .. ..... .. ... .. ..... .. ..... .. ..... .. ... .. ..... .. ..... .. ..... .. ..... ..... .. ... .. .. .. .. .. .. .. .. 4
Over vi ew.... ..... .. ..... .. ..... .. ..... ..... .. ..... .. ..... .. ..... .. ... .. ..... .. ..... .. ..... .. ..... ..... .. ..... .. ..... .. ..... ....6
Inte rn et radi o front , si de and re ar v iew…… …………… …… …………… …… …………… ……….. 6
Remo te c ontro l top vie w… …………… …… …………… …………… …… ....… …… …………… .. … 7
Summ ar y of Cont rols.. . .. . ... . .. . .. . .. . . .. . .. . .. . .. . . .. . .. . .. . .. . . .. . .. . .. . ... . .. . .. . .. . ... . .. . .. . .. . ... . .7
Disp la y overv iew…… …… …………… …… …………… …………… …… …………… …… ……….. .. 8
Inst al latio n………… …… …………… …… …………… …… ……… …… …………… …… …..…… .. .9
Remo te C ontro l Batte ry …………… …… …………… …………… …… …………… …… ……….. …1 0
Conf ig ure men u..... .. ..... .. ..... .. ..... .. ... .. ..... .. ..... .. ..... .. ... .. ..... .. ..... .. ..... .. ..... ..... .. ..... .. ..... .. 1 0
Choo si ng the op tion yo u wa nt from t he C onfig ure men u. .. . .. . .. . .. . . .. . .. . .. . .. . . .. . .. . .. . .. . . .. . 10
<Net wo rk Conf ig>. .. . . .. . .. . .. . ... . .. . .. . .. . ... . .. . .. . .. . ... . .. . .. . .. . . .. . .. . .. . .. . . .. . .. . .. . .. . . .. . .. . . 10
<Vers io n>.. . .. . .. . . .. . .. . .. . .. . . .. . .. . .. . ... . .. . .. . .. . ... . .. . .. . .. . . .. . .. . .. . .. . . .. . .. . .. . .. . . .. . .. . .. . .. . 10
<Upg ra de Firm ware>. . .. . .. . ... . .. . .. . .. . ... . .. . .. . .. . ... . .. . .. . .. . . .. . .. . .. . .. . . .. . .. . .. . .. . . .. . .. . .. . .11
<Lan gu age>.. . . .. . .. . .. . .. . . .. . .. . .. . ... . .. . .. . .. . ... . .. . .. . .. . . .. . .. . .. . .. . . .. . .. . .. . .. . . .. . .. . .. . .. . . .. 11
<Fac to ry Rese t>.. . .. . .. . .. . ... . .. . .. . .. . . .. . .. . .. . .. . . .. . .. . .. . .. . . .. . .. . .. . .. . . .. . .. . .. . ... . .. . .. . .. . .. 11
<Reg is ter>.. . . .. . .. . .. . .. . . .. . .. . .. . ... . .. . .. . .. . ... . .. . .. . .. . ... . .. . .. . .. . . .. . .. . .. . .. . . .. . .. . .. . .. . . .. . .11
<Clo ck S et Up>.. . . .. . .. . .. . .. . . .. . .. . .. . ... . .. . .. . .. . ... . .. . .. . .. . ... . .. . .. . .. . . .. . .. . .. . .. . . .. . .. . .. . .. .11
<Bac kl ight>. . .. . ... . .. . .. . .. . . .. . .. . .. . .. . . .. . .. . .. . .. . . .. . .. . .. . .. . . .. . .. . .. . ... . .. . .. . .. . ... . .. . .. . .. . ..11
<WiF i St rengt h>.. . .. . .. . .. . ... . .. . .. . .. . . .. . .. . .. . .. . . .. . .. . .. . .. . . .. . .. . .. . .. . . .. . .. . .. . ... . .. . .. . .. . ...11
Inte rn et Radi o Conne ct ion Req ui remen ts ... .. ..... .. ..... .. ..... .. ..... ..... .. ..... .. ..... .. ..... ..... .. ....11
What y ou n eed bef ore you c an u se your I nt ernet r adio.. . .. . . .. . .. . .. . .. . . .. . .. . .. . .. . . .. . .. . .. . .. . 11
Step s fo r conne cting y ou r Inter ne t radio t o yo ur wire less ne tw ork... .. ..... ..... .. ..... .. ..... ..12
Step 1 - P ow er up the I ntern et r adio.. . .. . . .. . .. . .. . ... . .. . .. . .. . ... . .. . .. . .. . ... . .. . .. . .. . . .. . .. . .. . ..12
Step 2 S ca n for a wir eless n et work co nn ectio n. .. . .. . .. . . .. . .. . .. . .. . . .. . .. . .. . ... . .. . .. . .. . ... . .. . 12
Step 3 C on nect to t he wire le ss netw or k. .. . ... . .. . .. . .. . ... . .. . .. . .. . ... . .. . .. . .. . . .. . .. . .. . .. . . .. . . 13
Choo si ng a radi o st ati on t o liste n to. ..... .. ..... .. ... .. ..... .. ..... .. ..... .. ..... ..... .. ..... .. ..... .. ..... ....1 4
Chan gi ng the vo lume.. . .. . . .. . .. . .. . .. . . .. . .. . .. . .. . . .. . .. . .. . ... . .. . .. . .. . ... . .. . .. . .. . ... . .. . .. . .. . . .. 14
Pres et ting yo ur favo ri te inte rn et radi o stati on s………… …… …………… …………… …… ……. 15
Play in g a prese t inter ne t radio s ta tion.. . . .. . .. . .. . .. . . .. . .. . .. . ... . .. . .. . .. . ... . .. . .. . .. . . .. . .. . .. . .. .15
Requ es ting a in terne t st ation t ha t is curr ently u na vaila bl e. .. . ... . .. . .. . .. . . .. . .. . .. . .. . . .. . .. . .. . 1 5
Inte rn et Stat ion whi ch e nable y ou t o choos e what yo u li sten to. . .. . .. . . .. . .. . .. . .. . . .. . .. . .. . .. . . 15
Troub le shoot ing.. .. ..... .. ..... .. ..... .. ... .. ..... .. ..... .. ..... .. ... .. ..... .. ..... .. ..... .. ..... ..... .. ..... .. ..... .. ...16
Medi a Pl ayer Op erati on …………… …… …………… …...… …… …………… …… …...… …. ..….1 6
Set up y ou r Windo ws PC to al lo w the rad io t o acces s your au di o files v ia W indow s Share s. . . 16
Loca ti ng audi o files v ia W indow s Sh ares. .. .. . .. . .. . . .. . .. . .. . ... . .. . .. . .. . ... . .. . .. . .. . . .. . .. . .. . .. . 16
List en ing to a si ngle sh ar ed trac k. .. . .. . .. . ... . .. . .. . .. . . .. . .. . .. . .. . . .. . .. . .. . .. . . .. . .. . .. . .. . . .. . .. . .1 7
List en ing to a co mplet e sh ared al bu m. .. . ... . .. . .. . .. . . .. . .. . .. . .. . . .. . .. . .. . .. . . .. . .. . .. . .. . . .. . .. . .. 17
Queu in g up trac ks for pl ay back la te r. .. . ... . .. . .. . .. . ... . .. . .. . .. . . .. . .. . .. . .. . . .. . .. . .. . .. . . .. . .. . .. . 17
Queu in g up albu ms for pl ay back la te r. .. . ... . .. . .. . .. . . .. . .. . .. . .. . . .. . .. . .. . .. . . .. . .. . .. . .. . . .. . .. . .. 17
Cont ro lling p layba ck. . ... . .. . .. . .. . ... . .. . .. . .. . ... . .. . .. . .. . . .. . .. . .. . .. . . .. . .. . .. . .. . . .. . .. . .. . ... . .. . .1 7
US- 4
Page 6

Brow si ng the li st of tra ck s curre nt ly queu ed u p for pla yback .. ..... .. ..... .. ... .. ..... .. ..... .. .... 18
Remo vi ng trac ks from t he q ueue.. . ... . .. . .. . .. . ... . .. . .. . .. . ... . .. . .. . .. . . .. . .. . .. . .. . . .. . .. . .. . .. . . ..18
Play in g track s in rand om o rder.. . ... . .. . .. . .. . ... . .. . .. . .. . . .. . .. . .. . .. . . .. . .. . .. . .. . . .. . .. . .. . .. . . .. . .1 8
Play in g track s in the qu eu e repea te dly. . .. . .. . .. . . .. . .. . .. . .. . . .. . .. . .. . .. . . .. . .. . .. . .. . . .. . .. . .. . ... . 18
Set up a W in dows PC t o allow t he I ntern et r adio to a ccess y ou r audio f il es via a Up np
serv er. . . .. . .. . .. . .. . . .. . .. . .. . .. . . .. . .. . .. . ... . .. . .. . .. . ... . .. . .. . .. . ... . .. . .. . .. . . .. . .. . .. . .. . . .. . .. . .. . .. 18
Loca ti ng and pl aying m ed ia file s us ing the r ad io and Up np.... .. ..... .. ..... .. ..... ..... .. ..... .. ... 19
Queu in g up UPnP tra ck s for p la yback l at er.. . .. . .. . ... . .. . .. . .. . . .. . .. . .. . .. . . .. . .. . .. . .. . . .. . .. . .. . .19
Queu in g up UPnP alb ums for p la yback l at er.. . .. . .. . . .. . .. . .. . .. . . .. . .. . .. . .. . . .. . .. . .. . .. . . .. . .. . .. 19
Cont ro lling p layba ck l ater.. . ... . .. . .. . .. . ... . .. . .. . .. . . .. . .. . .. . .. . . .. . .. . .. . .. . . .. . .. . .. . .. . . .. . .. . .. . 19
Brow si ng the li st of tra ck s curre nt ly queu ed u p for pla yback. .. ..... .. ..... .. ... .. ..... .. ..... .. ...19
Remo vi ng UPnP tra ck s fro m th e queue. . .. . .. . ... . .. . .. . .. . ... . .. . .. . .. . . .. . .. . .. . .. . . .. . .. . .. . .. . . .. 20
Play in g UPnP trac ks i n ran do m order. . .. . .. . ... . .. . .. . .. . . .. . .. . .. . .. . . .. . .. . .. . .. . . .. . .. . .. . .. . . .. . . 20
Play in g UPnP trac ks i n the q ue ue repe at edly… …… ……… …… …………… …… …………… .. ..20
Sett in g the clo ck... .. ..... .. ..... .. ..... ..... .. ..... .. ..... .. ..... .. ... .. ..... .. ..... .. ..... .. ..... ..... .. ..... .. ..... .. ..20
Sett in g the sle ep time r.. ..... .. ..... .. ..... ..... .. ..... .. ..... .. ..... ..... .. ..... .. ..... .. ..... .. ... .. ..... .. ..... .. ...21
Sett in g the ala rms.. .. ..... .. ..... .. ..... ..... .. ..... .. ..... .. ..... ..... .. ..... .. ..... .. ..... .. ... .. ..... .. ..... .. ..... .. 22
Play in g FM Radi o………… …… …………… …… …………… …… ……… …… ……….… …… ….. 24
Pres et ting yo ur favo ri te FM rad io s tatio ns……… …… …………… …… …………… …………… . 2 4
Play in g a prese t FM radi o st ation …… …………… …………… …… …………… …… …………… . 24
Opti on al Conn ectio ns …………… …… …………… …… ……… …… …………… …… …………. . 25
Auxi li ary Jac k …………… …… …………… .. ..... .. ... .. ..... .. ..... .. ..... …… ……… …… …...… …… ..25
Head ph one Jac k …………… …… …………… .. ..... .. ... .. ..... .. ..... .. …………… ……….. .… …….. 25
Line O ut J ack…… …..…… …… …………… …… …………. .. ... .. ..... .. ..... .. ..... .. ... …… ...…… …. . 25
Cabi ne t Clean ing.. .. ..... .. ..... .. ..... ..... .. ..... .. ..... .. ..... .. ... .. ..... .. ..... .. ..... .. ... .. ..... .. ..... .. ..... .. . 2 5
Spec if icati ons.. .. ..... .. ..... .. ..... ..... .. ..... .. ..... .. ..... ..... .. ..... .. ..... .. ..... .. ... .. ..... .. ..... .. ..... .. ..... .26
Lice ns e Infor matio n. ..... .. ..... .. ..... ..... .. ..... .. ..... .. ..... ..... .. ..... .. ..... .. ..... .. ... .. ..... .. ..... .. ..... .. 26
War ra nty …… …………… …… …………… …… ……… …… …………… …… …………… …… …… 27
US- 5
Page 7
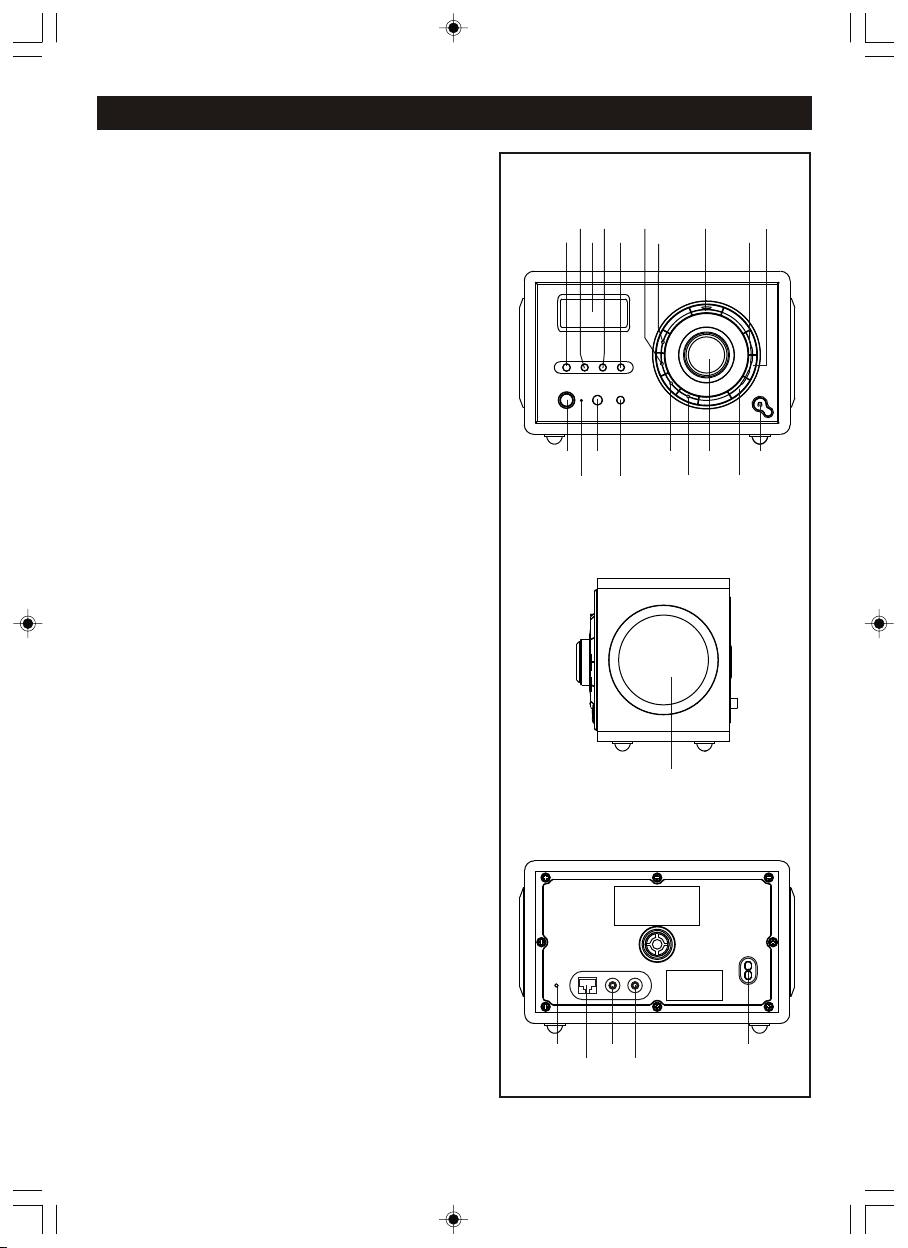
Overview
1. SLEEP BU TTON
2. SEEK ▼ BUTTON
3. LCD DISPLAY
4. SEEK ▲/BROW SE B UT TON
5. BACK BUTTO N
6. RADIO P2/ / RADIO P6 BUTTON
7. RADIO P1/ / RADIO P5/■ BUTTON
8. SNOOZE BUT T ON
9. VOLU ME + B UT TO N
10. VOLUM E - BU TT ON
11. HEADP HO NE J AC K
12. REPLY BUT T ON
13. SELECT BUTTON / SCROLL ▲/▼ CONTROL
14. RADIO P4/ ME DI A MOD E / RA DI O P8 BUTTON
15. RADIO P3/ / RADIO P7 BUT TON
16. SHIF T BU TT ON
17. IR SENS OR
►/ II
I◄
►I
Inte rne t radio f ront vi ew
1
234
18
6
5
7
16
15
14
1719
Inte rne t radio s ide vie w
20
8
13
12
10
9
11
18. STA ND BY IN DI CAT OR
19. STA ND BY/ ON B UT TO N
20. SPEAK ER
21. FM ANTE NN A
22. NETWORK J AC K
23. AUX IN J AC K
24. LINE OUT JA CK
25. AC SOCK ET
US- 6
Inte rne t radio r ear vie w
23
21
22
24
25
Page 8

Remo te co ntrol t op view
1. STANDBY/ON B UT TO N
2. BAC K BU TTON
3. SNO OZ E BU TT ON
4. RAD IO P 1/ BUTTON
I◄
5. RAD IO P 4/ ME DIA MODE BUT TON
6. RAD IO P 7 BU TT ON
7. SCR OL L ▲ BUTTO N
8. SCR OL L ▼ BUTTO N
9. SLE EP BUTTON
10. SE LE CT B UT TON
11. RE PLY BUT TO N
12. RA DI O P2 / BUTTON
13. RA DI O P3 / BUT TO N
►/ II
►I
14. RA DI O P5 /■ BU TTON
15. RA DI O P6 B UT TO N
1
2
3
4
5
6
7
8
9
11
13
15
17
19
20
10
12
14
16
18
16. SE EK ▲/ BR OW SE BUTTO N
17. RA DI O P8 B UT TO N
18. SE EK ▼ B UT TO N
19. VO LU ME + B UT TO N
20. VO LU ME - B UT TO N
Remo te se nsor
To op er ate the un it w it h th e re mo te c on tro l, poi nt the rem ot e at the Re mot e Sens or on the f ront o f
the main unit and pres s the appr op riate butt on . The remo te co ntrol has an effe ctive oper at ing
rang e of a pprox imate ly 2 0 feet an d an a ngle of n o more th an 3 0°.
NOTE : Br ight su nligh t ma y inter fe re with t he oper at ion of th e re mote co ntrol .
Summ ary o f Contr ols - Uni t and R emote
Cont ro l
STAN DB Y/ ON Press t o tu rn o n/ off t he I nt er ne t Radio
SEL EC T
SCROL L▲/▼
Bro ws e
Reply
Back
Inte rn et R ad io mode
Tur n th e knob to c ha ng e op ti ons. Pr es s th e kn ob t o SELEC T
Press ▲ o r ▼ to s el ec t op tions w he n us in g th e remot e co nt ro l
No func ti on
For f ut ur e ap pl ic ation s. N o fu nc ti on at pre se nt . No fu nc ti on a t pr es ent
Go ba ck t o pr ev io us m enu pag e
Medi a Pl ay er m ode
Displ ay Q ue ue i nf ormat io n
P1
P2
P3
P4
P5
Press a nd h ol d to s av e Prese t st at io n P1 , Press t o lo ad
prese t st at io n P1
Press a nd h ol d to s av e Prese t st at io n P2 , Press t o lo ad
Prese t st at io n P2
Press a nd h ol d to s av e Prese t st at io n P3 , Press t o lo ad
Prese t st at io n P3
Press a nd h ol d to s av e Prese t st at io n P4 , Press t o lo ad
Prese t st at io n P4
Press a nd h ol d to s av e Prese t st at io n 5, P ress to l oa d
Prese t st at io n P5
Pre vi ou s Tra ck
Play/ Pa us e
Next Tra ck
Repea t On /O ff,
Shuff le O n/ Off
Sto p
US- 7
Page 9

Cont ro l
Inte rn et R ad io mode
Medi a Pl ay er m ode
P6
P7
P8
SHIFT
Vol +/-
Seek ▲
Seek ▼
SLEEP
SNOOZ E
Most of the fu nctio ns of t hi s unit can be opera te d by pr essin g t he but tons o n t he f ro nt pan el or t he
corr es pondi ng butt on s on the re mo te cont rol han ds et.
Press a nd h ol d to s av e Prese t st at io n 6, P ress to l oa d
Prese t st at io n P6
Press a nd h ol d to s av e Prese t st at io n 7, P ress to l oa d
Prese t st at io n P7
Press a nd h ol d to s av e Prese t st at io n 8, P ress to l oa d
Prese t st at io n P8
Press s hi ft b ut to n then pr es s P1 t o ch an ge P1 or P5 ,
P2 or P6. .e tc
Incre as e vo lu me b y press in g +, D ec re ase vol um e by p re ss in g -
Tun e up F M radio s ta ti on b y pr essin g ▲, tu ne d ow n by
press in g ▼
Press t hi s bu tt on t o set the s le ep t im er ( 15/30 /6 0/ 90 m in )
Press t hi s bu tt on t o turn on t he s no oz e fu nctio n (9 m in s)
Bro ws e
Disp lay o vervi ew
Icon s ar e displ ayed on t he b ottom r ow o f the dis play. The m eanin g of thes e ic ons is ex pl ained
belo w.
Slee p tim er.
Alarm s et indi cat or
11:00
AM
Inte rne t Radio
Snoo ze
Zz
Zz
Rema rk s:
Tim e will sh ow i n the mid dl e of disp lay(at it s ma ximum s iz e)when un it is tur ne d Off.
When u ni t is turn O N, the ti me i nform at ion wil l be show n at t he bott om o f the dis play.
Disp lay l ist:
Stat ion s
Medi a Pla yer
Conf igu re
Tuner
Auxi lia ry Inpu t
Alar m Clo ck
US- 8
Page 10

In stalla tion
If th is I nt ern et rad io has been move d from a co ld pla ce t o a w ar m pl ac e, D O NO T p lug it in f or 2 -3
hour s (e. g. fr om a cold ca r to a war m roo m) . There i s a p ossib il ity t hat m oi sture ma y hav e
cond en sed i n t he Interne t rad io , t hi s can caus e d am age t o y ou r I nt ernet radio . To avoi d dam ag e
plea se unpa ck yo ur Inte rnet ra dio a nd allo w it to stand a t roo m tempe ra ture fo r 2-3 h ours be fore
use. Thi s wi ll help a ny m ois tu re evap or ate and p re ven t un neces sa ry dama ge to you r In terne t ra dio.
AC CON NE CTION
Unwi nd t he AC cord and exte nd i t to its full l ength . In se rt t he AC plu g
into an y c on venie nt 10 0-240 V 6 0/ 50Hz hou se hold out le t. Pleas e n ot e
that t his uni t is equi pp ed wi th a p ola ri zed AC p lu g whi ch h as on e blade
wide r than th e ot her. This is a s afety f eatur e to r educe t he like li hoo d of
elec tr ic s ho ck. This pol arize d AC plu g will onl y fit in a pola rized A C
outl et . If you find t hat yo u ca nnot i nsert this p lug into y our ou tlet, you
may ha ve an obso le te no n pol ar ized ou tlet. P lea se do n ot try to de fe at
this saf ety featu re by using a non-p ol arize d adapter or by fil in g the
wide r bl ade t o ma ke it fit i nto you r ou tlet. I f this pl ug d oes not f it into
AC Plu g
your ou tlet, you s hould conta ct a q ualif ie d l ic ens ed elect ri cian to
repl ac e your ob solet e ou tlet.
IMPO RTA NT N OTES:
● Befo re m oving o r lifti ng t he unit , ma ke sure t he AC plug i s di sconn ec ted fro m the pow er s ource .
● In case of malfu nc tion due to el ec trost atic dis ch arge, ju st reset th e pro duct (re co nnect of
powe r s ou rce ma y b e r eq uired ) t o r es ume no rmal opera tion. Sh ould any troub le occur,
remo ve t he powe r sourc e an d refer t o qu alifi ed pers on nel.
● If ther e is a p ow er fail ur e or t he AC c ord is disc on necte d fo r a sh ort per io d of t ime, the cl oc k
time will not be kept. When the power is r esume d or the AC co rd is co nn ected agai n, th e c lo ck
time will be re set fr om the int er net conne ct ion. If th e in te rnet connec ti on is do wn or not
avai la ble the c lock ca n be s et manu al ly.
RJ-4 5 JA CK (if no t using a w ir eless r ou ter)
Inse rt t he RJ-4 5 conne ct or into t he R J-45 ja ck on the u ni t.
AC Out le t
RJ-4 5 Ja ck
Bro a db an d mo dem
(with in te gra ted ro uter)
OR
Bro a db an d
serv ic e
Bro a db an d
serv ic e
Bro a db an d
mode m
RJ-4 5 Co nn ec to r
Route r
Conne ct e th ern et
Use a co mmerc ia lly av ai lable st raigh t LAN cable (C at egory 5/ CAT 5 or better wi th RJ-45
conn ec tor).
Do n ot plug -in a n ether ne t cab le if i ntend in g to us e a w ir eless n etwor k, to a void co nfusi on to t he
circ ui try. If int en din g to use an e th ern et con ne cti on , at tach c able to both m ode m/ wired rou te r an d
radi o be fore po werin g up r adio.
US -9
Page 11

REMO TE C ONTRO L BATTE RY
1. P ress f irmly on the ba tt ery co ver an d t hen ro tate
it in counte r clo ckwis e dir ectio n, the cover wil l
come o ff .
2. Place t he b atter y (C R2032 ) in to the batt er y
comp ar tment ac co rdi ng to th e p ol arity ma rk ings,
with t he “ +” sign f acing u p.
3. P lace ba ck the ba ttery c ov er, pr es s down sl ightl y
and ro ta te it i n cl ockwi se dire ct ion unt il it is fi rm ly
clos ed .
Note : R emove the bat te ry f ro m th e re mote c ontro l if
not i n us e fo r a l on g pe riod o f ti me . Wh en t he bat te ry
beco me s wea k, the remote cont ro l wil l not fu nctio n
prop er ly. Replac e wi th ne w ba ttery.
BATTERY PR EC AUTIO NS
Foll ow t hese pr ecaut io ns when u si ng a batt ery in th is d evice :
1.
War ning -Da ng er of explo sion if bat te ry is inc or rectl y r ep laced . R eplac e o nl y w ith th e s am e o r
equi va lent ty pe.
2.
Use on ly t he size a nd type o f ba ttery s pe cified .
3.
Be sure to fol lo w the c or rec t p ol arity when ins talli ng the battery as indic at ed in the Battery
Comp ar tment . A reverse d ba ttery m ay c ause da mage to t he d evice .
4.
If the dev ic e i s n ot to be used for a lon g p eriod of ti me , r emove th e b at tery to pre ve nt dam ag e
or inj ur y from po ssibl e ba ttery l ea kage.
5.
Do not t ry to recha rge a bat te ry not intende d t o b e r echar ged; it can overh ea t a nd rup tu re.
(Fol lo w batte ry manu fa cture r' s direc tions .)
6.
Batt er y shall n ot be exp os ed to exc es sive he at such a s su nshin e, f ire or th e like.
** Bat ter y Inclu ded **
Co nfigur e Menu
Choo si ng the op ti on yo u wa nt from t he C onfig ur e menu
1. Pre ss t he SELE CT but ton.
(Not e: i f yo u make a mist ak e at a ny poin t, p ress the BA CK b utton to go bac k to t he p revio us
scre en .)
2. Tur n th e knob un ti l 'Conf igure ' is d ispla ye d
3. P res s th e SELEC T bu tt on.
4. Tur n th e knob un ti l the dis play sh ow s the opt io n you wan t.
5. P res s t he SEL EC T b ut ton to cho os e t he optio n s hown on the displ ay. Th e o ption s a re
expl ai ned bel ow.
<Net wo rk Conf ig>
Enab le s you to s ca n ag ain for con necti on t o an other wir el ess net wo rk, or t o ma nuall y
conf ig ure t he n etwor k pa ram et ers. Us e th is if y ou t ake t he I ntern et r adi o to a nothe r build in g
wher e yo u want to u se it.
<Vers io n>
Disp la ys the ve rsion n um bers of t he v ariou s parts o f so ftwar e on y our Int ernet r ad io.
US -10
Page 12

<Upg ra de Firm ware>
Use thi s o pt ion to down lo ad new firm wa re for the rad io fr om th e R eciva po rt al on the Inte rn et.
If th er e is ne w firm ware a va ilabl e, the n t he rad io wil l p rom pt you if you wa nt to d ow nload it or
not.
Note , at t his stage , yo u can pre ss t he radi o' s BACK butt on t o cance l th e radio s, b eginn in g a
firm wa re upgr ade. A f irm wa re u pgr ad e may tak e sever al m inute s, s o do not switc h off the
powe r to the r ad io until the op er ation is comp lete othe rw ise the rad io m ay b ec ome
perm an ently d amage d.
<Lan gu age>
Allo ws y ou to cha nge the d is play la ng uage.
<Fac to ry Rese t>
Puts all the sett in gs back to thei r def aul ts as they were when they le ft th e fac to ry. If y ou
perf or m a facto ry re set on yo ur radio , y ou will los e a ll your pre sets and yo ur wirel es s n etw or k
conn ec tion.
<Reg is ter>
Thi s wi ll disp la y a key that ca n be u sed to regi st er the ra di o (reco mm ended ) on t he S ANYO
Reci va C ustom er p or tal: h ttp:/ /www.r ec iva.c om / . Regis te rin g en ables y ou t o reque st a
stat io n or podc ast to be a dd ed to jus t yo ur unit .
<Clo ck S et Up>
Sele ct ing thi s optio n ca n set the c lo ck of the u nit.
IMPO RTANT: the fi rs t t ime you con nect thi s i ntern et ra dio to AC outle t, th is unit w il l
auto ma tical ly set th e ti me zo ne t o Zone 2 wh ich is th e initi al d efaul t setti ng . If you do n ot live i n
this t im e zo ne, you mus t ch ange the de fa ult zon e di sp lay to your o wn z on e. You o nly do this
one ti me a nd the un it will r em ember t he n ew defa ult zon e.
<Bac kl ight>
Sele ct ing thi s optio n en ables y ou t o choos e the Int er net rad io 's back light b ri ghtne ss .
1. Afte r se lecti ng the 'B ac kligh t' m enu ite m, the ra di o will di sp lay its l ist of tw o me nu mode s:
● The 'act iv e' stat e is w hen the u nit is “O N” .
● 'Sta nd by' is th e state w he n the rad io h as been t urned o ff.
2. Rot at e the kno b to high li ght the d es ired me nu mode a nd p ress SE LE CT.
3. The radi o wil l now d ispla y the curr en t b ac kligh t val ue for this menu mo de. You ca n alt er this
valu e by r otati ng the kn ob t o incre as e or decr ease it .
<WiF i St rengt h>
The stren gt h of the WiF i sig na l wil l be displ ay ed. Str eng th shou ld be over 60% fo r stabl e
stre am ing. R el ocate this rad io or re-or ie nt the wireles s r ou ter, or bu y a wirel ess boos ter if
nece ss ary.
In ternet R adio Co n necti on Requi remen t s
What y ou n eed bef ore you c an u se your I nt ernet r ad io
Befo re y ou can us e your In te rnet ra di o, you ne ed the fo ll owing :
* A br oa dband I nt ern et c onnec ti on.
* If wi reles s o pe ratio n i s des ired - a wi reles s a cc ess poin t (Wi -Fi) con ne cted to your bro ad band
Inte rn et, pre ferab ly v ia a rout er.
* I f you r wi reles s ne twork i s co nfi gu red to us e Wi red Equ iv ale nt P rivac y (W EP) or Wi -F i
prot ec ted Acce ss (WPA) data en crypt io n then yo u ne ed to kno w the WPA passc od e so you ca n
get th e In terne t radio t o co mmuni ca te with t he netw or k.
* If y ou r wi reles s ne twork is conf ig ured for “t ru sted prod uc ts” you wil l ne ed t o en te r th e ra dio's
MAC ad dress i nt o you r wi reles s acces s po int . To fin d th e rad io 's MAC ad dress u se menu i tems
as fol lo ws: Con figur e- >Netw or k Confi g->View C on fig-> MA C Addres s
* To enter the MAC addre ss into your wir eless access point, you must read the inst ructi on s
supp li ed with t he wire le ss acce ss p oint.
The Inter ne t r adio shoul d wor k any wh ere w ith in the spe cifie d ran ge of th e wir el ess a ccess poin t
devi ce .
Befo re y ou cont inue, m ak e sure th at y our wir eless a cc ess poi nt i s power ed up and c on necte d to
your b ro adban d Inter ne t. To get this pa rt o f the sys te m wor ki ng you mu st r ead the i ns tru ct ions
supp li ed with t he wire le ss acce ss p oint.
US -11
Page 13

St eps for co nnect i ng your r adio to y o ur wire l ess net work
Step 1 -P ower up t he radi o
Firs t, conne ct the AC pow er. In use, t he radio ca n b e swit ch ed on or o ff wi th the stan dby butt on ,
the di sp lay on th e front o f th e radio w il l light u p and say :
SANY O
Afte r a fe w secon ds, thi s wi ll chan ge t o show:
Init ial iz ing n etwor k
Afte r a fe w secon ds, thi s wi ll chan ge t o show:
< Scan f or ne twork s >
Ente r net work
View Con fig
Step 2 S ca n for a wir eless n et work co nn ectio n
When t he d ispla y says< Sc an for ne tw orks> , press t he S ELECT but to n.
(Not e: if y ou mak e a mist ak e at any point, p ress t he BAC K butt on to g o back to t he pre vi ous
scre en .)
The ra di o will no w scan fo r al l avail ab le wi re less ne tw orks an d wi ll di sp lay:
Scan nin g
If it ca n' t find on e then th e di splay w il l say:
No net wor ks
Foun d
If t hi s hap pens th en yo u wil l have to get yo ur wi reles s acces s poi nt work in g. Se e the i nstru ct ions
supp li ed with i t.
When the r ad io finds your wirel es s n etwor k, it di splay s the ESSID f or the acces s poi nt on the
scre en t hi s i s a na me th at is alloc at ed to th e a ccess po in t b y t he perso n w ho se t u p t he ne twork
for ex am ple:
< My Hom e Net work >
US -12
Page 14

It i s p ossib le , a nd in so me lo catio ns hi ghly likel y, tha t you r rad io wi ll find more tha n one wi re less
acce ss po int, i n w hi ch case you ca n c ho ose wh ic h o ne you want to co nn ect to . Tu rn th e k nob on
the ra di o to see th e ESSID o f ea ch acce ss p oint th e radio h as f ound.
Step 3 C on nect to t he wire le ss netw or k
When t he ES SID f or the acc es s poi nt yo u want is di sp layed on t he sc reen, p ress the S EL ECT
butt on . If your n etwor k is n ot conf ig ured to n eed an en cr yptio n co de, the s creen s ho uld say :
Conn ect ing to ne twork
Then :
Netw ork O K
If the s cr een dis plays e it her:
Ente r WEP key
Or:
Ente r WPA key
Then t he netw or k is us ing one o f the enc rypti on s yst em s: Wire d Equiv al ent P ri vacy (W EP) or Wi Fi Pr otect ed A cce ss (WPA). You th er efo re nee d to en ter th e co rr ect WE P or WPA c ode or “Ke y”
into the ra di o to ge t it to commu nicat e with yo ur net wo rk. Onl y the per son wh o set up the
netw or k origi nally k no ws this c od e; if tha t perso n is n ot you th en y ou need t o find ou t wh at it is.
Afte r 3 se co nds, the di sp lay goes in to t he c od e entry mod e. To e nte r th e co de , use the knob to
sele ct each cha racte r of t he code in turn , pre ss ing the SEL ECT butto n after eac h chara ct er.
Note that WEP and W PA code s are sens itive to uppe r and lower case charact er s s o you must
ente r th em exac tly.
Use th e BA CK butt on to era se i ncorr ec t chara cters .
Afte r the final chara ct er, u se the kno b t o select t he <EN D> cha racte r a nd p re ss t he SEL EC T
butt on .
The r ad io sho ul d n ow be a bl e to conne ct to the network . I f the disp lay shows “Invali d k ey” or
“Net wo rk Erro r”, an in co rrect p as sword h as prob ab ly been e nt ered.
US -13
Page 15

Ch oosing a r adio st a tion to l isten t o
1. Pre ss t he SELE CT but ton . Cho ose Sta ti ons and p re ss SELE CT button .
(N ote: if y ou ma ke a mist ake a t an y poi nt , pre ss t he BA CK butto n to go b ac k to th e previ ou s
scre en .)
< Stat ion s >
Medi a Pla yer
Conf igu re
2. Turn t he k nob to ch oose fr om <Loca ti on> or <G enre> .
<Loc at ion> e nable s y ou to c ho ose fr om the ra dio st at ions p ro vided by any co untry wh ich yo u
choo se f rom a lis t.
<Gen re > e na bles you t o c ho ose r adio stati ons a cc ord in g t o the ir co nt ent, for e xampl e Cla ss ic
Rock . Sp ort, Ne ws, etc .
3. P ress th e SELEC T bu tt on to cho os e the opt io n you w an t.
<Loc at ion>
1.Turn t he kn ob until th e d ispla y sho ws the re gion you wa nt (o r s el ect 'A ll' t o d ispla y all
coun tr ies),
2. P res s th e SELEC T bu tt on.
3. Tur n th e knob un ti l the dis play sh ow s the cou nt ry you wa nt.
4. P res s th e SELEC T bu tt on.
5. Tur n th e knob un ti l the dis play sh ow s the sta ti on you wa nt.
6. P res s th e SELEC T bu tt on and wa it u ntil th e radio c on nects t o th at stat io n.
Note tha t some r ad io s tatio ns do not broa dca st 24 hour s per day, and some s ta tions are not
alwa ys o n line.
If this stat ion has on d emand con tent (tha t is , it giv es t he o ption of list en ing to prog ra ms w hich
have a lr eady be en broa dc ast), s ee “ Stati ons whi ch e nable y ou t o choos e what yo u li sten to ”.
<Gen re >
1. Tu rn the knob un til t he di sp lay s ho ws th e typ e of co nt ent y ou want , the n press the S EL ECT
butt on .
2. Tur n th e knob un ti l the dis play sh ow s the sta ti on you wa nt.
3. P res s th e SELEC T bu tt on and wa it u ntil th e radio c on nects t o th at stat io n.
Chan gi ng the vo lume
When a radio st at ion is playin g, yo u can ch ange the volu me si mply by using Volum e + and
Volum e b utton s loca ted on the uni t or on t he rem ote control . T he v ol ume bar will a ppear on
disp la y to show t he volu me c hange l ev el.
US -14
Page 16

Pres et ting yo ur favo ri te inte rn et radi o stati on s
Up to ma xi mum 8 sta tions c an b e store d in m emory w ith thi s un it.
Whil e a r ad io sta tion i s play in g, h ol d do wn one of the prese t butt on s (n um bered 1 to 8) unt il the
scre en s ays
Assi gne d to pres et #
Wher e # is th e numbe r of the bu tto n you hel d down.
To ass ign a ra dio stat io n t o o ne of th e pre se ts numbe re d 5 to 8, pres s SHI FT an d the n p re ss an d
hold o ne o f th e prese t ke ys. Whe n yo u ar e using t he r em ote con tr ol, sim pl y press a nd h old the
desi re d prese t numbe r bu tton.
Play in g a prese t inter ne t radio s ta tion
When an i nte rn et ra dio i s p layin g, br ie fly p res s the pres et bu tton (1 to 4) for the stat io n y ou wa nt
or al so p re ss S HIFT but to n fo r st at ion 5 to 8. (No te , do not ho ld t he b ut ton do wn. If you do t he n
the st at ion cur rentl y pl aying w il l overw rite th e on e store d in t he pres et; be ca re ful.)
Requ es ting an i ntern et s tatio n th at is cur re ntl y un avail ab le
If you wa nt t o li sten to a pa rt icula r ra di o st ation whi ch is curr en tly not avail ab le o nline , yo u can
visi t th e Reci va w eb site at ht tp:// ww w.re ci va.co m/ and put in a req uest t o ad d th e st at ion to t he
list .
Inte rn et stat ions wh ic h enabl e yo u to choo se w hat you l isten t o
Some i nt ernet r adio st at ions ca n pr ovide a n umber o f op tions a ss ociat ed with t he ir stat io n; for
exam pl e, some s tatio ns e nable y ou t o liste n to prog ra mmes th at h ave alr eady be en b roadc as t.
When y ou s elect a r adio st at ion tha t ha s this fa cilit y, the st ation d oe s not sta rt p layin g
imme di ately, but i ns tea d th e displ ay s hows:
< Live >
On Dem and
1. Turn t he k nob to ch oose <L iv e> or <On D em and>, t hen pre ss t he SELE CT b ut ton.
If you c ho ose <Li ve> the n th e radio p la ys the cu rrent o ut put fro m th is stat ion as no rm al.
If you c ho ose <On D em and > t he n m ore scre ens are d is playe d w here you choose wha t y ou
want t o li sten to .
What is d ispla ye d wi ll d epend on t he s ta tio n you have chose n t he f ollow in g st eps ar e on ly a
guid e.
2. Wh en y ou cho os e <O n De ma nd>, t he d is play s hows t he n ames o f th e prog ra mmes. Turn th e
knob t o ch oose th e progr am y ou want , th en pres s the SEL EC T bu tton.
3. When yo u h ave ch os en the prog ramme yo u w ant to list en to, eith er it will jus t s tart pla yi ng, or
the display may s how a l is t of days for you choos e from us e the kno b to s et the day the
prog ra me was br oadca st , then pr es s the SEL ECT bu tto n.
4. A ft er y ou hav e chos en the day, yo u may b e able to c ho ose th e St ar t Tim e. Set the St art Tim e
usin g th e knob an d press t he S ELECT but to n.
5. Prog ra mmes whi ch en able you to ch oo se the time al so en able you to fa st -forw ar d a nd rewin d
to th e p art yo u w ant wh ile th e r adio i s p layin g. Th e elap se time i s disp la yed. U si ng the Sk ip +
(P3) o r Sk ip - (P1) b utton t o sk ip forw ar d or back ward in 3 0 se cond in te rvals .
US -15
Page 17

Tr oubles hooti n g
You may fin d it usefu l to visit the he lp sect io n on the webpag e of our ass oc iates at Rec iva:
http :/ /radi o.rec iv a.com /
This mode l has a b uil t- in wire les s inter ne t cap abili ty. If you ha ve trou bl e con necti ng to your
wire le ss netw ork, th es e steps m ay h elp to re solve t he p roble m:
1. Con fi rm th at a W i-Fi co nn ect ed P C can acc es s the I nt ernet ( i. e. ca n br owse th e we b) us in g the
same n et work.
2. Chec k t hat a DHCP serve r i s a vaila bl e, or tha t y ou ha ve con fi gured a sta tic IP a ddres s o n t he
radi o. To config ure the DHCP, you must read the ins truct io ns suppli ed with the wir el ess
acce ss p oint.
3. Check that y ou r fire wall i s not blockin g any outgoin g p ort s. A s a m in imum t he rad io nee ds
acce ss to UD P and TCP port s 80, 554,1 75 5,500 0 and 70 70 . To con figur e the Acc es s Port
Cont ro l, you mu st read t he i nstru ct ions su pplie d wi th the wi re less ac cess po in t.
4. Ch ec k yo ur acces s p oin t d oes no t r est ri ct con ne ction s to pa rt icula r MAC a dd resse s. You ca n
view t he ra dio's M AC ad dress u sin g the m en u i te m Con fi gur e- > Net wo rk Co nfig- > Vi ew
Conf ig -> MAC ad dress .
5. If y ou have an enc ry pted net wo rk, chec k tha t y ou ha ve enter ed th e c orrec t key or pa ss phras e
into t he r adio. R ememb er t hat tex t- forma t keys ar e ca se sens it ive. Se e pages 1 9- 20.
If yo ur rad io can co nnect to the ne twork su ccess fully, bu t i s unab le to p la y pa rt icula r s tatio ns, it
may be d ue t o one of th e follo wi ng caus es :
1. The stati on is no t broadc as ting at thi s tim e of the day (rem em ber it may be loc at ed in a
differ en t time zo ne ).
2. The sta ti on has re ac hed t he m aximu m al lowed n um ber o f si multa ne ous lis te ner s.
3. The sta ti on is not b ro adc as ting an ym ore.
4. The lin k on t he radi o is o ut of d at e.
5. The Int er net con ne cti on b etwee n th e serve r (o fte n in a d ifferen t co untry ) an d you is sl ow.
Try t ur nin g yo ur radi o of f an d on agai n. I f unsuc cessf ul , unplu g an d replu g power c or d. If sti ll n ot
help fu l, use a PC ( if avai la ble) to c he ck play b ack of th e st ream vi a th e broad caste r' s web sit e.
If you c an p lay bac k the sta ti on with a P C, u se the fo rm at
http :/ /www.r eciva .c om/st at ions/ add_s ta tion. as p to noti fy us so th at w e can cha ng e the sta ti on
data t ha t is used b y the rad io .
Me dia Pla y er
NOTE : Th is f uncti on i s for mor e advan ce d users .
The b uilt- in Med ia Pla yer allows y ou to p lay unprote cted a ud io f il es (AA C, AIFF, M P3, RM,
WAV, WMA) i nclud in g itu nes , an d pla yl ist s (M3U) stor ed on a ne tw orked PC(n ot Ma c) . It has
been v er ified t o work on W in dows 20 00 a nd Wind ows XP.
Set up y ou r Windo ws P C to allo w th e radio t o ac ces s yo ur audi o fi les via Win dows Sh ar es
1. Plea se ens ur e that you r P C is avail able on t he netwo rk for your Int er net radi o, the n, using
Wind ow s Explo rer, loc at e the fol de r where y our aud io f iles ar e st ored.
2. R igh t cl ick on th e fo lder.
3. S ele ct ' Prope rt ies'.
4. C lic k on ' Shari ng '.
5. S ele ct “ Share t hi s folde r on t he ne tw ork” an d “A llow ne tw ork u se r to chan ge m y files ”.
Loca ti ng audi o fi les v ia W in dows Sh ar es
1. Pow er u p the rad io.
2. Wai t f or “ St ation s” to b e display ed on t he rad io , or press the BACK b utton repea te dly until
“Sta ti ons” is d ispla ye d.
TM
US -16
Page 18

3. Tur n th e knob un ti l the rad io disp la y shows “ Me dia Pla yer”.
4. P res s th e SELEC T bu tt on and tu rn t he knob u ntil “W in dows Sh ar es” is di splay ed .
5. P res s t he SEL EC T b utton , turn th e knob until “S can fo r PCs” is dis pl ayed a nd press SELEC T
agai n.
6. T he ra di o wil l no w dis pl ay “F in ding PC s”, onc e the r ad io has fi nishe d, tu rn the kn ob to
high li ght the c orrec t PC .
7. P res s th e SELEC T bu tt on. The rad io w ill sea rc h for sha red fol de rs.
8. Tur n th e knob to h ig hligh t the cor re ct shar ed f older a nd pres s SE LECT.
9. T he ra di o will di sp lay ' Fi le Scan …' a s it scan s throu gh t he medi a files i n th e share d folde r. Text
on the b ot tom ro w o f t he displ ay will cha ng e to indi cate tha t t he file s ca n i s in prog re ss. If yo u
have a l ar ge numb er of aud io f iles th is c ould ta ke seve ra l minut es t o compl ete.
10. Onc e t he radio ha s f inish ed sc annin g, it will dis play 'By Alb um ' You can now bro wse thro ug h
the s ca nned med ia files , w hich w il l n ow be org anize d “ By Album” ,” By Arti st ” and “Pl aylis ts ” if
avai la ble.
Note t hat t he first t ime t he file sc an is d on e a f il e cal le d 're ci va_me dia_c ac he' i s writt en to th e
fold er w here th e audio f il es are st or ed. This is i n or der t o sp eed up su bs equen t fi le sc an s.
List en ing to a si ng le sh ar ed trac k
1. Turn t he k nob unt il 'By Art is t' is dis pl ayed.
2. P res s th e SELEC T bu tt on.
3. Tur n th e knob un ti l the req uired a rt ist is di sp layed .
4. P res s th e SELEC T bu tt on.
5. Tur n th e knob un ti l the req uired a lb um name i s di splay.
6. P res s th e SELEC T bu tt on. '<A dd t o Queue >' w ill b e di splay ed .
7. Tur n th e knob un ti l the req uired t ra ck is dis pl ayed.
8. P res s th e SELEC T bu tt on. The tra ck w ill beg in p layin g.
List en ing to a co mplet e sh ared al bu m
1. Turn t he k nob unt il 'By Art is t' is dis pl ayed.
2. P res s th e SELEC T bu tt on.
3. Tur n th e knob un ti l the req uired a rt ist is di sp layed .
4. P res s th e SELEC T bu tt on.
5. Tur n th e knob un ti l the req uired a lb um name i s di splay ed.
6. P res s th e SELEC T bu tt on. '<A dd t o Queue >' w ill b e di splay ed .
7. P res s th e SELEC T bu tt on. The alb um w ill beg in p lay in g.
Queu in g up trac ks for pl ay back la te r
1. Hig hl ight th e requi re d track .
2. P res s th e SELEC T bu tt on. 'Tra ck Add ed To Queu e' will b e di splay ed .
Queu in g up albu ms f or pl ay back la te r
1. Hig hl ight th e requi re d album .
2. Pre ss t he SELE CT but ton.
3. Turn t he k nob unt il '<Ad d To Que ue >' is dis pl ayed.
4. Pre ss t he SELE CT but ton. 'Track s Add ed to Que ue' wil l be d ispla ye d.
Cont ro lling p la yba ck
1. Use t he S TO P bu tton to s to p playb ack.
2. U se th e P LAY / PAUS E b ut ton t o e it her p ause a cur re ntly playi ng tr ac k o r to re start a cu rrent ly
paus ed t rack or t o resta rt a s toppe d tr ack.
3. U se the SKIP T O PREVI OU S TRACK but ton to start playba ck of t he prev io us trac k in the
queu e.
4. U se th e SK IP TO NEXT TR ACK but ton to st ar t playb ac k of the ne xt trac k in t he queu e.
US -17
Page 19

Br owsing t he list o f t racks c urren t ly queu e d up for pl aybac k
1. Pre ss t he BROW SE butt on . Th e curre nt ly play in g track n ame wil l be d ispla ye d.
2. Tur n th e knob to s ee w hich tr acks ar e qu eued up f or p layba ck.
3. I f you wan t t o j ump to a parti cular pl ac e i n the que ue th en pre ss th e S ELECT butt on when the
requ ir ed trac k is disp la yed.
Remo vi ng trac ks from t he q ueue
1. Pres s th e BROWS E butto n. The c urren tl y playi ng t rack na me will b e di splay ed .
2. Tur n th e knob to s el ect the t rack yo u wa nt to rem ov e from th e queue .
3. P res s an d hold th e ST OP but ton for 2 s ec onds an d th e radio w ill dis pl ay: 'De le te Tra ck ?'
4. Tur n th e knob to h ig hligh t 'Yes' o r 'N o'.
5. P res s SE LECT to con fi rm whet he r you act ually w an t to dele te t he trac k fr om th e qu eue.
6. I f 'Yes' w as sele ct ed then ' Remov ed F rom Que ue ' will be d ispla ye d.
7. To remo ve all track s from the qu eue , keep press in g BA CK unt il the 'Medi a Play er ' me nu ite m
is sele ct ed, pr es s S ELECT and the n t urn the kno b t o s elect 'C le ar Que ue ' a nd press SE LECT
agai n.
Play in g track s in rand om o rder
1. Sele ct t he indi vidua l tr acks as d es cribe d previ ou sly.
2. N avi ga te to top -l evel me nu i tem ' Me dia Pla ye r' usin g th e SEL EC T an d BACK bu tt ons.
3. P res s th e SELEC T bu tt on.
4. Tur n th e knob un ti l 'Play back Mo de ' is disp la yed.
5. P res s th e SELEC T bu tt on.
6. Tur n th e knob un ti l 'Shuffl e' i s dis pl ay.
7. P res s th e SELEC T bu tt on.
8. Tur n th e knob to s el ect YES/N O to c onfir m that sh uf fl e mode sh ou ld be ena bled.
Play in g track s in the qu eu e repea te dly
1. Sele ct t he indi vidua l tr acks as d es cribe d previ ou sly.
2. N avi ga te to top -l evel me nu i tem ' Me dia Pla ye r' usin g th e SEL EC T an d BACK bu tt ons.
3. P res s th e SELEC T bu tt on.
4. Tur n th e knob un ti l ' Playb ack Mod e' i s displ ay ed.
5. P res s th e SELEC T bu tt on.
6. Tur n th e knob un ti l 'Repe at' is di sp layed .
7. P res s th e SELEC T bu tt on.
8. Tur n th e knob to s el ect YES/N O to c onfir m that re pe at mode s ho uld be en abled .
Set up a Win dows PC t o al low the r ad io to acc es s you r au dio fil es v ia a UPnP ser ve r
1. I f y our PC is runn in g M icros oft W ind ow s X P, then yo u c an us e W indow s M ed ia Conne ct to ac t
as yo ur U Pn P (Uni ve rsa l Plug and Pl ay) me dia se rve r 1.0. Windo ws Med ia Pla yer 11 m ay b e
down lo aded fro m M ic rosof t' s w ebsit e a nd in st alled by fo ll owing th e ins tr uct io ns de tai le d i n i ts
inst al latio n wizar d.
2. O nc e ins ta lled, W indow s Media P layer 11 w il l cre at e a l ib rary fr om al l th e med ia f ile s avail ab le
to i t o n y ou r P C. To add new m edia fil es to th e lib ra ry, se lect “File >A dd to Li brary..> Adv an ced
Opti on s”, cli ck “Add ” an d choos e th e files y ou wish t o ad d and cli ck “ OK”.
3. You will now ne ed to conne ct yo ur Inter net radi o t o W in dows Med ia Playe r 11 and con fi gure it
to allow the rad io to acces s your med ia l ib rary. I n order to d o this, you will n ee d to do t he
foll ow ing:
a)Ke ep pres si ng BACK to get to the radio 's top- le vel men u and then turn the rota ry knob to
sele ct “ Media P layer ”.
b) Pr ess SEL ECT an d the n tu rn the kn ob t o highl ig ht “U Pn P Se rvers ”.
c) P ress SELEC T an d the radio w ill s can f or all ava il able UP nP serv ers. No te, t hi s m ay take a
few seco nd s for the radio to comp le te i ts scan and bef or e th e sc an has comp le ted, the radi o
will di sp lay “EMP TY ”. The radio wil l con tinue to di sp lay “EMP TY” if no UPnP server s are
foun d.
d) Af ter a s ucc es sful sc an, s el ect y ou UPnP s er ver, b y rot at ing t he knob i f the re is m ore t ha n one
UPnP s erver, and the n p re ss SE LECT (n ote, you r rad io will di splay “Access Deni ed” a t t hi s
stag e) .
US -18
Page 20

4. Your PC w ill now promp t yo u th at a devic e ha s at te mpted to conn ec t to you r UP nP ser ve r. In
orde r to a ll ow the ra di o to h ave acc es s to t he m edi a fi le s, you wi ll n ee d to c lic k th e “L ibrar y”
tab f rom Wi nd ows Me dia Pl ayer 11 an d sele ct the “M edia S ha rin g… ” item to ope n the “ Me dia
Shar in g” wind ow.
5. Fr om the “M ed ia Sha ri ng” wi ndow, t he radio wi ll be l is ted as an unkno wn devic e. Cli ck on the
unkn ow n devic e liste d, t hen cli ck t he “All ow” but to n and the n cl ick “OK ”.
Lo cating a nd play i ng medi a files u s ing the r adio and U PnP
Once t he U PnP serve r is c onf ig ured to s ha re medi a fi les w it h the Int er net rad io , you c an p lay the
file s by d oing th e follo wi ng on the r ad io:
a. Kee p press in g BACK to g et to t he r adio' s to p-l ev el menu a nd then t ur n the k no b to se le ct
'Med ia P layer '.
b. P res s SE LECT and th en t urn the k no b to high light ' UP NP Server s' .
c. P re ss S ELECT and th e ra dio will scan for all avail able U PnP se rvers . This may take a f ew
seco nd s for the r ad io comp le te its sc an a nd befo re t he scan h as c omple te d, the ra di o will
disp la y '(Emp ty)'. The r ad io will c on tinue t o di spl ay ' (Empt y) ' if no UPn P se rv ers are f ound.
d. A fte r a su cc essfu l s can, sel ec t y our UP nP se rv er, by rot at ing the kno b i f t here is m or e t han
one UP nP s er ver, and t ha n pre ss S ELECT.
e. T he ra dio will now l ist t he me dia c atego ri es av ail ab le fr om th e U Pn P ser ve r, e .g . ' Mu sic',
'Pla yl ists' e tc. Tu rn the knob to s elect w hich ca tegor y you w is h to br owse, p ress SE LECT
and tu rn t he k nob to hi gh light a sub c at egory a nd p ress SE LE CT a ga in. For e xa mple, y ou
coul d se lect 'M usic' a nd t hen 'Al bu m'
f. Tur n th e kno b to h ighli gh t the med ia file s th at you wi sh t o play an d press S EL ECT.
g. T he radio will di sp lay “ Add to Q ueue” , p re ss SE LEC T and t he ra dio will add the trac ks to it s
queu e an d begin p layin g th em auto ma tic al ly.
Queu in g up UPnP tra ck s for pla yback l at er
1. Hig hl ight th e requi re d track .
2. Pre ss t he SELE CT but ton. 'Track Ad de d To Que ue' wil l be d isp la yed.
Queu in g up UPnP alb um s for pla yback l at er
1. Hig hl ight th e requi re d album .
2. Pre ss t he SELE CT but ton.
3. Turn t he k nob unt il '(Ad d To Que ue )' is dis pl ayed.
4. Pre ss t he SELE CT but ton. 'Track s Add ed to Que ue' wil l be d ispla ye d.
Cont ro lling p la yba ck
1. Use t he S TO P bu tton to s to p playb ack.
2. Use t he P LAY/PAUSE but to n to eith er p aus e a cu rrent ly p layin g tr ack o r to r estar t a cu rrent ly
paus ed t rack or t o resta rt a s toppe d tr ack.
Br owsing t he list o f t racks c urren t ly queu e d up for pl aybac k
1. Pre ss t he BROW SE butt on . Th e curre nt ly play in g track n ame wil l be d ispla ye d.
2. Turn t he knob t o see whi ch t racks a re q ueued u p for pla yb ack.
3. If you wa nt to jump to a pa rt icula r p la ce in the qu eu e t hen pr es s t he SEL EC T b ut ton when th e
requ ir ed trac k is disp la yed.
4. It is impor ta nt to no te here that medi a fi les scann ed f ro m th e ra dio 's “ Wi ndows Sha re s”
func ti on can al so be add ed t o the rad io 's queu e.
5. U se the SKIP T O PREVI OU S TRACK but ton to start playba ck of t he prev io us trac k in the
queu e.
6. U se th e SK IP TO NEXT TR ACK but ton to st ar t playb ac k of the ne xt trac k in t he queu e.
US -19
Page 21

Remo vi ng UPnP tra ck s fro m th e queue
1. Pre ss t he BROW SE butt on . Th e curre nt ly play in g track n ame wil l be d ispla ye d.
2. Turn t he k nob to se lect th e tr ack you w an t to remo ve from t he q ueue.
3. Pre ss a nd hold t he STO P bu tton fo r 2 secon ds .
4. Turn t he k nob to hi ghlig ht ' Yes' or ' No'.
5. Pre ss S ELECT to co nf irm whe ther yo u ac tuall y wa nt to del ete the t ra ck from t he q ueue.
6. If 'Yes' was s el ected t he n 'Remo ved Fro m Qu eue' wi ll b e displ ayed.
7. To re mo ve a ll tra ck s fr om the queue , keep press in g BA CK unt il the 'Medi a Play er' me nu ite m
is sele ct ed, pr es s S ELECT and the n t urn the kno b t o s elect 'C le ar Que ue ' a nd press SE LECT
agai n.
Play in g UPnP trac ks i n rando m order
1. Sel ec t the ind ividu al t racks a s de scrib ed prev io usly.
2. Nav ig ate to to p-lev el m enu ite m 'M edia Pl ayer' u si ng the SE LE CT and BACK b ut ton s.
3. Pre ss t he SELE CT but ton.
4. Turn t he k nob unt il 'Pla yb ack Mod e' i s displ ayed.
5. Pre ss t he SELE CT but ton.
6. Turn t he k nob unt il 'Shu ff le ' is disp la y.
7. Pre ss t he SELE CT but ton.
8. Turn t he k nob to se lect YES/ NO t o confi rm t hat shu ff le m ode sho uld be en ab led.
Play in g UPnP trac ks i n the que ue repe at edly
1. Sel ec t the ind ividu al t racks a s de scrib ed prev io usly.
2. Nav ig ate to to p-lev el m enu ite m 'M edia Pl ayer' u si ng the SE LE CT and BACK b ut ton s.
3. Pre ss t he SELE CT but ton.
4. Turn t he k nob unt il ' Play ba ck Mode ' is d ispla yed.
5. Pre ss t he SELE CT but ton.
6. Turn t he k nob unt il 'Rep ea t' is dis pl ayed.
7. Pre ss t he SELE CT but ton.
8. Turn t he k nob to se lect YES/ NO t o confi rm t hat rep ea t mode sh ould be e na bled.
Note :
1. I f the sha red fol ders co ntain m ore son gs than t he In te rnet Ra dio m em ory l im it, i t will di splay
“Too man y fi les”
2. Rep ea tedly p ressi ng b utton P 4 wi ll togg le the Re pe at and Sh uf fl e modes .
Se tting th e clock
1. Pre ss t he SELE CT but ton. (N ote: if y ou m ake a mis ta ke at any p oint, p re ss the BA CK b utton
go bac k to t he prev ious sc re en.)
2. Tur n th e knob un ti l the dis play sa ys < Confi gu re>
Stat ion s
Medi a Pla yer
< Conf igure >
3. P res s th e SELEC T bu tt on.
4. Turn t he k nob unt il the di sp lay say s <C lock Se tup>
Regi ste r
< Cloc k Set up >
Back lig ht
US -20
Page 22

5. Turn t he k nob unt il the di sp lay say s <S et Time> .
< Set Time / D ate >
6. Bef or e setti ng Time an d Da te, you n ee d to choo se the co rr ect tim e zo ne. There a re 7 t ime
zone s to c hoose .
7. A fte r se tting t he t ime zon e, y ou need t o set the t im e.
8. P res s th e SELEC T bu tt on.
Set Time
10:3 0 AM
9. Tur n th e knob un ti l the hou r setti ng i s corre ct , then pr ess the S EL ECT butto n.
Set Time
10:0 3 AM
10.Turn th e kn ob unti l th e minut e setti ng i s corre ct , then pr es s the S EL ECT butto n.
Set Da te
01 Jan 2 008
11.Then w e ca n conti nu e to se t th e date, m on th and ye ar.
Fina ll y, th e displ ay r etu rn s to the Se t Tim e/Dat e mo de.
Afte r finish ed set ti ng, wh en the un it is turned on , the tim e in fo rmati on will always sh ow on
bott om rig ht han d corn er of t he dis play. When the unit p ow er i s o ff , the t ime informa tion w il l
show i n th e middl e of the di sp lay at it s ma ximum s ize.
Se tting Sl eep Ti m er
Sele ct ing thi s optio n wi ll enab le t he radi o to swit ch i tself o ff a ft er a set pe ri od.
1. Pre ss the Sle ep b utton , the dis play will show “Sleep Timer 15 min ut es” and the radi o wil l
cont in ue to pla y as norm al f or 15 min ut es and go i nto sta nd by mode a ut omati cally.
2. To incre as e the a mou nt of t im e that the radio will p lay before s hu tting off, p re ss the Sleep
butt on a ga in to chang e th e di sp lay to t he desi re d sl eep time. When Sl ee p bu tton is press ed
each t im e, the sl eep tim er p rolon gs 1 5 minut es, up to a m ax imum of 9 0 mi nutes .
3. To turn the r ad io on aga in , sim pl y press t he S tandb y bu tto n.
US -21
Page 23

Se tting th e alarm s
1. Pre ss t he SELE CT but ton. (N ote: if y ou m ake a mis ta ke at any p oint, p re ss the BA CK b utton t o
go bac k to t he prev ious sc re en.)
2. Tur n th e knob un ti l the dis play sa ys < Alarm C lo ck>.
Tuner
Auxi lia ry Inpu t
< Ala rm Cloc k >
3. P res s th e SELEC T bu tt on.
4. Tur n th e knob un ti l the dis play sa ys < Set Alar ms >.
< Set Alarms >
5. There a re t hree op ti ons t o ch oose fr om :
Disa bl e All : a quic k way to di sa ble bot h al arms, w hen cho os e this op ti on, bot h alarm w il l be OFF
Alar m 1: f or sett ing, en ab le or dis ab le alar m 1, fact or y defau lt i s “ 1.OFF 1 2:00 AM”
Alar m 2: f or sett ing, en ab le or dis ab le alar m 2, fact or y defau lt i s “2 OFF 12 :00 AM”
< Disa ble a ll >
1. OFF 1 2:0 0 AM
2. OFF 1 2:0 0 AM
6. Pre ss t he SELE CT but ton to co nfirm y ou r selec ti on.
Set Alarm
12:0 0 AM
7. Turn t he k nob unt il the ho ur s ettin g is c orrec t, then p re ss the SE LE CT button .
Set Alarm
07 : 06 AM
8. Turn t he k nob unt il the mi nu te sett in g is corr ect, th en p ress th e SE LECT butt on .
US -22
Page 24

9. There a re f ive ala rm m ode s to s elect f or e ither a la rm. The ala rm mode s ar e:
Once : Ala rm will t urn on on ce
Ever yd ay: Alar m will tu rn o n all 7 day s
Weekly : Ala rm will t ur n on on ce e very we ek
Weekda ys : Alarm wi ll o nly t ur n on Mond ay t hroug h Fr ida y
Weeken ds : Alarm wi ll o nly t ur n on Satu rd ay and Su nd ay
Once
Ever y Day
Weekly
10.T he re are th ree wak e up o ption s fo r eithe r alarm :
Wak e to B uzz er
Wak e to I nte rn et Radi o
Wak e to F M Rad io
Note :
1. You are una bl e to c ho ose wake to in terne t ra dio if t he re i s no pre set st ation bei ng s et o r yo u
are no t cu rrent ly list en ing to th e in terne t radio
2. En sure t he vol um e has b een se t to th e desi re d leve l when choos in g wake to int er net ra dio or
FM rad io
Buzz er
Inte rne t Radio
FM Tuner
Once i nf ormat ion is al l se t, the al ar m icon ap pears o n bo ttom le ft h and sid e of the di sp lay.
Chec ki ng the Wake up Tim es a nd Alarm M ode
For ch ec king th e alarm i nf ormat io n, sele ct Alarm C lo ck, the n Se t Alarms . If alar m is s et,
info rm ation w ill be sh ow n in foll ow ing seq uence “ Al ar m/ alar m ti me/ al arm mod e/ wake up
opti on ”.
For ex am ple, wh en alar m 1 is s et at 9:3 0a m, turn s on ever yd ay, wake to bu zz er, alar m 2 is s et at
10:3 0a m, turn s on ever yd ay, wake to bu zz er, disp la y wil l sh ow:
Dis able All
1. 9: 30 AM Dail y Buzze r
2. 10 :30 AM Dai ly Buzz er
More ov er, if a larm ha s been se t, al ar m icon is s how n on the di splay d uring S tandb y mode . Cl ock
info rm ation i s shown a t it s maxim um s ize dur ing Sta nd by mode .
Radi o wi ll p lay for a bo ut 1 h our after a la rm star t an d th en shut off. Pres s th e stand by b utton to
stop e ar lier. Pr ess aga in t o turn on m an ually.
AM
11:00
US -23
Page 25

Snoo ze /Repe at Alarm
Afte r t he ala rm turns “O n” in t he morni ng , you c an press th e Snoo ze butto n o n unit 's front pa nel
or on re mo te cont rol for a f ew e xtra mi nu tes sle ep.
The al ar m will st op for ap pr oxima te ly 9 minu tes and t he n comes “ On ” again .
AM
11:00
Zz
Pl aying FM R adio
This I nt ernet r adio al so h as an FM tu ne r; you wi ll be abl e to a ccess s ta ndard F M stati on s from it .
1. Pre ss t he SELE CT but ton. (N ote: if y ou m ake a mis ta ke at any p oint, p re ss the BA CK b utton t o
go bac k to t he prev ious sc re en.)
2. Turn t he k nob unt il the di sp lay say s <Tun er >.
Medi a Pla yer
Conf igu re
< Tuner >
3. Pre ss t he SELE CT but ton.
Tur n th e kno b to c hoose y ou r desir ed stat io n. When a s tr ong FM st er eo si gn al is rec ei ved,
Ster eo a ppear s on disp la y. Or p ress Se ek u p/dow n to s ear ch f or a stro ng s ignal s ta tio n.
98.5 M Hz
Ster eo
4. Use V OL UME + or - bu ttons t o ad just th e de sired v olume l ev el.
5. U nrave l the FM an te nna wir e at t he back o f the cab in et and po si tion fo r best re ce ption .
Pres et ting yo ur favo ri te FM rad io s tatio ns
Up to ma xi mum 8 FM st ation s ca n be stor ed i n memor y with th is u nit.
Whil e an FM ra dio s tatio n is playi ng, h old d own o ne of th e pre se t b ut tons (numb er ed 1 to 8) un til
the sc re en says
Assi gne d to pres et #
Wher e # is th e numbe r of the bu tto n you hel d down.
To assign a F M r ad io stati on to one of the p re sets num be red 5 to 8, pre ss SH IFT a nd the n p re ss
and ho ld o ne of the p reset k ey s.
Play in g a prese t FM radi o st ation
When a FM ra dio st ation s is pl aying , b rie fl y pres s the p reset butto n (1 to 4) o r t ogeth er wit h the
SHIF T bu tton for t he pres et st ation s 5 to 8 for t he FM stat ion y ou want. ( No te, d o not h old t he
butt on down . If you do then the sta ti on curr ently playin g will overwri te the one sto re d in the
pres et ; be care ful.)
US -24
Page 26

Op tional c onnec t ions
AUXI LI ARY JACK
You c an con nect a n exte rn al s ou rce to this u nit, s uc h as an MP3 or CD playe r, etc. Conne ct an
audi o cable (n ot incl ud ed) f ro m the AU X IN jack at the ba ck of t his u ni t to th e e xt ernal u nit's AU X
OUT jack . Th is w ill all ow y ou to amp lify th e ex terna l un it's so und thr ou gh this u ni t's spe akers .
1. Press the SELEC T butto n. (N ot e: if yo u m ak e a mist ak e a t any poin t, pr ess t he BA CK bu tton
go bac k to t he prev ious sc re en.)
2. Turn th e kn ob un ti l the dis pl ay says < Au xil ia ry Inpu t>
Tu ne r
< Au xi li ar y Inp ut >
Al ar m Cl oc k
3. P ress th e SE LECT butt on .
Au x In
4. C onnec t th e ex terna l un it's AUD IO O UT j ac k on t he rear of th e un it v ia an aud io c able (not
incl ud ed). Turn on th e e xt ernal un it, s et its volu me contr ol (i f t here is one ) t o mid -posi ti on at
firs t an d op erate it as usual . Di st ortio n wi ll r esult if the exte rnal unit 's v ol ume set ti ng i s to o
high .
5. The so un d will be h eard th ro ugh thi s un it's sp eaker.
6. U se VOLU ME + or - but to ns on thi s un it to adj ust the d es ired vo lu me leve l.
7. Whe n fin ished list en ing, turn off the po wer of the ex te rnal unit. Pres s SEL ECT or BAC K
butt on on t his uni t to go b ack to ma in me nu for FM or I ntern et liste ni ng, e sp ecial ly if w ake
alar ms a re prog ramme d.
NOTE S:
● Wh en c onnec ti ng t he e xtern al uni t, r ef er t o th e owne r's ma nual of th e ex terna l un it , as wel l
as thi s ma nual.
● Examp le s o f Ext er nal Au dio S ource s tha t can be c onn ec ted t o t hi s u ni t are : Por table MP3
Play er, C asset te Play er, M ini Dis c Pl ayer, DV D playe r.. etc
HEAD PH ONE JAC K
For p ri vate l is tenin g, con ne ct 3.5 mm (32 ohm) ste re o head phone s ( not include d) to thi s j ack.
The sp ea kers ar e autom at icall y di sconn ected w he n the hea dp hone pl ug is ins er ted in th e ja ck.
IMPO RTA NT:
Exce ss ive sou nd pres su re from e ar phone s and hea dp hones c an c aus e he aring l os s.
LINE O UT J ACK
A st ereo line out jack is loc at ed o n the bac k of t he unit, which ena bl es t he c onnec tion to a n
exte rn al audi o syste m.
Ca binet Cl eanin g
Use onl y a soft clo th on the hi gh-gl os s cabi ne t surfac e. Do not us e a paper to we l to avoi d
scra tc hing.
US -25
Page 27

Sp ecifi c ation s
Powe r Su pply: AC 1 00-24 0V ~60/5 0H z
Outp ut P ower: 2 W x2
Unit D im ensio n: 220( L) x 11 2. 5(W) x 13 5( H)mm
Weight : 1. 54 kg
Radi o Se ction
Tun ing ran ge s: FM 87. 5 -1 08 MHz
Aeri al s: Wire a ntenn a (F M)
Gene ra l
Termin al s-Out put: 3. 5m m stere o he adpho ne
Line O ut : 3.5mm J ack
Aux In : 3. 5mm Jac k
*** Sp ec ifica ti ons sub ject to c ha nge wit ho ut noti ce * **
Li cense In forma t ion
This p roduc t conta in s sof tw are lic ensed u nd er ve rs ion 2 o f the G NU P ubl ic L icens e and v er sion 2. 1
of t he G NU Le ss er Pu bl ic Li ce nse. Th e sourc e code fo r this so ftwar e is av ai lable f rom
http :/ /www.r eciva .c om/gp l
This produ ct inc lu des te chnol ogy ow ned by Micro soft Cor po ratio n a nd und er a li cense from
Micr os oft Lice ns ing GP. Us e o r d is tribu tion of such tec hn olo gy ou tside of this pr od uct is proh ib ited
with ou t a licen se from M ic rosof t Co rpora tion an d/ or Micr os oft Lic ensin g, G P as a pplic ab le.
US -26
Page 28

MODEL R227 LIMITED WARRANTY
SANYO
In order to obtain factory warranty service, call the toll-free number below. The unit should be packed in the original
carton or a well padded sturdy carton in order to avoid shipping damage. Note: Do not return unit to the retail store
for service.
THIS WARRANTY IS VALID ONLY ON FISHER PRODUCTS PURCHASED AND USED IN THE UNITED
STATES OF AMERICA.
THIS WARRANTY APPLIES ONLY TO THE ORIGINAL RETAIL USER, AND DOES NOT APPLY TO PRODUCTS
USED FOR ANY INDUSTRIAL, PROFESSIONAL OR COMMERCIAL PURPOSE. THE ORIGINAL DATED BILL
OF SALE OR SALES SLIP MUST BE SUBMITTED AT THE TIME WARRANTY SERVICE IS REQUESTED.
Subject to the OBLIGATIONS above and EXCLUSIONS below, SANYO FISHER COMPANY (SFC) warrants this
SANYO product against defects in materials and workmanship for the periods of LABOR and PARTS specified
below. SFC will repair or replace (at its option) the product and any of its parts which fail to conform to the warranty
with new or reconditioned products or parts. This warranty period commences on the date the product was first
purchased at retail.
EXCLUSIONS
This warranty does not cover (A) the adjustment of customer-operated controls as explained in the appropriate
model’s instruction manual, or (B) the repair of any product whose serial number has been altered, defaced or
removed.
This warranty shall not apply to the cabinet or cosmetic parts, antenna, knobs, batteries or routine maintenance.
This warranty does not apply to uncrating, setup, installation, removal of the product for repair or routine
maintenance.
This warranty does not apply to repairs or replacements necessitated by any cause beyond the control of SFC
including, but not limited to, any malfunction, defect or failure caused by or resulting from unauthorized service or
parts, improper maintenance, operation contrary to furnished instructions, shipping or transit accidents, modification
or repair by the user, abuse, misuse, neglect, accident, incorrect power line voltage, fire, flood or other Acts of God,
or normal wear and tear.
The foregoing is in lieu of all other expressed warranties and SFC does not assume or authorize any party to
assume for it any other obligation or liability.
THE DURATION OF ANY WARRANTIES WHICH MAY BE IMPLIED BY LAW (INCLUDING THE WARRANTIES
OF MERCHANTABILITY AND FITNESS) IS LIMITED TO THE TERM OF THIS WARRANTY. IN NO EVENT
SHALL SFC BE LIABLE FOR SPECIAL, INCIDENTAL OR CONSEQUENTIAL DAMAGES ARISING FROM
OWNERSHIP OR USE OF THIS PRODUCT, OR FOR ANY DELAY IN THE PERFORMANCE OF ITS
OBLIGATIONS UNDER THIS WARRANTY DUE TO CAUSES BEYOND ITS CONTROL. SOME STATES DO NOT
ALLOW LIMITATIONS ON HOW LONG AN IMPLIED W ARRANTY LASTS AND/OR DO NOT ALLOW THE
EXCLUSION OR LIMITATION OF CONSEQUENTIAL DAMAGES, SO THE ABOVE LIMITATIONS AND
EXCLUSIONS MAY NOT APPLY TO YOU. THIS WARRANTY GIVES YOU SPECIFIC LEGAL RIGHTS. YOU
MAY HAVE OTHER RIGHTS, WHICH VARY FROM STATE TO STATE.
For your protection in the event of theft or loss of this product, please fill in the information below for your own
personal records.
Model No. ____________________________ Serial No. ____________________________
Date of Purchase _______________________ Purchase Price ________________________
Where Purchased _________________________________________________________________
To obtain factory warranty service or product operation, call
Customer Information 1-800-421-6382
Weekdays: 7:30 AM – 5:00 PM Pacific Time
90 DAYS 90 DAYS
OBLIGATIONS
LABOR PARTS
US- 27
Page 29

CODE NO .:11211470 0
SANYO Electric Co., Ltd.
Print ed in C hina
 Loading...