

Page 1
Français
Español
Deutsch
Italiano
日本語
English
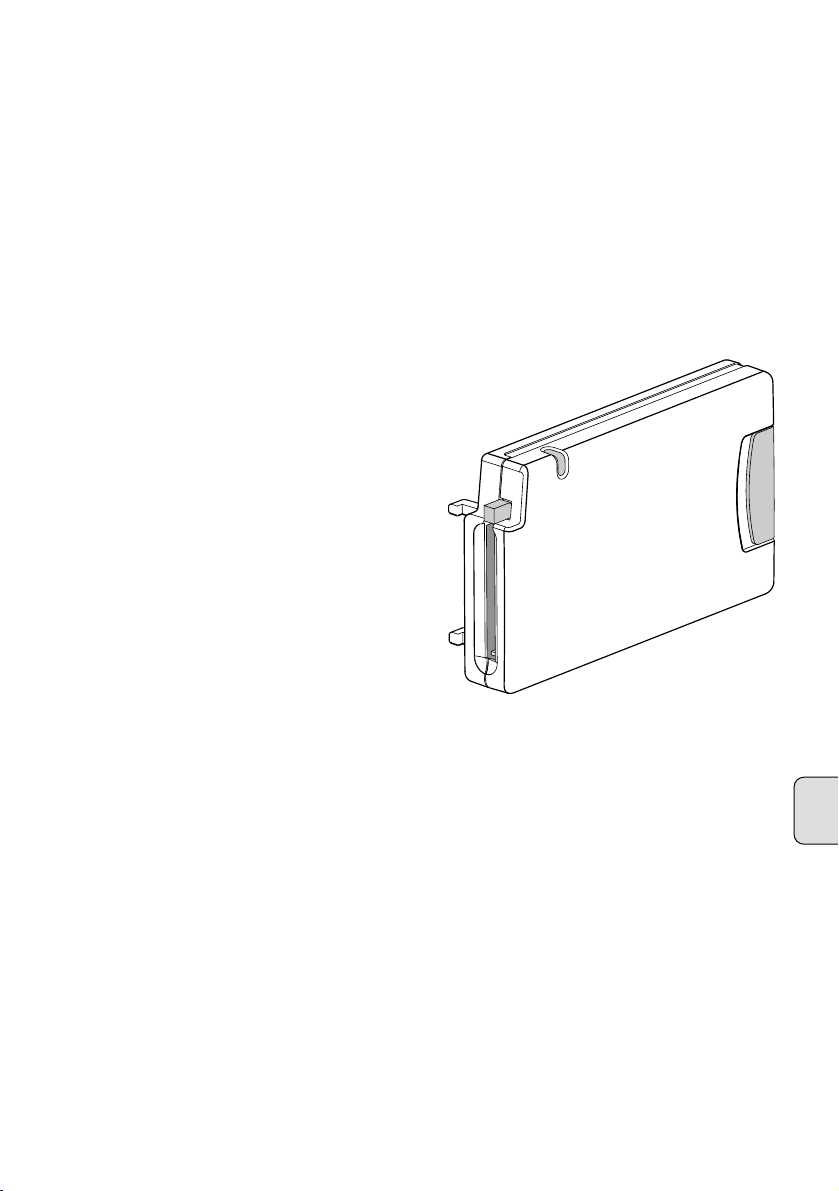
Media Card Imager Kit
MODEL POA-MD07MCI
INSTALLATION AND OPERATION
OF THE IMAGER BOX
This Media Card Imager kit is an optional
kit to project image data in various format
and files created with Microsoft PowerPoint
with our projector. Image data can be easily projected just by attaching the Imager
Box to a projector without any connection
with a computer.
This kit is only used for our projectors that
have a terminal for the Imager Box.
This manual explains the installation of the
Imager Box and its operation.
The data played back through the Imager
Box is edited with Media Card Imager software included in the kit. For operation of
the software, refer to separately included
"Media Card Imager" Owner's Manual.
OWNER'S MANUAL
Page 2

2
Compliances
Federal Communication Commission Notice
This equipment has been tested and found to comply with the limits for a Class B
digital device, pursuant to part 15 of the FCC Rules. These limits are designed to
provide reasonable protection against harmful interference in a residential
installation. This equipment generated, uses and can radiate radio frequency energy
and, if not installed and used in accordance with the instructions, may cause harmful
interference to radio communications. However, there is no guarantee that
interference will not occur in a particular installation. If this equipment does cause
harmful interference to radio or television reception, which can be determined by
turning the equipment off and on, the user is encouraged to try to correct the
interference by one or more of the following measures :
– Reorient or relocate the receiving antenna.
– Increase the separation between the equipment and receiver.
– Connect the equipment into an outlet on a circuit different from that to which the
receiver is connected.
– Consult the dealer or an experienced radio/TV technician for help.
Trademark
Microsoft, Windows, and PowerPoint are registered trademarks of Microsoft Corp. in
the U.S.A.
Microdrive is a trademark of IBM in the U.S.A.
CompactFlash is a trademark of SanDisk Corporation in the U.S.A.
Each name of corporations or products in Owner's Manual is a trademark or a registered trademark of its respective corporation.
Do not make any changes or modifications to the equipment unless otherwise specified in the manual. If such changes or modifications should be made, you could be
required to stop operation of the equipment.
Page 3
3
English
Table of Contents
Table of Contents 3
Contents of Media Card Imager Kit 3
Name of Each Part of Imager Box 4
Attach Imager Box to Projector 5
Remove Imager Box from Projector 6
Load and Remove CF Card 6
Use CF Card Adapter 7
Handle CF Card and Adapter 8
Specifications 9
PLAY BACK IMAGE
(OPERATING PROJECTOR) 11
PLAYING BACK IMAGE IN THE MEMORY CARD
11
PICTURE IMAGE ADJUSTMENT
15
PICTURE SIZE ADJUSTMENT
17
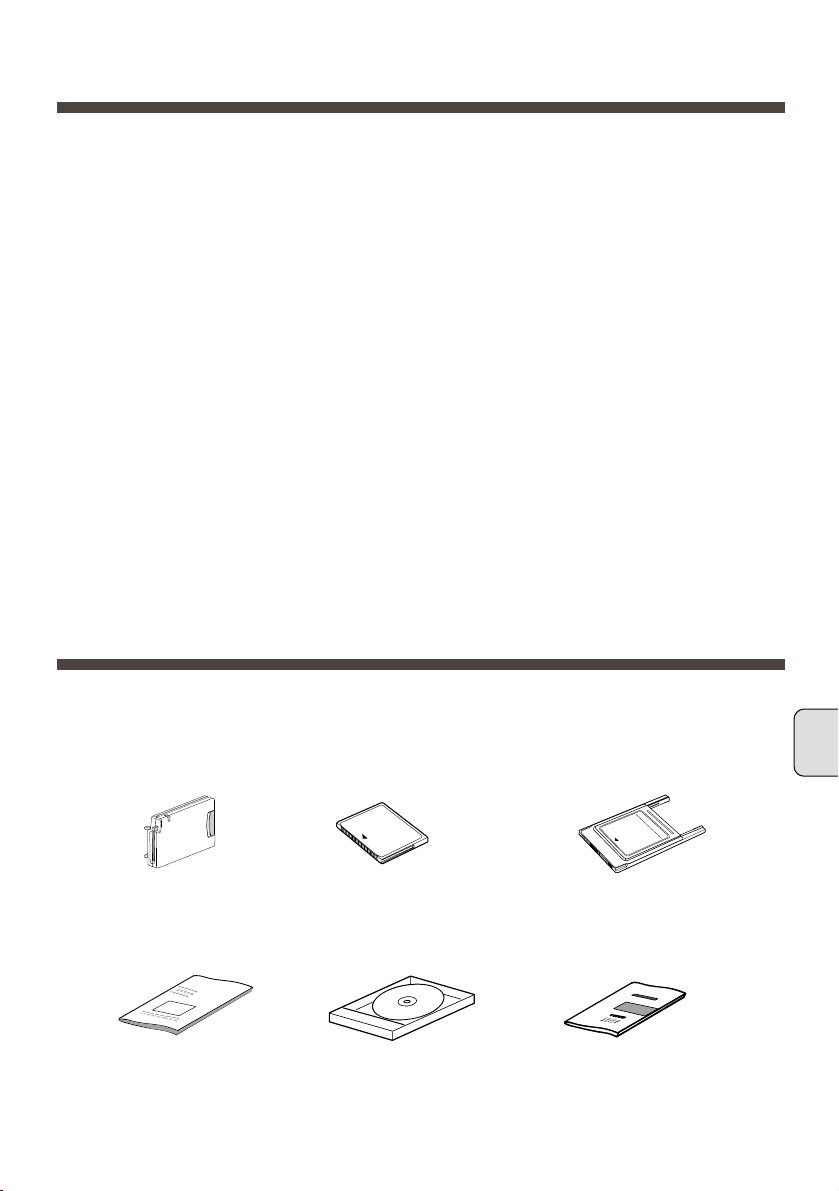
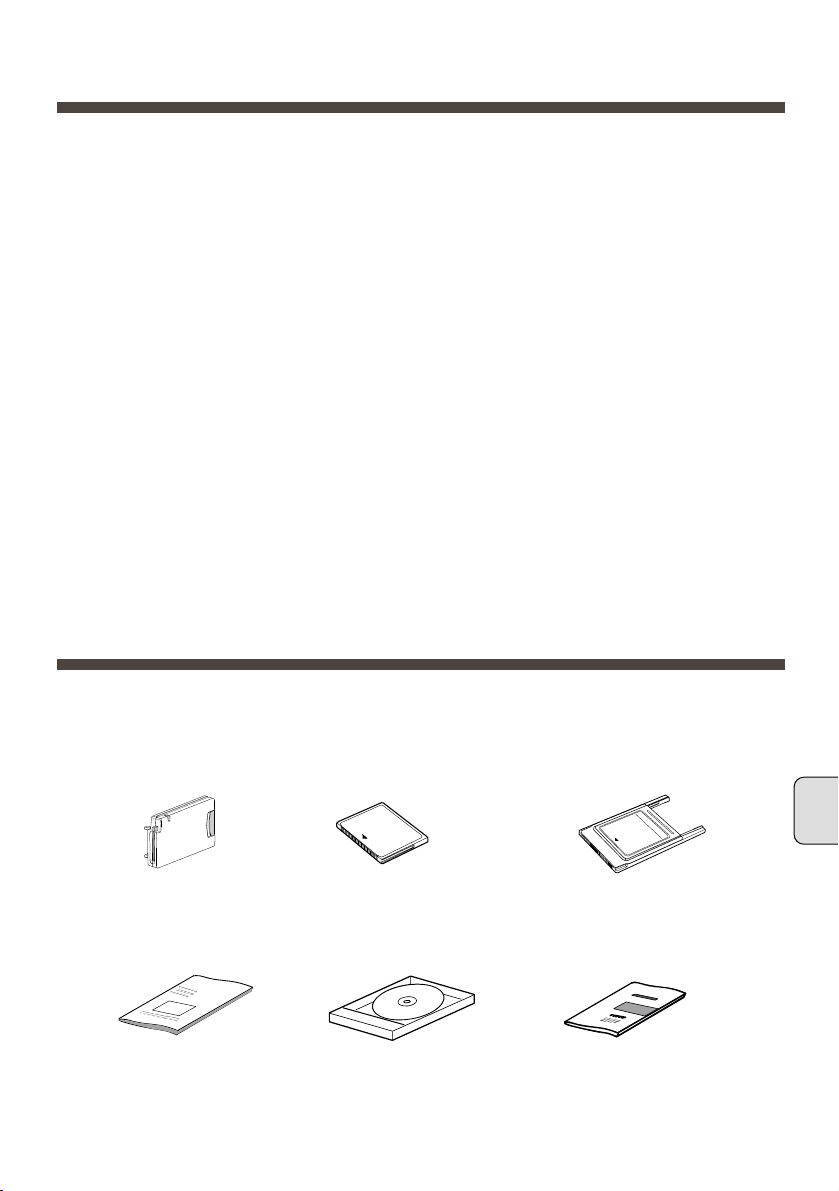
Contents of Media Card Imager Kit
The package contains following items. Make sure you have all of it.
Imager Box
CompactFlash
(CF) Card
CF Card Adapter
Media Card Imager Kit
Owner's Manual (this
manual)
* CD-ROM * MediaCard Imager
Owner's Manual
*Those are used for editing image data played back with the Imager Box.
Page 4

4
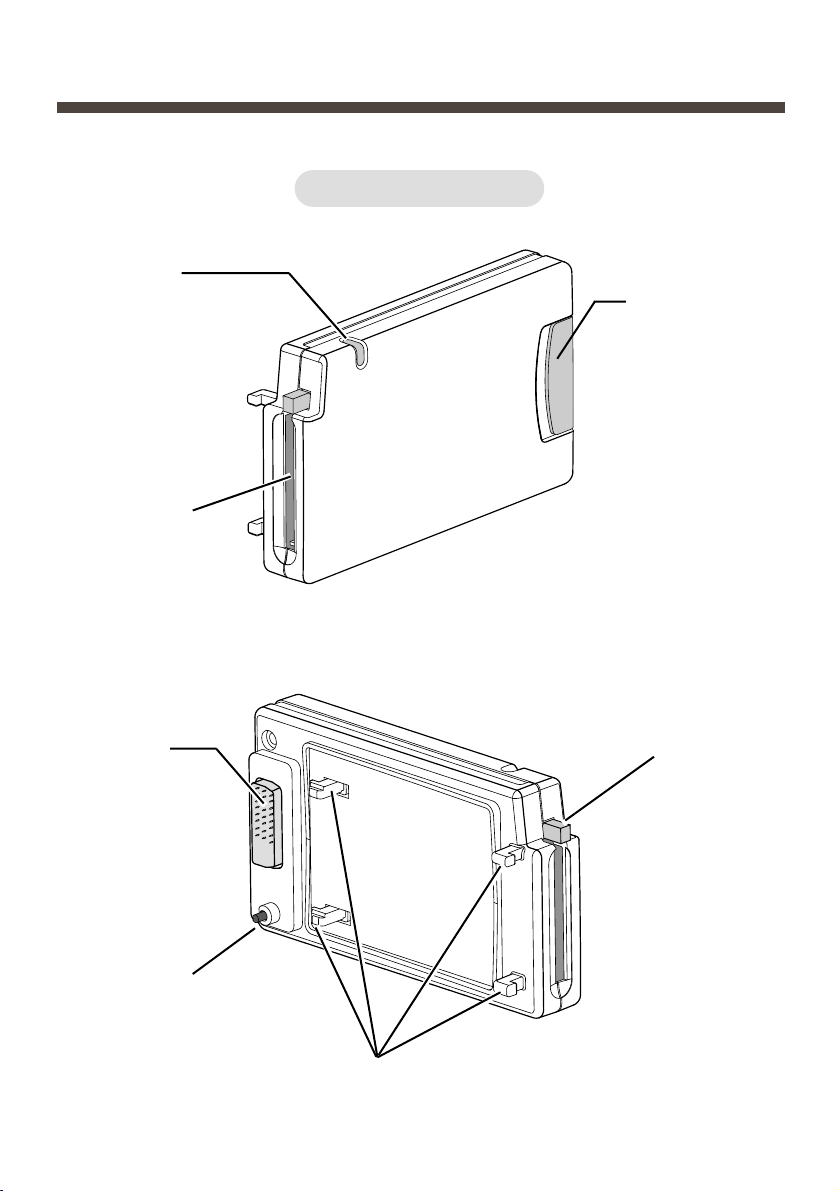
Name of Each Part of Imager Box
Imager Box
LATCH
BUTTON
CF CARD EJECT
BUTTON
MOUNTING HOOK
SWITCH
BUTTON
CONNECTOR
PLUG
CF CARD SLOT
INDICATOR
(lights while
accessing)
Page 5
5
English
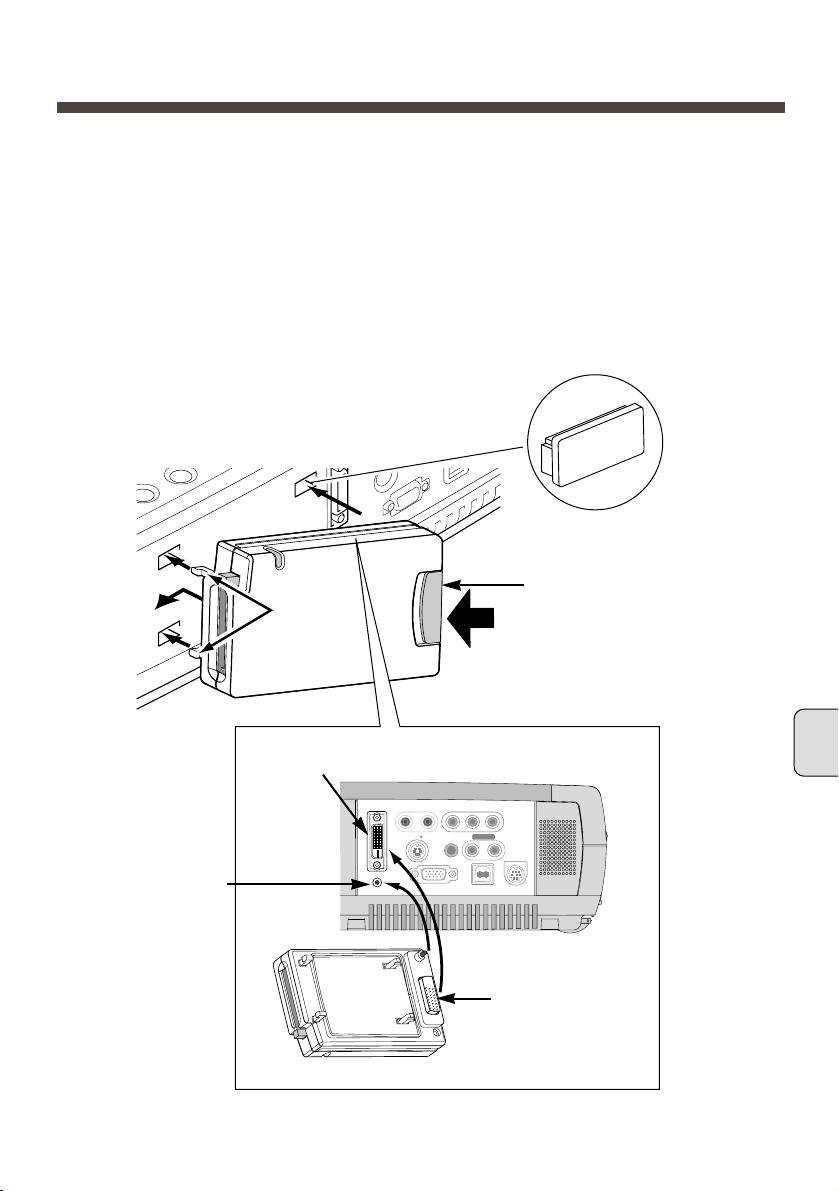
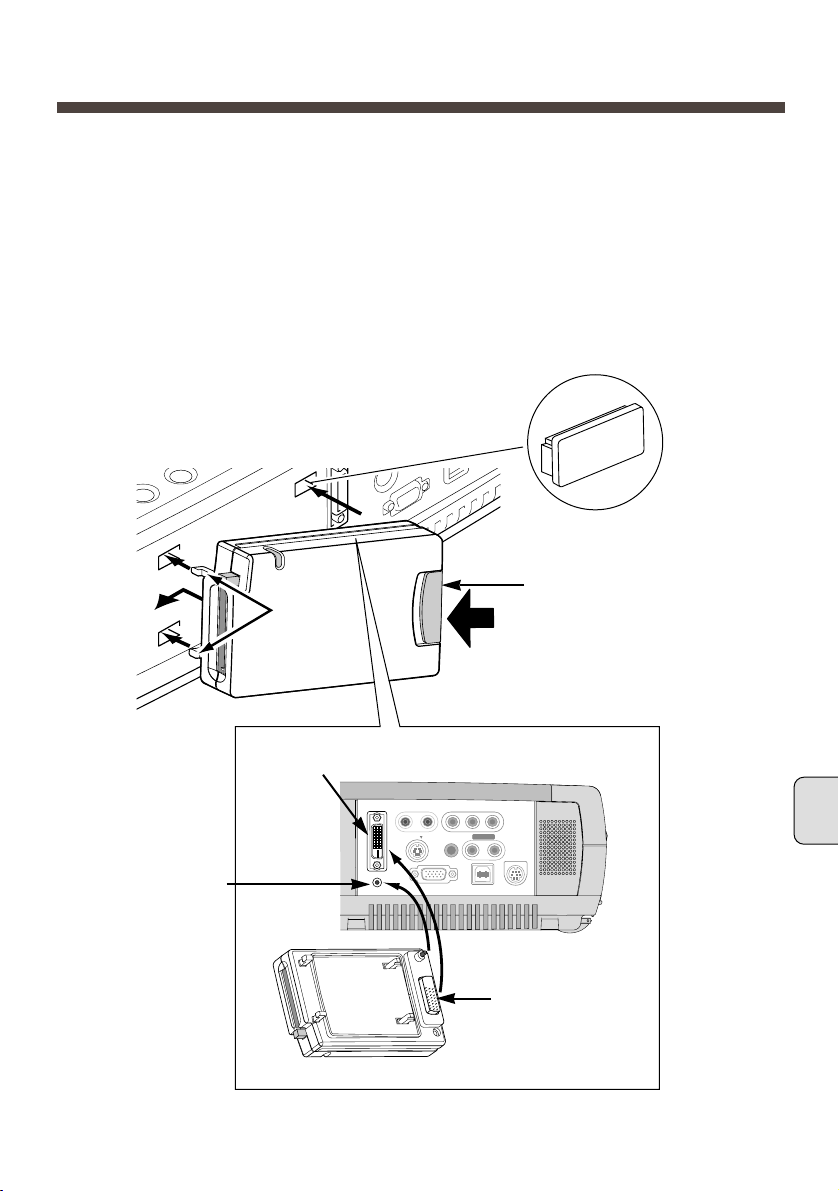
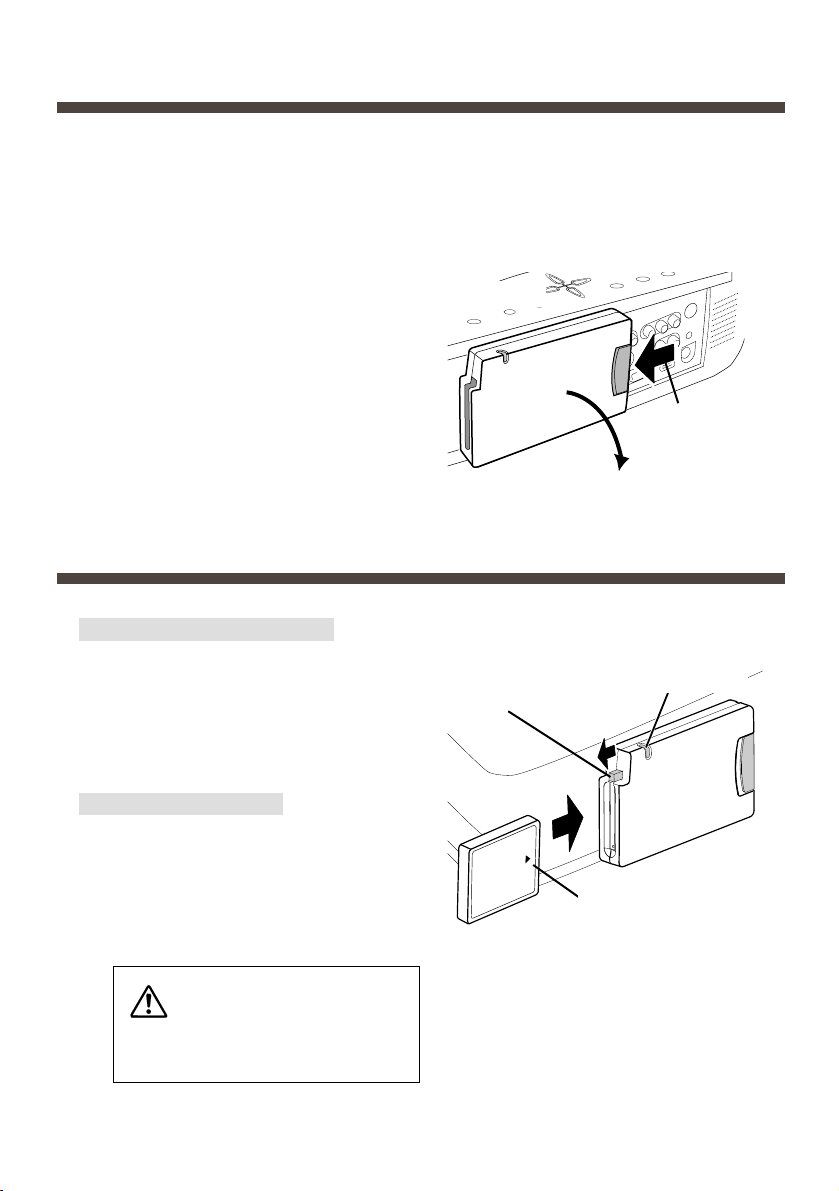
Attach Imager Box to Projector
CAUTION : Turn off the projector when attaching the Imager Box to the projector.
Do not attach or remove while the projector is turned on. It may damage
the equipment.
Remove 4 covers attached to a projector. Insert the
MOUNTING HOOKs (A) into the projector to the arrow
direction. (Fig.-1)
1
2
Plug the CONNECTOR PLUG into the DVI Terminal of the
projector while pressing the Imager Box LATCH BUTTON,
and release it.
C
O
M
P
U
T
E
R
IN
D
IG
IT
A
L
MCI
S – VIDEO
R – AUDIO IN – L
VIDEO
Y – Pb / Cb – Pr / Cr
CONTROL PORT
USB
COMPUTER IN
ANALOG
AUDIO IN
COMPUTER
R – – L
AUDIO OUT
(MONO)
(Fig.-1)
(Fig.-2)
(A)
LATCH BUTTON
The SWITCH BUTTON of the Imager
Box is placed on
the switch of the
projector.
CONNECTOR
PLUG
DVI Terminal
Remove 4 covers.
cover
Page 6

6
Remove Imager Box from Projector
Press the LATCH BUTTON to the arrow
direction. Then pull and remove the
Imager Box.
CAUTION:Removing by force may
damage the Imager Box.
(Fig.-3)
Press the LATCH
BUTTON.
CAUTION : Do not remove the Imager Box from the projector while the projector is
on. It may damage data in a memory card and the card itself.
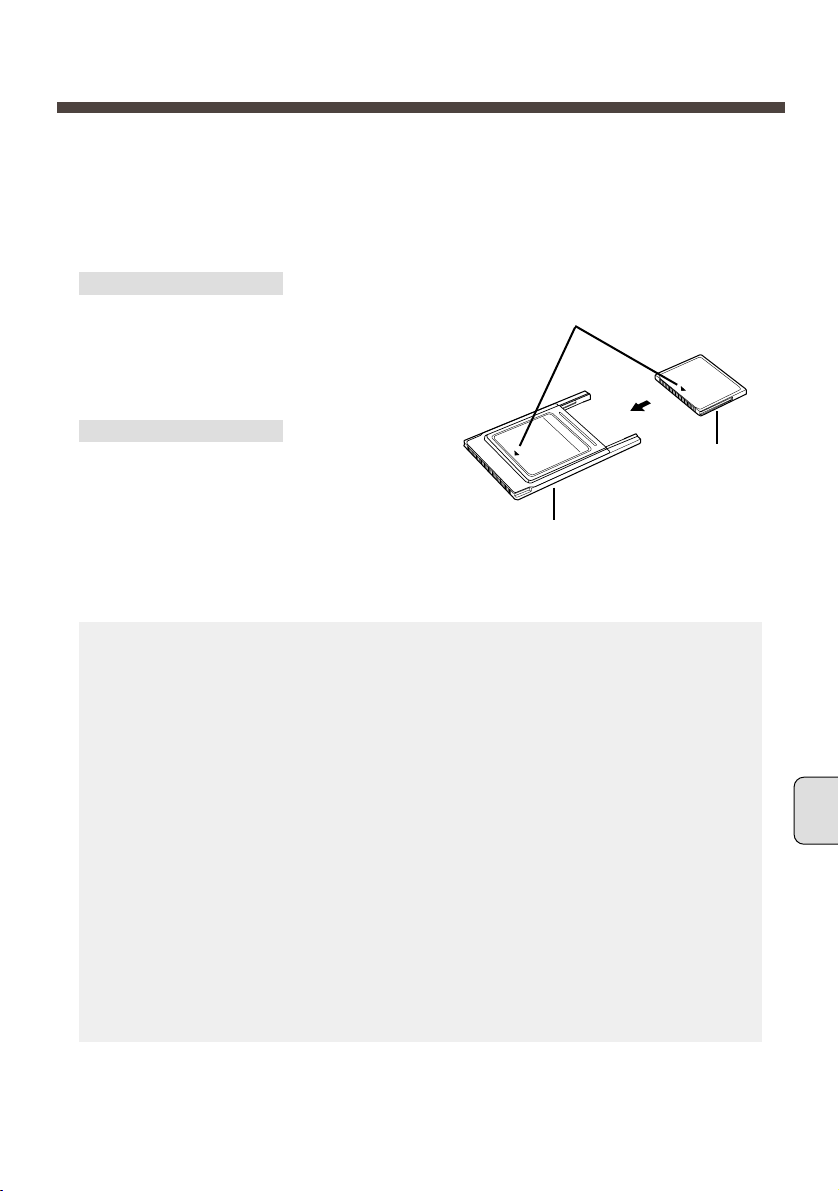
Load and Remove CF Card
Load CF Card
(Fig.-4)
CF CARD
EJECT BUTTON
INDICATOR
1
2
Insert the CF Card into the CF Card slot
of the Imager Box until the EJECT BUTTON pops out.
• Do not insert it in the wrong way. It may damage
the equipment.
Remove CF Card
Press the CF CARD EJECT BUTTON. The CF Card is released.
Pull out the CF Card from the Imager
Box.
Do not remove a CF Card while
the indicator is lighting. It may
damage the card and the data
in it.
CAUTION
Insert the CF Card with the
mark
▲ ahead.
Pull and remove the
Imager Box.
Page 7
7
English
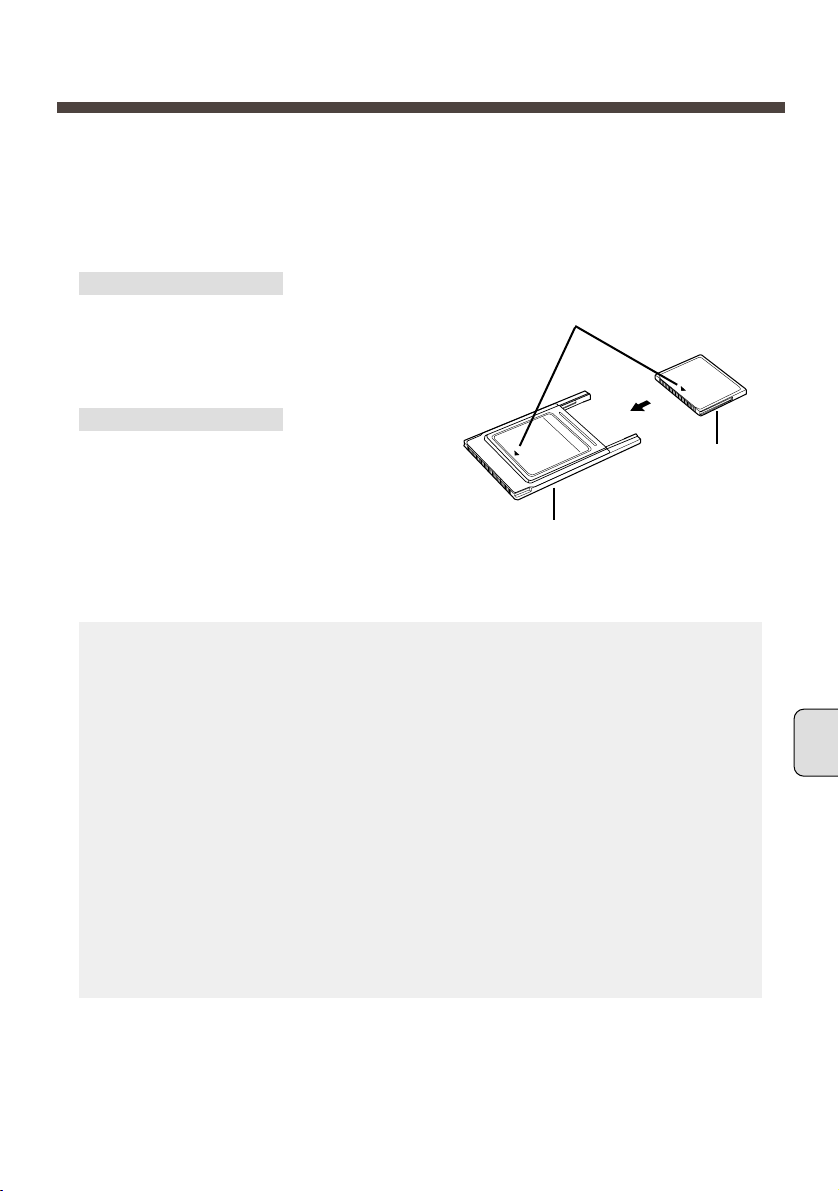
Use CF Card Adapter
CF Card Adapter is used when a CF Card is loaded into the PC card slot of a computer. You can write and rewrite data into the CF Card with the Adapter through the
PC card slot of a computer. For operation, refer to the "Media Card Imager" Owner's
Manual.
Attach CF Card
Insert the CF Card firmly into the CF Card
Adapter, aligning the arrows on the CF
Card and the adapter.
Remove CF Card
Pull the CF Card straight out.
Insert the CF Card aligning the arrows.
IMPORTANT NOTE
Data stored on a CF Card may be damaged or lost due to physical damage to
the CF Card or accidental erasure. It is recommended that any important data
should be copied as a backup onto separate media, such as a floppy disk, a
hard disk, or a MO disk, etc. We shall not be liable for any damage or loss of
profits arising from the loss of data caused by the misoperation or the damage to
a CF Card or its appliances.
The following may result in damaged or lost data:
• Misoperation of the CF Card.
• Turning off the projector or the computer or removing the CF Card / Adapter
while the CF Card is in access operations (writing, reading, or deleting the
files).
• Exposure to a strong static electric charge.
• The CF Card has reached the end of its life.
CF Card
CF Card Adapter
Page 8

8
Handle CF Card and Adapter
● CF Cards / Adapters are high-precision electronic devices. Do not bend, drop,
apply strong forces or shock or place it where a strong static electrical charge may
be generated.
● Do not touch the surface of the contact area with your fingers or allow it to be
stained with foreign materials.
● Do not attempt to disassemble or alter CF Cards.
● Moving CF Card rapidly between hot and cold temperatures may cause conden-
sation (water droplets) to form on it, leading to malfunctions. Avoid this problem
by placing the CF Card in a plastic bag and letting it slowly adjust to temperature
changes before removing it from the bag. If condensation should occur, maintain
the CF Card at a constant temperature and let the moisture evaporate naturally.
● Store CF Cards / Adapters in the protective case.
● Do not use or store CF Cards / Adapters in places subject to the following condi-
tions:
• strong magnetic fields
• abundant dirt or dust
• high temperatures, high humidity
ENVIRONMENT of CF Card operation
Operating Temperature : 41 ˚F ~ 95 ˚F (5 ˚C ~ 35 ˚C)
Storage Temperature : 14 ˚F ~ 140 ˚F (-10 ˚C ~ 60 ˚C)
Page 9
9
English
Dimensions
(W x H x D)
Weight
Operating Voltage
Available Memory
Card
4.61" x 2.76" x 0.75" (117mm x 70mm x 19mm)
(not including MOUNTING HOOKs)
5.29 oz (150g)
DC 5V 450mA, DC 3.3V 600mA
We recommend you to use a CF card that comes with
this kit. The following memory cards can also be used.
• Microdrive (1GB or less)
We do not guarantee use of any memory card except for
the above. Some memory cards may not operate properly.
Specifications
■ Imager Box
■ CompactFlash Card Adapter (ATA standard
Type-
II)
NOTE ; This adapter cannot be used for other memory cards.
The specifications are subject to change without notice.
■ CompactFlash (16MB)
Page 10

10
Page 11
English
11
IMAGE PLAYBACK (OPERATING PROJECTOR)
Attach Imager Box to your projector properly (P5), and turn the projector on. Refer to Owner’s Manual
of your projector for operation.
1
2
Load a memory card into CF Card Slot of Imager Box. (P6)
NOTE ; Refer to Owner’s Manual of your projector for location of each button and basic operation.
3
Projector automatically turns to MCI mode and shows the image data in a memory card.
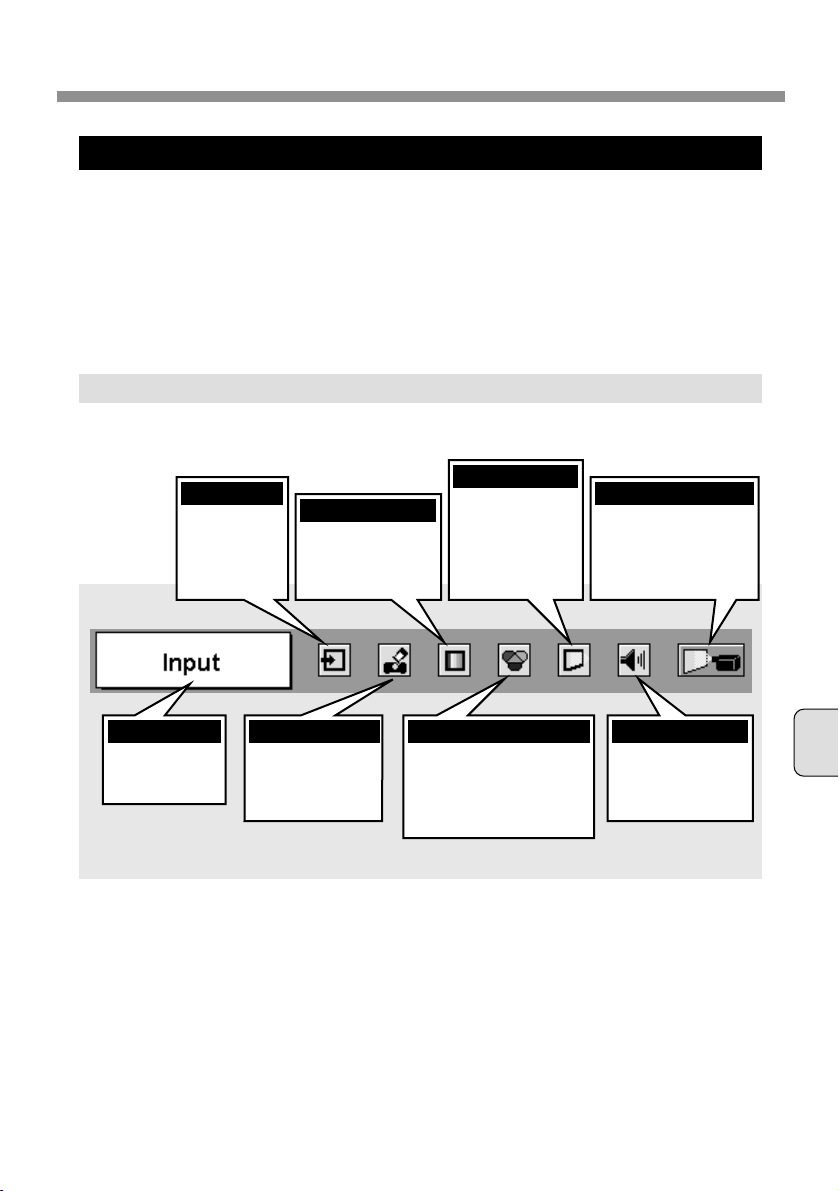
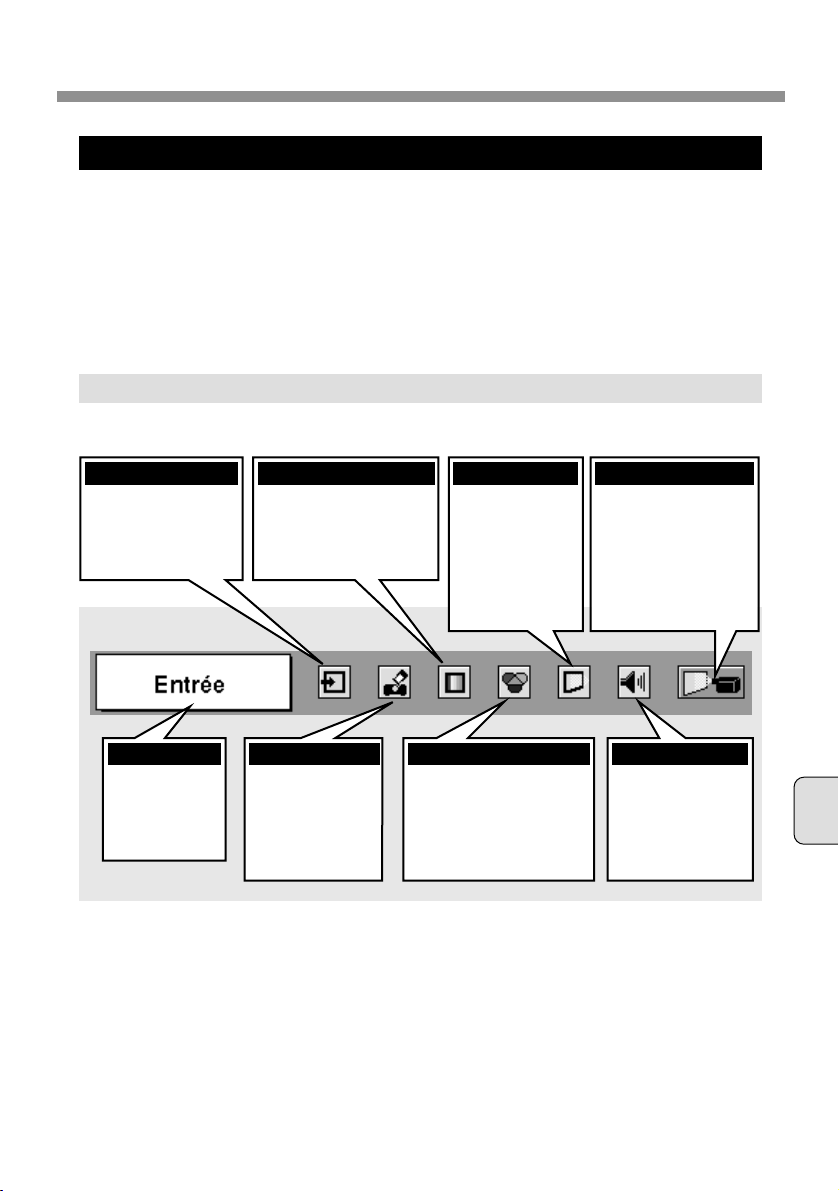
PLAYING BACK IMAGE IN THE MEMORY CARD
MENU BAR
Used to select
input source
either Computer
(MCI) or Video.
(Refer to P12)
INPUT MENU
Used to select image
level among Standard,
Real and Image 1 ~ 4.
(Refer to P15)
IMAGE SELECT MENU
Used to adjust size
of image to Normal
or True, or expand /
compress image
(Digital zoom +/–).
(Refer to P17)
SCREEN MENU
Used to change settings
of projector or reset Lamp
Reset Counter.
(Refer to Owner’s Manual
of your projector.)
SETTING MENU
Used to display
image data in a
memory card.
(Refer to P13, 14)
VIEW MENU
Used to adjust picture image.
[Contrast / Brightness / White
balance (Red/Green/Blue) /
Gamma]
(Refer to P16)
IMAGE ADJUST MENU
Used to adjust volume
or mute sound. (Refer
to Owner’s Manual of
your projector.)
SOUND MENU
Press MENU button while in MCI mode.
Shows selected
item of ONSCREEN Menu.
GUIDE WINDOW
Page 12
12
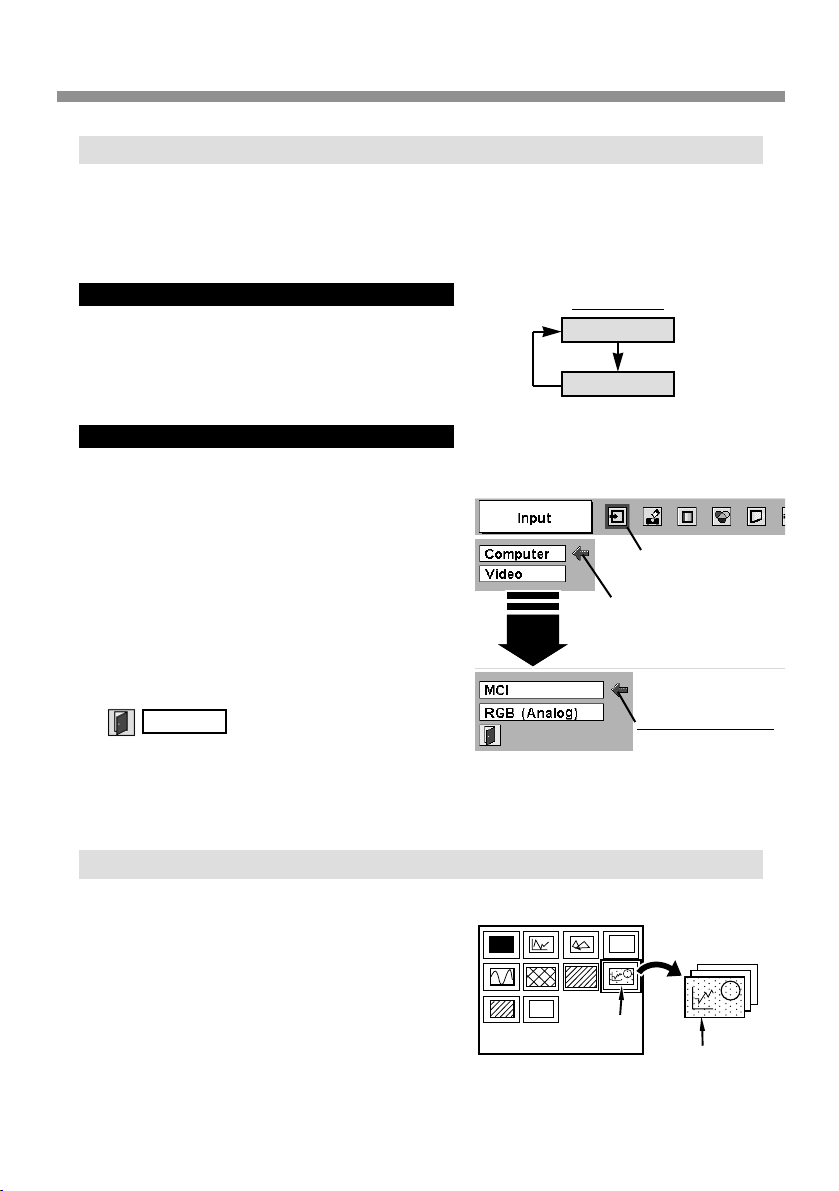
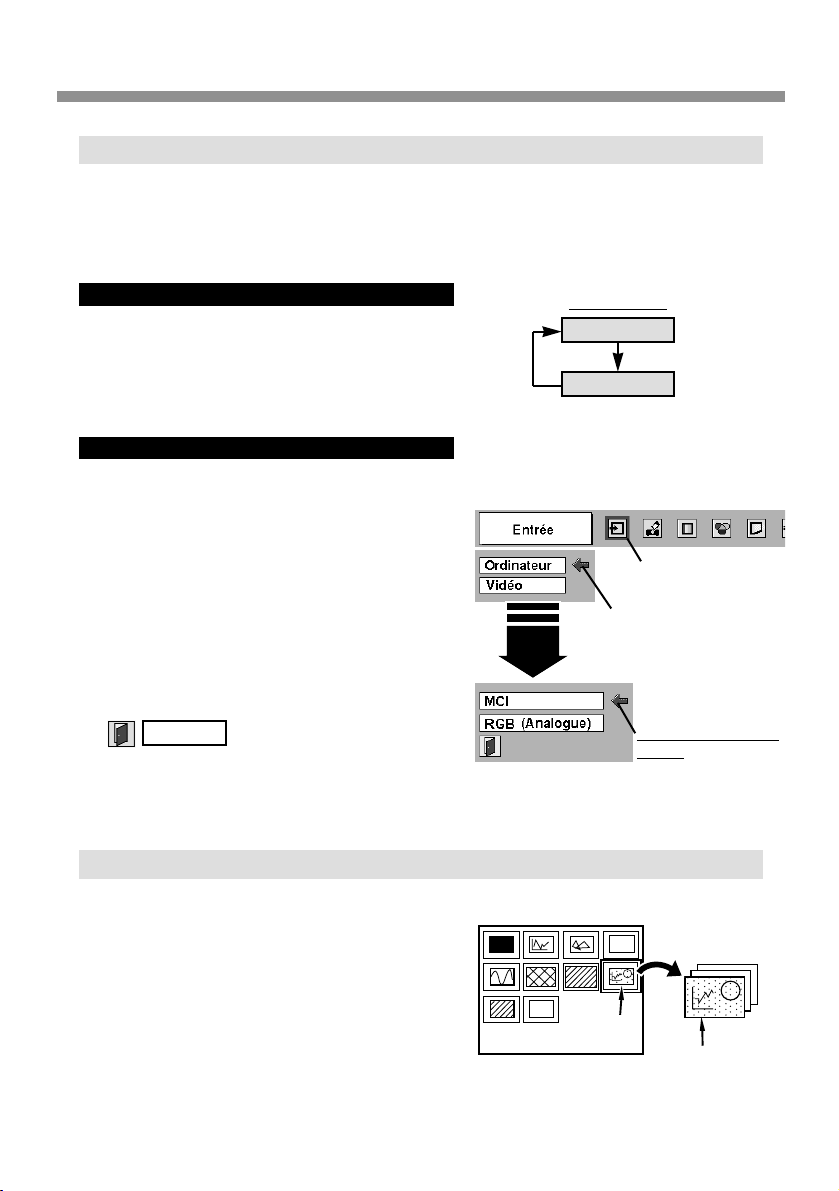
IMAGE PLAYBACK (OPERATING PROJECTOR)
Press MENU button and ON-SCREEN MENU
will appear. Press POINT LEFT/RIGHT button
to move a red frame pointer to INPUT Menu
icon.
1
2
Press POINT DOWN button to move a red
arrow pointer to Computer and then press
SELECT button. Source Select Menu will
appear.
Move a pointer (red arrow)
to Computer and press
SELECT button.
INPUT MENU
INPUT Menu icon
Choose Computer by pressing INPUT button on
Top Control or on Remote Control Unit.
If projector cannot reproduce proper image, select
correct input source through MENU OPERATION.
INPUT button
Computer
Video
Source Select Menu
Move a pointer to MCI
and press SELECT
button.
SELECTING INPUT SOURCE
DIRECT OPERATION
MENU OPERATION
INDEX AND PAGE
Image data edited with Media Card Imager
(software) is Index format consisting of several
Pages. To project desirable image, select Index
and then select Page in the Index.
When a memory card is loaded into Imager Box connected to the projector, MCI mode is
automatically selected. The first Page of the latest Index in a memory card is displayed on a
screen.
To switch to MCI mode manually, operate as follows.
Quit
Closes Source Select Menu.
Select Index
Index
Pages in Index
3
Move a pointer to MCI and then press SELECT
button.
Page 13
English
13
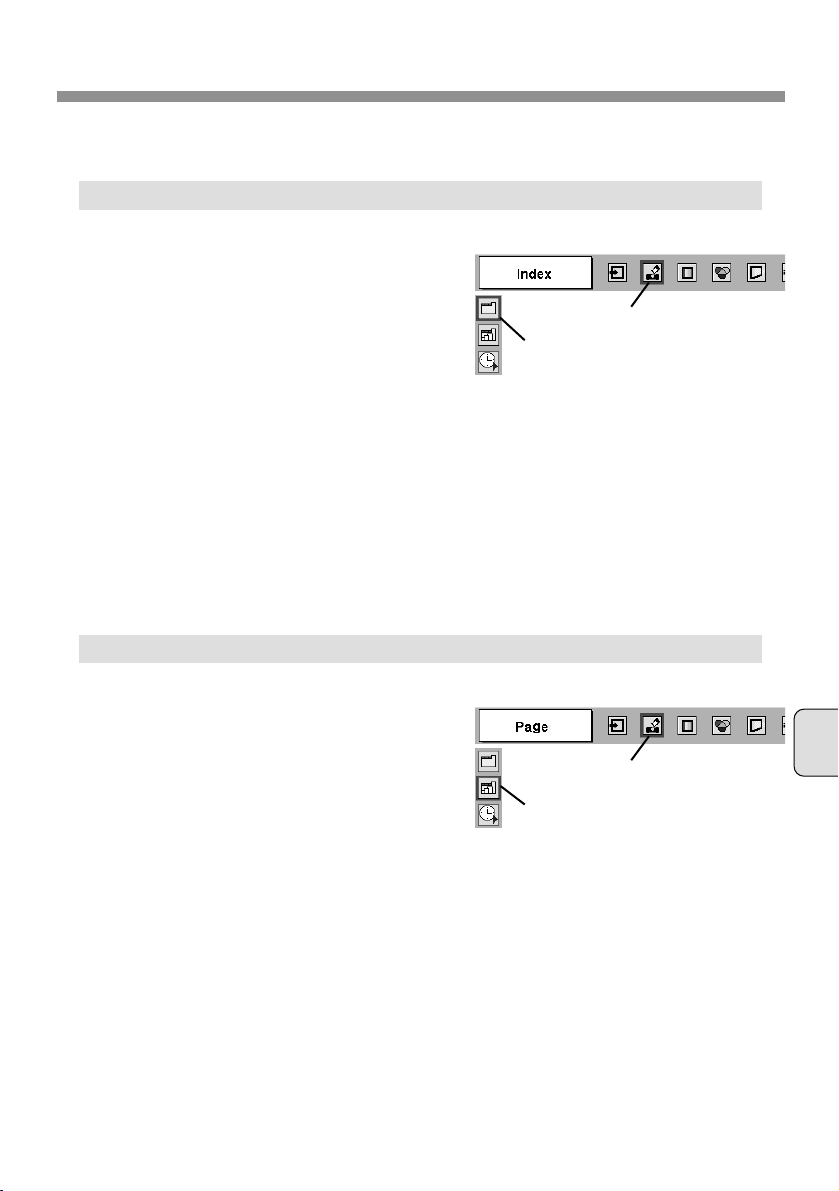
IMAGE PLAYBACK (OPERATING PROJECTOR)
To project desirable image, select Index and then Page as follows.
SELECTING INDEX
Press MENU button and ON-SCREEN MENU
will appear. Press POINT LEFT/RIGHT button
to move a red frame pointer to VIEW Menu
icon.
1
2
Press POINT DOWN button to move a red
frame pointer to Index icon and then press
SELECT button. The table of Indexes in the
memory card is displayed.
Press RIGHT CLICK button on Remote Control
Unit to stop table display. (✽1)
Move a red frame pointer to Index
icon and press SELECT button.
VIEW MENU
VIEW Menu icon
Press POINT LEFT/RIGHT/UP/DOWN buttons
to move a pointer to the Index to be projected
and then press SELECT button. The first Page
of the selected Index is displayed.
Press POINT UP/DOWN button to turn
previous/next Page over. (✽2)
POINT UP button ··· returns to previous page.
POINT DOWN button ··· goes to next page.
3
SELECTING PAGE
Press MENU button and ON-SCREEN MENU
will appear. Press POINT LEFT/RIGHT button
to move a red frame pointer to VIEW Menu
icon.
1
2
Press POINT DOWN button to move a red
frame pointer to Page icon and then press
SELECT button. The table of all Pages of
selected Index is displayed.
Press RIGHT CLICK button on Remote Control
Unit to stop table display. (✽1)
Press POINT LEFT/RIGHT/UP/DOWN buttons
to move a pointer to the Page to be projected
and then press SELECT button.
Press POINT UP/DOWN button to turn
previous/next Page over. (✽2)
POINT UP button ··· returns to previous page.
POINT DOWN button ··· goes to next page.
Table of Pages can be also displayed by
pressing SELECT button when Page is
displayed on full screen.
3
Move a red frame pointer to Page
icon and press SELECT button.
VIEW MENU
VIEW Menu icon
✽1 When RIGHT CLICK button is
pressed during table display, each
Index/Page is displayed as an icon.
This operation reduces time for
displaying all image data.
✽2 When ON-SCREEN MENU is
displayed, Page cannot be turned
over to next/previous one.
Page 14
14
IMAGE PLAYBACK (OPERATING PROJECTOR)
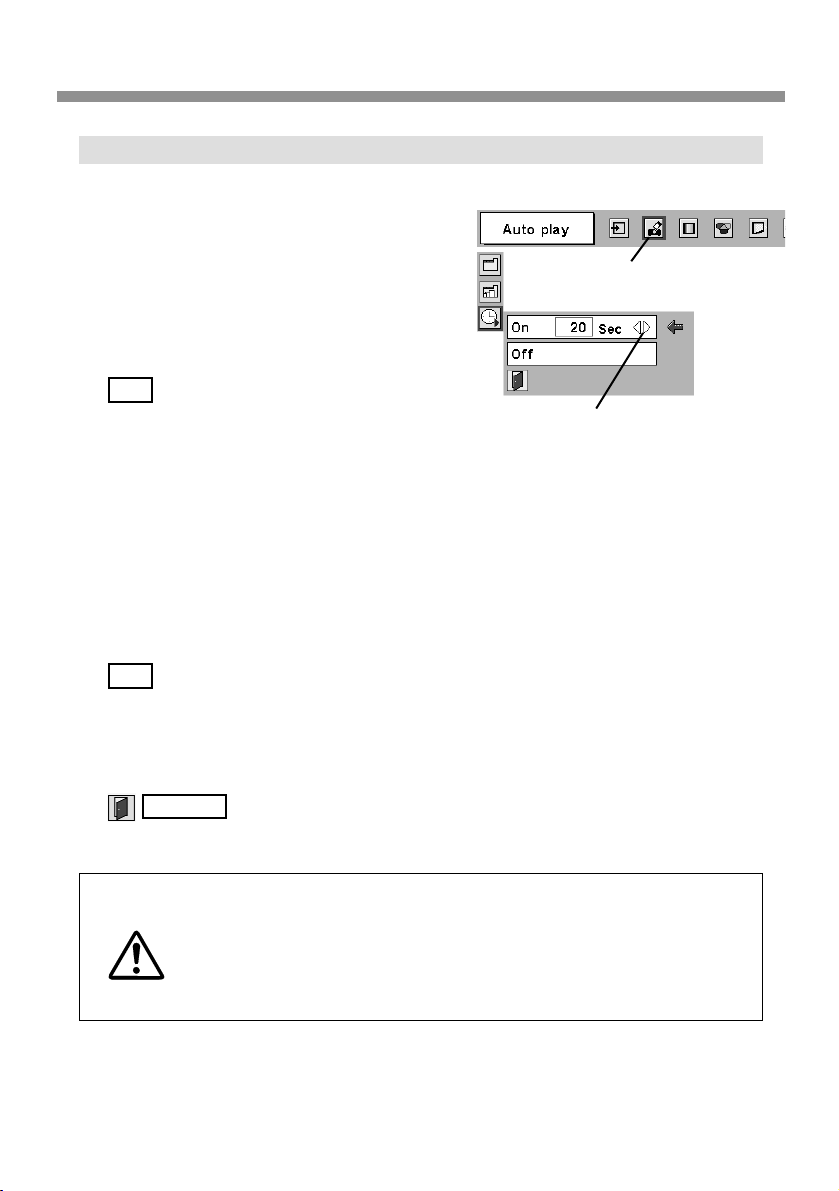
AUTO PLAY FUNCTION
Press MENU button and ON-SCREEN MENU
will appear. Press POINT LEFT/RIGHT button
to move a red frame pointer to VIEW Menu
icon.
1
2
Press POINT DOWN button to move a red
frame pointer to Auto play icon and then press
SELECT button. Auto play setting dialog box
will appear
3
Auto play setting dialog box
Press POINT LEFT/RIGHT
button(s) to adjust the interval
and press SELECT button.
VIEW MENU
VIEW Menu icon
Quit
Closes Auto play setting dialog box.
When setting Auto play function on, move a red
arrow pointer to “On,” adjust interval (sec.) by
pressing POINT LEFT RIGHT button, and then
press SELECT button. Projected image is
turned over to next automatically with interval.
This Auto play function can be pausing by
pressing POINT UP button and restarts with
POINT DOWN button.
✽ When auto play setting is previously set with
Media Card Imager (software), interval set by
Media Card Imager has priority over interval
with this menu.
On
To cancel Auto play function, move a red arrow
pointer to “Off” and then press SELECT button.
Auto play setting set with Media Card Imager
(software) is also suspended by setting to “Off.”
Off
Do not remove a memory card from Imager Box while Auto play function is
operated or Indicator of Imager Box is lighting or flashing. It may damage a
memory card or data in a memory card.
Before removing a memory card from Imager Box, be sure to set Auto play
function to “Off” or interrupt input signal from Imager Box by changing input
source.
CAUTION
Page 15
English
15
IMAGE PLAYBACK (OPERATING PROJECTOR)
PICTURE IMAGE ADJUSTMENTS
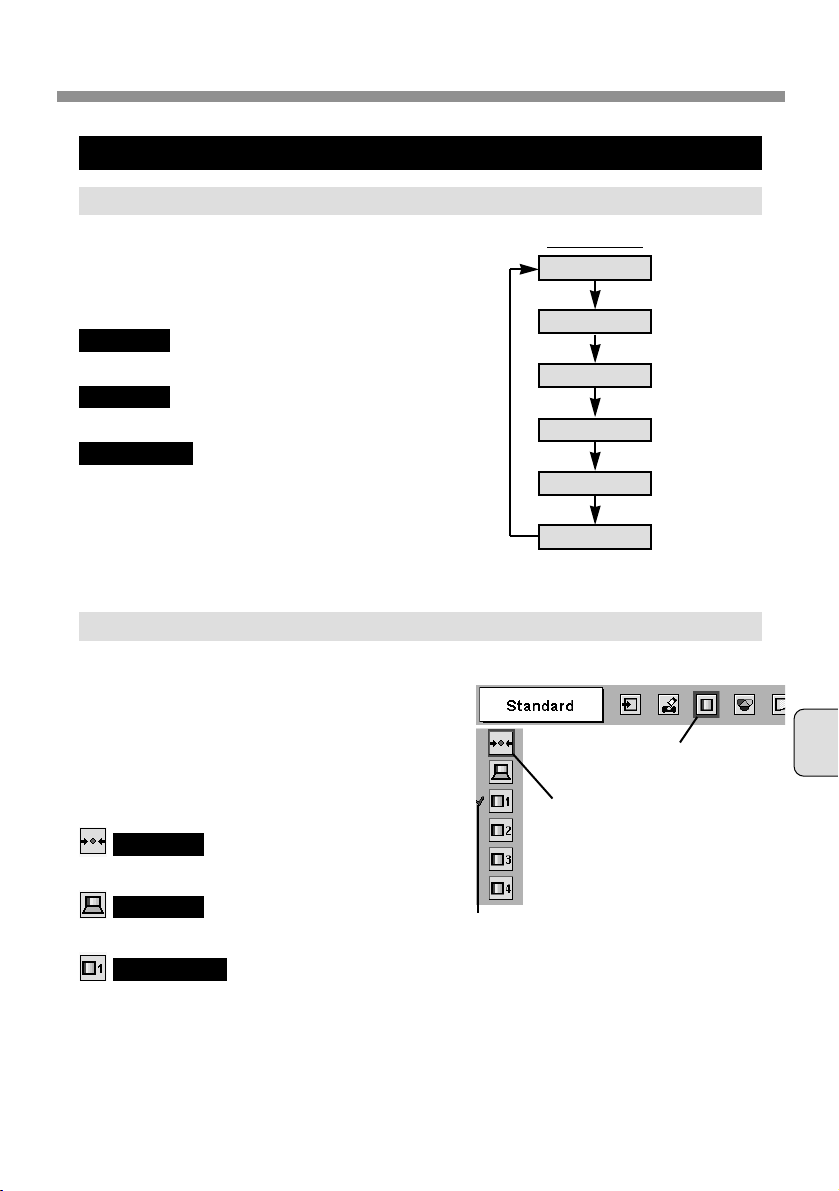
IMAGE LEVEL SELECT (MENU OPERATION)
Press MENU button and ON-SCREEN MENU
will appear. Press POINT LEFT/RIGHT button
to move a red frame pointer to IMAGE SELECT
Menu icon.
1
2
Press POINT DOWN button to move a red
frame pointer to the Image Level that you want
to set and then press SELECT button.
Move a red frame pointer to the
Image Level and press SELECT
button.
Image Level being selected.
IMAGE SELECT MENU
Normal picture level preset on this projector.
Standard
Picture level with improved halftone for graphics.
Real
User preset picture adjustment in IMAGE ADJUST
Menu (refer to P16).
Image 1 ~ 4
IMAGE SELECT
Menu icon
IMAGE LEVEL SELECT (DIRECT OPERATION)
Select Image Level among Standard, Real, Image
1, Image 2, Image 3 and Image 4 by pressing
IMAGE button on Top Control or on Remote
Control Unit.
IMAGE button
Standard
Real
Image 1
Image 2
Image 3
Image 4
Normal picture level preset on this projector.
Picture level with improved halftone for graphics.
User preset picture adjustment in IMAGE ADJUST
Menu (refer to P16).
Standard
Real
Image 1 ~ 4
Page 16
16
IMAGE PLAYBACK (OPERATING PROJECTOR)
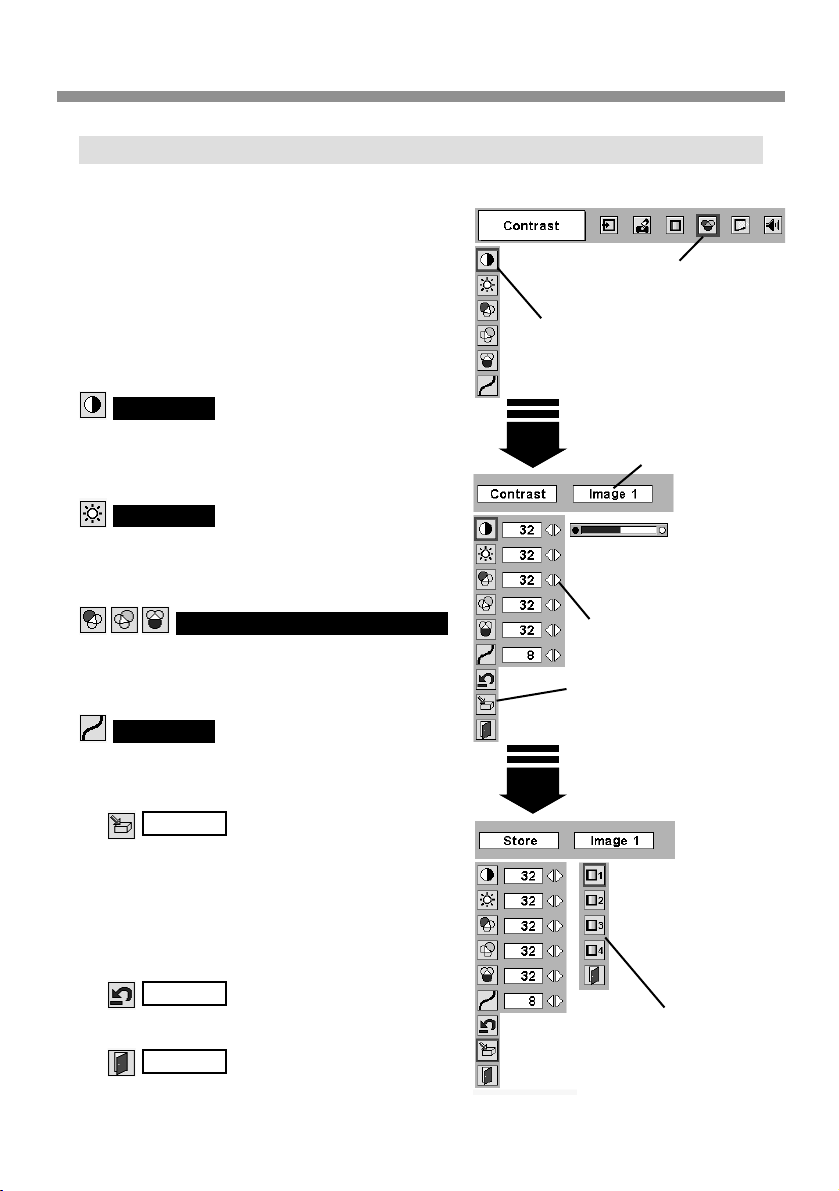
IMAGE LEVEL ADJUSTMENT
Press MENU button and ON-SCREEN MENU
will appear. Press POINT LEFT/RIGHT
buttons to move a red frame pointer to IMAGE
ADJUST Menu icon.
1
2
Press POINT DOWN button to move a red
frame pointer to the item that you want to
adjust, and then press SELECT button. The
level of each item is displayed. Adjust each
item by pressing POINT LEFT/RIGHT buttons.
Move a red frame pointer to
the item to be adjusted and
then press SELECT button.
IMAGE ADJUST MENU
IMAGE ADJUST
Menu icon
Selected Image Level (P15)
Press POINT LEFT/RIGHT
buttons to adjust value.
IMAGE LEVEL SET MENU
Move a red frame pointer to
Image 1 ~ 4 and then press
SELECT button.
Store icon
Press SELECT button at this icon
to store the adjustment.
Press POINT LEFT button to decrease contrast,
and POINT RIGHT button to increase contrast.
(From 0 to 63.)
Contrast
Press POINT LEFT button to adjust image darker,
and POINT RIGHT button to adjust brighter. (From
0 to 63.)
Brightness
Press POINT LEFT button to lighten tone of each
color, and POINT RIGHT button to deepen tone.
(From 0 to 63.)
White balance (Red/Green/Blue)
Press POINT LEFT button or POINT RIGHT button
to obtain better balance of contrast. (From 0 to 31.)
Gamma
Store
To store manually preset image level, move a
red frame pointer to Store icon and press
SELECT button. IMAGE LEVEL SET MENU
will appear. Move a red frame pointer to Image
1 ~ 4 where you want to set and then press
SELECT button.
3
Reset
Reset all adjustment to previous value.
Quit
Closes IMAGE ADJUST MENU.
Page 17
English
17
IMAGE PLAYBACK (OPERATING PROJECTOR)
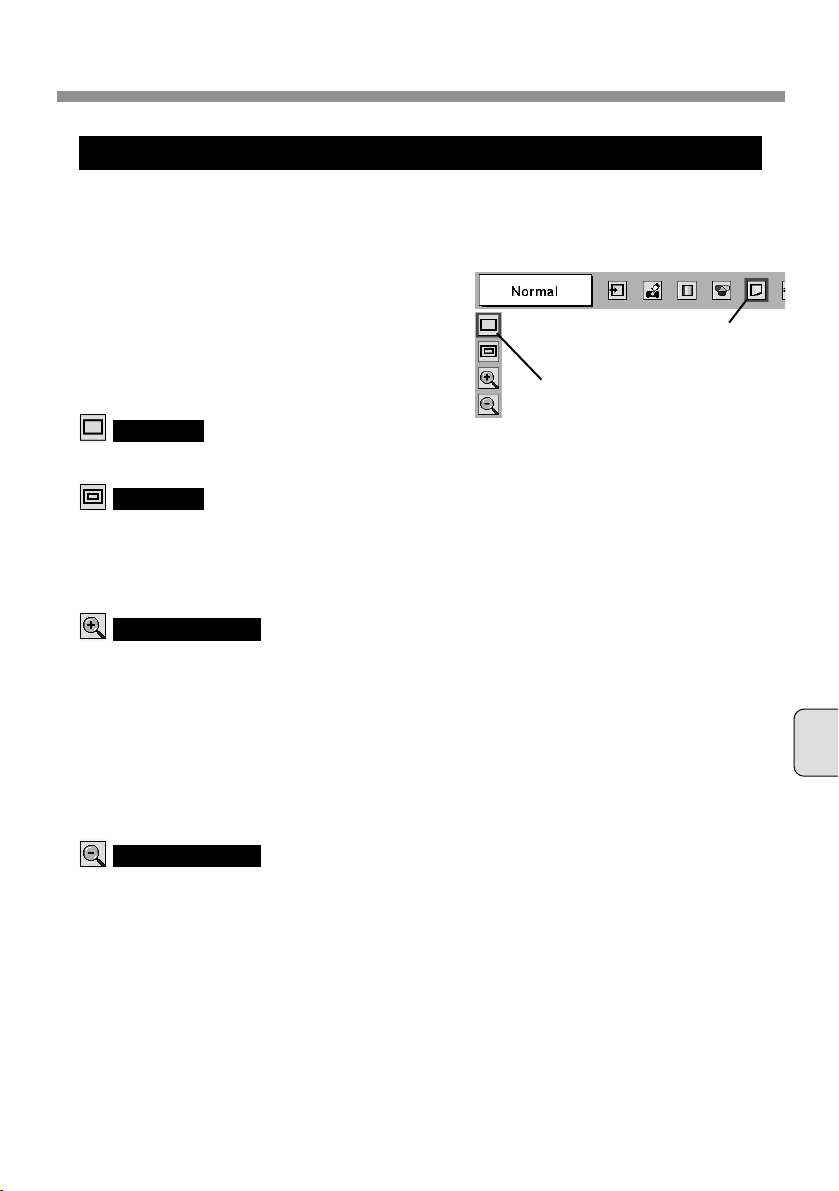
PICTURE SIZE ADJUSTMENT
Press MENU button and ON-SCREEN MENU
will appear. Press POINT LEFT/RIGHT
buttons to move a red frame pointer to
SCREEN Menu icon.
1
2
Press POINT DOWN button and move a red
frame pointer to the function that you want to
select and then press SELECT button.
This projector has a picture screen resize function, which enables you to display the desirable
image size.
Move a red frame pointer to the
function and press SELECT button.
SCREEN MENU
Provides image to fit screen size.
Normal
Provides image in its original size. When the
original image is larger than screen size, the
projector automatically enters “Digital zoom +”
mode.
True
When Digital zoom + is selected, ON-SCREEN
MENU disappears and the message “D. Zoom +” is
displayed. Press SELECT button to expand image
size. And press POINT UP/DOWN/LEFT/RIGHT
button(s) to pan the image. Panning function can
work only when the image is larger than screen
size.
Projected image can be also expanded by pressing
D. Zoom ▲ button on Remote Control Unit.
Digital zoom +
SCREEN Menu
icon
When Digital zoom – is selected, ON-SCREEN
MENU disappears and the message “D. Zoom –” is
displayed. Press SELECT button to compress
image size.
Projected image can be also compressed by
pressing D. Zoom ▼ button on Remote Control
Unit.
Digital zoom –
To cancel Digital Zoom +/– mode, press any button
except D. ZOOM ▲ /▼ , SELECT, POINT and
LASER buttons.
Page 18

18
Page 19
Kit de puce Media Card Imager
MODELE POA-MD07MCI
INSTALLATION ET UTILISATION
DE L’IMAGER BOX
Ce kit de puce Media Card Imager est un
kit en option permettant de projeter les
données d’images en différents formats et
fichiers créés par Microsoft PowerPoint
avec notre projecteur. Les données
d’images peuvent être projetées aisément
en fixant simplement l’Imager Box sur un
projecteur sans effectuer aucune connexion
à un ordinateur.
Ce kit est utilisé uniquement sur nos
projecteurs équipés d’une borne pour
l’Imager Box.
Le présent manuel donne les explications
relatives à l’installation et à l’utilisation de
l’Imager Box.
Les données lues par l’Imager Box sont
éditées par le logiciel de Media Card
Imager inclus dans le kit. Pour l’utilisation
du logiciel, reportez-vous au manuel du
propriétaire du “Media Card Imager” inclus
séparément.
MANUEL DU PROPRIETAIRE
Français
Page 20

2
Conformité aux normes
Avis de la commission fédérale des communications
Cet appareil a été testé et jugé conforme aux limites des appareils numériques de la
classe B, conformément à l’article 15 des jugements FCC. Ces limites sont destinées
à assurer une protection raisonnable contre les interférences nuisibles dans une
installation résidentielle. Cet appareil produit, utilise et peut émettre de l’énergie de
fréquence radio, et s’il n’est pas installé et utilisé conformément aux instructions, il
pourra produire des interférences affectant négativement les communications radio.
Toutefois, il n’est pas garanti qu’aucune interférence ne se produira pas dans une
installation particulière. Si cet appareil cause des interférences affectant
négativement la réception des émissions de radio et de télévision, ce qui peut être
déterminé en éteignant et en rallumant l’équipement, nous conseillons à l’utilisateur
d’essayer de corriger les interférences en prenant une ou plusieurs des mesures
suivantes:
– Modifier l’orientation de l’antenne de réception, ou la placer à un autre endroit.
– Eloigner l’équipement du récepteur.
– Brancher l’équipement à une prise sur un circuit différent de celui auquel le
récepteur est connecté.
– Demander de l’aide au revendeur ou à un technicien de radio/télévision
compétent.
Marques de commerce
Microsoft, Windows et PowerPoint sont des marques déposées de la société
Microsoft Corp. des Etats-Unis.
Microdrive est une marque commerciale de la société IBM des Etats-Unis.
CompactFlash est une marque commerciale de la société SanDisk Corporation des
Etats-Unis.
Chaque nom de société ou de produit figurant dans le manuel du propriétaire est une
marque commerciale ou une marque déposée de sa société respective.
N’effectuez aucun changement ou modification sur cet appareil qui ne soit pas
expressément spécifié dans ce manuel. Si vous effectuez de tels changements ou
modifications, on pourra vous interdire d’utiliser cet appareil.
Page 21
Français
Table des matières
Table des matières 3
Contenu du kit de puce Media Card Imager 3
Nom des pièces de l’Imager Box 4
Fixation de l’Imager Box au projecteur 5
Retrait de l’Imager Box du projecteur 6
Mise en place et retrait de la carte CF 6
Utilisation de l’adaptateur de carte CF 7
Manipulation de la carte CF et de l’adaptateur 8
Spécifications 9
LECTURE DE L’IMAGE
(UTILISATION DU PROJECTEUR) 11
LECTURE DE L’IMAGE DE LA CARTE MEMOIRE
11
REGLAGE D’IMAGE
15
REGLAGES DE LA TAILLE D’IMAGE
17
Contenu du kit de puce Media Card Imager
L’emballage contient les articles suivants. Vérifiez bien qu’ils sont tous inclus.
Imager Box
Carte
CompactFlash (CF)
Adaptateur de
carte CF
Manuel du propriétaire du kit
de puce Media Card Imager
(le présent manuel)
* CD-ROM * Manuel du propriétaire
du Media Card Imager
* Utilisés pour éditer les données d’images lues par l’Imager Box.
3
Page 22
FICHE DU
CONNECTEUR
4
Nom des pièces de l’Imager Box
Imager Box
BOUTON DE
VERROUILLAGE
BOUTON D’EJECTION
DE CARTE CF
CROCHET DE MONTAGE
BOUTON DE
COMMUTATION
FENTE DE
CARTE CF
TEMOIN
(s’allume lors
de l’accès)
Page 23
Français
Fixation de l’Imager Box au projecteur
ATTENTION: Lorsque vous fixez l’Imager Box au projecteur, mettez le projecteur hors
tension. Ne fixez pas ou ne retirez pas l’Imager Box lorsque le projecteur
est sous tension. Vous risqueriez d’endommager l’équipement.
Retirez les 4 couvercles fixés au projecteur. Insérez les
CROCHETS DE MONTAGE (A) dans le projecteur dans le
sens indiqué par la flèche. (Illustration 1)
1
2
Branchez la FICHE DU CONNECTEUR dans la borne DVI
du projecteur tout en appuyant sur le bouton de
VERROUILLAGE de l’Imager Box, puis relâchez-le pour le
verrouiller.
C
O
M
P
U
T
E
R
IN
D
IG
IT
A
L
MCI
S – VIDEO
R – AUDIO IN – L
VIDEO
Y – Pb / Cb – Pr / Cr
CONTROL PORT
USB
COMPUTER IN
ANALOG
AUDIO IN
COMPUTER
R – – L
AUDIO OUT
(MONO)
(Illustration 1)
(Illustration 2)
(A)
BOUTON DE VERROUILLAGE
Le BOUTON DE
COMMUTATION
de l’Imager Box
est placé sur le
commutateur du
projecteur.
FICHE DU
CONNECTEUR
Borne DVI
5
Retirez les quatre
couvercles.
Couvercle
Page 24
6
Retrait de l’Imager Box du projecteur
Appuyez sur le BOUTON DE
VERROUILLAGE dans le sens indiqué
par la flèche. Ensuite, enlevez l’Imager
Box en le tirant.
ATTENTION: Si vous retirez l’Imager Box en
forçant excessivement, vous
risquez d’endommager celui-ci.
(Illustration 3)
Appuyez sur le
BOUTON DE
VERROUILLAGE.
ATTENTION: Ne retirez pas l’Imager Box du projecteur lorsque le projecteur est sous
tension. Vous risqueriez d’endommager les données de la carte
mémoire, et la carte elle-même.
Mise en place et retrait de la carte CF
Mise en place de la carte CF
(Illustration 4)
BOUTON D’EJECTION
DE CARTE CF
TEMOIN
1
2
Mettez la carte CF dans la fente de carte
CF de l’Imager Box jusqu’à ce que le
BOUTON D’EJECTION sorte.
• N’insérez pas la carte dans la mauvaise direction.
Vous risqueriez d’endommager l’équipement.
Retrait de la carte CF
Appuyez sur le BOUTON D’EJECTION
DE CARTE CF. La carte CF est alors
libérée.
Tirez la carte CF hors de l’Imager Box.
Ne retirez pas une carte CF
pendant que le témoin est
allumé. Vous risqueriez
d’endommager la carte et les
données qu’elle contient.
ATTENTION
Insérez la carte CF en
orientant la marque
▲ vers
l’avant.
Enlevez l’Imager
Box en le tirant.
Page 25
Français
Utilisation de l’adaptateur de carte CF
L’adaptateur de carte CF est utilisé lorsqu’une carte CF est mise en place dans la
fente de carte PC d’un ordinateur. Vous pouvez écrire et ré-écrire les données dans
la carte CF avec l’adaptateur en utilisant la fente de carte PC d’un ordinateur. Pour
plus de détails concernant cette opération, reportez-vous à la section “Media Card
Imager” du manuel du propriétaire.
Fixation de la carte CF
Insérez fermement la carte CF dans
l’adaptateur de carte CF, en alignant les
flèches de la carte CF sur celles de
l’adaptateur.
Retrait de la carte CF
Tirez la carte CF droit vers l’extérieur.
Insérez la carte CF en alignant les flèches.
REMARQUE IMPORTANTE
Les données mémorisées dans une carte CF risquent d’être endommagées ou
perdues si la carte CF est abîmée ou effacée par mégarde. Il est conseillé de
réaliser une copie de secours des données importantes sur un support séparé,
tel qu’une disquette, un disque dur ou un disque MO, etc. Nous dégageons toute
responsabilité en cas de dommages ou de perte de profits suite à une perte de
données causée par une utilisation incorrecte ou des dommages à la carte CF
ou ses appareils.
Les opérations suivantes peuvent entraîner des dommages ou des pertes de
données:
• Utilisation incorrecte de la carte CF.
• Mise hors tension du projecteur ou de l’ordinateur, ou retrait de la carte CF /
adaptateur pendant que des opérations d’ accès (é criture, lecture ou
suppression de fichiers) sont effectuées sur la carte CF.
• Exposition à une charge d’électricité statique puissante.
• La carte CF a atteint la fin de sa durée de vie.
7
Carte CF
Adaptateur de carte CF
Page 26

8
Manipulation de la carte CF et de l’adaptateur
● Les cartes CF / adaptateurs sont des dispositifs électroniques de haute précision.
Il ne faut pas les plier, les laisser tomber, leur faire subir de forces excessives ou
de chocs, ou les placer à des endroits auxquels une forte charge d’électricité
statique est susceptible d’être produite.
● Ne touchez pas la surface de la zone de contact avec les doigts; veillez à ce
qu’elle ne soit pas salie par des corps étrangers.
● Ne tentez pas de démonter ou de modifier les cartes CF.
● Si vous faites passer rapidement la carte CF d’un endroit chaud à un endroit froid,
de la condensation (gouttelettes d’eau) pourra s’y former et entraîner des
anomalies de fonctionnement. Evitez ce problème en plaçant la carte CF dans un
sac en plastique et en la laisser s’adapter lentement aux changements de
température avant de la retirer du sac. Si de la condensation se forme, placer la
carte à une température constante et laisser les gouttelettes de condensation
s’évaporer naturellement.
● Rangez les cartes CF / adaptateurs dans leur boîtier de protection.
● N’utilisez pas ou ne rangez pas les cartes CF / adaptateurs à des endroits sujets
aux conditions suivantes:
•à des champs magnétiques puissants
•à la saleté ou à la poussière
•à une température ou une humidité excessives
CONDITIONS AMBIANTES pour l’utilisation de la carte CF
Température de fonctionnement : 5°C - 35°C
Température de stockage : –10°C - 60°C
Page 27

Français
Dimensions
(L x H x P)
Poids
Tension d’utilisation
Carte mémoire
utilisable
117 mm x 70 mm x 19 mm
(sans les CROCHETS DE MONTAGE)
150 g
5 VCC 450 mA, 3,3 VCC 600 mA
Nous vous recommandons d’utiliser une carte CF fournie
avec ce kit. Les cartes mémoires suivantes peuvent aussi
être utilisées.
• Microdrive (1 Go ou moins)
Nous n’offrons aucune garantie pour les cartes mémoires
autres que celles mentionnées ci-dessus. Certaines cartes
mémoires rsiquent de ne pas fonctionner correctement.
Spécifications
■ Imager Box
■ Adaptateur de carte CompactFlash (norme ATA type II)
REMARQUE: Cet adaptateur ne peut pas être utilisé avec d’autres cartes mémoire.
Les spécifications sont sujettes à changements sans préavis.
■ CompactFlash (16 Mo)
91011
Page 28

Page 29
Français
LECTURE DE L’IMAGE (UTILISATION DU PROJECTEUR)
Fixez l’Imager Box correctement sur le projecteur (P5), puis mettez le projecteur sous tension. Pour
plus de détails concernant cette opération, reportez-vous au mode d’emploi.
1
2
Mettez une carte mémoire en place dans la fente de carte mémoire de l’Imager Box. (P6)
REMARQUE: Pour plus de détails concernant l’emplacement des touches et l’utilisation de base, reportez-
vous au mode d’emploi de votre projecteur.
3
Le projecteur passe automatiquement au mode MCI et montre les données d’images de la carte
mémoire.
LECTURE DE L’IMAGE DE LA CARTE MEMOIRE
BARRE DE MENU
Utilisée pour sélectionner
la source de l’ordinateur
(MCI) ou vidéo.
(Reportez-vous à la page
12.)
MENU D’ENTREE
Utilisé pour sélectionner le
niveau des images entre
Standard, Naturel ou Image 1
à 4. (Reportez-vous à la
page 15.)
MENU DE SELECTION D’IMAGE
Utilisé pour régler la
taille de l’image à
Normal ou Vrai, ou
pour élargir /
compresser l’image
(Zoom digital +/–).
(Reportez-vous à la
page 17.)
MENU D’ECRAN
Utilisé pour changer les
réglages du projecteur et
remettre le Compteur de
remplacement de la lampe
à zéro.
(Reportez-vous au mode
d’emploi de votre
projecteur.)
MENU DE REGLAGE
Utilisé pour afficher
les données
d’images de la carte
mémoire.
(Reportez-vous aux
pages 13, 14.)
MENU AFFICHAGE
Utilisé pour régler l’image.
[Contraste/Luminosité/
Bal. des gris
(Rouge/Vert/Bleu)/
Gamma] (Reportez-vous à la
page 16.)
MENU DE REGLAGE DES IMAGES
Utilisé pour régler ou
pour couper le
volume. (Reportezvous au mode
d’emploi de votre
projecteur.)
MENU SON
Appuyez sur la touche MENU en mode MCI.
Montre les
éléments
sélectionnés du
MENU A
L’ECRAN.
FENETRE DE GUIDE
Page 30
12
LECTURE DE L’IMAGE (UTILISATION DU PROJECTEUR)
Appuyez sur la touche MENU pour faire apparaître le
MENU A L’ECRAN. Appuyez sur la touche de
POINTAGE (GAUCHE/DROITE) pour placer le
pointeur à cadre rouge sur l’icône du menu ENTREE.
1
2
Appuyez sur la touche de POINTAGE (BAS) pour
placer un pointeur à flèche rouge sur Ordinateur, puis
appuyez sur le bouton de SELECTION. Le menu de
sélection de source apparaît alors.
Placez le POINTEUR
(flèche rouge) sur
Ordinateur et appuyez sur
le bouton de SELECTION.
MENU D’ENTREE
Icône du menu ENTREE
Choisissez Ordinateur en appuyant sur la touche INPUT
sur le projecteur ou sur la télécommande.
Si le projecteur ne peut pas reproduire correctement
l’image, sélectionnez la source d’entrée correcte par
OPERATION PAR MENU.
Touche INPUT
Ordinateur
Vidéo
Menu sélectionner la
source
Placez un pointeur sur
MCI puis appuyez sur
le bouton de
SELECTION.
SELECTION DE LA SOURCE D’ENTREE
OPERATION DIRECTE
OPERATION PAR MENU
INDEX ET PAGE
Les données d’images éditées par le Media Card
Imager (logiciel) sont en format Index composé de
plusieurs Pages. Pour projeter l’image voulue,
sélectionnez Index puis sélectionnez Pages dans
l’Index.
Lorsqu’une carte mémoire est mise en place dans l’Imager Box connecté au projecteur, le
mode MCI est sélectionné automatiquement. La première page du dernier Index de la carte
mémoire est affichée sur l’écran.
Pour passer au mode MCI manuellement, procédez comme suit.
Quitter
Ferme le menu Sélection de source.
Sélectionnez l’Index
Index
Pages dans l’Index
3
Placez un pointeur sur MCI puis appuyez sur le
bouton de SELECTION.
Page 31

Français
13
LECTURE DE L’IMAGE (UTILISATION DU PROJECTEUR)
Pour projeter l’image voulue, sélectionnez Index puis Pages en procédant comme suit.
SELECTION D’INDEX
Appuyez sur la touche MENU; un menu à l’écran
apparaît alors. Appuyez sur la touche de POINTAGE
(GAUCHE/DROITE) pour placer un pointeur à cadre
rouge sur l’icône du menu AFFICHAGE.
1
2
Appuyez sur la touche de POINTAGE (BAS) pour
placer un pointeur à cadre rouge sur l’icône d’Index,
puis appuyez sur le bouton de SELECTION. Le tableau
des index de la carte mémoire apparaît alors. Appuyez
sur le bouton de CLIC A DROITE de la télécommande
pour faire disparaître l’affichage du tableau. (✽1)
Placez un pointeur à cadre rouge
sur l’icône de l’Index, puis appuyez
sur le bouton de SELECTION.
MENU AFFICHAGE
Icône du menu AFFICHAGE
3
SELECTION DE PAGE
Appuyez sur la touche MENU; un menu à l’écran
apparaît alors. Appuyez sur la touche de POINTAGE
(GAUCHE/DROITE) pour placer un pointeur à cadre
rouge sur l’icône du menu AFFICHAGE.
1
2
Appuyez sur la touche de POINTAGE (BAS) pour
placer un pointeur à cadre rouge sur l’icône de Page,
puis appuyez sur le bouton de SELECTION. Le tableau
de toutes les pages de l’index sélectionné apparaît
alors. Appuyez sur le bouton de CLIC A DROITE de la
télécommande pour faire disparaître l’affichage du
tableau. (✽1)
Appuyez sur les touches de POINTAGE (GAUCHE/DROITE/HAUT/BAS) pour placer un pointeur sur
la Page à projeter, puis appuyez sur le bouton de SELECTION.
Appuyez sur la touche de POINTAGE (HAUT/BAS) pour passer à la page précédente/suivante. (✽2)
Touche de POINTAGE (HAUT) … Retourne à la page précédente.
Touche de POINTAGE (BAS) …… Passe à la page suivante.
Vous pouvez faire apparaître le tableau des Pages en appuyant sur le bouton de SELECTION lorsque
la page apparaît sur l’écran tout entier.
3
Placez un pointeur à cadre rouge
sur l’icône de Page, puis appuyez
sur le bouton de SELECTION.
MENU AFFICHAGE
Icône du menu AFFICHAGE
✽1 Lorsque vous appuyez sur le bouton
de CLIC A DROITE pendant que le
tableau est affiché, chaque
Index/Pages apparaît sous forme
d’icône. Cette opération permet de
diminuer le temps nécessaire pour
afficher toutes les données d’images.
✽2 Lorsque le menu à l’écran apparaît, il
n’est pas possible de faire passer la
Page à la page suivante/précédente.
Appuyez sur les touches de POINTAGE
(GAUCHE/DROITE/HAUT/BAS) pour placer un
pointeur sur l’index à projecter, puis appuyez sur le
bouton de SELECTION. La première page de l’index
sélectionné apparaît alors.
Appuyez sur la touche de POINTAGE (HAUT/BAS)
pour passer à la page précédente/suivante. (✽2)
Touche de POINTAGE (HAUT) … Retourne à la page précédente.
Touche de POINTAGE (BAS) …… Passe à la page suivante.
Page 32

14
LECTURE DE L’IMAGE (UTILISATION DU PROJECTEUR)
FONCTION DE LECTURE AUTOMATIQUE
Appuyez sur la touche MENU; un menu à l’écran
apparaît alors. Appuyez sur la touche de POINTAGE
(GAUCHE/DROITE) pour placer un pointeur à cadre
rouge sur l’icône du menu AFFICHAGE.
1
2
Appuyez sur la touche de POINTAGE (BAS) pour
placer un pointeur à flèche rouge sur l’icône de
Fonctionnement Auto, puis appuyez sur le bouton de
SELECTION. La boîte de dialogue de configuration
de Fonctionnement Auto apparaît alors.
3
Boîte de dialogue du réglage de
Fonctionnement Auto
Appuyez sur la (les) touche(s) de
POINTAGE (GAUCHE/DROITE)
pour régler l’intervalle, puis
appuyez sur le bouton de
SELECTION.
MENU AFFICHAGE
Icône du menu AFFICHAGE
Quitter
Ferme la boîte de dialogue du réglage de Fonctionnement Auto.
On
Pour annuler la fonction de Fonctionnement Auto,
placer un pointeur à flèche rouge sur “Off”, puis
appuyez sur le bouton de SELECTION. Le réglage
de Fonctionnement Auto établi avec le Media Card
Imager (logiciel) est aussi suspendu lorsque le
réglage est mis sur “Off”.
Off
Ne retirez pas la carte mémoire de l’Imager Box pendant que la fonction de
Fonctionnement Auto est utilisée, ou que le témoin de l’Imager Box s’allume ou
clignote. Ceci risquerait d’endommager la carte mémoire ou les données de la carte
mémoire.
Avant de retirer une carte mémoire de l’Imager Box, veillez à mettre la fonction de
Fonctionnement Auto sur “Off”, ou à interrompre le signal d’entrée de l’Imager Box
en changeant la source d’entrée.
ATTENTION
Pour mettre la fonction de Fonctionnement Auto en
circuit, placez un pointeur à flèche rouge sur “On”,
réglez l’ intervalle (secondes) en appuyant sur la
touche de POINTAGE (GAUCHE), puis appuyez sur
le bouton de SELECTION. L’image projetée passe à
l’image suivante automatiquement avec un intervalle.
Cette fonction de Fonctionnement Auto peut être
momentanément suspendue en appuyant sur la
touche de POINTAGE (HAUT), puis peut être
redémarrée en appuyant sur la touche de
POINTAGE (BAS).
✽ Lorsque le réglage de Fonctionnement Auto a été
établi auparavant avec le Media Card Imager
(logiciel), l’intervalle réglé par le Media Card
Imager a priorité sur l’intervalle réglé sur ce menu.
Page 33

Français
15
LECTURE DE L’IMAGE (UTILISATION DU PROJECTEUR)
REGLAGE D’IMAGE
SELECTION DU NIVEAU DE L’IMAGE (OPERATION PAR MENU)
Appuyez sur la touche MENU; le MENU A L’ECRAN
apparaît alors. Appuyez sur la touche de POINTAGE
(GAUCHE/DROITE) pour placer un pointeur à cadre
rouge sur l’icône menu SELECTION D’IMAGE.
1
2
Appuyez sur la touche de POINTAGE (BAS) pour
placer un pointeur à cadre rouge sur le niveau que
vous voulez régler, puis appuyez sur le bouton de
SELECTION.
Placez l’icône à cadre rouge sur
le niveau et appuyez sur le
bouton de SELECTION.
Le niveau sélectionné.
MENU DE SELECTION D’IMAGE
Niveau d’image normal préréglé sur ce projecteur.
Standard
Niveau d’image avec demi-teintes améliorées pour les
graphiques.
Naturel
Réglage de l’image utilisateur préréglée dans le menu
REGLAGE D’IMAGE (page 16).
Image 1 - 4
Icône du menu
SELECTION D’IMAGE
SELECTION DU NIVEAU DE L’IMAGE (OPERATION DIRECTE)
Sélectionnez le niveau de l’image entre Standard,
Naturel, Image 1, Image 2, Image 3 et Image 4 en
appuyant sur la touche IMAGE du projecteur ou de
la télécommande.
Touche IMAGE
Standard
Naturel
Image 1
Image 2
Image 3
Image 4
Niveau d’image normal préréglé sur ce projecteur.
Niveau d’image avec demi-teintes améliorées pour les
graphiques.
Réglage de l’image utilisateur préréglée dans le menu
REGLAGE D’IMAGE (page 16).
Standard
Naturel
Image 1 - 4
Page 34

16
LECTURE DE L’IMAGE (UTILISATION DU PROJECTEUR)
REGLAGE DU NIVEAU D’IMAGE
1
2
Appuyez sur la touche de POINTAGE (BAS) pour
placer un pointeur à cadre rouge sur l’élément que
vous voulez régler, puis appuyez sur le bouton de
SELECTION. Le niveau de chaque élément s’affiche.
Réglez chaque niveau en appuyant sur la (les)
touche(s) de POINTAGE (GAUCHE/DROITE).
Placez un pointeur à cadre rouge
sur l’élément devant être
sélectionné, puis appuyez sur le
bouton de SELECTION.
MENU REGLAGE D’IMAGE
Icône du menu
REGLAGE D’IMAGE
Niveau de l’image
sélectionnée (page 15)
Appuyez sur la touche de
POINTAGE
(GAUCHE/DROITE) pour
régler la valeur.
Menu niveau image
Placez un pointeur à cadre
rouge sur n’importe
laquelle des Images 1 à 4
où vous voulez régler, puis
appuyez sur le bouton de
SELECTION.
Icône Mémoriser
Appuyez sur le bouton de
SELECTION de cette icône pour
stocker le réglage.
Appuyez sur la touche de POINTAGE (GAUCHE) pour
diminuer le contraste et sur la touche de POINTAGE
(DROITE) pour augmenter le contraste (De 0 à 63.)
Contraste
Appuyez sur la touche de POINTAGE (GAUCHE) pour
rendre l’image plus sombre et sur la touche de POINTAGE
(DROITE) pour la rendre plus claire. (De 0 à 63.)
Luminosité
Appuyez sur la touche de POINTAGE (GAUCHE) pour
obtenir un ton plus clair pour chaque couleur, et sur la
touche de POINTAGE (DROITE) pour obtenir un ton plus
foncé. (De 0 à 63.)
Bal. Des gris (Rouge/Vert/Bleu)
Appuyez sur la touche de POINTAGE (GAUCHE) ou sur
la touche de POINTAGE (DROITE) pour obtenir une
meilleure balance du contraste. (De 0 à 15.)
Gamma
Mémoriser
Pour stocker manuellement les images préréglées,
placez un pointeur à cadre rouge sur l’icône
Mémoriser et appuyez sur le bouton de SELECTION.
Le menu niveau image apparaît. Placez un pointeur à
cadre rouge sur Image 1 à 4 à l’endroit où vous voulez
régler, puis appuyez sur le bouton de SELECTION.
3
Reset
Remettez tous les réglages à zéro à la figure précédente.
Quitter
Ferme menu REGLAGE D’IMAGE.
Appuyez sur la touche MENU; le MENU A L’ECRAN
apparaît alors. Appuyez sur les touches de
POINTAGE (GAUCHE/DROITE) pour placer un
pointeur à cadre rouge sur l’icô ne du menu
REGLAGE D’IMAGE.
Page 35

Français
17
LECTURE DE L’IMAGE (UTILISATION DU PROJECTEUR)
REGLAGES DE LA TAILLE D’IMAGE
Appuyez sur la touche MENU; le MENU A L’ECRAN
apparaît alors. Appuyez sur la (les) touche(s) de
POINTAGE (GAUCHE/DROITE) pour placer un
pointeur à cadre rouge sur l’icône du menu ECRAN.
1
2
Appuyez sur la touche de POINTAGE (BAS) et
placez un pointeur à cadre rouge sur la fonction que
vous voulez sélectionner, puis appuyez sur le bouton
de SELECTION.
Ce projecteur possède une fonction de modification de taille de l’écran d’image permettant de
faire apparaître l’image dans la taille désirée.
Placez le cadre rouge sur la fonction
et appuyez sur le bouton de
SELECTION.
MENU D’ECRAN
Fournit une image adaptée à la taille de l’écran.
Normal
Fournit des images qui s’adaptent à la taille originale de
l’écran. Lorsque la taille originale de l’image est plus
grande que la taille de l’écran, ce projecteur entre
automatiquement dans le mode Zoom numérique +.
Vrai
Lorsque le zoom digital + est sélectionné, le MENU A
L’ECRAN disparaît et le message “D.Zoom +” apparaît.
Appuyez sur le bouton de SELECTION pour agrandir la
taille de l’image. Et appuyez sur la (les) touche(s) de
POINTAGE (HAUT/BAS/GAUCHE/DROITE) pour obtenir
une image en panning. La fonction de panning est
utilisable seulement lorsque l’image est plus grande que
la taille de l’écran.
Une image projetée peut aussi être agrandie en appuyant
sur la touche D.ZOOM ▲ de la télécommande.
Zoom digital +
Icône du menu ECRAN
Lorsque le Zoom digital – est sélectionné, le MENU A
L’ECRAN disparaît et le message “D. Zoom –” s’affiche.
Appuyez sur le bouton de SELECTION pour compresser
la taille de l’image.
Une image projetée peut aussi être compressée en
appuyant sur la touche D.ZOOM ▼ de la télécommande.
Zoom digital –
Pour annuler le mode de zoom numérique +/–, appuyez
sur une touche quelconque à l’exception des touches
D.ZOOM ▲/▼, SELECTION, POINTAGE ou LASER.
Page 36

18
Page 37

Kit Media Card Imager
MODELO POA-MD07MCI
INSTALACIÓN Y FUNCIONAMIENTO
DEL IMAGER BOX
Este kit Media Card Imager es un kit
opcional para proyectar datos de imágenes
en diversos formatos y archivos creados
con Microsoft PowerPoint usando su
proyector. Los datos de las imágenes
pueden ser proyectados fácilmente sólo
conectando la Imager Box a un proyector
sin ninguna conexión a su computadora.
Este kit sólo puede ser usado en nuestros
proyectores equipados con un terminal
para el Imager Box.
Este manual explica la instalación del
Imager Box y su funcionamiento.
Los datos reproducidos a través del Imager
Box son editados con el software Media
Card Imager incluido con el kit. Para el uso
del software, consulte el manual del
usuario “Media Card Imager” incluido por
separado.
MANUAL DEL USUARIO
Español
Page 38

2
Conformidad
Aviso de la Comisión Federal de Comunicaciones
Este equipo ha sido probado y se ha encontrado que cumple con los requisitos de un
dispositivo clase B, de acuerdo con la sección 15 de las reglas de la FCC. Estos
límites están diseñados para brindar una protección razonable contra interferencias
perjudiciales cuando el equipo se usa en residencias. Este equipo genera, usa, y
puede irradiar energía de frecuencias de radio y, si no se instala y usa de acuerdo
con las instrucciones, puede causar una interferencia perjudicial a las
comunicaciones de radio. Sin embargo, no es posible garantizar que no habrá
interferencia en un determinado lugar. Si este equipo produce interferencias
perjudiciales a la recepción de radio y televisión, que pueden ser determinadas
apagando y encendiendo el equipo, se recomienda al usuario corregir la
interferencia mediante una o más de las siguientes medidas:
– Reorientar o reubicar la antena receptora.
– Aumentar la separación entre el equipo y el receptor.
– Conectar el equipo a un tomacorriente en un circuito diferente del que se
encuentra conectado el receptor.
– Consultar por ayuda en un lugar de venta o un técnico especializado en
radio/TV.
Marcas registradas
Microsoft, Windows, y PowerPoint son marcas registradas de Microsoft Corp. en
EE.UU.
Microdrive es una marca registrada de IBM en EE.UU.
CompactFlash es una marca registrada de SanDisk Corporation en EE.UU.
Cada uno de los nombres de corporaciones o productos mencionados en el manual
del usuario son marcas registradas de sus respectivas corporaciones.
No realice ningún cambio o modificaciones en el equipo a menos que sea
especificado en este manual. Si debiera de realizar algún cambio o modificación,
deberá primero interrumpir el funcionamiento del equipo.
Page 39

Español
Contenido
Contenido 3
Contenido del kit Media Card Imager 3
Nombre de cada parte del Imager Box 4
Instalando el Imager Box en el proyector 5
Desinstalando el Imager Box del proyector 6
Insertando y retirando una tarjeta CF 6
Usando el adaptador de tarjeta CF 7
Manipulación de una tarjeta CF y adaptador 8
Especificaciones 9
REPRODUCCIÓN DE IMÁGENES
(
USANDO EL PROYECTOR
) 11
REPRODUCIENDO IMÁGENES EN UNA
TARJETA DE MEMORIA
11
AJUSTES DE IMAGEN
15
AJUSTES DE TAMAÑO DE IMAGEN
17
Contenido del kit Media Card Imager
El paquete contiene los siguientes items. Asegúrese que se encuentran todos
ellos.
Imager Box
Tarjeta
CompactFlash (CF)
Adaptador de
tarjeta CF
Manual de instrucciones
Kit Media Card Imager
(este manual)
* CD-ROM * Manual del usuario
MediaCard Imager
*Estos son usados para editar datos de imágenes reproducidos con el Imager Box.
3
Page 40

4
Nombre de cada parte del Imager Box
Imager Box
SEGURO
BOTÓN DE
EXPULSIÓN DE
LA TARJETA CF
GANCHO DE MONTAJE
INTERRUPTOR
CONECTOR
RANURA DE
TARJETA CF
INDICADOR
(se enciende
al acceder a
los datos)
Page 41

Español
Instalando el Imager Box en el proyector
PRECAUCIÓN : Apague el proyector al instalar el Imager Box en el proyector. No lo
instale o desinstale mientras el proyector está encendido. Se podría
dañar el equipo.
Retire las 4 cubiertas colocadas en el proyector. Inserte
los GANCHOS DE MONTAJE (A) en el proyector en la
dirección de la flecha. (Fig. -1)
1
2
Conecte el CONECTOR en el terminal DVI del
proyector mientras presiona el SEGURO del Imager
Box, y suéltelo para trabarlo en su lugar.
C
O
M
P
U
T
E
R
IN
D
IG
IT
A
L
MCI
S – VIDEO
R – AUDIO IN – L
VIDEO
Y – Pb / Cb – Pr / Cr
CONTROL PORT
USB
COMPUTER IN
ANALOG
AUDIO IN
COMPUTER
R – – L
AUDIO OUT
(MONO)
(Fig.-1)
(Fig.-2)
(A)
SEGURO
El INTERRUPTOR
del Imager Box
debe quedar
ubicado en el
interruptor del
proyector.
CONECTOR
Terminal DVI
5
Retire las 4 cubiertas.
Cubierta
Page 42

6
Desinstalando el Imager Box del proyector
Presione el SEGURO en la dirección de
la flecha. Luego tire y desinstale el
Imager Box.
PRECAUCIÓN : Desinstalarlo a la fuerza
podría dañar el Imager Box.
(Fig.-3)
Presione el
SEGURO.
PRECAUCIÓN : No instale el Imager Box del proyector mientras el proyector está
encendido. De lo contario se podrían dañar los datos de la tarjeta
de memoria y en la misma tarjeta.
Insertando y retirando una tarjeta CF
Insertando una tarjeta CF
(Fig.-4)
BOTÓN DE
EXPULSIÓN DE
LA TARJETA CF
INDICADOR
1
2
Inserte la tarjeta CF en la ranura de la
tarjeta CF del Imager Box hasta que el
BOTÓN DE EXPULSIÓN salga hacia
afuera.
• No la inserte de manera equivocada. Se podría
dañar el equipo.
Retirando una tarjeta CF
Presione el BOTÓN DE EXPULSIÓN
DE LA TARJETA CF. La tarjeta CF
será expulsada.
Saque la tarjeta CF del Imager Box.
No retire una tarjeta CF
mientras el indicador esté
encendido. De lo contrario se
podría dañar la tarjeta y los
datos dentro de ella.
PRECAUCIÓN
Inserte la tarjeta CF con la
marca
▲ hacia adelante.
Tire y desinstale el
Imager Box.
Page 43

Español
Usando el adaptador de tarjeta CF
El adaptador de tarjeta CF se usa cuando se haya cargado una tarjeta CF en la
ranura PC de una computadora. Puede escribir y reescribir datos en la tarjeta CF
con el adpatador a través de la ranura de la tarjeta PC del ordenador. Por
información sobre el funcionamiento, consulte la sección “Media Card Imager” en el
manual del usuario.
Insertando la tarjeta CF
Inserte la tarjeta CF firmemente en el
adaptador de tarjeta CF, alineando las
flechas en la tarjeta CF y el adaptador.
Retirando la tarjeta CF
Tire de la tarjeta CF derecho hacia afuera.
Inserte la tarjeta CF alineando las flechas.
NOTA IMPORTANTE
Los datos almacenados en una tarjeta CF se pueden dañar o perder debido a
daños físicos en la tarjeta CF o a borrones accidentales. Se recomienda hacer
copias de respaldo en otro medio separado, como un disco flexible, un disco
duro o un disco MO, etc. de cualquier dato importante. No nos hacemos
responsables por cualquier daños o pérdidas ocasionadas por la pérdida de
datos debido al mal uso o daño en la tarjeta CF o sus aparatos.
Los siguiente puede resultar en daños o pérdida de datos:
• Mal uso de la tarjeta CF.
• Apagar el proyector o la computadora o retirar la tarjeta/adaptador CF
mientras la tarjeta CF está siendo usada (al escribir, leer, o borrar archivos).
• Exposición a cargas eléctricas estáticas fuertes.
• La tarjeta CF ha llegado al final de su vida útil.
7
Tarjeta CF
Adaptador de tarjeta CF
Page 44

8
Manipulación de una tarjeta CF y adaptador
● Las tarjetas/adaptadores CF son dispositivos electrónicos de alta precisión. No
los doble, deje caer, aplique fuerzas o golpee o los exponga a cargas de
electricidad estática fuertes.
● No toque la superficie de contacto con sus dedos ni deje que se ensucie con
materiales extraños.
● No intente desarmar o alterar las tarjetas CF.
● Mover la tarjeta CF rápidamente entre lugares fríos y calientes puede provocar
condensación (gotitas de agua) lo cual podría ocasionar malfuncionamientos.
Evite este problema colocando la tarjeta CF dentro de una bolsa de plástico y
dejando que se ajuste lentamente a los cambios de temperatura antes de retirarla
de la bolsa. Si occuriera condensación, mantenga la tarjeta CF a una temperatura
constante y deje que la humedad se evapore naturalmente.
● Almacene las tarjetas/adaptadores CF en estuches protectores.
● No use o almacene tarjetas/adaptadores CF en lugares sujetos a las siguientes
condiciones:
• campos magnéticos fuertes
• mucho polvo y suciedad
• temperaturas altas y humedad alta
Ambiente de uso de tarjetas CF
Temperatura de funcionamiento : 5 °C - 35 °C
Temperatura de almacenamiento: –10 °C - 60 °C
Page 45

Español
Especificaciones
■ Imager Box
■ Adaptador de tarjeta CompactFlash (Estándar ATA Tipo II)
NOTA: Este adaptador no puede ser usado para otras tarjetas de memoria.
Las especificaciones están sujetas a cambio sin previo aviso.
■ CompactFlash (16MB)
9
Dimensiones
(An. x Al. x Prof.)
Peso
Voltaje de funcionamiento
Tarjeta de memoria
disponible
117mm x 70mm x 19mm
(no incluyendo los GANCHOS DE MONTAJE)
150g
CC de 5V 450mA, CC de 3,3V 600mA
Recomendamos usar la tarjeta CF que viene con este kit.
También se pueden usar las siguientes tarjetas de
memoria.
• Microdrive (1GB o menos)
No podemos garantizar el uso de ninguna tarjeta de
memoria excepto la antes indicada. Algunas tarjetas de
memoria no funcionan correctamente.
Page 46

10
Page 47

Español
11
REPRODUCCIÓN DE IMÁGENES (USANDO EL PROYECTOR)
Conecte correctamente el Imager Box a su proyector (P5), y encienda el proyector.
Consulte el manual del usuario de su proyector para usarlo.
1
2
Inserte una tarjeta de memoria en la ranura de tarjeta CF del Imager Box. (P6)
NOTA: Consulte el manual del usuario de su proyector por la ubicación de cada botón y el
funcionamiento básico.
3
El proyector cambia automáticamente al modo MCI y muestra los datos de imágenes en la
tarjeta de memoria.
REPRODUCIENDO IMÁGENES EN UNA TARJETA DE MEMORIA
BARRA DE MENÚ
Se usa para
seleccionar la fuente
de entrada entre
Computer (MCI) o
Video. (Consulte la
página 12.)
MENÚ DE ENTRADA
Se usa para seleccionar el
nivel de la imagen entre
Standard, Real o Imagen 1 -
4.
(Consulte la página 15.)
MENÚ DE SELECCIÓN DE IMAGEN
Se usa para ajustar el
tamaño de la imagen
a Normal o Real, o
expandir/comprimir la
imagen (zoom digital
+/–). (Consulte la
página 17.)
MENÚ DE PANTALLA
Se usa para cambiar los
ajustes del proyector y
reponer el contador de
cambio de lámpara.
(Consulte el manual del
usuario en su proyector.)
MENÚ DE AJUSTE
Se usa para exhibir
datos de imágenes
en una tarjeta de
memoria.
(Consulte las
páginas 13, 14.)
MENÚ DE VISTA
Se usa para ajustar la imagen.
[Contraste / Brillo / Balance
del blanco (Color rojo/Color
verde/Color azul) / Gamma]
(Consulte la página 16.)
MENÚ DE AJUSTE DE IMAGEN
Se usa para ajustar o
silenciar el volumen.
(Consulte el manual
del usuario en su
proyector.)
MENÚ DE SONIDO
Presione el botón MENU mientras se encuentra en el modo MCI.
Muestra el ítem
seleccionado en
el menú en la
pantalla.
VENTANA GUIA
Page 48

12
REPRODUCCIÓN DE IMÁGENES (USANDO EL PROYECTOR)
Presione el botón MENU y aparecerá el menú
en la pantalla. Presione el(los) botón(es) de
apuntar hacia la izquierda/derecha para mover
el puntero rojo al ícono del menú de entrada.
1
2
Presione el botón de apuntar hacia abajo para
mover el ícono de flecha roja a Computer y
luego presione el botón de selección
(SELECT). Aparecerá el menú de selección de
fuente.
MENÚ DE ENTRADA
Ícono de menú de entrada
Elija el modo de ordenador presionando el botón
INPUT en los controles en la parte de arriba o en el
control remoto. Si el proyector no puede reproducir
la imagen correctamente, seleccione la fuente de
entrada correcta mediante el funcionamiento del
menú.
Botón INPUT
Computer
Video
Menú de selección
de fuente
Mueva el puntero a
MCI y presione el
botón de selección
(SELECT).
SELECCIÓN DE LA FUENTE DE ENTRADA
FUNCIONAMIENTO DIRECTO
FUNCIONAMIENTO DEL MENÚ
ÍNDICE Y PÁGINA
Los datos de imágenes editados con el Media Card
Imager (software) tiene el formato de índice
consistente de varias páginas. Para proyectar la
imagen deseada, seleccione Índice y luego
seleccione Página en el Índice.
Cuando se carga una tarjeta de memoria en el Imager Box conectado al proyector, se
selecciona automáticamente el modo MCI. Se exhibe en la pantalla la primera página del
último índice de una tarjeta de memoria.
Para cambiar manualmente al modo MCI, haga lo siguiente.
Salir
Cierre el menú de selección de fuente.
Seleccione el índice
Índice
Páginas en el
índice
3
Mueva el puntero a MCI y luego presione el
botón de selección (SELECT).
Mueva el puntero
(flecha roja) a Computer
y presione el botón de
selección (SELECT).
Page 49

Español
13
REPRODUCCIÓN DE IMÁGENES (USANDO EL PROYECTOR)
Para proyectar la imagen deseada, seleccione Índice y luego Página de la siguiente manera.
SELECCIÓN DE ÍNDICE
Presione el botón MENU y aparecerá el menú
en la pantalla. Presione el botón de apuntar
hacia izquierda/derecha para mover la flecha
roja al menú de vista.
1
2
Presione el botón de apuntar hacia abajo para mover
la flecha roja al ícono de índice y luego presione el
botón de selección (SELECT). Se exhibirá el cuadro
de índices en la tarjeta de memoria. Presione el
botón de clic derecho del control remoto para detener
la exhibición del cuadro. (✽1)
Mueva la flecha roja al ícono de
índice y presione el botón de
selección (SELECT).
MENÚ DE VISTA
Ícono del menú de vista
3
SELECCIÓN DE PÁGINA
Presione el botón MENU y aparecerá el menú
en la pantalla. Presione el botón de apuntar
hacia izquierda/derecha para mover la flecha
roja al menú de vista.
1
2
Presione el botón de apuntar hacia abajo para
mover la flecha roja al ícono de página y luego
presione el botón de selección (SELECT). Se
exhibirá el cuadro de todas las páginas del
índice seleccionado.
Presione el botón de clic derecho del control
remoto para detener la exhibición del cuadro. (✽1)
Presione los botones de apuntar hacia izquierda/derecha/arriba/abajo para mover el
puntero a la página a ser proyectada y luego presione el botón de selección (SELECT).
Presione el botón de apuntar hacia arriba/abajo para dar vuelta a la página
anterior/siguiente. (✽2)
Botón de apuntar hacia arriba ... vuelve a la página anterior
Botón de apuntar hacia abajo ... va a la página siguiente
Cuando se exhibe la página en toda la pantalla, el cuadro de páginas puede ser exhibido
presionando el botón de selección (SELECT).
3
Mueva la flecha roja al ícono de
página y presione el botón de
selección (SELECT).
MENÚ DE VISTA
Ícono del menú de vista
✽1 Cuando se presiona el botón de clic
derecho mientras que se exhibe el
cuadro, cada índice/página se
exhibe como un ícono. Esta
operación reduce el tiempo de
exhibición de todos los datos de
imágenes.
✽2 Cuando se exhibe el menú en la
pantalla, la página no puede ser
cambiada a una siguiente/anterior.
Presione los botones de apuntar hacia
izquierda/derecha/arriba/abajo para mover el puntero
al Índice a proyectar y luego presione el botón de
selección (SELECT). Se exhibirá la primera página
del índice seleccionado.
Presione el botón de apuntar hacia arriba/abajo para
dar vuelta a la página anterior/siguiente. (✽2)
Botón de apuntar hacia arriba ... vuelve a la página anterior
Botón de apuntar hacia abajo ... va a la página siguiente
Page 50

14
REPRODUCCIÓN DE IMÁGENES (USANDO EL PROYECTOR)
FUNCIÓN DE REPRODUCCIÓN AUTOMÁTICA
Presione el botón MENU y aparecerá el menú
en la pantalla. Presione el botón de apuntar
hacia izquierda/derecha para mover la flecha
roja al menú de vista.
1
2
Presione el botón de apuntar hacia abajo para
mover la flecha roja al ícono de reproducción
automática y luego presione el botón de
selección (SELECT). Se exhibirá el cuadro de
diálogo del ajuste de reproducción automática.
3
Cuadro de diálogo de ajuste de
reproducción automática
Presione el(los) botón(es) de
apuntar hacia izquierda/derecha
para ajustar el intervalo y
presione el botón de selección
(SELECT).
MENÚ DE VISTA
Ícono del menú de vista
Salir
Cierra el cuadro de diálogo de ajuste de reproducción
automática.
Al activar la función de reproducción automática,
mueva la flecha roja a “On”, ajuste el intervalo (seg.)
presionando el botón de apuntar hacia izquierda, y
luego presione el botón de selección (SELECT). La
imagen proyectada cambia automáticamente a la
siguiente con el intervalo especificado.
Esta función de reproducción automática puede ser
pausada presionando el botón de apuntar hacia arriba
y se puede continuar usando con el botón de apuntar
hacia abajo.
✽ Cuando el ajuste de reproducción automática ha
sido ajustado previamente con el Media Card
Imager (software), el intervalo ajustado por el Media
Card Imager tiene prioridad sobre el intervalo con
este menú.
On
Para cancelar la función de reproducción automática,
mueva la flecha roja a “Off” y luego presione el botón
de selección (SELECT). El ajuste de reproducción
automática ajustado con la Media Card Imager
(software) también se suspenderá al ajustar a “Off”.
Off
No retire una tarjeta de memoria del Imager Box mientras la función de reproducción
automática esté funcionando o el indicador de Imager Box esté encendido o
destellando. Se podría dañar la tarjeta de memoria o los datos en la tarjeta de
memoria. Antes de retirar una tarjeta de memoria del Imager Box, asegúrese de
ajustar la función de reproducción automática a “Off” o interrumpir la señal de
entrada del Imager Box cambiando la fuente de entrada.
PRECAUCIÓN
Page 51

Español
15
REPRODUCCIÓN DE IMÁGENES (USANDO EL PROYECTOR)
AJUSTES DE IMAGEN
SELECCIÓN DE NIVEL DE IMAGEN (FUNCIONAMIENTO DEL MENÚ)
Presione el botón MENU y aparecerá el menú
en la pantalla. Presione el(los) botón(es) de
apuntar hacia la izquierda/derecha para mover
el puntero rojo al ícono del menú de selección
de imagen.
1
2
Presione el botón de apuntar hacia abajo para
mover el puntero rojo al nivel que desea ajustar
y luego presione el botón de selección
(SELECT).
Mueva el ícono de marco rojo al
nivel y presione el botón de
selección (SELECT).
El nivel seleccionado.
MENÚ DE SELECCIÓN DE IMAGEN
Nivel de imagen normal preajustado en este proyector.
Standard
Nivel de imagen con mediotonos mejorados para
gráficos.
Real
Ajuste de imagen preajustada del usuario en el menú de
AJUSTE DE IMAGEN (página 16).
Imagen 1 - 4
Ícono de menú de
selección de imagen
SELECCIÓN DE NIVEL DE IMAGEN (FUNCIONAMIENTO DIRECTO)
Seleccione el nivel de imagen entre Standard,
Real, Imagen 1, Imagen 2, Imagen 3 e Imagen 4
presionando el botón IMAGE en los controles en la
parte de arriba o en el control remoto.
Botón IMAGE
Standard
Real
Imagen 1
Imagen 2
Imagen 3
Imagen 4
Nivel de imagen normal preajustado en este proyector.
Nivel de imagen con mediotonos mejorados para
gráficos.
Ajuste de imagen preajustada del usuario en el menú de
AJUSTE DE IMAGEN (página 16).
Standard
Real
Imagen 1 - 4
Page 52

16
REPRODUCCIÓN DE IMÁGENES (USANDO EL PROYECTOR)
AJUSTE DE NIVEL DE IMAGEN
Presione el botón MENU y aparecerá el menú
en la pantalla. Presione el(los) botón(es) de
apuntar hacia izquierda/derecha para mover el
puntero rojo al ícono de menú de ajuste de
imagen.
1
2
Presione el botón de apuntar hacia abajo para
mover el puntero rojo al ítem que desea ajustar
y luego presione el botón de selección
(SELECT). Se exhibe el nivel de cada ítem.
Ajuste cada nivel presionando el(los) botón(es)
de apuntar hacia izquierda/derecha.
Mueva el puntero de marco rojo al
ítem a seleccionar y luego presione
el botón de selección (SELECT).
MENÚ DE AJUSTE DE IMAGEN
Ícono del menú de
ajuste de imagen
Seleccione el nivel de
imagen (página 15)
Presione el(los) botón(es)
de apuntar hacia la
izquierda/derecha para
ajustar el valor.
Menú de nivel de imagen
Mueva el puntero de marco
rojo a una de las imágenes
1 a 4 donde quiera ajustar
y luego presione el botón
de selección (SELECT).
Al ícono de registrado
Presione el botón de selección
(SELECT) de este ícono para
almacenar el ajuste.
Presione el botón de apuntar hacia izquierda para reducir
el contraste, y el botón de apuntar hacia derecha para
aumentar el contraste. (De 0 a 63.)
Contraste
Presione el botón de apuntar hacia izquierda para
oscurecer la imagen, y el botón de apuntar hacia derecha
para dar brillo a la imagen. (De 0 a 63.)
Brillo
Presione el botón de apuntar hacia izquierda para
suavizar el tono de cada color, y el botón de apuntar
hacia derecha para profundizar el tono. (De 0 a 63.)
Balance blanco (Color rojo/Color verde/Color azul)
Presione el botón de apuntar hacia izquierda o el botón
de apuntar hacia derecha para obtener un mejor balance
del contraste. (De 0 a 15.)
Ajuste Gamma
Memorizado
Para registrado las imágenes preajustadas, mueva el
puntero de marco rojo al ícono Memorizado y
presione el botón de selección (SELECT). Aparecerá
el menú de nivel de imagen. Mueva el puntero de
marco rojo a la imagen 1 a 4 donde quiera ajustar y
luego presione el botón de selección (SELECT).
3
Reset
Reponga todos los ajustes a los valores anteriores.
Salir
Cierra el menú de AJUSTE DE IMAGEN.
Page 53

Español
17
REPRODUCCIÓN DE IMÁGENES (USANDO EL PROYECTOR)
AJUSTES DE TAMAÑO DE IMAGEN
Presione el botón MENU y aparecerá el menú
en la pantalla. Presione el(los) botón(es) de
apuntar hacia la izquierda/derecha para mover
el puntero rojo al ícono de menú de pantalla.
1
2
Presione el botón de apuntar hacia abajo y
mueva el puntero de marco rojo a la función
que desea seleccionar y luego presione el
botón de selección (SELECT).
Este proyector tiene una función de ajuste del tamaño de la pantalla que le permite exhibir la
imagen en el tamaño deseado.
Mueva el marco rojo a la función y
presione el botón de selección
(SELECT).
MENÚ DE PANTALLA
Provee de imagen para estar de acuerdo con el tamaño
de la pantalla.
Normal
Ofrece la imagen en su tamaño original. Cuando el
tamaño original de la imagen es mayor que el tamaño de
la pantalla, este proyector cambia automáticamente al
modo de Zoom digital +.
Real
Cuando se selecciona el Zoom digital +, el menú en la
pantalla desaparece y se exhibe el mensaje “D.Zoom +”.
Presione el botón de selección (SELECT) para expandir
el tamaño de la imagen. Y presione el(los) botón(es) de
apuntar hacia arriba/abajo/izquierda/derecha para panear
la imagen. La función de paneo puede funcionar sólo
cuando la imagen es más grande que el tamaño de la
pantalla.
También se puede expandir la imagen proyectada
presionando el botón D.ZOOM ▲ en el control remoto.
Zoom digital +
Ícono de menú
de pantalla
Cuando se selecciona Zoom digital –, el menú en la
pantalla desaparece y aparece el mensaje “D.Zoom –”.
Presione el botón de selección (SELECT) para comprimir
el tamaño de la imagen.
También se puede comprimir la imagen proyectada
presionando el botón D.ZOOM ▼ del control remoto.
Zoom digital –
Para cancelar el modo de zoom digital +/–, presione
cualquiera de los botones excepto D.ZOOM ▲/▼, de
selección (SELECT), de apuntar o LASER.
Page 54

18
Page 55

Media Card Imager Kit
MODELL POA-MD07MCI
INSTALLATION UND BEDIENUNG
DER IMAGER BOX
Dieses Media Card Imager Kit ist eine
Option für die Wiedergabe verschiedener
Bildformate und Dateien mit Ihrem
Projektor, die mit PowerPoint von Microsoft
hergestellt wurden. Die Bilddaten lassen
sich sehr einfach wiedergeben, wenn die
Imager Box an Ihrem Projektor angebracht
wird. Dazu ist ein Anschluss eines
Computers nicht notwendig.
Dieses Kit kann nur für Projektoren
verwendet werden, die mit einer Buchse für
die Imager Box ausgerüstet sind.
In dieser Bedienungsanleitung wird die
Installation und die Bedienung der Imager
Box erklärt.
Die über die Imager Box wiedergegebenen
Daten können mit der Software Media Card
Imager, die mit diesem Kit mitgeliefert wird,
bearbeitet werden. Für die Bedienung der
Software wird auf die separate
Bedienungsanleitung “Media Card Imager”
verwiesen.
BEDIENUNGSANLEITUNG
Deutsch
Page 56

2
Einhaltungen
Bestimmung der Bundeskommission zur Kommunikation
Dieses Gerät wurde getestet und erfüllt die Grenzwertbestimmungen für Digitalgeräte
der Klasse B, entsprechend den FCC-Bestimmungen Teil 15. Mit diesen
Grenzwerten wird beim Betrieb des Gerätes in einem Wohngebiet ein angemessener
Schutz gegen schädliche Interferenzen garantiert. Das Gerät erzeugt, verwendet und
strahlt Radiofrequenzen ab und falls es nicht entprechend den Anweisungen
installiert ist, können schädliche Radiokommunikationsstörungen auftreten. Es
besteht keinerlei Garantie, daß bei einer bestimmten Installation keine Störungen
auftreten. Falls Radio- oder Fernsehempfangsstörungsen verursacht werden, was
durch Aus- und Wiedereinschalten des Gerätes überprüft werden kann, sollten Sie
versuchen die Störungen auf eine der folgenden Arten zu korrigieren:
– Ändern Sie die Ausrichtung oder den Standort der Empfangsantenne.
– Vergrößern Sie den Abstand zwischen dem Gerät und dem Empfänger.
– Schließen Sie das Gerät, an einer Steckdose an, die sich nicht im gleichen
Schaltkreis befindet, wie die Steckdose, an welcher der Empfänger
angeschlossen ist.
– Lassen Sie sich von einem Händler oder einem erfahrenen
Radio/Fernsehfachmann beraten.
Warenzeichen
Microsoft, Windows und PowerPoint sind eingetragene Warenzeichen von Microsoft
Corp. in den USA.
Microdrive ist ein Warenzeichen von IBM in den USA.
CompactFlash ist ein Warenzeichen von SanDisk Corporation in den USA.
Die Firmen- und Produktebezeichnungen in der Anleitung sind Warenzeichen, bzw.
eingetragene Warenzeichen der betreffenden Firma.
Nehmen Sie am Gerät keine, in dieser Anleitung nicht beschriebene Änderungen
oder Modifikationen vor. Falls solche Änderungen oder Modifikationen vorgenommen
werden, kann die weitere Verwendung des Gerätes untersagt werden.
Page 57

Deutsch
Inhaltsverzeichnis
Inhaltsverzeichnis 3
Lieferumfang des Media Card Imager Kit 3
Bezeichnung der einzelnen Teile 4
Anbringen der Imager Box am Projektor 5
Abnehmen der Imager Box vom Projektor 6
Einsetzen und Auswerfen der CompactFlash-Karte 6
Verwendung des Kartenadapters 7
Handhabung der Karte und des Adapters 8
Technische Daten 9
BILDWIEDERGABE
(PROJEKTORBEDIENUNG) 11
WIEDERGABE VON AUF DER SPEICHERKARTE
GESPEICHERTEN BILDERN
11
BILDEINSTELLUNGEN
15
BILDGRÖSSENEINSTELLUNGEN
17
Lieferumfang des Media Card Imager Kit
Kontrollieren Sie, ob der gesamte Lieferumfang vorhanden ist.
Imager Box
CompactFlashKarte
Kartenadapter
Bedienungsanleitung für
Media Card Imager Kit
(diese Anleitung)
* CD-ROM
* Bedienungsanleitung
für Media Card
Imager
* Verwendung zum Bearbeiten von Bilddaten, die mit der Imager Box wiedergegeben werden.
3
Page 58

4
Bezeichnung der einzelnen Teile
Imager Box
Verriegelung
Kartenauswurftaste
Haken
Schalterknopf
Anschlußstecker
Kartensteckplatz
Anzeige
(leuchtet beim Zugriff)
Page 59

Deutsch
Anbringen der Imager Box am Projektor
VORSICHT: Schalten Sie den Projektor zum Anbringen der Imager Box aus.
Bei eingeschaltetem Projektor darf die Imager Box nicht angebracht
oder entfernt werden, weil sie beschädigt werden kann.
Entfernen Sie die vier Abdeckungen am Projektor. Stecken
Sie die Haken (A) in Pfeilrichtung in den Projektor. (Abb. -1)
1
2
Schließen Sie den Anschlußstecker an der DVI-Buchse
des Projektors an, drücken Sie dazu die Verriegelung und
lassen Sie sie los, um die Imager Box zu verriegeln.
C
O
M
P
U
T
E
R
IN
D
IG
IT
A
L
MCI
S – VIDEO
R – AUDIO IN – L
VIDEO
Y – Pb / Cb – Pr / Cr
CONTROL PORT
USB
COMPUTER IN
ANALOG
AUDIO IN
COMPUTER
R – – L
AUDIO OUT
(MONO)
(Abb. -1)
(Abb. -2)
(A)
Verriegelung
Der Schalterknopf
der Imager Box
wird auf den
Schalter des
Projektors
ausgerichtet.
Anschlußstecker
DVI-Buchse
5
4 Abdeckungen entfernen
Abdeckung
Page 60

6
Abnehmen der Imager Box vom Projektor
Drücken Sie die Verriegelung in
Pfeilrichtung. Ziehen Sie die Imager Box
ab.
VORSICHT: Beim Entfernen mit großem
Kraftaufwand kann die Imager
Box beschädigt werden.
(Abb. -3)
Die Verriegelung
drücken.
VORSICHT: Bei eingeschaltetem Projektor darf die Imager Box nicht entfernt
werden, weil sonst die auf der Karte gespeicherten Daten und die Karte
selbst beschädigt werden können.
Einsetzen und Auswerfen der CompactFlash-Karte
Einsetzen der CompactFlash-Karte
(Abb. -4)
Kartenauswurftaste
Anzeige
1
2
Stecken Sie die CompactFlash-Karte in
den Kartensteckplatz bis die Auswurftaste
vorsteht.
• Stecken Sie die Karte nicht verkehrt hinein, weil
sonst die Imager Box beschädigt werden kann.
Auswerfen der CompactFlash-Karte
Drücken Sie die Kartenauswurftaste,
um die Karte auszuwerfen.
Ziehen Sie die Karte aus der Imager
Box heraus.
Bei leuchtender Anzeige darf die
Karte nicht ausgeworfen werden,
weil sonst die Karte und die
darauf gespeicherten Daten
beschädigt werden können.
VORSICHT
Stecken Sie die Karte mit
der Pfeilmarkierung
▲ nach
vorne gerichtet hinein.
Ziehen Sie danach
die Imager Box ab.
Page 61

Deutsch
Verwendung des Kartenadapters
Der Kartenadapter wird verwendet, wenn die CompactFlash-Karte in einen PCKartensteckplatz eines Computers eingeschoben werden soll.
Auf der im Adapter eingesetzten und in den Computer eingeschobenen
CompactFlash-Karte können Daten aufgezeichnet werden. Für die Bedienung wird
auf die Bedienungsanleitung “Media Card Imager” verwiesen.
Einsetzen der CompactFlash-Karte
Setzen Sie die Karte fest in den
Kartenadapter ein, indem Sie die
Pfeilmarkierungen auf der Karte und auf
dem Adapter aufeinander ausrichten.
Entfernen der CompactFlash-Karte
Ziehen Sie die Karte gerade heraus.
Die Karte mit ausgerichteten
Pfeilmarkierungen einsetzen.
WICHTIGER HINWEIS
Die auf der CompactFlash-Karte abgespeicherten Daten können durch
physikalische Beschädigung oder durch unbeabsichtigtes Löschen der
CompactFlash-Karte zerstört werden. Es wird deshalb empfohlen von allen
wichtigen Daten eine Schutzkopie auf einem anderen Datenträger, wie einer
Floppydiskette, einer Festplatte, einer MO-Diskette usw. herzustellen. Für
irgendwelche Schäden oder Verdienstausfälle, die durch eine Zerstörung von
Daten wegen Fehlbedienung oder Beschädigung einer CompactFlash-Karte
oder ihrer Geräte verursacht wurden, wird keine Haftung übernommen.
In den folgenden Fällen besteht die Gefahr von Beschädigung oder Zerstörung
von Daten:
• Fehlbedienung der CompactFlash-Karte.
• Ausschalten des Projektors oder des Computers oder Entfernen der Karte
bzw. den Adapter während des Zugriffs auf die Karte (Aufzeichnen, Lesen
oder Löschen von Daten).
• Aussetzen starker statischer Elektrizität.
• Die CompactFlash-Karte hat das Ende der Lebensdauer erreicht.
7
CompactFlashKarte
Kartenadapter
Page 62

8
Handhabung der Karte und des Adapters
● CompactFlash-Karten und Adapter sind Präzisionsteile. Sie dürfen nicht gebogen,
fallen gelassen, mit übermäßigen Kräften behandelt, starken Stößen oder
elektrischen Feldern ausgesetzt werden.
● Die Kontaktstelle darf nicht mit den Fingern berührt oder verschmutzt werden.
● CompactFlash-Karten dürfen nicht zerlegt werden.
● Wenn eine CompactFlash-Karte plötzlich tiefen Temperaturen ausgesetzt wird,
kann sich auf der Karte Kondensat abscheiden, was zu Störungen führen kann.
Legen Sie in diesem Fall die CompactFlash-Karte in einen Plastikbeutel bis sich
der Temperaturunterschied ausgeglichen hat. Falls sich Kondensat auf der Karte
abgeschieden hat, bewahren Sie die Karte bei konstanter Temperatur auf, bis das
abgeschiedene Kondensat auf natürliche Weise verdampft ist.
● Bewahren Sie die CompactFlash-Karten bzw. den Adapter in der Schutzbox auf.
● CompactFlash-Karten und Adapter dürfen nicht unter den folgenden Bedingungen
verwendet oder aufbewahrt werden:
• Orte an denen stake Magnetfelder vorhanden sind
• an stark verschmutztem oder staubigen Orten
• und an Orten an denen hohe Temperaturen oder eine hohe Luftfeuchtigkeit
auftritt.
Umgebungsbedingungen für die CompactFlash-Karte
Betriebstemperatur : 5°C - 35°C
Aufbewahrungstemperatur : –10°C - 60°C
Page 63

Deutsch
Technische Daten
■ Imager Box
■ CompactFlash-Kartenadapter (ATA Standard Typ-II)
HINWEIS: Dieser Adapter kann nicht für andere Speicherkarten verwendet
werden.
Änderungen der technischen Daten vorbehalten.
■ CompactFlash (16 MB)
9
Abmessungen
(B x T x H)
Gewicht
Betriebsspannung
Erhältliche
Speicherkarten
117mm x 70mm x 19mm (ohne Haken)
150 g
Gleichspannung 5 V, 450 mA Gleichspannung 3,3 V, 600 mA
Es wird empfohlen die in diesem Kit gelieferte
CompactFlash-Karte zu verwenden. Die folgenden
Speicherkarten lassen sich ebenfalls verwenden.
• Microdrive (1 GB oder weniger)
Außer den obenstehenden wird die Verwendung von
anderen Speicherkarten nicht garantiert. Gewisse
Speicherkarten lassen sich nicht richtig verwenden.
Page 64

10
Page 65

Deutsch
11
BILDWIEDERGABE (PROJEKTORBEDIENUNG)
Bringen Sie die Imager Box am Projektor an (Seite 5) und schalten Sie den Projektor ein.
Für die Bedienung wird auf die Bedienungsanleitung des Projektors verwiesen.
1
2
Stecken Sie eine CompactFlash-Speicherkarte in den Steckplatz der Imager Box (Seite 6).
HINWEIS: Für die Anordnung der Tasten und die Grundbedienung wird auf die
Bedienungsanleitung Ihres Projektors verwiesen.
3
Der Projektor wird automatisch in die MCI-Betriebsart umgeschaltet und die auf der
Speicherkarten gespeicherten Bilddaten werden wiedergegeben.
WIEDERGABE VON AUF DER SPEICHERKARTE GESPEICHERTEN BILDERN
Menüleiste
Zum Einstellen der
Eingangsquelle
Computer (MCI)
oder Video.
(Siehe Seite 12.)
Eingangsmenü
Zum Einstellen des
Bildpegels Standard,
Natürlich oder Bild 1 -
4. (Siehe Seite 15.)
Bildwahlmenü
Für die Einstellung
der Größe auf
Normal oder Original,
bzw. zum Erweitern
und Komprimieren
des Bildes
(Digitalzoom +/–).
(Siehe Seite 17.)
Bildschirmmenü
Zum Ändern von
Projektoreinstellungen
und um den
Lampenbetriebszeitzähler
zurückzustellen.
(Siehe
Bedienungsanleitung des
Projektors.)
Einstellungsmenü
Für die Anzeige von
Bilddaten in der
Speicherkarte.
(Siehe Seiten 13,
14.)
Ansichtmenü
Zum Einstellen des Bildes.
[Kontrast/Helligkeit/
Weißabgleich (Rot/Grün/Blau)/
Gamma].
(Siehe Seite 16.)
Bildeinstellmenü
Zum Einstellen des
Lautstärkepegels oder
zum Abschalten der
Tonwiedergabe.
(Siehe
Bedienungsanleitung
des Projektors.)
Tonmenü
Drücken Sie bei eingeschalteter MCI-Betriebsart die MENU-Taste.
Zeigt den im
Bildschirmmenü
gewählten
Gegenstand.
Anzeigefenster
Page 66

12
BILDWIEDERGABE (PROJEKTORBEDIENUNG)
Drücken Sie die MENU-Taste für die Anzeige
des Bildschirmmenüs. Drücken Sie die
Zeigertaste links/rechts, um den roten Rahmen
auf das Eingangsmenüsymbol einzustellen.
1
2
Stellen Sie den roten Zeiger mit der Zeigertaste
ab auf den Computer und drücken Sie die
Einstelltaste. Das Eingangsquellenmenü
erscheint.
Stellen Sie den Zeiger
(roter Pfeil) auf Computer
und drücken Sie die
Einstelltaste.
Eingangsmenü
Eingangsmenüsymbol
INPUT-Taste
Computer
Video
Eingangsquellenmenü
Den Zeiger auf “MCI”
stellen und die
Einstelltaste drücken.
Einstellen der Eingangsquelle
Direkte Einstellung
Einstellung mit Hilfe des Menüs
Index und Seite
Die mit dem Programm Media Card Imager
bearbeiteten Bilddaten sind in Indexe aufgeteilt, die
wiederum aus mehreren Seiten bestehen können.
Wählen Sie für die Wiedergabe eines gewünschten
Bildes den Index und stellen Sie die betreffende
Seite ein.
Beim Einschieben einer Speicherkarte in die am Projektor angebrachte Imager Box wird
automatisch in die MCI-Betriebsart umgeschaltet. Die erste Seite des letzten Indexes der
Speicherkarte wird auf dem Bildschirm angezeigt.
Die Umschaltung in die MCI-Betriebsart kann auch wie folgt manuell vorgenommen werden.
Verlassen
Schließt das Quelleneinstellmenü.
Indexwahl
Index
Seiten im Index
3
Stellen Sie den Zeiger auf “MCI” und drücken
Sie die Einstelltaste.
Stellen Sie den Computer durch Drücken der INPUTTaste auf der Projektoroberseite oder der
Fernbedienung ein. Falls der Projektor das Bild nicht
richtig wiedergeben kann, muß die richtige
Signalquelle mit Hilfe des Menüs eingestellt werden.
Page 67

Deutsch
13
BILDWIEDERGABE (PROJEKTORBEDIENUNG)
Wählen Sie für die Wiedergabe eines gewünschten Bildes den Index und stellen Sie die Seite
wie folgt ein.
Indexwahl
Drücken Sie die MENU-Taste für die Anzeige
des Bildschirmmenüs. Stellen Sie mit den
Zeigertasten links/rechts den roten Rahmen auf
das Ansichtsmenüsymbol ein.
1
2
Stellen Sie den roten Rahmen mit der Zeigertaste ab
auf das Indexsymbol und drücken Sie die Einstelltaste.
Eine Tabelle mit den auf der Speicherkarte
vorhandenen Indexen wird angezeigt. Drücken Sie die
rechte Klicktaste der Fernbedienung, um die Anzeige
der Tabelle zu unterbrechen. (✽1)
Stellen Sie den roten Rahmen auf
das Indexsymbol und drücken Sie
die Einstelltaste.
Ansichtmenü
Ansichtmenüsymbol
3
Seitenwahl
Drücken Sie die MENU-Taste für die Anzeige
des Bildschirmmenüs. Stellen Sie mit den
Zeigertasten links/rechts den roten Rahmen auf
das Ansichtsmenüsymbol ein.
1
2
Stellen Sie den roten Rahmen mit der Zeigertaste
ab auf das Seitensymbol und drücken Sie die
Einstelltaste. Die Tabelle aller Seiten des gewählten
Indexes wird wiedergegeben. Drücken Sie die
rechte Klicktaste der Fernbedienung, um die
Anzeige der Tabelle zu unterbrechen. (✽1)
Drücken Sie die Zeigertaste links/rechts/auf/ab, um
den Zeiger auf den wiederzugebende Seite zu stellen
und drücken Sie die Einstelltaste. Durch Drücken der
Zeigertaste auf/ab können Sie auf die vorhergehende
bzw. die nächste Seite umblättern. (✽2)
Zeigertaste auf ...
Wiedergabe der vorhergehenden Seite
Zeigertaste ab ... Wiedergabe der nächsten Seite
Das Seitenverzeichnis kann während der
Wiedergabe der Seite durch Drücken der
Einstelltaste angezeigt werden.
3
Stellen Sie den roten Rahmen auf
das Seitensymbol und drücken Sie
die Einstelltaste.
Ansichtmenü
Ansichtmenüsymbol
✽1 Wenn Sie während der Tabellenanzeige
die rechte Klicktaste drücken, werden
die einzelnen Indexe/Seiten als Symbol
dargestellt. Damit läßt sich die Zeit für
die Anzeige der gesamten Bilddaten
verkürzen.
✽2 Bei der Anzeige des Bildschirmmenüs
kann nicht auf die vorhergehende bzw.
die nächste Seite umgeblättert werden.
Drücken Sie die Zeigertaste links/rechts/auf/ab,
um den Zeiger auf den wiederzugebenden Index
zu stellen und drücken Sie die Einstelltaste. Die
erste Seite des gewählten Index wird
wiedergegeben. Durch Drücken der Zeigertaste
auf/ab können Sie auf die vorhergehende bzw.
die nächste Seite umblättern. (✽2)
Zeigertaste auf ...
Wiedergabe der vorhergehenden Seite
Zeigertaste ab ... Wiedergabe der nächsten Seite
Page 68

14
BILDWIEDERGABE (PROJEKTORBEDIENUNG)
Auto-Wiedergabefunktion
Drücken Sie die MENU-Taste für die Anzeige
des Bildschirmmenüs. Stellen Sie mit den
Zeigertasten links/rechts den roten Rahmen auf
das Ansichtsmenüsymbol ein.
1
2
Stellen Sie den roten Rahmen mit der
Zeigertaste ab auf das Auto-Wiedergabesymbol
und drücken Sie die Einstelltaste. Die Dialogbox
für die Auto-Wiedergabe wird angezeigt.
3
Dialogbox Auto-Wiedergabe
Drücken Sie die Zeigertaste(n)
links/rechts, um das Intervall
einzustellen und drücken Sie die
Einstelltaste.
Ansichtmenü
Ansichtmenüsymbol
Verlassen
Die Dialogbox Auto-Wiedergabe wird geschlossen.
Stellen Sie zum Einschalten der AutoWiedergabefunktion den roten Zeiger auf “Ein”,
stellen Sie das Intervall (Sek.) mit der Zeigertaste
links/rechts ein und drücken Sie die Einstelltaste. Das
nächste Bild wird automatisch nach Ablauf des
eingestellten Intervalls wiedergegeben.
Die Auto-Wiedergabe kann mit der Zeigertaste auf
unterbrochen und mit der Zeigertaste ab wieder
fortgesetzt werden.
✽ Falls die Auto-Wiedergabe bereits im Programm
Media Card Imager eingestellt wurde, so hat das
mit Media Card Imager eingestellte Intervall den
Vorrang über die Einstellung dieses Menüs.
Ein
Um die Auto-Wiedergabefunktion auszuschalten,
stellen Sie den Zeiger auf “Aus” und drücken Sie die
Einstelltaste. Mit der Einstellung auf “Aus” wird die
Auto-Wiedergabe des Programms Media Card
Imager ebenfalls ausgeschaltet.
Aus
Die Speicherkarte darf bei eingeschalteter Auto-Wiedergabe oder wenn die Anzeige
der Imager Box leuchtet oder blinkt nicht aus der Imager Box entfernt werden.
Dadurch können die Daten auf der Speicherkarte oder die Speicherkarte beschädigt
werden. Vor dem Entfernen der Speicherkarte aus der Imager Box müssen Sie
kontrollieren, ob die Auto-Wiedergabefunktion auf “Aus” gestellt ist oder Sie müssen
das an der Imager Box anliegende Eingangssignal durch Umschalten der
Signalquelle unterbrechen.
VORSICHT
Page 69

Deutsch
15
BILDWIEDERGABE (PROJEKTORBEDIENUNG)
BILDEINSTELLUNGEN
Bildpegel (Einstellung mit Hilfe des Menüs)
Drücken Sie die MENU-Taste, um das
Bildschirmmenü anzuzeigen. Stellen Sie mit
den Zeigertasten links/rechts den roten
Rahmen auf das Bildwahlmenüsymbol.
1
2
Stellen Sie den roten Rahmen mit der
Zeigertaste ab auf den einzustellenden Pegel
und drücken Sie die Einstelltaste.
Stellen Sie den roten Rahmen
auf den Pegel und drücken Sie
die Einstelltaste.
Einzustellender Pegel
Bildwahlmenü
Normale Bildeinstellung.
Standard
Bildeinstellung mit verbesserter Halbtonwiedergabe für
Abbildungen.
Natürlich
Anwenderspezifische Bildeinstellung im Bildeinstellmenü
(Seite 16).
Bild 1 - 4
Bildwahlmenüsymbol
Bildpegel (Direkte Einstellung)
Wählen Sie einen Bildpegel, “Standard”,
“Natürlich”, “Bild 1”, “Bild 2”, “Bild 3” und “Bild 4”,
durch Drücken der IMAGE-Taste auf der
Projektoroberseite oder der Fernbedienung.
IMAGE-Taste
Standard
Natürlich
Bild 1
Bild 2
Bild 3
Bild 4
Normale Bildeinstellung.
Bildeinstellung mit verbesserter Halbtonwiedergabe für
Abbildungen.
Anwenderspezifische Bildeinstellung im Bildeinstellmenü
(Seite 16).
Standard
Natürlich
Bild 1 - 4
Page 70

16
BILDWIEDERGABE (PROJEKTORBEDIENUNG)
Bildpegeleinstellung
Drücken Sie die MENU-Taste, um das
Bildschirmmenü anzuzeigen. Stellen Sie mit den
Zeigertasten links/rechts den roten Rahmen auf
das Bildeinstellmenüsymbol.
1
2
Stellen Sie den roten Rahmen mit der
Zeigertaste ab auf den einzustellenden
Gegenstand und drücken Sie die Einstelltaste.
Die einzelnen Einstellpegel werden angezeigt.
Stellen Sie die einzelnen Pegel mit den
Zeigertasten links/rechts ein.
Stellen Sie den roten Rahmen auf
den gewünschten Gegenstand und
drücken Sie die Einstelltaste.
Bildeinstellmenü
Bildeinstellmenüsymbol
eingestellter Bildpegel (Seite 15)
Nehmen Sie die Einstellung
mit den Zeigertasten
links/rechts vor.
Bildpegelmenü
Stellen Sie den roten
Zeiger auf ein
einzustellendes Bild 1 bis 4
und drücken Sie die
Einstelltaste.
Symbol Speichern
Die Einstelltaste bei diesem
Symbol zum Abspeichern der
Einstellungen drücken.
Drücken Sie die Zeigertaste links zum Vermindern und die
Zeigertaste rechts zum Erhöhen des Kontrasts.
(Einstellbereich 0 bis 63)
Kontrast
Drücken Sie die Zeigertaste links zum Vermindern und die
Zeigertaste rechts zum Erhöhen der Helligkeit.
(Einstellbereich 0 bis 63)
Helligkeit
Mit der Zeigertaste links können Sie den Farbton der
einzelnen Farben abschwächen, mit der Zeigertaste rechts
können Sie den Farbton verstärken. (Einstellbereich 0 bis
63)
Weiß-Abgleich (Rot/Grün/Blau)
Stellen Sie die Balance des Kontraste mit den
Zeigertasten links und rechts ein. (Einstellbereich 0 bis 15)
Gamma
Speichern
Stellen Sie den roten Rahmen zum manuellen
Voreinstellen des Bilds auf das Symbol “Speichern”
und drücken Sie die Einstelltaste. Das Bildpegelmenü
erscheint. Stellen Sie den roten Zeiger auf das
abzuspeichernde Bild 1 bis 4 und drücken Sie die
Einstelltaste.
3
Reset
Zurückstellen aller Einstellungen auf die vorherigen
Werte.
Verlassen
Schließen des Bildeinstellmenüs.
Page 71

Deutsch
17
BILDWIEDERGABE (PROJEKTORBEDIENUNG)
BILDGRÖSSENEINSTELLUNGEN
Drücken Sie die MENU-Taste, um das
Bildschirmmenü anzuzeigen. Stellen Sie mit
den Zeigertasten links/rechts den roten
Rahmen auf das Bildschirmmenüsymbol.
1
2
Stellen Sie den roten Rahmen mit der
Zeigertaste ab auf die einzustellende Funktion
und drücken Sie die Einstelltaste.
Dieser Projektor ist mit einer Bildformatfunktion ausgerüstet, mit welcher ein gewünschtes
Bildformat eingestellt werden kann.
Stellen Sie den roten Rahmen auf
die Funktion und drücken Sie die
Einstelltaste.
Bildschirmmenü
Das Bild wird auf die Bildschirmgröße angepaßt.
Normal
Bild in der Originalgröße. Falls das Bild größer als der
Bildschirm ist, wird der Projektor automatisch in die
Digitalzoombetriebsart + umgeschaltet.
Original
Bei der Einstellung von “Digitales Zoom +” verschwindet
das Bildschirmmenü und auf dem Bildschirm wird
“D. Zoom +” eingeblendet. Drücken Sie die Einstelltaste
zum Erweitern der Bildgröße. Zum Schwenken können
Sie die Zeigertaste(n) auf/ab/links/rechts verwenden. Das
Schwenken ist nur möglich, wenn das Bild größer als der
Bildschirm ist.
Ein projiziertes Bild kann auch mit der D.ZOOM-Taste ▲
der Fernbedienung erweitert werden.
Digitales zoom +
Bildschirmmenüsymbol
Bei der Einstellung von “Digitales Zoom –” verschwindet
das Bildschirmmenü und auf dem Bildschirm wird
“D. Zoom –” eingeblendet. Drücken Sie die Einstelltaste
zum Komprimieren der Bildgröße.
Ein projiziertes Bild kann auch mit der D.ZOOM-Taste ▼
der Fernbedienung erweitert werden.
Digitales zoom –
Zum Ausschalten des Digitalzooms +/– können Sie
irgendeine Taste, außer der D.ZOOM-Taste ▲/▼, der
Einstelltaste, der Zeigertaste oder der LASER-Taste
drücken.
Page 72

18
Page 73

Kit Media Card Imager
MODELLO POA-MD07MCI
INSTALLAZIONE E FUNZIONAMENTO
DI IMAGER BOX
Questo kit Media Card Imager è un kit
opzionale che serve per proiettare con il
nostro proiettore dati di immagini in vari
formati e file creati con Microsoft
PowerPoint. I dati delle immagini possono
essere facilmente proiettati semplicemente
montando Imager Box su un proiettore,
senza nessun collegamento con un
computer.
Questo kit può essere utilizzato solo con i
nostri proiettori dotati di un terminale per
Imager Box.
Questo manuale illustra l’installazione di
Imager Box e il suo funzionamento.
I dati riprodotti tramite Imager Box vengono
modificati con il software Media Card
Imager, incluso nel kit. Per il
funzionamento del software, consultare il
manuale del proprietario “Media Card
Imager”, incluso a parte.
MANUALE DEL PROPRIETARIO
Italiano
Page 74

2
Precauzioni
Avviso della Federal Communication Commission
Questo apparecchio è stato testato e dichiarato conforme ai limiti di un dispositivo
digitale di classe B, ai sensi della Parte 15 della normativa FCC. Questi limiti hanno
lo scopo di fornire una ragionevole protezione contro interferenze dannose, nel caso
in cui l’apparecchio venga usato in un ambiente residenziale. Questo apparecchio
genera, usa e può irradiare energia di frequenze radio e, se non installato in
conformità con le istruzioni, può causare interferenze dannose alle comunicazioni
radio. Comunque, non è possibile garantire che in una particolare installazione non si
verifichino interferenze. Se questo apparecchio causa interferenze dannose alla
ricezione di programmi radio o televisivi, cosa che può essere determinata
accendendo e spegnendo l’apparecchio, l’utente è incoraggiato a tentare di rimediare
al problema delle interferenze con una o più delle contromisure seguenti.
– Riorientare l’antenna o installarla in un altro posto.
– Aumentare la distanza tra apparecchio e ricevitore.
– Collegare l’apparecchio a una presa della rete elettrica diversa da quella a cui
è collegato il ricevitore.
– Rivolgersi al rivenditore o a un tecnico radio/TV esperto per i consigli del caso.
Marchi di fabbrica
Microsoft, Windows e PowerPoint sono marchi registrati di Microsoft Corp. negli Stati
Uniti.
Microdrive è un marchio di fabbrica di IBM negli Stati Uniti.
CompactFlash è un marchio di fabbrica di SanDisk Corporation negli Stati Uniti.
Ogni nome di azienda o di prodotto riportato nel manuale del proprietario è un
marchio di fabbrica o un marchio registrato della rispettiva società.
Non eseguire nessun cambiamento e nessuna modifica all’apparecchio a meno che
sia altrimenti specificato nel manuale. Se si eseguono tali cambiamento o tali
modifiche, potrebbe essere necessario interrompere l’uso dell’apparecchio.
Page 75

Italiano
Sommario
Sommario 3
Contenuto del kit Media Card Imager 3
Nome delle varie parti di Imager Box 4
Collegare Imager Box al proiettore 5
Rimozione di Imager Box dal proiettore 6
Caricamento e rimozione della scheda CF 6
Uso dell’adattatore per schede CF 7
Uso della scheda e dell’adattatore CF 8
Dati tecnici 9
RIPRODUZIONE DELLE IMMAGINI
(AZIONAMENTO DEL PROIETTORE) 11
RIPRODUZIONE DELLE IMMAGINI
CONTENUTE NELLA SCHEDA DI MEMORIA
11
REGOLAZIONE DELL’IMMAGINE
15
REGOLAZIONI DELLA FOTOGRAFIA DELL’IMMAGINE
17
Contenuto del kit Media Card Imager
La confezione contiene gli elementi seguenti. Accertarsi che siano tutti inclusi.
Imager Box
Scheda
CompactFlash (CF)
Adattatore per
schede CF
Manuale del proprietario
del kit Media Card Imager
(questo manuale)
* CD-ROM
* Manuale del
proprietario di Media
Card Imager
* Vengono utilizzati per la modifica dei dati delle immagini riprodotte con Imager Box.
3
Page 76

SPINA DEL
CONNETTORE
4
Nome delle varie parti di Imager Box
Imager Box
TASTO DI
BLOCCO
TASTO DI
ESPULSIONE
DELLA SCHEDA CF
GANCIO DI MONTAGGIO
TASTO DEL
COMMUTATORE
SLOT PER
SCHEDE CF
INDICATORE
(si accende
durante l’accesso)
Page 77

Italiano
Collegare Imager Box al proiettore
ATTENZIONE: Prima di collegare Imager Box al proiettore, spegnere il proiettore.
Non collegare o scollegare Imager Box mentre il proiettore è acceso.
Altrimenti si potrebbe danneggiare l’apparecchio.
Rimuovere i 4 coperchi fissati al proiettore. Inserire i ganci
di montaggio (A) nel proiettore verso la direzione della
freccia. (Fig.-1)
1
2
Inserire la spina del connettore nel terminale DVI del
proiettore mentre si preme il tasto di blocco di Imager Box
e rilasciarlo per bloccarlo.
C
O
M
P
U
T
E
R
IN
D
IG
IT
A
L
MCI
S – VIDEO
R – AUDIO IN – L
VIDEO
Y – Pb / Cb – Pr / Cr
CONTROL PORT
USB
COMPUTER IN
ANALOG
AUDIO IN
COMPUTER
R – – L
AUDIO OUT
(MONO)
(Fig.-1)
(Fig.-2)
(A)
TASTO DI BLOCCO
Il tasto del
commutatore di
Imager Box viene
posizionato sul
commutatore del
proiettore.
SPINA DEL
CONNETTORE
Terminale DVI
5
Rimuovere i 4 coperchi.
Coperchio
Page 78

6
Rimozione di Imager Box dal proiettore
Premere il tasto di blocco in direzione
della freccia. Quindi, tirare e rimuovere
Imager Box.
ATTENZIONE: Rimovendolo con
forza si potrebbe danneggiare
Imager Box.
(Fig.-3)
Premere il tasto
di blocco.
ATTENZIONE: Non rimuovere Imager Box dal proiettore mentre il proiettore è
acceso. Si potrebbe danneggiare i dati contenuti nella scheda di
memoria e la scheda stessa.
Caricamento e rimozione della scheda CF
Caricare la scheda CF
(Fig.-4)
TASTO DI
ESPULSIONE
DELLA SCHEDA CF
INDICATORE
1
2
Inserire la scheda CF nello slot per le
schede CF di Imager Box fino a quando
fuoriesce il tasto di espulsione.
• Non inserirla nel senso sbagliato. Altrimenti si
potrebbe danneggiare l’apparecchio.
Rimozione della scheda CF
Premere il tasto di espulsione della
scheda CF. La scheda CF viene
rilasciata.
Turare fuori la scheda CF da Imager
Box.
Non rimuovere la scheda CF
mentre l’indicatore è acceso.
Altrimenti si potrebbe danneggiare
la scheda e i dati in essa
contenuti.
ATTENZIONE
Inserire la scheda CF con il
simbolo
▲ davanti.
Tirare e rimuovere
Imager Box.
Page 79

Italiano
Uso dell’adattatore per schede CF
L’adattatore per schede CF viene usato quando si carica una scheda CF nello slot
per schede PC di un computer.
È possibile scrivere e riscrivere dati nella scheda CF con l’adattatore tramite lo slot
per schede PC di un computer. Per il funzionamento, consultare il manuale del
proprietario di “Media Card Imager”.
Inserimento della scheda CF
Inserire saldamente la scheda CF
nell’adattatore per schede CF, allineando
le frecce situate sulla scheda CF con
l’adattatore.
Rimozione della scheda CF
Tirare completamente fuori la scheda CF.
Inserire la scheda CF allineando le frecce.
NOTE IMPORTANTI
I dati memorizzati sulla scheda CF potrebbero alterarsi o perdersi a seguito di
danneggiamenti fisici della scheda CF o per cancellazione accidentale. Si
raccomanda di eseguire una copia di backup di tutti i dati importanti su un
supporto separato quale un floppy disk, un hard disk o un MO disk, ecc. Noi non
ci riteniamo responsabili per danni o perdite di profitto dovuti alla cancellazione
di dati causata da operazioni errate o danneggiamenti della scheda CF o delle
apparecchiature.
Le cause di danneggiamenti o di perdite di dati potrebbero essere le seguenti:
• Uso errato della scheda CF.
• Spegnere il proiettore o il computer o rimuovere la scheda CF/l’adattatore CF
mentre sono in corso operazioni di accesso alla scheda CF (scrittura, lettura o
eliminazione di file).
• Esposizione a forti cariche elettrostatiche.
• La scheda CF ha raggiunto il termine della sua durata.
7
Scheda CF
Adattatore per schede CF
Page 80

8
Uso della scheda e dell’adattatore CF
● Le schede/gli adattatori CF sono dispositivi elettronici ad alta precisione. Non
piegarli, non lasciarli cadere, non applicare su di essi grandi forze o forti urti e non
posizionarli in un luogo dove può essere generata una forte scarica di elettricità
statica.
● Non toccare la superficie dell’area di contatto con le dita, né permettere che venga
sporcata da corpi estranei.
● Non tentare di smontare o alterare le schede CF.
● Spostando la scheda CF rapidamente da un ambiente a temperatura bassa a un
ambiente a temperatura alta si potrebbe formare della condensa (goccioline
d’acqua) su di essa che potrebbe essere causa di malfunzionamenti. Ovviare a
questo problema inserendo la scheda CF in un sacchetto di plastica e lasciando
che si adatti lentamente alla variazione di temperatura prima di rimuoverla dal
sacchetto. Se si forma la condensa, mantenere la scheda CF a una temperatura
costante e lasciare che l’umidità evapori in modo naturale.
● Conservare le schede CF/gli adattatori CF nella custodia protettiva.
● Non usare o conservare le schede CF/gli adattatori CF in luoghi soggetti alle
condizioni seguenti:
• Con forti campi magnetici
• Molto polverosi o umidi
• Molto caldi o molto freddi
AMBIENTE di funzionamento delle schede CF
Temperatura operativa : 5 °C - 35 °C
Temperatura di conservazione : –10 °C - 60 °C
Page 81

Italiano
Dati tecnici
■ Imager Box
■ Adattatore per schede CompactFlash (standard ATA tipo II)
NOTA: Questo adattatore non può essere utilizzato con altre schede di memoria.
I dati tecnici sono soggetti a modifiche senza preavviso.
■ CompactFlash (16 MB)
9
Dimensioni
(L x A x P)
Peso
Voltaggio operativo
Schede di memoria
disponibili
117 mm x 70 mm x 19 mm
(esclusi i ganci di montaggio)
150 g
5 V in c.c. 450 mA, 3,3 V in c.c. 600 mA
Si raccomanda di usare la scheda CF in dotazione con il kit.
È anche possibile usare le seguenti schede di memoria.
• Microdrive (1 GB o inferiore)
Non si garantisce l’uso di altre schede di memoria tranne
quelle citate sopra. Alcune schede di memoria potrebbero
non funzionare correttamente.
Page 82

10
Page 83

Italiano
11
RIPRODUZIONE DELLE IMMAGINI (AZIONAMENTO DEL PROIETTORE)
Collegare correttamente Imager Box al proiettore (P. 5) e poi accendere il proiettore. Per la
procedura, consultare il manuale d’uso del proiettore.
1
2
Carica una scheda di memoria nello slot per schede CF di Imager Box. (P. 6)
NOTA: Per la posizione di ogni tasto e per le operazioni di base, consultare il manuale d’uso
del proiettore.
3
Il proiettore passa automaticamente in modalità MCI e visualizza i dati delle immagini
contenuti nella scheda di memoria.
RIPRODUZIONE DELLE IMMAGINI CONTENUTE NELLA SCHEDA DI MEMORIA
BARRA DEI MENU
Serve per selezionare
la sorgente computer
(MCI) o video.
(Vedere a pagina 12.)
MENU INGRESSO
Serve per selezionare il
livello di immagine tra
Predefinito, Reale o
Immagine 1 - 4. (Vedere a
pagina 15.)
MENU SELEZIONE DI IMMAGINE
Utilizzato per impostare
le dimensioni
dell’immagine su
Normale o Vero o
per espandere /
comprimere l’immagine
(zoom digitale +/–).
(Vedere a pagina 17.)
MENU SCHERMO
Serve per cambiare le
regolazioni del proiettore e
azzerare il contatore di
sostituzione della
lampada.
(Consultare il manuale
d’uso del proiettore.)
MENU DI REGOLAZIONE
Utilizzato per
visualizzare i dati
delle immagini
contenute nella
scheda di memoria.
(Vedere le pagine
13, 14.)
MENU VISUALIZZA
Serve per regolare la
fotografia dell’immagine.
[Contrasto / Luminosità /
Bilanciamento del bianco
(Rosso/Verde/Blu) / Gamma]
(Vedere a pagina 16.)
MENU REGOLAZIONE DI IMMAGINE
Serve per regolare o
silenziare il volume.
(Consultare il manuale
d’uso del proiettore.)
MENU SUONO
Premere il tasto MENU in modalità MCI.
Visualizza la voce
selezionata del MENU
SU SCHERMO.
FINESTRA DELLA GUIDA
Page 84

12
RIPRODUZIONE DELLE IMMAGINI (AZIONAMENTO DEL PROIETTORE)
Premere il tasto MENU in modo che venga
visualizzato il menu su SCHERMO. Premere il
tasto PUNTATORE SINISTRA/
DESTRA per spostare il puntatore a forma di
cornice rossa sull’icona del menu INGRESSO.
1
2
Premere il tasto PUNTATORE BASSO per
spostare un puntatore a freccia rossa su
computer e poi premere il tasto SELEZIONE.
Appare il menu di selezione della sorgente.
Spostare il puntatore
(freccia rossa) su
computer e premere il
tasto SELEZIONE.
MENU INGRESSO
Icona del menu INGRESSO
Scegliere Computer premendo il tasto INPUT sul
pannello comandi superiore o sul telecomando.
Se il proiettore non può riprodurre un’immagine
corretta, selezionare la corretta sorgente di
ingresso con USO DEL MENU.
Tasto INPUT
Computer
Video
Menu selezione
sorgente
Spostare il puntatore
su MCI e poi premere
il tasto SELEZIONE.
SELEZIONE DELLA SORGENTE DI INGRESSO
OPERAZIONE DIRETTA
USO DEL MENU
INDICE E PAGINA
I dati delle immagini modificate con Media Card
Imager (software) sono in un formato indice
consistente di diverse pagine. Per proiettare le
immagini desiderate, selezionare l’Indice e poi la
Pagina nell’Indice.
Quando si carica in Imager Box collegato al proiettore una scheda di memoria, viene
selezionata automaticamente l modalità MCI. Sullo schermo viene visualizzata la prima pagina
dell’ultimo indice della scheda di memoria.
Per passare manualmente alla modalità MCI, agire nel modo seguente.
Uscita
Chiude il menu di selezione della sorgente.
Selezionare l’indice
Indice
Pagine nell’indice
3
Spostare il puntatore su MCI e poi premere il
tasto SELEZIONE.
Page 85

Italiano
13
RIPRODUZIONE DELLE IMMAGINI (AZIONAMENTO DEL PROIETTORE)
Per proiettare le immagini desiderate, selezionare l’Indice e poi la Pagina nel modo seguente.
SELEZIONE INDICE
Premere il tasto MENU in modo che venga
visualizzato il MENU SU SCHERMO. Premere il
tasto PUNTATORE SINISTRA/DESTRA per
spostare il puntatore a forma di cornice rossa
sull’icona del menu VISUALIZZA.
1
2
Spostare l’icona a forma di cornice
rossa sull’icona dell’indice e
premere il tasto SELEZIONE.
MENU VISUALIZZA
Icona del menu VISUALIZZA
3
SELEZIONE PAGINA
1
2
Premere il tasto PUNTATORE BASSO per
spostare il puntatore a forma di cornice rossa
sull’icona della pagina e poi premere il tasto
SELEZIONE. Viene visualizzata la tabella di tutte
le Pagine dell’Indice selezionato.
Premere il tasto CLICK DESTRO sul telecomando
per arrestare la visualizzazione della tabella. (✽1)
Premere i tasti PUNTATORE SINISTRA/DESTRA/ALTO/BASSO per spostare il puntatore sulla
Pagina da proiettare e poi premere il tasto SELEZIONE.
Premere il tasto PUNTATORE ALTO/BASSO per passare alla pagina precedente/successiva. (✽2)
Tasto PUNTATORE ALTO ··· torna alla pagina precedente.
Tasto PUNTATORE BASSO ··· passa alla pagina successiva.
La tabella delle pagine può essere visualizzata premendo il tasto SELEZIONE quando la pagina
viene visualizzata tutta sullo schermo.
3
Spostare l’icona a forma di cornice
rossa sull’icona della pagina e
premere il tasto SELEZIONE.
MENU VISUALIZZA
Icona del menu VISUALIZZA
✽1 Se si preme il tasto CLICK DESTRO
durane la visualizzazione della
tabella, ogni Indice/Pagina viene
visualizzato sotto forma di icona.
Questa operazione riduce il tempo di
visualizzazione di tutti i dati delle
immagini.
✽2 Quando è visualizzato il MENU SU
SCHERMO, non è possibile passare
alla pagina precedente/successiva.
Premere i tasti PUNTATORE SINISTRA/
DESTRA/ALTO/BASSO per spostare il puntatore
sull’Indice da proiettare e poi premere il tasto
SELEZIONE. Viene visualizzata la prima pagina
dell’indice selezionato. Premere il tasto
PUNTATORE ALTO/BASSO per passare alla
pagina precedente/successiva. (✽2)
Tasto PUNTATORE ALTO ··· torna alla pagina precedente.
Tasto PUNTATORE BASSO ··· passa alla pagina successiva.
Premere il tasto PUNTATORE BASSO per
spostare il puntatore a forma di cornice rossa
sull’icona dell’indice e poi premere il tasto
SELEZIONE. Viene visualizzata la tabella degli
indici contenuti nella scheda di memoria. Premere
il tasto CLICK DESTRO sul telecomando per
arrestare la visualizzazione della tabella. (✽1)
Premere il tasto MENU in modo che venga
visualizzato il MENU SU SCHERMO. Premere il
tasto PUNTATORE SINISTRA/DESTRA per
spostare il puntatore a forma di cornice rossa
sull’icona del menu VISUALIZZA.
Page 86

14
RIPRODUZIONE DELLE IMMAGINI (AZIONAMENTO DEL PROIETTORE)
FUNZIONE DI RIPRODUZIONE AUTOMATICA
Premere il tasto MENU in modo che venga
visualizzato il MENU SU SCHERMO. Premere il
tasto PUNTATORE SINISTRA/DESTRA per
spostare il puntatore a forma di cornice rossa
sull’icona del menu VISUALIZZA.
1
2
Premere il tasto PUNTATORE BASSO per
spostare il puntatore a forma di cornice rossa
sull’icona della Riproduzione automatica e poi
premere il tasto SELEZIONE. Viene visualizzata
la finestra di dialogo dell’impostazione della
Riproduzione automatica.
3
Finestra di dialogo della
Riproduzione automatica
Premere i tasti PUNTATORE
SINISTRA/DESTRA per regolare
l’intervallo e poi premere il tasto
SELEZIONE.
MENU VISUALIZZA
Icona del menu VISUALIZZA
Uscita
Chiude la finestra di dialogo della Riproduzione automatica.
Quando si attiva la funzione di Riproduzione automatica,
spostare il puntatore a forma di freccia rossa su “On”,
regolare l’intervallo (secondi) premendo il tasto
PUNTATORE SINISTRA/DESTRA e poi premere il tasto
SELEZIONE. Le immagini vengono proiettate in
successione automatica, con un intervallo fra una e l’altra.
È possibile mettere in pausa la funzione di Riproduzione
automatica premendo il tasto PUNTATORE ALTO e
premendo poi il tasto PUNTATORE BASSO per riprendere
la riproduzione.
✽ Quando si è impostata la Riproduzione automatica in
precedenza con Media Card Imager (software),
l’intervallo impostato da Media Card Imager ha la priorità
su quello impostato con questo menu.
On
Per annullare la funzione di Riproduzione automatica,
spostare il puntatore a forma di freccia rossa su “Off” e poi
premere il tasto SELEZIONE.
È possibile annullare l’impostazione della Riproduzione
automatica effettuata tramite Media Card Imager
(software) anche impostando questa opzione su “Off”.
Off
Non rimuovere la scheda di memoria da Imager Box mentre è attiva la funzione di
Riproduzione automatica o l’indicatore di Imager Box è acceso o sta lampeggiando.
Si potrebbe danneggiare la scheda di memoria o i dati contenuti nella scheda stessa.
Prima di rimuovere la scheda di memoria da Imager Box, accertarsi di aver impostato
la funzione di Riproduzione automatica su “Off” oppure interrompere il segnale in
ingresso da Imager Box cambiando la sorgente in ingresso.
ATTENZIONE
Page 87

Italiano
15
RIPRODUZIONE DELLE IMMAGINI (AZIONAMENTO DEL PROIETTORE)
REGOLAZIONE DELL’IMMAGINE
SELEZIONE DEL LIVELLO DELL’IMMAGINE (USO DEL MENU)
Premere il tasto MENU per richiamare il MENU
SU SCHERMO. Premere il tasto PUNTATORE
SINISTRA/DESTRA per spostare il puntatore a
forma di cornice rossa sull’icona del menu
SELEZIONE DI IMMAGINE.
1
2
Premere il tasto PUNTATORE BASSO per
spostare il puntatore a forma di freccia rossa
sul livello che si desidera impostare e poi
premere il tasto SELEZIONE.
Spostare l’icona a forma di
cornice rossa sul livello e
premere il tasto SELEZIONE.
Il livello selezionato.
MENU SELEZIONE DI IMMAGINE
Livello di immagine normale preselezionato su questo
proiettore.
Predefinito
Livello d’immagine con aumento delle tonalità intermedie
per i grafici.
Reale
Regolazione dell’immagine reimpostata dall’utente nel
menu REGOLAZIONE DI IMMAGINE (pagina 16).
Immagine 1 - 4
Icona del menu SELEZIONE
DI IMMAGINE
SELEZIONE DEL LIVELLO DELL’IMMAGINE (OPERAZIONE DIRETTA)
Selezionare il livello dell’immagine tra Predefinito,
Reale, Immagine 1, Immagine 2, Immagine 3 e
Immagine 4 premendo il tasto IMAGE sul pannello
comandi superiore o sul telecomando.
Tasto IMAGE
Predefinito
Reale
Immagine 1
Immagine 2
Immagine 3
Immagine 4
Livello di immagine normale preselezionato su questo
proiettore.
Livello d’immagine con aumento delle tonalità intermedie
per i grafici.
Regolazione dell’immagine reimpostata dall’utente nel
menu REGOLAZIONE DI IMMAGINE (pagina 16).
Predefinito
Reale
Immagine 1 - 4
Page 88

16
RIPRODUZIONE DELLE IMMAGINI (AZIONAMENTO DEL PROIETTORE)
REGOLAZIONE DEL LIVELLO DELL’IMMAGINE
1
2
Premere il tasto PUNTATORE BASSO per
spostare il puntatore a forma di freccia rossa sulla
voce che si desidera impostare e poi premere il
tasto SELEZIONE. Viene visualizzato il livello di
ogni voce. Regolare ogni livello premendo il
tasto(i) PUNTATORE SINISTRA/DESTRA.
Spostare il puntatore a forma di
cornice rossa sulla voce da
selezionare e poi premere il tasto
SELEZIONE.
MENU REGOLAZIONE DI IMMAGINE
Icona del menu
REGOLAZIONE DI IMMAGINE
Livello di immagine
selezionato. (pagina 15)
Premere i tasti PUNTATORE
SINISTRA/DESTRA per
regolare il valore.
Menu dei livelli dell’immagine
Spostare il puntatore a forma
di cornice rossa sull’icona
dell’immagine 1 - 4 da
selezionare e poi premere il
tasto SELEZIONE.
Icona Memorizzare
Premere il tasto SELEZIONE su
questa icona per memorizzare la
regolazione.
Premere il tasto PUNTATORE SINISTRA per diminuire il
contrasto e il tasto PUNTATORE DESTRA per aumentare
il contrasto. (Da 0 a 63.)
Contrasto
Premere il tasto PUNTATORE SINISTRA per scurire
l’ immagine e il tasto PUNTATORE DESTRA per
schiarirla. (Da 0 a 63.)
Luminosità
Premere il tasto PUNTATORE SINISTRA per alleggerire
la tonalità dei colori e il tasto PUNTATORE DESTRA per
appesantirla. (Da 0 a 63.)
Bilanciamento del bianco (Rosso/Verde/Blu)
Premere il tasto PUNTATORE SINISTRA o il tasto
PUNTATORE DESTRA per ottenere un miglior
bilanciamento del contrasto. (Da 0 a 15.)
Gamma
Memorizzare
Per memorizzare un’immagine reimpostata
manualmente, spostare il puntatore a forma di cornice
rossa sull’icona Memorizzare e premere il tasto
SELEZIONE. Appare il menu dei livelli dell’immagine.
Spostare il puntatore a forma di cornice rossa sulle
opzioni Immagine da 1 a 4 che si desidera impostare e
poi premere il tasto SELEZIONE.
3
Reset
Ripristinare tutte le regolazioni ai valori precedenti.
Uscita
Chiude il menu REGOLAZIONE DI IMMAGINE.
Premere il tasto MENU per richiamare il MENU SU
SCHERMO. Premere il tasto PUNTATORE
SINISTRA/DESTRA per spostare il puntatore a
forma di cornice rossa sull’icona del menu
REGOLAZIONE DI IMMAGINE.
Page 89

Italiano
17
RIPRODUZIONE DELLE IMMAGINI (AZIONAMENTO DEL PROIETTORE)
REGOLAZIONI DELLA FOTOGRAFIA DELL’IMMAGINE
Premere il tasto MENU per richiamare il MENU
SU SCHERMO. Premere il tasto(i)
PUNTATORE SINISTRA/DESTRA per
spostare il puntatore a forma di cornice rossa
sull’icona del menu SCHERMO.
1
2
Premere il tasto PUNTATORE BASSO per
spostare il puntatore a forma di cornice rossa
sulla funzione che si desidera impostare e poi
premere il tasto SELEZIONE.
Questo proiettore è dotato della funzione di ridimensionamento dello schermo dell’immagine
che permette di visualizzare le immagini nel formato desiderato.
Spostare l’icona a forma di cornice
rossa sulla funzione e premere il
tasto SELEZIONE.
MENU SCHERMO
Le immagini riempiono lo schermo nella sua grandezza.
Normale
Visualizza l’immagine nel formato originale. Se il formato
originale dell’immagine è maggiore del formato dello
schermo, il proiettore entra automaticamente in modalità
di Zoom digitale +.
Vero
Quando si seleziona Zoom digitale +, menu su schermo
scompare e viene visualizzato il messaggio “D. Zoom +”.
Premere il tasto SELEZIONE per ingrandire il formato
dell’immagine. E premere i tasti PUNTATORE
ALTO/BASSO/SINISTRA/DESTRA per vedere tutta
l’immagine. La funzione di visione panoramica può
funzionare solo quando l’immagine è più grande dello
schermo. Un’immagine proiettata può anche essere
ingrandita premendo il tasto D. ZOOM ▲ sul telecomando.
Zoom digitale +
Icona del menu
SCHERMO
Quando si seleziona Zoom digitale –, menu su schermo
scompare e viene visualizzato il messaggio “D. Zoom –”.
Premere il tasto SELEZIONE per comprimere il formato
dell’immagine.
Un’immagine proiettata può anche essere compressa
premendo il tasto D. ZOOM ▼ sul telecomando.
Zoom digitale –
Per disattivare la modalità zoom digitale +/–, premere
qualsiasi tasto eccetto i seguenti: D.ZOOM ▲ /▼ ,
SELEZIONE, PUNTATORE o LASER.
Page 90

18
Page 91

メディアカードイメージャーキット
品番 POA-MD07MCI
取扱説明書
メディアカードイメージャーキットは
Microsoft PowerPointで作成したファイル
およびJPEG形式、ビットマップ形式等各
種画像をプロジェクターで再生するための
付属キットです。この付属キットをプロジ
ェクターへ装着することによりこれらの画
像をコンピュータを使わずプロジェクター
の操作でスクリーンに映すことができま
す。
このキットはイメージャーボックス接続端
子を持つ当社プロジェクターでのみご使用
になれます。専用の接続端子を持たない指
定外のプロジェクターではご使用になれま
せん。
この取扱説明書はイメージャーボックスの
取り付けかたと操作方法を掲載していま
す。
イメージャーボックスで再生する画像の編
集はキットに付属のCD-ROMに収録され
ているMediaCardImagerソフトウェアで
行います。画像編集の詳しくは別冊の
MediaCardImager取扱説明書をご覧
ください。
イメージャーボックスの取り付けかたと
操作のしかた
日本語
Page 92

2
商標
Microsoft、Windows、PowerPointは米国Microsoft社の登録商標です。
Microdriveは、米国IBM社の商標です。
CompactFlashおよびCFは、米国SanDisk社の商標または登録商標です。
説明書に記載の会社名、および製品名は各社の商標または登録商標です。
この装置は、情報処理装置等電波障害自主規制協議会(VCCI)の基準に基づ
くクラスB情報技術装置です。この装置は、家庭環境で使用することを目的と
していますが、この装置がラジオやテレビジョン受信機に近接して使用される
と、受信障害を引き起こすことがあります。
取扱説明書に従って正しい取り扱いをして下さい。
Page 93

3
日本語
目次
梱包には以下の6点の部品が入っております。梱包内の部品をお確かめください。
梱包物
*画像編集ソフトウェアとその取扱説明書
メディアカードイメージャー
ボックス
(以下イメージャーボックス)
コンパクトフラッシュ
カード(16MB)
コンパクトフラッシュ
カードアダプター
メディアカードイメージャー
キット取扱説明書(本書)
*MediaCardImager
CD-ROM(編集ソフト)
*MediaCardImager
取扱説明書
目次 3
梱包物 3
本体各部のなまえ 4
イメージャーボックスの取り付けかた 5
イメージャーボックスの取り外しかた 6
コンパクトフラッシュカードの取り付け・取り外しかた 6
コンパクトフラッシュカードアダプタの使いかた 7
コンパクトフラッシュカード使用上のご注意 8
仕様 9
画像の再生のしかた(プロジェクターの操作) 11
メモリカードの画像を投映する 11
イメージの調整 15
適切な画像サイズに調整する 17
Page 94

4
本体各部のなまえ
インジケーター
コネクタープラグ
ラッチボタン
コンパクトフラッシュ
カードイジェクトボタン
コンパクトフラッシュ
カードスロット
イメージャーボックス
取り付け留め具
取り付け検出
ボタン
(データ読み出し中
ランプが点灯します。)
イメージャーボックス
Page 95

5
日本語
イメージャーボックスの取り付けかた
注意;取り付けは必ずプロジェクターの電源を切って行ってください。電源を入れ
たままでの取り付け、取り外しは行わないでください。データやカードの損
傷の原因となります。
プロジェクターに付いている穴カバー4個を取り外し、イ
メージャーボックス取り付け留め具(A)をプロジェクター
にひっかけるようにはめこみます。(図1)
(図2)
(図1)
1
2
ラッチボタンを矢印の方向へ押しながら、イメージャーボ
ックスのコネクタープラグをプロジェクターのDVI端子へ差
し込みます。イメージャーボックスをプロジェクターへ押
しつけ、プロジェクターへラッチがはまったところで手を
離します。
C
O
M
P
U
T
E
R
IN
D
IG
IT
A
L
MCI
S – VIDEO
R – AUDIO IN – L
VIDEO
Y – Pb / Cb – Pr / Cr
CONTROL PORT
USB
COMPUTER IN
ANALOG
AUDIO IN
COMPUTER
R – – L
AUDIO OUT
(MONO)
取り付け検出ボタ
ンをこの位置に合
わせます。
DVI端子
コネクタープラグ
(A)
ラッチボタン
4個の穴カバーを取
り外してください。
穴カバー
Page 96

6
コンパクトフラッシュカードの取り付け・取り外しかた
取り付けかた
コンパクトフラッシュカードスロットに
コンパクトフラッシュカードを挿入しま
す。
※コンパクトフラッシュカードを裏返しに挿入しな
いでください。故障の原因となります。
(図4)
▲印を前にして挿入します。
取り外しかた
コンパクトフラッシュカ
ードを挿入するとイジェ
クトボタンが飛び出ます。
イジェクトボタンを押すと、コンパ
クトフラッシュカードが少し飛び出
します。
コンパクトフラッシュカードを引き
出します。
1
2
インジケータ
インジケータ点灯中は絶対にコンパ
クトフラッシュカードを取り出さな
いでください。データやカードの損
傷の原因となります。
注意
イメージャーボックスの取り外しかた
イメージャーボックスラッチボタンを
矢印の方向にゆっくりと押し、イメー
ジャーボックスをプロジェクターから
取り外します。
注意;取り外しは必ずプロジェクターの電源を切って行ってください。電源を入れ
たままでの取り付け、取り外しは行わないでください。データやカードの損
傷の原因となります。
注意; 無理に取り外すと破損するおそ
れがあります。
(図3)
ラッチボタンを左へ
押す。
Page 97

7
日本語
コンパクトフラッシュカードアダプタの使いかた
コンパクトフラッシュカードアダプタは付属のコンパクトフラッシュカードをコン
ピュータのPCカードスロットに取り付けるときに使います。コンパクトフラッシュ
カード内へのデータの書き込み、データの書き替えはこのコンパクトフラッシュ
カードアダプタを使いコンピュータのPCカードスロットに差し込みコンピュータで
行います。カードへの書き込みの詳しくは別冊のMediaCardImager取扱説明書お
よびコンピュータの取扱説明書をご覧ください。
取り付けかた
コンパクトフラッシュカードの▲印とコ
ンパクトフラッシュカードアダプタの▲
印が同じ向きになるようにして、カード
アダプタにしっかりと差し込みます。
取り外しかた
外すときは、コンパクトフラッシュカー
ドを持って、まっすぐ引き抜きます。
▲印の向きを合わせます。
ご注意
コンパクトフラッシュカードに保存されたデータは、メモリカードの損傷や誤消去で破壊されたり消
去されることがあります。大切なデータは、フロッピーディスク、ハードディスク、MOディスクなど
の別のメディアにバックアップすることをおすすめします。誤った操作、コンパクトフラッシュカー
ドや機器の損傷によるデータの消失によって生じる損害、逸失利益などに関し、当社では一切その責
任を負いかねますので、ご了承ください。
以下の場合にデータが破壊されたり消去されたりすることがあります。
・ コンパクトフラッシュカードの操作を誤って行った。
・ コンパクトフラッシュカードのアクセス中(記録中、読み出し中、消去中)にプロジェクターやコ
ンピュータの電源を切ったり、コンパクトフラッシュカード/コンパクトフラッシュカードアダプタ
を抜いた。
・ コンパクトフラッシュカードが静電気、電気的ノイズの影響を受けた。
・ コンパクトフラッシュカードが寿命になった。
コンパクトフラッシュ
カード
コンパクトフラッシュ
カードアダプタ
Page 98

8
コンパクトフラッシュカード使用上のご注意
● コンパクトフラッシュカード/コンパクトフラッシュカードアダプタは精密電子
機器です。曲げたり、落としたり強い力を加えたり、衝撃や振動を与えないでく
ださい。また、強い静電気や電気的ノイズの発生しやすい場所での使用や保管を
避けてください。故障の原因となることがあります。
● コンパクトフラッシュカード/コンパクトフラッシュカードアダプタのコネクタ
部に指などで触れたり、ごみなどが付着したりしないようにしてください。故障
の原因となることがあります。
● コンパクトフラッシュカード/コンパクトフラッシュカードアダプタを分解した
り、改造したりしないでください。
● 温度差の大きな場所へ急に移動するとコンパクトフラッシュカードに水滴が付き
(結露現象)、故障の原因となることがあります。結露を防ぐには、移動の前にビ
ニール袋に入れて密封しておき、周囲の温度に充分ならしてから、出してお使い
ください。
● コンパクトフラッシュカード/コンパクトフラッシュカードアダプタを保管する
ときは、専用ケースに入れてください。
● コンパクトフラッシュカード/コンパクトフラッシュカードアダプタは、下記の
場所で使用したり、保管しないでください。
・強い磁気が発生する場所
・ほこりや砂ぼこりのたつところ
・高温多湿の場所
コンパクトフラッシュカードおよびコンパクトフラッシュカードアダプタは、以下
の環境でご使用ください。
使用温度範囲:5 ˚C〜35˚C
保存温度範囲:-10˚C〜60˚C
Page 99

9
日本語
仕様
■イメージャーボックス
■コンパクトフラッシュカードアダプタ
PCカードType-II スロット対応
■コンパクトフラッシュ(16MB)
質量
動作電圧
幅117mmx 高さ70mmx奥行き19mm(突起物含まず)
150g
DC5V450mADC3.3V600mA
付属のコンパクトフラッシュカード(16MB)のご使用をおすす
めします。また下記のメモリーカードについても使用可能となっ
ています。
・マイクロドライブ(1GB以下)
なお、上記以外のコンパクトフラッシュでの動作は保証いたしま
せん。また、メモリカードによって正常に動作しないものもあり
ます。
対応メモリカード
寸法
※本書に記載されている仕様は、予告なく変更する場合があります。あらかじめご了承ください。
Page 100

10
 Loading...