

Sanyo PLC220P,PLC250P Instruction Manual
INSTRUCTION
MANUAL
PLC220P
PLC250P
TABLE
OF
CONTENTS
PAGE
1.
SAFETYPRECAUTtONS
.........
.......
.."...'.........-
3
2.
FEATURES
..'-""
"
.'..'.'.."-........'
'3
3.
!MPORTANTSAFETY!NSTRUCT!ONS''-'
-''"'"'--
4
4.
DESCR!PT)ON
--"-.'-"""""'"
"--'"'
""""-'
'5
5.
OPERADONOFCONTROLS"""""
"""""'.'...-"""""""""""
-———-6-7
6.
REMOTECONTROLOPERATION"
'"-"""'""--"''
-8-9
7.
SETT)NG-UPTHEPROJECTOR—""""---''-""""""''
10
8.
US)NGTHEPROJECTOR"'
"-'..""
."''"'
'"''"'
11-14
9.
PtCTUREANDSOUNDADJUSTMENTS.
"--..".
"""-"""""""""-'""
14-15
10.
CONNECTtNG
THE
PROJECTOR
.............................................................................16-17
11.AmF!LTERCAREANDCLEAN)NG
................................................................
....18
12.
LAMP
REPLACEMENT/TEMPERATURE
)NDtCATORS
.................................................18
13.TROUBLE-SHOOTiNGGU!DE
.""."------."""""-"-'"'-""""'""
"-19
14.TECHN!CALSPEC)F)CATtONS
--'"-"""""""""--""'-
"BACK
COVER
)MPORTANT:
fUK
MODEL
ONLY)
This
cord
is
already
fitted
with a moutded
ptug
incorporaSng a fuse,
the
vaiue
of
which
is
indicated
on
the
pin
face
of
the
pfug.
Should
the
fuse
need
to
be
replaced,
an
ASTA
approved
8S
1362
fuse
must
be
used
of
the
same
rating,
marked
thus
^
.
if
the
fuse
cover
is
detachab!e,
never
use
the
piug
with
the
cover
omitted,
tf a replacement
fuse
cover
is
required,
ensure
it
is
of
the
same
co!our
as
that
visibto
on
the
pin
face
of
the
piug
(i.e.
red
or
orange).
Fuse
covers
are
avaiiabie
from
the
Parts
Department
indicated
in
your
User
instructions.
if
the
p)ug
supplied
is
not
suitabfe
for
your
socket
outtet.
it
shouid
be
cut
off
and
destroyed.
The
end
of
the
ffexib!e
cord
shoutd
be
suitably
prepared
and
the
correct
piug
fitted.
WARN!NG: A PLUG
WtTH
BARED
FLEXtBLE
CORDS
!S
HAZARDOUS
)F
ENGAGED
)N A UVE
SOCKET
OUTLET.
The
Wires
in
this
mains
!ead
are
co!oured
in
accordance
with
the
following
code:
Biue
............................Neutrai
Brown...........................Live
As
these
colours
may
not
correspond
with
the
cofoured
markings
identifying
the
terminals
in
your
piug,
proceed
as
follows:
The
wire
which
is
cotoured
Biue
must
be
connected
to
the
terminal
in
the
piug
which
is
marked
with
the
tetter N or
coloured
Biue
or
Black.
The
wire
which
is
co!oured
Brown
must
be
connected
to
the
terminal
which
is
marked
with
the
tetter L or
coloured
Brown
or
Red.
WARN)NG:
DO
NOT
CONNECT
EtTHER
W)RE
TO
THE
EARTH
TERMINAL
WH!CH
)S
MARKED
WtTH
THE
LETTER
E.
BY
THE
EARTH
SYMBOL
-^
OR
COLOURED
GREEN
OR
GREEN/YELLOW.
________
1
SAFETY
PRECAUTIONS
WARNING:
TO
REDUCE
THE
R)SK
OF
FtRE
OR
ELECTR)C
SHOCK,
DO
NOT
EXPOSE
THiS
APPLIANCE
TO
RA!N
OR
MOSTURE.
Intense
tight
source.
Do
not
stare
directly
into
the
projection
tens
as
possible
eye
damage
couid
result.
Be
especiaity
carefu!
that
children
do
not
stare
directiy
into
the
tight
beam.
!f
the
LC
cotour
video
projector
witt
not
be
used
for
an
extended
time,
unplug
the
LC
cotour
video
projector
from
the
power
out!et.
READ
AND
KEEP
THtS
OWNER'S
tNSTRUCTtON
MANUAL
FOR
LATER
USE.
IMPORTANT:
For
your
protection
in
the
event
of
theft
or
toss
of
this
LC
cotour
video
projector,
please
record
the
Mode!
Number
and
Seriat
Number
tocated
on
the
rear
of
unit
'"ode!
No.
and
retain
this
information.
Refer
to
these
numbers
whenever
you
cait
upon
your
authorized
distributor
regarding
this
product.
Seria!
No:
2
FEATURES
< 4 cotour
system,
PAL,
SECAM,
NTSC4.43,
NTSC
compatible.
*3-LCD
projection
system
reaiizes
762cm
(300-inch)
big
screen
size
with a sharper
and
clearer
picture.
wHigh-quaiity
7.9cm
(3.1-inch)
twin-TFT
LCD
paneL
*
Screen
size
is
adjustabfe
from
20
inches
to
300
inches.
'
Can
be
projected
directly
onto a white
screen
or
white
wai!.
*
112,800
pixets
per
pane!
promises
high
resoiution.
^
Keystone
correction,
convenient
for
the
ceiting
or
floor
mount
projection
in
short
distance.
'Motor-drive
ZOOM
and
FOCUS.
*
Lit-up
remote
contro!.
w
Lighted
controt
panei
for
easy
operation.
wSCART,
S-V)DEO
terminats
provided.
*
Audio
monitor
output
terminal
provided
for
the
externa!
sound
system.
*
Bui!t-in
Audio
ampiifier
and
speaker
(monaurat).
*
Superimpose,
Biue
Back,
Expand
and
Reverse
Picture
Scanning
feature
provided.

3
tMPORTANT
SAFETY
!NSTRUCT!ONS
Read
a!)
of
the
instructions
given
here
and
retain
them
for
)ater
use.
Unptug
this
projector
from
AC
power
supply
before
cleaning.
Do
not
use
liquid
or
aerosoi
cteaners.
Use
a
damp
ctoth
for
cteaning.
Do
not
use
attachments
not
recommended
by
the
manufacturer
as
they
may
cause
hazards.
Do
not
piace
this
projector
on
an
unstable
cart,
stand,
or
tabie.
The
projector
may
fai!,
causing
serious
injury
to
a
chiid
or
adutt,
and
serious
damage
to
the
projector.
Use
onty
with a cart
or
stand
recommended
by
the
manufacturer,
or
sofd
with
the
projector.
Wa!i
or
sheif
mounting
should
foitow
the
manufacturer's
instructions,
and
should
use a mounting
kit
approved
by
the
manufacturer.
Do
not
expose
this
unit
to
rain
or
use
near
water...
for
exampie,
in a wet
basement,
near a swimming
pooi
or
the
!!ke.
Siots
and
openings
in
the
cabinet
and
the
back
or
bottom
are
provided
for
ventilation.
to
insure
reliable
operation
of
the
equipment
and
to
protect
it
from
overheating.
The
openings
should
never
be
covered
with
cioth
or
other
material,
and
the
bottom
opening
should
not
be
blocked
by
placing
the
projector
on a bed,
sofa,
rug,
or
other
similar
surface.
This
projector
shou!d
never
be
ptaced
near
or
over a radiator
or
heat
register.
This
projector
should
not
be
piaced
in a buiit-in
installation
such
as a bookcase
unless
proper
ventilation
is
provided.
This
projector
shouid
be
operated
oniy
from
the
type
of
power
source
indicated
on
the
marking
tabet.
tfyou
are
not
sure
of
the
type
of
power
supptied,
consult
your
authorized
distributor
or
iocai
power
company.
Do
not
overbad
waii
outiets
and
extension
cords
as
this
can
result
in
fire
or
eiectric
shock.
Do
not
a!iow
anything
to
rest
on
the
power
cord.
Do
not
locate
this
projector
where
the
cord
wiii
be
abused
by
persons
walking
on
it.
Never
push
objects
of
any
kind
into
this
projector
through
cabinet
s!ots
as
they
may
touch
dangerous
voitage
points
or
short
out
parts
that
couk)
result
in a fire
or
eiectric
shock.
Never
spit!
liquid
of
any
kind
on
the
projector.
Do
not
attempt
to
service
this
projector
yourself
as
opening
or
removj
ng
covers
may
expose
you
to
dangerous
vottage
or
other
hazards.
Refer
a!!
servicing
to
quaiified
service
personnel.
Unplug
this
projector
from
wati
outtet
and
refer
servicing
to
qualified
service
personnel
under
the
fotiowing
conditions:
a.
When
the
power
cord
or
pfug
is
damaged
or
frayed.
b.
!f
tiquid
has
been
spiiied
into
the
projector.
c.
tf
the
projector
has
been
exposed
to
rain
or
water.
d.
tf
the
projector
does
not
operate
normafiy
by
foitowing
the
operating
instructions.
Adjust
onty
those
controls
that
are
covered
by
the
operating
instructions
as
improper
adjustment
of
other
controis
may
resutt
in
damage
and
win
often
require
extensive
work
by
a
quaked
technician
to
restore
the
projector
to
normal
operation.
e.
tf
the
projector
has
been
dropped
or
the
cabinet
has
been
damaged.
f.
When
the
projector
exhibits a distinct
change
in
performance-this
indicates a need
for
service.
When
repfacement
parts
are
required,
be
sure
the
service
technician
has
used
replacement
parts
specified
by
the
manufacturer
that
have
the
same
characteristics
as
the
original
part.
Unauthorized
substitutions
may
resuit
in
fire,
electric
shock,
or
injury
to
persons.
Upon
completion
of
any
service
or
repairs
to
this
projector,
ask
the
service
technician
to
perform
routine
safety
checks
to
determine
that
the
projector
is
in
safe
operating
condition.
Foiiow
aii
warnings
and
instructions
marked
on
the
projectors.
For
added
protection
for
the
projector
during a lightning
storm,
or
when
it
is
teft
unattended
and
unused
for
tong
periods
of
time,
unpiug
it
from
the
wat!
outlet.
This
wi!i
prevent
damage
due
to
lightning
and
poweriine
surges.
An
apptiance
and
cart
combination
should
be
moved
with
care.
Quick
stops,
excessive
force,
and
uneven
surfaces
may
cause
the
appliance
and
cart
combination
to
overturn.
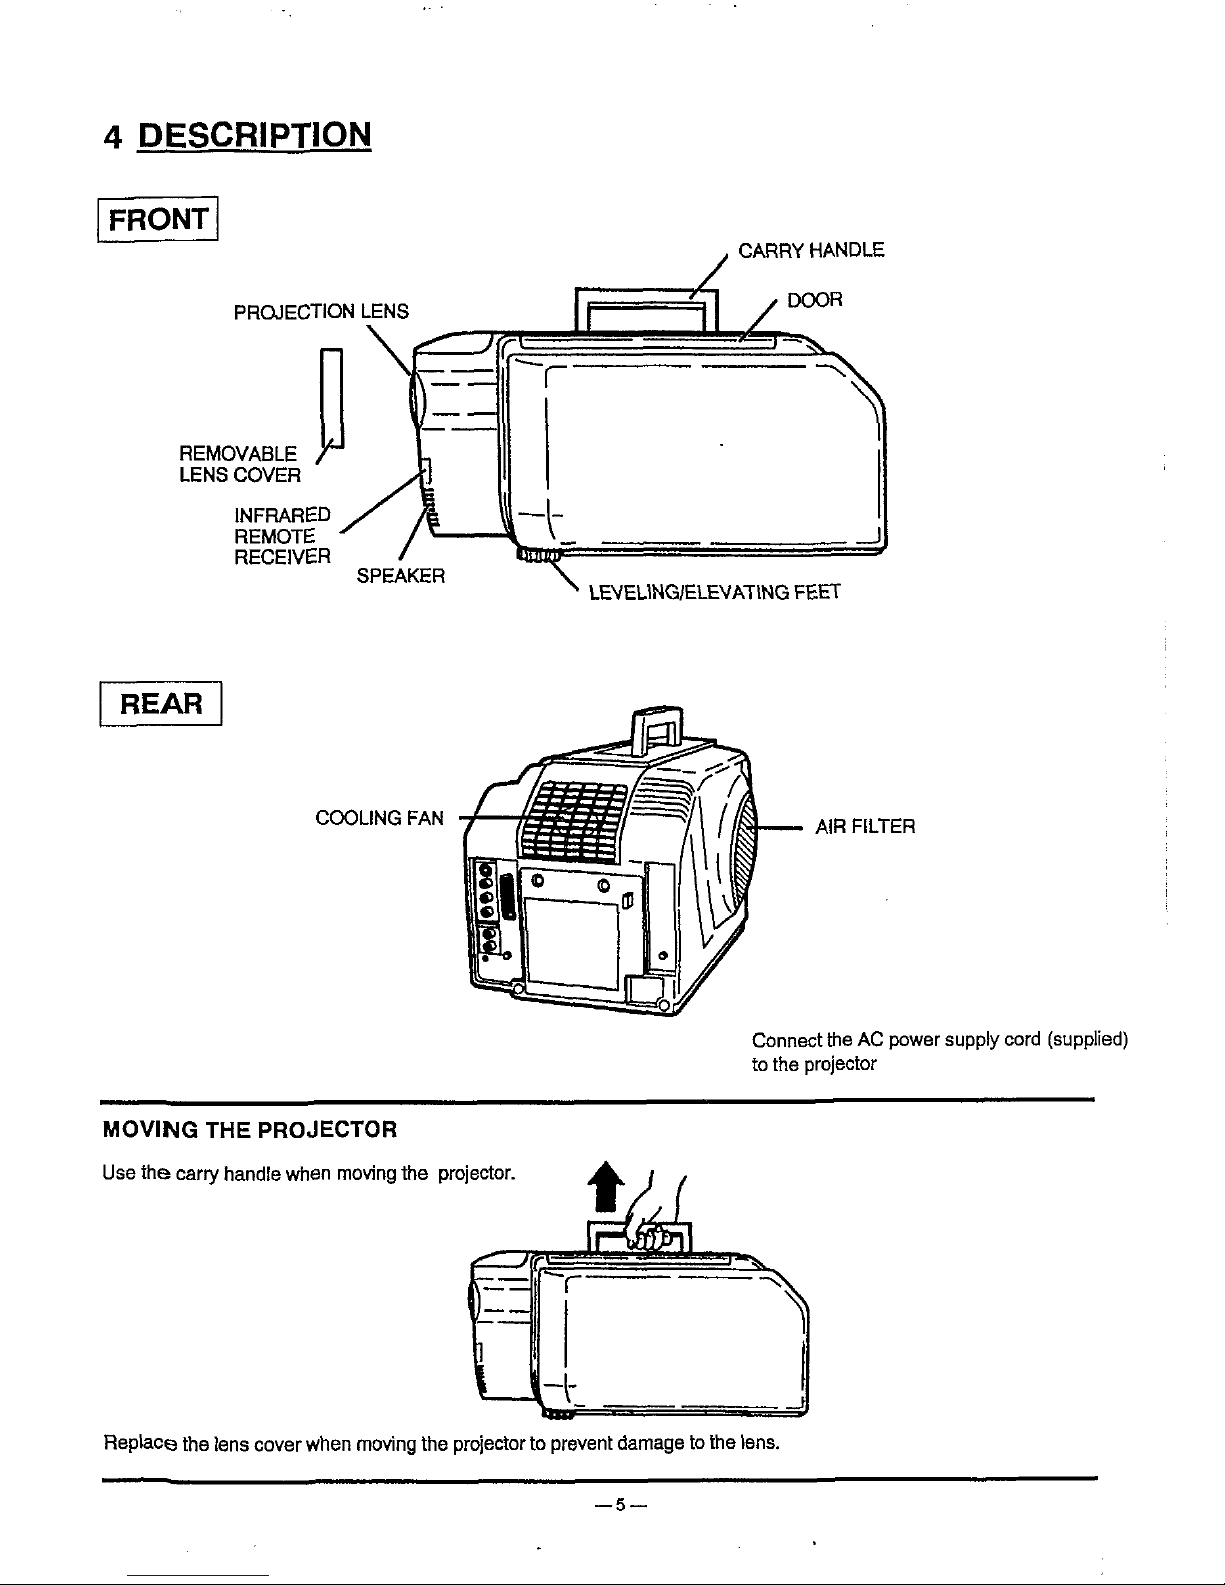
4
DESCR!PT!ON
FRONT
CARRY
HANDLE
PROJECTION
LENS
REMOVABLE
/"^
LENS
COVER
tNFRARED
REMOTE
RECE)VER
LEVEUNG/ELEVATtNG
FEET
REAR
COOUNG
FAN
A!R
FtLTER
Connect
the
AC
power
supp)y
cord
(supplied)
to
the
projector
MOV)NG
THE
PROJECTOR
Use
the
carry
hand!e
when
moving
the
projector.
Reptace
the
tens
cover
when
moving
the
projector
to
prevent
damage
to
the
(ens.
5
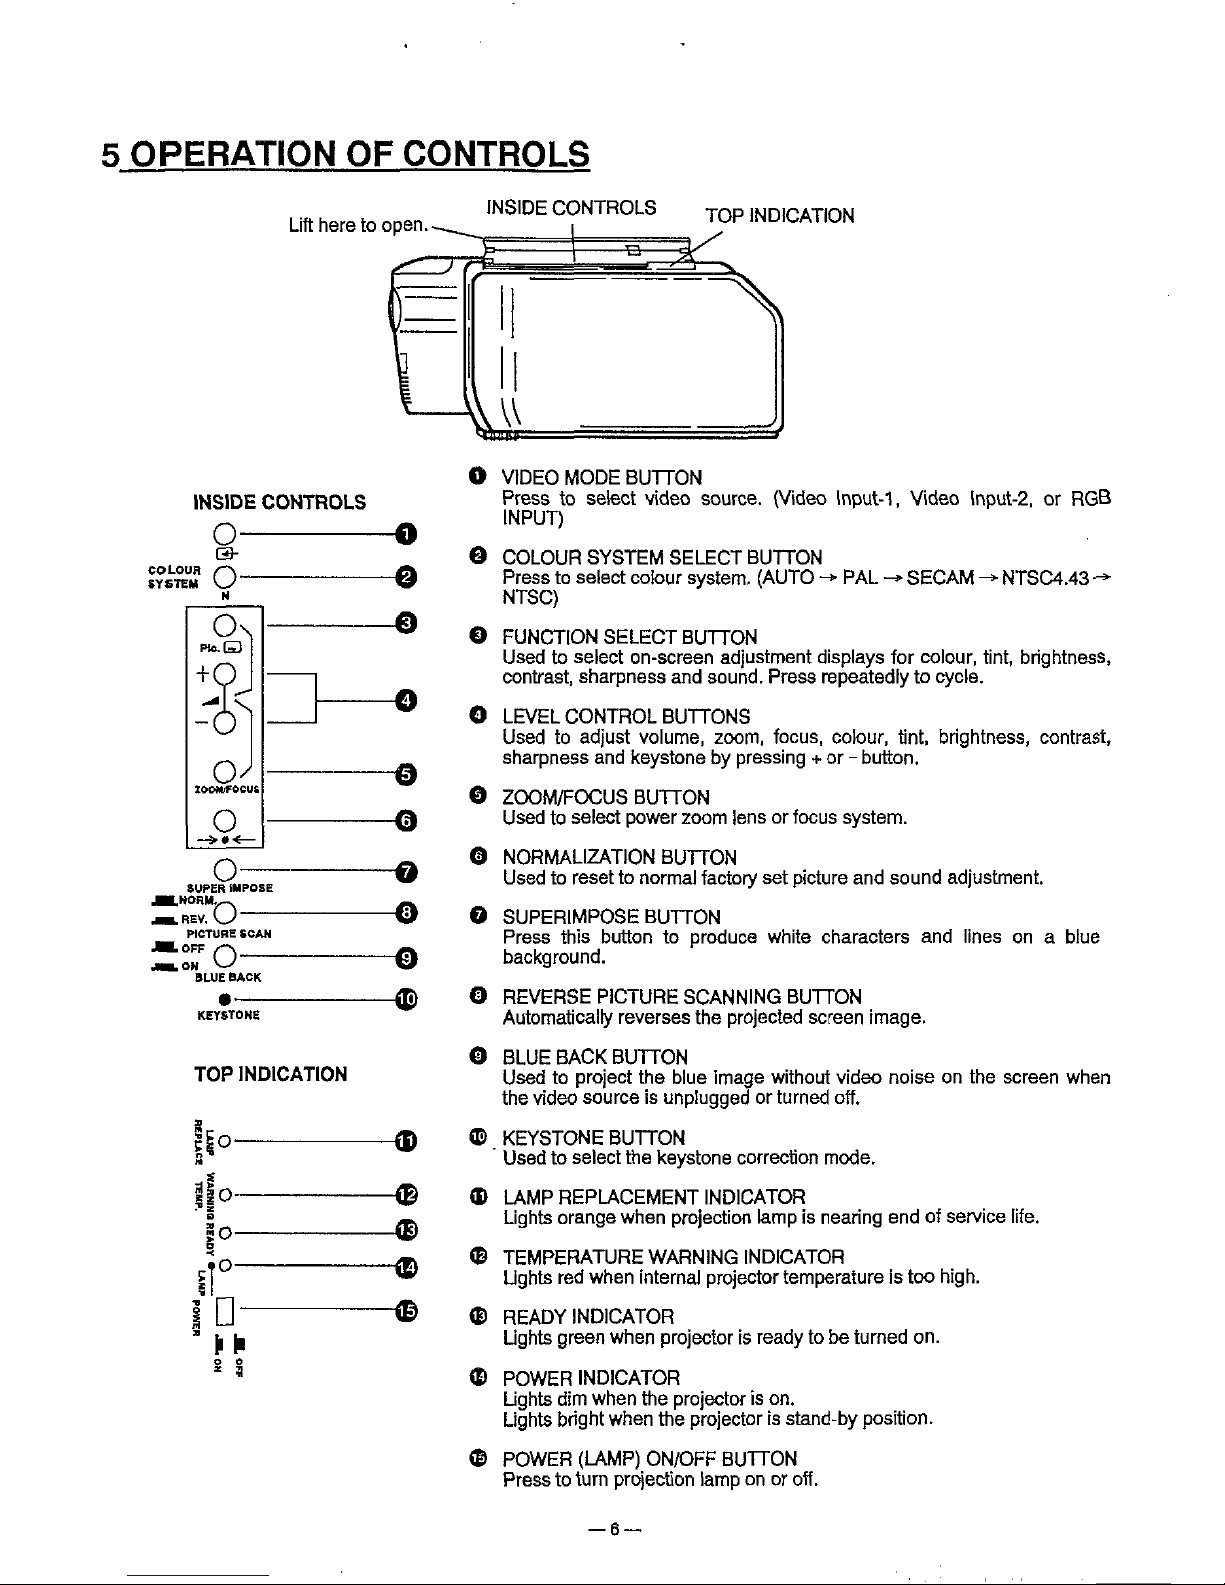
OPERATION
OF
CONTROLS
Lift
here
to
open.
!NS)DE
CONTROLS
^P
!NDtCATtON
^
tNStDE
COMTROLS
TOP
)ND!CAT)ON
0
0
"=
9
^
s-
UH
^
M
L^
M
0^
P!e.Q
^
0^
!&C^FCCU
0
—^«^
eUPER
IMPOSE
OM
=tEV.^
PtCTURE
<CAM
.FFQ
^H
^-^
BLUE
BACK
W————————
KEYSTONE
t
0-—
^^
———0
^
—————^
———0
———A
^
———0
———0
———0
————<t
^
———<E)
^"
^^o
.
.
:°^
B
So
—.
..
^
^-'
^
^
n
^
LJ
^
'
)!)'
<^
————————————(B
^
———————tjjp
———(p
0
VtDEO
MODE
BUTTON
Press
to
select
video
source.
(Video
input-1,
Video
tnput-2.
or
FtGB
)NPUT)
0
COLOUR
SYSTEM
SELECT
BUTTON
Press
to
setect
co!our
system.
(AUTO ^ PAL
^-
SECAM
^-
NTSC4.43
-^
NTSC)
0
FUNCTtON
SELECT
BUTTON
Used
to
setect
on-screen
adjustment
disp)ays
for
cotour,
tint,
bnghtness,
contrast,
sharpness
and
sound.
Press
repeatedtyto
cycte.
0
LEVEL
CONTROL
BUTTONS
Used
to
adjust
vo)ume,
zoom,
focus,
cotour,
tint.
brightness,
contrast,
sharpness
and
keystone
by
pressing + or - button.
0
ZOOM/FOCUS
BUTTON
Used
to
setect
power
zoom
tens
or
focus
system.
0
NORMALiZATfON
BUTTON
Used
to
reset
to
normal
factory
set
picture
and
sound
adjustment.
0
SUPERIMPOSE
BUTTON
Press
this
button
to
produce
white
characters
and
iines
on a btue
background.
0
REVERSE
P!CTURE
SCANNING
BUTTON
Automatical
reverses
the
projected
screen
image.
0
BLUE
BACK
BUTTON
Used
to
project
the
biue
image
without
video
noise
on
the
screen
when
the
video
source
is
unpegged
or
turned
off.
0
KEYSTONE
BUTTON
Used
to
se)ect
the
keystone
correction
mode.
<D
LAMP
REPLACEMENT
INDICATOR
Lights
orange
when
projection
tamp
is
nearing
end
of
service
iife.
<B
TEMPERATURE
WARNING
INDICATOR
Ughts
red
when
internal
projector
temperature
is
too
high.
<B
READY
)NDICATOR
Ughts
green
when
projector
is
ready
to
be
turned
on.
<B
POWER
)ND)CATOR
Lights
dim
when
the
projector
is
on.
Ughts
bright
when
the
projector
is
stand-by
position.
<&
POWER
(LAMP)
ON/OFF
BUTTON
Press
to
turn
projection
iamp
on
or
off.
 Loading...