

Page 1
For customer service issues, please call 1-866-848-9912
or visit us online at www.sanyobatteries.com.
Charger Model #NC-MQN06
Notes on Safety (Please read for proper use.)
Severity of symbol
Danger - Very close to causing death or heavy damage
to human body.
Warning - May cause death or heavy damage to
human body.
Caution - May cause heavy damage to human body
or property damage.
Example of the symbols
This symbol is to inform that the action written inside of the
symbol is prohibited. (Left is to prohibit you from taking apart)
Safety issues of charger
Danger
Use under the specified voltage
Please use under AC100V to 240V. Otherwise, may
cause high heat, fire breakout, electric shock, or harm to
human body.
Warning
Do not allow metal objects come into contact with charger.
May cause electric shock, excessive heat, or fire.
This appliance is not intended for use by persons
(including children) with reduced physical, sensory or
mental capabilities, or lack of experience and knowledge,
unless they have been given supervision or instruction
concerning use of the appliance by a person responsible
for their safety. Children should be supervised to ensure
that they do not play with the appliance. Do not charge
non-rechargeable batteries.
Caution
May deform charger causing high heat, leakage,
or explosion.
Do not place heavy objects on top of the charger. Avoid
unstable locations like areas with strong magnetic fields or
dust. May cause excessive heat or fire.
Charger should be used between 41°F to 95°F. If ambient
temperature is higher, charger may cause the battery to leak
or rupture.
Charging Safety
Do not charge near hot temperatures like an electric blanket,
stove, near direct sunlight, inside of a car, or under hot sun, etc. In
addition, please do not cover the charger with a blanket. In such
cases, battery would not be fully charged because the temperature
inside of the charger will become hot, and the safety protective
function will be activated and stop charging.
Please charge at temperature between 41°F to 95°F.
Call GE SANYO at (866) 848-9912 • SANYO Energy (U.S.A.) Corp.,
c/o XWG, 1840 County Line Road Huntingdon Valley, PA 19006
sanyo@accessoryhelp.info •www.sanyobatteries.com
Regarding eneloop Ni-MH batteries
Please follow the instructions below to avoid damage or injury.
Danger
• Do not dispose of in fire. Do not heat, deform, solder, dissamble or
modify.
• Do not insert batteries with the (+) and (-) ends reversed.
• If leaked liquid gets in the eyes, wash them with clean water and
consult a doctor immediately.
• Batteries should not be used in underwater lighting or in sealed
electronic devices.
Warning
• Do not connect the (+) and (-) ends with metal objects. When
carrying or storing batteries, avoid direct contact with metal objects.
• Children should be supervised while handling the batteries.
• Do not peel off or damage the outer tube.
• If leaked liquid gets on the skin or clothing, wash off with clean water
immediately.
• Do not connect 10 batteries or more in series.
Caution
Operating temperature range for Ni-MH battery eneloop
• Discharge
• Recharge
• Store
• Outside of the indicated range, battery’s performance and
life-cycle may decrease.
Do not use these batteries together with dry cells, other types of
batteries, new or old batteries together, or batteries with different
charge levels.
Correctly use “eneloop”
About Charging
Depending upon storage condition, typically eneloop does not need to
be recharged for the first time if used within 2 years from the
manufactured date. However, there may be a time when some digital
cameras may display the low battery indicator. In these cases, please
recharge.
* All statements concerning capacity (mAh) or the life of the battery (cycle
life) are based on IEC61951-2.
* Statements concerning long term storage is based on simulations at room
temperature.
23°F to 122°F
41°F to 95°F
- 4°F to 86°F
Ni-MH battery
Please recycle used rechargeable batteries.
All rechargeable batteries contain precious
resources that can be reused. To learn more
about recycling or to find a drop-off location,
please visit http://www.rbrc.org
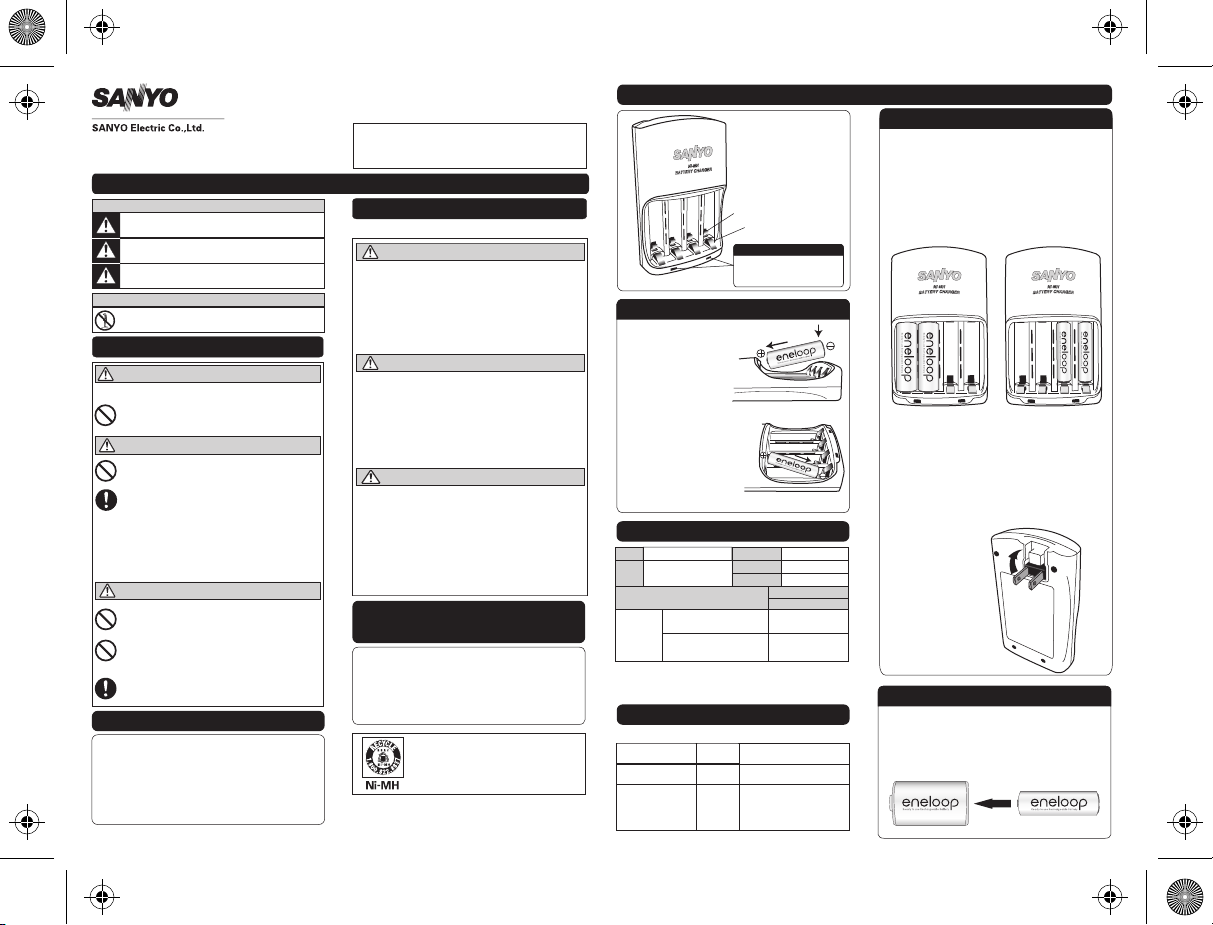
Parts and usage
With this charger, you can
charge up to 4 AA or 4AAA
eneloop Ni-MH batteries.
AAA (-) contact surface
AA (-) contact surface
Charge indicator light
• Flashes when charging.
•Turns on when charging is
complete.
How to insert and remove battery
How to insert
• Match the + and – terminal of the
battery with the charger’s + and
– contact surface.
• For AA battery, insert from the
+ terminal and push on the
– terminal.
•For AAA battery, insert from
– terminal as in the picture, then
place + terminal into + contact surface.
How to remove
• For AA battery, take out from
– terminal.
• For AAA battery, if pushed on
the + side, - side will pop out
for easy removal.
Input
AC100-240V ~ 50/60Hz 8W
AA - 2/4 x 1.2V — 300mA
Output
AAA - 2/4 x 1.2V — 150mA
Suitable Battery
Ni-MH
AA HR-3UTG ( Max 3000mAh.
Min. 1900mAh*)
battery
eneloop
AAA HR-4UTG (Max 1000mAh.
Min. 750mAh*)
Charge time is the time it takes to charge a fully discharged battery.
The charge time will depend on the remaining charge in the battery
and the ambient temperature.
Appearance
Indicator lights flashing
Indicator lights are on
Indicator lights are off
How to insert a AA battery
How to insert a AAA battery
Spec
Size
Weight
Temp. range
Indication light
Status
Charging
properly
Finish
Batteries are ready for use
charging
a) No battery put inside charger
b) Battery connected incorrectly
Default
mode
c) The charger has internal failure
118 x 72 x 32.5 mm
~ 98g
41°F – 95°F
Charge time
1 – 4 battery
Approx. 10 hours
Approx. 7 hours
Handling
Normal
d) Power off
1) This charger is designed to charge 2 or 4 pcs of AA or AAA
Ni-MH rechargeable batteries. AA and AAA batteries can be
charged at the same time.
2) If you want to charge 4 pcs of AA or AAA, put batteries into the
charger compartments, taking care to observe polarity (+/-) as
indicated inside the charger.
3) If only charging 2 batteries at a time, place the batteries in the
left or right side compartments of the charger.
4) Swing plug out and plug into AC100-240V outlet.
5) Confirm that the indication lights begin to flash. Do not plug in
upside down. If plugged in upside down, it will finish charging
before it is fully charged.
6) When charging is complete, the indicator lights will turn on
constantly. Refer to charging chart for typical charge time.
7) After charging is done, unplug the charger from the outlet and
swing plug back into place.
How to assemble C or D battery
• Match the + and – terminal of a AA eneloop battery with the
spacer’s + and – terminals.
• Insert the + terminal of the AA eneloop battery into the – end of
the spacer.
•Push the AA battery until it “snaps” into place.
• To remove, push on the + terminal of the AA eneloop battery
until it releases.
How to charge
C or D spacer
AA battery
 Loading...