

Page 1
AS
HT30744
AS
AS
AS
HT32744
Model Nos. :
No. de Modelo:
o
N
de modele:
Owner’s Manual
ENGLISH
Table of Contents . . . . . . . 3
Manual de Instrucciónes
ESPAÑOL
Contenido . . . . . . . . . . . . 25
Manuel d’instructions
FRANÇAIS
Table des matières . . . . 48
HT27744
HT30744
HT32744
HT27744
ENERGY STAR
“As an ENERGY STAR® Partner, Sanyo
Manufacturing Corporation has determined
that this product meets the ENERGY STAR®
guidelines for energy efficiency.”
As Real
As It Gets!
“Read this manual before assembling (or using) this product.”
Need assistance?
Visit our Web site at www.sanyoctv.com or
Call toll free 1-800-877-5032
Importado Por :
Comercializadora México
Americana, S. DE R.L. DE C.V.
Nextengo Nº 78
Col. Santa Cruz Acayucan
Del. Azcapotzalco, México D.F. C.P.
02770, RFC CMA 9109119L0
Telefono: 55-5328-3500
Printed in U.S.A. SMC, May 2004
Impreso en U.S.A. SMC, Mayo 2004
Imprimé aux É.-U. SMC, mai 2004
Part No. / No. de Parte/
No de pièce : 1AA6P1P4417A–
Service Code /Código de Servicio/
Code de service : 610 312 2304
Page 2
CAUTION
RISK OF ELECTRIC SHOCK DO NOT OPEN
CAUTION: TO REDUCE THE RISK OF ELECTRIC SHOCK, DO NOT REMOVE COVER (OR
BACK). NO USER-SERVICEABLE PARTS INSIDE. REFER SERVICING TO QUALIFIED
SERVICE PERSONNEL.
THIS SYMBOL INDICATES THAT DANGEROUS VOLTAGE CONSTITUTING A RISK OF ELECTRIC SHOCK IS PRESENT WITHIN THIS UNIT.
THIS SYMBOL INDICATES THAT THERE ARE IMPORTANT OPERATING AND MAINTENANCE
INSTRUCTIONS IN THE LITERATURE ACCOMPANYING THIS UNIT.
WARNING: TO REDUCE THE RISK OF FIRE OR ELECTRIC SHOCK, DO NOT EXPOSE THIS APPLIANCE TO RAIN OR MOISTURE.
IMPORTANT SAFETY INSTRUCTIONS
CAUTION: PLEASE ADHERE TO ALL WARNINGS ON THE PRODUCT AND IN THE OPERATING INSTRUCTIONS. BEFORE OPERATING THE PRODUCT, PLEASE
READ ALL OF THE SAFETY AND OPERATING INSTRUCTIONS. RETAIN THIS LITERATURE FOR REFERENCE. Follow all instructions...
Positioning the appliance
1. Do not place your appliance on an unstable cart, stand, shelf or table.
Serious injury to an individual, and damage to the appliance, may result if
it should fall. Your salesperson can recommend approved carts and stands
or shelf and wall mounting instructions. An appliance and cart combination
should be moved with care. Quick stops, excessive force, and uneven surfaces may
cause the appliance and cart combination to overturn.
2. Slots and openings in the cabinet and in the back or bottom are provided for ventilation.
To ensure reliable operation of the appliance and to protect it from overheating, these
openings must not be blocked or covered. The openings should never be covered with
a cloth or other material, and the bottom openings should not be blocked by placing the
unit on a bed, sofa, rug, or other similar surface. This appliance should never be placed
near or over a radiator or heat register. This appliance should not be placed in a built-in
installation such as a bookcase unless proper ventilation is provided.
3. Do not expose the appliance to rain or use near water . . . for example, near a bathtub,
swimming pool, kitchen sink, in a wet basement, etc.
Hooking Up Outdoor Antenna
LIGHTNING PROTECTION FOR YOUR ANTENNA AND SET AS PER NATIONAL ELECTRICAL CODE
NSTRUCTIONS.
I
4. If an outside antenna is connected to the receiver, be sure the antenna system is
grounded so as to provide some protection against voltage surges and built up static
charges. Article 810 of the National Electrical Code, ANSI/NFPA 70, provides information with respect to proper grounding of the mast and supporting structure, grounding
of the lead in wire to an antenna discharge unit, size of grounding conductors, location
of antenna discharge unit, connection to grounding electrodes, and requirements for
the grounding electrode.
EXAMPLE OF ANTENNA GROUNDING ACCORDING TO NATIONAL ELECTRICAL CODE,
ANSI/NFPA 70
ANTENNA
LEAD IN
WIRE
GROUND
CLAMP
ELECTRIC
SERVICE
EQUIPMENT
GROUND CLAMPS
POWER SERVICE GROUNDING
ELECTRODE SYSTEM
(NEC ART 250, PART H)
“Note to CATV system installer:
This reminder is provided to call the CATV system installer’s attention to Article 820-40 of the NEC that provides
guidelines for proper grounding and, in particular, specifies that the cable ground shall be connected to the
grounding system of the building, as close to the point of cable entry as practical.”
NEC - NATIONAL ELECTRICAL CODE
ANTENNA
DISCHARGE UNIT
(NEC SECTION 810-20)
GROUNDING CONDUCTORS
(NEC SECTION 810-21)
An outside antenna system should not be located in the vicinity of overhead power
lines or other electric light or power circuits, or where it can fall into such power lines
or circuits. When installing an outside antenna system extreme care should be taken to
keep from touching such power lines or circuits as contact with them might be fatal.
Plug in the power cord
5. This product should be operated only from the type of power source indicated on the
marking label. If you are not sure of the type of power supply to your home, consult
your product dealer or local power company. This product is equipped with a polarized
alternating current line plug (a plug having one blade wider than the other). This plug
will fit into the power outlet only one way. This is a safety feature. If you are unable
to insert the plug fully into the outlet, try reversing the plug. If the plug should still
fail to fit, contact your electrician to replace your obsolete outlet. Do not defeat the
safety purpose of this polarized plug. Do not overload wall outlets, extension cords, or
integral convenience receptacles as this can result in a risk of fire or electric shock.
6. Power-supply cords should be routed so that they are not likely to be walked on or
pinched by items placed upon or against them, paying particular attention to cords at
plugs, convenience receptacles, and the point where they exit from the product.
Cleaning
7. Before cleaning, unplug the unit from the wall outlet. Do not apply liquid cleaners or
aerosol cleaners directly to the unit. Use a dry cloth for cleaning.
Service & Repair
8. Unplug the appliance from the wall outlet and refer servicing to qualified ser vice
personnel under the following conditions:
A. If the power cord or plug is damaged or frayed.
B. If liquid has been spilled into the appliance.
C. If the appliance has been exposed to rain or water.
D. If the appliance has been dropped or the cabinet has been damaged.
E. If the appliance exhibits a distinct change in performance.
F. If the appliance does not operate normally by following the operating
instructions, adjust only those controls that are covered in the operating
instructions. Improper adjustment of other controls may result in damage
and will often require extensive work by a qualified technician to restore the
appliance to normal operation.
9. Upon completion of any service or repair, request the service technician’s assurance
that only Factory Authorized Replacement Parts that have the same characteristics as
the original parts were used, and that routine safety checks have been performed to
determine that the appliance is in safe operating condition. Unauthorized substitutions
may result in fire, electrical shock, or other hazards.
10. Never add accessories that have not been specifically designed for use with this appli-
ance as they may cause hazards.
11. For added protection during a lightning storm, or when the set is left unattended and
unused for long periods of time, unplug it from the wall outlet and disconnect the
antenna. This will prevent damage to the set due to lightning or power line surges.
12. Never push objects of any kind into this product through openings as they may touch
dangerous voltage points or short-out parts that could result in a fire or electric shock.
Never spill liquid of any kind on the product.
Positioning the TV
Do not position the TV in a confined area. Allow space for normal air circulation
around electronic parts.
Child Safety
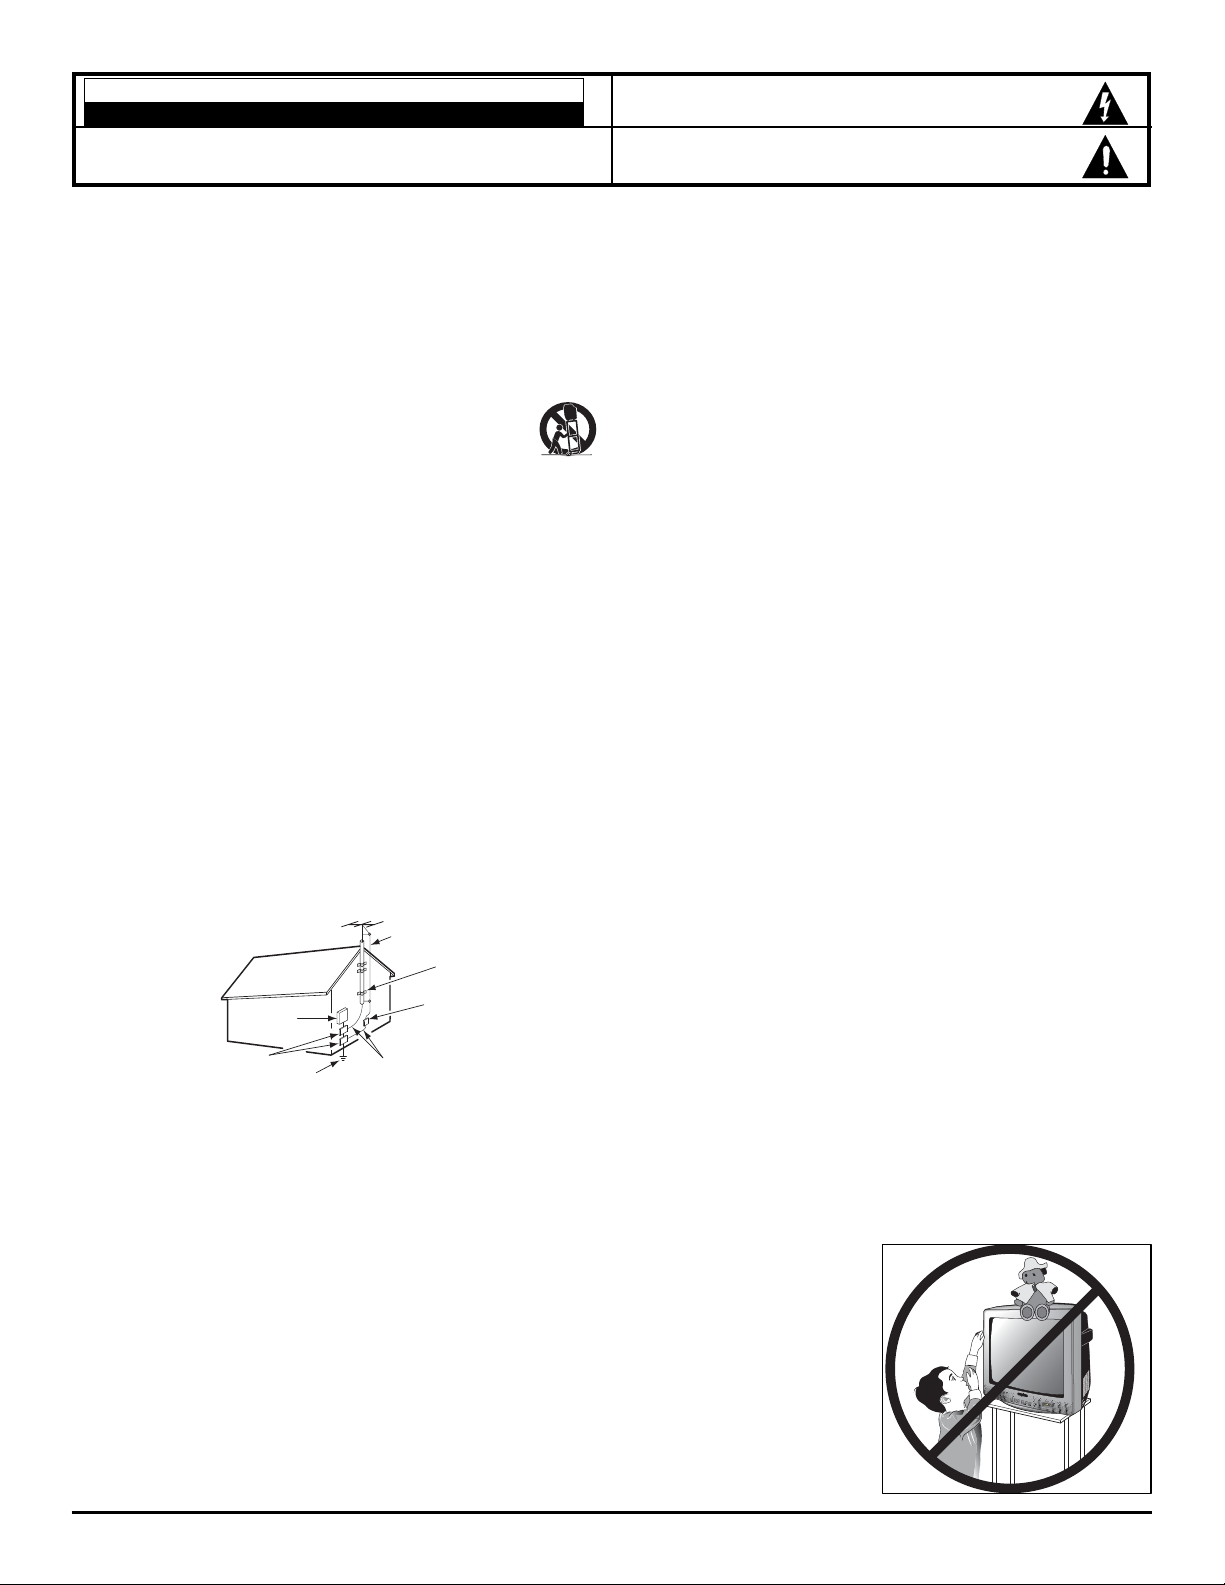
Sanyo is committed to making home entertainment safe and enjoyable. Always use
an appropriate table or stand when positioning your TV. Use appropriate brackets,
braces, or straps to anchor your furniture in place. But never screw anything
directly to the television.
Do not place televisions on dressers, shelves, desks, carts, etc., where curious
or excited children could pull, push, or otherwise cause the unit to fall and cause
personal injury.
Never place toys or other items on top
of the TV that could pique children’s
curiosity causing them to climb
about the furniture.
Always use stands that are designed
to support the size and combined
weight of your television and other
electronic devices.
A
S
V
I
D
E
O
I
N
L
A
U
D
I
O
R
2
2 Important Safety Information
Page 3

Contents
Important Safety Instructions . . . . . . . . . . . . . . . . . . . . . . . . 2
Welcome to the World of Sanyo . . . . . . . . . . . . . . . . . . . . . . 3
Features . . . . . . . . . . . . . . . . . . . . . . . . . . . . . . . . . . . . . . . . . . 4
Specifications . . . . . . . . . . . . . . . . . . . . . . . . . . . . . . . . . . . . . . 4
Glossary . . . . . . . . . . . . . . . . . . . . . . . . . . . . . . . . . . . . . . . . . . 5
Getting Started . . . . . . . . . . . . . . . . . . . . . . . . . . . . . . . . . . . . 6
HDTV Back—Jacks Locations & Functions . . . . . . . . . . . . 6
Signal Connections
Analog (RF) Antenna Connection . . . . . . . . . . . . . . . . . . . . 7
Digital (DTV) Antenna Connection . . . . . . . . . . . . . . . . . . . 7
Setting Up the TV . . . . . . . . . . . . . . . . . . . . . . . . . . . . . . . . . . 7
Digital A/V Connections
Connecting External Equipment to HDMI Input
with HDCP . . . . . . . . . . . . . . . . . . . . . . . . . . . . . . . . . . . . . . 8
Connecting STB or DVD with DVI Output to HDMI Input
With HDCP . . . . . . . . . . . . . . . . . . . . . . . . . . . . . . . . . . . . . . 8
Using the Component jacks to connect a DVD Player or
Other digital equipment . . . . . . . . . . . . . . . . . . . . . . . . . . . . 9
Analog A/V Connections
Using the S-Video Jacks to connect a VCR or DVD
Player to A/V jacks . . . . . . . . . . . . . . . . . . . . . . . . . . . . . . . 9
Audio Connections
Connecting Digital Audio Output to a Stereo Amplifier . . 10
Connecting Analog Audio Output to a Stereo Amplifier . . 10
Typical Home Theater Connections . . . . . . . . . . . . . . . . . . .11
Using the Multimedia Remote Control
Installing Batteries . . . . . . . . . . . . . . . . . . . . . . . . . . . . . . . .12
Programming the Remote . . . . . . . . . . . . . . . . . . . . . . . . . . 13
Remote Program Codes (VCR/DVD/Satellite/Cable) . . 14~15
Remote Program Key Functions Chart . . . . . . . . . . . . . . . . 15
TV Adjustment and Setup
How to Operate the On-Screen Menu . . . . . . . . . . . . . . . . 16
Menu Navigation Map . . . . . . . . . . . . . . . . . . . . . . . . . . . . 16
Channel Search . . . . . . . . . . . . . . . . . . . . . . . . . . . . . . . . . . 17
Digital Cable Search . . . . . . . . . . . . . . . . . . . . . . . . . . . . . . 17
Digital Add-On Search . . . . . . . . . . . . . . . . . . . . . . . . . . . . 17
Antenna Selection . . . . . . . . . . . . . . . . . . . . . . . . . . . . . . . . 17
Channel Scan Memory . . . . . . . . . . . . . . . . . . . . . . . . . . . . 18
Initial Channel . . . . . . . . . . . . . . . . . . . . . . . . . . . . . . . . . . 18
Closed-Captioning
How to View Captions . . . . . . . . . . . . . . . . . . . . . . . . . . . . 18
How to Customize Digital Captioning On-Screen Display . . . 18
V-Guide (Parental Control) Operation
How to Block Movies or TV Programs . . . . . . . . . . . . . . . 19
How to Temporarily Unblock Movies or TV Programs . . . 19
How to Unblock Movies or TV Programs . . . . . . . . . . . . . 19
Setup Menu
Setting the Clock Manually . . . . . . . . . . . . . . . . . . . . . . . . 20
Digital Audio Output . . . . . . . . . . . . . . . . . . . . . . . . . . . . . 20
TV Speakers . . . . . . . . . . . . . . . . . . . . . . . . . . . . . . . . . . . . 20
Menu Language . . . . . . . . . . . . . . . . . . . . . . . . . . . . . . . . . 20
Picture/Sound Adjustment
Adjusting the Picture/Sound Manually . . . . . . . . . . . . . . . . 20
Color Enhancer . . . . . . . . . . . . . . . . . . . . . . . . . . . . . . . . . . 21
Scan Velocity . . . . . . . . . . . . . . . . . . . . . . . . . . . . . . . . . . . 21
PAP (Picture and Picture)
Using the PAP Split Screen . . . . . . . . . . . . . . . . . . . . . . . . 21
Switching Between the Split Windows . . . . . . . . . . . . . . . 21
Freezing the PAP Window . . . . . . . . . . . . . . . . . . . . . . . . . 21
Operating PAP Screens with other features . . . . . . . . . . . . 21
Helpful Hints (Problems/Solutions) . . . . . . . . . . . . . . . . . . 22
Warranty (Mexico) . . . . . . . . . . . . . . . . . . . . . . . . . . . . . . . . 23
Warranty (U.S.A. and Canada) . . . . . . . . . . . . . . . . . . . . . . 24
Introduction
Welcome to the World of Sanyo
Thank you for purchasing this Sanyo High-Definition Digital Television. You made an excellent choice for Performance, Reliability,
Features, Value, and Styling.
To The Owner
We are aware that you are eager to begin using your new HDTV. However, we also understand that to enjoy it fully you must first understand its
many features. While this owner’s manual is intended to fully acquaint you with the TV’s operation, it is not meant to be read from cover to cover.
Instead, it has been carefully arranged for easy use so you can find what you need, then move on quickly to enjoying your digital television.
Table of Contents / Introduction 3
Page 4

Features Specifications
◆ 27″ High-Definition Digital True Flat-screen television
◆
30″ High-Definition Digital True Flat Wide-screen television
32″ High-Definition Digital True Flat-screen television
◆
◆ Trilingual Menu Options
◆ Built-in Digital and Analog Tuners
◆ Automatic Channel Search
◆
Auto Shut Off
◆
3-D Digital Comb Filter (for better picture detail)
◆ Adjustable Scan Velocity Modulation
◆
V-Chip for Movies and TV guidelines rating limits (parental
control)
◆ Closed-Captioning: Analog EIA-608B and Digital (EIA-708B)
◆ Audio Modes: DTV—Main and Sub
NTSC—Stereo, Mono, and SAP
◆ Front Surround Sound
◆ Bass / Treble
◆ Front speakers 6 x 12 cm (two)
◆ Factory preset adjustments for picture/sound
◆ Picture shape: Letter box, Zoom, Normal, and Full (HT30744 only)
◆ Initial Channel (automatic selection)
◆ Receivable Formats: Two tuning system: with integrated ATSC
digital tuner for terrestrial and nonscrambled (ClearQAM)
cable channels. NTSC analog tuner for VHF/UHF or CATV
◆ Audio Format: Dolby™ Digital for DTV and Analog for NTSC
◆
PAP (Picture-and-Picture) split-screen
◆ Channel Scan Memory
◆
Color Enhancer
◆ Auto Flesh Tone
◆ Receives 181 Analog Channels [VHF 2~13 and UHF 14~69;
Cable TV 1, 14~125]; and 99 Digital Channels
◆ RF Antenna Input Jacks: Digital and Analog
◆ HDMI (High-Definition Multimedia Interface) Input with
HDCP (High-bandwidth Digital Content Protection)
◆ Component Video Input (Two Sets)
◆ Rear AV Input (Two Sets)
◆ S-Video Input (Two Sets)
◆ Optical Digital Audio Out
◆ Audio Out (Switchable)
◆
Clock (auto clock)
◆ XDS (Extended Data Services) displays station call letters,
Title of show, and ratings when broadcast
◆ Sleep Timer (3 hours)
◆ 52-Key DTV Multimedia Remote Control
Picture Tube Size (Measured Diagonally):
HT27744 - 27″; HT30744 - 30″; HT32744 - 32″ True Flat screens
Picture Resolution: RF: Input–330, AV Input–800
Scanning Format: 1080i
RF Antenna Input: Analog–UHF/VHF/CATV 75 ohm
Digital–75 ohm
No Signal Reception: TV automatically switches off after 15 minutes
In Video Modes, TV will NOT switch off
Power Requirement: Source: AC 120V, 60Hz
Power Consumption: 140 Watts
Sound: Two Speakers, size: 6x12cm
Amplifier: Built-in with 5.0W/ch
Jacks and Connectors:
Video 1 Input: S-Video1, Video and Audio L/R
Video 2 Input: S-Video2, Video and Audio L/R
Compo 2 Input: Component (Y/Pb/Pr), with shared
Video 2 Audio L/R input
Compo 3 Input: Component (Y/Pb/Pr), and
Audio 3 L/R input
Digital Audio Output: S/P DIF or PCM
Analog Audio Output: Audio L/R
HDMI Input: 19-pin connector (Picture/Sound)
Service input Terminal: For Technical use only
Size and Weight (approximately):
HT27744
Horizontal Dim. (Width): 30.3 in. (770mm)
Vertical Dim. (Height): 23.0 in. (585mm)
Depth Dim. (Thickness): 19.5 in. (496mm)
Weight: 103.5 (lbs.), 47.0 (Kg)
HT30744
Horizontal Dim. (Width): 35.7 in. (908mm)
Vertical Dim. (Height): 22.5 in. (572mm)
Depth Dim. (Thickness): 21.8 in. (553mm)
Weight: 132.2 (lbs.), 60.0 (Kg)
HT32744
Horizontal Dim. (Width): 35.0 in. (888mm)
Vertical Dim. (Height): 27.0 in. (687mm)
Depth Dim. (Thickness): 22.4 in. (570mm)
Weight: 143.4 (lbs.), 65.1 (Kg)
CAUTION: FCC Regulations state that improper modifications or unauthorized
changes to this unit may void the user’s authority to operate the unit.
Trademarks Information:
Manufactured under license from Dolby Laboratories. “Dolby”
and the double-D symbol are trademarks of Dolby Laboratories.
This symbol on the nameplate means the product is Listed by
Underwriters’ Laboratories Inc. It is designed and manufactured to
meet rigid U.L. safety standards against risk of fire, casualty and
electrical hazards.
4 Features & Specifications
Page 5

Glossary
Analog—Commonly refers to the current NTSC transmission
standard for televisions.
Aspect Ratio—This term describes the ratio of the width to the
height of a TV screen independent of the screen size (x units wide
by x units high).
ATSC—Advanced Television Systems Committee (digital standards
committee).
Bandwidth—The range of frequencies assigned to a broadcast
channel. A TV channel is 6 MHz wide.
ClearQAM Digital Channels—Unscrambled digital cable channels. Cable companies may or may not choose to provide ClearQAM
channels.
Dolby® Digital (Formally known as Dolby AC-3)—A 5.1 channel
(Front L/R, Rear L/R, Center, and Bass) surround sound audio
standard for digital television.
Downconverting—A process for decreasing the number of pixels
in an image. Frame rate and/or scanning format may also change.
Broadcasters may use this process to make room in their bandwidth
for additional services.
DTV (Digital Television)—Comprises three elements, HDTV,
EDTV, and SDTV.
DVI (Digital Video Interface)—Designed to accommodate
both analog and uncompressed digital video signals with a single
connector.
EDTV—Enhanced Definition Television (480p).
HDCP—High-bandwidth Digital Content Protection. A means of
protecting copyrighted digital entertainment content.
HDMI—High Definition Multimedia Interface. HDMI is a new stan-
dard digital connection between A/V devices, such as a set-top box,
DVD player or A/V receiver, and a digital television. HDMI offers
exceptional video and audio quality with a single quick-disconnect
connector. HDMI supports multi-channel digital audio transmissions
and component video color spacing for true rendering of highdefinition video. It supports the HDCP protection standard, allowing
transmission of copy-protected digital content to your display.
HDTV—High Definition Television (1080i & 720p).
Interlaced Scanning—The process of scanning two fields of video
then combining (interlacing) them to make one frame.
Letter Box—A widescreen 16:9 aspect ratio image
being displayed on a 4:3 aspect ratio screen. Black
borders appear at the top and bottom of the screen
(image fails to fill screen vertically).
Multicasting—The dividing of a station’s broadcast signal into subchannels of programming or data services.
NTSC—National Television Systems Committee (analog standards
committee).
OSD—On Screen Display.
Pulse Code Modulation (PCM)—This is a binary digital signal
format used for digitizing analog data.
Pillar Box—A 4:3 aspect ratio image being
displayed on a 16:9 ratio screen. Black borders
appear at the sides of the screen (image fails to fill
screen horizontally).
Postage Stamp—This term is used to describe a 4:3
aspect ratio image that the broadcaster has up-coverted
to a 16:9 aspect ratio image, then displayed on a 4:3
aspect ratio screen. Black borders appear at the top,
sides, and bottom of the screen (image fails to fill screen both vertically and horizontally). (See Zoom definition below.)
Progressive Scanning—The process of scanning lines sequentially.
One field produces one frame.
PSIP—Program and System Information Protocol is a collection of
tables designed to operate within every transport stream for DTV
broadcasts. PSIP includes instructions advising TVs that a change
is about to occur and where virtual channel programming can be
found.
Set-Top Box (STB)—A device that receives and converts signals for
display on a television screen or monitor (can be digital or analog).
Many digital STBs have cable and off-air tuners.
SDTV—Standard Definition Television (480i).
Simulcast—A broadcast station simultaneously broadcasting the
same program on an analog channel and a DTV channel. This is
required by the FCC during the transition from analog to digital.
Spectrum—A continuous band of frequencies.
S/P DIF —S/P DIF is a digital audio format that can transmit a Dolby
Digital bit stream. By connecting this output to an AV receiver that
includes a Dolby Digital decoder, the TV can reproduce up to 5.1
channels of surround sound. S/P DIF can also transmit PCM audio.
Surround Sound (Front)—This feature adds another dimension to
the acoustic experience and helps to improve the movie-theater like
sound.
Terrestrial Broadcast—An over-the-air broadcast to an antenna.
Tuner Indicator—The letters “D,” “C,” or “DC” will appear directly
to the left of the channel number:
Off-air channels selected with the digital (DTV) tuner will have
the prefix “D.”
Channels selected with the analog (NTSC) tuner will either have
the prefix “C” (analog cable channels) or will be blank (for terrestrial, VHF/UHF channels).
ClearQAM digital cable channels will have the prefix “DC.”
Tuner Key—This key is used to toggle from one tuning system to
another, digital channels and analog channels.
Upconverting
image (may include changing the frame rate and scanning format).
Additional pixels are inserted between existing pixels in an attempt to
simulate HDTV. This process does not increase the resolution.
Virtual Channel—Channels broadcasted with major and minor
information contained in the PSIP package. The number of virtual
channels a broadcaster can send depends on the resolution of the
programming.
Wide-Screen—Used to describe a 16:9 or greater aspect ratio. 16:9
is the standard aspect ratio for HDTV programming. Movies screens
are sometimes slightly wider (often 2:1).
Zoom—Enlarges center of the image. For
instance, if you have a postage stamp image
shape, press this key to enlarge image.
—A process for increasing the number of pixels in an
Glossary 5
Page 6
Getting Started
This new high-definition digital television is capable of reproducing a crystal clear picture and exceptional sound.
Just like being There!
To get the best performance from this HDTV you will need to...
1. Choose the appropriate Signal Connection, “The Signal Makes the Difference,” pages 7
2. Connect External equipment, if desired, pages 8 ~ 11
3. Install Batteries in the Remote, and Review the functions, pages 12~13
4. Program Remote to operate other equipment, if desired, pages 13~15
5. Follow the on-screen menu display to customize and setup features, pages 16~21
Note: For additional assistance, reference the Quik ’N Easy Setup guide to learn how different signals and external equipment
effect picture quality. Follow the examples there to ensure that you are getting the best possible picture, based on your
external equipment’s capability and your signal quality.
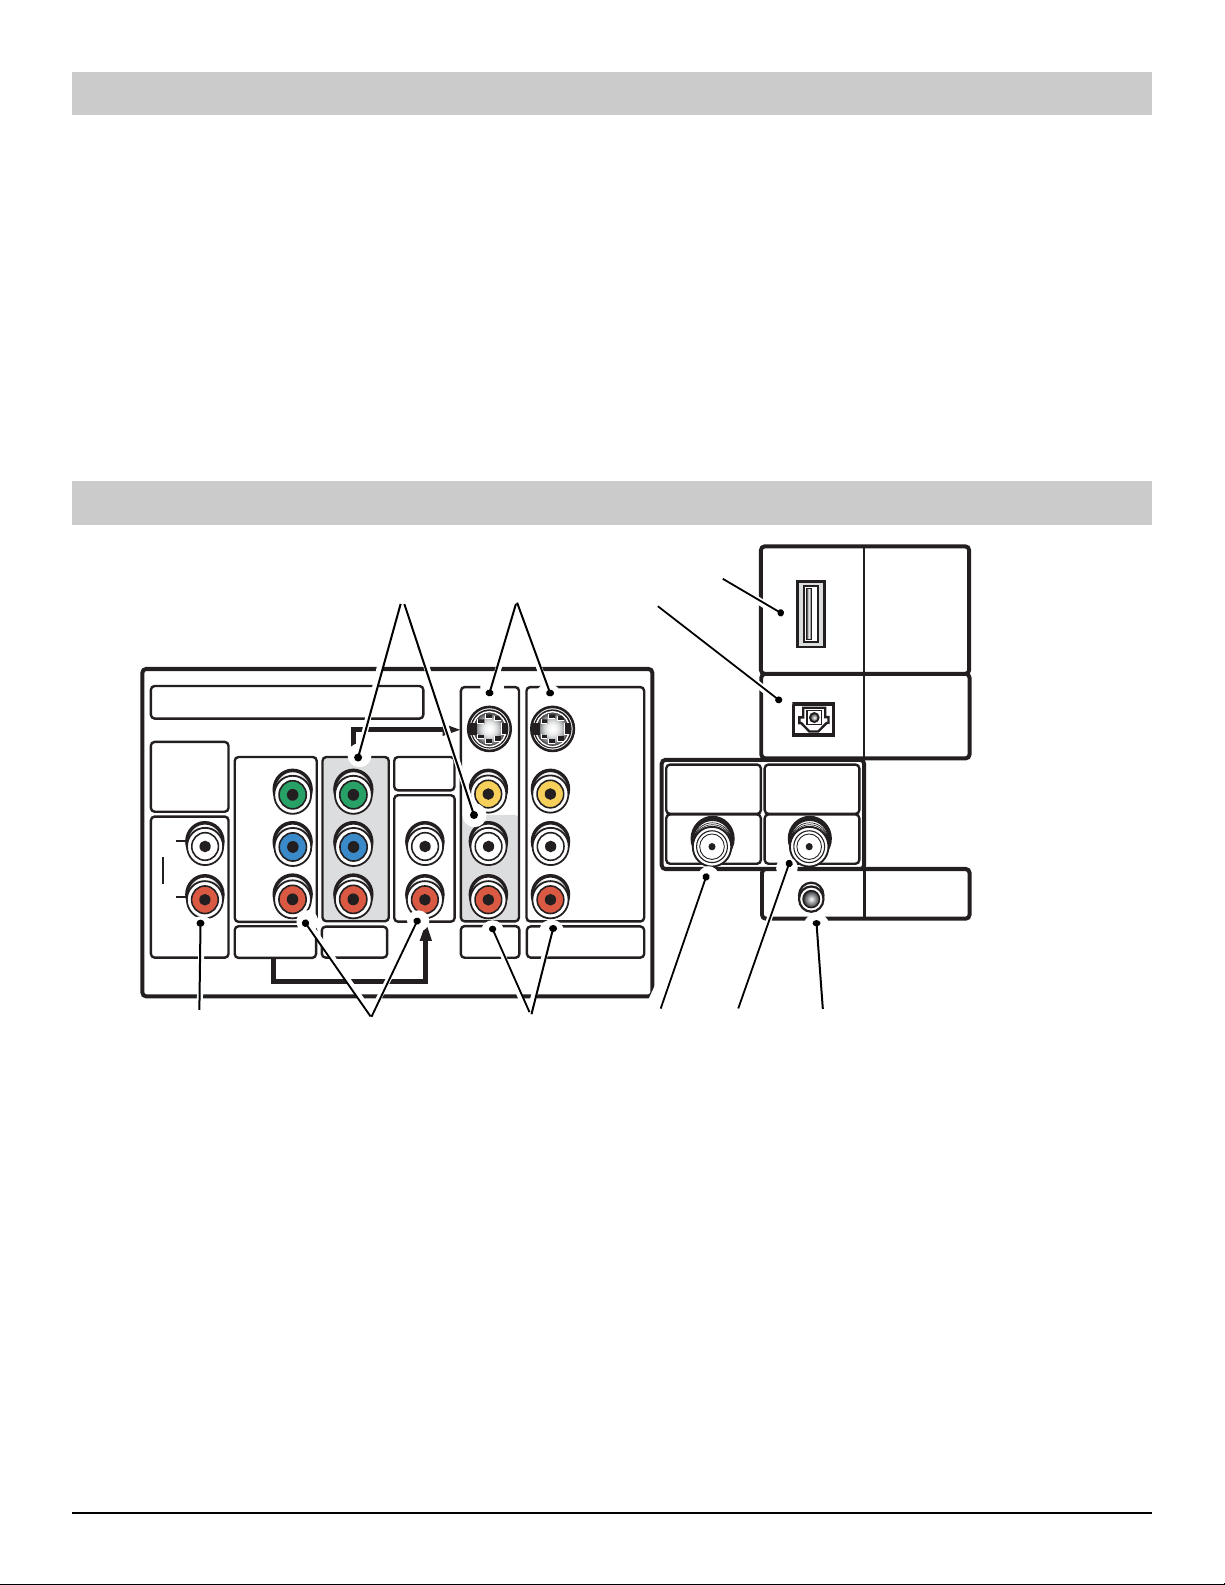
HDTV Back—Jacks Locations and Functions
➀
COMPONENT VIDEO INPUT
ANALOG
AUDIO
OUTPUT
L
R
Y
P
b
P
r
COMPO 3
COMPO 2
➄
Component Video Input (COMPO 2)—Connect digital video
➀
equipment to the Y, Pb, Pr and VIDEO 2 Audio L/R jacks.
These jacks will automatically detect the type of signal being
received (HDTV, EDTV, or SDTV).
S-Video (Video 1 and 2) Input—To enhance video detail use
➁
the S-Video (Video 1/2) jacks instead of the Video jacks, if
available on your external equipment. (S-Video connections
will override connections to the Video 1/2 input jacks.)
Digital Audio Output—Optical connection for advanced
➂
Dolby™ Digital 5.1 stereo home theater systems.
HDMI (High Definition Multimedia Interface) Input—
➃
Connect digital video equipment to this jack. It only takes one
high bandwidth cable (not supplied) to communicate between
the video/audio equipment and this TV. This connection is compatible with DVI equipped devices. (Separate audio connection
is required for DVI device.)
Analog Audio Out (L/R) Jacks—Connect external audio
➄
equipment here. (See page 10.)
AUDIO 3
➅
➁
VIDEO 2
➆
S-VIDEO
VIDEO
L
(MONO)
AUDIO
R
VIDEO 1
➃
➂
UHF/VHF/CATV
DIGITAL
ANTENNA IN
HDMI
INPUT
DIGITAL
AUDIO
OUTPUT
SERVICE
➇➈➉
Component Video Input (COMPO 3)—Connect digital video
➅
equipment to the Y, Pb, Pr and AUDIO 3 (L/R) jacks. (See
page 9.) These jacks will automatically detect the type of signal
being received (HDTV, EDTV or SDTV).
Audio/Video Input (AV1/AV2)—Connect standard video
➆
equipment here (see page 9).
Note: S-Video1/2 connections override the AV1/2 video
composite connections.
Analog Antenna Input (UHF/VHF/CATV)—Connect an RF
➇
antenna, cable, or satellite receiver to this jack as shown on
page 7.
Digital Antenna Input—Connect an RF antenna to this jack as
➈
shown on page 7.
Service Terminal—For technical use only.
➉
6 Getting Started / Back Panel Jacks
Page 7
First
Please connect all signals
and antennas to jacks and
the terminals on the back.
Then press the Channel UP key.
Signal Connection
Please wait,
Automatic clock setting.
Press Channel UP Key to cancel.
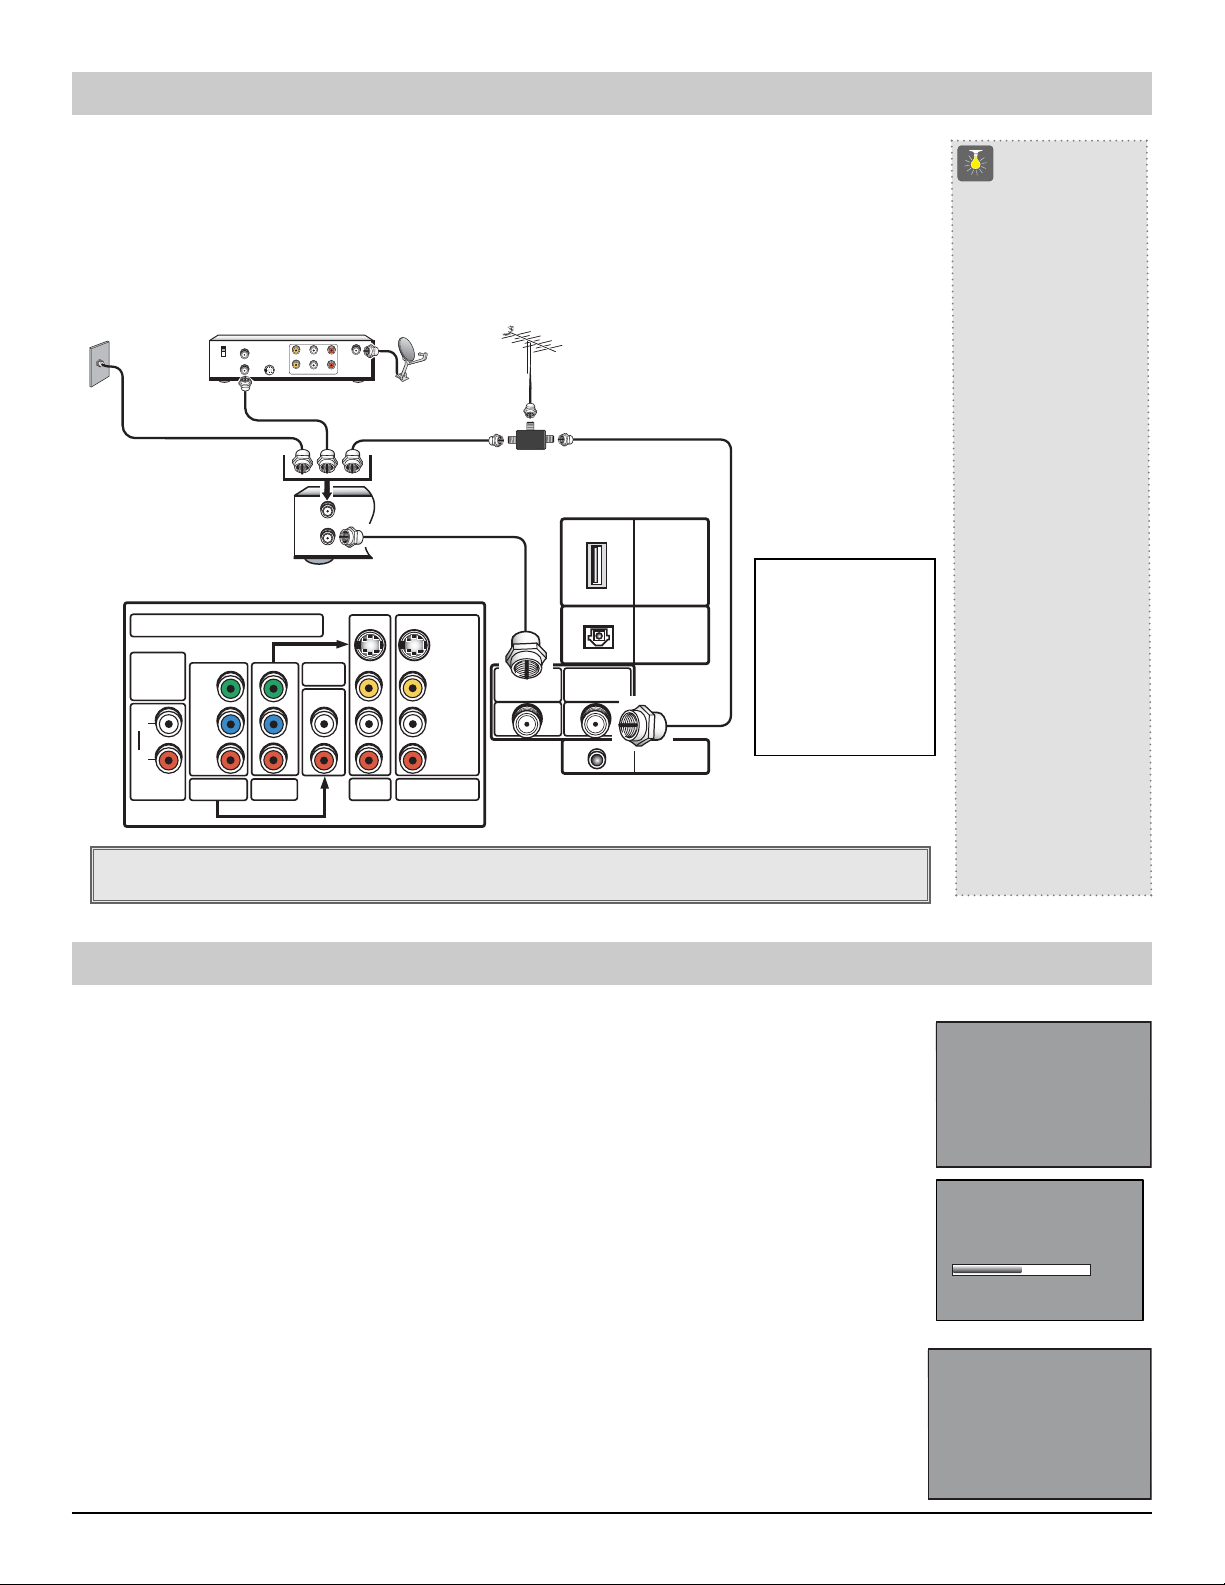
Analog RF Antenna Connection
Connecting Analog Cable service, RF antenna,
or Satellite Receiver to the TV Analog
(UHF/VHF/CATV) 75 ohm terminal.
CABLE
Note: If you do not
have a VCR connect
signal directly to the TV
75 ohm terminal.
ANALOG
AUDIO
OUTPUT
L
R
SATELLITE RECEIVER
CATV IN
CH3
CH4
OUT TO TV
S-VIDEO
COMPONENT VIDEO INPUT
Y
Pb
Pr
COMPO 3
COMPO 2
L- -RAUDIOVIDEO
L- -RAUDIOVIDEO
IN
FROM ANT.
OUT
OUT TO TV
TV BACK
AUDIO 3
IN FROM
SAT.
VIDEO 2
TV BACK
ANALOG
SIGNAL
VCR
S-VIDEO
VIDEO
L
(MONO)
AUDIO
R
VIDEO 1
To connect a High-Definition cable or satellite set-top box, go to page 8.
Digital (DTV) Antenna Connection
Connect RF antenna to the splitter, then to
the TV Digital Antenna In Terminal.
RF ANTENNA
DIGITAL
SIGNAL
SPLITTER
UHF/VHF/CATV
DIGITAL
ANTENNA IN
Note: RF Antenna can be
connected directly to the 75
ohm terminal. In fringe reception areas, it may be better to
connect separate RF antennas.
HDMI
INPUT
DIGITAL
AUDIO
OUTPUT
SERVICE
CATV FRANCHISE NOTE:
Cable companies, like public
utilities, are franchised by
local government authorities.
To receive cable programs,
even with equipment which
is capable of receiving cable
channels, the consumer
must subscribe to the cable
company’s service.
QuickTips
■
The TV will auto-
matically select an
Antenna mode for the
type of Analog RF
signal you connect.
Use “Antenna Selec-
tion” in the Setup
menu to change
Antenna mode.
■
TV will switch off
automatically after
15 minutes if there is
no signal reception
(cable out or station
not broadcasting).
Exception—When a Video
mode is selected, the
TV will not automati-
cally switch off when
signal reception
has stopped for 15
minutes.
■
If you move the TV to
a new location, press
the RESET key twice
after connecting the
signal and turning on
the TV.
Need help?
Visit our Web site at
www.sanyoctv.com
or Call 1-800-877-5032
Setting Up the TV
NOTE: When the television is powered on for the first time, it automatically checks to make sure an RF
input signal is connected. After you have made all necessary connections, continue as follows...
1. Press the CHANNEL UP key to automatically search and scan for available channels: Digital (DTV) and
Analog (NTSC). The Channel Search contains two processes that are executed simultaneously for digital and
analog channels, therefore, this will take a few minutes.
NOTES:
The on-screen message for digital search will appear with the channel number, a progress bar, and
percentile number displayed across the bottom of the screen (to indicate activity) as the search process
continues. This may take some time, so please be patient.
Channel information found during the channel search is stored in the Channel Scan Memory database.
The HD television will be tuned to the lowest Digital channel or lowest Analog channel if no digital
channels are found.
2. To change the initial analog tuning system setup (from antenna to cable or cable to antenna), use the on-screen
menu. See “Antenna Selection” on page 17.
3. After channel search is complete, the TV will begin Auto Clock setting. This feature searches for a local PBS
station that is broadcasting an extended data service signal. This signal is used to automatically set the clock/day.
(This may take several seconds.)
To cancel auto clock setting, press the CHANNEL UP key. (To set the clock manually, see page 20.)
Signal Connection : Digital/Analog / Setting Up the TV 7
First
Please connect all signals
and antennas to jacks and
the terminals on the back.
Then press the Channel UP key.
Please wait,
while your TV searches
for available channels.
50%
Digital Antenna 35
Please wait,
Automatic clock setting.
Press Channel UP Key to cancel.
Page 8
INPUT
RESET
POW ER
Digital A/V Connections
QuickTips
■
If the television HDMI
pin configuration is
different from the
pin configuration on
your set-top box, you
will need to use an
Adapter for Step 1
connection.
■
To connect DVI to
HDMI, you will need
to use a DVI to HDMI
Cable or an adapter
to make the connection in Step 1.
■
With a DVI connec-
tion, make sure you
connect Audio out
to the TV’s Compo3
Audio in.
■
Because the Compo-
nent (Compo3) audio
jacks are used to
receive the audio from
the DVI device, the
Compo3 video jacks
cannot be used when
a DVI device is connected.
Need help?
Visit our Web site at
www.sanyoctv.com
or Call 1-800-877-5032
IMPORTANT FACT:
When using HDCP
(High Definition
Content Protection)
you may not be able
to copy material that
is copyrighted by the
content owner.
Remote Control
TV
POWER
RESET
A/V inputs.
CABLE
AUXSAT
❺
❻
VCR
DVD
INPUT
Press INPUT key after
connecting cables to access the
There is NO need to tune to a
blank channel.
This is the best option for picture and sound! Using the HDMI connection, which has high-definition
content protection, provides you with uncompressed digital video and audio. As Real As It Gets!
Connecting External Equipment to HDMI (Includes HDCP copy protection)
To avoid problems with some brands of external equipment, follow this procedure when connecting cables and
powering on your equipment.
Switch off TV and external equipment before connecting cable. (Cable is not supplied.)
❶
Connect the external equipment’s high bandwidth HDMI Output to the TV’s HDMI input. This connection
❷
requires only one cable, and includes uncompressed video and Dolby 5.1 or PCM sound.
The TV must be turned on first, press POWER.
❸
Then turn on your external equipment.
❹
Press INPUT to select HDMI to view digital
❺
program.
What you will need for connections:
19 Pin HDMI Digital Cable – 1
❷
(Make sure you check the pin configuration
of the cable plug-end*)
Adapter may be required
*
A/V OUT
(480i)
VIDEO
S-VIDEO
L
OUT
AUDIO
R
COMPONENT OUT
DIGITAL
(1080i/720p/480p)
AUDIO OUT
HDMI
OUTPUT
Y
COAXIAL
B
P
PR
❷
COMPONENT VIDEO INPUT
ANALOG
AUDIO
Y
OUTPUT
Pb
L
Pr
R
COMPO 3
AUTHORIZED
SERVICE ONLY
RGB OUT
(1080i/720/480p)
COMPO 2
HDMI CABLE
AUDIO 3
VIDEO 2
SET-TOP BOX
❷
S-VIDEO
VIDEO
UHF/VHF/CATV
L
(MONO)
AUDIO
R
VIDEO 1
DIGITAL
ANTENNA IN
Connecting STB with DVI Output to HDMI Input (Includes HDCP copy protection)
Using a DVI to HDMI cable provides better picture quality than standard component or composite
connections, but to receive sound, a separate audio connection is required.
To avoid problems with some brands of external equipment, follow this procedure when connecting cables and
powering on your equipment.
Switch off TV and STB before connecting cables. (Cables are not supplied.)
❶
Connect the STB’s DVI Output to a “DVI to HDMI Cable;” then connect the cable to the TV’s HDMI input.
❷
Note: Check with your local electronic store for a DVI to HDMI Cable that matches your equipment
and the TV.
Connect the STB’s Audio L/R to the TV’s Component Audio 3 L/R.
❸
The TV must be turned on first, press POWER.
❹
Then turn on your external
❺
equipment.
Press INPUT to select HDMI
❻
to view digital TV programs.
What you will need for
connections:
DVI to HDMI Cable – 1
❷
Audio Cable – 1
❸
❸
❹
A/V OUT
(480i)
VIDEO
S-VIDEO
OUT
❸
TV BACK
JACKS
COMPONENT VIDEO INPUT
ANALOG
AUDIO
OUTPUT
L
R
Y
Pb
Pr
COMPO 3
DIGITAL
AUDIO OUT
COAXIAL
COMPONENT OUT
(1080i/720p/480p)
Y
P
P
COMPO 2
AUTHORIZED
DVI
SERVICE ONLY
OUTPUT
B
R
RGB OUT
(1080i/720/480p)
❷
DVI to HDMI
CABLE
❸
S-VIDEO
AUDIO 3
VIDEO 2
VIDEO
L
(MONO)
AUDIO
R
VIDEO 1
SET-TOP BOX
❷
UHF/VHF/CATV
DIGITAL
ANTENNA IN
INPUT
DIGITAL
OUTPUT
SERVICE
HDMI
AUDIO
HDMI
INPUT
DIGITAL
AUDIO
OUTPUT
SERVICE
8 HDMI Connection / Connecting a DVI Set-top Box to HDMI
Page 9
Using Component Jacks to connect a DVD Player
INPUT
RESET
POW ER
❶
or other digital equipment
The Component Video jacks will accept HDTV, EDTV, or SDTV
video content.
Switch off TV and external equipment before connecting cables.
(Cables are not supplied.)
Follow these steps to easily connect your STB or DVD to this HDTV:
Connect DVD Player or other digital equipment’s Component Video
❶
Out to the TV Component Video (Compo 3) or (Compo 2) Input
jacks.
❷ Connect DVD Player or other digital equipment’s Audio Out to the
TV Component Audio 3 or Audio (Video 2) 2 Input jacks.
❸ Press POWER to turn on the TV. Turn on external equipment also.
❹ Press the INPUT to select COMPONENT3 or COMPONENT2 to
view the DVD program.
Note: To connect additional digital external equipment, use
either set of component video audio jacks.
DVD PLAYER
VIDEO OUT SELECT
S
OPT.
COPONENT
S-VIDEO OUT
DIGITAL
OUT
COMPONENT VIDEO OUT
Y
BPR
P
RL
AUDIO OUT
VIDEO OUT
❶
❷
TV BACK COMPONENT JACKS
COMPONENT VIDEO INPUT
ANALOG
❶
AUDIO
Y
OUTPUT
L
P
b
R
P
r
COMPO 3
COMPO 2
A/V OUT
(480i)
VIDEO
DIGITAL AUDIO
ANT LOOP OUT
ANT IN
OUTPUT
SELECTION
YPbPr RGB
OUT
(OPTICAL)
S-VIDEO
OUT
AUDIO
❷
What you will need for connections:
Component Video Cable—1 (2)
❶
Audio Cable—1 (2)
❷
HDMI
INPUT
DIGITAL
AUDIO 3
VIDEO 2
S-VIDEO
VIDEO
L
(MONO)
AUDIO
R
VIDEO 1
UHF/VHF/CATV
❷
DIGITAL
ANTENNA IN
AUDIO
OUTPUT
SERVICE
❶
COMPONENT OUT
DIGITAL
(1080i/720p/480p)
AUDIO OUT
COAXIAL
L
R
AUTHORIZED
HDIM
SERVICE ONLY
OUTPUT
Y
RGB OUT
P
B
P
R
(1080i/720/480p)
CABLE OR SATELLITE
SET-TOP BOX BACK
❶
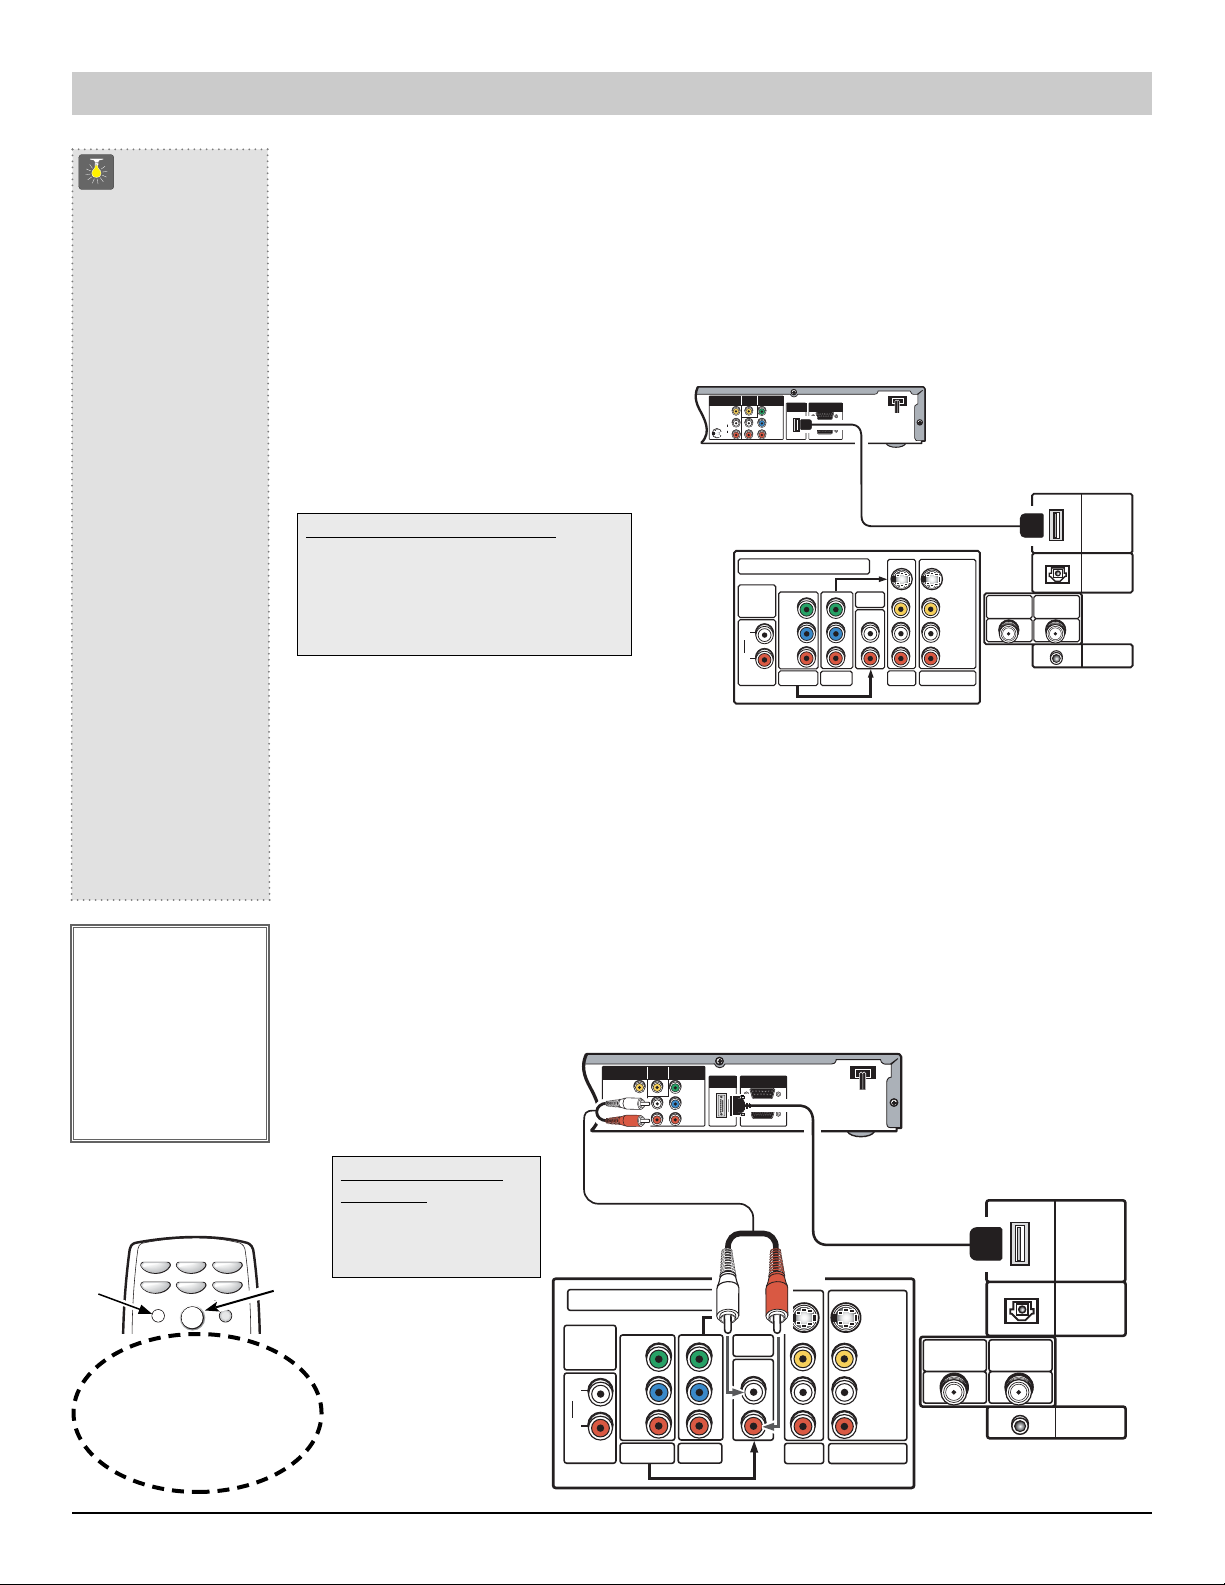
Analog A/V Connections
Using S-Video Jacks to connect a DVD Player and VCR
to A/V jacks
Switch off TV and external equipment before connecting cables. (Cables
are not supplied.) Follow these steps to easily connect your DVD or
VCR.
Connect DVD Player or other equipment’s S-Video Out to the TV
❶
S-Video In 1 or 2 Jacks.
Note: S-Video jacks override Video jacks.
② Optional
Connect VCR’s Audio Video Out to the TV Audio Video 1 or 2 Input
jacks.
For Mono VCR (Single Audio Jack) connect VCR Audio Out to TV
Audio (L) Input.
❸ Press POWER to turn on the TV. Turn on external equipment also.
❹ Press the INPUT to select VIDEO 1 or VIDEO 2 to view the DVD
or VCR program.
Notes:
A V1 and AV2 jacks have identical functions. Any compatible video
device can be connected to either set of jacks.
A solid Blue screen with the word VIDEO1 or VIDEO2 displayed
means that the Video mode is selected, but no signal is being
detected at the Video jacks. Check connections and turn on
external equipment.
Composite jacks offer only 480i (SDTV) resolution.
Press INPUT key after
connecting cables to access
the A/V inputs.
There is NO need to tune to a
blank channel.
Back View of VCR
IN
IN
OUT
R-AUDIO-L VIDEO
R-AUDIO-L
FROM ANT.
VHF/UHF
RF
TO TV
CHANNEL
3 4
OUT
VIDEO
❶
COMPONENT VIDEO INPUT
ANALOG
AUDIO
OUTPUT
L
R
Y
Pb
Pr
COMPO 3
COMPO 2
AUDIO 3
VIDEO 2
❹
S-VIDEO
VIDEO
L
(MONO)
AUDIO
R
VIDEO 1
②
OPT.
DIGITAL
OUT
UHF/VHF/CATV
Remote Control
TV
POWER
DVD Player
COMPONENT VIDEO OUT
Y
VIDEO OUT SELECT
S
COPONENT
AUDIO OUTRLVIDEO OUT
DIGITAL
ANTENNA IN
CABLE
AUXSAT
RESET
B PR
P
VCR
DVD
INPUT
123
123
②
S-VIDEO OUT
②
②
HDMI
INPUT
DIGITAL
AUDIO
OUTPUT
SERVICE
❸
TV AV Input Jacks
Analog Connections: S-Video and A/V Jacks 9
Page 10
INPUT
RESET
POWER
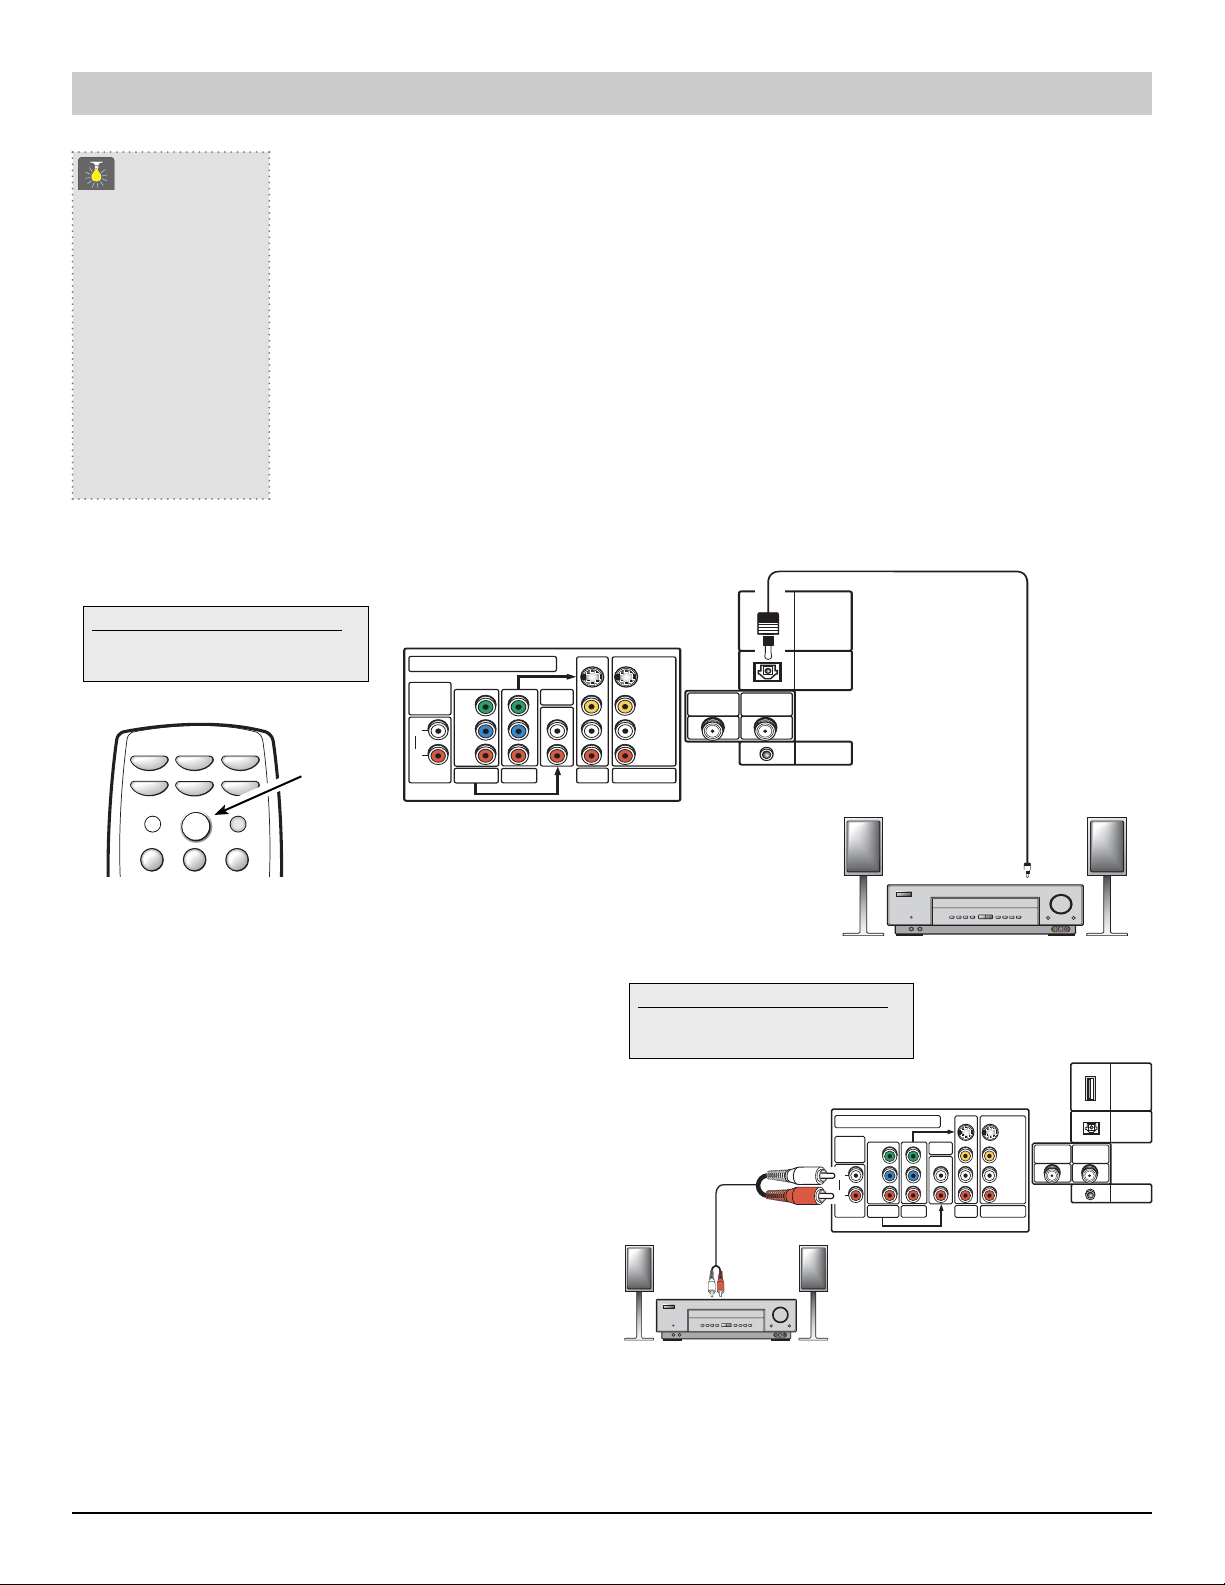
Audio Connections
Connecting Digital Audio Output to an External Amplifier
QuickTips
■
Position your TV at
least 2 feet from
stereo speakers.
The magnets in
the speakers may
affect the picture
quality.
Need help?
Visit our Web site at
www.sanyoctv.com
or Call 1-800-877-5032
Using this optical digital connection minimizes electrical noise to help assure high quality signal transfer.
Switch off TV and external equipment before connecting cables. (Cables are not supplied.) Remove the protective
cover before connecting cable to TV digital optical jack.
CAUTION: DO NOT look directly at the laser light.
Connect one end of the optical cable to the TV Digital Audio Output and the other end to the Stereo Amplifier
❶
Optical Digital Input.
❷ Press POWER to turn on the TV. Turn on external equipment also.
Notes:
DO NOT connect external speakers directly to the TV.
When TV Speakers is in the ON mode, sound will be reproduced through your TV and stereo amplifier.
When TV Speakers is in the OFF mode, sound will be reproduced only through
the stereo amplifier. (See page 20 to set TV speakers.)
What you will need for connections:
Optical Digital Audio Cable – 1
❶
ANALOG
AUDIO
REMOTE CONTROL
TV
POWER
CABLE
AUXSAT
RESET
❷
VCR
DVD
INPUT
123
123
Connecting Audio Out Jacks to a Stereo Amplifier
OUTPUT
L
R
BACK OF TV
COMPONENT VIDEO INPUT
Y
P
b
P
r
COMPO 3
COMPO 2
AUDIO 3
Switch off TV and external equipment before connecting cables.
(Cables are not supplied.)
Connect the TV Audio Out (R/L) to the Stereo Amplifier In (R/L).
❶
❷ Press POWER to turn on the TV. Turn on external equipment also.
Notes:
DO NOT connect external speakers directly to the TV.
When TV Speakers is in the ON mode, sound will be
reproduced through your TV and stereo amplifier.
When TV Speakers is in the OFF mode, sound will be
reproduced only through the stereo amplifier. (See page 20
to set TV speakers.)
❶
S-VIDEO
DIGITAL
ANTENNA IN
VIDEO 2
VIDEO
L
(MONO)
AUDIO
R
VIDEO 1
UHF/VHF/CATV
What you will need for connections:
Audio Cable – 1
❶
❶
HDMI
INPUT
DIGITAL
AUDIO
OUTPUT
SERVICE
OPTICAL DIGITAL
CABLE
STEREO
AMPLIFIER
COMPONENT VIDEO INPUT
ANALOG
AUDIO
OUTPUT
L
R
Y
Pb
Pr
COMPO 3
AUDIO 3
COMPO 2
BACK OF TV
VIDEO 2
❶
VIDEO 1
VIDEO
(MONO)
AUDIO
R
S-VIDEO
L
UHF/VHF/CATV
DIGITAL
ANTENNA IN
HDMI
INPUT
DIGITAL
AUDIO
OUTPUT
SERVICE
10 Connecting Digital or Analog Audio to Stereo Amplifier
STEREO AMPLIFIER
Page 11
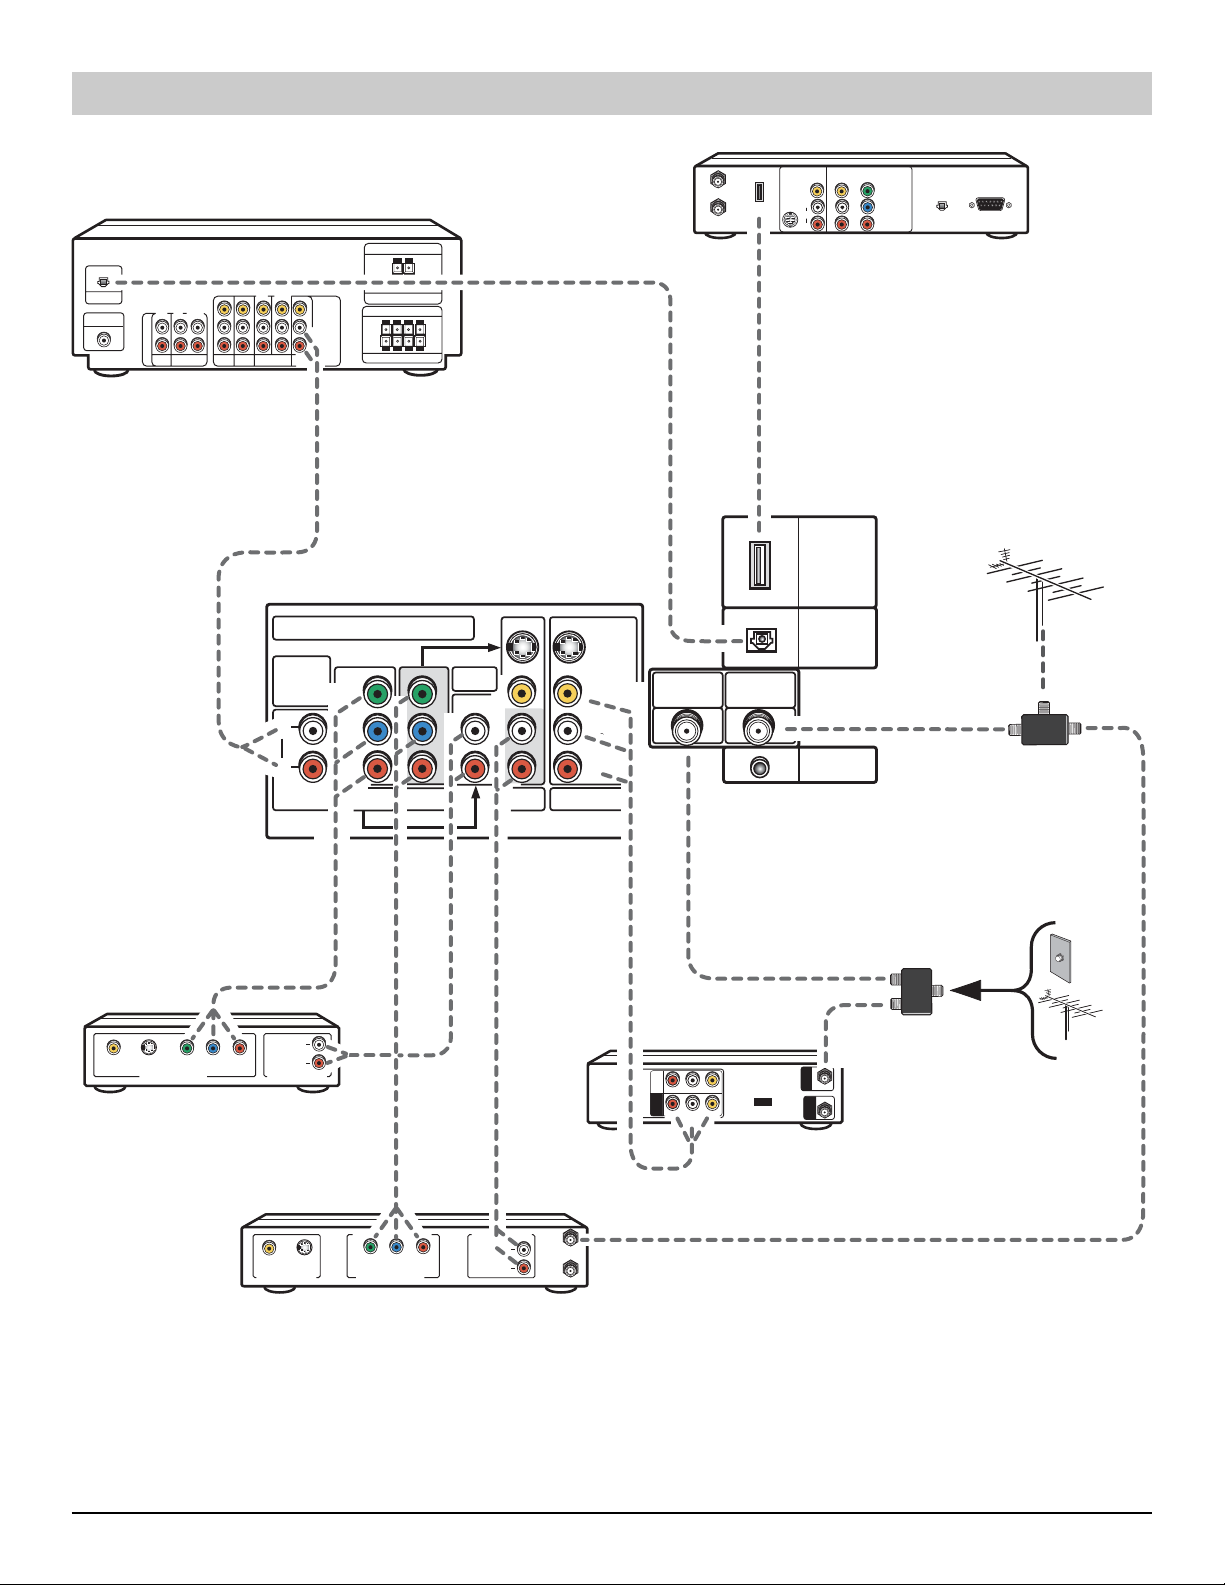
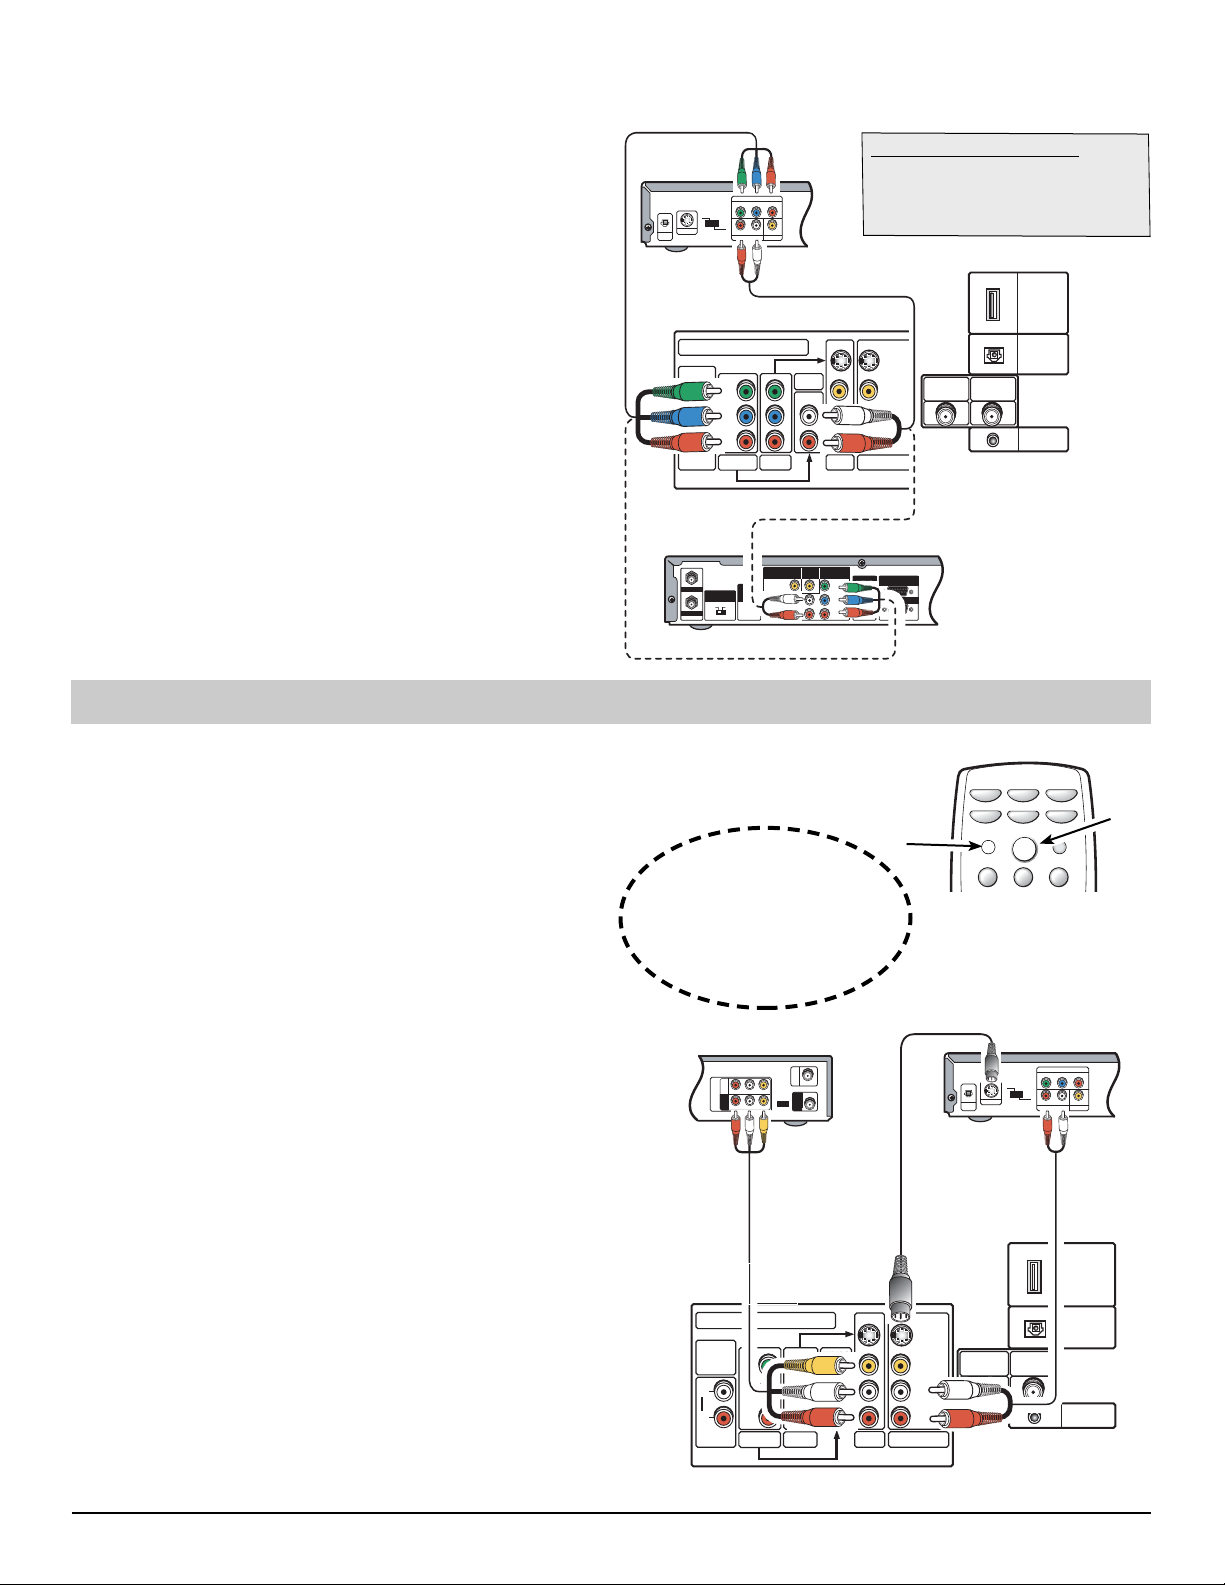
Typical Home Theater Connections
IN
OUT
CENTER SPEAKER (8Ω)
OPTICAL
DIGITAL INPUT
IN IN OUT
L
R
CD TAPE
IN OUT
DVD SAT VCR TV
L
R
SUBWOOFER (8Ω)
FRONT SPEAKERS (8Ω)
REAR SPEAKERS (8Ω)
VIDEO
AUDIO
Surround
Sound System
A/V OUT
(480i)
VIDEO
S-VIDEO
L
HDMI
OUT
AUDIO
R
Cable Box /
Sat. Receiver
HDMI
INPUT
DIGITAL
AUDIO OUT
COMPONENT OUT
(1080i/720p/480p)
Y
B
P
PR
RJ11/
PHONE
AUTHORIZED
SERVICE ONLY
VIDEO S-VIDEO COMPONENT VIDEO
YCb Cr
VIDEO OUTPUT
DVD Player
COMPONENT VIDEO INPUT
ANALOG
AUDIO
OUTPUT
L
R
ANALOG
AUDIO
AUDIO OUTPUT
Pb
Pr
COMPO 3
L
R
DIGITAL
S-VIDEO
Y
AUDIO 3
VIDEO
L
(MONO)
AUDIO
UHF/VHF/CATV
DIGITAL
ANTENNA IN
R
COMPO 2
VIDEO 2
VIDEO 1
AUDIO
OUTPUT
SERVICE
Digital
Antenna
Splitter
Splitter
IN
VIDEO
Analog
CHANNEL
RF
34
FROM ANT.
VHF/UHF
TO TV
OUT
Analog
Cable or
VHF/UHF
Antenna
IN
OUT
R-AUDIO-L VIDEO
R-AUDIO-L
VCR
YCb
S-VIDEOVIDEO
VIDEO OUTPUT
Cr
COMPONENT VIDEO
VIDEO OUTPUT
Digital Video Recorder
AUDIO OUTPUT
L
ANALOG
AUDIO
R
ANT IN
SAT IN
HD
Typical Home Theater Connections 11
Page 12
AUDIO
SLEEP
PIX SHAPE
RECALL
CAPTION
INFO
POWER
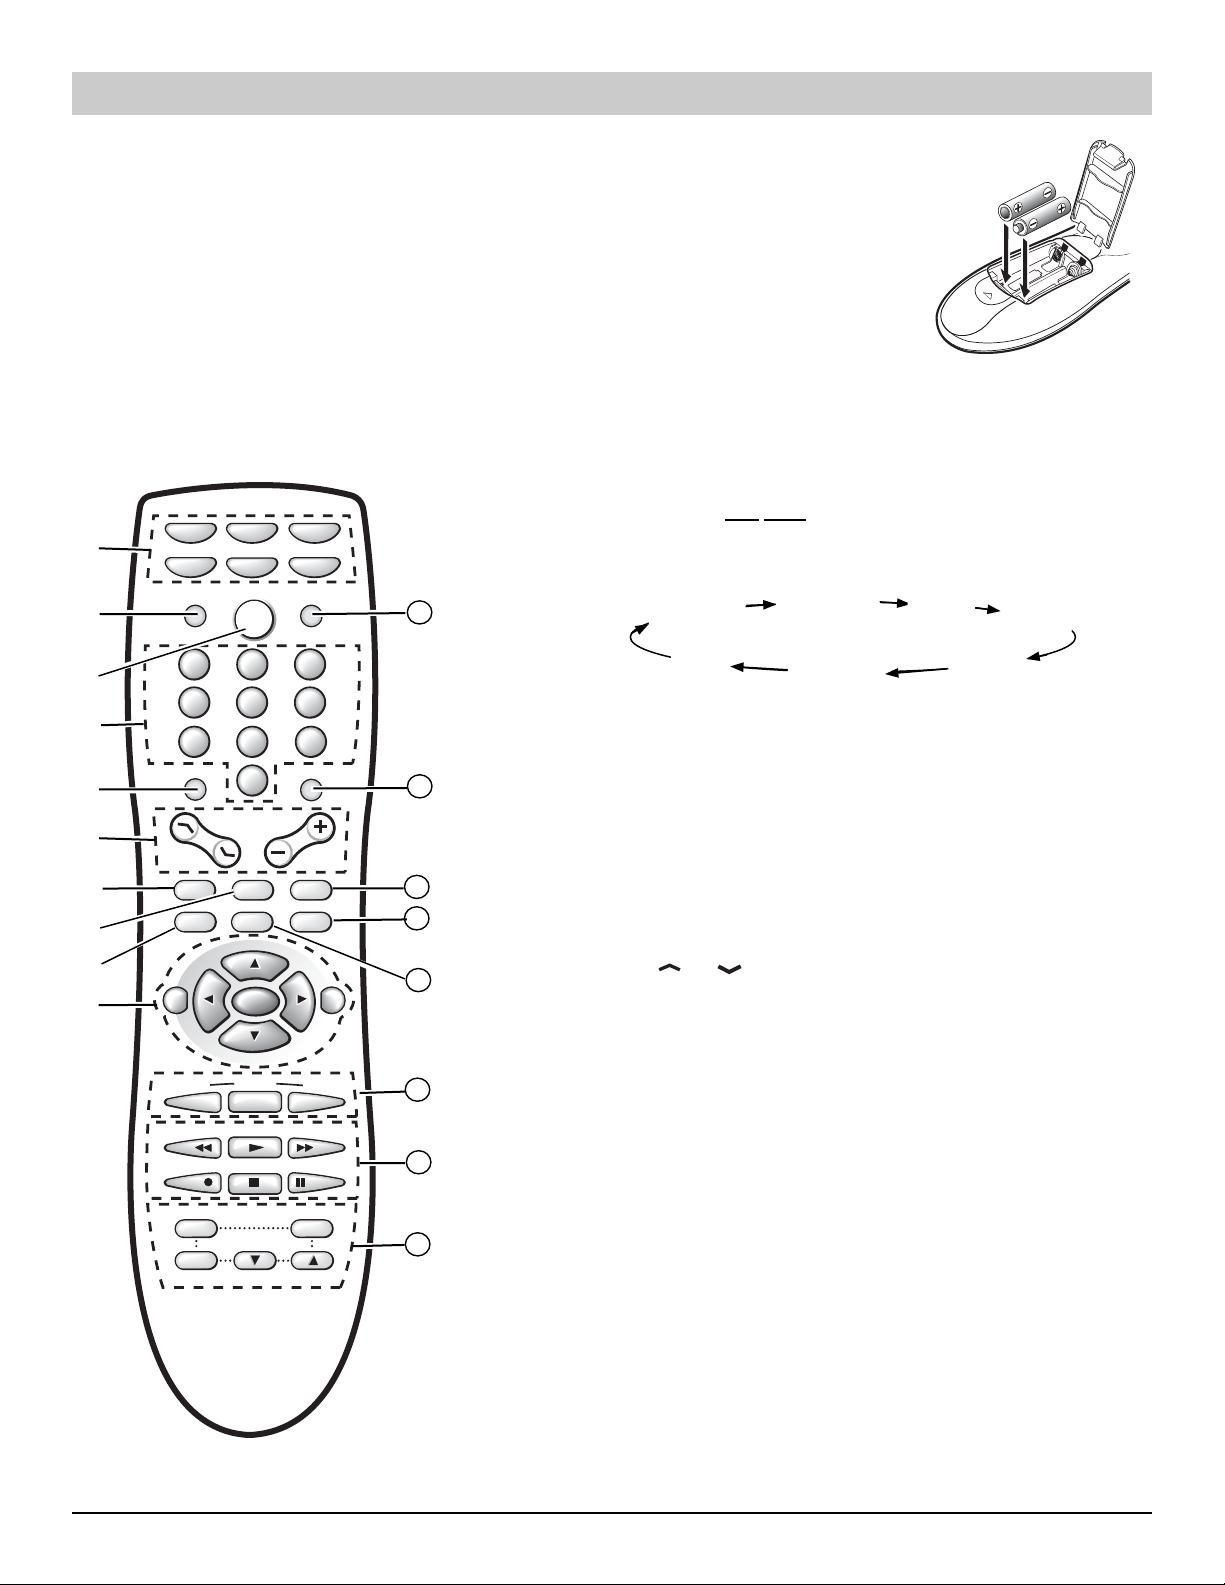
Using the Multimedia Remote Control
It takes only one remote to operate your TV and other equipment. Simply follow the
instructions on pages 13 ~ 15.
Install Batteries as shown (2 AA, not included)
Notes:
Do not mix old batteries with new ones or mix different types of batteries together.
Remove the batteries if the remote control will not be used for a month or more.
Weak batteries may leak and cause damage. (Normal battery life is roughly six months.)
Mode Keys—Use these keys to program the remote control and to select the
➀
operating mode (VCR, TV, CABLE, DVD, SAT, or AUX). To Operate Your...
VCR—Press the VCR key; Television—Press the TV key; Cable Box—Press the
CABLE key; DVD Player—Press the DVD key; and Satellite Receiver—Press the
key.
SAT
Note: Make sure you hold
see page 13.
Input Key—Press this key to change the input signal source as follows:
➁
ANALOG
H
DMI
In the TV, DVD, Cable, and Satellite modes, this key selects the program source
to display on the screen (TV signal or signal from equipment connected to the AV
jacks). In the VCR mode, this key functions as a VCR’s TV/VCR key.
Power Key—Press to turn TV on or off.
➂
Number Keys—Two keys must be pressed to select a direct channel. Example:
➃
Press 0 then 6 to select channel 6. For Analog channels above 100, press and hold the
1 key until C1–– appears.
Tuner Key—Use this key to toggle from one tuning system to another, digital
➄
channels and analog channels.
Channel (CH up / down) and Volume (VOL –/+) Keys—Press Up/down
➅
keys to tune to the next higher or lower channel in the Channel Scan Memory
database. Press the –/+ keys to adjust volume. The screen displays a left or right
red arrow that blinks as many time as you press the Vol –/+ keys.
Pix Shape Key—Use this key to change the video display format. Available
➆
options depend on signal received and the broadcast aspect ratio: For HT27744/
HT32744—Letter box, Zoom, and Normal. For HT30744—Full, Zoom1/2, and
Normal. (See explanation of image shapes on page 5.) Note: If PAP feature is
selected, this key is not operable.
Sleep Key—Press this key, then press the “0” key to set the Sleep Timer. The
➇
desired time can be set from 30 minutes up to 3 hours in 30 minutes increments.
Sleep Timer will switch off the TV automatically.
Note: The Sleep Timer cancels when the TV is turned off or i f a p ower failure
occurs.
down the mode key while entering a code number,
RF
DIGITAL
COMPO
➀
➁
➂
➄
➅
➆
➇
➉
➃
➈
Point towards TV / Equipment
VCR
DVD
INPUT RESET
PIX SHAPE
RECALL
M
DOWN
ON/OFF QUIK
SWAP
TV
POWER
123
123
7809
7809
E
N
PAP
CH
U
SLEEP
CAPTION
ENTER
ENTER
PAGE
GUIDE
PLAY
PAP CHANNEL
VOL
CABLE
AUXSAT
654
654
MUTETUNER
AUDIO
INFO
UP
PAUS EREC STOP
FREEZE
➠
T
I
X
E
11
12
13
14
15
16
17
18
RF
VIDEO
1
VIDEO
2
2
3
COMPO
12 Remote Control
Recall Key—Select the first channel you want to watch; then select another
➈
channel using the number keys. Press Recall to easily switch between the channels
without entering the channel numbers again.
Note: The Recall key can only toggle between channels within the same
signal source. Recall between a Digital channel and an Analog channel will
not work.
Page 13
➉
VCR Code:
LIST DE VICE HE RE
AUX
Satellite Code:
Cable Box
Code:
DVD Player
Code:
Menu key—Press this key to display the on-screen
Cursor ▲ (up) /▼ (down) keys—Press these keys to
Cursor
Exit key—Press this key to exit from the menu
11
Reset Key—Press twice to restore factory settings.
12
Note: When using the audio out jacks this key
Audio Key—Press to select the desired audio
13
ANALOG: Stereo, Mono, SAP.
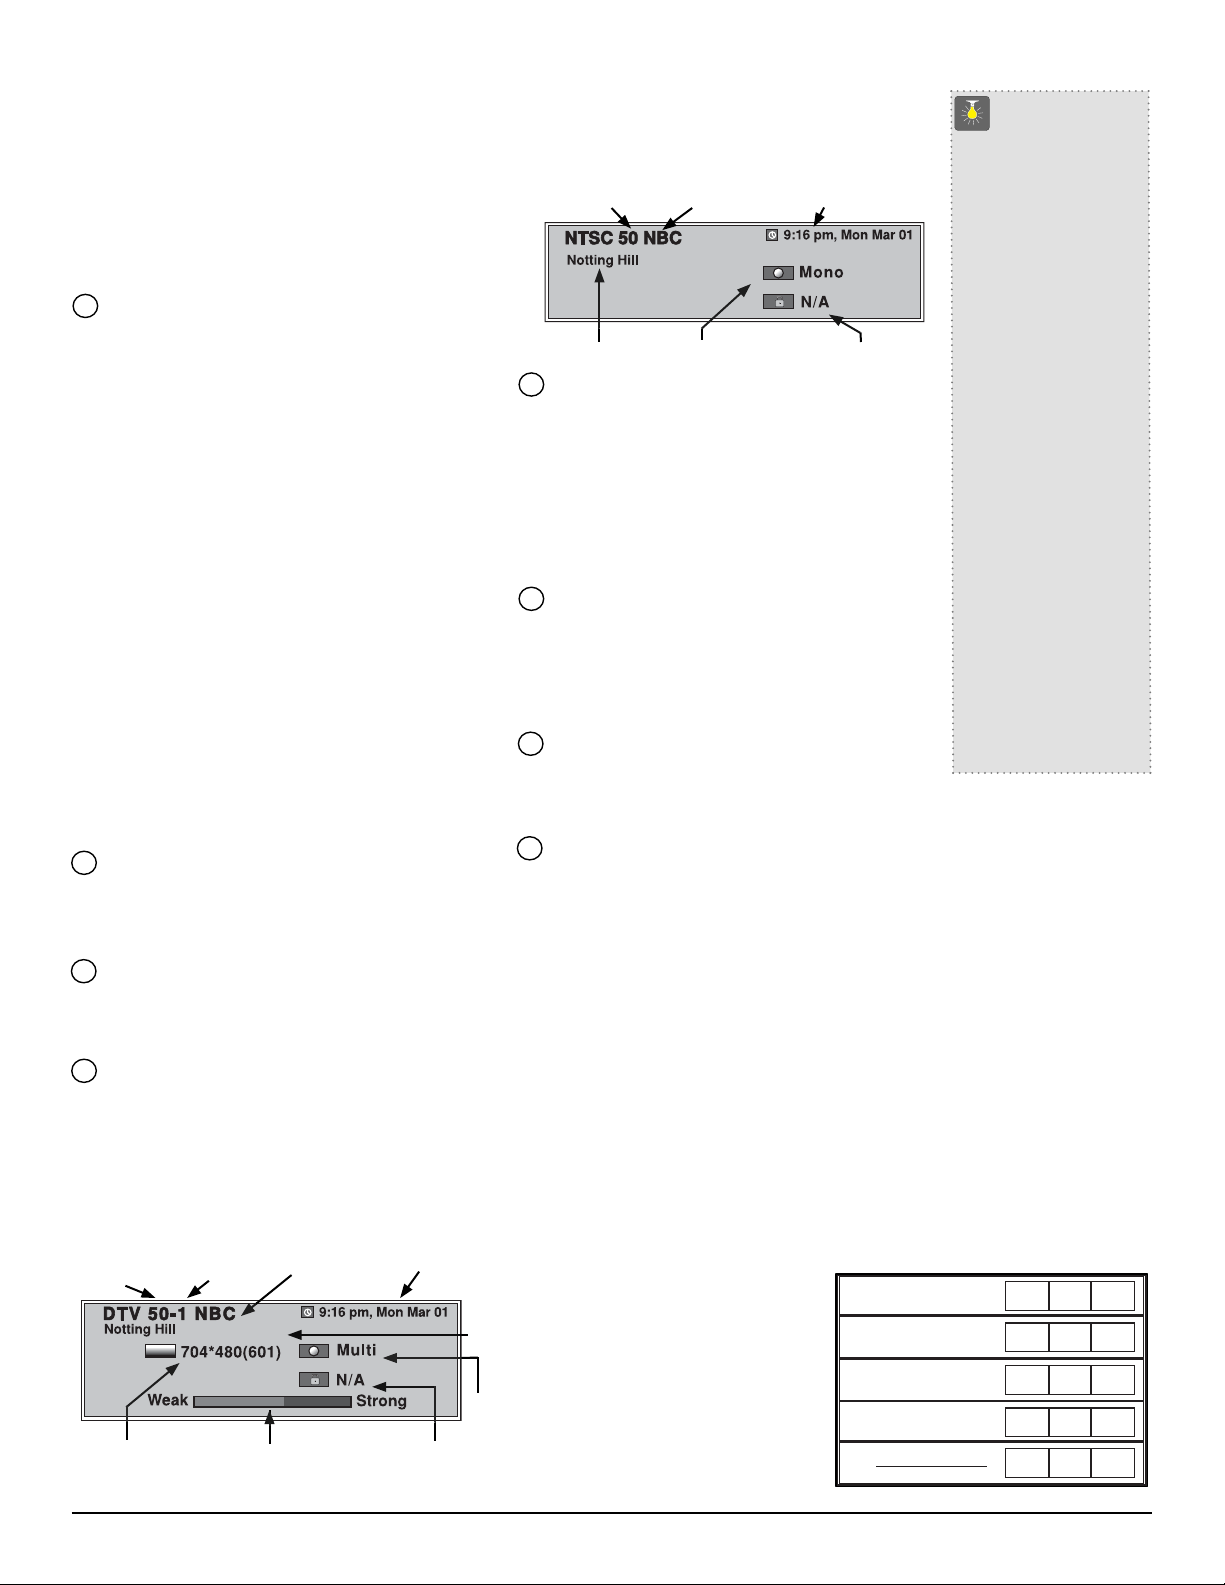
Info Key—Press to display the Digital and Analog
14
Digital Full Banner display–Contains a two-part
Major
Signal Format
Menu selection and navigation keys—Use these
keys as follows:
menu.
move the cursor up and down within the menu.
3 (left) /4 (right) keys—Press these keys to
move the cursor left and right within the menu.
system.
The TV will automatically start Channel Search and
clear all customized settings. These features will automatically reset:
Picture/Sound Adjustments: Color, Tint, Contrast,
•
Brightness, Sharpness, Color Enhancer, Bass,
Treble, and Surround Sound
Channel Memory
•
Initial Channel to OFF
•
Audio to Stereo
•
Caption to OFF
•
V-Guide to OFF
•
TV Speakers to ON
•
Digital Audio Output to Dolby Digital
•
Scan Velocity to HIGH
•
Picture-And-Picture (PAP) to OFF
•
Menu Language to English
•
Auto Clock and Sleep Timer (if previously set)
•
Video to TV (if previously set)
•
If desired, personal settings can be made again using
the menu options.
Mute Key—Press once to minimize the volume.
Press again to restore.
will not mute the sound.
reception feature options (if available) for...
DIGITAL: Main, Sub1, Sub2, Sub3, etc.
Full Banner information:
Channel Number (Major and Minor). If available
the following is also included–Station ID, Program
Title, Current Time & Date, Antenna Signal Strength,
Signal Format, Program Rating, and Audio Mode.
Virtual Channel
Station ID
Minor
Antenna Signal
Current Time/Date
Program
Title
Audio
Mode
Program Rating
Analog Full Banner display–Contains Channel
Number (analog antenna/cable), Current time & Date
(if set), Station ID (if available), Program Title (if
available) and Audio Mode.
Channel No.
Program Title
Caption Key—Press to select analog or digital
15
caption. The Analog Caption modes are: CC1, CC2,
Quikcap and OFF. The Digital Caption modes are:
Digital CC1~CC6, Quikcap and OFF.
Digital Captions can also be customized to change
the text font type, size, style, background and edge
colors. (See page 18.) Note: These feature are
operable only when digital caption service is
available.
Guide Keys—Press the following keys to operate
16
your satellite receiver once the remote is
programmed:
Page/Guide key—Press to display menu guide.
Up/Down key—Press the cursor up/down to move
within the menu display.
VCR/DVD Keys—These keys control VCR or DVD
17
functions for Fast Forward (44), Rewind (33), Play
(4 ), Record (REC), Stop (
Pause.
PAP Keys—See page 21 for split-screen
18
Picture-and-Picture.
Station ID
Current Time/Date
Program RatingAudio Mode
■), Tracking (–/+), and
QuickTips
■
Be sure batteries are
installed correctly.
■
Point the remote
control toward the
equipment you want
to operate. Objects
between the remote
control and the equipment may cause
misoperation of the
remote control
function.
■
If the remote control
does not work: Press
TV key (see item 1).
■
The remote control
must be programmed
before it will operate
your VCR, DVD
Player, Satellite
Receiver, or Cable
Box.
Need help?
Visit our Web site at
www.sanyoctv.com
or Call 1-800-877-5032
PROGRAMMING THE REMOTE CONTROL
1. Find your VCR, Cable Box, DVD Player, and Satellite Receiver brand codes in
the charts on page 14.
2. Press and hold the VCR, CABLE, DVD, SAT (Satellite Receiver) or AUX
(Auxiliary) mode key while entering a three-digit code number. Then release
the mode key.
If the code was accepted, the mode key will flash 5 times after it is released. If you
entered an invalid code, the mode key will not flash. Check the code number and
repeat Step 2.
After entering each code number check the unit’s operation by pressing the Power
and/or Channel keys. If these keys operate your equipment, you have probably
entered the correct code number for that device. If not, follow Step 2 and enter
another code, if available.
Perform Steps 1 and 2 for each piece of equipment you have.
The VCR, Cable Box, DVD, and
Satellite modes will accept only each
mode’s specific code type.
The AUX mode will accept all code
types, but only one code at a time.
After you have programmed the
remote control and confirmed its
operation, enter your codes in the
spaces provided for easy reference.
VCR Code:
Cable Box
Code:
DVD Player
Code:
Satellite Code:
AUX
LIST DEVICE HERE
Remote Control Key Functions 13
Page 14
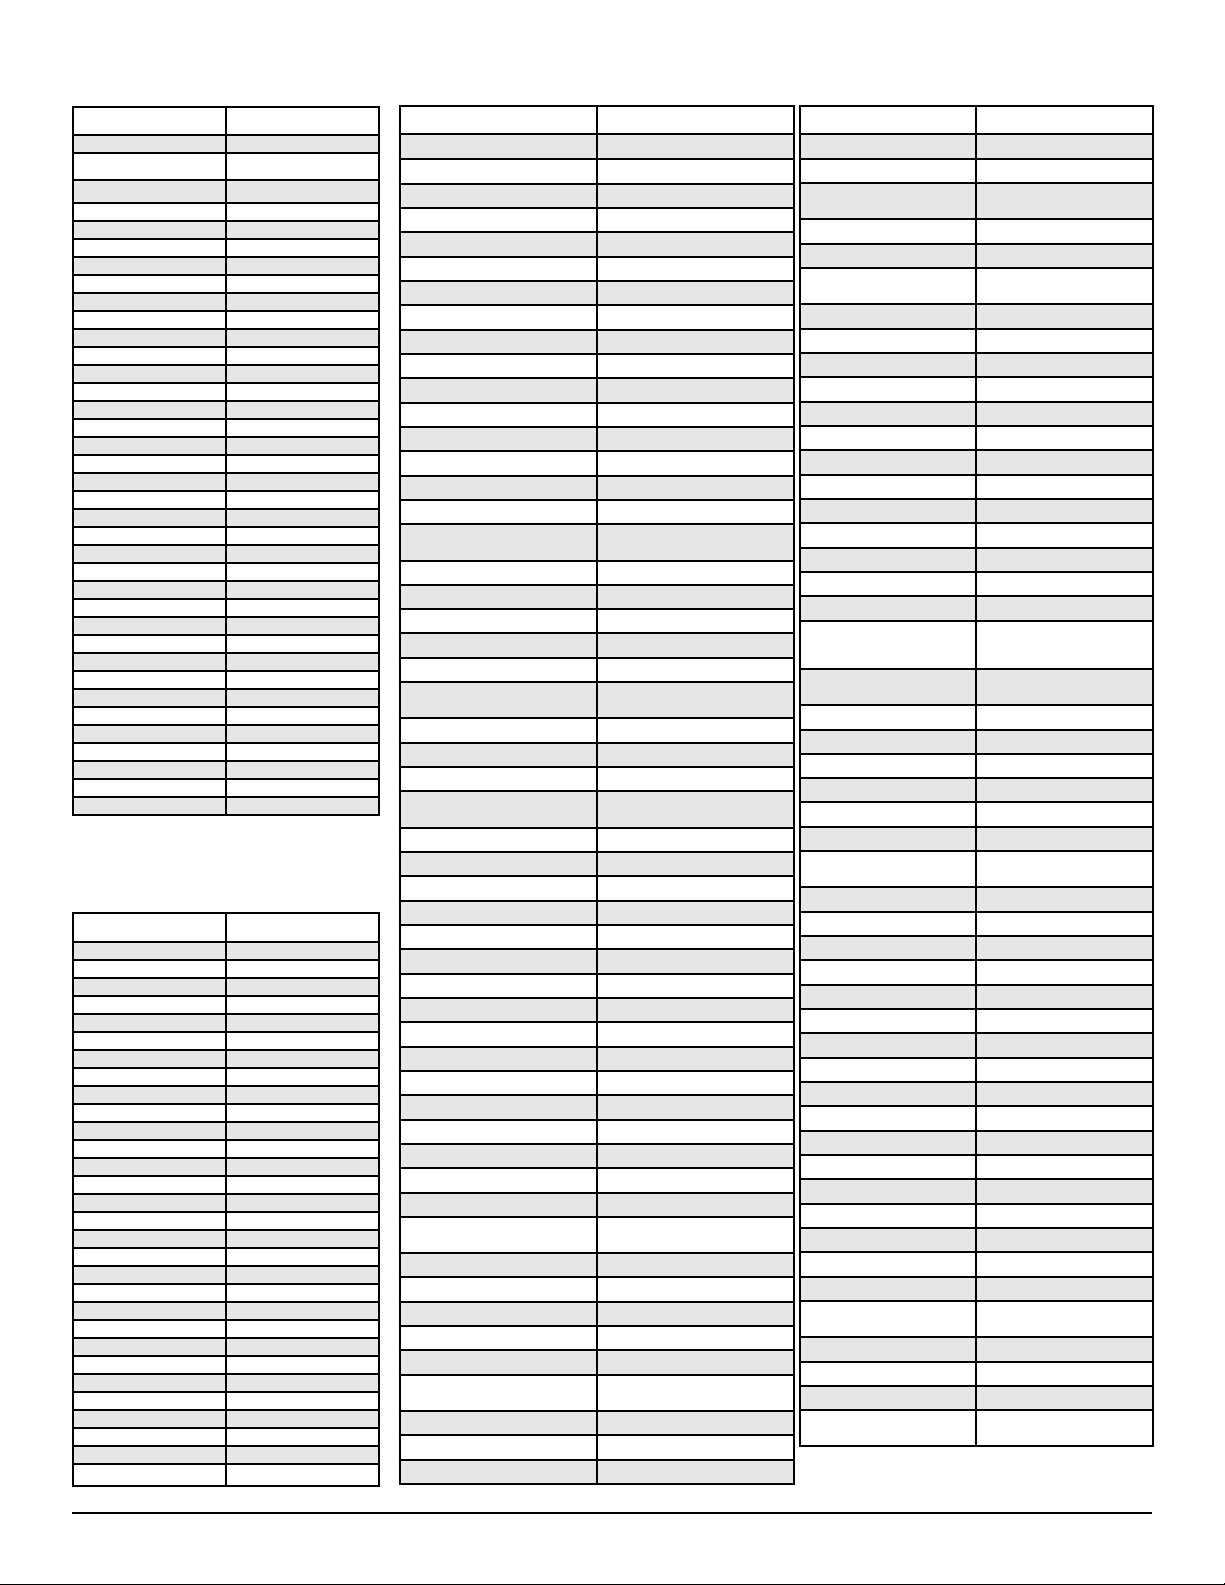
DVD CODES
VCR CODES
Brand Name Codes
Akai 529
Apex
Broksonic 536
Daewoo 529
Denon 501, 520
Emerson 540, 521, 524, 527
Fisher 500
GE 541, 504
Hitachi 530
JVC 515, 510
Kenwood 507
Koss 522
Lasonic 544
Magnavox 508, 502
Marantz 508
Mintek 543
Norcent 532
Onkyo 516, 502
Optimus 511
Orion 526
Oritron 522
Panasonic 501, 518
Philips 508, 502
Pioneer 542, 537, 511, 505, 518
Proscan 504
RCA 539, 538, 504
Samsung 512
Sanyo 500, 526
Sharp 531, 517
Sony 506
Sylvania 524
Symphonic 524
Technics 501
Theta Digital 511
Toshiba 502, 526
Yamaha 501
Zenith 521, 514, 502
535, 534, 533, 525, 527,
528, 523
SATELLITE RECEIVER CODES
Brand Name
AlphaStar 431
Echostar 432, 410, 416
ExpressVU 432
Fujitsu 404
GE 426, 436, 437, 423
General Instruments 425, 427, 415, 435, 405
Hitachi 407, 421
HTS 432
Hughes 442, 407
Janeil 404
Jerrold 425, 427
JVC 432
Magnavox 429, 430
Memorex 430
Next Level 415
Optimus 430
Panasonic 441, 428, 400
Philips 439, 438, 429, 430, 432
Primestar 425, 427
Proscan 426, 436, 437, 423
Radio Shack 415
RCA 426, 436, 437, 423
Samsung 440
Sony 420
Star Choice 415, 435
Toshiba 422, 405
Uniden 429, 430, 406, 409, 412
Video Pall 404
Viewstar 418
Zenith 434, 404
Codes
Brand Name Codes
Admiral 234, 243, 247, 224, 229, 222, 215
Adventura 228
Aiko 205
Aiwa 228, 217
Akai 209, 215
America Action 205
America High 232
Bell&Howell 201
Broksonic 234, 243, 247, 227, 204
Candle 248, 222, 204, 205, 211, 217
Canon 232
CCE 205
Cineral 205
Citizen 222, 205, 211, 217
Craig 202, 219
Craver 204
Curtis Mathes 232, 236, 238, 248, 222, 228, 209,
Daewoo 205, 211
Daytron 205
Denon 230
Dynatech 228
Emerex 214
Emerson 251, 228, 243, 234, 236, 247, 227,
Fisher 200, 201, 202, 211
Fuji 232
Funai 228, 217
GE 222, 246, 248, 232, 236, 226, 229,
Goldstar 253, 238, 248, 226, 206, 215, 217
Go Video 248, 249, 212, 219
Gradiente 228
Garrard 228
Harley Davidson 228
Headquarter 200
Hitachi 228, 230, 246, 226, 222, 209, 217
Hughes 230
JBL 237
Jensen 209
JVC 220, 238, 226, 201, 209, 230
KEC 205
Kenwood 220, 226, 238, 201, 209
Kodak 232
Lloyd’s 228
Logik 219
LXI 232, 228, 230, 201, 202, 206,
Magnasonic 205, 219
Magnavox 204, 232, 228, 211, 217, 219, 220
Marta 206
Matsushita 232
MEI 232
Memorex 227, 232, 243, 245, 224, 228, 229,
Minolta 230
Mitsubishi 244, 224, 226, 229, 210
Motorola 232, 229, 224
211, 217
201, 204, 205, 206, 210, 211, 217
224, 212
211, 217
230, 200, 201, 202, 206, 215
Brand Name Codes
MTC 228, 217, 219
Multitech 228, 217
NEC 238, 226, 201, 206, 209, 215,
Olympus 232
Optimus 245, 248, 224, 229, 201
Orion 243, 227, 234, 205, 206,
Panasonic 245, 232, 236, 202, 211, 219
Penny 230, 232, 248, 211, 219
Pentax 238, 230
Philco 204, 232, 243, 228, 217
Philips 204, 232, 228, 211, 217
Pioneer 242, 204, 207, 220
Proscan 222, 241, 246, 230, 236, 226
Proton 219
Pulsar 248, 205, 217
Quarter 200
Quartz 200
Quasar 245, 232, 236
Radio Shack 228, 245
RCA 250, 222, 241, 246, 248, 230,
Realistic 232, 248, 224, 228, 229, 200,
Samsung 248, 211, 217, 222
Samtron 248
Sansui 243, 226, 228, 209, 219, 220
Sanky 229, 224
Sanyo 200, 201, 202
Scott 234, 247, 227, 211
Sears 232, 228, 230, 200, 201, 202,
Semp 211
Shintom 219, 227
Sharp 252, 229, 224
Signature 228, 217, 229, 224, 200
Sony 214, 218, 232, 237, 226, 228
STS 230
Sylvania 228, 232, 244, 204, 217
Symphonic 228, 217, 226, 202
Yamaha 238, 226
Tatung 226, 209
Teac 228, 209, 214, 217
Technics 232
Teknika 232, 228, 217
Toshiba 211, 244, 202, 205, 210
Tomas 228, 217
Vector 211
Video Concept 211
Wards 230, 232, 248, 224, 228, 229,
White Westinghouse 243, 205
XR-1000 228, 232
Yamaha 238, 226
Zenith 206, 215, 237, 243, 220,
217, 248
210, 211
232, 236, 224, 226, 229, 201,
207, 210
201, 202, 206, 217
206, 211, 217
202, 204, 211, 217
228, 222
14 Remote Control Programmable Codes
Page 15
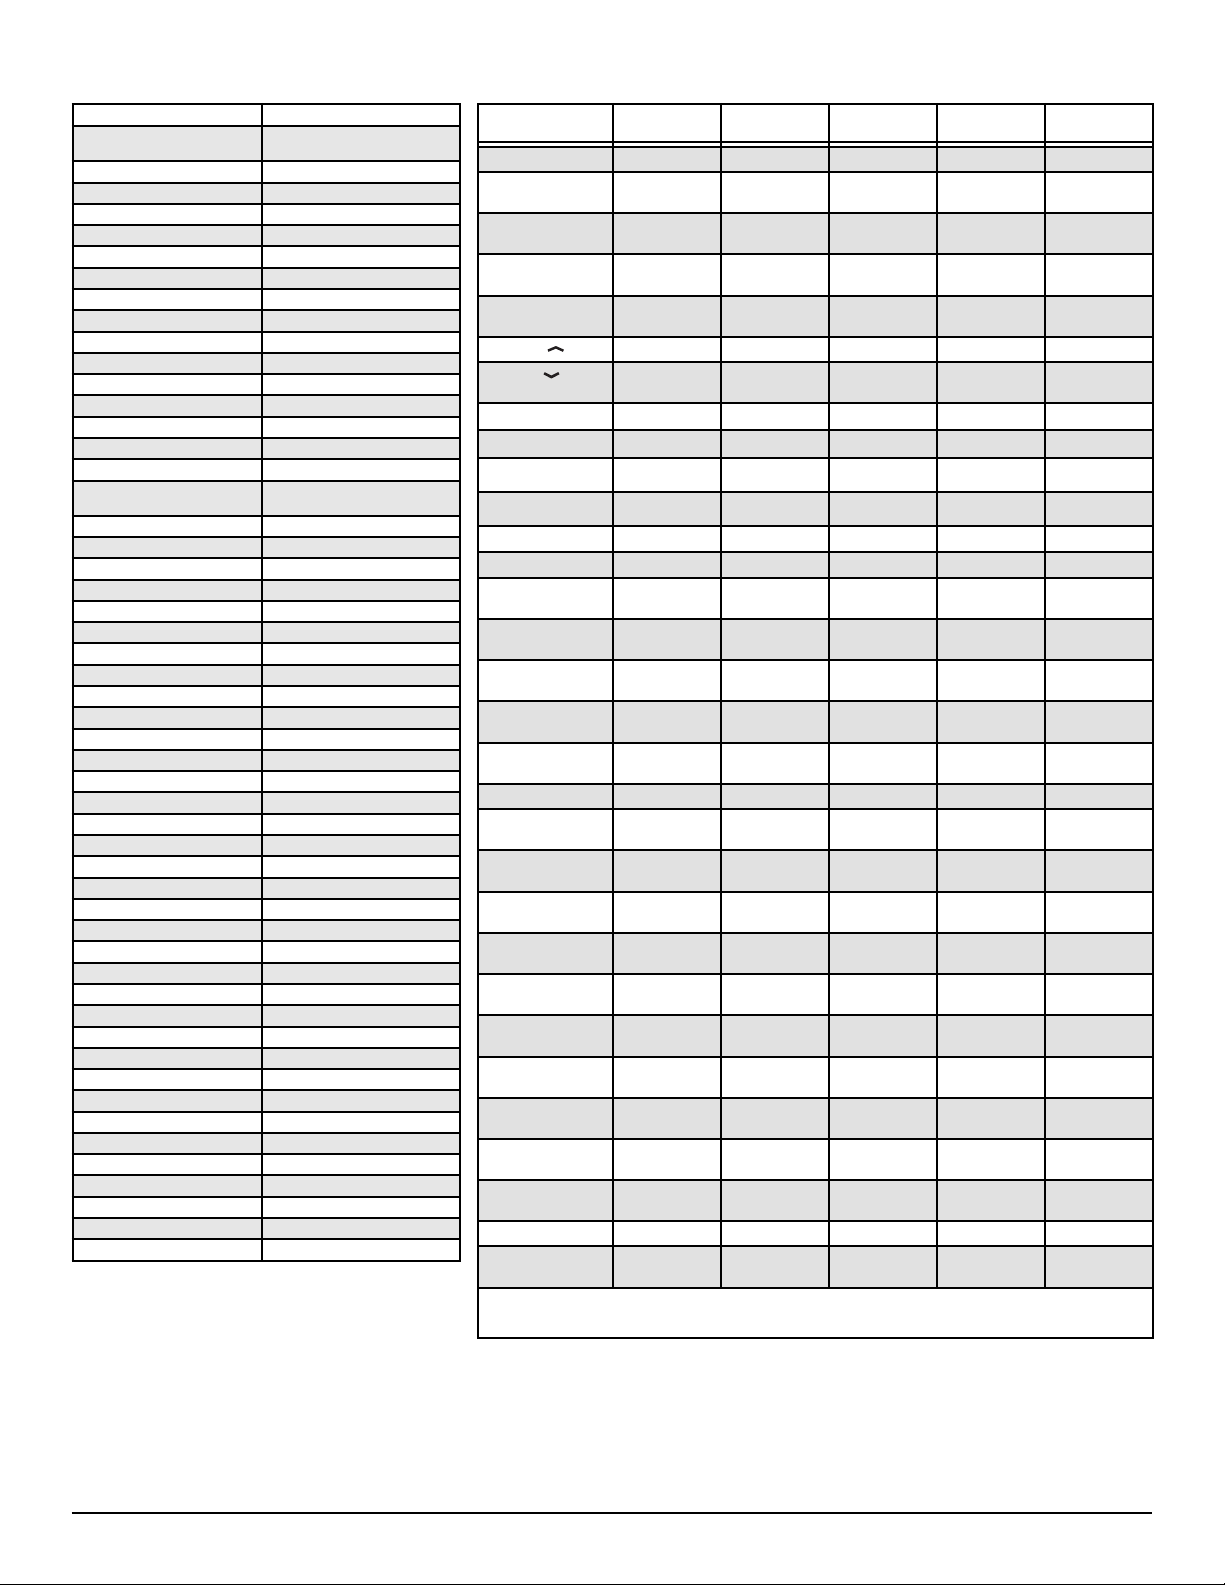
CABLE CODES
Brand Name Codes
ABC
AIM 321
Archer 334
Bell & Howell 313, 314, 329
Contec 305, 302, 307, 309, 318, 320, 324
CPI 309, 323
Diamond 320
Eagle 313, 314, 329
Emerson 334
Gemini 334
General Instruments 303, 300, 309, 320, 321, 323
Goldstar 312
Goodmind 334
Hamlin 330, 320
Hitachi 309, 323
Hytex 318
Jerrold
Magnavox 325, 301, 309, 313, 314, 323
Memorex 331, 332, 313, 314, 329
Motorola 338, 303, 300, 309, 320, 321, 323
Movie Time 306, 310, 314, 313, 329
Northcoast 316
NSC 305, 306, 314, 313, 329
Oak 305, 318, 320
Paragon 331, 313, 314, 329
Panasonic 331, 324, 302, 307, 317, 327
Philips 341, 325, 301, 309, 313, 314, 323
Pioneer 312, 335, 333, 317, 324
Quasar 331, 302, 307, 317
RCA 328, 302, 307
Regal 330, 307, 320
Rembrandt 305, 309, 323
Radio Shack 334
Samsung 312, 310
Scientific Atlanta 335, 307, 324
Signal 310
Signature 300, 309, 321, 323
Sony 340
Sprucer 302, 307, 316
Starcom 332, 309, 321, 323
Stargate 309, 310, 321, 334
Teleview 310
Tocom 300, 303, 305, 304, 306, 307
Toshiba 331, 309, 316, 323
Unika 314, 313, 329
United Artists 318
United Cable 309, 323
U.S. Electronics 309, 324
Viewstar 326, 313, 315, 314, 329
Wards 321, 309, 323
Warner 312
Zenith 331, 336, 337, 309, 316, 324
312, 304, 306, 309, 313, 314, 318,
319, 321, 324, 329
300, 303, 309, 313, 314, 320,
321, 329
REMOTE CONTROL KEYS FUNCTIONS CHART
REMOTE KEYS TV MODE VCR MODE CABLE MODE DVD MODE SATELLITE
POWER
NUMBER KEYS
(0 ~ 9)
INPUT
RECALL
MENU
CHANNEL (UP)
CHANNEL (DOWN)
– (DOWN)
VOLUME
VOLUME
+ (UP)
CURSOR
3
CURSOR
CURSOR ▲ (UP)
CURSOR ▼ (DOWN)
MUTE
RESET
CAPTION
SLEEP
V-GUIDE
ENTER
PLAY (
FAST FORWARD
(
8
REWIND (
STOP ( ■ )
PAUSE (II)
RECORD
(REC
TUNER Operates TV
GUIDE No Function No Function No Function No Function Display Guide
PIX SHAPE Operates TV
INFO Displays Banner Selects Program
EXIT Ends Selection Ends Selection Ends Selection Ends Selection Ends Selection
PAP Operates TV
MODE KEYS Press these keys (VCR/TV/CABLE/DVD/SAT/AUX) when programming the remote
(RIGHT)
4
)
4
)
7
)
•
Turns Unit On/Off Turns Unit On/Off Turns Unit On/Off Turns Unit On/Off Turns Unit On/Off
Used to Select
Channels
Selects TV/Video
mode
Selects Previous
Channel
Displays Setup
Menu
Channel Up Channel Up Channel Up Next Ch. Up Channel Up
Channel Down Channel Down
Audio Down Audio Down Audio Down Audio Down Audio Down
Audio Up Audio Up Audio Up Audio Up Audio Up
Cursor Left Cursor Left Cursor Left Cursor Left Cursor Left
(LEFT)
Cursor Right Cursor Right Cursor Right Cursor Right
Cursor Up Cursor Up Cursor Up Cursor Up Cursor Up
Cursor Down Cursor Down Cursor Down Cursor Down Cursor Down
Switches TV
sound Off/On
Operates TV
ONLY
Operates TV
ONLY
Operates TV
ONLY
Operates TV
ONLY
Makes Selection Makes Selection Makes Selection Makes Selection Makes Selection
Selects VCR/DVD
Play Mode
Operates VCR/
DVD
)
Operates VCR/
DVD
Selects VCR/DVD
Stop
Selects VCR/DVD
Pause
No Function
ONLY
ONLY
ONLY
Used to Select
Channels
Selects TV/VCR
mode
Selects Previous
Channel
Displays Setup
Menu
Switches TV
sound Off/On
No Function No Function No Function No Function
No Function No Function Accesses Audio
No Function No Function No Function No Function
No Function No Function No Function No Function
Selects VCR Play Selects VCR/DVD
Operates VCR Operates VCR/
Operates VCR Operates VCR/
Selects VCR
Stop
Selects VCR
Pause
Selects VCR
Record
No Function No Function No Function No Function
No Function No Function No Function No Function
Display
No Function No Function No Function No Function
Used to Select
Channels
No Function No Function Selects TV/DSS
Selects Previous
Channel
Displays Setup
Menu
Channel Down Previous Ch.
Switches TV
sound Off/On
Play
DVD
DVD
Selects VCR/DVD
Stop
Selects VCR/DVD
Pause
No Function No Function
No Function Selects Zoom Selects Program
No Function Used to Select
Select Repeat
Function
Displays Setup
Menu
Down
Switches TV
sound Off/On
Options
Selects DVD Play Selects VCR/DVD
Operates DVD Operates VCR/
Operates DVD Operates VCR/
Selects DVD
Stop
Selects DVD
Pause
control and to choose an operating mode.
MODE
Channels
mode
Selects Previous
Channel
Displays Setup
Menu
Channel Down
Cursor Right
Switches TV
sound Off/On
No Function
Play
DVD
DVD
Selects VCR/DVD
Stop
Selects VCR/DVD
Pause
No Function
Screen
Display
Notes:
Many of the keys on this remote control are multi-functional. Please refer to the chart for a generic description of the keys and their functions.
Refer to your original operating manuals for specific feature operation.
This remote control cannot add keys or features to your equipment. Your equipment’s manufacturer must have provided them originally.
Remote Control Key Functions 15
Page 16
Mov e
Sel ect
Bac k
Exi t
ENTER
MENU
EXIT
Size
Color
Style
cc
Main
Channel
Digital Caption Font
V-Guide
Setup
Picture/Sound
Date/Time
Digital Audio Output
TV Speaker
Menu Language
Dolby Digital
Auto Clock
Manual Setup
Time
Date (Day)
Off
On
English
Español
Français
Channel Search
Add
Delete
Channel Scan Memory
Off
On
Initial Channel
Sports
News
Movies
Manual
Color Enhancer
Scan Velocity
Picture
Sound
Surround
Background
Normal
Cool
Low
High
Color
Tint
Contrast
Background
Brightness
Sharpness
Bass
Treble
Off
On
Digital Add-on Search
Off
On
Antenna Selection
Off
On
Opacity
Edge Style
Foreground Opacity
Background Opacity
Yes
No
Warm
Off
PCM
Foreground Color
Background Color
Edge Color
TV Adjustment and Setup
The on-screen menu provides the viewer with easy access to adjustments and settings. Just use the keys on the remote control and follow the on-screen
instructions.
HOW TO OPERATE THE ON-SCREEN MENU
1. Press MENU key, the Main Menu appears. Note: The Main Menu consists of the Icon Area and the Option Area. If no key is pressed after 30
seconds, the menu disappears from the TV screen.
2. Use the ▲/▼ keys to move the Cursor to select options from the Icon Area.
3. Press the ENTER key or
4. Use the ▲/▼ keys to choose desired option in the Main and Sub Menus. (Selected item bar is highlighted in yellow.)
5. Press the ENTER key to save the menu setting or to selected a different item.
6. Press
3left arrow to move Cursor from the Menu Option area back to the Icon area or EXIT key to exit from the menu.
Note: Items with submenus require additional steps, basically follow the on-screen directions using the Arrow keys and ENTER key.
4 right arrow to move Cursor from the Icon Area to the Menu Option area.
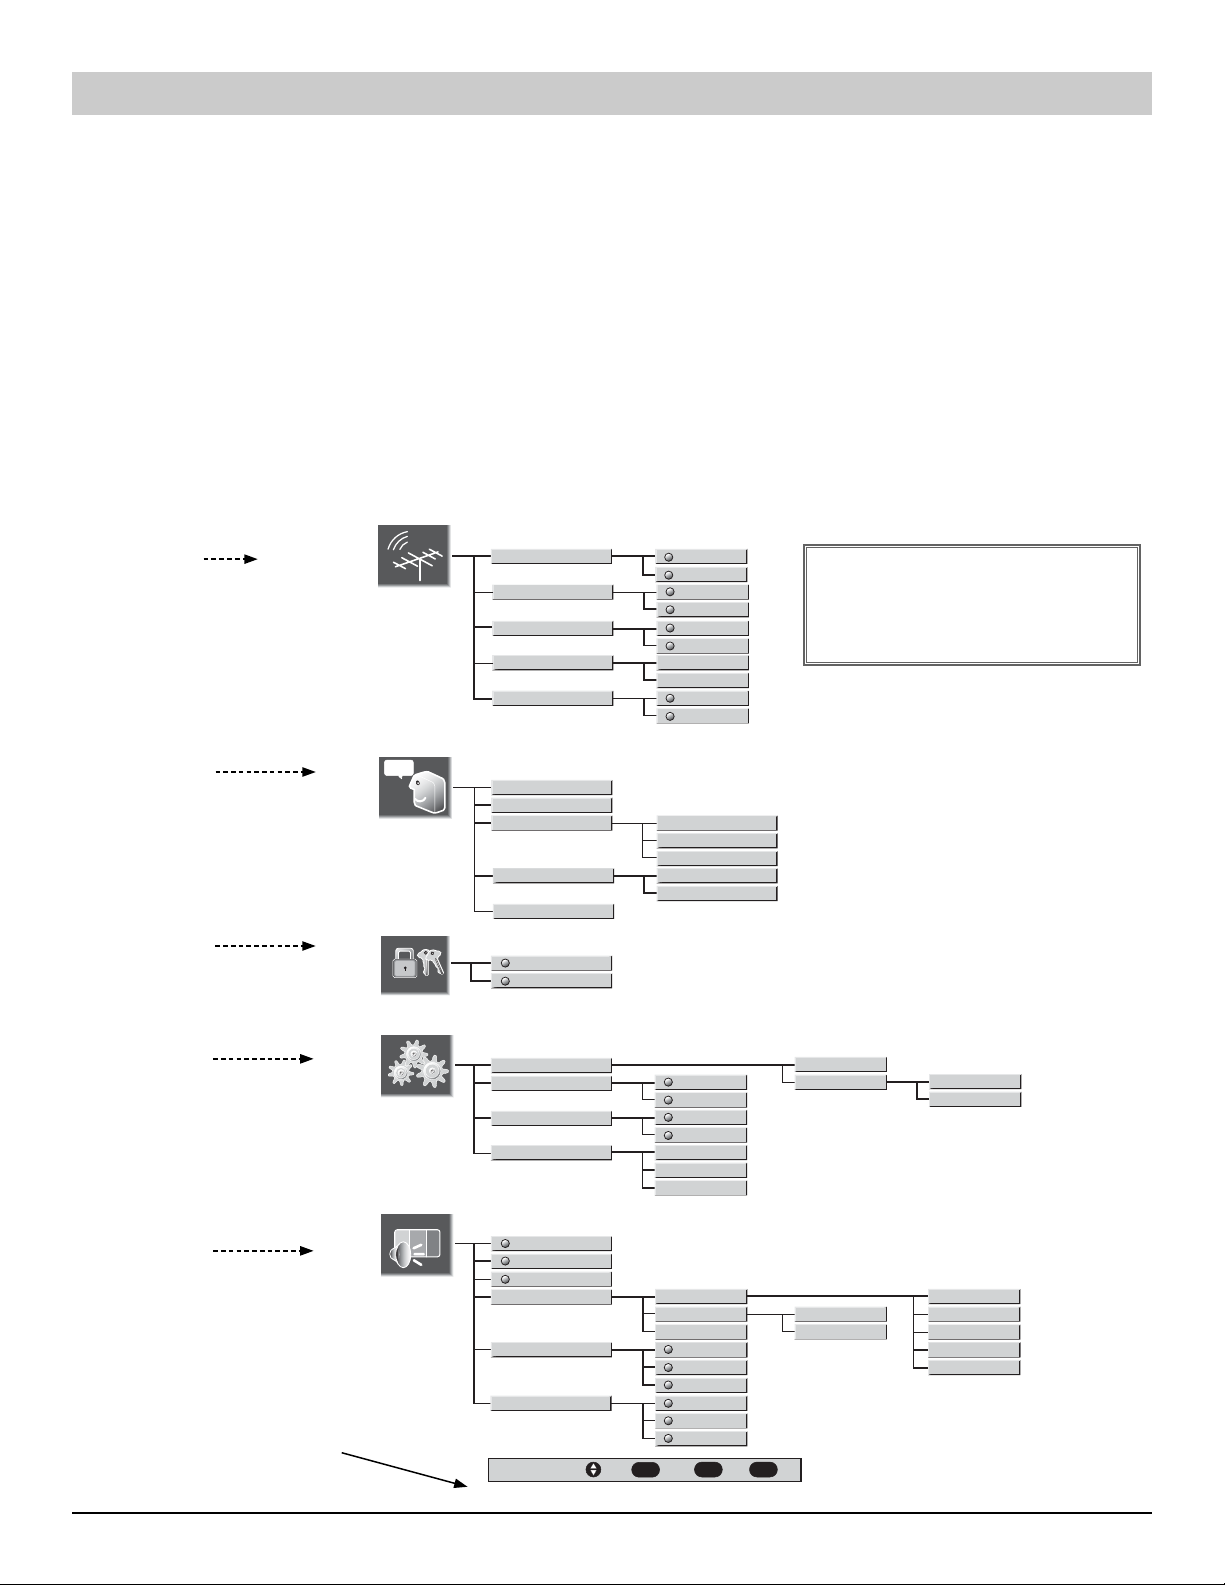
MENU NAVIGATION MAP
See page 17.
See page 18.
Main
See page 19.
See page 20.
See page 20.
MENU NAVIGATION KEYS
(See steps 1~6 for key
operation.)
16 Using the Menu
ICON AREA
Channel
Digital Caption Font
cc
V-Guide
Setup
Picture/Sound
MAIN MENU SUB MENU
Channel Search
Digital Add-on Search
Antenna Selection
Channel Scan Memory
Initial Channel
Size
Style
Color
Opacity
Edge Style
Yes
No
Date/Time
Digital Audio Output
TV Speaker
Menu Language
Sports
Movies
News
Manual
Color Enhancer
Scan Velocity
Move
ENTER
Off
On
Off
On
Off
On
Add
Delete
Off
On
Background Color
Foreground Color
Edge Color
Background Opacity
Foreground Opacity
Dolby Digital
PCM
Off
On
English
Español
Français
Picture
Sound
Surround
Normal
Background
Cool
Warm
High
Low
Off
Select
MENU
Back
EXIT
IMPORTANT FACT: Some Menu
options are specific to Digital and
Analog channels. Therefore, they are
not always selectable.
Auto Clock
Manual Setup
Bass
Treble
Exit
Time
Date (Day)
Color
Tint
Contrast
Brightness
Background
Sharpness
Page 17
CHANNEL SEARCH
cc
Channel
Back
Sele ct
Exi t
ENTER
MENU
Move
EXIT
Channel Search
Digital Cable Search
Digital Add-on Search
Channel Scan Memory
Initial Channel
Antenna Selection
Digital Add-on Search
cc
Power
cc
Channel
Back
Sele ct
Exi t
ENTER
MENU
Move
EXIT
Digital Add-on Search
Channel Scan Memory
Initial Channel
Antenna Selection
Channel Search
cc
Digital Cable Search
Back
Sele ct
Exi t
ENTER
MENU
Move
EXIT
Digital Cable
Channel Search
OFF
ON
cc
Channel
Channel Search
Digital Cable Search
cc
Antenna Selection
Back
Sele ct
Exi t
ENTER
MENU
Move
EXIT
Switch
Antenna?
Off
On
cc
Channel
Back
Sele ct
Exi t
ENTER
MENU
Move
EXIT
Digital Add-on Search
Channel Scan Memory
Initial Channel
Antenna Selection
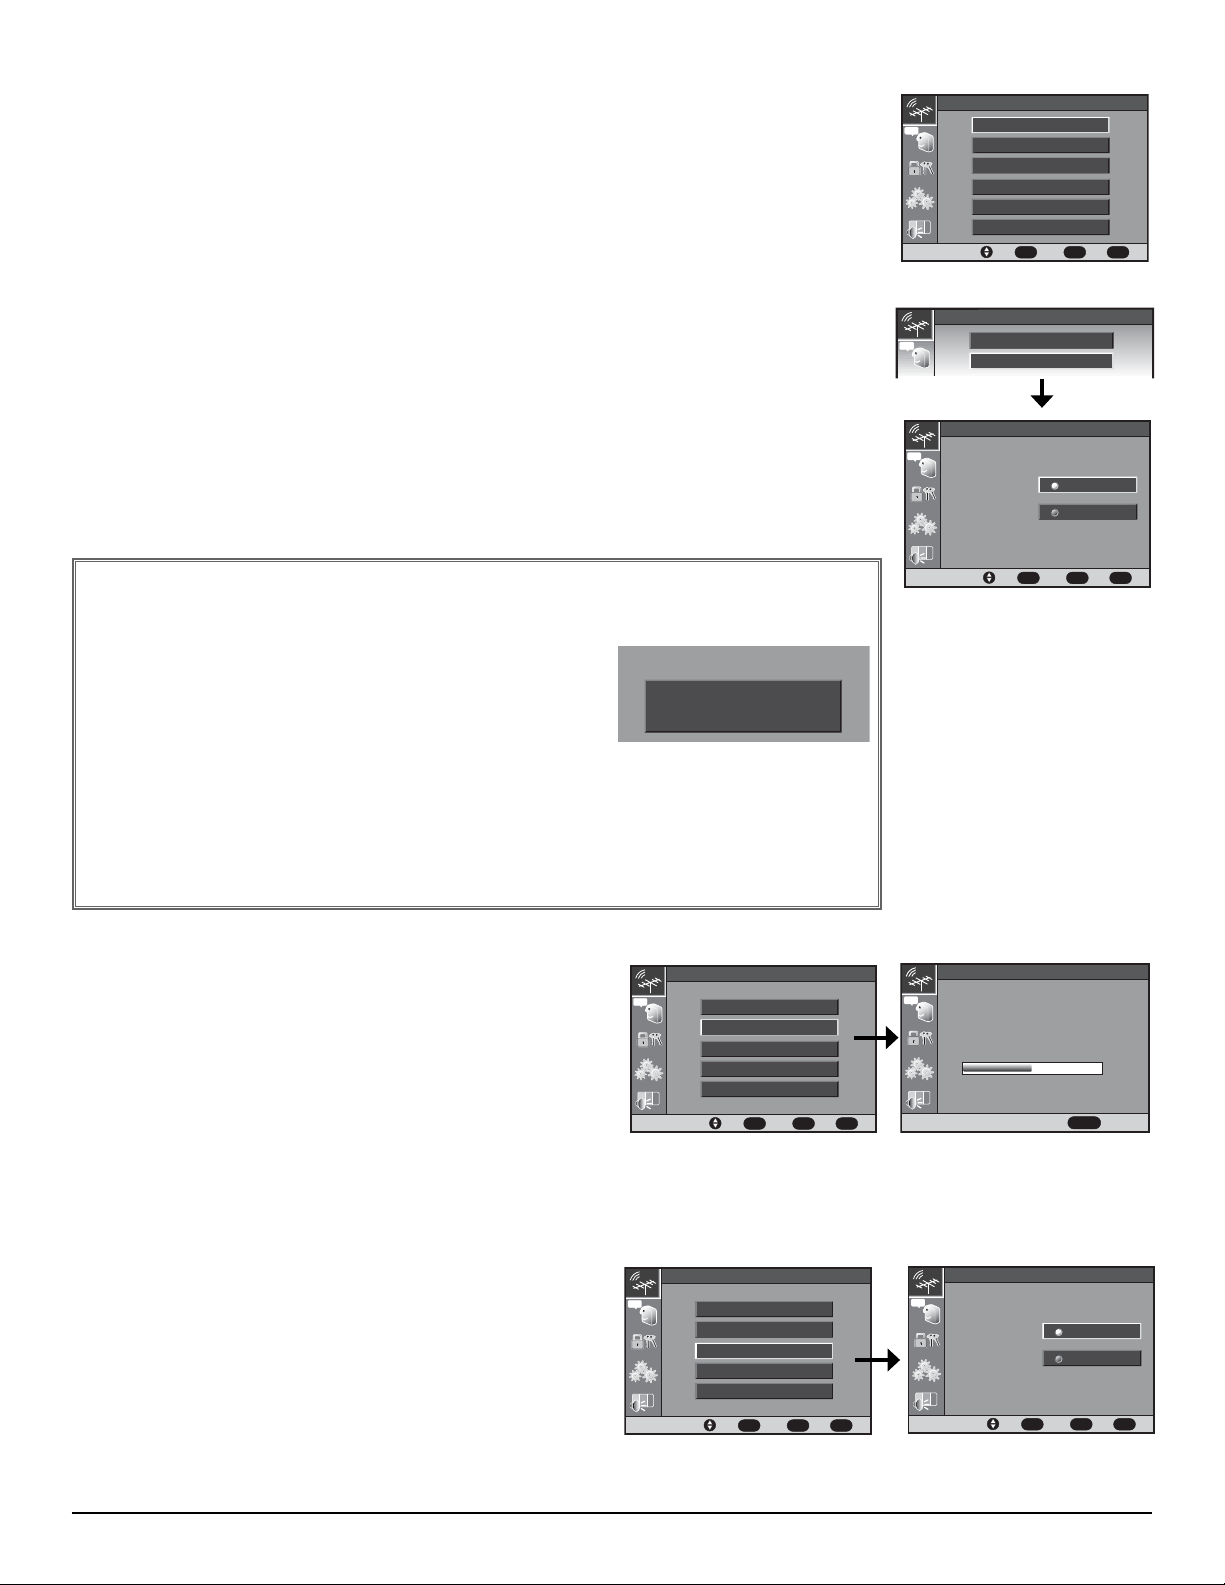
Channel Search
Channel Search is required only if additional channels become available, such as moving to another
city or having a cable service installed.
1. Press MENU.
2. Use the ▲/▼ keys to highlight the Antenna icon. Press ENTER.
3. Use the ▲/▼ keys to select Channel Search. Press ENTER.
4. Use the ▼ key to select ON. Press ENTER.
Channel
cc
Channel Search
Digital Cable Search
Digital Add-on Search
Antenna Selection
Channel Scan Memory
Initial Channel
Back
Select
ENTER
Move
MENU
Exit
EXIT
DIGITAL CABLE SEARCH (Optional)
This TV can receive unscrambled (ClearQAM) digital cable channels, when available.
However, not all cable companies provide ClearQAM digital channels.
Searching for digital cable channels will take about 10 minutes, please be patient.
1. Connect a Digital Cable signal directly to the TV Digital Antenna In jack.
2. Press the TUNER key to select digital channels. Press MENU.
3. Use the ▲/▼ keys to highlight the Antenna icon. Press ENTER.
4. Use the ▲/▼ keys to highlight Digital Cable Search. Press ENTER.
5. Use the ▼ key to choose ON. Press ENTER.
IMPORTANT FACT: This TV only maintains one database of digital channels. Therefore, when
you search for ClearQAM digital cable channels, the database of antenna digital channels will be
deleted. You will only be able to receive those ClearQAM channels your cable company provides.
Cable companies rearrange virtual channels as programming
changes which may cause the program you are watching to
move to another channel. This will appear briefly to notify you
of this change. You have to relocate the program you were
watching by scanning through the channels.
When a terrestrial broadcast station rearranges its virtual channels, data in the PSIP tables
advises the TV of the change. This allows the TV to “follow” a program to its new virtual
channel. The viewer should not even realize a change has occurred.
To restore the antenna digital channel database, reconnect the antenna and use the menu
system to perform normal channel search.
Program change
from cable company
Channel
cc
Digital Cable Search
cc
Digital Cable
Channel Search
Channel Search
Digital Cable Search
OFF
ON
Select
ENTER
Move
MENU
Back
Exit
EXIT
DIGITAL ADD-ON SEARCH
Use this feature to update the digital antenna channel map database to
add new channels or to add channels when broadcast towers
are in opposite directions from your location.
1. Press the TUNER key to select digital channels. Press MENU.
2. Use the ▲/▼ keys to highlight the Antenna Icon. Press ENTER.
3. Use the ▲/▼ keys to highlight Digital Add-on Search. Press ENTER.
4. Use the ▼ key to choose YES. Press ENTER.
Note: Turn your Antenna and repeat these steps for each
direction in which there are transmitting towers.
ANTENNA SELECTION
Use this feature to switch between analog terrestrial channels and
analog cable channels.
1. Press MENU.
2. Use the ▲/▼ keys to highlight the Antenna Icon. Press ENTER.
3. Use the ▲/▼ keys to select Antenna Selection. Press ENTER.
4. Use ▼ key to select ON. Press ENTER.
Channel
cc
Channel Search
Digital Add-on Search
Antenna Selection
Channel Scan Memory
Initial Channel
Back
Select
ENTER
Move
MENU
Exit
EXIT
Channel
cc
Channel Search
Digital Add-on Search
Antenna Selection
Channel Scan Memory
Digital Add-on Search
cc
Please wait,
while your TV searches
for available channels.
Digital Antenna 35
Antenna Selection
cc
Switch
Antenna?
Power
Off
On
50%
Power off
Initial Channel
Back
Select
ENTER
Back
Select
ENTER
Move
MENU
Exit
EXIT
Move
MENU
Exit
EXIT
(Continued on page 18.)
Channel Search / Digital Cable, Add-on Search / Antenna Selection 17
Page 18
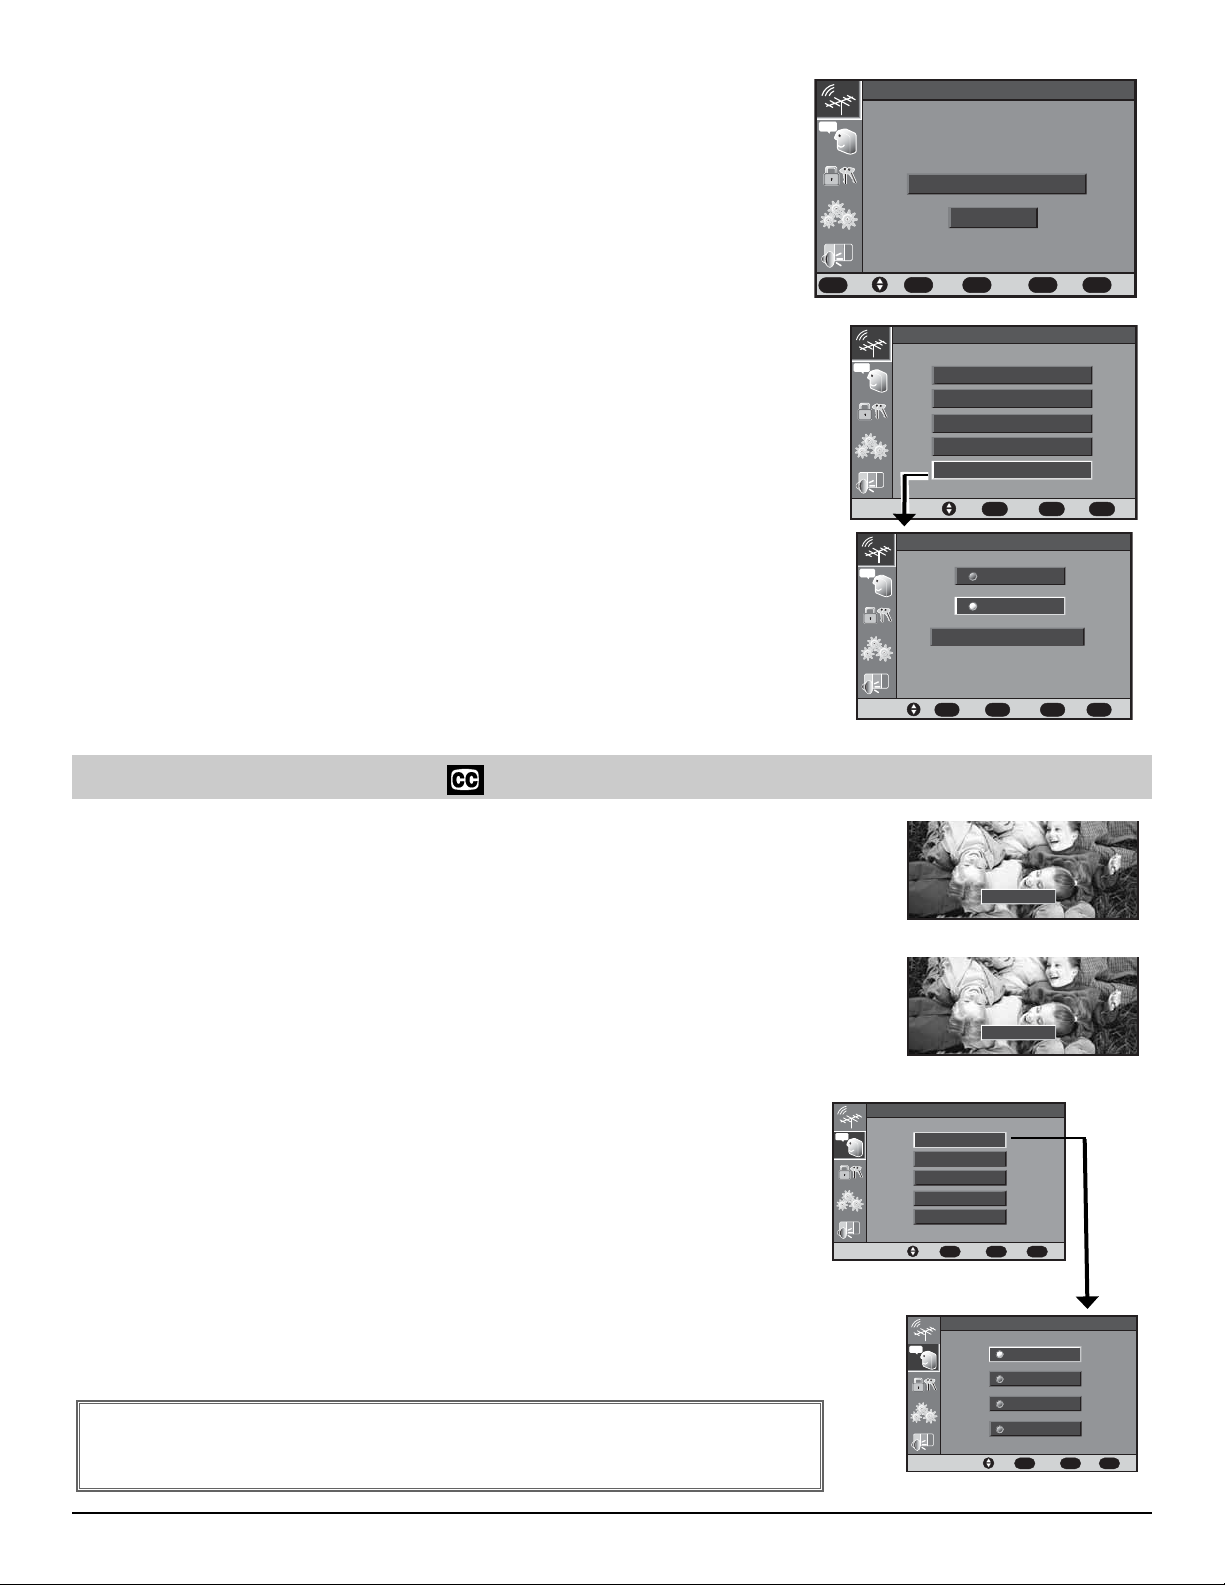
cc
Digital Caption Font
Back
Sele ct
Exi t
ENTER
MENU
Move
EXIT
Size
Style
Color
Opacity
Edge Style
cc
Size
Back
Selec t
Exi t
ENTER
MENU
Move
EXIT
Default
Small
Standard
Large
CC1
Digital CC1
cc
Initial Channel
Press ENTER Key to set.
Use Channel UP/DOWN Keys
Off
On
Digital Antenna 24-1
Ch
Bac k
Exi t
ENTER
TUNER
Tune r
Sel ect
MENU
EXIT
cc
Channel
Bac k
Sel ect
Exit
ENTER
MENU
Move
EXIT
Digital Add-on Search
Channel Scan Memory
Initial Channel
Antenna Selection
Channel Search
cc
Digital Antenna 06-1
Channel Scan Memory
Deleted
NumChCh
Bac k
Exit
ENTER
TUNER
Tuner
Add /De l
0~ 9
MENU
EXIT
CHANNEL SCAN MEMORY
Channel scan memory is a list of active channels that you can scan through when using the
Channel Scan (up/down) keys. This list can be customized by deleting unwanted channels.
1. Press MENU.
2. Use the ▲/▼ keys to highlight the Antenna Icon. Press ENTER.
3. Use the ▲/▼ keys to select Channel Scan Memory. Press ENTER.
When the CH Scan Memory option is selected, the Channel Add/Delete menu appears.
The current channel number will also appear in the box.
4. Press the TUNER key to select Digital or Analog.
5. Use the CHANNEL Up/Down keys or numerical keys to select desired channel.
6. Press the ENTER key to delete or add the channel.
INITIAL CHANNEL
The television can be programmed to tune to your favorite channel each time it is powered on,
such as your favorite news or sports channel.
1. Press MENU.
2. Use the ▲/▼ keys to highlight the Antenna Icon. Press ENTER.
3. Use the ▲/▼ keys to select Initial Channel. Press ENTER.
4. Use the ▼ key to select ON. Press ENTER.
5. Press the TUNER key to choose Digital or Analog.
6. Select your favorite channel using the CHANNEL Up/Down keys on the remote.
7 Press the ENTER key to set the initial channel, or to clear the channel if you would like to
change the channel number.
8. Press MENU to return to the Main Menu or EXIT to exit from the menu.
cc
Channel Scan Memory
Digital Antenna 06-1
Deleted
Back
Back
Back
EXIT
Exit
Exit
EXIT
Exit
EXIT
0~9
Num
TUNER
Tuner
Channel
cc
Channel Search
Digital Add-on Search
Antenna Selection
Channel Scan Memory
Move
Initial Channel
cc
Digital Antenna 24-1
Press ENTER Key to set.
Use Channel UP/DOWN Keys
Ch
TUNER
Add/Del
ENTER
MENU
Initial Channel
Select
ENTER
MENU
Off
On
Tuner
Select
ENTER
MENU
Closed-Captioning
Captioning is textual information transmitted along with the picture and sound so it can be displayed on the TV
screen. Because different types of captions can be transmitted with the TV signal, separate captioning modes are
provided. The captioning modes recognized by this model are: Analog EIA-608B and Digital EIA-708B. Local
broadcasters decide which caption signals to transmit.
To View Captions:
1. Press the CAPTION key on the remote to select: Analog caption—CC1, CC2, QuikCap or Off.
Digital caption—Digital CC1, Digital CC2, Digital CC3, Digital CC4, Digital CC5, Digital
CC6, Quikcap, or Off.
2. Using the Quikcap feature enables you to turn captioning on and off with the Mute function.
Press the MUTE key on the remote control to block the TV sound; the captions display automatically. Press again to restore sound, captions will disappear.
To Customize Digital Captioning On-screen Display:
This feature is designed to customize Digital Captioning only.
1. Press the TUNER key to select Digital. Press MENU.
2. Use the ▲/▼ keys to highlight the Caption icon. Press ENTER.
3. Use the ▲/▼ keys to select desired options. Press ENTER.
4. Use the ▲/▼ keys to make adjustment.
NOTE: The item customized will be highlighted with a yellow border and
a bright yellow bullet to indicate selection.
5. To adjust other options, repeat steps 3~5.
6. Press MENU to return to the Main Menu or press EXIT to exit from the menu.
IMPORTANT FACT: Receiving a true EIA 708B Digital Closed-Captioning... Some
broadcasters upconvert 608B Analog Caption to include in their digital stream. These
upconverted Analog captions may not respond to all the options for customized settings.
18 Initial Channel / Closed-Captioning
CC1
Analog Caption
Digital CC1
Digital Caption
Digital Caption Font
cc
Size
Style
Color
Opacity
Edge Style
ENTER
Move
Select
MENU
Back
Exit
EXIT
Main Menu
Size
cc
Small
Standard
Large
Move
Default
ENTER
Select
MENU
Back
Exit
EXIT
Sub-Menu
Page 19
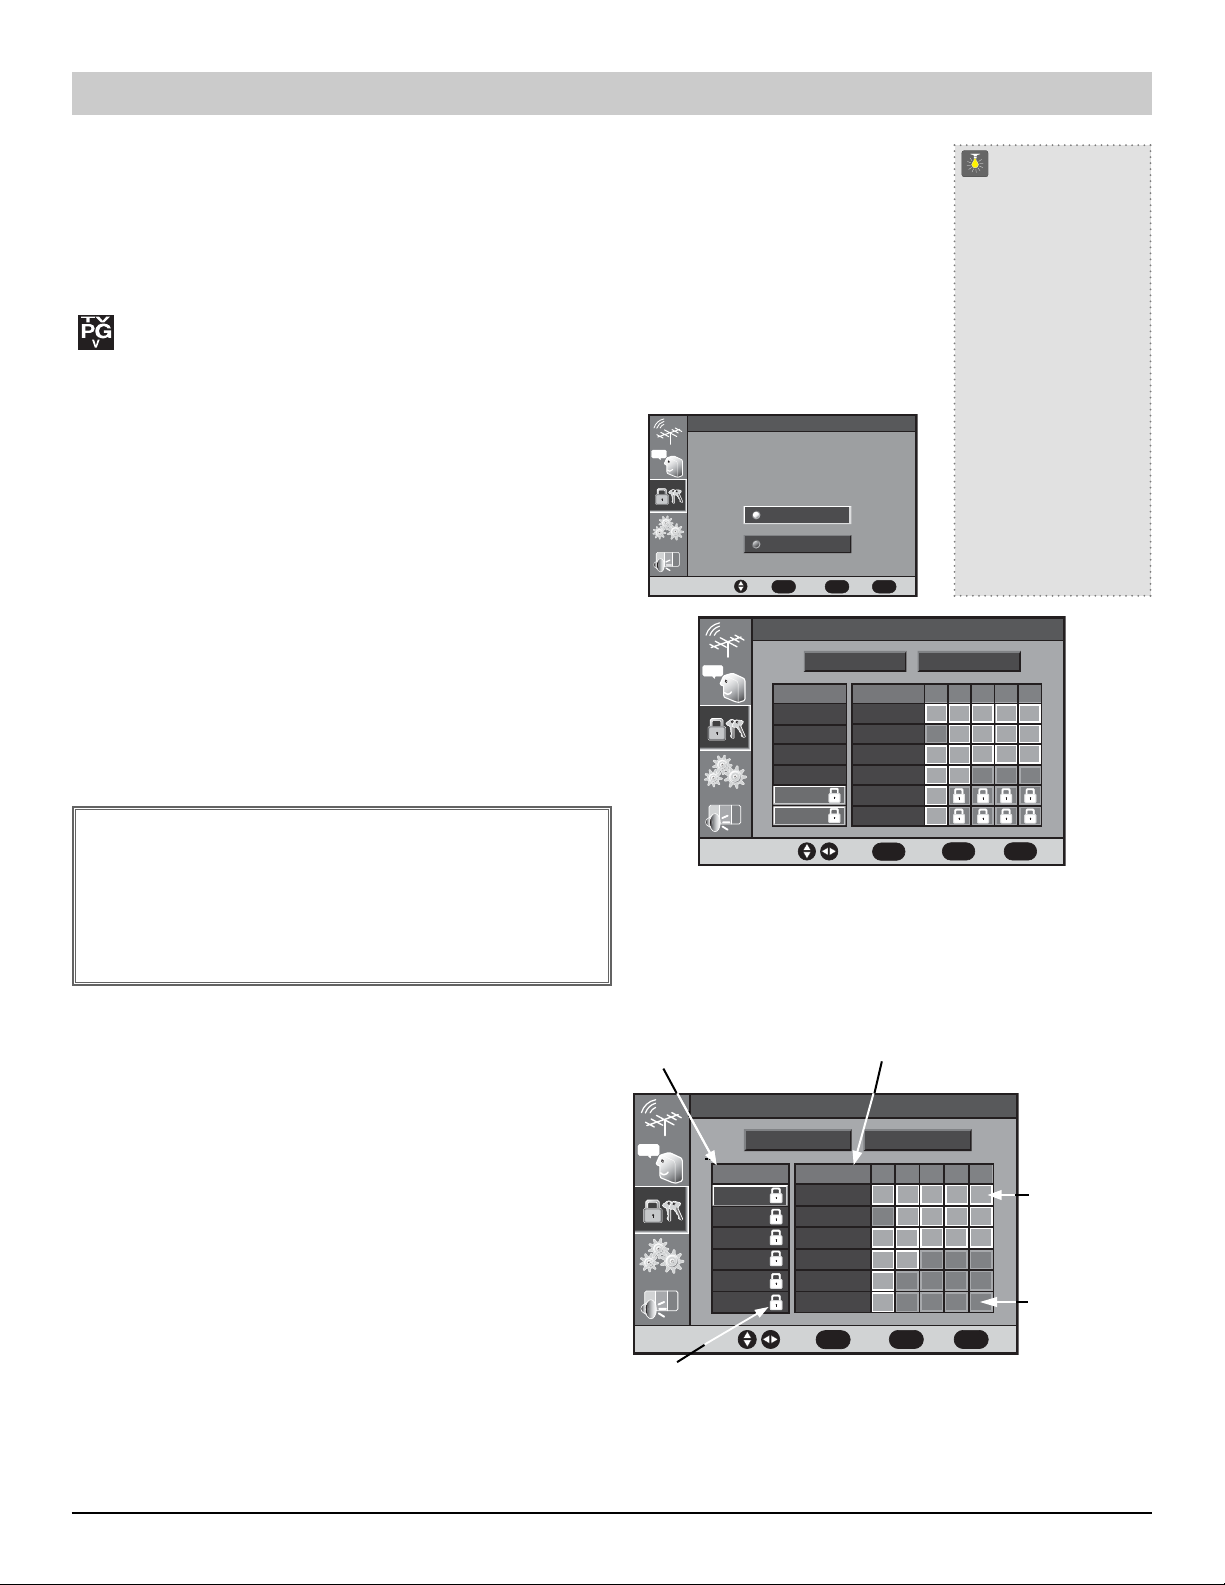
cc
V-Guide
Bac k
Sel ect
Exi t
ENTER
MENU
Move
EXIT
Do you want to enter the
V- Guide system and set
the rating limits?
YES
NO
Move
Select
Back
Exit
ENTER
MENU
EXIT
Rating
cc
Allow All
Block All
TV-Y7
TV-Y
TV-G
TV-PG
TV-14
MOVIE
PG
PG13
NC17
TV-MA
V-Guide (Parental Control) Operation
Move
Sel ect
Back
Exit
ENTER
MENU
EXIT
Rating
cc
Allow All
Block All
TV-Y7
TV-Y
TV-G
TV-PG
TV-14
MOVIE
PG
PG13
TV-MA
NC17
NOTE: THIS FEATURE IS DESIGNED TO COMPLY WITH THE UNITED STATES OF AMERICA’S FCC
V-CHIP REGULATIONS. THEREFORE, IT MAY NOT FUNCTION WITH BROADCASTS THAT ORIGINATE
IN OTHER COUNTRIES.
This Sanyo television is equipped with an electronic V-Chip to interpret MPAA and TV Parental Guidelines rating codes.
When these codes are detected, the TV will automatically display or block the program, depending upon choices you make
when setting up the V-Guide system. Content ratings are represented by the initials: FV (fantasy violence), D (suggestive
dialog), L (adult language), S (sexual situations), and V (violence).
A rating icon will generally appear in the upper left hand corner of the TV screen for about fifteen seconds at
the beginning of a program.
This television can be set to block programs automatically with content
you deem as inappropriate for your children to view.
TO BLOCK MOVIE OR TV PROGRAM
1. Press MENU.
V-Guide
cc
Do you want to enter the
V- Guide system and set
the rating limits?
YES
NO
2. Use the ▲/▼keys to highlight the V-Guide Icon [Locks & Keys]. Press
ENTER.
3. Use the ▲/▼ keys to select YES. Press the ENTER.
4. Use the ▲/▼, / keys to select Movie or TV ratings.
▲
▲
5. Press the ENTER key to active selected option.
For Movie Ratings: A lock symbol will appear beside the selected
option indicating it is blocked.
For TV Ratings: A locked symbol appears in the rating boxes
indicating blocked rating.
IMPORTANT FACT: The TV will automatically block (locked
symbol) ratings above or unblock (no lock) ratings below selec-
Select
ENTER
Move
MENU
Rating
cc
Allow All
MOVIE
G
PG
PG13
R
NC17
X
Exit
EXIT
TVTVFVFVD L S V
TV-Y
TV-Y7
TV-G
TV-PG
TV-14
TV-MA
Move
ENTER
Select
Back
tion. For example, if you block TV rating TV-G, the ratings
TV-PG, TV-14 and TV-MA will be blocked automatically or if you
block Movie rating PG-13, the ratings R, NC17 and X will be
EXAMPLE: MOVIE RATING: NC17 & X (BLOCKED)
TV RATING: TV-14 & TV-MA–D,L,S, & V (BLOCKED)
blocked automatically.
Blocking TVY7 does not block higher ratings.
QuickTips
■
The V-Guide menu
display remains on
screen for approximately 30 seconds. If
it disappears, press
the V-GUIDE key.
■
You can block a
content rating such as
TVPG-V and still be
able to watch TVPG
programs with ratings
of S-L-D provided the
TVPG is unblocked.
Need help?
Visit our Web site at
www.sanyoctv.com
or Call 1-800-877-5032
Block All
MENU
Back
EXIT
Exit
6. Press MENU to return to the Main Menu or press EXIT to exit from
the menu.
TO TEMPORARILY UNBLOCK MOVIE OR
V-GUIDE RATINGS—AT-A-GLANCE
MOVIE RATING
Rating
TV RATING
TV PROGRAM
MOVIE
G
PG
PG13
R
NC17
X
Allow All
TV-Y
TV-Y7
TV-G
TV-PG
TV-14
TV-MA
Move
ENTER
1. Press MENU.
cc
2. Use the ▲/▼ keys to highlight the V-Guide Icon. Press ENTER.
3. Select “NO” to temporarily unblock settings.
TO UNBLOCK MOVIE OR TV PROGRAM
1. Press MENU.
2. Use the ▲/▼ keys to highlight the V-Guide Icon. Press ENTER.
3. Use the ▲/▼ keys to select “YES,” only if the option indicator
(yellow bullet) is not highlighted. Press ENTER.
4. Highlight the “ALLOW ALL” option using the ▲/▼, / keys, if
needed. Press ENTER to clear all settings.
▲
▲
LOCKED SYMBOL
Block All
TVTVFVFVD L S V
Select
MENU
Back
EXIT
UNRATED
GUIDELINES
(Light Gray)
RATED
GUIDELINES
Exit
(Dark Gray)
V-Guide Operation 19
Page 20

Adju st
Move
Back
Exi t
ENTER
MENU
EXIT
Manual Setup
cc
Hour
Month
Day
Year
Minute
AM/PM
cc
Digital Audio Output
Dolby Digital
PCM
Move
Sel ect
Back
Exi t
ENTER
MENU
EXIT
Setup
cc
Date/Time
TV Speaker
Menu Language
Digital Audio Output
Analog Audio Output
Move
Adju st
Back
Exi t
MENU
EXIT
Picture
cc
Sharpness
Color
Tint
Contrast
Brightness
cc
Picture/Sound
Back
Sel ect
Exi t
ENTER
MENU
Move
EXIT
Sports
Movie
News
Manual
Color Enhancer
Scan Velocity
Setup Menu
cc
TV Speaker
On
Off
cc
Menu Language
Bac k
Selec t
Exi t
MENU
EXIT
English
Español
Français
QuickTips
■
Cursor will continue
to move through the
menu loop until the
Exit key is pressed.
■
The Channel Banner
(Full or Brief) Clock
option will be blank if
the clock/day has not
been set.
■
Surround sound will
be on automatically
when Sports or Movie
is selected. Surround
expands the sound
effect while receiving
MTS stereo signals.
Need help?
Visit our Web site at
www.sanyoctv.com
or Call 1-800-877-5032
Setting the Clock Manually
1. Press MENU.
2. Use the ▲/▼ keys to highlight the Setup Icon. Press ENTER.
3. Use the ▲/▼ keys to select Date/Time. Press ENTER.
4. Use the ▲/▼ keys to select Manual Setup. Press ENTER.
5. Use the ▲/▼ keys to select the correct Hour. Press ENTER to set hour.
(The TV will go automatically to the next setting.)
6. Use the ▲/▼ keys to select the correct Minutes. Press ENTER to set minutes.
(The TV will go automatically to the next setting.)
7. To set the other information, use the ▲/▼ keys to select the correct
information. Press ENTER to set information.
Digital Audio Output
Use this feature to choose the format of the audio output signal: Dolby
Digital or PCM.
1. Press MENU.
2. Use the ▲/▼ keys to highlight the Setup Icon. Press ENTER.
3. Use the ▲/▼ keys to highlight the Digital Audio. Press ENTER.
4. Use the ▲/▼ keys to select Dolby Digital or PCM. Press ENTER
.
Note: If you are watching an analog channel, or a signal connected to
the Video 1/2 or Component jacks, the Digital Audio output setting is not available.
TV Speakers
1. Press MENU.
2. Use the ▲/▼ keys to highlight the Setup Icon. Press ENTER.
3. Use the ▲/▼ keys to highlight the TV Speaker. Press ENTER.
4. Use the ▲/▼ keys to select ON. Press ENTER.
NOTE: Sound will not be produced through your television speakers if the OFF mode is selected.
Menu Language
1. Press MENU.
2. Use the ▲/▼ keys to highlight the Setup Icon. Press ENTER.
3. Use the ▲/▼ keys to highlight the Menu Language. Press ENTER.
4. Use the ▲/▼ keys to select English, Español, or Français. Press ENTER.
5. Press MENU to return to the Main Menu or EXIT to exit from the menu.
Setup
cc
cc
cc
cc
cc
Date/Time
Digital Audio Output
Analog Audio Output
TV Speaker
Menu Language
Move
Select
ENTER
Manual Setup
Hour
Minute
Month
Adjust
Day
ENTER
Digital Audio Output
Dolby Digital
PCM
TV Speaker
On
Off
Menu Language
English
Español
Français
Select
Move
MENU
MENU
MENU
Back
AM/PM
Year
Back
Back
Exit
EXIT
Exit
EXIT
Exit
EXIT
Picture/Sound Adjustment
When the Picture/Sound Option is selected, press the ENTER key to select the desired option and setting.
To expand your viewing experience, select Sports, Movie, or News to match the program you are watching.
The TV will automatically adjust the sound and picture.
1. Press MENU.
2. Use the ▲/▼ keys to highlight the Picture/Sound Icon. Press ENTER.
Adjusting the Picture/Sound Manually
1. Use the ▲/▼ keys to select Manual. Press ENTER.
2. Use the ▲/▼ keys to select Picture (Options: Color, Tint, Contrast, Brightness, Sharpness), Sound
3. Use the ▲/▼ keys to select desired option setting. Then use the / keys to make adjustments.
4. Press MENU to return to the Main Menu or EXIT to exit from the menu.
20 Set-up & Picture/Sound Adjustment
(Options: Bass or Treble), or Surround (Options: On or Off). Press ENTER.
▲
▲
cc
cc
Picture/Sound
Sports
Movie
News
Manual
Color Enhancer
Scan Velocity
Move
Picture
Color
Tint
Contrast
Brightness
Sharpness
Move
ENTER
Select
Adjust
MENU
MENU
Back
Back
Exit
EXIT
Exit
EXIT
Page 21
cc
Scan Velocity
Back
Selec t
Exi t
MENU
EXIT
High
Low
Off
Color Enhancer
cc
Color Enhancer
Back
Selec t
Exi t
MENU
EXIT
Normal
Cool
Warm
Use this feature to highlight the picture flesh tones and color highlights. Selecting WARM will deepen the
picture red tints and COOL will highlight the picture blue tints.
Scan Velocity
Color Enhancer
cc
Normal
Cool
Warm
This television has an electronic circuit that regulates the scan speed of the electron beam creating sharp
Back
Select
transitions between the light and dark portions of the picture. The results are crisp edges and sharply-defined
clarity. Select LOW or HIGH option to change settings.
1. Press MENU.
2. Use the ▲/▼ keys to highlight the Picture/Sound Icon. Press ENTER.
3. Use the ▲/▼ keys to highlight the Color Enhancer or Scan Velocity. Press ENTER.
4. Use the ▲/▼ keys to select setting. Press ENTER.
Scan Velocity
cc
MENU
High
Low
Off
5. Press the MENU key to return to the Main Menu or EXIT to exit from the menu.
Back
Select
MENU
PAP (Picture-and-Picture) Operation
The PAP (Picture and Picture) feature divides the screen into two picture windows so you can easily watch two different programs at once. The
left picture will always be the Main picture with audio. The right picture is considered the Sub picture with no sound available. The signal for one
window must come from the Digital Tuner. The signal for the other window can be from the Analog Tuner or any of the audio/video inputs.
IMPORTANT FACT: The Viewer cannot use the DTV’s Analog Tuner as one source and
any audio/video jack connection (VCR, DVD Player, Cable Box, or Satellite Reciever) as
the other source.
Exit
EXIT
Exit
EXIT
Using the PAP Split Screen
1. Press the PAP ON/OFF key to split the screen.
2. To change channels in the Left Window: Use the Channel Up/Down keys.
3. To change channels in the Right Window: Use the PAP Channel Up/Down keys.
Switching between the Windows
RIGHT WINDOWLEFT WINDOW /
1. Press the SWAP key to switch between the Left picture and Right picture windows.
Use this feature if you are viewing a program in the right window and desire to hear
the audio, just press the SWAP key to quickly exchange it to the left window.
NOTE: This feature is operational only when PAP Split window is ON.
Freezing the PAP Window
1. Press the QUIK FREEZE key to stop the action. Use this feature to hold an advertised phone
number or address on the screen until you collect the information.
NOTE: This feature will not freeze a picture in the Left window.
RIGHT WINDOWLEFT WINDOW /
IMPORTANT FACT: The QUIK FREEZE feature will freeze the Right window
content if PAP is ON.
Operating PAP Split–Screen with the following features...
Captioning Setting
If Caption mode is ON and corresponding captioning data is available, it applies to the Left picture window only.
Sleep Timer Setting
If the Sleep timer is set, the display will show in the Right Window. It is not active in the Left window on-screen display.
V-Guide Setting
If the PAP Split Screen feature is on, the V-Guide control settings will affect the Left picture and Right picture windows individually.
If only the Left picture has the same or higher rating than the program rating limit, only the Left picture window is blocked.
If only the Right picture has the same or higher rating than the program rating limit, only the Right picture window is blocked.
If both the Left picture and the Right picture have the same or higher rating than the program rating limit, both the Left and Right
pictures will be blocked.
IMPORTANT FACT: Even if the Left and Right picture windows are swapped, the V-Guide blocking
feature will still be active until turned off or cleared.
PAP (Split Screen) 21
Page 22
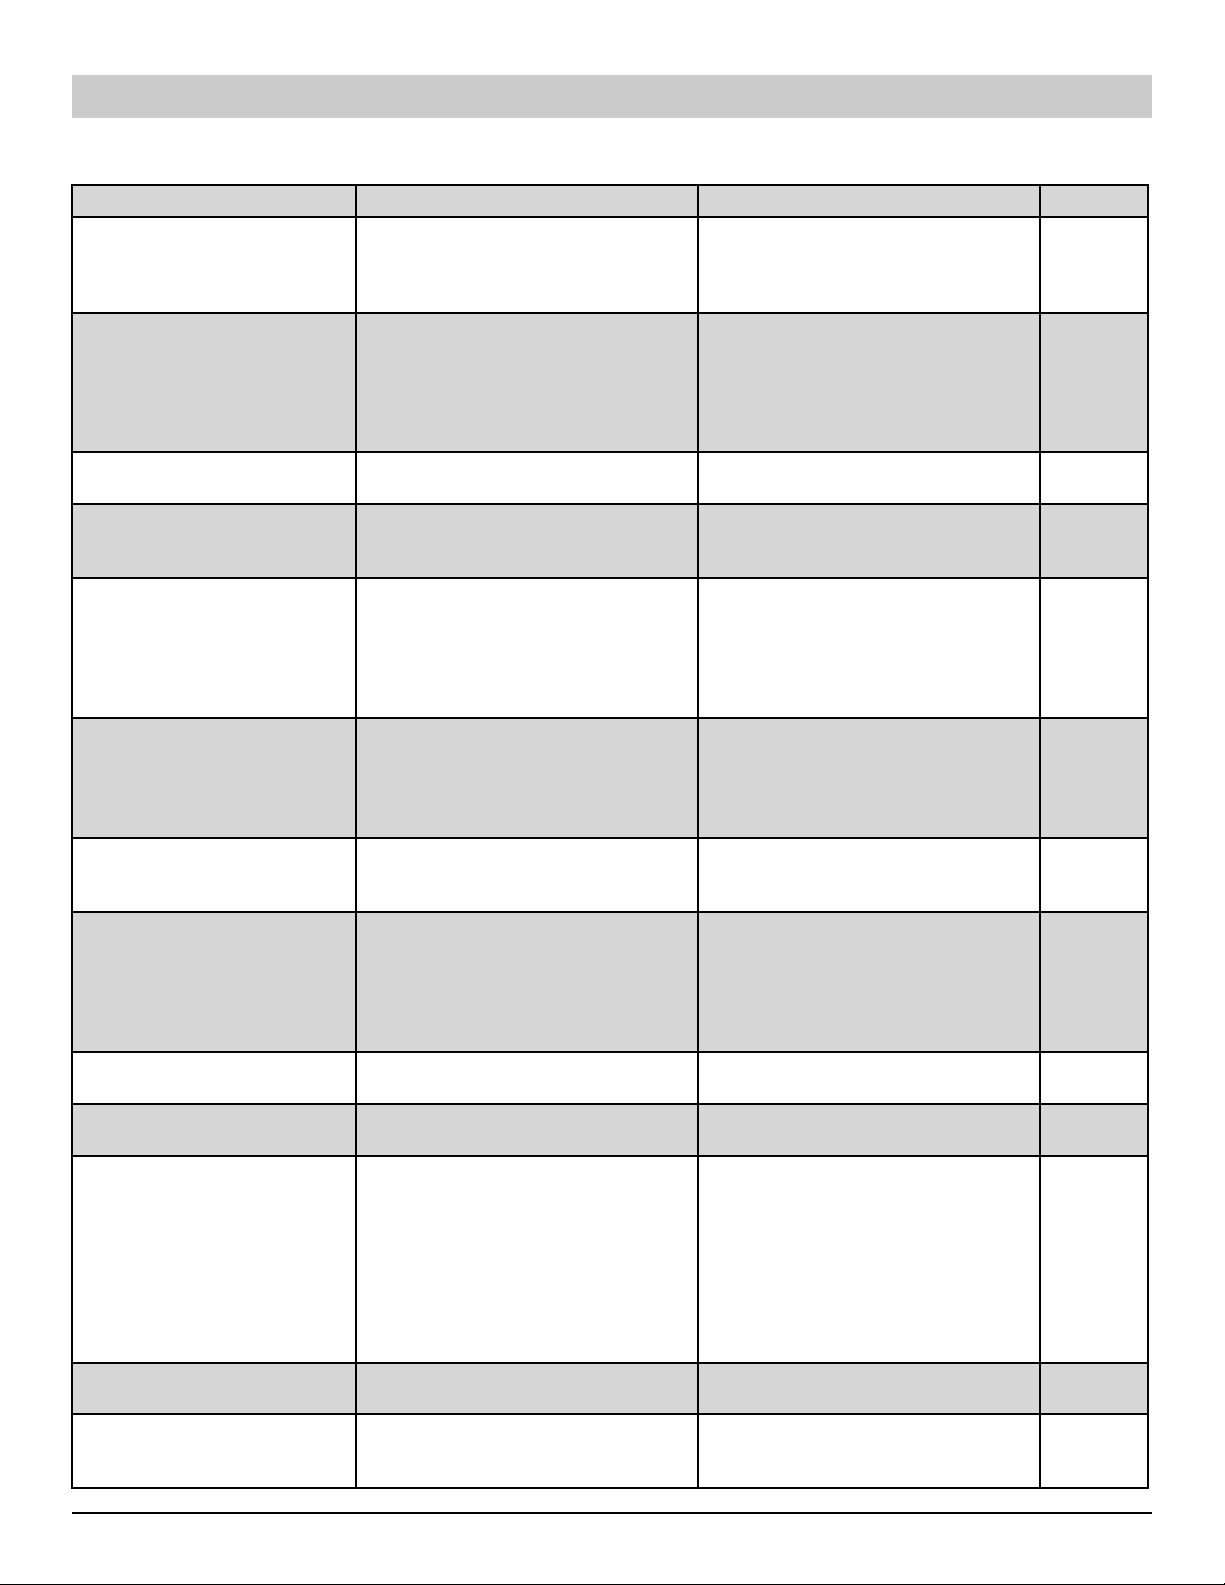
Helpful Hints (Problems/Solutions)
Before calling for assistance, please check the condition that most closely resembles your problem in the following chart, then
try the solutions for that condition. Visit our Web site at www.sanyoctv.com or call toll free 1-800-877-5032.
Problem Check these Conditions Try these Solutions Page No.
TV turns off automatically.
No picture/sound (digital
picture)
●
Check signal (Cable/Ant.)
connection.
●
Power surge protection feature.
●
Press POWER key.
●
Check antenna/external equipment
connections.
●
May be station trouble, NO signal
broadcast.
●
May be MUTE function is on.
●
The sleep timer may have been set.
●
Unplug TV momentarily.
●
Adjust antenna.
●
Try a different channel.
●
Press RESET key or restart channel
search.
●
Adjust volume.
7
8~11
12~13
20
Cannot customize Caption.
No Captioning.
Poor Picture/sound (watching
Analog)
Blue Screen with Video1,
Video2, Component2,
Component3, or HDMI
displayed.
No HDTV Stereo or SAP Sound
Cannot select or scan some
channels.
No Cable Channels
above number 13.
No UHF, VHF Channels OK.
Remote Control will not work
TV or other equipment (VCR,
Cable Box, Satellite Receiver,
and DVD).
Menu words seem misspelled
Cabinet makes popping sound.
●
Digital caption signal not broadcast.
●
Check if station is broadcasting
a Closed-Caption signal. Select
another channel.
●
Check if program is in color.
●
Check antenna/external equipment
connections.
●
Color or Tint misadjusted.
●
May be station trouble.
●
May be MUTE function is on.
●
Check Audio /Video connections.
●
Check external equipment
connections.
●
Check external equipment setting.
●
Check if station is broadcasting a
true MTS stereo signal or a SAP
signal.
●
Channel may be removed from
memory.
●
Check antenna connections.
●
No digital signal being broadcasted.
●
V-Guide is set to block program-
ming (see page 19).
●
Cable Channel indicator C should
appear next to channel number.
●
Cable Channel indicator C should
not appear next to channel number.
●
Press TV key to operate the TV.
●
Press VCR key to operate the VCR,
CABLE key to operate Cable Box,
DVD key to operate DVD Player,
and SAT key to operate Satellite
Receiver.
●
Check batteries; see if TV is
plugged in.
●
Check external equipment.
●
May be a different language is
selected.
●
This is a normal condition during
warm-up and cool down of the
plastic cabinet parts.
●
Press CAPTION key to select
Analog captioning.
●
Press CAPTION key to select
Captioning.
●
Try a different channel.
●
Adjust antenna.
●
Press RESET key to restart channel
search.
●
Adjust volume.
●
Press INPUT key.
●
Switch on external equipment.
●
Set external equipment output
connections to match input
connections.
●
Press AUDIO key.
●
Select CH. Scan Memory and
manually add channels or start CH.
(channel) search.
●
Set V-Guide to ALLOW ALL or press
RESET key to clear all settings and
restart channel search.
●
Switch Antenna mode ON.
●
Switch Antenna mode ON.
●
Replace batteries.
●
Aim remote control at front of TV
and external equipment.
●
Re-enter brand code.
●
Reselect menu language choice
using the on-screen menu.
18
18
13
20
8~11
13
18
19
17
17
12
13~15
20
22 Helpful Hints (Problems/Solutions)
Page 23

Mexico Guarantee
IMPORTADOR:
COMERCIALIZADORA MEXICO
AMERICANA, S.DE R.L. DE C.V.
AV. NEXTENGO No 78
COL. SANTA CRUZ ACAYUCAN
DEL. AZCAPOTZALCO, MÉXICO, D.F. C.P. 02770
RFC: CMA9109119L0
GUARANTEE
THE APPARATUS THAT YOU HAVE ACQUIRED HAS A ONE YEAR GUARANTEE FOR MANUFACTURING DEFECTS AND A
ONE YEAR SERVICE WARRANTY FROM THE DATE OF PURCHASE GRANTED BY:
COMERCIALIZADORA MEXICO-AMERICANA, S. DE R.L. DE C.V.
UNDER THE FOLLOWING CONDITIONS:
1. TO MAKE THE GUARANTEE EFFECTIVE, SIMPLY SHOW THIS POLICY FILLED OUT BY THE STORE OR SUPPLIER
UNIT OR THIS SALES INVOICE, WITH THE APPARATUS IN ANY OF THE SERVICE CENTERS INDICATED ON THIS
GUARANTEE.
2. IF THE FAULT IS ATTRIBUTED TO A MANUFACTURING DEFECT, THE APPARATUS WILL BE REPLACED
OR YOUR MONEY REFUNDED. DURING THE 30 DAYS SUBSEQUENT TO THE PURCHASE THE GUARANTEE WILL BE VALID AT THE STORE WERE THE APPARATUS WAS PURCHASED, PRESENTING THE ABOVE
DOCUMENTS.
3. REPAIR TIME WILL NEVER BE MORE THAN 30 DAYS. IF THIS TIME HAS ELAPSED, AND THE PRODUCT ISN’T REPAIRED,
COMERCIALIZADORA MEXICO AMERICANA, S. DE R.L. DE C.V. WILL PROCEED TO EFFECTUATE THE EXCHANGE FOR
AN EQUIVALENT APPARATUS OR THE RETURN OF THE BUYING-SALE COST RESPECTIVELY.
4. THIS GUARANTEE WILL COVER ITS TOTALITY OF PIECES, COMPONENTS AND SERVICE REPAIR OF PRODUCT, AND
THE RESPECTIVE COST OF TRANSPORTATION.
THIS GUARANTEE WILL BE NULL AND VOID IN THE FOLLOWING CIRCUMSTANCES
WHEN PRODUCT HAS BEEN USED IN A DIFFERENT CONDITION THAN ITS NORMAL USE.
*
WHEN PRODUCT HASN’T BEEN OPERATING CORRECTLY ACCORDING TO THE INSTRUCTIONS IN THIS MANUAL.
*
WHEN PRODUCT HAS BEEN CHANGED OR REPAIRED BY PERSONS NOT AUTHORIZED FROM THE
*
MANUFACTURER, IMPORTER, OR MERCHANT RESPONSIBLE RESPECTIVE.
DESCRIPTION: Television
BRAND: SANYO
MODELS: HT27744
HT30744
HT32744
:
CENTRO DE SERVICIO Y LUGAR DONDE OBTENER PARTES, COMPONENTES, CONSUMIBLES Y ACCESORIOS:
SUCURSAL VALLEJO SUCURSAL MINERVA
Poniente 126 No 288 B Silos No 135, Col. Minerva
Col. Nueva Vallejo Deleg. Iztapalapa
México, D.F. México, D.F. 09810
Tels. 5567-5378 Tels. 5646-4551
5368-0105, 8589-8033 5646-4550
DESCRIPTION:________________________________________BRAND:__________________MODEL: ___________________________
CLIENT’S NAME: ___________________________________________________________________________________________________
ADDRESS: _________________________________________________________________________________________________________
EXTERIOR NUMBER: ____________________________________ INTERIOR NUMBER: ___________________________________
SUB DIVISION: ___________________________________________ STATE/DELEGATION: ____________________________________
TELEPHONE: _____________________________________________
STAMP, DATE AND SIGNATURE
OF
STORE
Mexico Guarantee 23
Page 24

United States and Canada Warranty
ONE-YEAR LIMITED WARRANTY
THIS LIMITED WARRANTY IS VALID ONLY ON SANYO TELEVISIONS PURCHASED AND USED IN THE UNITED STATES OF
AMERICA, CANADA, AND PUERTO RICO, EXCLUDING THE UNITED STATES’ OTHER TERRITORIES AND PROTECTORATES.
THIS LIMITED WARRANTY APPLIES ONLY TO THE ORIGINAL PURCHASER, AND DOES NOT APPLY TO PRODUCTS USED
FOR INDUSTRIAL OR COMMERCIAL PURPOSES.
FOR ONE YEAR from the date of purchase, Sanyo Manufacturing Corporation will replace any defective TV.
To insure proper warranty exchange, keep the original sales receipt for evidence of purchase. Return the defective TV
to the retailer along with the receipt and the included accessories, such as the remote control. The defective TV will be
exchanged for the same model, or a replacement model of equal value, if necessary. Replacement model will be contingent on availability and at the sole discretion of Sanyo Manufacturing Corporation.
THE FOREGOING WARRANTY IS EXCLUSIVE AND IN LIEU OF ALL OTHER WARRANTIES OF MERCHANTABILITY OR
FITNESS FOR A PARTICULAR PURPOSE.
OBLIGATIONS
For one year
in material and workmanship under normal use and conditions. Should replacement be necessary under this warranty
for any reason due to manufacturing defect or malfunction during the first year from date of original purchase, Sanyo
Manufacturing Corporation will provide a new TV via exchange at the retailer.
For customer assistance, whether during or out of the warranty period, call toll free 1-800-877-5032.
Weekdays 7:30 AM – 7:00 PM Central Time
Saturday 7:30 AM – 4:00 PM Central Time
This warranty expresses specific contractual rights; retail purchasers may have additional statutory rights which vary from
state to state.
For your protection in the event of theft or loss of this product, please fill in the information requested below
and KEEP IN A SAFE PLACE FOR YOUR OWN PERSONAL RECORDS.
Model No._________________________ Date of Purchase ______________________
Serial No._________________________ Purchase Price________________________
Where Purchased______________________
from the date of purchase, Sanyo Manufacturing Corporation warrants this product to be free from defects
(EFFECTIVE: August 1, 2002)
(Located on back of unit)
AS
Sanyo Manufacturing Corp.
3333 Sanyo Road, Forrest City, AR 72335
Care and Cleaning
Cleaning the Cabinet
The surface of the cabinet can be damaged if not properly maintained. Many common household aerosol sprays, cleaning agents,
solvents and polishes will cause permanent damage to the fine surface.
1. Unplug the power cord before cleaning the television.
2. Clean the cabinet with a soft dry cloth.
Cleaning the Television Screen
1. Use a soft cloth moistened with a non-alkaline diluted soap solution. Gently rub surface until it is fully dry.
Notes: Never spray liquids on the screen because they can run down and drip onto the chassis. This may cause component failure not covered under
Warranty.
Never try to polish away any stain or other blemish, or use an abrasive material on the screen surface as this action may permanently
damage the surface of the picture tube.
24 United States and Canada Warranty
Page 25

Español Manual de Instrucciónes
Bienvenido al Mundo de SANYO
Gracias por comprar esta televisión digital HDTV. Usted ha hecho una excelente elección por Desempeño, Confiabilidad,
Características, Valor y Estilo.
Al Propietario:
Nosotros estamos concientes que usted esta ansioso por usar su nuevo receptor HDTV. Sin embargo también entendemos que para disfrutarlo
completamente usted debe entender primero sus variadas características. Mientras que este manual del propietario intenta que usted conozca la
completa operación de su TV, esto no significa que se deba leer de principio a fin. En su lugar, este ha sido ordenado de una manera fácil para que
usted pueda encontrar lo que usted necesita y así avanzar rápidamente para que disfrute su televisión digital.
“Como un Asociado de ENERGY STAR®,” Sanyo Manufacturing
Corporation, ha determinado que este producto cumple con
los lineamientos en eficiencia energética de ENERGY STAR®.
ENERGY STAR
Contenido
Bienvenido al Mundo de Sanyo. . . . . . . . . . . . . . . . . . . . . . . . . . . 25
Importantes Medidas de Seguridad . . . . . . . . . . . . . . . . . . . . . . . 26
Características. . . . . . . . . . . . . . . . . . . . . . . . . . . . . . . . . . . . . . . . . 27
Especificaciones. . . . . . . . . . . . . . . . . . . . . . . . . . . . . . . . . . . . . . . . 27
Glosario . . . . . . . . . . . . . . . . . . . . . . . . . . . . . . . . . . . . . . . . . . . . . . 28
Procedimientos Iniciales. . . . . . . . . . . . . . . . . . . . . . . . . . . . . . . . . 29
Localización y Funciones de los Conectores HDTV Traseros . . 29
Conexión de la Señal
Conexión de Antena Analógica (NTSC) . . . . . . . . . . . . . . . . . . . 30
Conexión de Antena Digital (DTV). . . . . . . . . . . . . . . . . . . . . . . 30
Preparando la TV . . . . . . . . . . . . . . . . . . . . . . . . . . . . . . . . . . . . . 30
Conexiones Digitales A/V
Conectando Equipo Externo
a la Entrada HDMI con HDCP . . . . . . . . . . . . . . . . . . . . . . . . . . 31
Conectando STB o un DVD con
Salida DVI a la Entrada HDMI con HDCP . . . . . . . . . . . . . . . . . 31
Usando los Conectores Componente
para Conectar un Reproductor de DVD u otro Equipo Digital. . 32
Conexiones A/V Análogas
Usando los Conectores S-Video
para Conectar un Reproductor VCR o DVD
a los Conectores A/V . . . . . . . . . . . . . . . . . . . . . . . . . . . . . . . . . . 32
Conexiones de Audio
Conectando la Salida Digital de
Audio a un Amplificador Estereofonico. . . . . . . . . . . . . . . . . . . . 33
Conectando la Salida Análoga de
Audio a un Amplificador Estereofonico. . . . . . . . . . . . . . . . . . . . 33
Conexiones Típicas de un Teatro en Casa . . . . . . . . . . . . . . . . . . 34
Usando el Control Remoto Multimedia
Instalación de Baterías . . . . . . . . . . . . . . . . . . . . . . . . . . . . . . 35~36
Programando el Control Remoto . . . . . . . . . . . . . . . . . . . . . . . . . 36
Códigos de Programación del
Control Remoto (VCR/DVD/Satelite/Cable). . . . . . . . . . . . . 37~38
Carta de Funciones para Programar
las Teclas del Control Remoto . . . . . . . . . . . . . . . . . . . . . . . . . . 38
Ajustes del Televisor
Como Operar el Menú en Pantalla. . . . . . . . . . . . . . . . . . . . . . . . 39
Mapa de Navegación del Menú . . . . . . . . . . . . . . . . . . . . . . . . . . 39
Búsqueda de Canales . . . . . . . . . . . . . . . . . . . . . . . . . . . . . . . . . . 40
Búsqueda de Canales de Cable Digital . . . . . . . . . . . . . . . . . . . . 40
Búsqueda Digital para Reagregar Canales. . . . . . . . . . . . . . . . . . 40
Selección de Antena. . . . . . . . . . . . . . . . . . . . . . . . . . . . . . . . . . . 40
Canales en Memoria. . . . . . . . . . . . . . . . . . . . . . . . . . . . . . . . . . . 41
Canal Inicial . . . . . . . . . . . . . . . . . . . . . . . . . . . . . . . . . . . . . . . . . 41
Transmisión Captada
Para ver textos Caption . . . . . . . . . . . . . . . . . . . . . . . . . . . . . . . 41
Para personalizar la función Caption en el menú de pantalla . . . 41
Operación de Guía-V (Control Paternal)
Como Bloquear Películas o Programas de TV. . . . . . . . . . . . . . . 42
Como Desbloquear Temporalmente
Películas o Programas de Televisión . . . . . . . . . . . . . . . . . . . . . . 42
Como Desbloquear Películas o Programas de Televisión . . . . . . 42
Ajustes del Menú
Ajustando el reloj Manualmente . . . . . . . . . . . . . . . . . . . . . . . . . 43
Salida de Audio Digital . . . . . . . . . . . . . . . . . . . . . . . . . . . . . . . . 43
Bocinas del Televisor. . . . . . . . . . . . . . . . . . . . . . . . . . . . . . . . . . 43
Menu de Lenguajes . . . . . . . . . . . . . . . . . . . . . . . . . . . . . . . . . . 43
Ajustes de Imagen /Sonido
Ajuste Manual de Imagen /Sonido . . . . . . . . . . . . . . . . . . . . . . . . 43
Resaltar Color. . . . . . . . . . . . . . . . . . . . . . . . . . . . . . . . . . . . . . . . 44
Velocidad de Trazo. . . . . . . . . . . . . . . . . . . . . . . . . . . . . . . . . . . . 44
PAP (Imagen e Imagen)
Usando el PAP con Pantalla Dividida . . . . . . . . . . . . . . . . . . . . . 44
Intercambiando Imagines en Pantalla Dividida. . . . . . . . . . . . . . 44
Congelando la Pantalla PAP. . . . . . . . . . . . . . . . . . . . . . . . . . . . . 44
Operando Pantallas PAP con Otras Características . . . . . . . . . . . 44
Consejos Utiles (Problemas Soluciones) . . . . . . . . . . . . . . . . . . . . 45
Garantía (México). . . . . . . . . . . . . . . . . . . . . . . . . . . . . . . . . . . . . . 46
Garantía (USA y Canadá) . . . . . . . . . . . . . . . . . . . . . . . . . . . . . . . 47
Español Manual de Instrucciónes / Contenido 25
Page 26

PRECAUCION
RIESGO DE TOQUE ELECTRICO NO ABRIR!
PRECAUCION : PARA REDUCIR EL RIESGO DE TOQUE ELECTRICO, NO QUITE LA CUBIERTA
(O LA TAPA TRASERA). NO HAY PARTES ADENTRO QUE LAS PUEDA REPARAR EL USUARIO.
REFIERASE A PERSONAL CALIFICADO PARA REPARAR EL APARATO.
ESTE SIMBOLO INDICA QUE VOLTAJES PELIGROSOS QUE CONSTITUYEN UN RIESGO DE TOQUE ELECTRICO ESTAN PRESENTES DENTRO
DE ESTA UNIDAD.
ESTE SIMBOLO INDICA QUE HAY INSTRUCCIONES IMPORTANTES DE
OPERACION Y MANTENIMIENTO EN LA LITERATURA QUE SE ANEXA
A ESTA UNIDAD.
ADVERTENCIA : PARA REDUCIR EL RIESGO DE FUEGO O TOQUE ELECTRICO, NO EXPONGA ESTE
APARATO A LLUVIA O HUMEDAD.
IMPORTANTES MEDIDAS DE SEGURIDAD
PRECAUCION : POR FAVOR SIGA TODAS LAS ADVERTENCIAS EN EL PRODUCTO Y EN LAS INSTRUCCIONES DE OPERACION. ANTES DE OPERAR EL PRODUCTO, POR FAVOR LEA TODAS LAS INSTRUCCIONES DE OPERACION Y SEGURIDAD.
GUARDE ESTA LITERATURA PARA SU REFERENCIA. Siga todas las instrucciones. . .
Colocando el aparato
1. No coloque su aparato en carrito, pedestal, anaquel o mesa que sean inestables.
Heridas serias a un individuo, y avería al aparato, pueden resultar si este cae. Su
vendedor puede recomendar carritos y pedestales o anaqueles e instrucciones
para montaje en la pared. Una combinación de aparato y carrito deberá de ser
movida con cuidado. Paradas rápidas, fuerza excesiva, y superficies irregulares
pueda causar que la combinación de aparato y carrito se volteen y caigan.
2. Las ranuras y aperturas en el gabinete y en la parte trasera e inferior fueron provistas para
ventilación del aparato. Para asegurar una operación confiable del aparato y protejerlo de sobrecalentamiento, estas aperturas no deberán de ser tapadas o cubiertas. Las aperturas nunca deberán
de ser cubiertas con un trapo u otro material, y las aperturas de la parte inferior no deberán de ser
tapadas poniendo la unidad en una cama, sofá, alfombra, u otra superficie similar. Este aparato
nunca deberá de ser puesto cerca o sobre radiadores de calor. Este aparato nunca deberá de ser
puesto en instalaciones tales como libreros a no ser que haya una adequada ventilación en tales
instalaciones.
3. No exponga el aparato a lluvia o a uso cerca de agua . . . por ejemplo, cerca a una bañera, una
alberca, un lavabo, en un sótano húmedo, etc.
Conectando la Antena Externa
PROTECCION EN CONTRA DE RAYOS ELECTRICOS PARA SU ANTENA Y APARATO DE ACUERDO A LAS
INSTRUCCIONES DEL CODIGO NACIONAL ELECTRICO (EUA).
EJEMPLO DE ATERRIZAMIENTO DE ANTENA DE ACUERDO AL CODIGO NACIONAL ELECTRICO
(National Electrical Code, ANSI/NFPA 70)
CABLE DE ANTENA
GRAPA DE TIERRA
EQUIPO DE
SERVICIO
ELECTRICO
GRAPA DE TIERRA
TIERRA DE SERVICIO DE POTENCIA
ELECTRODO DEL SISTEMA
(NEC ART 250, PARTE H)
“Nota al instalador del sistema de cable CATV :
Este recordatorio es dado para llamar la atención del instalador del sistema de cale CATV al Articulo 820-40
del NEC que provee guias para el aterrizamiento adecuado y, en particular, especifica que la tierra del cable
deberá de estar conectada al sistema de tierra del edificio, tan cercano al punto de entrada del cable como
sea practico.”
4. Si una antena exterior es conectada al receptor, asegúrese que el sistema de antena esté
aterrizado para proveer alguna protección en contra de impulsos de voltaje y la acumulación de
cargas estáticas. El articulo 810 del código nacional eléctrico de los Estados Unidos de América
(National Electrical Code, ANSI/NFPA 70), provee información con respecto al aterrizamiento
correcto del mástil y la estructura de soporte, el aterrizamiento del alambre a la antena en una
unidad de descarga, el tamaño de los conductores de aterrizamiento, la localización de la unidad
de descarga, conexión a los electrodos de aterrizamiento, y requerimientos para los electrodos
de aterrizamiento.
Una antena exterior no deberá de ser localizada en la vecindad de líneas de potencia que pasen por
encima de otros circuitos de luz eléctrica o de potencia, o en donde pueda caer sobre tales líneas
de potencia o circuitos. Cuando se instale un sistema de antena externa, se debe de tener cuidado
extremo en no tocar tales líneas de potencia o circuitos ya que contacto con ellos puede llegar a
ser fatal.
CODIGO NACIONAL ELECTRICO
UNIDAD DE
DESCARGA DE ANTENA
(NEC SECCION 810-20)
CONDUCTORES DE TIERRA
(NEC SECCION 810-21)
Conectando el cordon de potencia
5. Este producto debe ser operado solamente con el tipo de cordón de potencia indicado
en la etiqueta. Si usted no esta seguro del tipo de alimentación en su casa, consulte a su
distribuidor de este producto, o a la compañía de suministro eléctrico. Este producto esta
equipado con cordón de potencia polarizado (una de las navajas de la clavija es más ancha,
que la otra). Esta clavija debe de ajustar en el toma corriente de una manera solamente. Esta
característica es una medida de seguridad. Si usted no puede insertar la clavija totalmente
en el toma corriente, trate invirtiendo la clavija.Si la clavija continua floja en el toma corriente, llame a su electricista, para reemplazar su toma corriente obsoleto. No deshabilite el
propósito de seguridad de esta clavija polarizada. No sobre cargue los toma corrientes de
pared, extensiones eléctricas, o receptáculos integrales, ya que esta condición puede resultar
en un riesgo de fuego o descarga eléctrica.
6. Los cordones de potencia deben ser direccionados de tal manera que no puedan ser pisados o
dañados con enseres colocados a un lado arriba del cordón de potencia. ponga una particular
atención a los cordones de potencia y clavijas, receptáculos de toma corrientes, y el punto donde
ellos salen del producto.
Limpieza
7. Antes de limpiar, desconecte la unidad del receptáculo de la pared. No aplique limpiadores
líquidos o en aerosol directamente a la unidad. Utilice un trapo seco para limpiar.
Servicio y Reparación
8. Desconecte el aparato del receptáculo de pared y refiera servicio a personal de servicio
eléctrico calificado bajo las siguientes condiciones :
A Si el cordón de potencia o el conector están averiados o raídos.
B. Si líquido ha sido derramado en el aparato.
C. Si el aparato ha sido expuesto a lluvia o agua.
D. Si el aparato ha sido tirado o el gabinete a sido averiado.
E. Si el aparato exhibe un cambio perceptible en funcionamiento.
F. Si el aparato no opera normalmente siguiendo las instrucciones de operación, ajuste sola-
mente aquellos controles que han sido cubiertos en las instrucciones de operación. Ajuste
impropio de otros controles puede resultar en avería al aparato y posiblemente requiera de
trabajo extensivo por un técnico calificado para restaurar el aparato a su operación normal.
9. Cuando se termine cualquier servicio o reparación, requiera del técnico de servicio confirmación
de que solo Partes Autorizadas de Remplazo de Fabrica que tengan las mismas características que
las partes originales hayan sido usadas, y que verificaciones de seguridad rutinarias hayan sido
llevadas a cabo para determinar que el aparato se encuentra en condiciones seguras de operación.
Substituciones no autorizadas pueden resultar en fuego, toque eléctrico u otros peligros.
10. Nunca adicione accesorios que no han sido especificamente diseñados para uso con este
aparato.
11. Para protección adicional durante una tormenta eléctrica, o cuando el aparato es dejado sin
atención ni uso durante largos periódos de tiempo, desconéctelo del receptáculo de la pared y
desconecte la antena. Esto evitará daños al aparato debido a rayos o a cambios bruscos en el
voltaje de línea.
12. Nunca introduzca ningún tipo de objetos a través de las ranuras, ya que el
contacto con componentes de alto voltaje pueden poner en corto dichas componentes que
pueden resultar en incendios o descargas eléctricas, Nunca derrame líquidos o cualquier
tipo de productos.
Colocando el TV
No se coloque el TV en áreas confinadas. Permita una circulación normal de aire
para las partes eléctricas.
Seguridad para Infantes
Sanyo esta comprometido en hacer que su sistema de entretenimiento sea seguro
y agradable. Use siempre una mesa o soporte apropiado cuando coloque su televisor. Use soportes, refuerzos o correas para sujetar el mueble en su lugar. NUNCA
atornille nada directamente al televisor.
Nunca coloque televisiones en repisas, escritorios, carros, etc. donde niños
traviesos pudieran empujar, jalar o hacer de cualquier forma que la unidad se
cayera y les causara algún daño.
Nunca coloque juguetes u otros
artículos encima de la televisión que
puedan llamar la atención de los
niños queriendo ellos alcanzarlos
ya que pueden trepar en el mueble
pudiendo lastimarse.
Siempre use soportes que están
diseñados para contener la combinación de peso y tamaño de su
televisión y otros artículos
eléctricos.
A
S
V
I
D
E
O
I
N
L
A
U
D
I
O
R
26 Importantes Medidas de Seguridad
Page 27

Caracteristicas Especificaciones
◆ 27″ Televisión digital de pantalla realmente plana de alta definición
◆ 30″ Televisión digital de pantalla realmente
plana de alta definición
◆ 32″ Televisión digital de pantalla realmente plana de alta definición
◆ Menú de opciones trilingüe
◆ Sintonizador Análogo y Digital integrados
◆ Búsqueda automática de canales
◆ Apagado automático
◆ Filtro digital tipo Peine 3-D (para mejorar detalles en la imagen)
◆ Modulación en velocidad de rastreo ajustable
◆ V-Chip Control Paternal para clasificación de programas y películas
◆ Transmisión Capatada Analógica EIA-608B y Digital (EIA-708B)
◆ Modos de Audio: DTV–Principal y Sub
NTSC–Estereofonico, Mono y SAP
◆ Sonido Envolvente Frontal
◆ Graves y Agudos
◆ Bocinas frontales 6x12 cm (dos)
◆ Preajustes de fabrica para Imagen /Sonido
◆ Formas de Imagen: Modo de Carta, Zoom, Normal y Completo
(solo HT30744)
◆ Canal Inicial (selección Automática)
◆ Formatos de Recepción: Dos sistemas sintonizadores: Tuner digital
ATSC para señales terrestres y canales de cable no encriptados
(QAM Limpio). Tuner análogo NTSC para VHF/UHF o CATV
◆ Formatos de Audio: Dolby
TM
Digital para DTV y Analógica para
NTSC
◆ PAP (Imagen e Imagen) Pantalla Dividida
◆ Rastreo de Canales en Memoria
◆ Color Realzado
◆ Tono de piel Automático
Recibe 181 canales analógicos [VHF 2~13 y UHF 14~69; Cable TV
1,14~125]; y 99 canales Digitales
◆ Conectores RF de entrada para Antena: Digital y Analógica
◆ Entrada HDMI (Interfase Multimedia de Alto Ancho de Banda
Digital) con HDCP (Contenido Protegido de Alto Ancho de Banda
Digital)
◆ Entrada de Video Componente (dos grupos)
◆ Entradas Traseras de A/V (dos grupos)
◆ Entrada S-video (dos Grupos)
◆ Salida Óptica de Audio Digital
◆ Salida de Audio (Intercambiable)
◆ Reloj (Reloj Automático)
◆ XDS (Servicio Extendido de Datos) muestra letras de la estación,
Titulo del Programa—Clasificación cuando es transmitida
◆ Cronometro para Dormir (3 horas)
◆ Control Remoto Multimedia DTV de 52 teclas
Tamaño del Cinescopio (medido diagonalmente)
HT27744 - 27″; HT30744 - 30″; HT32774 - 32″ Pantalla real Plana
Resolución de Imagen: Entrada RF -330, entrada AV -800
Formato de Rastreo: 1080i
Entrada Antena RF: Analógica - UHF/VHF/CATV 75 Ohms
Digital - 75 Ohms
Sin Recepción de Señal: La TV automáticamente se apagara
después de 15minutes
En Modo de Video, la TV no se apagara
Requerimientos de Potencia: Fuente: 120VAC,60Hz
Consumo de Potencia: 140 Watts
Sonido: Dos Bocinas tamaño 6X12cm
Amplificador: Integrado de 5Watts/ Canal
Conectores y Terminales:
Entrada Video 1: S-Video1, Video y Audio L/R
Entrada Video 2: S-Video2, Video y Audio L/R
Entrada Compo 2: Componente (Y/Pr/Pb) compartiendo Audio L/R
de Video 2
Entrada Compo 3: Componente (Y/Pr/Pb) compartiendo Audio L/R
de Video 3
Salida de Audio Digital: S/P DIF o PCM
Salida de Audio Analógica: Audio L/R
Entrada HDMI: Conector de 19 pines (Imagen/ Sonido)
Terminal entrada de Servicio: para uso del Técnico solamente
Tamaño y Peso (aproximado):
HT27744
Dimensión horizontal (Ancho) 30.2in. (770mm)
Dimensión Vertical (Alto) 23.0in. (585mm)
Dimensión Profundidad (Profundo) 19.5in. (496mm)
Peso 103.3 (lbs) 47 (Kg)
HT30744
Dimensión horizontal (Ancho) 35.7in. (908mm)
Dimensión Vertical (Alto) 22.5in. (572mm)
Dimensión Profundidad (Profundo) 21.8in. (553mm)
Peso 132.2 (lbs) 60 (Kg)
HT32744
Dimensión horizontal (Ancho) 35.0in. (888mm)
Dimensión Vertical (Alto) 27.0in. (687mm)
Dimensión Profundidad (Profundo) 22.4in. (570mm)
Peso 143.4 (lbs) (65.1 Kg)
ADVERTENCIA: Regulaciones de FCC establecen que modificaciones inapropiadas o
cambios no autorizados a esta unidad podrían nulificar la autoridad del usuario para
operar esta unidad.
Información de Marcas Registradas:
Manufacturado bajo licencia de Dolby Laboratories. “Dolby” y el
símbolo doble-D son marcas registradas de Laboratorios Dolby.
Este símbolo impreso, significa que el producto esta listado por
Underwriters Laboratories Inc. El Diseño y manufactura de este
producto, reúne los rígidos estándares de UL, contra riesgos de
incendios, accidentes o descargas eléctricas.
Carate ri sti cas / Es p e c i fi c a c i o n e s 27
Page 28

Glosario
Análoga– Comúnmente se refiere al estándar actual (NTSC) de la
transmisión de televisión.
Ancho de Banda– El rango de frecuencias asignado a la transmisión
de un canal. Un canal de TV tiene 6 Mhz de anchura.
Aspecto de Imagen– Este termino describe la relación de la anchura
a la altura de la pantalla de TV independientemente del tamaño de la
pantalla (x unidades de anchura por x unidades de altura).
ATSC– Comité de Sistemas de Televisión Avanzada (comité de
estándares digitales).
Barrido Entrelazado– El proceso de procesar dos campos de video
y después combinarlos (entrelazarlos) para producir un solo cuadro
en la pantalla del televisor.
Barrido Progresivo– El proceso de barrer la líneas en la pantalla
secuencialmente. Un campo produce un cuadro.
Caja de Pilares (“Pillarbox”)– Una imagen con
relación de aspecto de 4:3 siendo mostrada en una
pantalla de aspecto 16:9. Franjas negras aparecen
en los lados de la pantalla (la imagen no llena la
pantalla horizontalmente).
Canales Digitales ClearQAM– Estos son los canales de cable sin
encripción. Las compañías de cable pueden escoger el incluir o no
incluir estos canales ClearQAM.
Canal Virtual– Canales transmitidos con información mayor y
menor contenida en paquetes PSIP. El numero de canales virtuales
que una transmisora pueda transmitir depende de la resolución de su
programación.
TM
Dolby
AC-3)– Un estándar de audio con sonido surround con 5.1 canales de
audio (Izquierdo /Derecho frontales, Izquierdo /Derecho posteriores,
Central, y Graves) para televisión digital.
Downconverting– Un proceso para reducir el numero de píxeles en
una imagen. La velocidad de los cuadros y /o el formato de rastreo
pueden también cambiar. Las estaciones de TV pueden utilizar
este proceso para hacer cabida en su ancho de banda para servicios
adicionales.
DTV (Televisión Digital)– Se compone de tres elementos. HDTV,
EDTV, y SDTV.
DVI (Interfase de Video Digital)– Diseñada para acomodar tanto
señales de video análogas y digitales sin compresión en un solo
conector.
EDTV– Televisión con Definición Mejorada (480p).
Espectro– Una banda continua de frecuencias.
Estampa de Correo (“Postage Stamp”)– Este termino
es utilizado para describir una imagen con aspecto 4:3
que la estación de transmisión a convertido hacia arriba a
una imagen con aspecto 16:9, y después de esto mostrada
en una pantalla con aspecto 4:3. Franjas negras aparecen
en la parte superior, en los lados, y en la parte inferior de la pantalla
(la imagen no llena la pantalla ni horizontalmente ni verticalmente).
(Vea la función de Zoom abajo).
HDCP– Protección de Contenido Digital de Alto Ancho de Banda.
Un medio para proteger los derechos de autor en contenido de entretenimiento digital.
HDMI– Interfase Multimedia de Alta Definición. HDMI es un
nuevo estándar digital de conexión entre equipos de Audio / Video,
tales como una caja STB, u tocador de DVD o receptor de A/V, y un
televisor digital. HDMI ofrece calidad excepcional de audio y video
a través de un solo conector que fácilmente se desconecta. HDMI
soporta transmisiones de canales múltiples de audio digital y de video
componente con espaciamiento de colores para una reproducción fiel
Digital (Anteriormente conocida como Dolby
de video de alta definición. Soporta el estándar de protección de
HDCP, haciendo posible la transmisión a su televisor de contenido
digital protegido contra violación de los derechos de autor.
HDTV– Televisión de Alta Definición (1080i & 720p).
Indicador de Tuner– Las letras “D,” “C,” o “DC” aparecerán
directamente a la izquierda del numero de canal:
Canales transmitidos a través del aire y seleccionados por el
Tuner digital (DTV) tendrán el prefijo “D.”
Canales seleccionados por el Tuner análogo (NTSC) tendrán
ya sea el prefijo “C” (canales análogos de cable) o estarán
sin prefijo (para canales VHF o UHF del aire).
Modo de Carta (“Letter Box”)– Un aspecto 16:9
de pantalla alargada siendo mostrada en una pantalla
de aspecto 4:3. Franjas negras aparecen en la parte
superior e inferior de la pantalla (la imagen no llena la
pantalla verticalmente).
Multicasting– La división de la señal de una estación transmisora en
sub-canales de programación o de servicios de datos.
NTSC– Comité de Sistemas de Televisión Nacional (comité de
estándares análogos).
OSD– Caracteres mostrados en la pantalla.
PSIP– Protocolo de Información de Programa y Sistema es una col-
ección de tablas diseñadas para operar dentro de cada flujo de datos
de transporte para transmisiones digitales. PSIP incluye instrucciones
informando al televisor cuando un cambio va a ocurrir y en donde
encontrar la programación de los canales virtuales.
Simulcast– Una estación simultáneamente transmitiendo el mismo
programa en un canal análogo y en un canal DTV. Esto es requerido
por la FCC durante la transición de análogo a digital.
SDTV– Televisión de Definición Estándar (480i).
Sonido Surround (Frontal)– Esta función añade otra dimensión a
la experiencia acústica y ayuda a mejorar el sonido parecido al de un
teatro de cine.
S/P DIF– S/P DIF es un formato de audio digital que puede transmitir
un flujo de bits Dolby Digital. Conectando esta salida a un receptor
A/V que incluya un decodificador Dolby Digital, usted puede reproducir hasta 5.1 canales de sonido Surround. S/P DIF también puede
transmitir audio PCM.
STB (“Set Top Box”)– Un aparato que recibe y convierte señales
para ser mostradas en la pantalla de un televisor (puede ser análogo
o digital). Muchos STBs digitales tienen Tuners para cable y para
señales en aire.
Tecla de Tuner– Esta tecla es utilizada para cambiar de un sistema
de sintonía a otro, canales digitales y canales análogos.
Terrestre– Una transmisión en el aire hacia una antena.
Upconverting– Un proceso para incrementar el numero de píxeles
en una imagen. La velocidad de los cuadros y /o el formato de
rastreo pueden también cambiar. Píxeles adicionales son insertados
entre los píxeles existentes en un intento a simular HDTV. Este
proceso no incrementa la resolución.
Wide-Screen– Usado para describir un aspecto de imagen de 16:9 o
mas grande. El aspecto estándar para programación de HDTV es 16:9.
Las pantallas de los cines son ligeramente mas anchas (seguido 2:1).
Zoom– Aumenta el tamaño de la imagen en
el centro de la pantalla. Por ejemplo si usted
tiene una imagen de Estampa de Correo, presione esta tecla para aumentar la imagen.
28 Glosario
Page 29

Procedimientos Iniciales
Esta nueva Televisión Digital de Alta Definición es capaz de reproducir imágenes claramente cristalinas y un sonido excepcional.
!Es como estar ahí!
Para obtener el mejor desempeño de este HDTV usted necesitara...
1. Escoger la apropiada conexión de señal, pagina 30
2. Conectar el equipo externo si así lo desea, paginas 31~34
3. Instalar las baterías en el Control Remoto, y revisar las funciones, paginas 35~36
4. Programar el control remoto para operar otro equipo, si lo desea paginas 36~38
5. Seguir el menú en pantalla mostrado para personalizar y ajustar características. Paginas 39~43
Nota: Para asistencia adicional vea el “Quik ‘N Easy Setup” Guide para aprender como diferentes señales y equipo externo
afectan en la calidad de la imagen. Siga los ejemplos citados para asegurar que usted esta obteniendo la mejor imagen
posible basado en la capacidad de su equipo externo y la calidad de su señal.
Localización y Funciones de los Conectores HDTV
Traseros
➀
➁
➂
➃
HDMI
INPUT
COMPONENT VIDEO INPUT
ANALOG
AUDIO
OUTPUT
L
R
Y
P
b
P
r
COMPO 3
COMPO 2
➄
Entrada Video Componente (COMPO 2) – Conecte equipo
➀
de video digital a los conectores Y, Pr, Pb, y los de Audio a los
Video 2 L/R. Estos conectores automáticamente detectaran el
tipo de señal siendo recibida (HDTV, EDTV, o SDTV).
Entrada S-Video (Video 1 y Video 2) – Para realzar los det-
➁
alles en la imagen use S-Video (Video 1 / 2) en lugar de los
conectores de Video, si están disponibles en su equipo externo.
(Las conexiones de S-Video anularan las conexiones en los
conectores de Video 1 / 2 ).
Salida de Audio Digital – Conexión Óptica para avanzados
➂
sistemas estereofonico de “Teatro en Casa” Dolby™ Digital 5.1.
Entrada HDMI (Interfase Multimedia de Alta
➃
Definición) – Conecte equipo digital de video en este conector.
Solo se necesita un cable de banda ancha (No provisto) para
comunicar el Audio/ Video a esta TV. Esta conexión es compatible con dispositivos equipados con DVI. (Conexiones de Audio
separadas son requeridas para dispositivos DVI).
Conectores de Salida de Audio Análogo (L / R) – Conecte
➄
equipo externo de audio aquí. (Vea pagina 10.)
AUDIO 3
VIDEO 2
➅
➆
S-VIDEO
VIDEO
L
(MONO)
AUDIO
R
VIDEO 1
DIGITAL
AUDIO
OUTPUT
➈
DIGITAL
ANTENNA IN
SERVICE
➉
UHF/VHF/CATV
➇
Entrada Video Componente (COMPO 3) – Conecte equipo
➅
de video digital a los conectores Y, Pr, Pb, y los de Audio a los
Video 2 L/R. (Vea pagina 9). Estos conectores automáticamente
detectaran el tipo de señal siendo recibida (HDTV, EDTV o
SDTV).
Entrada Audio/ Video (AV1/AV2) – Conecte equipo de video
➆
estándar aquí.
NOTA: S-Video 1 / 2 anulan las conexiones de video
compuesto de AV1/2.
Entrada Analógica de Antena (UHF/VHF/CATV) – Conecte
➇
una Antena de RF, Cable o Receptor de Satélite a este conector
como se muestra en la pagina 30.
Entrada de Antena Digital – Conecte una antena de RF a este
➈
conector como se muestra en la pagina 30.
Terminal de Servicio – Para uso del Técnico solamente.
➉
Para Empezar / Conectores HDTV Traseros 29
Page 30

First
Please connect all signals
and antennas to jacks and
the terminals on the back.
Then press the Channel UP key.
Conexiones de la Señal
Please wait,
Automatic clock setting.
Press Channel UP Key to cancel.
Conexión de Antena Analógica
Conectando servicio de Cable Analógico,
Antena de RF, o Receptor de Satélite al conector de TV analógico (UHF/VHF/CATV) 75
Ohm terminal.
CABLE
Nota: Si usted no tiene
un VCR conecte la
señal directamente al
conector de 75 Ohms
de la TV.
ANALOG
OUTPUT
L
R
RECEPTOR DE SATÉLITE
CATV IN
CH3
CH4
OUT TO TV
S-VIDEO
PARTE POSTERIOR DE TV
COMPONENT VIDEO INPUT
AUDIO
Y
Pb
Pr
COMPO 3
COMPO 2
L- -RAUDIOVIDEO
L- -RAUDIOVIDEO
IN
FROM ANT.
OUT
OUT TO TV
AUDIO 3
IN FROM
SAT.
SEÑAL DE
ANALÓGICA
VCR
VIDEO 2
TV BACK
S-VIDEO
VIDEO
L
(MONO)
AUDIO
R
VIDEO 1
Para conectar un receptor de cable o satélite de Alta Definición, vea
las pagina 31.
Conexión de Antena Digital (DTV)
Conecte la antena de RF al splitter; entonces
al conector de Antena Digital.
ANTENA DE RF
SEÑAL DE
DIGITAL
DIVISOR
UHF/VHF/CATV
DIGITAL
ANTENNA IN
Nota: La antena de RF puede
ser conectada directamente al
conector de 75 Ohms. En áreas
de recepción marginal puede
ser mejor conectar antenas de
RF separadas.
Nota sobre la Franquicia de
HDMI
INPUT
DIGITAL
AUDIO
OUTPUT
SERVICE
CATV: Las compañías de
cable así como los servicios
públicos son franquicias
otorgadas por las autoridades
de los gobiernos locales. Para
recibir programas de Cable
aun con equipo que es capaz
de recibir canales de cable el
consumidor debe suscribirse
al servicio de la compañía
de cable.
Información
Rápida
■
La televisión automáti-
camente seleccionara
el modo de antena
para el tipo de señal
analógica de RF que
usted conecte.
Use “Selección de
Antena” en el menú
de ajustes para
cambiar el modo de
antena.
■
La TV automática-
mente se apagara
después de 15
minutos si no hay
recepción de señal
(sin cable o no
transmisión).
Excepción
modo de video esta
seleccionado la TV no
se apagara automáticamente después de
15 minutos de haber
detenido la recepción.
• Si usted mueve la TV
a otro lugar presione
la tecla de RESET dos
veces después de
conectar la señal y
encender la TV.
¿Necesita asistencia?
www.sanyoctv.com
o llame al 1-800-877-5032
-Cuando el
Visite nuestro sitio
de Internet en
Preparando la TV
Nota: Cuando la TV es energizada por primera vez, esta automáticamente checa para asegurar que una
señal de entrada de RF esta conectada. Si usted ha hecho todas las conexiones necesarias continúe como se indica...
1. Presione la tecla de CHANNEL UP para buscar y rastreas automáticamente por los canales disponibles:
Digitales (DTV) y Analógicos (NTSC). La búsqueda de canales tiene dos procesos que son ejecutados
simultáneamente para canales Análogos y Digitales, así pues esto tomara algunos minutos.
Notas:
El mensaje en la pantalla para la búsqueda digital aparecerá con el numero del canal, una barra
progresiva y un numero porcentual se mostrara a través de la parte baja de la pantalla (para indicar
actividad) como el proceso de búsqueda continua. Esto tomara algún tiempo, por favor sea paciente.
La información del canal encontrada durante la búsqueda es almacenada en la base de datos de
memoria del rastreo de canal. La Televisión de alta definición será sintonizada al canal digital mas
bajo o al canal analógico mas bajo si no encontró canales digitales.
2. Para cambiar el sistema inicial de sintonización analógica (de antena a cable o de cable a antena) use el menú
en pantalla. Vea “Selección de Antena” en la pagina 40.
3. Después de completar la búsqueda de canales, la TV comenzara con el Ajuste Automático de Reloj. Esta carac-
terística buscara una estación local PBS que este transmitiendo señal de servicio de datos extendidos. Esta señal
es usada para automáticamente ajustar el día/ hora. (Esto puede tomar varios segundos)
Para cancelar la opción de Ajuste Automático de Reloj, presione la tecla de “CHANNEL UP.” (Para ajustar el
reloj manualmente, vea pagina 43.)
30 Conexiones de la Señal : Digital (DTV)/Analógica / Preparando la TV
First
Please connect all signals
and antennas to jacks and
the terminals on the back.
Then press the Channel UP key.
Por favor espere mientras su TV
busca los canales disponibles
50%
Antena digital 35
Please wait,
Automatic clock setting.
Press Channel UP Key to cancel.
Page 31

INPUT
RESET
POW ER
Conexiones Digitales A/V
Información
Rápida
■
Si la configuración
de pines HDMI de la
televisión es diferente
de la configuración
¡Esta es la mejor opción para imagen y sonido! Usando la conexión HDMI, la cual tiene protección de contenido de
alta definición obtiene audio y video digital sin compresión. ¡Mas Real Que Nunca!
Conectando equipo externo al HDMI (Incluye HDCP protección de copia)
Para evitar problemas con algunas marcas de equipo externo, siga el siguiente procedimiento cuando conecte los
cables y energice su equipo.
de su Caja Receptora
usted necesitara usar
un adaptador para la
conexión de el paso 1.
■
Para conectar DVI a
HDMI usted necesitará usar un cable DVI
a HDMI o un adaptador para hacer la
conexión del paso 1.
■
Con una conexión DVI
asegúrese de conectar la salida de audio
a la entrada de audio
COMPO3 de la TV.
Debido a que los
conectores de Audio
de COMPO3 están
siendo usados los
conectores de video
de COMPO 3 no
pueden ser usados
cuando un dispositivo
DVI esta conectado.
Conectando un STB con salida DVI a la entrada HDMI (Incluye HDCP protección de Copia)
Usando un cable DVI a HDMI se provee mejor calidad de imagen que conexiones estándar de video compuesto o
componente, pero para recibir sonido, una conexión separada de audio es requerida
Para evitar problemas con algunas marcas de equipo externo, siga el siguiente procedimiento cuando conecte los
¿Necesita asistencia?
Visite nuestro sitio
de Internet en
cables y energice su equipo.
www.sanyoctv.com
o llame al 1-800-877-5032
INFORMACION
IMPORTANTE:
Cuando este usando
HDPC (High Definition
Contenido Protegido)
usted no podrá copiar
material que esta
protegido por los
derechos de autor.
Control Remoto
❺
❻
VCR
DVD
INPUT
TV
POWER
CABLE
AUXSAT
RESET
❸
❹
Presione la tecla INPUT
después de conectar los cables
para tener acceso las entradas A/V
No hay necesidad de sintonizar
un canal vació.
Apague la TV y el equipo externo antes de conectar el cable. (El Cable no es incluido.)
❶
Conecte la salida de alto ancho de banda HDMI del equipo externo a la entrada HDMI de la TV. Esta conexión
❷
requiere solo un cable, e incluye video sin compresión y sonido Dolby 5.1 o PCM.
La TV debe ser encendida primero, presione la
❸
tecla POWER.
Ahora encienda su equipo externo.
❹
Presione la tecla INPUT para seleccionar HDMI y
❺
ver un programa digital.
Lo que necesitara para sus conexiones:
Un cable Digital HDMI de 19 pines
❷
(asegúrese de revisar la configuración de
pines al final de la clavija*)
*Un adaptador podría ser requerido.
A/V OUT
(480i)
VIDEO
S-VIDEO
L
OUT
AUDIO
R
COMPONENT OUT
DIGITAL
(1080i/720p/480p)
AUDIO OUT
HDMI
OUTPUT
Y
COAXIAL
B
P
PR
❷
COMPONENT VIDEO INPUT
ANALOG
AUDIO
Y
OUTPUT
Pb
L
Pr
R
COMPO 3
AUTHORIZED
SERVICE ONLY
RGB OUT
(1080i/720/480p)
COMPO 2
CABLE HDMI
AUDIO 3
VIDEO 2
SENTA-CAJA
ARRIBA
❷
S-VIDEO
VIDEO
UHF/VHF/CATV
L
(MONO)
AUDIO
R
VIDEO 1
DIGITAL
ANTENNA IN
HDMI
INPUT
DIGITAL
AUDIO
OUTPUT
SERVICE
.
Apague la TV y el STB antes de conectar los cables. (Los cables no son incluidos.)
❶
Conecte la salida DVI del STB al cable DVI a HDMI, ahora conecte la entrada HDMI de la TV.
❷
Nota: Cheque en su tienda local de electrónica por un cable DVI a HDMI que iguale su equipo y su TV.
Conecte la salida de Audio del STB Audio L/R a la entrada de componente la TV Audio 3 L/R.
❸
La TV debe ser encendida primero, presione la tecla POWER.
❹
Ahora encienda su equipo externo.
❺
Presione la tecla INPUT para
❻
seleccionar HDMI y ver un
programa digital.
Lo que necesitara para
sus conexiones:
Cable DVI a HDMI - 1
❷
Cable de Audio -1
❸
S-VIDEO
OUT
❸
PARTE POSTERIOR
DE TV
COMPONENT VIDEO INPUT
ANALOG
AUDIO
OUTPUT
L
R
A/V OUT
(480i)
VIDEO
COMPO 3
COMPONENT OUT
DIGITAL
(1080i/720p/480p)
AUDIO OUT
Y
COAXIAL
P
P
AUTHORIZED
DVI
SERVICE ONLY
OUTPUT
B
R
RGB OUT
(1080i/720/480p)
❷
CABLE DVI a HDMI
SENTA-CAJA ARRIBA
❷
HDMI
INPUT
❸
DIGITAL
S-VIDEO
COMPO 2
AUDIO 3
VIDEO 2
VIDEO
L
(MONO)
AUDIO
R
VIDEO 1
UHF/VHF/CATV
Y
Pb
Pr
DIGITAL
ANTENNA IN
AUDIO
OUTPUT
SERVICE
Conectando HDMI / Conectando un STB con salida DVI a la entrada HDMI 31
Page 32

Usando los conectores de componentes para conectar
INPUT
RESET
POW ER
un reproductor DVD u otro equipo digital
El conector de video componente aceptará contenido de video de
HDTV, EDTV, o SDTV.
Apague la televisión y el equipo externo antes de conectar los cables
(cables no incluidos.)
Siga los siguientes pasos para fácilmente conectar su STB o DVD a este
HDTV.
Conecte la salida de video componente del reproductor de DVD
❶
u otro equipo digital al conector de entrada de video componente
(COMPO 3) o (COMPO 2) de la TV.
❷ Conecte la salida de audio del reproductor de DVD u otro equipo
digital al conector de entrada de audio 3 o audio 2 (video 2) de la
TV.
❸ Presione la tecla POWER para encender la TV. Encienda también el
equipo externo.
❹ Presione la tecla INPUT para seleccionar COMPONENTE 3 o
COMPONENTE 2 para observar el programa DVD.
Nota: Para conectar equipo digital externo adicional, use
cualquier grupo de conectores de audio componentes.
PARTE POSTERIOR DE DVD
❶
COMPONENT VIDEO OUT
Y
BPR
P
VIDEO OUT SELECT
S
OPT.
COPONENT
S-VIDEO OUT
DIGITAL
OUT
RL
AUDIO OUT
VIDEO OUT
❷
ENTRADAS DE COMPONENTE
DE VIDEO DEL TV
COMPONENT VIDEO INPUT
ANALOG
❶
AUDIO
OUTPUT
L
R
Y
P
b
P
r
COMPO 3
AUDIO 3
COMPO 2
❷
COMPONENT OUT
DIGITAL
A/V OUT
(1080i/720p/480p)
AUDIO OUT
(480i)
VIDEO
DIGITAL AUDIO
ANT LOOP OUT
OUTPUT
(OPTICAL)
SELECTION
YPbPr RGB
ANT IN
COAXIAL
OUT
S-VIDEO
L
OUT
AUDIO
R
Lo que necesitara para sus conexiones:
Cable de Video Componentes —1 (2)
❶
Cable de Audio -1 (2)
❷
S-VIDEO
UHF/VHF/CATV
DIGITAL
ANTENNA IN
VIDEO 2
VIDEO
L
(MONO)
AUDIO
R
VIDEO 1
❷
❶
AUTHORIZED
HDIM
SERVICE ONLY
OUTPUT
Y
RGB OUT
P
B
P
R
(1080i/720/480p)
PARTE POSTERIOR DE
CABLE O RECEPTOR
SENTA-CAJA ARRIBA
❶
HDMI
INPUT
DIGITAL
AUDIO
OUTPUT
SERVICE
SATÉLITE
Conexiones Analógicas A/V
Usando los conectores S-Video para conectar un
reproductor VCR o DVD a los conectores A/V
Apague la televisión y el equipo externo antes de conectar los cables
(cables no incluidos). Siga estos pasos para fácilmente conectar su DVD
o VCR.
Conecte la salida de S-Video del reproductor de DVD u otro equipo
❶
a los conectores de entrada S-Video 1 o 2.
Nota: Los conectores de S-Video anulan los conectores de video.
② Opcional
Conecte las salidas de audio video de la VCR a las entradas de
audio video 1 o 2 de la TV.
Para VCR mono aurales (conector de audio sencillo) conecte la
salida de audio de la VCR a la entrada de audio (L) de la TV.
For Mono VCR (Single Audio Jack) connect VCR Audio Out to TV
Audio (L) Input.
❸ Presione la tecla POWER para encender la TV. Encienda también
el equipo externo.
❹ Presione la tecla INPUT para seleccionar VIDEO 1 o VIDEO 2
para observar el programa DVD o VCR.
Notas:
Los conectores AV1 y AV2 tienen funciones idénticas.
Cualquier equipo compatible de video puede ser conectado a
cualquier grupo de conectores.
Una pantalla totalmente azul mostrando las palabras VIDEO 1 o
VIDEO 2 significa que el modo de video esta seleccionado, pero
ninguna señal es detecta en los conectores de video. Revise las
conexiones y prenda su equipo externo.
Los conectores de video compuesto ofrecen solamente una
resolución de 480i (SDTV).
❹
Presione la tecla INPUT
después de conectar los cables
para tener acceso las entradas A/V
No hay necesidad de sintonizar
un canal vació.
PARTE POSTERIOR DE VCR
IN
IN
OUT
R-AUDIO-L VIDEO
R-AUDIO-L
FROM ANT.
VHF/UHF
RF
TO TV
CHANNEL
3 4
OUT
VIDEO
❶
COMPONENT VIDEO INPUT
ANALOG
AUDIO
Y
OUTPUT
L
Pb
R
Pr
COMPO 3
ENTRADAS A/V DEL TV
COMPO 2
AUDIO 3
VIDEO 2
VIDEO
(MONO)
AUDIO
VIDEO 1
②
S-VIDEO
L
R
OPT.
DIGITAL
OUT
UHF/VHF/CATV
Control Remoto
TV
POWER
CABLE
AUXSAT
RESET
VCR
DVD
INPUT
123
123
PARTE POSTERIOR
DE DVD
②
COMPONENT VIDEO OUT
Y
B PR
P
VIDEO OUT SELECT
S
COPONENT
S-VIDEO OUT
AUDIO OUTRLVIDEO OUT
②
HDMI
INPUT
DIGITAL
AUDIO
OUTPUT
DIGITAL
ANTENNA IN
SERVICE
②
❸
32 Conexiones Analógicas: Conectores S-Video y A/V
Page 33

INPUT
RESET
POWER
Conexiones Audio
Conectando la salida Digital de Audio a un Amplificador Estereofónico
Información
Rápida
■
Coloque sus
bocinas estereofónicos al menos
2 pies alejados de
su TV. Los magnetos de los bocinas
podrían afectar
la calidad de la
imagen.
¿Necesita asistencia?
Visite nuestro sitio
de Internet en
www.sanyoctv.com
o llame al 1-800-877-5032
Usando esta conexión digital óptica minimiza el ruido eléctrico y ayuda a una transferencia de señal de alta calidad.
Apague la televisión antes de conectar los cables (cables no incluidos). Asegúrese de remover las cubiertas protectoras antes de conectar el cable al conector óptico de la TV digital.
ADVERTENCIA: NO mire directamente la luz del láser.
Conecte un extremo del cable óptico a la salida de audio digital de la TV y el otro extremo a la entrada óptica
❶
digital del amplificado externo.
❷ Presione la tecla POWER para encender la TV. Encienda también el equipo externo.
Notas:
NO CONECTE bocinas externos directamente a la TV.
Cuando los bocinas de la TV están en modo PRENDIDO el sonido será reproducido a través de su TV y el
amplificador estereofónico.
Cuando los bocinas de la TV están en modo APAGADO el sonido será reproducido solo a través del
amplificador estereofónico. (Ver página 43 para ajustar los bocinas de la TV.)
Lo que usted necesita para las
conexiones:
Cable óptico digital de audio – 1
❶
Control Remoto
TV
POWER
CABLE
AUXSAT
RESET
❷
VCR
DVD
INPUT
123
123
PARTE POSTERIOR
DE TV
COMPONENT VIDEO INPUT
ANALOG
AUDIO
Y
OUTPUT
L
P
b
R
P
r
COMPO 3
COMPO 2
AUDIO 3
VIDEO 2
Conectando la salida Analógica de Audio a un
Amplificador Estereofónico
Apague la TV y el equipo externo antes de conectar los cables.
(Cables no incluidos.)
Conecte la salida de audio (R/L) de la TV a la entrada (R/L) del
❶
amplificador estereofónico.
❷ Presione la tecla POWER para encender la TV. Encienda también
el equipo externo.
Notas:
NO conecte bocinas externos directamente a la TV.
Cuando los bocinas de la TV están en modo PRENDIDO el
sonido será reproducido a través de su TV y el amplificador
estereofónico.
Cuando los bocinas de la TV están en modo APAGADO el sonido
será reproducido solo a través del amplificador estereofónico.
(Ver página 43 para ajustar los bocinas de la TV.)
CABLE ÓPTICO
HDMI
DIGITAL
INPUT
DIGITAL
AUDIO
OUTPUT
SERVICE
S-VIDEO
VIDEO
L
(MONO)
AUDIO
R
VIDEO 1
❶
UHF/VHF/CATV
DIGITAL
ANTENNA IN
AMPLIFICADOR ESTEREOFÓNICO
Lo que usted necesita para las conexiones:
Cable de audio – 1
❶
COMPONENT VIDEO INPUT
❶
ANALOG
AUDIO
OUTPUT
L
R
Y
Pb
Pr
COMPO 3
AUDIO 3
COMPO 2
PARTE POSTERIOR
DE TV
AMPLIFICADOR
ESTEREOFÓNICO
VIDEO 2
❶
VIDEO
VIDEO 1
S-VIDEO
L
(MONO)
AUDIO
R
UHF/VHF/CATV
DIGITAL
ANTENNA IN
HDMI
INPUT
DIGITAL
AUDIO
OUTPUT
SERVICE
Conectando la salida Digital / Analógica de Audio a un Amplificador Estereofónico 33
Page 34

Conexiones Típicas de un Teatro en Casa
DIGITAL
A/V OUT
AUDIO OUT
(480i)
VIDEO
S-VIDEO
L
HDMI
OUT
AUDIO
R
Decodificador de Cable/
Receptor de Satélite
HDMI
INPUT
OPTICAL
DIGITAL INPUT
IN IN OUT
L
R
CD TAPE
IN OUT
DVD SAT VCR TV
CENTER SPEAKER (8Ω)
L
R
SUBWOOFER (8Ω)
FRONT SPEAKERS (8Ω)
REAR SPEAKERS (8Ω)
VIDEO
AUDIO
Sistema de
Sonido (surround)
envolvente
IN
OUT
COMPONENT OUT
(1080i/720p/480p)
Y
P
B
PR
RJ11/
PHONE
AUTHORIZED
SERVICE ONLY
ANALOG
AUDIO
OUTPUT
L
R
VIDEO S-VIDEO COMPONENT VIDEO
YCb Cr
VIDEO OUTPUT
ANALOG
AUDIO
AUDIO OUTPUT
Reproductor de DVD
COMPONENT VIDEO INPUT
Y
Pb
Pr
COMPO 3
L
R
COMPO 2
AUDIO 3
VIDEO 2
S-VIDEO
VIDEO
L
(MONO)
AUDIO
R
VIDEO 1
UHF/VHF/CATV
IN
R-AUDIO-L VIDEO
OUT
R-AUDIO-L
DIGITAL
ANTENNA IN
RF
CHANNEL
34
VIDEO
Analógica
VCR
DIGITAL
AUDIO
OUTPUT
SERVICE
IN
FROM ANT.
VHF/UHF
TO TV
OUT
Antena
Digital
Divisor
Divisor
Antena
VHF/UHF o
Cable Analógica
Antenna
S-VIDEOVIDEO
VIDEO OUTPUT
YCb
COMPONENT VIDEO
VIDEO OUTPUT
Grabador de Video Digital
34 Conexiones Típicas de un Teatro en Casa
Cr
AUDIO OUTPUT
L
ANALOG
AUDIO
R
ANT IN
SAT IN
HD
Page 35

AUDIO
SLEEP
PIX SHAPE
RECALL
CAPTION
INFO
POWER
Usando el Control Remoto Multimedia
Requiere un solo control remoto para operar su TV y otros equipos.
Simplemente siga las instrucciones en las páginas 36 ~ 38.
Instale las baterías como se muestran (2 AA, not incluidas)
Notas:
No mezcle baterías usadas con nuevas o mezcle distintos tipos de baterías.
Remueva las baterías si el control remoto no va a ser utilizado por mas de un mes. Las baterías
descargadas podrían escurrir y causar daños. (La vida normal de una batería es aproximadamente 6 meses.)
Teclas de MODE—Use estas teclas para programar el control remoto y seleccio-
➀
nar el modo de operación (VCR, TV, CABLE, DVD, SAT, o AUX). Para operar
su...VCR presione la tecla VCR; para TV presione la tecla TV; caja receptora de
cable presione la tecla CABLE; reproductor de DVD presione la tecla DVD; y
receptor de satélite presione la tecla SAT.
Nota: Asegúrese de presionar y sostener la tecla de MODE mientras ingresa
el número del código, ver página 36.
Tecla INPUT—Presione esta tecla para cambiar la fuente de señal de entrada
➁
como sigue:
ANALÓGICA
RF
H
DMI
En los modos TV, DVD, CABLE y SATELITE esta tecla selecciona la fuente de
el programa para mostrarlo en la pantalla (la señal de TV o señales de un equipo
conectado a los conectores AV). En el modo VCR esta tecla funciona como
TV/VCR.
T ecla POWER— Presione para encender o apagar la TV.
➂
Teclas NUMBER—Dos teclas deben de ser presionadas para la selección directa de
➃
un canal. Ejemplo: presione 0 y después 6 para seleccionar el canal 6. Para canales
analógicos arriba de 100 presione y sostenga la tecla 1 hasta que aparezca – C1--.
Tecla TUNER—Utilice esta tecla para cambiar de un sistema de sintonización a
➄
otro, canales digitales y canales analógicos.
Tecla CHANEL (CH up / down) y VOLUME (Vol +/–)— Presione
➅
up /down para sintonizar el siguiente canal arriba o abajo en la memoria de la
base de datos de los canales. Presione +/– para ajustar el volumen la pantalla
mostrará una flecha roja la izquierda a la derecha que parpadea tantas veces como
usted presione la tecla VOL +/–.
Tecla PIX SHAPE—Use esta tecla para cambiar el formato de video, las
➆
opciones disponibles dependen de la señal recibida y de la relación de aspecto
transmitido: Para el modelo HT27744/HT32744—letter box, zoom y normal.
Para el modelo HT30744—completo, zoom y normal. (Ver explicación de tipos
de imágenes en la página 28.)
Nota: Si la característica PAP esta seleccionada, ésta tecla es no operable.
Tecla SLEEP—Presione esta tecla, después presione la tecla 0 para ajustar el
➇
cronómetro de apagado. El tiempo deseado podrá ser seleccionado de 30 minutos
hasta 3 horas en incrementos de 30 minutos. Este cronómetro apagará la TV
automáticamente.
Nota: El cronómetro de apagado automático se cancela cuando la TV es
apagada o si ocurre una falla en la potencia.
DIGITAL
RF
COMPO
➀
➁
➂
➄
➅
➆
➇
➉
Apunte hacia el TV o el equipo
➃
➈
VCR
DVD
INPUT RESET
PIX SHAPE
RECALL
M
DOWN
ON/OFF QUIK
SWAP
TV
POWER
123
123
7809
7809
CH
SLEEP
CAPTION
U
N
E
ENTER
ENTER
PAGE
GUIDE
PLAY
PAP
PAP CHANNEL
VOL
CABLE
AUXSAT
MUTETUNER
AUDIO
INFO
PAUS EREC STOP
FREEZE
➠
654
654
X
E
UP
11
12
13
14
15
T
I
16
17
18
VIDEO
1
VIDEO
2
2
3
COMPO
Tecla RECALL—Seleccione el primer canal que usted quiere observar; después
➈
seleccione otro canal usando las teclas de número. Presione RECALL para fácilmente cambiar entre los canales sin ingresar el número de canal otra vez.
Nota: La tecla RECALL solamente puede cambiar entre canales con la
misma fuente de señal. RECALL entre un canal digital y análogo no trabajará.
Control Remoto 35
Page 36

Teclas Menu, Selection y Navigation—Use estas
Código de VCR:
Código del Aparato
Auxiliar:
Código del Receptore
de Satélite:
Código de Decodificador de Cable:
Código de Reproductore de DVD:
➉
teclas como siguen:
Tecla MENU –Presione esta tecla para mostrar el
menú en pantalla.
Tecla CURSOR ▲ (arriba) / ▼ (abajos)—Presione
estas teclas para mover el cursor arriba y abajo dentro
del menú.
Tecla CURSOR
sione estas teclas para mover el cursor a la izquierda o
la derecha dentro del menú.
Tecla EXIT—Presione esta tecla para salir de la
operación del menú.
Tecla RESET—Presione dos veces para restabl-
11
ecer los ajustes de fábrica. La TV automáticamente
comenzará la búsqueda de canales y limpiara
todos los ajustes personalizados, esta característica
automáticamente reajustara:
•
•
•
•
•
•
•
•
•
•
•
•
•
•
Si se desea ajustes personales pueden ser hechos otra
vez usando las opciones del menú.
Tecla MUTE—Presione una vez para minimizar el
12
volumen. Presione otra vez para restablecer.
Nota: Cuando se usa el conector de salida de
audio esta tecla no minimizará el sonido.
Tecla AUDIO—Presione para seleccionar la deseada
13
opción de recepción de audio (si es disponible)
DIGITAL: Principal, Sub 1, Sub 2, Sub 3, etc.
ANALÓGICA: estereofónico, mono, SAP.
Tecla INFO —Presione para desplegar la infor-
14
mación titular completa Digital o Analógica:
Titular completo Digital—Contiene una numeración
virtual de canales formada de 2 partes (Mayor y
Menor). Si esta disponible también se incluye la ID
de la estación, Titulo del Programa, Hora y fecha,
intensidad de la señal recibida, Formato, Calcifi-
cación del Programa y modo de Audio.
Mayor
Sennal Formato
36 Programando el Control Remoto
3(izquierda) /4 (derecha)—Pre-
Ajustes en imagen / sonido: color, tinte, contraste,
brillo, sharpness, color realzado, graves, agudos y
sonido envolvente.
Memoria de canales
Canal inicial apagado
Audio a estereofónico
Captura de texto
Transmisión captada apagada
V-Guide apagada
Bocinas de TV encendidas
Salida de audio digital a dolby digital
Velocidad de rastreo a alto
Imagen e Imagen (PAP) apagado
Lenguaje de menú a Ingles
Reloj automático y cronómetro (si estaba prendido
previamente)
Video a TV (si estaba prendido previamente)
Virtual de Canal
ID de la
Menor
Señal de Antena
Estación
Hora/Fecha
Titulo del
Programa
Modo de
Audio
Calcificación del
Programa
Titular completo Analógico—Contiene numero de
Canal (antena Analógica / Cable), Fecha y Hora, ID
de la estación (si esta disponible), Titulo del Programa (si esta disponible) y modo de Audio.
Contiene numero
de Canal
Titulo del Programa
Tecla Caption—Presione para seleccionar captación
15
de subtítulos Analógicos o Digitales. Los modos de
Captación Analógica son: CC1, CC2, Quickcap, y
apagado. Las Captaciones Digitales también pueden
ser personalizadas para cambiar el tipo, tamaño,
estilo y colores de fondo. (Vea pagina 41.) Nota:
Esta característica es solo operable cuando el
servicio de captación Digital esta disponible.
Tecla GUIDE—Presione las siguientes teclas para
16
operar su receptor de satélite una vez que el remoto
es programado:
Tecla Page/Guide—Presione para desplegar el menú
de la Guía.
Tecla Up/Down—Presione para mover el cursor
Arriba / abajo dentro del menú.
Tecla VCR/DVD—Esta tecla controla las funciones
17
de Avance rápido (44), Retrazar (33), Reproducc-
ión (4 ), Grabar (REC), Detener (
pista (–/ +), y Pausa para el VCR o el DVD.
Tecla PAP—Vea pagina 44 para “Pantalla
18
Dividida,” “Imagen e Imagen.”
ID de la Estación
Modo de Audio
Hora/Fecha
Calcificación del
Programa
■), Ajuste de
Información
Rápida
■
Asegúrese que
las baterías esten
instaladas correctamente.
Apunte el control
remoto hacía el
equipo que Ud.
quiere operar.
Objetos entre el
control remoto y
el equipo, pueden
causar un mal funcionamiento del
control remoto.
Sí el control remote
no funciona: presione la tecla de TV
(ver artículo 1).
El control remoto
debe de ser programado antes de
operar su VCR, su
Decodificador de
Cable, Reproductor
de DVD o receptor
de Satélite.
¿Necesita asistencia?
Visite nuestro sitio
de Internet en
www.sanyoctv.com
o llame al 1-800-877-5032
PROGRAMANDO EL CONTROL REMOTO
1. Localice en la tabla de la pagina 37 la marca y código de su VCR, Receptor
Caja de Cable, Reproductor de DVD y Receptor de Satélite.
2. Presione y sostenga la tecla de modo VCR, CABLE, DVD, SAT o AUX (auxiliar)
mientras introduce el código de tres dígitos. Después libere la tecla de modo.
Si el código fue aceptado la tecla de código se iluminara 5 veces después de ser
liberada. Si usted ingreso un código invalido la tecla no se iluminara. Revise el
numero del código y repita el paso numero 2.
Después de ingresar cada código pruebe la operación de la unidad presionando
la tecla POWER o CHANNEL. Si estas teclas operan su equipo probablemente
usted haya ingresado los códigos correctos para su equipo, si no siga el paso 2 e
ingrese otro código si esta disponible.
Realice los pasos 1 y 2 para cada equipo que usted tenga.
Los modos VCR, Cable, DVD y Satélite
aceptaran solo un tipo especifico de
código para cada modo.
El modo AUX aceptara todos los tipos de
códigos pero solo uno a la vez.
Después que usted ha programado y
confirmado la operación de su control
remoto, ingrese los números en lo espacios provistos para su fácil referencia.
Código de VCR:
Código de Decodificador de Cable:
Código de Reproductore de DVD:
Código del Receptore
de Satélite:
Código del Aparato
Auxiliar:
ANOTE EL APARATO QUE CORRESPONE AQUÍ
Page 37

Códigos para Reproductores de
DVD
Marca Código No.
Akai 529
Apex
Broksonic 536
Daewoo 529
Denon 501, 520
Emerson 540, 521, 524, 527
Fisher 500
GE 541, 504
Hitachi 530
JVC 515, 510
Kenwood 507
Koss 522
Lasonic 544
Magnavox 508, 502
Marantz 508
Mintek 543
Norcent 532
Onkyo 516, 502
Optimus 511
Orion 526
Oritron 522
Panasonic 501, 518
Philips 508, 502
Pioneer 542, 537, 511, 505, 518
Proscan 504
RCA 539, 538, 504
Samsung 512
Sanyo 500, 526
Sharp 531, 517
Sony 506
Sylvania 524
Symphonic 524
Technics 501
Theta Digital 511
Toshiba 502, 526
Yamaha 501
Zenith 521, 514, 502
535, 534, 533, 525, 527,
528, 523
Códigos para Receptores de
Satélite
Marca
AlphaStar 431
Echostar 432, 410, 416
ExpressVU 432
Fujitsu 404
GE 426, 436, 437, 423
General Instruments 425, 427, 415, 435, 405
Hitachi 407, 421
HTS 432
Hughes 442, 407
Janeil 404
Jerrold 425, 427
JVC 432
Magnavox 429, 430
Memorex 430
Next Level 415
Optimus 430
Panasonic 441, 428, 400
Philips 439, 438, 429, 430, 432
Primestar 425, 427
Proscan 426, 436, 437, 423
Radio Shack 415
RCA 426, 436, 437, 423
Samsung 440
Sony 420
Star Choice 415, 435
Toshiba 422, 405
Uniden 429, 430, 406, 409, 412
Video Pall 404
Viewstar 418
Zenith 434, 404
Código No.
Códigos para VCR
Marca Código No.
Admiral 234, 243, 247, 224, 229, 222, 215
Adventura 228
Aiko 205
Aiwa 228, 217
Akai 209, 215
America Action 205
America High 232
Bell&Howell 201
Broksonic 234, 243, 247, 227, 204
Candle 248, 222, 204, 205, 211, 217
Canon 232
CCE 205
Cineral 205
Citizen 222, 205, 211, 217
Craig 202, 219
Craver 204
Curtis Mathes 232, 236, 238, 248, 222, 228, 209,
Daewoo 205, 211
Daytron 205
Denon 230
Dynatech 228
Emerex 214
Emerson 251, 228, 243, 234, 236, 247, 227,
Fisher 200, 201, 202, 211
Fuji 232
Funai 228, 217
GE 222, 246, 248, 232, 236, 226, 229,
Goldstar 253, 238, 248, 226, 206, 215, 217
Go Video 248, 249, 212, 219
Gradiente 228
Garrard 228
Harley Davidson 228
Headquarter 200
Hitachi 228, 230, 246, 226, 222, 209, 217
Hughes 230
JBL 237
Jensen 209
JVC 220, 238, 226, 201, 209, 230
KEC 205
Kenwood 220, 226, 238, 201, 209
Kodak 232
Lloyd’s 228
Logik 219
LXI 232, 228, 230, 201, 202, 206,
Magnasonic 205, 219
Magnavox 204, 232, 228, 211, 217, 219, 220
Marta 206
Matsushita 232
MEI 232
Memorex 227, 232, 243, 245, 224, 228, 229,
Minolta 230
Mitsubishi 244, 224, 226, 229, 210
Motorola 232, 229, 224
211, 217
201, 204, 205, 206, 210, 211, 217
224, 212
211, 217
230, 200, 201, 202, 206, 215
Marca Código No.
MTC 228, 217, 219
Multitech 228, 217
NEC 238, 226, 201, 206, 209, 215,
Olympus 232
Optimus 245, 248, 224, 229, 201
Orion 243, 227, 234, 205, 206,
Panasonic 245, 232, 236, 202, 211, 219
Penny 230, 232, 248, 211, 219
Pentax 238, 230
Philco 204, 232, 243, 228, 217
Philips 204, 232, 228, 211, 217
Pioneer 242, 204, 207, 220
Proscan 222, 241, 246, 230, 236, 226
Proton 219
Pulsar 248, 205, 217
Quarter 200
Quartz 200
Quasar 245, 232, 236
Radio Shack 228, 245
RCA 250, 222, 241, 246, 248, 230,
Realistic 232, 248, 224, 228, 229, 200,
Samsung 248, 211, 217, 222
Samtron 248
Sansui 243, 226, 228, 209, 219, 220
Sanky 229, 224
Sanyo 200, 201, 202
Scott 234, 247, 227, 211
Sears 232, 228, 230, 200, 201, 202,
Semp 211
Shintom 219, 227
Sharp 252, 229, 224
Signature 228, 217, 229, 224, 200
Sony 214, 218, 232, 237, 226, 228
STS 230
Sylvania 228, 232, 244, 204, 217
Symphonic 228, 217, 226, 202
Yamaha 238, 226
Tatung 226, 209
Teac 228, 209, 214, 217
Technics 232
Teknika 232, 228, 217
Toshiba 211, 244, 202, 205, 210
Tomas 228, 217
Vector 211
Video Concept 211
Wards 230, 232, 248, 224, 228, 229,
White Westinghouse 243, 205
XR-1000 228, 232
Yamaha 238, 226
Zenith 206, 215, 237, 243, 220,
217, 248
210, 211
232, 236, 224, 226, 229, 201,
207, 210
201, 202, 206, 217
206, 211, 217
202, 204, 211, 217
228, 222
Códigos para Programando el Control Remoto 37
Page 38

Códigos para Decodificador de Cable
Brand Name Codes
ABC
AIM 321
Archer 334
Bell & Howell 313, 314, 329
Contec 305, 302, 307, 309, 318, 320, 324
CPI 309, 323
Diamond 320
Eagle 313, 314, 329
Emerson 334
Gemini 334
General Instruments 303, 300, 309, 320, 321, 323
Goldstar 312
Goodmind 334
Hamlin 330, 320
Hitachi 309, 323
Hytex 318
Jerrold
Magnavox 325, 301, 309, 313, 314, 323
Memorex 331, 332, 313, 314, 329
Motorola 338, 303, 300, 309, 320, 321, 323
Movie Time 306, 310, 314, 313, 329
Northcoast 316
NSC 305, 306, 314, 313, 329
Oak 305, 318, 320
Paragon 331, 313, 314, 329
Panasonic 331, 324, 302, 307, 317, 327
Philips 341, 325, 301, 309, 313, 314, 323
Pioneer 312, 335, 333, 317, 324
Quasar 331, 302, 307, 317
RCA 328, 302, 307
Regal 330, 307, 320
Rembrandt 305, 309, 323
Radio Shack 334
Samsung 312, 310
Scientific Atlanta 335, 307, 324
Signal 310
Signature 300, 309, 321, 323
Sony 340
Sprucer 302, 307, 316
Starcom 332, 309, 321, 323
Stargate 309, 310, 321, 334
Teleview 310
Tocom 300, 303, 305, 304, 306, 307
Toshiba 331, 309, 316, 323
Unika 314, 313, 329
United Artists 318
United Cable 309, 323
U.S. Electronics 309, 324
Viewstar 326, 313, 315, 314, 329
Wards 321, 309, 323
Warner 312
Zenith 331, 336, 337, 309, 316, 324
Notas:
Muchas de estas teclas en el Control Remoto son multifuncionales. Sírvase ver la tabla para una descripción
genérica de las teclas y sus funciones.
Refiera a sus manuales de operación originales para
características especificas.
Este Control Remoto no puede agregar teclas o funciones a su equipo. El manufacturador de su equipo debe
haberlos proveído originalmente.
312, 304, 306, 309, 313, 314, 318,
319, 321, 324, 329
300, 303, 309, 313, 314, 320,
321, 329
TABLA DE FUNCIONAMIENTO DE LAS TECLAS DEL CONTROL
REMOTO
TECLA MODO TV MODO VCR MODO CABLE MODO DVD MODO SATELITE
POWER Enciende /Apaga
la unidad
TECLAS
NUMERICAS
Usadas para seleccionar canales
INPUT Selecciona Modo
TV/Video
RECALL Selecciona Canal
Previo
MENU Muestra menú
de ajustes
CANAL ARRIBA Canal Arriba Canal Arriba Canal Arriba Siguiente Canal
CANAL ABAJO Canal Abajo Canal Abajo Canal Abajo Siguiente Canal
VOLUME – Decrementa
Volumen
VOLUME + Incrementa
Volumen
CURSOR
Cursor a Izquierda Cursor a Izquierda Cursor a Izquierda Cursor a Izquierda Cursor a Izquierda
IZQUIERDA
CURSOR
Cursor a Derecha Cursor a Derecha Cursor a Derecha Cursor a Derecha Cursor a Derecha
DERECJA
CURSOR ARRIBA Cursor hacia Arriba Cursor hacia Arriba Cursor hacia Arriba Cursor hacia Arriba Cursor hacia Arriba
CURSOR ABAJO Cursor hacia Abajo Cursor hacia Abajo Cursor hacia Abajo Cursor hacia Abajo Cursor hacia Abajo
MUTE Apaga/ Enciende
Sonido en TV
RESET Opera solo en TV No Opera No Opera No Opera No Opera
CAPTION Opera solo en TV No Opera No Opera Accesa opciones
SLEEP Opera solo en TV No Opera No Opera No Opera No Opera
V-GUIDE Opera solo en TV No Opera No Opera No Opera No Opera
ENTER Selecciona Selecciona Selecciona Selecciona Selecciona
PLAY
4
Selecciona modo
de Reproducir
VCR/DVD
AVANCE
RÁPIDO
RETRAZAR
STOP
(■)
(44)
Opera VCR /DVD Opera VCR Opera VCR/DVD Opera DVD Opera VCR/DVD
Opera VCR /DVD Opera VCR Opera VCR/DVD Opera DVD Opera VCR/DVD
(33)
Selecciona
Detener VCR/DVD
PAUSE (II) Selecciona
Pausa VCR/DVD
GARBAR (REC) No Opera Selecciona
TUNER Opera solo en TV No Opera No Opera No Opera No Opera
GUIDE No Opera No Opera No Opera No Opera Muestra la Guía
PIX SHAPE Opera solo en TV No Opera No Opera No Opera No Opera
INFO Muestra
Titulares
EXIT Termina Selección T ermina Selección Termina Selección Termina Selección Termina Selección
PAP Opera solo en TV No Opera No Opera No Opera No Opera
TECLAS DE MODO Presione estas tecla (VCR/TV/CABLE/DVD/SAT/AUX) cuando programe el
control remoto multimedia y seleccione el modo de operación.
Enciende /Apaga
la unidad
Usadas para seleccionar canales
Selecciona Modo
TV/VCR
Selecciona Canal
Previo
Muestra menú
de ajustes
Decrementa
Volumen
Incrementa
Volumen
Apaga/ Enciende
Sonido en TV
Selecciona
Reproducir VCR
Selecciona
Detener VCR
Selecciona
Pausa VCR
Grabar en VCR
Selecciona
Programa
Enciende /Apaga
la unidad
Usadas para seleccionar canales
Enciende /Apaga
la unidad
Enciende /Apaga
la unidad
No Opera Usadas para selec-
cionar canales
No Opera No Opera Selecciona Modo
TV/DSS
Selecciona Canal
Previo
Muestra menú
de ajustes
Selecciona función
de Repetir
Muestra menú
de ajustes
Selecciona Canal
Previo
Muestra menú
de ajustes
Canal Arriba
Arriba
Canal Abajo
Abajo
Decrementa
Volumen
Incrementa
Volumen
Apaga/ Enciende
Sonido en TV
Decrementa
Volumen
Incrementa
Volumen
Apaga/ Enciende
Sonido en TV
Decrementa
Volumen
Incrementa
Volumen
Apaga/ Enciende
Sonido en TV
No Opera
de Audio
Selecciona modo
de Reproducir
VCR/DVD
Selecciona
Detener VCR/DVD
Selecciona
Pausa VCR/DVD
Selecciona
Reproducir DVD
Selecciona
Detener DVD
Selecciona
Pausa DVD
Selecciona modo
de Reproducir
VCR/DVD
Selecciona
Detener VCR/DVD
Selecciona
Pausa VCR/DVD
No Opera No Opera No Opera
No Opera Selecciona
Zoom
Selecciona
Programa
38 Funcionamiento de las Teclas del Control Remoto
Page 39

Mov er
Sel ecc
Atr as
Sal ir
ENTER
MENU
EXIT
Tamaño
Color
Estilo
cc
Principal
Canal
Font de Caption Digital
Guia-V
Ajuste
Imagen/Sonido
Fecha/Hora
Salide de Audio Digital
Bocinas de TV
Lenguaje del Menú
Digital Dolby
Auto Reloj
Ajuste Manual
Hora
Fecha (Dia)
Apagado
Prendido
English
Español
Français
Add
Saltar
Depote
Noticia
Cine
Manual
Resatar color
Velocidad de Trazo
Imagen
Sonido
Agudos
Bajos
Background
Normal
Fresco
Bajo
Alto
Color
Tinte
Contraste
Background
Brillo
Nitidez
Busqueda de Canales Digitales
Apagado
Prendido
Apagado
Prendido
Apagado
Prendido
Apagado
Prendido
Opacidad
Estilo de Borde
Opacidad de primer plano
Opacidad de Fondo
Si
No
Caliente
Apagado
PCM
Color de primer plano
Color de Fondo
Color del Borde
Busqueda de Canales
Canal Inicial
Memoria de\ Canales
Seleccione Antena
Surround
Ajustes Del Televisor
El menú en pantalla ofrece al televidente un fácil acceso a los ajustes. Use las teclas del Control Remoto y sigas las instrucciones en pantalla.
COMO OPERAR EL MENU EN PANTALLA
1. Presione la tecla MENU, para que aparezca el menú principal. Nota: El menú principal consiste del área se Iconos y Opciones.
Si ninguna tecla es presionada después de 30 segundos el menú desaparecerá de la pantalla.
2. Use las teclas ▲/▼ mover el cursor y seleccionar opciones del área de Iconos.
3. Presione ENTER o
4. Use las teclas ▲/▼ para escoger la opción deseada dentro de menú principal y del Sub Menú (El articulo seleccionado será
resaltado en Amarillo).
5. Presione la tecla ENTER para grabar los ajustes al menú o para seleccionar un diferente articulo.
6. Presione
3flecha izquierda para mover el cursor del área de menú de opciones hacia el área de Iconos, o presione la tecla MENU para salir.
Nota: Artículos con Sub-menú requieren pasos adicionales, básicamente sígalas instrucciones en pantalla usando las teclas de flecha y ENTER
para ajustar.
MAPA DE NAVEGACION DEL MENU
4flecha derecha para mover el Cursor del área de Iconos al Menú de Opciones.
ÁREA DE ICONOS
Canal
MENÚ PRINCIPAL
SUB MENÚ
Vea página 40.
Vea página 41.
Vea página 42.
Vea página 43.
Vea página 43.
Principal
TECLAS DE NAVEGACION DEL
MENU
(Vea los pasos 1~6 para la
operación dominate.)
Font de Caption Digital
cc
Guia-V
Ajuste
Imagen/Sonido
Busqueda de Canales
Busqueda de Canales Digitales
Seleccione Antena
Memoria de\ Canales
Canal Inicial
Tamaño
Opacidad
Estilo de Borde
Si
No
Fecha/Hora
Salide de Audio Digital
Bocinas de TV
Lenguaje del Menú
Depote
Cine
Noticia
Manual
Resatar color
Velocidad de Trazo
Estilo
Color
Mover
Color de Fondo
Color de primer plano
Color del Borde
Opacidad de Fondo
Opacidad de primer plano
Digital Dolby
PCM
Apagado
Prendido
English
Español
Français
Imagen
Sonido
Surround
Normal
Background
Fresco
Caliente
Alto
Bajo
Apagado
Selecc
ENTER
MENU
Apagado
Prendido
Apagado
Prendido
Apagado
Prendido
Add
Saltar
Apagado
Prendido
Atras
EXIT
INFORMACION IMORTANTE:
Algunas opciones del Menú son
especificas de los canales
Digitales o Analógicos. Por lo tanto
no siempre son seleccionables.
Auto Reloj
Ajuste Manual
Agudos
Bajos
Salir
Hora
Fecha (Dia)
Color
Tinte
Contraste
Brillo
Background
Nitidez
Como Operar el Menu 39
Page 40

BUSQUEDA DE CANALES
Mover
Sel ecc
Atras
Sal ir
ENTER
MENU
EXIT
Canal
cc
Busquede de Canales
Busquede de Canales Digitales
Memoria de Canales
Canal Inicial
Seleccione Antena
cc
Power
Busquede de Canales Digitales
Mover
Sel ecc
Atras
Sal ir
ENTER
MENU
EXIT
Canal
cc
Busquede de Canales
Busquede de Canales Digitales
Memoria de Canales
Canal Inicial
Seleccione Antena
cc
Busquede de Cable Digitales
Cable Digital
Busquede de Canales
Mover
Sel ecc
Atras
Sal ir
ENTER
MENU
EXIT
Apagado
Prendldo
cc
Canal
Busquede de Canales
Busquede de Cable Digitales
cc
Cambie la
antena?
Apagado
Prendido
Mover
Sel ecc
Atras
Sal ir
ENTER
MENU
EXIT
Seleccione Antena
Mover
Sel ecc
Atras
Sal ir
ENTER
MENU
EXIT
Canal
cc
Busquede de Canales
Busquede de Canales Digitales
Memoria de\ Canales
Canal Inicial
Seleccione Antena
La Búsqueda de Canales es requerida solo si canales adicionales se presentan disponibles, casos como
cambiarse a otra ciudad o instalar servicio de cable.
1. Presione la tecla MENU.
2. Use las teclas ▲/▼ para resaltar el Icono de Antena. Presione ENTER.
3. Use las teclas ▲/▼ para seleccionar Búsqueda de Canales. Presione ENTER.
4. Use ▼ para seleccionar PRENDIDO. Presione ENTER.
Canal
cc
Busquede de Canales
Busquede de Canales Digitales
Seleccione Antena
Memoria de Canales
Canal Inicial
Mover
Selecc
MENU
Atras
ENTER
Salir
EXIT
BUSQUEDA DE CANALES DE CABLE DIGITAL (Opcional)
Esta TV puede recibir canales no encriptados de cable digital (Clear QAM) cuando están disponibles.
Sin embargo, no todas las compañías de cable proveen canales digitales ClearQAM.
La búsqueda de canales de cable digital puede tomar aproximadamente 10 minutos, por favor sea
paciente.
1. Conecte la señal de cable digital directamente al conector de Antena TV Digital.
2. Presione la tecla TUNER para seleccionar canales digitales. Presione MENU.
3. Use las teclas ▲/▼ para resaltar el Icono de Antena. Presione ENTER.
4. Use las teclas ▲/▼ para resaltar Búsqueda de Cable Digitales. Presione ENTER.
5. Use la tecla ▼ para seleccionar PRENDIDO. Presione ENTER.
INFORMACION IMORTANTE: Esta TV solo mantiene una base de datos para canales digitales.
Por lo tanto cuando usted busque canales digitales ClearQAM la base de datos de la antena
digital serán borrados. Usted solo podrá recibir aquellos canales Clear QAM que sean provistos
por su compañía de cable.
Las compañías de cable re-arreglan los canales virtuales según
la programación cambie, lo cual puede causar que el programa
que usted esta viendo sea movido a otro canal. El siguiente
mensaje aparecerá brevemente para notificarle este cambio.
Usted tiene que re-localizar el programa que estaba viendo
.
rastreando a través de los canales
Cuando una estación transmisora terrestre re-arregla sus canales virtuales, los datos en la tabla
PSIP avisan a la TV del cambio. Esto le permite a la TV “seguir “ un programa a su nuevo canal
virtual. El televidente ni siquiera se dará cuenta que el cambio ha ocurrido.
Para restablecer la base de datos de la antena digital, reconecte la antena y utilice el menú para
realizar una búsqueda normal de canales.
Cambio programa
por la compañia de cable
Canal
cc
Busquede de Canales
Busquede de Cable Digitales
Busquede de Cable Digitales
cc
Cable Digital
Busquede de Canales
Mover
ENTER
Selecc
Apagado
Prendldo
Atras
MENU
Salir
EXIT
BUSQUEDA DIGITAL PARA REAGREGAR CANALES
Utilice esta característica para actualizar el mapa de canales de la antena
digital o para agregar nuevos canales, o bien agregar canales cuando las
torres transmisoras están en lugares opuestos a su localización.
1. Presione la tecla TUNER para seleccionar canales digitales.
Presione MENU.
2. Use las teclas ▲/▼ para resaltar el Icono de Antena. Presione ENTER.
3. Use las teclas ▲/▼ para resaltar Búsqueda de Canales Digitales.
Presione ENTER.
4. Use la tecla ▼ para seleccionar SI. Presione ENTER.
Note: Reoriente su antena y repita estos pasos para cada
dirección en la que se encuentren las torres de transmisión.
SELECCIÓN DE ANTENA
Utilice esta característica para cambiar canales transmitidos por aire a
canales de cable.
1. Presione la tecla MENU.
2. Use las teclas ▲/▼ para resaltar el Icono de Antena. Presione ENTER.
3. Use las teclas ▲/▼ para seleccionar Selección de Antena.
Presione ENTER.
4. Use la tecla ▼ para seleccionar PRENDIDO. Presione ENTER.
40 Busqueda de Canales / Canales de Cable Digital / Reagregar Canales / Selección de Antena
Canal
cc
Busquede de Canales
Busquede de Canales Digitales
Seleccione Antena
Memoria de Canales
Canal Inicial
Mover
Selecc
MENU
Atras
ENTER
Salir
EXIT
Canal
cc
Busquede de Canales
Busquede de Canales Digitales
Seleccione Antena
Memoria de\ Canales
Canal Inicial
Mover
Selecc
MENU
Atras
ENTER
Salir
EXIT
Busquede de Canales Digitales
cc
Por favor espere mientras su TV
busca los canales disponiles
Antena digital 35
Seleccione Antena
cc
Cambie la
antena?
Mover
ENTER
Selecc
50%
Power
Apagado
Prendido
Atras
MENU
Apagar
EXIT
Salir
Page 41

cc
Font de Caption Digital
Tamaño
Estilo
Color
Opacidad
Estilo de Borde
Mover
Sele cc
Atras
Sal ir
ENTER
MENU
EXIT
cc
Tamaño
Preselección
Pequeño
Normal
Grande
Mover
Sele cc
Atras
Sal ir
ENTER
MENU
EXIT
CC1
Digital CC1
cc
Presione ENTER para seleccionar
Use CH-UP/DOWN
Apagado
Prendido
Antena Digital 24-1
Ch
TUNER
Tune r
Sel ecc
Atras
Sal ir
ENTER
MENU
EXIT
Canal Inicial
Mover
Sel ecc
Atras
Salir
ENTER
MENU
EXIT
Canal
cc
Busquede de Canales
Busquede de Canales Digitales
Memoria de\ Canales
Canal Inicial
Seleccione Antena
cc
Antena digital 06-1
Memoria de\ Canales
Agregado
NumChCh
Atr as
Sor tir
ENTER
TUNER
Tuner
Add /De l
0~ 9
MENU
EXIT
CANALES EN MEMORIA
Este articulo es la lista de canales activos que usted ha examinado cuando usa las teclas (arriba/
abajo) de la memoria. Esta lista puede ser personalizada borrando los canales no requeridos.
1. Presione la tecla MENU.
2. Use las teclas ▲/▼ para resaltar el Icono de Antena. Presione ENTER.
3. Use las teclas ▲/▼ para seleccionar Examinar Canales en Memoria. Presione ENTER.
Cuando esta opción es seleccionada el menú de Agregar/ Borrar aparece.
Los canales existentes también aparecerán en el recuadro.
4. Presione la tecla TUNER para seleccionar Digital o Analógico.
5. Use la s teclas CHANNEL arriba/abajo o numéricas para seleccionar el canal deseado.
6. Presione la tecla ENTER para agregar o borrar el canal deseado.
CANAL INICIAL
La televisión puede ser programada para sintonizar su canal favorito cada vez que es energizada, casos
como su canal favorito de noticias o deportivo.
1. Presione la tecla MENU.
2. Use las teclas ▲/▼ para resaltar el Icono de Antena. Presione ENTER.
3. Use las teclas ▲/▼ para seleccionar Canal Inicial. Presione ENTER.
4. Use la tecla ▼ para seleccionar PRENDIDO. Presione ENTER.
5. Presione la tecla TUNER para seleccionar Digital o Analógico.
6. Seleccione su canal favorito usando CHANNEL arriba/abajo en el control remoto.
7 Presione la tecla ENTER para aceptar el canal inicial o en caso de que guste borrar el canal inicial
para cambiar el numero de canal.
8. Presione la tecla MENU para regresar al menú principal o EXIT para salir de este.
.
cc
Memoria de\ Canales
Antena digital 06-1
Agregado
Atras
Atras
Atras
EXIT
Sortir
Salir
EXIT
Salir
EXIT
0~9
Num
TUNER
Tuner
ENTER
Add/Del
Canal
cc
Busquede de Canales
Busquede de Canales Digitales
Seleccione Antena
Memoria de\ Canales
Canal Inicial
Mover
ENTER
Canal Inicial
cc
Apagado
Prendido
Antena Digital 24-1
Presione ENTER para seleccionar
Use CH-UP/DOWN
TUNER
Tuner
ENTER
Ch
Selecc
Selecc
MENU
MENU
MENU
Transmision Captada (Closed-Caption)
La transmisión Captada es transmisión de texto transmitida junto con la imagen y el sonido, y que puede ser
desplegada en la pantalla de la TV. Debido a los distintos tipos de subtítulos que pueden se transmitidos con
la señal de TV, modos separados son provistos. Los modelos de transmisión captada por este modelo son:
Analógico EIA-608B y Digital EIA-708B. Los transmisores locales deciden que tipo de señal será transmitida.
Para ver textos Caption:
1. Presione la tecla CAPTION en el control remoto para seleccionar Caption Analógico—CC1,
CC2, QuickCap o apagado. Caption Digital – Digital CC1, Digital CC2, Digital CC3, Digital
CC4, Digital CC5, Digital CC6, QuickCap o apagado.
2. Usando la característica QuickCap que habilita encender y apagar la función Caption con la
función de Mute. Presionando la tecla MUTE en el control remoto para bloquear el sonido, la
función Caption se habilita automáticamente desplegando el texto. Presionando de nuevo para
reestablecer el sonido la función Caption desaparecerá.
Para personalizar la función Caption en el menú de pantalla:
Esta función esta diseñada para personalizar el Caption Digital solamente.
1. Presione la tecla TUNER para seleccionar Digital. Presione MENU.
2. Use las teclas ▲/▼ para resaltar el Icono de Caption. Presione ENTER.
3. Use las teclas ▲/▼ para seleccionar las opciones deseadas. Presione ENTER.
4. Use las teclas ▲/▼ para hacer los ajustes.
NOTA: El articulo personalizado será resaltado con un borde amarillo y un indicador
Amarillo brillante indicara la selección.
5. Para ajustar otra opción repita los pasos 3 y 4.
6. Presione la tecla MENU para regresar al menú principal o EXIT para salir de este.
INFORMACION IMPORTANTE: Recibiendo una verdadera Transmisión Captada (Closed
Caption) digital EIA 708B, algunas estaciones convierten el Caption Analógico 608B para
incluirlo en sus datos digitales. Esta conversión de Caption Analógico pudiera no responder a
todas las opciones de ajustes personalizados.
CC1
Caption analógico
Digital CC1
Caption Digital
Font de Caption Digital
cc
Tamaño
Estilo
Color
Opacidad
Estilo de Borde
Mover
Selecc
Atras
ENTER
MENU
Salir
EXIT
Main Menu
Tamaño
cc
Preselección
Pequeño
Normal
Grande
Mover
Selecc
Atras
ENTER
MENU
Salir
EXIT
Sub-Menu
Canales en Memoria/Inicial / Transmision Captada 41
Page 42

cc
Guia-V
Desea agregar el sistema
de la Guia-V y seleccionar
los límites de clasificación?
Si
No
Mover
Sel ecc
Atras
Sal ir
ENTER
MENU
EXIT
Clase
cc
Permita Todos
Bloquee Todos
TV-Y7
TV-Y
TV-G
TV-PG
TV-14
Cine
PG
PG13
NC17
TV-MA
Mover
Selecc
Atras
Salir
ENTER
MENU
EXIT
Operación De Guia-V (Control Paternal)
Clase
cc
Permita Todos
Bloquee Todos
TV-Y7
TV-Y
TV-G
TV-PG
TV-14
Cine
PG
PG13
TV-MA
Mover
Sel ecc
Atras
Salir
ENTER
MENU
EXIT
NC17
ESTA FUNCION ESTA DISEÑADA PARA CUMPLIR REGULACIONES DE LA FCC PARA V-CHIP EN LOS
ESTADOS UNIDOS DE AMERICA, ESTA FUNCION PUDIERA NO ACTIVARSE CON SEÑALES QUE SE
ORIGINEN EN OTROS PAISES.
Esta televisión Sanyo esta equipada con un circuito electrónico V-CHIP para interpretar los códigos de clasificación
de la MPAA y ordenamientos de Control Paternal en TV. Cuando estos códigos son detectados la TV desplegara o
bloqueara la señal dependiendo de las opciones hechas en el sistema Guia-V. La clasificación de los contenidos son
especificados por las iniciales: FV (fantasía Violencia), D (dialogo sugestivo), L (lenguaje adulto), S (situaciones
sexuales) y V (violencia).
Un Icono de clasificación aparece generalmente en la esquina superior izquierda de la pantalla por 15 segundos al
inicio del programa.
Esta televisor puede ser ajustado para bloquear programas que a su juicio
no son apropiados para ser vistos por niños.
COMO BLOQUEAR PELICULAS O PROGRAMAS DE TV
1. Presione la tecla MENU.
2. Use las teclas ▲ / ▼ para resaltar el Icono de Guia-V. Presione ENTER.
3. Use las teclas ▲ / ▼ para seleccionar SI. Presione ENTER.
4. Use las teclas ▲ / ▼ , / para seleccionar la clasificación de
películas o programas.
5. Presione la tecla ENTER para activar la opción seleccionada.
Para clasificación de películas un símbolo de candado aparecerá a un
costado de la opción seleccionada indicando que esta bloqueada.
Para clasificación de programas de TV un símbolo de candado aparecerá en
los recuadros de clasificación indicando clasificación bloqueada.
INFORMACION IMPORTANTE: La TV automáticamente
bloqueara la clasificación por arriba o no bloqueara la clasificación
por debajo de la opción seleccionada. Ejemplo: Si usted bloquea
la clasificación TV-G, las clasificaciones TV-PG, TV14 y TV-MA
serán bloqueadas automáticamente, o si usted bloque la
clasificación de películas PG-13 las clasificaciones R, NC-17 y X
serán bloqueadas automáticamente.
Bloqueando TVY7 no bloque clasificaciones altas.
6. Presione la tecla MENU para regresar al menú principal o EXIT para salir
de este.
COMO DESBLOQUEAR TEMPORLMENTE UNA PELICULA
O UN PROGRAMA DE TV
1. Presione la tecla MENU.
2. Use las teclas ▲ / ▼ para resaltar el Icono de Guia-V. Presione ENTER.
3. Seleccione NO para temporalmente no bloquear el programa.
COMO DESBLOQUEAR UNA PELICULA O UN PROGRAMA
DE TV
1. Presione la tecla MENU.
2. Use las teclas ▲ / ▼ para resaltar el Icono de Guia-V. Presione ENTER.
3. Use las teclas ▲ / ▼ para seleccionar SI, solo si el indicador de opción no
esta resaltado. Presiones ENTER.
4. Resalte la opción “PERMITA TODOS” usando las teclas ▲ / ▼, / si
es necesario. Presione ENTER para eliminar sus opciones.
42 Operación de Guia-V
En esta TV se puede seleccionar el bloqueo automático de programas con contenido que usted juzgue como
inapropiado para que lo vean sus niños. Por conveniencia bloque la recepción de programación especifica,
use el control remoto o las opciones del menú.
Guia-V
cc
Desea agregar el sistema
de la Guia-V y seleccionar
los límites de clasificación?
Si
No
Mover
Selecc
MENU
Atras
ENTER
EXIT
▲
▲
Clase
cc
Permita Todos
Cine
G
PG
PG13
R
NC17
X
TV-Y
TV-Y7
TV-G
TV-PG
TV-14
TV-MA
Mover
TVTVFVFVD L S V
ENTER
EJEMPLO: Clasificación de Pelicula: NC17 y X (BLOQUEADA)
Clasificación de TV: TV-14 y TV-MA–D,L,S, y V (BLOQUEADA)
CLASIFICACIÓN DE GUIA-V—EN-UNO-ECHE
UN VISTAZO
CLASE DE TV
TVTVFVFVD L S V
TV-Y
TV-Y7
TV-G
TV-PG
TV-14
TV-MA
Mover
ENTER
Selecc
▲
▲
CLASE DE PELICULA
Clase
cc
TRABE EL SIMBOLO
Permita Todos
Cine
G
PG
PG13
R
NC17
X
Información
Rápida
■
El menú V-Guide permanecerá en la pantalla
aproximadamente por 30
segundos, si este desaparece presione la tecla
V-GUIDE.
■
Usted puede bloquear
un contenido con clasificación como: TVPG-V y
todavía ser capaz de ver
un programa TVPG con
clasificación de S-L-D.
¿Necesita asistencia?
Visite nuestro sitio
de Internet en
www.sanyoctv.com
o llame al 1-800-877-5032
Salir
Bloquee Todos
Selecc
Bloquee Todos
MENU
MENU
Atras
Atras
EXIT
Salir
EXIT
NO
CLASIFICADO
SUPERVISIÓNS
(Gris Luz)
Salir
CLASE
SUPERVISIÓNS
(Gris Opaco)
Page 43

Aju star
Ajuste Manual
cc
Hora
Mes
Día
Año
Minuto
AM/PM
Sel ecc
Atras
Sal ir
ENTER
MENU
EXIT
cc
Salida de Audio Digital
Digital Dolby
PCM
Ajuste
cc
Fecha/Hora
Bocinas de TV
Lenguaje del Menú
Salida de Audio Digital
Mover
Sel ecc
Atras
Sal ir
ENTER
MENU
EXIT
Imagen
cc
Nitidez
Color
Tinte
Contraste
Brillo
Mover
Ajus tar
Atras
Sal ir
MENU
EXIT
cc
Imagen/Sonido
Deporte
Cine
Noticia
Manual
Resatar Color
Velocidad de Trazo
Mov er
Sel ecc
Atras
Sal ir
ENTER
MENU
EXIT
Ajustes del Menú
cc
Bocinas de TV
Apagado
Prendido
cc
Lenguaje del Menú
Atr as
Selec c
Sal ir
MENU
EXIT
English
Español
Français
Información
Rápida
■
El cursor se seguirá
moviendo a través del
menú hasta que la tecla
de EXIT sea presionada.
■
La opción de reloj del
Titular del Canal (completa o breve) estarán en
blanco si el reloj no ha
sido ajustado.
■
El sonido envolvente
estará puesto en
automático cuando el
modo de Deportes o
Cine esta seleccionado.
Mientras reciba señales
MTS estereofónico el
efecto envolvente será
expandido.
¿Necesita asistencia?
Visite nuestro sitio
de Internet en
www.sanyoctv.com
Ajustando el Reloj Manualmente
1. Presione la tecla MENU.
2. Use las teclas ▲/▼ para resaltar el Icono de Ajuste. Presione ENTER.
3. Use las teclas ▲/▼ para seleccionar Fecha/ Hora. Presione ENTER.
4. Use las teclas ▲/▼ para seleccionar Ajuste Manual. Presione ENTER.
5. Use las teclas ▲/▼ para seleccionar la Hora correcta. Presione ENTER.
para fijar la hora (la TV automáticamente ira al siguiente ajuste).
6. Use las teclas ▲/▼ para seleccionar los Minutos correctos. Presione
ENTER (la TV automáticamente ira al siguiente ajuste).
7. Para seleccionar otra información use las teclas ▲/▼ para corregir su
elección. Presione ENTER para fijar la información.
Salida de Audio Digital
Use esta característica para escoger el formato de audio de salida:
Dolby Digital o PCM.
1. Presione la tecla MENU.
2. Use las teclas ▲/▼ para resaltar el Icono de Ajuste. Presione ENTER.
3. Use las teclas ▲/▼ para seleccionar Audio Digital. Presione ENTER.
4. Use las teclas para seleccionar Dolby Digital o PCM. Presione ENTER.
Nota: Si usted está viendo un canal analógico o una señal conectada a
Video 1 / 2 o los conectores de componente la salida Digital de
Audio no esta disponible.
o llame al 1-800-877-5032
Bocinas del TV
1. Presione la tecla MENU.
2. Use las teclas ▲/▼ para resaltar el Icono de Ajuste. Presione ENTER.
3. Use las teclas ▲/▼ para seleccionar Bocinas de la TV. Presione ENTER.
4. Use las teclas ▲/▼ para seleccionar PRENDIDO. Presione ENTER.
NOTA: El sonido no será reproducido en su televisor si la opción seleccionada esta en modo
Apagado.
Menú de Lenguajes
1. Presione la tecla MENU.
2. Use las teclas ▲/▼ para resaltar el Icono de Ajuste. Presione ENTER.
3. Use las teclas ▲/▼ para seleccionar Menu Languaje. Presione ENTER.
4. Use las teclas ▲/▼ para seleccionar English, Español y Français. Presione ENTER.
5. Presione la tecla MENU para regresar al menú principal o EXIT para salir de este.
Ajuste
cc
Ajuste Manual
cc
Salida de Audio Digital
cc
Bocinas de TV
cc
Lenguaje del Menú
cc
Fecha/Hora
Salida de Audio Digital
Bocinas de TV
Lenguaje del Menú
Mover
Selecc
ENTER
MENU
Hora
Minuto
AM/PM
Mes
Día
Ajustar
Selecc
ENTER
MENU
Digital Dolby
PCM
Apagado
Prendido
English
Español
Français
Selecc
MENU
Atras
Año
Atras
Atras
Salir
EXIT
Salir
EXIT
Salir
EXIT
Ajustes de Imagen/Sonido
Cuando la opción Imagen/ Sonido es seleccionada presione la tecla ENTER para seleccionar la opción
deseada. Para ampliar su experiencia visual, seleccione Deportes, Cine o Noticias para caracterizar el
programa que usted esta viendo. La televisión automáticamente ajustará el Sonido y la Imagen.
1. Presione la tecla MENU.
2. Use las teclas ▲/▼ para resaltar el Icono Imagen/ Sonido. Presione ENTER.
Ajuste Manual de Imagen/ Sonido
1. Use las teclas ▲/▼ para seleccionar Manual. Presione ENTER.
2. Use las teclas ▲/▼ para seleccionar Imagen (opciones: Color, Tinte, Contraste, Brillo, Nitidez), Sonido
(opciones: Graves o Agudos), o Envolvente (opciones: Prendido o Apagado). Presione ENTER.
3. Use las teclas ▲/▼ para seleccionar la opción deseada, después utilice flechas hacia los lados /
para hacer los ajustes. Presione ENTER.
4. Presione la tecla MENU para regresar al menú principal o EXIT para salir de este.
Imagen/Sonido
cc
Deporte
Cine
Noticia
Manual
Resatar Color
Velocidad de Trazo
Mover
Selecc
Atras
Salir
EXIT
Atras
Salir
EXIT
▲
▲
ENTER
MENU
Imagen
cc
Color
Tinte
Contraste
Brillo
Nitidez
Mover
Ajustar
MENU
Ajustes del Menú / Ajustes de Imagen/Sonido 43
Page 44

.
cc
Velocided de Trazo
Alto
Bajo
Apagado
Sele cc
Atras
Sal ir
MENU
EXIT
Resaltar Color
cc
Resaltar Color
Normal
Fresco
Caliente
Sele cc
Atras
Sal ir
MENU
EXIT
Use esta característica para resaltar los tonos de piel de las imágenes y los colores sobresalientes. Seleccionando
Tibio denotara los tintes rojizos de la imagen y seleccionando “Cool” denotara los tintes azules de la imagen.
Resaltar Color
cc
Normal
Fresco
Caliente
Velocidad de Trazo (Scan Velocity)
Esta televisión tiene un circuito electrónico que regula la velocidad de rastreo del rayo de electrones creando
Selecc
MENU
Atras
Salir
EXIT
nítidas transiciones entre porciones luminosas y obscuras de la imagen. Los resultados son contornos detallados
y nítidamente definidos. Seleccione las opciones Bajo o Alto para cambiar el ajuste.
1. Presione la tecla MENU.
2. Use las teclas ▲/▼ para resaltar el Icono de Imagen / Sonido. Presione ENTER.
3. Use las teclas ▲/▼ para seleccionar Resaltar Color o Velocidad de Trazo. Presione ENTER.
Velocided de Trazo
cc
Alto
Bajo
Apagado
4. Use las teclas ▲/▼ para seleccionar ajustar su selección. Presione ENTER.
Selecc
Atras
5. Presione la tecla MENU para regresar al menú principal o EXIT para salir de este.
MENU
Salir
EXIT
Operación de PAP (Imagen e Imagen)
La característica PAP (Imagen e Imagen) divide la pantalla en dos ventanas de manera que usted pueda ver dos programas a la vez, la imagen de la izquierda siempre la imagen principal con audio, la imagen de la derecha es considerada como sub-imagen y no tiene sonido disponible.
ventana proviene del sintonizador Digital. La señal de la otra ventana puede ser del Sintonizador Análogo ó de cualquier entrada de Audio/Video
INFORMACION IMPORTANTE: El observador no puede usar el Sintonizador Análogo
de la DTV como una de las fuentes de video y cualquier conexión de A/V (VCR, Reproductor de DVD’s, Convertidor de Cable o receptor de Satelite) como la otra fuente.
La señal de una
.
Usando el PAP con Pantalla Dividida
1. Presione la tecla PAP ON/OFF para dividida la pantalla.
2. Para cambiar canales en la ventana izquierda: use la tecla Channel Arriba/Abajo.
3. Para cambiar canales en la ventana derecha: use la tecla PAP Channel Arriba/Abajo.
Intercambiando imagines en Pantalla Dividida
1. Presione la tecla SWAP para cambiar la imagen de la izquierda y la derecha. Usando esta caracter-
ística si usted esta viendo un programa en la ventana derecha y desea oír su contenido solo presione
la tecla SWAP para rápidamente intercambiarla a la ventan izquierda.
NOTA: Esta característica opera solamente cuando la opción PAP esta Encendida.
VENTANA
DERECHA
VENTANA
IZQUIERDA
Congelando la pantalla PAP
1. Presione la tecla QUIK FREEZE para detener la acción de la imagen. Use esta característica para
congelar un anuncio comercial donde un número telefónico o una dirección sea necesario
transcribir.
NOTA: Esta característica no congelará la imagen en la ventana izquierda.
INFORMACION IMPORTANTE: La función QUIK FREEZE congelará el
contenido de la ventana derecha si la opción PAP esta encendida.
VENTANA
DERECHA
VENTANA
IZQUIERDA
Operando pantallas PAP con otras características...
Ajustes de Transmisión Captada (Caption)
Si el modo de Caption esta PRENDIDO y su correspondiente información de Caption esta disponible, esta solo se aplicara a la imagen de la izquierda.
Ajuste del Cronometro para Dormir
Si el cronometro para dormir esta activo el indicador se mostrará en la ventana derecha. Este no esta activo en la pantalla de la ventana izquierda.
Ajuste V-Guide
Si la función PAP esta activa el control V-Guide afectará la imagen de la izquierda y derecha individualmente.
Si solamente la imagen de izquierda tiene una clasificación igual o mayor que la clasificación límite del programa, sólo la imagen de la ventana
izquierda será bloqueada.
Si solamente la imagen de derecha tiene una clasificación igual o mayor que la clasificación límite del programa, sólo la imagen de la ventana
derecha será bloqueada.
Si ambas imágenes izquierda / derecha tiene una clasificación igual o mayor que la clasificación límite del programa, ambas imagines
izquierda / derecha serán bloqueadas.
INFORMACION IMPORTANTE: Aunque la imagen de la derecha e izquierda sean intercambiadas la
función de bloqueo de V-Guide seguirá estando activa hasta que esta sea apagada o cancelada.
44 Operación de PAP (Imagen e Imagen)
Page 45

Consejos Utiles (Problemas/Soluciones)
Antes de pedir asistencia, por favor revise de la siguiente tabla la condición que mas se parezca a su problema, entonces trate la solución
para esa condición. Visite nuestro sitio de Internet en www.sanyoctv.com
o llame al numero gratis 1-800-877-5032.
Problema Cheque estas Condiciones Intente estas Soluciones
La TV se apaga
automáticamente.
No Imagen/ Sonido
(Imagen Digital).
Opción Caption no se
puede personalizar.
No Transmisión Captada
(Caption).
Recepción pobre de
Imagen/ Sonido.
Pantalla Azul mostrando
Video1,Video2, Component2,
Component3 o HDMI.
No Sonido o SAP en HDTV.
No selecciona o examina
algunos canales.
No canales de Cable
disponibles arriba del
numero 13.
No sintoniza canales UHF
pero si de VHF.
El Control Remoto no opera
la TV o algún otro equipo
(VCR, Receptor de Cable,
Satélite y DVD).
Palabras en el menú
incorrectas.
El gabinete de la TV hace
ruidos.
●
Revise la conexión de señal (Cable/Ant)
●
Protección contra variaciones de potencia.
●
Presión sobre la tecla de POWER.
●
C
heque la conexión de Antena o Equipo
externo
●
Podría ser un problema de la
transmisora.
●
Podría estar la función MUTE encendida.
●
Carencia de señal Caption Digital.
●
C
señal Caption. Seleccione otro canal
●
C
●
C
equipo externo
●
C
●
Podría ser problema de la estación.
●
Podría estar la función MUTE encendida.
●
C
●
C
externo
●
Cheque las conexiones del equipo
externo.
●
C
.
heque si la estación esta transmitiendo
.
heque si el programa es a colores.
heque las conexiones de Antena o
.
olor o Tinte mal ajustados.
heque las conexiones de Audio/ Video.
heque las conexiones del equipo
.
heque si la estación esta transmitiendo
señal MTS real o SAP.
●
El canal podría haber sido removido de la
memoria
●
Cheque las conexiones de antena.
●
Opción de bloqueo V-Guide activa.
●
El indicador de canal de cable C debe de
.
aparecer a un costado del numero del
canal
.
●
El indicador de canal de cable C no debe
de aparecer a un costado del numero del
canal
.
●
Presione la tecla TV para operar la TV.
●
P
resione la tecla VCR para operar VCR,
CABLE para Cable, SAT para Satélite,
DVD para reproductor de DVD
●
Cheque si las baterías están insertadas.
●
C
heque el equipo externo.
●
Puede un lenguaje distinto estar
seleccionado
●
Esta es una condición normal de los
.
.
gabinetes de plástico durante el
calentamiento o el enfriamiento
.
●
La opción de Cronometro para
Dormir puede estar activa.
●
Desconecte la energía de la TV
momentáneamente.
●
Ajuste la Antena.
●
Seleccione un canal diferente.
●
P
resione la tecla RESET o reinicie
una búsqueda de canales
●
Ajuste el Volumen.
●
P
resione la tecla CAPTION para
seleccionar Caption Analógico
●
P
resione la tecla CAPTION para
activar la función.
●
Seleccione un canal diferente.
●
Adjust antenna.
●
P
resione la tecla RESET o reinicie
una búsqueda de canales
●
Ajuste el Volumen.
●
Presione la tecla INPUT.
●
Intercambie el equipo externo.
●
Iguale las salidas del equipo
externo con las conexiones
de entrada.
●
P
resione la tecla de AUDIO.
●
Seleccione Examinar Canales de
Memoria y manualmente agregue los
canales o inicie una búsqueda.
●
Seleccione la opción V-Guide para
Permitir Todos o presione la tecla
RESET para inicializar y comenzar
búsqueda de canales.
●
Cambie el modo de antena a Prendido.
●
Cambie el modo de antena a Prendido.
●
R
eemplazar las baterías.
●
Dirija el Control Remoto al frente de
la TV o del equipo externo
●
Rei
ngrese los códigos de marca de
su equipo externo
●
Re
seleccione la opción de Lenguaje
.
del Menú usando el menú en
pantalla.
Pagina No.
29
35~36
43
.
41
41
36
.
43
30~34
36
41
42
40
40
35
.
36~38
43
Consejos Utiles (Problemas/Soluciones) 45
Page 46

Mexico Garantía
IMPORTADOR:
COMERCIALIZADORA MEXICO
AMERICANA, S.DE R.L. DE C.V.
AV. NEXTENGO N
COL. SANTA CRUZ ACAYUCAN
DEL. AZCAPOTZALCO, MÉXICO, D.F. C.P. 02770
RFC: CMA9109119L0
o
78
DESCRIPCION: Televisor
MARCA: SANYO
MODELOS: HT27744
HT30744
HT32744
GARANTIA
EL APARATO QUE USTED HA ADQUIRIDO CUENTA CON UNA GARANTIA DE UN AÑO DE SERVICIO A PARTIR DE
LA FECHA DE ADQUISICION OTORGADA POR:
COMERCIALIZADORA MEXICO-AMERICANA, S. DE R.L. DE C.V.
BAJO LAS SIGUIENTES CONDICIONES:
1.- PARA HACER EFECTIVA LA GARANTIA, BASTARA PRESENTAR ESTA POLIZA DEBIDAMENTE SELLADA POR
LA TIENDA O UNIDAD VENDEDORA, JUNTO CON EL APARATO EN LA TIENDA DONDE FUE COMPRADO EL
ARTICULO.
2.- SE COMPROMETE A CAMBIAR EL ARTÍCULO O A DEVOLVER SU DINERO, SI LA FALLA ES ATRIBUIBLE A
DEFECTO DE FABRICACION. DURANTE LOS TREINTA DIAS POSTERIORES A LA COMPRA LA GARANTÍA
SE HARÁ VÁLIDA EN LA TIENDA DONDE ADQUIRIÓ EL PRODUCTO, PRESENTANDO LOS DOCUMENTOS
MENCIONADOS.
3.- EN NINGUN CASO EL TIEMPO DE REPARACIÓN SERÁ MAYOR A 30 DIAS, TRANSCURRIDO ESTE TERMINO,
COMERCIALIZADORA MEXICO AMERICANA, S. DE R.L. DE C.V. PROCEDERÁ A EFECTUAR EL CAMBIO POR UN
APARATO EQUIVALENTE O A LA DEVOLUCIÓN DEL IMPORTE DE COMPRA VENTA RESPECTIVO.
4.- ESTA GARANTÍA AMPARA LA TOTALIDAD DE LAS PIEZAS Y COMPONENTER DEL PRODUCTO Y MANO DE
OBRA DE LA REPARACIÓN, ASÍ COMO GASTOS DE TRANSPORTACIÓN RESPECTIVOS.
ESTA GARANTIA SERA NULA EN LOS SIGUIENTES CASOS:
CUANDO EL PRODUCTO SE HUBIESE UTILIZADO EN CONDICIONES DISTINTAS A LAS NORMALES.
*
CUANDO EL PRODUCTO NO HUBIESE SIDO OPERADO DE ACUERDO CON EL INSTRUCTIVO DE USO QUE SE
*
LE ACOMP AÑA.
CUANDO EL PRODUCTO HUBIESE SIDO ALTERADO O REPARADO POR PERSONAS NO AUTORIZADAS POR EL
*
FABRICANTE NACIONAL, IMPORTADOR O COMERCIALIZADOR RESPONSABLE RESPECTIVO.
CENTRO DE SERVICIO Y LUGAR DONDE OBTENER PARTES,
COMPONENTES, CONSUMIBLES Y ACCESORIOS:
SUCURSAL VALLEJO SUCURSAL MINERVA
Poniente 126 No 288 B Silos No 135, Col. Minerva
SELLO, FECHA Y FIRMA
DE
TIENDA
Col. Nueva Vallejo Deleg. Iztapalapa
México, D.F. México, D.F. 09810
Tels. 5567-5378 Tels. 5646-4551
5368-0105, 8589-8033 5646-4550
DESCRIPCION: ______________________________ MARCA: __________________ MODELO:__________________
NOMBRE DEL CLIENTE: ____________________________________________________________________________
DOMICILIO: ___________________________________________________ No Ext. ___________ No Int. ___________
Col. ____________________________________________ Estado/Deleg: _____________________________________
Tel. _____________________________________________
46 Mexico Garantía
Page 47

Garantía, Estados Unidos y Canadá
GARANTíA LIMITADA POR UN AÑO
ESTA GARANTÍA LIMITADA ES VALIDA UNICAMENTE EN TELEVISORES SANYO COMPRADOS Y USADOS EN LOS
ESTADOS UNIDOS DE AMERICA, CANADÁ Y PUERTO RICO, EXCLUYENDO OTROS TERRITORIOS Y PROTECTORADOS. ESTA GARANTÍA LIMITADA APLICA SOLAMENTE AL COMPRADOR ORIGINAL, Y NO APLICA A OTROS PRODUCTOS
USADOS CON PROPÓSITOS INDUSTRIALES Y COMERCIALES.
POR UN AÑO, a partir de la fecha de compra, Sanyo Manufacturing Corporation, reemplazará cualquier TV.
Para asegurar el intercambio adecuado por garantía, mantenga el recibo original de la compra como evidencia de la
compra. Regrese la TV defectuosa al vendedor, junto con el recibo de compra y los accesorios incluidos, como es el
control remoto. La TV defectuosa será cambiada por una del mismo modelo, o el reemplazo de un modelo igual valor,
sí es necesario. El modelo de reemplazo dependerá de la disponibilidad y de la voluntad de Sanyo Manufacturing
Corporation.
LA ANTERIOR GARANTÍA ES EXCLUSIVA Y EN LUGAR DE OTRAS GARANTÍAS DE MERCANCÍA O CONVENIENTE PARA
UN PROPÓSITO PARTICULAR.
OBLIGACIONES
Por un año a partir de la fecha de compra, Sanyo Manufacturing Corporation garantiza que este producto esta libre de defectos en materiales y mano de obra bajo condiciones normales de uso. El reemplazo solo será necesario bajo esta garantía, por
cualquier razón debido a defecto de manufactura o mal funcionamiento durante el primer año a partir de la fecha de compra
original. Sanyo Manufacturing Corporation proveerá de una TV nueva, vía intercambio al vendedor.
Para asistencia al cliente o en localización de centros de servicio más cercanos a Ud. llame gratis al 1-800-877-5032.
En días hábiles de 7:30 A.M. – 7:00 P.M. Hora del Centro.
Sàbado 7:30 A.M. – 4:00 P.M. Hora del Centro.
Esta garantía le da derechos legales específicos. Usted puede tener otros derechos, los cuales varíar de estado a estado.
(EFECTIVO: Agosto 1, 2002)
Para su protección en caso de robo o pérdida de esté producto, por favor llene la siguiente información requerida y
GUARDELA en un lugar seguro en sus registros personales:
Modelo No. _____________________________________ Fecha de compra _____________________________
Serie No. _____________________________________ Precio de compra_____________________________
(Localizada en la parte posterior)
Lugar de compra _____________________________
AS
Sanyo Manufacturing Corp.
3333 Sanyo Road, Forrest City, AR 72335
Cuidados y Limpieza
Limpieza del Gabinete
La superficie del gabinete puede ser dañada si no recibe un mantenimiento apropiado. Varios productos usados en el hogar como
aerosoles, agentes de limpieza, solventes y ceras pueden causar daños en el acabado de la superficie del gabinete.
1. Desconecte el cordón de potencia antes de limpiar el televisor.
2. Limpie el gabinete con un trapo suave y seco.
Limpieza en la Pantalla del Televisor
1. Utilice un trapo suave ligeamente húmedo con una solución diluida en jabón no alcalino.
Delicadamente limpie la superficie hasta que esté totalmente seca.
Notas : Nunca aplique líquido en aerosol sobre la pantalla, este puede escurrirse y gotear dentro del chasis.
Este puede cuasar fallas en los componentes no cubiertos por la garantía.
Nunca intente pulir para limpiar alguna mancha o utilizar material abrasivo sobre la superficie de la pantalla, ya que con ésta acción
puede dañar permanentemente la superficie de ésta.
Garantía, Estados Unidos y Canadá / Cuidados y Limpieza 47
Page 48

Français Manuel d’Instructions
Bienvenue dans l’univers de Sanyo
Nous vous remercions d’avoir acheté ce téléviseur haute définition Sanyo. Nous avez fait un choix excellent du point de vue du fonctionnement, de la
fiabilité, des caractéristiques, du rapport qualité-prix et du style.
Au propriétaire
Nous sommes conscients que vous avez hâte de commencer à utiliser votre nouveau téléviseur haute définition. Cependant, nous savons aussi que,
pour être en mesure d’en profiter pleinement, vous devez comprendre ses nombreuses caractéristiques. Ce manuel est destiné à vous faire connaître
le fonctionnement complet du téléviseur, mais il n’est pas nécessaire de le lire en entier d’une seule traite. Il a été organisé de façon à vous permettre
de retrouver facilement ce dont vous avez besoin et d’utiliser rapidement votre nouveau téléviseur numérique.
En tant que partenaire d’ENERGY STARMD, Sanyo Manufacturing
Corporation a déterminé que ce produit répond, pour son rende-
ENERGY STAR
ment énergétique, aux normes d’ENERGY STARMD.
Table des matières
Bienvenue dans l’univers de Sanyo . . . . . . . . . . . . . . . . . . . . . . . 48
Mesures de sécurité . . . . . . . . . . . . . . . . . . . . . . . . . . . . . . . . . . . . 49
Entretien et nettoyage . . . . . . . . . . . . . . . . . . . . . . . . . . . . . . . . . . 49
Caractéristiques . . . . . . . . . . . . . . . . . . . . . . . . . . . . . . . . . . . . . . . 50
Fiche technique. . . . . . . . . . . . . . . . . . . . . . . . . . . . . . . . . . . . . . . . 50
Glossaire . . . . . . . . . . . . . . . . . . . . . . . . . . . . . . . . . . . . . . . . . . . . . 51
Pour commencer. . . . . . . . . . . . . . . . . . . . . . . . . . . . . . . . . . . . . . . 52
Arrière de la TVHD – emplacement et fonction des prises . . . . 52
Câblage
Branchement de l’antenne analogique . . . . . . . . . . . . . . . . . . . . 53
Branchement de l’antenne numérique (DTV). . . . . . . . . . . . . . . 53
Configuration du téléviseur . . . . . . . . . . . . . . . . . . . . . . . . . . . . . . . 53
Connexions A/V numériques
Branchement de l’équipement extérieur à la prise
HDMI (avec HDCP) . . . . . . . . . . . . . . . . . . . . . . . . . . . . . . . . . . 54
Branchement d’un décodeurou d’un lecteur DVD
avec sortie DVI à une entrée HDMI (avec HDCP) . . . . . . . . . . 54
Utilisation des prises composant pour brancher un
lecteur DVD ou un autre appareil numérique . . . . . . . . . . . . . . . 55
Connexions A/V analogiques
Utilisation des prises S-vidéo pour brancher un
lecteur DVD ou un magnétoscope aux prises A/V . . . . . . . . . . . 55
Connexions audio
Branchement de la sortie numérique audio à un
amplificateur stéréophonique . . . . . . . . . . . . . . . . . . . . . . . . . . . 56
Branchement des sorties audio à un amplificateur
stéréophonique. . . . . . . . . . . . . . . . . . . . . . . . . . . . . . . . . . . . . . . 56
Branchements typiques pour un cinéma maison . . . . . . . . . . . . 57
Utilisation de la télécommande multimédia
Installation des piles . . . . . . . . . . . . . . . . . . . . . . . . . . . . . . . . . . 58
Programmation de la télécommande. . . . . . . . . . . . . . . . . . . . . . 59
Codes de programmation (magnétoscope,
lecteur DVD, satellite, convertisseur). . . . . . . . . . . . . . . . . . 60~61
Tableau des fonctions des touches de la
télécommande multimédia. . . . . . . . . . . . . . . . . . . . . . . . . . . . . . 61
Réglage et configuration du téléviseur
Comment utiliser le menu à l’écran . . . . . . . . . . . . . . . . . . . . . . 62
Diagramme de navigation du menu . . . . . . . . . . . . . . . . . . . . . . 62
Recherche des canaux . . . . . . . . . . . . . . . . . . . . . . . . . . . . . . . . . 63
Recherche des canaux du câble numérique. . . . . . . . . . . . . . . . . 63
Recherche de canaux numériques additionnels. . . . . . . . . . . . . . 63
Choix de l’antenne. . . . . . . . . . . . . . . . . . . . . . . . . . . . . . . . . . . . 64
Mémoire balayage . . . . . . . . . . . . . . . . . . . . . . . . . . . . . . . . . . . . 64
Réglage du canal initial. . . . . . . . . . . . . . . . . . . . . . . . . . . . . . . . 64
Sous-titrage
Pour affi cher les sous-titres. . . . . . . . . . . . . . . . . . . . . . . . . . . . . 65
Pour personnaliser l’affi chage des sous-titres. . . . . . . . . . . . . . . 65
Menu Réglage
Réglage manuel de l’horloge. . . . . . . . . . . . . . . . . . . . . . . . . . . . 66
Sortie audio numérique . . . . . . . . . . . . . . . . . . . . . . . . . . . . . . . . 66
Haut-parleurs du téléviseur . . . . . . . . . . . . . . . . . . . . . . . . . . . . . 66
Langue du menu . . . . . . . . . . . . . . . . . . . . . . . . . . . . . . . . . . . . . 66
Fonctionnement du Guide V (surveillance parentale) . . . . . . . . 67
Réglage de l’image/du son
Réglage manuel de l’image/du son
Resaltar color. . . . . . . . . . . . . . . . . . . . . . . . . . . . . . . . . . . . . . . . 67
Vitesse de balayage . . . . . . . . . . . . . . . . . . . . . . . . . . . . . . . . . . . 67
Fonctionnement de PAP (image-et-image)
Utilisation de l’image côte-à-côte PAP. . . . . . . . . . . . . . . . . . . . 68
Permutation entre les fenêtres
Gel de la fenêtre PAP . . . . . . . . . . . . . . . . . . . . . . . . . . . . . . . . . 68
Utilisation de l’image côte-à-côte PAP
avec d’autres fonctions . . . . . . . . . . . . . . . . . . . . . . . . . . . . . . . . 68
Dépannage (problèmes/solutions) . . . . . . . . . . . . . . . . . . . . . . . . . 69
Garantie (États-Unis et Canada) . . . . . . . . . . . . . . . . . . . . . . . . . 70
48 Mexico Garantía
Page 49

Mesures de sécurité
Afin d’éviter tout risque d’incendie ou de choc électrique,
n’exposez pas l’appareil à la pluie ni à l’humidité.
Afin d’éviter tout risque de choc électrique, n’enlevez pas le
panneau arrière. L’appareil est entièrement transistorisé et ne
contient aucune pièce remplaçable ou réparable par l’usager.
En cas de problème, confiez l’appareil à un réparateur
qualifié.
Le télécouleur est muni d’un cordon d’alimentation CA à
fiche polarisée dont une lame est plus large que l’autre.
MISE EN GARDE : Pour éviter le risque de choc électrique,
faites correspondre la lame large de la fiche à la fente large
de la prise, puis enfichez à fond. Ceci est une mesure de
sécurité conçue pour ne brancher la fiche que d’une seule
façon sur une prise électrique.
Lorsque vous utilisez le télécouleur avec des jeux vidéo, ne
saturez pas la luminosité ni le contraste.
Avec le temps, ceci pourrait causer l’impression
permanente de l’image du champ de jeu sur l’écran. Ne
placez pas cet appareil sur un chariot, support ou table instable. Il risquerait de tomber, de s’endommager et d’entraîner
de graves blessures.
N’utilisez qu’un chariot, support ou
table recommandé par le fabricant
ou vendu avec l’appareil. Lors de son
installation, suivez les instructions du
fabricant et utilisez les accessoires
d’installation recommandés. Prenez
garde lorsque vous déplacez le télécouleur s’il se trouve sur un chariot. Des arrêts brutaux, une
force excessive et des surfaces inégales peuvent renverser le
chariot et l’appareil.
Lisez attentivement le présent manuel et conservez-le.
Entretien et nettoyage
Nettoyage du coffret
La surface du coffret peut s’endommager si elle n’est pas suffisamment entretenue. De nombreux produits ménagers courants en aérosol, agents de
nettoyage, solvants et polis peuvent endommager définitivement la surface.
1. Débranchez le cordon d’alimentation avant de nettoyer le télécouleur.
2. Nettoyez le coffret à l’aide d’un chiffon doux et sec.
Nettoyage de l’écran du télécouleur
1. Utilisez un chiffon doux imbibé d’une solution savonneuse diluée non alcaline.
Frottez doucement la surface jusqu’à ce qu’elle soit complètement sèche.
Remarques : Ne vaporisez jamais de liquide sur l’écran, car il peut dégoutter sur le châssis et endommager les composants. Ce genre de problème
n’est pas couvert par la garantie.
N’essayez jamais d’enlever une tache ou autre souillure en la polissant; n’utilisez pas non plus de matière abrasive sur l’écran, car
vous risquez d’endommager définitivement sa surface.
Mesures de sécurité / Entretien et nettoyage 49
Page 50

Caractéristiques Fiche technique
◆ Téléviseur haute définition numérique à écran totalement plat 27″
◆
Téléviseur haute définition numérique à grand écran totalement
plat 30″
Téléviseur haute définition numérique à écran totalement plat 32″
◆
◆
Menu trilingue à l’écran
◆
Syntoniseurs numériques et analogiques intégrés
◆
Recherche automatique des canaux
◆
Arrêt automatique
◆
Filtre-peigne numérique à 3 dimensions (pour une meilleure qualité
d’image)
◆
Modulation ajustable de la vitesse du balayage
◆
Puce V pour les codes de classification des films et des émissions
(surveillance parentale)
◆
Sous-titrage : analogique EIA-608A et numérique EIA-708B
◆
Modes audio : DTV – principal et sous
NTSC – stéréo, mono et SAP
◆
Son ambiophonique à l’avant
◆
Graves / Aigus
◆
Hauts-parleurs de 6 x 12 cm à l’avant (deux)
◆
Préréglages d’image/de son du fabricant
◆
Format de l’image : boîte aux lettres, zoom, normal et plein
(HT30744 seulement)
◆
Canal initial (sélection automatique)
◆
Formats de réception – système à deux syntoniseurs : syntoniseur
numérique ATSC intégré pour les canaux terrestres et pour les
canaux de câble non brouillés (ClearQAM); syntoniseur analogique
NTSC pour VHF/UHF ou CATV.
◆
Formats audio : Dolby
MD
Digital pour DTV et analogique pour
NTSC
◆
Images côte à côte PAP (image et image)
◆
Mémoire balayage
◆
Rehaussement des couleurs
◆
Ajustement automatique des tons chair
◆
Reçoit 181 canaux analogiques [canaux VHF 2 à 13 et canaux
UHF 14 à 69; télé par câble 1, 14 à 125] et 99 canaux numériques
◆
Prises d’entrée pour antenne RF : numérique et analogique
◆
Entrée HDMI (interface multimédia haute définition) avec HDCP
(protection du contenu numérique large bande)
◆
Entrée composant vidéo (2 jeux)
◆
Entrée A/V à l’arrière (2 jeux)
◆
Entrée S-vidéo (2 jeux)
◆
Sortie audio numérique optique
◆
Sortie audio (commutable)
◆
Horloge (auto-horloge)
◆
XDS (service élargi de données) : indicatifs des stations, titre de
l’émission, indices d’écoute
◆
Minuterie de sommeil (3 heures)
◆
Télécommande multimédia DTV à 52 touches
Dimensions du tube image (en diagonale) :
Écrans totalement plats : HT27744 – 27 po; HT30744 – 30 po;
HT32744 – 32 po
Résolution d’image : entrée RF – 330, entrée AV – 800
Format de balayage : 1080i
Entrée antenne RF : analogique – 75 ohms, UHF/VHF/télé par
câble numérique – 75 ohms
Aucune réception : le téléviseur s’éteint automatiquement après
15 minutes
En mode vidéo, le téléviseur ne s’éteindra PAS
Alimentation : 120 V CA, 60 Hz
Consommation : 140 watts
Son : Deux haut-parleurs de 6 x 12 cm
Amplificateur : Intégré avec 5 W/canal
Prises et connecteurs :
Entrée vidéo 1 : S-vidéo 1, audio et vidéo (G/D)
Entrée vidéo 2 : S-vidéo 2, audio et vidéo (G/D)
Entrée composant 2 : composant (Y/Pb/Pr) avec entrée partagée
vidéo 2 audio G/D
Entrée composant 3 : composant (Y/Pb/Pr) avec entrée audio 3 G/D
Sortie audio numérique : S/P DIF ou PCM
Sortie audio analogique : audio G/D
Entrée HDMI : connecteur à 19 broches (image/son)
Connecteur d’entretien : Pour usage technique seulement
Dimensions et poids (approximatifs) :
HT27744
Dim. horizontale (largeur) : 30,3 po (770 mm)
Dim. verticale (hauteur) : 23,0 po (585 mm)
Profondeur : 19,5 po (496 mm)
Poids : 103,5 lb (47,0 kg)
HT30744
Dim. horizontale (largeur) : 35,7 po (908 mm)
Dim. verticale (hauteur) : 22,5 po (572 mm)
Profondeur : 21,8 po (553 mm)
Poids : 132,2 lb (60,0 kg)
HT32744
Dim. horizontale (largeur) : 35,0 po (888 mm)
Dim. verticale (hauteur) : 27,0 po (687 mm)
Profondeur : 22,4 po (570 mm)
Poids : 143,4 lb (65,1 kg)
Renseignements au sujet des marques de commerce :
Fabriqué sous licence de Dolby Laboratories. « Dolby » et le
symbole du double D sont des marques de commerce de Dolby
Laboratories.
Ce symbole sur la plaque d’identification indique que le produit est
approuvé par Underwriters Laboratories Inc. Il a été conçu et fabriqué
selon les normes strictes de sécurité UL contre les risques d’incendie, de
blessures et de chocs électriques.
50 Caractéristiques / Fiche technique
Page 51

Glossaire
Ambiophonie (avant) – Cette caractéristique ajoute une nouvelle
dimension à l’expérience acoustique et aide à améliorer la qualité du
son cinéma.
Analogique – Se réfère généralement aux normes courantes de transmission NTSC pour les téléviseurs.
ATSC – Advanced Television Standards Committee (comité établissant des normes numériques)
Balayage entrelacé – Processus permettant de balayer deux images et
de les combiner (entrelacer) pour produire une seule image.
Balayage progressif – Processus permettant de balayer les lignes en
séquence. Un champ produit une image.
Boîte aux lettres – Une image grand écran 16:9 affichée
sur un écran 4:3. Des bordures noires apparaissent en haut
et en bas de l’écran (l’image ne remplit pas l’écran en
hauteur).
Canal virtuel – Canal diffusé avec des renseignements majeurs et
mineurs contenus dans le paquet PSIP. Le nombre de canaux virtuels
envoyés par un diffuseur dépend de la résolution de la programmation.
Canaux numériques ClearQAM – Il s’agit de canaux de câble
numérique non brouillés. Les compagnies de câble peuvent choisir de
fournir ou de ne pas fournir ces canaux ClearQAM.
Décodeur – Un dispositif qui reçoit et qui convertit des signaux pour
affichage sur l’écran d’un téléviseur (numérique ou analogique). De
nombreux décodeurs numériques ont des syntoniseurs de câble et
d’antenne.
Diffusion simultanée – Poste qui diffuse une émission simultanément
sur un canal analogique et sur un canal numérique. Cela est exigé par
le FCC pendant la transition de l’analogique vers le numérique.
MD
Dolby
norme pour les systèmes de son ambiophonique à 5,1 canaux (avant
G/D, arrière G/D, centre et grave) pour la télévision numérique.
« Downconverting » – Un processus servant à réduire le nombre
de pixels d’une image. La fréquence des images et/ou le format de
balayage peut aussi être modifié. Les diffuseurs utilisent parfois ce
processus pour créer de l’espace pour des services additionnels dans
leur bande passante.
DTV (Digital Television) – Télévision numérique. Composée de trois
éléments : TVHD, TVDE, et TVDN.
DVI (Digital Video Interface) – Interface vidéo numérique. Conçue
pour accommoder des signaux analogiques et des signaux numériques
sans compression avec un seul connecteur.
Format « timbre-poste » – Ce terme est utilisé pour décrire une image
4:3 que le diffuseur a convertie en une image 16:9 et
affichée sur un écran 4:3. Des bordures noires apparaissent en haut, en bas, à gauche et à droite de l’écran
(l’image ne remplit l’écran ni en largeur ni en hauteur).
Voir la fonction Zoom ci-dessous.
Grand écran – Utilisé pour décrire un ratio de forme de 16:9 ou plus.
Un ratio de forme de 16:9 est standard pour la programmation TVHD.
Les écrans de cinéma sont parfois légèrement plus larges (souvent 2:1).
HDCP (High-bandwidth Digital Content Protection) – Protection
du contenu numérique large bande. Une méthode pour protéger le
contenu des émissions numériques couvert par des droits d’auteur.
HDMI (High Definition Multimedia Interface) – Interface multimédia haute définition. Le HDMI est une nouvelle norme de branchement entre les dispositifs A/V, tels que les décodeurs, les lecteurs
DVD ou les récepteurs A/V, et un téléviseur numérique. Le HDMI
offre une qualité exceptionnelle du son et de l’image, avec un seul
connecteur facile à débrancher. Le HDMI supporte des transmissions
audio numériques à multiples canaux et une gradation des couleurs
Digital (autrefois connu sous le nom de Dolby AC-3) – Une
composant vidéo pour un véritable rendu de vidéo haute définition. Il
supporte la norme de protection HDCP, permettant la transmission de
contenu numérique protégé contre la copie à votre téléviseur.
Indicateur de syntoniseur – Les lettres D, C ou DC apparaîtront
immédiatement à gauche du numéro du canal.
Les canaux d’antenne choisis avec le syntoniseur numérique
(DTV) auront le préfixe D.
Les canaux choisis avec le syntoniseur analogique (NTSC) auront
soit le préfixe C (canaux de câble analogiques) ou n’auront aucun
préfixe (canaux d’antenne, UHF/VHF).
Les canaux de câble numérique ClearQAM auront le préfixe
DC.
Largeur de bande – La gamme de fréquences assignées à un canal.
Un canal de télévision a une largeur de bande de 6 MHz.
Multi-diffusion – La division du signal de diffusion d’une station en
sous-canaux de programmation ou de services de données.
NTSC – National Television Systems Committee (comité établissant
les normes analogiques).
OSD (On-Screen Display) – Affichage à l’écran.
PCM (Pulse Code Modulation) – Modulation par codage
d’impulsions. Il s’agit d’un format de signal numérique binaire utilisé
pour numériser des données analogiques.
« Pillarbox » – Une image 4:3 affichée sur un écran 16:3. Des
bordures noires apparaissent à gauche et à droite de
l’écran (l’image ne remplitpas l’écran en largeur).
PSIP (Program and System Information Protocol)
– Protocole de renseignements sur le programme et le système. Il
s’agit d’une collection de tables conçues pour fonctionner dans tous
les flots de données lors des diffusions DTV. Le PSIP comprend des
instructions qui indiquent au téléviseur l’apparition prochaine d’un
changement ainsi que l’emplacement de la programmation des canaux
virtuels.
Ratio de forme – ce terme décrit le rapport largeur-hauteur de l’écran
d’un téléviseur, indépendamment des dimensions de l’écran (largeur de
x unités sur hauteur de x unités).
S/P DIF – S/P DIF est un format audio numérique qui peut transmettre
un flux binaire Dolby Digital. En branchant cette sortie à un récepteur
A/V qui inclut un décodeur Dolby Digital, vous pouvez reproduire
jusqu’à 5,1 canaux de son ambiophonique. S/P DIF peut aussi transmettre du son PCM.
Spectre – Une gamme continue de fréquences.
Terrestre – Une diffusion directe vers une antenne.
Touche TUNER – Cette fonction sert à permuter les systèmes de
syntonisation, entre les canaux numériques et les canaux analogiques.
TVDE – Télévision à définition étendue (480p).
TVDN – Télévision à définition normalisée (480i).
TVHD – Télévision haute définition (1080i et 720p).
« Upconverting » - Un processus permettant d’augmenter le nombre
de pixels dans une image (peut inclure la modification de la fréquence
des images et du format de balayage. Des pixels supplémentaires sont
ajoutés entre les pixels existants pour tenter de simuler la TVHD. Ce
processus n’augmente pas la résolution.
Zoom – Agrandit le centre de l’image. Par
exemple, si vous avez une image de format
« timbre-poste », appuyez sur cette touche pour
agrandir l’image.
Glossaire 51
Page 52

Pour commencer
Ce nouveau téléviseur haute définition numérique est capable de reproduire une image parfaitement claire et un son exceptionnel.
C’est comme si vous y étiez!
Pour tirer le meilleur rendement de ce téléviseur haute définition, vous devrez…
1. Choisir le meilleur câblage, page 53.
2. Brancher l’équipement externe, au besoin, pages 54 à 57.
3. Installer des piles dans la télécommande et passer en revue ses fonctions, pages 58 à 59.
4. Programmer la télécommande afin qu’elle puisse activer d’autres équipements, au besoin, pages 59 à 61.
5. Suivre le menu à l’écran pour personnaliser et configurer les caractéristiques, pages 62 à 67.
Remarque : Pour obtenir de l’aide supplémentaire, veuillez consulter le Guide rapide de départ afin de connaître l’effet des signaux
et de l’équipement extérieur sur la qualité de l’image. Suivez les exemples que vous y trouverez afin de vous assurer
d’obtenir la meilleure image possible, selon les capacités de votre équipement externe et la qualité de votre signal.
Arrière de la TVHD – emplacement et fonction des prises
➀
COMPONENT VIDEO INPUT
ANALOG
AUDIO
OUTPUT
L
R
Y
P
b
P
r
COMPO 3
COMPO 2
➄
Entrée composant vidéo (COMPO 2) – Branchez
➀
l’équipement vidéo numérique aux prises Y, Pb, Pr, et Video 2
Audio G/D. Ces prises détecteront automatiquement le type de
signal reçu (TVHD, TVDE, TVDN).
Entrée S-vidéo (Vidéo 1 et 2) – Pour améliorer les détails
➁
vidéo, utilisez les prises S-vidéo (Vidéo 1 et 2) au lieu des
prises vidéo, si votre équipement extérieur en est doté. (Les
connexions S-vidéo remplaceront celles des prises d’entrée
Vidéo 1 et 2.)
Sortie audio numérique – Connexion optique pour les
➂
systèmes de cinéma maison évolués Dolby
Entrée HDMI (interface multimédia haute définition)
➃
Branchez l’équipement vidéo numérique à cette prise. Un
seul câble à large bande (non inclus) est nécessaire pour relier
l’équipement audio/vidéo à ce téléviseur. Cette prise est compatible avec les appareils équipés de DVI. (Un branchement
audio séparé est requis pour les appareils DVI.)
➅
AUDIO 3
VIDEO 2
MD
Digital 5.1 stéréo.
➁
➆
S-VIDEO
VIDEO
L
(MONO)
AUDIO
R
VIDEO 1
➃
➂
UHF/VHF/CATV
DIGITAL
ANTENNA IN
HDMI
INPUT
DIGITAL
AUDIO
OUTPUT
SERVICE
➇➈➉
Prises de sortie audio analogiques (G/D) – Branchez
➄
l’équipement audio extérieur ici. (Voir page 56.)
Entrée composant vidéo (COMPO 3) – Branchez
➅
l’équipement vidéo numérique aux prises Y, Pb, Pr, et Audio 3
(G/D). (Voir page 55.) Ces prises détecteront automatiquement
le type de signal reçu (TVHD, TVDE, TVDN).
Prises audio/vidéo (AV1/AV2) – Branchez l’équipement vidéo
➆
standard ici. (Voir page 55.)
Remarque : Les connexions S-vidéo 1/2 remplacent les
connexions vidéo AV 1/2.
Entrée pour antenne analogique (UHF/VHF/CATV) – Bran-
➇
chez une antenne RF, le câble ou un récepteur de satellite à
cette prise, tel qu’illustré à la page 53.
Entrée pour antenne numérique – Branchez une antenne RF
➈
à cette prise, tel qu’illustré à la page 53.
Connexion d’entretien –Pour usage technique seulement.
➉
52 Mexico Garantía
Page 53

First
Please connect all signals
and antennas to jacks and
the terminals on the back.
Then press the Channel UP key.
Câblage
Please wait,
Automatic clock setting.
Press Channel UP Key to cancel.
Branchement de l’antenne analogique RF
Branchez le câble analogique, l’antenne RF ou un
récepteur de satellite au connecteur analogique de
75 ohms (UHF/VHF/CATV).
Branchement de l’antenne numérique
(DTV)
Branchez l’antenne RF au répartiteur, puis au
connecteur d’entrée de l’antenne numérique.
Remarque : l’antenne RF peut
CÂBLE
RÉCEPTEUR DE SATELLITE
CH3
CH4
Remarque : si vous
CATV IN
OUT TO TV
ANTENNE RF
L- -RAUDIOVIDEO
S-VIDEO
IN FROM
SAT.
L- -RAUDIOVIDEO
SIGNAL
ANALOGIQUE
TV BACK
SIGNAL
NUMÉRIQUE
RÉPARTITEUR
être branchée directement au
connecteur de 75 ohms. Dans
des zones périphériques de
réception, il peut être préférable
de brancher des antennes RF
séparées.
n’avez pas de magnétoscope, branchez le
signal directement au
connecteur de 75 ohms
du téléviseur.
IN
FROM ANT.
OUT
OUT TO TV
MAGNÉTOSCOPE
HDMI
INPUT
ARRIÈRE DU TÉLÉVISEUR
COMPONENT VIDEO INPUT
ANALOG
AUDIO
OUTPUT
L
R
Y
Pb
Pr
COMPO 3
COMPO 2
AUDIO 3
VIDEO 2
S-VIDEO
VIDEO
L
(MONO)
AUDIO
R
VIDEO 1
UHF/VHF/CATV
DIGITAL
ANTENNA IN
DIGITAL
AUDIO
OUTPUT
SERVICE
Pour brancher un décodeur de câble haute définition ou de satellite, voir les page 54.
Conseils
■
Le téléviseur choisit
automatiquement le mode
d’antenne correct selon
le type de signal RF
analogique reçu.
■
Utilisez « Choix
antenne » dans le menu
Réglage pour choisir le
mode d’antenne.
■
Le téléviseur
s’arrête automatiquement s’il reste plus de 15
minutes sans recevoir de
signal (absence de signal
de télé par câble ou
station n’émettant plus).
Exception : Si vous choisissez un mode Vidéo, le
téléviseur ne s’arrête pas
automatiquement s’il reste
15 minutes sans recevoir
de signal.
■
Si vous déplacez le
téléviseur, appuyez
deux fois sur la touche
RESET après le câblage
et l
a mise en marche du
téléviseur.
Besoin d’aide?
Visitez notre site Web à
www.sanyoctv.com
ou appelez le
1 800 877-5032
Configuration du téléviseur
REMARQUE : Lorsque le téléviseur est mis en marche pour la première fois, il vérifie automatiquement
qu’un signal d’entrée RF est branché. Si vous avez effectué tous les branchements nécessaires, continuez comme suit…
1. Appuyez sur la touche CHANNEL UP pour rechercher automatiquement les canaux disponibles numériques
(DTV) et analogiques (NTSC). La recherche des canaux met en jeu deux processus qui sont exécutés simultanément pour les canaux numériques et analogiques : cette étape peut donc prendre quelques minutes.
REMARQUES :
Le message apparaissant à l’écran pendant la recherche des canaux numériques affiche le
numéro du canal, une barre d’avancement, et un pourcentage pour indiquer l’avancement du
balayage. Veuillez être patient car ce processus peut prendre quelques minutes.
Les renseignements sur les canaux trouvés pendant la recherche sont sauvegardés dans la
mémoire balayage. Le téléviseur haute définition sera syntonisé au canal numérique le plus bas,
ou au canal analogique le plus bas si aucun canal numérique n’est trouvé.
2. Pour modifier le réglage initial de la syntonisation analogique (de l’antenne au câble ou vice-versa), utilisez le
menu à l’écran, Voir « Choix de l’antenne » à la page 64.
3. Une fois le choix des canaux complété, le téléviseur procédera au réglage automatique de l’horloge. Cette fonc-
tion recherche une station PBS locale qui émet un signal de service étendu des données. Ce signal transmis est
utilisé pour régler automatiquement l’heure et le jour. (Cela peut prendre plusieurs secondes.)
Pour annuler le réglage automatique de l’horloge, appuyez sur la touche CHANNEL UP. (Pour le réglage
manuel de l’horloge, voir à la page 66.)
Câblage : Numérique/Analogique / Configuration du téléviseur 53
First
Please connect all signals
and antennas to jacks and
the terminals on the back.
Then press the Channel UP key.
Prière d’attendre alors que votre
téléviseur cherche les chaînes
disponibles.
50%
Antenne digital 35
Please wait,
Automatic clock setting.
Press Channel UP Key to cancel.
Page 54

INPUT
RESET
POW ER
Connexions A/V numériques
Conseils
■
Si la configuration des
broches HDMI de votre
téléviseur est différente de
celle de votre décodeur,
vous devrez utiliser un
adaptateur pour l’étape 1
du branchement.
Pour brancher une prise
DVI à une prise HDMI,
vous devrez utiliser un
câble DVI à HDMI ou un
adaptateur pour l’étape 1
du branchement.
Avec une connexion DVI,
assurez-vous de brancher
la sortie audio à l’entrée
Compo3 audio du
téléviseur.
Parce que les prises com-
posant audio (Compo3)
sont utilisées pour
recevoir le signal audio
du dispositif DVI, les
prises Compo3 vidéo ne
peuvent pas être utilisées
lorsqu’un dispositif DVI
est branché.
Besoin d’aide?
Visitez notre site Web à
www.sanyoctv.com
ou appelez le
1 800 877-5032
FAIT IMPORTANT :
L’utilisation de
HDCP (protection
du contenu haute
définition) peut
vous empêcher de
copier du matériel
dont le contenu est
protégé par les droits
d’auteur.
TÉLÉCOMMANDE
TV
POWER
CABLE
AUXSAT
RESET
❺
❻
VCR
DVD
INPUT
Appuyez sur la
touche INPUT après le
branchement des câbles afin
d’accéder aux entrées A/V.
Il n’est PAS nécessaire de
syntoniser un canal nul.
La meilleure option pour l’image et le son! L’utilisation de la connexion HDMI, dotée de la protection du contenu
numérique, vous offre un signal audio et vidéo numérique sans compression. C’est comme si vous y étiez!
Branchement de l’équipement extérieur à la prise HDMI
(comprend la protection du contenu HDCP)
Pour vous éviter des problèmes avec certaines marques d’équipement extérieur, suivez cette procédure lorsque.
Éteignez le téléviseur et léquipement extérieur avant de brancher le câble. (Le câble nest pas fourni.)
❶
Branchez la sortie HDMI à large bande de léquipement extérieur à lentrée HDMI du téléviseur. Un seul
❷
câble est nécessaire pour ce branchement, qui comprend du vidéo sans compression et le son Dolby 5.1 ou
PCM.
Le téléviseur doit être mis en marche en premier,
❸
en appuyant sur la touche POWER.
Mettez ensuite votre équipement extérieur en
❹
marche.
Appuyez sur la touche INPUT pour sélectionner
❺
HDMI, afin de voir les émissions numériques.
Équipement nécessaire pour le branchement :
Câble numérique HDMI à 19 broches – 1
❷
(Assurez-vous de vérifier la configuration des
broches*)
*Un adaptateur peut être requis
A/V OUT
(480i)
VIDEO
S-VIDEO
L
OUT
AUDIO
R
COMPONENT OUT
DIGITAL
(1080i/720p/480p)
AUDIO OUT
HDMI
OUTPUT
Y
COAXIAL
B
P
PR
❷
COMPONENT VIDEO INPUT
ANALOG
AUDIO
Y
OUTPUT
Pb
L
Pr
R
COMPO 3
AUTHORIZED
SERVICE ONLY
RGB OUT
(1080i/720/480p)
AUDIO 3
COMPO 2
DÉCODEUR
CÂBLE HDMI
S-VIDEO
VIDEO
L
(MONO)
AUDIO
R
VIDEO 2
VIDEO 1
❷
UHF/VHF/CATV
DIGITAL
ANTENNA IN
Branchement d’un décodeur avec sortie DVI à une entrée HDMI
(comprend la protection du contenu HDCP)
L’utilisation d’un câble DVI à HDMI donne une image de meilleure qualité qu’une connexion standard composant
ou composite, mais une connexion audio séparée est nécessaire pour la réception du son.
Pour vous éviter des problèmes avec certaines marques d’équipement extérieur, suivez cette procédure lorsque.
Éteignez le téléviseur et le décodeur avant de brancher les câbles. (Les câbles ne sont pas fournis.)
❶
Branchez la sortie DVI du décodeur à un câble DVI à HDMI, puis branchez le câble à l’entrée HDMI du
❷
téléviseur.
Remarque : Vérifiez avec votre magasin de fournitures électroniques pour obtenir un câble DVI à
Branchez la sortie audio G/D du décodeur à l’entrée composant 3 audio G/D.
❸
Le téléviseur doit être mis en marche en premier, en appuyant sur la touche POWER.
❹
Mettez ensuite votre équipe-
❺
ment extérieur en marche.
Appuyez sur la touche
❻
INPUT pour sélectionner
HDMI, afin de voir les
émissions numériques.
❸
❹
Équipement nécessaire
pour le branchement :
Câble DVI à HDMI – 1
❷
Câble audio – 1
❸
HDMI qui convient à votre équipement et à votre téléviseur.
COMPONENT OUT
DIGITAL
A/V OUT
(1080i/720p/480p)
AUDIO OUT
(480i)
VIDEO
COAXIAL
S-VIDEO
OUT
❸
ARRIÈRE DE LA
TVHD PRISES
ARRIÈRE
COMPONENT VIDEO INPUT
ANALOG
AUDIO
Y
OUTPUT
Pb
L
R
Pr
COMPO 3
Y
P
P
COMPO 2
AUTHORIZED
DVI
SERVICE ONLY
OUTPUT
B
R
RGB OUT
(1080i/720/480p)
❷
CÂBLE DVI À
HDMI
❸
S-VIDEO
AUDIO 3
VIDEO 2
VIDEO
L
(MONO)
AUDIO
R
VIDEO 1
DÉCODEUR
❷
UHF/VHF/CATV
DIGITAL
ANTENNA IN
HDMI
INPUT
DIGITAL
AUDIO
OUTPUT
SERVICE
HDMI
INPUT
DIGITAL
AUDIO
OUTPUT
SERVICE
54 Branchement HDMI / Branchement d’un décodeur DVI à HDMI
Page 55

Utilisation des prises composant pour brancher un
INPUT
RESET
POW ER
lecteur DVD ou un autre appareil numérique
Les prises composant vidéo acceptent le contenu vidéo provenant de
TVHD, TVDE, TVDN.
Éteignez le téléviseur et le décodeur avant de brancher les câbles. (Les
câbles ne sont pas fournis.)
Suivez les étapes suivantes pour brancher facilement votre décodeur
numérique ou votre lecteur DVD à ce téléviseur haute définition :
Branchez la sortie composant vidéo de votre lecteur DVD ou de
❶
l’autre appareil numérique à l’entrée composant vidéo (Compo3 ou
Compo2) du téléviseur.
Branchez la sortie audio du lecteur DVD ou de l’autre appareil
❷
numérique à l’entrée composant 3 audio ou audio 2 (vidéo 2) du
téléviseur.
❸ Appuyez sur la touche POWER pour mettre le téléviseur en
marche, et mettez ensuite votre appareil extérieur en marche.
❹ Appuyez sur la touche INPUT pour sélectionner COMPONENT3
ou COMPONENT2, afin de voir les émissions numériques.
Remarque : Utilisez l’autre jeu de prises composant audio
vidéo pour brancher de l’équipement extérieur
numérique additionnel.
LECTEUR DVD
VIDEO OUT SELECT
S
OPT.
COPONENT
S-VIDEO OUT
DIGITAL
OUT
COMPONENT VIDEO OUT
Y
BPR
P
RL
AUDIO OUT
❶
VIDEO OUT
❷
ARRIÈRE DU TÉLÉVISEUR
PRISES COMPOSANT
COMPONENT VIDEO INPUT
ANALOG
❶
AUDIO
OUTPUT
L
R
Y
P
b
P
r
COMPO 3
AUDIO 3
COMPO 2
❷
DIGITAL
A/V OUT
AUDIO OUT
(480i)
VIDEO
DIGITAL AUDIO
ANT LOOP OUT
OUTPUT
(OPTICAL)
SELECTION
YPbPr RGB
ANT IN
COAXIAL
OUT
S-VIDEO
L
OUT
AUDIO
R
VIDEO 2
COMPONENT OUT
(1080i/720p/480p)
Y
P
P
É
quipement nécessaire pour le
branchement :
Câble composant vidéo – 1 (2)
❶
Câble audio – 1 (2)
❷
HDMI
INPUT
DIGITAL
DIGITAL
ANTENNA IN
AUDIO
OUTPUT
SERVICE
S-VIDEO
VIDEO
L
(MONO)
AUDIO
R
VIDEO 1
UHF/VHF/CATV
❷
❶
AUTHORIZED
HDIM
SERVICE ONLY
OUTPUT
RGB OUT
B
R
(1080i/720/480p)
ARRIÈRE DU DÉCODEUR
CÂBLE OU SATELLITE
❶
Connexions A/V analogiques
Utilisation des prises S-vidéo pour brancher un lecteur
DVD et un magnétoscope aux prises A/V
Éteignez le téléviseur et le décodeur avant de brancher les câbles. (Les
câbles ne sont pas fournis.) Suivez les étapes suivantes pour brancher
facilement votre lecteur DVD ou votre magnétoscope.
Branchez la sortie S-vidéo de votre lecteur DVD ou de l’autre
❶
appareil extérieur à l’entrée S-vidéo 1 ou 2 du téléviseur.
Remarque : les prises S-vidéo ont la priorité sur les prises vidéo.
② Facultatif
Branchez la sortie audio vidéo du magnétoscope à l’entrée audio
vidéo 1 ou 2 du téléviseur.
Pour un magnétoscope mono (prise audio simple), branchez la sortie
audio du magnétoscope à l’entrée audio (G) du téléviseur.
❸ Appuyez sur la touche POWER pour mettre le téléviseur en
marche, et mettez ensuite votre appareil extérieur en marche.
❹ Appuyez sur la touche INPUT pour sélectionner VIDEO1 ou
VIDEO2, afin de voir les programmes sur le lecteur DVD ou sur le
magnétoscope.
Remarques :
Les prises AV1 et AV2 ont des fonctions identiques. Tout
appareil vidéo compatible peut être branché à l’un ou l’autre
jeu de prises.
Un écran bleu uni où apparaît le mot VIDEO1 ou VIDEO2
signifie que le mode vidéo est sélectionné mais qu’aucun
signal n’est détecté par les prises vidéo. Vérifiez les
branchements et mettez l’appareil extérieur en marche.
Les prises composite n’offrent que la résolution 480i
(TVDN).
Appuyez sur la touche
INPUT après le branchement
des câbles afin d’accéder aux
entrées A/V.
Il n’est PAS nécessaire de
syntoniser un canal nul.
ARRIÈRE DU MAGNÉTOSCOPE
IN
IN
OUT
R-AUDIO-L VIDEO
R-AUDIO-L
FROM ANT.
VHF/UHF
RF
TO TV
CHANNEL
3 4
OUT
VIDEO
❶
COMPONENT VIDEO INPUT
ANALOG
AUDIO
Y
OUTPUT
L
Pb
R
Pr
COMPO 3
PRISES D’ENTRÉE AV
DU TÉLÉVISEUR
COMPO 2
AUDIO 3
VIDEO 2
❹
S-VIDEO
VIDEO
L
(MONO)
AUDIO
R
VIDEO 1
TÉLÉCOMMANDE
VCR
DVD
INPUT
123
123
②
OPT.
S-VIDEO OUT
DIGITAL
OUT
②
UHF/VHF/CATV
②
CABLE
TV
AUXSAT
POWER
RESET
LECTEUR DVD
COMPONENT VIDEO OUT
Y
B PR
P
VIDEO OUT SELECT
S
COPONENT
AUDIO OUTRLVIDEO OUT
②
HDMI
INPUT
DIGITAL
AUDIO
OUTPUT
DIGITAL
ANTENNA IN
SERVICE
❸
Connexions analogiques : prises S-vidéo et A/V 55
Page 56

INPUT
RESET
POWER
Branchements audio
Branchement de la sortie audio numérique à un amplificateur extérieur
Conseils
■
Placez votre téléviseur
à au moins 2 pieds des
haut-parleurs de votre
système de son. Les
aimants des hautparleurs peuvent affecter
la qualité de l’image.
Besoin d’aide?
Visitez notre site Web à
www.sanyoctv.com
ou appelez le
1 800 877-5032
Équipement nécessaire pour le
branchement :
Câble numérique audio
❶
optique – 1
TÉLÉCOMMANDE
TV
POWER
CABLE
AUXSAT
RESET
VCR
DVD
INPUT
L’utilisation de cette connexion numérique optique minimise les parasites d’origine électrique afin d’aider à assurer
un transfert de signal de haute qualité.
Éteignez le téléviseur et l’équipement extérieur avant de brancher les câbles. (Les câbles ne sont pas fournis.)
Assurez-vous d’enlever le capuchon protecteur avant de brancher le câble à la prise numérique optique du téléviseur.
MISE EN GARDE : NE regardez PAS directement la lumière laser.
Branchez une extrémité du câble optique à la sortie audio numérique du téléviseur, et l’autre extrémité à l’entrée
❶
numérique optique de l’amplificateur.
❷ Appuyez sur la touche POWER pour mettre le téléviseur en marche, et mettez votre équipement extérieur en
marche par la suite.
Remarques :
NE branchez JAMAIS de haut-parleurs extérieurs directement au téléviseur.
Lorsque les haut-parleurs du téléviseur sont en mode ON, le son sera reproduit par le truchement
de votre téléviseur et de votre amplificateur stéréophonique.
Lorsque les haut-parleurs du téléviseur sont en mode OFF, le son sera reproduit uniquement par
votre amplificateur stéréophonique. (Voir la page 66 pour le réglage des haut-parleurs du
téléviseur.)
ARRIÈRE DU TÉLÉVISEUR
COMPONENT VIDEO INPUT
ANALOG
AUDIO
OUTPUT
L
R
❷
Y
P
b
P
r
COMPO 3
COMPO 2
AUDIO 3
VIDEO 2
S-VIDEO
VIDEO
L
(MONO)
AUDIO
R
VIDEO 1
❶
UHF/VHF/CATV
DIGITAL
ANTENNA IN
CÂBLE NUMÉRIQUE
HDMI
OPTIQUE
INPUT
DIGITAL
AUDIO
OUTPUT
SERVICE
❶
123
123
Branchement des sorties audio à un amplificateur
stéréophonique
Éteignez le téléviseur et l’équipement extérieur avant de brancher les
câbles. (Les câbles ne sont pas fournis.)
Branchez la sortie audio (G/D) du téléviseur à l’entrée de
❶
l’amplificateur stéréophonique (G/D).
❷ Appuyez sur la touche POWER pour mettre le téléviseur en marche,
et mettez votre équipement extérieur en marche par la suite.
Remarques :
NE branchez JAMAIS de haut-parleurs extérieurs directe-
ment au téléviseur.
Lorsque les haut-parleurs du téléviseur sont en mode ON,
le son sera reproduit par le truchement de votre téléviseur
et de votre amplificateur stéréophonique.
Lorsque les haut-parleurs du téléviseur sont en mode
AMPLIFICATEUR STÉRÉOPHONIQUE
OFF, le son sera reproduit uniquement par votre amplificateur stéréophonique. (Voir la page 66 pour le réglage des
haut-parleurs du téléviseur.)
56 Branchement de l’audio numérique ou analogique à un amplificateur stéréophonique
AMPLIFICATEUR STÉRÉOPHONIQUE
Équipement nécessaire pour le branchement :
Câble audio – 1
❶
COMPONENT VIDEO INPUT
❶
ANALOG
AUDIO
OUTPUT
L
R
Y
Pb
Pr
COMPO 3
COMPO 2
AUDIO 3
VIDEO 2
ARRIÈRE DU TÉLÉVISEUR
VIDEO 1
VIDEO
(MONO)
AUDIO
S-VIDEO
L
R
UHF/VHF/CATV
DIGITAL
ANTENNA IN
HDMI
INPUT
DIGITAL
AUDIO
OUTPUT
SERVICE
Page 57

Branchements typiques pour un cinéma maison
COMPONENT OUT
DIGITAL
A/V OUT
AUDIO OUT
(1080i/720p/480p)
L
R
Y
B
P
PR
RJ11/
PHONE
AUTHORIZED
SERVICE ONLY
Récepteur de satellite
HDMI
INPUT
OPTICAL
DIGITAL INPUT
IN IN OUT
L
R
CD TAPE
IN OUT
DVD SAT VCR TV
CENTER SPEAKER (8Ω)
L
R
SUBWOOFER (8Ω)
FRONT SPEAKERS (8Ω)
REAR SPEAKERS (8Ω)
VIDEO
AUDIO
Système de son
ambiophonique
OUT
(480i)
HDMI
S-VIDEO
VIDEO
OUT
AUDIO
IN
Convertisseur de télé par câble/
VIDEO S-VIDEO COMPONENT VIDEO
YCb Cr
VIDEO OUTPUT
Lecteur DVD
COMPONENT VIDEO INPUT
ANALOG
AUDIO
OUTPUT
L
R
L
ANALOG
AUDIO
R
AUDIO OUTPUT
Y
Pb
Pr
COMPO 3
COMPO 2
AUDIO 3
VIDEO 2
S-VIDEO
VIDEO
L
(MONO)
AUDIO
R
VIDEO 1
UHF/VHF/CATV
IN
OUT
R-AUDIO-L VIDEO
R-AUDIO-L
ANTENNA IN
VIDEO
Magnétoscope
analogique
DIGITAL
RF
CHANNEL
34
DIGITAL
AUDIO
OUTPUT
SERVICE
IN
FROM ANT.
VHF/UHF
TO TV
OUT
Antenne
numérique
Répartiteur
Répartiteur
Câble
analogique
ou antenne
VHF/UHF
AUDIO OUTPUT
ANALOG
AUDIO
S-VIDEOVIDEO
VIDEO OUTPUT
YCb
Cr
COMPONENT VIDEO
VIDEO OUTPUT
Magnétoscope numérique
ANT IN
SAT IN
HD
L
R
Branchements typiques pour un cinéma maison 57
Page 58

AUDIO
SLEEP
PIX SHAPE
RECALL
CAPTION
INFO
POWER
Utilisation de la télécommande multimédia
Vous n’avez besoin que d’une seule télécommande pour utiliser votre téléviseur et
tout autre équipement. Suivez simplement les instructions aux pages 59 à 61.
Installation des piles tel qu’illustré (2 AA, non fournies)
Remarques :
N’utilisez pas en même temps des piles usagées et des piles neuves, ni des piles de types
différents.
Si vous comptez ne pas utiliser la télécommande pendant un mois ou plus, retirez-en les piles.
Des piles faibles peuvent fuir et endommager la télécommande. (La durée de vie normale des
➀
➁
➂
➄
➅
➆
➇
➉
piles est d’environ six mois.)
Orientez vers
le téléviseur/
l’équipement
VCR
DVD
POWER
INPUT RESET
123
123
➃
➈
7809
7809
CH
SLEEP
PIX SHAPE
RECALL
CAPTION
U
N
E
M
DOWN
ON/OFF QUIK
PAP
SWAP
TV
VOL
ENTER
ENTER
PAGE
GUIDE
PLAY
PAP CHANNEL
CABLE
AUXSAT
654
654
MUTETUNER
AUDIO
INFO
UP
PAUS EREC STOP
FREEZE
➠
T
I
X
E
11
12
13
14
15
16
17
18
Touches de mode – Ces touches servent à programmer la télécommande et à
➀
choisir le mode d’utilisation (magnétoscope, téléviseur, câble, lecteur DVD, satellite ou auxiliaire). Pour faire fonctionner le magnétoscope – appuyez sur la touche
VCR; pour votre téléviseur – appuyez sur la touche TV; pour le câble – appuyez
sur la touche CABLE; pour le lecteur DVD – appuyez sur la touche DVD; pour e
récepteur de satellite – appuyez sur la touche SAT.
Remarque : Assurez-vous de tenir
lorsque vous entrez un numéro de code (voir la page 59).
Touche d’entrée – Cette touche sert à modifier la source du signal d’entrée
➁
comme suit :
ANALOG
En mode télé, lecteur DVD, câble et satellite, cette touche sert à choisir la source
du programme qui apparaît à l’écran (signal de télé ou signal de l’équipement
relié aux prises A/V). En mode magnétoscope, elle remplace la touche TV/VCR
du magnétoscope.
Touche de marche/arrêt – Sert à mettre le téléviseur en marche ou à l’éteindre.
➂
Touches numériques – Vous devez appuyer sur deux touches pour choisir un canal.
➃
Par exemple : appuyez sur 0 et sur 6 pour choisir le canal 6. Pour les canaux de télé
analogiques supérieurs à 100, appuyez sur la touche 1 et maintenez-la jusqu’à ce
que C1—apparaisse.
Touche de syntoniseur – Cette touche sert à passer d’un système de syntonisa-
➄
tion à l’autre, des canaux analogiques aux canaux numériques.
Touches de canal (CH haut / bas) et de volume (VOL + / –) – Appuyez
➅
sur les touches haut et bas pour syntoniser le canal suivant ou précédent dans la
mémoire balayage. Appuyez sur les touches + / – pour régler le volume. L’écran
affiche une flèche rouge qui pointe vers la gauche ou vers la droite et qui clignote
chaque fois que vous appuyez sur les touches Vol + / –.
Touche de forme de l’image – Cette touche sert à modifier la forme de l’image.
➆
Les options disponibles dépendent du signal reçu et du ratio de forme : pour
HT20744/HT32744 – boîte aux lettres, zoom et normal. Pour HT30744 – plein,
zoom 1/2 et normal. (Voir l’explication des formes d’image à la page 51.)
Remarque : si la fonction PAP est choisie, cette touche ne fonctionne
pas.
Touche sommeil – Appuyez sur cette touche puis appuyez sur la touche 0 pour
➇
régler la minuterie de sommeil. La durée désirée peut être réglée entre 30 minutes
et 3 heures 30 minutes, en incréments de 30 minutes. La minuterie arrêtera le
téléviseur automatiquement.
Remarque : La minuterie est annulée lorsque le téléviseur est éteint ou
qu’une panne de courant se produit.
HDMI
RF
la touche de mode enfoncée
DIGITAL
COMPO
RF
VIDEO
1
VIDEO
2
2
3
COMPO
58 Télécommande
Touche de rappel – Choisissez le premier canal que vous désirez regarder, puis
➈
choisissez un deuxième canal en utilisant les touches numériques. Appuyez sur
la touche RECALL pour permuter facilement entre ces deux canaux sans avoir à
entrer à nouveau les numéros des canaux.
Remarque : la touche de rappel ne peut permuter qu’entre des canaux
provenant de la même source. Vous ne pouvez pas permuter entre un
canal numérique et un canal analogique.
Page 59

Touches des options de menu et de navigation
Code magnétoscope:
Code auxiliaire:
Code récepteur
de satellite:
Code boîte de télé
par câble:
Code de lecteur
de vidéodisque:
➉
– Utilisez ces touches comme suit :
Touche de menu – Cette touche sert à afficher le
menu à l’écran.
Curseur ▲ haut / ▼ bas – Appuyez sur ces touches
pour déplacer le curseur vers le haut ou vers le bas
dans le menu.
Curseur
touches pour déplacer le curseur vers la gauche ou
vers la droite dans le menu.
Touche de sortie – Cette touche sert à quitter le
menu.
Touche de réinitialisation – Appuyez deux fois sur
11
cette touche pour rétablir les réglages du fabricant.
Le téléviseur commence automatiquement la recherche des canaux et efface tous les réglages personnels.
Les fonctions qui suivent seront automatiquement
réinitialisées :
•
•
•
•
•
•
•
•
•
•
•
•
(si réglées auparavant)
•
Les réglages personnels peuvent être refaits à l’aide
des options de menu, si on le souhaite.
Touche de sourdine – Appuyez une fois sur cette
12
touche pour couper le son. Appuyez à nouveau pour
le rétablir.
Remarque : lorsque vous utilisez les sorties
audio, cette touche ne coupera pas le son.
Touche audio – Cette touche sert à choisir les
13
options de réception audio, le cas échéant, pour…
Touche de renseignements – Cette touche sert à
14
afficher les renseignements complets sur l’émission :
Renseignements numériques complets : Inclut un
numéro de canal virtuel en deux parties (majeure et
mineure). Les renseignements suivants sont aussi
affichés s’ils sont disponibles : l’indicatif de la
station, le titre de l’émission, l’heure et la date, la
force du signal de l’antenne, le format du signal, la
classification de l’émission et le mode audio.
Majeur
Format du signal
3gauche /4 droite – Appuyez sur ces
Réglages du son/de l’image : couleur, teinte,
contraste, luminosité, netteté, rehaussement des couleurs, son grave, son aigu, et son ambiophonique.
Mémoire canaux
Canal initial à OFF
Audio à stéréo
Sous-titres à OFF
Guide V à OFF
Haut-parleurs du téléviseur à ON
Sortie audio numérique à Dolby Digital
Vitesse de balayage à HAUTE
Image-et-image (PAP) à OFF
Langue du menu à l’anglais
Auto-horloge et minuterie de sommeil
Vidéo à TV (si réglé auparavant)
NUMÉRIQUE : Principal, Sous1, Sous2, Sous3, etc,
ANALOGIQUE : Stéréo, Mono, SAP.
Canal virtuel
Indicatif de
Mineur
la station
Signal de l’antenne
Date/heure
Titre de
l’émission
Mode
audio
Classification de
l’émission
Renseignements analogiques complets – Inclut le
numéro du canal (antenne analogique/câble), l’heure
et la date (si elles sont réglées), l’indicatif de la
station (s’il est disponible), le titre de l’émission
(s’il est disponible) et le mode audio.
Numéro du
canal
Indicatif de
la station
Date/heure
Conseils
■
Assurez-vous que les
piles sont installées
correctement.
■
Orientez la télécom-
mande vers l’appareil
que vous désirez utiliser.
La présence d’objets
entre la télécommande et
Titre de
l’émission
Touche de sous-titrage – Cette touche sert à choisir
15
le sous-titrage numérique ou analogique. Les modes
de sous-titrage analogique sont : CC1, CC2, Quikcap
et OFF. Les modes de sous-titrage numériques sont :
CC1 à CC6 numériques, Quikcap et OFF.
Il est possible de personnaliser les sous-titres numéri-
ques en modifiant la police de caractères du texte, sa
taille, son style, la couleur de fond et la couleur du
bord. (Voir la page 64.) Remarque : cette fonction
ne peut être utilisée que lorsque le service de soustitrage numérique est disponible.
Touches de guide – Ces touches servent à utiliser
16
votre récepteur de satellite une fois la télécommande
programmée :
Touche Page/Guide – Cette touche sert à afficher le
guide du menu.
Touche haut/bas – Cette touche sert à déplacer le
curseur vers le haut ou vers le bas dans les options de
menu.
17
Touches de magnétoscope/lecteur DVD – Ces
touches contrôlent les fonctions suivantes du magnétoscope ou du lecteur DVD : avance rapide (44),
rembobinage (33), lecture (4 ), enregistrement (REC),
■ ), alignement des têtes ( –/+), et pause.
arrêt (
18
Touches d’image-et-image – Voir la page 66 pour le
fonctionnement de l’image côte-à-côte.
Mode audio
Classification de
l’émission
l’appareil peut causer un
mauvais fonctionnement
de la télécommande.
■
Si la télécommande ne
fonctionne pas, appuyez
sur la touche TV (voir
l’item 1).
■
La télécommande doit
être programmée afin de
vous permettre d’utiliser
votre magnétoscope,
votre lecteur DVD, votre
récepteur de satellite ou
votre convertisseur de
câble.
Besoin d’aide?
Visitez notre site Web à
www.sanyoctv.com
ou appelez le
1 800 877-5032
Programmation de la télécommande
1. Trouvez les codes de marque de votre magnétoscope, convertisseur de télé par
câble, lecteur DVD et récepteur de satellite dans les tableaux figurant à la pages
60 et 61.
2. Appuyez sur la touche VCR, CABLE, DVD, SAT, ou AUX et maintenez-la
pendant que vous entrez un code numérique à trois chiffres. Relâchez ensuite la
touche de mode.
Si le code a été accepté, la touche de mode clignotera 5 fois après avoir été relâchée.
Si vous avez entré un code invalide, la touche de mode ne clignotera pas. Vérifiez le
numéro de code et répétez l’étape 2.
Après avoir entré chaque numéro de code, vérifiez le fonctionnement de l’appareil
en appuyant sur les touches POWER ou CHANNEL. Si ces touches font fonctionner votre équipement, vous avez probablement entré le bon numéro de code pour cet
appareil. Si non, répétez l’étape 2 en entrant un nouveau code.
Répétez les étapes 1 et 2 pour chacun de vos appareils.
Le modes magnétoscope, convertisseur de
câble, lecteur DVD et satellite n’acceptent
que le type de code qui se rapporte à
chacun d’eux.
Le mode AUX accepte tous les types de
code, mais à raison d’un seul à la fois.
Lorsque vous aurez fini de programmer la
télécommande et que vous avez confirmé
son fonctionnement, inscrivez vos codes
dans les espaces prévus à cette fin.
Touches de fonction de la télécommande 59
Code magnétoscope:
Code boîte de télé
par câble:
Code de lecteur
de vidéodisque:
Code récepteur
de satellite:
Code auxiliaire:
NOM DU DISPOSITIF ICI
Page 60

Codes de lecteur DVD
Codes de magnétoscope
Marque Numéro de Code
Akai 529
Apex
Broksonic 536
Daewoo 529
Denon 501, 520
Emerson 540, 521, 524, 527
Fisher 500
GE 541, 504
Hitachi 530
JVC 515, 510
Kenwood 507
Koss 522
Lasonic 544
Magnavox 508, 502
Marantz 508
Mintek 543
Norcent 532
Onkyo 516, 502
Optimus 511
Orion 526
Oritron 522
Panasonic 501, 518
Philips 508, 502
Pioneer 542, 537, 511, 505, 518
Proscan 504
RCA 539, 538, 504
Samsung 512
Sanyo 500, 526
Sharp 531, 517
Sony 506
Sylvania 524
Symphonic 524
Technics 501
Theta Digital 511
Toshiba 502, 526
Yamaha 501
Zenith 521, 514, 502
535, 534, 533, 525, 527,
528, 523
Codes de récepteur de satellite
Marque
AlphaStar 431
Echostar 432, 410, 416
ExpressVU 432
Fujitsu 404
GE 426, 436, 437, 423
General Instruments 425, 427, 415, 435, 405
Hitachi 407, 421
HTS 432
Hughes 442, 407
Janeil 404
Jerrold 425, 427
JVC 432
Magnavox 429, 430
Memorex 430
Next Level 415
Optimus 430
Panasonic 441, 428, 400
Philips 439, 438, 429, 430, 432
Primestar 425, 427
Proscan 426, 436, 437, 423
Radio Shack 415
RCA 426, 436, 437, 423
Samsung 440
Sony 420
Star Choice 415, 435
Toshiba 422, 405
Uniden 429, 430, 406, 409, 412
Video Pall 404
Viewstar 418
Zenith 434, 404
Numéro de Code
Marque Numéro de Code
Admiral 234, 243, 247, 224, 229, 222, 215
Adventura 228
Aiko 205
Aiwa 228, 217
Akai 209, 215
America Action 205
America High 232
Bell&Howell 201
Broksonic 234, 243, 247, 227, 204
Candle 248, 222, 204, 205, 211, 217
Canon 232
CCE 205
Cineral 205
Citizen 222, 205, 211, 217
Craig 202, 219
Craver 204
Curtis Mathes 232, 236, 238, 248, 222, 228, 209,
Daewoo 205, 211
Daytron 205
Denon 230
Dynatech 228
Emerex 214
Emerson 251, 228, 243, 234, 236, 247, 227,
Fisher 200, 201, 202, 211
Fuji 232
Funai 228, 217
GE 222, 246, 248, 232, 236, 226, 229,
Goldstar 253, 238, 248, 226, 206, 215, 217
Go Video 248, 249, 212, 219
Gradiente 228
Garrard 228
Harley Davidson 228
Headquarter 200
Hitachi 228, 230, 246, 226, 222, 209, 217
Hughes 230
JBL 237
Jensen 209
JVC 220, 238, 226, 201, 209, 230
KEC 205
Kenwood 220, 226, 238, 201, 209
Kodak 232
Lloyd’s 228
Logik 219
LXI 232, 228, 230, 201, 202, 206,
Magnasonic 205, 219
Magnavox 204, 232, 228, 211, 217, 219, 220
Marta 206
Matsushita 232
MEI 232
Memorex 227, 232, 243, 245, 224, 228, 229,
Minolta 230
Mitsubishi 244, 224, 226, 229, 210
Motorola 232, 229, 224
211, 217
201, 204, 205, 206, 210, 211, 217
224, 212
211, 217
230, 200, 201, 202, 206, 215
Marque Numéro de Code
MTC 228, 217, 219
Multitech 228, 217
NEC 238, 226, 201, 206, 209, 215,
Olympus 232
Optimus 245, 248, 224, 229, 201
Orion 243, 227, 234, 205, 206,
Panasonic 245, 232, 236, 202, 211, 219
Penny 230, 232, 248, 211, 219
Pentax 238, 230
Philco 204, 232, 243, 228, 217
Philips 204, 232, 228, 211, 217
Pioneer 242, 204, 207, 220
Proscan 222, 241, 246, 230, 236, 226
Proton 219
Pulsar 248, 205, 217
Quarter 200
Quartz 200
Quasar 245, 232, 236
Radio Shack 228, 245
RCA 250, 222, 241, 246, 248, 230,
Realistic 232, 248, 224, 228, 229, 200,
Samsung 248, 211, 217, 222
Samtron 248
Sansui 243, 226, 228, 209, 219, 220
Sanky 229, 224
Sanyo 200, 201, 202
Scott 234, 247, 227, 211
Sears 232, 228, 230, 200, 201, 202,
Semp 211
Shintom 219, 227
Sharp 252, 229, 224
Signature 228, 217, 229, 224, 200
Sony 214, 218, 232, 237, 226, 228
STS 230
Sylvania 228, 232, 244, 204, 217
Symphonic 228, 217, 226, 202
Yamaha 238, 226
Tatung 226, 209
Teac 228, 209, 214, 217
Technics 232
Teknika 232, 228, 217
Toshiba 211, 244, 202, 205, 210
Tomas 228, 217
Vector 211
Video Concept 211
Wards 230, 232, 248, 224, 228, 229,
White Westinghouse 243, 205
XR-1000 228, 232
Yamaha 238, 226
Zenith 206, 215, 237, 243, 220,
217, 248
210, 211
232, 236, 224, 226, 229, 201,
207, 210
201, 202, 206, 217
206, 211, 217
202, 204, 211, 217
228, 222
60 Codes programmables de la télécommande
Page 61

Codes de convertisseur de télé par câble
Marque Numéro de Code
ABC
AIM 321
Archer 334
Bell & Howell 313, 314, 329
Contec 305, 302, 307, 309, 318, 320, 324
CPI 309, 323
Diamond 320
Eagle 313, 314, 329
Emerson 334
Gemini 334
General Instruments 303, 300, 309, 320, 321, 323
Goldstar 312
Goodmind 334
Hamlin 330, 320
Hitachi 309, 323
Hytex 318
Jerrold
Magnavox 325, 301, 309, 313, 314, 323
Memorex 331, 332, 313, 314, 329
Motorola 338, 303, 300, 309, 320, 321, 323
Movie Time 306, 310, 314, 313, 329
Northcoast 316
NSC 305, 306, 314, 313, 329
Oak 305, 318, 320
Paragon 331, 313, 314, 329
Panasonic 331, 324, 302, 307, 317, 327
Philips 341, 325, 301, 309, 313, 314, 323
Pioneer 312, 335, 333, 317, 324
Quasar 331, 302, 307, 317
RCA 328, 302, 307
Regal 330, 307, 320
Rembrandt 305, 309, 323
Radio Shack 334
Samsung 312, 310
Scientific Atlanta 335, 307, 324
Signal 310
Signature 300, 309, 321, 323
Sony 340
Sprucer 302, 307, 316
Starcom 332, 309, 321, 323
Stargate 309, 310, 321, 334
Teleview 310
Tocom 300, 303, 305, 304, 306, 307
Toshiba 331, 309, 316, 323
Unika 314, 313, 329
United Artists 318
United Cable 309, 323
U.S. Electronics 309, 324
Viewstar 326, 313, 315, 314, 329
Wards 321, 309, 323
Warner 312
Zenith 331, 336, 337, 309, 316, 324
Remarques :
Plusieurs des touches de cette télécommande sont multifonctionnelles. Veuillez consulter le tableau pour obtenir
une description générale des touches et de leur fonction.
Consultez vos manuels d’utilisation originaux pour le fonctionnement particulier de la fonction.
Cette télécommande ne peut pas ajouter de touches ou
de fonctions à votre équipement. Ces fonctions doivent
avoir été initialement fournies par le fabricant de votre
équipement.
312, 304, 306, 309, 313, 314, 318,
319, 321, 324, 329
300, 303, 309, 313, 314, 320,
321, 329
TABLEAU DES FONCTIONS DES TOUCHES DE LA TÉLÉCOMMANDE
TOUCHES
POWER
NUMBER KEYS Sélection des
INPUT Mode télé/vidéo Mode télé/
RECALL Canal précédent Canal précédent Canal précédent Canal précédent Canal précédent
MENU Affiche le menu
CHANNEL UP Canal supérieur
CHANNEL DOWN Canal inférieur
VOLUME – Volume plus bas Volume plus bas Volume plus bas Volume plus bas Volume plus bas
VOLUME + Volume plus haut Volume plus haut Volume plus haut Volume plus haut Volume plus haut
CURSOR
LEFT
3
CURSOR
RIGHT
4
CURSOR ▲ UP Curseur vers le
CURSOR ▼
DOWN
MUTE Coupe/rétablit le
RESET Fait fonctionner
CAPTION Fait fonctionner
SLEEP Fait fonctionner
V-GUIDE Fait fonctionner
ENTER Confirme la
PLAY (
4
FAST FORWARD
)
(
8
REWIND (
STOP () Arrêt du
PAUSE (ll) Pause du
RECORD (
TUNER Fait fonctionner
GUIDE Pas de fonction Pas de fonction Pas de fonction Pas de fonction Affiche l’écran de
PIX SHAPE Fait fonctionner
INFO Affiche les ren-
EXIT Sortie du menu Sortie du menu Sortie du menu Sortie du menu Sortie du menu
PAP Fait fonctionner
TOUCHES MODE Appuyez sur ces touches (VCR/TV/CABLE/DVD/SAT/AUX) quand vous programmez
la télécommande et que vous choisissez un mode d’utilisation
MODE
TÉLÉVISEUR
Marche/arrêt
canaux
de réglage
suivant
suivant
Curseur à gauche Curseur à
MODE
MAGNÉTOSCOPE
Marche/arrêt
Sélection des
canaux
magnétoscope
Affiche le menu
de réglage
Canal supérieur
suivant
Canal inférieur
suivant
gauche
MODE CONVERTISSEUR
Marche/arrêt
Sélection des
canaux
MODE LECTEUR
DVD
Marche/arrêt
Pas de fonction Sélection des
Pas de fonction Pas de fonction Mode télé/
Affiche le menu
de réglage
Canal supérieur
suivant
Canal inférieur
suivant
Affiche le menu
de réglage
Canal supérieur
suivant
Canal inférieur
suivant
Curseur à gauche Curseur à gauche Curseur à gauche
Curseur à droite Curseur à droite Curseur à droite Curseur à droite Curseur à droite
haut
Curseur vers
le bas
son du téléviseur
la télé seulement
la télé seulement
la télé seulement
la télé seulement
sélection
)
Mode de
lecture du
magnétoscope/
lecteur DVD
Fait fonctionner le
magnétoscope/
lecteur DVD
Fait fonct-
)
7
tionner le
magnétoscope/
lecteur DVD
magnétoscope/
lecteur DVD
magnétoscope/
lecteur DVD
Pas de fonction Mode d’enregis-
)
•
la télé seulement
la télé seulement
seignements
la télé seulement
Curseur vers le
haut
Curseur vers
le bas
Coupe/rétablit le
son du téléviseur
Pas de fonction Pas de fonction Pas de fonction Pas de fonction
Pas de fonction Pas de fonction Accès aux
Pas de fonction Pas de fonction Pas de fonction Pas de fonction
Pas de fonction Pas de fonction Pas de fonction Pas de fonction
Confirme la
sélection
Mode de lecture
du magnétoscope
Fait fonctionner
le magnétoscope
Fait fonctionner
le magnétoscope
Arrêt du
magnétoscope
Pause du magnétoscope
trement du
magnétoscope
Pas de fonction Pas de fonction Pas de fonction Pas de fonction
Pas de fonction Pas de fonction Pas de fonction Pas de fonction
Affiche les renseignements
Pas de fonction Pas de fonction Pas de fonction Pas de fonction
Curseur vers le
haut
Curseur vers
le bas
Coupe/rétablit le
son du téléviseur
Curseur vers le
haut
Curseur vers
le bas
Coupe/rétablit le
son du téléviseur
options audio
Confirme la
sélection
Mode de
lecture du
magnétoscope/
lecteur DVD
Fait fonctionner le
magnétoscope/
lecteur DVD
Fait fonctionner le
magnétoscope/
lecteur DVD
Arrêt du
magnétoscope/
lecteur DVD
Pause du
magnétoscope/
lecteur DVD
Confirme la
sélection
Mode de lecture
du lecteur DVD
Fait fonctionner
le lecteur DVD
Fait fonctionner
le lecteur DVD
Arrêt du lecteur
DVD
Pause du lecteur
DVD
Pas de fonction Pas de fonction Pas de fonction
Pas de fonction Sélection du
zoom
MODE
SATELLITE
Marche/arrêt
canaux
satellite
Affiche le menu
de réglage
Canal supérieur
suivant
Canal inférieur
suivant
Curseur vers le
haut
Curseur vers
le bas
Coupe/rétablit le
son du téléviseur
Pas de fonction
Confirme la
sélection
Mode de
lecture du
magnétoscope/
lecteur DVD
Fait fonctionner le
magnétoscope/
lecteur DVD
Fait fonctionner le
magnétoscope/
lecteur DVD
Arrêt du
magnétoscope/
lecteur DVD
Pause du
magnétoscope/
lecteur DVD
guide
Affichage des
renseignements
Touches de fonction de la télécommande 61
Page 62

Dép la
Cho isi r
Rec ule r
Sor tir
ENTER
MENU
EXIT
Dimensions
Couleur
Style
cc
Principal
Chîne
Font de digital
V-Guide
Réglage
Image/Son
Date/Heure
Sortie numérique audio
Haut-parleur de la télé
Langue du menu
Dolby digital
Auto-horloge
Réglage manuel
Heure
Date (Jour)
Arrêt
Marche
English
Español
Français
Add
Supprimer
Sports
Nouvelles
Film
Manuel
Resaltar color
Vitesse de balayage
Image
Son
Ambiophonie
Background
Normal
Froid
Bas
Haut
Couleur
Teinte
Contraste
Background
Luminosité
Netteté
Son grave
Son aigu
Recherche additionnelle DTV
Arrêt
Marche
Arrêt
Marche
Arrêt
Marche
Arrêt
Marche
Opacité
Style de bord
Opacité du premier plan
Opacité de l’arrière-plan
Oui
Non
Chaud
Arrêt
PCM
Couleur du premier plan
Couleur de l’arrière-plan
Couleur de la bordure
Recherche de chaîne
Chaîne initiale
Mémoire balayage
Chioix d’antenne
Réglage et configuration du téléviseur
Le menu à l’écran facilite l’accès aux réglages. Il suffit d’utiliser les touches de la télécommande et de suivre les instructions apparaissant à l’écran.
Comment utiliser le menu à l’écran
1. Appuyez sur la touche MENU. Le menu principal apparaît. Remarque : le menu principal est composé de la zone d’icônes et de la zone
d’options. Si vous n’appuyez sur aucune touche, le menu disparaîtra de l’écran après 30 secondes.
2. Utilisez les touches ▲ et ▼ pour déplacer le curseur afin de choisir des options dans la zone d’icônes.
3. Appuyez sur la touche ENTER ou sur la flèche de droite
4. Utilisez les touches ▲ et ▼ pour choisir l’option désirée dans le menu principal et dans les sous-menus. (L’option choisie est mise en évidence
en jaune.)
5. Appuyez sur la touche ENTER pour confirmer le réglage du menu ou pour choisir un élément différent.
6. Appuyez sur la flèche gauche
3pour déplacer le curseur de la zone doptions vers la zone dicônes, ou sur la touche MENU pour quitter.
Remarque : D’autres étapes sont nécessaires pour les éléments qui ont des sous-menus. Suivez les instructions apparaissant à l’écran en
utilisant les flèches et la touche ENTER pour confirmer le réglage.
4pour déplacer le curseur de la zone d’icônes vers la zone d’options.
DIAGRAMME DE NAVIGATION
DU MENU
62 Utilisation du menu
Voir la page 63.
Voir la page 65.
Voir la page 65.
Voir la page 66.
Voir la page 67.
Touches de navigation du menu
(Voir les étapes 1 à 6 pour le
fonctionnement des touches)
Principal
ZONE D’ICÔNES
Chîne
Font de digital
cc
V-Guide
Réglage
Image/Son
MENU PRINCIPAL SOUS–MENU
Recherche de chaîne
Recherche additionnelle DTV
Chioix d’antenne
Mémoire balayage
Chaîne initiale
Dimensions
Style
Couleur
Opacité
Style de bord
Oui
Non
Date/Heure
Sortie numérique audio
Haut-parleur de la télé
Langue du menu
Sports
Film
Nouvelles
Manuel
Resaltar color
Vitesse de balayage
Dépla
Couleur de l’arrière-plan
Couleur du premier plan
Couleur de la bordure
Opacité de l’arrière-plan
Opacité du premier plan
Choisir
ENTER
Dolby digital
PCM
Arrêt
Marche
English
Español
Français
Image
Son
Ambiophonie
Normal
Background
Froid
Chaud
Haut
Bas
Arrêt
Reculer
MENU
Arrêt
Marche
Arrêt
Marche
Arrêt
Marche
Add
Supprimer
Arrêt
Marche
EXIT
FAIT IMPORTANT : Certaines touches du menu
sont destinées à des
canaux numériques et
analogues spécifiques.
Elles ne seront donc pas
toujours disponibles à
sélectionner.
Auto-horloge
Réglage manuel
Son grave
Son aigu
Sortir
Heure
Date (Jour)
Couleur
Teinte
Contraste
Luminosité
Background
Netteté
Page 63

RECHERCHE DES CANAUX
Dépla
Cho isir
Recul er
Sor tir
ENTER
MENU
EXIT
Chaîne
cc
Recherche de chaîne
Recherche additionnelle DTV
Mémoîre balayage
Chaîne initiale
Chioix d’antenne
cc
Recherche câble digital
Câble digital
Recherch de chaîne
Arrêt
Marche
Rec uler
Cho isir
Sor tir
ENTER
MENU
Dépla
EXIT
cc
Chaîne
Recherche de chaîne
Recherche câble digital
Recherche additionnelle DTV
cc
Power
Dépla
Cho isir
Recul er
Sor tir
ENTER
MENU
EXIT
Chaîne
cc
Recherche de chaîne
Recherche additionnelle DTV
Mémoîre balayage
Chaîne initiale
Chioix d’antenne
La recherche des canaux n’est nécessaire que si des canaux additionnels deviennent disponibles, par
exemple si vous déménagez dans une autre ville ou si vous vous abonnez au câble.
1. Appuyez sur la touche MENU.
2. Utilisez les touches ▲ et ▼ pour mettre en évidence l’icône Antenne. Appuyez sur la touche ENTER.
3. Utilisez les touches ▲ et ▼ pour sélectionner Recherche des canaux. Appuyez sur la touche ENTER.
4. Utilisez le touche ▼ pour choisir MARCHE. Appuyez sur la touche ENTER.
RECHERCHE DU CÂBLE NUMÉRIQUE (FACULTATIF)
Ce téléviseur peut recevoir des canaux de câble numérique non brouillés (ClearQAM) s’ils sont
disponibles. Cependant, les câblodiffuseurs ne fournissent pas tous des canaux numériques ClearQAM.
La recherche des canaux de câble numérique prendra environ 10 minutes, veuillez être patient.
1. Branchez un signal de câble numérique directement dans l’entrée d’antenne numérique du téléviseur.
2. Appuyez sur la touche TUNER pour choisir les canaux numériques. Appuyez sur la touche MENU.
3. Utilisez les touches ▲ et ▼ pour mettre en évidence l’icône Antenne. Appuyez sur la touche ENTER.
4. Utilisez les touches ▲ et ▼ pour choisir Recherche des canaux numériques Appuyez sur la touche
ENTER.
5. Utilisez le touche ▼ pour choisir MARCHE. Appuyez sur la touche ENTER.
FAIT IMPORTANT : Ce téléviseur ne conserve qu’une seule base de données de canaux numériques. Lorsque vous recherchez des canaux numériques ClearQAM, la base de données de
canaux numériques par antenne sera donc effacée. Vous ne pourrez recevoir que les canaux
ClearQAM fournis par votre câblodiffuseur.
Les câblodiffuseurs remanient les canaux virtuels au fur et à
mesure que les programmes changent, ce qui peut déplacer le
programme que vous êtes en train de regarder à un autre canal.
Le message qui suit apparaîtra brièvement pour vous avertir
du changement. Vous devrez alors retrouver le canal que vous
regardiez en effectuant un balayage des canaux.
Lorsqu’une station de radiodiffusion terrestre remanie ses canaux virtuels, les données contenues dans les tables PSIP avertissent le téléviseur du changement. Cela permet au téléviseur
de « suivre » un programme à son nouveau canal virtuel. Le téléspectateur ne se rendra même pas
compte qu’un changement a eu lieu.
Pour rétablir la base de données des canaux par antenne, rebranchez l’antenne et utilisez le
menu pour effectuer une nouvelle recherche des canaux.
Changement de programme
est venu de la compagnie cable
Chaîne
cc
Recherche additionnelle DTV
Chaîne
cc
Recherche câble digital
cc
Câble digital
Recherch de chaîne
Recherche de chaîne
Chioix d’antenne
Mémoîre balayage
Chaîne initiale
Dépla
Choisir
MENU
Reculer
ENTER
Recherche de chaîne
Recherche câble digital
Arrêt
Marche
Reculer
Choisir
ENTER
Dépla
MENU
Sortir
EXIT
Sortir
EXIT
RECHERCHE DE CANAUX NUMÉRIQUES ADDITIONNELS
Utilisez cette fonction pour mettre à jour la base de données du tableau des canaux numériques par
antenne, pour ajouter de nouveaux canaux ou pour ajouter de nouveaux canaux lorsque les tours de transmission sont dans des directions opposées à partir de votre emplacement.
1. Appuyez sur la touche TUNER pour choisir les canaux numériques Appuyez sur la touche MENU.
2. Utilisez les touches ▲ et ▼ pour mettre en évidence l’icône Antenne. Appuyez sur la touche ENTER.
3. Utilisez les touches ▲ et ▼ pour choisir Recherche additionnelle
DTV. Appuyez sur la touche ENTER.
4. Utilisez le touche ▼ pour choisir OUI. Appuyez sur la
touche ENTER.
Remarque : Tournez votre antenne et répétez ces étapes
pour chaque direction où l’on trouve des tours de
transmission.
Configuration du téléviseur : Recherche des canaux / Câble numérique, Recherche additionnelle 63
Chaîne
cc
Recherche de chaîne
Recherche additionnelle DTV
Chioix d’antenne
Mémoîre balayage
Chaîne initiale
Dépla
Choisir
MENU
Reculer
ENTER
Sortir
EXIT
Recherche additionnelle DTV
cc
Prière d’attendre alors que votre
téléviseur cherche les chaînes
disponibles
Antenne digital 35
Power
50%
L‘arreter
(Suite à la page 64.)
Page 64

cc
Chaîne initiale
Appuyer sur ENTER pour régler
Utiliser les touches CH-UP/DOWN
Arrêt
Marche
Antenne digital 24-1
Ch
Rec uler
Sor ti r
ENTER
TUNER
Tune r
Cho isir
MENU
EXIT
Dépla
Cho isir
Reculer
Sorti r
ENTER
MENU
EXIT
Chaîne
cc
Recherche de chaîne
Recherche additionnelle DTV
Mémoîre balayage
Chaîne initiale
Chioix d’antenne
cc
Antenne digital 06-1
Mémoire balayage
Supprimé
NumChCh
Rec ule r
Sor tir
ENTER
TUNER
Tuner
Add /De l
0~ 9
MENU
EXIT
CHOIX DE L’ANTENNE
cc
Changez
l‘antenne?
Arrêt
Marche
Dépla
Cho isir
Recul er
Sor tir
ENTER
MENU
EXIT
Chioix d’antenne
Dépla
Cho isir
Recul er
Sor tir
ENTER
MENU
EXIT
Chaîne
cc
Recherche de chaîne
Recherche additionnelle DTV
Mémoîre balayage
Chaîne initiale
Chioix d’antenne
Utilisez cette fonction pour permuter entre les canaux d’antenne
analogique et les canaux de câble analogique.
1. Appuyez sur la touche MENU.
2. Utilisez les touches ▲ et ▼ pour mettre en évidence l’icône
Antenne. Appuyez sur la touche ENTER.
3. Utilisez les touches ▲ et ▼ pour choisir Choix de l’antenne.
Appuyez sur la touche ENTER.
4. Utilisez le touche ▼ pour choisir MARCHE. Appuyez sur la touche
ENTER.
Chaîne
cc
Recherche additionnelle DTV
Recherche de chaîne
Chioix d’antenne
Mémoîre balayage
Chaîne initiale
Dépla
Choisir
ENTER
MENU
MÉMOIRE BALAYAGE
La mémoire balayage est une liste de canaux actifs que vous pouvez traverser lorsque vous utilisez
les touches de balayage de canaux (haut/bas). Cette liste peut être personnalisée en effaçant les
canaux non désirés.
1. Appuyez sur la touche MENU.
2. Utilisez les touches ▲ et ▼ pour mettre en évidence l’icône Antenne.
Appuyez sur la touche ENTER.
3. Utilisez les touches ▲ et ▼ pour choisir Mémoire balayage. Appuyez sur la touche ENTER.
Lorsque l’option Mémoire balayage est choisie, le menu d’ajout et d’élimination des canaux
apparaît. Le numéro du canal courant apparaîtra aussi dans la case.
4. Utilisez le touche TUNER pour choisir Numérique ou Analogique.
5. Utilisez les touches CHANNEL haut/bas ou les touches numériques pour choisir le canal
désiré.
6. Appuyez sur la touche ENTER pour ajouter ou effacer le canal.
Reculer
Chioix d’antenne
cc
Changez
l‘antenne?
Dépla
Sortir
EXIT
cc
ENTER
Choisir
Arrêt
Marche
MENU
Reculer
Sortir
EXIT
Mémoire balayage
Antenne digital 06-1
Supprimé
0~9
Num
TUNER
Tuner
ENTER
Add/Del
MENU
Reculer
EXIT
Sortir
RÉGLAGE DU CANAL INITIAL
Vous pouvez programmer le téléviseur pour qu’il reçoive votre canal préféré chaque fois que vous
le mettez en marche, par exemple votre canal préféré de sports ou d’information.
1. Appuyez sur la touche MENU.
2. Utilisez les touches ▲ et ▼ pour mettre en évidence l’icône Antenne. Appuyez sur la touche
ENTER.
3. Utilisez les touches ▲ et ▼ pour choisir Canal initial. Appuyez sur la touche ENTER.
4. Utilisez le touche ▼ pour choisir MARCHE. Appuyez sur la touche ENTER.
5. Utilisez le touche TUNER pour choisir Numérique ou Analogique.
6. Utilisez les touches CHANNEL haut/bas ou les touches numériques de la télécommande
pour choisir votre canal numérique.
7. Appuyez sur la touche ENTER pour confirmer le canal initial ou pour réinitialiser le canal, si
vous aimeriez changer le numéro du canal numérique ou analogique préféré.
8. Appuyez sur la touche MENU pour retourner au menu principal, ou sur la touche EXIT pour
quitter le menu.
64 Configuration du téléviseur : Antenne / Memoire balayage / Canal initial
Chaîne
cc
Recherche de chaîne
Recherche additionnelle DTV
Chioix d’antenne
Mémoîre balayage
Chaîne initiale
Dépla
Choisir
MENU
Reculer
ENTER
Sortir
EXIT
Chaîne initiale
cc
Arrêt
Marche
Antenne digital 24-1
Appuyer sur ENTER pour régler
Utiliser les touches CH-UP/DOWN
Reculer
Ch
Tuner
Choisir
ENTER
TUNER
MENU
Sortir
EXIT
Page 65

cc
Font de digital
Rec uler
Cho isir
Sor ti r
ENTER
MENU
Dépla
EXIT
Dimensions
Style
Couleur
Opacité
Style de bord
cc
Dimensions
Défaut
Petit
Standard
Grand
Rec uler
Cho isir
Sor ti r
ENTER
MENU
Dépla
EXIT
CC1
Digital CC1
Sous-titrage
Le sous-titrage se compose d’un texte transmis avec l’image et le son de façon à pouvoir être affiché à
l’écran du téléviseur. Différents types de sous-titres peuvent être transmis avec le signal de télévision;
pour cette raison, plusieurs modes de sous-titrage sont prévus. Les modes de sous-titrage acceptés par
ce téléviseur sont : analogique EIA-608B et numérique EIA-708B. Les télédiffuseurs locaux décident
des signaux des sous-titres à transmettre.
Pour afficher les sous-titres
1. Appuyez sur la touche CAPTION sur la télécommande afin de choisir : sous-titres analogiques
– CC1, CC2, QuikCap ou OFF. Sous-titres numériques – CC1 numérique, CC2 numérique, CC3
numérique, CC4 numérique, CC5 numérique, CC6 numérique, QuikCap ou OFF.
2. L’utilisation de QuikCap vous permet de permuter les sous-titres à l’aide de la fonction Mute.
Appuyez sur la touche MUTE de la télécommande pour couper le son du téléviseur : les soustitres apparaissent automatiquement. Appuyez de nouveau sur la touche MUTE pour rétablir le
son et les sous-titres disparaîtront.
Pour personnaliser l’affichage des sous-titres
Cette fonction est destinée à personnaliser uniquement les sous-titres numériques.
1. Utilisez le touche TUNER pour choisir Numérique. Appuyez sur la touche ENTER.
2. Utilisez le touche ▲ et ▼ pour mettre en évidence l’icône Sous-titres. Appuyez sur la touche
ENTER.
3. Utilisez le touche ▲ et ▼ pour choisir les options désirées. Appuyez sur la touche ENTER.
4. Utilisez le touche ▲ et ▼ pour faire les réglages nécessaires.
REMARQUE : L’élément personnalisé sera mis en évidence avec une bordure jaune et un
point jaune vif.
5. Pour régler d’autres options, répétez les étapes 3 à 5.
6. Appuyez sur la touche MENU pour retourner au menu principal, ou sur la touche EXIT pour
quitter le menu.
Sous-titrage analogique
Sous-titrage numérique
Font de digital
cc
Dépla
Menu principal
cc
Dimensions
Style
Couleur
Opacité
Style de bord
Choisir
ENTER
Dimensions
CC1
Digital CC1
Reculer
MENU
Défaut
Petit
Standard
Grand
Sortir
EXIT
Reculer
Choisir
ENTER
MENU
FAIT IMPORTANT : Pour la réception de vrais sous-titres numériques EIA 708B...
Dépla
Sous-menu
Certains diffuseurs convertissent les sous-titres analogiques EIA 608B afin de les
inclure dans leurs signaux numériques Ces sous-titres convertis peuvent ne pas
répondre à tous les réglages personnalisés.
Fonctionnement du Guide V (surveillance parentale)
REMARQUE : CETTE FONCTION PERMET DE RESPECTER LA RÉGLEMENTATION SUR LA PUCE V DE LA FCC DES
ÉTATS-UNIS. IL SE PEUT QU’ELLE NE FONCTIONNE PAS AVEC LES ÉMISSIONS ORIGINAIRES D’AUTRES PAYS. CEYYE
TÉLÉCOULEUR N’EST PAS COMPATIBLE AVEC LE SYSTÉME D’EMISSION DE GUIDE V CANADIEN, DONC, LES
INSTRUCTIONS NE SONT PAS POURVU À CETTE CARACTÉRISTIQUE.
Guide V / Sous-titrage 65
Sortir
EXIT
Page 66

Aju ste
Réglage manuel
cc
Heure
Mois
Jour
An
Minute
AM/PM
Rec uler
Cho isir
Sor tir
ENTER
MENU
EXIT
cc
Dolby digital
PCM
Sortie numérique audio
Réglage
cc
Date/Heure
Haut-parleur de la télé
Langue du menu
Sortie numérique audio
Rec uler
Cho isir
Sor ti r
ENTER
MENU
Dépla
EXIT
Menu Réglage
cc
Haut-parleur de la télé
Marche
Arrêt
cc
Langue du menu
Rec uler
Chois ir
Sor ti r
MENU
EXIT
English
Español
Français
Conseils
■
Le curseur continuera
à défiler à travers
les options de menu
jusqu’à ce que vous
appuyiez sur la touche
EXIT.
L’option d’horloge des
renseignements sur
le canal (complets ou
abrégés) sera vide si
l’horloge/le jour n’ont
pas été réglés.
Le son ambiophonique
est automatiquement
en fonction (ON)
avec les sports ou les
films. L’ambiophonie
accentue le relief
sonore quand vous
recevez des signaux
stéréo MTS.
Besoin d’aide?
Visitez notre site Web à
www.sanyoctv.com
ou appelez le
1 800 877-5032
Réglage manuel de l’horloge
1. Appuyez sur la touche MENU.
2. Utilisez les touches ▲ et ▼ pour mettre en évidence l’icône Réglage.
Appuyez sur la touche ENTER.
3. Utilisez les touches ▲ et ▼ pour choisir Date/Heure. Appuyez sur la
touche ENTER.
4. Utilisez les touches ▲ et ▼ pour choisir Réglage manuel. Appuyez sur la
Réglage
cc
Date/Heure
Sortie numérique audio
Haut-parleur de la télé
Langue du menu
Reculer
Choisir
ENTER
Dépla
MENU
EXIT
touche ENTER.
5. Utilisez les touches ▲ et ▼ pour régler l’heure. Appuyez sur la touche
ENTER pour confirmer le réglage de l’heure. (Le téléviseur passera
Réglage manuel
cc
Heure
Minute
AM/PM
automatiquement au réglage suivant.)
6. Utilisez les touches ▲ et ▼ pour régler les minutes. Appuyez sur la touche
Jour
An
Mois
ENTER pour confirmer le réglage de les minutes. (Le téléviseur passera
automatiquement au réglage suivant.)
7. Utilisez les touches ▲ et ▼ pour régler le reste des renseignements.
Ajuste
ENTER
Choisir
MENU
Reculer
EXIT
Appuyez sur la touche ENTER pour confirmer les renseignements choisis.
Sortie audio numérique
Utilisez cette fonction pour choisir le format du signal de sortie audio : Dolby
Digital ou PCM.
1. Appuyez sur la touche MENU.
Sortie numérique audio
cc
Dolby digital
PCM
2. Utilisez les touches ▲ et ▼ pour mettre en évidence l’icône Réglage.
Appuyez sur la touche ENTER.
3. Utilisez les touches ▲ et ▼ pour choisir Audio numérigue. Appuyez sur la touche ENTER.
4. Utilisez les touches ▲ et ▼ pour choisir Dolby Digital ou PCM. Appuyez sur la touche ENTER.
REMARQUE : Si vous regardez un canal analogique ou un signal branché aux prises vidéo 1/2 ou com-
posant, le réglage de la sortie audio numérique n’est pas disponible
Sortir
Sortir
66 Menu Réglage
Haut-parleurs du téléviseur
1. Appuyez sur la touche MENU.
2. Utilisez les touches ▲ et ▼ pour mettre en évidence l’icône Réglage.
Appuyez sur la touche ENTER.
3. Utilisez les touches ▲ et ▼ pour choisir Haut-parleurs TV. Appuyez sur la
touche ENTER.
4. Utilisez le touche ▼ pour choisir MARCHE. Appuyez sur la touche ENTER.
REMARQUE : Aucun son ne sera émis par les haut-parleurs de votre téléviseur si le
mode Arrêt (OFF) est choisi.
Langue du menu
1. Appuyez sur la touche MENU.
2. Utilisez les touches ▲ et ▼ pour mettre en évidence l’icône Réglage.
Appuyez sur la touche ENTER.
3. Utilisez les touches ▲ et ▼ pour choisir Langue de menu. Appuyez sur la
touche ENTER.
4. Utilisez les touches ▲ et ▼ pour choisir English, Español, or Français.
Appuyez sur la touche ENTER.
5. Appuyez sur la touche MENU pour retourner au menu principal, ou sur
la touche EXIT pour quitter le menu.
Haut-parleur de la télé
cc
Langue du menu
cc
Marche
Arrêt
English
Español
Français
Choisir
MENU
Reculer
Sortir
EXIT
Page 67

cc
Vitesse de balayage
Haut
Bas
Arrêt
Chois ir
Rec uler
Sor ti r
MENU
EXIT
cc
Accenteur c ouleurs
Normal
Froid
Chaud
Cho isir
Recul er
Sor ti r
MENU
EXIT
Aju ste
Image
cc
Netteté
Couleur
Teinte
Contraste
Luminosité
Rec uler
Sor ti r
MENU
Dépla
EXIT
cc
Image/Son
Sports
Film
Nouvelles
Manuel
Acceteur couleurs
Vitesse de balayage
Rec uler
Cho isir
Sorti r
ENTER
MENU
Dépla
EXIT
Réglage de l’image/du son
Lorsque l’option Image/Son est choisie, appuyez sur la touche ENTER pour choisir l’option
et le réglage désirés. Pour rehausser votre expérience de visionnement, choisissez Sports,
Film ou Nouvelles selon le programme que vous recevez. Le téléviseur ajustera automatiquement le son et l’image.
1. Appuyez sur la touche MENU.
2. Utilisez les touches ▲ et ▼ pour mettre en évidence l’icône Image/Son. Appuyez sur la
touche ENTER.
Réglage manuel de l’image/du son
1. Utilisez les touches ▲ et ▼ pour choisir Manuel. Appuyez sur la touche ENTER.
2. Utilisez les touches ▲ et ▼ pour choisir Image (options : couleur, teinte, contraste,
luminosité, netteté), Son (options : grave ou aigu), ou Ambiophonie (options : ON ou
OFF). Appuyez sur la touche ENTER.
3. Utilisez les touches ▲ et ▼ pour choisir l’option désirée. Utilisez ensuite les touches
▲
/ pour les réglages.
▲
4. Appuyez sur la touche MENU pour retourner au menu principal, ou sur la touche EXIT
pour quitter le menu.
Rehaussement des couleurs
Cette caractéristique sert à rehausser l’apparence des tons chair et les nuances de la couleur.
Le réglage CHAUD donne des teintes rouges plus intenses, et le réglage FRAIS accentue les
couleurs bleues de l’image.
Vitesse de balayage
Ce téléviseur possède un circuit électronique qui règle la vitesse de balayage du faisceau
d’électrons, créant ainsi des transitions nettes entes les parties claires et foncées de l’image.
Cela produit des bords nets et une image très claire. Utilisez les options BAS et HAUT pour
changer les réglages.
1. Appuyez sur la touche MENU.
2. Utilisez les touches ▲ et ▼ pour mettre en évidence l’icône Image/Son. Appuyez sur la
touche ENTER.
3. Utilisez les touches ▲ et ▼ pour mettre en évidence l’icône Rehaussement des couleurs
ou Vitesse de balayage. Appuyez sur la touche ENTER.
4. Utilisez les touches ▲ et ▼ pour les réglages. Appuyez sur la touche ENTER.
5. Appuyez sur la touche MENU pour retourner au menu principal, ou sur la touche EXIT
pour quitter le menu.
cc
Image/Son
Image
cc
Accenteur couleurs
cc
cc
Sports
Film
Nouvelles
Manuel
Acceteur couleurs
Vitesse de balayage
Choisir
ENTER
Dépla
MENU
Couleur
Teinte
Contraste
Luminosité
Netteté
Ajuste
Dépla
MENU
Normal
Froid
Chaud
Choisir
Vitesse de balayage
Haut
Bas
Arrêt
Choisir
MENU
MENU
Reculer
Reculer
Reculer
Reculer
Sortir
EXIT
Sortir
EXIT
Sortir
EXIT
Sortir
EXIT
Réglage de l’image/du son 67
Page 68

Fonctionnement de PAP (image-et-image)
La fonction de PAP (image-et-image) divise l’écran en deux parties, ce qui vous permet de regarder deux émissions en même temps. L’image de
gauche sera toujours l’image principale avec le son. L’image de droite sera l’image secondaire, et le son ne sera pas disponible. Le signal pour
une fenêtre doit provenir du syntoniseur numérique. Le signal pour l’autre fenêtre peut provenir du syntoniseur analogique ou d’une autre
entrée audio/vidéo.
FAIT IMPORTANT : La visionneuse ne peut pas utiliser le syntoniseur
analogique de la télévision numérique comme une source et toute autre
connexion audio/vidéo (VCR, lecteur DVD, boîtier de câble ou récepteur de
satellite) comme l’autre source.
Utilisation de l’image côte-à-côte PAP
1. Appuyez sur la touche PAP ON/OFF pour diviser l’écran.
2. Pour changer le canal de la fenêtre de gauche : Utilisez la touche
Channel Up/Down pour choisir un canal.
3. Pour changer le canal de la fenêtre de gauche : Utilisez la touche
PAP Channel Up/Down pour choisir un canal.
Permutation entre les fenêtres
1. Appuyez sur la touche SWAP pour permuter les fenêtres de gauche et de droite.
Par exemple, si vous regardez un programme dans la fenêtre de droite et que vous
désirez obtenir le son, appuyez sur la touche SWAP pour faire passer le programme
rapidement à la fenêtre de gauche.
REMARQUE : Cette fonction ne peut être utilisée que lorsque l’image côte-à-côte
PAP est activée.
FENÊTRE DE GAUCHE/FENÊTRE DE DROITE
FENÊTRE DE DROITE/FENÊTRE DE GAUCHE
Gel de la fenêtre PAP
1. Appuyez sur la touche QUIK FREEZE pour geler l’action. Utilisez cette fonction
pour geler à l’écran un numéro de téléphone ou une adresse jusqu’à ce que vous
puissiez écrire cette information.
REMARQUE : Cette fonction ne gèlera pas une image affichée dans la
fenêtre de gauche.
FAIT IMPORTANT : la fonction QUIK FREEZE gèlera le contenu de la fenêtre
de droite si PAP est activé.
Utilisation de l’image côte-à-côte PAP avec les fonctions suivantes…
Réglage du sous-titrage
Si le mode Sous-titrage est activé et que les sous-titres sont disponibles, ceux-ci ne seront affichés que dans la fenêtre de gauche.
Réglage de la minuterie de sommeil
Si la minuterie de sommeil est activée, elle sera affichée dans la fenêtre de droite. L’affichage n’est pas actif dans la fenêtre de gauche.
Réglage du Guide V
Si la fonction d’image côte-à-côte PAP est activée, les réglages du Guide V affecteront les fenêtres de gauche et de droite séparément.
Si seule la fenêtre de gauche a une classification supérieure ou identique au réglage du programme, seule la fenêtre de gauche sera filtrée.
Si seule la fenêtre de droite a une classification supérieure ou identique au réglage du programme, seule la fenêtre de droite sera filtrée.
Si les fenêtres de gauche et de droite ont toutes deux une classification supérieure ou identique au réglage du programme, les deux fenêtres
seront filtrées.
FAIT IMPORTANT : même si les fenêtres de droite et de gauche sont permutées, la fonction de filtrage
du Guide V restera active jusqu’à ce qu’elle soit arrêtée ou réinitialisée.
68 PAP (image côte-à-côte)
Page 69

Dèpannage (problèmes/solutions)
Avant de demander de l’aide, cherchez dans le tableau suivant la situation qui ressemble le plus à celle que vous rencontrez puis suivez les
instructions correspondantes. Visitez notre site Web à
Problème Vérifiez ces situations Essayez ces solutions Page
Le téléviseur s’arrête de
lui-même.
Pas d’image ou de son
(image numérique)
Je ne peux pas personnaliser les
sous-titres.
Pas de sous-titrage.
Image/son médiocre (image
analogique)
Écran bleu uni avec Vidéo1,
Vidéo2, Composant2, Composant3,
ou HDMI affiché
Pas de son stéréo TVHD ou SAP
Je ne peux ni choisir ni balayer
certains canaux.
Pas de canaux de câble
supérieurs à 13.
Aucun canal UHF (les canaux VHF
apparaissent)
Je ne peux pas utiliser mon
téléviseur ou un autre appareil
(magnétoscope, convertisseur de
câble, récepteur de satellite ou
lecteur DVD) à l’aide de la télécommande
Il semble y avoir des fautes
d’orthographe dans le texte des
menus
Le coffret émet un claquement
●
Vérifiez le branchement du signal (câble/
antenne).
●
Caractéristique de protection contre les
sautes de puissance.
●
Appuyez sur la touche POWER.
●
Vérifiez le branchement de l’antenne/de
l’équipement extérieur.
●
Il se peut que la station ait un problème
et qu’elle ne diffuse AUCUN signal.
●
La fonction Mute peut avoir été activée.
●
Aucun signal de sous-titrage numérique
n’est diffusé.
●
Vérifiez si la station diffuse un signal de
sous-titrage. Choisissez un autre canal.
●
Vérifiez si l’émission est diffusée en
couleurs.
●
Vérifiez le branchement de l’antenne/de
l’équipement extérieur.
●
La couleur/la teinte peut être mal réglée.
●
Il se peut que la station ait un problème.
●
La fonction Mute peut avoir été activée.
●
Vérifiez les branchements audio/vidéo.
●
Vérifiez le branchement de l’équipement
extérieur.
●
Vérifiez les réglages de l’équipement
extérieur
●
Vérifiez si la station diffuse un véritable
signal stéréo MTS ou un signal SAP.
●
Le canal peut avoir été effacé de la
mémoire.
●
Vérifiez le branchement de l’antenne.
●
Aucun signal numérique n’est diffusé.
●
L’indicateur des canaux du câble C
devrait apparaître à côté du numéro du
canal.
●
L’indicateur des canaux du câble C ne
doit pas apparaître à côté du numéro du
canal.
●
Appuyez sur la touche TV pour utiliser le
téléviseur.
●
Appuyez sur la touche VCR pour utiliser
le magnétoscope, sur CABLE pour
utiliser le convertisseur de câble, sur
DVD pour utiliser le lecteur DVD et sur
SAT pour utiliser le récepteur de satellite.
●
Vérifiez les piles; vérifiez si le téléviseur
est branché.
●
Vérifiez l’équipement extérieur.
●
Une autre langue peut avoir été choisie.● Choisissez la langue à nouveau avec le
●
Cet état de choses est normal pendant
le chauffage et le refroidissement des
pièces en plastique du coffret.
www.sanyoctv.com, ou appelez notre numéro sans frais 1-800-877-5032.
●
La minuterie de sommeil peut avoir été
activée.
●
Débranchez le téléviseur pendant
quelques instants.
●
Ajustez l’antenne.
●
Essayez un autre canal.
●
Appuyez sur la touche RESET ou recom-
mencez la recherche des canaux.
●
Ajustez le volume.
●
Appuyez sur la touche CAPTION pour
choisir le sous-titrage analogique.
●
Appuyez sur la touche CAPTION pour
choisir le sous-titrage.
●
Essayez un autre canal.
●
Ajustez l’antenne.
●
Appuyez sur la touche RESET ou recom-
mencez la recherche des canaux.
●
Ajustez le volume.
●
Appuyez sur la touche INPUT.
●
Mettez l’équipement extérieur en marche.
●
Réglez les connexions de sortie de
l’équipement extérieur afin qu’elles correspondent aux connexions d’entrée.
●
Appuyez sur la touche AUDIO.
●
Choisissez CH. Scan Memory et ajoutez
les canaux manuellement, ou effectuez
une recherche des canaux.
●
Réglez le mode Antenne à ON.
●
Réglez le mode Antenne à ON.
●
Remplacez les piles.
●
Orientez la télécommande vers l’avant du
téléviseur et de l’équipement externe.
●
Entrez à nouveau le code de marque.
menu à l’écran.
53
53~56
58~59
66
65
65
58~59
66
53~56
66
64
63
63
58~59
60~61
66
Dèpannage (problèmes/solutions) 69
Page 70

Garantie pour le Canada et les États-Unis
GARANTIE LIMITÉE D’UN AN
LA PRÉSENTE GARANTIE LIMITÉE N’EST ACCORDÉE QU’AUX TÉLÉCOULEURS SANYO ACHETÉS ET UTILISÉS AU CANADA, AUX
ÉTATS-UNIS ET À PORTO RICO, MAIS À L’EXCEPTION DES AUTRES TERRITOIRES ET PROTECTORATS DES ÉTATS-UNIS. CETTE
GARANTIE LIMITÉE NE S’APPLIQUE QU’À L’ACHETEUR INITIAL; ELLE NE COUVRE PAS LES ARTICLES UTILISÉS À DES FINS
INDUSTRIELLES OU COMMERCIALES.
PENDANT UN AN à compter de la date d’achat, Sanyo Manufacturing Corporation remplacera tout télécouleur défectueux.
Pour bénéficier d’un échange au titre de la garantie, conservez le reçu de vente original comme preuve d’achat. Retournez le
télécouleur défectueux au détaillant, avec le reçu et les accessoires inclus, notamment la télécommande. Si c’est nécessaire,
le télécouleur défectueux sera remplacé par un modèle identique ou par un modèle de rechange de valeur égale. Le modèle de
rechange est subordonné à la disponibilité et son choix est laissé au gré de la Sanyo Manufacturing Corporation.
LA GARANTIE SUSMENTIONNÉE EST EXCLUSIVE ET REMPLACE TOUTE AUTRE GARANTIE DE VALEUR MARCHANDE OU
D’APTITUDE À UNE UTILISATION PARTICULIÈRE.
OBLIGATIONS
Sanyo Manufacturing Corporation garantit ce produit pendant un an à compter de la date d’achat, comme étant exempt de défaut de matériaux et de fabrication, s’il est utilisé normalement dans des conditions appropriées. Si, pour quelque raison que ce soit, un remplacement
s’avère nécessaire dans le cadre de la présente garantie à cause d’un défaut de fabrication ou de mauvais fonctionnement pendant la
première année à partir de la date de l’achat initial, Sanyo Manufacturing Corporation fournira un télécouleur neuf à titre d’échange pour le
détaillant.
Pour l’assistance à la clientèle, pendant ou après la période de garantie, appelez le numéro sans frais 1-800-877-5032.
En semaine : de 7 h 30 à 19 h, heure du Centre
Le samedi : de 7 h 30 à 16 h, heure du Centre
Cette garantie énonce des droits contractuels spécifiques; les acheteurs au détail peuvent bénéficier d’autres droits légaux qui varient
d’une province à l’autre.
(ENTRÉE EN VIGUEUR : 1er août 2002)
À titre de protection en cas de vol ou de perte de ce produit, veuillez indiquer ci-dessous les renseignements demandés et GARDER
CETTE FEUILLE EN LIEU SÛR, AVEC VOS PAPIERS PERSONNELS.
No de modèle ________________________________ Date d’achat _______________________
o
de série _________________________________ Prix d’achat _______________________
N
Lieu d’achat _______________________
(Indiqué à l’arrière de l’appareil)
AS
Sanyo Manufacturing Corp.
3333 Sanyo Road, Forrest City, AR 72335
70 Garantie pour le Canada et les États-Unis
Page 71

Page 72

 Loading...