

Page 1
SUMMARY MANUAL
VDC-HD3500P/HD3500
VDC-HD3300P/HD3300
VDC-HD3100P/HD3100
Side B
Megapixel Camera
THIS INSTALLATION SHOULD BE MADE BY A QUALIFIED
SERVICE PERSON AND SHOULD CONFORM TO ALL LOCAL
CODES.
Please read this instruction manual carefully in order to ensure correct installation.
In addition, be sure to read carefully the electronic manual (INSTRUCTION MANUAL)
contained in the supplied CD-ROM to ensure correct operation of the camera.
VCC-HD3500/HD3300
EnglishFrançaisEspañolDeutschЁ᭛ㅔԧ日本語
Page 2
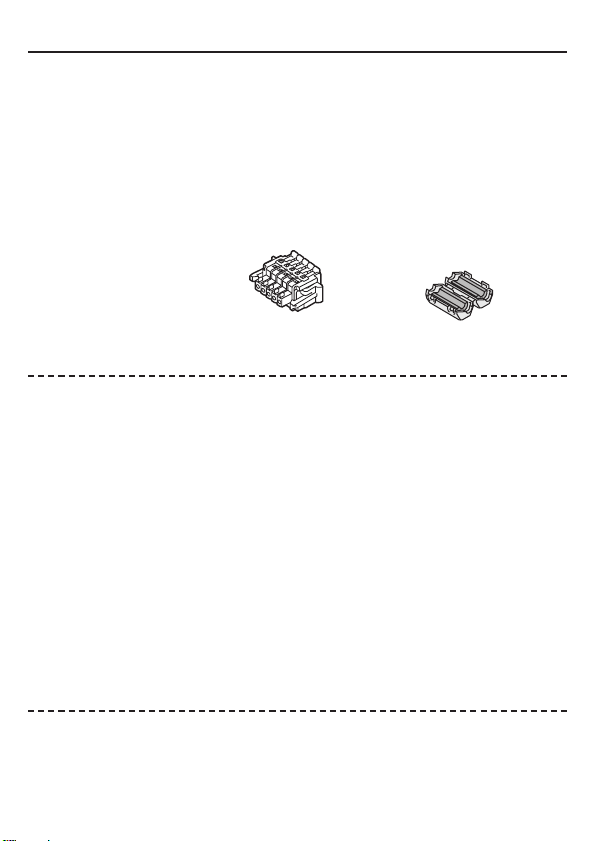
Table of Contents
Name and Function of Each Component .................................................................2
Lens Adjustment .......................................................................................................3
Network Settings ......................................................................................................5
Specifications ........................................................................................................... 7
Copyright Notice .......................................................................................................9
Accessories
■
① Video Cable
②Cushioning Sheet
③ Hexagonal Wrench
④ Pattern Sheet
⑤ CD-ROM
■
Check your operating environment.
To operate the camera via network operation, you must meet the following operating
requirements.
• : IBM PC/AT compatible
PC
Operating system
• : Windows XP Professional/Windows Vista
CPU
• : Core2Duo E6700 2.66 GHz or higher
Memory
• : Windows XP: 1GB or more
• : 10Base-T/100Base-TX (RJ-45 connector)
Network interface
Display card
• : 1920×1200 pixels or higher
Graphics chip
• : ATI RADEON HD2600 series or higher
• : Internet Explorer Ver. 6.0 SP2 or higher,
Web browser
⑥ Connector ⑦ Clamping Core
To prevent electromagnetic
interference
VDC-HD3500P
Windows Vista: 2GB or more
nVIDIA GeForce 8600 series or higher
nVIDIA Quadro FX550 series or higher
or Internet Explorer Ver. 7.0
You can automatically set up the IP address of the camera.
■
This software application is useful when two or more cameras are connected to the
network.
Download “AUTO IP SETUP” software application from the supplied CD-ROM.
1
Page 3
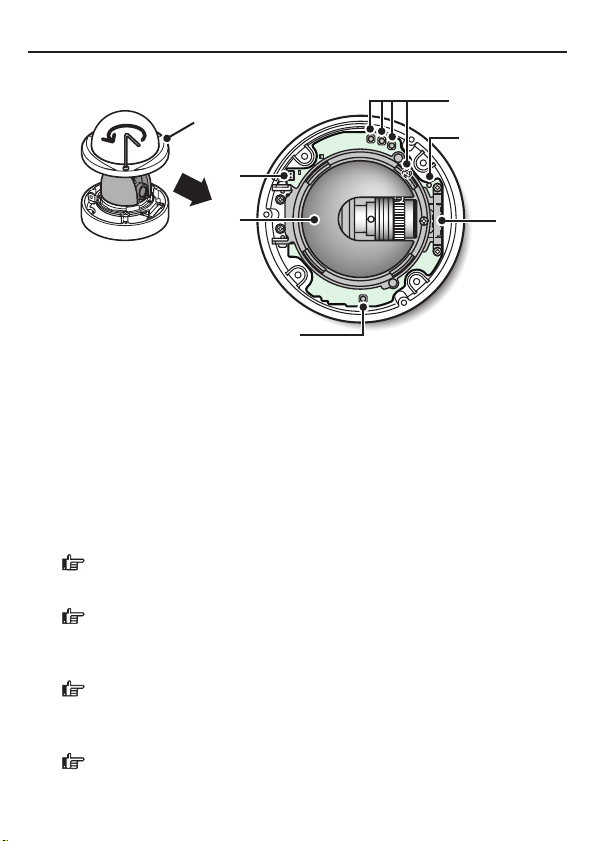
Name and Function of Each Component
Top Face
■
①
②
⑥
⑤
③
⑥
① Dome cover
② Monitor Output Socket
③ Inner cover
④ SD Card Slot (VDC-HD3500P/HD3500)
⑤ LED lamp (VDC-HD3500P/HD3500)
The power indicator blinks to indicate the following camera statuses.
•
Recording to SD memory card stopped
•
Firmware update in progress
•
An SD memory card error occurred (Fast blink)
⑥ Operation Buttons
•
Restarting camera: Press the RESET button.
OPTION SETTINGS (CAMERA REBOOT)
•
Restoring factory default settings: Press the NEAR and SET buttons
simultaneously.
OPTION SETTINGS (FACTORY DEFULT)
•
Resetting login password (for default users only): Press the FAR and SET
buttons simultaneously.
•
Adjusting focus/Adjusting iris
Page 3, “Lens Adjustment” section or the CAMERA SETTINGS (FOCUS
ASSIST/IRIS SETTING) section on the electronic manual.
•
Inverting video of wall-mounted camera: Press the REVERSE button.
•
Viewing Firmware Version:
“Viewing Firmware Version” section or the OPTION SETTINGS (FIRMWARE
UPDATE) section on the electronic manual.
④
2
Page 4

Lens Adjustment
Focus can be electrically adjusted. For high-resolution megapixel images, the focus
assist function is useful to obtain a precise focus because otherwise it is extremely
difficult.
The focus must be readjusted if the camera has lost focus due
to difference in the subject distance or ambient temperature, the
deterioration of the lens and installation environment, and the like that
have been caused over the years.
Press the SET button for 2 seconds or more.
The monitor now shows the SELECT MENU screen.
SELECT MENU
FOCUS ASSIST
IRIS
FIRMWARE VERSION
NEAR UP
FAR DOWN
SET SELECT
NEAR
FAR
SET
On the SELECT MENU screen, all information is displayed in English.
Select [FOCUS ASSIST] using the NEAR/FAR button and press the SET
button.
The monitor now shows the focus adjustment screen.
Adjust the lens orientation, and adjust the angle of view with the zoom ring
and the focus with the operation buttons.
FOCUSING
FOCUSING
PEAK HOLD XXXX
PEAK HOLD XXXX
INDICATOR XXXX
INDICATOR XXXX
NEAR FAR
NEAR FAR
PEAK HOLD: Shows the value of the maximum focus level.
INDICATOR: Shows the value of the current focus level.
3
Page 5

Lens Adjustment
■
Adjusting focus
NEAR
FAR
SET
Roughly focus the subject using NEAR/FAR buttons.
Make adjustment while watching the monitor.
Press the SET button.
The camera automatically focuses on the subject. Note that the color of the status
indicator “FOCUSING” turns from black to orange.
The status indicator changes to “ERROR” when the subject cannot
automatically come into focus.
In this case, manually adjust the focus. (
Press the NEAR/FAR button to adjust the focus.
Make adjustment so that the FA bar gauge indicates the highest level.
When the subject comes into focus, the color of the status indicator
“FOCUSING” changes from black to orange.
Pressing the buttons moves the FB bar gauge .
The position changes step by step each time the button is pressed
and continuously at a high speed when the button is held down.
Press the SET button for 2 seconds or more.
The focus adjustment screen will close.
The focus adjustment screen will also close automatically if left idle
•
for 5 minutes or more.
•
VDC-HD3500P/HD3500/HD3300P/HD3300:
If video is out of focus in either color or black-and-white mode,
adjust the focus in respective modes.
Electronic manual)
4
Page 6

Network Settings
Preparing Your Computer for Network Operation
Check your operating environment. (
Connect the camera to the network to which your PC is also connected.
Configue the network information on your PC.
Configure information such as the IP address of your PC.
Install the “H.264 Plug-in” from the supplied CD-ROM onto your PC.
You are now ready to monitor the surveillance video in the H.264 format.
Start Internet Explorer.
The supported Web browser is Internet Explorer Ver.6.0 SP2 or higher, or Internet
Explorer Ver.7.0.
Access the camera from your Web browser.
From your Web browser (Internet Explorer), access the camera and log into the
system as an “admin” user (administrator).
In the address bar, type the IP address of the camera and press [Enter] key.
When you access the camera, the login screen appears.
If this is the first access to the camera, in the Address bar, enter the default IP
address as follows.
If you set [SSL] to “ON”, before the IP address, type “https://” (instead
of “http://”).
Attempts to access the camera using the default IP address will fail if
that address is already being used by another device in the network.
If so, change the IP address of the existing device before accessing
the camera.
Page 1)
5
Page 7

Network Settings
Type your user name and password and click [OK].
The language selection screen appears.
If this is the first access to the camera, log in as an admin user
(administrator) using the following default authentication information.
•
User name: admin
•
Password: admin
Click the button corresponding to the language you want to use.
The live screen appears.
From the second login onwards, the live screen appears automatically by skipping
the language selection screen.
If this is the first access to the camera, configure the system clock on the CLOCK
SETTINGS screen.
6
Page 8

Specifications
Camera■
Image pickup device 1/3" CMOS sensor
Effective pixels 16:9 1920 (H)×1080 (V), 4:3 2288 (H)×1712 (V)
Lowest image illumination 50IRE: 1.0 lx (at F1.2, color mode, high gain)
Video S/N ratio 50dB (when AGC is “OFF”)
Lens Built-in vari-forcal lens f=3 to 9 mm, F1.2 to 2.1
Focus adjustment Focus assist function
Iris control DC iris lens supported
Digital PTZ
(VDC-HD3500P/HD3500)
Mirror H/V/HV/OFF
Privacy mask On/Off, max. 8 mask patterns
Motion sensor On (Motion masking/motion detection area setting, or
Language selection English, French, German, Spanish, Japanese
For further details on the specifications of the camera, refer to the electronic manual.
SD Recording (SD Memory Card) (VDC-HD3500P/HD3500)■
Recording mode Alarm recording, backup recording in event of a network
For the recommended SD memory cards, visit our website.
http://www.sanyo-cctv.net/
I/O■
Video output Composite output
LAN 10BASE-T/100BASE-TX (RJ-45 connector)
Card slot
(VDC-HD3500P/HD3500)
Alarm input 2 (NO/NC), also serving as Day/Night switching terminal
Alarm output 2 (NO/NC, 16V, 150 mA, open collector)
Audio input/output
(VDC-HD3500P/HD3500)
50IRE: 0.1 lx (at F1.2, black-and-white mode, high gain)
Enables electronic pan, tilt, and zoom operations on
clipped subject areas in VGA size.
Zoom magnification: max. 2X
video analytics)/Off, face detection function supported
failure
1 (SDHC compliant, max. 32 GB supported)
Microphone input (3.5-mm mini jack)
Line output (3.5-mm mini jack)
7
Page 9

Specifications
Network■
Image/video compression H.264/JPEG
Video size (H.264) (16:9) 1920×1080, 1280×720, 640×360, 320×180
Video size (JPEG) (16:9) 1920×1080, 1280×720, 1024×576, 640×360
Picture quality QUALITY mode: BASIC, NORMAL, ENHANCED, FINE,
Interface 10BASE-T/100BASE-TX
Protocol TCP/IP, UDP, HTTP, HTTPS, SMTP, NTP, DHCP, FTP,
Audio G.711 (Bidirectional)
Simultaneous access 20
Security BASIC authentication (ID/password), SSL, IP filtering
(4:3) 1600×1200, 1280×960, 1024×768, 640×480,
320×240
(4:3) 2288×1712, 1600×1200, 1280×960, 1024×768,
800×600, 640×480, 320×240
SUPER FINE
BITRATE mode: User-specified bit rate
DDNS, RTP, RTSP, RTCP
Others■
Waterproof standard IP66
Operating ambient
temperature/humidity
Power source 12 to 15 V DC/24 V AC ± 10%, 50/60 Hz, PoE
Power consumption 6.8W (with heater turned on: 20 W) (VDC-HD3500P/
Dimensions
Weight 800 g/28.2 oz. (VDC-HD3500P/HD3500)
Appearance and specifications are subject to change without prior notice or
obligations.
Approvals: IP66
■
This unit has been certified to IP66 standards when properly installed.
Ensure all openings in enclosure are sealed as per manufacturer’s instructions.
–10 to +50ºC/14 to 122ºF,
90% RH or less (no condensation)
HD3500)
4.6W (with heater turned on: 18 W) (VDC-HD3300P/
HD3300, VDC-HD3100P/HD3100)
φ146 × 94 mm/φ5.7 × 3.7 inch
Dome diameter: 114 mm/4.5 inch
700 g/24.7 oz. (VDC-HD3300P/HD3300, VDC-HD3100P/
HD3100)
8
Page 10

Copyright Notice
The instruction manual and the software are copyrighted by SANYO Electric Co., Ltd.
No materials contained in the manual and the software may, wholly or partially, be
copied, modified, reproduced, or distributed in any format without the prior permission
of the copyright holder.
Microsoft, Windows, ActiveX and Internet Explorer are registered trademarks or
trademarks of Microsoft Corporation in the United States and other countries.
The official name for “Windows” used in this manual is Microsoft
System.
In this manual, note that the word “Windows” refers to both “Microsoft
Operating System” and “Microsoft
Intel and Pentium are registered trademarks or trademarks of Intel Corporation and its
subsidiaries in the United States and other countries.
IBM and IBM PC/AT are trademarks of International Business Machines Corporation.
All other brands and product names in this manual are the registered trademarks or
trademarks of their respective owners.
SDHC Logo is a trademark.
Notes on data storage
■
It is recommended that important data be copied to a separate medium.
•
•
In the following situations, it is possible that recorded data may be lost (destroyed).
Our company bears absolutely no responsibility for damages or profits loss due to
the loss of data.
•
The medium (SD card or external hard disk) is not used correctly.
•
The medium is not installed on the device correctly.
•
The medium is subjected to electrical or mechanical shock.
•
The card is removed or the power is turned off while the card is being accessed.
•
The medium has reached the end of its service life.
License for Software Contained in CD-ROM
■
Please read carefully the terms and conditions contained in the license agreement
•
that appears on the screen during the software installation process. Provided that
you have agreed to all the terms and conditions therein, you may use the software
subject to the license agreement.
•
For information on the other products or services provided by third parties which
are introduced in the CD-ROM, please contact each supplier or manufacturer.
®
Windows® Vista Operating System”.
®
Windows® Operating
®
Windows® XP
9
 Loading...