

Page 1

INSTRUCTION
MANUAL
GCD 2000
CD Changer Stereo Music System
.
Page 2
T 7
_.————————_____
K
‘3
!5!!%!5
@
L
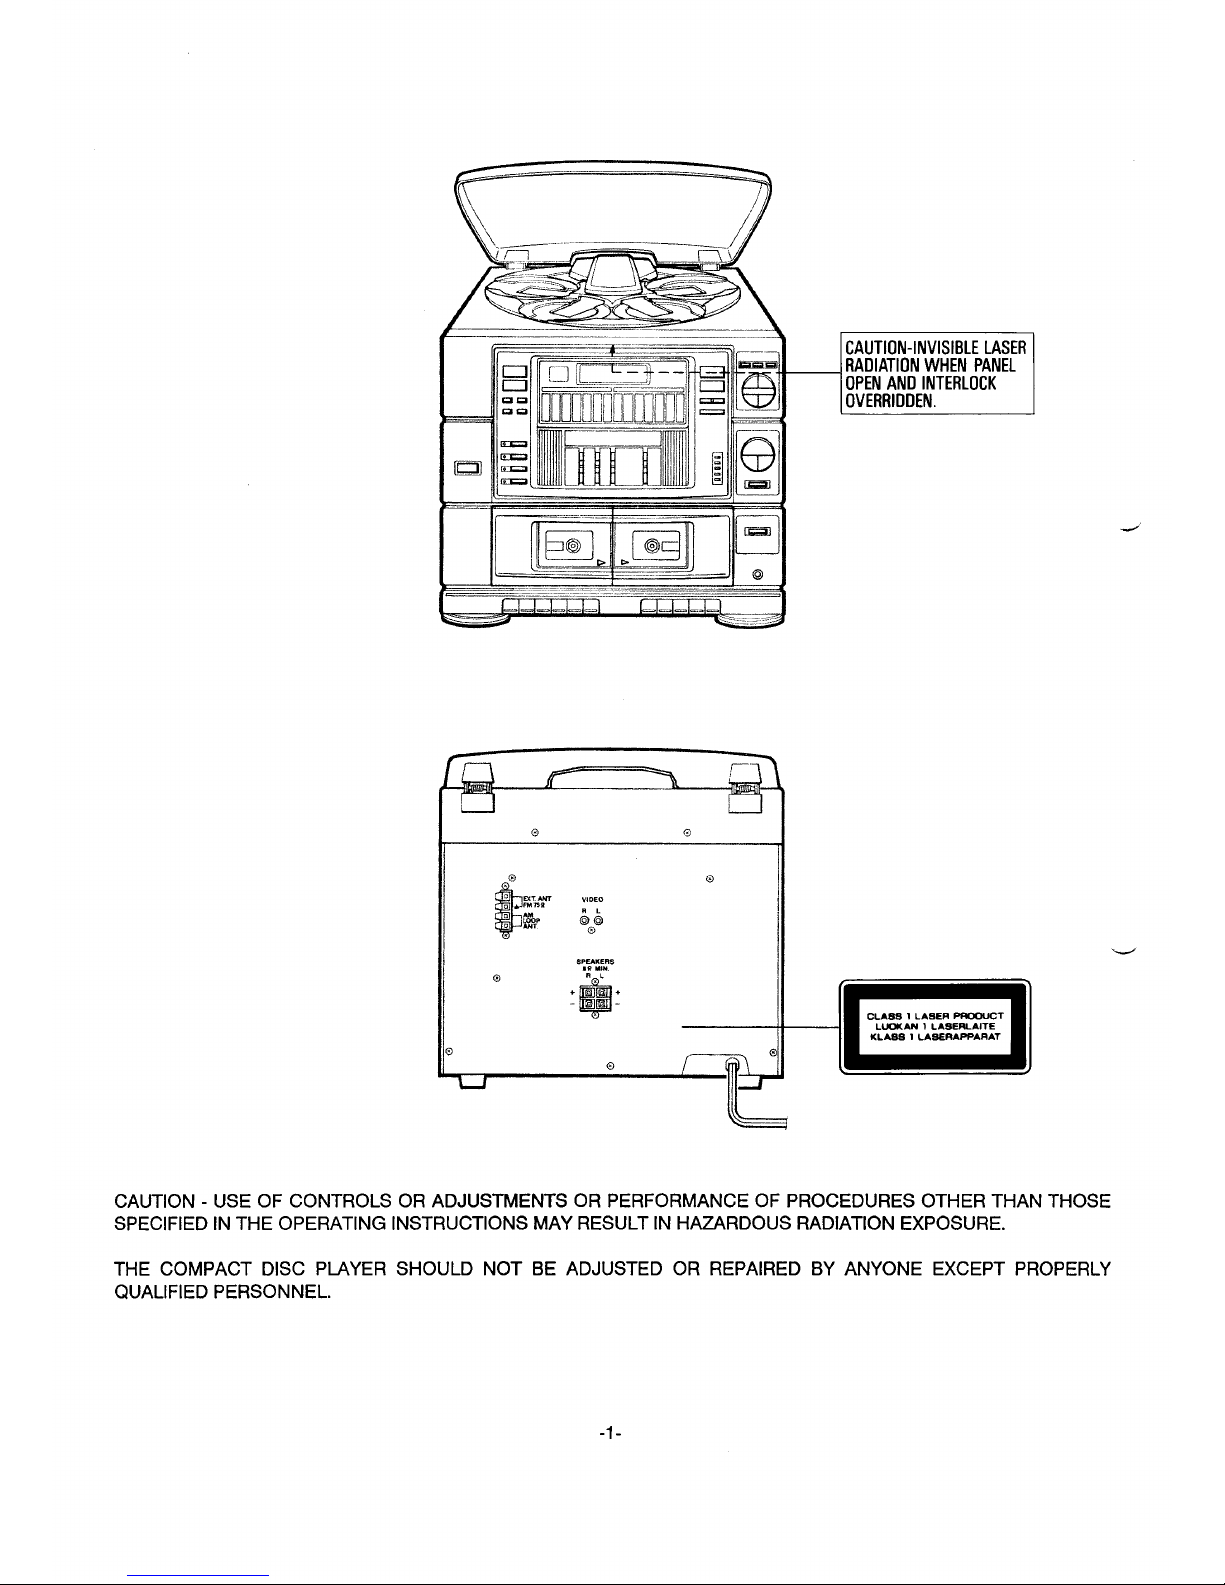
CAUTION - USE OF CONTROLS OR ADJUSTMENTS OR PERFORMANCE OF PROCEDURES OTHER THAN THOSE
SPECIFIED IN THE OPERATING INSTRUCTIONS MAY RESULT IN HAZARDOUS RADIATION EXPOSURE.
THE COMPACT DISC PIAYER SHOULD NOT BE ADJUSTED OR REPAIRED BY ANYONE EXCEPT PROPERLY
QUALIFIED PERSONNEL.
-1-
Page 3

CONTENTS
BEFORE USE OR TRANSPORTATIONo ................................................................................................................................. 2
FOR SAFE AND EFFICIENT Operation .............................................................................................................................. 2
Connections ....................................................................................................................................................................... 3
CONTROLS .............................................................................................................................................................................. 5
GENERAL Operation ..........................................................................................o................................................................ 7
VIDEO EQUIPMENT PUYBACK ............................................................................................................................................. 7
HANDLING THE DISCS ...............,..,0..,.,,,!.............................................................................................................................. .
8
CD PLAY.,,,,,............................................................................................,,,,,,,,,,,,,,.............................,,,,.,..,,,,, ....0....................
8
PROGRAMMED PLAY
..........................................,,,... .........................,,,,,,.,........................................................................... ..10
LISTENING TO THE RADIO
...........................................................................................................................!0............... .........
11
LISTENING TO TAPE
............................................................................................................................................ .............. .....
12
RECORDING (TAPE B)
.....................!.......................................................................................................................... ............ 13
RECORDING COMPACT DISCS
............................................................................................................................................ . 14
TAPE DUBBING (TAPE A TO TAPE B)
................................................................................................................................... 17
MAINTENANCE
......................................................................,..................................................................... .............. ..............
18
SPECIFICATION
........................................................................................................................................................Back Cover
3EFORE USE OR TRANSPORTATION
Before use
1. Carefully unpack the unit.
2. Remove all packing material from around the unit.
3. Remove the sheet and tape which secures the carousel,
4. Attach the dust cover.
NOTE:
Keep the packing material in case it is necessary to ship
the unit in the fu;ure.
Slide the dust cover onto the
Before transportation
hingesonthe rearoftheunit.Be
sure that both hinges are fully
1,
2.
3,
4.
5,
Remove afi discs from the trays.
insertedintothe notchesonthe
Turn off the power.
dustcover.
Disconnect the AC power cord.
Remove the dust cover.
Attach the transportation sheet and tape.
m
\
FOR SAFE AND EFFICIENT OPERATION
Do not damage the power cord.
When not in use, disconnect the power cord from the
outlet, Grasp the plug, not the cord, when disconnecting the unit.
If water should enter the unit, electrical shock or a mal-
function may result. Use in an area where there is low
humidity and little dust.
Do not disassemble or alter the unit in any way.
Do not use the unit in area where extremes in tempera-
ture occur (below 50C or exceeding 350C), or where il
may be exposed to direct sunlight.
Because of the unit’s extremely low noise and wide
dynamic range, there may be a tendency to turn the
volume on the amplifier higher than necessary. Doing
so may produce an excessive output from the amplifier,
which can cause damage to your speakers. Use care
when playing compact discs. Wait until the music has
started before raising the volume.
Sudden changes in the surrounding temperature can
cause dew to form on the optical pickup lens inside the
unit. Under this condition the unit may not operate properly. If this should occur, remove the disc and allow the
player to adjust to the surrounding temperature.
-2-
Page 4
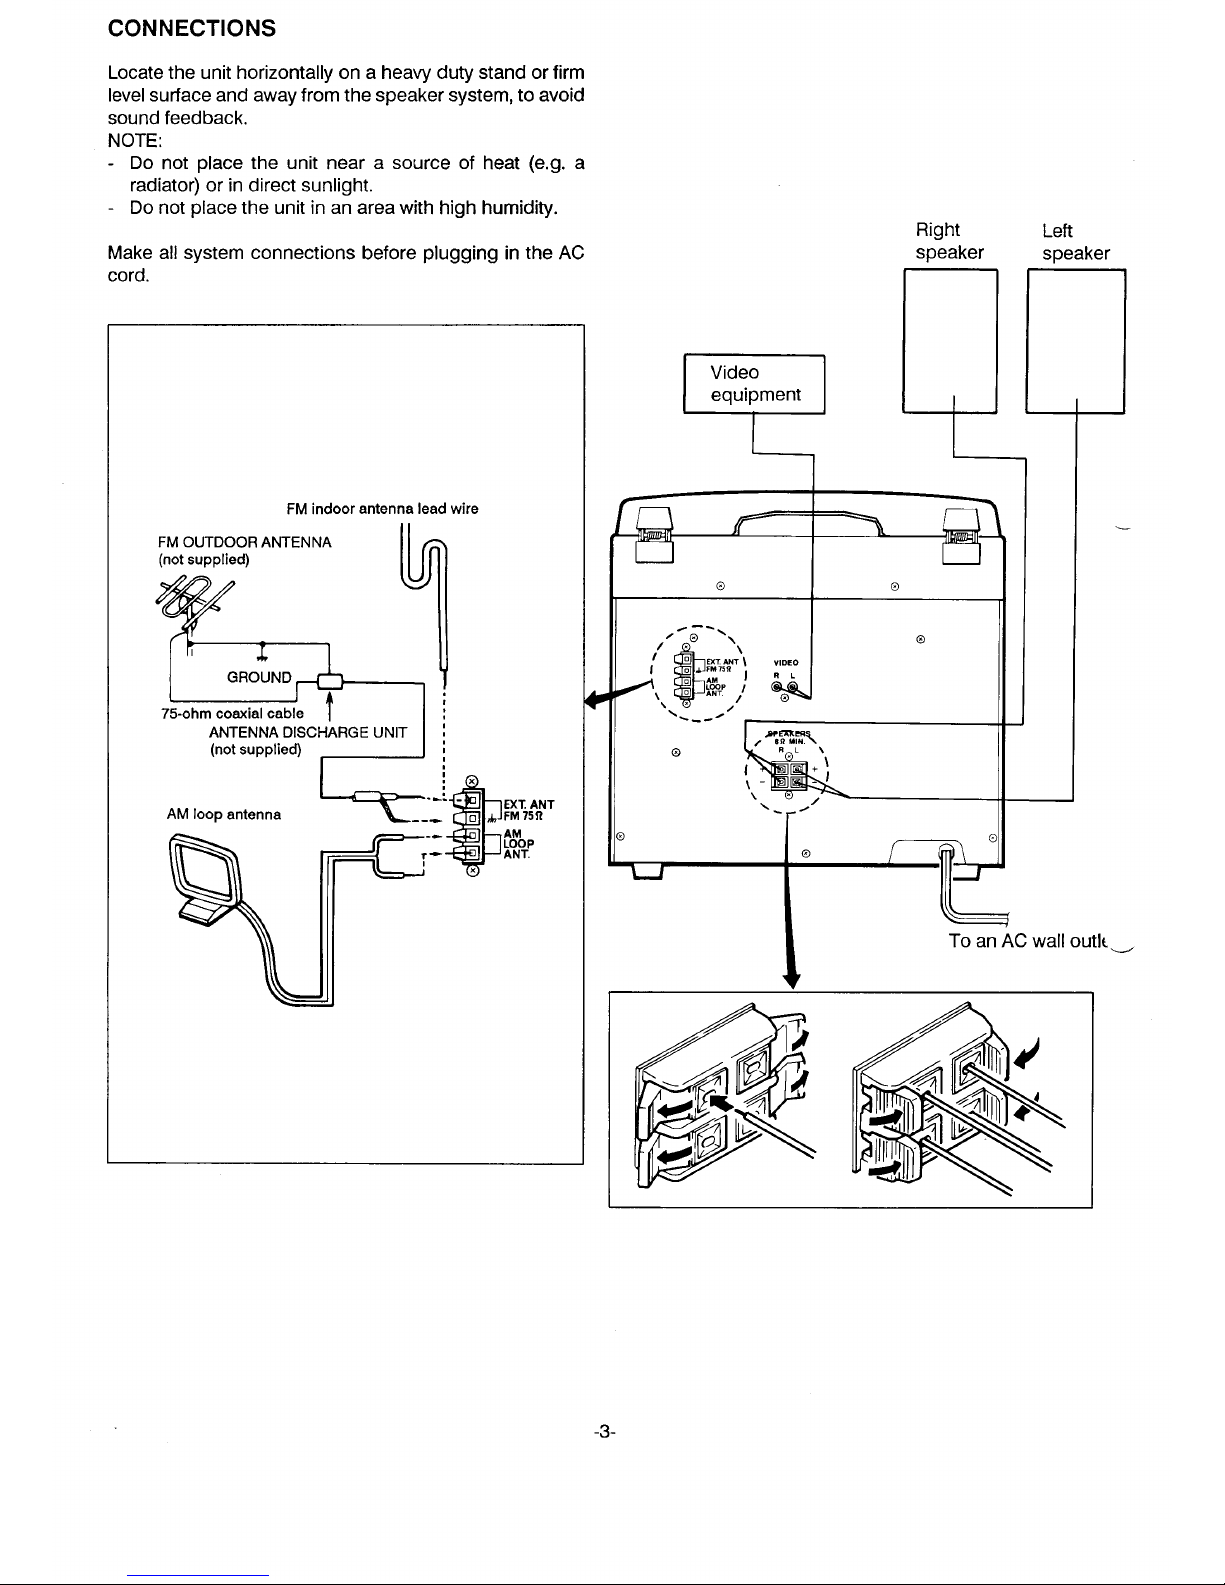
CONNECTIONS
Locate the unit horizontally on a heavy duty stand or firm
level surface and away from the speaker system, to avoid
sound feedback.
NOTE:
- Do not place the unit near a source of heat (e.g. a
radiator) or in direct sunlight.
- Do not place the unit in an area with high humidity.
Make all system connections before plugging in the AC
cord.
FM indoorantennalead wire
FM OUTDOORANTENNA
(notsupplied)
v
Right
speaker
<’ L
Video
equipment
.
@
8
Left
speaker
—
\\ -
\
-i-’
wall outlt_
-3-
Page 5
FM antenna
The FM indoor antenna lead wire is sufficient to receive
most local FM broadcasts and should be connected to the
rear FM ANT terminal. Extend the antenna lead wire as
straight as possible and, while listening to the sound from
the system, secure it in a position where the best FM
reception is found.
Infringe areas, or where reception is distorted or noisy, an
FM outdoor antenna (not supplied) should be connected
instead of the FM indoor antenna lead wire. The terminals
will accept 75-ohm coaxial cable,
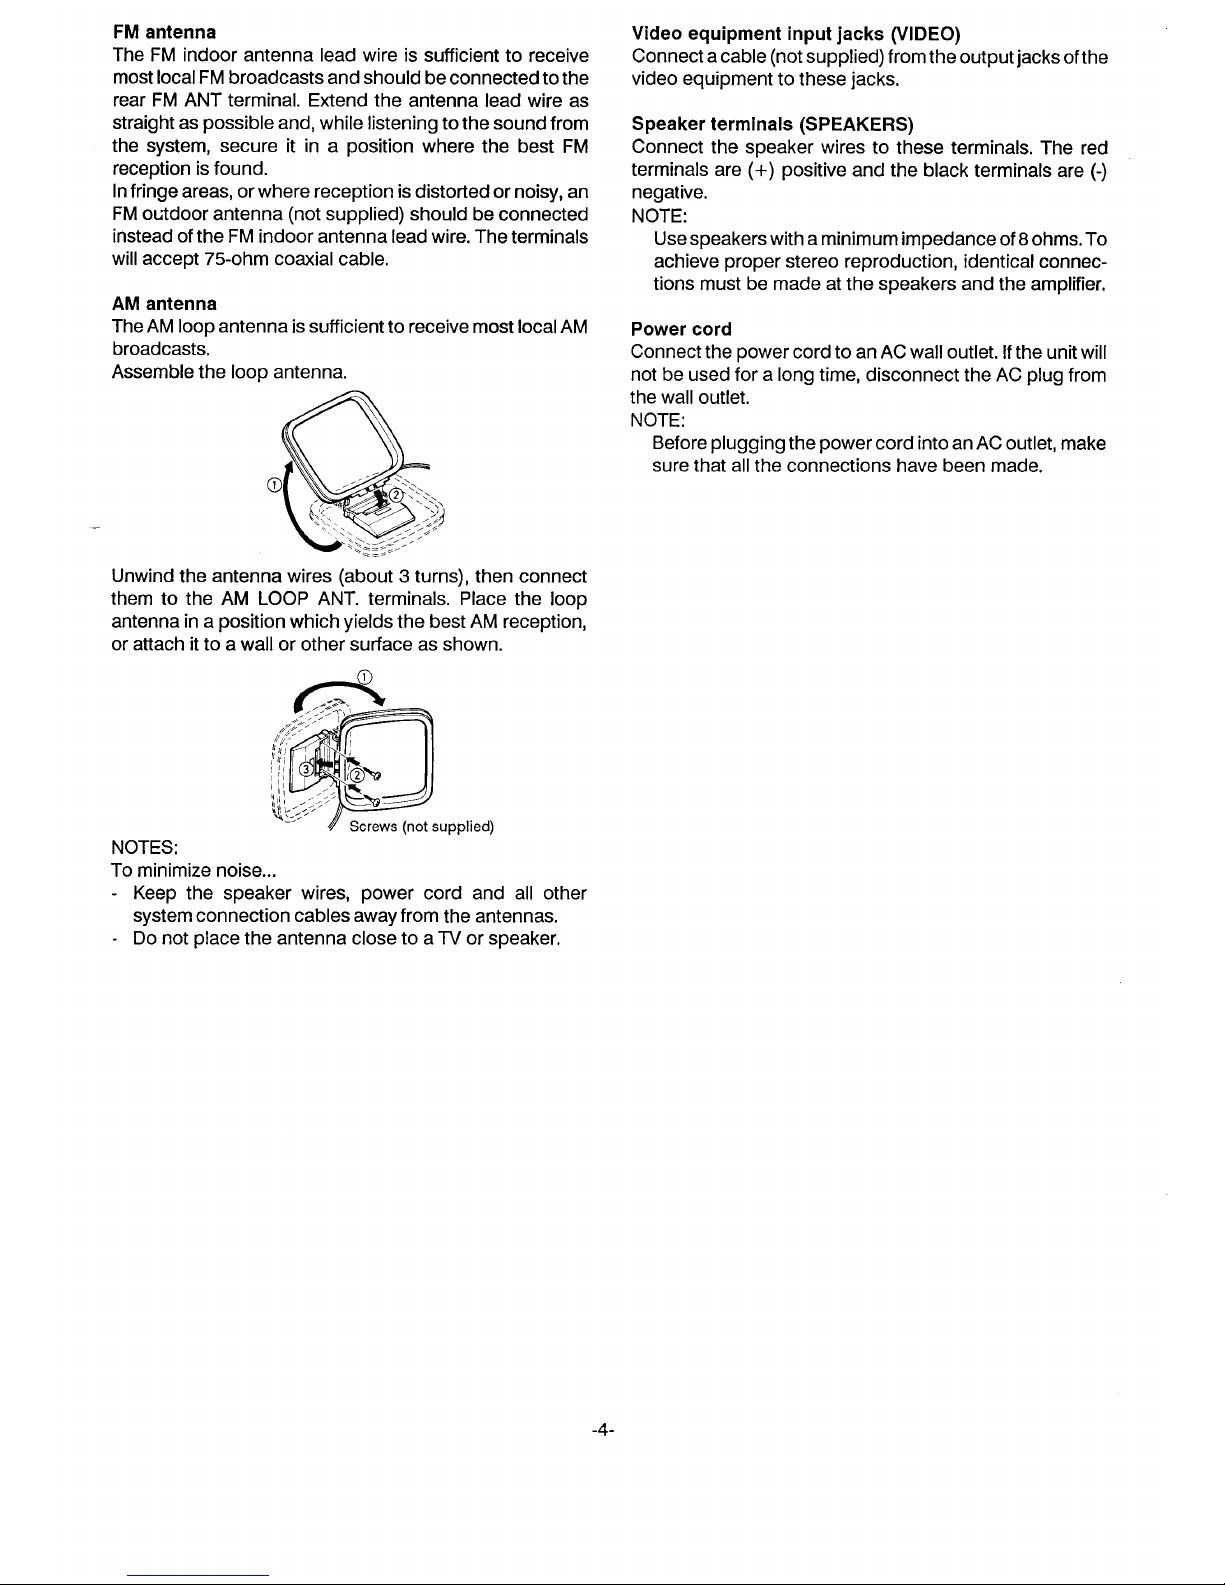
AM antenna
The AM loop antenna is sufficient to receive most local AM
broadcasts.
Assemble the loop antenna.
Unwind the antenna wires (about 3 turns), then connect
them to the AM LOOP ANT. terminals. Place the loop
antenna in a position which yields the best AM reception,
or attach it to a wall or other surface as shown.
upplied)
NOTES:
To minimize noise...
- Keep the speaker wires, power cord and all other
system connection cables away from the antennas.
- Do not place the antenna close to a TV or speaker.
Video equipment input jacks (VIDEO)
Connect a cable (not supplied) from the output jacks of the
video equipment to these jacks.
Speaker terminals (SPEAKERS)
Connect the speaker wires to these terminals. The red
terminals are (+) positive and the black terminals are (-)
negative,
NOTE:
Use speakers with a minimum impedance of 8 ohms, To
achieve proper stereo reproduction, identical connec-
tions must be made at the speakers and the amplifier,
Power cord
Connect the power cord to an AC wall outlet. If the unit will
not be used for a long time, disconnect the AC plug from
the wall outlet.
NOTE:
Before plugging the power cord into an AC outlet, make
sure that all the connections have been made.
-4-
Page 6

CONTROLS
Amplifier section
}— - -—-..
.-
_,.
10
1.
2.
3,
4.
5.
6,
7.
8,
9,
10
Power switch (POWER)
Function buttons and indicators
(CD/TUNER~APE/VIDEO)
Infrared remote control sensor (REMOTE SENSOR)
Multi-display
(MULTI FUNCTION DISPLAY FOR CD& TUNER)
Graphic equalizer controls and indicators
(GRAPHIC EQUALIZER)
Balance control and indicator (BALANCE)
Volume UP/DOWN buttons (VOLUME)
Volume position indicators (VOLUME POSITION)
Bass expander button (BASSXPANDER)
Stereo headphones jack (PHONES)
CD section
11.
12.
13.
14.
15.
16.
17.
18.
19.
20.
21.
22.
23,
Fade-out button (FADE)
Edit button (EDIT)
Random play button (RANDOM PLA~
Intro scan button (INTRO SCAN)
Memory button (MEMORY)
Repeat button (REPEAT)
Disc trays
CD cover
Dust cover
Play/pause button ( D/00 )
Stop button (
❑ )
Skip/Search buttons ( KM/~ , DD/DDi )
Disc skip button (DISC SKIP)
Tuner section
2:2; 2:
i-l J
24. Band button (BAND)
d
25. Memory button (MEMORY)
26. FM/Tuning mode select button (FM/TUNE MODE)
27, Tuning UP/DOWN buttons (TUNING)
28. Preset UP/DOWN buttons (PRESET)
Tape section
29
29,
30,
31.
32.
33.
34,
35,
36.
37.
38,
39.
40.
41.
42.
Dubbing speed/Beat cancel button
(DUBBING SPEED/BEAT CANCEL)
Cassette compartment lid (TAPE A)
Pause button (PAUSE)
Stop/Eject button (STOP/EJECT)
Fast forward button (FFWD)
Rewind button (REW)
Play button (PIAY)
Cassette compartment lid (TAPE B)
Pause button (PAUSE)
Stop/Eject button (STOP/EJECT)
Fast forward button (FFWD)
Rewind button (REW)
Play button (PLAY)
Record button (REC)
NOTE:
This unit has transparent protective sheets on the front
panel to protect it from scratches. If desired, you may
remove these protective sheets before use.
-5-
Page 7

REMOTE CONTROL
1, Compact disc changer section (CD)
Intro scan button (INTRO)
Time display button (TIME DISPLAY)
2.
3.
L
(See “Time display selection” on page 9.)
Memory button (MEMORY)
Repeat button (REPEAT)
Stop button (
❑ )
Skip/Search buttons ( l@l/04 ),( m/~ )
Play/Pause button ( D/on
)
Random play button (RANDOM)
Disc skip button (DISC SKIP)
Tuner section (TUNER)
FM/Tuning mode select button (MODE)
Preset button (PRESET)
(Press this button to select a preset station.)
Band button (BAND)
Tuning UP/DOWN buttons (- TUN +)
Amplifier section
Video function button (VIDEO)
Tape function button (TAPE)
Volume UP/DOWN buttons (- VOL +)
Battery installation
1,
2,
Open the battery compartment by sliding the lid toward
the bottom of the remote control.
lnsta[l 2 “SUM-3/AA/R6” size batteries
(nOt supplied)
exactly as shown in the polarity diagram inside the
battery compartment.
D
@@
@@
*
3. Close the battery compartment lid.
NOTES:
Always remove the batteries if the remote control will not
to be used for a month or more. Batteries left in the unit
may leak and cause damage.
When the batteries have become discharged, they
must be disposed of in a safe manner which complies
with all applicable laws.
OPERATION
The GCD2000 can be operated from a distance of up to 7
meters with the wireless remote control. Point the remote
control directly at the unit and press the desired buttons.
The infrared beam from the remote control travels in a
straight line, Make sure that there are no objects between
the remote control and the GCD2000 that might block the
beam,
NOTE:
The remote control may not operate when the batteries
begin to wear out, If this happens, replace the batteries
with new ones.
-6-
—
Page 8

GENERAL OPERATION
Power switch (POWER)
Press the POWER switch to ON (button IN). The display
shows “HELLO”, then changes to the function mode.
POWER
OFF~ *ON
101
Volume control
Press the “UP” or “DOWN” VOLUME button or press the
“+” or “-” VOL button on the remote control.
u
m
,EMoTsl&o_
Volume position indicators (VOLUME POSITION)
These indicators show the relative volume position.
VOLUME POSITIC+I
[
5— n
4— u
3— o
2— n
1— o
Balance control (BALANCE)
Adjusts the output level (balance) between the left and
right channels of the speakers and headphones.
SALANCE
n
:
SF
i
.
.
.
I
.
. .
.
.
.
0
.
. .
.
.
.
.
.
.
R
R
.
.
u
Graphic equalizer controls (GRAPHIC EQUALIZER)
The separate 3-BAND GRAPHIC EQUALIZER controls
(100Hz/1 kHz/1 OkHz) allow the sound to be tailored to
individual musical preferences or to fit the acoustics of the
room. Moving the control up will increase the sound level
in a narrow range of musical frequencies and moving the
control down will decrease the sound level.
GRAPHIC EQUALIZER
100Hz 1kHZ
7
10kHZ
~m!Hllr
Uuu
Bass expander button (BASSXPANDER)
Press the button to the ON position to enhance the bass
sound,
.
SASS XPANDER
OFF I -ON
m
Stereo headphones jack (PHONES)
Connect a pair of stereo headphones (not supplied) to the
PHONES jack for monitoring or private listening.
PHONES
@
VIDEO EQUIPMENT PLAYBACK
1. Connect a VCR or other video equipment to the VIDEO
input jacks,
2, Press the VIDEO function button.
The display shows “VI dEO”.
3. Follow the instructions provided with the component.
4. Adjust the VOLUME and other controls as desired.
.
-7-
Page 9

HANDLING THE DISCS
This unit has been designed to play compact discs bearing the identification logo as shown. No other discs can be
played,
KmEiE
DIGITAL AUDIO
Both 8 cm and 12
this CD changer.
NOTE:
cm compact discs can be played with
----
—
Place only one disc in each tray.
Fingerprints and dust should be carefully wiped off the
signal surface of the disc (glossy side) with a soft cloth. Wipe in a straight motion from the center to the outside
of the disc.
Never use chemicals such as record cleaning sprays, antistatic sprays or fluids, benzine or thinner to clean
compact disc. These chemicals will permanently damage the plastic surface of the disc.
Always place the compact disc in the disc tray with the
label facing upward, Compact discs can be played on
only one side.
CD PLAY
Loading discs
1. Press the POWER switch to ON (button IN).
- The display shows “HELLO”, then changes to the
function mode
2. Press the CD function button.
3. Place each disc in the tray with the label facing up.
Place a 8 cm disc in the circular section at the center
of the disc tray.
Do not place 8 cm and 12 cm discs in the same disc
tray.
Each time the DISC SKIP button is pressed, the
carousel turns clockwise to the next tray position.
_ NOTES:
- Do not put anything except a compact disc on the tray.
Foreign objects can damage the mechanism.
- Do not touch the carousel while it is rotating.
For12 cm disc
For8 cm disc
w
(EM@
t
-8-
To remove a disc from its storage case, press down on
the center of the case and lift the disc out, holding it
carefully by the edges.
Lift out. The proper way to hold
a compact disc.
u
Discs should be returned to their cases after use to
protect them from dust and scratches.
To prevent warping the disc, do not expose it to direct
sunlight, high humidity or high temperatures for ex-
tended periods of time,
Do not apply paper or write anything on the disc sur-
face.
Playing discs
1.
2.
3.
4.
Pre;s the DiSC SKIP button to display the tray number
of the disc to be played first.
Press the D/00 button. ” D “ appears on the dispiay
and play starts from the first track. The following infor-
mation is dispiaved:
The current ~sc number
The current track number
Eiapsed time for the current track
Totai number of tracks on the disc
- if the disc contains 15 or more tracks, “ D” appears to the right of the”1 5“ indicator.
Press the
❑ button to end disc piay. The disc number,
totai number of tracks and totai piay time for the cur-
rentiy seiected disc are dispiayed.
When the last track of the last disc has been played, the
player automatically stops.
.......... -----——
——.
.——.————.. —.. _—=__
I
J
I
I
I
I
Page 10

NOTE:
- A disc cannot be played if it is installed with label facing
down. If a disc is installed in this way, the player will
search each disc tray in order until a properly loaded
disc is found. If the last disc tray does not contain a
playable disc, the player will search disc tray 1 for a
playable disc. If a playable disc is not found, the display
will show “no dlSC. ”
- The player may not operate properly ifthe surface of the
disc is marred by scratches, fingerprints or dirt.
Temporarily stopping play
When the D/ OD button is pressed, “ D “ flashes on the
display and play is temporarily stopped. To resume play,
press the D/00 button again.
Skip play
Press the M/@ or DD/ DM button toquicklyfindthe
beginning of the next track or return to the beginning of the
track that is playing.
- To skip to track 6 while track 3 is playing, press the
“ DD/DDi
“ button until “6” appears in the TRACK
section of the display.
- To skip back to track 3 while track 6 is playing, press the
“ IW /04 “ button until “3” appears in the TRACK
section of the display.
NOTE:
When the skip function is used in the pause mode, the
player will skip to the start of the track, then pause.
Search (forward/reverse)
Ifthe’( HQ/@ “or”
DD/ DCl “ button is pressed during play, the player will search at high speed in the forward
or reverse direction while the button is being pressed.
When the button is released, normal play will continue.
- While the” I@I/@ “ or” DD/~ “ button is pressed,
the sound will be reduced in volume.
- Ifthe” l@/c4 “ or” DO/~ “ button is pressed in
the pause mode, pause will resume when the button is
released.
- In the forward direction, search will continue disc to
disc, except in the “REPEAT ALL” mode (See “Repeat
play function” section).
- In the reverse direction, the player will pause when the
beginning of the first track on the disc being played is
reached.
Introscan
INTRO
SCAN
D
Press the INTRO SCAN button to play the first 10 seconds
of each track. “INTRO” appears on the display.
- Press the INTRO SCAN button again to return to normal
play.
- If the INTRO SCAN button is pressed during normal
play, introscan will start with the next track on the disc.
- Pressthe” lcu/ca “or”
DO/ w “ button to skip to
another track during introscan play.
- Ifthe player is set to “REPEAT CONT” mode, Introscan
will continue from disc to disc (See “Repeat play function” section).
Random play
RANDCM
PLAY
D
Press the RANDOM PIAY button at any time to begin
random play. The player will automatically select and play
discs and tracks at random. “RANDOM” appears on the
display.
- Press the RANDOM PLAY button again during random -~
play. The player will select the next random disc and
track.
Random introscan play
Press the INTRO SCAN button, then the RANDOM PIAY
button, to play the first 10 seconds of each track at
random.
Repeat play function ,—1
I
REPEAT
I
1
1
This unit has three different repeat modes. Press the
REPEAT button repeatedly to select the desired mode in
the following sequence. The selected repeat mode is
shown on the display.
“REPEAT ONE”: Repeat one track
“REPEAT ALL”: Repeat all tracks on the selected disc
“REPEAT CONT”: Repeat all the tracks of all discs
None: Normal play mode
During programmed play, only “REPEAT ONE” and
“REPEAT ALL” can be selected.
Time display selection
During play, the remaining playtime can be checked using
the TIM-E DISPLAY button on the remote control.
Press the TIME DISPIAY button repeatedly during normal
play. The following display modes appear:
- Remaining time on the current track
- Remaining time on the entire disc
- Elapsed time on the current track
NOTES:
- During programmed play, total remain time cannot be
displayed.
- The displayed play times may differ slightly from the
times listed on the notes accompanying the disc.
- In the stop mode, the total play time on the disc is
displayed.
-9-
Page 11

.,
PROGRAMMED PLAY
Up to 32 selections, from up to 5 discs, can be programmed for play in any order.
- The same track or disc can be programmed more than
once.
Programming procedure
Follow the example below to program tracks 2 and 6 on
DISC 1, track 9 on DISC 2 and all tracks on DISC 3. In this
example, each disc has 9 tracks and DISC 3 is in playing
position.
1.
2.
3.
4.
5.
6.
7.
8.
9,
10.
11.
Press the MEMORY button.
“PROG.” blinks on the display.
m
DISC3
TRACKAL Pr. 1
PROG. 123456789
?!1
Select DISC 1 by pressing the DISC SKIP button.
DISC 1 TRACKAL Pr. 1
PROG.
?1!
Select track 2 by pressing the” DD/ m “ button.
Disc 1 TRACK2 Pro 1
PROG.
/!1
Press the MEMORY button. “PROG.” remains lit.
DISC 1 TRACK2 Pr. 1
PROG. 2
Select track
6 by pressing the “ bD/~ “ button.
“PROG,” blinks.
DISC 1 TR4CK 6 Pr. 2
PROG, 2
!!1
Press the MEMORY button. “PROG,” remains lit,
DISC1
TRACK6 Pr, 2
PROG. 2 6
Select DISC 2 by pressing the DISC SKIP button.
“PROG.” blinks,
DISC2 TRACKAL Pr. 3
PROG.
!11
Select track 9 by pressing the” DD/Dt+ “ button.
DiSC2 TRACK 9 Pro3
PROG.
/!1
Press the MEMORY button, “PROG.” remains lit.
DISC2 TRACK9 pr. 3
PROG. 9
Select DISC
3 by pressing the DISC SKIP button.
“PROG.” blinks,
DISC3 TRACKAL Pr. 4
PROG.
?!1
Press
the MEMORY button. “PROG.” remains lit.
DISC3 TRACKAL Pr. 4
PROG.
When programming, use the disc select buttons to
assign the discs and the MU/Cd or DD/DH button
to assign the tracks.
The maximum number of selections that can be programmed is 32. If you try to enter more selections,
“FULL” will appear on the display.
Checking the program
1.2.While in the stop mode, press the MEMORY button. The
disc, track and program numbers will appear on the
display. Press the MEMORY button again to view the
disc, track and program numbers for the other programmed selections.
- These displays do not appear during programmed
play.
Press the D/00 button to start play. When all programmed selections have played, the player stops
automatically.
- During programmed play, if the programmed track
does not exist on the disc, the next programmed
selection is played.
NOTE:
The program is cleared in the following cases:
- When the
❑ button is pressed in the stop mode
Changing a program
To add a new selection to a program:
1. In the stop mode, press the MEMORY button repeatedly until the following display appears:
t, ,,
----- -----
2. Select a disc and track number.
3. Press the MEMORY button.
To change a selection:
1. Press the MEMORY button repeatedly until the selection to be replaced is displayed.
2. Select a disc and track number.
3. Press the MEMORY button.
Operations during programmed play
Press the “ I@/@l “ or “ CD/N “ button to skip
programmed tracks,
Ifthe end (or beginning) of the current track is reached
in forward (or reverse) search mode, the player enters
the pause mode.
-10-
Page 12

LISTENING TO THE RADIO
Preparation
1. Press the POWER switch to ON.
Automatic or Manual tuning operation:
1.
2.
3.
4.,
Press the TUNER functio; button.
Press the BAND button to select the desired radio band.
The selected band will be displayed: “FM 1”, “FM 2“ or
“AM”.
a) For automatic tuning, press the FM/TUNE MODE
button to select the AUTO position. (The AUTO indicator will appear in the display.) Press either the
“UP” or “DOWN” TUNING button, The unit will automatically tune in a station. Press either the “UP” or
“DOWN” TUNING button again to receive the next
broadcast station, In the automatic tuning mode, the
unit may not stop on distant or weak signal stations,
b) For manual tuning, press the FM/TUNE MODE but-
ton to select the manual position. (The AUTO indi-
cator will go off.) Press either the “UP” or “DOWN”
TUNING button until you have reached the desired
station.
NOTES:
- For receiving an FM stereo broadcast, set the FM/
TUNE MODE button to the AUTO position. The unit
will automatically switch to mono or stereo as you
tune in different stations. The FM stereo (ST) indicatorwill appear in the display when a stereo broadcast
is being received.
- For receiving a weak-signal FM stereo broadcast, set
the FMnUNE MODE button to the manual position.
The MONO indicator will appear in the display.
Adjust the VOLUME and other controls as desired.
To preset stations and operate preset tuning:
The unit has an electronic memory circuit which is capable
of memorizing a total of 36 stations (e.g. 24 FM and 12AM
stations).
1.
2.
3.
4.
5.
6.
7,
8.
Press the TUNER function button,
Select the desired radio band with the BAND button.
Tune in a desired station.
Press the MEMORY button. The PROG. indicator will
flash,
Press the ‘(UP” or “DOWN” PRESET button to select
the desired preset number.
Press the MEMORY button. The PROG. indicator will go
off. The station is now preset.
Example:
p12
FM 1 88.1 MHz
AUTO
12
To preset the other stations, follow the same procedure
outlined in Steps 2-6 above.
Now, you can
receive a desired AM or FM broadcast
station quickly and accurately, Select the desired band,
press and release the “UP” or DOWN” PRESET button.
The preset station will be heard.
l—
d’
1
NOTES:
- 12 stations can be preset on each Band.
- Once you have preset the desired stations, they will be
held in memory even if the unit is turned off.
- Ifthe power cord is disconnected from the wall outlet, or
if a power failure occurs, the tuning memory will be
erased. Preset new stations as described above.
-11-
Page 13

LISTENING TO TAPE
PLAYBACK (TAPE A/TAPE B)
TAPE B is used for both recording and playback. TAPE A
is used for playback only.
Do not turn the unit off while the tape is running. Otherwise,
the pinch roller may be damaged.
Preparation
1. Press the TAPE function button. The display shows
“TAPE”.
2. Press the appropriate STOP/EJECT button and insert a
recorded cassette.
mm
-
s
~1==1
3. Close the compartment lid.
.._-
/
Pause
Press the PAUSE button to temporarily stop the tape
during playback or recording. Press it again to resume
operation.
Fast forward and rewind
Press the FFWD or REW button to quickly wind the tape
forward or backward. Press the STOP/EJECT button
when the desired position of the tape has been reached.
When the end of the tape is reached, the tape will stop
and the FFWD or REW button will be released automatically.
Fully automatic stop
This deck has a full-release stop system, to protect the
tape and prevent pinch roller wear. When the end of the
tape is reached in any mode, the tape will stop automati-
cally,
~
While playing or recording with one deck, do not press
the Fast Forward (FFWD) or Rewind (RE~ button of the
other deck, or the sound quality may deteriorate.
A) Playback (TAPE A or TAPE B)
1. Press the PIAY button (TAPE A or TAPE B).
2. Adjust the VOLUME and other controls as desired.
3. Press the STOP/EJECT button to stop playback at any
time. When the end of the tape is reached, the tape will
stop automatically.
B) Continuous playback (TAPE A to TAPE B)
1.
2.
3.
4.
5.
Press the TAPE A PLAY button. TAPE A playback will
begin.
Press the TAPE B PAUSE button.
Press the TAPE B PLAY button. TAPE B will enter the
pause mode.
When the end of the tape in TAPE A is reached, the tape
will stop and TAPE B playback will begin,
When the end of the tape in TAPE B is reached, the tape
will stop,
._..--——-— -—
32i
-12-
Page 14

RECORDING (TAPE B)
WARNING:
UNAUTHORIZED RECORDING OF COPYRIGHTED MATERIALMAYVIOIATE APPLICABLE COPYRIGHT l_AWS,
SANYO ASSUMES NO RESPONSIBILITY FOR UNAUTHORIZED DUPLICATION, USE OR OTHER ACTS
WHICH INFRINGE UPON THE RIGHTS OF COPYRIGHT
OWNERS,
This unit features ALC (Automatic Level Control) which
automatically adjusts the recording level.
PREPARATION
1. Press the STOP/EJECT button and insert a cassette.
RECORDING FROM THE RADIO
1.
2.
3.
4.
Press the TUNER function button.
Press the REC button to start recording. The PIAY
button is engaged simultaneously.
During recording, the sound can be monitored through
the speakers. The VOLUME and other controls will not
affect the recording, Adjust them as desired.
Press the STOP/EJECT button to stop recording at any
time. When the end of the tape is reached, the tape will
automatically stop.
1
24
Beat cancel switch (DUBBING SPEED/BEAT CANCEL)
When recording a radio program on the tape, an irritating
beat sound (high pitched tone) may sometimes be heard.
In this occurs, set the DUBBING SPEED/BEAT CANCEL
switch to the position that gives the best result.
DuBBING SPEED
/BEAT CANCEL
NORMAL/1 ~ * HIGH/2
m
RECORDING FROM VIDEO EQUIPMENT
1. Press the VIDEO function button. The display shows
“VI dEO”.
2, Operate the video equipment following the instruction
manual provided with the component.
3. Press the REC button to start recording.
Erasing a tape
To erase a recorded segment without making a new -
recording, press the TAPE function button and operate
the unit in the recording mode.
NOTE:
Do not operate the TAPE A mechanism while erasing.
Safeguards against accidental erasure
Whenever a recording is made, the sound previously
recorded is automatically erased. To protect valuable
recordings from accidental erasure, break out the tab(s)
on the back of the cassette with a screwdriver.
To protect side A, break out tab (1). To protect side B,
break out tab (2).
NOTE:
A cassette with the erase guard tabs removed cannot
be erased or used for recording and the REC button
cannot be depressed. To record or erase a protected
cassette, cover the tab openings with adhesive tape (3). -
-13-
Page 15

RECORDING COMPACT DISCS
EDIT RECORDING
NOTES:
The following edit recording operations can be performed. Selections from multiple discs can be programmed and
recorded automatically.
a) Normal edit recording
b) Program edit recording
c) Fade-out edit recording
d) Backward skip edit recording
CD play starts automatically after 8 seconds, so the
recording will not be interrupted by the leader tape at
the beginning of sides A and B.
A short blank space is automatically recorded at the
end of each track.
The highest track number which can be edited is 32.
a) Normal edit recording
Since track 3 will not fii on this side, side B is used instead and an
unrecorded blank is created here.
SIDEA25 min.
................. .................. .......
:.:.:.:.:.:.+.:.:.:.:.:.:.:.~.:.:.:
>
Manualreverse
I
SIDEB25
min.
.-
1
Unrecordedblank
To record a CD with no change in the track sequence, 4.
follow the example below.
To record all tracks on a 5-track disc (total play time of 47
min 20 see) on DISC 2, onto a 50-minute tape:
1. Press the DISC SKIP button to select the DISC 2.
OISC SKIP
~
5.
2. Press the EDIT button to select the recording tape
length.
EDIT
D
The display indicates:
6.
DISC2 C-46 EDIT SIDE A
123...
7.
Each time the EDIT button is pressed, the tape length
display changes
in the following sequence:
8.
~6+C-54+C-60<-74 +C-90+C- +(Cleared)
9.
To set the desired tape length up to C-99, use the
“ l@I/CU “ or “ ~/DDI “ button. To set “C-50”,
press the EDIT button to select “C-46” and press the
“ DU/w
“ button 4 times. “C-50” appears on the
display.
Press the REC button to set the record pause mode for
side A.
● REC ➤ PLAY
Press the D/011 button to start playback with track 1
on disc 2. The deck starts recording at the same time.
L!-1
DISC 2 TRACK1 0.01 EDIT b SIDEA
123...
When all of the tracks
for side A have finished playing,
the player will go to pause mode at the beginning of
the track to be recorded onto side B.
After the tape deck stops automatically, turn over the
cassette and reinsert it.
Press the REC button to start recording of side B,
The player will start playback with track 3 on disc 2.
When all tracks for side B have finished, disc play
stops.
The tape deck will continue recording to the end of the
tape (side B).
The edit mode remains operational when recording
ends. Press the
❑ button to cancel the edit mode.
3. Insert aC-50 cassette tape into the tape deck to record
side A.
-14-
..
_—
Page 16

b) Program edit recording
Unrecorded blank
SIDEA 23 min.
Track3 on DISC3
Track5 on
DISC 1 :;
Track 2 on DISC 1
II ‘ [“
I
‘IJ
Manual reverse
Track 4 on DISC 2
Track 1 on DISC 3
[ Tracki’on D!SC2
Unrecorded blank
The desired selections can be rearranged and recorded
on the tape within a designated tape length.
Example:
The following tracks are to be recorded.
Track 5 on DISC 1:10 min 00 sec
Track 2 on DISC 1:7 min 26 sec
Track 3 on DISC 3:4 min 37 sec
Track 1 on DISC 3:11 min 09 sec
Track 4 on DISC 2:9 min 21 sec
Track 7 on DISC 2:1 min 10 sec
These tracks are recorded in the following order on a 46-
minute tape.
SIDE A:
Track 5 on DISC 1
Track 2 on DISC 1
Track 3 on DISC 3
SIDE B: Track 1 on DISC 3
Track 4 on DISC 2
Track 7 on DISC 2
1. Press the EDIT button until “C-46” appears,
EDIT
ml
2. Press the DISC SKIP button to select the disc (DISC 1).
DISC SKIP
~
3. Press the MEMORY button.
m
“PROG.” blinks and the display indicates:
DISC1 TRACKAL 23.00
EDIT SIDE A
PROG. 123...
Itl
-
The remaining time on side A blinks on the time
display.
4,
5.
6.
7.
8.
9.
10,
11.
-15-
SIDE B 23 min.
Press the @/~ or DD/ w button to select the track
“PROG,” remains lit.
DISC 1 TRACK 5 13.00 EDIT SIDE A
PROG. 1 23 ...
Press the MEMORY button.
m
“PROG.” remains lit.
4
DISC i TRACK 5 13.00 EDIT SIDEA
PROG. 5
Repeat steps 2-5 to program the tracks to be recorded onto side A.
If a track which exceeds the remaining time on side
A is selected, its remaining time blinks on the display.
When the MEMORY button is pressed, “SIDE A“
disappears and “SIDE B“ appears. The remaining
time on side B appears on the display. This and
subsequent tracks are recorded on side B.
Repeat steps 2-5 to program the tracks to be recorded onto side B.
- If a track exceeding the remaining time on side B is
programmed, “Err” will appear in the display for 4 _
seconds.
Insert the C-46 cassette tape into the tape deck to
record side A.
Press the REC button.
●REC ➤ pLAY
~
Press the
D/oo button. Recording starts.
m
The programmed tracks will play in sequence starting
from track 5 on disc 1, and pause at the end of track 3
on disc 3.
DISC 1 TRACK5 0.01 EDIT D SIDEA
PROG. 25
Follow steps “6” to”1 O“ of “Normal edit recording”.
Page 17

c) Fade-out edit recording
The sound is automatically faded out at the end of sides A
and B, according to the selected tape length.
Fade out (1Osec.)
SIDE A 30 min.
I
1,2,
3
H
4
H
[1 H
Manual reverse
10 “ 9
8
I
Fade out (1O sec.)
Record from the beginning of a track. SIDE B 30 min.
Example:
6. Follow steps “6” to”1 O“ of “Normal edit recording”.
To record onto a 60-minute tape
1. Press the EDIT button until “C-60” appears on the -
“FADE” blinks as the sound fades out (1Oseconds).
display.
When the remaining tape length is less than 10 sec.,
2. Press the FADE button.
the track currently playing is not faded out.
“FADE” appears.
The sound is also faded out when a track is interrupted
3. Insert a C-60 cassette tape into the tape deck to record
at the end of side B.
side A.
(If you desire, program the tracks. Refer to “Programmed play” on page 10.)
4. Press the REC button.
5. Press the D/00 button. Recording starts.
The player will start playback with track 1 on sideA and
proceed in sequence until track 6 is recorded. The
display indicates:
DISC 1 TRACK1 FADE 0.01 EDITD SIDEA
123...
d) Backward skip edit recording
Track 4 will be interrupted.
EEiHi@B~Man
SIDE B T
Record from the beginning of a track,
Track 8 will be interrupted.
1, Press the EDIT button until “C---” appears on the
display.
2. Press the REC button.
3. Press the D/00 button.
Recording starts on side A with track 1.
4. Follow steps “6” to “9” of “Normal edit recording”.
MANUAL RECORDING
For programmed recording, program the material in
advance (as described under “PROGRAMMED PLA’f’).
1. Press the REC button.
2. Press the D/On button. Recording starts.
If the FADE button is pressed during recording, the
sound begins to fade out from that point (about 10
seconds). The CD player pauses, but the deck continues recording.
-16-
—
Page 18

TAPE DUBBING (TAPE A TO TAPE B)
Dubbing:
Copying recorded material from the cassette in TAPE
A onto the cassette in TAPE B.
Preparation
1. Press the TAPE function button.
2. Insert a recorded tape into the TAPE A cassette compartment.
3. Set the cassette in TAPE A to the selection to be
recorded.
4. Insert the tape for recording into the TAPE B cassette
compartment.
5, Set the DUBBING SPEED/BEAT CANCEL button to
the desired dubbing speed:
NORMAL:
For dubbing while monitoring at normal speed
HIGH:
For dubbing the tape at high speed (approximately
twice normal speed)
Synchro dubbing
1. Press the TAPE B PAUSE button.
2. Press the TAPE B REC button. (TAPE B will enter the
record pause mode.)
3. Press the TAPE A PLAY button. Dubbing will begin.
4. To stop dubbing, press both STOP/EJECT buttons.
DuBBING SPEED
/BEAT C.4NCEL
NWMALiIm -n1GH12
m
21131
NOTES:
4
4
Do not change the dubbing speed during the dubbing
operation.
Ifyou change the function position during the dubbing
operation, TAPE B will continue to record the new
sound source at normal speed.
Automatic stop during dubbing
1. The TAPE A cassette is longer than the TAPE B
cassette:
After the TAPE B cassette stops, TAPE A playback will
continue at normal speed.
2. The TAPE B cassette is longer than the TAPE I
cassette:
After the TAPE A cassette stops, TAPE B will enter the
erasing mode. Press the TAPE B STOP/EJECT button
immediately when the TAPE A cassette stops.
-17-
Page 19

MAINTENANCE
Cleaning the cabinet
Use a clean soft cloth moistened with plain lukewarm
water and wrung dry. Never use benzol, benzine or other
strong chemical cleaners since these could damage the
finish of your unit. It is important that no liquid reaches the
inside of the unit.
Cleaning the cassette section
For continued high performance from the cassette section, periodically clean the heads, pinch rollers and capstans whenever an accumulation of dust and red-brown
oxide particles is noticed.
To do this, press both STOP/EJECT buttons. Remove any
cassettes still in the cassette compartments. Carefully rub
each head (4, 5, 8), pinch roller (3, 7) and capstan (2, 6)
with a cotton swab (1) moistened with isopropyl alcohol or
special head-cleaning fluid.
/Y*
l—
IY6
l—
J
d~
3
4
I
1
54
8
-18-
Page 20

AMPLIFIER SECTION
Output power
3.5 W/ch (1O% THD)
Input sensitivity and impedance:
VIDEO 300 mV/50 kohms
Graphic equalizer control:
A 6 dB (100 Hz, 1 kHz, 10 kHz)
Bass expander:
+ 8 dB (100
Hz)
TUNER SECTION
(FM)
Frequency range:
87.5 MHz -108.0 kHz (50 kHz steps)
Usable sensitivity:
20,7 dBf (mono)
(AM)
Frequency range:
531 kHz -1,701 kHz (9 kHz steps)
Sensitivity:
800 pV/m (AM Loop antenna)
CASSEITE DECK SECTION
Track system:
4-track, 2-channel stereo
Frequency response:
100 Hz -12.5 kHz
Signal to noise ratio:
50 dB
Wow and flutter:
0.15 % (WRMS)
Tape speed:
4.75 cm/sec
Fast forward and Rewind time:
Approx. 110 sec. (C-60)
CD PLAYER SECTION
Channels:
Sampling frequency:
Digital filter:
D/A conversion:
Pick-up:
Frequency response:
Total harmonic distortion:
Signal to noise ratio:
Wow and flutter:
2-channel stereo
44.1 kHz
8 x Oversampling
Dual 16-bit linear D/A converters
Optical 3-beam semiconductor laser
20 Hz -20 kHz
0.04% (1 kHz)
96 dB
Below measurable limits
GENERAL
Power requirements:
AC: 230-240 V, 50 Hz
Power consumption:
31 w
Dimensions (W x H x D):
Approx. 360x 353x 399 mm
Weight:
Approx. 7.5 kg
RB-2000 WIRELESS REMOTE CONTROL
Power requirements:
2 “SUM-3/AA/R6” batteries
Dimensions (W x H x D):
Approx. 41 x 175x 18 mm
Weight:
Approx. 63 g (without batteries)
4’
Because its products are subject to continuous improvement, SANYO reserves the right to modify product designs and
specifications without notice and without incurring any obligation.
1AD6P10A23003
(AU)
SANYO Electric Co., Ltd.
Printed in Singapore
 Loading...