

Page 1

FXD-MP900
Full Panel Detachable
FM Stereo/MW Receiver
Compact Disc/MP3-CD Player
With CD Changer Controller
With Remote Controller
ISO Mounting with Removable Trim Ring
(English)
OPERATING INSTRUCTIONS . . . . . . . . . . . . . . . . . . . 1~33
(Español)
LIBRITO DE INSTRUCCIONES . . . . . . . . . . . . . . . . . 34~66
GB
E
Page 2

CAUTION - INVISIBLE LASER RADIATION WHEN OPEN AND
VORSICHT - UNSICHTBARE LASERSTRAHLUNG TRITT IM
VARNING - OSYNLIG LASER STRÅLNING NÄR DENNA DEL ÄR
ADVARSEL - USYNLIG LASER STRÅLING VED ÅBNING, NÅR
VARO - AVATTAESSA JA SUOJALUKITUS OHITETTAESSA
INTERLOCKS DEFEATED. AVOID EXPOSURE TO BEAM.
GEÖFFNETEN ZUSTAND AUS UND WENN DIE
SICHERHEITSVERRIEGELUNG ÜBERBÜCKT
IST. EINE AUSSETZUNG DIESER STRAHLUNG IST
ZU VERMEIDEN.
ÖPPNAD OCH SPÄRR ÄR URKOPPLAD.
STRÅLEN ÄR FARLIG.
SIKKERHEDSABRYDERE ER UDE AF FUNKTION,
UNDGÅ UDS ÆTTELSE FOR STRÅLING.
OLET ALTTINA NÄKYMÄTTÖMÄLLE
LASERSÄTEILYLLE.
ÄLÄ KATSO SÄTEESEEN.
CAUTION - USE OF CONTROLS OR ADJUSTMENTS OR PERFORMANCE OF PROCEDURES
OTHER THAN THOSE SPECIFIED HEREIN MAY RESULT IN HAZARDOUS RADIATIION EXPOSURE.
ACHTUNG - BEIVERWENDUNG VON ANDERENALS DEN VORGESCHRIEBENEN REGLERN,
EINSTELLUNGEN ODER BEDIENUNGSSCHRITTEN, BESTEHT DIE GEFAHR EINER
GEFÄHRLICHEN STRAHLUNGSAUSSETZUNG.
ATTENTION - L’EMPLOI D’ORGANES DE COMMANDE OU DE RÉGLAGE, OU L’EXÉCUTION DE
PROCÉDURES, AUTRES QUE CEUX SPÉCIFIÉS DANS LE MODE D’EMPLOI, PEUT PROVOQUER UNE
EXPOSITION DANGEREUSE AU RAYONNEMENT.
OPGELET - HET GEBRUIK VAN REGELAARS OF HET MAKEN VAN AFSTELLINGEN E.D. DIE NIET
IN DEZE GEBRUIKSAANWIJZING ZIJN BESCHREVEN KAN LEIDEN TOT SCHADELIJKE STRALINGEN.
VARNING! OM APPARATEN ANVÄNDS PÅ ANNAT SÄTT ÄN VAD SOM BESKEIVIDENNA
BRUKSANVISNING, KAN ANVÄNDAREN UTSÄTTAS FÖR OSYNLIG LASERSTRÅLNING, SOM
ÖVERSKRIDER GRÄNSEN FÖR LASERKLASS 1.
VAROITUS! LAITTEEN KÄYTTÄMINEN MUULLA KUIN TÄSSÄ KÄYTTÖOHJEESSA MAINITULLA
TAVALLA SAATTAA ALTISTAA KÄYTTÄJÄN TURVALLISUUSLUOKAN 1 YLITTÄVÄLLE
NÄKYMÄTTÖMÄLLE LASERSÄTEILYLLE.
CAUTELA - L'USO DI COMANDI, AGGIUSTAMENTI O PROCEDIMENTI DIVERSO DA QUELLO QUI
SPECIFICATO PUÒ DAR LUOGO AD ESPOSIZIONE A RADIAZIONI PERICOLOSE.
PRECAUCION - EL USO DE CONTROLES O AJUSTES, O PROCEDIMIENTOS DE OPERACION
DIFERENTES DE LOS ESPECIFICADOS EN ESTE DOCUMENTO RESULTARAN EN EXPOSICION
PELIGROSA A LA RADIACION.
CUIDADO - O USO DOS CONTROLOS OU AJUSTES OU DESEMPENHOS DE PROCEDIMENTOS
OUTROS QUE NÃO OS ESPECIFICADOS NAS INSTRUÇÕES DE OPERAÇÃO PODEM RESULTAR
EM PERIGOSAS EXPOSIÇÕES À RADIAÇÃO.
-1-
Page 3

English
CONTENTS
COMPACT DISC CARE. . . . . . . . . . . . . . . . . . . . . . . . . . . . . . . . . . . . . . . . . . . . . . . . . . . . . . . 3
REMOTE CONTROLLER . . . . . . . . . . . . . . . . . . . . . . . . . . . . . . . . . . . . . . . . . . . . . . . . . . . . . 5
DIGITAL DISPLAY. . . . . . . . . . . . . . . . . . . . . . . . . . . . . . . . . . . . . . . . . . . . . . . . . . . . . . . . . . . 7
DETACHABLE FRONT PANEL. . . . . . . . . . . . . . . . . . . . . . . . . . . . . . . . . . . . . . . . . . . . . . . . . 8
GENERAL OPERATION . . . . . . . . . . . . . . . . . . . . . . . . . . . . . . . . . . . . . . . . . . . . . . . . . . . . . . 9
RADIO OPERATION . . . . . . . . . . . . . . . . . . . . . . . . . . . . . . . . . . . . . . . . . . . . . . . . . . . . . . . . 11
CD OPERATION . . . . . . . . . . . . . . . . . . . . . . . . . . . . . . . . . . . . . . . . . . . . . . . . . . . . . . . . . . . 13
CD CHANGER OPERATION. . . . . . . . . . . . . . . . . . . . . . . . . . . . . . . . . . . . . . . . . . . . . . . . . . 15
BEFORE PLAYING AN MP3 DISC . . . . . . . . . . . . . . . . . . . . . . . . . . . . . . . . . . . . . . . . . . . . . 17
LISTTENING TO AN MP3 DISC . . . . . . . . . . . . . . . . . . . . . . . . . . . . . . . . . . . . . . . . . . . . . . . 22
AUX OPERATION . . . . . . . . . . . . . . . . . . . . . . . . . . . . . . . . . . . . . . . . . . . . . . . . . . . . . . . . . . 24
ERROR SIGNS . . . . . . . . . . . . . . . . . . . . . . . . . . . . . . . . . . . . . . . . . . . . . . . . . . . . . . . . . . . . 25
CLOCK. . . . . . . . . . . . . . . . . . . . . . . . . . . . . . . . . . . . . . . . . . . . . . . . . . . . . . . . . . . . . . . . . . . 26
HINTS FOR PROPER AND SAFE OPERATION . . . . . . . . . . . . . . . . . . . . . . . . . . . . . . . . . . 27
TROUBLESHOOTING. . . . . . . . . . . . . . . . . . . . . . . . . . . . . . . . . . . . . . . . . . . . . . . . . . . . . . . 28
ACCESSORIES AND HARDWARE. . . . . . . . . . . . . . . . . . . . . . . . . . . . . . . . . . . . . . . . . . . . . 29
INSTALLATION . . . . . . . . . . . . . . . . . . . . . . . . . . . . . . . . . . . . . . . . . . . . . . . . . . . . . . . . . . . . 29
UNIT REMOVAL . . . . . . . . . . . . . . . . . . . . . . . . . . . . . . . . . . . . . . . . . . . . . . . . . . . . . . . . . . . 31
ELECTRICAL CONNECTIONS . . . . . . . . . . . . . . . . . . . . . . . . . . . . . . . . . . . . . . . . . . . . . . . . 32
LINE OUT CONNECTIONS. . . . . . . . . . . . . . . . . . . . . . . . . . . . . . . . . . . . . . . . . . . . . . . . . . . 33
CAUTION
• This unit is designed to operate on 12 volts DC, NEGATIVE ground electrical systems only.
• When fuse replacement is necessary, use only a 15 amp fuse. Do not replace with a higher rated fuse.
If the fuse blows often, carefully check all electrical connections for any short circuits and have your
car's voltage regulator checked also.
• Do not install the unit where it will be exposed to direct sunlight or hot air discharged from the car heater.
• Do not expose the unit to water or moisture.
• To avoid damaging the unit, never insert anything other than a compact disc into the disc slot.
• This unit should not be adjusted or repaired by anyone except qualified service personnel.
If servicing is required, return the unit to an authorized SANYO mobile audio dealer.
• Use of controls or adjustments or performance of procedures other than those specified herein may
result in hazardous radiation exposure.
• Changes or modifications not expressly approved by Sanyo may void the user's authority to operate
this equipment.
-2-
Page 4

COMPACT DISC CARE
Dirt, dust, scratches and warpage can cause a deterioration in the sound or intermittent skipping some tracks
during play.
• This unit has been designed to play compact
bearing the identification logo shown on the left .
Discs bearing other types of identification logos
may not play properly.
• This unit can play MP3 files that have been
recorded on CD-R/CD-RWs.
• Playback may not be possible due to the
characteristics of the CD recorder or the CD-R/RW
used,or due to scratches or dirt on the CD.
• For some CD-R/RWs, depending on the quality
of their recording or storage media used, playback
may not be possible due to deterioration of
recorded of material.
• Do not use non-conventional discs such as
heart-shaped, octagonal discs, etc.
The player could be damaged.
discs
Label Side
• Fingerprints and dust should be carefully wiped
from the signal surface of the disc (glossy side) with
a soft cloth.
Wipe in a straight motion from the inside to the
outside of the disc. Unlike conventional records,
the compact disc has no grooves to collect dust and
debris. Small dust particles will have no effect on
reproduction quality.
• Do not insert a disc which is cracked into the unit.
• Do not apply paper or write anything on the disc.
• To prevent warping the disc, do not expose it to
direct sunlight, high humidity or high temperatures
for extended periods.
-3-
Page 5

• Never use chemicals such as record cleaning
sprays, antistatic sprays or fluids, benzene or
thinner to clean compact discs. These chemicals
will permanently damage the plastic surface of
the disc.
• When not using the disc player for extended
Benzene Thinner Cleaning spray
periods, remove the compact disc and return it to
the plastic storage case. This will protect the disc
from dust and exposure to the sun.
• Mixed-mode CDs
This product can only play audio tracks on mixed-mode CDs.
The initial track contains non-audio data, and so it does not produce any sound.
Playback will start from the next track.
(Mixed-mode CDs are CDs which contain both non-audio data and audio tracks.)
• CDs containing copy control protection technology.
It is possible that some CDs with copy control protection (added to prevent computer
duplication) may not play on this unit.
This is due to the CD with copy control protection not conforming to CD standards and is
not due to a malfunction of this unit.
If there are any problems playing a CD with copy control protection, consult the store where
the CD was purchased.
• Supply of this product only conveys a license for private, non-commercial use and does not
convey a license nor imply any right to use this product in any commercial (i.e. revenue-generating) real time broadcasting (terrestrial, satellite, cable and/or any other media), broadcasting/streaming via the Internet, intranets and/or other networks or in
other electronic
content distribution systems, such as pay-audio or audio-on-demand applications.
An independent license for such use is required.
For details, please visit http://www.mp3licensing.com.
-4-
Page 6

REMOTE CONTROLLER
REMOTE CONTROLLER OPERATION
PRESET (+) Button
BAND Button
Change reception band
SCN Button
Radio mode:
Scan a preset station
CD mode, MP3 mode:
Play introduction to
current DISC
CD-CH mode:
Play introduction to
current DISC
TUNE Button
Radio mode:
Short press:
Station selected manually
(to low frequency station)
Long press:
Station selected automatically
(to low frequency station)
CD mode, MP3 mode:
Short press:
Rewind to a previous track
Long press: Fast rewind
AUX Button
Change to
AUX mode
Radio mode:
Select a registered station
CD-CH mode:
DISC change
MP3 mode:
Folder change
Not used
PWR Button
Power ON/OFF
CD Button
Change to CD mode
Switch between CD and
CD-CH when CD CHANGER
is connected
ATP Button
Radio mode:
Short press:
Select a station
received by ATP
Long press:
Set the 6 strongest
stations
TUNE Button
Radio mode:
Short press:
Station selected manually
(to higher frequency )
Long press:
Station selected automatically
(to higher frequency )
CD mode, MP3 mode:
Short press:
Skip to the next track
Long press: Fast-forward
SHF Button
CD mode, MP3 mode:
SHUFFLE current DISC
CD-CH mode:
SHUFFLE current DISC
SOUND Button
SOUND EFFECT
switching mode
PRESET (-) Button
Radio mode:
Select a registered station
CD-CH mode:
DISC change
MP3 mode:
Folder change
VOL(+/-) Button
Adjust volume
+: Volume up
-: Volume down
DISP Button
Changeover of
clock display
RPT Button
CD mode, MP3 mode:
REPEAT current title
CD-CH mode:
REPEAT current title
AUDIO Button
Sound quality modulation
switching mode
BASS TREBLE
BALANCE FADER
Adjust using VOL button (+/-)
CAUTION
• For the purpose of safe driving, a passenger other than a driver should operate a remote
controller while the vehicle is being driven, or the operation should be done after parking the
vehicle in a safe area.
-5-
Page 7

BATTERY INSTALLATION
Install a lithium battery (CR2025) with the poles facing the correct direction.
Positive pole faces upward.
BATTERY REPLACEMENT TIMING
When battery power is depleted, the buttons may not be operable.
If the remote controller does not operate, replace the battery and check the operation.
CAUTIONS REGARDING BATTERY
Be sure to follow the instructions to prevent battery leakage, over-heating, ignition, or explosion.
WARNING
• Do not expose the battery to flame. Do not short circuit, disassemble, or heat the battery.
• Do not charge the battery.
• Use the specified type battery.
• Keep the button-shaped battery away from children to prevent accidental swallowing.
• If the battery is swallowed, contact a doctor immediately.
CAUTION
• Install the battery with the poles facing the correct direction.
• When not in use for a long period of time, or if the battery is dead, remove the battery from
the remote controller.
If battery leakage has occurred, wipe the container first, then install a new battery. If the battery solution
contacts the skin, wash off with water completely.
CAUTIONS REGARDING REMOTE CONTROLLER
• Do not leave the remote controller in an area exposed to direct sunlight, such as on the dashboard or
steering wheel. The remote controller may deform because of the heat. (Be especially careful of the
dashboard exposed to direct sunlight in the summer, as it will become extremely hot.)
• When the vehicle is parked in an area exposed to direct sunlight, remove the remote controller from its
holder and put it in a shaded spot such as the glove box.
• Under direct sunlight, signal reception from the remote controller becomes weakens. If this happens, hold
the remote controller close to the signal receptor on the front panel.
-6-
Page 8

DIGITAL DISPLAY
CD play
Disc in
Level Indicator
Level Indicator (L)
Folder
Play
Shaffle
Play
Disc
Play
Repeat
Play
Scan
Play
Radio Frequency, Time,
CD Track Number,
Audio Control Selection,
Error Signs, CD Operation,
MP3 Operation,
CD Changer Operation,
CD TEXT, ID3-Tag
MP3
Play
BASS
mode
Level Indicator (R)
CD
Changer
AUX
Sound
mode
Auto Travel
Preset Channel,
DISC Number
-7-
Page 9

DETACHABLE FRONT PANEL
The front panel is designed to be removable for antitheft purposes.
It is recommended that you remove and carry the front panel with you when you leave your car.
A carrying case is provided with the unit for this purpose.
RELEASE KNOB
HOW TO DETACH THE FRONT PANEL
1
Press the release knob (REL) to release the front panel.
2
Pull the entire panel to remove it from the unit.
HOW TO REPLACE THE FRONT PANEL
Align the left side of the panel with the stopper,
and then push the right side of the panel into the
unit until it clicks.
FRONT PANEL
Note
The unit will not operate if it is installed incorrectly.
FRONT PANEL FIXING
The front panel can be installed so that it cannot be removed
to prevent theft or loss. Using the screw included with the
accessory kit, install it to the right side of the front panel.
CAUTION
• Do not attempt to remove the panel in a manner other than that described above.
• When installing the panel, do not force it into the unit.
• Do not touch the connection terminals of the panel or the unit. It may cause poor
contact.
• Use a clean, dry cloth when cleaning the terminals.
• Keep the panel out of direct sunlight and high temperatures.
• Prevent the panel from coming into contact with benzene, thinner, or insecticides.
• Do not drop the panel.
• Do not attempt to remove the radio front panel that takes your attention away from safety
driving you vehicle.
-8-
Page 10

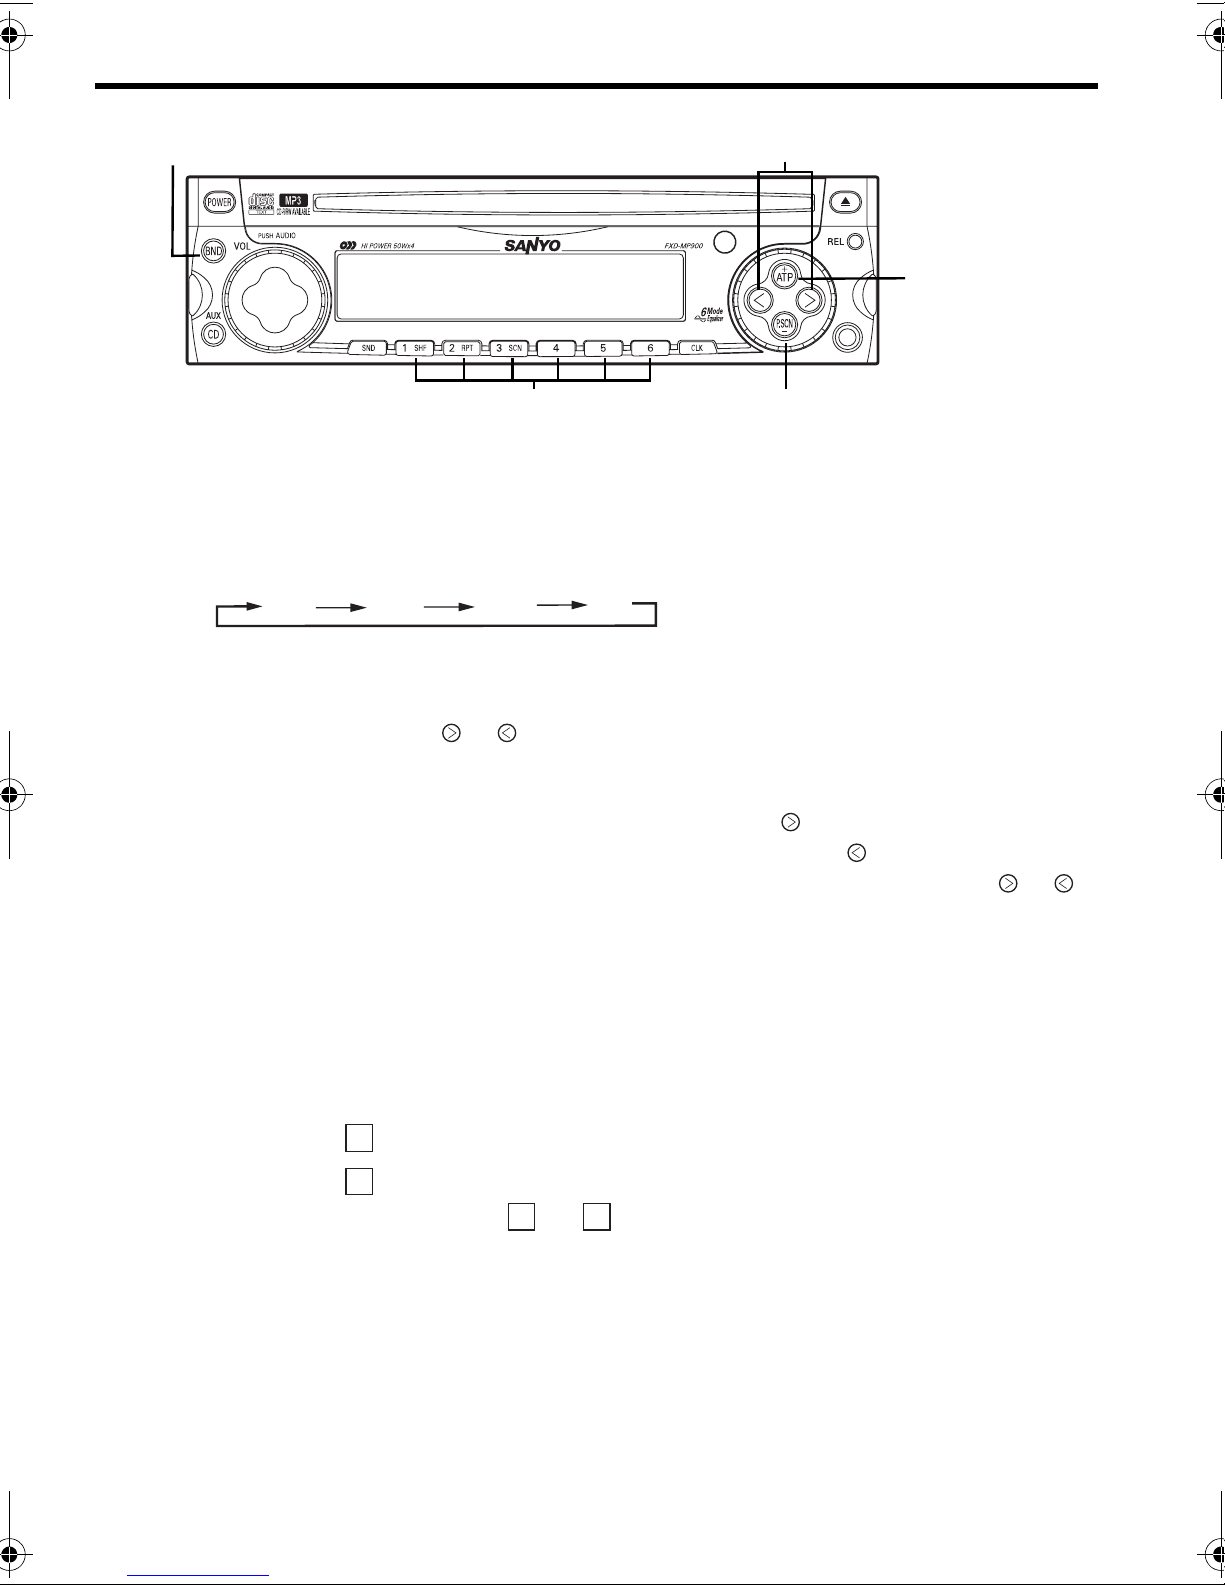
GENERAL OPERATION
1 2
5 3 6 784
TURNING THE POWER ON........................................ 1
Install the front panel and press the POWER button c when ACC is on.
TURNING THE POWER OFF ...................................... 1
Press the POWER button c to stop the current operation.
The button dims when the power is off (ACC on).
ELECTRONIC CONTROLS......................................... 2
Push the AUDIO button d, then Push the AUDIO button d to select the audio functions as shown in the
table below.
Turn the VOL knob d to adjust the selected function ; bass, treble, balance, fade, or volume.
Note
While no other mode is displayed, the VOL knob function as a volume control.
MODE
BAS(bass)
TRE(treble)
BAL(balance)
FAD(fader)
VOL(volume)
Turn left (Min)
Down -5
Down -5
Left L9
Rear R9
Down 0
Turn right (Max)
UP +5
UP +5
Right R9
Front F9
UP 35
SOUND EFFECT BUTTON ......................................... 3
Press the SND Button e for less than 1.5 second.
Each time the button is pressed, the function changes as shown below.
1 FLAT 2 ROCK 3 CLASSIC 4 POPS 5 JAZZ 6 HIP POP
-9-
Page 11

BASSXPANDER........................................................ 3
Press the SND button e for more than 1.5 second to switch ON/OFF of the BASS mode. When the BASS
mode is on, “BASS ON” is displayed and the bass enhances.
RADIO SELECTION BUTTON (BND) ...........................4
Press the BND button f to switch from CD player mode to radio.
Each time the button is pressed, the function changes as shown below.
FM1 FM2 MW
FM3
CD PLAYER, CD CHANGER* OR AUX SELECTION
BUTTON (CD/AUX).................................................... 5
Press the CD/AUX button g to switch from radio mode to CD, CD changer* or AUX mode.
*If a CD changer is connected.
CLOCK BUTTON (CLK) .............................................6
Press the CLK button h to switch between the clock and audio display. When an audio function is
performed while the time display is selected, the audio display will appear for 5 seconds, then the display
will return to the time mode.
TO CANCEL THE BEEP TONES .................................1, 7
1
Turn off the power by depressing the POWER button c.
2
To cancel all beep tones, press the button i and the POWER button c simultaneously for more than
3 seconds and then "BEEP OFF" is displayed.
3
To turn on the beep tones again, perform the same procedure. The beep tones are set and "BEEP ON"
is displayed.
DEMO MODE ON/OFF ............................................... 1, 8
1
Turn off the power by depressing the POWER button c.
2
To turn ON/OFF the demo mode, press the button j and the POWER button c simultaneously for
more than 3 seconds.
DEMO ON : Demo is displayed.
DEMO OFF : Display is OFF.
(DEFAULT : DEMO ON)
-10-
Page 12
RADIO OPERATION
1
2
4
3
SELECTING RADIO MODE ........................................ 1
Press the BND button c to switch from CD player or AUX mode to the radio.
Each time the BND button is pressed, the selected band changes as shown below.
FM1 FM2
FM3
RADIO TUNING ........................................................ 2
MW
5
• Automatic tuning ............Press the or button d for more than 0.5 second until it beeps twice if the
beep tones are on. When the button is released, the system will start automatic
tuning and stop at the next receivable station.
•
Manual tuning ................To select higher frequency stations, press the button for less than 0.5
second.To select lower frequency stations, press the button for less than 0.5
second. To quickly scan up or down in frequency, press and hold the or
button. Release the button when the display approaches the desired frequency,
then press and release the button repeatedly until the desired frequency is
displayed.
STORING PRESET STATIONS ................................... 3
The preset buttons e can be used to store 6 stations in each band (FM1, FM2, FM3 and MW) for convenient
access to your favorite stations.
• Programming stations
• Quick tuning.................... Select the desired band, then press one of the six preset buttons.
1
.....
2
Select the desired band, then tune in the station you want to store in memory.
Press and hold one of the preset buttons for more than 2 seconds.
1 22
Repeat steps
and to program additional stations.
-11-
Page 13

ATP (AUTO TRAVEL PRESET) OPERATION................ 4
The Auto Travel Preset function searches for and memorizes the 6 strongest stations in one of the two
bands (FM, MW) in the order of signal strength.
This feature is useful when you are driving in an unfamiliar location and want to memorize local stations
without changing the standard preset stations.
A total of 12 stations (6 FM and 6 MW) can be programmed.
•
To set the stations
•
Quick Tuning of ATP Stations
• To scan programmed stations............. See “PRESET-SCAN-BUTTON OPERATION”.
...............................
.................
1
Select the desired band.
2
Press and hold the ATP button f for more than 2 seconds.
“ATP” appears in the display.
When the stations have been memorized, scanning stops and the
strongest station is selected.
1
Select the desired band.
2
Press the ATP button if the “ATP” indicator does not appear in
the display.
3
While ATP is illuminated, press the ATP button and the unit
seeks ATP1-6. If there is no preset ATP, - 0 - appears in the
display.
Notes
• If no station can be received, “- 0 -” appears in the display.
If fewer than 6 stations can be received, the system will memorize as many stations as
•
possible, then select the strongest one.
• If ATP mode is selected in FM2, FM3 band, FM ATP mode is selected.
To cancel the ATP, press the BND button c. When ATP is canceled, the ATP indicator disappears and ATP
mode is canceled.
PRESET-SCAN-BUTTON OPERATION ........................ 1, 4, 5
This function scans each of the preset stations stored in the selected band (both manual preset and
auto travel presets).
1
Select the desired band or ATP mode.
Press the BND button c for FM1, FM2, FM3 or MW. Press the ATP button f to select the ATP mode.
2
Press the P.SCN button g. The system will select and receive each preset station for ten-second.
3
To stop scanning and retain the station currently selected, press the P.SCN button g again during this
ten-second period.
-12-
Page 14

CD OPERATION
1
2
3 6 7 8 9 5 4
LOADING AND EJECTING THE CD ............................ 1, 2
Insert a disc into the CD slot c and the CD player will start playing.
Press the eject button d to eject a disc.
CAUTION
• If the unit is already loaded with a CD, please do not attempt to insert another disc,
which may result in damage to both of the discs and the unit.
SWITCHING TO CD MODE......................................... 3
Press the CD button e to switch from radio, CD Changer* or AUX mode to CD player mode.
When the CD mode is switched on while a disc is loaded, play resumes from the point at which play was
stopped.
When the entire disc has played, the unit returns to the first track and play resumes.
The CD player continues playing the disc until the POWER button is pressed, the other mode is selected, or
the disc is ejected.
*If a CD changer is connected.
-13-
Page 15

SKIPPING TRACKS...................................................4, 5
Press the button f to skip to the beginning of the next track.
Press the button g to skip to the beginning of the track currently playing.
Press the button g twice to skip to the beginning of the previous track.
Press and hold the or button for more than 0.5 seconds to search quickly
(with sound) in the forward or reverse direction.
When the button is released, the CD resumes normal play.
SHUFFLE MODE ....................................................... 6
This function plays the tracks on a CD in random order.
Press the SHF button h to begin shuffle play. The SHF indicator lights.
Press the or button twice to select another random track.
To cancel this mode, press the SHF button h again or eject the CD.
Notes
If a disc is already loaded under the following conditions, shuffle play will resume
from the point at which play was stopped:
If the vehicle ignition is turned off, then on again.
•
• If the power is switched off, then on again with the POWER button.
REPEAT MODE......................................................... 7
Press the RPT button i to play the current track repeatedly. The RPT indicator lights.
To cancel this mode, press the RPT button i again or eject the CD.
Notes
If a disc is already loaded under the following conditions, repeat play will resume:
•
If the vehicle ignition is switched off, then on again.
• If the power is switched off, then on again with the POWER button.
SCAN MODE (PLAYING THE BEGINNING
OF EACH TRACK)..................................................... 8
This function plays the first 10 seconds of each track sequentially.
Press the SCN button j to begin the scan mode. The SCN indicator lights.
To cancel this mode, press the SCN button j again or eject the CD.
Note
Scan mode will be canceled when the vehicle ignition is turned off, or when the disc
is ejected.
DISPLAYING TRACK, ARTIST, AND DISC NAMES .......9
Every time preset button 6 ⑨ is pressed during playing CD TEXT, the display changes as follows:
TITLE (name of the track) ARTIST (artist name) ALBUM (name of the disc) TRACK No. and
the playback time.
If the disc does not content CD TEXT, “NONE” is displayed.
-14-
Page 16

CD CHANGER OPERATION
The unit can be used to control the functions of the compatible sanyo CD changers. (If a CD changer switch
is equipped, always set it to "1".)
2
5 4
1
6 7 8
3
SELECTING CD CHANGER MODE ............................. 1
Press the CD/AUX button c to switch from radio, AUX or CD player mode to CD changer mode.
SELECTING A DISC .................................................. 2, 3
Press the + button d to select the next disc.
Press the - button e to select the preceding disc.
SKIPPING TRACKS .................................................. 4, 5
Press the button f to skip to the beginning of the next track.
Press the button g to skip to the beginning of the track currently playing.
Press the button g twice to skip to the beginning of the previous track.
Press and hold the or button for more than 0.5 second to search quickly (with sound) in the forward
or reverse direction.
When the button is released, the CD resumes normal play.
SHUFFLE MODE....................................................... 6
This function plays the tracks on one CD or all CDs in the magazine in random order.
•
“Shuffle-playing” tracks; .......................Press the SHF button h to play tracks on the current disc in random
• “Shuffle-playing”
To cancel the track shuffle or disc shuffle mode, press the SHF button h again, press the DISC + or - button
or eject the magazine.
The system will remain in this mode until it is cancelled.
discs;
......................... Press the SHF button h for more than 1.5 seconds. The D SHF
order. The SHF indicator lights.
indicator lights. The system selects a disc at random and plays all
tracks on that disc. When all tracks have been played, the next disc is
selected and “shuffle-play” is repeated.
-15-
Page 17

REPEAT MODE......................................................... 7
•
Repeat tracks ...................................... Press the RPT button i to play the current track repeatedly.
The RPT indicator lights.
•
Repeat discs
To cancel the track repeat or disc repeat mode, press the RPT button i again, press the DISC + or - button
or eject the magazine.
The system will remain in this mode until it is cancelled.
......................................... Press the RPT button i for more than 1.5 seconds to play the current
disc repeatedly. The D RPT indicator lights.
SCAN MODE (PLAYING THE BEGINNING
OF TRACKS OR DISCS) ............................................ 8
This function plays the first 10 seconds of each track or disc sequentially.
•
Playing the beginning of tracks ........... Press the SCN button j to play the first 10 seconds of each track on
the current disc in order. The SCN indicator lights.
• Playing the beginning of discs............. Press the SCN button j for more than 1.5 seconds to play the first 10
seconds of each disc in the magazine. The D SCN indicator lights.
To cancel the track scan or disc scan mode, press the SCN button j again or to switch between ACC off,
power off and mode, press the , , + or - button.
Note
Scan mode will be canceled when the vehicle ignition is turned off or when the magazine is
ejected.
-16-
Page 18

BEFORE PLAYING AN MP3 DISC
ABOUT MP3
This unit can play an MP3 file format written into a CD-RW (rewritable) disc, CD-ROM and
CD-R (recordable).
However, the files and media that can be used are limited, only after thoroughly reading the contents
below write MP3 files to a disc, and the instruction manuals regarding proper use of your CD-R/RW
drive and recording software.
WHAT IS MP3?
• MP3 files are music data compressed using an “MPEG 1/2 audio layer 3” file format.
A file with an “.mp3” extension is called an “mp3 file.”
This unit cannot play files other than those with an “.mp3” extension.
•
•
A file without an extension cannot be played even if it is an MP3 file.
Also, a file that is not recorded in an MP3 data format cannot be played even if it has an “.mp3” extension
in the file name.
ISO9660 FORMAT
This unit can play data recorded in compliance with the ISO9660 format.
ISO9660 is a common international CD-ROM file format standard as specified by International
Organization for Standardization.
The following media formats can be used with this unit:
• ISO9660 Level 1
• ISO9660 Level 2
• Extended format Joliet
• Extended format Romeo
-17-
Page 19

DISC RECORDING SYSTEM
This unit is not compatible with packet writing methods.
The following three methods are used to record data (file) to disc, however, please be aware that
this unit is not compatible with “packet writing methods.”
This unit plays discs recorded using “Disc-At-Once” and “Track-At-Once” methods.
1. Disc-At-Once
Data to be written is prepared beforehand and recorded in a single operation.
Additional data cannot be added.
2. Track-At-Once
Recorded per track unit (piece of music). Additional data can be added.
3. Packet writing
According to the space on the disc, tracks are further divided for recording. This is recordable.
CAUTION
• Do not attach the extension ".mp3" to files other than MP3 files. If a disc with such
a file is played, it will be mistakenly recognized and it may cause excessive noise to
be emitted, damaging the speaker.
• This unit may not be able to play certain discs depending on disc conditions, recording
software or
manual of the equipment used.
• No extension is attached when using a Macintosh, so be sure to attach an ".mp3"
extension at the end of the file before writing onto the disc.
• This unit is not compatible with WAVE files.
• This unit is not compatible with an m3u playlist.
• This unit is compatible with multisession recorded. However, be sure to properly close
the session. Disc with a session that has not been closed cannot be played properly. When
a disc is initially inserted, some time will be required for reading the data before
play can begin.
the recorder used for writing the data. In such cases, refer to the instruction
-18-
Page 20

PLAYING LIMITATIONS
• The number of tracks and folders that can be played on one disc is as follows:
Tracks: 250 depending on file contents
Folders: 250 maximum depending on the number of tracks
However, the total number of folders + total tracks=512
Also, there is no limit to the folder levels.
• The compression bit rate of MP3 files that can be played with this unit is from 32 kbps
to 320 kbps. However, for file capacity and sound quality, 128 kbps and above is recommended.
When a file compressed at 128 kbps or less is played, sound quality may be inconsistent.
Compatible sampling rates are as follows:
MPEG 1 48k 44.1k 32k
MPEG 2 24k 22.05k 16k
• When both music CD data (CD-DA) and MP3 file data exist on one disc, only the music
data (CD-DA) is played.
• This unit is compatible with files compressed with VBR (Variable Bit Rate), however, the playback time
may not be displayed correctly when fast-forward / fast-reverse.
• This unit may not play MP3 files in the order of recording.
• As the number of folders recorded on the disc increases, the time to read the disc information
also increases.
LIMITATIONS OF DISPLAYED INFORMATION
• Up to 64 folders and file name characters can be displayed.
However, only one-byte alphanumeric characters and symbols can be displayed. If 2-byte characters can
be displayed, they will display as 1 character. If 2-byte character display is not possible, a “ ∗ ” will be displayed.
• This unit only displays the album, track and artist names input using ID3 Tag Ver.1 and Ver.2
formats. Even if other information is input, it will not be displayed. If information is input using
both Ver.1 and Ver.2 formats, the Ver.2 information is displayed.
• When playing an MP3 file, the playback time may not be displayed properly.
WHEN CREATING A DISC
It may not be possible to play MP3 files in the order of recording. Keep the following in mind
when creating a disc so that the files will play in the order of recording.
• Only one-byte alphanumeric characters (uppercase only) and the underscore “_” can be used.
• Use writing software that can write MP3 files in file (track) name order. Consult the software
manufacturer for details regarding the writing software applications.
• Place number at the beginning of the folder (album) or file (track) name so that the order is maintained.
Good example (begin with a number of 2 – 3 digits for proper ordering)
01xxx.mp3
02xxx.mp3
03xxx.mp3
04xxx.mp3
Poor example (beginning with the same digit number does not allow for proper ordering.)
1xxxx.mp3
10xxxx.mp3
11xxxx.mp3
2xxxx.mp3
-19-
Page 21

MP3 RECORD FORMAT COMPATIBILITY LIST
Recording format
ISO9660 Level 1
File name
Maximum number of characters
8
(File name)
Folder name
Maximum number of characters
Maximum number
folder levels
8
Character type
Alphanumeric characters
8
(uppercase) Underscore
Alphanumeric characters
ISO9660 Level 2 31 31 8
ISO9660 Level 3
Packet writing
JOLIET
ROMEO
WINDOWS
Incompatible
Incompatible
64
64
(*2)
Incompatible
64
64
(*2) 8 (*1)
8 (*1)
(uppercase) Underscore
Alphanumeric characters
Alphanumeric characters
(*1) Within the standard, a larger value can be recorded, however, this unit is limited to the values on the list.
(*2) Within the standard, a maximum 128 characters can be recorded, however, this unit is limited to
the values on the list.
MP3 FUNCTION AND SYSTEM COMPATIBLE LIST
Function
Compression system
Sampling frequency
Bit rate
ID3 - Tag ID3 Ver.1.X and ID3 Ver.2 album, artist, and track names can be displayed.
Multisession disc
8 cm CD-R/RW disc
CD-DA (music CD) and MP3
data on the same disc
VBR (Variable bit rate)
Emphasis
Joint stereo
Cue / Review
Resume playing
m3u playlist
Compatibility/incompatibility
MPEG1/2
Audio Layer3
16~48kHz
32~320kbps
May not play properly depending on the encoding software.
May not play properly depending on the encoding software.
May not play properly depending on the encoding software.
When a disc is initially inserted, some time will be required for reading the data before play can begin.
Be sure to close the session properly. A disc with session that has not been closed will not be
play properly.
Insert directly without any adapter.
Only CD-DA (music CD) data can be played.
May not play properly depending on the encoded software.Also, the playback time
may not be displayed properly.
Playing-time displayed, however it is silent
Remarks (caution, etc.)
: OK : NG : Partial
-20-
Page 22

ORDER TO PLAY AN MP3 FOLDER / MP3 FILE
Hierarchy 1 Hierarchy 2 Hierarchy 6Hierarchy 5Hierarchy 4Hierarchy 3
ROOT
1
2
3
4
ROOT
5
Root
1
フォルダ
Folder
(グループ)
(group)
6
7
8
9
MP3ファイル
MP3 file
(トラック)
(track)
• Root refers to the folder at the top of an MP3 disc level that is currently open.
•
Folders and files in the same level are played in the order written on the MP3 disc by the writing software.
In general, they are written in alphanumeric order of the names, so if numbers such as 01A, 01B, etc.
•
are attached at the beginning of the folder name or file name, the playing order can be specified.
-21-
Page 23

LISTTENING TO AN MP3 DISC
3
1
675
8
4
2
PLAYING AN MP3 DISC............................................. 1
When the disc is inserted into the CD slot with the label side up, CD play starts. (When playing an
MP3, “MP3” is displayed.) When listtening to the radio and a disc is already in the CD player, playing
of the CD is started by pressing the CD play/auxilliary button (CD/AUX).
• When “TOC READ” is displayed on the display, it means that the unit will take a few moment to
read the disc data before starting play.
SELECTING TRACKS ................................................ 2, 4
The track skip button ( , )is used to display the desired track number for listtening.
Press to proceed to the next track.
Press twice to return to the previous track.
• When is pressed once, it returns to the beginning of the current track.
• When is pressed within 1 second after a track starts, play resumes with the previous track.
• It may take a few moments until a track is selected.
SELECTING FOLDERS (FOLDER SELECT) ................. 3
Every time the folder select button (ATP+, P.SCN-) is pressed,
it moves to the next folder / previous folder.
• It may take a few moments until a folder is selected.
TO SEARCH A FAVORITE PART IN A TRACK
(FAST-FORWARD, FAST-REVERSE) ......................... 2, 4
Press and hold a track skip button ( , ) for fast-forward and fast-reverse. When the button is kept
pressed down, a favorite part of a track can be found. When the button is released, play resumes
from that point.
Press and hold for fast-forward.
Press and hold for fast-reverse.
-22-
Page 24

Note
Note
When the track skip button is kept pressed down between files for fast-forward or fast-
When the track skip button is kept pressed down between files for fast-forward or fastreverse, the display may seem to stop for a moment, however, this is not a malfunction.
reverse, the display may seem to stop for a moment, however, this is not a malfunction.
Keep the button pressed down.
Keep the button pressed down.
SCAN (INTRO) MODE (MODE c)................................ 5
When the scan button (SCN) is pressed, "SCN" is displayed and the first 10 seconds of the
track (intro) is played. The function is then repeated with the other tracks.
When you find a track that you would like to listen to, press the scan button to release function.
Normal play resumes from the track where the function is released.
Folder scan mode (Mode d)
This folder scan mode plays the beginning of the top track of each folder for approximately 10 seconds.
When the scan button (SCN) is pressed for more than 0.5 second, "F SCN" is displayed and it
enters the folder scan mode, scanning each folder.
SHUFFLE (RANDOM ORDER) MODE (MODE c) .......... 6
When the shuffle button (SHF) is pressed, "SHF" is displayed and all the tracks in the disc are played in
random order. When all tracks are played, random play is repeated within the folder.
When the shuffle button is pressed again, the shuffle play mode is released, and normal play resumes
from the track where it is released.
Folder shuffle mode (Mode d)
When the shuffle button (SHF) is pressed for more than 0.5 second, "F SHF" is displayed and
it enters the folder shuffle mode, and random play begins in the folder that is currently being played.
REPEAT MODE (MODE c) ........................................ 7
When the repeat button (RPT) is pressed, "RPT" is displayed, and the track that is currently playing is
played repeatedly. When the repeat button is pressed again, it is released.
Normal play resumes from the track where it is released.
Folder repeat mode (Mode d)
When the repeat button (RPT) is pressed for more than 0.5 second, "F RPT" is displayed and it enters
the folder repeat mode and the folder that is currently playing is played repeatedly.
DISPLAYING FILE, FOLDER, TITLE, ARTIST, AND
ALBUM NAMES........................................................ 8
Every time preset button 6 j is pressed during playing an MP3 disc, the display changes as follows:
FOLDER (folder name) FILE (file name) TITLE (name of the track) ARTIST (artist name)
ALBUM (album name) TRACK No. and the playback time.
If there is no ID3 tag data, "NONE" is displayed.
-23-
Page 25

AUX OPERATION
Auxiliary mode allows for playing of an auxiliary audio source that is connected by a
commercial auxiliary cord to the AUX IN jack of this unit.
12
AUX CONNECTION ...................................................1
Connect the auxiliary audio source to the AUX IN jack c of this unit with a commercial auxiliary cord.
SELECTING AUX MODE ............................................2
Press the CD/AUX button d to switch from radio or CD player mode.
Pressing the button will change the mode as explained in section “CD OR AUX SELECTION BUTTON (CD/
AUX)” in page 10.
CAUTION
• Before connection, set the volume for this unit to “ 0 ” and also keep the volume of the
auxiliary audio source within a range that will not cause distortion.
Notes
Noise may be emitted if the following actions are performed. Be sure to turn off this unit or
switch to another mode before performing these actions.
• The auxiliary audio source is turned off.
• The auxiliary cord is connected to or disconnected from the auxiliary audio source or the
AUX IN jack of this unit.
Notes
• Please consult with an authorized SANYO mobile audio dealer where this unit was bought
for details about whether a given auxiliary audio source can be connected and the proper
auxiliary cord to use.
• The volume and tone controls of the auxiliary audio source can be adjusted on this unit.
-24-
Page 26

ERROR SIGNS
CD Player
If a problem should occur while operating the built-in CD player, one of the following error signs
may be displayed:
Error Sign
E01
E07
E99
NO CD
CD Changer
If a problem should occur while operating the connected CD changer, one of the following error signs may
be displayed.
Error Sign
Abnormal CD mechanism function.
The disc is dirty.
CD is inserted upside down.
Internal connection check error. Contact the place of purchase.
No disc in the player. Insert the disc.
Cause
Cause
Remedy
Press the eject button.
Turn the power off and then on again.
If it is not corrected, contact the place
of purchase.
Clean the disc.
Insert the CD properly.
Remedy
E01
E07
E30
NO CD
NO CDC
Error Sign
Abnormal mechanism function
The disc was inserted incorrectly.
The disc is dirty.
The disc is defective.
There is condensation on the
optical lens.
Excessive temperature has been
detected in the vehicle.
No discs in the magazine.
The connector is connected
incorrectly.
Cause
Contact the place of purchase.
Insert the disc properly.
Clean the disc.
Use another disc.
Leave the disc player off for an hour
or so, then try again.
Refer to the instructions supplied with
the CD changer.
Allow the car to cool.
Load discs into the magazine.
Connect the connector correctly and
securely until it clicks.
Remedy
E10
Abnormal amplifier. Check the speaker line code.
-25-
Page 27

CLOCK
23
4 1
DISPLAY MODE CHANGE..........................................1
The display on the unit can be changed by pressing CLK button c. Press the CLK button c to switch
between the clock and audio display. When a radio, CD function is performed while the time display is selected, the audio display will appear for 5 seconds, then the display will return to the time mode.
ADJUSTING THE TIME .............................................. 1, 2, 3
To adjust the time, press the CLK button c for more than 2 seconds. The time display blinks.
To adjust the minute, press the button d.
To adjust the hour, press the button e.
To advance the time rapidly, hold the or button continuously.
Press CLK button c again to start the clock.
CLOCK RESET ......................................................... 1, 4
Press CLK button c for more than 2 seconds and the time display blinks. While blinking, press preset
button 6 f to skip to the nearest half-hour as follows:
Example: 3:00
Notes
• This unit uses a 12-hour clock.
• The clock function and radio presets are retained in memory when the audio is switched off.
– 3:29 3:00
– 3:59 4:00
3:30
-26-
Page 28

HINTS FOR PROPER AND SAFE OPERATION
• Condensation
Moisture can condense on the optical lens of the CD player during humid or rainy days, or after the car
heater is turned on. If this occurs the disc player may not function properly. To remedy the situation,
remove the disc from the unit and wait approximately one hour. This should allow the moisture to
evaporate and restore normal operation.
• Temperature Consideration
The unit may not operate correctly in extremely hot or cold temperatures. Avoid exposing the unit to
extremely high or low temperatures.
• Interruptions in the sound (skipping)
When the car is driven on very rough surfaces, the sound from the CD player may skip and be interrupted.
This will not cause any damage to the disc or the player. If this occurs, wait for the road surface to
improve before using the CD player.
• Safety
For safer driving, keep the volume at a moderate level to enable you to hear outside sounds (such as
emergency vehicle sirens).
• Cleaning the unit
Clean the unit with a soft, dry cloth. Stains should be removed by wiping the surfaces with a soft cloth
immersed in lukewarm water and wrung dry. Never use strong chemicals or solvents. These will damage
the finish of the unit.
• Disc care
When not using the disc player for extended periods, remove the compact disc and return it to the
plastic storage case. Do not leave a disc partially ejected from the player.
• Servicing
Should a problem develop, do not open the unit or try to repair it yourself. If servicing is required, bring
the unit to a Sanyo Authorized Service Center.
-27-
Page 29

TROUBLESHOOTING
Sometimes a simple operational error or a mistake in the wiring can appear to be a problem with the unit.
Before having the unit serviced, refer to the troubleshooting chart below.
Symptom
The compact disc cannot be
inserted into the unit.
The "CHECK CD" is
displayed.
No sound is emitted even when
the compact disc is inserted.
No power.
No radio sound.
Automatic tuning is not
available.
The radio sensitivity is poor.
Cause
Another disc has already been
inserted.
The compact disc is upside down.
The compact disc is very dirty or
seriously damaged.
Condensation has occurred.
The volume is turned down.
The vehicle ignition is switched off.
The power of this unit is turned off.
The antenna connection is incomplete.
Waves are weak.
The power antenna cord connection
is incomplete. The antenna is not
extended fully.
Solution
Remove the inserted disc.
Insert the disc with the label face
upward.
For dirt, clean the compact disc.
(Refer to "How to handle compact
discs" on pages 3-4.)
Use the unit after leaving it idle for a while.
Adjust the volume to the proper level
using the volume control button.
Turn the vehicle key to the ACC
position when the power is connected
to the vehicle’s accessory circuit but
the engine does not operate.
Press the POWER button.
Connect the antenna.
Select a station using manual tuning.
Check the connection of the power
antenna or antenna booster.
Extend the antenna fully.
No sound is coming out either
from the front speaker or rear
speaker.
The MP3 file cannot be played.
Adjustment of the front and rear
speakers tilts toward either one side.
The MP3 file has no extension.
An extension is supplied to a file
other than the MP3 file.
The compact disc is not recorded
according to the ISO 9660 Level 1
or Level 2.
Check it according to the volume
control procedures. For the two
speakers, press the AUDIO button
to call FAD and set "0."
Supply an extension with the
recording equipment.
Use a compact disc that complies
with ISO 9660 Level 1 or Level 2.
-28-
Page 30

ACCESSORIES AND HARDWARE
Mounting Bracket
(Half Sleeve) x 1
Removable Trim Ring
x 1
Mounting Grommet
x 1
Unlock Levers
x 2
Mounting Screw M5
x1
Screw M2 x 6
x 1
INSTALLATION
1. BEFORE INSTALLATION
When mounting the unit in a car, keep the unit as level as possible.
If the unit must be mounted at an angle, due to the design of the
vehicle, make sure the unit does not tilt by more than 30°.
-29-
Page 31

2. ISO MOUNTING WITH REMOVABLE TRIM RING
When mounting the unit into a DIN-standard cutout (182 × 53 mm) in the dashboard or
console, attach the provided Removable Trim Ring to the unit.
182 mm
53 mm
REMOVABLE TRIM RING
3. INSTALLATION PROCEDURES
DASHBOARD OR CONSOLE
AUDIO UNIT
DASHBOARD
OR CONSOLE
182 mm
53 mm
MOUNTING GROMMET
MOUNTING SCREW
REMOVABLE
MOUNTING BRACKET
TRIM RING
(HALF SLEEVE)
AUDIO UNIT
1. Insert the mounting bracket into the DIN-standard cutout (182 × 53 mm) in the dashboard or console.
2. Bend the mounting bracket stopper outward until the bracket fits snugly in the cutout.
3. Install the supplied mounting screw (M5) in the audio unit.
Cover the mounting screw with the supplied mounting grommet.
4. Push the unit into the mounting bracket until it locks in place.
-30-
Page 32

UNIT REMOVAL
2
2
2
UNLOCK LEVERS
2
1
1
2
2
UNLOCK LEVERS
1. Insert the unlock levers into the slots on each side of the unit until they click into place.
Note
Take care not to insert the levers upside down.
2. While pressing the levers downward, pull the levers to remove the audio unit.
-31-
Page 33

ELECTRICAL CONNECTIONS
1. ANTENNA SOCKET
ANTENNA PLUG
4-speaker System
(White)
(White/Black)
(Gray)
(Gray/Black)
(Green)
(Green/Black)
(Violet)
(Violet/Black)
+ +
-
-
+ +
-
-
+ +
-
-
+ +
-
-
2. +12V Constant Power Supply (Yellow)
3. +12V Accessory/Switched (Red)
4. Ground Wire (Black)
5. Power Antenna (Blue/Red)
6. Amplifier Turn On (Blue/White)
Front Left
Speaker
Front Right
Speaker
Rear Left
Speaker
Rear Right
Speaker
2-speaker System
(White)
(White/Black)
(Gray)
(Gray/Black)
(Green)
(Green/Black)
(Violet)
(Violet/Black)
+ +
-
+ +
-
+ +
-
+ +
-
-
-
-
-
Left
Speaker
Right
Speaker
Do Not
Connect
Do Not
Connect
CAUTION
• DO NOT connect any speaker wires to the metal body or chassis of the vehicle.
• DO NOT connect the speaker common (-) wires to each other.
• Connect each speaker wire directly to each speaker terminal.
• All speaker common (-) wires must remain floating.
1 Antenna socket
• Insert the plug from the antenna installed in your vehicle into this socket. (If your vehicle has a dual
antenna system, a dual antenna to single antenna cable adaptor may be required.)
2 +12V Constant Power Supply (Yellow)
• Connect this wire to the +12V power terminal which receives power continuously.
• Connect to location drawing 10 A amperage or more.
3 +12V Accessory/Switched (Red)
• Connect this wire to the terminal which receives power while the ignition switch is at ON or
ACCESSORY position.
• If the ignition switch does not have an ACC position, connect this wire to a +12V
power terminal which receives power continuously. (Same as item 2.)
• Connect to location drawing 100 mA amperage or more.
4 Ground wire (Black)
• Connect this wire to the vehicle chassis.
5 Power Antenna (Blue/Red)
• Connect this wire to the control terminal of a Power Antenna.
• When not using a Power Antenna, this wire is not connected.
6 Amplifier Turn On (Blue/White)
• Connect this wire to an external amplifier.
• When not using an external amplifier, this wire is not connected.
-32-
Page 34

Notes
• When using a two-speaker installation, the Green, Green/Black, Violet, Violet/Black wires,
which are used for a four-speaker installation, are not used. The ends of these wires must
be covered with electrical tape to prevent them from shorting to the unit or the vehicle chassis.
• When using a two-speaker installation, set the
FADER control to the center position.
• When fuse replacement is necessary remove
the blown fuse by using pliers.
Then install the new 15 amp. fuse.
Fuse 15A
NG OK
Burnt
LINE OUT CONNECTIONS
• The unit has a built-in CD changer controller and line output terminals. You can use a compatible Sanyo
CD changer and a separate amplifier to upgrade your system.
CD Changer
DIN Socket
RCA Line-out Jacks
OUTPUT
FRONT REAR
White
L (eft)
R (ight)
Red
External
Amplifier
CD Changer
CD Changer DIN Socket
• Connect the 8-pin DIN cable, which is supplied with the Sanyo CD changer, to the DIN socket on the back
of the unit.
RCA Line-out Jacks (For Speakers)
• Connect a patch cable (not supplied) from the White (left channel) and Red (right channel) RCA line output
jacks to the line input terminals of the external amplifier.
-33-
Rear Speaker
Front Speaker
Page 35

SANYO Electric Co., Ltd
Printed in China
1ED 6P10A 20900
REV.0
 Loading...