

Page 1
INSTRUCTION MANUAL
Microwave Oven with Grill
EM-G5596V UK2
Read these instructions carefully before use.
If you follow these instructions, your Microwave
Oven will serve you long and well.
Page 2

THE OVEN CAVITY SHOULD BE CLEANED
AND WIPED DRY AFTER EACH USE. THE
OVEN SHOULD NOT BE USED IF ANY WATER
OR MOISTURE REMAINS IN THE CAVITY.
ROLLER REST AND GLASS TRAY SHOULD
NOT STAND IN WATER.
DUE TO HIGH MOISTURE CONTENT OF
CERTAIN FOODS SUCH AS POTATOES, IT IS
IMPORTANT THAT THE OVEN IS WIPED
CLEAN AFTER EACH USE.
ATTENTION!
1) Read these instructions carefully before
installing and operating the oven. Keep them
for further reference.
2) Record in the space below the SERIAL No.
found on the oven and retain this information
for future reference.
SERIAL NO.
2
Page 3

CONTENTS
SPECIFICATION --------------------------------------------------------------------------------------- 4
Safety instructions
How To use Your Oven Safely ----------------------------------------------------------------------4
Other Important Safety Instructions ----------------------------------------------------------------5
Installation
Connecting To The Mains ---------------------------------------------------------------------------- 6
Oven Positioning----------------------------------------------------------------------------------------- 6
Oven Parts And Accessories-------------------------------------------------------------------------- 7
Oven Control Panel -------------------------------------------------------------------------------------9
Oven Utensils------------------------------------------------------------------------------------------- 10
MAFF Rating-------------------------------------------------------------------------------------------- 10
Operating Instructions
How To Set The Oven Controls ------------------------------------------------------------------- 11
Setting The Clock --------------------------------------------------------------------------------- 11
Child-Proof Lock ----------------------------------------------------------------------------------- 11
Kitchen Timer --------------------------------------------------------------------------------------- 11
Microwave ------------------------------------------------------------------------------------------- 12
Grill ---------------------------------------------------------------------------------------------------- 12
Combination Cooking ---------------------------------------------------------------------------- 12
Weight Defrost ------------------------------------------------------------------------------------- 13
Multi-Stage Cooking ------------------------------------------------------------------------------ 13
Setting About Auto-Menu ---------------------------------------------------------------------------- 14
Other Convenient Features ------------------------------------------------------------------------- 15
Questions And Answers ---------------------------------------------------------------------------- 16
Care And Cleaning ------------------------------------------------------------------------------------ 17
Before Calling Service-------------------------------------------------------------------------------- 17
Imperial To Metric Conversion Table -------------------------------------------------------------- 18
Electrical Appliance Gurantee (Warranty) ------------------------------------------------------- 19
3
Page 4

SPECIFICATION
Model EM-G5596V UK2
Power Source 230V, 50Hz
Maximum Output Power 900W *
Grill Heater 1000W
Oven Capacity 0.9cu.ft. (25L)
Outside Dimensions (W x D x H) mm 508 x 420 x 310
Net Weight 19.5 Kg
MAFF Rating 900 / E
*According to IEC705 test procedures.
HOW TO USE YOUR OVEN SAFELY
1. When boiling water or other liquids, be
sure to use a wide mouthed container,
this will allow air bubbles to escape freely
and prevent boiling over. Overheating the
liquid beyond boiling point can occur
without evidence of bubbling. This could
result in a sudden boil over of the hot
liquid.
2. Do not attempt to operate the oven while
empty, as this will cause damage.
3. Do not deep fry in the microwave oven as
the temperature of the oil cannot be
controlled and it may overheat.
4. Never completely seal containers in the
microwave oven. Coverings are
necessary but containers must not be
airtight.
5. Small quantities of food with low moisture
content or high fat or sugar content can
burn, dry out or catch fire if cooked or
re-heated too long. Please note that the
heating / cooking period required is
ALTHOUGH YOUR OVEN IS PROVIDED WITH SAFETY FEATURES, IT IS
IMPORTANT TO OBSERVE THE FOLLOWING:
a. Do not tamper with safety interlocks.
b. Do not place any object between the oven and the door or allow any food residue to
accumulate on sealing surfaces. Wipe the door sealing area frequently with a mild detergent,
rinse and wipe dry. Never use abrasive powders or pads.
c. When opened, the door must not be subjected to strain, for example, a child hanging on an
opened door may cause the oven to fall forward resulting in injury.
d. If any damage is apparent, do not operate the oven. Contact your nearest SANYO SERVICE
CENTRE.
e. Children may use the appliance only without supervision as long as instructions have been
given, which enable the child to operate the oven safely and make the child aware of the
dangers of false operation
extremely short: for example mince pies
or similar.
6. Always pierce food, which has a skin or
membrane, for example, eggs, potatoes,
tomatoes, apples, sausages etc. If you
don’t pierce them steam will build up
inside and they may explode.
7. When disposable containers of plastic,
paper or other combustible materials are
used to reheat food, it is advisable to
check from time to time during the cooking
cycle.
NOTE
It is quite normal for steam to be emitted
around the door, for misting to occur on the
door, or even for water droplets to appear
below the door during the cooking cycle.
This is merely condensation from the heat
of the food and does not affect the safety of
your oven. The door is not intended to seal
the oven cavity completely but its special
SANYO design contributes to the safety of
the appliance.
4
Page 5

OTHER IMPORTANT SAFETY INSTRUCTIONS
The following safety precautions should
be followed when using these
appliances.
1. Read all instructions before first use.
2. When using the grill and / or convection
function for the first time, smoke and
odour may be given off for a few minutes.
This is normal during first operation, and
is no cause for alarm.
3. As with most cooking appliances close
supervision is necessary to reduce the
risk of a fire in the oven cavity.
If a fire should start;
Keep the door closed. •
• • Turn the oven off
Disconnect the power cord or shut
off the power at the mains.
Other important safety points to remember
are:
1. Do not use wire ties in the oven. Be sure
to inspect purchased items for wire ties
and remove before placing food in the
oven.
2. It is important to keep the oven interior
clean. Food particles left on the oven
walls reduce the efficiency of the
microwaves.
3. Do not heat foods or liquids in bottle or
jars with lids on. Air must be allowed to
escape from the container.
4. Milk or food for babies should be heated
on “MEDIUM”. It should then be stirred
thoroughly and tested to ensure that it is
at the correct temperature before giving it
to the baby.
5. Care must be taken when removing cups
of hot liquid from the turntable.
6. Cups should be lifted not slid to the edge
of the turntable to prevent tipping.
WARNING
a) Do not adjust or repair the microwave oven yourself. Do not operate the oven if it is
damaged, until it has been repaired by a service engineer trained by the manufacturer.
b) It is dangerous for anyone other than a properly qualified engineer trained by the
manufacturer to carry out adjustments or repairs.
c) If the power supply cord/cable is damaged, it must be replaced by the manufacturer or
its service agent or a similar qualified person in order to avoid a hazard.
d) On no account remove or interfere with any parts or screws.
THIS COULD PROVE VERY DANGEROUS.
7. Never microwave eggs in the shell since
they may explode. The egg yolk may pop
because of a build-up of steam inside the
membrane. To prevent this, pierce the
membrane before cooking it.
WHEN COOKING BY GRILL:
1. Take care not to spill water on the
glass-viewing window during or
immediately after cooking as it may crack.
2. Be sure to use an oven glove when
loading and unloading the ovens. Care
should be taken to avoid pressing cavity
walls inside oven.
3. Be careful not to press the viewing
window when loading or unloading the
oven.
4. The top of the cabinet gets very hot,
therefore do not place items on the
oven. Do not place the oven near
combustible materials e.g. curtains,
kitchen paper.
5. The grill may cycle on/off during
operation.
6. IMPORTANT GRILLING MEAT /
CHICKEN PIECES
Roasting joints / whole Chicken
pieces
Place on an upturned saucer in a flat
dish. Turn over and remove any juices
halfway through cooking.
Smaller Cuts:
Place on the grill rack, place a dish on
the turntable beneath the rack to catch
any liquid. Turn meat over and remove
any juices halfway through cooking.
PLEASE SAVE THESE INSTRUCTIONS
5
Page 6

INSTALLATION
CONNECTING TO THE MAINS
Before you use your oven, check that the
voltage shown on the face of the oven
conforms with your mains supply. The mains
lead has a 13 amp plug containing a 13 amp
fuse. If the fuse requires replacing at any time,
the fuse cover should be removed using a
small screwdriver to lever it out. The old fuse
should be replaced by a 13 amp fuse and the
fuse cover must be refitted before the plug is
used again.
If the plug supplied on the mains lead is not
suitable for the socket in your home, it should
be cut off and disposed of safely, or
destroyed, to avoid possible shock hazard
resulting from the plug being inserted into a
13 amp socket).
If the fuse cover is lost or damaged, the plug
must not be used until a replacement is
obtained. Replacement fuse covers are
available from SANYO SERVICE CENTRES.
It is important that the colour of the
replacement fuse cover corresponds with the
coloured insert or as embossed in words on
the base of the plug.
WARNING – THIS APPLIANCE MUST BE
EARTHED
IMPORTANT:
The wires in this mains lead are
coloured in accordance with the following code:
Green-and-yellow: Earth
Blue: Neutral
Brown: Live
As the colours of the wires in the mains lead
of this appliance may not correspond with the
coloured markings identifying the terminals in
your plug, proceed as follows:
The wire, which is coloured green-and-yellow,
must be connected to the terminal in the plug,
which is marked with the letter E or by the
earth symbol or coloured green or
green-and-yellow. The wire, which is coloured
blue, must be connected to the terminal,
which is marked with the letter N or coloured
black. The wire, which is coloured brown,
must be connected to the terminal, which is
marked with the letter L or colour red.
It is recommended that a separate circuit
serving only the oven be provided. Using a
high voltage is dangerous and may result in a
fire or other accident causing oven damage.
Note:
1. If you have any questions about grounding
or electrical instructions, please consult a
qualified electrician or service person.
2. Neither the manufacturer nor the dealer can
accept any liability for damage to the oven or
personal injury resulting from a failure to
observe the electrical connection procedure.
6
Page 7

level.
OVEN POSITIONING
Make sure that all packing materials are
1.
removed from inside of the door.
2. Check the oven for any damage, such as
a misaligned or bent door, damaged door
seals and sealing surface, broken or
loose door hinges and latches and dents
inside the cavity or on the door. If there is
any damage, do not operate the oven
and contact qualified service personnel.
3. Install the oven on a flat, level surface
strong enough to safely bear the weight
of the oven.
4. Do not locate the oven near areas where
heat and moisture are generated as this
may lower oven efficiency.
5. Covering the air vents may lead to
malfunctioning; therefore a minimum
clearance of 20cm is required above the
oven, 10cm at the back and 5cm to each
side of the oven.
6. Some interference may occur if it is
placed too close to a radio or TV, so keep
them as far apart as possible.
7. The microwave oven must be installed at
a minimum height of 85cms above floor
Note:
This symbol mark and recycle system are applied only to EU
countries and not applied to
countries in other parts of the world.
Your SANYO product is designed and manufactured with high
quality materials and components which can be recycled and
reused.
This symbol means that electrical and electronic equipment, at their
end-of-life, should be disposed of separately from your household
waste.
Please dispose of this equipment at your local community waste
collection/recycling centre.
In the European Union there are separate collection systems for
used electrical and electronic products.
Please help us to conserve the environment we live in!
7
Page 8

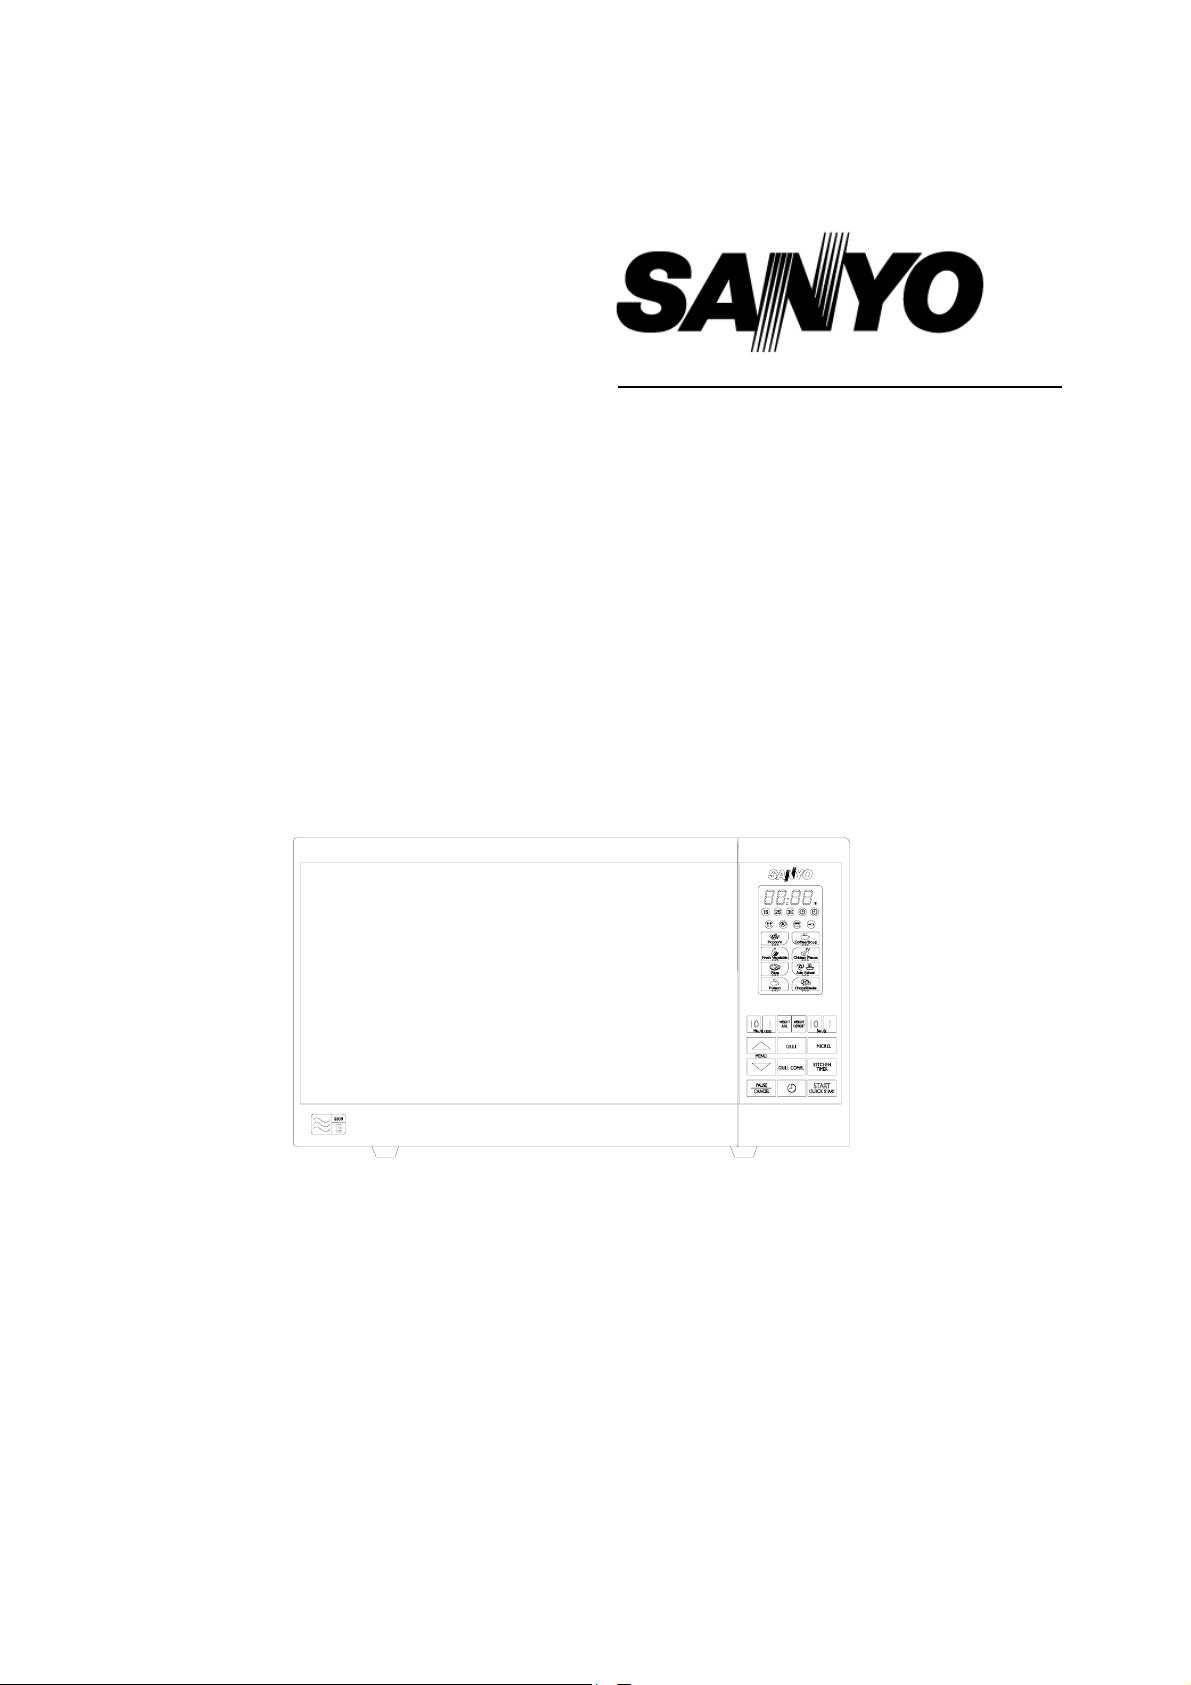
OVEN PARTS AND ACCESSARIES
Your oven is supplied with the following accessories:
Turntable 1 Instruction manual 1
Turntable roller rest 1
Metal Rack 1
6
3
2
4
5
7
1
9
Turntable Installation
1. Place the roller rest on the cavity bottom.
2. Place the turntable on top of the roller rest
1. Safety Lock System
2. Oven Window
3. Oven Air Vents
4. Shaft
5. Roller Ring
6. Glass Tray
7. Control Panel
8. Grill Heater
9. Metal Rack
as shown in the diagram. Make sure the
turntable hub is securely locked in the
turntable shaft. Never place the turntable
upside down.
•
Both turntable and roller rest must
always be used during cooking.
•
All food and containers of food are
always placed on this turntable for
8
Page 9

cooking.
This turntable rotates clockwise and
•
OVEN CONTROL PANEL
anticlockwise; this is normal
DISPLAY SCREEN
Cooking time, power, indicators and present time
are displayed.
MICRO.
Press to select microwave power level.
GRILL
Press to set a grill-cooking program.
WEIGHT ADJ.
Use to enter food weight.
GRILL COMBI.
Press to select one of two combination cooking
settings.
MENU
Use to select an auto cook item.
START/QUICK START
Press to start cooking program or set quick start
cooking program.
CLOCK (icon)
Press to set the clock time.
PAUSE/CANCEL
Press to stop cooking program or clear all
previous settings before cooking starts.
KITCHEN TIMER
Use to set a count down time.
NUMBER PADS
Use to enter the clock, or cooking time.
WEIGHT DEFROST
Press to defrost food according to weight.
(Please also see the following pages for more
detail)
9
Page 10

OVEN UTENSILS
1. The ideal material for a microwave utensil is transparent to microwave, it allows energy to
pass through the container and heat the food.
2. Microwave cannot penetrate metal, so metal utensils or dishes with metallic trim should not be
used.
3. Do not use recycled paper products when microwave cooking, as they may contain small
metal fragments which may cause sparks and/or fires.
4. Round /oval dishes rather than square/oblong ones are recommend, as food in corners tends
to overcook.
5. Narrow strips of aluminium foil may be used to prevent overcooking of exposed areas. But be
careful not to use too much and keep a distance of 1 inch (2.54cm) between foil and cavity.
The list below is a general guide to help you select the correct utensils.
MATERIAL UTENSILS MICROWAVE GRILL COMBI.
Ceramic & Glass Heat Resistant Glassware
Glassware with Metal Decoration
Lead Glass
China Without Metal Decoration YES YES YES
Pottery YES YES YES
Plastic Regular Oven Heat-proof Ware YES NO NO
Plastic Wrap YES NO NO
Metal Metal Baking Pan
Aluminium Foil
Paper Cups, Plates, Towels YES NO NO
Waxed Paper YES NO NO
Wood NO NO NO
Combination: applicable for "microwave + grill" cooking.
YES
NO
NO
NO
YES
YES
NO
NO
YES
YES
YES
NO
NO
NO
NO
MAFF RATING
Explanation of the heating category label for microwave ovens and small packs of food (up to
500g / 1lb 2oz, typical of ready meals for 1 or 2 people) as agreed by MAFF (the Ministry of
Agriculture, Fisheries and Food) in conjunction with food and microwave oven manufacturers.
Oven heating category power output
B D 650W 750W
6 5 6 5
minutes minutes
Always follow instructions found on food
packaging. The higher the power output
and heating category of the oven, the less
heating time is required.
Always ensure that food is piping hot
before serving.
10
Page 11

HOW TO SET THE OVEN CONTROLS
BEEPS DURING OVEN SETTINGS
ONE BEEP: Oven accepts the entry. ♦
♦ TWO BEEPS: Oven does not accept the entry. Please check and try again.
SETTING THE CLOCK
1. Press and hold CLOCK icon for 3 seconds (press it again to set clock time in 12-hour cycle).
2. Use the number pads (Minutes 10 or 1) to set the correct hour.
3. Use the number pads (Seconds 10 or 1) to set the correct minute.
4. Press CLOCK icon to confirm.
CHILD-PROOF LOCK
The child proof lock prevents unsupervised operation by little children.
To set the child proof lock: Press PAUSE/CANCEL button for 3 seconds, then a beep will sound and the indicator light
will come on. In the lock state, all buttons are disabled.
To cancel the child proof lock: Press PAUSE/CANCEL button for 3 seconds, then a beep will sound and the indicator
light will come off.
KITCHEN TIMER
This function can be used independently. The user can use it to time a long distance phone call for example.
1.
Press “KITCHEN TIMER” button.
2.
Use the number pads to enter time.
3.
Press “START/QUICK START button.
NOTE:
•
Time countdown can be seen in display for 3 seconds before clock or cooking time is returned to
display.
•
Press KITCHEN TIMER button and then press PAUSE/CANCEL button to cancel KITCHEN TIMER
during timing process.
11
Page 12

12
 Loading...