

Page 1
MIKROWELLENGERAET FUER DIE GASTRONOMIE
BEDIENUNGSANLEITUNG
COMMERCIAL USE MICROWAVE OVEN OPERATING
INSTRUCTIONS
FOUR PROFESSIONNEL A MICRO-ONDES
MODE D’EMPLOI
MAGNETRONOVEN VOOR COMMERCIEEL GEBRUIK
GEBRUIKSAANWIJZING
FORNO A MICROONDE PROFESSIONALE MANUALE
D’ISTRUZIONE
EM-C1100
Page 2

1
1.NAME AND FUNCTION OF PARTS...........................................17
2.CONTROL PANEL.......................................................................18
3.INSTALLATION............................................................................19
4.WARNING-This appliance must be earthed...............................19
5.HOW TO USE YOUR SANYO MICROWAVE
OVEN SAFELY .............................................................................20
6.HINTS FOR COOKING................................................................20
7.MICROWAVE OVEN COOKING KNOW-HOW..........................21
8.OPERATING INSTRUCTION (1)
TIMER (MANUAL) WITH 3 POWER SETTINGS BY TIMER KNOB
TIMER (MANUAL) COOKING ...............................................21–22
9.OPERATING INSTRUCTION (2)
USING THE PROGRAMME KEY
FOR MEMORY STORAGE....................................................23–25
10.OPERATING INSTRUCTION (3)
HEATING METHOD ....................................................................26
11.PRECAUTION WHILE HEATING................................................27
12.USABLE COOKING UTENSILS AND MATERIALS....................27
13.CHECKING ACCUMULATIVE COOKING TIME,
NUMBER OF DOOR OPERATIONS AND CONTROL
OF THE BUZZER SOUND...........................................................28
14.CARE AND CLEANING...............................................................29
15.WHAT TO DO IF REPAIRS ARE NEEDED................................29
16.SPECIFICATIONS AND ACCESSORIES .....................................29
1.DESIGNATION ET FONCTION DES PIECES .............................30
2.TABLEAU DE COMMANDE.......................................................31
3.INSTALLATION............................................................................32
4.ATTENTION-CE FOUR A MICRO-ONDES DOIT ETRE
MIS A MASSE.............................................................................32
5.COMMENT UTILISER LE FOUR À MICRO-ONDES
EN TOUTE SÉCURITÉ.................................................................33
6.CONSEILS POUR LA CUISSON.................................................33
7.CE QUE BOUS DEVEZ SAVOIR POUR CUISINER AVEC
LE FOUR A MICRO-ONDES.......................................................34
8.INSTRUCTIONS DE FONCTIONNEMENT (1)
TIMER (MANUEL) AVEC TROIS RÉGLAGES DE PUISSANCE
CUISSON AVEC MINUTERIE (MANUELLE) ........................34–35
9.INSTRUCTIONS DE FONCTIONNEMENT (2)
UTILISATION DE LA TOUCHE DE PROGRAMME
POUR LA MISE EN MÉMOIRE DES RÉGLAGES...............36–37
10.INSTRUCTIONS DE FONCTIONNEMENT (3)
MÉTHODE DE RÉCHAUFFAGE.................................................38
11.PRÉCAUTIONS À OBSERVER POUR LE RÉCHAUFFAGE ......39
12.USTENSILES DE CUISINE ET MATÉRIAUX UTILISABLES ......39
13.VÉRIFICATION DU TEMPS DE CUISSON CUMULÉ,
DU NOMBRE D’OUVERTURES/FERMETURES
DE LA PORTE ET COMMANDE DE LA SONNERIE................40
14.ENTRETIEN ET NETTOYAGE .....................................................41
15 QUE FAIRE SI DES RÉPARATIONS SONT
NÉCESSAIRES.............................................................................41
16.FICHE TECHNIQUE ET ACCESSOIRES .....................................42
1.ONDERDELEN EN HUN FUNCTIES..........................................43
2.BEDIENINGSPANEEL..................................................................44
3.INSTALLATIE ...............................................................................45
4.ATTENTIE: DE MAGNETRON MOET GEAARD ZIJN...............45
5.AANWIJZINGEN VOOR VEILIG GEBRUIK ................................46
6.NUTTIGE WENKEN.....................................................................47
7.WAT U MOET WETEN OVER HET KOKEN MET DE
MAGNETRON ..............................................................................47
8.BEDIENING (1)
TIMER (HANDBEDIENING) MET 3 STANDEN
KOKEN MET BEHULP VAN DE SCHAKELKLOK
(HANDBEDIENING) ...............................................................48–49
9.BEDIENING (2)
PROGRAMMEREN VAN HET GEHEUGEN MET BEHULP
VAN DE PROGRAMMATOETS ............................................50–51
10.BEDIENING (3)
KOOKPROCEDURE .....................................................................52
11.VOORZORGSMAATREGELEN TIJDENS HET KOKEN.............53
12.BRUIKBAAR KOOKGEREI EN MATERIAAL..............................53
13.CONTROLEREN VAN DE TOTALE KOOKTIJD,
AANTAL OVENDEUR-BEDIENINGEN EN REGELING
VAN DE ZOEMERTOON.............................................................54
14.ONDERHOUD EN REINIGING....................................................55
15.ALS REPARATIE VEREIST IS .....................................................55
16.TECHNISCHE GEGEVENS EN TOEBEHOREN..........................56
INHALTSVERZEICHNIS
CONTENTS
SOMMAIRE
INHOUD
GB AU
F NL
D
1.BEZEICHNUNG UND FUNKTION DER EINZELNEN TEILE ........3
2.BEDIENUNGSEINHEIT..................................................................4
3.AUFSTELLUNG ..............................................................................5
4.ACHTUNG - DIESES GERAET MUSS GEERDET SEIN...............5
5.WIE SIE IHR SANYO MIKROWELLENGERAET
GEFAHRLOS EINSETZEN.............................................................6
6.KOCHTIPS ......................................................................................7
7.WAS SIE UEBER DAS KOCHEN MIT DEM
MIKROWELLENGERAET WISSEN MUESSEN ...........................7
8.BEDIENUNGSVERFAHREN (1)
SCHALTUHR (MANUELL) MIT DREI LEISTUNGSSTUFEN
MANUELLES GAREN MIT ZEITSCHALTUHR.........................8–9
9.BEDIENUNGSVERFAHREN (2)
GEBRAUCH DER PROGRAMMTASTE ZUR
SPEICHERUNG......................................................................10–11
10.BEDIENUNGSVERFAHREN (3)
GARVERFAHREN ........................................................................12
11.HINWEISE ZUM GAREN ............................................................13
12.GEEIGNETES KOCHGESCHIRR UND ZULÄSSIGE
WERKSTOFFE .............................................................................13
13.KONTROLLE VON AUFGELAUFENER GARZEIT,
ANZAHL VON KLAPPENOEFFNUNGEN UND
REGELUNG DES AKUSTISCHEN SIGNALS..............................14
14.REINIGUNG UND PFLEGE .........................................................15
15.IM REPARATURFALL..................................................................15
16.TECHNISCHE DATEN UND ZUBEHÖR.....................................16
Page 3
17
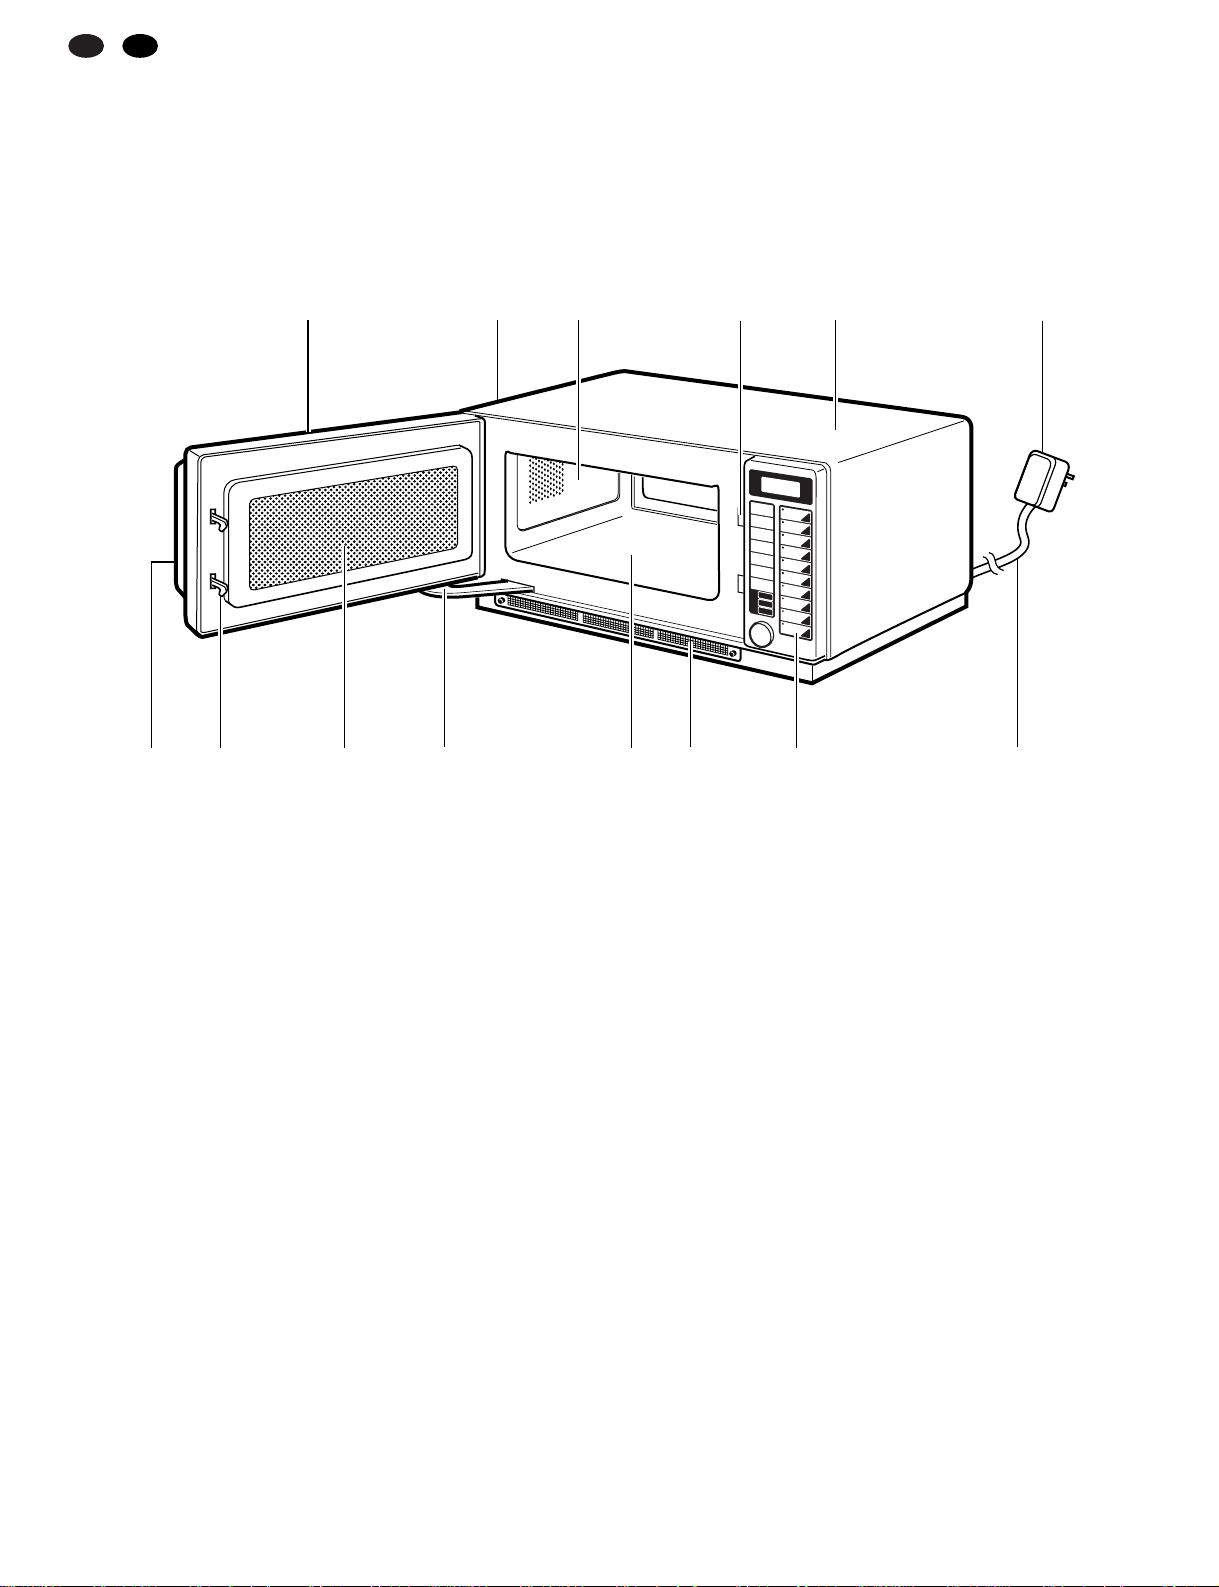
NAME AND FUNCTION OF PARTS
1.Oven Cavity
Place food in this space to cook. Wipe the cavity clean each
time the oven is used.
2.Door Handle
3.Door
4.Door Latch
5.Shielded Viewing Window
The progress of cooking can be observed while oven is
operating.
6.Door Arm
Prevents door swinging back.
7.Ceramic Tray
Food in suitable container is placed on this tray for cooking.
8.Cabinet
9.Control Panel
10.Power Supply Cord
11.Safety Interlock System
With built-in safety interlock.
12.Air Filter
Clean with care.
13.Lamp Cover
14.Power Supply Plug
12 107 96542
13 1
811 143
GB AU
Page 4
18
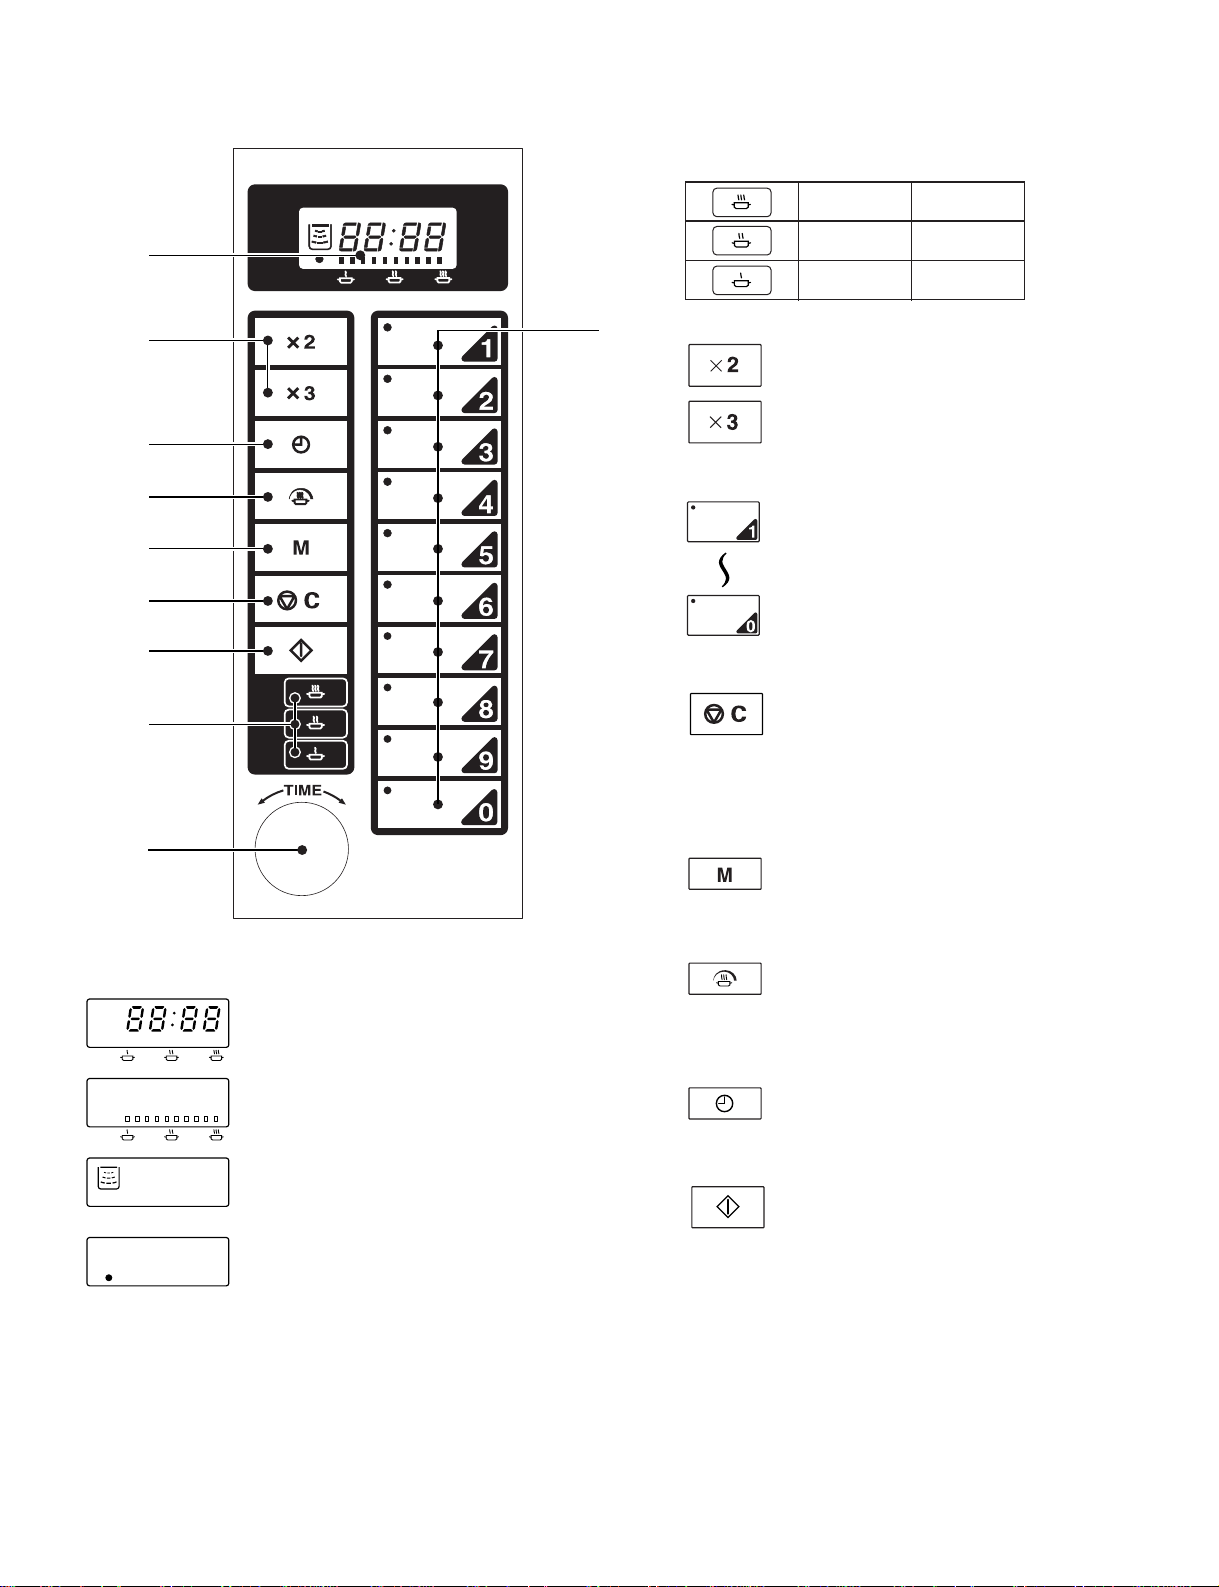
5. Programme Selection Keys
¡The unit is ready to begin operation as soon as
the heating time has been programmed, using
these ten keys (numbered1 to 9, 0).
The time selected will be displayed, and “count
down” after the process is begun.
¡For determining power output and cooking time
during programming.
6. Clear Key
¡For cancelling setting, interrupting the setting process when
a mistake has been made, or stopping cooking before the
completion of the cooking process.
7. Memory Key
¡For entering the desired power output and cooking time.
8. Power Key
¡For entering the desired power output into the unit’s
memory.
9. Timer Key
¡For entering the desired cooking time into the unit’s memory.
10.Start Key
¡For timer cooking.
¡For restart at programmed cooking.
CONTROL PANEL
1. Digital Timer
¡Displays remaining cooking time.
¡Displays remaining cooking power
levels.
¡Blinks while cooking.
¡Gives notice that it is time to replace
the Magnetrons.
5
9
8
7
6
10
2
1
4
3
4. Multiple Quantity Selection Key
¡For setting cooking to double or triple-quantity.
These keys to be used in conjunction with the
programme key.
2. Timer (Manual)
3. Power Select Key (Manual cooking)
High
Medium
Low
1100W
550W
220W
Page 5
19
INSTALLATION
WARNING - This appliance must be ear thed
THIS PLUG IS NOT WATERPROOF - KEEP DRY (FOR U.K.)
*WARNING: A PLUG WITH BARED FLEXIBLE CORDS
IS HAZARDOUS IF ENGAGED IN A LIVE SOCKET OUTLET.
1. The oven surround and also the surround of the control panel is
covered by a protective plastic film, and this should be removed
prior to putting the oven into use.
2. Install the oven on a flat, level surface
Strong enough to safely bear the weight of the oven. To avoid the
possibility of causing vibration or noise the oven must be in a
stable position.
3. Keep the oven away from heat and water
Exposure to heat and water can lower oven efficiency and lead to
malfunctioning, so be sure to install the oven away from external
heat and water sources.
4. This oven conforms to EMC Directive 89/336/EEC, however some
interference may occur if it is placed too close to a radio or TV, so
keep them as far apart as possible.
5. Exhaust vents are located at the rear of the oven so maintain
a minimum spacing of 5cm (2") between the oven and any
adjacent surfaces at these points.
In an enclosed housing. please maintain a minimum spacing
of 20cm on the top.
Covering the exhaust vent may lead to malfunctioning. Hot air
flows from these vents, so be sure not to obstruct cover or let
curtains come between the oven and the rear wall.
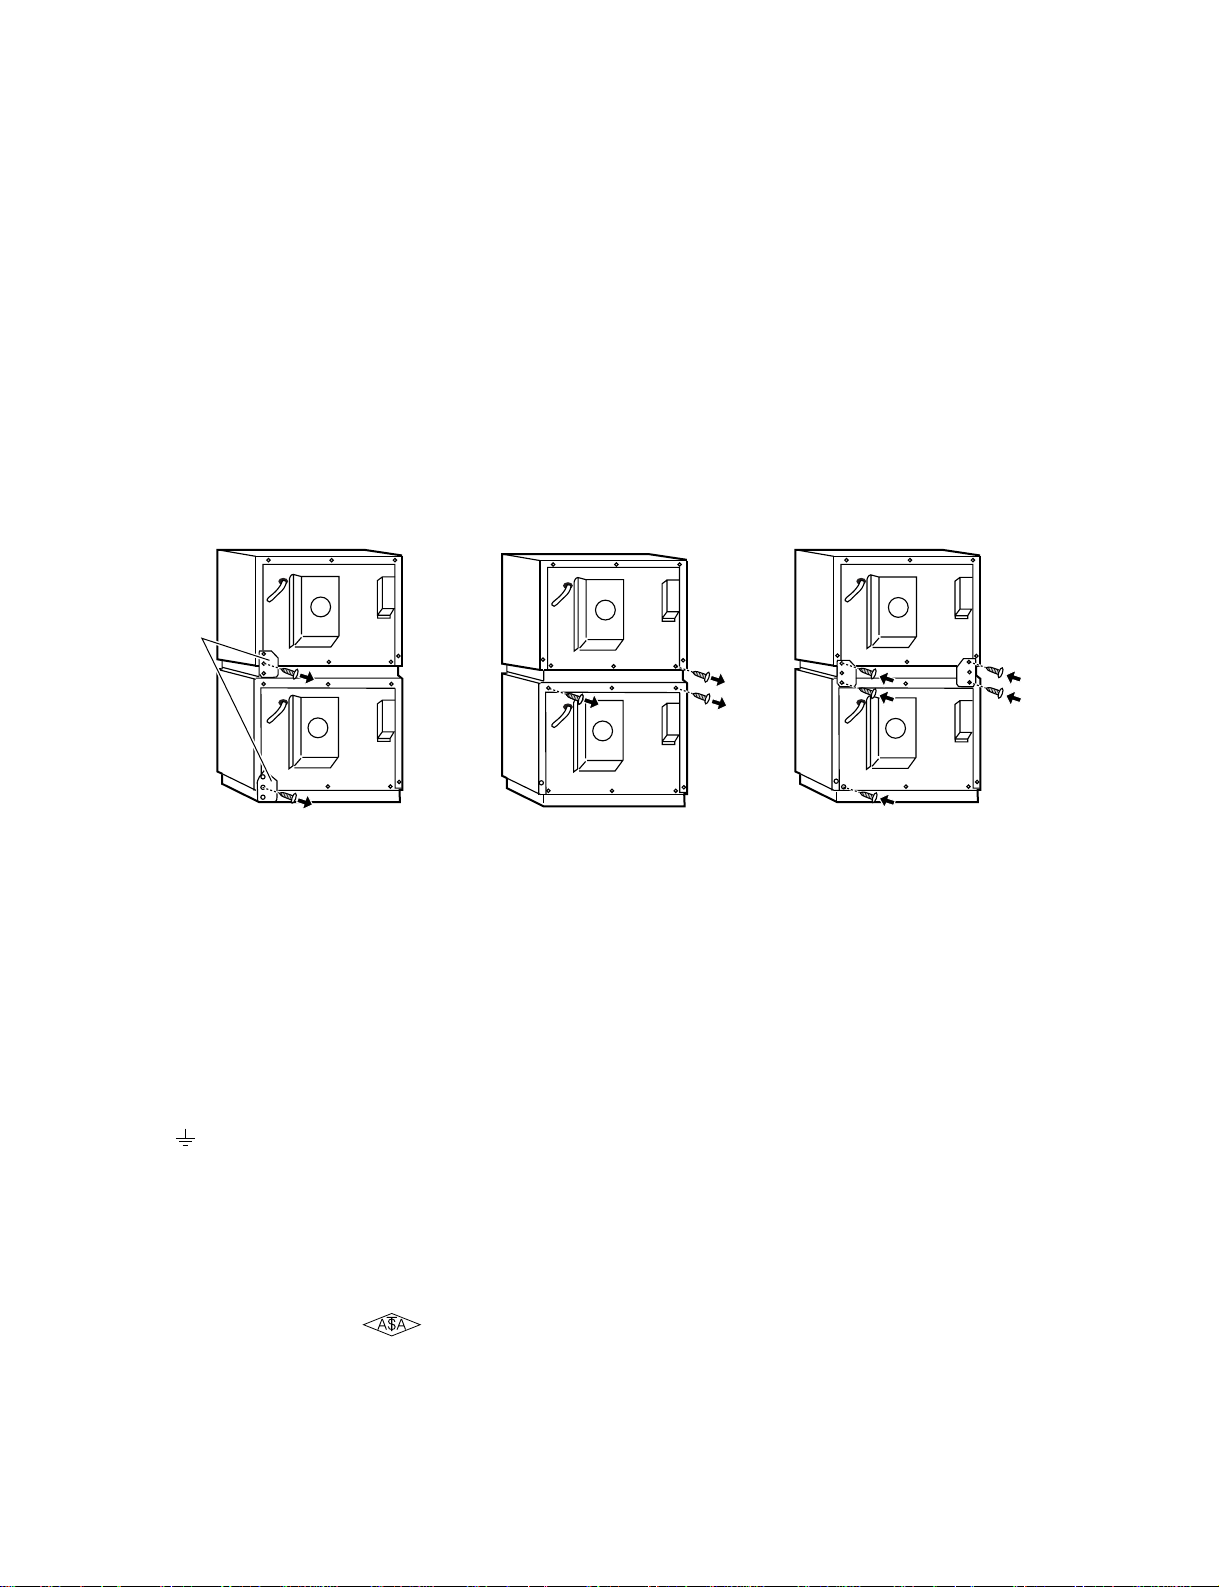
6. When you stack your sanyo microwave ovens.
1)Place one microwave oven on top of the other one, and remove
the plates which are each secured by a single screw tu the
bottom-left corners at the rear of both microwaves. (Fig.1)
2)Remove the two screws which are securing the frame of the
lower microwave oven. Remove the screw which is securing
the bottom-right corner of the upper microwave oven. (Fig.2)
3)Use the upper and lower plate screw holes to secure the upper
and lower microwave ovens with te four screws. Secure the
bottom-left corner of the lower microwave also. (Fig.3)
IMPORTANT
The wires in this mains lead are coloured in accordance with the
following code:
Green-and-yellow: Earth.
Blue: Neutral.
Brown: Live.
As the colours of the wires in the mains lead of this appliance may
not correspond with the coloured markings identifying the terminals
in your plug, proceed as follows:
The wire which is coloured green-and-yellow must be connected to
the terminal in the plug which is marked with the letter E or by the
earth symbol or coloured green or green-and-yellow.
The wire which is coloured blue must be connected to the terminal
which is marked with the letter N or coloured black.
The wire which is coloured brown must be connected to the terminal
which is marked with the letter L or coloured red.
(FOR AUSTRALIA)
This appliance must be earthed. If there is an electrical short circuit,
earthing reduces the risk of electric shock by providing an escape
wire for the electric current. This appliance is equipped with a cord
that has a earthing wire with a earthing plug. The plug must be
plugged into an outlet that is properly installed and earthed.
This cord is already fitted with a moulded plug incorporating a fuse,
the value of which is indicated on the pin face of the plug. Should the
fuse need to be replaced, an ASTA approved BS1362 fuse must be
used of the same rating, marked thus.
If the fuse cover is detachable, never use the plug with the cover
omitted. If a replacement fuse cover is required, ensure it is the
same colour as that visible on the pin face of the plug.
Fuse covers are available from Sanyo Service Centre.
If the plug supplied is not suitable for your socket outlet, it should be
cut off and destroyed*.
The end of the flexible cord should be suitably prepared and the
correct plug fitted.
plate
(Fig.1) (Fig.2) (Fig.3)
Page 6

20
HOW TO USE YOUR SANYO MICROWAVE OVEN SAFELY
a) It is important not to defeat or tamper with safety interlocks.
b) Do not place any object between the oven front face and the door
or allow residue to accumulate on sealing surfaces. Wipe the
sealing area frequently with a mild detergent, rinse and wipe dry.
Never use abrasive powders or pads.
c) When opened, the door must not be subjected to strain, for
example, a child hanging on an opened door or any load could cause
the oven to fall forward to cause injury and also damage to the door.
Do not operate the oven if it is damaged, until it has been repaired
by a qualified service engineer. It is particularly important that the
oven closes properly and that there is no damage to the:
i) Door (bent)
ii) Hinges and Latches (broken or loosened)
iii) Door seals and Sealing surfaces
d) It is dangerous for anyone other than a properly qualified service
engineer trained by SANYO to carry out adjustments or repairs.
NOTE
It is quite normal for steam to be emitted around the door, or for
misting to occur on the door, or even for water droplets to appear
below the door during the cooking cycle. This is merely condensation from the heat of the food and does not affect the safety of
your oven. The door is not intended to seal the oven cavity
completely but its special SANYO design contributes to the
complete safety of the appliance.
Note: After cooking or when you stop cooking by opening the door.
The fan of the oven will turn for one minute.
OTHER SAFEGUARDS:
1. Never remove the cabinet.
High voltage electricity is used in this oven, so be sure no to
remove the cabinet.
2. Be careful not to spill water over the oven, especially near the air
vents.
3. Never operate oven without the air filter which is located on
underside of cabinet. Air Filter must be kept clean for maximum
efficiency.
4. Do not operate when there is no food in the oven.
Operation of the oven when empty shortens the service life of
the magnetron and causes overheating.
Also, the internal components of oven melt or burn and will
damage the product.
5. Do not operate without the cooking tray inside the oven.
The oven can become stained by food burning on to base of oven.
6. When cooking, never allow aluminum foil, metal skewers or
other metallic objects to touch the glass viewing window or
oven cavity.
This may cause sparking at the point of contact, may break the
glass, or cause damage to the oven walls.
7. Do not leave the oven in unattended operation when food is
heated or cooked in disposable containers of plastic, paper or
other combustible materials.
8. If smoke is observed, keep the oven door closed and switch off
by disconnecting the oven from the power supply.
9. Do not do anything that may interfere with the operation of the
upper or lower hinges and/or latches of the oven's door. Such
interference causes unit malfunctions.
10. Do not use excessive force when pressing the unit’s keys, or
press them with metal or sharp utensils or objects.
These can damage the unit and lead to malfunctions.
11. Do not place or store things on top of the unit, as it can become
quite hot during operation and there is the danger of melting or
harming them.
12. Handle the unit's tray with care, as it can crack or break if
dropped or struck.
13. Keep the power sapply plug clean at all times to ensure proper
operation.
14. Allow the tray to cool before immersing it for cleaning.
Failure to do so can result in cracking or breaking.
15. Only allow children to use the oven without supervision when
adequate instructions have been given so that the child is able to use
the oven in safe way and understands the hazards of improper use.
Note: If the supply cord is damaged, it must be replaced by SANYO
SERVICE CENTRE, as a special prepared cord is required.
For U.K. plug (432-0-8390-56700)
For Australian plug (432-0-8390-54300)
Although your oven is provided with safety features, it is important to observe the following:
WARNING - To reduce the risk of burns, electric shock, fire, injury to persons or exposure to excessive microwave energy:
WARNING -
ELECTROCUTION HAZARD HIGH VOLTAGE
Removing the cover of your microwave oven and touching an electrical part can kill you.
Have a professional repair your microwave oven.
HINTS FOR COOKING
1. Microwave cooking time
¡As when cooking with other forms of heat, microwaves can
cause the moisture in foods to evaporate so that the food will
burn if overheated.
¡Do not set the timer for a longer time than necessary.
¡The first time you make a dish with this oven, stop cooking a bit
early and check on the cooking progress.
¡Do not overcook. Baked foods having a hard, dry brown spot
after microwave cooking indicates overcooking.
2. Do not heat small quantities of food or dried foods for long periods
of time.
¡Such foods may burn or catch fire, and the oven will also be
affected in much the same way as if it were operating empty.
Put a cup of water in the oven when heating such foods.
3. Always make sure that closed containers, such as jars of baby
food, are opened and plastic pouches of vegetables are pierced
before cooking.
¡Tightly closed containers could explode.
4. Avoid heating baby bottles or baby food jars. Transfer the food into
a suitable container for the microwave oven. The food
temperature should be tested before giving it to the baby.
5. Do not cook eggs in their shells because they will explode.
¡Prick the membrane around the yolk before frying eggs to allow
steam to escape. This is because the yolk swells faster than the
membrane and the egg explodes when heated quickly. Eggs
cannot be boiled in this microwave oven.
6. Do not overheat.
¡During defrosting, shorten the time to avoid overcooking.
7. Never use the oven as a Clothes Drying Cabinet.
Since there is no heating time guide for drying things like paper or
cloth, using the oven for this purpose may lead to oven damage
or Fire!
8. When boiling water or other liquids, be sure to use wide mouthed
containers. This will allow air bubbles to escape freely. Should a
narrow mouthed container be used, air bubbles may combine to
form a large bubble which may in turn cause the liquid to boil over.
This may happen even after the cooking time has stopped.
Page 7

21
MICROWAVE OVEN COOKING KNOW-HOW
OPERATING INSTRUCTIONS (1)
TIMER (MANUAL) WITH 3 POWER SETTINGS BY TIMER KNOB
1) Connect mais lead to power outlet.
2) Open the door. The oven lamp will light.
3) Put food in suitable containers on the tray in the oven cavity and close the door.
The oven lamp will go out.
MANUAL USE
4) Set the time knob to the desired time (maximum 10 minutes). The digital timer shows the cooking
time.
5) To start cooking, press either “HIGH”, “MEDIUM”, or “LOW” power select buttons:
the corresponding indicator lights up and the digital timer counts down to zero.
The oven lamp will light when any one of the power select key is pressed.
* If you want to check cooking progress during oven operation, the door may be opened while the
oven is operating.
The oven is designed so that the microwaves will be switched off immediately the door is opened
and the timer will stop until cooking is resumed.
To resume cooking, close the door and press previously selected power key.
(Note: Other buttons will not operate the oven at this stage.)
* If food is ready or you wish to cancel timer during cooking, press “ ” key.
6) On completion of cooking time, the beep tone sounds and the
microwaves stop.
High
Medium
Low
1100W
550W
220W
1. Cooking times with quantity
¡Input the cooking time that is appropriate to the quantity of
foods being prepared.
¡When heating double or triple quantity, use the appropriate
multiple-quantity key.
Note: Before use, the user should check that utensils are suitable
for used in microwave ovens.
2. To do even cooking
¡Turn bulky foods oven (180˚ degree) halfway through the
cooking.
¡When cooking two or more items, rotate them halfway
through the cooking.
¡When cooking tall foods, be sure to turn them upside down
halfway through the cooking.
¡When cooking foods with parts of different thicknesses.
protect the thinner, faster-cooking part with aluminum foil
halfway through the cooking to protect them from overcooking.
¡When cooking soups or sauces, stir them (once or twice)
halfway through the cooking.
Page 8

22
TIMER (MANUAL) COOKING
1) Connect mains lead to power outlet. 2) Open the door. The interior lamp will light.
Operation Display window
1
2
3
4
5
6
7
8
9
Put food in suitable containers on the ceramic tray in the oven
cavity and close the door.
The interior lamp will go out.
¡Touch key.
¡Input POWER level 8 with the PROGRAMME
keys.
¡Touch: number “8”.
¡Touch key.
¡Input the desired time with the
PROGRAMME keys.
¡Touch number “1” of the desired 1 minute
30 seconds.
¡Touch number “3”.
¡Touch another “0”.
¡Touch “ ” key.
¡Cooking time ends.
¡Remove the food from oven.
¡“0” appears in the display.
¡The colon will appear on the display and
Power Level “10” Bar.
¡Power Level “8” Bar.
¡No change in display.
¡“1” will appear on the display.
¡“3” will appear on the right of “1”, “13”
shows in the display.
¡“1.30” then shows in the display.
¡To start cooking, the corresponding
indicator lights up and the digital timer
counts down to zero.
¡The “beep” tone sounds, “0” shows. The
oven lamp will go out.
colon
Power level bar
Note: When you operate Max Power, don’t touch POWER key. Max power operation will automatically be made so you can skip operation 2 and
3. Max input time is ten minutes.
2-stage cooking
Follow steps 1 to 7, then repeat steps 2 to 7 and touch START key.
3-stage cooking
Follow steps 1 to 7, then repeat step 2 to 7 two times and touch
START key.
Page 9

23
OPERATING INSTRUCTION (2)
USING THE PROGRAMME KEY FOR MEMORY STORAGE
1. Programmed (1-Stage) Cooking at lower power level.
(Example) To programme the following on programme No.4: (
Operational Display window
1
2
3
4
5
6
7
¡Touch key (2nd time).
¡Touch PROGRAMME key number “4”.
¡Touch key.
¡Input “power level 5” with PROGRAMME
key Touch number “5”.
¡Touch key.
¡Input the operating time with the
PROGRAMME keys Touch number “4”.
¡“0” appears in the display.
¡No change.
¡The program key number “4” indicator
will illuminate.
Power level “10” bar.
¡No change.
¡Power Level “5” Bar.
¡No change.
¡The “4” appears in the display.
8
¡Then, touch number “5”.
¡The “5” appears behind the “4”.
”45” then shows in the display window.
9
¡Then, touch key.
¡“0” appears in the display.
Note: When you operate Max Power, don’t touch POWER key. Max power operation will automatically be made so you can skip operation 4 and 5.
¡Touch key (1st time).
Power Level 5
for 45 seconds.
2-stage cooking
Follow steps 1 to 8, then repeat steps 4 to 8 and touch MEMORY key.
3-stage cooking
Follow steps 1 to 8, then repeat steps 4 to 8 two times and touch MEMORY key.
Page 10

24
*You can set the power level at “0” to use the device as a timer (up to 30 minutes). In such case, the oven lamp
will not light. Only the indication of remaining time will decrease every second after the start button is pressed.
Note:
1. A “beep” tone sounds whenever any key is touched.
2. If the desired numeral is not displayed, touch CLEAR key and restart (procedures) from the beginning.
3. If an operating time over the Max. Input time is selected, subsequent key operation is impossible.
4. To enter 1 minute (60 seconds) input ”100”.
5. The storing process is completed by touching MEMORY key.
If MEMORY key is not touched, the new settings will not be stored and the previous memory information will be retained.
Max. Input time
max power (no input)
9
8
7
6
5
4
3
2
1
0
POWER LEVEL LIST (Input figure)
POWER (W)
EM-C1100
1100
990
880
770
660
550
440
330
220
110
0
6 min. 00 sec.
30 min. 00 sec.
”
”
”
”
”
”
”
”
”
POWER LEVEL LIST
Page 11

25
2. Confirmation of Memory.
(Example) When programme No.3 is programmed as:
1st input: Max power 30 sec. 2nd input: Power Level 5 1min. 3rd input: Power Level 2 2min.
Operation Display window
1
2
3
4
5
¡Touch number “3”.
¡Touch number “3” again.
¡Touch number “3” again.
¡Touch key.
¡“0” appears in the display.
¡Programmed No.3.
¡Input power Level bar “10”.
¡Input time 30 sec. (1st stage)
¡Programmed No.3.
¡Input power Level bar “5”.
¡Input time 1 min. (2nd stage)
¡Programmed No.3.
¡Input power Level bar “2”.
¡Input time 2 min. (3rd stage)
¡“0” appears in the display.
¡Open the door.
Note:
1. Touch CLEAR key after confirming the contents of the unit’s memory.
2. If nothing is in the memory, the programme selection key indicator will flash.
3. If you wish to change a programme memory, touch MEMORY key twice and then input again as shown in pages 23 – 24.
Page 12

26
OPERATING INSTRUCTION (3)
Operation Display window
1
2
3
¡Touch PROGRAMME SELECTION key
number “3”. (Heating starts)
¡Cooking time ends.
¡Remove food from oven.
¡Place food in oven.
¡Touch MULTIPLE QUANTITY SELECTION key “×3” once. Triple quantity cooking will be selected and “3” appears in the display.
HEATING METHOD
1. Ordinary Use
(Example) When programme No.3 is programmed as:
1st input: Max power 30 sec. 2nd input: Power Level 5 1min. 3rd input: Power Level 2 2min.
¡“0” appears in the display.
¡The programme selection key number “3”
indicator will illuminate.
¡The total heating time shows and count
down.
¡After 1st stage is completed, the rest of
heating time shows and count down.
¡After 2nd stage is completed, the rest of
heating time for 3rd stage shows and
count down to zero.
¡The “beep” tone sounds, “0” appears in
the display.
Operation Display window
1
2
3
4
¡Touch PROGRAMME SELECTION key
number “3”. (Heating starts)
¡Cooking time ends.
¡Remove food from oven.
¡Place food in oven.
¡Touch key once.
2. MULTIPLE QUANTITY SELECTION Key Use
(Example) When DOUBLE is used.
¡“0” appears in the display.
¡“2” show.
¡The programme selection key number “3”
indicator will illuminate.
¡The total heating time shows and count
down.
¡After 1st stage is completed, the rest of
heating time shows and count down.
¡After 2nd stage is completed, the rest of
heating time for 3rd stage shows and
count down to zero.
¡The “beep” tone sounds, “0” appears in
the display.
Page 13

27
PRECAUTION WHILE HEATING
USABLE COOKING UTENSILS
AND MATERIALS
OVENPROOF GLASS
Ovenware (treated for high intensity heat), such as mixing bowls,
bread dishes, pie plates, cake plates, liquid measuring cups,
casseroles, and bowls without metallic decoration.
CHINA
Bowls, cups, serving pieces, plates, and platters without metallic
decoration.
POTTERY
Dishes, cups, mugs, and bowls.
PLASTIC
Plastic wrap (cling film) may be used as a cover. Lay the plastic wrap
loosely over the dish and press it to the sides. The dish should be
deep enough so that plastic wrap will not touch the food, also the
film should be pierced to allow steam to escape. As the food heats,
it may cause the wrap to melt wherever it touches the food. Plastic
dishes, cups, semi-rigid freezer containers, and plastic bags are
usable for short cooking operations. Use with care as some
softening of the plastic can occur with heat from the food.
Not suitable for microwave cooking
METAL UTENSILS
Metal utensils are not recommended because the metal shields the
food from microwave energy on the bottom and sides, causing
uneven cooking result. Metal utensils will also cause arcing and
damage to the appliance.
METAL DECORATION
Metal-trimmed or banded dinnerware, casseroles, etc., should not be
used. The metal trim interferes with normal cooking and damage
may result.
ALUMINUM FOIL
Large sheets or pieces of aluminum foil should be avoided because
they will disrupt cooking and may cause harmful arcing. However,
smaller pieces may be used to cover areas such as poultry legs and
wings. Any aluminum foil use should never be closer than 1 inch
from side walls of oven.
WOOD
Wooden bowls and boards will become dried out when used in the
microwave oven and may split or crack.
OTHER
Avoid using cracked, flawed, or defective utensils, including
ovenproof glassware.
CAUTION: DO NOT USE METAL TIES ON ANY PAPER OR
PLASTIC BAGS; THE TIES BECOME HOT AND COULD
CAUSE A FIRE.
1. To check food doneness
Open the door halfway through the process. Cooking stops.
Remaining time appears and power level bar light in the display.
Also, the programme selection key indicator will illuminate.
2. To resume cooking after checking food doneness.
Close the door and touch START key.
3. To stop cooking halfway through the process.
Touch CLEAR key.
4. When a programme not entered in the unit’s memory is
selected
“0” appears in the display and the programme selection key
indicator will flash and the oven will then cease operation without
heating.
5. Cooking time for double quantity
The cooking time for double quantity is 1.6 times the cooking
times for ordinary quantity.
6. Cooking time for triple quantity
The cooking time for triple quantity is 2.1 times the cooking time
for ordinary quantity.
7. Limitations on multiple-quantity cooking
When more than “Power Level 6” is being used, its max. heating
time is 12 minutes. When less than “Power Level 5” is being
used, its max. heating time is 60 minutes.
Max input time
POWER
LEVEL
Double quantity
Heating time
Max
input time
Heating time
Max
input time
Triple quantity
10~6
5~1
6 min 00 sec
30 min 00 sec
9 min 36 sec
48 min 00 sec
5 min 43 sec
28 min 35 sec
12 min 00 sec
60 min 00 sec
Page 14

28
CHECKING ACCUMULATIVE COOKING TIME, NUMBER OF
DOOR OPERATIONS AND CONTROL OF THE BUZZER SOUND
Display shows accumulative cooking time or the number of door operations by key operation. Also, you can change any remaining cooking time,
buzzer sound or buzzer volume.
Operation Display window
1
2
3
*
4
5
6
7
¡Touch “ ” key.
¡Touch “ ” key.
¡Touch number “8” three times.
¡Stages 1 to 3 are the same for all options. Input the 4th digit as follows to check or change the modes.
¡Input one of the following options (1-0)
using the PROGRAMME SELECTION key.
¡Touch “ ” key.
¡Touch “ ” key again.
¡Touch “ ” key.
¡“0” appears in the display.
¡The colon and Power level “10” bar
appear in the display.
¡The “8.88” appears in the display.
¡e.g. Input “1” (accumulative cooking time).
¡All 4 digits will be flashing.
¡The number “215” shows total cooking
hours OR.
¡In case where options other than 1 or 2
were selected in stage 4, “0” appears in
the display confirming that the new setting
has been accepted.
¡In case of option 1 or 2, the CLEAR key
must be touched to clear the display.
(Not necessary for options 3 to 0)
The following modes can be selected by inputting one of the numbers below at the operation stage “4”.
INPUT OPTIONS
1 . . . Accumulative cooking time.
2 . . . The number of door operations. (100 times)
3 . . . Indication of remaining cooking time (when cooking is interrupted
by door opening).
4 . . . To cancel remaining cooking time (when cooking is interrupted
by door opening).
5 . . . Tone of the buzzer on cooking completion. (Pip, Pip, Pip)
6 . . . Tone of the buzzer on cooking completion. (Peep)
7 . . . The volume of the buzzer. (quiet)
8 . . . The volume of the buzzer. (medium)
9 . . . The volume of the buzzer. (loud)
0 . . . The volume of the buzzer. (none)
Page 15

29
Specifications
EM-C1100
1100W~110W
2450 MHz
527(W) × 415(D) × 287(H) mm
330(W) × 330(D) × 175(H) mm
22 Kg (48lbs)
Microwave power output
Microwave frequency
Outer dimensions
Cavity dimensions
Weight
ALWAYS KEEP THE OVEN CLEAN
1. Cleaning the glass viewing window, the inner door panel and oven
front face.
For best performance and to maintain the high degree of safety
the inner door panel and oven front face should be free of food or
grease build-up.
Wipe these parts with a mild detergent, rinse and wipe dry.
Never use abrasive powders or pads.
2. Cleaning the control panel and plastic parts.
Do not apply a detergent or an alkaline liquid spray to the control
panel and plastic parts, as this may cause damage to these parts.
Use a dry cloth (not a soaked cloth) to clean these parts.
3. Cleaning the oven interior.
After use be sure to clean up spilled liquids, spattered oil and food
debris as quickly as possible. If the oven is used when dirty,
efficiency drops and the dirt gets stuck on the oven surface and
may cause bad odours. Clean the interior with a cloth soaked in
luke-warm water with a mild detergent dissolved in it, then rinse
the soap off with a damp cloth.
In particular, the bottom of the oven interior tends to get stained
from spices and food. Since this may cause odour and abnormal
vibration, be sure to keep this area clean.
CAUTION: Do not wipe plastic and painted sections of the oven
with bleach, thinners or other cleaning detergent, as this
may cause these parts to dissolve or change shape.
4. Clean the removable air filter regularly. (at least once a week)
Do not operate oven without air filter in position.
It is easier to attach or detach the air filter with the door opened.
CARE AND CLEANING
1. If any of the following appear, check for a problem.
“U-50” flashes in the display window.
When using Programme Selection Keys the key must be touched
within 1 minute of closing the door.
After inserting the power plug into the wall outlet, open and close
the door and then touch the key.
→ Open and close the door, and then touch the key before 1
minute passes.
* The purpose of this function is to prevent operation when there
is no food in the oven.
“U-10” appears in the display window.
The oven operates empty without food in it.
→ Touch CLEAR key, place food in oven and start again.
2. This is normal operation:
Cooling fan operates for a while after heating has completed or
heating has been stopped by opening door or touch CLEAR key
during operating.
→ Cooling fan operating continues for five minutes to keep the
electronic components cool.
3. This is abnormal operation:
Get in contact with your nearest Service center or retailer.
This oven is provided with self-diagnostic function.
– When the window display indicates the error code “E”
(example: E-21), it shows to need repairing by a technical service
engineer. Remove the power supply plug from wall outlet and
call a Service Center.
– When the magnetron indicator in control panel lights, it shows
that remaining magnetron life became short. Call a Service
Center to replace the magnetron before it becomes defective.
* On no account remove or interfere with any parts or screws.
“THIS COULD PROVE VERY DANGEROUS.”
Make the following simple check-up before contacting a Sanyo
Service Centre:
* If the interior lamp does not light when one of the programme
selection key is touched.
1. Make sure that the power supply cord is securely plugged in.
2. Check the fuse in the plug top and ensure the plug top is wired
correctly.
Note: The appliance must be protected by a fuse.
3. Make sure that the door is completely closed.
4. Make sure that a programme has been stored.
* Before changing the interior lamp, please confirm the power
supply plug is disconnected from the socket.
* If the interior lamp lights and the appropriate power select or
preset cooking indicator is illuminated but the food is not heated;
1. Make sure that the food is not completely covered with a metal
container.
* Abnormal noise during operation.
1. Make sure that sparking during microwave cooking is not
caused by using unsuitable utensils of metal or having metal
bands or trimmings, or aluminum foil or skewers.
2. Make sure that the tray is set in the oven properly.
3. Check whether foods or containers are touching inside walls of
the oven.
* If smoke is observed, keep the oven door closed and switch
off by disconnecting the oven from the power supply.
WHAT TO DO IF REPAIRS ARE NEEDED
SPECIFICATIONS AND ACCESSORIES
Accessories
Menu Sheet . . . . . . . . . . . . . . . . . . . . 1
Operating instructions . . . . . . . . . . . . . 1
Air filter. . . . . . . . . . . . . . . . . . . . . . . . 1
Page 16

CODE NO. 432-6-414S-83300
SANYO ELECTRIC CO., LTD.
OSAKA JAPAN
3/’00 Printed in Japan
 Loading...