

Page 1
INSTRUCTION MANUAL
CLT-OHE40
2.4 GHz Expansion
Cordless Handset
with Charging Cradle
IMPORTANT
Charge the handset battery pack a full 15-20 hours before
using your cordless handset for the first time.
SANYO Canada Inc.
www.sanyocanada.com
Page 2
UU438DH_ENG.fm Page 2 Monday, June 13, 2005 7:00 PM
Welcome
Congratulations on your purchase of the SANYO CLT-OHE40 handset and
charger. This expansion handset is for use with the CLT-E40/42. Each
main base model in this series can support up to four handsets. You
can place a fully-featured cordless handset anywhere as long as there
is AC power to connect the handset charging cradle.
IMPORTANT
The CLT-OHE40 expansion handset will not operate unless it has been
registered to your main base. This manual describes how to set up
and connect your new handset; for instructions on operating your
new handset, refer to the owner's manual supplied with your main
base.
Backward / Forward Compatibility
Your phone is compatible with SANYO CLT-E23 and CLT-E30/32/33 2.4
GHz Digital Expandable Systems.
Checking the Package Contents
Make sure you have received the following items in the package.
•Cordless Handset
•Charging Cradle
• Battery Pack (BT-0001) (pre-installed)
(Capacity: 650 mAh, 3.7V)
• AC Adapter (AD-708)
(INPUT: 120V AC 60Hz) (OUTPUT: 9V DC 210 mA)
• Audio Recording Cable
•Holster
• This Owner’s Manual
• Other Printed Material
– E2 –
Page 3
UU438DH_ENG.fm Page 3 Monday, June 13, 2005 7:00 PM
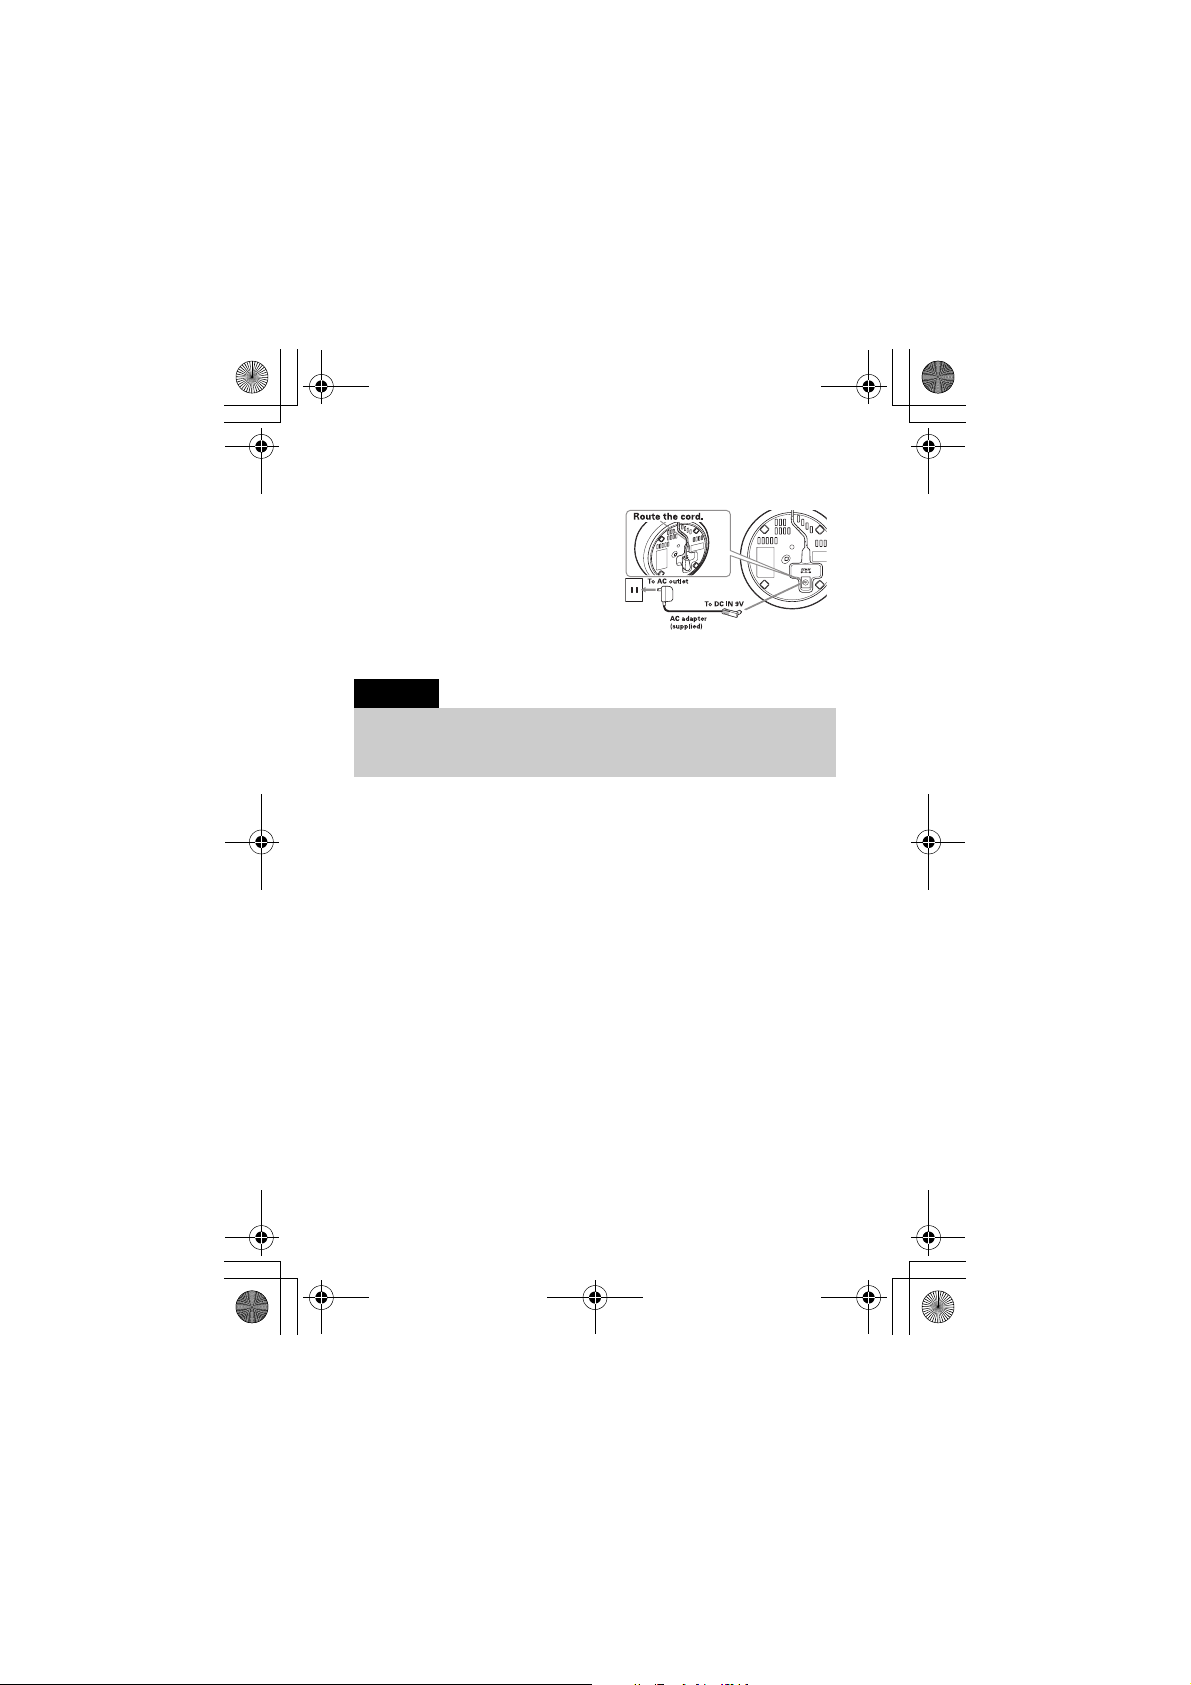
Step 1: Connect the Charger
Connect the AC adapter to the DC
1
IN 9V jack and to a standard 120V
AC wall outlet.
Set the charger on a desk or tabletop,
2
and place the handset in the charger
with the keypad facing forward.
Make sure the
3
illuminates. If the LED does not
illuminate, check to see that the AC adapter is plugged in and that
the handset makes good contact with the charger charging contacts.
CHARGE
LED
Notes:
• Use only the supplied AD-708 AC adapter. Do not use any
other AC adapter.
• Place the charger close to the AC outlet so that you can
unplug the AC adapter easily.
4 Charge the handset for 15-20 hours before using. Recharge your
handset on a regular basis by returning the handset to the charger
after each phone call.
– E3 –
Page 4
UU438DH_ENG.fm Page 4 Monday, June 13, 2005 7:00 PM
Step 2: Register the Handset
YOU NEED TO REGISTER THE CLT-OHE40 TO A MAIN BASE BEFORE
USE!
Be sure the handset battery is fully charged.
1
With the main base in standby mode (i.e., not being used), place
2
the handset in the main base to begin registration.
For compatible models in the CLT-E23 and CLT-E30/32/33
series:
1)Disconnect the AC adapter.
2)While holding the find handset key, connect the AC Adapter:
Keep pressing the key until the CHARGE LED starts to blink.
3)On the handset, press and hold # until you hear beep.
Handset Registering
3
Registration Complete
registered to the base. If
try these steps again.
will appear in the LCD. Once
is displayed, the extra handset is
Registration Failed
appears, please
De-register the handset
1)Press and hold END and # for more than 5 seconds.
2)Select the handset ID to be de-registered from the list.
The phone will ask you to confirm the deregistration. Select
Yes
.
– E4 –
Page 5

UU438DH_ENG.fm Page 5 Monday, June 13, 2005 7:00 PM
Using Your Expansion Handset
Now that your new handset is registered, it can perform all the same
functions as the handsets originally included with your phone. With
your new handset, you can
• Transfer calls or intercom between handsets
• Use two handsets as 2-way radios in Walkie-Talkie mode
• Use two handsets as a baby/room monitor
• Hold 3 or 4 way conference calls (depends on the model)
• Send Text Messages between Handsets (CLT-E40/42 Series Only)
• Record Distinctive Ringer Tones
• Customize Handset with Animations and Wall Paper Displays
• Customize Reminder Displays using Calendar
See the owner's manual that came with your main base for complete
instructions on operating your new expanded digital phone.
Using the joystick
The joystick makes it easy to
use your phone. The five most
commonly used functions are
accessible just by moving the
joystick:
Adjust the ringer
View the
phonebook
View the redial list
Upward Adjust the ringer
Downward View the redial list
Towards the right View the Caller ID
Towards the left View the phonebook
Press centre OK/Select
– E5 –
PRESS
OK/Select
View the
Caller ID
Page 6

UU438DH_ENG.fm Page 6 Monday, June 13, 2005 7:00 PM
You will also use the joystick to make menu
selections.
To enter the menu, press the center of the
joystick inwards or press the MENU soft key.
OK
To highlight the option you want, move the
joystick up, down, right or left. This will
move the cursor to your selection, which will
appear in reverse text or icon.
To select the highlighted option, press the
center of the joystick inward (You can also
press the OK soft key).
To go back to the previous menu at any time,
press the BACK soft key. To exit the MENU
and return to standby, press END or return the handset to the
charging cradle.
Using your handset with compatible CLT-E23 and
CLT-E30/32/33 series phones
Note:
Not all features are available when this handset is used with the
CLT-E23 and CLT-E30/32/33 series main base. If you want to use
all of this handset's features, use it with a CLT-E40/42 series
base.
The CLT-OHE40 has many new features. You can record a ringer from
any audio source, select animation on the display, and set alarms to
remind you of important events.
Record Ringer Tones
1)Connect the audio recording cable to the handset and sound
source (e.g. stereo or CD player). Insert one end of the audio
recording cable into the handset's headset jack and the other end
into the sound source.
You can also simply use the handset's microphone by holding the
handset close to the sound source.
2)Select menu option .
Record Ringer
3)Go to
4)To start recording, press the RECORD soft key. The message
counter starts at
.
60
and then begins to count down.
– E6 –
Page 7

UU438DH_ENG.fm Page 7 Monday, June 13, 2005 7:00 PM
5)To end recording, press the STOP soft key.
The phone will play the recorded ringer.
6)Press the center of the joystick or the SAVE soft key to store the
ringer tone.
7)Enter the title of this ringer. If you don't enter a title, the phone
will store it as "Recorded ring."
8)Press the center of the joystick.
Set Animation Displays
1)Select menu option .
2)Scroll to
3)To preview Animations press the VIEW soft key.
4)Press the OK soft key.
Set Wallpaper Displays
1)Select menu option .
2)Scroll to
3)To preview wallpaper press the VIEW soft key.
4)Press the SELECT soft key.
Set Keypad Lock
1)Select menu option .
2)Scroll to
3)Select
You'll hear a confirmation tone, and your keypad is locked.
To unlock the keypad temporarily, press any key on the upper part
of the handset, and press
To release the keypad lock, press any key on the upper part of the
handset, and press the # key.
Set Backlight Display Color
1)Select menu option .
2)Scroll to
3)Press the OK soft key.
Scheduling Reminders
1)Select menu option .
2)Press the SKDL soft key, then press the OPTION soft key.
3)Scroll to
4)Press the center of the joystick inwards. Use the number keypad
or
5)Press the center of the joystick.
6)To set reminder tone, go to the second line and select.
7)To enter a name or reminder text, go to the third line and enter.
You can enter up to 32 characters.
8)Press the center of the joystick when you're finished.
9)Press the DONE soft key.
Animations
Themes
Keypad Lock
Lock
, and press the OK.
Backlight Color
New Entry
/TONE to select the date and time of this reminder.
*
and select.
and select.
and select.
/TONE in 5 seconds.
*
and select.
and select.
– E7 –
Page 8

UU438DH_ENG.fm Page 8 Monday, June 13, 2005 7:00 PM
Editing/Deleting Reminders
1)Select menu option .
2)Press the SKDL soft key.
3)To edit reminder, select the reminder. Edit the date, time,
reminder tone, and text the same way you entered them for a new
entry.
To delete reminder, highlight the reminder and press the OPTION
soft key, and select
Delete All
Creating and Editing Phonebook Entries
To go to the phonebook, slide the joystick to the left.
Press the OPTION soft key and select
number, unique ring, unique display, phonebook group, and speed
dial as you want. Press the center of the joystick to enter each
entry and confirm the selection. When you're finished, press the
DONE soft key to save this phonebook entry.
Delete entry
. Press the OK soft key.
. To delete all reminders, select
New Entry
. Enter the name,
Battery Information
Low battery alert
When the batteries are very low and need to be charged, the phone is
programmed to eliminate functions in order to save power.
The batteries need to be charged when:
- The empty battery icon appears.
Low Battery
-
If the phone is in standby mode, none of the keys will operate.
If you are on a call, complete your conversation as quickly as possible,
and return the handset to the charging cradle.
Cleaning the battery charging contacts
To maintain a good charge, clean the
charging contacts on the handset once
a month. Use a clean pencil eraser or
superfine steel wool. Avoid touching
the cabinet area of the phone or
scratches may occur.
Caution: Do not use paint thinner, benzene, alcohol, or other chemical
products. Doing so may discolor the surface of the telephone and
damage the finish.
appears in the display.
– E8 –
Page 9

UU438DH_ENG.fm Page 9 Monday, June 13, 2005 7:00 PM
Installing a Replacement Battery
Follow the steps if you need to replace a battery.
Press down on the handset battery
1
case cover (use the finger indention
for a better grip) and slide the cover
downward to remove.
Remove the existing battery and
2
unplug the connector from the jack.
Plug the battery pack connector
3
(red, black, and white wires) into the
jack inside the battery compartment.
(The connector notches fit into the
grooves of the jack only one-way.)
Match the wire colors to the polarity
label in the battery compartment, and
push the connector in until you hear a
click.
Make sure you have a good connection
4
by slightly pulling on the battery
wires. If the connection is secure, the
battery jack will remain in place.
Place the battery case cover back on
5
the handset by sliding it upwards
until it clicks into place.
Notes:
• Use only the SANYO battery (BT-0001) supplied with your
phone.
• Don't place the charger in direct sunlight or subject it to high
temperatures. The battery may not charge properly.
Rechargeable Lithium Ion Batteries
Must Be Recycled or Disposed of Properly
– E9 –
Page 10

UU438DH_ENG.fm Page 10 Monday, June 13, 2005 7:00 PM
I.C. Notice
TERMINAL EQUIPMENT
NOTICE: This equipment meets the applicable Industry Canada Terminal Equipment Technical
Specifications. This is confirmed by the registration number. The abbreviation, IC, before the
registration number signifies that registration was performed based on a Declaration of
Conformity indicating that Industry Canada technical specifications were met. It does not
imply that Industry Canada approved the equipment.
NOTICE: The Ringer Equivalence Number (REN) for this terminal equipment is marked on the
equipment itself. The REN assigned to each terminal equipment provides an indication of the
maximum number of terminals allowed to be connected to a telephone interface. The
termination on an interface may consist of any combination of devices subject only to the
requirement that the sum of the Ringer Equivalence Numbers of all the devices does not exceed
five.
RADIO EQUIPMENT
The term “IC:” before the radio certification number only signifies that Industry Canada
technical specifications were met.
Operation is subject to the following two conditions: (1) this device may not cause
interference, and (2) this device must accept any interference, including interference that may
cause undesired operation of the device. “Privacy of communications may not be ensured when
using this telephone.”
– E10 –
Page 11

UU438DH_ENG.fm Page 11 Monday, June 13, 2005 7:00 PM
THE SANYO COMFORT WARRANTY
WARRANTY APPLICATION
Sanyo Communications products
purchased new, unused in Canada through
a Sanyo Authorized Dealer are warranted
against manufacturing defects in
materials and workmanship for ONE YEAR
covering parts and labour, from the date
of purchase by the original retail
purchaser. This warranty only applies in
favour of the original retail purchaser of
the warranted product.
SANYO CANADA INC.’ S
RESPONSIBILITY
During the warranty period, SANYO
Canada Inc. will repair, or at our option,
replace a Communications product which
shows evidence of a manufacturing defect
in materials or workmanship.
Replacement PARTS are warranted for the
remaining portion of the warranty pe riod.
WHAT IS NOT COVERED
(a) Communications products purchased
outside C anada.
(b) Communications products purchased
in a used condition.
(c) Communications products purchased
from non Sanyo-authorized dealer.
(d) Communications products not
intended for Canadian usage or
products without appropriate
Canadian regulatory approvals.
(e) Problems due to product set-up and
installation.
(f) Adjustments that are outlined in the
Operating Manual.
(g) Accessory items including antenna,
and batteries,
(h)Damage in or due to transportation.
(i) Damage due to improper maintenance,
accident, abuse, misuse or negligence.
(j) Damage caused by lightning and
power surges.
ORIGINAL RETAIL
PURCHASER’S RESPONSIBILITY
You, the original retail purchaser, must
present your original, dated bill-of-sale
together with this warranty to SANYO
Canada Inc. or to an authorized Sanyo
Service Depot when you make a claim under
this warranty.
You, the original retail purchaser, are
responsible for any costs of TRANSPORTING
the product to and from SANYO Canada Inc.
or an authorized Sanyo Service Depot. You
also are responsible for the cost of any
MAINTENANCE necessary in respect of the
product.
WARRANTY BECOMES VOID
This warranty becomes void if the
product’s serial numbers are altered or
removed or if any repair to the product is
made other than by SANYO Canada Inc. or
by an authorized Sanyo Service Depot.
LIMITATIONS
(a). SANYO Canada Inc. reserves the right
to change or improve the design of
the model of the product warranted
hereunder without incurring any
obligation to make any modifications
to or to install any improvement in
or on the product.
(b). In no event shall SANYO Canada Inc.
or any of its Authorized Dealers be
liable for special or consequential
damage arising from the use of this
product.
STATUTORY WARRANTIES
The above provisions do not preclude the
operation of any applicable provincial
statute which in certain circumstances
may not allow some of the limitations
and exclusions described in this Warranty.
Where any terms of this Warranty are
prohibited by such a statute, they shall
be deemed null and void but the
remainder of this warranty shall remain in
effect.
HOW TO OBTAIN WARRANTY
SERVICE
Please contact the Sanyo Authorized
Dealer from whom the product was
purchased, or contact us directly at:
SANYO Canada Inc.
1-300 Applewood Cres.
Concord, Ont. L4K 5C7
(905) 760-9944
1-800-263-2244
– E11 –
Page 12

UU438DH_ENG.fm Page 12 Monday, June 13, 2005 7:00 PM
SOS HELP LINE
At Sanyo, fulfilling the needs of our customers is a priority. That's why we created
our SOS customer service program that guarantees satisfaction.
NATIONWIDE CUSTOMER SUPPORT
SOS is there to help you. Our friendly and knowledgeable product specialists will
quickly answer your questions about setup and use of Sanyo telephone products.
Simply call toll free from anywhere in Canada to connect to our no-charge, SOS
support and service network:
Or visit our website at www.sanyoservice.com, and click the Customer Relations
button to get access to our FAQ's (Frequently Asked Questions) and other helpful
features.
STAY-AT-HOME CONVENIENCE
It's a nuisance making another trip to the store when you're stuck.
Now with SOS, all that's necessary is a quick call from your home for
product assistance.
HASSLE-FREE EXCHANGE
Should your Sanyo telephone require servicing due to a manufacturing defect during
the warranty period, SANYO Canada will ship prepaid a replacement unit* within two
business days after receiving your defective unit. Consumers are responsible for
the shipping costs of the unit back to Sanyo.
• For older, non-current models, replacement units may not be available, in which case our
regular warranty conditions will apply.
GUARANTEED QUALITY
All SOS replacement sets are checked and serviced by factory-authorized technicians
before being sent out.
SOS means you never have to worry.
C.O.D. and/or Collect shipments will not be accepted.
Unit must be returned to Sanyo in its original box with all accessories,
i.e.: owner's manual, battery, adaptor, telephone cord, etc.
Covered under one or more of the following U.S. patents:
4,797,916 5,381,460 5,426,690 5,434,905 5,491,745 5,493,605
5,533,010 5,574,727 5,581,598 5,650,790 5,660,269 5,661,780
5,663,981 5,671,248 5,696,471 5,717,312 5,732,355 5,754,407
5,758,289 5,768,345 5,787,356 5,794,152 5,801,466 5,825,161
5,864,619 5,893,034 5,912,968 5,915,227 5,929,598 5,930,720
5,960,358 5,987,330 6,044,281 6,070,082 6,125,277 6,253,088
6,314,278 6,418,209 6,618,015 6,671,315 6,714,630 6,782,098
6,788,920 6,788,953
All rights reserved
1-800-263-2244
between 8:30 am – 7:00 pm EST
– E12 –
SANYO Canada Inc.
Printed in China
UUZZ01438DZ(0)
 Loading...