

Page 1

Instruction
Manual
Colour
Television
STEREO*
SURROUND (ALL IN ONE:
TELETEXT
S7ERMINAL
VIDEO MULTI TERMINAL
(PAL/NTsc/NTsc4.43)
MESSAGE
CALENDAR
HELP MESSAGE K
Model CAP3310TXN
CZP3310TX
* Model CAP331 OTXN – NICAM Digital Stereo Decoder and West Germany Stereo Decoder built in.
* Model CZP331 OTX – NICAM Digital Stereo Decoder built in.
Page 2

Introduction
HHi-Fistereosoundcircuit
with %r-
round Circuit.
ALL IN ONE (Surround speaker built in).
It’s easy to enjoy TV and video sound with the Surround
effect,
SurroundSystem
The sounds that we hear in a natural listening
environment consist of those which reach
our ears directly from the sound source, and
those which reach us indirectly after being
reflected off of the floor, walls, and other surrounding objects. The Surround System electrically produces these direct and indirect
sounds, then sends them through speakers to
surround the listener with sound that is rich in
stereo presence.
Where to Place the TV for the best Surround Effect
● Do not place furniture or other objects any closer than 30 cm
from the sides of the TV. Placing objects directly next to the
sides of the TV will block the sound from the speakers.
●It is a good idea to place the TV in a corner of the room. This
allows the walls to serve as reflectors to achieve a greater
Surround effect.
9 This Av Television Allows Free System
Expansion
● S-terminal is provided.
. Three videolaudio inputs and one audio output enable easy
VCR connection for tape playback and editing.
■ MESSAGE, CALENDAR and HELP-
MESSAGE functions
In additional to standard TV functions, this set offers
the convenience of MESSAGE, CALENDAR and HELP
MESSAGE functions in 5 language: English, German,
French, Italian and Spanish.
Electric Mains
The TV receiver is manufactured to utilize an AC VOLTAGE
SOURCE of 220-240 Volts, 50Hz.
Safety Precaution
When the TV receiver is not to be used for an extended period
of time, it is advisable to disconnect the AC power cord from
the AC outlet.
WARNING
To prevent fire or shock hazard, do not expose the unit to rain
or moisture.
High voltages are used in the operation of this TV set.
Do not remove the back from your set. Refer servicing to qualified service personnel.
e
Aerial Connection
● Connect the cable with a plug from a UHF (or VHF) aerial to
the Ir aerial socket on the cabinet back.
-———-
-———-
_—— —=
—-—=
I(3I I r+
~raerialsocket
. For all aerial circuit problems please consult your local deale-
U
Battery Installation (Remote Control Transmitter)
❑ Remove the battery cover by sliding.
❑ Install two “M” 1.5 volt batteries so that the “+“ and “-”
marks on the batteries match the”+” and” –” marks
inside
the unit.
❑ Close the battery cover.
Note: Replace the batteries when the TV set is showing the fol-
lowing symptoms:
Operation is unsteady or erratic, sometimes the TV set
does not work with transmitter. Discharged batteries
may leak and damage the unit. The normal life of batteries should be from nine to ten months.
x For the handling of these functions, please refer to
the separate operating manual.
–l–
Page 3

Controls
\
f’
>
/
b
Surround Speaker
/
/
@
Main Speaker
>
b
\
‘~< J“
~
Press to open
/
i
~ Mam ON/OFF Switch
Remote Control Detector
Standby and Power Indicator
>
[
o f .,,,..,. .,,-,,. m
~
ON/OFF (
I
Operation of the Receiver
‘witching on/off
● AUTO SHUTOFF
__BTo turn onthe TV:
This TV set incorporates the AUTO SHUT OFF function.
Press Mains
ON/OFFswitch ~.
Even if the TV is lefton after you have gone to sleep,the
TV set changes to the standby mode within 10 minutes
●To turn offtheTV:
Press the Power ON/OFF button ~ on the remote control
afterall broadcastshaveended.
transmitter, and the TV changes to the standby mode. During
Note: AUTO SHUT OFF also functions for the AV mode even
the standby mode, the standby and power indicator illumi-
when there is no signal being transmitted.
nates more brightly than during the power–ON mode.
The remaining time for AUTO SHUT OFF is displayed on
Press this button ~ to turn off the unit for short periods
the screen.
of the time.
. Toturnon the TV from thestandby mode:
Press one of these button.
I
Power ON/OFF (Q
(Remote control transmitter)
Remaining time
L
au 1
Programme Selector ~
‘10
AUTO PAUNTSC
(Remote control transmitter)
Volume @
Programme selection
● TOcutoffthe mains powercompletely:
Press the right side (+ ) of the programme selector ~ of the
Press the Mains ON/OFF switch ~.
TV set, and the TV set will step up to the next station, i.e; 1, 2,
3...29, VCR1, VCR2, VCR3, 1,2,3 ...
Important! Be sure to set the Mains ON/OFF switch ~ to the
Press the left side (–), and the TV set will step down to the
off position, ifthe power failure occurs while view-
previous station.
ing.
–2–
Page 4

(Operation of the Receiver)
Sound adjustments
● To adjust the sound volume:
Press + or– volume @ button.
I
I
A SOUND
E9s Is GIBE-------
1
. Toadjust the bass, treble, balance and the depth of surround
effect:
Select the control function by pressing SOUND SELECT Q
button.
c Each time SOUND SELECT~ button is pressed, the con-
trol function changes as follows:
9: BASS
-------- +----t---
BAss
I
cl”
~ TREBLE
--------
+-- t-----
TREBLE
u BALANCE
-------- t--------
BALANCE
J
~
- SOUNO
SURROUNDLEVEL
mllluallm-------
----mw((((u(----
1 1
L 1
SOUND VOLUME
SURROUND
LEVEL
Note: “SURROUND LEVEL’ will be skipped when the Sur-
@.... TV/VIDEO Selector
To watch the television programmed leave this switch in the
TV mode. When this switch is set to the VIDEO mode you can
enjoy the playback from the VCR or other AV equipment connected to the AV input terminals.
Each time the TV/VIDEO Selector ~ is pressed, the AV position changes as follows:
t
l--.%LL&d&
TV mode ~
I
@.... Memory O
This function lets you store the settings (for colour, brightness, contrast, video tone, tint, sound volume, bass, treble,
balance and Surround effect) in memory for both picture ar
the sound. Simply adjust the picture and sound as desiredY
then press the Memory 0 @ button. To recall these levels
from memory, press the Normalization ~0~ @ button on
the remote control unit.
When Memory button
is pressed, “NORMAL’
is displayed,
I
NORMAL
.-- *+---
I
I
I
round effect is turned off.
0 .... Headphone Jack ~
Insert the headphones plug into this jack to listen to either
Adjust the bass, treble, balance or the depth of surround ef -
stereo or monaural sound via a headphones set.
feet by pressing Volume @ button.
Note: No sound will be heard from the speakers when the
headphones plug is connected to this jack.
Pictureadjustments
elect the picture control function by pressing PICTURE
ELECT @ button.
Each time PICTURE SELECT @ button is pressed, the
control function changes as follows:
@ COLOUR
mmalmlmlm-------
COLOUR
‘~ BRIGHT
mllllm DmDB------
BRIGHTNESS
J-L
‘INE TUNING
VIDEO TONE
I
(1 CONTRAST
●lBamllmm -------
1
CONTRAST
1
cl
K-x TINT
-------- t--+-----
TINT
OTE: “TINT” will be skipped during PAL mode.
❑ Adjust the colour intensity, brightness, contrast, tint, video
tone or fine tuning by pressing Volume @ button.
–3–
Page 5

Remote Control Operation
~ Programme Selector
@ Colour System Selector
(AV mode only)
@ Normahzizfou:
\
Brightness
-
Contrast
Video tone
TINT ~
(for NTSC and NTSC 4.43)
Note: This button has no
effect during PAL mode.
~1
_ TVIVCR switch
/
● For operation of the TV set,
set the TV/VCR switch to
“TV position.
Programme up (Press this button, and the programme
position step up to the next position.)
Programme down (Press this button, and the programme
position steps down to the previous position.)
~ l%wer ON/OFF
@ Off timer
~ TV/VIDEO Selector
c
I
II
@ Channel Scanning
‘1
@ Recall
@ Sound mute
0 Volume
~ AUDIO SELECT
Fine tuning
@ Bilingual A/B
@ Stereo/Mono
@ Surround ON/OFF
Main ON/OFF switch of the TV set must be in “ON” position
Picture adjustments
before remote control operation is possible.
Point transmitter towards the TV set, then press the appropri-
. To
adjust the colour intensi~:
ate function button for the following controls.
Press @ (Colour) button.
+
‘m .... Power ON/OFF (!) Press A or ~ volume @ button.
Press this button to switch TV set on.
To switch TV set off, press again.
.
TO adjust the brightness:
~ .... Programme selection
● e.g. TO select programme number 17, press “l-” button and
then press “7” button ~ within five seconds.
To select programme number 27, press “2-” button and
then press “7” button ~ within five seconds.
■ You can select any desired programme number directly
from standby mode.
. e.g. To directly select programme number 2 from stand-
by mode, press the
“2” button. The set is then
switched on, and the picture of programme number
2 appears.
Todirectly select programme number 16 from standby mode, press the “l-” button (after which the
Standby and Power indicator flashes), then press the
“6” button. The set is then switched on, and the picture of programme number 16 appears.
Press @ (Brightness) button.
Press A or ~ volume button.
● To adjust the picture contrast:
Press O (Contrast) button.
Press A or ~ volume button.
● TO adjust the video tone:
Press V. TON. button.
1
Press A volume button.
-whap picture.
Press V volume button.
~soft picture.
–4–
El
Q COLOUR
nls Io*9nn -------
D
‘t BRIGHT
tmmaomnlnn------
❑
C) CONTRAST
slnnsooss-------
n
V.TON.
-.-.----+--,.----
Page 6

(Remote Control Operation)
● Fine tuning
Press <> (Fine tuning) button.
+
Press A or ~ volume button.
❑
<>
Note: Normally fine tuning is not required for this TV. However,
in some case (such as radio interference) picture may become more clear by detuning from the best tuned frequency.
In such case, you can use this fine tuning to eliminate
some interference beat pattern.
Sound adjustments
● TO adjust the sound volume:
Press A (up) or ~ (down)
volume ~button.
n
~
SOUND
m#mflnmlmm-------
●
Toadjust the bass, treble, balance and the depth of surround
effeet:
Select the control function by pressing AUDIO SELECT o
button.
. Each time AUDIO SELECT o button is pressed, the con-
trol function changes as follows;
El
-j:
BASS
-------- +----l---
BASS
t
El
~ TREBLE
-. . . . ..-
+--l -----
TREBLE
-El
u BALANCE
-------- +--------
BALANCE
1
SOUND VOLUME
SURROUND
LEVEL
Note: “SURROUND LEVEL’ will be skipped when the sur-
round effet is turned off.
Adjust the bass, treble, balance or the depth of surround effect by pressing Volume o button.
@... SurroundON/OFF
To enjoy the surround effect, press the Surround ON/OFF@
button.
To cancel the effect, press this button again.
Surround OFF
STEREO
b~
Surround ON
STEREO
~
ww(
@... Stereo/Mono ~
● When receiving the stereo broadcast,
is displayed.
If the sound of a stereo broadcast is not clear due to interference or poor reception, select the MONO position by pressing this button.
. In the AV mode, select either STEREO or MONO to match
the stereo or monaural condition of the audio signal coming
from an external source, e.g. a VCR, A. V. equipment, or
other component by pressing Stereo/Mono Switch.
@... BilingualA/B
When receiving the bilingual broadcast, ‘A~H’A) is die_
played.
You can select the main or sub language with this button.
MAIN (A)
w
In the AV mode, each time Bilingual AIB button is pressed, the
audio channel changes as follows:
LEFT (A)~RIGHT (B)
@.... Sound mute ~
Should you wish to mute the
sound (e.g. While talking on the
telephone), press this button once.
To switch the sound back on,
press it again.
@... Normalization+*+
Press this button to recall the pic-
ture and sound settings which
you stored using the Memory O
@ button.
❑
NORMAL
.-- ++---
@....
ChannelScanning~J
Press Channel Scanning button @to search for a programme.
The channel positions are automatically scanned, and the channel scanning will stop at the position where it began. To stop at
the position you want, press this button again.
=+=-------------*D
b-m-m-b
–5–
Page 7
(Remote Control Operation)
~.... Off timer Q
After a set time has elapsed, the power of the TV receiver is
switched off automatically.
● Each time Off timer button @ is pressed, the set time
changes as follows:
~~~
L-J”L14U
t
30minutes
60 minutes
4
●
●
+
-120 -90
120 minutes
90 minutes
With the off timer being set and the chann~l .A!wmlayreset, the
s
rem’alning time is displawd by pressing the off timer button
ayalli.
When the button is pressed again within three secoria<-u?her
the button was first pressed in above manner, the time is set
to an upper time which is most close to the remaining time.
Just one minute before switching off, “-01” and program me
number you are watching are displayed on the screen.
The timer setting will be cancelled if the power is switched
@).... Recall ~/S
To display the on-screen indications, press this button.
The display disappears after five seconds.
L___l’
STEREO
w
Programme
number
9
.
Note:
When this button is pressed for more than 2 seconds,
The following is displayed and the unit enters SELF
DEMO mode. This mode is for use in storefront demonstrations.
It has no effect on TV operation.
SELF DEMO.
SELF DEMO. mode
kE-E!!l
● To cancel the SELF DEMO mode, press the Recall ~ /S@
button once again.
● If the Memory O 0 button is pressed in the SELF DEMO
mode, the self-demonstration will begin. You can also cancel
the SELF DEMO mode midway through play by pressing the
Recall ~ /S ~ button.
–6–
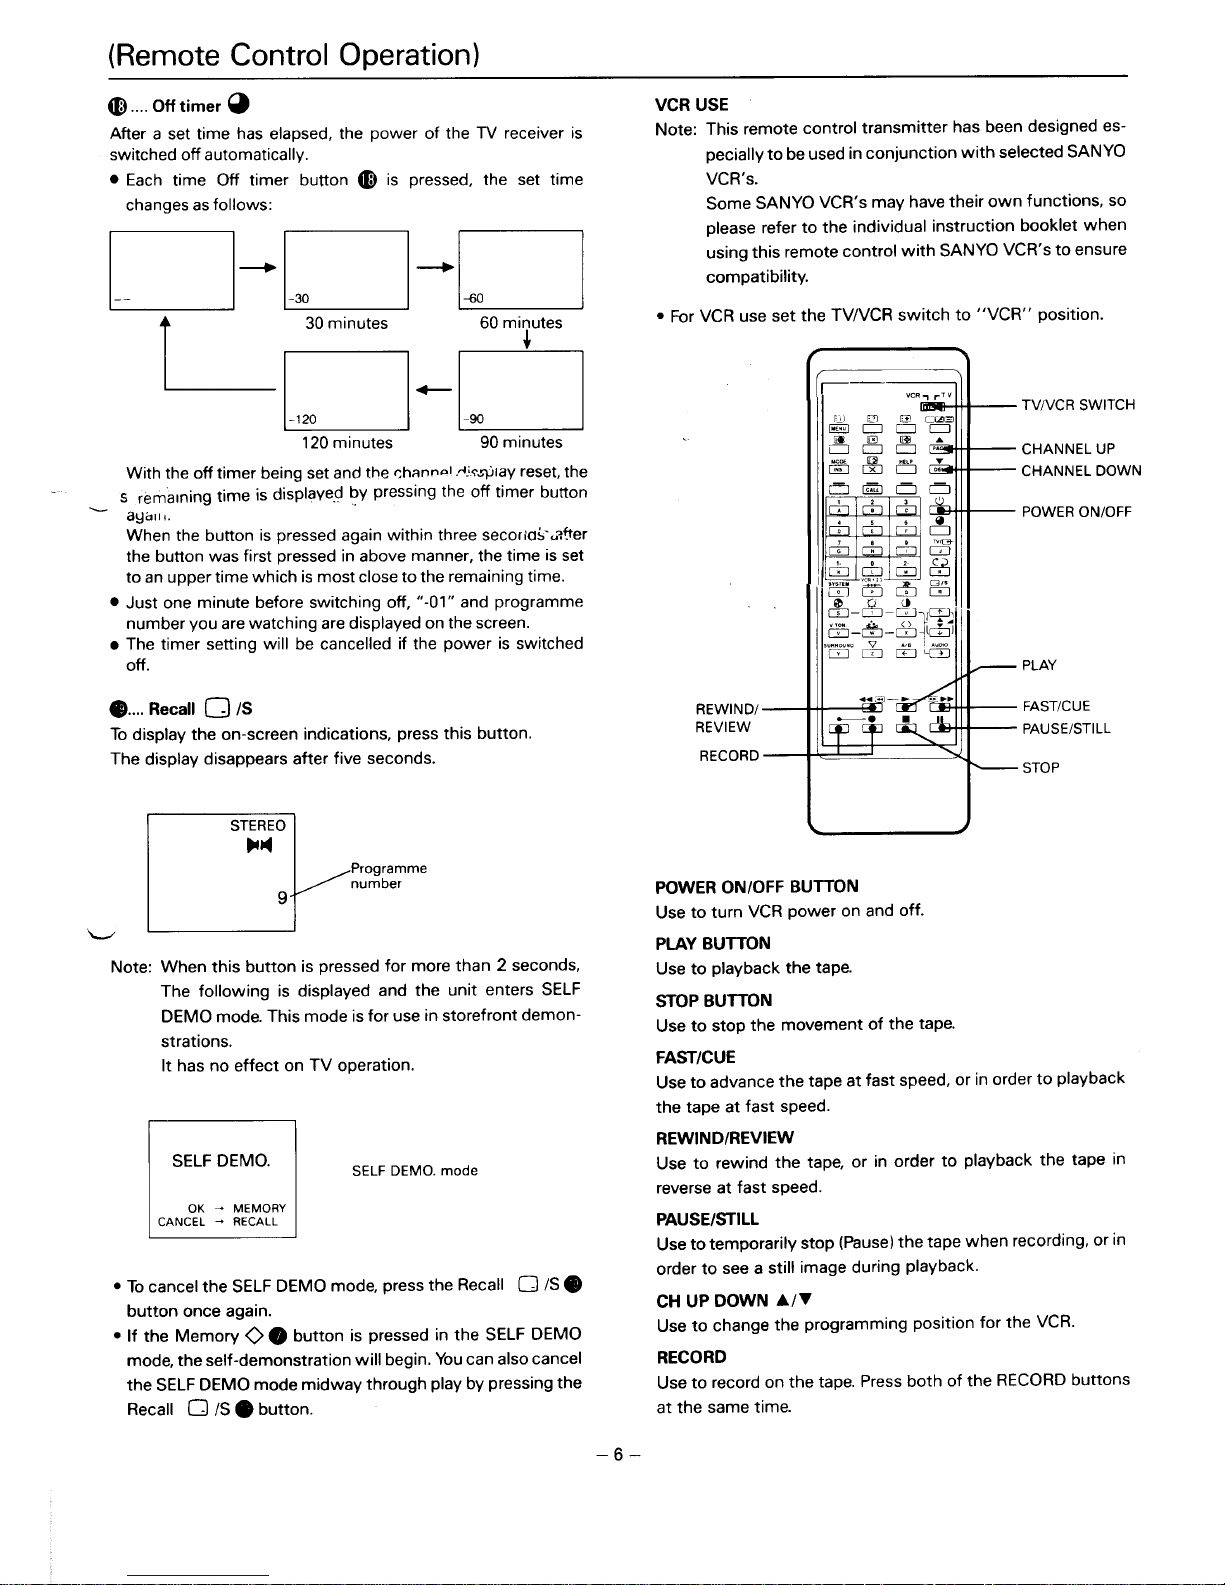
VCR USE
Note: This remote control transmitter has been designed es-
pecially to be used in conjunction with selected SANYO
VCR’S.
Some SANYO VCR’s may have their own functions, so
please refer to the individual instruction booklet when
using this remote control with SANYO VCR’s to ensure
compatibility.
● For VCR use set the TVAfCR switch to “VCR” position.
REWIND/—
REVIEW
RECORD —
L
4
POWER ON/OFF BUTTON
Use to turn VCR power on and off.
PLAYBUITON
Use to playback the tape.
STOP BUITON
Use to stop the movement of the tape.
FAST/CUE
— TVIVCR SWITCH
— CHANNEL UP
— CHANNEL DOWN
— POWER ON/OFF
— PLAY
— FAST/CUE
— PAUSE/STILL
— STOP
Use to advance the tape at fast speed, or in order to playback
the tape at fast speed.
REWIND/REVIEW
Use to rewind the tape, or in order to playback the tape in
reverse at fast speed.
PAUSEKTILL
Useto temporarily stop (Pause) the tape when recording, or in
order to see a still image during playback.
CH UP DOWN A/~
Use to change the programming position for the VCR.
RECORD
Use to record on the tape. Press both of the RECORD buttons
at the same time.
Page 8

Pre-Settinu Of Stations UPt032 broadcaststations inyo.rreception area can b,~tO~ed inthe electronic memOI-Y.
There are two ways of presetting as follows:
Automatic presetting – the basic way
All receivable channels are automatically tuned in and memo-
rized in consecutive program positions.
Note: Programme position 1 to 29 can be automatically
preset. VCRI, VCR2 and VCR3 positions cannot be automatically preset.
Manual presetting
Use to preset a receivable channel in any desired program position, e.g. the position with the same number as the channel.
Automaticpresetting
1. Select any programme position from 1 to 29.
(Automatic presetting is
VCR2, or VCR3 position.)
2. Press PRESET o button.
m
m
$mp
, :“”,+ z 8
BUD.,”0
not possible from the W%?,
K
AUTO
Program
PRESET
position
&
Channel band
VL: low VHF band
VH: high VHF band
3. Press TUNING (+)@ button.
U: UHF band
mQ4’
I
\
J
The channels are preset in consecutive postions beginning
from the program position “l”.
After all available channels (position 1 to 29) have been
preset, the unit returns to the postion “l”.
Note: To cancel automatic presetting midway, press the
Recall D /S@ button.
IManual presetting]
1.Press PRESET o button.
1 r
1
w
ml
p
+ p,
;“”,@p“i%o
2. Press PRESET@ button again.
w
$ p-%%
SUM MEW
3. Press the programme selector
~ or ~ to select the desired
programme position.
AUTO
PRESET
1 VL
Mmm-------------
El
1 VL
now------------
\
0
6 VL
MmB-------------
4. Press 8AND selector @to select
the channel band.
m
p’ -?*”8
,5fT 7“.1.. a !4,.0
--.-.-.---.-.-.-
When BAND selector is pressed, the frequency will be set to
the lowest frequency in the set band.
. Channels band VL, VH and U are for the following channel
groups.
(Asia) (New Zealand)
VHF low band : E2– E4 1–3
VHF high band : E5 – E12
4–11
UHF band :
21 – 69
21 – 69
(–) button until the desifed SPIC.
, , ...’_
tion appe.w?-. ‘““
m
u
6 VH
tmamEm----------
6’-%58
x Fn,sE, ..,.
.,”O .,.0 The number of upright segments
increases for a higher-frequency
channel.
6. Press o (Memory) button e.
1-l
6 VH
Bn#nmm----------
7. Repeat steps 3 to 6 for other desired channels.
8. Press PRESET @ or ~ /S
n
STEREO
(Recall) o button.
P4
This completes the presetting.
Memory- Copy
This TV tuning system has
another advanced feature called
“memory copy”.
For example, if you wish to copy the TV channel in the
programme position “2” into the programme position “6”:
1. Select the programme position “2”.
2. Press PRESET@ button.
3. Press PRESET@ button once again.
4. Press “6” button of the programme selector ~ .
5. Press O (Memory) button 0.
6. Press PRESET@ or Q /S (Recall) button e.
–7–
Page 9

(Pre-Setiing of Stations)
I InsertingChannels
The following example shows how to insert Channel-D of
programme position “4” into programme position “2”.
TDeletingChannels I
The following example shows how to delete Channel-B from
programme position “2”.
Channel-A
n
1
I
Channel-D
Insert
(
u
Channel-B Channel-C
Channel-D
-D
4
I
\ Programme
1
h
Position
I
I
I
VCR3
I
I
,
I
I
I
a-m----------’;
1.
2.
3.
4.
5.
6.
Select programme position “4” (Channel-D).
Press PRESET @ button.
Press PRESET @ button once again.
Press “2” button of the Programme Selector ~ .
❑ -m
Press and hold down the TVAIIDEO selector o, then press
the (+ ) Programme Selector o.
Press the PRESET ~ or Recall ~ /S ~ button.
. Channel-D of programme position “4” is now inserted into
programme position “2”.
. In this example, the channels from Channel-B (programme
position “2”) onward will be shifted successively into the
next highest programme position.
-----
Channel-A
~ Channel-D I Channel-B
Channel-C
Ll+n:rrl-rl
I
-----
Chan~el-D
El
VCR3
I
El
5
I
I
I
LHJJ-----------’
Note: You cannot insert a channel which would cause the
channel in programme position “29” to shift to a higher
programme position. You also cannot insert channels
into the VCRI, VCR2, or VCR3 position. When the
Channel-A
D
1
I
r
__ —-- -
I Channel-B ;
I
I
I
7
Q
+
I
21
‘-7--
DELETE
Channel-C
El
3
Programme
Position
Channel-D
-D
4
I
I
I
I
L-!!!4
I
I
b-m-----------
1.
2.
3.
4.
5.
Select programme position “2” (Channel-B).
Press PRESET ~ button.
Press PRESET @ button once again.
El
2 VL
lmn-------------
Press and hold down the TVIVIDEO selector e, then press
the (– ) Programme Selector o.
Press PRESET @or ~ /S (Recall) ~ button.
● Channel-B of programme position “2” is now deleted.
● In this example, the channels from Channei-B
(programne position “2”) onward will be shifted Suc-
cessively into the next lowest programme position.
Channel-A
Channel-C
Channel-D
~~1
I 1 l–l 21–I 31----’,:
I
I
I
I
I
I
VCR3
I
I
L
I
I
h-m-----------
Note: Channel deletion is not possible in the VCRI, VCR2, or
VCR3 position.
When the above procedure is done, the position indicator (VCRI, VCR2, or VCR3) will flash in red.
above procedure is done, the position indicators will
flash in red.
–8–
Page 10

TELETEXTUSE
● Automatically adjust fordisplays in English, German, French, Swedish, ltalian and
Spanish in accordance with the television broadcast signals.
INDEX ~—
TIME/SUB @ —
MODE —
STORE ~1 —
RED ~
Page Selection _
L
■ Switching to the Teletext Mode O B ~
Press the TV/MIXflEXT button, then the screen changes as
follows:
1
I I I
1
SIZE ~
HOLD ~
TVIMIXITEXT (J @ @
PAGE UP A
PAGE DOWN ~
CYAN
YELLOW
GREEN
1]
Back to TV programme.
PageSelection
DIRECTPAGEACCESS
A page can be selected
with the 0-9 buttons. For example, to display page 120 press buttons 1, 2 and O. The selected
page number will appear on the screen.
UP-DOWN PAGE ACCESS
If a page is displayed on the screen and you want to read the following page, you can press the UP
button instead of
selecting the page number. To bring back the previous page press the Down button. If you keep the UP or DOWN button
pressed the page numbers will run up or down until you release the button.
The page number will change as follows by pressing the UP-DOWN button.
(A) P200 – P201 – P202 – ... ..........– F299 – P200 – P201
(~) P200 – P299 – P298 – .... . ........– P201 – P200 – P299
Note: In the LIST mode, you can access the pages directly. (See page 12.)
–9–
Page 11

(TELETEXTUSE)
■ Sub-coded pageaccess
For Teletext information which is longer than one page it may take some time for the a~tomatic changing of sub pages
to reach the sub page you require. It is possible, however, to enter the sub-page you require and then continue watching
the normal television picture until the correct sub-page is reached.
A. Select the required page using the page selection button.
B.
c
D
E.
F.
Press the TIME/SUB button. The character “S” and sub code digits
“*
● ● ● “ will be displayed in the top left of the
screen.
Enter the desired sub-page number before figure “S*”
● ‘“
disappears. For example, if you select sub-page 10 you
must press O, 0, 1 and O button.
Then the character “ +” is displayed following the page number.
Press the CANCEL to return to normal television programme. When the correct sub-page is reached the page number
will appear on the normal television picture.
Press the TV/MIX/TEXT button to display the stored page.
To clear the sub-coded page you must enter a new page number.
Note: It is not possible to select another television station during a sub-page access operation.
VIEWING TV WHILE SEARCHING FOR A PAGE
~
In some cases it can take some time to look for a page. In the interval
you can view TV by pressing the CANCEL button. When the page ar-
~
TV/MIX/TEXT button to display the page.
Note: When you press the CANCEL button, the green “>” mark is
displayed at the top right of the screen. Whilst this “>”
mark is displayed you can not select another TV channel.
rives, the page number will appear on the normal TV picture. Press
L
‘a
1
/
■ HOLD ~
If the teletext information is longer than one page, the pages are automatically changed. The automatic page changing can be cancelled by pressing the HOLD button. The word “HOLD” then
appears on the top of the screen. Normal operation is restored by
pressing the HOLD button again or entering a page number.
‘~ DOUBLE LETTERHEIGHT S
Either the top or bottom half of the display can be expanded by
pressing the SIZE button. When the SIZE button is pressed for the
first time, the top half of the display is expanded. If it is pressed once
again, the bottom half of the display is expanded. To return the display to normal-sized characters, this button should be pressed a third
time.
■ DISPLAYINGCONCEALED INFORMATION ~
In one of the lists of contents you may find the heading “QUIZ”
(concealed information). If you have selected the relevant page num-
ber questions will appear on the screen. You can find out the correct
answer to the questions by pressing the REVEAL button. Press the
REVEAL button again to make the answers disappear.
P351 P301
TEXT
PAGE
P351
Normal TV
picture
m
tiOIC TEXT ~$0576
News
HOLD
Q
SIZE
1
Q
TELETEXT
DISPLAY
P351
=
SPORT=
PElqE!!Y
mom
i
1
I
1
REVEAL
a
–lo–
Page 12

(TELETEXTUSE)
■ ALARM CLOCK @
The Alarm Clock Function can beset cooperate at any requested
time reminding viewers to carry out a specific task, i.e. making a
phone call at a specified time.
First select either page 196 (BBC1) or page 296 (BBC2), using the
page selection buttons. Press the TIME/SUB button, S*
● + + will ap-
m“m
pear on the top of the screen. Select the time at which you require
Set Alarm Call
AIARM Call
Time
the alarm call.
Example, for a call at 8.15 pm, press buttons 2015, watching that
S*”
● changes to S20:15. Then press the CANCEL button to con-
tinue watching normal TV programmed. At 8:15 pm the words
“ALARM CLOCK” in large letters will appear on the screen. Press
the TV/MIX/TEXT button to return to normal teletext operation. It is
not possible to select another TV programme when in the CANCEL
mode.
-
NEWS FLASH
If you select the news flash page and view the TV programme by
pressing the CANCEL button, the moment news comes in, the word
“NEWS FLASH” and the news appears over the normal TV picture.
If you want to make the news disappear press the CANCEL button
again. To recall the news press the TV/MIX/TEXT button.
Note: It is not possible to select another TV station during a NEWS
FLASH. You should first switch back to TV reception by pressing the TVIMIXITEXT button. You can, however, change both
the picture and sound settings.
UPDATED PAGES
There are pages which are updated as events progress, such as
sports results, news reports and traffic information. If you have
selected one of the above pages from the list of contents and you
want to view television but still be kept informed about the other
events, press the CANCEL button. The page will disappear and the
TV station which will broadcast this will appear in the screen. As
soon as this page is updated, the page number will appear on the
normal TV
picture. To display the updated page on the screen, press
the TV/MIX/TEXT button. The page will disappear when the CAN-
CEL button is pressed again.
Note: It is not possible to select another TV station during an UP-
DATE. You should first switch back to TV reception by pressing the TVIMIXITEXT button. YOUcan, however, change both
the picture and sound settings.
CANCEL ~
*
News Flash
NORMAL TV
-
PICTURE
1 & 1
TVIMIXITEXT
0(2?s
CANCEL ~
1
$
L b
TVIMIXITEXT
OBB
–11–
Page 13

(TELETEXTUSE)
■ LIST
In the text mode, each time the MODE button is pressed, the text mode is changed to the NON LIST mode and the LIST mode
alternately.
LIST mode
In the LIST mode, the four coloured page numbers and “L letter are
displayed on the bottom of the screen. The number on the left side is
enclosed by a red frame.
First, input the page number you desire,
into each coloured position using the digit button, then press the
STORE button for more than two seconds.
When the page number is memorized, the four coloured numbers
TEXT
(LIST mode)
change into white frame momentarily.
After you memorize the four page numbers, you can select the page
,s,!
you desire by pressing the RED, GREEN, YELLOW or CYAN button. “.”
Even if you select another page by inputting a new page number,
(See direct page selection), the memorized pages return after
~ ~ switching power off or changing the programme position.
Note: When the INDEX button is pressed in this mode,
the page number coloured RED will be selected.
[
Press the MODE button.
NON LIST mode
When first switching to the NON LIST mode, the INDEX page (PI 00)
is automatically displayed.
TEXT
At the bottom of the screen, the four page numbers 100,101, 102, 199
(NON LIST mode)
and “F letter are also displayed,
Then, when you select a randam page number out of the displayed four
F
100
101
102
199
pages by pressing a colour button, the text of that page is displayed.
d
The selected page minus one, plus one, and plus two page numbers are
\
displayed but their display order is at random.
‘ED GREEN ‘ELLOw CYAN
Of course at any time you can select new pages by inputting new page
numbers.
displayed,
w
9
Note: When the INDEX button is pressed in this mode,
the INDEX page (PI 00) is displayed.
MEMORY OF THE TEXT PAGES
When you assign a broadcasting station which is providing a TEXT service to some programme positions of your TV
set,’four pages of TEXT can be memorized on each programme position.
(Tomemorize the TEXT pages, see “LIST mode”.) If it is required to have more than four instant text available from the
same text service, tune the necessary number of programme positions to the same TV channel.
i.e. TV programme position 1 page, 300, 301, 302, 303
2 ... page, 304, 305, 306, 307
3 ...page. 308,309,310,311
16... page, 411,412,413,414
The memory capacity is 16 programme positions and four pages per each position.
Note:
The producer and dealer does not take any responsibility for errors concerning teletext caused by wrong written teletext,
wrong antenna installation or not sufficient power of transmitter (poor signal).
–12–
Page 14

CONNECTING OTHER EQUIPMENT
Video Multi Terminal:
The AV input terminal of this TV set enables playback for
VCRs and video disc players which employ the PAL system,
NAP system (PAL- 60Hz), NTSC system and NTSC4.43
system.
. Connect the video and audio outputs of a VCR, video disc
player, etc. to the input jack of this TV set, Tapes and discs
can be played back.
. To watch the input picture, press TV/VIDEO Selector @ .
(AV mode)
El
AVI
AUTO PALINTSC
● If necessary, press Colour System Selector @ to select
the colour system to match the appropriate AV appliance.
In the AV mode, each time Colour System Selector@ is
pressed, the colour system changes as follows:
AUTO PAUNTSC ~ PAL
NTSC
~NTsc4,43
Note: When NAP system (PAL 60 Hz) AV appliance is used,
set the colour system to PAL position.
To adjust tint:
(NTSC and NTSC4.43 system only.)
Press K“M (T1NT)button.
+
m
w“MTINT
Press A or 7 volume button @ .
----+ +---
To return to the TV mode, press TV/VIDEO Selector@
again.
Use the followingstepsto memorizethe coloursystemto
be usedin theAV position.
1.
2.
Select AVI or AV2 position by
pressing TV/VIDEO Selector @
~~
Press PRESET @ button.
Z!!i!23
““m
@p ,
:U”,Jp“”o$QM
3. Press Colour System Selector~
to select the desired colour
system.
4. Press O (Memory) button ~.
Y!ziP
$’ -%0
,s, T*,”G BAN. “o mm”
5. Press PRESET @ or ~ /S
(Recall) @ button.
1~
El
au 1
PAL
El
au 1
PAL
I
I
u
4-
Clu 1
NTSC 4.43
Cw 1
NTSC 4.43
D.
au 1
NTSC 4,43
$?
–13–
Page 15

(CONNECTING OTHER EQUIPMENT)
■ connecting to the AV1 Input Jack
Connect to the video and audio outputs of a VCR, video
disc player, etc. Tapes and discs can be played back.
(REAR PANEL)
ANT 75C)
lr
IN
I
Q
o
AvI
AV2
e
V,”cul
&3 -
-1
iQO
AUDIO
::
.4 R
@ S-VIDEO
E-II
Cliiin
ExT INT
nAV 1
PAL
. Use the TVIVIDEO
selector ~ to switch
to the AV1 position for
watching.
tiA.d’oout#’f(eoo.t
l+;
- ‘CR
If the audio signal from the VCR is stereo, be sure to connect
the right and left channels to the respective right and left
Audio-in terminals.
If the external audio signal is a monaural one, connect it to the
left terminal of Audio-in. Then select the monaural mode and
the audio channel in the TV set
with the remote control
Stereo/Mono button @or Bilingual AIB button ~.
■ S-VI-IS VCR Connections. (AV2 Input)
S-VHS VCR is designed with a highly advanced techniques.
‘So the visual quality of S-VHS VCR is better than the other
popular VHS VCR.
S-VHS VCR can be enjoyed by using S-terminal.
(REAR PANEL)
‘N’”” I m “Ewto’
1 rfi
Audio out
~ S-terminal ou- M z
■ Audio Monitor out connection
More powerful sound can be enjoyed by using your audio ap-
paratus.
Connect the audio signal source from audio-monitor-out ter-
minal to the LINE-IN or AUX terminal of the audio apparatus.
(REAR PANEL)
● All sound volume can be
controlled using the TV’s remote control unit.
To the amp’s ~ #
LINE IN or
AUX
~;
RL
● Audio recording isalso possi-
ble using this terminal.
● Wth this connection method
you can enjoy Surround
sound using the speakers of
your audio apparatus and the
TV s~eakers.
Mini-component stereos, etc.
■ External Speaker Connection
(REAR PANEL)
(+ ) jRIGHt (– )1 – ) L~FT (+ ) ~Peaker selector
Illllltl
(Set to the “EXTERNAL” position
71
u LJJ
Speaker
cabinet
(right)
(8 ohm, MAX. 5W)
when external speakers are used.
This will cut the sound of the
internal TV speakers. )
Speaker
cabinet
(left)
4
—
(8 ohm, MAX. 5W)
● You can also enjoy Surround sound through connected ex-
ternal speakers.
–14–
Page 16

(CONNECTING OTHER EQUIPMENT)
■ Connecting to the Front Panel AV1 Input
Jack
It is convenient to use the AW input jack on the front panel for
equipment that is often connected and disconnected.
(TV frontpanelterminals)
I
IL
Video out
I I
MSX personal computer
(with video output)
RF adaptor
I I
8mm video moviecamera
L-3id=-
● Use the TV/VIDEO selector @ to
switch to the AV1 position for
The AV1 input jack on the front panel is bridged with AVI
input jack on the rear panel, so you can connect two VCRs,
one to the front panel and one to the rear panel, and dub
tapes while monitoring them on the TV screen.
Note: Dubbing can be done without turning on the TV
power.
(TV front panel terminals)
u
AV1 IN
DuSSING
VCR for playback
L-F
(REAR PANEL)
ANT 75Cl I
P2_l
Prerecorded video cassette
t
lr
t
IN
I
@
o
AVI
AV2
v ,4
50
;3 ‘
.1 ~-o -
VCR for recording
~“r@
S!?.
V--11
l-l
A
—-
1
Audio in
Blank video cassette
● The image can be monitored on the TV
screen as soon as dubbing begins.
Use the TVIVIDEO selectoro to switch to
the AW position for watching.
❑
AV1
Adjustments to the TV picture or sound
PAL
volume will have no effect on the dubbing
operation.
Note: When using this connection method for dubbing,
you must also set the DUBBING switch to the ON
position to watch the playback of a VCR which is
connected to the front panel AVI input jack.
■ in the AV mode, you can select the TV
programme.
● For example, to select the programme position “7” in the AV
mode (while watching the play backing from a VCR):
❑ Press “7” button of the pro- ]-~
gramme selector ~ .
I I
Program me
number
❑ Press TV/VIDEO Selector @,
and the picture of the
programme position
,,7, / Wi,,
appear.
7
AV Connection to the Aerial Socket
Important Note: In this connection, it can be used for AV
apparatuswhichemploys the PALsystem
only.
● The A.V, apparatus can also be connected to the aerial SOCI
of your TV receiver. In this case, it is advisable to select th=
“VCRI”, “VCR2” or “VCR3” position for the best picture by
pressing “O”key of the program me selector.
Each time “O key is pressed, VCR Position changes as
follows:
D–D
Lfi
I
VCR3
Note: VCR Position is specially designed for the playback of the
AV equipments. The picture of the VCR playbacking may
be distorted in other position.
● For further details concerning this connection and adjust-
ment, refer to the operating instructions for the AV equipment.
–15–
Page 17

Specifications
Power source
AC 220-240 Volts, 50 Hz
Television system
BIG
Colour system
PAL (AV input: PALINTSCINTSC4.43)
Channel coverage
VHF: E2 – El 2 (Model CAP331 OTXN)
1 – 11 (Model CZP331OTX)
UHF:21 – 69
Aerial input impedance
75 ohms
Picture Tube
83cm diagonal,
110 degree deflection
Speakers
Mains Speaker {8x 16cm)
x 2
Surround Speaker(@ 10cm)
x 2
Audio output
Mains Speaker: 7.5W
x 2
(Peak music
Surround Speaker: 2.5W
x 2
power output)
=xt: terminals
Video input:
w
● Phono jack x 3 (1.0 Vp-p, 75 ohm)
. S-terminal x 1 (DIN 4-pin, separate
Y/C signal input)
Audio input:
● Phono jack (R/L) x 3 (436 mVrms,
more than 40K ohm)
Audio output (Audio Monitor Out):
● Phono jack (R/L) x 1 (436 mVrms,
less than 600 ohm)
External speaker terminals
● 8 ohm, Output max. 5W
Dimensions
769(W)
x 699(H) x 542(D) mm
Weight
approx. 58Kg
Country of Origin
Made in Japan
Specifications subject to change without notice.
w
–16–
Page 18

—
Part No. 4AA6P1OO663- E4GC1 (A4-A)
s
*O
SANYOElectricCo.,Ltd.
 Loading...