

Page 1
Contents/
Before Use
Phone Call
Global
Functions
Inputting
Characters
Address Book/
Pair Function
Mail
Camera
EZweb
EZ Navi
SimpleMode
Troubleshooting/
Remote Auto Lock
Other Features/
Index
Page 2

Welcome
目次/準備
通話
アドレス帳/
ペア機能
グローバル機能
メール
カメラ
EZweb
EZナビ
かんたんモード
文字入力
困ったときは?/
遠隔オートロック
その他機能/
索引
English(英語)/
中文(中国語)
Thank you very much for purchasing the A5527SA.
Before using, read the A5527SA “Basic Manual (this PDF manual)” to ensure correct use of your
A5527SA. After you have fi nished reading, store this PDF manual and the printed manuals in a
safe place so that you can retrieve them whenever you need.
Contact au shop or au Customer Service Center if you lose either of these manuals.
Printed Manuals for the A5527SA
The A5527SA comes with Basic Manual and Manual.
● A5527SA Basic Manual ● A5527SA Manual
目次
ご利用いただく前に
基本機能
グローバル機能
メール
HelloMessenger
カメラ/OCR機能
データフォルダ
microSDTMメモリカード
EZweb
EZナビ
EZ・FM
赤外線通信
かんたんモード
各種設定
便利な機能
auのネットワークサービス
付録/索引/クイックガイド
English version is not available.Equivalent to this English PDF manual.
The following manuals are available on the au website:
Download site for “Basic Manual” (Japanese and English) and “Manual” (Japanese only)
・
The au online manual (Japanese) for searching by keyword
・
(http://www.au.kddi.com/torisetsu/index.html)
(http://www.au.kddi.com/manual/index.html)
The au online manual (Japanese) is also available from EZweb:
<How to access>
→ “Top Menu” → “au
→ “オンラインマニュアル
お客さまサポート
(Online Manual)”.
(au Customer Support)” → “
調べる
(Information)”
Check the website of SANYO Electric Co., Ltd. below, for the troubles on your A5527SA.
From A5527SA→Press for more than one second. (SANYO Keitai Planet, in Japanese only)
・
From PC→http://www.sanyo-keitai.com (SANYO Keitai Arena, in Japanese only)
・
Fonts or indications may be different from those on the actual screen, or may be
・
partly omitted for better readability of PDF manual. Note that this PDF manual may not
reproduce actual screen color tones exactly.
Screen color tones shown in this manual are those obtained with the default setting.
・
Page 3

Cellphone Etiquette
Cellphones emit weak radio waves at all times even if you just turn the power on.
Enjoy and safely use your cellphone without forgetting those who are around you.
The use of cellphones is forbidden in
some places.
• Using cellphones while driving is dangerous
and forbidden by law.
• Using cellphones in airplanes is forbidden by
law. Be sure to turn your cellphone OFF.
Consider where to use your cellphone and be careful how loudly you talk.
• Do not make calls in cinemas, theaters, museums, libraries, and other similar
places. Turn your cellphone off or set it to the silent mode to prevent others
around you from being inconvenienced by
ring tones.
• Use your cellphone in places where you do
not prevent others from passing through.
• Move to areas where you do not cause
others inconvenience on trains or in hotel
lobbies.
• Take care not to talk too loudly during
conversations.
• Get other people’s permission before you
start taking photos with the cellphone’s
camera.
Radio waves from cellphones may adversely influence medical
apparatus and equipment.
• Some people close to you in busy places
such as crowded trains may be using
pacemakers. Turn your cellphone off in such
places.
• Abide by the instructions of hospitals and
other medical institutions where it is
forbidden to use or carry cellphones.
1
Page 4

What You Can Do with the A5527SA
Mail
You can send mail to other cellphones
or personal computers.
Page 50
EZ Navi
You can access position information
using the functions such as EZ Navi
Walk, Position Search, and Area
Message.
Page 74
Camera
You can take photos or movies and
send them easily by E-mail.
Page 62
EZweb
®
Chaku-Uta
Wallpaper
You can download Chaku-Uta®,
wallpaper and others.
Games
Page 67
Use Overseas
You can use the A5527SA overseas with global functions.
For information on other features, see page 87.
2
Page 34
Page 5

Silent Mode and In-Phone Ans Mach
Silent Mode
You can use the silent mode to turn incoming rings and
other tones off to prevent others from being inconvenienced.
Press for more than one second in the standby
screen.
Transportation systems
like trains, buses, etc.
Public facilities like
libraries, museums, etc.
In-Phone Ans Mach
You can play answering message and
record caller’s message when you cannot
answer a call.
Press for more than one second
in the standby screen.
Standby screen Screen while answering
I can’t answer
the phone right
now. (Japanese)
During lectures, meetings, etc.
Page 31
Recording endsIncoming call
Page 32
3
Page 6
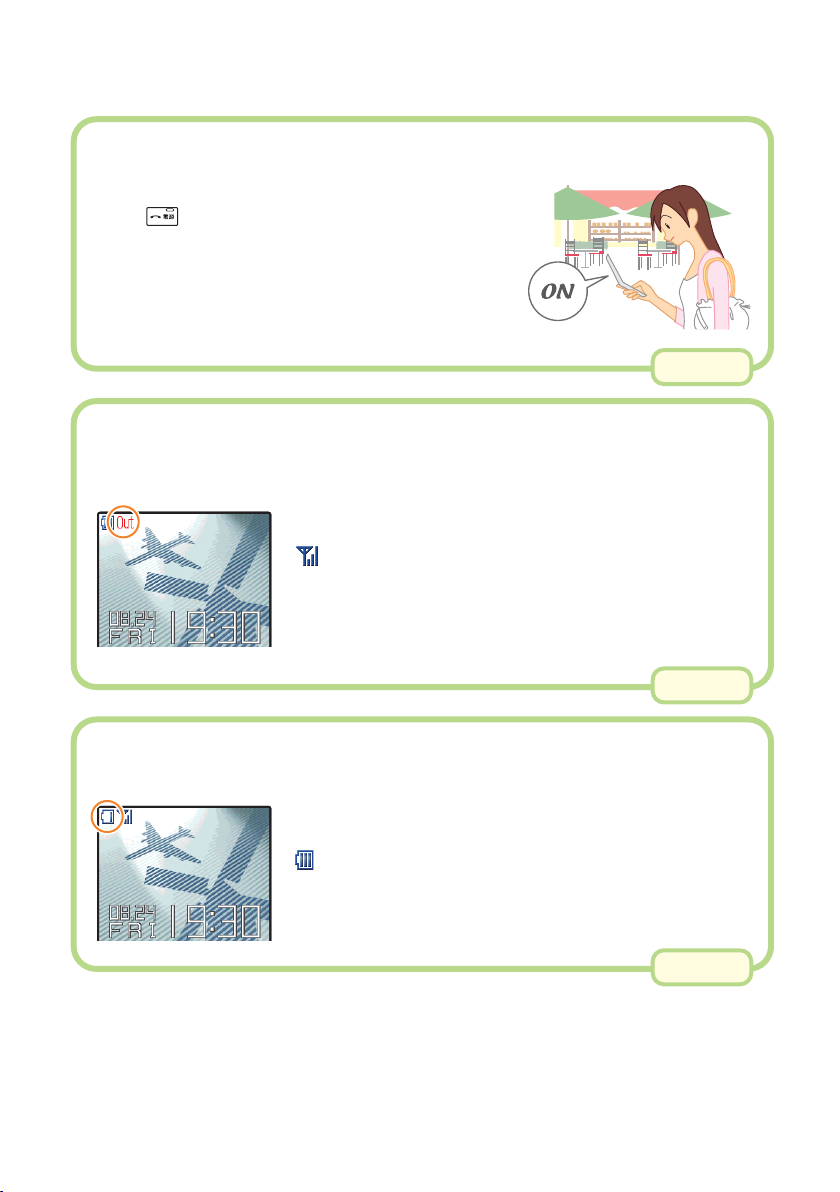
Check the Power, Radio Waves, and Battery!
Usually, keep the “power” ON.
Keep the power on to make or answer calls.
Press for more than one second.
Page 13
You cannot talk on the phone if A5527SA is
not receiving “radio waves”.
It may be difficult to receive radio waves in some places
even in service areas.
indicates the reception state.
Pay attention to the remaining “battery” power.
You cannot use the cellphone when the battery goes off.
Charge the battery soon when the remaining power is too
low.
indicates the remaining battery power.
4
Page 13
Page 13
Page 7

Do Not Use the Cellphone While Driving
Using cellphone while driving is subject to penalties.
Holding a cellphone in a hand and use it for a call or gazing at a screen to
see mails, etc. while driving is subject to penalties.
(November 1, 2004 Implementation of the Revised Road Traffic Law)
Holding a cellphone in a
hand and use it for a call
Gazing at a screen to see
mails, etc.
Use drive mode or turn the power off while driving.
Drive Mode
When the drive mode is set, the caller
will hear the answering message
“Now driving. I can’t answer the phone
right now... (Japanese)” , and can leave a
message in the In-Phone Ans Mach.
From the standby screen, press , use to select “Car”, and press
[Select].
Standby screen
Select “Car”
and press
[Select].
Now driving.
I can’t answer the
phone right now...
(Japanese)
5
Page 8

Watch Out for Junk Mail and One-Ring Calls!
If you receive junk mail…
●
Mail Filter
Using the mail filter function, you can reject mail sent from specified addresses
and Spoof e-mail.
The following mail functions are the main methods available for
preventing the arrival of junk mail:
• Reject mail with “未承諾広告※ (Unsolicited Ad Mail)” in the subject
• Reject mail from specified addresses
• Reject Spoof e-mail
●
Change E-mail Address
You can prevent arrival of junk mail by changing E-mail
address.
If you receive a call from unknown number…
It may be a “One-Ring Call” which intends to trick you into calling back and
accessing unwanted pay programs. Be careful of a call from unknown number.
Page 57
Page 22
●
Icon for One-Ring Calls
The icon ( ) is displayed in the log of One-Ring Call and lets you know
the caller hung up within 3 seconds.
6
Page 9

Disaster Message Board Service
About Disaster Message Board
When a big scale disaster occurs, you can register your safety
information through EZweb. The registered safety information can be
confirmed from anywhere in Japan through EZweb or Internet.
• When a big scale disaster occurs, you can register your safety
Registering
safety
information
Confirming
safety
information
information such as your condition and comments from au
cellphone to the “災害用伝言板 (Disaster Message Board)”
created on the EZweb.
• After registering your safety information, you can notify by
E-mail your family or acquaintances you have previously
specified that you registered your safety information on the
“災害用伝言板(Disaster Message Board)” .
• You can confirm the safety information of the person you want
to know about by entering his/her phone number from EZweb
or Internet*.
* When you confirm the safety information from other carriers’
cellphone, PHS or personal computer, access the following
URL.
http://dengon.ezweb.ne.jp/
→Top Menu→ 災害用伝言板
How to access
http://dengon.ezweb.ne.jp/
(Disaster Message Board)
仮
* The maximum preservation period of the registered
information is 72 hours.
* The maximum available number of each registration is 10.
When the number of registration exceeds 10, the
information will be overwritten from the oldest one.
* The demonstration of this service can be referred to anytime
by accessing →Top Menu→auお客さまサポート
(au Customer Support)→災害用伝言板(デモ版)
(The demonstration of Disaster Message Board).
* You can use English version by selecting “English”.
7
Page 10

Contents
Contents/Before Use
Cellphone Etiquette ……………………………………………… 1
What You Can Do with the A5527SA ………………………… 2
Silent Mode and In-Phone Ans Mach ………………………… 3
Check the Power, Radio Waves, and Battery! ………………… 4
Do Not Use the Cellphone While Driving ……………………… 5
Watch Out for Junk Mail and One-Ring Calls! ………………… 6
Disaster Message Board Service ……………………………… 7
Contents…………………………………………………………… 8
Before Use
Phone Call
Global Functions
Inputting
Characters
Confi rming the Packed Contents …………………………… 10
Names of Parts ………………………………………………… 11
How to Charge the Battery Pack …………………………… 12
Turn the Power On/Off ………………………………………… 13
Basic Operation ……………………………………………… 14
Viewing the Screen …………………………………………… 16
About Menu …………………………………………………… 17
Setting the Language to English …………………………… 18
Initial Setting for E-mail and EZweb ………………………… 20
Confi rming Your Cellphone Number/E-mail Address ……… 21
Changing Your E-mail Address ……………………………… 22
Making a Call ………………………………………………… 24
Making an International Call ………………………………… 25
Answering a Call ……………………………………………… 26
Calling Back (Outgoing Calls/Incoming Calls Log) ………… 27
Adjusting the Caller’s Voice Volume ………………………… 27
Adjusting the Ringer Volume ………………………………… 28
Changing the Ringer Type …………………………………… 30
Setting the Silent Mode ……………………………………… 31
Using the In-Phone Ans Mach ……………………………… 32
Using Overseas ……………………………………………… 34
About Inputting Characters …………………………………… 36
How to Input Characters ……………………………………… 38
Address Book/
Pair Function
8
Saving to the Address Book ………………………………… 42
Making a Call from the Address Book ……………………… 45
Editing an Entry in the Address Book ……………………… 46
Saving from Outgoing Calls/Incoming Calls Log …………… 47
Setting a Pair Partner ………………………………………… 48
Making a Call to a Pair Partner ……………………………… 49
Page 11

Mail
About E-mail …………………………………………………… 50
Creating and Sending an E-mail …………………………… 51
Reading a Received E-mail ………………………………… 54
Replying to a Received E-mail ……………………………… 56
Blocking Junk Mails …………………………………………… 57
About C-mail …………………………………………………… 58
Creating and Sending a C-mail ……………………………… 59
Reading a Received C-mail ………………………………… 61
Contents/Before Use
Camera
EZweb
EZ Navi
SimpleMode
Troubleshooting/
Remote Auto Lock
Other Features/
Index
What You Can Do with the Camera ………………………… 62
Taking a Photo ………………………………………………… 64
Viewing Photos ………………………………………………… 65
Sending Photos by E-mail …………………………………… 66
About EZweb …………………………………………………… 67
Accessing Information Sites ………………………………… 68
Inquiring Toll …………………………………………………… 69
Downloading Chaku-Uta
Incoming Calls ………………………………………………… 70
Registering Frequently-Accessed Information Sites ……… 72
What You Can Do with EZ Navi ……………………………… 74
About SimpleMode …………………………………………… 76
Using SimpleMode …………………………………………… 79
Troubleshooting ……………………………………………… 84
Before Losing...(Remote Auto Lock) ………………………… 85
Other Features ………………………………………………… 87
Index …………………………………………………………… 88
®
and Set It as a Ringer for
9
Page 12
Before Use
目次/準備
通話
アドレス帳/
ペア機能
グローバル機能
メール
カメラ
EZweb
EZナビ
かんたんモード
文字入力
困ったときは?/
遠隔オートロック
その他機能/
索引
English(英語)/
中文(中国語)
Contents/Before Use
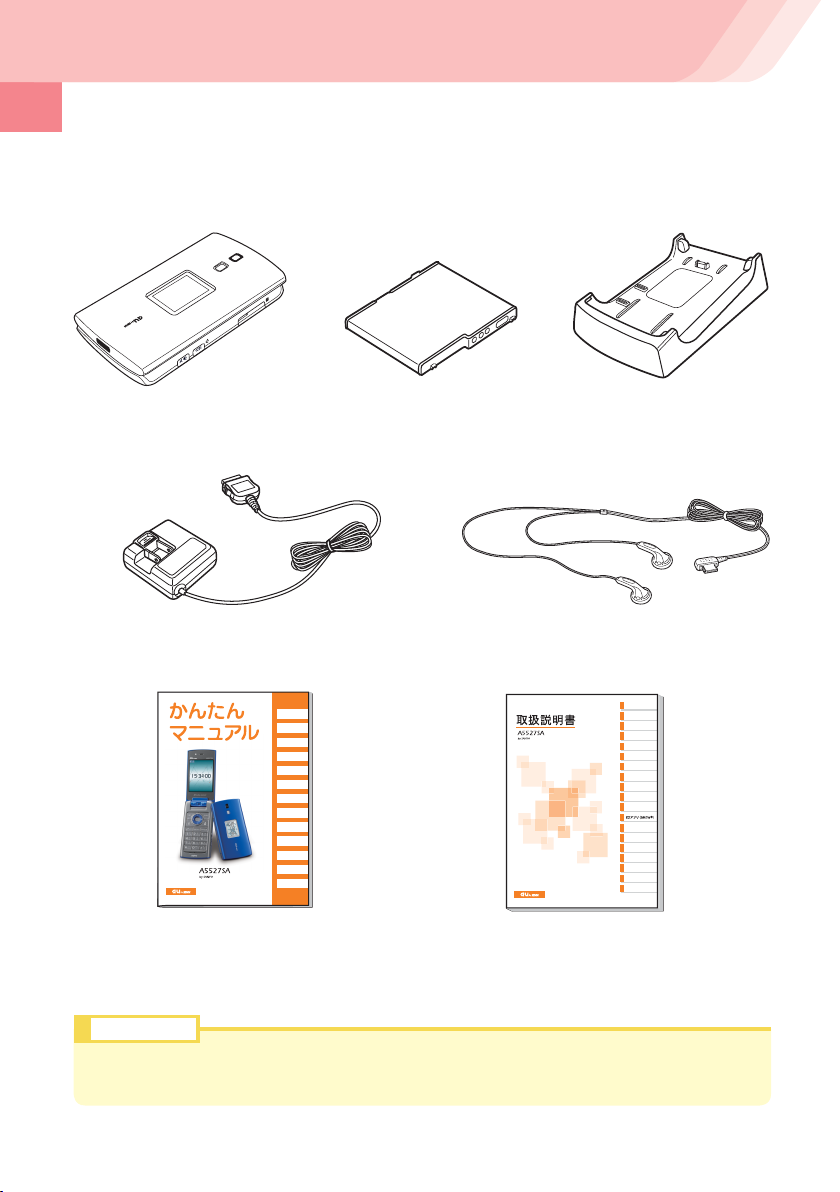
Confirming the Packed Contents
A5527SA Main
●
Unit
AC Adapter
●
Basic Manual (Japanese)
●
Battery Pack
●
(Installed in the
main unit)
SANYO Flat-type Stereo
●
Earphones 04
Manual (Japanese)
●
Desktop Holder
●
目次
ご利用いただく前に
基本機能
グローバル機能
メール
HelloMessenger
カメラ/OCR機能
データフォルダ
microSDTMメモリカード
EZweb
EZナビ
EZ・FM
赤外線通信
かんたんモード
各種設定
便利な機能
auのネットワークサービス
付録/索引/クイックガイド
Warranty (Japanese)
●
Precautions in Use (Japanese)
●
Information
A microSD™ Memory Card (Commercially Available) is not included in this package. Please
purchase your own memory card.
10
GLOBAL PASSPORT Owner’s Manual
●
Page 13

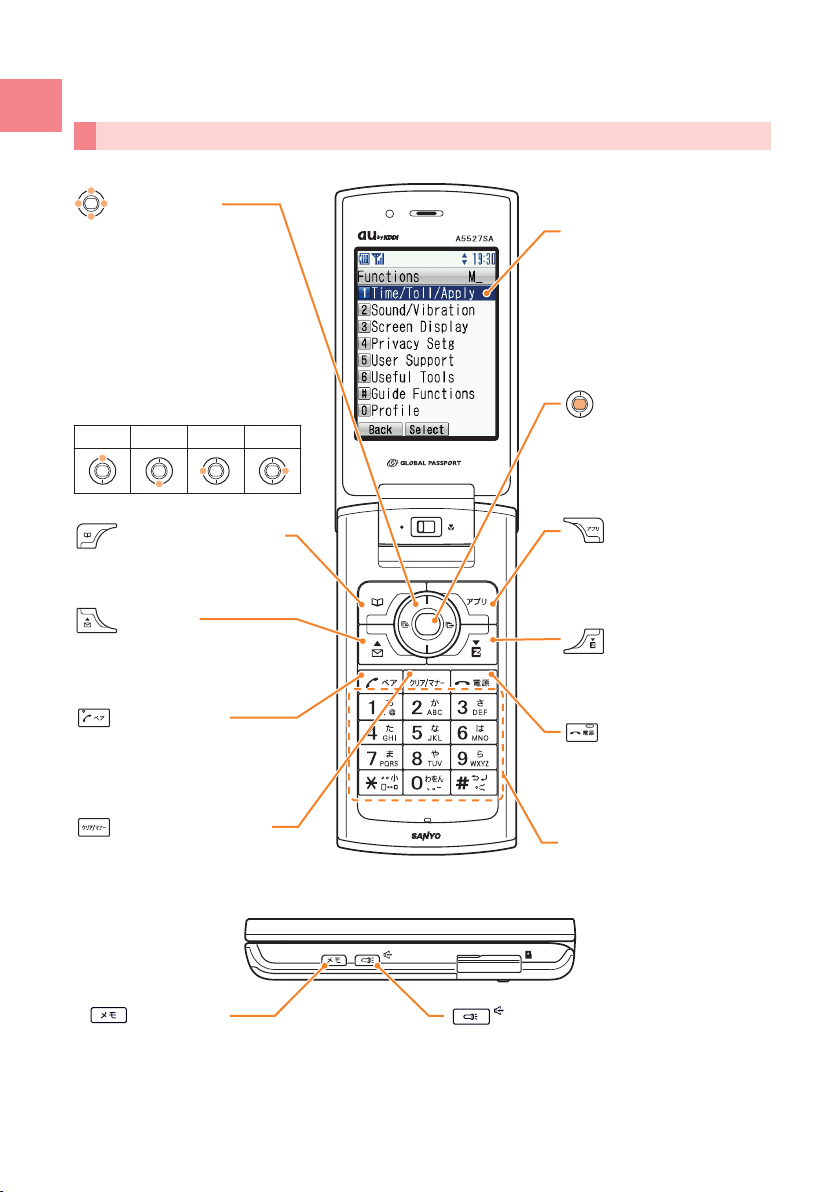
Names of Parts
Main display
Macro Mode Selector Switch
Cursor key
Earpiece
Contents/Before Use
Center key
Camera lens
Flash
Incoming indicator
Sub display
Address book key
Mail key
Send/Pair key
Dial keys
Built-in Antenna
Speaker
Battery Pack/
Cover
Charging
Terminals
Flat-type
Earphone
Jack/Cover
External
Connector/
Cover
Application key
EZweb key
Clear/Manner key
Power/End key
Microphone
Infrared Port
microSD Memory
Card Slot/Cover
Hands Free/
Light key
Memo key
11
Page 14

How to Charge the Battery Pack
The battery pack is not fully charged at the time of purchase. Before using
Contents/Before Use
your cellphone, charge the battery pack in the following ways.
To Charge Using the Desktop Holder
●
Connect the AC adapter to the desktop holder, plug the power plug into a power outlet, and
insert the A5527SA to the desktop holder. A confi rmation tone sounds once when charging
begins. It also sounds when charging is completed.
Incoming Indicator
Red light is on→Charging
・
Light is off→
・
Charging is completed
Desktop Holder
3
2
AC Adapter
1
Connector
Power Plug
Fold out
To Charge Using the AC Adapter
●
Connect the AC adapter to the external terminal of the A5527SA and plug the power plug into
a power outlet. A confi rmation tone sounds once when charging begins. It also sounds when
charging is completed.
Incoming Indicator
Red light is on→Charging
・
Light is off→Charging is completed
・
2
AC Adapter
1
Connector
External
Terminal
Fold out
12
Power Plug
Page 15

Turn the Power On/Off
To Turn the Power On
●
Standby screen
Press for more than one
second.
The standby screen is displayed.
To Turn the Power Off
●
Press for more than one
second.
Confi rming the Reception State and Remaining Battery Power
Check here for remaining battery power!
Fully
charged
* “ ” is displayed while charging.
Low
Requires
charging
Fully
discharged
Contents/Before Use
Check here for the reception state!
Strong Medium Weak
* You cannot receive or make calls when “Out” (Out
of service area) is displayed.
Too
weak
Out of
service area
13
Page 16
Basic Operation
Key Functions
Contents/Before Use
Cursor Keys
Move cursor or screen
In the standby screen,
Press Displays
Up Profile
Down Calendar
Left Incoming Calls log
Right Outgoing Calls log
Cursor keys are indicated in
this manual as follows:
Up Down Left Right
Cursor
Center Key
Displays Main Menu
Selects an item where
the cursor is placed
Address Book Key
Displays Address Book
Mail Key
Displays E-Mail/C-Mail Menu
Talk/Pair Key
Makes/Receives calls
Displays Pair Menu
Clear/Manner Key
Sets the silent mode
Deletes entered characters
Memo Key
Sets the In-Phone Ans Mach
Plays recorded messages
Application Key
Launches EZ apps
(BREW®)
EZweb Key
Displays EZ Menu
Power/End Key
Turns the power on/off
Ends a call
Dial Keys
Enters phone numbers
or characters
Hands Free/Light Key
For using Hands Free function
For using as Light
14
Page 17

Executing Functions Displayed at the Bottom
The functions displayed at the bottom of the screen correspond with the keys as follows:
Pressing the key executes
the function displayed at the
Pressing the key
executes the function
displayed at the lower left.
lower right.
Pressing the key executes
the function displayed at the
lower center.
Selecting Items/Returning
To select an item, use to move the cursor and press .
An item with numeric icon can also be selected by pressing the corresponding dial key.
To go back to the previous screen, press
of the screen, pressing the corresponding key also allows you to return to the previous
screen.
To return to the standby screen, press
<Example>
Standby screen
. When is displayed at the bottom
.
Contents/Before Use
Press .
Use to select
an item and press
.
Press
or
.
Press
.
Press dial key.
Use to select
an item and press
.
Press
or
.
15
Page 18

Viewing the Screen
Indications in the Main Screen
Contents/Before Use
The following icons are displayed in the main screen and indicate the status of your
A5527SA. Icons and the number of cases are displayed when you have received
missed calls or mails.
① ②③④⑤ ⑥ ⑦
⑩
⑧
①
②
③
⑨
④
⑤
⑥
⑦
⑪
⑧
⑫
⑨ Current date and time
⑬
⑭
⑩
⑮
⑯
⑪ Current time
⑫
⑬
⑭
⑮
⑯
* is displayed when you have a mail from pair partner.
Battery level
Charging
Reception state
Roaming area
* No indication when set to
“
Japan”.
Phone calls are available in roaming area
Packet communication is available in roaming area
During a call
Using EZweb
Running EZ apps
Running Hello Messenger
Running EZ・FM
Unread E-mail
Unread C-mail
Unchecked missed call
Indicates the directions to scroll
Appears when the volume setting is
available while confi rming or playing data
Silent Mode is ON
In-Phone Ans Mach is ON
Missed Call
New E-mail*
New C-mail*
New memo in the In-Phone Ans Mach
To main menu
16
Page 19

About Menu
About Main Menu
Pressing in the standby screen launches the Main Menu.
Each function can be accessed by using
<Example> Accessing Camera from Main Menu
Standby screen Main Menu screen
to select an item and pressing .
Camera function screen
Use to select
“Camera” and press
.
About Submenu
When
can access related functions or information by pressing the key that corresponds to
Submenu.
is displayed at the bottom of the screen during each operation, you
Contents/Before Use
<Example> Displaying Photo’s Submenu
[Submenu]
17
Page 20

Setting the Language to English
Contents/Before Use
1
2
3
Press in the standby screen.
Use to select “機能” and
press [選択].
Use to select “
press [選択].
画面表示
” and
18
4
Use to select “Set Language”
and press [選択].
Page 21
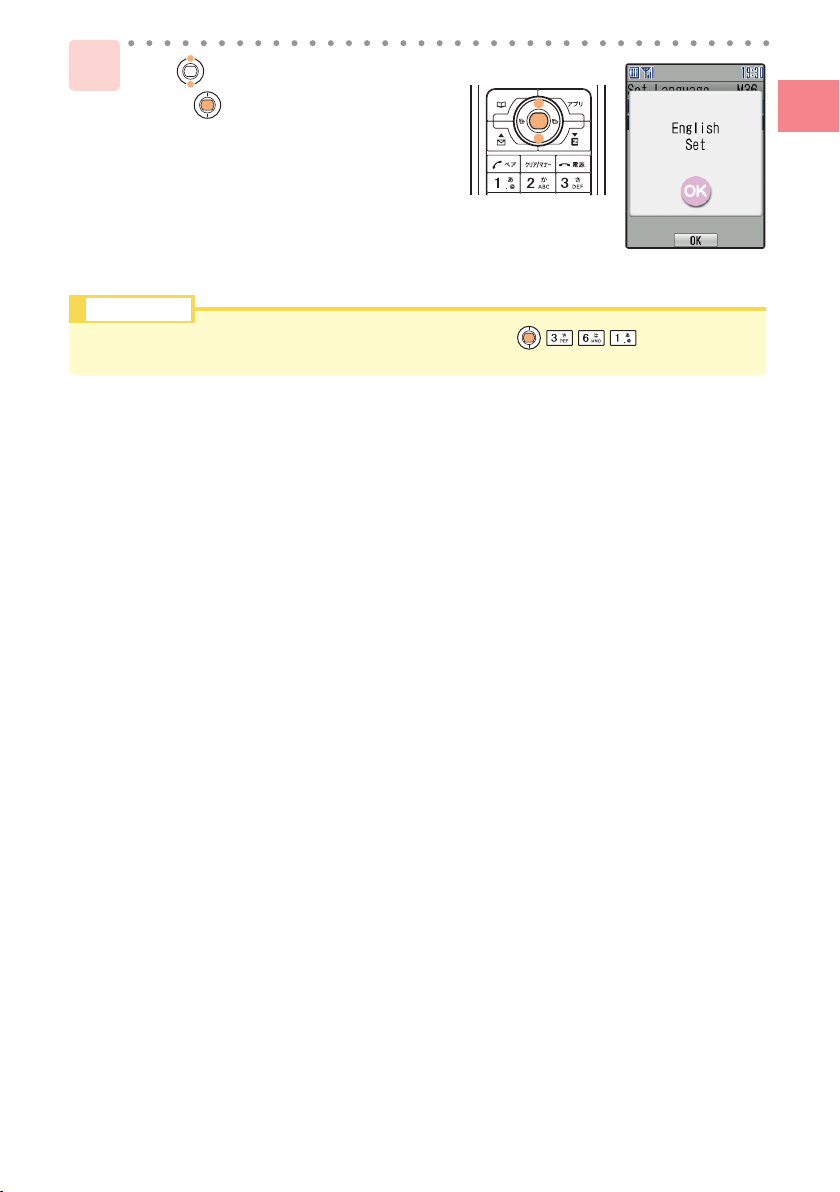
Use to select “English” and
5
press [
Information
You can set the language to Japanese by pressing in turn from the standby
screen.
選択
].
Contents/Before Use
19
Page 22

Initial Setting for E-mail and EZweb
To use E-mail and EZweb services, you need to subscribe to the EZweb
service. If you did not subscribe it when you purchased your phone, please
Contents/Before Use
contact au Customer Service Center or au shop for further information. Make
sure that you do the initial setting before using E-mail and EZweb services for
the fi rst time. The initial setting automatically determines your E-mail address.
To change it as you like, see “Changing Your E-mail Address” (p.22).
Press in the standby screen.
1
Press [OK].
2
Your E-mail address is determined
automatically by the initial setting.
20
Press [OK].
3
The initial setting is completed and
E-mail Menu appears.
Information
Pressing / in the standby screen also allows you to do the initial setting.
Page 23

Confirming Your Cellphone Number/E-mail Address
Press in the standby screen.
1
Your cellphone number and E-mail
address are displayed.
Information
You can also display them from the standby screen by pressing , and then .
Contents/Before Use
21
Page 24

Changing Your E-mail Address
Contents/Before Use
1
2
E-Mail Address
Domain
ezweb.ne.jp
△△△
Press in the standby screen
Use to select “E-Mail Setting”
and press [Select].
@
Changeable part
.
22
3
Use to select “Others” and
press [Select].
4
Use to select “E
レスの変更
Address)” and press
(Change E-mail
メールアド
[OK].
Page 25

Enter your Security Code, press
5
[Set], use to select 送信
(Send), and press [OK].
Security Code is the 4-digit number you wrote in the application
•
form when purchasing.
If you enter a wrong Security Code 3 times in a row within the
•
same day, you will not be allowed to perform setup operations
until the following day.
6
Use to select “
(Agree)” and press [OK].
Use to select the input fi eld,
7
enter an E-mail address, and
press [Set].
承諾する
Contents/Before Use
See “Inputting English Characters” (p.39) about the characters
•
available for E-mail address and the way of entering E-mail
address.
8
Use to select
press [OK].
When the E-mail address you entered
•
is already being used, enter a different
one.
9
Use to select
[OK].
Your E-mail address is changed.
送信
(Send) and
OK
and press
23
Page 26

Phone Call
Making a Call
Phone Call
●
From the standby screen,
1
press - to enter a phone
number.
To call a regular phone, enter a phone
•
number starting with the area code.
Press .
2
To end the call, press .
To Select the Way of Dialing
After entering a phone number,
1
press [Dial], use to
select the way of dialing, and
press [Select].
24
The following are details of each menu:
•
Dial : Makes a call in accordance with the
Caller ID setting.
184+Number → Dial : Not notify the other par ty of your
cellphone number.
186+Number → Dial : Notifi es the other party of your
cellphone number.
Page 27

Making an International Call
au International Call Service
Available without any additional application.
Example: To call 212-123-XXXX in the USA
005345 – 1 – 212 – 123-XXXX
↑↑↑↑
International
access code
* When an area code begins with “0”, dial excluding “0”.
•
Calling charges for this service are added to monthly au calling charges and billed together.
•
Check the Country code at au Customer Service Center.
•
For charges, refer to Global Passport Owner’s Guide or contact au Customer Service Center.
001 KOKUSAI MOBILE TALK
Application required.
For inquiries, contact KDDI Customer Service Center at 0077-7160 (Toll-free; open 9:00
to 20:00 every day including weekends and national holidays).
Country code
(USA)
Area code* Phone number
Phone Call
001 – 010 – 1 – 212 – 123-XXXX
↑↑↑↑
KDDI
International
access code
* When an area code begins with “0”, dial excluding “0”.
•
Calling charges for 001KOKUSAI MOBILE TALK are charged separately from monthly au calling
charges.
•
Check the Country code at au Customer Service Center.
For charges, refer to Global Passport Owner’s Guide or contact au Customer Service Center.
Country code
(USA)
Area code* Phone number
25
Page 28

Answering a Call
1
Press to answer the call.
To end the call, press .
Phone Call
On-screen display for Incoming calls
Phone
number
ID Unsent
Payphone
Unsupported
When You Could Not Answer a Call (Missed Call)
●
The caller notifi es his/her phone number. If the
caller is already saved in the Address book,
his/her name or image is also displayed.
The caller does not notify his/her phone
number.
The caller is making a call from a payphone.
The caller is making a call from a phone that
does not support ID notifi cation.
(Missed) and the number of
missed calls are displayed.
26
1
Use to select (Missed) and
press .
Incoming calls log is displayed.
Page 29

Calling Back (Outgoing Calls/Incoming Calls Log)
<Example> Calling back from the Incoming calls log
Press in the standby screen.
1
The incoming calls log is displayed.
Use to select a desired
2
number and press .
The phone starts dialing the phone
number you selected.
Information
To call back to a number from outgoing calls log, press in the standby screen.
The latest 20 phone numbers you dialed and received are saved in each log.
Adjusting the Caller’s Voice Volume
Press during a call.
1
: turns the volume up
: turns the volume down
5 levels of adjustment (Level 1 to 5) are
available.
Phone Call
Information
If you press [Loudest] during a call, the volume will be
louder than level 5. This setting will be automatically released once
the call is completed.
27
Page 30

Adjusting the Ringer Volume
Press in the standby screen.
1
Phone Call
Use to select “Functions” and
2
press [Select].
Use to select “Sound/
3
Vibration” and press [Select].
28
Use to select “Incoming Call”
4
and press [Select].
The actual volume is displayed in
incoming call setting screen.
Page 31

Use to select “Volume” and
5
press
: turns the volume up
: turns the volume down
5 levels of adjustment (Level 1 to 5) are
available.
To confirm the volume, press [Confirm].
•
•
To mute the ringer, set the volume to S (OFF).
To set Step down/Step up, press
•
Step Down : The volume turns down step by step.
Step Up : The volume turns up step by step.
Use to adjust the volume and
6
press [Select].
[Select].
Phone Call
.
Press [Set].
7
The volume is changed.
29
Page 32

Changing the Ringer Type
<Example> Setting the ringer type in “Original”
After the step 4 on page 28,
1
Phone Call
use to select “Melody” and
press [Select].
Use to select “Original” and
2
press [Select].
Ringer list is displayed.
To confirm the selected ringer,
•
press [Confirm].
Use to select a ringer type
3
and press [Select].
30
Press [Set].
4
The ringer is changed.
Information
The default ringer is “The American Patrol”.
Page 33

Setting the Silent Mode
When the silent mode is set, your cellphone vibrates to notify you of incoming
calls and records the caller’s message in the In-Phone Ans Mach when you
cannot answer a call.
Press for more than one
1
second in the standby screen.
The silent mode is set and appear in the
standby screen.
To Release the Silent Mode
●
Press for more than one
1
second while setting the
silent mode.
Phone Call
screen.
disappear from the standby
31
Page 34

Using the In-Phone Ans Mach
When the In-Phone Ans Mach is set, you can play answering message and
record caller’s message.
Setting the In-Phone Ans Mach
Phone Call
Press for more than one
1
second in the standby screen.
In-Phone Ans Mach is set and appears in the standby
screen.
To Release the In-Phone Ans Mach
●
Press for more than
1
one second while setting
the In-Phone Ans Mach.
disappears from the standby
screen.
32
Page 35

Playing Back the Recorded Messages
When a message is recorded in the In-Phone Ans Mach, the standby screen notifi es
you.
Use to select (Msgs)
1
and press .
Playback screen is displayed.
To delete a message, press
•
[Erase].
Use to select a desired
2
message and press [Play].
The message is played.
(Msgs) and the number of
recorded messages are displayed.
Phone Call
Information
Up to 3 messages (including voice memo) can be recorded, and the available recording time
for each message is 20 seconds.
In-Phone Ans Mach cannot be set when the maximum number of message is recorded.
You can also display the playback screen from the standby screen by pressing
then select “Playback”
, and
33
Page 36

Global Functions
Using Overseas
You can use the A5527SA overseas with global functions.
Setting Area
Press in the standby screen.
1
Global Functions
2
Use to select “Global
Functions”, press [Select]
and press [OK].
34
Use to select “Area Setting”
3
and press [Select].
Use to select “Overseas” and
4
press
[Select].
Page 37

Calling to Japan from Overseas
1
From the standby screen,
enter a phone number and
press [Dial].
Use to select “Dial to Japan”,
2
press [Select] and press .
Information
Although the preferred roaming list (PRL) is already stored in the phone at the time of
purchase, the list may be updated several times a year. Update it before departure.
You can use like a normal cellphone when calling from Japan to an overseas cellphone
compatible with GLOBAL PASSPORT.
You need to sign up for the EZweb service before departure. Initial setting of EZweb must
also be done in Japan.
Global Functions
35
Page 38

Inputting Characters
About Inputting Characters
It is necessary to input characters when saving an entry to the Address Book, or
creating an E-mail, for instance. Kanji, Hiragana, Katakana, English, numbers,
pictograms, emoticons, symbols, and phrases can be inputted.
Changing the Character Input Mode
Press in the text input
1
Inputting Characters
screen.
A list of character input modes is
displayed.
Use or [Switch] to
2
select an input mode and
press [Select].
The currently selected input mode is
shown at the bottom of the text input
screen.
かな Kana/Kanji mode カナ
Full-sized and uppercase English modeabFull-sized and lowercase English mode12Full-sized number mode
AB
Half-sized and uppercase English modeabHalf-sized and lowercase English mode12Half-sized number mode
AB
Pictograms mode
Undo
Information
Input modes available for text input screen in each function vary.
36
Full-sized Katakana mode
Emoticons mode
Half-sized Katakana mode
カナ
Symbols mode
Sym.
Chara Moji mode
Chara
Page 39

Key Assignment of Characters
Several characters are assigned to one key. Pressing the same key repeatedly displays
a character you want to input.
Example (in the English mode)
Press once twice 3 times 4 times 5 times 6 times 7 times 8 times
a b
c
A
B
C
2
Character assignment table
Input
mode
Key
Kana/Kanji
(Full-sized)
あいうえおぁぃぅぇぉ1 アイウエオァィゥェォ1 .@−_/:〜1 1
かきくけこ2 カキクケコ2 abcABC2 2
さしすせそ3 サシスセソ3 defDEF3 3
たちつてとっ4 タチツテトッ4 ghiGHI4 4
なにぬねの5 ナニヌネノ5 jklJKL5 5
はひふへほ6 ハヒフヘホ6 mnoMNO6 6
まみむめも7 マミムメモ7 pqrsPQRS7 7
やゆよゃゅょ8 ヤユヨャュョ8 tuvTUV8 8
Katakana
(Full-sized/Half-sized)
English
(Full-sized/Half-sized)
(Full-sized/Half-sized)
a
Number
…
…
Inputting Characters
らりるれろ9 ラリルレロ9 wxyzWXYZ9 9
わをんゎ、。 ・〜!?
゛
(Voiced sound symbol) ゜(Semi-voiced sound symbol)
Switch between uppercase and lowercase
Switch to a list of pictograms, emoticons and symbols
Enter (Linefeed)
Display candidate words in reverse order while inputting characters (which are not set yet) (Back function)
* “〜” can be inputted only when inputting full-sized characters. It changes to “ ˜ ” when inputting half-
sized characters.
* “ヮ” (lowercase character) can be inputted only when inputting full-sized characters.
*
indicates a space.
[
* Inputting voiced sound symbol/semi-voiced sound symbol or switching uppercase/lowercase can be
done by pressing
(A list of pictograms, emoticons and symbols is displayed if you press it after the inputted character is set.)
* Ex.
)つ→っ→づ→つ ハ→バ→パ→ハ a →
after inputting the character.
0 ワヲンヮ、。 ・〜!?
[
00 , .−〜!?
[
A → a
[
0
#
37
Page 40

How to Input Characters
Inputting Kana or Kanji
<Example> Inputting “
In a text input screen,
1
press 5 times ……………
press once ………………
(makes a cursor move)
press once ………………
Inputting Characters
press
press twice ………………
•
To consecutively input characters assigned to a same key, move the cursor to the right.
•
Candidate words are displayed when inputting a character. You can input by selecting
a candidate word with .
•
When you press
change it to a character which may be displayed in number, English, or Katakana
mode. However, a space is displayed when there is no corresponding character in
number, English, or Katakana mode.
Press [Convert].
2
” in a name input screen of the Address Book
岡垣
「お」
「か」
「か」
(voiced sound symbol)
before converting or setting an inputted character, you can
…
「が」
「き」
38
“
おかがき
Then pressing displays a list of
candidate words.
Use to select “
3
press [Select].
“岡垣” is inputted.
” is converted to Kanji.
岡垣
” and
Page 41

Inputting English Characters
<Example> Inputting “komatsu” in an E-mail address input screen of the Address Book
1
In a text input screen,
press twice……
press 3 times…
(makes a cursor move)
press once……
press once……
press once……
press 4 times…
press twice……
Characters available for E-mail Addresses
Key Available characters
「k」
「o」
「m」
「a」
「t」
「s」
「u」
To consecutively input characters
•
assigned to a same key, move the
cursor to the right.
To input an E-mail address, you can
•
input “@ezweb.ne.jp” by selecting
it from phrases. See “Inputting
Phrases” (p.40) about inputting
phrases.
Inputting Characters
.@- _ / : ˜ 1
abcABC2
de fDEF3
gh i GH I 4
jklJKL5
mn oMNO6
pqr sPQRS7
tuvTUV8
wxy zWXYZ9
0,.-˜ !?
* Characters in cannot be used for your E-mail address
when you change it.
39
Page 42

Inputting Phrases
<Example> Inputting “@ezweb.ne.jp” in an E-mail address input screen
Press [Submenu] in a text
1
input screen.
Use to select “Phrases” and
2
Inputting Characters
press [Select].
Groups of phrases are displayed.
Use to select
3
“
インターネット
(Internet)” and press
[Select].
40
A list of phrases is displayed.
Use to select
4
“@ezweb.ne.jp” and press
[Select].
“@ezweb.ne.jp” is inputted.
Page 43

Inputting Pictograms, Emoticons and Symbols
<Example> Inputting a pictogram
Press in a text input screen.
1
A list of input mode is displayed.
…Pictogram
…Emoticon
…Symbol
2
Use to select and press
[Select].
A list of pictograms is displayed.
•
To change categories, press or .
•
To switch between pictograms, emoticons and symbols, press
.
•
To input consecutively, press
[Continue].
Inputting Characters
3
Use to select a pictogram and
press [Select].
The pictogram is inputted.
Information
To delete one character, put the cursor on the character you want to delete and press .
To delete multiple characters, press for more than one second to either delete all
characters to the right of the cursor or delete all displayed characters when there are no
characters to the right of the cursor.
41
Page 44

Address Book
Saving to the Address Book
You can save phone numbers to which you call frequently, names, and E-mail
addresses.
<Example> Saving a name, phone number and E-mail address
Press for more than one
1
second in the standby screen.
Address book registration screen is
displayed.
Address Book/Pair Function
Use to select (Name) and
2
press [Select].
42
Enter a name and press [Set].
3
See “Inputting Characters” (p.36) about
•
the way of inputting characters.
The reading is automatically entered.
•
Use to select (Phone
4
No.1) and press [Select].
Page 45

Enter a phone number and
5
press
Enter the area code when saving a
•
regular phone number.
Use to select a type of phone
6
number and press [Select].
The icon of selected type is displayed.
If you do not enter E-mail address, go to
•
step 10.
Use to select (E-Mail
7
Address1) and press [Select].
[Set].
Address Book/Pair Function
Enter an E-mail address and
8
press [Set].
Use to select a type of E-mail
9
address and press [Select].
The icon of selected type is displayed.
43
Page 46

10
11
Address Book/Pair Function
Information
Up to 1000 entries can be saved.
You can also save some information such as group, image and address.
An entry can contain up to 3 phone numbers and 3 E-mail addresses.
The smallest available memory number from 000 to 999 is automatically assigned. You can
assign any number by pressing dial keys.
Press [Set].
Pop-up screen which indicates Memory
No. is displayed.
Press [Set].
Saving to the Address Book is
completed.
44
Page 47

Making a Call from the Address Book
Press in the standby screen.
1
Address book list is displayed.
Use to select a person to call
2
and press .
Use to select the number 1 to 3
•
when the entry has some numbers.
Press .
3
Address Book/Pair Function
45
Page 48

Editing an Entry in the Address Book
From the standby screen,
1
, use to select an
2
Address Book/Pair Function
press
entry to edit, and press
[Select].
The address book detailed screen is
displayed.
Press [Submenu], use
to select “Edit” and press
[Select].
The address book registration screen is
displayed.
You can delete the displayed address
•
book data by selecting “Delete” after
pressing [Submenu].
46
Edit the entry and press [Set].
3
Yes : Overwrites the entry.
No : Registers the edited information
under a different Memory No.
Use to select “Yes” and press
4
[Select].
The entry in the Address Book is edited.
Page 49

Saving from Outgoing Calls/Incoming Calls Log
<Example> Saving from Incoming calls log
From the standby screen,
1
press
log to save, and press
Use to select “Save to
2
AdrsBk” and press [Select].
Use to select “New” and
3
press [Select].
, use to select the
[Submenu].
Address Book/Pair Function
Address book registration screen is
displayed. The phone number of the
selected entry is automatically entered.
Refer to “Saving to the Address Book” (p.42) to save the entry.
4
Information
To save from Outgoing Calls log, press in the standby screen and follow the steps
above.
47
Page 50

Pair Function
Setting a Pair Partner
You can select 5 persons from saved entries in the Address Book and set them
as pair partners. This function allows you to call or send mail easily to them.
Press in the standby screen.
1
Pair menu is displayed.
Address Book/Pair Function
2
3
4
Information
Pair partners can be selected from the Address Book. Save a partner to the Address Book
before setting him/her as pair partner. See “Saving to the Address Book” (p.42) for details.
If you delete a pair partner from the Address Book, the partner is also deleted from Pair
menu.
Use to select a number, use
to select “Save/Release”, and
press [Select].
Use to select “Yes” and press
[Select].
Use to select a partner, press
[Select] and press [Set].
48
Page 51

Making a Call to a Pair Partner
Press in the standby screen.
1
Pair menu is displayed.
Use to select a partner to call,
2
use to select “Phone” and
press [Select].
Information
You can also send E-mail and C-mail to pair partners.
Address Book/Pair Function
49
Page 52

About E-mail
To use E-mail, you need to subscribe to the EZweb service. If you did not
subscribe to it when you purchased your phone, please contact the au
Customer Service Center or an au shop for further information. Make sure
that you do the initial setting before using E-mail for the fi rst time. See “Initial
Setting for E-mail and EZweb” (p.20) about the initial setting.
E-mail allows you to exchange mails of up to 5000 full-sized (or 10000 halfsized) characters with other cellphones or personal computers that support
E-mail. Photos and movies can also be sent and received.
* You can send E-mail to up to 5 recipients at a time.
* You can send up to 1000 E-mails (or to up to 1000 recipients) in a day.
* Sending or receiving mail with an attached fi le may take more time than usual,
depending on its size or radio wave conditions.
* Packet charges will differ depending upon the amount of data sent or received in the
E-mail.
Mail
E-mail is sent using an E-mail address.
(Ex.) △△△@ezweb.ne.jp
(Subscription to EZweb required)
50
A5527SA
E-mail can be sent to other
cellphones or personal
computers that support
E-mail.
E-mail
E-mail
Page 53

Creating and Sending an E-mail
Press in the standby screen.
1
E-Mail Menu is displayed.
Use to select “Create New”
2
and press [Select].
Create Mail screen is displayed.
Use to select , press
3
[Edit] and press [Edit].
Mail
Address Entry screen is displayed.
Use to select “Address Book”
4
and press [Select].
Address book list is displayed.
Address Entry screen also allows you
•
to enter an E-mail address manually or
select it from Received Mail History or
Sent Mail History.
51
Page 54

Use to select a recipient,
5
press [Select] and press
[Select].
Use to select 1 to 3 when the
•
entry has some E-mail addresses.
Mail
Press
6
Press [Set].
7
E-mail address is entered.
Use to select and press
8
[Edit].
Subject input screen is displayed.
[Finish].
52
Enter a subject and press [Set].
9
The subject is entered.
See “Inputting Characters” (p.36) about
•
the way of inputting characters.
Subject can use up to 50 full-sized (or
•
100 half-sized) characters.
Page 55

Use to select and press
10
[Edit].
Body text input screen is displayed.
Enter a body text and press
11
[Set].
Body text is entered.
Press [Send].
12
Created mail is sent.
After finished sending, the mail is saved
•
in Outbox as sent mail.
Mail
53
Page 56

Reading a Received E-mail
When an E-mail is received, the standby screen notifi es you.
(E-Mail) and the number of E-mail
are displayed.
Use to select (E-Mail) and
1
press .
Inbox screen is displayed.
The color is changed and with the
•
Mail
number of E-mail is displayed when the
folder has new mail.
54
Use to select “
2
folder)” and press [Select].
Received mail list is displayed.
Use to select a mail and press
3
[Display].
Received mail is displayed.
To display a previous or next mail, press
•
or .
メインフォルダ
(Main
Page 57

How to view a received mail
Mail’s sender
Mail’s subject
Displaying an E-mail in Inbox
●
From the standby screen,
1
press , use to select
“Inbox”, and press [select].
Inbox screen is displayed.
Follow the steps 2 to 3 on page 54 to display a mail.
2
Received date and time
Body text
Attached file
Mail
When a Photo Is Attached in a Received Mail
●
Display a received mail, use
1
to select a fi le name which
appears after the body text,
press [Receive] , and press
[Play].
Attached fi le is played.
Information
Depending on the file size, attached file may be displayed automatically or by selecting the
attached file and pressing [Play].
55
Page 58

Replying to a Received E-mail
After the step 3 on page 54,
1
press [Reply].
Create Mail screen is displayed. The
recipient is entered and the subject and
body text of the received mail is quoted.
Subject is prefixed with “Re:”.
•
Subject can be edited.
•
Use to select and press
2
[Edit].
Mail
Enter a body text and press
3
[Set].
56
Press [Send].
4
Created mail is sent.
Page 59

Blocking Junk Mails
To block junk mails, it is recommended to set
By selecting “
(Mail Filter) easily by answering the Inquiry on the screen.
ター
Setting
●
Example: To access “
Press in the standby screen.
Select “E-Mail Setting” and press [Select].
Select “Mail Filter” and press [Select].
Select “
Enter your Security Code and press [Set].
Select “
Select an item and press [OK].
カンタン設定
●
サポート設定
(supportive settings)
サポート設定
メールフィルター
次へ
(Next)” and press [OK].
送信
(Send)” and press [OK].
(supportive settings)”, you can set
(Mail Filter)
サポート設定
(supportive settings)”
(Easy Setup)
Sets the fi lter by answering the inquiry.
For the users who would like to check
each setting condition.
メールフィルター
(Mail Filter).
メールフィル
Mail
フィルターレベル(高)
(Filter level (Strict))
フィルターレベル(中)
(Filter level (Medium))
フィルターレベル(低)
(Filter level (Normal))
Information
You can also block junk mails by changing your E-mail address. See “Changing Your E-mail
Address” (p.22) about changing the E-mail address.
Rejects mails from PC.
For the users who send/receive the
mails only between cellphones.
Blocks Unsolicited Ad Mail and Spoof
e-mail, as well as all mail from designated
addresses.
For the users who are annoyed by a
stalker or a specifi c junk mailer.
Blocks the Unsolicited Ad Mails or the
Spoof e-mails.
The fi lter minimally required.
57
Page 60

About C-mail
C-mail allows you to exchange mail of up to 50 full-sized (or 100 half-sized)
characters with other au cellphones that support C-mail.
* C-mail transmission fees are charged when sending C-mail.
* C-mail Safety Block
C-mail safety block allows you to reject C-mails that include URL to access (http://
Mail
,https://
□□
default.
) or phone numbers in the C-mail body text. This function is valid by
□□□
C-mail is sent using a phone number.
(Ex.) 090-0001-××××
(standard service)
□
58
C-mail can be sent to au cellphones
that support C-mail
C-mail
A5527SA
Page 61

Creating and Sending a C-mail
Press for more than one
1
second in the standby screen.
C-Mail Menu is displayed.
Use to select “Create New”
2
and press [Select].
Create Mail screen is displayed.
Use to select and press
3
[Edit].
Mail
Address Entry screen is displayed.
Use to select “Address Book”
4
and press [Select].
Address book list is displayed.
Address Entry screen also allows you
•
to enter an address manually or select it
from Received Mail History or Sent Mail
History.
59
Page 62

Mail
Use to select a recipient and
5
press
•
Go to step 7 when the entry has only
one phone number.
Use
•
3 when the entry has some phone
numbers.
Press [Select].
6
Use to select and press
7
Body text input screen is displayed.
[Select].
to select the number 1 to
[Edit].
60
8
Enter a body text and press
[Set].
Body text is entered.
See “Inputting Characters” (p.36) about
•
the way of inputting characters.
Press [Send].
9
Created mail is sent.
After finished sending, the mail is saved
•
in Outbox as sent mail.
Page 63

Reading a Received C-mail
When a C-mail is received, the standby screen notifi es you.
(C-Mail) and the number of
E-Mail are displayed.
Use to select (C-Mail) and
1
press .
Received mail is displayed.
The newest mail is displayed when you have some new mails.
•
You can display a previous or next mail by pressing or .
To reply to the sender, press
•
[Reply].
Mail
Displaying a C-mail in Inbox
●
From the standby screen,
1
press for more than one
second, use to select “Inbox”,
and press [Select].
Inbox screen is displayed.
Use to select a mail and press [Display].
2
61
Page 64

Camera
What You Can Do with the Camera
Take photos and movies
You can take photos and movies with this 1.34-megapixel camera.
You can also add frames and special effects to photos, and take picture with
the timer.
Photos you took can be...
●Used in the A5527SA
You can set taken photos as the standby
screen, or register them to the Address Book
to display when you receive incoming calls.
●Sent by E-mail
You can attach photos and movies of 500 KB
Camera
or less to E-mail and send them to personal
computers or other cellphones.
* It may take more time than usual, depending
upon radio wave conditions.
Incoming
Call
/KMG/KMG
●Printed out
Photos you take can be saved onto a
microSD™ Memory Card (commercially
available) and can be printed out with a
printer or at a DPE shop.
62
Page 65

How to Hold Your Cellphone When Shooting
When you take photos or movies, put the subject inside the screenand hold the
cellphone fi rmly with both hands to prevent a blur.
When shooting with a vertical screen
Shutter button
When shooting with a horizontal screen
Shutter button
About the Shoot and Movie modes
The most appropriate Shoot or Movie mode can be selected depending upon the
purpose for the image. The size and fi le name that will be used for the images in each
mode are as follows.
Mode for taking photos
Shoot mode Image size File name Location saved
QQVGA size 120x160
QVGA size 240x320
0.3M size 640x480
1M size 1280x960
* Photos are saved in the “Photo Folder” when a microSD™ Memory Card is not inserted.
Save date_time~serial number
SA2A+serial number
“
Photo Folder” in the
Data Folder
“
DSC Folder” in the
microSD™ Memory Card*
Camera
Mode for recording movies
Movie mode Image size File name Location saved
Standard S size 96x80
Standard M size 128x96
High M size 128x96
High L size 176x144
Video S size (Std) 96x80
Video M size (Std) 128x96
Video M size (High) 128x96
Video L size (High) 176x144
* Movies are saved in the “Movie Folder” when a microSD™ Memory Card is not inserted.
S_Save date_time~serial number
Save date_time~serial number
“
Movie Folder” in the
Data Folder
“
Movie Folder” in the
microSD™ Memory Card*
63
Page 66

Taking a Photo
From the standby screen,
1
press , use to select
“Camera”, and press [Select].
Camera functions are displayed.
Use to select “Photo” and
2
press [Select].
Press [Shoot].
3
Shutter sounds and taken photo is
Camera
displayed.
64
To retake the photo, press .
•
Press [Save].
4
Taken photo is saved.
Page 67

Viewing Photos
From the standby screen,
1
press , use to select
“Data”, and press [Select].
Use to select “Data Folder”
2
and press [Select].
Use to select “Photo Folder”
3
and press [Select].
Photo Folder list is displayed.
All photos are saved in “All Photo”.•
Camera
Use to select a folder which
4
contains a photo to view, and
press [Select].
Photo list is displayed.
Use to select a photo and
5
press [Play].
Selected photo is displayed.
To display a previous or next photo,
•
press or .
65
Page 68

Sending Photos by E-mail
After taking a photo (follow the
1
steps 1 to 3 on page 64), press
[E-Mail].
Create Mail screen appears with a taken
photo attached.
Follow “Creating and Sending an E-mail” (p.51) and send E-mail.
2
Information
Sending E-mail may take more time than usual, depending upon radio wave conditions.
Camera
66
Page 69

EZweb
(Subscription to EZweb required)
About EZweb
To use EZweb, you need to subscribe to the EZweb service. If you did not
subscribe it when you purchased your phone, please contact au Customer
Service Center or au shop for further information. Make sure that you do the
initial setting before using the EZweb for the fi rst time. See “Initial Setting for
E-mail and EZweb” (p.20) about the initial setting.
EZweb is an information service for enjoying the Internet on your cellphone.
You can obtain Chaku-Uta® and the latest news from information sites.
* Packet charges will be based on the actual amount of data sent and received while
connected to EZweb and not on the amount of time you connect.
* Some information sites are subject to additional information costs besides
communication costs.
Information sites
A5527SA
Games
Chaku-Uta
Traffic
information
®
Wallpaper
Latest
news
Fair
EZweb
Weather
report
67
Page 70

Accessing Information Sites
Displaying the EZ Top Menu
From the standby screen, press , use to
1
select “Top Menu”, and press [Select].
EZ Top Menu is displayed.
EZweb
EZ Top Menu
Provides a search engine for information available by the
①
keyword entry.
Searches for a site by category.
②
Accesses recommended fun and convenient sites.
③
①
The latest top news topics are delivered by an automatic
④
②
③
④
⑤
⑥
⑦
⑧
⑨
⑩
⑪
⑫
⑬
⑭
⑮
⑯
⑰
⑱
⑲
update.
Provides special discount campaign information and other
⑤
recommended contents.
Offers gifts and free valuable information to EZweb service
⑥
subscribers.
Provides weather news, fortune-telling, or the useful function
⑦
of train connection search.
Provides the latest information such as news, weather, or
⑧
useful information for business.
You can search the connection of train, map or other local
⑨
information.
Provides information about shops where you can purchase
goods with your cellphone, and the information about the
⑩
auction where you can sell or buy easily.
Provides useful information for daily life.
⑪
Provides the latest information about games, music, books,
⑫
and information on hobby or entertainment trends.
Provides interesting, convenient and fun information on SNS
⑬
and blogs, etc.
Provides the various information, useful tools, or large storage
spaces, which are appropriate for your selection of the
⑭
services.
Introduces au-recommended information and sites.
⑮
Provides phone bills, application forms, au online manuals,
⑯
and au announcement.
Introduces
⑰
Access & Open Site).
Registers/checks the safety information in disasters.
⑱
Introduces English sites.
⑲
カンタンアクセス・オープンサイト
(Simple
68
Information
The layout and contents of the screens in this manual are examples and are subject to change.
Page 71

Basic Operation while Using EZweb
You can display the next screen by using to select an item and pressing .
•
You can return to the previous screen by pressing
•
to EZ Top Menu by pressing it for more than one second.
You can scroll the screen by pressing
•
EZ Top Menu
Use to select
an item and press
.
(Up) or (Down) when it continues.
or , and you can go back
Use
to select
an item and press
.
Press
or
.
Press
Inquiring Toll
From the standby screen,
1
press in that order.
Use to select “
2
(call or communication
照会
charge inquiry)” press [OK].
通話料・通信料
Press
.
or for more than one second.
or
EZweb
Information
The on-screen call or communication charge should be used only as a guide.
69
Page 72

Downloading Chaku-Uta
You can download Chaku-Uta® from information site and set it as a ringer
for incoming calls. You can also download wallpaper and set it to the standby
screen and others.
From EZ Top Menu, use to
1
select “
category)” and press [OK].
カテゴリで探す
®
and Set It as a Ringer for Incoming Calls
(Search by
EZweb
Use to select “
2
Uta)” and press [OK].
Use to select a category and
3
press [OK].
Use to select an information
4
site, press [OK], and
download following the
on-screen instructions.
着うた
(Chaku-
70
Page 73

Press [Play].
5
Downloaded data is played.
Press [Set].
6
Save to screen is displayed.
Use to select “Ringers” and
7
press [Select].
Registration destinations of the selected
target are displayed.
Use to select “Incoming Call”
8
and press [Select].
Downloaded data is set as ringer for
“Incoming Call”.
Information
When you access a site requiring additional information fee, input your EZ Password or
Premium EZ Password.
EZ Password: The 4-digit number that you have filled in the application form at the time of
purchase.
Premium EZ Password: The 4-digit number that you have filled in the application form at the
time of purchase.
Follow the on-screen instructions to input either of the passwords.
Download procedure depends on the site. The procedure described above shows an
example and may differ from the actual one.
EZweb
71
Page 74

Registering Frequently-Accessed Information Sites
You can access information sites easily by registering frequently-accessed
sites to “Bookmark(s)”.
Registering to Bookmark
Display a site you want to register
1
and press [BrsrMnu].
Browser menu is displayed.
Use to select “New bookmark”
2
and press [OK].
The title, URL, and folder name are
displayed.
Some information sites may not be
•
registered to Bookmark.
EZweb
72
Press [Save].
3
The site is registered to Bookmark.
Information
Up to 100 sites can be registered in Bookmark.
Page 75

Viewing an Information Site Registered as a Bookmark
Press in the standby screen.
1
EZweb Menu is displayed.
Use to select “Bookmark(s)”
2
and press [Select].
A list of registered information sites is
displayed.
Use to select a site you want
3
to view and press [Select].
You can connect to the selected
information site.
EZweb
73
Page 76

EZ Navi
(Subscription to EZweb required)
What You Can Do with EZ Navi
EZ Navi is a useful service which provides you with global positioning
information (GPS information).
Packet fees will be charged whenever you use one of the functions under the EZ Navi service. Other
*
fees may also be charged for some functions.
Standby screen Main Menu EZ Navi Menu
to
Use
Press .
“EZ Navi Walk” for When You Go Out
Displays various menus that are useful when you are out.
select “EZnavi”
and press
.
EZ Navi Walk Menu
Going-Out Menu
EZ Navi
My Spot
74
ナビをする*1 (Navigation)
地図を見る*1(無料)
(View Map (free))
乗換検索する*
(Search Connection (free))
道路情報を見る
(View Traffi c Info)
もっとナビウォーク (EZ Navi Walk)
インフォメーション (Information)
*1:
You can also select the service using your voice (“声de入力 (Voice input)”).
*2: A portion of these menus are charged services.
1
(無料*2)
Provides the navigation (voice directions) to the destination, or you
can search for shops or facilities around your present location.
You can view a map of your present location or any
other location.
You can search the connection of train, timetable and
railway information.
Check real-time traffi c information on the major roads
all over Japan.
Provides explanations about each setting or search on PC.
You can register for memberships or make inquiries.
View My Map
Just register the
position of your home
and favorite places
(offi ce, friends’ houses,
shops, etc.) for easy
navigation when you
go there.
Navigation engine by NAVITIME JAPAN/MAP: 昭文社/住友電工
When you are in an
unfamiliar place or
when you lose your
way, simply select “View
My Map”. A map around
your current position is
displayed in real-time.
Page 77

“Position Search” allows you to confirm the current position of your child
This service allows you to use the A5527SA to confi rm the position of an au cellphone that
supports Position Search. The following 2 types of Position Search services are available.
いつでも位置確認
(Auto Position Search)
Register the phone numbers of the mother and
the child to each other’s cellphone. The mother
can check where her child is by Auto Position
Search, without any operation by the child.
* Additional monthly charge is required.
Where is
my son?
位置確認メール
The mother can send a mail to her child for Position
Search. She can easily check where her child is
without any service registration, as long as her child’s
phone number is registered in the address book.
* Operation by the child is required to use Position Search Mail.
I’m here!
(Position Search Mail)
Where
are you?
“Area Message” sends you notification during a designated time period and area
A mother can be automatically notifi ed by mail when
her child enters (or is in) a pre-determined area during
the time period that she registers in advance. It is also
possible for her to receive notifi cation when the child
leaves (or is out of) the pre-determined area.
Information
The additional information fee may be charged separately from the packet communication
fee, to use EZ Navi.
In addition to the packet communication fee, separate information fees are charged for
receiving positioning information and viewing maps.
EZ Navi and Security Navi services are not available outside of Japan.
“
安心ナビ
service.
Register phone numbers to the address book between cellphones compatible with the
service, before using “
Before using “
on starting the service, and make the settings of the Navi Password. * The other party is
also required to agree to the Terms of Use.
Area information may appear differently in underpasses, indoor or near buildings where the
reception level of the radio wave from GPS satellites is poor.
If the positioned location information is different from the actual location, Area Message may
not be notified correctly.
Positioning location is not available when the other party’s cellphone is under following
conditions; out of service area, with Incoming Reject set, with no application, under
operation, or incompatible with the service.
When you stop the C-mail service or “EZapps Restrict” is set, “
not available.
The EZ apps communication fee is included in Free Calling Time, however, it is excluded
from the discount service of Family C-mail and Packet Communication Discount Service.
The layout or contents of the screen in this manual are examples and are subject to change.
(Security Navi)” service is only available between cellphones compatible with the
安心ナビ
安心ナビ
(Security Navi)”.
(Security Navi)”, be sure to confirm and agree to the Terms of Use
安心ナビ
(Security Navi)” is
EZ Navi
75
Page 78

SimpleMode
About SimpleMode
Setting SimpleMode allows you to simplify operation to the frequently used
functions such as phone function, Address Book, Camera, Mails, and EZweb.
Setting SimpleMode
Press in the standby screen.
1
Use to select “SimpleMode”
2
and press [Select].
Confi rmation screen is displayed.
3
SimpleMode
76
Use to select “Yes” and
press [Select].
SimpleMode is set.
Page 79

Releasing SimpleMode
●
Press in the standby screen.
1
Simple Menu is displayed.
Use to select “Functions”
2
and press [Select].
Use to select
3
“Rel. Simple Mode” and
press [Select].
Confi rmation screen is displayed.
Use to select “Yes” and
4
press [Select].
SimpleMode is released.
Information
Setting SimpleMode may change what you have set in normal mode. Some functions
inform you of the change by displaying a message.
SimpleMode
77
Page 80

Simple Menu
In SimpleMode, functions are accessed from Simple Menu.
Standby screen Simple Menu
Use to select
“
Camera” and
press
Address Book Save to or search in the Address Book
Phone
Mail
Camera
Data
Functions
SimpleMode
Tools
Hello Messenger Start up Hello Messenger
Global
Functions
My Number Display your phone number and E-mail address
Incoming Display the incoming calls log
Outgoing Display the outgoing calls log
In-Phone Ans Mach Set/Release/Replay the In-Phone Ans Mach
E-Mail
C-Mail Create C-mail/Confi rm sent or received C-mail
Photo Take photos
Movie Record movies
Bar Code Reader Read bar codes (QR codes)
Data Folder Confi rm data saved in the Data Folder
microSD Folder
microSD Mail Fldr
Toll/Subscription Inquire about toll or subscribe to services
Ringers
Screen Set font size and wallpaper
Rel. Simple Mode Cancel SimpleMode
Calendar Display calendar
Alarm Set/Cancel alarm
Calculator Calculator function
EZ・FM FM radio function
Area Setting Set destination
PRL Setting Set roaming area information
Create E-mail/Confi rm sent or received E-mail, Check for
new mail, Change your E-mail address
Confi rm data saved in a microSD™ Memory Card
(commercially available)
Confi rm data saved in the Mail Folder in a microSD™
Memory Card (commercially available)
Set ringer melody and volume for incoming call,
Set/Release the Silent Mode
.
78
Page 81

Using SimpleMode
Saving to the Address Book
In SimpleMode, you can save names, readings, phone numbers, and E-mail addresses.
From Simple Menu, use to
1
select “Phone”, press [Select],
use to select “Address Book”,
and press [Select].
Address book list is displayed.
Press [New].
2
3
Enter a name and press [Set].
After entering a name, the reading is
•
automatically entered.
Confi rm the reading and
4
press [Set].
The ways of entering phone number are
displayed.
If you do not enter phone number, press
•
[Next].
SimpleMode
79
Page 82

Use to select “Direct Input”
5
and press [Select]
Enter a phone number and press
6
[Set].
The ways of entering E-mail address are
displayed.
Enter the area code when saving a regular phone number.
•
If you do not enter E-mail address, press
•
Use to select “Direct Input”
7
and press [Select].
[Next].
8
SimpleMode
9
Information
You can also save an entry from the standby screen by pressing , and then [New].
80
Enter an E-mail address and
press [Set].
Address book registration screen is
displayed.
To edit a focused item, press [Select].
•
Press [Set].
Saving to the Address Book is completed.
Page 83

Creating and Sending an E-mail
From Simple Menu, use
1
to select “Mail” and
press [Select].
Select mail type screen is displayed.
Use to select “E-Mail” and
2
press [Select].
E-Mail Menu is displayed.
Use to select “Create New”
3
and press [Select].
Enter Address screen is displayed.
Use to select “Address Book”
4
and press [Select].
Address book list is displayed.
Use to select a recipient and
5
press [Select].
Subject input screen is displayed.
SimpleMode
81
Page 84

6
Enter a subject and press
[Set].
Body text input screen is displayed.
Enter a body text and
7
press [Set].
Create Mail screen is displayed.
To edit a focused item, press [Edit].
•
To save the created mail in Outbox,
•
press
Press [Send].
8
Created mail is sent.
[Save].
Information
Select mail type screen can also be displayed by pressing in the standby screen.
One data of up to 500 KB can be attached.
In SimpleMode, only one recipient can be selected per one E-mail. However, all pair
partners can be selected as recipients by displaying Pair menu, selecting “E-Mail” and
pressing
SimpleMode
82
[SendAll].
Page 85

Taking a Photo
From Simple Menu, use
1
to select “Camera” and
press [Select].
Camera functions are displayed.
Use to select “Photo” and
2
press [Select].
To change the photo size, press [Mode].•
Press [Shoot].
3
Shutter sounds and taken photo is
displayed.
To clear the photo, press
•
To create an E-mail with the taken photo attached, press
•
[E-Mail].
Press [Save].
4
Taken photo is saved.
.
SimpleMode
83
Page 86

Troubleshooting
Symptom What to check Solution Page
The power
cannot be
turned on.
Cannot
charge.
There is no
reaction when
pressing a key.
Calls cannot
be made/
received.
Troubleshooting/Remote Auto Lock
Ringer for
incoming
calls does not
sound.
Did you press
one second?
Is the battery pack exhausted?
Is the battery pack inserted
properly?
Is the cellphone set to the desktop
holder properly?
Is the connector put in the desktop
holder properly?
Is the connector put in the external
terminal properly?
Is the power turned on? Turn the power on. 13
Is the power turned on?
Is “Out” displayed or are you in an
area where the reception is bad?
Did you enter the area code?
(when you failed to make calls)
Is the ringer volume set to
“S(OFF)”?
Is the silent mode set?
for more than
Press
second.
Charge the battery pack.
Insert the battery pack properly.
Set the cellphone properly.
Put the connector properly.
Put the connector properly.
Turn the power on.
Move to a place where the
reception is good.
First dial the area code.
Adjust the ringer volume.
Release the silent mode.
for more than one
13
12
12
12
12
13
13
24
28
31
–
The caller’s
voice cannot
be heard/is
hard to hear.
Calls are
interrupted.
The cellphone
answers
automatically.
For detailed information, visit the website of SANYO Electric Co., Ltd. as below.
From A5527SA: Press for more than one second. (SANYO Keitai Planet, in Japanese only)
・
From PC: http://www.sanyo-keitai.com (SANYO Keitai Arena, in Japanese only)
・
Is the earpiece volume set to low?
Is the reception bad?
Is the reception bad? Move to a place where the
Is the In-Phone Ans Mach set? Release the In-Phone Ans Mach. 32
Adjust the earpiece volume.
Move to a place where the
reception is good.
reception is good.
84
27
13
13
Page 87

Before Losing...(Remote Auto Lock)
Set the operating condition of the remote auto lock on the assumption that
you might lose the A5527SA. Receiving a specifi ed number of calls from a
specifi ed number in a specifi ed time locks your A5527SA automatically, which
prevents other person’s use.
Setting Remote Auto Lock
●
Press in turn
1
from the standby screen, enter
your Lock No. and press [Set].
Lock No. is set to “1234” at the time of
•
purchase.
Select an item and press [Select].
2
ON/OFF Setting
Use to select “ON” and press
Specifi ed Number
Press [New], enter a phone number and press [Set] →
[Select].
Troubleshooting/Remote Auto Lock
[Back].
Up to 3 phone numbers can be specified.
•
To enter several phone numbers, select “Specified Number”, press
•
and press “New”.
Time Period
Enter time and press [Select].
1 to 10 minutes can be set.•
Incoming Count
Enter a number of calls and press [Select].
3 to 10 times can be set.•
[Submenu]
85
Page 88

Erase Data
Use to select “Valid” or “Invalid” and press [Select].
If you select “Valid”, all data in the A5527SA will be deleted when Auto Lock is
•
turned on. Be very careful when you select “Valid” for this setting.
Unlock Phone
Use to select “Valid” or “Invalid” and press [Select].
If you select “Invalid”, you will be unable to release the lock by entering the Lock No. To
•
release the lock in this case, perform the Remote Auto Lock procedure once again.
Press [Set].
3
Remote auto lock is set.
Locking Automatically by Remote Control
●
Make a call to your A5527SA in accordance with the operating
1
Troubleshooting/Remote Auto Lock
condition you set.
86
Remote auto lock runs and the guidance is heard.
Information
Even if the receiver answers when you make a call to set the remote auto lock, it is also
counted as Number of Calls.
At the time of purchase, “Erase Data” is set to “Invalid” and “Unlock Phone” is set to “Valid”.
Remote auto lock cannot be launched when your A5527SA is powered off or when it
cannot receive radio waves.
Page 89

Other Features
Safety Buzzer
You can sound an alarm at full volume in case of an emergency.
●Setting the Safety Buzzer
From the standby screen, press , use to select
“ON”, and press [Select].
* At the time of purchase, the Safety Buzzer is set to “OFF”.
●Sounding the Safety Buzzer
From the standby screen, press for more
than one second.
To stop the alarm, press again for more than one
second.
No operation on your cellphone is possible while the alarm is sounding
*
except the procedure to turn off that alarm.
The A5527SA has other useful features which are not presented in this
Basic Manual.
microSD™ Memory Card (Commercially Available)
●
You can keep various data on a microSD™ Memory Card (commercially available).
EZ apps (BREW®)
●
You can download and use applications such as games and standby screens. Also, you
can read QR code or character by Bar Code Reader or Character Reader, which allows
you to access information sites or to look up dictionary.
Infrared Communication
●
You can send data between cellphones that support infrared communication.
Journal
●
You can create simple journal with images.
Pocket Money Log
●
You can create pocket money log of the current and previous month.
●
Dictionary
Dictionaries such as Japanese-English and English-Japanese are included, which may
be useful in foreign countries.
Other Features/Index
87
Page 90

Index
Number
184+Dial ......................................... 24
186+Dial ......................................... 24
A
AC Adapter ................................ 10,12
Address Book
Editing ......................................... 46
Making a Call .............................. 45
Saving ............................... 42,47,79
Area Setting .................................... 34
B
Back Function ................................. 37
Basic Operation .............................. 14
Battery Level ................................... 13
Before Use ...................................... 10
Bookmark
Accessing.................................... 73
Registering .................................. 72
C
C-mail
C-mail Menu ................................ 59
Creating ...................................... 59
Reading....................................... 61
Receiving .................................... 61
Sending ....................................... 59
Call
Other Features/Index
Making ......................... 24,27,45,49
Receiving .................................... 26
Camera
Photo...................................... 64,83
Sending ....................................... 66
Chaku-Uta
Charging ......................................... 12
®
.................................... 70
D
Desktop Holder .......................... 10,12
Disaster Message Board Service ..... 7
Download ........................................ 70
Drive Mode ....................................... 5
E
E-mail
Creating ...................................... 51
E-mail Menu ................................ 51
Initial Setting ............................... 20
Reading....................................... 54
Receiving .................................... 54
Replying ...................................... 56
Sending ............................. 51,66,81
E-mail Address
Changing..................................... 22
Confi rming ................................... 21
Earpiece Volume.............................27
English Characters ......................... 39
EZ Navi
Area Message ............................. 75
EZ Navi Walk ............................... 74
Position Search ........................... 75
EZweb
Basic Operation .......................... 69
EZ Password ...............................71
EZ Top Menu ............................... 68
Initial Setting ............................... 20
G
Global Functions
Area Setting ................................ 34
I
Incoming Calls Log .................... 27,47
In-Phone Ans Mach
Playing ........................................ 33
Releasing .................................... 32
Setting ......................................... 32
Initial Setting ................................... 20
Inputting Characters
Emoticons ................................... 41
English ........................................ 39
Input Mode .................................. 36
Kana/Kanji................................... 38
Key Assignment .......................... 37
88
Page 91

Phrases ....................................... 40
Pictograms .................................. 41
Symbols ...................................... 41
J
Junk Mail ........................................57
K
Kana/Kanji ...................................... 38
Key Functions ................................. 14
L
Pictograms ...................................... 41
Playing
In-Phone Ans Mach .................... 33
Photo........................................... 65
Power .............................................. 13
Profi le ............................................. 21
R
Reception State .............................. 13
Remote Auto Lock .......................... 85
Ringer
Adjusting the Volume................... 28
Changing..................................... 30
Language........................................ 18
Loudset ........................................... 27
M
Mail
C-mail.......................................... 58
E-mail .......................................... 50
Mail Filter ........................................ 57
Main Menu ...................................... 17
Main Screen ...................................16
microSD™ Memory Card ............... 87
Missed Call ..................................... 26
Movie mode .................................... 63
N
Names of Parts ............................... 11
O
One-Ring Calls ................................. 6
Other Features ...............................87
Outgoing Calls Log .................... 27,47
P
Pair Function ..................................48
Phone Menu ................................... 24
Photo
Sending ....................................... 66
Taking ..................................... 64,83
Viewing........................................ 65
Phrases .......................................... 40
S
Safety Buzzer ................................. 87
SANYO Flat-type Stereo
Earphones 04 ................................. 10
Shoot mode .................................... 63
Silent Mode
Releasing .................................... 31
Setting ......................................... 31
SimpleMode
Releasing .................................... 77
Setting ......................................... 76
Simple Menu ............................... 78
Standby Screen .............................. 13
Step Down/Step Up ........................ 29
Submenu ........................................ 17
T
Toll .................................................. 69
Troubleshooting .............................. 84
Other Features/Index
V
Viewing the Screen ......................... 16
W
Ways of Dialing ............................... 24
89
Page 92

For inquiries, call:
au Customer Service Center (General Information)
From EZweb:
How to access
EZ Top Menu
auお客さまサポート (au Customer Support)
お問い合わせ(Inquiry)
*Menu is subject to change.
عFor general information and charges
ޓFrom regular phones:
0077-7-111
(Toll free)
From au cellphones:
157 area code not required
(Toll free)
ع
For loss, theft or damage and operation information
ޓFrom regular phones:
0077-7-113
(Toll free)
From au cellphones:
113 area code not required
(Toll free)
Pressing zero will connect you to an operator,
after calling 157 on your au cellphone.
Sales : KDDI CORPORATION •
OKINAWA CELLULAR TELEPHONE COMPANY
Manufactured by :
July 2007 Edition
Cellphone and PHS operators collect and recycle unused telephones,
batteries and battery chargers at stores bearing the logo
regardless of brand and manufacturer to protect the environment
and reuse valuable resources.
SANYO Electric Co., Ltd.
Access the au online
manual from here.
 Loading...