

Page 1
Page 2

Welcome
Thank you very much for purchasing the A5514SA.
Before using, read the A5514SA “Basic Manual (this PDF manual)” to ensure correct use of your
A5514SA. After you have finished reading, store this PDF manual and the printed manuals in a
safe place so that you can retrieve them whenever you need.
Contact au shop or au Customer Service Center if you lose either of these manuals.
Printed Manuals for the A5514SA
The A5514SA comes with Basic Manual and Manual.
The following manuals are also available from au home page:
¡The downloadable “Basic Manual” and “Manual”
(http://au-pro.kddi.com/phone/torisetu/index.html)
¡The au online manual (Japanese) for searching by keyword
(http://www.au.kddi.com/manual/index.html)
The au online manual (Japanese) is also available from the EZ web:
<How to access>
EZ Top Menu →料金・申込・インフォ (Charges, application and information)
→auオンラインマニュアル (au online manual)
Have access to the au online
manual by reading the bar code
(QR code).
Note that the shape and typeface used in the screens of this manual may differ from those used
in the actual screens, and some screens are partly omitted.
Manual
English version is not available.
仮
Basic Manual
Equivalent to this English PDF manual.
Page 3
Cellphone Etiquette
Cellphones emit weak radio waves at all times even if you just turn the
power on. Enjoy and safely use your cellphone without forgetting those
around you.
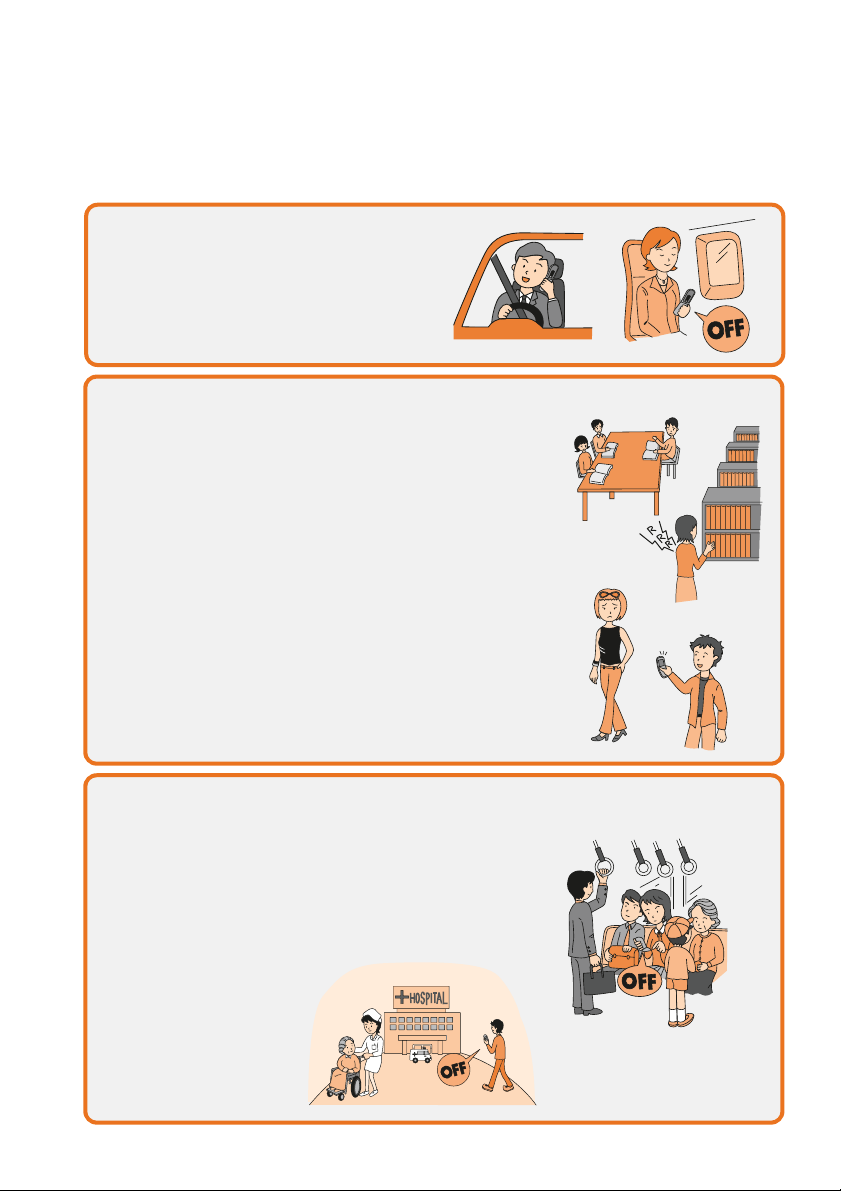
Some places forbid the use of cellphones.
Consider where to use your cellphone and be careful of how loudly you talk.
Radio waves from cellphones may adversely influence medical apparatus and
equipment.
¡Some people close to you in busy places such as
crowded trains may be using pacemakers. Turn your
cellphone off in such places.
¡Abide by the instructions of hospitals and other medical
institutions where it is forbidden to use or carry
cellphones.
¡Do not make calls from cinemas, theaters, museums,
libraries, and other similar places. Turn your cellphone off
or set it to the silent mode to prevent others around you
from being inconvenienced by ring tones.
¡Use your cellphone in places where you do not prevent
others from passing through.
¡Move to areas where you do not cause others
inconvenience on trains or in hotel lobbies.
¡Take care not to talk too loudly during conversations.
¡Get other peopleʼs permission before you start taking
photos with the cellphoneʼs camera.
¡Using cellphones while driving is dangerous
and forbidden by law.
¡Using cellphones in airplanes is forbidden by
law. Be sure to turn your cellphone OFF.
1
Page 4

Page 44 Page 56
Page 70 Page 62
Page 34 Page 74
What You Can Do with the A5514SA
You can send mail to other
cellphones or personal computers.
Mail
You can download Chaku-Uta®,
wallpaper and others.
EZweb
You can take photos or movies and
send them easily by E-mail.
Camera
You can access position
information using the functions
such as EZ Navi Walk, Position
Search, and Area Message.
EZnavi
You can use the A5514SA
overseas with global functions.
Use Overseas
You can use the A5514SA as FM
radio.
EZ・FM
2
Page 5

Page 31 Page 32
Page 13
Page 13
Page 13
Silent Mode and In-Phone Ans Machn
Silent Mode
In-Phone Ans Machn
You can use the silent mode to turn incoming
rings and other tones off to prevent others
from being inconvenienced.
Press for more than one second in
the standby screen.
You can play answering message and record
callerʼ s message when you cannot answer a
call.
Press for more than one second
in the standby screen.
Check the Power, Radio Waves, and Battery!
Usually, keep the “power” ON.
You cannot talk on the phone if you are not receiving “radio waves” .
Keep the power on to make or answer calls.
Press for more than one second.
It may be difficult to receive radio waves in some places
even in service areas.
indicates the reception state.
You cannot use the cellphone when the battery goes off.
Charge the battery soon when the remaining power is too
low.
indicates the remaining battery power.
Pay attention to the remaining “battery” power.
I canʼt answer
the phone right
now.(Japanese)
3
Page 6
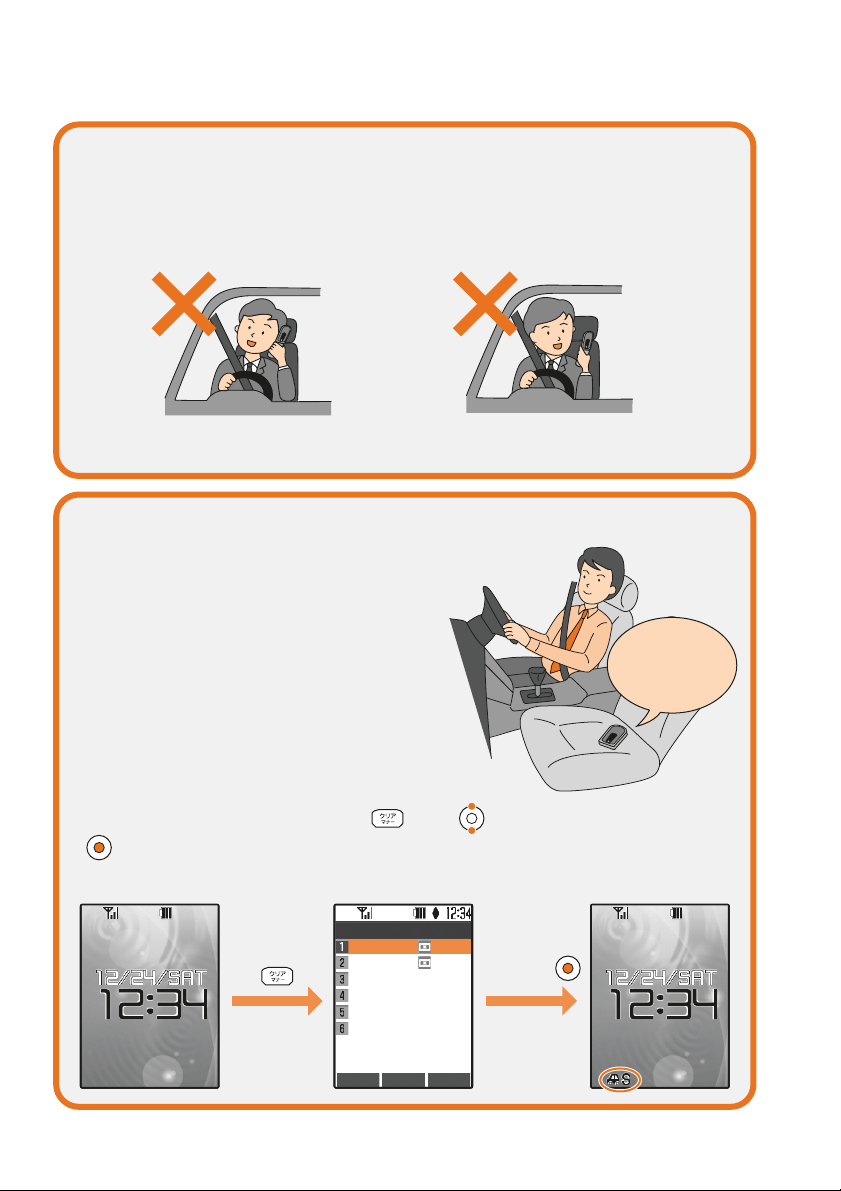
Do Not Use the Cellphone While Driving
Using cellphone while driving is subject to penalties.
Drive Mode
Holding a cellphone in a hand and use it for a call or gazing at a screen to
see mails, etc. while driving is subject to penalties.
(November 1, 2004 Implementation of the Revised Road Traffic Law)
Holding a cellphone in a
hand and use it for a call
Gazing at a screen to see
mails, etc.
When the drive mode is set, the caller
will hear the answering message
“Now driving. I canʼ t answer the phone
right now... (Japanese)”, and can leave a
message in the In-Phone Ans Machn.
Standby screen
From the standby screen, press , use to select “Car” , and press
[Select].
Use drive mode or turn the power off while driving.
Select “Car”
and press .
Back Select Confirm
Silent Mode Settings
Standard1: ON
Standard2: OFF
Sleep
Personal
Car
Release
Now driving.
I canʼt answer the
phone right now...
(Japanese)
4
Page 7

Watch Out for Junk Mail and One-Ring Calls!
If you receive junk mail…
You can prevent arrival of junk mail by changing E-mail
address.
¡Mail Filter
¡Change E-mail Address
Using the mail filter function, you can reject mails sent from specific
addresses or mails that contain “未承諾広告※ (Unsolicited Ad)” in the title,
which is the biggest source of junk mail.
The following mail functions are available for preventing arrival of junk mail:
¡ “未承諾広告フィルター” : Rejects Unsolicited Ad mails.
¡ “アドレスフィルター” : Rejects mails sent from specific addresses.
If you receive a call from unknown number…
It may be a “One-Ring Call” which intends to trick you into calling back and
accessing unwanted pay programs. Be careful to a call from unknown
number.
The icon ( ) is displayed in the log of One-Ring Call and lets you know
the caller hung up within 3 seconds.
¡Icon for One-Ring Calls
Back Select Submenu
Received
Dialed
Sat12/24 12:34
0900003××××
Sat12/24 7:20
Mike
Thu12/22 12:45
0900004××××
Thu12/22 12:07
Mary
Page 22
Page 51
5
Page 8

Disaster Message Board Service
About Disaster Message Board
Registering
safety
information
Confirming
safety
information
When a big scale disaster occurs, you can register your safety
information through EZweb. The registered safety information can
be confirmed from anywhere in Japan through EZweb or Internet.
→ Top Menu →
災害用伝言板 (Disaster Message Board)
http://dengon.ezweb.ne.jp/
How to access
¡When a big scale disaster occurs, you can register
your safety information such as your condition and
comments from au cellphone to the “災害用伝言板
(Disaster Message Board)” created on the EZweb.
¡After registering your safety information, you can notify
by E-mail your family or acquaintances you have
previously specified that you registered your safety
information on the “災害用伝言板 (Disaster Message
Board)” .
¡You can confirm the safety information of the person
you want to know about by entering his/her phone
number from EZweb or Internet.
* When you confirm the safety information from other
carriers cellphone (except TU-KA), PHS or personal
computer, access the following URL.
6
Page 9

* The maximum preservation period of the registered information is 72 hours.
* The maximum available number of each registration is 10.
* The demonstration of this service can be referred to anytime by accessing
EZ Top Menu → 料金・申込・インフォ (Charges, application and information)
→ 災害用伝言板(デモ版)(The demonstration of Disaster Message Board)
* You can use English version by selecting “English”.
Register
Confirm
Top screen of
Disaster Message
Board
Safety
information
registration
screen
Safety
information
confirmation
screen
OK
BrsrMnu
災害用伝言板
〜登録〜
被災状況
無事です。
被害があります。
自宅に居ます。
避難所に居ます。
コメント見て
コメント入力
(
全角
100
文字まで
)
※登録内容確認画面
にて、お客様の携帯
電話番号および登録
日時が表示されます。
伝言板トップへ
(C)KDDI/TUーKA Group
登録
OK
BrsrMnu
災害用伝言板
〜確認〜
安否情報を確認した
い相手の
au/
ツーカー
携帯電話番号を入力
して下さい。
伝言板トップへ
(C)KDDI/TUーKA Group
検索する
OK
BrsrMnu
災害用伝言板
伝言板トップ
〜サービス提供中〜
安否情報の登録・確
認ができます。
登録
(
ご利用可能地域
の方のみ登録可能で
す
)
確認
削除
お知らせメール設定
サービス概要
ご利用地域情報
お問合せ
English
(C)KDDI/TUーKA Group
7
Page 10

Before Use
Confirming the Packed Contents ................................... 10
Names of Parts .......................................................... 11
How to Charge the Battery Pack ................................... 12
Turn the Power On/Off ................................................ 13
Basic Operation ......................................................... 14
Viewing the Screen..................................................... 16
About Menu ............................................................... 17
Setting the Language t o English ................................... 18
Initial Setting for E-mail and EZweb ............................... 20
Confirming Your Cellphone Number/E-mail Address .......... 21
Changing Your E-mail Address...................................... 22
Address Book/
Pair Function
Saving to the Address Book ......................................... 36
Making a Call from the Address Book ............................ 39
Editing an Entry in the Address Book ............................ 40
Saving from Dialed/Received Log .................................. 41
Setting a Pair Person.................................................. 42
Making a Call to a Pair Person...................................... 43
Phone Call
Making a Call ............................................................. 24
Answering a Call......................................................... 25
Calling Back (Dialed/Received) ..................................... 26
Adjusting the Callerʼs Voic e Volume............................... 27
Adjusting the Ringer Volume......................................... 28
Changing the Ringer Type ............................................ 30
Setting the Silent Mode ............................................... 31
Using the In-Phone Ans Machn ..................................... 32
Using Overseas ......................................................... 34
Mail
About E-mail .............................................................. 44
Creating and Sending an E-mail .................................... 45
Reading a Received E-mail........................................... 48
Replying to a Received E-mail ...................................... 50
Blocking Junk Mail...................................................... 51
About C-mail .............................................................. 52
Creating and Sending a C-mail ...................................... 53
Reading a Received C-mail........................................... 55
Cellphone Etiquette .................................................................. 1
What You Can Do with the A5514SA....................................... 2
Silent Mode and In-Phone Ans Machn..................................... 3
Check the Power, Radio Waves, and Battery! ......................... 3
Do Not Use the Cellphone While Driving.................................. 4
Watch Out for Junk Mail and One-Ring Calls!.......................... 5
Disaster Message Board Service ............................................. 6
Contents ................................................................................... 8
Contents
8
Contents/Before Use
Page 11

Infrared
Communication
About Infrared Communication ...................................... 76
Using Infrared Communication ...................................... 77
Camera
EZnavi
What You Can Do with EZnavi ...................................... 70
What You Can Do with Security Navi ............................. 72
EZ・FM
How to Use the EZ・FM................................................ 74
What You Can Do with the Camera ................................ 56
Taking a Photo ........................................................... 58
Recording a Movie...................................................... 59
Sending Photos or Movies by E-mail.............................. 61
EZweb
About EZweb ............................................................. 62
Accessing Sites ......................................................... 63
Downloading Chaku-Uta® and Set It as a R i nger for Incom i ng C alls
.... 65
Registering Frequently-Acc essed Sites .......................... 67
Inquiring Toll .............................................................. 69
Inputting
Characters
About Inputting Characters .......................................... 90
How to Input Characters .............................................. 92
Smart Mode
About Smart Mode...................................................... 80
Using Smart Mode ...................................................... 84
Troubleshooting/
Remote Auto Lock
Troubleshooting .......................................................... 96
Before Losing…(Remote Auto Lock).............................. 97
Other Features
Other Features........................................................... 99
Index
Index.......................................................................100
9
Contents/Before Use
Page 12

¡A5514SA Main Unit
¡AC Adapter ¡
SANYO Flat-type Stereo Earphones 04
¡Desktop Holder¡Battery Pack
(Installed in the main unit)
Confirming the Packed Contents
¡Warranty (Japanese)
¡Precautions in Use (Japanese)
¡GLOBAL PASSPORT Ownerʼs Manual
¡Basic Manual (Japanese) ¡Manual (Japanese)
Before Use
仮
10
Contents/Before Use
Page 13

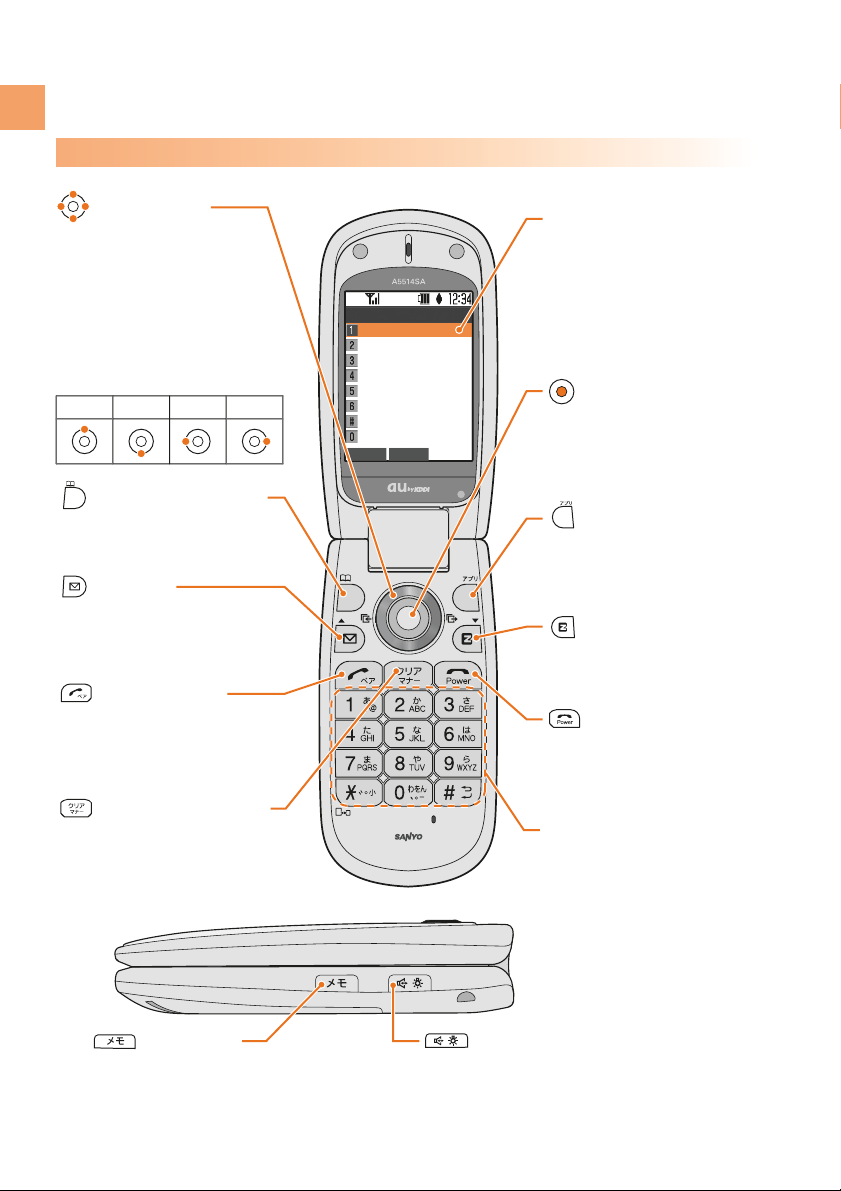
Names of Parts
Main Display
External Terminal
Infrared Port
Receiver
Camera Lens
Incoming Indicator
Sub Display
Charge Indicator
Power/End Key
Speaker-Phone/Light Key
Memo Key
Dial Keys
Built-in Antenna
Talk/Pair Key
Clear/Manner Key
Cursor Keys
Center Key
Battery Pack Cover
(Battery Pack is installed)
Close-Up Switch
Flat-type EarphoneMicrophone Jack
Flash
Speaker
Charger Connector
Microphone
11
Contents/Before Use
Page 14

1
AC Adapter
2
Desktop Holder
3
1
2
AC Adapter
External Terminal
Power Plug
Fold outFold outFold out
Power Plug
Fold outFold outFold out
How to Charge the Battery Pack
To Charge Using the Desktop Holder
To Charge Using the AC Adapter
Connect the AC adapter to the external terminal of the A5514SA and plug the power
plug into a power outlet.
Connect the AC adapter to the desktop holder, plug the power plug into a power outlet,
and insert the A5514SA to the desktop holder.
Charge Indicator
¡Red light is on →Charging
¡Light is off →Charging is completed
Charge Indicator
¡Red light is on →Charging
¡Light is off →Charging is completed
Connector
Connector
The battery pack is not fully charged at the time of purchase. Before
using your cellphone, charge the battery pack in the following ways.
12
Contents/Before Use
Page 15

Turn the Power On/Off
Press for more than one
second.
The standby screen is displayed.
Press for more than one
second.
To Turn the Power On
To Turn the Power Off
* You cannot receive or make calls when “Out”(Out of
service area) is displayed.
* is displayed while charging.
Standby screen
Check here for the reception state!
Check here for remaining battery power!
Strong Medium Too weak
Out of
service area
Weak
Fully
charged
Low
Fully
discharged
Requires
charging
Confirming the Reception State and Remaining Battery Power
13
Contents/Before Use
Page 16
Back Select
Functions
M_
Time/Toll/Apply
Sound/Vibration
Screen Display
Privacy Stngs
User Support
Useful Tools
Guide Functions
Profile
Basic Operation
Cursor
Address Book Key
¡Displays Address Book
Cursor Keys
¡Move cursor or screen
¡In the standby screen,
display Dialed calls log
by pressing right or
Received calls log by
pressing left
Talk/Pair Key
¡Makes/Receives calls
¡Displays Pair Menu
Power/End Key
¡Turns the power on/off
¡Ends a call
EZweb Key
¡Connects to EZweb
Center Key
¡Displays Main Menu
¡Selects an item where the
cursor is placed
Application Key
¡Launches EZ apps(BREW®)
Dial Keys
¡Enter phone numbers or
characters
Memo Key
¡Sets the In-Phone Ans Machn
¡Plays recorded messages
Speaker-Phone/Light Key
¡For using Speaker-Phone function
¡For using as Light
Mail Key
¡Displays E-Mail/C-Mail Menu
Clear/Manner Key
¡Sets the silent mode
¡Deletes entered characters
Key Functions
Cursor keys are indicated in
this manual as follows:
Up Down Left Right
14
Contents/Before Use
Page 17
Edit
NaviWalk
Submenu
My
スポット
自宅
半蔵門駅
東京丸の内
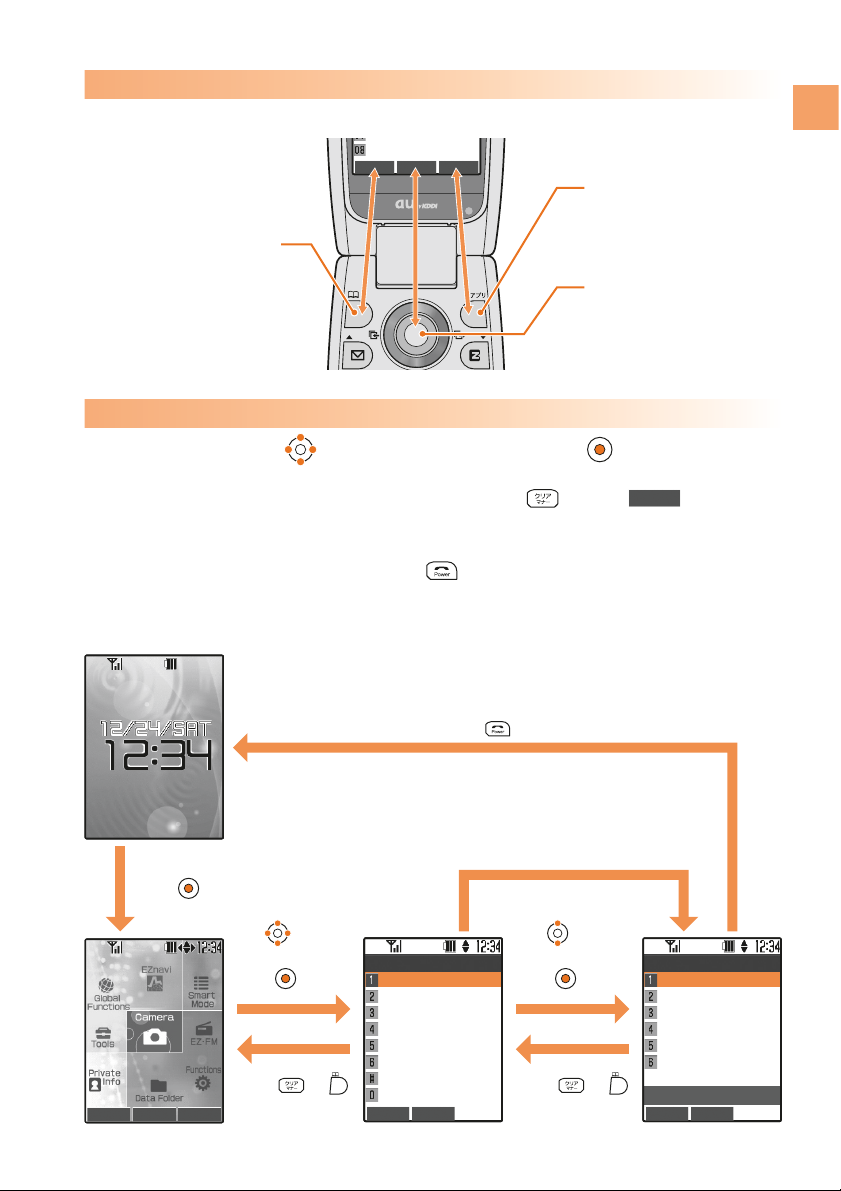
To select an item, use to move the cursor and press .
An item with numeric icon can also be selected by pressing the corresponding
dial key. To go back to the previous screen, press . When is displayed
at the bottom of the screen, pressing the corresponding key also allows you to
return to the previous screen.
To return to the standby screen, press .
Pressing the key executes
the function displayed at the
lower center.
Pressing the key executes
the function displayed at the
lower right.
Pressing the key executes
the function displayed at the
lower left.
The functions displayed at the bottom of the screen correspond with the keys as follows:
Press dial key.
Standby screen
<Example>
Executing Functions Displayed at the Bottom
Selecting Items/Returning
Press .
Press .
Back
Use to select
an item and
press .
Press or .
Use to select
an item and
press .
Press or .
Back Select Switch
Back Select
Screen Display
M3_
Main Display
Sub Display
Display Light
Light Settings
Font Size
バイリンガル機能
Back Select
Functions
M_
Time/Toll/Apply
Sound/Vibration
Screen Display
Privacy Stngs
User Support
Useful Tools
Guide Functions
Profile
15
Contents/Before Use
Page 18

MissdCls 2
EーMail
2
CーMail
2
Mesgs
2
Main Menu
Viewing the Screen
The following icons are displayed in the main screen and indicate
the status of your A5514SA. Icons and the number of cases are
displayed when you have received missed calls or mails.
⑨
⑩⑪
⑫
⑬
⑭
①
③
During a call
⑮
⑯
Using EZweb
Running EZ apps
Running EZ・FM
Reception state
Area setting
*No indication when Japan is set
②
①② ③ ④④⑤⑥⑦⑧
⑰
:
New service area
: Indonesia
: Thailand
: Taiwan
: New Zealand
:
China (Hong Kong)
:
China (except Hong Kong)
: Korea: Australia
: Canada
: USA: Mexico
⑧
Battery level
⑩
Current date and time
Current time
⑪
In-Phone Ans Machn is ON
Missed Call
New E-mail*
New C-mail*
New memo in the In-Phone Ans Machn
To main menu
Looking for service area while roaming
Silent Mode is ON
Charging
⑦
Unchecked missed call
Phone calls are available in roaming area
Packet communication is available in roaming area
⑫
⑬
⑭
⑮
⑯
⑰
⑨
Indicates the directions to scroll
Appears when the volume setting is available
while confirming or playing data
⑤
⑥
Unread E-mail
Unread C-mail
Indication in the Main Screen
* is displayed when you have a mail from pair person.
16
Contents/Before Use
Page 19
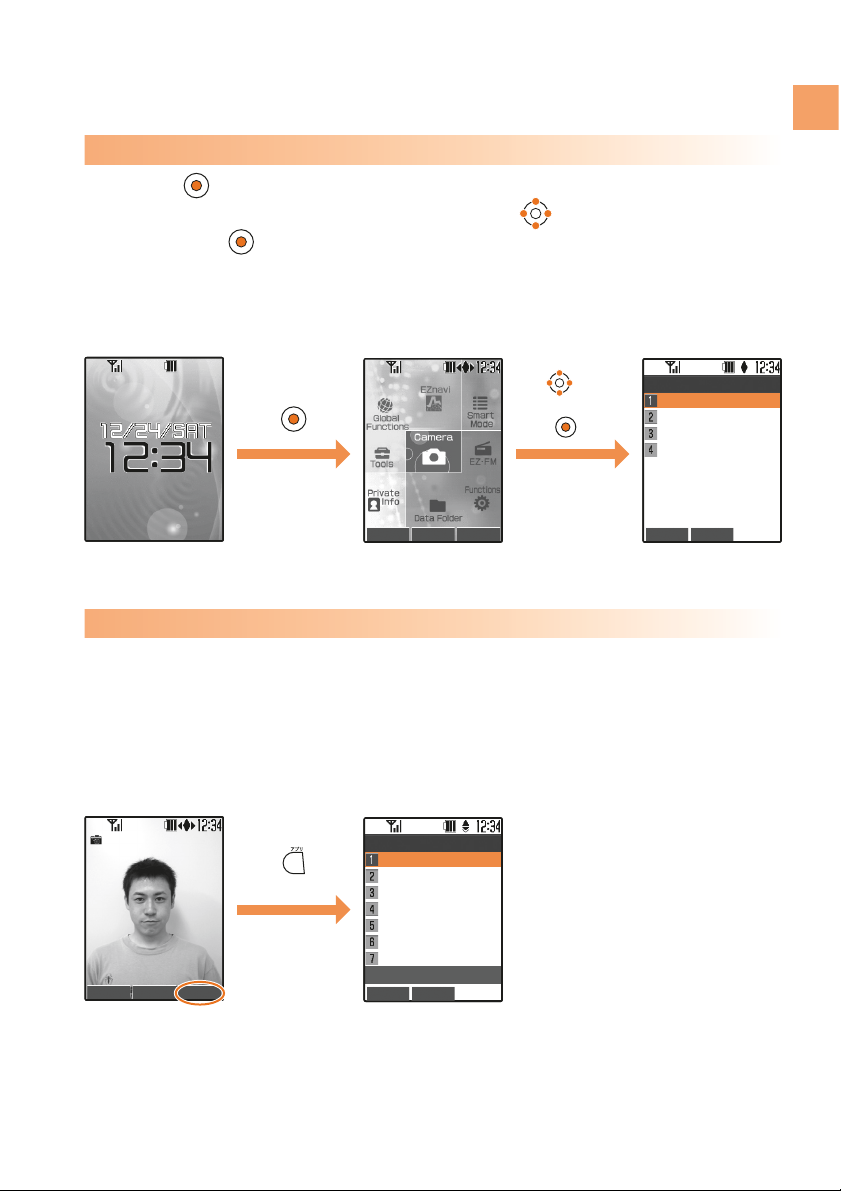
Pressing in the standby screen launches the Main Menu.
Each function can be accessed by using to select an image
and pressing .
<Example> Accessing Camera from Main Menu
Camera function screen
Main Menu screen
About Menu
When “Submenu” is displayed at the bottom of the screen during
each operation, you can access related functions or information by
pressing the key that corresponds to Submenu.
<Example> Displaying Photoʼs Submenu
Standby screen
[Submenu]
About Main Menu
About Submenu
Use to select
“Camera” and
press .
Back Select
Camera
Photo
Movie
Bar Code Reader
Character Reader
Back Select
Submenu
Frame
Special Effects
Portrait Flash
Self Timer
Add GPS Info
Shoot Mode
Barcode Reader
OFF
Movie Shoot Submenu
Back Select Switch
17
Contents/Before Use
Page 20

Setting the Language to English
Press in the standby screen.
Use to select “
画面表示
” and
press [
選択
].
Use to select “
機能
” and
press [
選択
].
1
2
3
Use to select “Set Language”
and press [
選択
].
4
戻る 選択
Set Language M36
日本語
English
戻る 選択 切替
戻る 選択
機能
M_
時間/料金/申込
音
/
バイブ
画面表示
プライバシー
ユーザー補助
便利機能
ガイド機能
プロフィール
戻る 選択
画面表示
M3_
メインディスプレイ
サブディスプレイ
照明
ランプ設定
文字サイズ
Set Language
18
Contents/Before Use
Page 21

Use to select “English” and
press [
選択
].
5
OK
Set Language M36
日本語
English
English
Set
¡You can set the language to Japanese by pressing in turn from the standby
screen.
19
Contents/Before Use
Page 22

Press in the standby screen.
Press [OK].
Your E-mail address is determined
automatically by the initial setting.
To use E-mail and EZweb services, you need to subscribe to the EZweb
service. If you did not subscribe it when you purchased your phone,
please contact au Customer Service Center or au shop for further
information. Make sure that you do the initial setting before using E-mail
and Ezweb services for the first time. The initial setting automatically
determines your E-mail address. To change it as you like, see “Changing
Your E-mail Address” (p.22).
Initial Setting for E-mail and EZweb
Press [OK].
The initial setting is completed and
E-mail Menu appears.
1
2
3
CーMail Select Switch
OK
EZweb
を利用するため
の初期設定を行います
「
OK
」を押してしばら
くお待ちください
OK
BrsrMnu
ようこそ
EZweb
へ
お客様の
E
メールアドレスは
、
△□△□△□△□△□△□△@ezweb
.ne.jp
です。
ー
ヒント
ー
メールアドレスの変更は
「OK」
押下後に
¡Pressing or in the standby screen also allows you to do the initial setting.
20
Contents/Before Use
Page 23

Confirming Your Cellphone Number/E-mail Address
Press in the standby screen.
Use to select “Profile” and
press [Select].
Your cellphone number and E-mail
address are displayed.
Use to select “Functions”
and press [Select].
1
2
3
Back Detail
Profile
M0
△△△△@ezweb.ne.jp
Back Select
Functions
M_
Time/Toll/Apply
Sound/Vibration
Screen Display
Privacy Stngs
User Support
Useful Tools
Guide Functions
Profile
Back Select Switch
¡
You can also display them from the standby screen by pressing , and then .
21
Contents/Before Use
Page 24

Back Select
EーMail Settings
Receive/Display
Send/Create
Other Settings
Confirm Settings
OK
BrsrMnu
その他の設定
1 E
メールアドレスの変更
2
自動転送先
3
メールフィルター
4 E
メールヘッダ情報表示
(
通信料有料
)
5
その他の設定の確
認
Edit BrsrMnu
お客様の暗証番号を
入力してください。
下記の対象サービスで同
日内に合計
3
回間違え
ると、翌日までご利
用できなくなります
のでご注意ください。
送信 リセット
CーMail Select Switch
Use to select
“Eメールアドレスの変更
(Change E-mail Address)” and
press [OK].
Use to select “Other
Settings” and press [Select].
Use to select “E-Mail
Settings” and press [Select].
Press in the standby screen.
1
2
3
4
E-Mail Address
△△△@ezweb.ne.jp
Changeable part
Domain
Changing Your E-mail Address
22
Contents/Before Use
Page 25

23
Contents/Before Use
Edit BrsrMnu
E
メールアドレスを変更しま
す。ご希望の
E
メールアドレスを入力して
ください。
@ezweb.ne.jp
リセット
送信
OK
BrsrMnu
E
メールアドレスを変更しま
す。以下のご注意を
確認した上でアドレスの
変更を行ってくださ
い。
承諾する
戻る
OK
BrsrMnu
数字の
「0」
を使用する
ことはできません。
△△△△△△
@ezweb.ne.jp
前のページへ
リセット
送信
OK
BrsrMnu
新しいEメールアドレスは
△△△△△△@ezweb.ne.jp
です。
よろしいですか?
キャンセル
OK
Use to select and
press [OK].
Your E-mail address is changed.
Use to select the input field,
enter an E-mail address, and
press [Set].
Use to select
“承諾する(Agree)” and press
[OK].
Enter your lock code, press
[Set], use to select
(Send), and press [OK].
Use to select (Send)
and press [OK].
OK
送信
送信
¡See “Inputting English Characters” (p.93) about the
characters available for E-mail address and the way of
entering E-mail address.
¡Lock code is the 4-digit number you wrote in the application
form when purchasing.
¡No setting operation is allowed until the next day if you enter
the incorrect lock code 3 times in a day.
¡
When the E-mail address you enter is
already being used, enter a different
one.
5
6
7
9
8
Page 26

Making a Call
From the standby screen,
press - to enter a
phone number.
Press .
To end the call, press .
After entering a phone number,
press [Dial], use to
select the way of dialing,
and press [Select].
To Select the Way of Dialing
¡To call a regular phone, enter a phone
number starting with the area code.
Phone Call
1
1
2
HndFree Tools
Talking
Talk Time
15sec
Save Dial Submenu
Back Select Prefix
Phone Menu
Dial
184+Number
→
Dial
186+Number
→
Dial
¡The following are details of each menu:
Dial :
Makes a call in accordance with the Caller ID Notice setting.
184+Number →Dial
: Not notify the other party of your cellphone number.
186+Number →Dial
: Notifies the other party of your cellphone number.
24
Phone Call
Page 27

Answering a Call
Use to select (MissdCls)
and press .
Received calls log is displayed.
When You Could Not Answer a Call (Missed Call)
Press to answer the call.
To end the call, press .
(MissdCls) and the number of
missed calls are displayed.
On-screen display for Incoming calls
Phone
number
No Caller ID
Payphone
Unsupported
The caller notifies his/her phone
number. If the caller is already saved in
the Address book, his/her name or image
is also displayed.
The caller does not notify his/her
phone number.
The caller is making a call from a payphone.
The caller is making a call from a phone
that does not support ID notification.
1
1
HndFree Tools
Talking
Talk Time
15sec
MissdCls 2
Main Menu
Back Select Submenu
Received
Dialed
Sat12/24 12:34
Mike
Sat12/24 7:20
0900002××××
Thu12/22 12:45
0900004××××
Thu12/22 12:07
Mary
Silent
Mike
Fw/Rjct
25
Phone Call
Page 28

Press in the standby screen.
Received calls log is displayed.
Calling Back (Dialed/Received)
Use to select a desired number and
press .
Phone starts dialing the phone number you selected.
1
2
<Example> Calling back from Received log
Back Select Submenu
Received
Dialed
Sat12/24 12:34
Mike
Sat12/24 7:20
0900002××××
Thu12/22 12:45
0900004××××
Thu12/22 12:07
Mary
¡To call back to a number from dialed calls log, press in the standby screen.
¡The latest 20 phone numbers you dialed and received are saved in each log.
26
Phone Call
Page 29
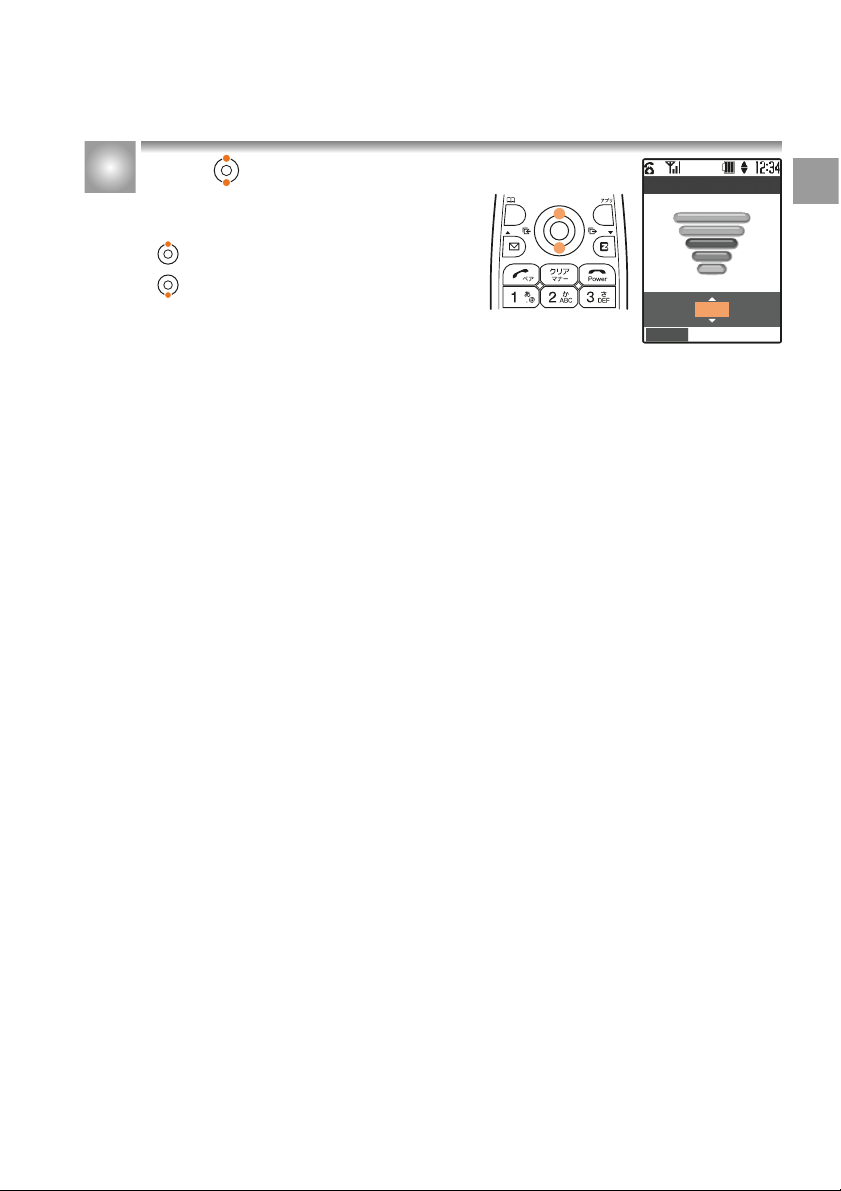
Press during a call.
The volume can be adjusted in
5 levels.
:turns the volume up
:turns the volume down
Adjusting the Callerʼs Voice Volume
1
Back
Earpiece Volume
Lv3
27
Phone Call
Page 30

Adjusting the Ringer Volume
Use to select
“Sound/Vibration” and press
[Select].
Press in the standby screen.
Use to select “Functions”
and press [Select].
Use to select “Incoming Call”
and press [Select].
The actual volume is displayed in
incoming call setting screen.
1
2
3
4
Back Select
Sound/Vibration M2_
Incoming Call
EーMail Receive
Notifications
CーMail Receive
Keypad Tone
3 OFF Aqua
Preview Select Set
Incoming Call M21
Volume
Level3
Vibration OFF
Sound[ Aqua]
Image[ Aqua]
Light Blue
Back Select
Functions
M_
Time/Toll/Apply
Sound/Vibration
Screen Display
Privacy Stngs
User Support
Useful Tools
Guide Functions
Profile
Back Select Switch
28
Phone Call
Page 31

¡To confirm the volume, press [Confirm].
¡To mute the ringer, set the volume to S (OFF).
¡To set Step down/Step up, press .
Step down : The volume turns down step by step.
Step up : The volume turns up step by step.
Use to select “Volume” and
press [Select].
The volume can be adjusted in
5 levels.
:turns the volume up
:turns the volume down
Press [Set].
The volume is changed.
Use to adjust the volume
and press [Select].
5
6
7
Back
Ringer Volume
Lv3
Step
down
Step
up
Select Confirm
Preview Select Set
Incoming Call M21
Volume Level4
Vibration OFF
Sound[ Aqua]
Image[ Aqua]
Light Blue
OK
Incoming Call M21
Volume Level4
Vibration OFF
Sound[ Aqua]
Image[ Aqua]
Light Blue
Set
29
Phone Call
Page 32

Back Select
Melody
Original
Data Folder
Search with EZweb
Preview Select Set
Incoming Call M21
Volume Level4
Vibration OFF
Sound[ Ringer2]
Image[ Aqua]
Light Blue
OK
Incoming Call M21
Volume Level4
Vibration OFF
Sound[ Ringer]
Image[ Aqua]
Light Blue
Set
Back Select Confirm
Aqua
After the step 4 on page 28,
use to select “Sound” and
press [Select].
Use to select a ringer and
press [Select].
Press [Set].
The ringer is changed.
Changing the Ringer Type
Use to select “Original” and
press [Select].
Ringer list is displayed.
<Example> Setting the ringer type in “Original”
¡To confirm the selected ringer, press
[Confirm].
1
2
3
4
30
Phone Call
Page 33

OK
Silent Mode
[ Standard1 ]
has been set
Press for more than one second while
setting the silent mode.
disappear from the standby screen.
The silent mode is set and appear in the
standby screen.
Setting the Silent Mode
Press for more than one
second in the standby screen.
To Release the Silent Mode
When the silent mode is set, your cellphone vibrates to notify you
of incoming calls and records the callerʼs message in the In-Phone
Ans Machn when you cannot answer a call.
1
1
31
Phone Call
Page 34

OK
In−Ph Ans Machn
has been set
In-Phone Ans Machn is set and appears in the
standby screen.
Using the In-Phone Ans Machn
Press for more than
one second in the standby
screen.
Press for more than one second while
setting the In-Phone Ans Machn.
disappears from the standby screen.
To Release the In-Phone Ans Machn
When the In-Phone Ans Machn is set, you can play answering
message and record callerʼs message.
1
1
Setting the In-Phone Ans Machn
32
Phone Call
Page 35

MissdCls 2
Mesgs
2
Main Menu
Delete Play
Playback
Msg Sat12/24 12:34
Mike
Msg Sat12/24 7:20
0900002××××
Rec Time 15seconds
Delete Stop
Playback
Msg Sat12/24 12:34
Mike
Msg Mon12/24 7:20
0900002××××
Rec Time 15seconds
InPhAnsMch
playng
Prs
→
Restart
Use to select a desired
message and press [Play].
The message is played.
Use to select (Mesgs)
and press .
Playback screen is displayed.
When a message is recorded in the In-Phone Ans Machn, the
standby screen notifies you.
(Mesgs) and the number of
recorded messages are displayed.
¡To delete a message, press
[Delete].
1
2
Playing Back the Recorded Messages
¡Up to 3 messages can be recorded, and the available recording time for each message is
20 seconds.
¡In-Phone Ans Machn cannot be set when the maximum number of message (including
voice memo) is recorded.
¡You can also display the playback screen from the standby screen by pressing , , and
then select “Playback” .
33
Phone Call
Page 36

Use to select “Roam. Area
Setup” and press [Select].
Using Overseas
Press in the standby screen.
Use to select “Global
Functions” and press
[Select].
Use to select an
area (country) and press
[Select].
You can use the A5514SA overseas with global functions.
Setting Area (Country)
1
2
3
4
Back Select
Global Functions
Roam.Area Setup
Intl.Access #
Reg.Area Code
Intl.Area Info
Airplane mode
PRL Setup
Japan
Back Select
Roam.Area Setup
Japan
USA
Canada
Mexico
New Zealand
Australia
Indonesia
Korea
OK
Roam.Area Setup
Japan
USA
Canada
Mexico
New Zealand
Australia
Indonesia
Korea
Roam.Area Setup
USA
set
Back Select Switch
34
Phone Call
Page 37

From the standby screen, enter
a phone number and press
[Submenu].
Use to select “Intl. Call:toJapan” ,
press [Select], and press .
Calling to Japan from Overseas
1
2
Back Select
Submenu
Save To AddBk.
Create C−Mail
Input [P]
Input [ー]
Call to AddBk.
Go to RcvdCallsLog
Go to Dialed Log
Intl.Call:toJapan
HndFree Tools
Talking
Talk Time
15sec
¡Although the preferred roaming list (PRL) is already stored in the phone at the time of
purchase, the list may be updated several times a year. Update it before departure.
¡You can use like a normal cellphone when calling from Japan to an overseas cellphone
compatible with GLOBAL PASSPORT.
¡You need to sign up for the EZweb service before departure. Initial setting of EZweb must
also be done in Japan.
35
Phone Call
Page 38

Saving to the Address Book
You can save phone numbers to which you call frequently, names,
and E-mail addresses.
Press for more than one
second in the standby screen.
Address book registration screen is
displayed.
Use to select (Phone No.1)
and press [Select].
Use to select (Name) and
press [Select].
Enter a name and press [Set].
<Example> Saving a name, phone number and E-mail address
¡See “Inputting Characters” (p.90)
about the way of inputting characters.
¡The reading is automatically entered.
Address Book
1
2
3
4
Back Set Submenu
Phone No.?
ab Set Submenu
Name? 24
Select
Basic
detail setngs
(Name)
グループ
00
Select Set
Basic
detail setngs
John
John
グループ
00
36
Address Book/Pair Function
Page 39

Enter a phone number and
press [Set].
¡If you do not enter E-mail address,
go to step 10.
¡Enter the area code when saving a
regular phone number.
Use to select a type of phone
number and press [Select].
The icon of selected type is displayed.
Use to select (E-Mail Add1)
and press [Select].
Use to select a type of E-mail
address and press [Select].
The icon of selected type is displayed.
Enter an E-mail address and
press [Set].
5
6
7
8
9
Select Set
Basic
detail setngs
John
John
0900005××××
△△△△@ezweb.ne.jp
(EーMail Add2)
グループ
00
Back Select
Type?
No settings
Cell Phone
PHS
Home
Business
FAX
Back Select
Type?
No settings
Cell Phone
PHS
Home
School
Business
Select Set
Basic
detail setngs
John
John
0900005××××
(Phone No.2)
グループ
00
ab Set Submenu
Sym.
EーMail Add? 64
37
Address Book/Pair Function
Page 40

Press [Set].
Pop-up screen which indicates
Memory No. is displayed.
Press [Complete].
Saving to the Address Book is
completed.
10
11
Complete
Basic
detail setngs
John
John
0900005××××
△△△△@ezweb.ne.jp
(EーMail Add2)
グループ
00
Memory No.?
123
OK
Basic
detail setngs
John
John
0900005××××
△△△△@ezweb.ne.jp
(EーMail Add2)
グループ
00
No.123
Saved
In AddBk
¡Up to 1000 entries can be saved.
¡You can also save some information such as group, image and address.
¡An entry can contain up to 3 phone numbers and 3 E-mail addresses.
¡The smallest available memory number from 000 to 999 is automatically assigned. You can
assign any number by pressing dial keys.
38
Address Book/Pair Function
Page 41

Making a Call from the Address Book
Press .
Use to select a person to
call and press .
Press in the standby screen.
Address book list is displayed.
¡Use to select the number 1 to 3
when the entry has some numbers.
1
2
3
Back Dial
No.1 No.2 No.3
012
グループ
00
Mike
HndFree Tools
Talking
Talk Time
15sec
Search Select Submenu
Ma Ya Ra Wa
etc
Emily
0900007××××
John
0900005××××
Julia
0900006××××
Linda
0900002××××
39
Address Book/Pair Function
Page 42

Press [Submenu], use to
select “Edit” and press
[Select].
Address book registration screen is
displayed.
Editing an Entry in the Address Book
Use to select “Yes” and
press [Select].
The entry in the Address Book is edited.
Edit the entry and press [Set].
Yes : Overwrites the entry.
No : Not overwrite the entry.
From the standby screen,
press , use to select an
entry to edit, and press
[Select].
Address book detailed screen is
displayed.
1
2
3
4
Select Set
Basic
detail setngs
John
John
0900005××××
△△△△@ezweb.ne.jp
グループ
00
OK
Basic
detail setngs
John
John
0900005××××
△△△△@ezweb.ne.jp
グループ
00
Overwrite to
No.123
Select
Basic
detail setngs
John
John
0900005××××
△△△△@ezweb.ne.jp
グループ
00
Overwrite
No.123?
Yes
No
Back Select Submenu
Basic
detail setngs
123
John
0900005××××
△△△△@ezweb.ne.jp
グループ
00
40
Address Book/Pair Function
Page 43

Use to select “Save to
AddBk.” and press [Select].
From the standby screen,
press , use to select an
entry to save, and press
[Submenu].
<Example> Saving from Received log
Use to select “New” and
press [Select].
Address book registration
screen is displayed. The phone
number of the selected entry is
automatically entered.
Refer to “Saving to the Address Book” (p.36) to save the entry.
Saving from Dialed/Received Log
1
2
3
4
Back Select
Submenu
Save to AddBk.
Create CーMail
Delete
赤
Save in RjctIncmng
Save in RmteAutoLk
Thumbnail OFF
Back Select
Save to AddBk.
New
Add
Select
Basic
detail setngs
(Name)
0900002××××
グループ
00
Set
¡
To save from Dialed log, press in the standby screen and follow the steps above.
41
Address Book/Pair Function
Page 44

Use to select a number,
use to select
“Save ・ Discard” , and press
[Select].
You can select 5 persons from saved entries in the Address Book
and set them as pair persons. This function allows you to call or
send mail easily to them.
Press in the standby screen.
Pair menu is displayed.
Setting a Pair Person
Use to select “Yes” and
press [Select].
Use to select a person, press [Select] and press [Set].
1
2
3
4
PairFunction
Select
Pair
Setngs
Not saved.
Save?
Yes
No
Back Select
1
2 3 4
5
¡
Pair persons can be selected from the Address Book. Save a person to the Address Book
before setting him/her as pair person. See “Saving to the Address Book” (p.36) for details.
¡
If you delete a pair person from the Address Book, the person is also deleted from Pair
menu.
Back Select Search
Ma Ya Ra Wa
etc
Emily
John
Julia
Linda
Mary
Mike
Nuncy
Poul
42
Address Book/Pair Function
Page 45

Use to select a person to call,
use to select “Phone” and
press [Select].
Press in the standby screen.
Pair menu is displayed.
Making a Call to a Pair Person
1
2
Back
1
2 3 4
5
Linda
0900002××××
□□□□□□@ezweb
.ne.jp
Ph.Menu
Select
HndFree Tools
Talking
Talk Time
15sec
¡
You can also send E-mail and C-mail.
43
Address Book/Pair Function
Page 46

To use E-mail, you need to subscribe to the EZweb service. If you did
not subscribe it when you purchased your phone, please contact au
Customer Service Center or au shop for further information. Make sure
that you do the initial setting before using E-mail for the first time. See
“Initial Setting for E-mail and EZweb” (p.20) about the initial setting.
E-mail allows you to exchange mails of up to 5000 full-sized (or 10000
half-sized) characters with other cellphones or personal computers that
support E-mail. Photos and movies can also be sent and received.
* You can send E-mail to up to 5 recipients at a time.
* You can send up to 1000 E-mails (or to up to 1000 recipients) in a day.
* Sending or receiving mails with attached file may take more time than
usual, depending on its size or radio wave condition.
About E-mail
(Subscription to EZweb required)
E-mail
E-mail can be sent to other
cellphones or personal
computers that support E-mail.
E-mail is sent using an E-mail address.
(Ex.) △△△@ezweb.ne.jp
E-mail
A5514SA
Send
44
Mail
Page 47

Press in the standby screen.
E-Mail Menu is displayed.
Use to select , press
[Edit] and press [Edit].
Input Address screen is displayed.
Use to select “Go To
Address Book” and press
[Select].
Address book list is displayed.
Creating and Sending an E-mail
Use to select “Create New”
and press [Select].
Create Mail screen is displayed.
¡Input Address screen also allows you
to enter an E-mail address manually or
select it from Received Mail Log or
Sent Mail Log.
1
2
3
4
Send Edit Submemu
Create Mail
Back Select
Input Address
Go To Pair
Go To Address Book
Go To RcvdMail Log
Go To SentMail Log
Go To Send Group
Go To Profile
Manual Input
CーMail Select Switch
Finish Select Search
Ma Ya Ra Wa
etc
Emily
John
Julia
Linda
Mary
Mike
Nuncy
Poul
45
Mail
Page 48

Press [Finish].
Press [Complete].
E-mail address is entered.
Use to select and press
[Edit].
Subject input screen is displayed.
Use to select a recipient,
press [Select] and press
[Select].
Enter a subject and press
[Set].
The subject is entered.
¡See “Inputting Characters” (p.90)
about the way of inputting characters.
¡Subject can use up to 50 full-sized (or
100 half-sized) characters.
¡Use to select 1 to 3 when the
entry has some E-mail addresses.
5
6
7
8
9
Finish Release
1
2
3
012
グループ
00
Emily
△△△△@ezweb.ne.jp
List
Complet
e Edit Submenu
Address List 626
Emily
Send Edit Submenu
Create Mail
Emily
ab Set Submenu
Subject 100
Send Edit Submenu
Create Mail
Emily
Dance Party
46
Mail
Page 49

Enter a body text and press
[Set].
Body text is entered.
Press [Send].
Select Send Method screen is
displayed.
Use to select and press
[Edit].
Body text input screen is displayed.
Use to select “Send” and
press [Select].
Created mail is sent.
¡After finished sending, the mail is
saved in Outbox as sent mail.
10
11
12
13
¡See “Using Photo Mail” (p.61) about sending a Photo Mail.
“My Pictograph” and “Easy Pictograph” are pay services. You
must subscribe separately for “Pictograph Mails” service.
ab Set Submenu
Pastel Mail
Body
0/10000
Back Select
Select Send Method
Send
Photo Mail
My Pictograph
Easy Pictograph
Send Edit Submenu
Create Mail
Emily
Dance Party
Hi! Do you have plan
s for Saturday night
? If not, what do yo
u say to going to a
OK
Sending complete.
47
Mail
Page 50

Use to select
“メインフォルダ(Main folder)” and
press [Select].
Received mail list is displayed.
Use to select a mail and
press [Display].
Received mail is displayed.
Use to select (E-Mail)
and press .
Inbox screen is displayed.
WhenanE-mailisreceived,thestandbyscreennotifiesyou.
(E-Mail) and the number of E-mail
are displayed.
Reading a Received E-mail
¡To display a previous or next mail,
press or .
¡The color is changed and with the
number of E-mail is displayed when
the folder has a new mail.
1
2
3
Back Select Submenu
Inbox
2/5
0
メインフォルダ
2
1
フォルダ
1
2
フォルダ
2
3
フォルダ
3
4
フォルダ
4
5
フォルダ
5
6
フォルダ
6
7
フォルダ
7
EーMail 2
Main Menu
Back Display Submenu
メインフォルダ
2/5
001
12:34 Sat Dec24
Julia
Dance Party
002
10:22 Sat Dec24
Paul
Meeting
Reply Submenu
Rcvd Mail001
10:22 Sat Dec24
Julia
Dance Party
Hi! Do you have plan
s for Saturday night
? If not, what do yo
u say to going to a
dance party with me?
48
Mail
Page 51

Follow the steps 2 to 3 on page 48 to display a mail.
From the standby screen,
press , use to select
“Inbox” , and press [select].
Inbox screen is displayed.
Displaying an E-mail in Inbox
1
2
When a Photo or Movie Is Attached in a Received Mail
Display a received mail,
use to select a file name
which appears after the body
text, press [Receive] , and
press [Play].
Attached file is played.
1
How to view a received mail
Back Select Submenu
Inbox
0/5
0
メインフォルダ
1
フォルダ
1
2
フォルダ
2
3
フォルダ
3
4
フォルダ
4
5
フォルダ
5
6
フォルダ
6
7
フォルダ
7
Set
051224_1205
〜
0001
Reply Submenu
Rcvd Mail001
10:22 Sat Dec24
Poul
Meeting
My Boss will attend
tomorrows meeting.
(33KB)051224_1002
〜
0001.jpg
Received date and time
Body text
Attached file
Mailʼs sender
Mailʼs subject
¡Depending on the file size, some photos or movies may be displayed automatically or by
selecting the attached file and pressing [Play].
49
Mail
Page 52

Replying to a Received E-mail
After the step 3 on page 48,
press [Reply].
Create Mail screen is displayed.
The recipient is entered and the
subject and body text of the received
mail is quoted.
¡Subject is prefixed with “Re:”.
¡Subject can be edited.
Press [Send].
Select Send Method screen is
displayed.
Use to select “Send” and
press [Select].
Created mail is sent.
1
3
4
Use to select , press
[Edit], enter a body text,
and press [Set].
2
Send Edit Submenu
Create Mail
Julia
Re:Dance Party
>Hi! Do you have pla
ns for Saturday nigh
t? If not, what do y
Send Edit Submenu
Create Mail
Julia
Re:Dance Party
Sure! Can you pick m
e up?
>Hi! Do you have pla
ns for Saturday nigh
Back Select
Select Send Method
Send
Photo Mail
My Pictograph
Easy Pictograph
OK
Sending complete.
50
Mail
Page 53

Blocking Junk Mail
Using E-mail, you may receive mails from unknown persons, or
unwanted solicitation mails which are called “Junk Mail” .The
following ways are available for preventing arrival of junk mail.
Mail Filter
Change E-mail Address
Press in the standby screen.
Select “E-Mail Settings” and press [Select]
Select “Other Settings” and press [Select]
Select “メールフィルター(Mail filter)” and press [OK]
Enter your lock code and press [Set]
Select (Send) and press [OK]
Mailfiltermainscreenisdisplayed.
*Lock code is the 4-digit number you wrote in the application form when purchasing.
You can also prevent arrival of junk mail by changing your E-mail address.
Mailfiltermainscreen
送信
The mail filters are “未承諾広告フィルター (Unsolicited Ad Mail Filter)” and
“アドレスフィルター (Address Filter)”.
¡ “未承諾広告フィルター (Unsolicited Ad Mail Filter)”
Rejects mails that contain “未承諾広告※ (Unsolicited Ad)” in the title.
¡“アドレスフィルター(Address Filter)”
全受信
指定受信設定
指定拒否設定
なりすまし規制
Receives all E-mails.
Rejects E-mails whose domains or addresses are speficied.
Receives only the E-mails whose domains are specified in
“一括指定” or whose domains or addresses are specified in
“個別指定” .
By setting “規制する(Regulate)” , rejects E-mails sent from a
personal computer with cellphone or PHS E-mail address.
OK BrsrMnu
メールフィルター
お知らせ
「####@jp− .ne.jp」
を
アドレスフィルターへ個別設
1
未承諾広告フィルター
2
アドレスフィルター
3
設定にあたって
51
Mail
Page 54

About C-mail
C-mail is sent using a phone number.
(Ex.) 090-0001-××××
C-mail
If you purchased your phone in Kanto or Chubu regions, you need
not subscribe separately to use C-mail. If you purchased outside
Kanto and Chubu regions, a separate subscription is required.
Please contact au Customer Service Center or au shop if you did
not subscribe at the time of purchase.
C-mail allows you to exchange mails of up to 50 full-sized (or
100 half-sized) characters with other au cellphones that support
C-mail.
* C-mail Safe Block Function
C-mail safe block function allows you to reject C-mails that include URL to
access(http:
//□□□
,https:
//□□□
) or phone numbers in the C-mail body text.
This function is valid by default.
A5514SA
C-mail can be sent to au cellphones
that support C-mail
What do you
want for dinner?
I want
hamburg
steak
52
Mail
Page 55

Creating and Sending a C-mail
Use to select and press
[Edit].
Input Address screen is displayed.
Press for more than one
second in the standby screen.
C-Mail Menu is displayed.
Use to select “Create New”
and press [Select].
Create Mail screen is displayed.
Use to select “Go To Address
Book” and press [Select].
Address book list is displayed.
¡Input Address screen also allows you
to enter an address manually or select
it from Received Mail Log or Sent Mail
Log.
1
2
3
4
EーMail Select Switch
Send Edit Submenu
Create Mail
Back Select
Input Address
Go To Pair
Go To Address Book
Go To RcvdMail Log
Go To SentMail Log
Paste Phone Number
Manual Input
Back Select Search
Ma Ya Ra Wa
etc
Emily
John
Julia
Linda
Mary
Mike
Nuncy
Poul
53
Mail
Page 56

Press [Send].
Created mail is sent.
¡After finished sending, the mail is
saved in Outbox as sent mail.
Press [Select].
Use to select a recipient and
press [Select].
Use to select and press
[Edit].
Body text input screen is displayed.
7
Enter a body text and press
[Set].
Body text is entered.
¡See “Inputting Characters” (p.90)
about the way of inputting characters.
8
5
6
9
¡Go to step 7 when the entry has only one phone number.
¡Use to select the number 1 to 3 when the entry has some
phone numbers.
Send Edit Submenu
Create Mail
Mike
Back Select
No.1 No.2 No.3
012
グループ
00
Mike
ab Set Submenu
Body 100
Send Edit Submenu
Create Mail
Mike
Lets go away for a
weekend.
OK
Mail delivered
54
Mail
Page 57

¡The newest mail is displayed when you have some new mails.
You can display a previous or next mail by pressing or
.
¡To reply to the sender, press [Reply].
Use to select (C-Mail)
and press .
Received mail is displayed.
When a C-mail is received, the standby screen notifies you.
(C-Mail) and the number of
E-Mail are displayed.
Reading a Received C-mail
1
Use to select a mail and press [Display].
From the standby screen,
press for more than
one second, use to select
“Inbox” , and press [Select].
Inbox screen is displayed.
Displaying a C-mail in Inbox
1
2
Reply Display Submenu
Inbox 0/5
001
12:34 Sat Dec24
Richard
002
11:54 Sat Dec24
0900001××××
003
10:30 Thu Dec22
CーMail 2
Main Menu
Reply Submenu
Rcvd Mail001
12:34 Sat Dec24
Richard
I hope you will have
a special day today
.
55
Mail
Page 58

What You Can Do with the Camera
When a photo is
registered to the
Address Book
Register
You can set taken photos as the
standby screen, or register them
to the Address Book to display
when you receive incoming calls.
Take photos and
movies
You can take photos and
movies with this
1.31-megapixel camera.
E-mail
Send by E-mail
You can attach photos and
movies of less than 500 KB to
E-mail and send them to other
cellphones or personal computers.
* It may take more time than usual, depending on radio wave condition.
Edit
Edit
You can edit taken photos or
movies as you like, by adding
words or images on them.
I am JohnI am JohnI am John
Camera
Silent
Mike
Fw/Rjct
Send
Incoming Call
56
Camera
Page 59

When shooting with a vertical screen When shooting with a horizontal screen
Mode for taking photo Mode for recording movie
You can select the mode for taking photo or recording movies. The
following table shows the data size for each mode.
①
②
* ② is the same size as the main display of A5514SA.
* The default value is ② for the mode for taking photo, and ⑦ for the mode for recording movie.
③
⑥⑤
④
When you take photos or movies, put the subject inside the screen
and hold the cellphone firmly with both hands to prevent a blur.
⑦
How to Hold Your Cellphone When Shooting
About Data Size
Shutter button
QQVGA size 120×160 dot size
QVGA size 240×320 dot size
VGA size 640×480 dot size
SXGA size 1280×960 dot size
Small size 96×80 dot size
Medium size 128×96 dot size
Large size 176×144 dot size
Shutter button
①
②
③
④
⑥
⑤
⑦
57
Camera
Page 60

Use to select “Photo” and
press [Select].
Taking a Photo
From the standby screen,
press , use to select
“Camera” , and press
[Select].
Camera functions are displayed.
Press [Shoot].
Shutter sounds and taken photo is
displayed.
Press [Save].
Taken photo is saved.
¡To switch to movie, press [Movie].
¡The title of taken photo means as follows:
051224_1234
˜
0001
Date: Dec 24, 2005 Time: 12:34 Number: 0001
1
2
3
4
Back Select
Camera
Photo
Movie
Bar Code Reader
Character Reader
Movie Shoot Submenu
EーMail Save Submenu
OK
[051224_1234
〜
0001]
Saved
¡To clear the photo, press .
58
Camera
Page 61

¡The title of recorded movie means as follows:
051224_1234
˜
0001
Date: Dec 24, 2005 Time: 12:34 Number: 0001
Recording a Movie
Press [Rec.].
Shutter sounds and starts recording.
Recording is finished after 15
seconds or by pressing [Stop]
while recording.
Press [Save].
Recorded movie is saved.
¡To cancel and start recording again, press [Cancel].
¡To cancel the recorded movie, press .
¡After finished recording, you can confirm the recorded
movie by pressing [Submenu] and selecting “Play” .
¡To switch to photo, press [Photo].
After the step 1 on page 58,
use to select “Movie” and
press [Select].
1
2
3
EーMail Save Submenu
00:00
OK
[051224_1234
〜
0001]
Saved
Photo Rec. Submenu
00:15
Cancel Stop
00:07
Pause
59
Camera
Page 62

Use to select “Photo Folder”
and press [Select].
Photo Folder list is displayed.
Use to select a folder which
contains a photo to view, and
press [Select].
Photo list is displayed.
Use to select a photo and
press [Play].
Selected photo is displayed.
¡All photos are saved in “All Photo” .
¡To display a previous or next photo,
press or .
Viewing Photos or Movies
2
3
4
From the standby screen,
press , use to select
“Data Folder” , and press
[Select].
1
<Example> Viewing a taken photo
Back Play
051224_1234
〜
0001
24KB
Submenu
Back Select
Photo Folder
All Photo 33
12/24/05 5
12/23/05 2
12/21/05 4
12/20/05 1
12/17/05 2
12/15/05 5
12/12/05 2
Submenu
Set Submenu
Back Select
Submenu
Data Folder
All Data 63
User Folder
Movie Folder
Photo Folder
PRL Folder 1
Rest16734KB
60
Camera
Page 63

You can use this function to automatically convert and send images
so that they can be viewed properly on other cellphones even if the
other party is not using au cellphone.
*□ differs depending on the area where the other party subscribed.
△△△@ezweb.ne.jp
DoCoMo
Other party E-mail address New address
△△△@docomo.ne.jp
Vodafone
△△△@□*.vodafone.ne.jp
TU-KAandau
cellphonesthatdonot
supportMovieMail
△△△@d.nepm.jp
△△△@□*.vodafone.nepm.jp
△△△@ezweb.nepm.jp
After the step 12 on page 47, use to select
“Photo Mail” and press [Select].
The other partyʼs E-mail address is automatically
changed and E-mail is sent.
If you select “Photo Mail” , the other partyʼ s E-mail address is automatically
changed (as shown below) before sending.
1
Sending Photos or Movies by E-mail
After taking a photo (follow the
steps 1 to 3 on page 58) or
recording a movie (follow the
steps 1 to 2 on page 59), press
[E-Mail].
Create Mail screen appears with a taken photo or
recorded movie attached.
Follow “Creating and Sending an E-mail” (p.45) and send
E-mail.
1
2
Using Photo Mail
Send Edit Submenu
Create Mail
(17KB)051224_123
¡Sending E-mail may take more time than usual, depending on radio wave condition.
61
Camera
Page 64

About EZweb
Chaku-Uta
®
Wallpaper
Games
Latest
news
Traffic
information
Weather
report
To use EZweb, you need to subscribe to the EZweb service. If you did not
subscribe it when you purchased your phone, please contact au Customer
Service Center or au shop for further information. Make sure that you do
the initial setting before using the EZweb for the first time. See “Initial
Setting for E-mail and EZweb” (p.20) about the initial setting.
EZweb is an information service for enjoying the Internet on your
cellphone. You can obtain Chaku-Uta
®
and the latest news from
information sites.
*Someinformationsitesaresubjecttoadditionalinformationcosts
besidescommunicationcosts.
EZweb(Subscription to EZweb required)
A5514SA
Fair
Information sites
62
EZweb
Page 65

Accessing Sites
From the standby screen, press , use to
select “Top Menu” , and press [Select].
EZ Top Menu is displayed.
Displaying the EZ Top Menu
EZTopMenu
au style
とくする情報(Valuable Information)
最新情報(Latest information)
EZサービスで探す (Search by EZweb service)
カテゴリで探す (Search by category)
ビジネス&ニュース (Business & News information)
エリア(Regional information)
ショッピング&オークション (Shopping & Auction information)
ライフ (Check useful daily life information)
ホビー&カルチャー (Hobby & Culture information)
キーワードで探す (Search by keyword)
料金・申込・インフォ (Charges, application and information)
災害用伝言板 (Disaster Message Board)
English
Introduces au-recommended information and sites.
Offers gifts and free valuable information to EZweb service subscribers.
Introduces new topics and daily information such as weather and fortunetelling.
Introduces useful and new recommended services special to EZweb.
Searches for news or whether sites by category.
Provides the latest information such as news, weather, stock prices,
and other information beneficial for business.
Provides weather reports, maps, and other local information.
Provides information about shopping malls where you can purchase goods with
your cellphone and auctions where you can put up or go for easily.
Provides information beneficial for daily life.
Provides the latest information about games, fortunetelling, music,
and information on hobby and entertainment trends.
Searches for a site by keyword.
Provides phone bills, application forms, au online manuals, and au information.
You can register or confirm the safety information in disasters.
Introduces English sites
1
OK
BrsrMnu
EZ
トップメニュー
au style
┗△○□…
とくする情報
最新情報
EZ
サービスで探す
┗△○□…
カテゴリで探す
ビジネス&ニュース
┗△○□…
エリア
┗△○□…
ショッピング&オークション
┗△○□…
ライフ
┗△○□…
ホビー&カルチャー
┗△○□…
キーワードで探す
料金・申込・インフォ
災害用伝言板
[English]
マーク表示メニューにつ…
¡The display layout and contents show an example and may differ from the actual screen.
63
EZweb
Page 66

¡You can display the next screen by using to select an item and pressing .
¡You can return to the previous screen by pressing or , and you can
go back to EZ Top Menu by pressing it for more than one second.
¡
You can scroll the screen by pressing (Up) or (Down) when it continues.
Basic Operation while Using EZweb
EZTopMenu
Use to select an
item and press .
Use to select an
item and press .
Press or . Press or .
Press or for more than one second.
OK
BrsrMnu
05/12/24
更新
お気に入り登録
MENU
壁紙
DL&
プレゼント…
OK
BrsrMnu
EZ
トップメニュー
au style
┗△○□…
とくする情報
最新情報
EZ
サービスで探す
┗△○□…
カテゴリで探す
ビジネス&ニュース
OK
BrsrMnuMenu
あなたにピッタリサイト
┗今週のオススメラインアップ
冬アイテム大充実
!
無料
豪華プレゼントが当た
新着
24
サイト
64
EZweb
Page 67

From EZ Top Menu, use to
select “カテゴリで探す(Search by
category)” and press [OK].
Use to select
“着うた・着ムービー” and press
[OK].
Use to select a category
and press [OK].
Downloading Chaku-Uta® and Set It as a Ringer for Incoming Calls
You can download Chaku-Uta® from information site and set it as a
ringer for incoming calls. You can also download wallpaper and set it
to the standby screen and others.
1
2
3
Use to select an information
site, press [OK], and
download following the
on-screen instructions.
4
OK
BrsrMnuMenu
カテゴリで探す
EZ
サービスで探す
┗△○□…
ニュース・天気
着うたフル
着うた・着ムービー
着FLash(
アニメ
)
着信メロディ
待ちうた
OK
BrsrMnuMenu
着うた・着ムービー
J−POP・総合(99)
アニメ・ゲーム
(19)
TV・
映画
(25)
ロック・洋楽
(22)
クラブ・インディーズ
(31)
クラシック・ジャズ
(24)
着ムービー
(86)
OK
Play
[
日本代表のテーマ
]
Download Complete.
Saved to
Data Folder.
65
EZweb
Page 68

Press [Set].
Select Set Target screen is displayed.
Use to select “Sound Setup”
and press [Select].
Registration destinations of the
selected target are displayed.
Use to select “Incoming Call” and press
[Select].
Downloaded data is set as ringer for “Incoming Call” .
Press [Play].
Downloaded data is played.
5
6
7
8
Back Select
Sound Setup
Incoming Call
EーMail Receive
Notifications
CーMail Receive
Set Pause
Playng
日本代表のテーマ
Back Select
Select Set Target
Sound Setup
Spcfied Incmg Call
Incming Group Call
Alarm
Effects Setup
¡
You must input your EZ password or Premium EZ password when the additional information
cost is charged to use the site. Follow the on-screen instructions and input your password
when you use it for the first time. Write down your password in order not to forget it.
¡
Download procedure depends on the site. The procedure described above shows an
example and may differ from the actual one.
66
EZweb
Page 69

Press [Set].
The site is registered to Favorite Site.
You can access information sites easily by registering frequentlyaccessed sites to “Favorite Site” .
Use to select “New bookmark”
and press [OK].
The title, URL, and folder name are
displayed.
Display a site you want to
register and press [BrsrMnu].
Browser menu is displayed.
Registering Frequently-Accessed Sites
¡Some sites may not be registered to
Favorite Site.
Registering to Favorite Site
1
2
3
OK
BrsrMnu
天気予報
12/24
今日の天気
明日の天気
今週の天気
来週の天気
今月の天気
来月の天気
New bookmark
Save Items
Take snapshot
Reload
Bookmark(s)
View snapshots
Go To URL
Current
Certificate
OK
Save Favorite Site
Title
天気予報
URL
http://△△△△△.□□□□□
Folder Name
No Folder
[
天気予報
]
Saved.
Back Enter Set
Save Favorite Site
Title
天気予報
URL
http://△△△△△.□□□□□
Folder Name
No Folder
¡
Up to 100 sites can be registered in Favorite Site.
67
EZweb
Page 70

Press in the standby screen.
EZ Menu is displayed.
Use to select a site you
want to view and press
[Select].
You are connected to the selected
information site.
Use to select “Favorite Site”
and press [Select].
Favorite site list is displayed.
Viewing a Site Registered to Favorite Site
1
2
3
OK
BrsrMnu
天気予報
12/24
今日の天気
明日の天気
今週の天気
来週の天気
今月の天気
来月の天気
SANYO Select Switch
Back Select Submenu
Favorite Site
KDDI
オススメ
天気予報
ニュース速報
最新メディア日本
サッカーワールド
68
EZweb
Page 71

Use to select a menu you
want to confirm and press
[OK].
Inquiring Toll
From the standby screen,
press in turn.
1
2
OK
BrsrMnu
■料金照会■
1
料金お知らせサービス
2
通話料・通信料照
会
説明
3
ご請求金額照会
説明
4
未払い料金照会
説明
Back BrsrMnu
料金合計(概算
)
16,367
円
※無料通話、各種割
引は計算されており
ません。
ーーーーーーーーーーーーーーーー
通話料
(12/23迄)
4、320
円
¡The on-screen call or communication charge should be used only as a guide.
69
EZweb
Page 72

What You Can Do with EZnavi
“Position Search” allows you to confirm the current position of your kid
“Area Message” lets you know when your kid enters a (or goes outside) preset area
EZnavi (Subscription to EZweb required)
EZnavi is a useful service which provides you with position information
(GPS information). You can use “EZ Navi Walk” which navigates you to
a destination, “Position Search” which informs you of the current
position of your kid, and “Area Message” which lets you know when
your kid enters a (or goes outside) preset area.
Press .
Use to select
“EZnavi” and
press .
This service allows you to confirm with your
A5514SA the current position of other au
cellphones that support Position Search. “位置確認
メール(Position Search Mail)” (charge-free) allows
you to send a message to the other au cellphone to
ask the position. “いつでも位置確認(Auto Position
Search)” (charged) allows you to confirm the
position of the other au cellphone without any
operation on the otherʼ s cellphone.
When your kid enters a (or goes outside) preset
area during a specified period of time, a message
with alarm is sent automatically from his/her
cellphone to your cellphone.
Standby screen
EZnavi Menu
Back Select
EZnavi Menu
EZnaviwalk
Position Search
Area Message
Settings
Main Menu
Back Select Switch
70
EZnavi
Page 73

71
EZnavi
Various useful menus can be displayed when you go out.
“EZ Navi Walk” is useful when you go out
EZNaviWalkMenu
オススメ The latest news and recommended information
*“おためしナビ” provides a demo of voice navigation.
乗換検索
Searchable source of train transfer and timetable information
ナビ
Voice navigation to a destination and “My Spot” registration
現在地
Searchable source of maps, shops, and others of your current position
道路情報
Searchable source of real-time Japan-wide traffic Information
設定登録 Setups, membership registrations and others
Going-OutMenu
My Spot
Just register the
position of your home
and favorite places
(office, friendsʼ houses,
shops, etc.) for easy
navigation when you go
there.
View My Map
When you are in an
unfamiliar place or
when you lose your
way, simply select
“View My Map”. A map
around your current
position is displayed in
real-time.
You can send a map
around your current
position by E-mail to
other person, who can
use the map to
navigate you.
E-Mail My Map
Simply preset the
position of your home
for easy navigation
when you go home.
Also, it is useful for
checking train transfers
and estimated time of
arrival.
Return Home
Back Select
EZnaviwalk Menu
GoingーOut Menu
My Spot
Return Home
現View My Map
EーMail My Map
Edit
Naviwalk
Submenu
My Spot
My Home
HANZOUMON
MARUNOUCHI
Send Edit Submenu
Create Mail
Julia
Now Im here.
【
GPS
情報】
http://walk.eznavi.j
p/map/△△△△△△△△△△/△△△
《経路候補一覧》
2005年12月24
日
12:34⇒12:53
12:34⇒12:59
再探索 終電探索
地図表示中のご注意
ナビ条件設定
■第
1
経路
160 19
分
12:34発
現在地
徒歩
(760m)
ルート案内開始
ルート地図確認
Page 74

What You Can Do with Security Navi
<Example> When a mother sends a message to her kid
<Example> When a mother sends a message to her kid
You can easily confirm the current position of your kid in a map when
he/she has not come home yet and you are worried about if he/she got
lost. There are two kinds of Position Search: “位置確認メール(Position
Search Mail)” and “いつでも位置確認(Auto Position Search)” .
Position Search Mail
Auto Position Search
What You Can Do with Position Search
This function allows you to send a message to your kid, who can
let you know his/her current position after confirming your
message.
This function lets you know the current position of your kid
without any operation on his/her phone. It is recommended for
kids who are not good at using cellphones.
おかあさん
Mother
さんがあなたの位
置確認をしています。
Robert
Tell me where you are!
Robert
さんの位置を確認
します。よろしいですか
?
72
EZnavi
Page 75

73
EZnavi
<Example> When a mother confirms an area where her kid is
Area Message
When your kid enters a (or goes outside) preset area during a specified
period of time, a message with alarm is sent automatically from his/her
cellphone to your cellphone.
What You Can Do with Area Message
You can set your mind at ease without worrying about your kid
when he/she is coming from after-school activities. When he/she
enters a preset area, a message is sent automatically from
his/her cellphone to your cellphone.
Ive finished the club.
Now Im going home.
Robert
¡ “Security Navi” service can only be used between supported models.
¡You may be charged packet communication fee to obtain a position information or display a
map.
¡It is necessary to set a password before using “Security Navi” .
¡Position Search cannot be performed when the other cellphone is under the following
conditions: Out of service area/Setting reject function/Without the application/Operating/Not
supported model.
¡
“Security Navi” cannot be used when you or the other person is suspending the use of C-mail.
¡The display layout and contents show an example and may differ from the actual screen.
¡Family discount for C-mail and packet communication fee does not apply to the message
fee for this service.
Page 76

How to Use the EZ・FM
Connecting SANYO Flat-type Stereo Earphones 04
Open the cover of Flat-type Earphone-Microphone Jack and connect SANYO
Flat-type Stereo Earphones 04.
Press in the standby screen.
Use to select “EZ・FM”,
press [Select],
use to select
“確認(Confirm)” , and press .
The EZ・FM screen is displayed.
The first time you use the EZ・FM,
a screen to select an area is displayed.
Select an area where you use.
EZ・FM(Subscription to EZweb required)
Listening to the EZ・FM
1
2
2
1
Flat-type Earphone-Microphone Jack
SANYO Flat-type Stereo Earphones 04
You can use the A5514SA as FM radio.
Back Select Switch
74
EZ
・
FM
Page 77

Press , use to select
“Suspend” or “End” , and
press [Select].
Pressing “Suspend” turns the
EZ・FM screen off, but you can
continue listening to the EZ・FM.
How to Operate
¡EZ・FM screen
Press , use to select an item and press .
¡Volume Adjustment
Pressing adjusts the volume.
Suspending/Ending the EZ・FM
1
Connection to the EZ・FM
¡Pressing it connects to the EZ・FM sites.
Frequency
¡Pressing tunes the frequency.
To tune automatically, press it for more than one second .
NOW ON AIR information
¡Normally, a station name is displayed.
¡Pressing displays information such as an artist name
and song name.
*Information is not displayed in some stations.
Turn up the volume
Turn down the volume
Mute(More than 1 sec.)
¡Make sure that you do the initial setting before using the EZ・FM. See “Initial Setting for
E-mail and EZweb” (p.20) about the initial setting.
¡You can listen to the EZ・FM at no charge. You are charged packet communication fee to
use services such as NOW ON AIR.
¡The display layout and contents show an example and may differ from the actual screen.
Select
App will end
OK?
End
Cancel
Suspend
75
EZ
・
FM
Page 78

About Infrared Communication
This function allows you to exchange data in the Address Book and
Profile, or photos and movies in Data Folder among au cellphones
that support the infrared communication function.
To make infrared communication, ensure that the receiver gets ready
before the sender sends data. Approximate both cellphones within
20 cm, keep their infrared ports face to face, and do not move them.
Infrared Communication
When Making Infrared Communication…
Within 20 cm
¡Address Book
¡Profile
¡Schedule
¡Ta sk
¡Journal
¡Favorite Site
¡Data in Data Folder
(Photos, movies, and others)
InfraredPort
Data available for sending and receiving by infrared communication
76
Infrared Communication
Page 79

Use to select “Recv IR Data”
and press [Select].
Data is received.
Use to select “Rem
Cont/Infrared” and press
[Select].
After receiving data, use to
select “Yes” and press
[Select].
Data is registered.
From the standby screen,
press , use to select
“Tools” , and press [Select].
Using Infrared Communication
<Example> Receiving one data
1
2
3
4
Receiving Data
Back Select
Tools
Rem Cont/Infrared
Alarm
Calculator
Dictionary
Photo Mixer
Appointment Mail
Back Select
Rem Cont/Infrared
Remote Control
Recv IR Data
Select
Save
[ John ]
In Address Book?
Yes
No
OK
No.123
Saved
In AddBk
77
Infrared Communication
Page 80

After displaying
Profile (See p.21), press
[Detail].
Press [Submenu].
<Example> Sending Profile Data
1
2
Sending Data
Use to select “Send IR Data”
and press [Select].
Data is sent.
3
Back Select
Submenu
Edit
Create EーMail
Send IR Data
Profile reset
Back Select Submenu
Basic
detail
0900001××××
△△△△@ezweb.ne.jp
OK
Sent
78
Infrared Communication
Page 81

¡Copyrighted data cannot be sent or received.
¡Some data may not be sent or received depending on the other cellphone even if it
supports the infrared communication function.
¡Infrared communication may not be made in direct sunlight, under fluorescent light, or near
other infrared equipment.
¡You may be required to enter authentication password when sending and receiving.
Authentication password is the 4-digit number which is arranged in advance between you
and the person you communicate with.
79
Infrared Communication
Page 82

About Smart Mode
Press in the standby screen.
Use to select “Smart Mode”
and press [Select].
Confirmation screen is displayed.
Use to select “Yes” and
press [Select].
Smart Mode is set.
Setting Smart Mode allows you to simplify operation to the frequently
used functions such as phone function, Address Book, Camera, Mails,
and EZweb.
Smart Mode
Setting Smart Mode
1
2
3
OK
Smart Mode
Settings Changed
Select
Set changes
in Smart Mode?
Yes
No
Back Select Switch
80
Smart Mode
Page 83

Use to select “Yes” and
press [Select].
Smart Mode is canceled.
Press in the standby screen.
Smart Menu is displayed.
Use to select “Functions”
and press [Select].
Use to select “Cancel Smart
Mode” and press [Select].
Confirmation screen is displayed.
Canceling Smart Mode
1
2
3
4
SwitchSelectBack
Functions
Toll/Apply
Ringers
Screen
Cancel Smart Mode
Inquire about
Toll & Apply
NoDetlsSelectBack
Functions
Toll/Apply
Ringers
Screen
Cancel Smart Mode
Cancel Smart Mode
Select
Smart Mode
Cancel?
Yes
No
Functions
Toll/Apply
Ringers
Screen
Cancel Smart Mode
Cancel Smart Mode
OK
Smart Mode
Canceled
¡Setting Smart Mode may change what you have set in normal mode. Some functions
inform you of the change by displaying a message.
81
Smart Mode
Page 84

MissdCls 2
EーMail 2
CーMail 2
Mesgs 2
Menu
Indication in the Standby Screen
Displaying Guide
In Smart Mode, a guide of a focused item is displayed at the bottom
of the screen. You can turn it on or off by pressing .
Without guideWith guide
Screen Display during Smart Mode
①
②
③
④
⑤
⑥
Missed Call
New E-mail*
New C-mail*
New memo in the In-Phone Ans Machn
To Smart Menu
Silent Mode is ON
①
②
③
④
⑤
⑥
* is displayed when you have a mail from
pair person.
Functions
Toll/Apply
Ringers
Screen
Cancel Smart Mode
Inquire about
Toll & Apply
NoDetlsSelectBack
Functions
Toll/Apply
Ringers
Screen
Cancel Smart Mode
DetailsSelectBack
82
Smart Mode
Page 85

Press in the standby screen.
Smart Menu is displayed.
In Smart Mode, functions are accessed from Smart Menu.
Smart Menu
1
Phone
Mail
Camera
Data Folder
Functions
Tools
Global Functions
My Number
Address Book
Dialed Log
Rcvd Calls Log
In-Phone Ans Machn
E-Mail
C-Mail
Photo
Movie
Bar Code Reader
Toll/Apply
Ringers
Screen
Cancel Smart Mode
Calendar
Alarm
Calculator
EZ・FM
Roam. Area Setup
Save to or search in the Address Book
Display dialed calls history
Display received calls history
Set/Release the In-Phone Ans Machn
Create E-mail/Confirm sent or received E-mail
Create C-mail/Confirm sent or received C-mail
Take photos
Record movies
Read bar codes (QR codes)
Confirm photos, movies or downloaded data
Inquire about toll or subscribe to services
Set ringer melody and volume for incoming call
Set font size and wallpaper
Cancel Smart Mode
Display calendar
Set/Cancel alarm
Calculator function
FM radio function
Set destination (country)
PRL Setup
Set roaming area information
Display your phone number and E-mail address
SwitchSelectBack
83
Smart Mode
Page 86

Confirm the reading and
press [Set].
The ways of entering phone number are
displayed.
From Smart Menu, use to
select “Phone” , press
[Select], use to select
“Address Book” , and press
[Select].
Address book list is displayed.
Using Smart Mode
Press [New].
Enter a name and
press [Set].
¡After entering a name, the reading is
automatically entered.
¡If you do not enter phone number, go
to step 6 by pressing [Next].
In Smart Mode, you can save names, readings, phone numbers,
and E-mail addresses.
1
2
3
4
Saving to the Address Book
PhrasesSetab
Save to AddBk. 24
Enter Name
PhrasesSetab
Sym.
Save to AddBk. 20
Enter Reading
John
NextSelectBack
Save to AddBk.
Enter Phone No.
Go To Received Log
Go To Dialed Log
Manually
SelectNew Delete
Ma Ya Ra Wa
etc
Linda
Mary
Mike
Nancy
84
Smart Mode
Page 87

Enter an E-mail address and
press [Set].
Address book registration screen is
displayed.
Enter a phone number and
press [Set].
The ways of entering E-mail address
are displayed.
Use to select “Manually” and
press [Select].
Press [Set].
Saving to the Address Book is completed.
¡
Enter the area code when saving a regular phone number.
¡If you do not enter E-mail address, go to step 8 by pressing
[Next].
Use to select “Manually” and
press [Select].
¡
To edit a focused item, press [Select].
5
6
7
8
9
PhrasesSetab
Sym.
Save to AddBk. 64
Enter E−Mail Add
SetBack
Save to AddBk.
Enter Phone No.
NextSelectBack
Save to AddBk.
Enter E−Mail Add
Use Received Rec.
Use Sent Rec.
Manually
SetSelectBack
Save to AddBk.
John
John
0900005××××
△△△△@ezweb.
¡You can also save from the standby screen by pressing , and then [New].
85
Smart Mode
Page 88

From Smart Menu, use to
select “Mail” and press
[Select].
Select mail type screen is
displayed.
Use to select “E-Mail” and
press [Select].
E-mail Menu is displayed.
Use to select “Create New”
and press [Select].
Enter Address screen is displayed.
Use to select “Go To
Address Book” and press
[Select].
Address book list is displayed.
Use to select a recipient and
press [Select].
Subject input screen is displayed.
Creating and Sending an E-mail
1
2
3
4
5
SelectCーMail
EーMail Menu
Create New
Inbox
Outbox
Check New Mail
Mail Adrs Change
SelectBack
Create Eml
Enter Address:
Go To Pair
Go To Address Book
Go To RcvdMail Log
Go To SentMail Log
Manual Input
PhrasesSetab
Create Eml 100
Enter Subject:
Mail
EーMail
CーMail
Snd/Rcv Mesgs from
Mobiles & PCs
NoDetlsSelectBack
SelectBack
Ma Ya Ra Wa
etc
John
Linda
Mary
Mike
86
Smart Mode
Page 89

Enter a subject and press
[Set].
Body text input screen is displayed.
Enter a body text and press
[Set].
Create Mail screen is displayed.
Press [Send].
Select Send Method screen is
displayed.
Use to select “Send” and
press [Select].
Created mail is sent.
6
7
8
9
PhrasesSetab
Create Eml
0/10000
Enter Body:
SelectBack
Select Send Method
Send
Photo Mail
My Pictograph
Easy Pictograph
Sending complete.
OK
SubmenuEditSend
Create Mail
Linda
Dance Party
Hi! Do you have plan
s for Saturday night
? If not, what do yo
u say to going to a
¡To edit a focused item, press [Edit].
¡To save the created mail in Outbox, press [Save].
¡Select mail type screen can also be displayed by pressing in the standby screen.
¡One data of up to 500 KB can be attached.
¡In Smart Mode, only one recipient can be selected per E-mail. However, all pair persons
can be selected as recipients by displaying Pair menu, selecting “E-mail” and pressing
[SendAll] .
87
Smart Mode
Page 90

¡To switch to movie, press [Movie].
¡To change the photo size, press [Mode].
Use to select “Photo” and
press [Select].
Press [Shoot].
Shutter sounds and taken photo is
displayed.
Press [Save].
Taken photo is saved.
Taking a Photo
From Smart Menu, use to
select “Camera” and press
[Select].
Camera functions are displayed.
¡To clear the photo, press .
¡To create an E-mail with the taken photo attached, press
[E-Mail].
1
2
3
4
Taking a Photo/Recording a Movie
ModeShootMovie
SaveEーMail
OK
[051224_1234
〜
0001]
Saved
Camera
Photo
Movie
Bar Code Reader
Take Pictures
NoDetlsSelectBack
88
Smart Mode
Page 91

Press [Save].
Recorded movie is saved.
After the step 1 on page 88,
use to select “Movie” and
press [Select].
Recording a Movie
Press [Rec.].
Shutter sounds and starts recording.
Recording is finished when the
maximum record time has passed,
or by pressing [Stop] while
recording.
¡To cancel recording, press or .
¡After finished recording, you can cancel the recorded movie
by pressing .
¡To create an E-mail with the recorded movie attached, press
[E-Mail].
¡To confirm the recorded movie, press [Play].
¡To switch to photo, press [Photo].
¡To change the movie size, press [Mode].
1
2
3
OK
[S_051224_1234
〜
00]
Saved
00:00
PlaySaveEーMail
00:15
ModeRec.Photo
00:07
StopCancel
Pause
89
Smart Mode
Page 92

Switch Select
Name? 24
かな カナ カナ
AB ab 12
AB ab 12
Sym.
About Inputting Characters
It is necessary to input characters when saving an entry to the Address
Book, or creating an E-mail, for instance. Kanji, Hiragana, Katakana,
English, numbers, pictograms, emoticons, symbols, and phrases can be
inputted.
The current input mode is displayed at the lower left of the screen while inputting characters.
The following shows the types and details of input mode.
Pressing in a text input screen displays a list of character input mode.
Kana/Kanji mode Katakana mode
English mode
Number mode
Full-sized
Uppercase
Lowercase
Half-sized
かな
Set Submenu
Name? 24
Inputting Characters
Changing the Character Input Mode
ab Set Submenu
Name? 24
Text input screen
かな カナ AB ab
ab
12
12
AB
カナ
Full-sized Katakana mode
AB
かな
AB
Full-sized and lowercase English mode
Half-sized Katakana mode
Full-sized number mode
Kana/Kanji mode
Full-sized and uppercase English mode
Half-sized and lowercase English mode
Half-sized number mode
Symbols mode
Chara Moji mode
Half-sized and uppercase English mode
Emoticons modePictograms mode
Undo
ab
カナ カナ
ab
12
Sym.
Chara
12
To change input mode…
¡Use to select an input mode and press [Select].
¡Press [Switch] to select an input mode and press [Select].
¡Press a dial key that corresponds with a number in a list of input mode.
* Some characters cannot be inputted in a text input screen, depending on the function.
Use to select
an input mode
and press .
Press .
90
Inputting Characters
Page 93

Several characters are assigned to one key. Pressing a key repeatedly
displays a character you want to input.
* “〜”
can be inputted only when inputting full-sized characters. It changes to “~” when inputting half-sized characters.
* “ヮ” (lowercase character) can be inputted only when inputting full-sized characters.
* indicates a space.
*
Inputting voiced sound symbol/semi-voiced sound symbol or switching uppercase/lowercase can
be done by pressing after inputting the character.
(A list of pictograms, emoticons and symbols is displayed if you press it after the inputted character is set.)
Ex.)つ→っ→づ→つ ハ→バ→パ→ハ a→A→a
Kana/Kanji
(Full-sized)
Katakana
(Full-sized/Half-sized)
English
(Full-sized/Half-sized)
Input
mode
Key
Display candidate words in reverse order while inputting characters (which are not set yet)
あいうえおぁぃぅぇぉ1 アイウエオァィゥェォ1 .@ー_/:〜1
かきくけこ2 カキクケコ2 abcABC2
さしすせそ3 サシスセソ3 defDEF3
たちつてとっ4 タチツテトッ4 ghiGHI4
なにぬねの5 ナニヌネノ5 jklJKL5
はひふへほ6 ハヒフヘホ6 mnoMNO6
まみむめも7 マミムメモ7 pqrsPQRS7
やゆよゃゅょ8 ヤユヨャュョ8 tuvTUV8
らりるれろ9
ラリルレロ9 wxyzWXYZ9
゛(
Voiced sound symbol
) ゜(
Semi-voiced sound symbol
)
Switch between uppercase and lowercase
Switch to a list of pictograms, emoticons and symbols
Number
(Full-sized/Half-sized)
1
2
3
4
5
6
7
8
9
0
#
わをんゎ、。 ・〜!? 0
﹈
ワヲンヮ、。 ・〜!? 0﹈0,.−〜!?
﹈
Enter (Linefeed)
﹈
Key Assignment of Characters
91
Inputting Characters
Page 94

How to Input Characters
In a text input screen,
………「お」
…………「か」
…………「か」
…「が」
…………「き」
press once
press once
press twice
press 5 times
(makes a cursor move)
press
(voiced sound symbol)
¡You can input a character by pressing a key. Pressing a same key repeatedly
changes characters in order. Pressing changes characters in reverse order.
¡
To consecutively input characters assigned to a same key, move the cursor to the right.
¡Candidate words are displayed when inputting a character. You can input by selecting
a candidate word with .
¡
When you press before converting or setting an inputted character, you can
change it to a character which may be displayed in number, English, or Katakana
mode. However, a space is displayed when there is no corresponding character in
number, English, or Katakana mode.
Press [Convert].
“おかがき” is converted to Kanji.
Then pressing displays a list of
candidate words.
Use to select “岡垣” and
press [Select].
“岡垣” is inputted.
<Example> Inputting “岡垣” in a name input screen of the Address Book
Inputting Kana or Kanji
1
2
3
かな
Set Convert
A/1/カナ Optn.
オカガキ おかがき
Name? 24
おかがき
かな
Set Submenu
Optn.
の さん は が 、 と
に を 様 。 ? ! も
ちゃん
氏 です 君
で
Name? 24
岡垣
Detail Select
Dictionary
Optn. 001/004
Name? 24
岡垣
Dictionary
002/004
岡垣
おかがき
オカガキ
オカガキ
92
Inputting Characters
Page 95

93
Inputting Characters
¡
To consecutively input characters assigned to a same key, move the cursor to the right.
¡
To input an E-mail address, you can input “@ezweb.ne.jp” by selecting it from phrases.
See “Inputting Phrases” (p.94) about inputting phrases.
Characters in cannot be used for your E-mail address
when you change it.
Characters available for E-mail Addresses
Key
. @ ー _ / : 〜 1
a b c A B C
2
d e f D E F
3
g h i G H I
4
j k l J K L
5
m n o M N O
6
p q r s P Q R S
7
t u v T U V
8
w x y z W X Y Z
9
Available characters
0 , . ー 〜 ! ?
In a text input screen,
…………「t」
………「o」
…………「t」
…………「t」
………「o」
………「r」
………「i」
press 3 times
press once
press 3 times
press once
(makes a cursor move)
press once
press 3 times
press 3 times
<Example> Inputting “tottori” in an E-mail address input screen of the Address Book
Inputting English Characters
1
ab Set Submenu
EーMail Add? 57
tottori
Page 96

Press [Submenu] in a text
input screen.
Use to select “Phrases” and
press [Select].
Groups of phrases are displayed.
Use to select
“インターネット(Internet)” and press
[Select].
A list of phrases is displayed.
<Example> Inputting “@ezweb.ne.jp” in an E-mail address input screen
Use to select “@ezweb.ne.jp”
and press [Select].
“@ezweb.ne.jp” is inputted.
1
2
3
4
Inputting Phrases
Back Select
Submenu
Go To
Phrases
Clipboard
Select Characters
Kuten Code
Prediction OFF
Font Size
Stop Editing
Back Select
Phrases
インターネット
あいさつ
伝言
返事
EーMailPriorityDisp
絵文字入り定型文
自作定型文
Back Select Detail
インターネット
TEL0900001××××
△△△△△△@ezweb.ne.jp
@ezweb.ne.jp
http://www.
.ne.jp
.co.jp
.com
.dion.ne.jp
ab
Sym.
To(Must) 624
△△△△@ezweb.ne.jp
Submenu
Set
94
Inputting Characters
Page 97

95
Inputting Characters
Use to select and press
[Select].
A list of pictograms is displayed.
Press in a text input screen.
A list of input mode is displayed.
…Pictogram
…Emoticon
…Symbol
Use to select a pictogram
and press [Select].
The pictogram is inputted.
<Example> Inputting a pictogram
¡To change categories, press or .
¡To switch between pictograms, emoticons and symbols,
press .
¡
To input consecutively, press [Continue].
1
2
3
Inputting Pictograms, Emoticons and Symbols
Sym.
ab Set Submenu
Pastel Mail
Body
14/10000
Good morning
Switch Select
Pastel Mail
Body 12/10000
Good morning
かな カナ カナ
AB ab 12
AB ab 12
Sym.
Back
Pastel Mail
Continue
Select
Body
12/10000
Good morning
Recent
Face
¡To delete one character, put the cursor on a character you want to delete and press . To
delete several characters, pressing for more than one second deletes all characters
which are at the right of the cursor, or deletes all characters when there is no character at
the right of the cursor.
Page 98

Symptom What to check Solution
Page
The power
cannot be
turned on.
Cannot charge.
Calls cannot
be made/
received.
Ringer for
incoming calls
does not sound.
There is no
reaction when
pressing a key.
The callerʼs
voice cannot
be heard/is
hard to hear.
Calls are
interrupted.
Is the cellphone set to the desktop
holder properly?
Is the connector put in the desktop
holder properly?
Is the connector put in the external
terminal properly?
Is the power turned on?
Is “Out” displayed or are you in an
area where the reception is bad?
Did you enter the area code? (when
you cannot make calls)
Is the ringer volume set to
“S(OFF)” ?
Is the silent mode set?
Is the earpiece volume set to low?
Is the reception bad?
Did you press for more than
one second?
Is the battery pack exhausted?
Is the battery pack inserted
properly?
Set the cellphone properly.
Put the connector properly.
Put the connector properly.
Turn the power on.
Move to a place where the
reception is good.
First dial the area code.
Adjust the ringer volume.
Release the silent mode.
Adjust the earpiece volume.
Move to a place where the
reception is good.
Is the reception bad? Move to a place where the
reception is good.
Is the power turned on? Turn the power on.
The cellphone
answers
automatically.
Is the In-Phone Ans Machn set? Release the In-Phone Ans Machn.
Press for more than one
second.
Charge the battery pack.
Insert the battery pack properly.
13
12
−
28
31
27
13
12
12
12
13
13
24
13
13
32
Troubleshooting
96
Troubleshooting/Remote Auto Lock
Page 99

Set the operating condition of the remote auto lock in case that you lose
the A5514SA. Receiving a specified number of calls from a specified
number in a specified time locks automatically your A5514SA, which
prevents other personʼs use.
Setting Remote Auto Lock
Press in turn
from the standby screen and
enter lock code.
¡Lock code is set to “1234” at the time of
purchase.
Select an item and press [Select].
ON/OFF
Use to select “ON” and press [Select].
Specified Number
Press [New], enter a phone number and press [Set]. → [Back]
¡To enter several phone numbers, select “Specified Number”, press [Submenu] and
press [New Enter].
Specified Time
Enter time and press [Select].
¡1 to 10 minutes can be set.
Number of Rings
Enter a number of rings and press [Select].
¡3 to 10 times can be set.
Press [Set].
Remote auto lock is set.
BeforeLosing...(RemoteAutoLock)
1
2
3
Back Select Set
Remote Auto LookM432
ON/OFF
[ OFF]
Specified Number
[ No Entries]
Specified Time
[ 3 Minutes]
Number of Rings
[ 5 Times]
97
Troubleshooting/Remote Auto Lock
Page 100

Locking Automatically by Remote Control
Make a call to your A5514SA in accordance with the operating
condition you set.
Remote auto lock runs and the guidance is heard.
1
¡Even if the receiver answers when you make a call to set the remote auto lock, it is also
counted as Number of Rings.
¡Up to 3 phone numbers can be specified.
¡Remote auto lock cannot be launched when your A5514SA is powered off or when it
cannot receive radio waves.
98
Troubleshooting/Remote Auto Lock
 Loading...