

Sanuvox SABER SMART User Manual
LAMP HANDLING
Do not touch Lamp glass without gloves. Reduced
performance of Lamp may result. Clean Lamp after
handling.
OPERATION
To start the purifier, press the switch to the I (ON) position. The LCD screen is illuminated to show that power is on. Within a few
seconds, the UV lamp will energize.
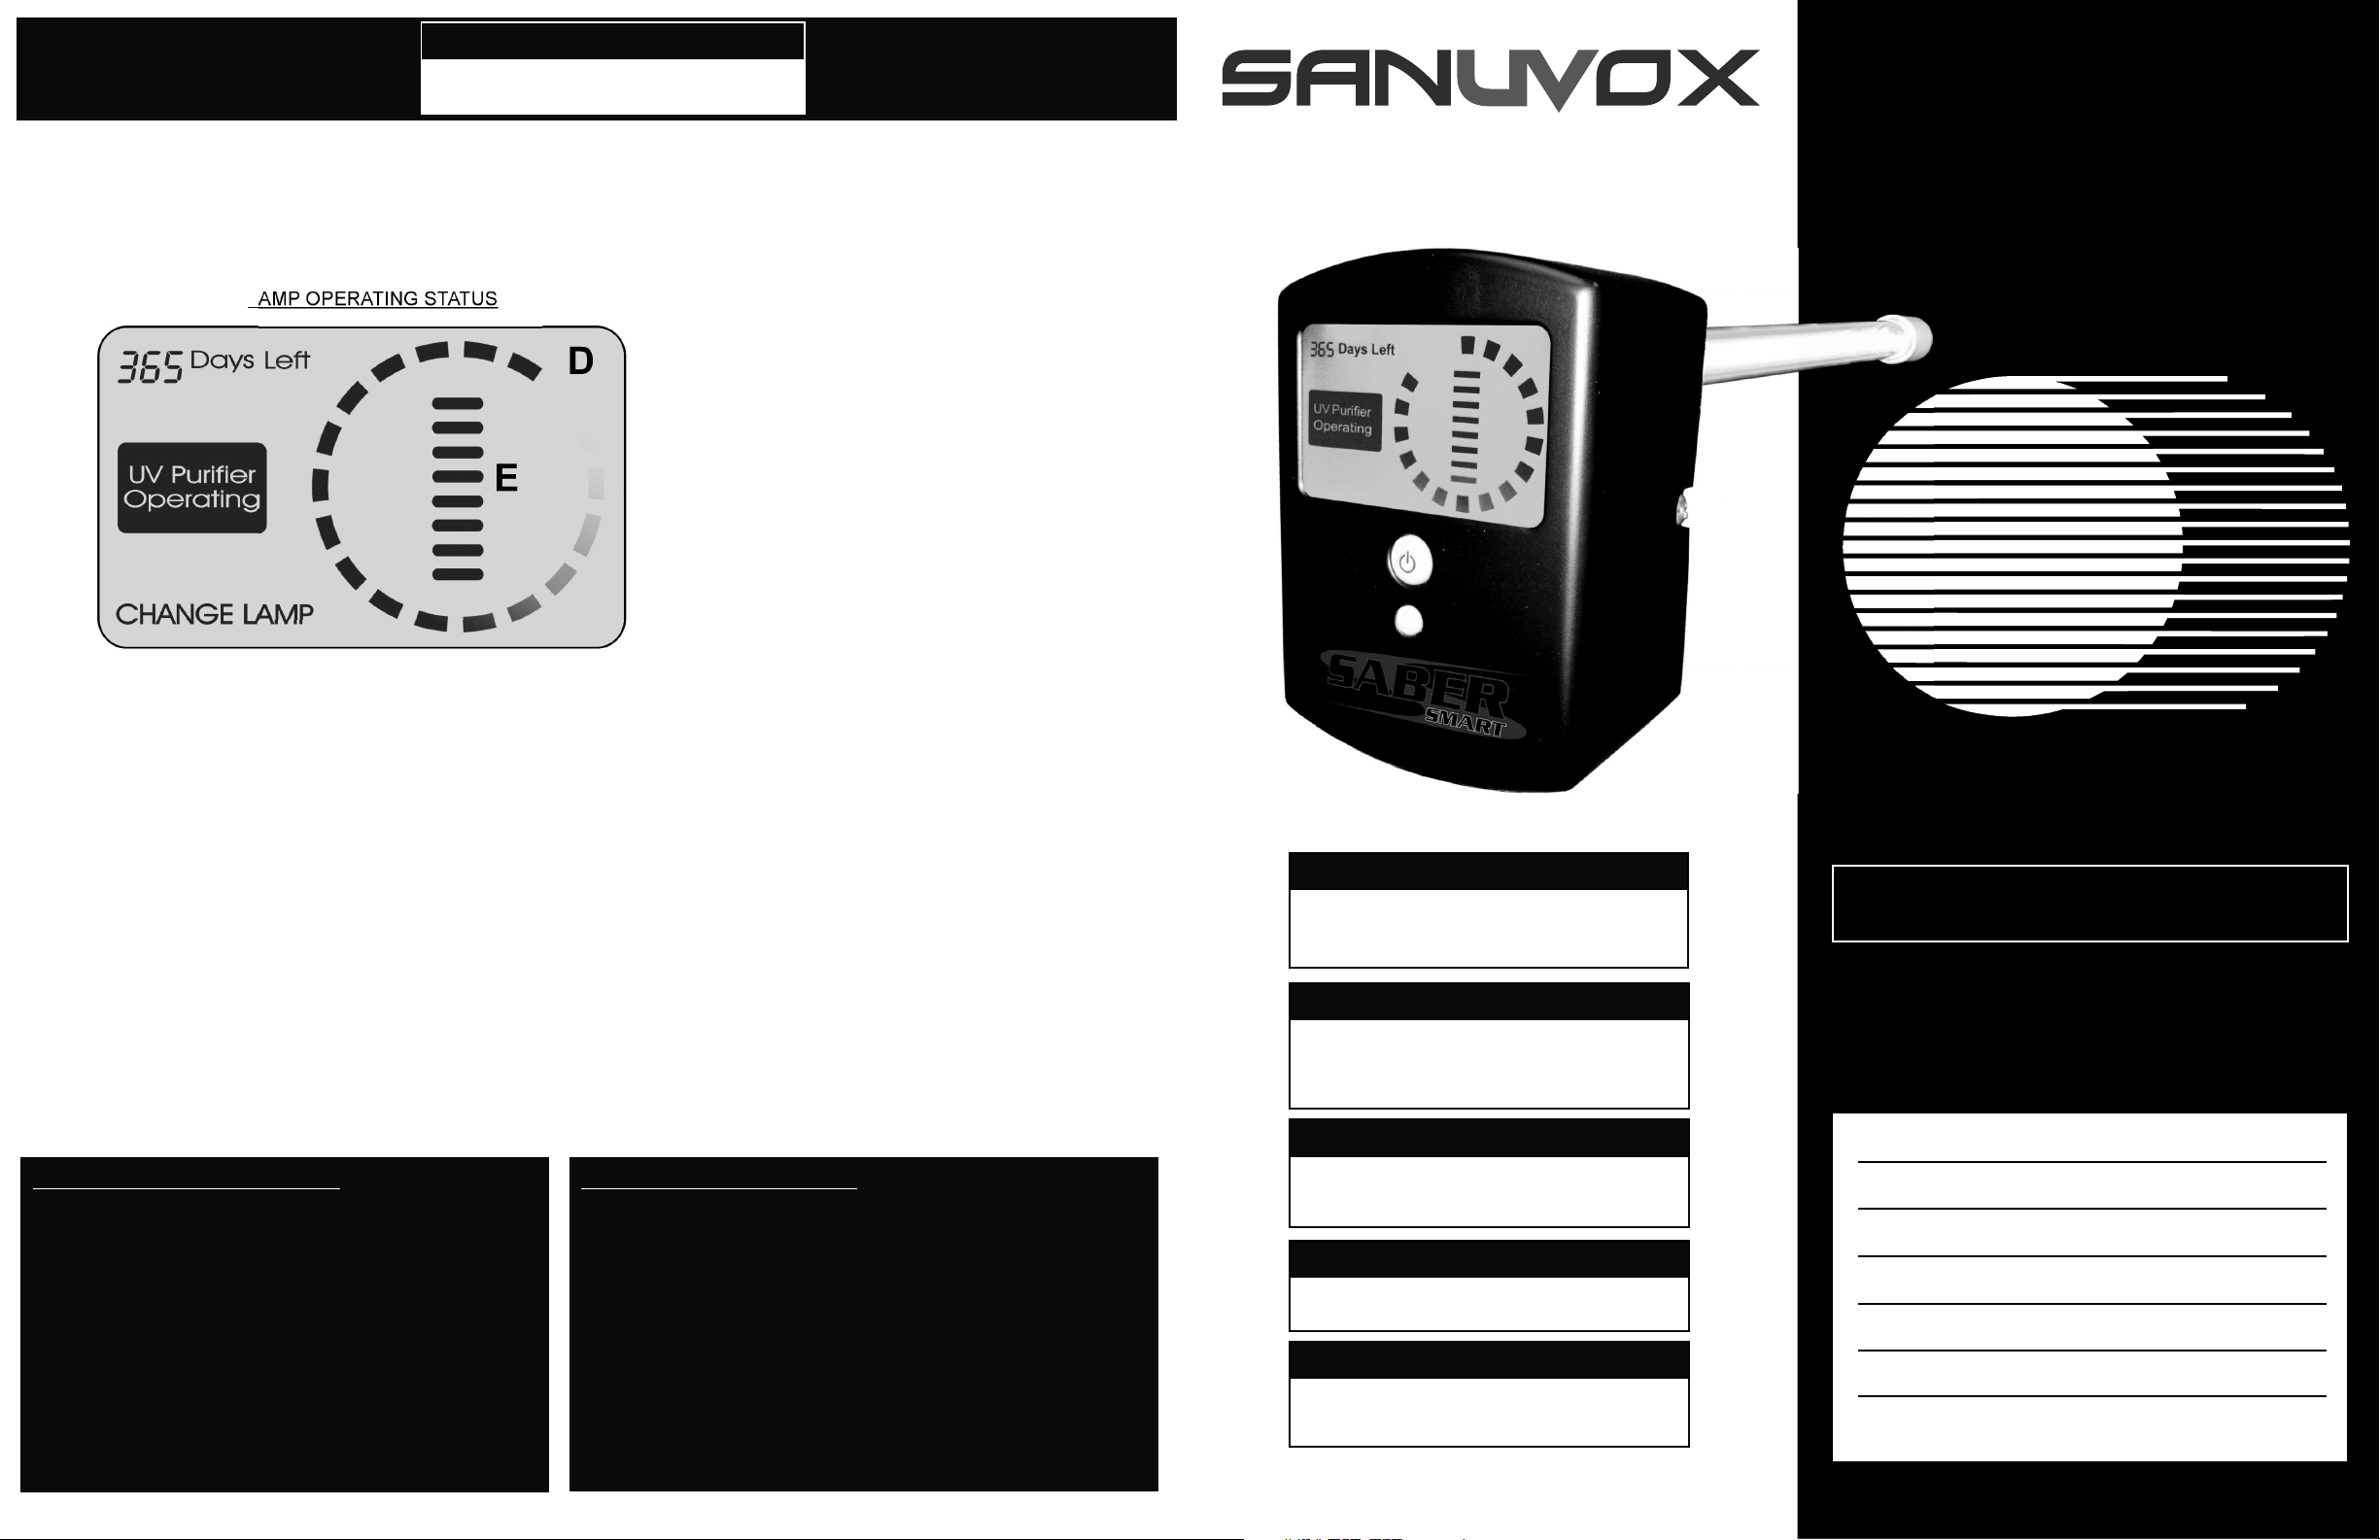
LAMP OPERATING STATUS
SABER SMART
INSTALLATION
MANUAL
A
B
SABER SMART
MANUAL
C
A. Day Counter - Provides lamp life left in days.
B. UV Lamp Status - UV PURIFIER OPERATING will show unless:
• Unit is OFF
• Lamp has failed
• Lamp is over 365 day life
C. Change Lamp Indicator - After 325 days, CHANGE LAMP will illuminate, indicating that lamp will need
to be replaced soon. After 365 days, CHANGE LAMP will flash indicating it is time to replace lamp.
CHANGE LAMP will also stay on if the lamp fails before the 365 days is up.
D. Timer - Rotating Circle indicates time counter. It will stop rotating after 365 days.
E. Day Counter - Bars will reduce in number each 45 days indicate lamp life left. At 365 days, no bars will be displayed
indicating the lamp should be replaced.
MAINTENANCE
Disconnect all power before performing any maintenance or service. The ultraviolet lamp should be cleaned every two to three
months. To clean, open the control box by loosening the screws with a flat head screwdriver and pulling cover off. Next, disconnect
white socket from lamp. Loosen the 3 screws on the retainer ring. Turn retainer ring left. Pull out lamp (leave it in retainer ring).
Wipe lamp with a soft tissue and alcohol based solution. Reverse the above procedure to reinstall the lamp. Lamps need periodic
replacement to maintain design specifications. Replace lamps after 1 year of operation. Follow instructions below on how to Reset
the Timer Feature. Contact a local dealer for replacement lamps.
When to use the RESET BUTTON
The “Reset” Button is used to reset the unit back to
original factory condition. This includes resetting the
“Lamp Timer” feature back to 365 days. The Reset Button
should be used when:
1) When you see a blank screen with “Change Lamp”
or
2) After replacing the UV Lamp with a new UV Lamp
In both instances, you must turn the Saber SMART “ON”
and press and hold the Reset Button for 3 seconds. This
will reset the unit back to factory condition.
Troubleshooting the UV Lamp
Disconnect the white socket from the Lamp. Ohmmeter required.
Place one probe of the ohmmeter to one of the four pins on the
end of the Lamp. Touch the other probe of the ohmmeter to each
of the other three pins until you find the matching pin. The
ohmmeter will read approximately 3 ohms (almost a short). This
indicates that the filament is good. Check the other two pins. If
both sets of filaments test OK, the Lamp is functioning. If one or
both sets of filaments read an open circuit (infinity) on resistance,
the Lamp is defective.
Trouble-Shooting the UV Lamp
WARNING
Before installing or performing maintenance or service
on the purifier, DISCONNECT from main power.
Electrical shock can cause injury or death.
WARNING
Never expose eyes or skin to ultraviolet light from any
source. The Purifier MUST be DISCONNECTED from
power source before performing maintenance or
service. Personal injury may result.
WARNING
Do not touch Lamp glass without gloves. Reduced
performance of Lamp may result. Clean Lamp after
handling.
WARNING
The UV Lamp contains a small quantity of mercury. If a
Lamp breaks, clean and dispose of with care.
WARNING
Use only specified replacement Lamps with your
Purifier. Use of an incorrect Lamp can result in damage
to the Purifier and/or Lamp.
Follow all safety codes.
Wear safety glasses and work gloves.
PLEASE SAVE FOR YOUR RECORDS
Serial Number#
Date Installed:
Installed By:
Installers Contact info.:
SANUVOX TECHNOLOGIES INC. © 2008
Manufacturer reserves the right to discontinue, or change at any time, specifications or designs without notice and without incurring obligations.
1-888-SANUVOX www.sanuvox.com
SABER SMART
INSTALLATION
MANUAL
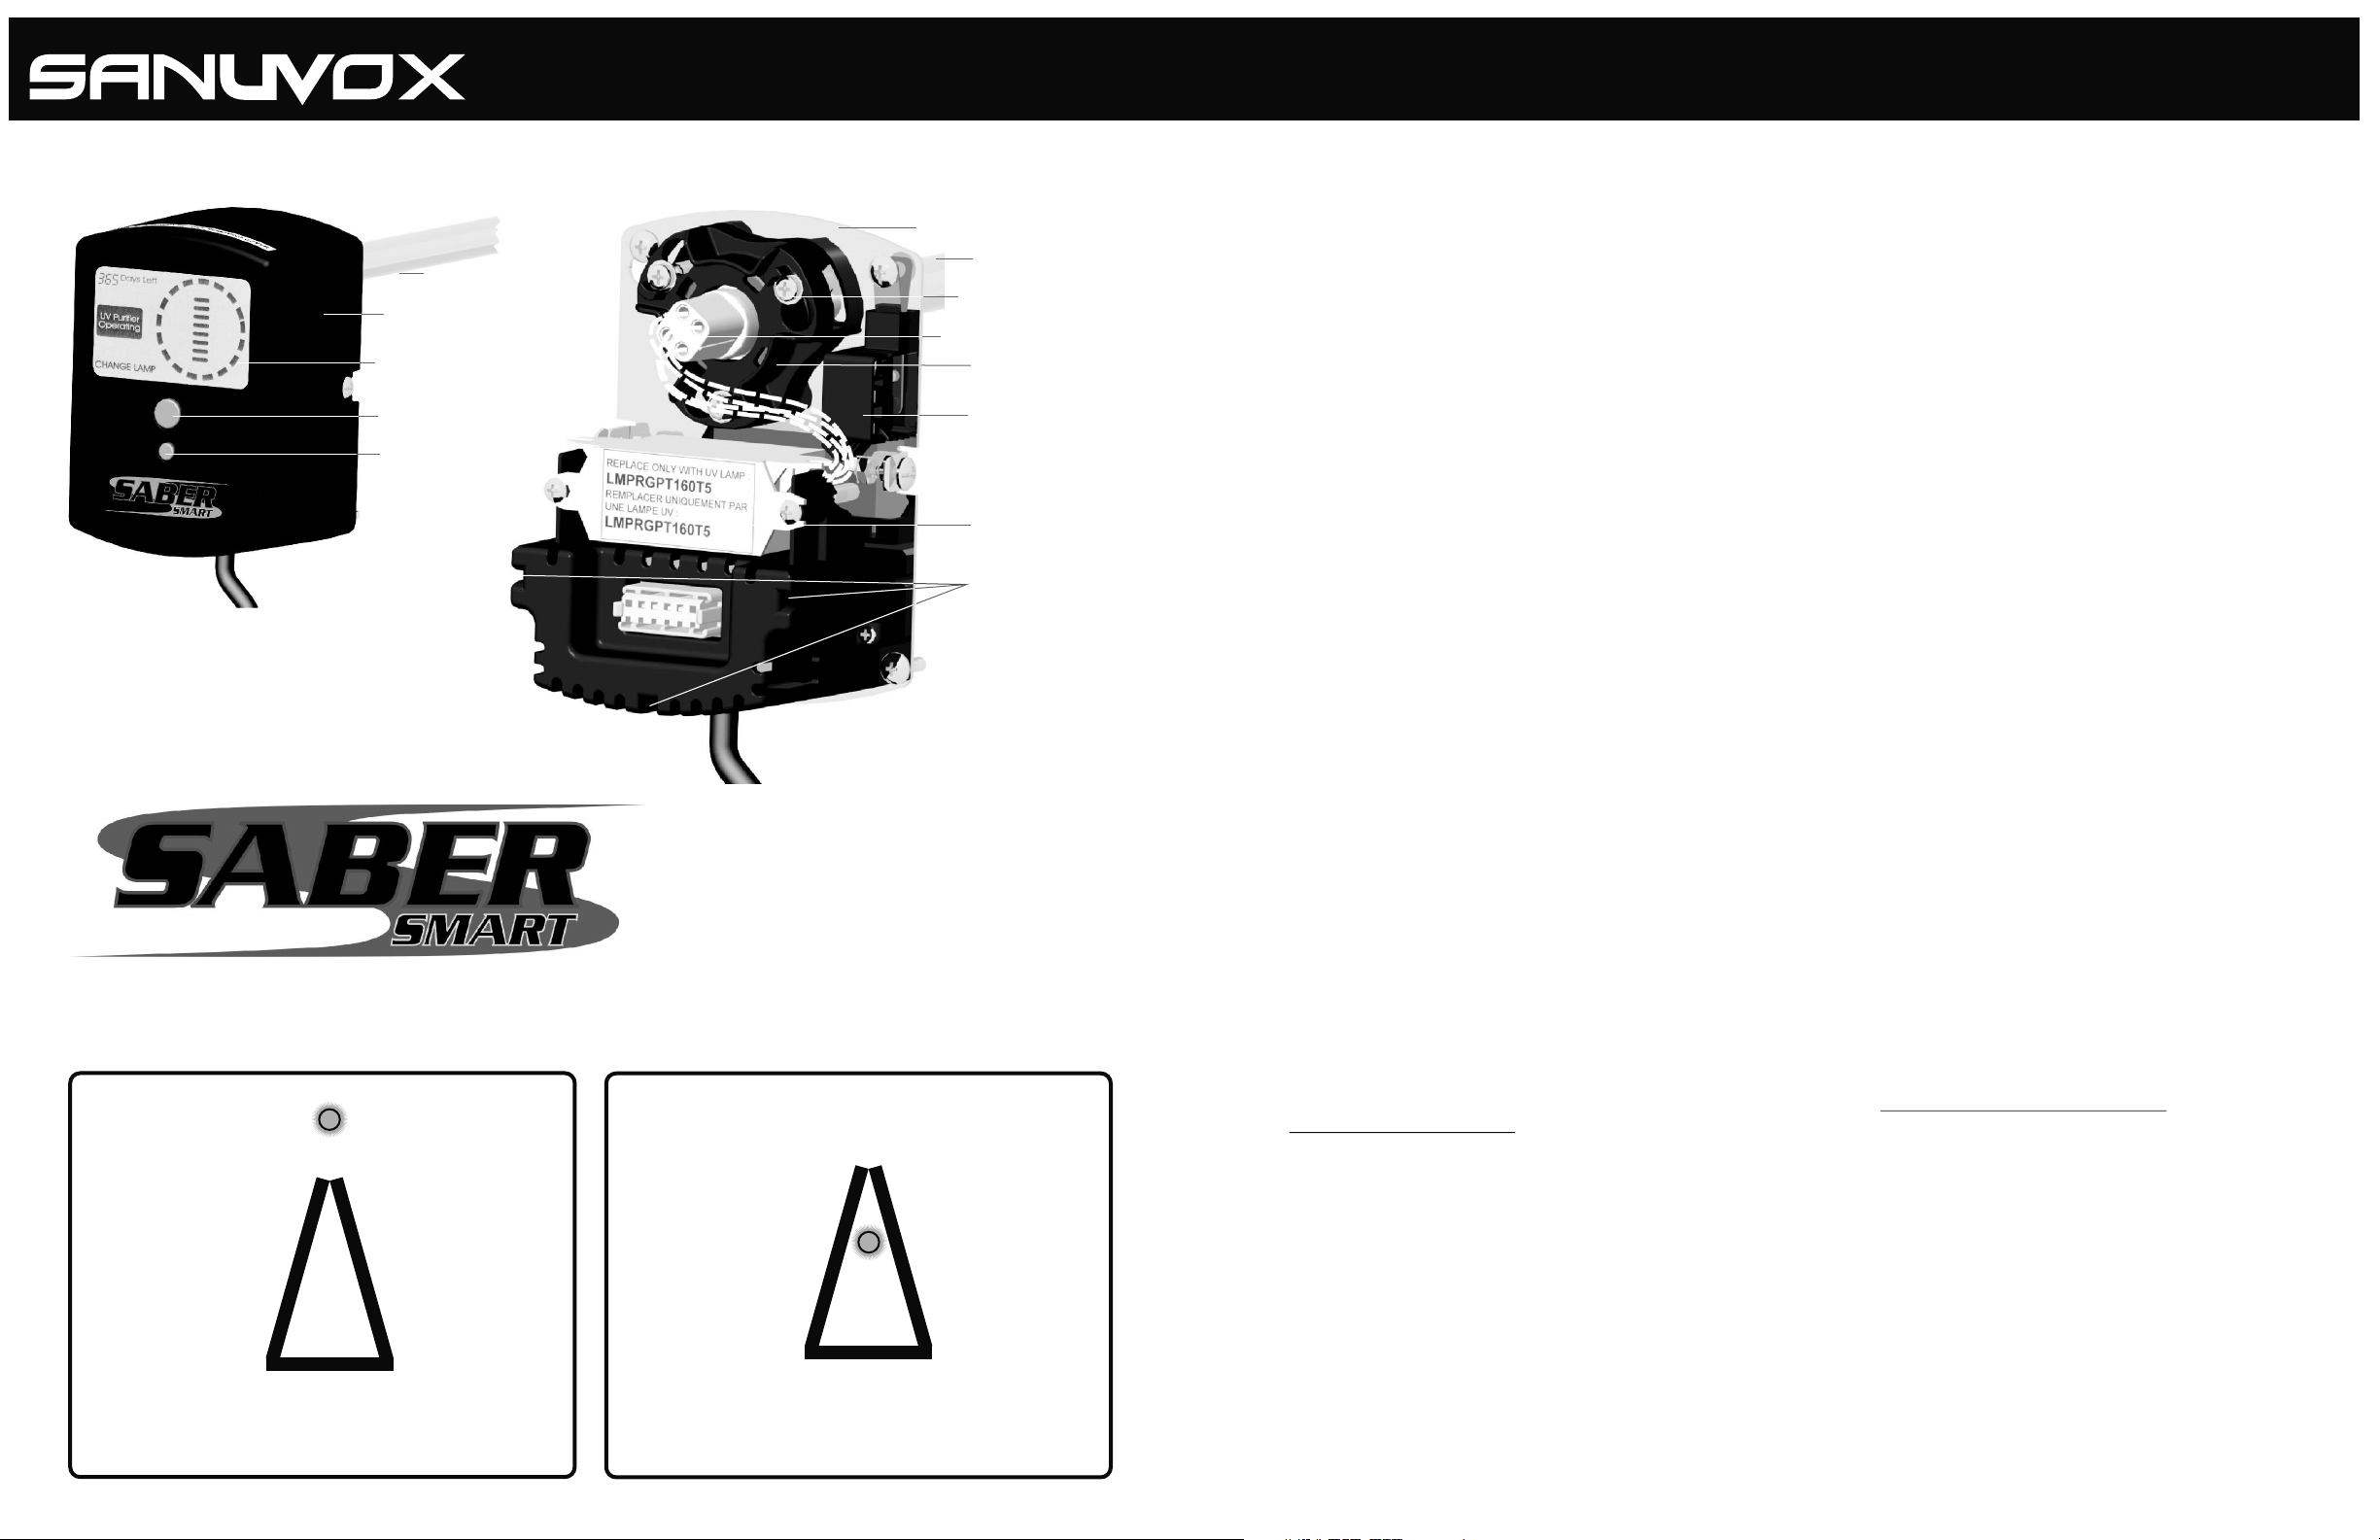
Figure A. Saber Smart
UVC Lamp
Front Cover
3” LCD Display
Power Button
Reset Button
Figure B. Saber Smart
w/ Front Cover Removed
Back Plate
UVC Lamp
Lamp Retaining Ring
Set Screws
White Ceramic Lamp Plug
Lamp Retaining Ring
Safety Switch
Ballast
Guides for
Front Cover
SAFETY CONSIDERATIONS
Installation and servicing of air-conditioning equipment can be hazardous due to system pressure and electrical components. Only
trained and qualified service personnel should install, repair, or service air conditioning equipment. Untrained personnel can perform
basic maintenance functions such as changing lamps. Trained service personnel should perform all other operations. When working
on air conditioning equipment, observe precautions in the literature, tags and labels attached to the unit or accessory, and other
safety precautions that may apply. Follow all safety codes. Wear safety glasses and work gloves.
GENERAL
The ultraviolet object purifier is designed to kill odor causing bacteria, viruses, mold and fungus that may be transmitted through the
ducts of the HVAC (heating ventilation, and air conditioning) equipment. The ultraviolet purifier is installed so that the UV rays treat
the coil of the HVAC unit. It can be installed in the supply section inside the HVAC evaporator “A” coil facing into the HVAC
evaporator coil, or from the top of the coil, shining onto the coil. The purifier is simple and easy to install in an existing HVAC unit
and incorporates a quick release mechanism to clean or replace the lamp.
INSTALLATION
Location — The preferred location for installation of the purifier is inside of the HVAC evaporator coil or on the top of the HVAC
evaporator coil. Ultraviolet light may damage certain plastics and exposed non-UV-C (ultraviolet energy, C-Band) protected wires or
drain pan. If the purifier is installed in the supply plenum or over the evaporator coil, the drain pan (if plastic) should be protected
from any UV rays. Cover the exposed area with reflective material such as metal tape or aluminum foil. Ensure site can be supplied
with the necessary power receptacle and that there is adequate clearance for service. Wrap exposed plastic and wiring.
The purifier can be mounted in a horizontal or vertical position. More than one unit can be used if necessary.
Sample Installations
*NOTE:
UV exposure is dangerous to eyes, skin and
exposed plastics and rubber.
Evaporator Coil*
Sample Installations
*NOTE:
UV exposure is dangerous to eyes, skin and
exposed plastics and rubber.
Evaporator Coil*
Mount Purifier on Unit — Perform the following procedure to install the purifier:
1. Do not plug in purifier.
2. Evaluate the ideal area for locating and installing the purifier. Ensure that the purifier will fit into the
plenum. Space required internally is approximately 15 inches. If the drain pan is plastic, it must be
protected with a reflective material, such as metal tape or aluminum foil.
3. Ultraviolet light may damage certain plastics and exposed non-UV-C (ultraviolet energy, C-Band)
protected wires or drain pan. Wrap exposed plastic and wiring.
4. Remove the control box from its package. Remove the cover of the control box from the back plate by
loosening the screws on the sides of the box 1 to 2 turns. Then pull the backplate off by inserting finger
in the 3/4” diameter hole and pulling back.
5. Using the backplate as a template, mark off the four corner holes and the center of the lamp access
hole to be cut in the plenum.
6. Drill the four corner holes 1/8" diameter and drill a 1" hole in the center.
LAMP INSTALLATION (refer to Figure B.)
7. Secure the control box to the plenum using four sheet metal screws. NOTE: Safety switch needs to be
secured in top right corner.
8. Open the carton containing the lamp and remove the foam packaging.
9. Loosen the three screws around lamp retaining ring.
10. Turn ring to left and remove from back plate.
11. Insert the end of the lamp with the 4 pins through the side of the retaining ring where the rubber
grommet is visible.
12. Seat lamp firmly into the retaining ring. Lamp will not move.
13. Insert lamp through the hole in back plate and then into the plenum.
14. Push retainer ring back onto 3 set screws and turn to right to lock lamp in place.
15. Tighten the 3 screws on retaining ring.
16. Connect the ceramic white plug onto the lamp pins. The plug is designed so that it can only be installed one way. If the pins
are not lined up with the holes, rotate the socket 90 degrees.
17. Replace cover by lining up the three guides in control box cover and slide into place. Tighten the two
screws on the sides.
18. The purifier can now be plugged into a standard110-volt receptacle.
 Loading...