

Sanuvox R MAX Instruction Manual
Instruction Manual
WHOLE HOME UV AIR PURIFIER & ODOR REMOVAL SYSTEM
IMPORTANT SAFETY INSTRUCTIONS
READ AND SAVE THESE SAFETY INSTRUCTIONS BEFORE USING THIS PRODUCT.
Read and follow all instructions contained in
this manual before using the product. Failure
to comply with these instructions may result
in personal injuries or damage to the unit or
system.
1. Installation and servicing of air conditioning
and related equipment can be hazardous due
to systems pressure and electrical components.
Only trained and qualied service personnel
should install, repair or service equipment.
2. Untrained personnel can perform basic
maintenance functions such as replacing
lamp(s) and/or lter(s). All other operations
should be performed by trained service
personnel.
3. When working on the unit or system, observe
precautions in the literature, tags and labels
attached to the unit or system, and all other
safety precautions considered as best practices
in the HVAC industry.
R MAX
Residential Model
4. When applicable, local regulation may
comprise more restrictive installation and/or
certication requirements. The afore mentioned
requirements prevail on those of this document
and the installer agrees to conform to these at
his own expense.
5. Follow all the safety instructions outlined in this
document and respect all local and national
codes applicable.
6. Never expose eyes or skin to ultraviolet light
from any source. Therefore, before installing
or performing maintenance on the unit or
system, TURN OFF AND DISCONNECT the
unit or system from all power sources (there
may be more than one switch to disconnect).
CAUTION: Electrical shock may cause
personal injuries or possibly death.
7. UV rays may destroy certain types of lters
(polymer or plastic); please keep the unit or
system light away from shining directly on
plastic.
8. When installing or performing maintenance on
the UV unit or system, it is recommended to
wear safety glasses and gloves. In order to
avoid reduced performance of lamp(s), do not
touch lamp glass without gloves.
9. UV lamps contain a small quantity of mercury:
if a lamp breaks, clean and dispose of with
care. UV lamps can be disposed/recycled after
use, as any other uorescent lamps. Contact
and follow your local and national authorities’
specic instructions.
10. Use only specied SANUVOX branded
replacement UV lamps with your unit or
system. Use of any other lamps will void your
warranty and can result in damage to the unit,
system and/or lamp(s).
11. Most UV units or systems are not waterproof.
DO NOT INSTALL OUTDOORS unless
specied otherwise.
SAVE THESE INSTRUCTIONS
Installation Date: _______________ Installed by: _________________
Installer Contact Info.: _________________________________________
Sanuvox Technologies Inc, © 2019 All rights reserved. July 2019 EN v.1
Instruction Manual for R Max
TABLE OF CONTENTS
IMPORTANT SAFETY INSTRUCTIONS 1
TABLE OF CONTENTS 2
ABOUT THE PRODUCT 3
COMPONENTS 3
How it Works 3
ACCESSORIES & KITS 3
SETUP & INSTALLATION 4
What you will need 4
What’s included 4
Step by Step Setup & Installation 4
OPERATION 7
How to Operate your Product 7
How to Read the LCD Screen Display 7
How to Activate “Airow Detection” Function (Optional) 8
Step by Step Function Activation 8
How to Reset your Product and its Lamp Timer 9
Step by Step Product and Lamp Timer Reset 9
MAINTENANCE 10
How to Replace Lamp(s) 10
Step by Step Lamp Replacement 10
How to Clean your Product 12
STORAGE 12
ULTRAVIOLETS: UVV & UVC 12
ELECTRICAL RATINGS, POWER CONSUMPTION & AVAILABLE VOLTAGE 12
TROUBLESHOOTING 12
What you will need 12
Internal Components 12
Problems & Solutions Table 13
A. Step by Step R Max Ballast Box Opening 14
B. Step by Step UV Lamp Continuity Test 14
C. Step by Step LCD Screen Circuit Board Bypass
(Ballast or Circuit Board Validation)
D. Step by Step Thermistor Bypass 16
WARRANTY 16
CONSUMER RELATIONS 16
15
2
1-888-726-8869www.sanuvox.com
Instruction Manual for R Max
ABOUT THE PRODUCT
The R Max represents an evolution in whole home UV air purication. The high-efciency patented design destroys airborne
bio-chemical contaminants, while providing important user information on the 3” back-lit LCD display. Installed into the return or
supply plenum, the Sanuvox proprietary process maximizes dwell (contact) time between the air and UV energy. With the ability
to treat homes up to 4,000 sq.ft., the patented technology rapidly puries the air and removes odors within the home.
For information or recommendations on how to size your specic application, please call SANUVOX at 1-888-726-8869.
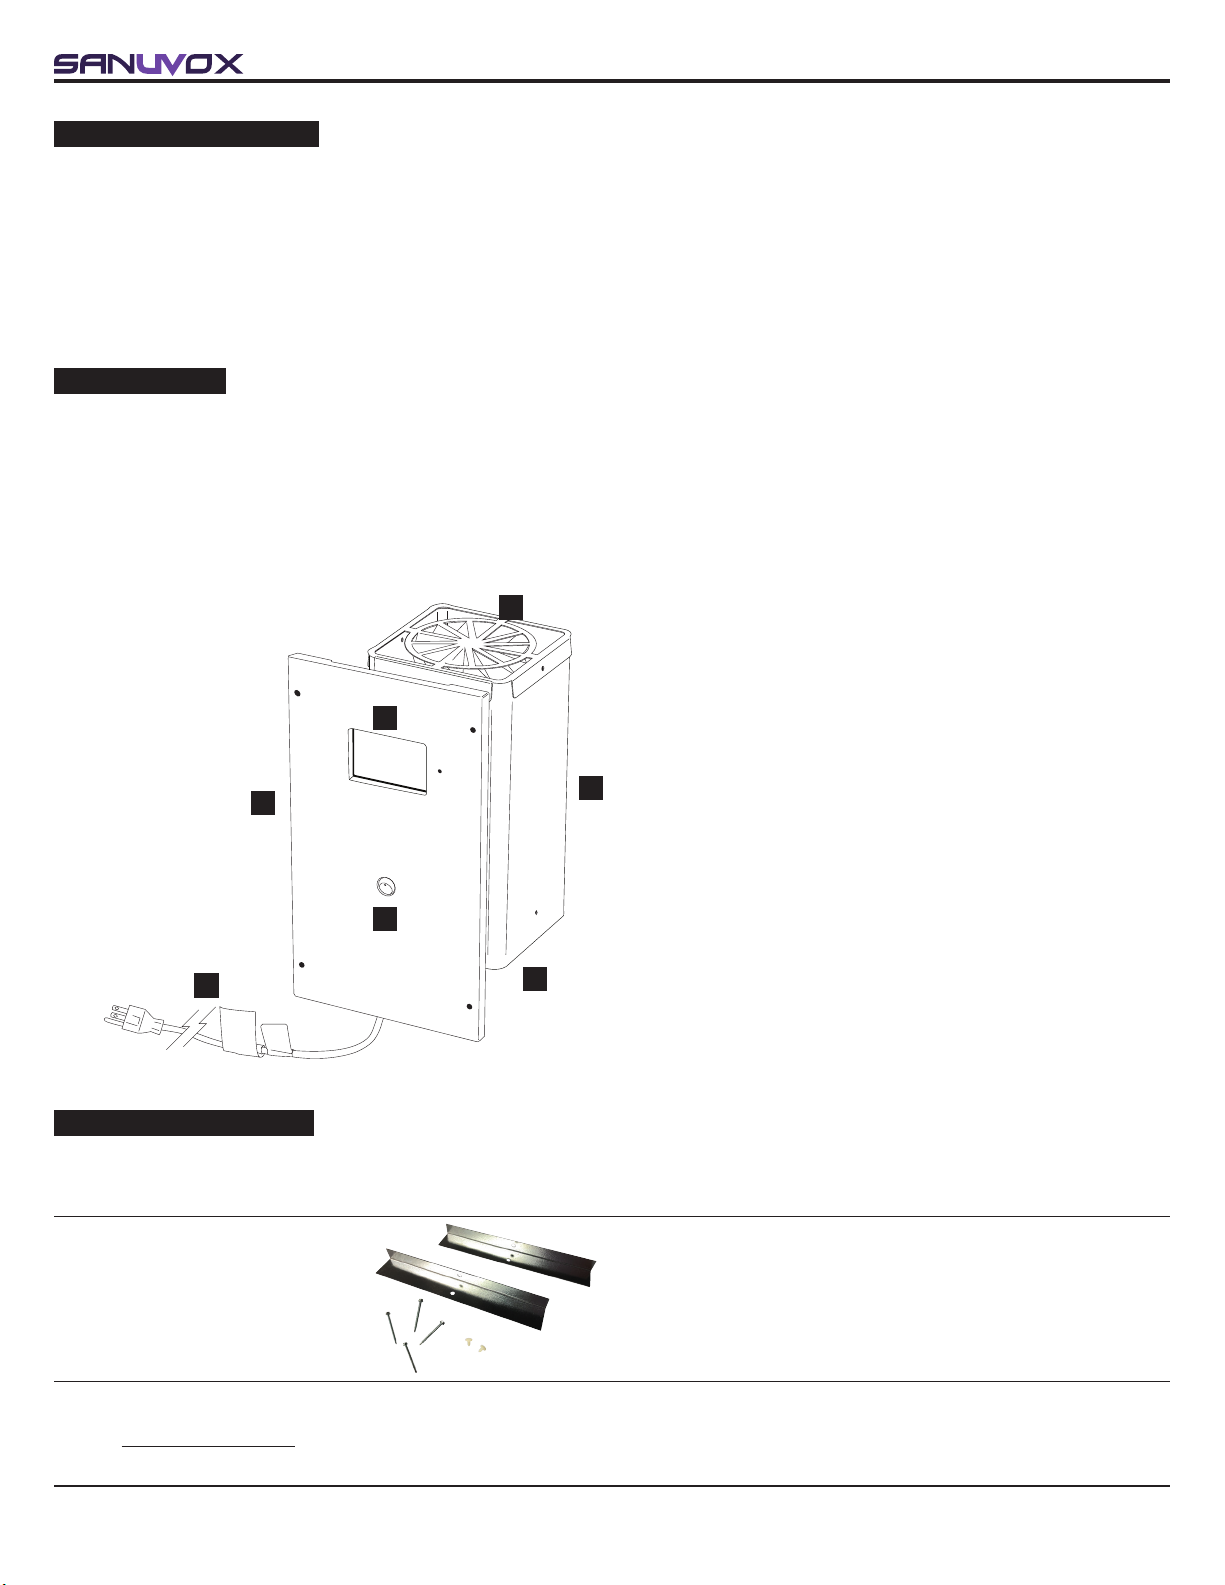
COMPONENTS
How it Works
Contaminated air enters the R Max parallel to the UV ‘J’ Lamp, thus increasing contact time with the UV energy. The Turbulator
spins and mixes the air around the UV ‘J’ Lamp. First, the UVV oxidizing section of the lamp, boosted by Cobalt, destroys
chemicals and odors. Then, the UVC germicidal section of the lamp destroys the biological contaminants. The Aluminum
Reector Chamber coated with cobalt amplies the UV energy for optimal purication. Finally, the treated air circulates through
the home.
A
B
A. Turbulator & Air Inlet
B. LCD Display
D
C
C. Aluminum Chamber coated with cobalt
(UV Lamp inside)
D. Cover
E. Power Switch
F. Power Cord
E
F
G
G. Air Outlet
ACCESSORIES & KITS
The following optional accessories and/or kits work great with your product (sold separately).
Duct Board Installation Kit
(Optional)
Accessories made to facilitate R Max installation
on MSC duct board.
For instruction manuals or information about your optional accessories and/or kits, please call SANUVOX at 1-888-726-8869
or visit www.sanuvox.com.
1-888-726-8869www.sanuvox.com
3
Instruction Manual for R Max
SETUP & INSTALLATION
What you will need
A utility knife to unpack all components, a Phillips No.2 screwdriver, a measuring tape, a marker and a metal saw.
CAUTION: Handle your product with care to avoid breaking parts. Make sure you have a free and safe space to unpack,
install and setup your product. Conrm you have access to the necessary power source for the product requirements (see unit
or system label). If you have any questions regarding the installation instructions, call SANUVOX at 1-888-726-8869.
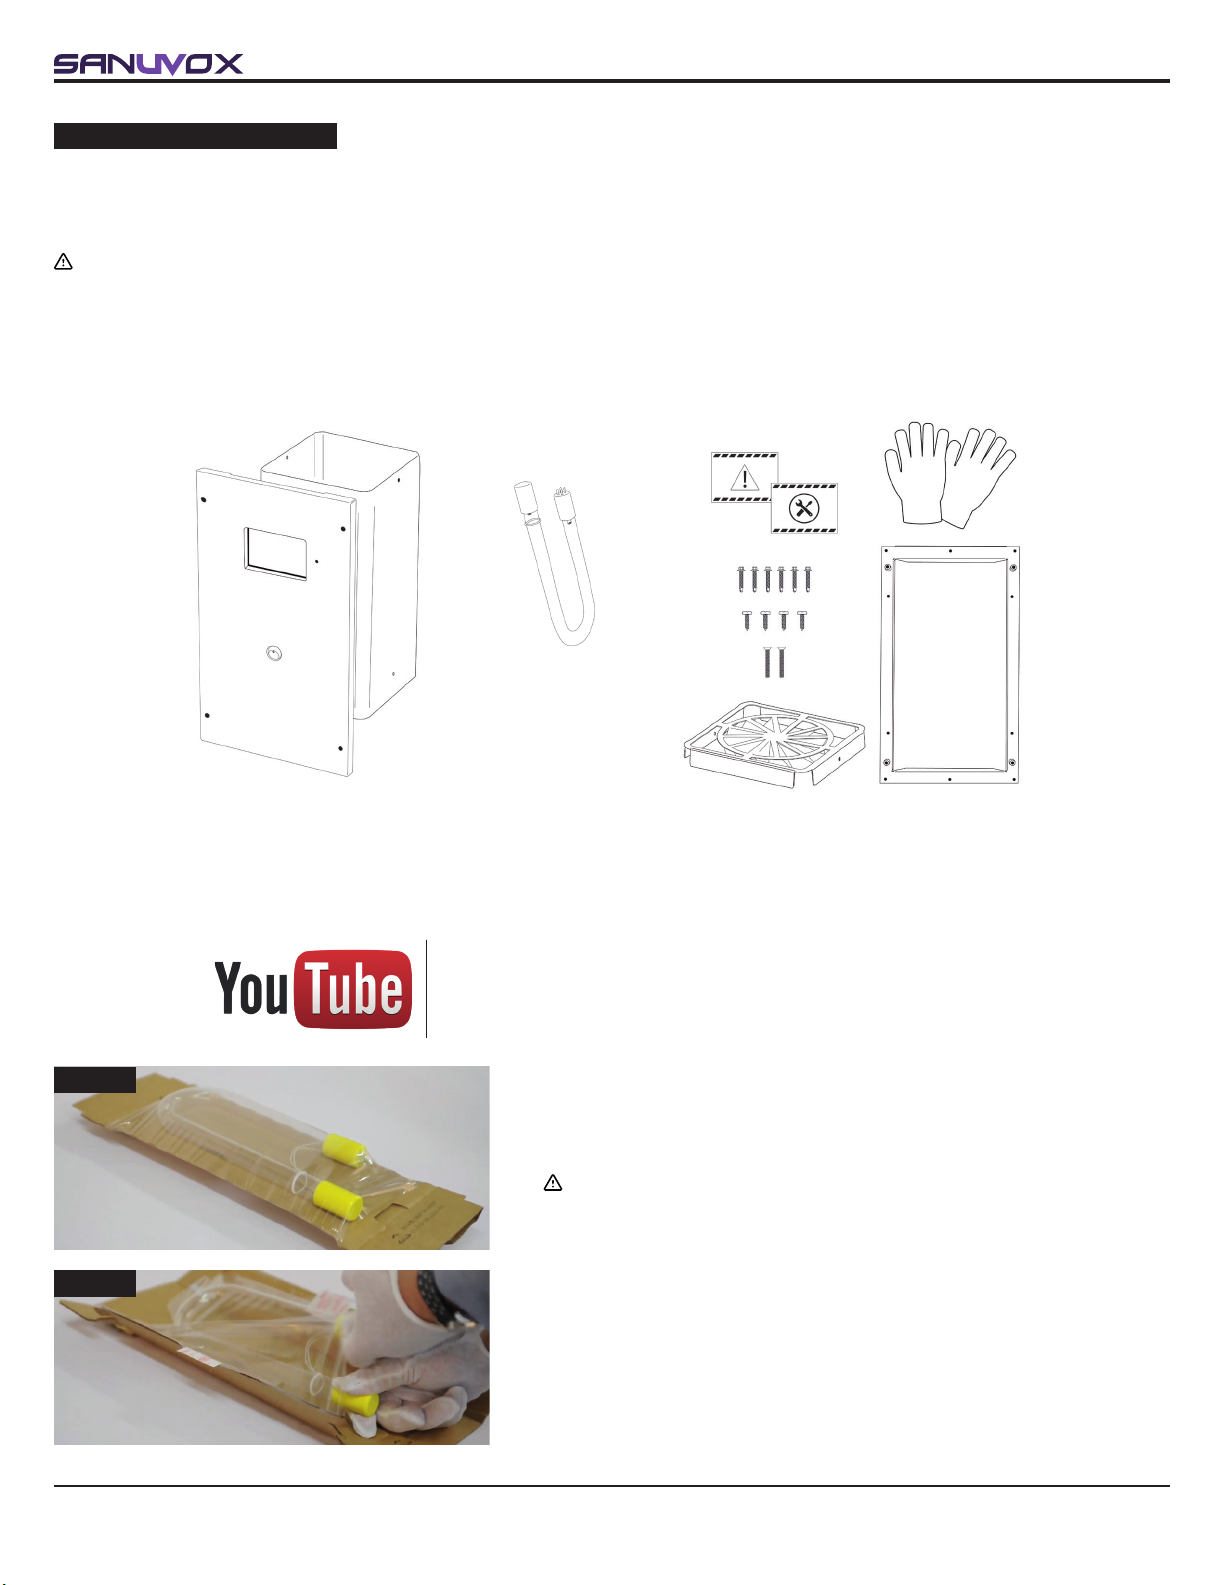
What’s included
The R Max, a UV lamp and a basic installation kit.
The installation kit includes: a UV caution decal, a maintenance decal, a pair of cotton gloves, metal screws for frame (6), Phillips
screws for cover (4), 8-32 screws for tabulator (2), a frame and a turbulator.
Step by Step Setup & Installation
Check out Sanuvox Technologies YouTube Channel
for the R Max installation video!
STEP 1
STEP 2
1. Prepare the R Max for installation. Remove the contents from
packaging. Only after you have visually inspected the UV lamp should
you break the security seal on the underside of the cardboard sleeve.
CAUTION: Before installing or performing maintenance on the unit
or system, TURN OFF AND DISCONNECT the unit or system from
all power sources (there may be more than one switch to disconnect).
2. Carefully slide the UV lamp out from the cardboard sleeve. Be sure to
wear the cotton gloves (included) guaranteeing a clean lamp free from
ngerprints.
NOTE: Fingerprints on the lamp will negatively impact the UV output of
the lamp.
4
1-888-726-8869www.sanuvox.com
STEP 3
STEP 4
Instruction Manual for R Max
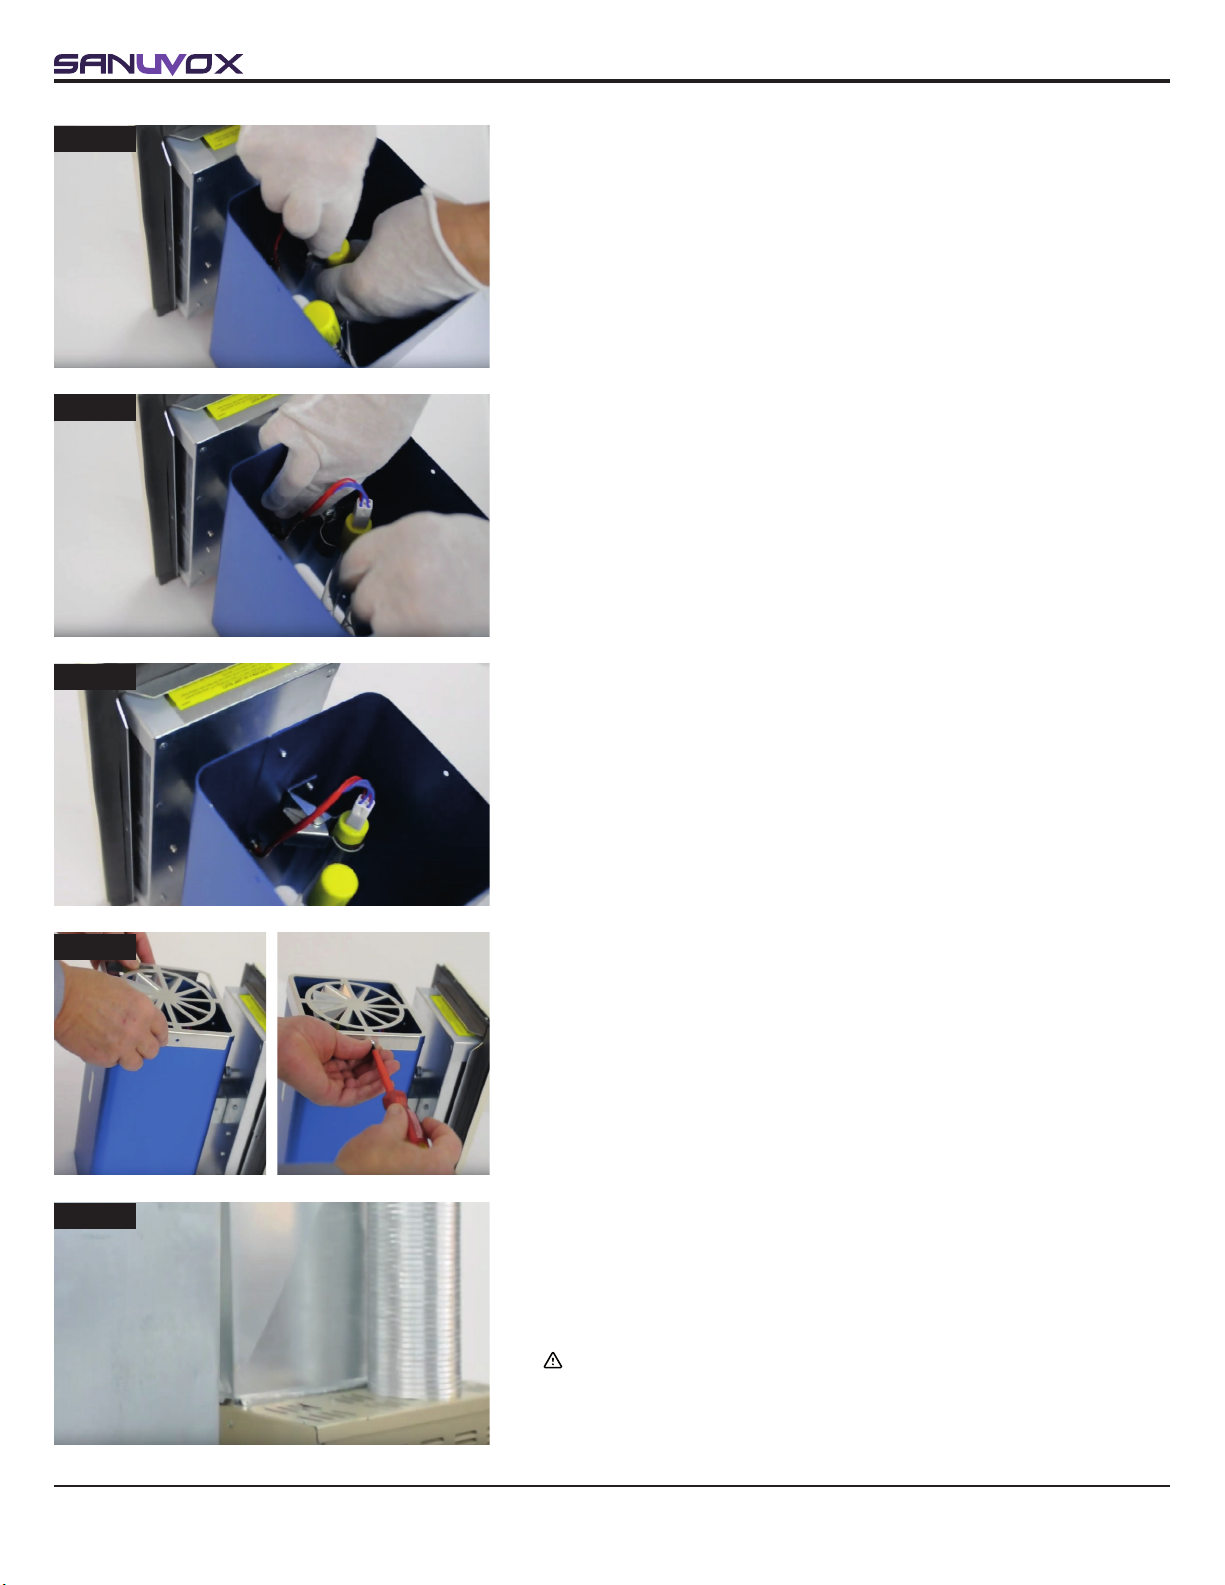
3. While holding the porcelain end-cap (with 4 pins), carefully push the
white connector onto the four pins. The connector will t into position.
NOTE: Too much force applied from the opposite end-cap may break
the lamp.
4. Slide the UV lamp porcelain end-cap (with 4 pins) in the aluminum
tube of the unit, then through the clamp.
STEP 5
STEP 6
STEP 7
5. Once the UV lamp is inserted, release the clamp to x the lamp in place.
6. Once the UV lamp is installed, place the turbulator on top of the reecting
chamber securing it with 2 screws provided in the installation kit. It is
important to note that the air should rst ow through the turbulator
before moving in front of the UV lamp.
7. Prepare the duct (return or supply) for installation. Evaluate the ideal area
for installing the air purier. The reection chamber should always be
parallel to the airow. Ensure that the purier will t into the plenum and
position it keeping in mind to minimize plastic exposure to direct UV light.
CAUTION: Before installing or performing maintenance on the unit
or system, TURN OFF AND DISCONNECT the unit or system from
all power sources (there may be more than one switch to disconnect).
1-888-726-8869www.sanuvox.com
5
 Loading...