

Sanuvox R+ User Manual

Operation
1. Once installed, the Sanuvox R+ should preferably be plugged into a conditioned dedicated 110V outlet. If one is not available, an
extension cord may be used. For 220V applications, the Sanuvox R+ plug may be cut and hardwired to a dedicated 220V source.
IMPORTANT: When the Sanuvox R+ is turned on, The <<STAND-BY>> icon will appear on the LCD display. The Sanuvox R+ must first go
through a warm-up not lasting more than 45 seconds, after which time the unit will become operational and the <<STAND-BY>> icon will
begin to blink. THE UNIT WILL NOT FUNCTION UNTIL THE WARM-UP IS COMPLETE.
2. To turn the Sanuvox R+ 'ON', press the toggle switch on the center of the front cover to the 'ON' position. The <<STAND-BY>> icon will
appear on the LCD display not lasting more than 45 seconds (warm up). After the warm-up, the purifier will be in "Stand-By Mode" (<<Stand-
By>> will begin to blink). The purifier will remain in Stand-By Mode until the purifier senses air-flow.
3. Upon sensing air-flow the purifier will automatically switch to "Air Purification Mode" The <<STAND-BY>> icon will disappear and be replaced
with useful user information.
UNDERSTANDING THE LCD DISPLAY
R+
INSTALLATION
MANUAL
Solid for up to 45 seconds
Troubleshooting the UV Lamp
To check to make sure the UV Lamp has in fact failed:
Disconnect the socket from the Lamp.
Placing the probe of the ohmmeter to one of the four pins on the end of the Lamp, touch the other probe of the ohmmeter to each of the other pins
until you find the matching pin. The ohmmeter will read approximately 3 ohms (almost a short). This indicates that the filament is good. Check the
other two pins. If both sets of filaments test OK, the Lamp is functioning. If one or both sets of filaments read an open circuit (infinity) on resistance,
the Lamp must be replaced.
WARNING
Before installing or performing maintenance or
service on the purifier, turn off main power switch
to unit. Electrical shock can cause injury or death.
There may be more than one disconnect switch.
WARNING
Never expose eyes or skin to ultraviolet light from
any source. The Purifier MUST be DISCONNECTED
from power source before performing maintenance
or service. Personal injury may result.
WARNING
Do not touch Lamp glass without gloves. Reduced
performance of Lamp may result. Clean Lamp after
handling.
WARNING
The UV Lamp contains a small quantity of mercury.
If a Lamp breaks, clean and dispose of with care.
Follow all safety codes.
Wear safety glasses and work gloves.
PLEASE SAVE FOR YOUR RECORDS
Serial Number#
Date Installed:
Installed By:
Installers Contact info.:
UV LAMP RESET BUTTON (To be used to reset “Days Left” after UV Lamp change-out)
To the right of the LCD screen is a small hole which houses the RESET BUTTON. To RESET the “Days Left” back to 1096, insert a small object
similar to a paper clip into the hole holding down the button for 3 seconds.
WARNING
Use only specified replacement Lamps with you
Purifier. Use of an incorrect Lamp can result in
damage to the Purifier and/or Lamp.
February 2011
SANUVOX TECHNOLOGIES INC. © 2011
1-888-SANUVOX www.sanuvox.com
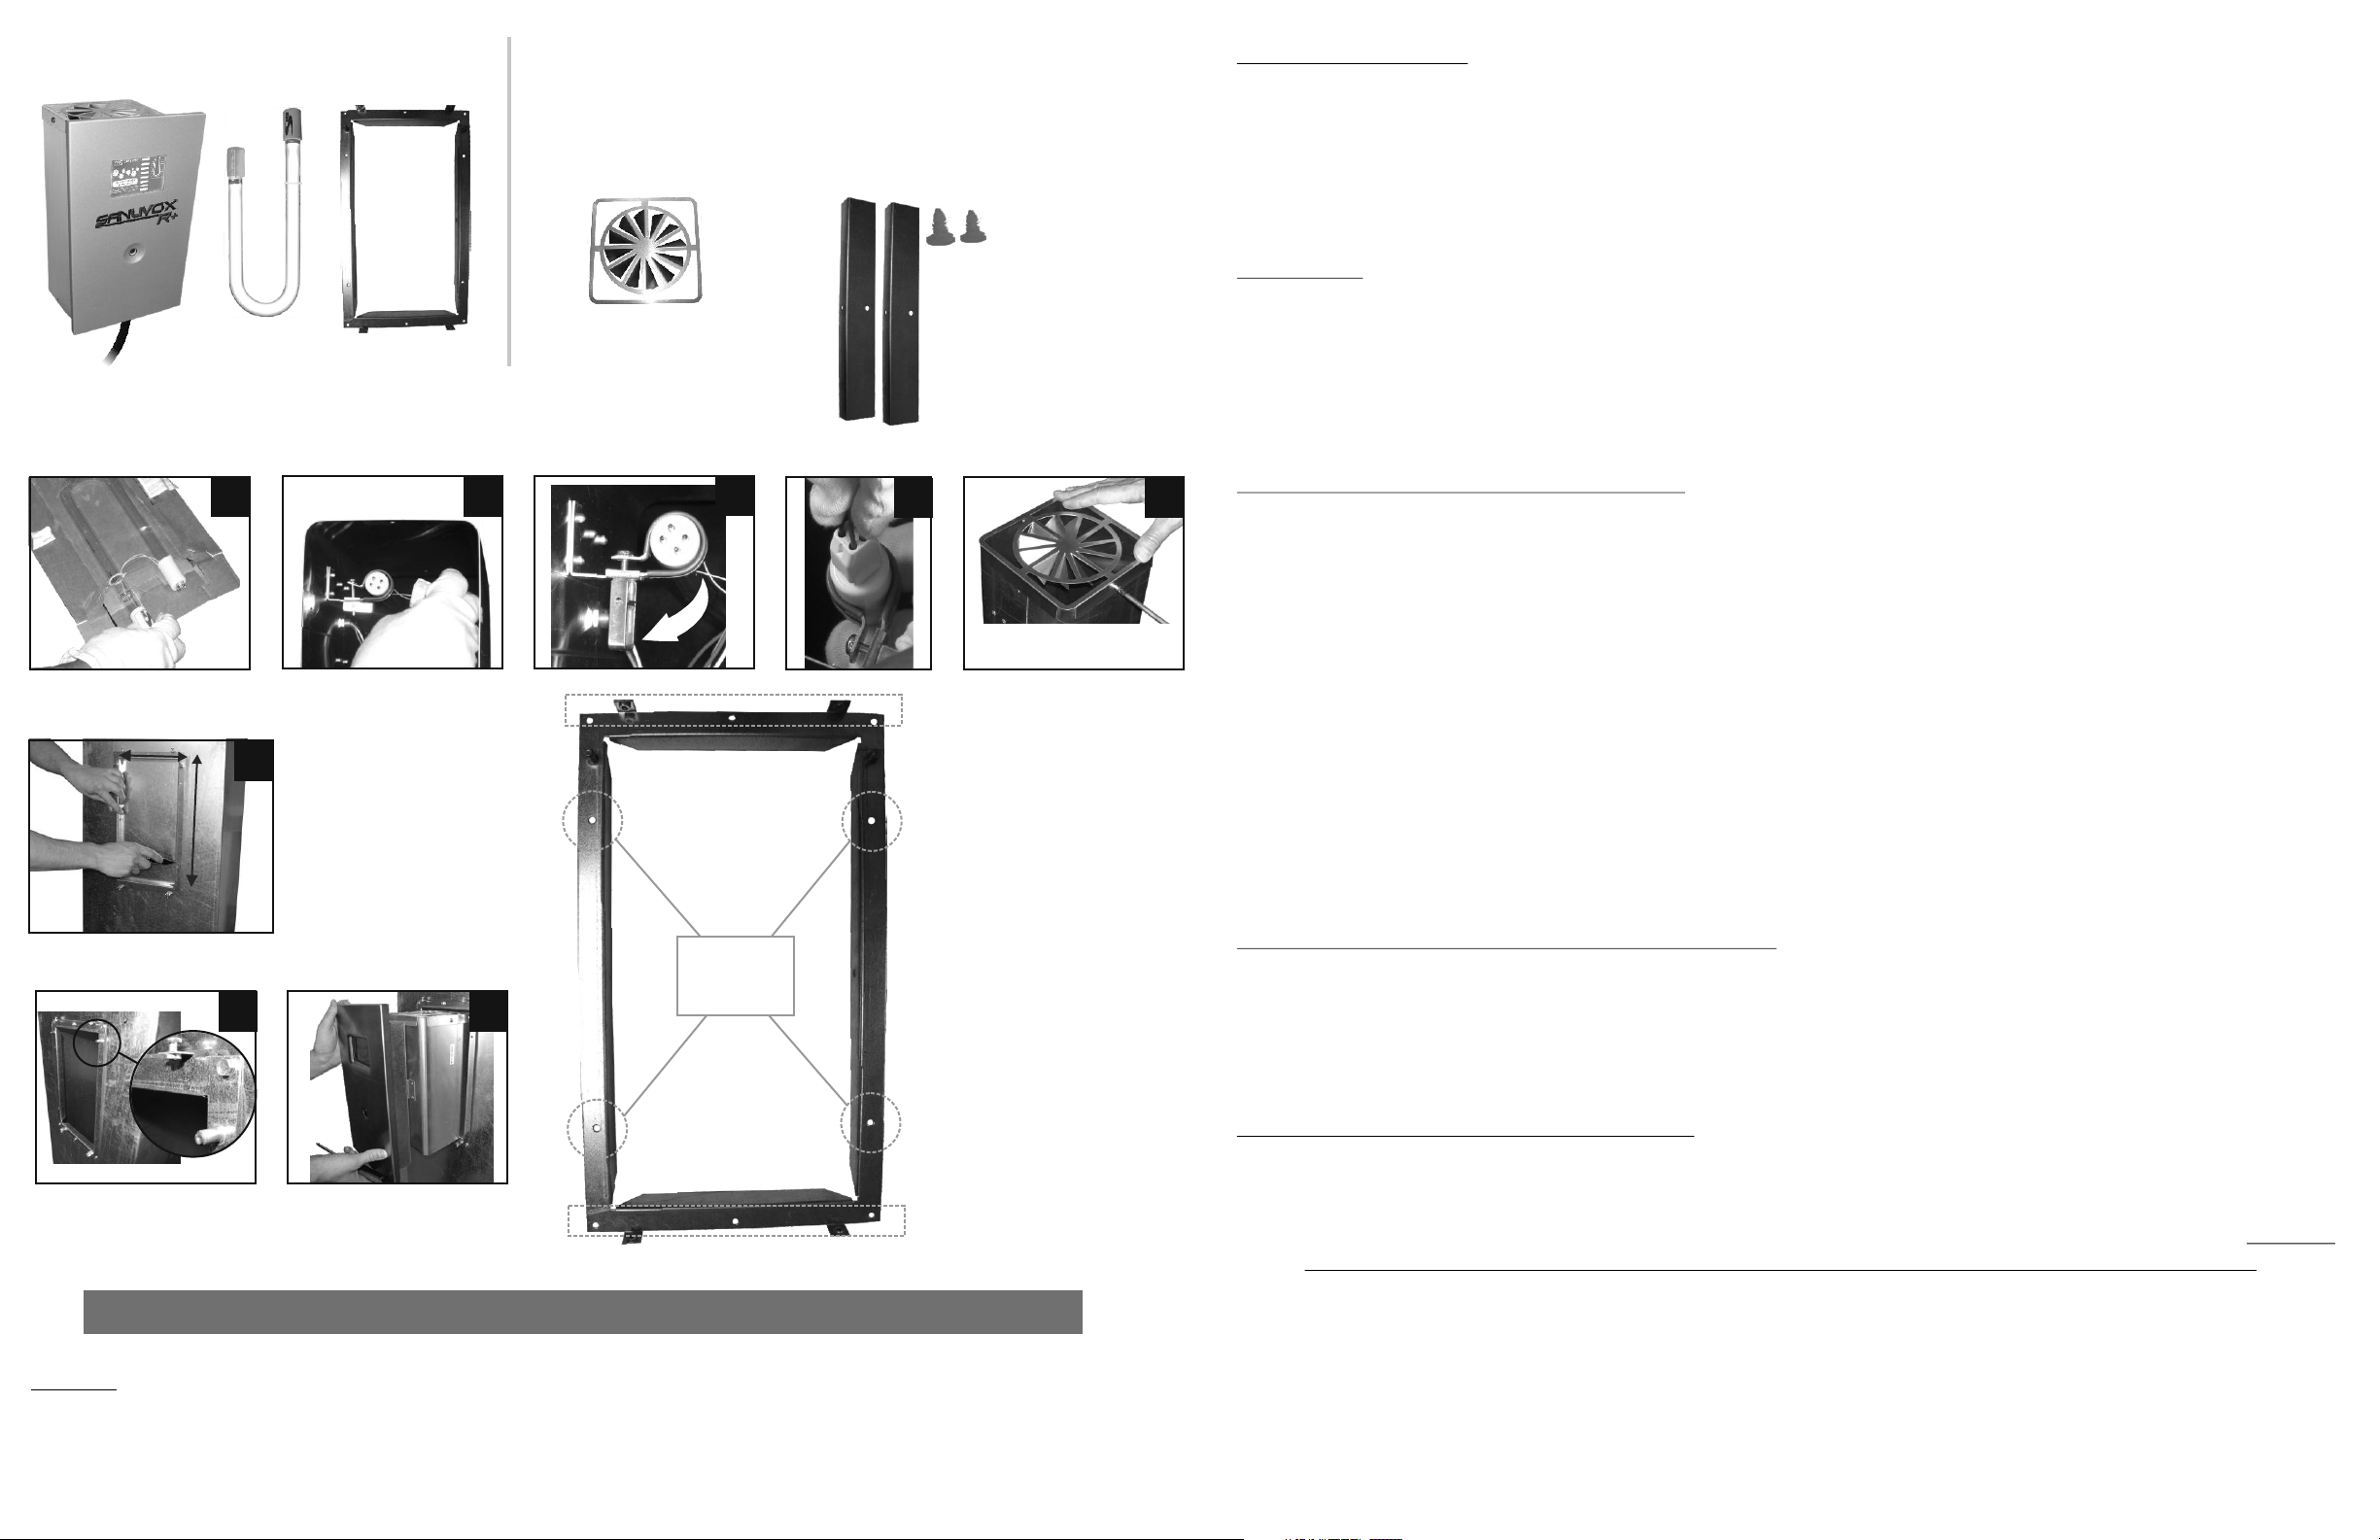
INCLUDED IN THE BOX: Installation Kit #1 Ductboard Mounting Kit #2
SAFETY CONSIDERATIONS
Sanuvox R+
FIGURE A.
FIGURE B.
6.25”
Frame
UV Lamp
1 2
1
12.25”
- Gloves
- 6 x Sheet Metal Screws (#8)
(1/2" long)
- Turbulator
Turbulator
3
- 2 x “L” Bracket Supports
- 4 x Sheet Metal Screws (#8) (2" long)
- 2 x “Tree” Buttons
- Instructions
2 x “Tree” Buttons
2 x “L” Bracket Supports
4 5
Holes to be used to
mount the R+ to the
duct wall with included
sheet metal screws
The two Turbulator screws
are factory mounted to the
Reflecting Tube
Installation and servicing of air-conditioning equipment can be hazardous due to system pressure and electrical components. Only trained and
qualified service personnel should install, repair, or service air conditioning equipment. Untrained personnel can perform basic maintenance
functions such as changing lamps. Trained service personnel should perform all other operations. When working on air conditioning equipment,
observe precautions in the literature, tags and labels attached to the unit or accessory, and other safety precautions that may apply. Follow all
safety codes. Wear safety glasses and work gloves.
INSTALLATION
Location The preferred location for installation of the Sanuvox R+ UV System is in the return duct as the air will be treated before the filter and
HVAC coil. If it is not possible to install in the return duct, it may be installed in the supply duct. Make sure site can be supplied with the
necessary power requirements. Direct UV exposure is dangerous to plastics. Wrap exposed plastic and wiring to shield from direct UV exposure
(The Sanuvox wire-set is Teflon coated which makes them resistant to UV exposure). The purifier can be mounted in a horizontal or vertical
position. More than one unit can be used in homes equipped with more than one air handler.
Preparing the Sanuvox R+ for Installation (FIGURE A.)
NOTE: Remove contents from packaging. Only after you visually inspect the UV Lamp should you break the Security Seal on the
underside of the cardboard sleeve.
1. Carefully slide the UV Lamp out from the protective sleeve. Be sure to wear the cotton gloves (included) guaranteeing a clean Lamp
free from fingerprints.
2. Slide the UV Lamp porcelain end-cap (the end with the 4 pins) through the clamp bracket. Insure that the Tension Lever is facing
downward.
3. Once the Lamp end-cap is in place, move the Tension Lever UP to lock the Lamp in place. If the Lever is loose, turn the Lever
clockwise a turn or so to tighten.
4. While holding the side of the Lamp attached to the clamp (the end with the four pins), carefully push the white connector onto the four
pins. NOTE: Although the Lamp is fairly strong, too much tension from the opposite side may break the Lamp.
5. Once the Lamp is installed, place the Turbulator on the top of the Reflecting Tube securing it with the two screws. The two screws are
already screwed to the Reflecting Box when shipped from the factory. The air must pass through this Turbulator as it enters the
Reflecting Tube.
.
FIGURE C.
1
2
Holes only to be
used with
ductboard
mounting kit
1
Align Pins
Note: The Align Pins are positioned
at the top of the Frame when the
Frame is installed to the duct.
Please Note: For DUCTBOARD installation, please refer to instructions included in Ductboard Mounting Kit #2
GENERAL
The Sanuvox R+ Ultraviolet Air Purification System is designed to destroy bio-chemical contaminants such as mold, bacteria, viruses, chemicals, VOCs
and odors that may be transmitted through the HVAC (heating ventilation, and air conditioning) system.
The Sanuvox R+ may be installed in the return or supply plenum.
Holes to be used to
mount the R+ to the
duct wall with included
sheet metal screws
Preparing the Duct (return or Supply) for Installation (FIGURE B.)
NOTE: Evaluate the ideal area for locating and installing the purifier. Ensure that the purifier will fit into the plenum. The space required
inside the plenum is approximately 9" deep x 6" wide x 12" high.
1. Use the included metal frame to trace the outline onto the duct (allow for a 1/4” space around the marking as to allow the frame to sit
properly in the duct . This will be the guide to cut the duct opening. The duct opening is 12.25" x 6.25".
Mounting the Sanuvox R+ to the Ductwork (FIGURE C.)
The metal frame is what supports the purifier to the duct. The metal frame will fit into the 12.25" x 6.25" opening. Use the six (6) sheet
metal screws to mount the frame to the duct. There are a total of 10 holes on the frame. The top 3 and bottom 3 holes are used to
secure the frame to the duct wall. The two holes on either side of the frame are to be used for the ductboard mounting kit. NOTE: The
orientation of the frame should be as to allow for the “Align Pins” to be positioned in the upper portion of the frame (Figure3).
1. Place the Sanuvox R+ into the frame, guided by the 'align pins'.
2. Secure the Sanuvox R+ to the frame with the four (4) retaining screws (two on the top, two on the bottom) NOTE: The Reflecting Tube
which houses the UV Lamp may be rotated 360 degrees (in 90 degree increments) allowing for the control box to be vertical in almost
any situation, but allowing the Turbulator, Reflecting Tube and Lamp to face the air-flow. (I.E. horizontal air-flow or up-flow air-flow). To
rotate the Reflecting Tube and UV Lamp, the front cover must be removed. The two Philips screws in the center of the housing (just
above the hex nut) must be removed. This will allow for the Reflecting Tube and UV Lamp to be easily rotated. Re-fasten screws once
the desired orientation is found. Replace cover.
1-888-SANUVOX www.sanuvox.com
 Loading...