

Sanus Systems Sanus Platinum Furniture PFFP2 PFFP2 PFFP2, PFFP2 Assembly Instructions Manual
Assembly Instructions for Sanus Systems Platinum Furniture Model: PFFP2
Thank you for choosing Sanus Systems Platinum Furniture. The PFFP2 is designed to support a 30” to 50” flat panel television up to 130 lbs.
If you have any questions regarding this or any other Sanus Systems product, please contact us at 800.359.5520 or visit us at www.sanus.
com. Our customer service representatives can assist you quickly with any issues regarding assembly or missing parts. Check carefully to
make sure none of the parts are missing or defective. Never use defective parts. Replacement parts for products purchased from an authorized
dealer will be shipped directly to you. Please call Sanus Systems before returning products to the retail store where you purchased them.
Required Tools: Wrench or Socket Set, Phillips Screw Driver
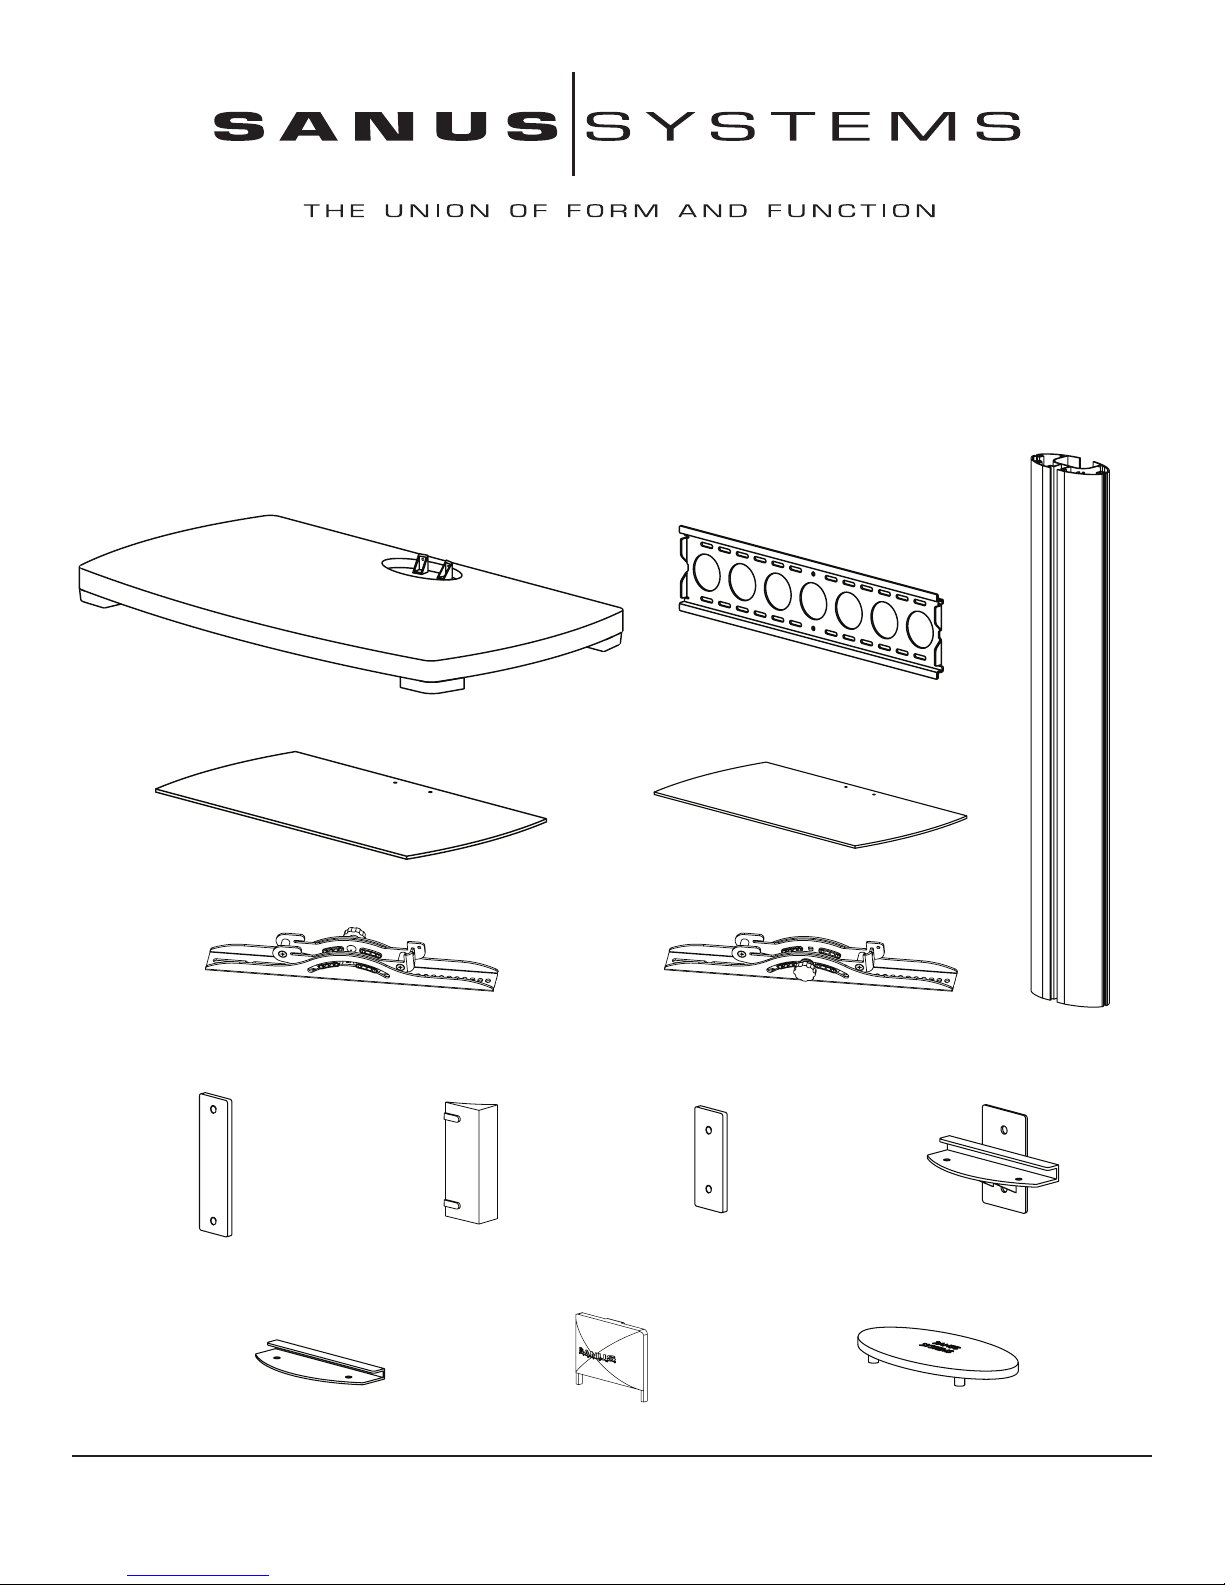
Parts: Some parts not shown at same scale*
(1) Base - a (1) Wall Bracket - b
(1) Large Glass Shelf - c (1) Small Glass Shelf - d
(1) Right Monitor Bracket - e (1) Left Monitor Bracket - f (1) Pillar - g
(1) Wall Plate - h* (2) Wall Bracket Spacer - i* (2) Shelf Plate - j* (2) Shelf Bracket - k*
(2) Glass Shelf Washer - l* (2) Shelf Bracket Cap - m* (1) Top Cap - n*
Sanus Systems 2221 Hwy 36 West, Saint Paul, MN 55113 7.15.05
Customer Service: 800.359.5520. See complementary Sanus products at www.sanus.com
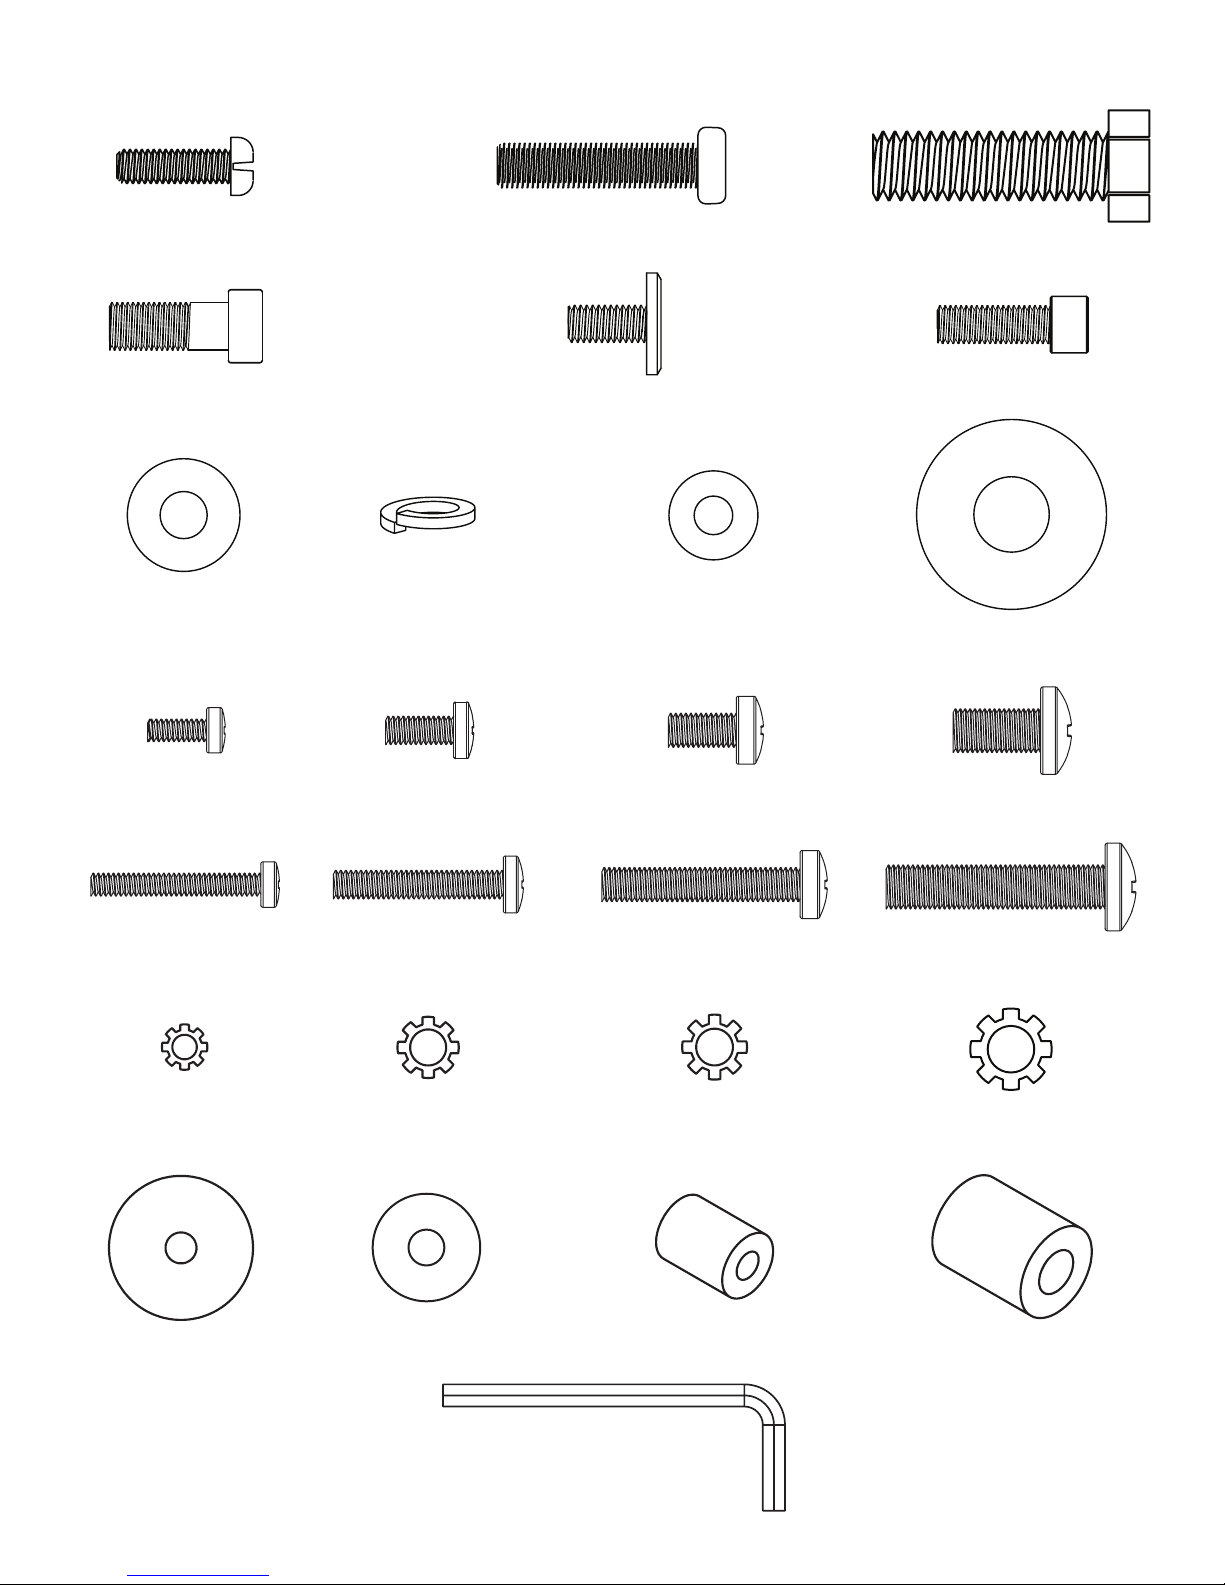
Hardware: All hardware shown as actual size
(2) M6 x 20 Bolt - o (2) M8 x 35 Bolt - p (2) M12 x 40 Bolt - q
(6) M8 Allen Bolt - r (4) 1/4-20 Allen Bolt - s (2) Safety Bolt - t
(8) M8 Washer - u (6) Spring Washer - v (4) Plastic Washer - w
(2) M12 Washer - x
TV Mounting Hardware:
(4) M4 x 12 Bolt - y (4) M5 x 12 Bolt - z (4) M6 x 12 Bolt - aa (4) M8 x 16 Bolt - bb
(4) M4 x 30 Bolt - cc (4) M5 x 30 Bolt - dd (4) M6 x 35 Bolt - ee (4) M8 x 40 Bolt - ff
(4) M4 Lock Washer - gg (4) M5 Lock Washer - hh (4) M6 Lock Washer- ii (4) M8 Lock Washer - jj
(8) M4/M5 Washer - kk (4) M6/M8 Washer - ll (4) M4/M5 Spacer - mm (4) M6/M8 Spacer - nn
(3) Allen Key - oo
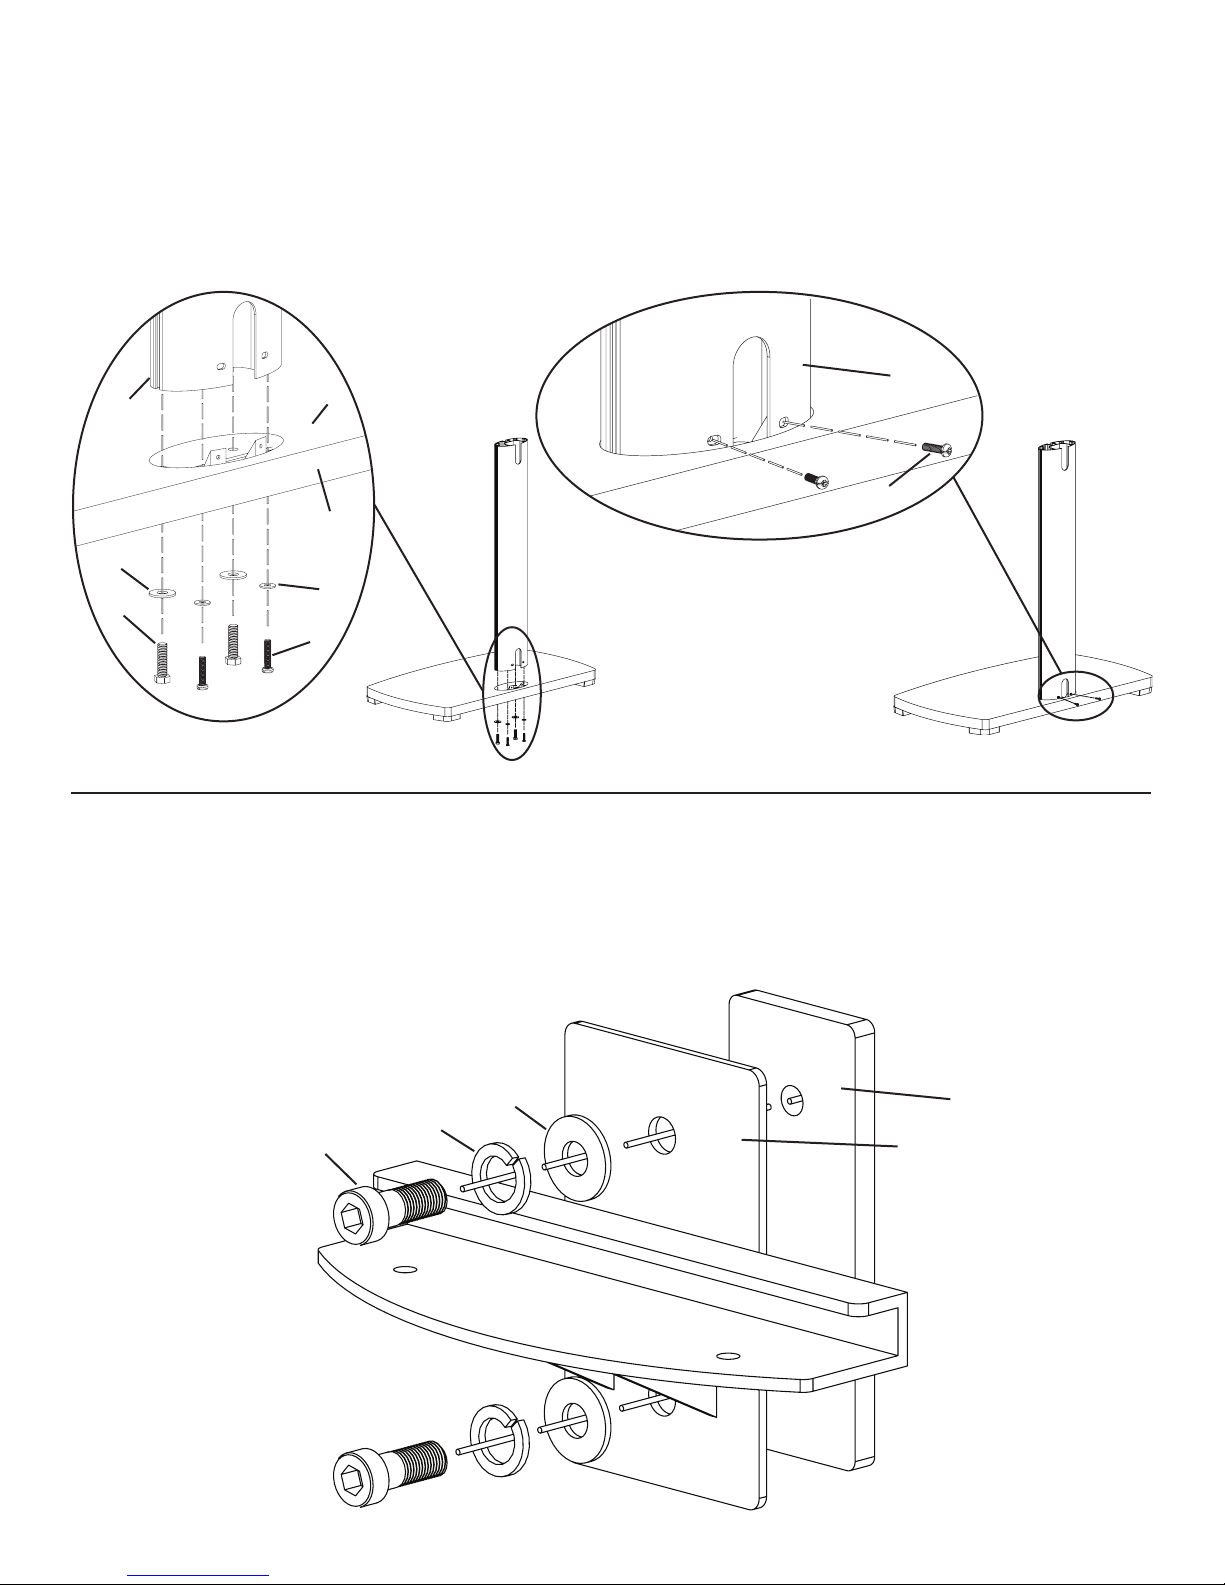
Step 1: Secure Pillar to Base
Attach the Pillar (g) to the Base (a) by placing each M12 x 40 Bolt (q) through an M12 Washer (x), each M8 x 35 Bolt (p) through an
M8 Washer (u). Then thread each Bolt up through the Base and into the Pillar as shown in Diagram 1a. The M12 x 40 Bolts should be
threaded into the front two holes of the Pillar, while the M8 x 35 Bolts should be threaded into the back two holes of the Pillar. Tighten
the M12 x 40 Bolts with a wrench, and tighten the M8 x 35 Bolts with a Phillips screw driver. Proceed to insert two M6 x 20 Bolts (o)
into the holes on the back of the Pillar as seen in Diagram 1b. Tighten the M6 x 20 Bolts with a Phillips screw driver.
Detailed View A Detailed View B
g
g a
Diagram 1a Diagram 1b
o
back
x
u
q
p
Step 2: Shelf Bracket Assembly
Thread an M8 Allen Bolt (r) through a Spring Washer (v), an M8 Washer (u), the Shelf Bracket (k), and into the Shelf Plate (j). See
Diagram 2 for assistance. Loosely tighten the M8 Allen Bolt into the Shelf Plate with an Allen Key (oo). Leave approximately a 1/8” gap
between the Shelf Bracket and the Shelf Plate for Step 4. Repeat process for 2nd Shelf Bracket.
Diagram 2
u j
v
r k
 Loading...