

Santec 9280ED User Manual
EDO COLLECTION
0 5
0 6
Pop-Up Drain
Po p-U p Dra i n I ns t al l at ion
assembly.
Do not remove the gasket, washer and lock nut.
Pop-U p Dra in
Pop-Up Dr a in In s ta l la t io n
Insert ballrod washerinto drainbody followed by the ballrod, 2ndwasher andball rod nut.
Tighten the ball rod nut so that the ball rod moves freely.
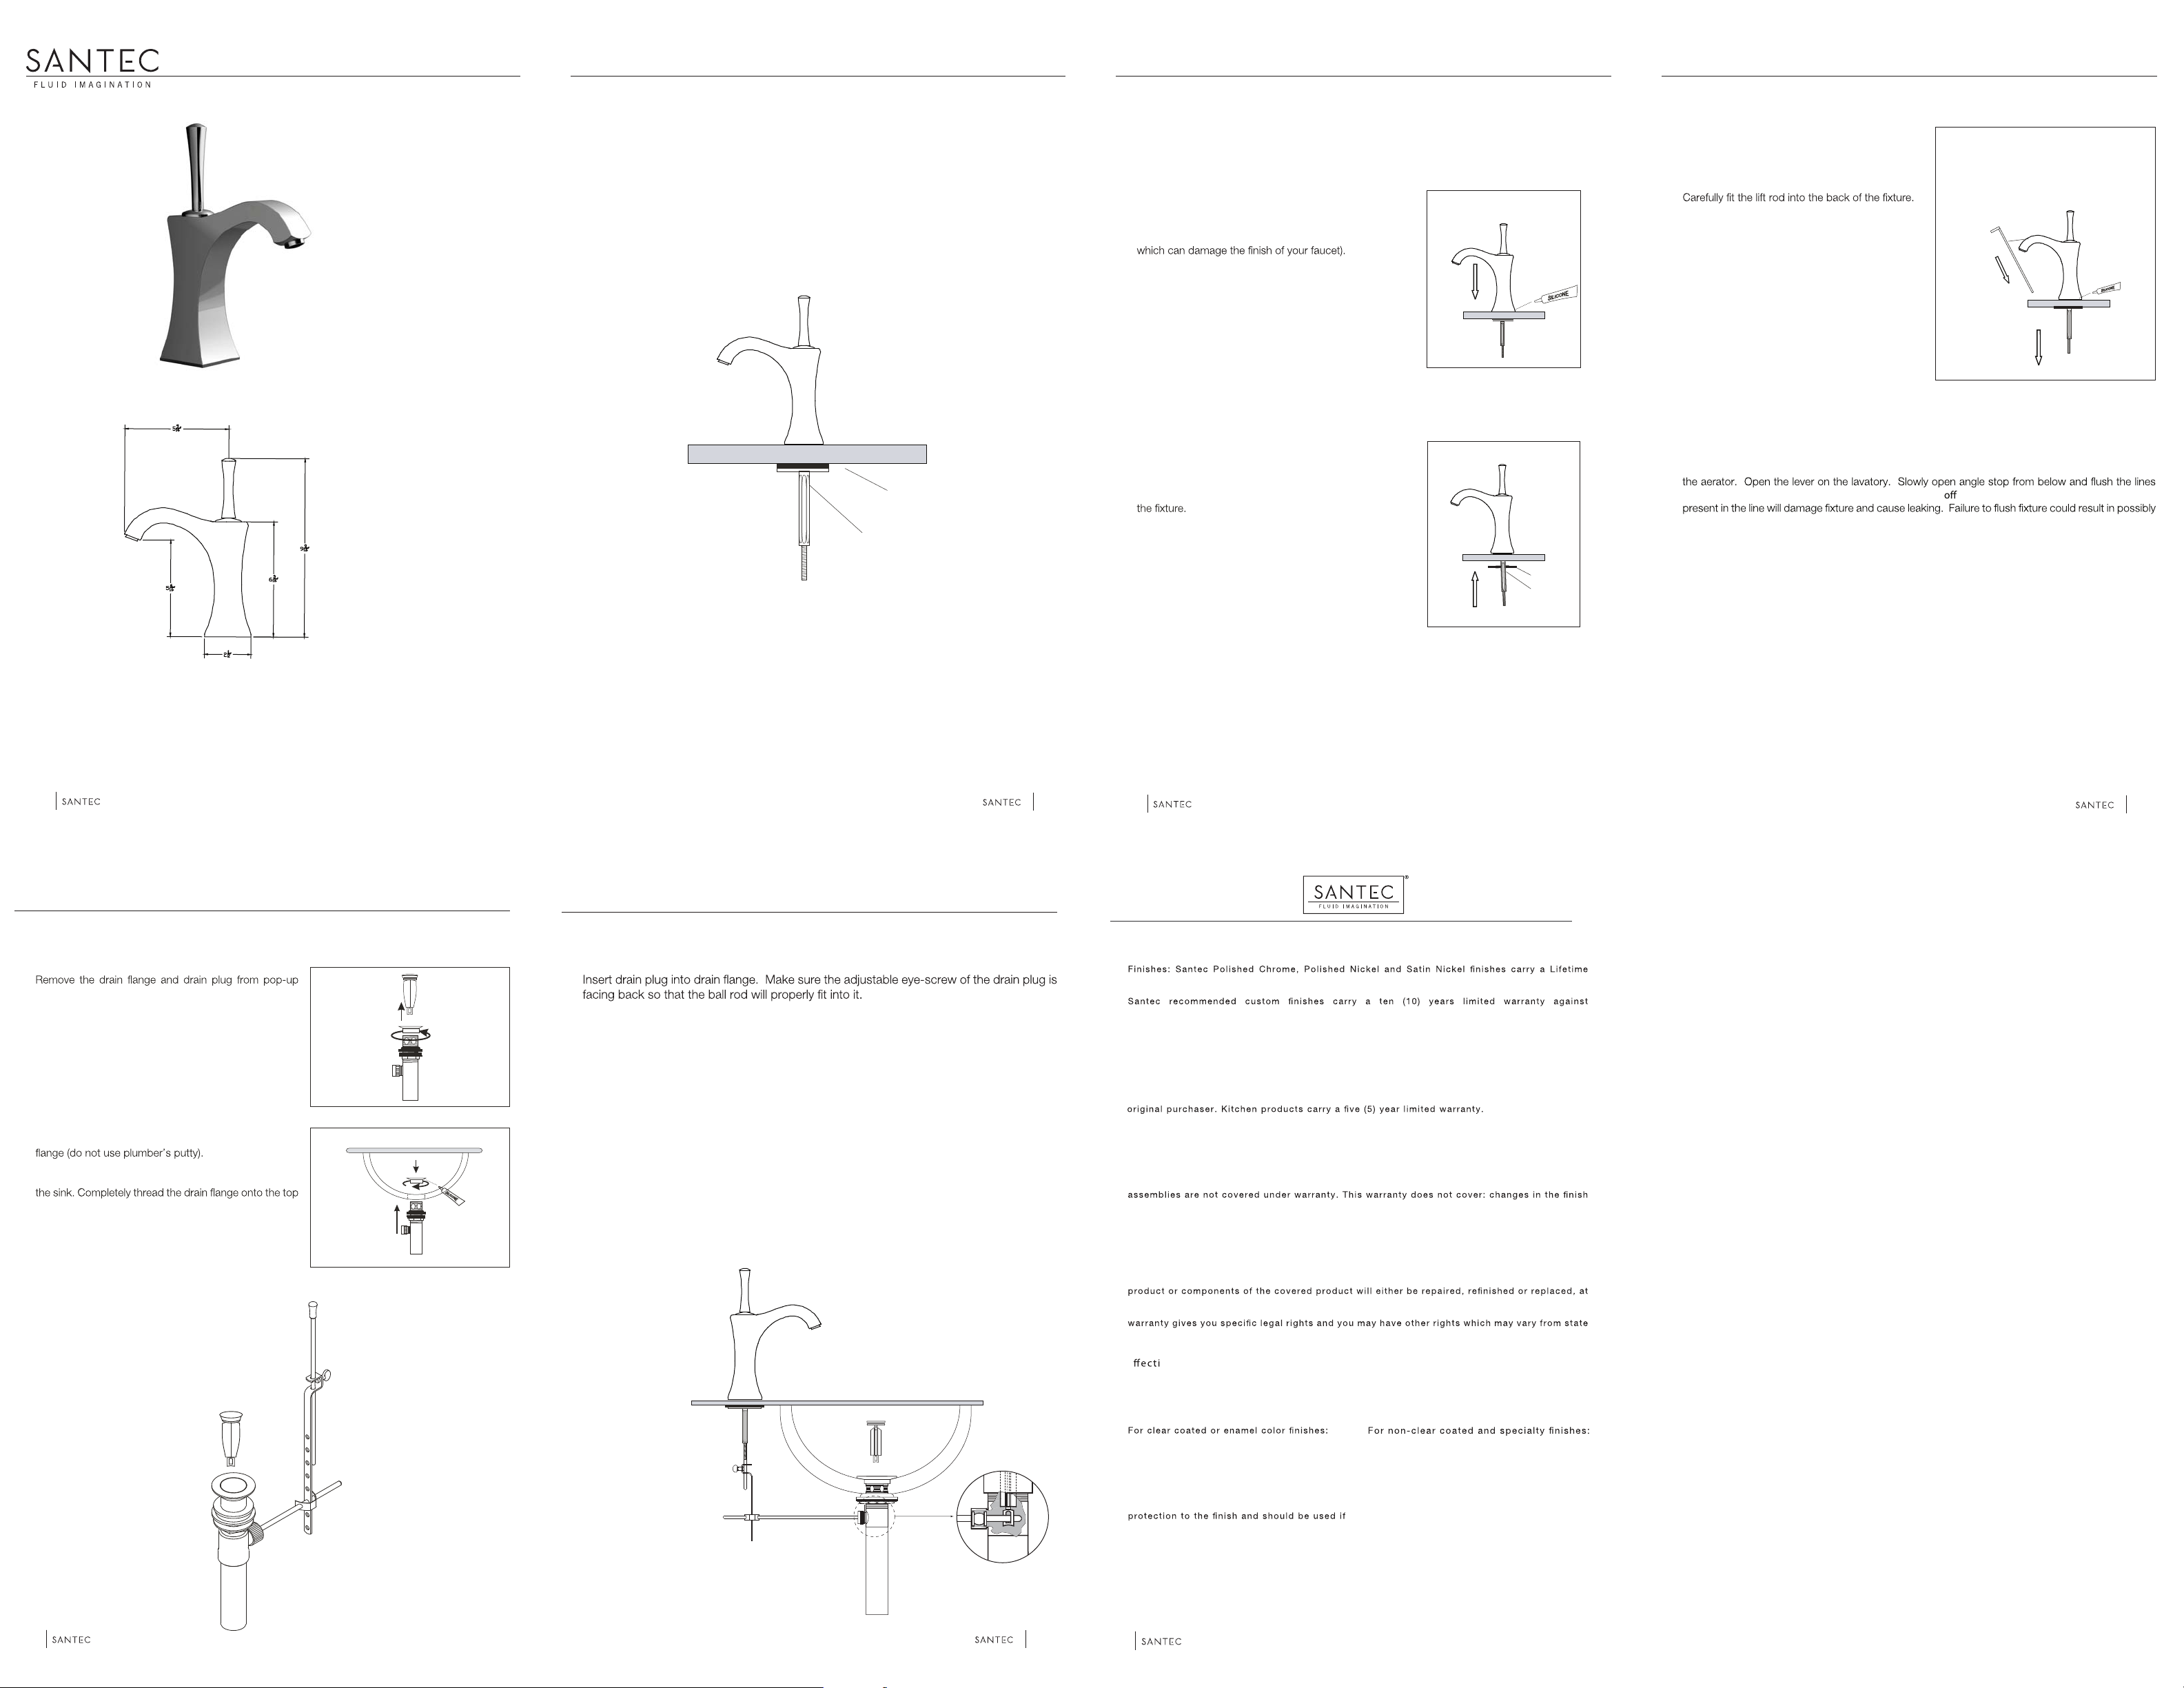
Slip the faucet’s lift rod through the holes at the top of the lift rod strap and hand tighten
the thumb screw. Push the ball rod down so the drain plug is in the up position.
Slip one leg of the ball rod clip onto the ball rod and slide the lift rod strap onto the ball rod
using the nearest hole. Then slide the second leg of the clip onto the rod.
Test pop-up for smooth operation and adjust the strap if necessary.
C
A
B
Apply a ring of silicone caulking underneath the drain
Insert the threaded end of the assembly up from under
of the drain tube.
Tighten the locknut from under the sink.
Drain Plug
Drain Flange
Lift RodStrap
Ball Rod
DrainTube
Ball RodNut
Ball RodClip
Thumb Screw
LockNut
Washer
Gasket
Side hole
Lift Rod& Knob
E ve 01/01/ 09 - Replac es and super sede s any p reviou sl y iss ue d w ar ra nt y
FINISH CARE INFORMATION
PLEASE REGISTER YOUR PRODUCT ONLINE FOR WARRANTY SERVICES
ww w.santecfaucet.c om /regi str ation
1.
2.
3.
4.
Limited w ar ra nt y aga in st ma nufact ur in g defects a nd t ar ni sh to the o ri gi na l pu rc haser wi th t he
excl us io n o f ki tc he n d ra in a ss em blie s w hi ch , d ue t o t he n at ur e o f t he ir u se , a re n ot w arr an ted.
ma nufact ur in g defects a nd t ar ni sh to th e o rigin al p urch aser w it h t he e xc lu si on o f kit ch en a nd
pop-up d rain as sembli es wh ic h, du e t o t he nat ur e o f t heir u se , a re n ot wa rr an ted. Kitc he n
prod uc ts c ar ry a th re e (3) y ear li mited wa rr ant y.
Cart ri dg es : S ante c C ar tridges c ar ry a l ifeti me li mi te d w ar ra nt y again st m an ufactu ri ng d efects f or
th e life of t he pro du ct to t he or igin al p ur ch as er .
Part s: S an te c p ar ts ca rr y a t en ( 10 ) y ear l im it ed warr an ty aga in st ma nufact ur in g d efects, t o t he
Wa rr an ty exclu si on s a nd l im it atio ns : Thi s w ar ra nt y d oe s no t cover : damage d ue t o neglig en ce ,
ac cide nt , a bu se , i mp ro pe r i nstal la tion , o r i mpro per m ainten an ce s uc h a s, b ut n ot li mi ted t o: he at
fr om s olde ri ng d urin g i nstal la tion, t he u se o f pl um bers p utty , da mage f ro m to ol s u sed d uri ng
insta ll at io n, the us e o r expo su re to c he micals or c le an ing p ro duct s e ither a br asiv e o r no n
abras iv e o r th e u se o f a ny c le aning too l o r pro du ct other t han a s oft, clean cloth . P op-u p
or i n th e pr od uc t d ue t o n or ma l wea r or agi ng a nd d oe s n ot c ov er a ny p rodu ct s o r p ar ts w hi ch
ha ve bee n a ltere d o r u se d i n a m an ne r n ot t ypical f or t he pr od uc t. This w ar ra nty d oe s n ot c over
an d S ante c w il l n ot b e held l iable f or damage to p rod uc ts cau se d b y the f re ig ht c ar ri er a nd a
clai m s houl d b e mad e i mm ediatel y to th e f rei ght c arrier s ho ul d thi s o ccu r. Thi s war ra nt y does
no t co ve r a ny c os t i nv olved i n t he i ns ta lla ti on , r epai r, o r r eplaceme nt o f a ny S antec prod uc t o r
pa rt . T hi s w ar rant y d oe s n ot c over a nd S ante c w il l n ot b e h eld li
ab le f or a ny l os s, dam ages, o r
expens es , i nc identa l or c onsequ ent ial w ha tsoever, o rigin atin g fr om t he p ur ch as e, i nstal lation ,
us e, r epair, failure , o r r eplace me nt o f a ny Sa nt ec pr od uc t o r pa rt , a s a llow ed b y l aw . T he
th e sole disc reti on o f Sa nt ec . Sa nt ec r eser ve s t he r ight t o ex am in e an y pr od uct cl ai me d
defectiv e p rio r to a ny w ar rant y clai m being ac cepted or p ro ce ssed , a t its sol e d is cr etio n. T hi s
to s ta te .
We re co mm end tha t all fa uc et s, dra in s, et c
be g ent ly wiped dry wit h a sof t clo th after us e
to av oid wa te r sp otting a nd w ater d epos it
bu ildu p. A m ild liq ui d ha nd soap , s uc h a s
Iv or y may b e u se d occasion ally i f d es ired .
Us e o f n on -a br asiv e c ar na ub a w ax will add
th e f au ce ts wil l n ot be dried a fter us e.
We r ecom me nd t ha t a ll f au ce ts , d rai ns , e tc be
gently wiped d ry w ith a soft clot h after u se t o
avoid wate r spotti ng a nd wat er deposit
bu ildup. Us e of a n on-abra si ve c ar naub a wax
is required o cc as io na ll y.
0 7
SINGLE CONTROL LAVATORY
S pou t
S pou t
S pou t
MODEL:
9280ED10
9280ED75
Hole size for the spout is a minimum of 1-3/8” and a maximum of 1-7/16”.
Washer
Sp o ut In s ta l la t io n Sp ou t I nst all a t io n
SPOUT ASSEMBLY IS READY FOR SIMPLE DROP-IN INSTALLATION. DO NOT DISASSEMBLE.
Remove the washer and lock nut from the valve body.
A
Apply a ring of silicone caulking around the spout hole
on the sink or counter top (do not use plumber’s putty
Insert lavatory assembly through the spout hole. Make
sure to center the lavatory over hole.
Re-install the washer and lock nut from below.
B
Hand tighten lock nut from below while properly aligning
C
IMPORTANT: After all the connections have been made from inlet supplies to angle stop, remove
D
for approximately 45 seconds to clean any debris. Turn the water and reinsert aerator. Debris
Lift rod
K EEP THIS I NS T RUC TION BOO KL E T FOR FU TU RE RE FER EN CE
Import ant : Ple ase registe r you r produc t online a t www.s antecfa ucet.co m w it hin
30 days o f pur chase. Sante c re se rves the rig ht to reque st add it io na l docu ment s
before s er vi ci ng w arranty request s.
0 1
Lock nut
0 2
Secure from below with an adjustable wrench and
connect the inlet hoses to the supply lines. Make sure
that the hot inlet hose connects to the hot supply line,
and the cold inlet hose connects to the cold supply line.
0 3
voiding warranty.
Washer
Lock nut
0 4
 Loading...