


SANKO Coating Thickness Meter
SAMAC-F
Instruction Manual
SANKO ELECTRONIC LABORATORY CO., LTD.
TOKYO・OSAKA・SENDAI・NAGOYA・FUKUOKA・KAWSAKI
June 2015
CAUTION
Read the manual thoroughly and use the meter correctly.
Keep the manual with care and refer to it when necessary.

Contents Pages
Attention for safety ・・・・・・・・・・・・・・・・・・・・・・・・・・・・・・・・・・・・・・・・・・・・・・・・・・・・・・・・・・・・・・・・・・・・・・・・・ 1
Notes ・・・・・・・・・・・・・・・・・・・・・・・・・・・・・・・・・・・・・・・・・・・・・・・・・・・・・・・・・・・・・・・・・・・・・・・・・・・・・・・・・・・・・ 3
Get started ・・・・・・・・・・・・・・・・・・・・・・・・・・・・・・・・・・・・・・・・・・・・・・・・・・・・・・・・・・・・・・・・・・・・・・・・・・・・・・・・・ 4
・ Contents in a package ・・・・・・・・・・・・・・・・・・・・・・・・・・・・・・・・・・・・・・・・・・・・・・・・・・・・・・・・・・ 4
・ Names of parts ・・・・・・・・・・・・・・・・・・・・・・・・・・・・・・・・・・・・・・・・・・・・・・・・・・・・・・・・・・・・・・・・・ 5
・ How to fit batteries ・・・・・・・・・・・・・・・・・・・・・・・・・・・・・・・・・・・・・・・・・・・・・・・・・・・・・・・・・・・・・ 6
・ How to hold a unit ・・・・・・・・・・・・・・・・・・・・・・・・・・・・・・・・・・・・・・・・・・・・・・・・・・・・・・・・・・・・・・・ 7
・ How to press a probe to an object ・・・・・・・・・・・・・・・・・・・・・・・・・・・・・・・・・・・・・・・・・・・・・・・ 7
How to operate ・・・・・・・・・・・・・・・・・・・・・・・・・・・・・・・・・・・・・・・・・・・・・・・・・・・・・・・・・・・・・・・・・・・・・・・・・・・・・ 8
(1) How to switch power source ・・・・・・・・・・・・・・・・・・・・・・・・・・・・・・・・・・・・・・・・・・・・・・・・・・・・・・ 8
(2) How to switch off ・・・・・・・・・・・・・・・・・・・・・・・・・・・・・・・・・・・・・・・・・・・・・・・・・・・・・・・・・・・・・・・ 8
(3) Zeroing ・・・・・・・・・・・・・・・・・・・・・・・・・・・・・・・・・・・・・・・・・・・・・・・・・・・・・・・・・・・・・・・・・・・・・・・・ 9
(4) Calibration standard (CAL) ・・・・・・・・・・・・・・・・・・・・・・・・・・・・・・・・・・・・・・・・・・・・・・・・・・・・・・・・ 11
(5) Zeroing in special cases (Multi-layers) ・・・・・・・・・・・・・・・・・・・・・・・・・・・・・・・・・・・・・・・・・・・・・・ 13
(6) 2-point calibration in case it is difficult to perform 「Zeroing」・・・・・・・・・・・・・・・・・・・・・・・・・ 16
(7) How to delete calibration ・・・・・・・・・・・・・・・・・・・・・・・・・・・・・・・・・・・・・・・・・・・・・・・・・・・・・・・・ 21
Measuring ・・・・・・・・・・・・・・・・・・・・・・・・・・・・・・・・・・・・・・・・・・・・・・・・・・・・・・・・・・・・・・・・・・・・・・・・・・・・・・・・・・・ 22
Function setting ・・・・・・・・・・・・・・・・・・・・・・・・・・・・・・・・・・・・・・・・・・・・・・・・・・・・・・・・・・・・・・・・・・・・・・・・・・・・・ 23
(1) Setting of Non-Interrupt Measurement Mode ・・・・・・・・・・・・・・・・・・・・・・・・・・・・・・・・・・・・・・・ 23
(2) Switching of resolutions ・・・・・・・・・・・・・・・・・・・・・・・・・・・・・・・・・・・・・・・・・・・・・・・・・・・・・・・・・・ 25
(3) Setting of Auto-Power-OFF function・・・・・・・・・・・・・・・・・・・・・・・・・・・・・・・・・・・・・・・・・・・・・・・・ 26
(4) Setting of Backlight ・・・・・・・・・・・・・・・・・・・・・・・・・・・・・・・・・・・・・・・・・・・・・・・・・・・・・・・ 28
Note to improve measuring accuracy・・・・・・・・・・・・・・・・・・・・・・・・・・・・・・・・・・・・・・・・・・・・・・・・・・・・・・・・・・・ 29
Trouble shooting(If any problems?) ・・・・・・・・・・・・・・・・・・・・・・・・・・・・・・・・・・・・・・・・・・・・・・・・・・・・・・・・・・・・ 30
Specifications ・・・・・・・・・・・・・・・・・・・・・・・・・・・・・・・・・・・・・・・・・・・・・・・・・・・・・・・・・・・・・・・・・・・・・・・・・・・・ 32
References(measurement principles) ・・・・・・・・・・・・・・・・・・・・・・・・・・・・・・・・・・・・・・・・・・・・・・・・・・・・・・・・・ 33

Attention for safety(to use safely and correctly)
To prevent you and your properties from damaging please take some time to read thoroughly this “Attention for Safety”
and use this unit correctly. And keep these instructions attentive to read when necessary.
Warning
● Do not dump nor wet the gauge unit in water, otherwise it may cause damage.
Prohibition Please contact our distributor or sales office should submerged water into the unit.
● Keep metals or foreign substances from the unit, otherwise it may cause damage.
Prohibition Please contact our distributor or sales office should put any materials or foreign substances in the unit.
● Do not insert a screwdriver into the connector, otherwise that it may cause damage.
Prohibition
● Do not throw, smash, drop the unit, otherwise it may cause damage.
Prohibition
● Never dismantle or modify the gauge unit by yourself, otherwise it may cause errors or damage.
Prohibition
-1-

Attention for safety
(to use safely and correctly)
Warning
!
● Never fail to remove batteries from the unit when not in use for a long time.
Must
Leakages occurred from deterioration of batteries may cause erroneous reactions or damage.
!
● Be sure to read this book on the item of 「How to fit batteries」 to replace batteries.
Must
!
● Store batteries in a place where children and pets are incapable of handling them.
Must
Please call a doctor like in a case that a battery is swallowed.
!
● Do not put batteries into fire or water. Store them in a cool, dry and dark place avoiding flames,
Must
high temperature and moisture.
!
● Do not get batteries shocked and dismantled, and soldered for processing.
Must
!
● Do not short or recharge batteries and handle with metallic tools like pliers.
Must
!
● Replace with new (live) batteries according to the procedure of this Operating Instructions.
Must
!
● Be sure of paying attention on battery polarity marks, (+、-) to place the batteries.
Must
! ● In case a battery has leakage please clean up the place with clothes to replace batteries.
Must
And do not touch the leaked liquid and wash skins or clothes in case they are contaminated.
! ● Comply to regulations and laws in your neighbors when disposing of them.
Must
-2-
Attention for safety(to use safely and correctly)
Attention
● Do not use Benzene or Thinner for cleaning and spray pesticides on the meter, otherwise it may
Prohibition cause cracks or malfunctions.
● Do not store the meter in places getting high in temperatures such as in a car in strong sunlight or
Prohibition near heaters, otherwise it will be hazardous to the meter and may cause malfunctions.
● Do not step, trample down nor put anything on the meter. Or it may cause breakdowns, injuries.
Prohibition
● Keep the meter away off rubber-made articles or vinyl articles. A lengthy contact between
Prohibition meter and them may cause stickiness and it may be difficult to get rid of them.
Notes:
● Please read this manual thoroughly for correct operations before getting started.
● This meter is a precision gauge. Please handle with care.
● Do not knock or scratch objects with the tip of a probe.
● Keep the tip of a probe clean. A slight amount of dust may cause errors in measurements.
● Clean the meter and store it in free from dust and moisture after operation.
● To keep precision with a gauge please contact us for a periodical inspection.
● Keep the meter away off electric noises, shocks or magnetic fields when in a use.
Or it may cause malfunctions.
-3-

Get started
◆ Contents in a package Please make sure if the following items are included.
・ Main unit
SAMAC-F
・ Dry batteries LR03 (2 pieces)
・ Carrying case for main unit
・ Instruction manual (this manual)
・ Inspection sheet (warranty) –cum- user registration sheet
(This warranty is valid only in Japan)
・ Zero plate for test : Fe substrate
・ Thickness standard (film : 2 pcs, Bakelite : 1 pc)
・ Carrying case for Zero plate/Thickness standards
・ Hand strap cord
-4-
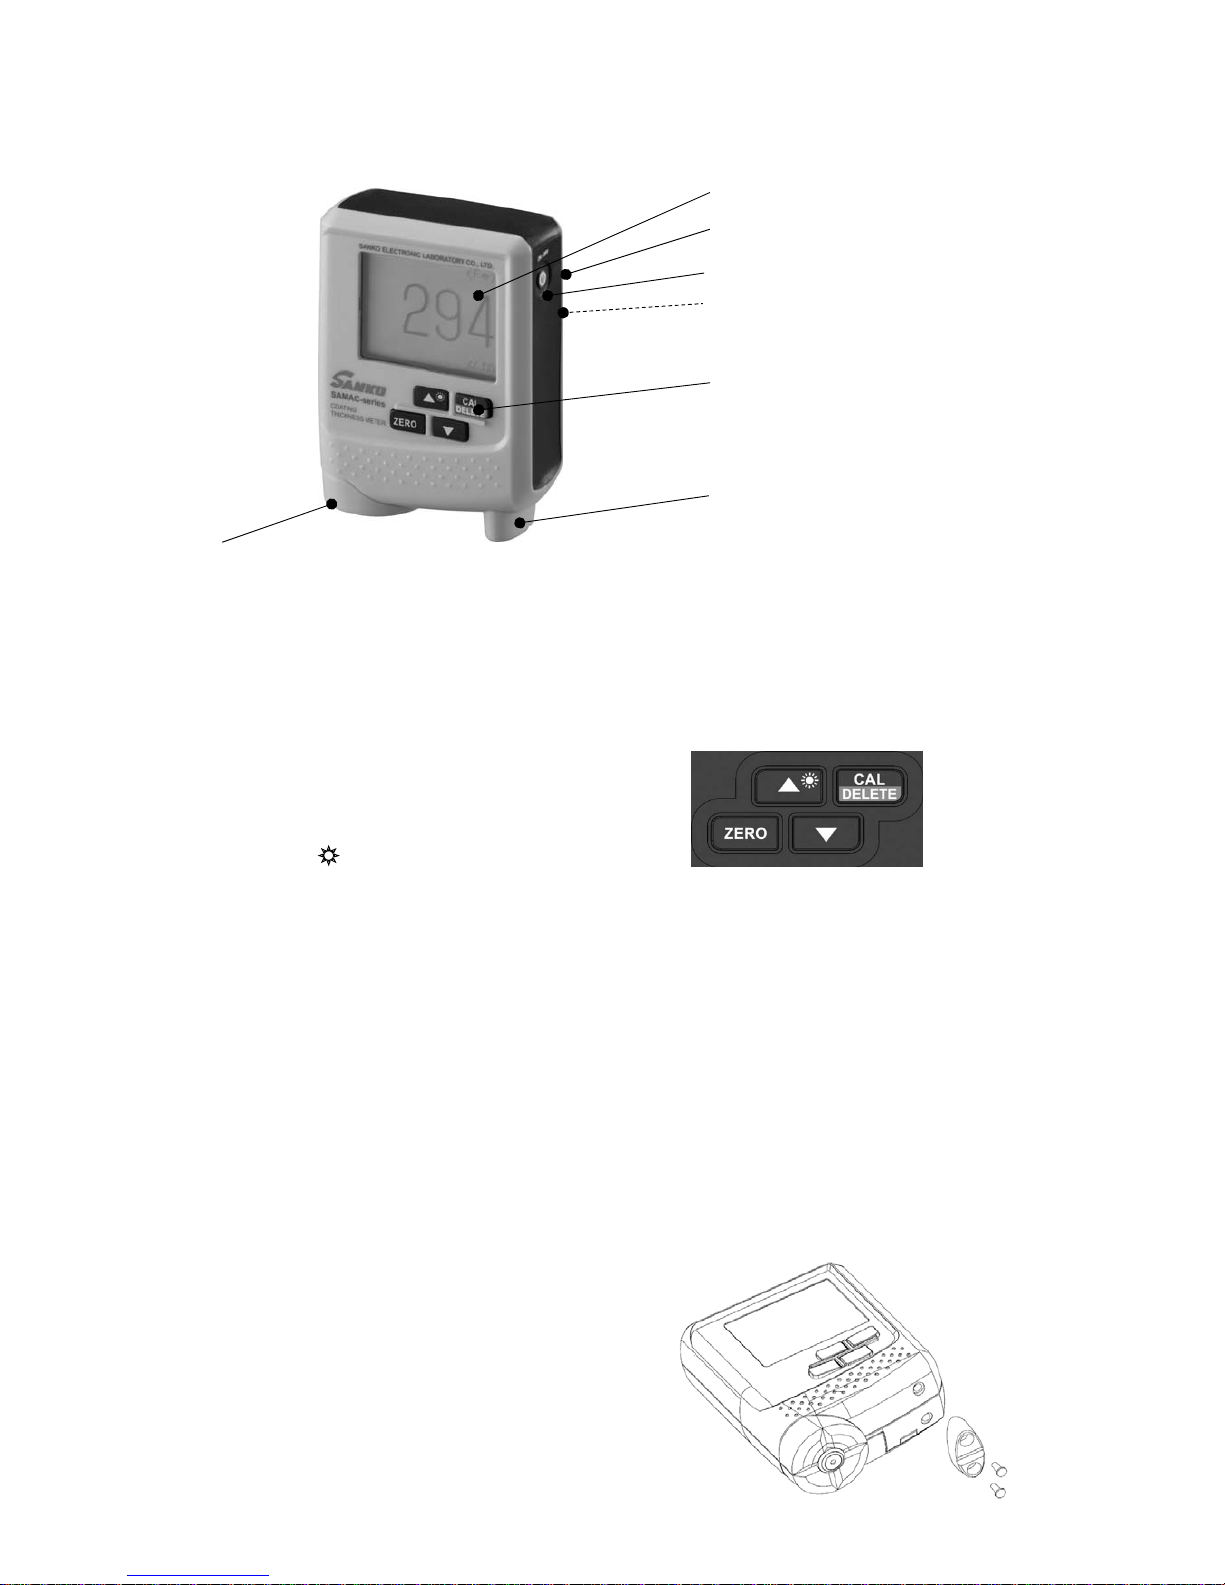
◆Names of parts
Display
Eyelet of hand strap cord
Power source key
Battery compartment (back side)
Operation keys
Stabilizer (detachable type)
Electromagnetic probe
● Electromagnetic probe
Capable of measuring film thicknesses on Fe metal substrates by a built-in probe.
● Display
Indicates measuring values, operation guides, malfunction states, etc., with backlight.
● Power source key
A key to switch ON/OFF.
● Operation keys
(1) 「ZERO」key
Set a Zero point before measuring.
(2)「▲ 」key, 「▼」key
ON/OFF of backlight, setting numerical values when adjusting calibration standard.
(3) 「CAL/DELETE」key
CAL: Key to initiate or finish for calibration standard.
DELETE: Delete incorrect or unnecessary measuring results when adjusting.
(works only when 「ZERO」, 「CALIBRATION」 is processed with combination of 「▼」key.)
※Power source key/Operation keys can be activated for setting of each function with
combination of other keys.
● Battery compartment
It contains 2 pieces of dry battery (LR03).
● Eyelet of hand strap
Hang the meter through a strap over your wrist never to drop it.
● Stabilizer (detachable type)
It is possible to take measurements without the stable leg depending on the measuring spot.
Detach the leg when it is necessary to adjust for proper measurement positioning.
(Removing 2 screws from the leg)
Be careful that measuring is not becoming unstable.
-5-
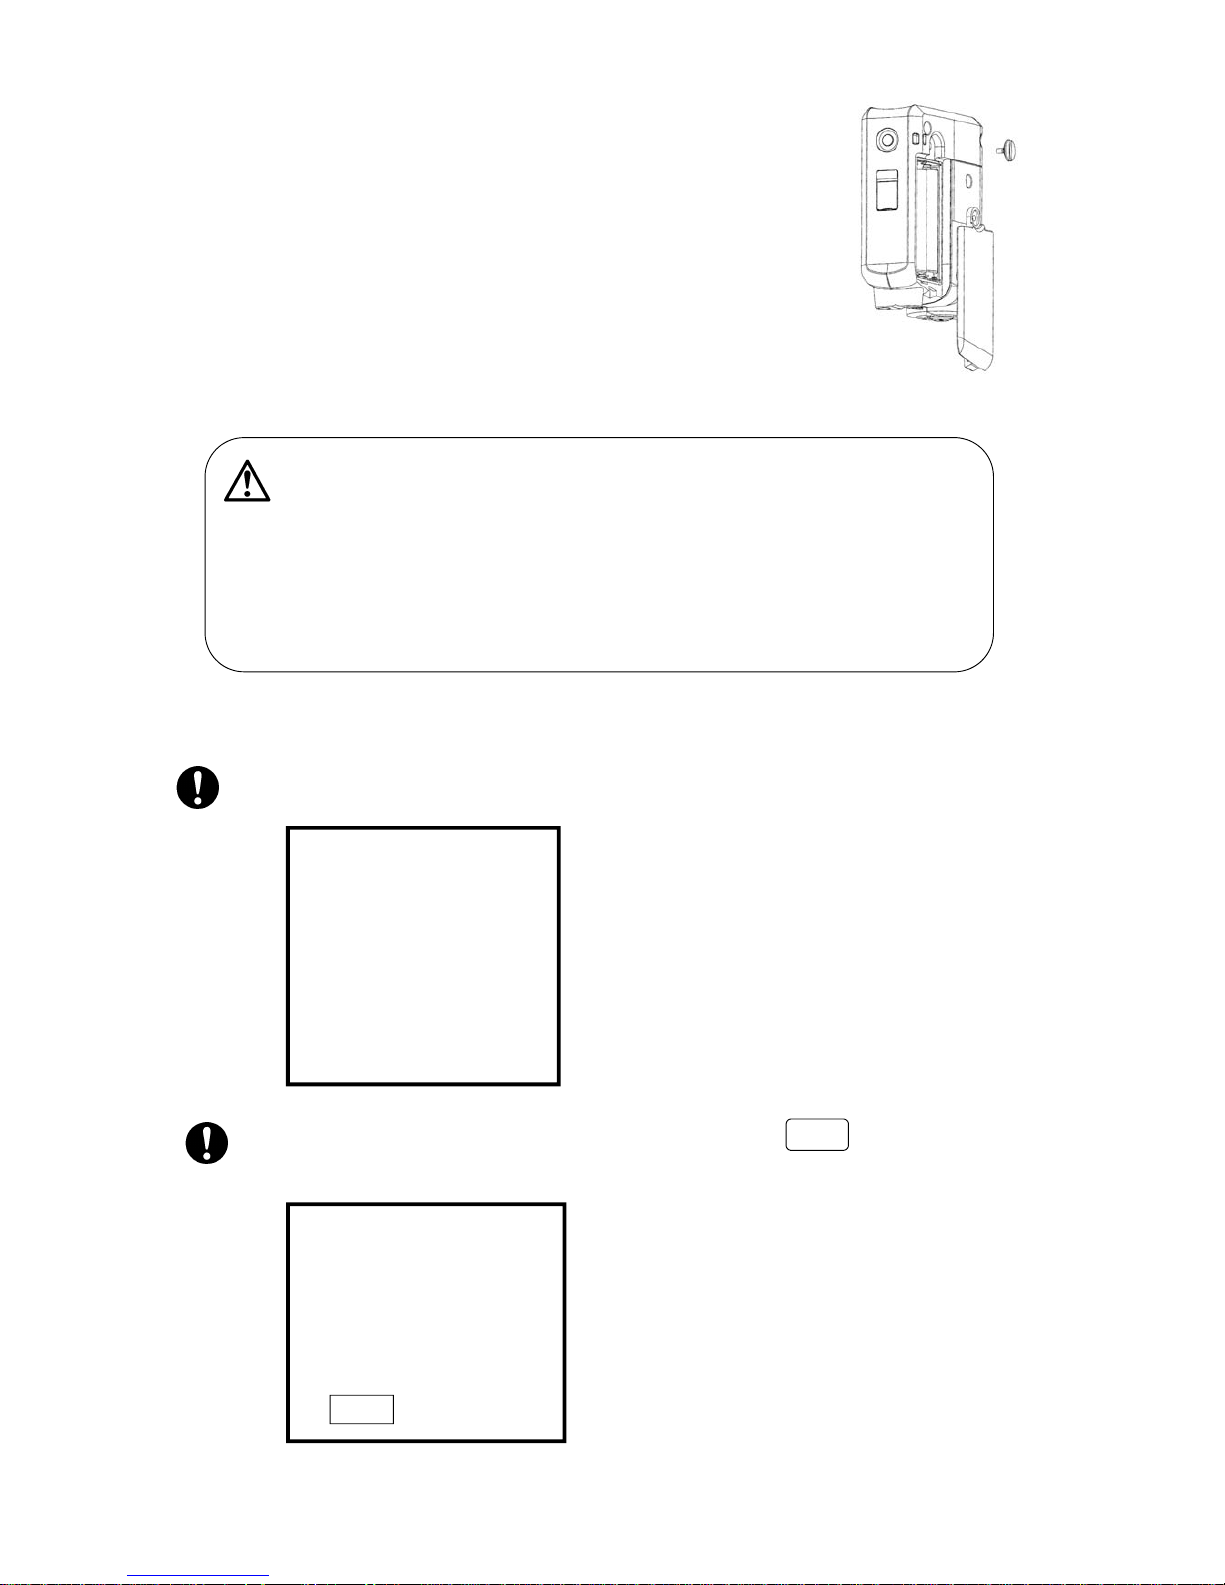
◆How to fit batteries
① Open the battery lid on the back of the unit.
Remove the screw from the lid and lift the upper side a little.
Slide it down to remove.
(Do not lift the lid too much or it may snap the pick.)
② Insert batteries.
Ensure the correct battery polarity ○
+、○-
for placement
③ Close the lid and fasten the cover with the screw.
※ It is not a breakdown that power becomes ON during replacement of
batteries.
Caution
● Use designated and new (check battery-life) batteries or ones supplied in this package.
● An incorrect use of batteries may cause leakages, bursts. Do not intermingle new with old ones.
● Take out batteries to store when not in use for a long absence. Or that may cause leakages.
● Keep batteries off children and pets.
● Comply to the laws and rules in your local authorities when disposing of batteries.
◎ About reading display
When placing batteries in the unit, the messages and warning below on the screen may be indicated.
And these are not breakdowns, wait until the reading disappears with a beeping sound.
Batteries have run out when the display on the unit indicates the mark listed below.
Replace with new batteries.
-6-
START UP
PHASE
Hold Probe
in the air
Don‘t touch it
on any
metallic object.
BAT
(Fe)
—
μm
BAT

◆How to hold a unit
Hold the lower part of SAMAC unit as illustrated.
Quickly and calmly press the probe perpendicularly to
the object
It beeps and indicates the measuring result on the
screen display. When it does not beep, lift it up 5~7
cm high above and try again to take measurements.
◆How to press a probe to an object
・keep the probe 5 cm or over away off metallic objects when not in use of measuring.
・SAMAC is a built-in probe type. When it tilts, that may cause errors.
・Press the probe perpendicularly against the measuring object.
・A slow pressing may cause large measuring errors.
○ × ×
Caution
◆ Do not smash or hit the probe against objects, or it may cause damages to probes and to
objects.
◆ Do not scrape, scrub objects with the probe except in a special measurement.
Or it may break the tip of the probe and cause damages to the tip and surface of objects.
-7-
Measuring object
Measuring object
Measuring object
Do not press slowly. Or it may
result in measuring errors.
Do not tilt the probe against
the object. Or it may make
measuring errors.
Press the probe swiftly
(swishing press) against the
measuring object.

How to operate
(1) How to switch Power source
Press ON/OFF key.
This message lasts for about 3 seconds.
Caution
Hold the probe in air without touching when
the reading is on display. Or it may indicate
「ERROR」 and automatically switch off
Power.
The buzzer beeps.
The Backlight mark is indicated when ON.
It becomes possible to take measurements or adjustments.
(2) How to switch off
Press ON/OFF key.
The buzzer beeps.
The message lasts for about 2 seconds.
The buzzer beeps and this unit is switched to OFF.
-8-
START UP
PHASE
Hold Probe
in the air
Don‘t touch it
on any
metallic object.
(Fe)
-
μm
POWER
OFF
Terminating
phase
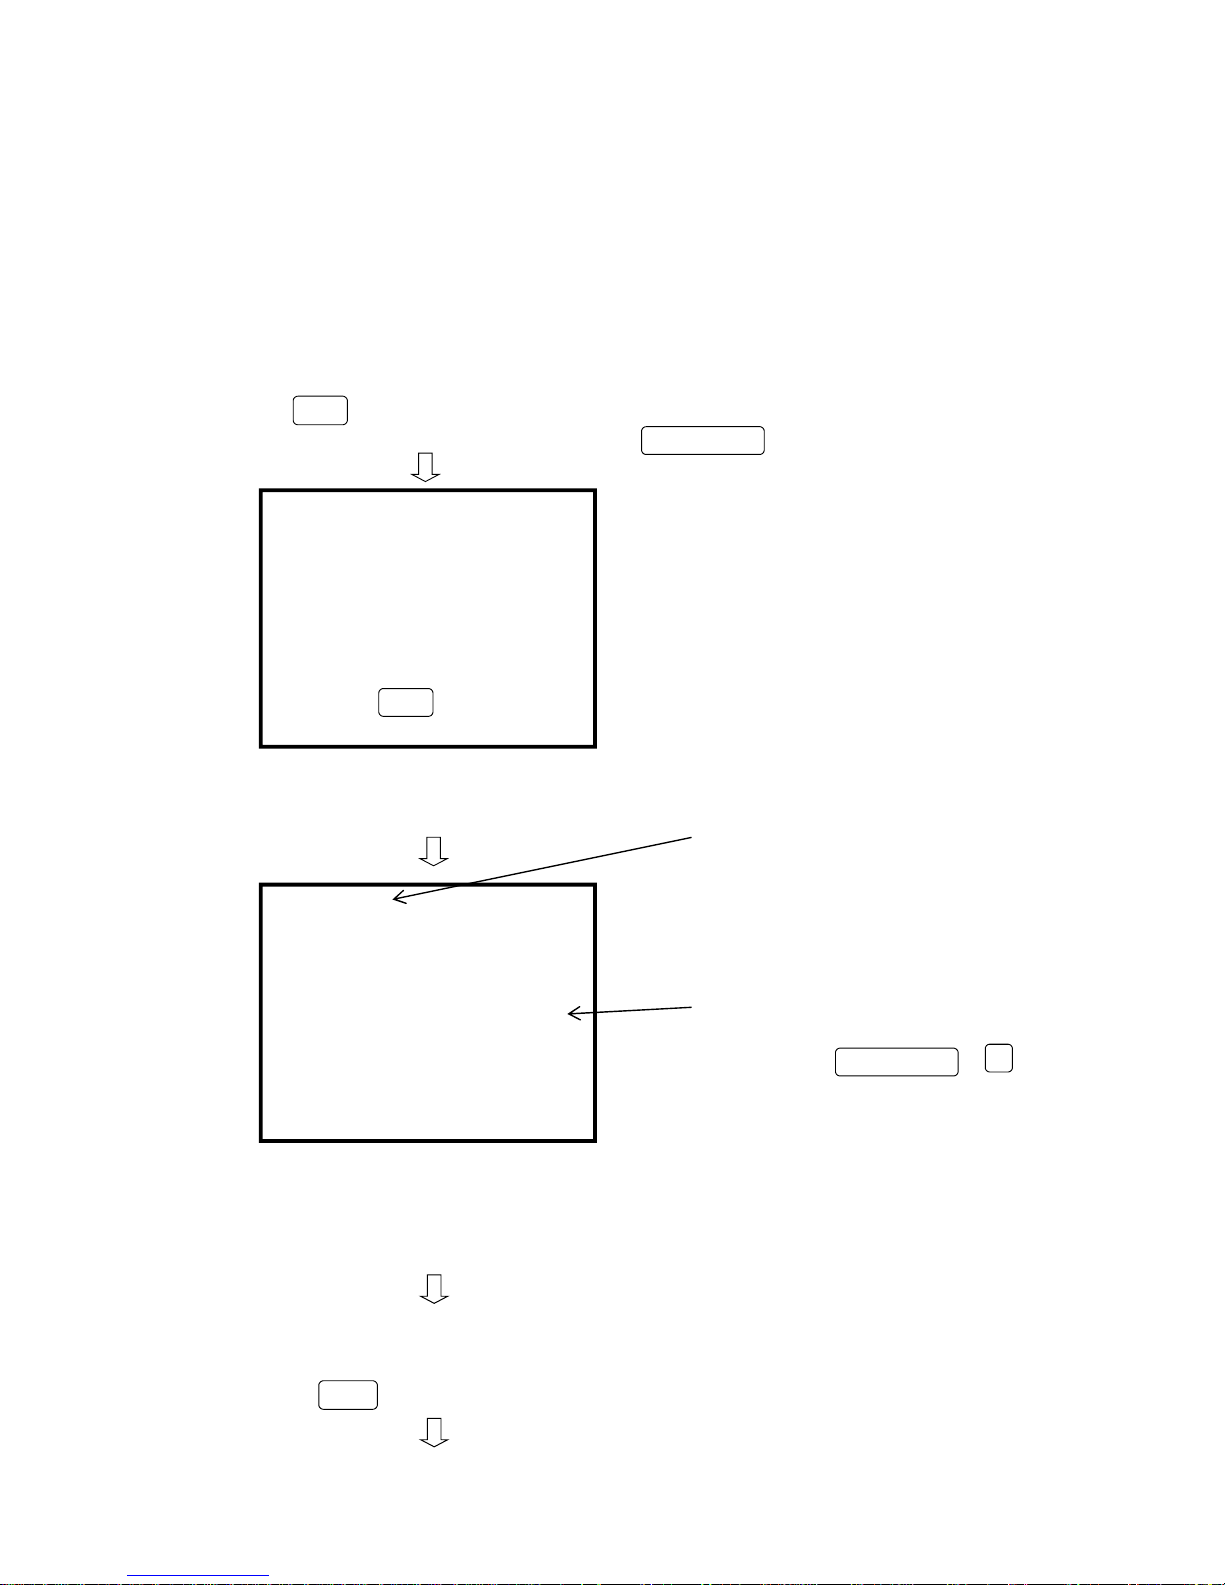
(3) Zeroing
It is capable of getting started on measurements and adjustments immediately after the message of
「START UP PHASE・・・・・・」 has disappeared.
※ Generally, the meter makes errors depending on material formation and shapes to be measured.
To minimize measurement errors and obtain as accurate results as possible please be sure of carrying
out 2 kinds of adjustments of 「Zeroing」 and 「Calibration standard」 before measuring process.
※ Please prepare for a Substrate plate the identical material, quality and size to a measuring object.
(This substrate plate should be designated as a 「Zero plate」)
◆ Press ZERO key.
The buzzer beeps. CAL/DELETE key changes to one data “deletion”
function.
Press the probe to the Zero plate.
The buzzer beeps.
Zeroing is in process.
Measured mean value
When the mean value results in largely off
the “0”, press CAL/DELETE + ▼ key to
delete the latest data out of measured values.
It indicates “-” to delete all data.
● Repeat a measuring process 1~20 times by pressing
the probe to 「Zero plate」. (A mean value is
Remove the probe from 「Zero plate」 displayed whenever a probe is pressed)
◆ When a measuring process reaches the 20th time, the
buzzer beeps, beeps 2 times and afterward new entry is
no more accepted.
After press of certain times or 20 times,
press ZERO key.
-9-
【ZERO cal.】
1.Measure subst
-rate Several
times.
2.press ZERO key.
ZERO cal. (Fe)
1
μm

The buzzer beeps. “Deletion” function of CAL/DELETE key stops.
The reading 「Zeroing」 in the upper left disappeared.
Zeroing completed and the unit becomes possible to take
measuring and adjusting operations .
● Press the probe to the 「Zero plate」 several times and make sure the measuring result indicates 「0」 or
in the neighborhood of 「0」. When the mean value results in largely off 「0」μm, please try again zeroing
from the beginning. There is a case when calibration is not correctly made.
● [LLLL] indicated on display during a time of zeroing means that the calibration point heavily deviates from
the standard. Please make sure that the metal substrate is not processed or plated with other materials and
repeat the zeroing until a stable 「0」 is obtained.
※After performing Zero calibration, the previous 「Zero adjusting value」 is deleted, and the last entry of 「Zero
Adjusting value」 is stored.
-10-
(Fe)
0
μm

(4) Calibration standard (CAL)
● Prepare 「Zero plate」 used for 「Zeroing」.
● Prepare 「Thickness standard」 that are the same thick as the measuring film or thicker than that.
● Place the 「Thickness standard」 on the 「Zero plate」.
● Press the CAL/DELETE key.
The buzzer beeps. CAL/DELETE key changes to one data “deletion” function.
Press again CAL/DELETE key to interrupt Calibration
standard (CAL).
Press the probe to the Thickness standard on the Zero plate.
It beeps whenever pressing.
Calibration standard is in process.
Measured mean value
When the mean value results in largely off
the “0”, press CAL/DELETE + ▼ key to
delete the latest data out of measured values.
μm It indicates “-” to delete all data.
● Repeat a measuring process 1~20 times by pressing
the probe to 「Zero plate」. (A mean value is
displayed whenever a probe is pressed)
● When a measuring process reaches the 20th time, the
buzzer beeps, beeps 2 times and afterward any new entry
is no more accepted.
Adjust the displayed value to Thickness standard
(in this case, 100μm) by pressing ▲ , ▼ key.
Pressing ▲ or ▼ key interrupts the delete function of
CAL/DELETE key.
Pressing ▲ key increases the displayed value.
Pressing ▼ key decreases the displayed value.
(Press and holding key turns to fast forwarding.)
Adjust the reading value to the Thickness standard.
μm
-11-
【 Cal. w. foil】
1.Measure thick
-ness of foil
several times.
2.With ▼ or ▲ , Ad
-just to thick
-ness of foil
3.press CAL key.
cal. w. foil (Fe)
102
cal. w. foil (Fe)
100

After adjusting the reading value to the Thickness standard,
press CAL/DELETE key.
The buzzer beeps, displayed 【cal. w. foil】 goes out and it returns to a measuring mode.
This is a measuring mode.
μm
● It is correct that numerical values measured by pressing the probe a few times to the 「Thickness stadard」
on the 「Zero Plate」 indicates the thickness in the neighborhood of the 「Thickness standard」.
● When the measured value results in largely off the 「Thickness standard」 please try again the 「Calibration
standard」 from the beginning.
※After performing Calibration standard , the previous 「Calibration standard adjusting value」 is deleted, and the
last entry of 「Calibration standard adjusting value」 is stored.
-12-
(Fe)
100
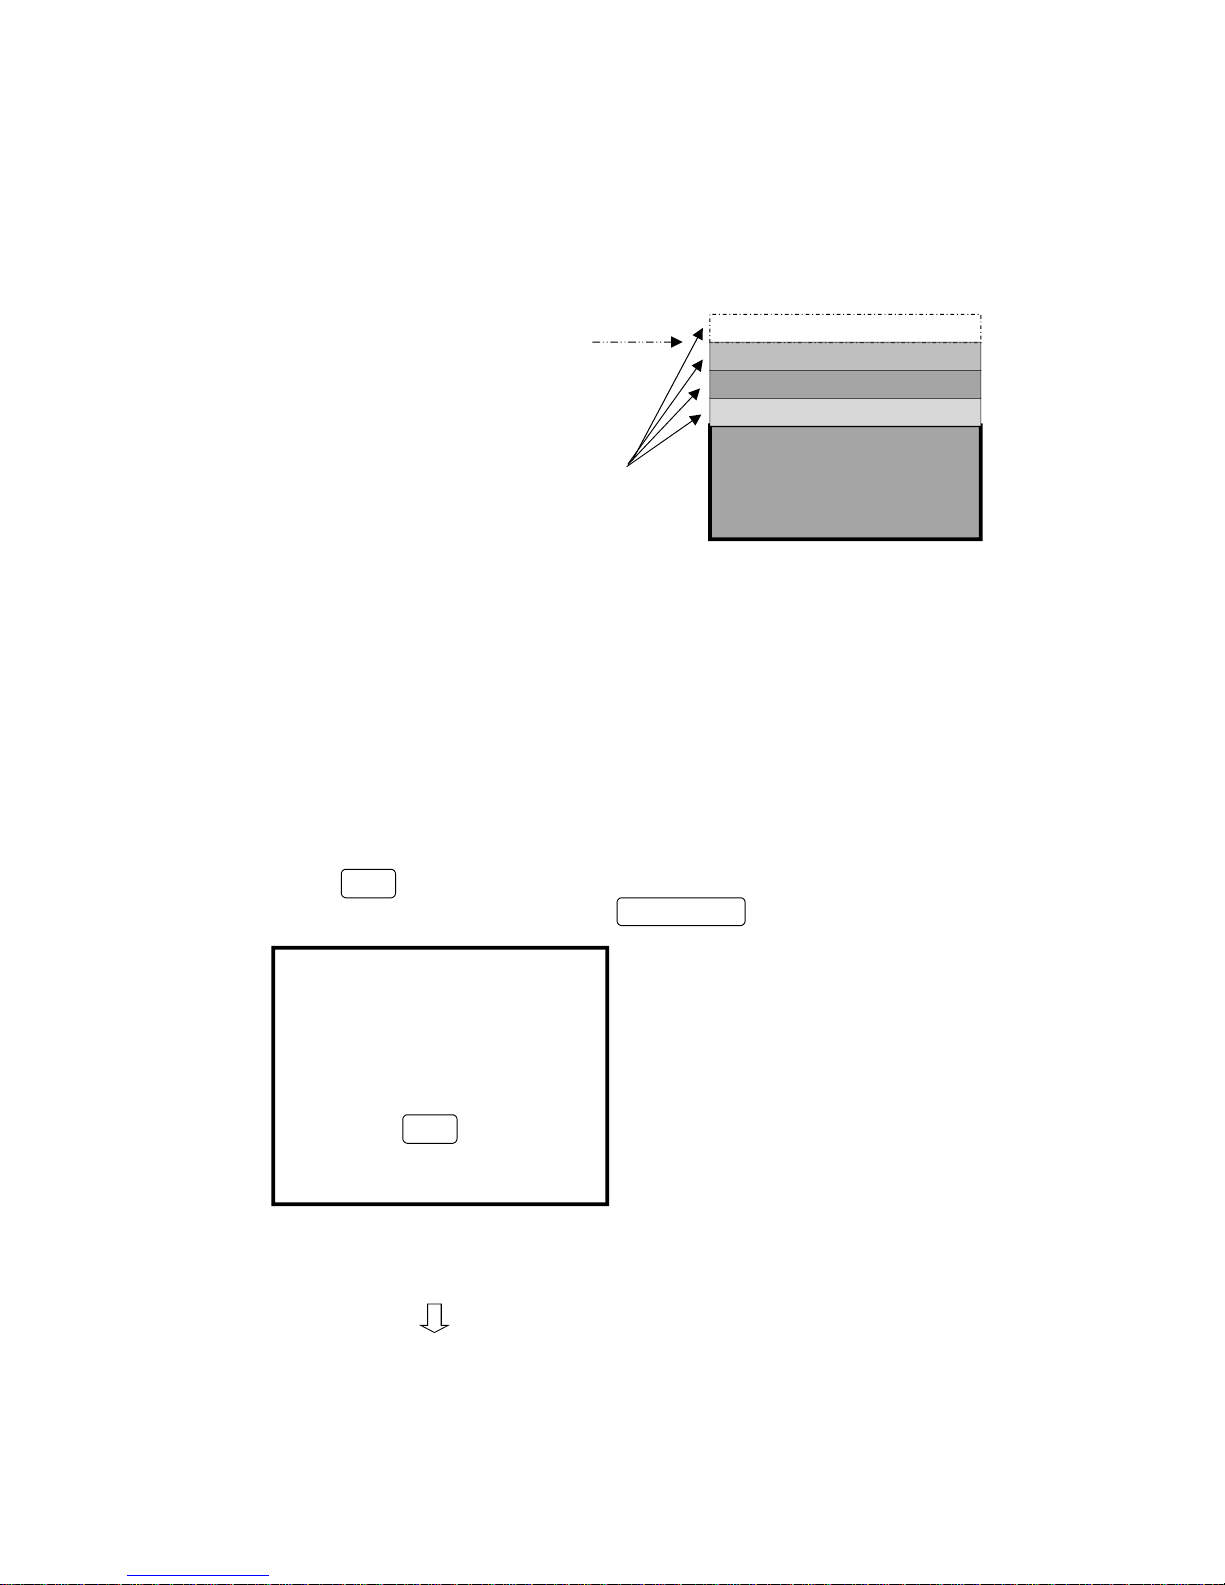
Substrate material
(1st layer)
(2nd layer)
(3rd layer)
(5)Zeroing in special cases (Multi-layers)
◎ In case of being painted as shown with multi-layers on the substrate there may be needs to measure thicknesses of
each layer. For example, measuring only the thickness of the 4
th
layer please zero as an assumed ZERO at the surface
of the 3
rd
layer stacked on the substrate and take 「Zeroing」, 「Calibration standard」 as the aforementioned (3), (4).
Measuring the thickness of the 4
th
layer
by zeroing at the 3
rd
layer.
Coating films
◆ Releasing of special-case zeroing
When zeroing again on the substrate after having finished the above measurements and if the combined thickness of
3 coating layers from 1st to 3rd exceeds 50μm, please zero the meter on the following procedures.
If the thickness of 3 combined layers is bellow 50μm, take the same procedure as usual zeroing to release.
● Prepare the identical material quality, plate size to a measuring object.
(This is designated as a Zero plate)
Press ZERO key.
The buzzer beeps. CAL/DELETE key changes to one data “deletion” function.
Press the probe to the Zero plate.
The buzzer beeps, beeps, beeps 3 times.
-13-
(4th layer)
【ZERO cal.】
1.Measure subst
-rate Several
times.
2.press ZERO key.

Press ZERO key .
The buzzer beeps.
Press ZERO key again.
The buzzer beeps.
Press probe to Zero plate.
The buzzer beeps.
Zeroing is in process.
Measured mean value
When the mean value results largely off the “0”,
press CAL/DELETE + key to
delete the latest data out of measured values.
It indicates “-” to delete all data.
Remove the probe from 「Zero plate」
● Repeat a measuring process 1~20 times by pressing
the probe to 「Zero plate」.
(A mean value is displayed whenever a probe is pressed)
◆ When a measuring process reaches the 20th time, the
buzzer beeps, beeps 2 times and afterward the unit does not
accept any entry.
After press of certain times or 20 times,
press ZERO key.
-14-
OFFSET.
To continue.
press ZERO twice.
【ZERO cal.】
1.Measure subst
-rate Several
times.
2.press ZERO key.
ZERO cal. (Fe)
1
μm
▼

The buzzer beeps. “Deletion” function of CAL/DELETE key stops.
The reading 「Zeroing」 in the upper left disappeared.
Zeroing completed and the unit becomes possible to
take measuring and adjusting operations.
● It is correct that numerical values measured by pressing the probe to the 「Zero plate」 indicates 「0」
or in the neighborhood of 「0」.
When the mean value results in largely off 「0」μm, please try again zeroing from the beginning.
● [LLLL] indicated on display during a time of zeroing means that the calibration point heavily deviates from
the standard please make sure that the material is not in process of being built with others and repeat the
zeroing in several times until a stable 「0」 is obtained.
※After performing Zero calibration, the previous 「Zero adjusting value」 is deleted, and the last entry of 「Zero
Adjusting value」 is stored.
-15-
(Fe)
0
μm
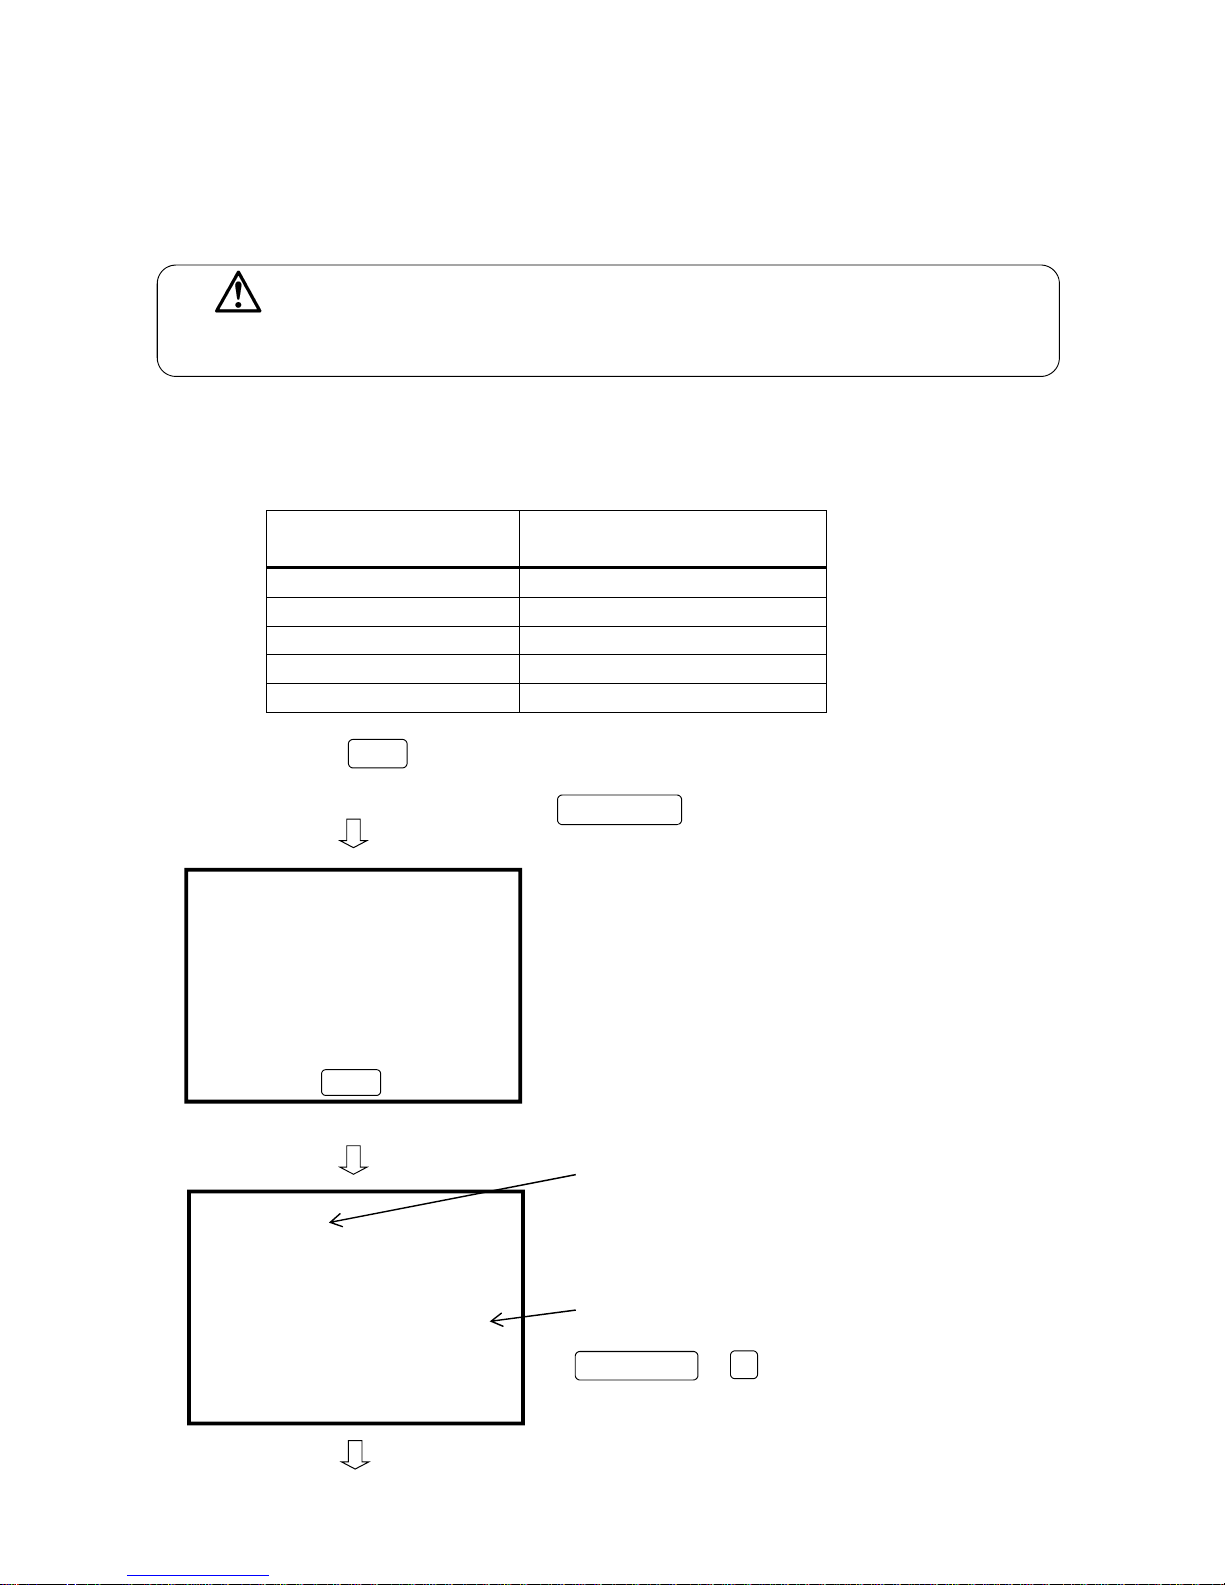
(6) 2-point calibration in case it is difficult to perform 「Zeroing」
In case zeroing is difficult to perform such as measuring the thickness of the film on the rough surface of Blast-steel plates,
a calibration method using 『2 different thicknesses of standard plates』 pinching a thickness of the object is defined as
「JIS K5600」 Standard. This calibration method complies to the regulations.
Caution
It is not possible to use both this calibration method and other calibration ones together, or mixing them together.
Should were the methods taken, measuring results could be the wrong values.
Prepare the same blast-steel-plate in material as the objective base or, a rough face on non-ferrous base like
aluminum and 2 different thicknesses of Thickness standards.
Please choose the suitable difference of Thickness standards from the list below.
Film thickness to be measured
(Predicting film thickness)
Difference of thickness between
2 Thickness standards
~ 49.9μm 10μm or over
50.0 ~ 99.9μm 25μm or over
100.0 ~ 499.9μm 50μm or over
500 ~ 999μm 199μm or over
1.0 ~ 2.5mm 0.5mm or over
Press and hold the ZERO key for 3 seconds.
The buzzer beeps.
CAL/DELETE key changes to one data “deletion” function.
Stack the thinner 「Thickness standard」 on the substrate and
press the probe on it.
The buzzer beeps whenever pressing the probe.
It reads that 2-foil calibration is under process.
Measured mean value
In case the mean value abnormally deviates, a press of
CAL/DELETE + ▼ key deletes the latest entry and displays
the mean value of all data except the last one.
All deletion indicates “-” on the reading.
- 16 -
【2 - foil’s cal】
Measure thinner
foil on metal
several times.
Afterward,
press ZERO key.
【 2 - f. c. 】 (Fe)
27
μm

After pressing certain times or 20 times, ●Try measuring plural times in the range of 1-20 times by pressing
press ZERO key. the probe on a thinner 「Thickness standard」.
( A mean value is indicated whenever the probe is pressed )
◆When repeating measurements 20 times, the buzzer beeps, beeps
2 times and afterward the unit does not accept any entry.
The buzzer beeps, beeps 2 times.
A press of ▲ or ▼ key makes the buzzer
beep and a mean value to the last measurement appears on the reading.
Mean value
Equate this reading value with Thickness standard (in this example, 25μm )
by pressing ▲ or ▼ key.
A press of ▲ key increase a reading value.
A press of ▼ key decreases a reading value.
(Press and holding turns to fast forwarding.)
Equate the reading value with Thickness standard.
After equating the reading value with the Thickness standard,
press ZERO key.
The buzzer beeps.
- 17–
【2 - foils’ cal】
Use or ▼ ,
to set foil
thickness
Afterward,
press ZERO key.
【 2 - f. c. 】 (Fe)
27
μm
▲
【 2 - f. c. 】 (Fe)
25
μm

Press the probe on the thicker 「Thickness standard」
stacked on the substrate.
The buzzer beeps whenever pressing the probe.
Measured mean value
In case the mean value abnormally deviates from the Thickness
standard, a press of CAL/DELETE + ▼ key deletes the latest
entry and displays the mean value of all data except the latest one.
All deletions indicates “-” on the reading.
●Try measuring in the range of 1-20 times by pressing
the probe on the thicker 「Thickness standard」.
(A mean value is indicated whenever the probe is pressed.)
After pressing certain times or 20 times,
press ZERO key.
The buzzer beeps, beeps 2 times.
◆When repeating measurements 20 times, the buzzer
beeps, beeps and the unit does not accept any entry.
A press of ▲ or ▼ key makes the buzzer beeps
and the last measurement value appears on the reading.
- 18-
【2 - foils’ cal】
Measure thicker
foil on metal
several times.
Afterward,
press ZERO key.
【 2 - f. c. 】 (Fe)
198
μm
【2 – foil’s cal】
Use ▲ or ▼ ,
to set foil
thickness.
Then, ready for
measure.

Mean value
Equate the displayed value with the thickness of Thickness standard
(in this example 200μm) by pressing ▲ or ▼ key.
A press of key increases a reading value.
A press of key decrease a reading value.
(Press and holding turns to fast forwarding.)
Adjust the value to the Thickness standard.
After adjusting to thickness of the Thickness standard,
Press ZERO key.
Then the buzzer beeps, beeps, beeps 3 times.
This is on display for about 0.5 seconds.
The buzzer beeps.
Measuring mode
-19-
【 2 - f. c. 】 (Fe)
198
μm
▼
【2 - foil’s cal】
Ready for
measure.
(Fe)
200
μm
▲
【 2 - f. c. 】 (Fe)
200
μm

● Press the probe plural times to the 「Thickness standard」 placed on the adjusted substrate .
It is correct that the reading value displays a thickness in the neighborhood of 「Thickness standard」.
Take the procedures with each 2 sheets of 「Thickness standard」.
● When the measured value results deviate largely from 「Thickness standard」, please try again performing
「2-point calibration」from the beginning.
※After performing 2 foil adjustments, all previous data are deleted and the last data measured with
「2-point calibration」 is stored.
- 20-

(7) How to delete calibration
Take the following procedures to delete calibration when the reading on the screen is locked or after
batteries replaced or when it becomes impossible to process 「Zeroing」, 「Calibration standard」(CAL).
※This operation procedures are taken when SAMAC is faulty. Usually, take adjustments with the old adjusted
data stored. Automatically, the old data is deleted and the new data is stored.
Hold ZERO key and press ▼ key.
The buzzer beeps, beeps 2 times.
※Switch Power to OFF when interrupting the deletion of
calibration.
Press ▼ key.
The buzzer beeps, beeps 2times.
Deletion of calibration data is over and
the buzzer beeps, beeps 2 times.
The last measured value is displayed.
It becomes possible to take measurements and
adjustment procedures of this unit.
After deleting, take 「Zeroing」 , 「Calibration standard」
procedures proceeding to measuring.
-21-
ERASE?
(ZREO cal.)
&
(cal.w.foil)
ERASE
(cal.data)
(Fe)
100
μm

Measuring
Hang the meter through a strap over your wrist never to drop it.
When pressing the probe against the object with Power on.
The buzzer beeps.
A measured result is indicated.
Each time a probe is pressed to an object,
the buzzer beeps and the measuring result is indicated.
-22-
(Fe)
125
μm

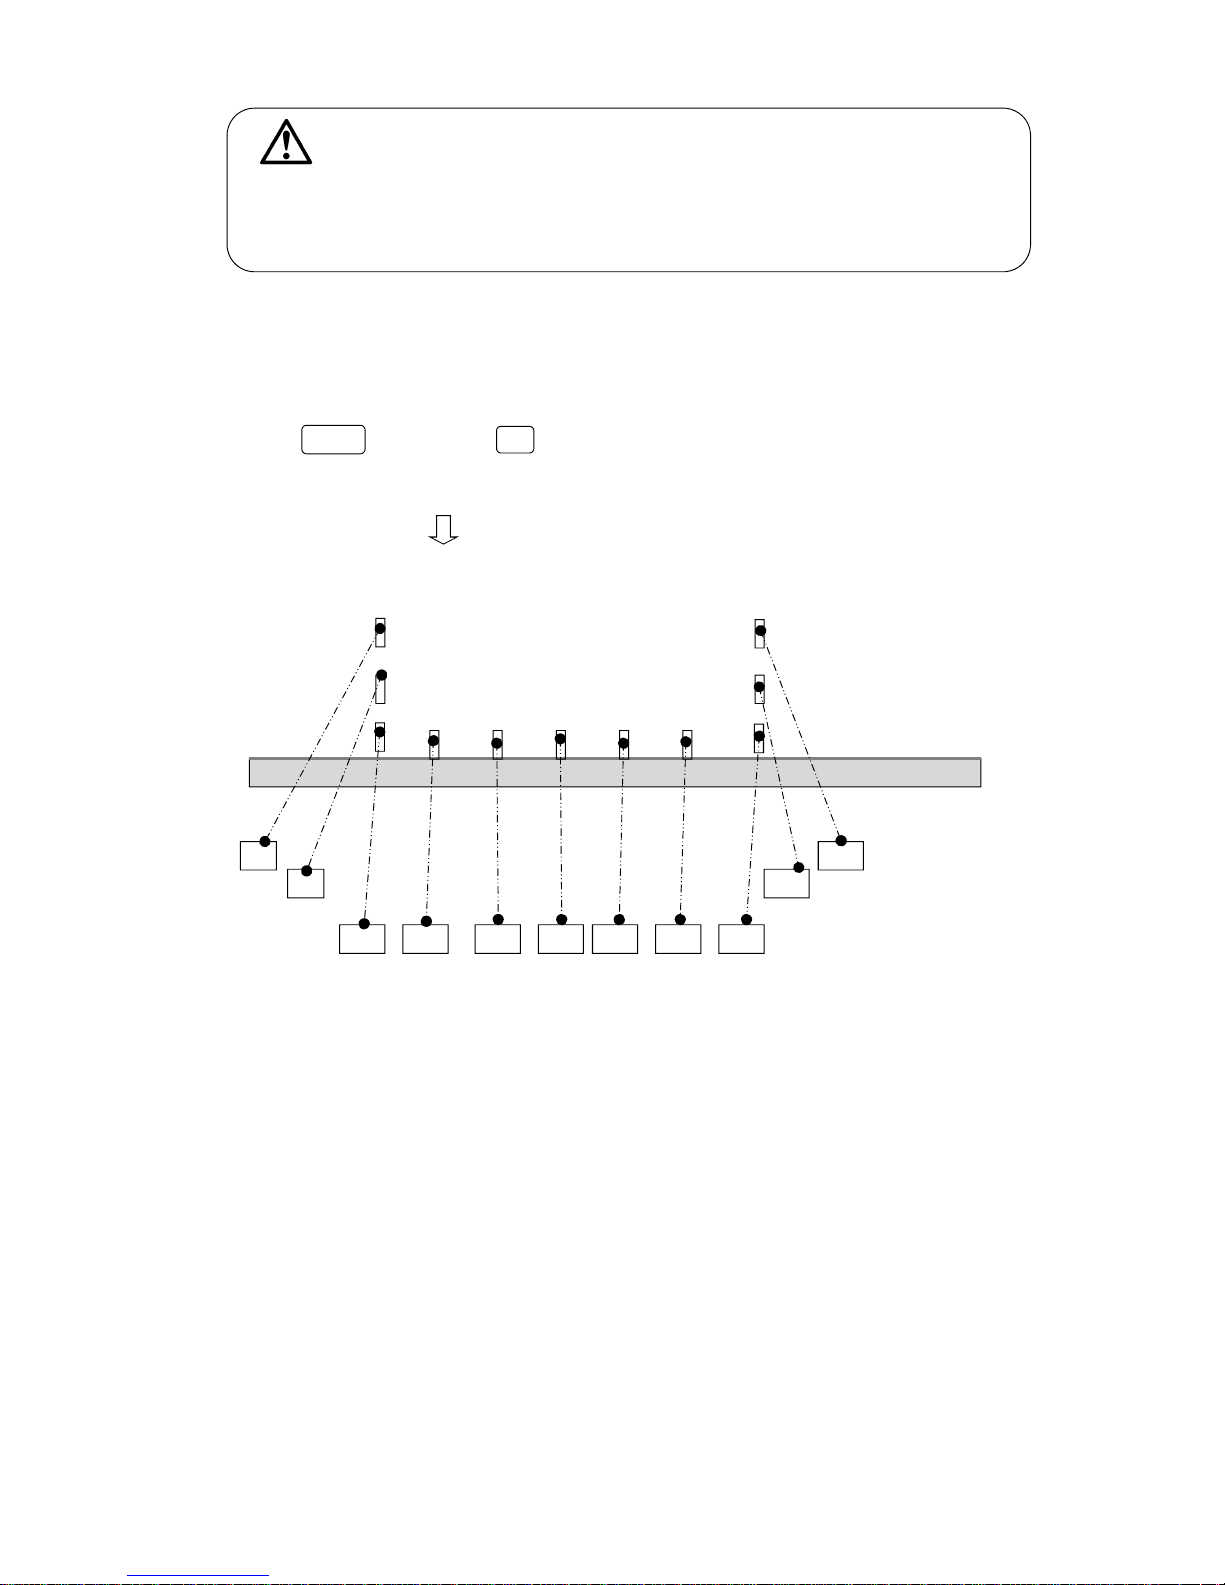
Function setting
(1)Setting of Non-Interrupt Measurement Mode
As illustrated on the right figure, this mode is used
when taking non-interrupt measurements for painting
surfaces etc. Film thickness values are taken/displayed
while press/ holding probe on the object.
A measuring value is held (displayed) when pressing
a probe at standard mode, but in Non-Interrupt mode
measuring values are taken/displayed about every
0.5 seconds interval while pressing a probe.
Hold ZERO key and press ▲ key.
The buzzer beeps, beeps 2 times.
This unit has turned into 「Non-Interrupt Measurement Mode」.
Data can be successively measured about 0.5 second intervals and the data is indicated with a beeping sound.
↓ ↑
Traces of probe
↓ ↑
→ → → → → →
- 751
- 751
837 125 124 126 123 124 751
↑
Reaching to a measurable distance, the probe indicates the distance/thickness at the spot.
Measuring values on display(indicated successively each 0.5 second interval).
※ The Non-Interrupt function is stored when switching Power to OFF.
To return to the beginning, take the procedure of “Returning to the beginning” listed on the following page.
-23-
Substrate
Substrate
(Fe)
125
μm
Caution
The moving measuring method at “Non-Interrupt Measuring Mode” may damage the measuring
surface or the probe tip because of frictions made by sliding the probe on the surface.
Please try fewer to take this method to minimize the frictions.
《Returning to the beginning》
To return 「Non-Interrupt Measurement Mode」 to the beginning take the same procedures as at the initial setting.
Hold ZERO key and press ▲ key.
The buzzer beeps, beeps 2 times.
「Non-Interrupt Measurement Mode」 has been released and returned to the beginning.
↓ ↑
Trace of probe
↓ ↑
→ → → → → →
- 125
- 125
- 125 125 125
125 125 125
↑
Measured values are stored until a next measurement is taken.
-24-
Substrate

(2)Setting of Resolutions
The reading values up to 500μm can be switched in resolutions as below.
It is possible to read resolution measurement results by the 0.1μm unit in the thickness of (0~400μm),
and by the 0.5μm unit in the thickness of (400 ~ 500μm).
● Switch Power to OFF when Power switch is ON.
Hold CAL/DELETE key and press ON/OFF key for 3 seconds or over
until the buzzer beeps 2 times.
The buzzer beeps, beeps 2 times.
Indicated :
0~400μm by the 0.1μm unit,
400μm~500μm by the 0.5μm unit.
※This function is not released if the power source is switched to OFF.
When returning, take the operation procedures of “Returning to the beginning” as below.
《Returning to the beginning》
To return 「0.1μm/0.5μm」 displayed resolutions to the beginning, take the same procedures as the above.
● Switch Power to OFF when Power is ON.
Hold CAL/DELETE key and press ON/OFF key for 3 seconds or over
until the buzzer beeps 2 times.
The buzzer beeps, beeps 2 times.
No indication under a decimal place.
(The data is rounded off to nearest whole digit.)
-25-
(Fe)
125.2
μm
(Fe)
125
μm

(3) Setting of Auto-Power-OFF function
When no entry of key operations and measuring procedures lasts for 3 minutes, the unit switches automatically
to OFF to save battery. This function can be released by the following operations.
No entry for 3 minutes lasts, and then the buzzer beeps.
The message is indicated for about 5 seconds.
The buzzer beeps, and the unit is switched to OFF.
《To Disable Auto-Power-OFF function》
●Switch to OFF when Power is ON.
While pressing and holding ▲ key, press ON/OFF key for 5 seconds or over.
The buzzer beeps, beeps 2 times.
It indicates 5 seconds.
It returns to a measurable mode.
Power switches to OFF when ON/OFF key is pressed.
※This function is not released even if the Power source is switched to OFF.
To enable it, take the operation procedures of “To Enable Auto-Power-OFF function”.
-26-
Automatic
Switch OFF
【DISABLE】
POWER
OFF
Terminating
phase
(Fe)
-
μm
《To Enable Auto-Power-OFF function》
●Switch to OFF when Power is ON.
While pressing and holding ▼ key, press ON/OFF key for 5 seconds or over.
The buzzer beeps, beeps 2 times.
It indicates for 5 seconds.
It returns to a measurable mode.
Auto-Power-OFF function can be functioned.
When no entry of key operations and measuring procedures lasts about for 3 minutes,
the buzzer beeps and the power is switched to OFF.
※This function is not released even if the Power source is switched to OFF.
To disable it, take the operation procedures of “To Disable Auto-Power-OFF function”.
-27-
Automatic
Switch OFF
【ENABLE】
(Fe)
-
μm
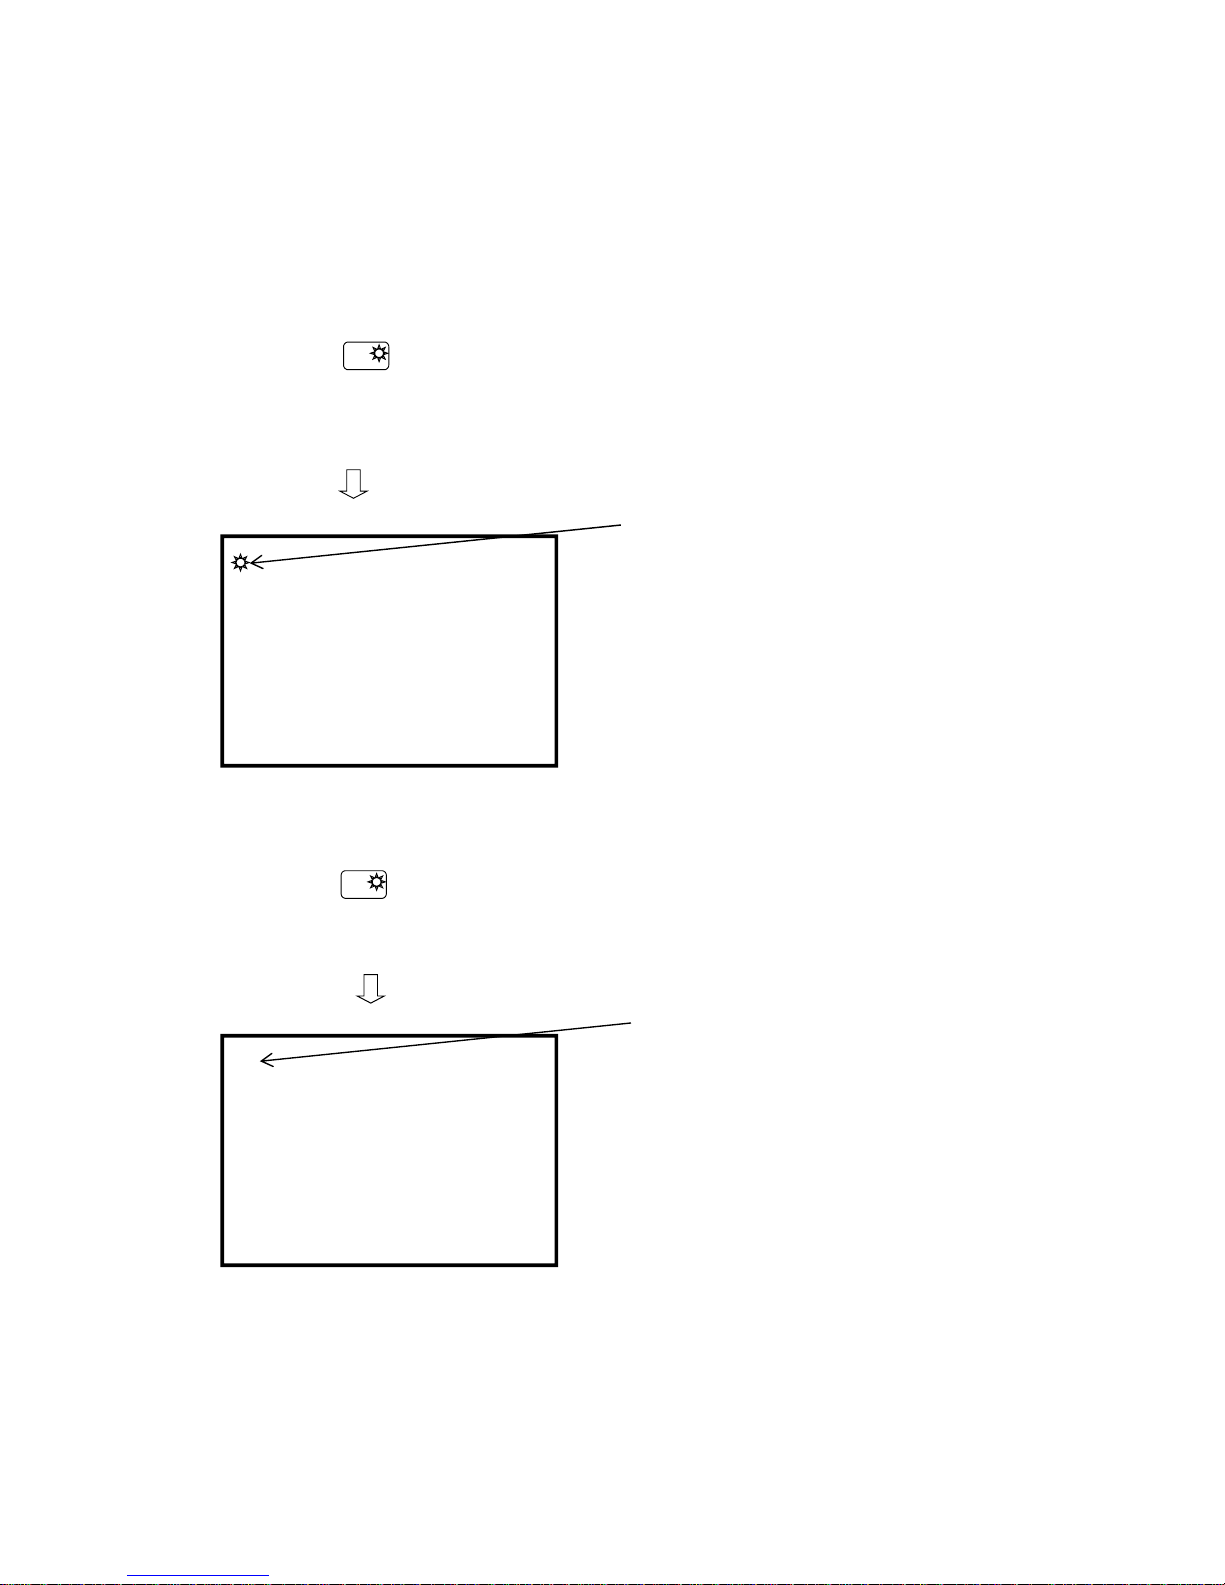
(4) Setting of Backlight
The LCD of this unit has a backlight function.
The backlight can be used at the place which is dark and difficult to read messages on display.
《Lighting the Backlight》
Press and hold ▲ key for 3 seconds or over.
The buzzer beeps, beeps 2 times
and the backlight goes on.
It is shown when the backlight is ON.
《Switching off the Backlight》
Press and hold ▲ key for 3 seconds or over.
The buzzer beeps, beeps 2 times and the backlight goes off.
The mark and backlight go off.
※This function is kept alive even if the Power source is switched to OFF.
-28-
(Fe)
-
μm
(Fe)
-
μm

Note to improve measuring accuracy
① Zero plate
Prepare the same material, thick and sized plate as the measuring object for Zeroing and Calibration
standard (CAL). Different materials may not bring about correct measuring results.
※As accessories to probe, “Zero plates for Zeroing” is for testing purpose only.
Select a most suitable Zero plate for actually measuring objects. (please refer to page 9)
② Thickness standard (foils)
Take Calibration standard measurements (CAL) using a Thickness standard which is thicker or as thick as
the measuring films.
※Use of a calibration standard with a deviant thickness may cause errors.
Replace worn-out or bent plates with new ones. In case non-accessorized plates are necessary
(over 16μm), contact a local sales office.
③ Quality of films to be measured
Magnetic metal contained in the films can correctly not be measured. In case of measuring elastic films,
place a standard plate of 30~50 μm thick on the object and subtract the thickness from the measuring
value to avoid errors caused by elastic dents.
④ Measurements of edges or angles
Magnetic fields in the neighborhood of the edges/the angles of a measuring object become uneven.
15~20 mm closer part to the center of the object shall generally be measured.
Pay attention to protruded part, curved part or unexpectedly deformed part.
⑤ Measurements of rough faces
Roughness of a substrate, a measuring face affects measuring results.
Take a mean value by measuring several places at a time.
⑥ Measurements of stretched part on faces
In some case stretched, rolled part occurred on a substrate, which may cause measuring errors.
Take a mean value by measuring several places at a time.
⑦ Temperature
Operating temperature range is 0~40 ℃. Especially, large temperature differences between a main unit
and a probe cause measuring errors.
⑧ Residual magnetism, stray magnetic fields
Pay attention to transportation method of electromagnets, residual magnetism on substrates or arc welding,
those of which emit strong magnetic fields to cause measuring errors.
-29-

Trouble Shooting (If any problems?)
Before contacting us please check with the following points.
Symptoms Points to check Measures to be taken
No response upon press of Are batteries worn out? Replace them with new ones (2 ea.)
「ON/OFF」 key.
No response after replacing Something wrong inside a meter Contact us for repair.
batteries and pressing a
「ON-OFF」key
Batteries is shorting. They can be used for a while.
Prepare for new batteries.
BAT
Batteries have worn out. Replace them with new ones.
BAT
Out of batteries. Replace them with new ones.
《Power OFF》
Possibly pressing probe to object Hold probe in air, keeping it away
too soon after switching on. off objects, metals during a time
of “START UP ・・・” on screen.
《Power OFF》
-30-
BATTERY
is dead!
Replace all of them with
NEW BATTERY.
ERROR!
Hold the probe
in the air.

Symptoms Points to check Measures to be taken
Something wrong with probe. Contact us for repair.
《Power OFF》
Something wrong with probe/ Contact us for repair.
main unit.
《Power OFF》
-31-
TROUBLE!
The probe may
have trouble.
TROUBLE!
The probe and the
main unit may have
trouble.
Repairing needed.

Specifications
Items Applications
Model
Probe built-in coating thickness meter SAMAC-F
Measuring method
Electromagnetic induction type
Display method Graphic LCD (data/message), Backlight
Measuring range Fe substrate: 0~2.5mm
Calibration (CAL)
2-point calibration
Zero: metal substrate calibration
Calibration standard: metal substrate and standard thickness calibration
Resolutions
1μm unit: 0~999μm
0.01mm unit : 1.00~2.50mm
by switching
0.1μm unit: 0~400μm
0.5μm unit: 400μm~500μm
Accuracies
(to flat, smooth face)
0~100μm: ±1μm or ±2% of reading
101μm~2.5mm: ±2%
Probe (built-in)
One point constant pressure contact type with V cross-cut groove
Measuring part φ28mm (probe partφ10mm)
Additional functions
① Switching to Measuring mode (hold/non-interrupt)
② Auto Power Off (3 min.), releasing and reactivating
③ Backlight
④ Switching of display resolutions
Keys
ON/OFF , ZERO , ▲ , ▼ , CAL/DELETE
Power source 3V DC Dry Battery (LR03×2), Continuous operation hours: 25 hours
Operating temperature 0 ~ 40 ℃ (Non-condensing)
Accessories
Thickness standards, Zero plate for testing (Fe), Carrying case for Thickness
standards, Carrying case for main unit, Dry batteries, Hand strap cord
Dimensions 63(W) × 84(H) × 30(D)mm
Weight About 125g (including dry batteries)
April, 2015
-32-

Reference (Principle of measurements)
●
Electro-Magnetic Induction type (Electromagnetic Type)
When iron (ferrous metals) approaches to the tip of the coil built-in core, the inductance of the coils changes
in response to changes of the approaching distances. Electromagnetic Type coating thickness meters take
measurements of thicknesses of coating films by using this technical Principle and taking out the changes of
the distances in state of electric signals .
●
Eddy Current Type
By using correlations of the sizes of Eddy current induced on the metal surface by High frequency wave
magnetic field and film thicknesses, Eddy Current Type coating thickness meters take measurements of
thicknesses of insulating films on the surface of non-ferrous metals.
―33-

Products sold:
Coating thickness meter, Pinhole detector,
Moisture meter, Concrete covermeter, Condensator,
Needle detector, Iron piece detector, Viscosity cup
Manufacturer :
Sanko Electronic Laboratory Co., Ltd.
Tokyo Branch:Shibata Bldg., 2-6-4, Uchikanda, Chiyoda-ku, Tokyo 101-0047, Japan
Tel. 81-3-3254-5031 Fax. 81-3-3254-5038
Osaka Branch:Konishi Bldg., 2-3, Sugawara-cho, Kita-ku, Osaka 530-0046, Japan
Tel. 81-6-6362-7805 Fa.x. 81-6-6365-7381
Sendai Branch:1F Bonheur Est, 2-5, Teppomachinaka, Miyagino-ku, Sendai 983-0868, Japan
Tel. 81-22-292-7030, Fax. 81-22-292-7033
Nagoya Branch:Meihoku Bldg., 3-11-27, Kinjo, Kita-ku, Nagoya 462-0847, Japan
Tel. 81-52-915-2650 Fax. 81-52-915-7238
Fukuoka Branch:11-11 Naraya-cho, Hakata-ku, Fukuoka 812-0023, Japan
Tel. 81-92-282-6801 Fax. 81-92-282-6803
Head Office:1677 Hisasue, Takatsu-ku, Kawasaki 213-0026, Japan
Tel. 81-44-751-7121 Fax. 81-44-755-3212
URL http://www. sanko-denshi.co.jp E-mail: info@sanko-denshi.co.jp
 Loading...