

Page 1
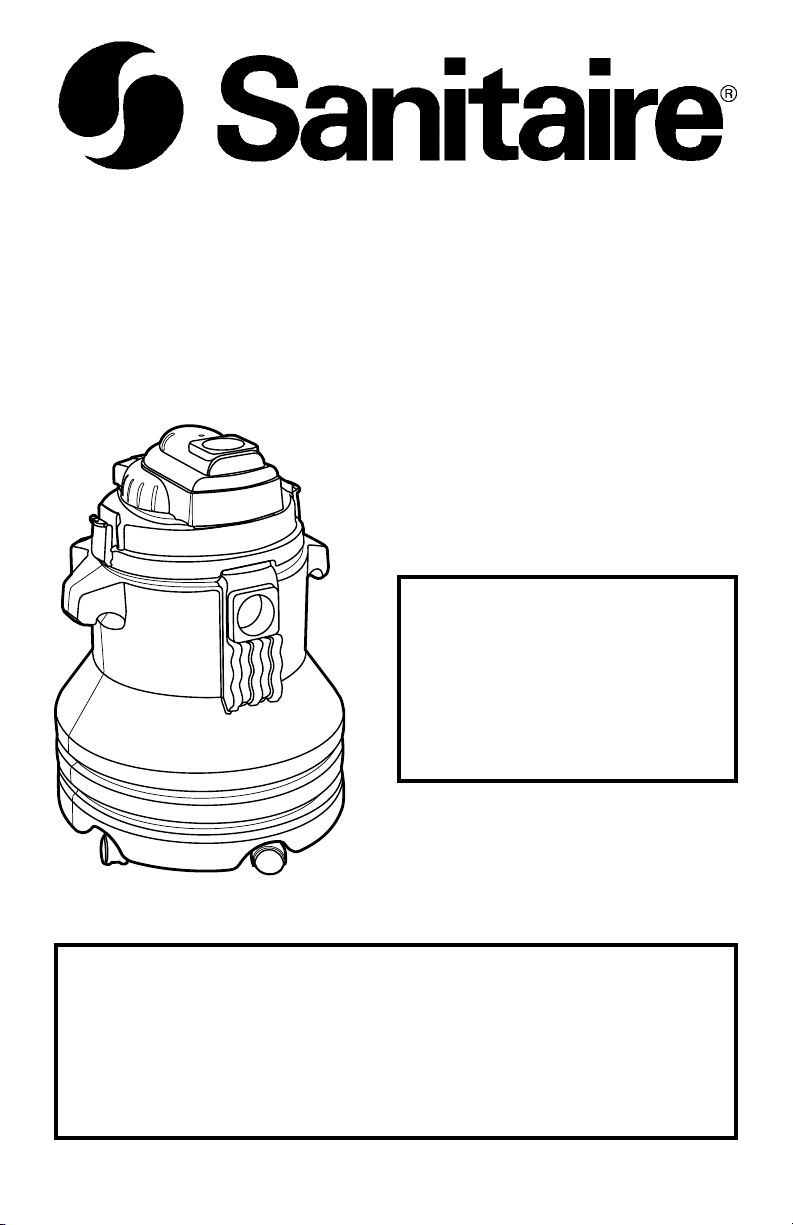
Commercial Wet/Dry
Vacuum Cleaner
Ownerʼs Guide
SC2800 Series
Index
Important Safeguards .................... 3-5
Service Information ...........................6
Identify Parts .....................................7
Use ................................................ 8-9
Motor Filter ......................................10
Clean and Store ..............................11
Warranty .................................... 14-15
To view the repair parts list, go to www.sanitairevac.com or
call 1-800-800-8975 for a copy.
For location of nearest Sanitaire/Eureka Warranty Station
or service information call 1-800-800-8975.
www.sanitairevac.com
Page 2

Page 3

IMPORTANT SAFEGUARDS
When using an electrical appliance, basic precautions should always be followed, including
the following:
READ ALL INSTRUCTIONS BEFORE USING THIS VACUUM CLEANER.
WARNING
To reduce the risk of fire, electric shock, or injury.
• Use indoors only.
• Do not leave vacuum cleaner when plugged in. Turn off the switch and unplug the
electrical cord when not in use and before servicing.
• Do not allow to be used as a toy. Close attention is necessary when used by or near
children.
• Use only as described in this manual. Use only manufacturerʼs recommended
attachments.
• Do not use with damaged cord or plug. If vacuum cleaner is not working as it should,
has been dropped, damaged, left outdoors, or dropped into water, return it to a service
center before using.
• Do not pull or carry by cord, use cord as a handle, close a door on cord, or pull cord
around sharp edges or corners. Do not run vacuum cleaner over cord. Keep cord away
from heated surfaces.
• Connect to a properly grounded outlet only (refer to Grounding Instructions).
• Do not use extension cords or outlets with inadequate current carrying capacity.
• Turn off all controls before unplugging.
• Do not unplug by pulling on cord. To unplug, grasp the plug, not the cord.
• Do not handle plug or vacuum cleaner with wet hands.
• Do not put any object into openings. Do not use with any opening blocked; keep free
of dust, lint, hair, and anything that may reduce airflow.
• This vacuum cleaner creates suction. Keep hair, loose clothing, fingers, and all parts
of body away from openings and moving parts.
• Do not pick up anything that is burning or smoking, such as cigarettes, matches, or
hot fireplace or barbeque ashes. Live sparks or embers could start a fire in waste
material inside the tank.
• Do not use without ball float and cage in place.
• Use safety goggles to avoid the discharge air as particles in the air could cause eye
damage.
• Use extra care when cleaning on stairs.
• If the machine tips over during use, shut it off immediately, set it upright, and wait for
the motor to stop completely. This allows the ball float to return to normal position and
permits proper airflow through the cleaner.
• Do not use to pick up flammable or combustible liquids such as gasoline, or use in
areas where they may be present.
• Store your cleaner indoors and in a cool, dry area.
• Keep your work area well lighted.
• Unplug electrical appliances before vacuuming them.
SAVE THESE INSTRUCTIONS
3
Page 4

CONSEILS DE SÉCURITÉ IMPORTANTS
Lʼutilisation dʼun appareil électrique sous-entend lʼobservation de certaines règles de
sécurité élémentaires:
LIRE TOUTES LES INSTRUCTIONS AVANT DʼUTILISER LʼASPIRATEUR.
Pour réduire les risques de feu, de secousse électrique ou de blessure:
AVERTISSEMENT
• Utiliser à la maison seulement.
• Ne pas sʼabsenter tant que lʼaspirateur est branché. Éteindre lʼappareil et le
débrancher lorsquʼon ne sʼen sert plus et avant son entretien.
• Veiller à ce que lʼaspirateur ne serve pas de jouet, particulièrement si lʼusager est un
enfant ou si lʼon sʼen sert près dʼun enfant.
• Ne sʼen servir que selon la description quʼen donne le guide. Nʼemployer que les
accessoires que recommande le fabricant.
• Ne pas sʼen servir si le cordon ou la fiche sont abîmés. Avant de se servir de lʼaspirateur,
le retourner à un centre de réparation sʼil ne fonctionne pas comme il faut, sʼil est tombé
ou abîmé, si on lʼa laissé dehors ou laissé tomber dans lʼeau.
• Ne pas le tirer ou le transporter par le cordon, ne pas se servir du cordon comme dʼune
poignée, ne pas coincer le cordon en fermant une porte et ne pas tirer le cordon sur
des encoignures ou des bordures pointues. Ne pas passer lʼaspirateur sur le cordon.
Éloigner le cordon des surfaces chauffées.
• Branchez toujours lʼaspirateur dans une prise à trois (mise à la terre).
• Ne pas se servir de cordons de rallonge ou de prises dʼintensité admissible mal adaptée
aux besoins.
• Éteindre complètement lʼaspirateur avant de le débrancher.
• Ne pas tirer sur le cordon pour débrancher lʼaspirateur. Le débrancher en tirant sur la
fiche et non sur le cordon.
• Ne toucher ni à la fiche ni à lʼaspirateur avec les mains mouillées.
• Ne pas introduire dʼobjets dans les orifices. Ne pas se servir de lʼaspirateur avec une
ouverture bouchée et en écarter poussière, charpie, cheveux et autres qui risquent
de réduire la circulation de lʼair.
• Lʼaspirateur créé une aspiration. Cheveux, vêtements amples, doigts et dʼune manière
générale tous les membres du corps doivent se trouver à lʼécart des pièces mobiles
et des ouvertures.
• Ne rien ramasser de brûlant ou de fumant, comme par exemple mégots, allumettes ou
cendres chaudes des cheminées ou des grilles. Des étincelles ou des braises peuvent
commencer un feu dans les dégâts au dedans du réservoir.
• Ne pas sʼen servir sans le filtre du moteur ou que le filtre soit abîmé.
• Utiliser avec des lunettes protectrices ou éviter des bouffées dʼair car des poussières
dans lʼair peuvent abîmer les yeux.
• Redoubler de prudence lorsquʼon aspire les escaliers.
• Si lʼaspirateur se renverse quand il est en usage, tout-de-suite il faut lʼéteindre, mettre- le
à la position droite et attendre que le moteur sʼarrête complètement. Cela permettra que
la flotteur retourne à sa position normale et laisse la normale circulation dʼair passée
dans lʼaspirateur.
• Ne pas sʼen servir pour recueillir des liquides inflammables ou combustibles, tels
lʼessence, et ne pas utiliser dans le endroits où ces produits risquent de se trouver.
• Ranger lʼaspirateur à lʼintérieur, au frais et au sec.
• Bien éclairer la surface de travail.
• Débrancher les appareils électriques avant de les aspirer.
CONSERVER CES INSTRUCTIONS
4
Page 5
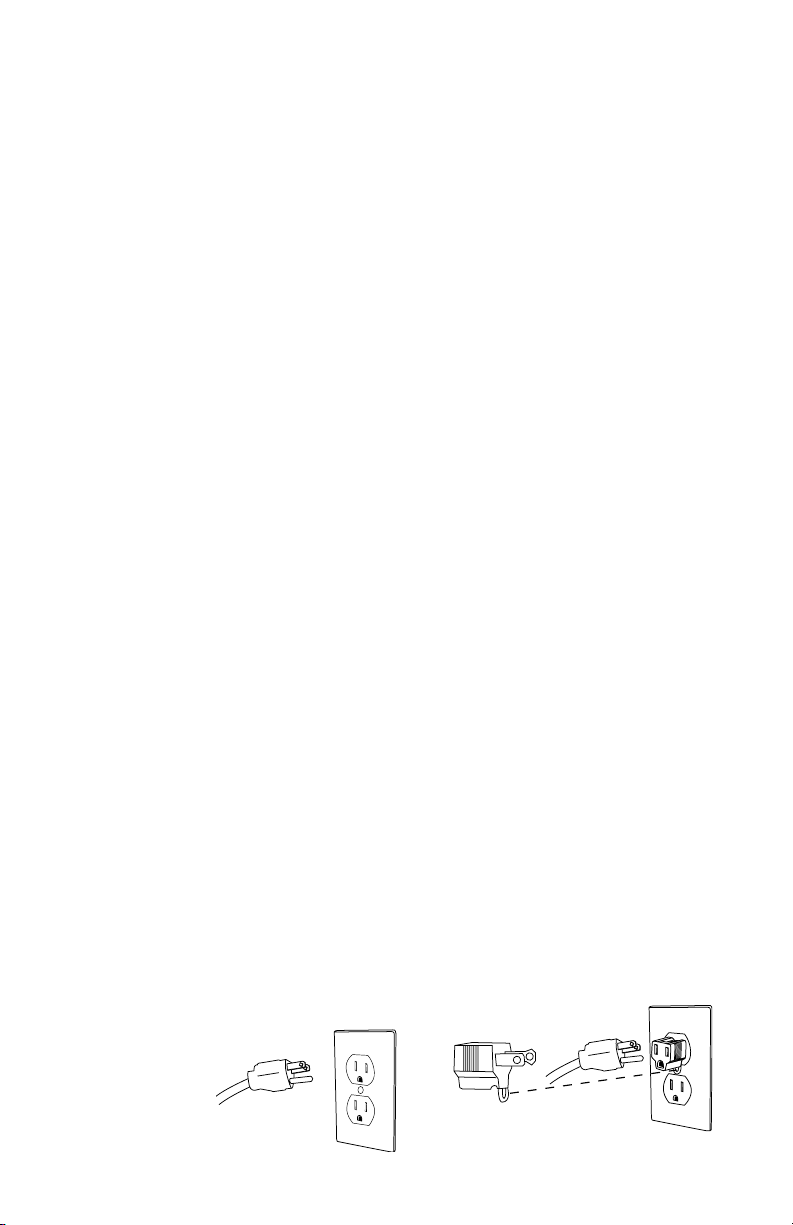
Grounding Instructions
This appliance must be grounded. If it should malfunction or breakdown, grounding provides
a path of least resistance for electric current to reduce the risk of electric shock. This appliance is equipped with a cord having an equipment-grounding conductor and grounding
plug. The plug must be plugged into an appropriate outlet that is properly installed and
grounded in accordance with all local codes and ordinances.
Improper connection of an equipment-grounding conductor can result in risk of electric
shock. Check with a qualified electrician or service person if you are in doubt as to whether
the outlet is properly grounded. Do not modify the plug provided with the appliance. If it
will not fit the outlet, have proper outlet installed by a qualified technician.
This appliance is for use on a nominal 120 volt circuit and has a grounding plug that looks
like the plug illustrated in Figure A. A temporary adapter which looks like the adapter
illustrated in Figure B may be used to connect this plug to a two-pole receptacle, as shown,
if a properly grounded outlet is not available. The temporary adapter should be used only
until a properly grounded outlet, Figure A, can be installed by a qualified electrician. The
green colored rigid ear, lug, or the like extending from the adapter must be connected to
a permanent ground such as a properly grounded outlet box cover. Whenever the adapter
is used, it must be held in place by a metal screw.
NOTE: In Canada, the use of a temporary adapter is not permitted by the Canadian
Electrical Code.
INSTRUCTIONS VISANT LA MISE À TERRE
Cet appareil doit être mis à la terre. En cas défaillance ou de panne éventuelles, la mise
à la terre fournit au courant un chemin de moindre résistance qui réduit le risque de choc
électrique. Cet appareil est pourvu dʼun cordon muni dʼun conducteur de terre et dʼune fiche
avec broche de terre. La fiche doit être branchée dans une prise appropriée correctement
installée et mise à la terre conformément aux règlements et ordonnances municipaux.
AVERTISSEMENT
Un conducteur de terre mal raccordé peut entraîner un risque de choc électrique. Consulter
un électricien ou un technicien dʼentretien qualifié si vous nʼêtes pas certain que la prise est
correctement mise à la terre. Ne pas modifier la fiche fournie avec lʼappareil-si elle ne peut
être insérée dans la prise, faire installer une prise adéquate par un électricien qualifié.
DANGER
Note. Au Canada, lʼutilisation dʼun adaptateur temporaire nʼest pas autorisée par le Code
canadien de lʼélectricité.
Cet appareil est destiné à un circuit de 120V et est muni dʼune fiche de mise à la terre
semblable à celle illustrée par le Figure A. Sʼassurer que lʼappareil est branché à une
prise de courant ayant la même configuration que la fiche. Aucun adaptateur ne devrait
être utilisé avec cet appareil.
Grounded Outlet Box
Grounded Outlet Box
Boîte de Prise de Terre
Grounding Blade is Longest
of the Three Blades
La Lame de Terre Est La
Plus Longue Des Trois
Lames
Figure A
Adapter
Adaptateur
Metal Screw
Vis de Métal
Grounding Tab
Taquet de Terre
Boîte de Prise de Terre
Figure B
5
Page 6

GENERAL INFORMATION
Automatic Suction Shut-Off
NOTE: Use the vacuum in the upright position. If the cleaner should tip, the
automatic suction shut-off turns off the suction.
The automatic suction shut-off functions when the tank is full of liquid. As the tank fills, the
ball float (inside the cage) rises until it seats itself against bottom of the motor. This shuts
off the suction causing the motor sound to become higher in pitch. When this happens,
empty the tank.
The automatic suction shut-off also functions if the cleaner tips over. To continue use, turn
cleaner off and set it upright. Wait a few seconds to allow motor to come to a complete
stop so the ball drops. Restart the motor.
Service Information
The instructions in this booklet serve as a guide to routine maintenance. For additional
service information, telephone our toll free number for the nearest Sanitaire/Eureka
Authorized Warranty Station. You should know the model, type and serial numbers
when you call:
USA: 1-800-800-8975
Mexico: 5670-6169
Canada: 1-800-800-8975
If you prefer, you can write to The Eureka Company, Service Division, 807 North Main
Street, Bloomington, Illinois 61701, USA. In Canada, write to The Eureka Company, 866
Langs Drive, Cambridge, Ontario N3H 2N7. Refer to The Eureka Warranty for complete
service information.
DO NOT OIL the motor at any time. Bearings have a seal and are
permanently lubricated.
Rating Plate
The model, type and serial numbers
are on the rating plate, located on
the back of the lid. For prompt and
complete service information, always
refer to these numbers when inquiring
about service.
Model and Type:_________________________
Serial No._______________________________
6
MODEL TYPE SERIAL NO.
VOLTS AMPS. HERTZ
SERVICE INFORMATION: 1-800-800-8975
THE EUREKA COMPANY
BLOOMINGTON, ILLINOIS 61701
Page 7

CONTENTS OF WET/DRY VAC
Unpack accessories from carton and remove vacuum cleaner. Additional accessories
may be inside the tank.
Pleated
Filter
Wands
Blower
Lid
Floor Nozzles
Tank
Hose
Reducer
Crevice
Tool
Wheels
Upholstery
Nozzle
Dusting
Brush
HOW TO ASSEMBLE
CAUTION: Fully assemble before using.
NOTE: Additional accessories are inside
the tank.
Remove Lid
• Squeeze latches together.
• Lift lid to remove.
To replace lid
• Align notch in the lid with the tank.
• Push the lid down until each latch snaps
to secure.
Attach Wheels
• Put tank upside down.
• Push and snap a wheel into each
socket.
Latches
Latch
Notch
7
Page 8

HOW TO USE
Dry Pick Up
To vacuum dry material, use the end of the hose or attach the floor nozzle without the
squeegee.
Wet Pick Up
To vacuum liquids, use the floor nozzle with the squeegee. The filter should be clean for
maximum efficiency.
Attach Hose Coupling
Hose Coupling
• Push the hose coupling into the
hose inlet.
• Give a slight twist to secure.
Hose
Connect Electric Plug
Inlet
• Place electric plug into outlet.
Power Switch
The power switch is opposite the hose inlet.
• Wear ear protection (not provided) if operating the
cleaner for a prolonged period of time.
• Push power switch to turn on.
Carry
Handle
Power
Switch
Carry Handle
CAUTION: Do Not carry wet or dry vacuum by the
lid.
• Carry handles are part of the tank.
• Always use these handles when lifting the cleaner.
Blower
NOTE: • Clean the hose, tank and tools before using the blower.
• Always wear safety goggles. Goggles are not sold with the cleaner.
• We recommend ear protection if using the cleaner for a long time.
• Never point blower toward people, animals or objects. The flying debris
can cause injury or damage.
• Do Not use the cleaner to power a paint sprayer or to supply air to any
other sprayer.
Blower
Outlet
Hose
Coupling
How To Use The Blower On The Lid
• Place hose coupling into blower outlet.
8
Page 9

HOW TO USE (continued)
Above-the-floor Cleaning Tools
• Use reducer at hose end (see illustration on page 7).
• Push desired tool onto the reducer.
• Cleaning tools fit on hose end only.
Floor Nozzles
• Push 1 1/2” diameter wand(s) onto hose end.
• Push tool onto the wand end with locking nut. Tighten nut to secure tool. Do not
overtighten, tool should still swivel.
Automatic Shut-Off
NOTE: Always use the wet or dry vacuum cleaner in the upright position. If cleaner
tips over, the suction automatically shuts off.
If the cleaner tips over:
• Turn off the power switch and set the cleaner upright.
• Wait a few seconds for the motor to come to a complete stop.
• Restart the motor.
When the tank is full:
• As the tank fills with liquid, the ball float (inside the cage) rises until it seats itself
against the bottom of the motor.
• The motor sound becomes a high pitch sound.
• The shut-off stops the suction.
• Turn off the power switch.
• Empty the tank (instructions follow).
CAUTION: FOR LIQUID PICKUP WITH THE PLEATED FILTER IN PLACE, DO NOT
FILL ABOVE INLET OR SPILLAGE WILL OCCUR. Your filter repels liquids
and when installed prevents your vacʼs float mechanism from automatically
shutting off airflow. Airflow will cease when your filter is completely submerged
in liquid, but spillage will occur if the water level reaches the vac tankʼs inlet
before airflow stops. The liquid level at which airflow will cease will be higher
than the normal automatic shut-off level. Your vacʼs float mechanism resumes
operation after removing the filter. Your filter should be dried completely after
liquid pickup to avoid mildew growth.
Empty Wet or Dry Contents from Tank
NOTE: Turn off the power switch and unplug electric cord to service.
• If cleaning liquid, lift the hose and drain any liquid back into the tank. Then remove
the hose.
• Empty contents into a suitable drain for liquids. Use a container for dry contents.
• Use special care when emptying full tanks with liquids.
• Replace lid and hose to continue cleaning.
9
Page 10

HOW TO MAINTAIN
These instructions serve as a guide to routine maintenance. To avoid unnecessary service
calls, clean motor filter and empty the tank often. Empty the liquids after each use.
Motor Filter
CAUTION: Turn off power switch and unplug the electrical cord before service.
Never operate cleaner without motor filters or with defective filters.
Do not collect oily or hazardous materials.
Check and clean the Pleated Filter once a month to maintain good performance.
The filter can be cleaned by washing with mild detergent and warm water. Be sure
pleated filter is completely dry before reinstalling.
IMPORTANT: Avoid touching filter media with abrasive materials or using a brush
to clean between pleats. This will permanently damage filter causing
dust to bypass filter.
How To Clean Filter
• Remove the lid. Place upside down on a
hard surface.
• Lift up on filter, twisting and pulling, to
remove it from the ball float cage.
• To remove debris, tap filter against waste
container. If filter needs further cleaning,
wash in warm water. To clean between
filter pleats, gently fan open under running
water.
• When all parts are cleaned, follow the
above steps in reverse to reassemble.
Filter
Ball Float
Cage
NOTE: Do n o t p u t a n y p a r t s in a
dishwasher.
NOTE: Your washable filter may need to
be replaced if cleaning it does not
restore cleaning performance.
Be sure to use GENUINE Sanitaire
replacement filter, 28680.
10
Lid
Page 11

HOW TO MAINTAIN (continued)
How To Clean and Store
NOTE: Turn off the power switch and unplug electrical cord before cleaning
tank.
• Empty tank of all liquid and thoroughly rinse inside before storing. This is even more
important after picking up wet or sticky substances.
• Use soap and warm water to clean tank and tools if cleaning a wet or sticky
substance.
• Clean and dry tank and all accessories.
• Store in a cool, dry area.
Store Cord
• Wrap cord around tank.
• Fasten plug to cord to prevent unwinding.
11
Page 12

Page 13

Page 14

THE SANITAIRE® COMMERCIAL
LIMITED WARRANTY
WHAT THIS WARRANTY COVERS
Your Sanitaire commercial cleaner is warranted to be free from all defects in
material and workmanship in normal use FOR A PERIOD OF ONE YEAR. The
warranty is granted only to the original purchase of the cleaner. The warranty is
subject to the following provisions.
WHAT THIS WARRANTY DOES NOT COVER
• Parts of the cleaner that require replacement under normal use, such as
bumpers, bags, and hoses.
• Damages or malfunctions caused by negligence, abuse, or use not in
accordance with the Ownerʼs Guide.
• Defects or damages caused by unauthorized service or the use of other than
Genuine Eureka parts.
WHAT THE EUREKA COMPANY WILL DO
The Eureka Company will, at its option, repair or replace a defective cleaner or
cleaner part that is covered by this warranty. As a matter of warranty policy, the
Eureka Company will not refund the consumerʼs purchase price.
WARRANTY REGISTRATION
Please fill out and return the warranty registration card accompanying your
cleaner.
14
–continued on next page–
Page 15

OBTAINING WARRANTY SERVICE
To obtain warranty service you must return the defective cleaner or cleaner
part along with proof of purchase to any Eureka/Sanitaire Authorized Warranty
Station. You will find the nearest location in the Yellow Pages under “Vacuum
Cleaners–Service and Repair.” Be certain that the Warranty Station is “Eureka/
Sanitaire Authorized.”
For the location of the nearest Eureka/Sanitaire Authorized Warranty Station
or for service information, telephone toll free:
USA: 1-800-800-8975
Mexico: 5670-6169
Canada: 1-800-800-8975
If you prefer, you can write to: In Canada write to:
The Eureka Company The Eureka Company
Service Division 866 Langs Drive
807 North Main Street Cambridge, Ontario N3H 2N7
Bloomington, IL 61701, USA
If it is necessary to ship the cleaner outside your community to obtain warranty
repair, you must pay the shipping charges to the Eureka/Sanitaire Authorized
Warranty Station. Return shipping charges will be paid by the Warranty Station.
When returning parts for repair, please include the model, type, and serial numbers
from the data plate on the cleaner.
FURTHER LIMITATIONS AND EXCLUSIONS
Any warranty that may be implied in connection with your purchase or use
of the cleaner, including any warranty of MERCHANTABILITY or any warranty
for FITNESS FOR A PARTICULAR PURPOSE is limited to the duration of this
warranty. Some states do not allow limitations on how long an implied warranty
lasts, so the above limitations may not apply to you.
Your relief for the breach of this warranty is limited to the relief expressly provided
above. IN NO EVENT SHALL EUREKA BE LIABLE FOR ANY CONSEQUENTIAL
OR INCIDENTAL DAMAGES THAT YOU MAY INCUR IN CONNECTION WITH
YOUR PURCHASE OR USE OF THE CLEANER. Some states do not allow
the exclusion or limitation of incidental or consequential damages, so the above
limitation or exclusion may not apply to you.
This warranty gives you specific legal rights. You may also have other rights
which vary by State.
THE EUREKA COMPANY
Bloomington, Illinois 61701
15
Page 16

©2004 White Consolidated, Ltd.
Printed in U.S.A.Part No. 73615 (02/04)
 Loading...