

Page 1

Thank you for purchasing the HyperDrive COLORSPACE
The HyperDrive COLORSPACE is a high performance memory card
backup device with a high resolution 2.2” color LCD screen.
Supporting 18 different types of memory card formats, the
COLORSPACE has the world’s fastest memory card backup speed at
25MB/s(download 1GB in under 1 minute) and an extremely long
battery life (backup to 120GB on a single battery charge). With
unique features like 32-bit copy verification and built-in card
recovery tool in a ultra compact package, the COLORSPACE is
designed as the ultimate photo backup device for photographers to
safely backup, store and view their photos on the go without the
need for a computer.
Before using COLORSPACE, try it out while reading this User
Manual to familiarize yourself with device operations.
To prevent accidents and damage, read the Safety Information on
the next page.
HyperDrive COLORSPACE
USB cable
AC adapter
Car charger
Soft carry case
Screwdriver
User manual
Before using HyperDrive COLORSPACE, test backup a few files from
all the memory cards that you will be using and check with a
computer that all the data is properly copied to the COLORSPACE.
If the device is faulty or memory card is incompatible and the data
cannot be backed up or read by a computer, Sanho cannot be held
liable for any loss or inconvenience caused.
Inspect the contents of the package and contact your dealer if you
find any missing items or defects. Included are the following:
The HyperDrive COLORSPACE is available both with and without a
hard drive installed. Make sure the capacity of the hard drive suits
your needs.
The information in this manual is correct at the time of printing.
Please refer to www.hyperdrive.com for any updates.
1
Getting Started
IMPORTANT! Test the Device Before Using
Page 2

Install only 18650 Li-ion batteries from authorized HyperDrive
sources. Installing other types of batteries may prevent the
COLORSPACE from operating properly and cause damage.
Moreover, observe correct polarity when installing a battery.
Incorrect polarity may prevent the COLORSPACE from operating
properly and cause serious damage if the battery short-circuits.
If the COLORSPACE emits any strange sounds or smells, high heat
or smoke, power off the device immediately and remove the
battery. Remove the battery carefully to avoid burning yourself.
Do not use the COLORSPACE in a moist environment. Do not handle
the device with wet hands. If water enters the device, remove the
battery immediately and return the device to your dealer for
inspection. If liquid corrodes the device, it may short-circuit and
cause a fire.
Warning!
Safety Information
Safety Information
2
Page 3

Basic Operation
Understanding the COLORSPACE 4
Using the Keypad 5
Installing a Hard Drive 6
Replacing the Battery 7
Charging the Battery 8
Turning the COLORSPACE On and Off 9
Backup a Memory Card to COLORSPACE 10
Connecting the COLORSPACE to a Computer via USB 11
Photo Management
Browse Photos 14
Search Photos 16
Recover Photos 17
Build Thumbs 18
Setup
Backup Setup 19
Browser Setup 22
Interface Setup 22
Advanced Functions
File Management 23
CF Cards Authenticity Verification 24
CardErase 25
Memory Card Scan/Repair 26
Hard Drive Formatting 27
Firmware Updates 28
Wallpaper Setup 29
Specifications 31
Table of contents
Table of contents
3
Page 4
Basic Operation
4
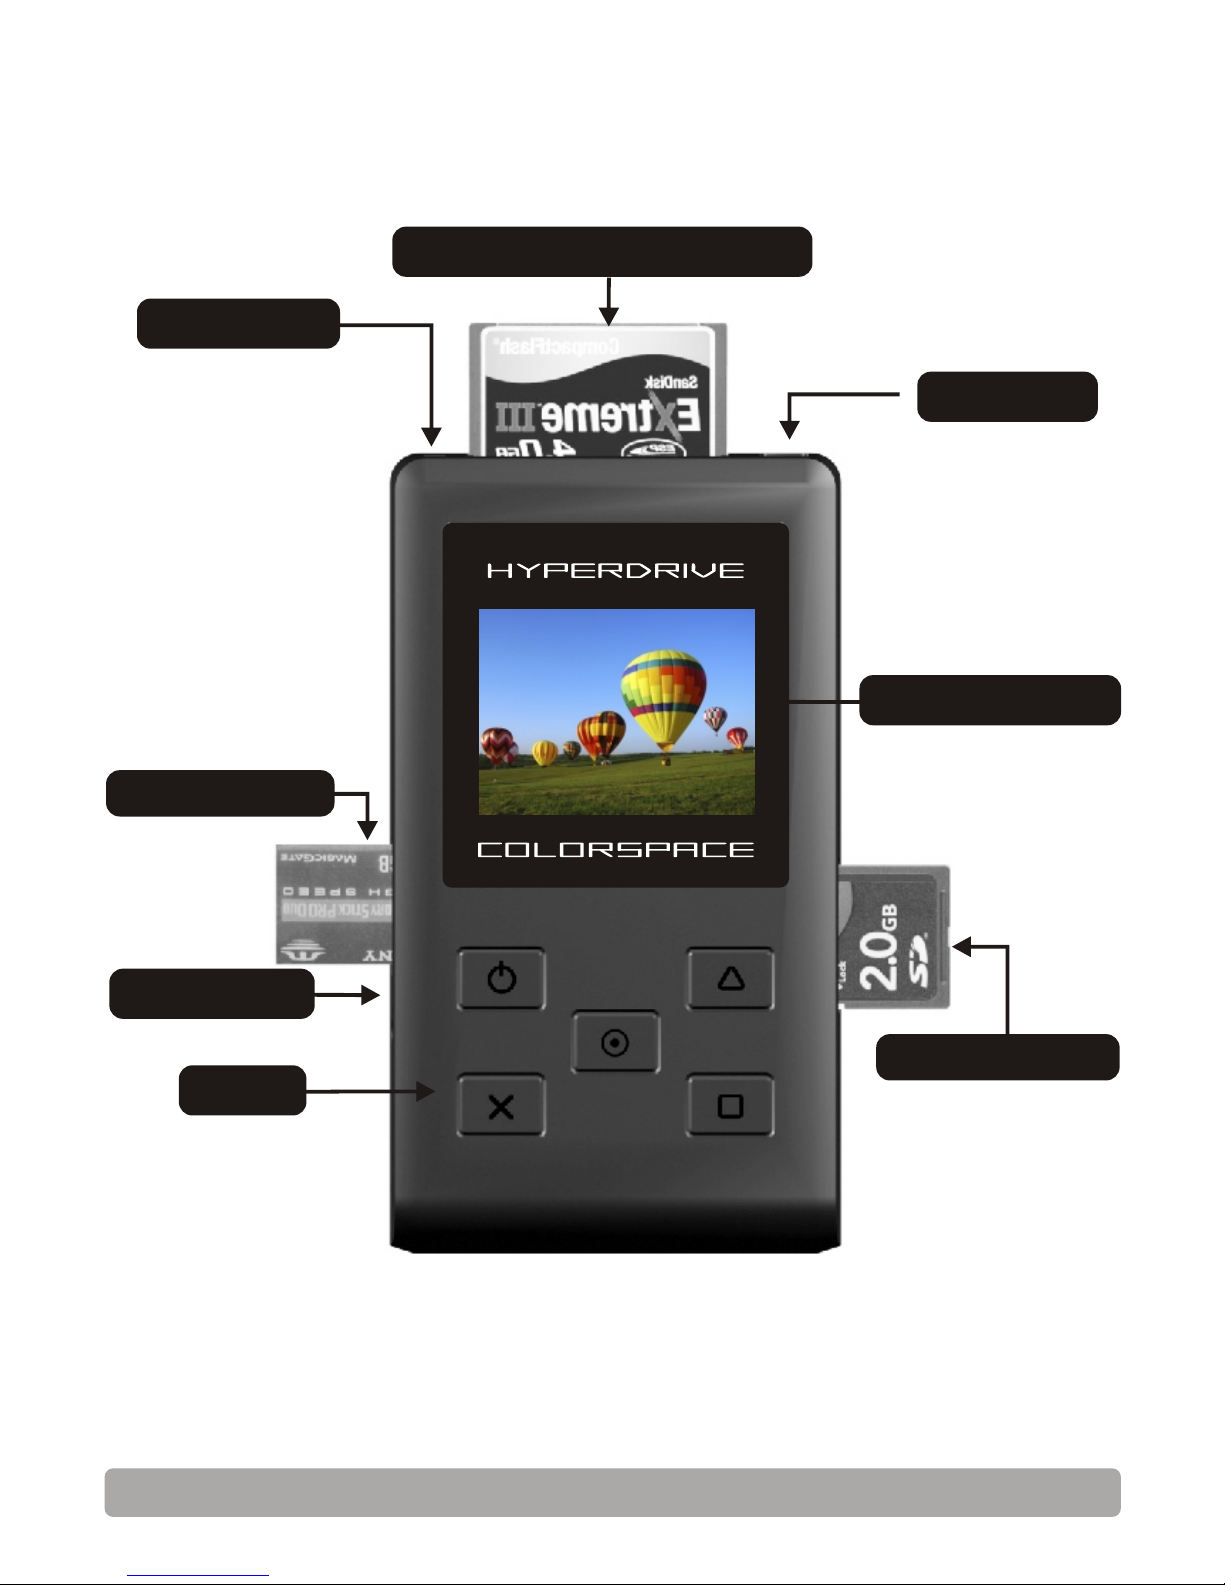
USB Socket
DC Power Socket
SD/MMC Slot
Keypad
MS/MS Duo Slot
LED Indicator
CompactFlash,MicroDrive Slot
Color LCD Screen
Understanding the COLORSPACE
Page 5
Using the keypad
5
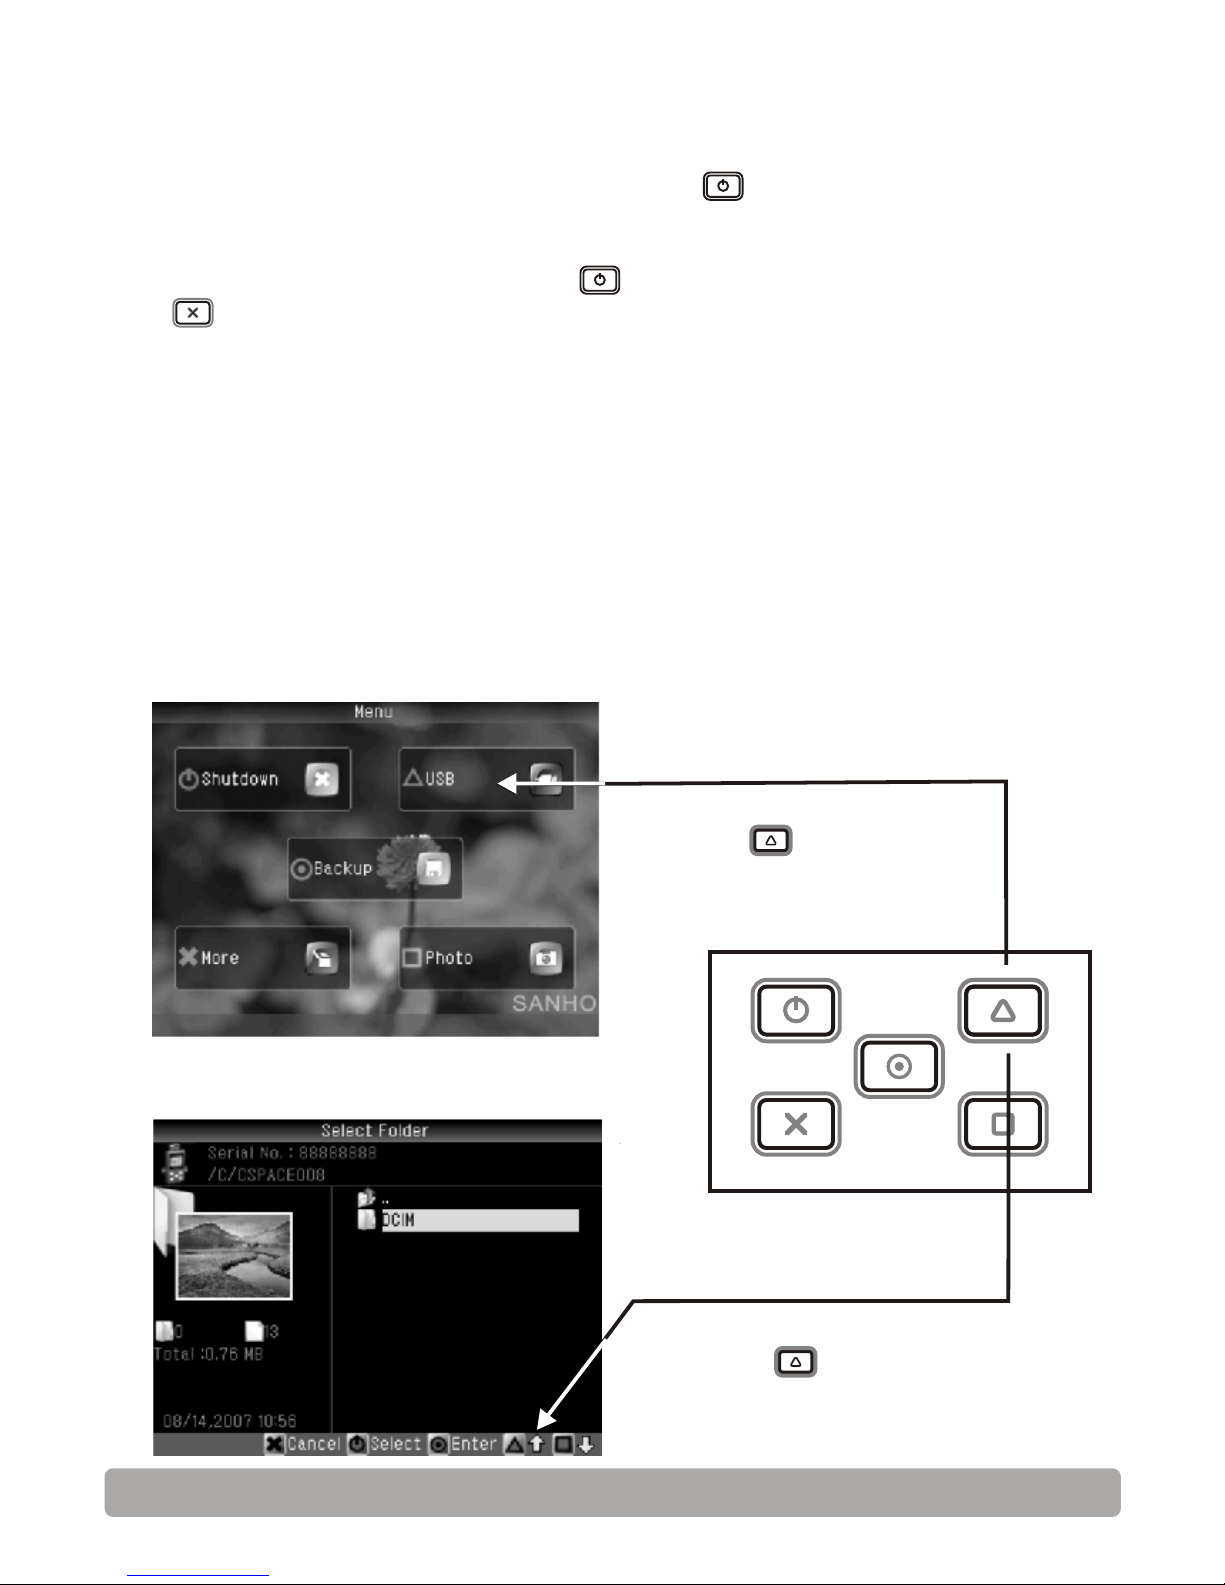
On this function screen,
pressing scrolls
upward.
To turn on COLORSPACE,press and hold until the device starts
up.
To turn off COLORSPACE, press on the main menu or press and
hold until the device shuts off.
To select a function on a menu screen, press the button
corresponding to the function you want to select.
To select an option on a function screen, press the button
corresponding to the option at the bottom of the screen.
To backup a memory card, first insert a memory card into the
appropriate card slot. Turn on COLORSPACE and select "Backup"
on the main menu.
On this menu screen,
pressing connects the
device to a computer.
Basic Operation
Page 6
Installing a Hard Drive
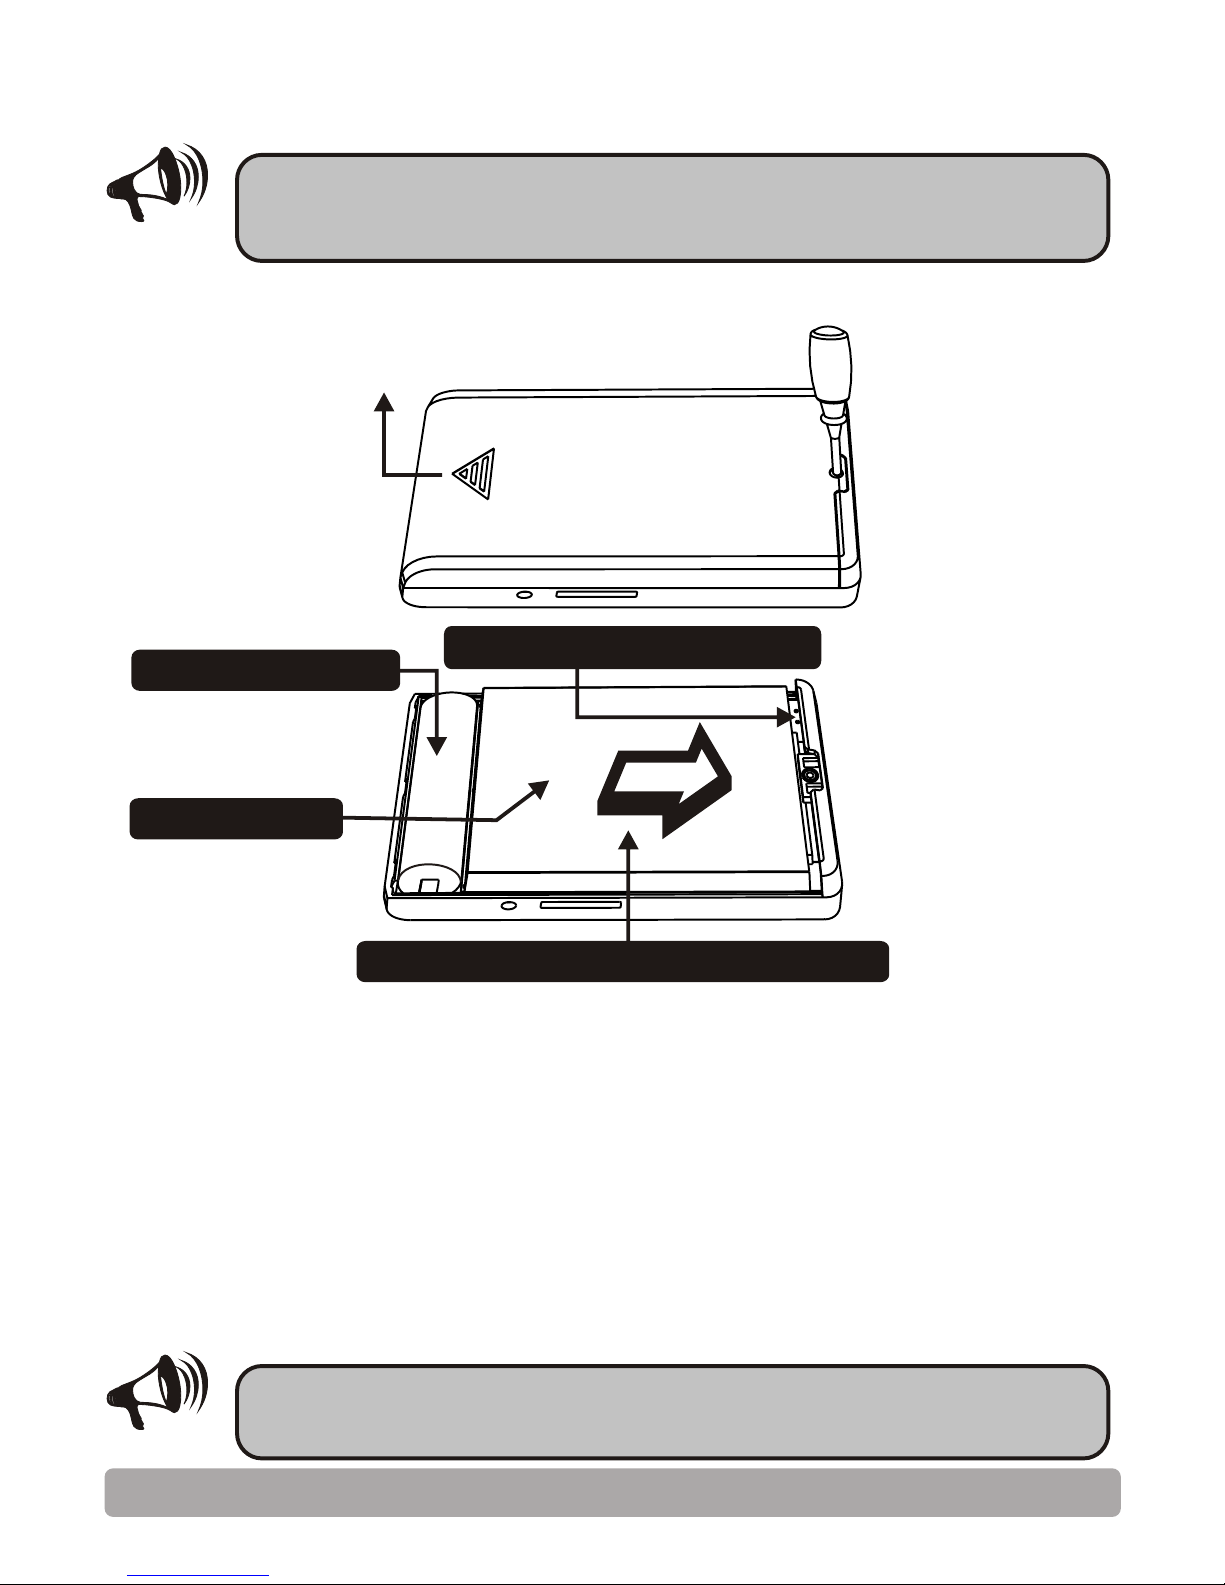
Remove the screw on the back cover as illustrated. Slide the back
cover in the direction of the arrow.
Use only 2.5” IDE/PATA/ATA-6/ATA-100 (44 pins) hard drive that is
less than 10mm in thickness. Ensure that the hard drive is set to
Master. Insert the hard drive in the direction as shown in the above
diagram with the hard drive information sticker facing outwards
and hard drive circuit board facing inwards. Ensure that the male
pins of the hard drive align properly and insert fully into the female
socket on the COLORSPACE. Some of pins on the hard drive may be
unused but if the hard drive is installed properly, you will be able to
close back the back cover. If you cannot close the back cover
properly, check that you have installed the hard drive correctly.
Note
Refer to this section only if you have purchased a
COLORSPACE (casing only) without a hard drive installed or
if you plan to upgrade or change the internal hard drive.
Hard drive connector socket
2.5” hard drive
18650 Li-ion battery
6
Basic Operation
Direction of proper hard drive insertion
Note
Do not turn on the COLORSPACE without the back
cover in place.
Page 7
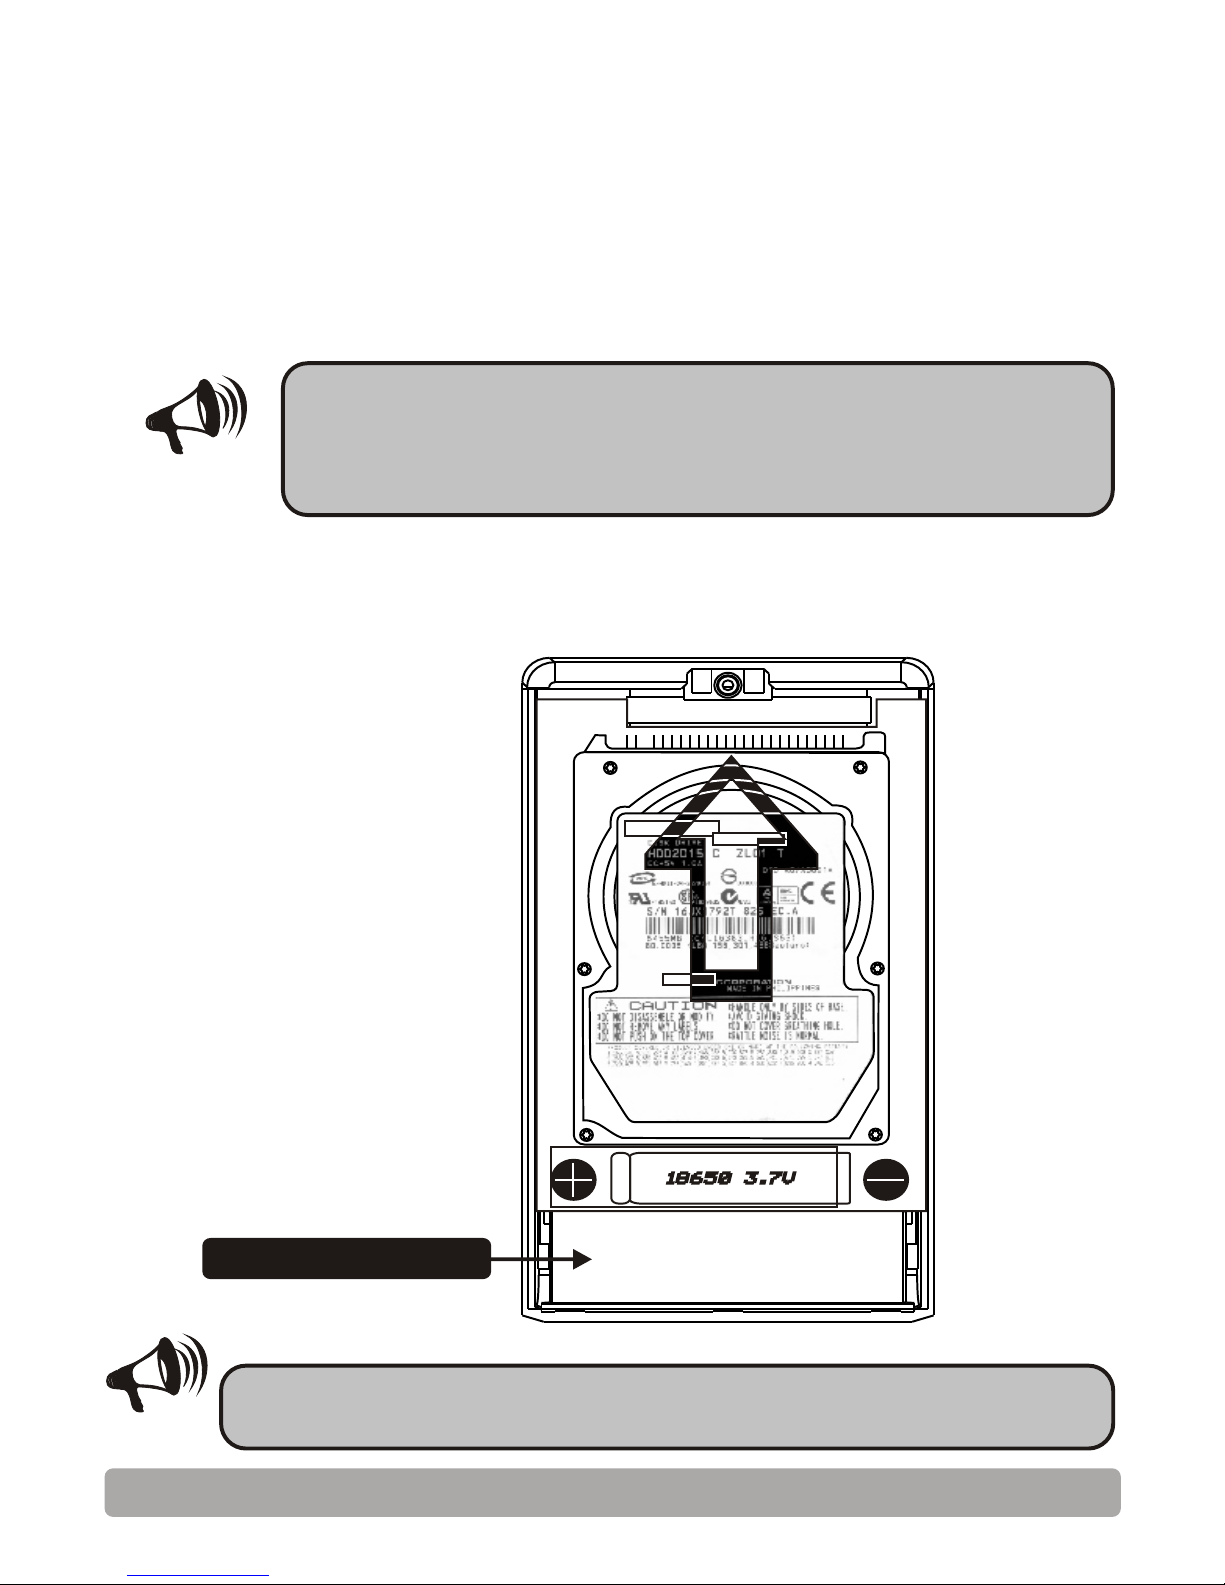
To replace the battery, remove the back cover, insert the new
battery in the correct polarity and replace the back cover.
Replacing a Battery
After you have replaced the battery, turn on the
COLORSPACE to check that the device will power on.
Your COLORSPACE already come with a battery installed. Refer to
this section only if you are replacing the battery.
Use only a 18650 Li-ion battery from authorized HyperDrive
sources. Other types of batteries may damage the COLORSPACE.
If you insert the battery with the polarities
incorrect, the device will not operate and under
certain circumstances, may even damage the
device.
Note
Warning!
7
Battery compartment
Basic Operation
Page 8

Charging the Battery
Connect the COLORSPACE via AC adapter or USB power to charge
the internal battery. The LED indicator will light up to indicate that
charging is in process. Once the battery is fully charged, the LED
indicator light will dim. It will take approximately 2.5 hours (via AC
adapter)/5 hours(via USB) to full charge an almost empty battery.
8
LED indicator
USB socket
DC socket
Basic Operation
Page 9

To turn on the COLORSPACE:
Press and hold for 2 seconds.
To turn off the COLORSPACE:
9
Alternatively, press and hold for 5 seconds.
Press on the main menu.
Turning the COLORSPACE On/Off
Press and hold this
button for 2 seconds
Press and hold this
button for 5 seconds
Select the
"Shutdown" function
Basic Operation
Page 10
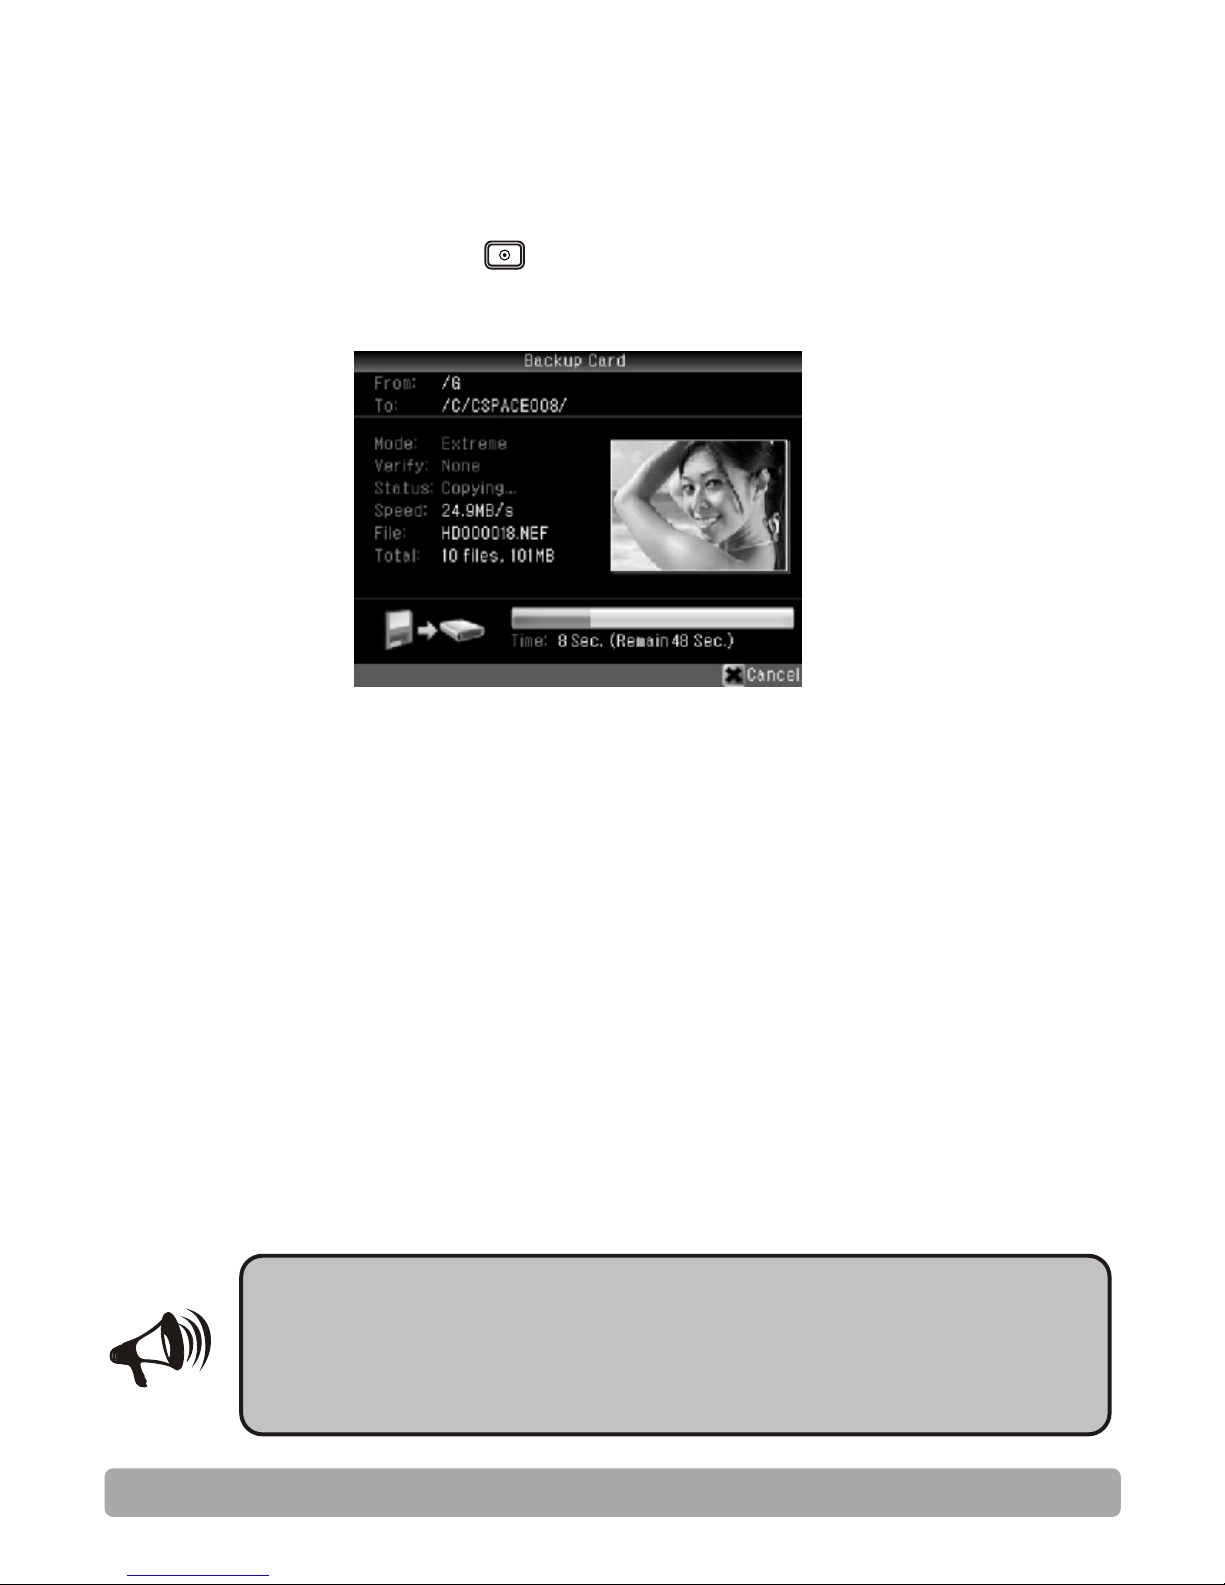
Backup a Memory Card to COLORSPACE
10
If the source memory card has errors and/or has
very fragmented space, the Copy Progress Bar
may not be accurate. If this happens, reformat
your memory card before the next usage.
Note
Insert a memory card into the COLORSPACE.
Turn on the COLORSPACE.
On the main menu, press (“Backup”) to start the
copying/backup process.
Basic Operation
Page 11

Use the provided USB cable to connect COLORSPACE to the USB
port on the back of the computer.
KB8X的USB接口
11
Connect only via the USB port on the back of your
computer. Your computer may not detect
COLORSPACE if you connect via a USB extension
cable or a USB hub.
Note
Select "USB" on the main menu.
USB port on the back
of the computer.
Connecting the COLORSPACE to a Computer via USB
Basic Operation
Page 12
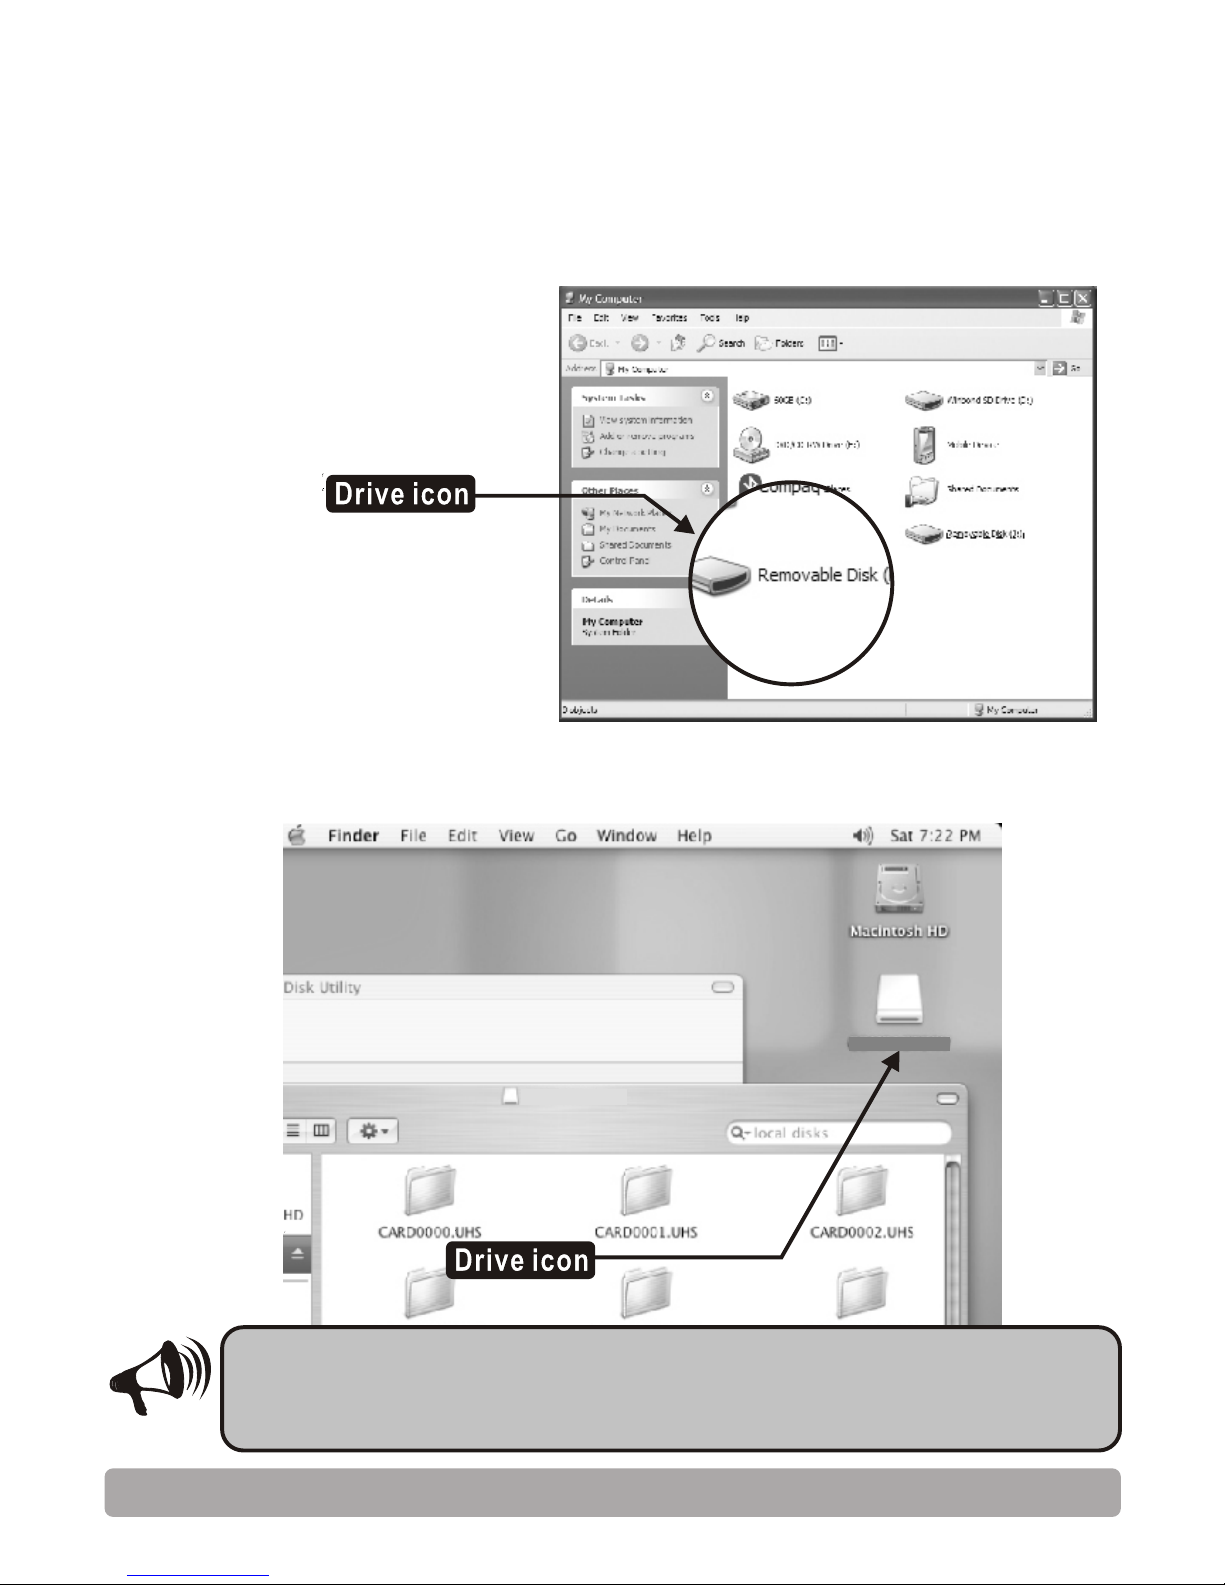
Windows Operation:
When Windows detects the COLORSPACE, it appears as a
removable disk in "My Computer." You can then access
COLORSPACE like an ordinary removable disk.
Mac OS Operation:
On Mac computers, a drive icon will appear on the desktop.
12
COL ORS PACECOL ORS PACE
HyperDrive uses UDMA technology to increase data
transfer speed to computers. As a result, you cannot
use COLORSPACE as a card reader.
Note
Basic Operation
COL ORS PACECOL ORS PACE
Page 13

You can disconnect COLORSPACE from a computer by pressing on
the main menu. Try, however, to disconnect COLORSPACE safely.
In Mac OS:
Drag the COLORSPACE removable drive icon to the trash to eject
the COLORSPACE. Unplug the USB cable. COLORSPACE screen will
then return to the main menu.
In Windows:
Click on the "Safely Remove Hardware" icon and select "USB Mass
Storage Device."
After Windows confirms that COLORSPACE has been removed,
unplug the USB cable. COLORSPACE screen will then return to the
main menu.
13
Safely Disconnecting COLORSPACE from a Computer:
Basic Operation
Page 14
14
Photo Management
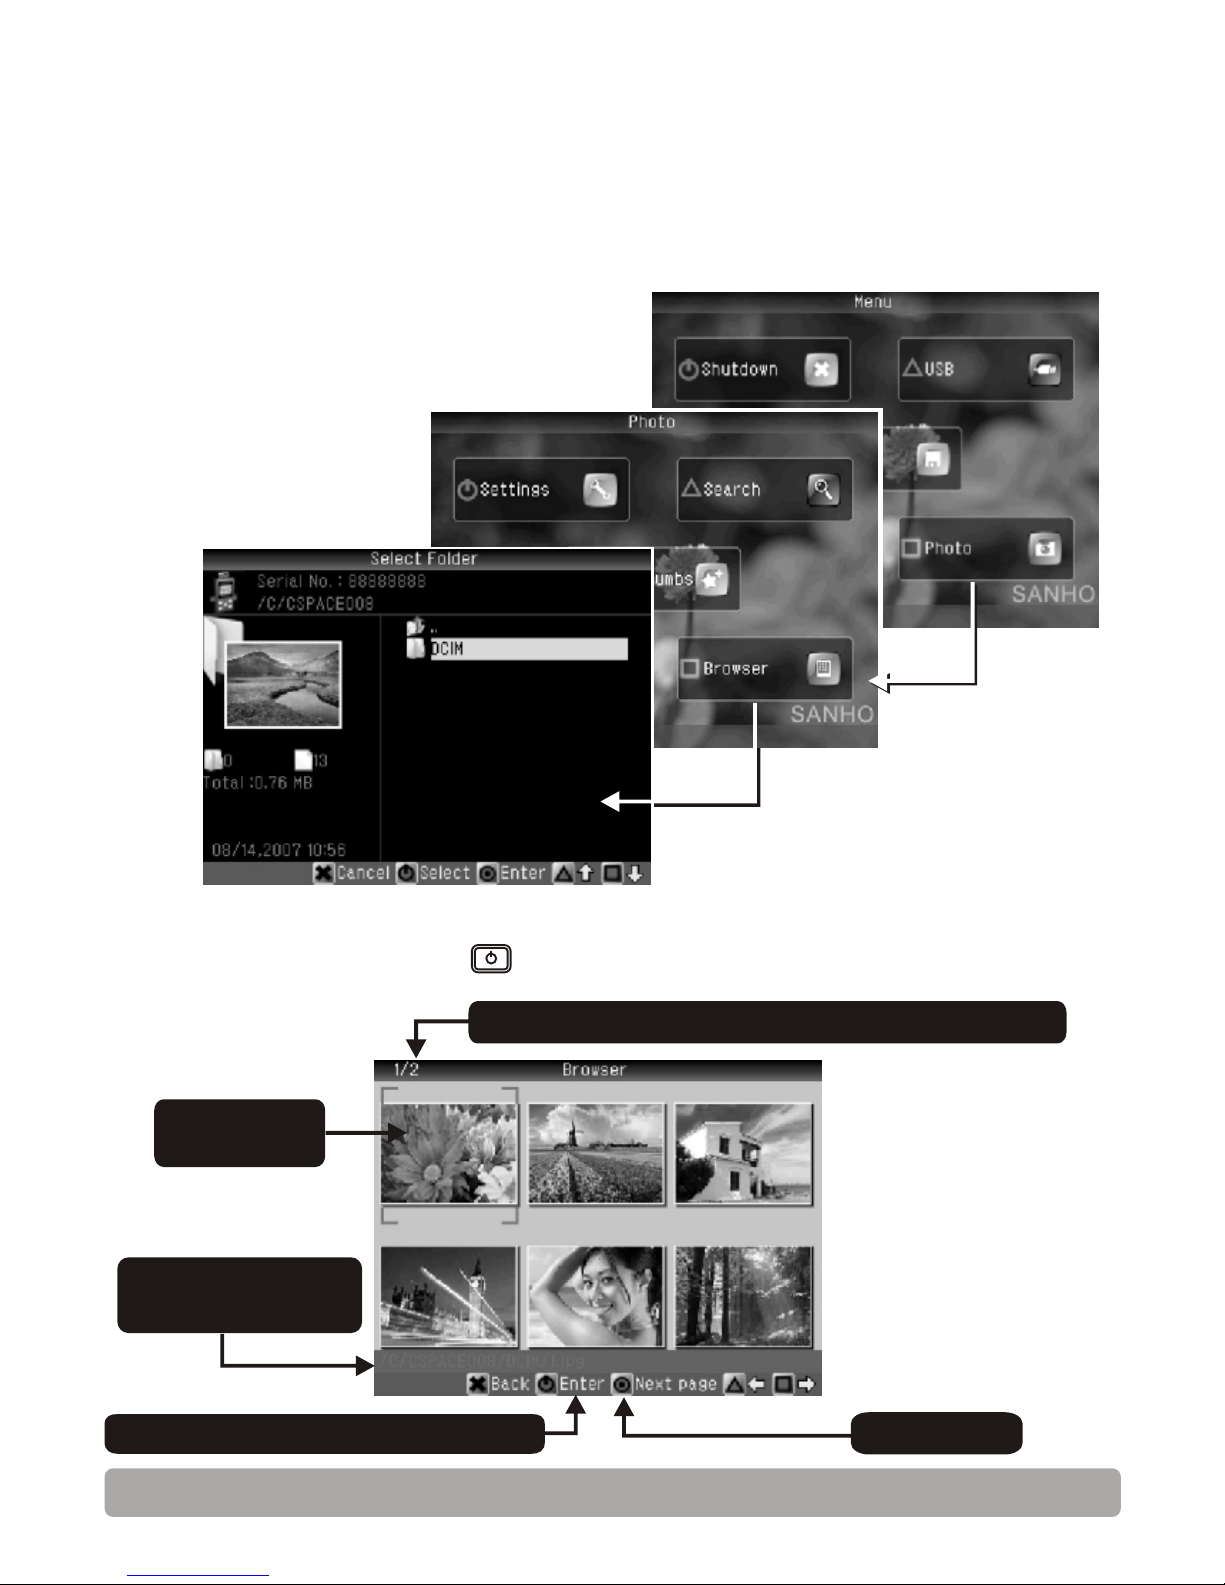
From the main menu, select Photo > Browser to enter the “Select
Folder” screen.
Browse Photos:
On the “Select Folder” screen, highlight a folder to preview the
images within and press to view the folder contents.
Next page
Path/name of
highlighted photo
Current page number/Total number of pages
Highlighted
photo
View highlighted photo fullscreen
Photo Management
Page 15
15
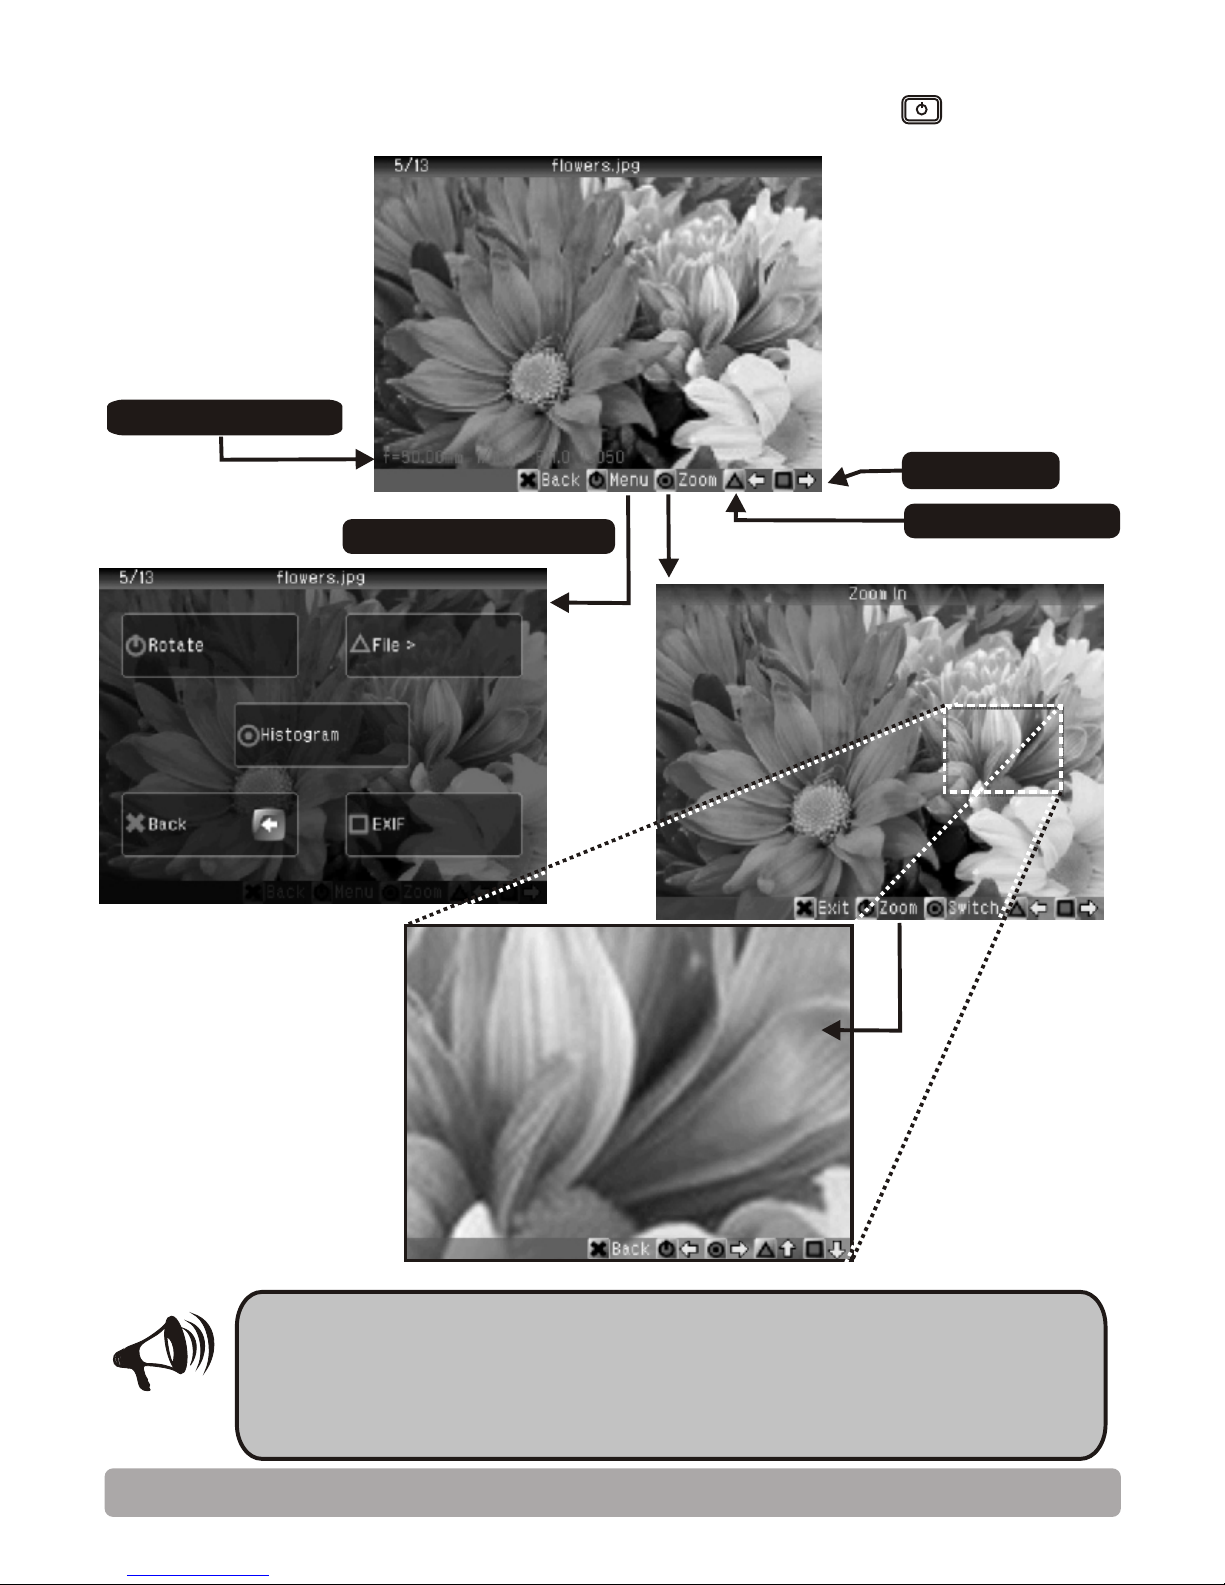
On the thumbnail screen, highlight a photo and press to view it.
Photo options menu
When you open a photo for the first time, COLORSPACE
creates an optimized 252k "thumb" version for faster
subsequent loading and viewing. To manually create
“thumbs” of photos, see "Build Thumbs" on page 18.
NOTE
Previous photo
Next photo
EXIF information
Photo Management
Page 16
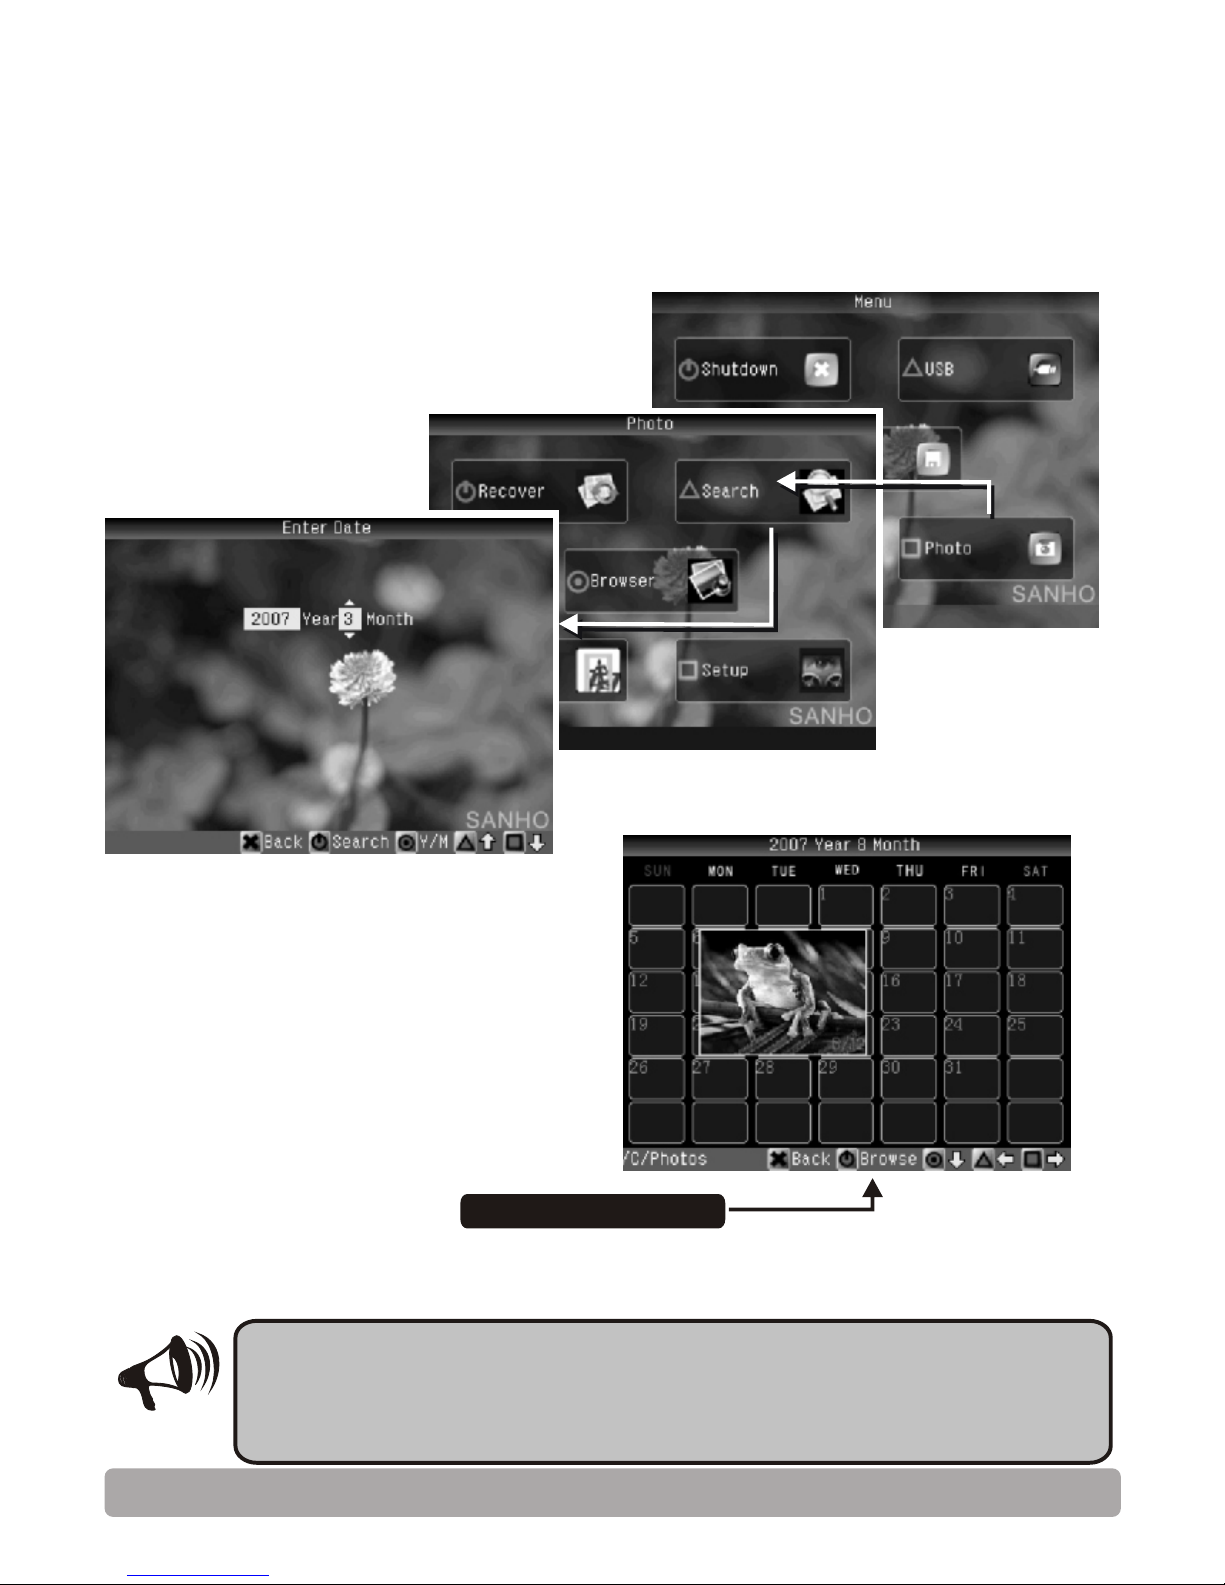
You can search for photos by date.
From the main menu, select Photo > Search.
COLORSPACE searches for photos by last date
modified.
Note
16
Search Photos:
Browse photos
Number of photos found
Photo Management
Page 17
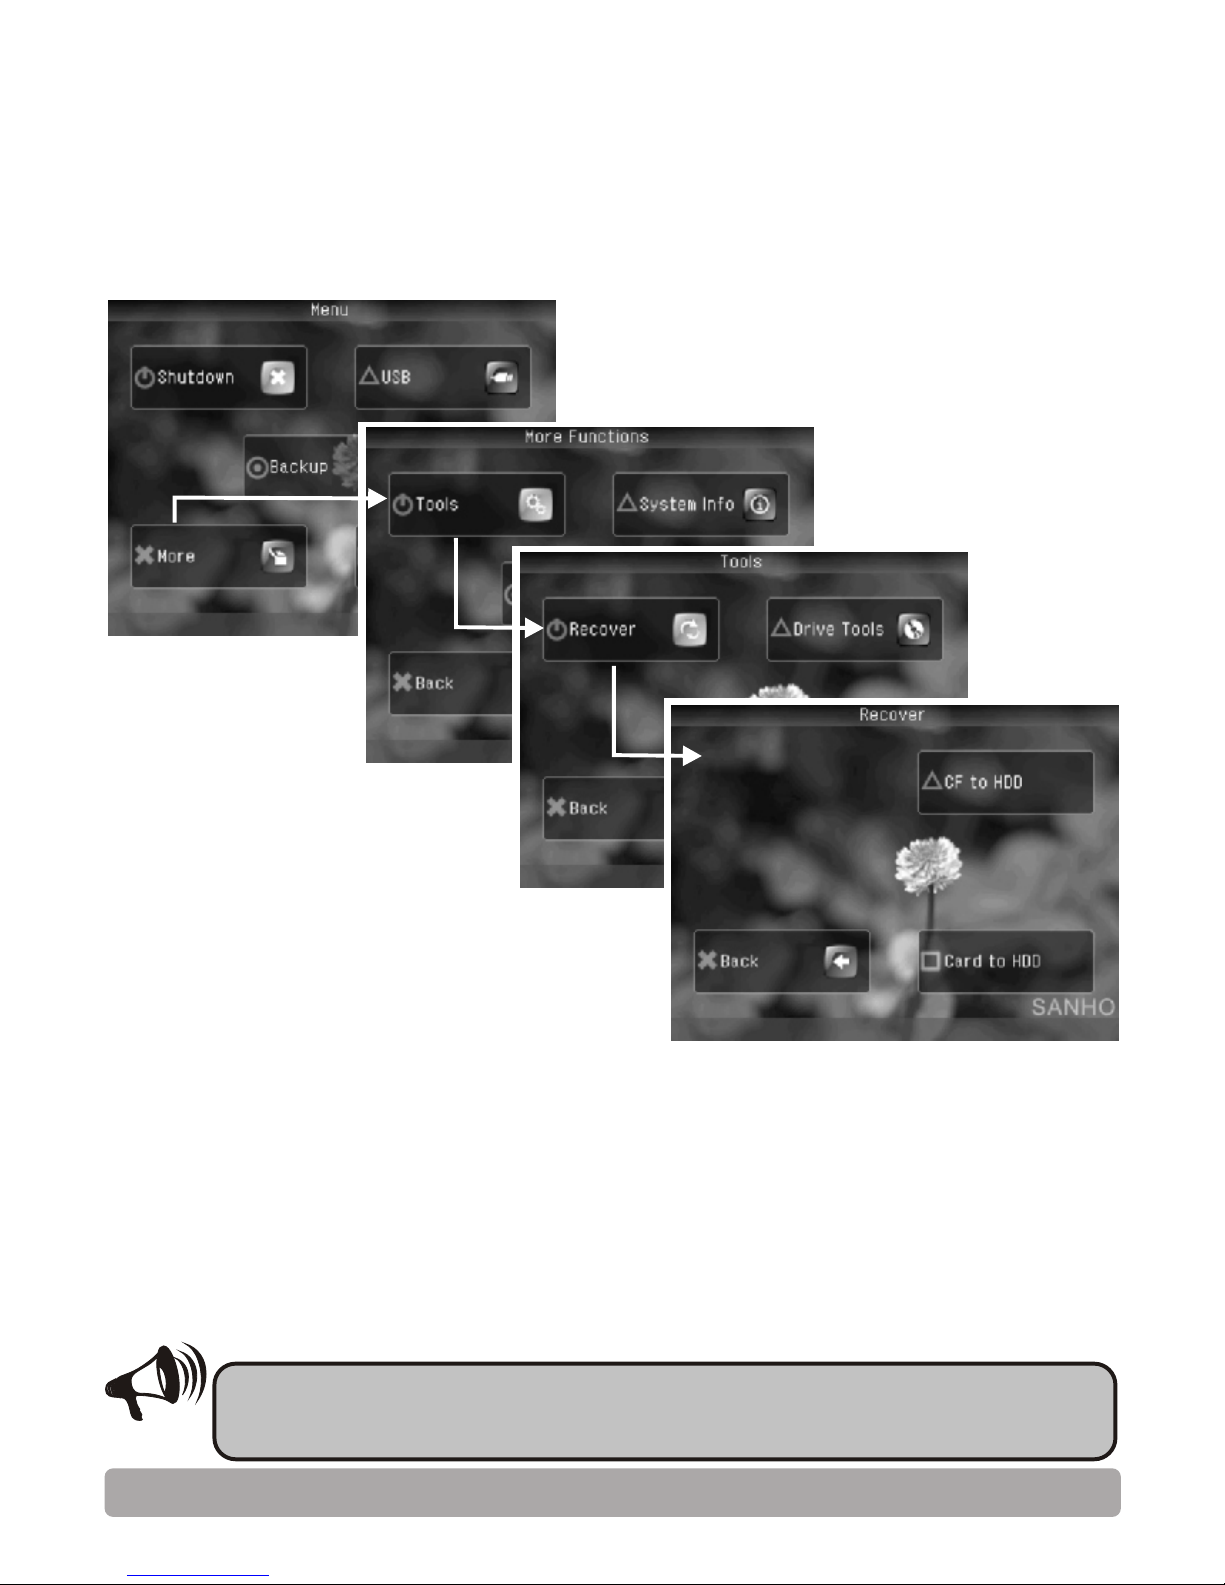
COLORSPACE can recover photos deleted from a memory card.The
recovered photos will be copied to COLORSPACE.
From the main menu, select More>Tools>Recover.
17
Recover Photos
Photo recovery will only be successful if the deleted photos
has not yet be overwritten by newer data.
Note
Select "CF to HDD" if you are recovering from a CF/MD card,
otherwise select "Card to HDD".
COLORSPACE can only recover image files. Please refer to
www.hyperdrive.com for types of image files supported.
In order to maintain data integrity during the recovery process,
COLORSPACE does not write any data to the memory card.
Photo Management
Page 18

You can create optimized 252k “thumb” version of photos for faster
loading and viewing on the COLORSPACE screen.
From the main menu, select Photo>Build Thumbs.
18
Build Thumbs
On the folder menu, select a folder and press . COLORSPACE will
create "thumbs" of all the photos in the selected folder.
Photo Management
Page 19

Backup Speed Setup
19
Backup Setup
From the main menu, select More>Settings>Backup>Speed.
Setup
Hyper Speed:
Designed for SanDisk Extreme III/IV or equivalent speed CF cards,
can achieve the maximum transfer speed of 25MB/s.
Ultra Speed:
Designed for professional series CF cards, can achieve a maximum
transfer speed of 16MB/s.
Fast Speed:
Designed for majority of CF cards, can achieve a maximum transfer
speed of 12MB/s.
Normal Speed:
Suitable for all types of memory cards, guaranteed maximum
compatibility.
Page 20

20
Setup
Verification Setup
Full Verification:
After copying a file, the file on the COLORSPACE hard drive is
compared bit by bit with the same file on the memory card to
ensure that the data is identical and hence successfully
transferred. This is the slower but most accurate verification
process.
Quick verification:
This verifies 1 out of every 32 blocks of data.
None / No Verification:
No copy verification is performed.
From the main menu, select More>Settings>Backup>Verify
Page 21

Visual Backup Setup
Hard Drive:
Display image thumbnail from the hard drive just after it is copied
to the COLORSPACE. This option also serves to confirm that the
image has been copied to the COLORSPACE.
Card:
Display image thumbnail from the memory card just before it is
about to be copied to the COLORSPACE. This option will yield a
faster card backup speed than the previous option.
Off:
Does not display any image thumbnail during the backup process.
This option will yield the fastest card backup speed.
21
Setup
From the main menu, select More>Settings>Backup>Visual Backup
Page 22
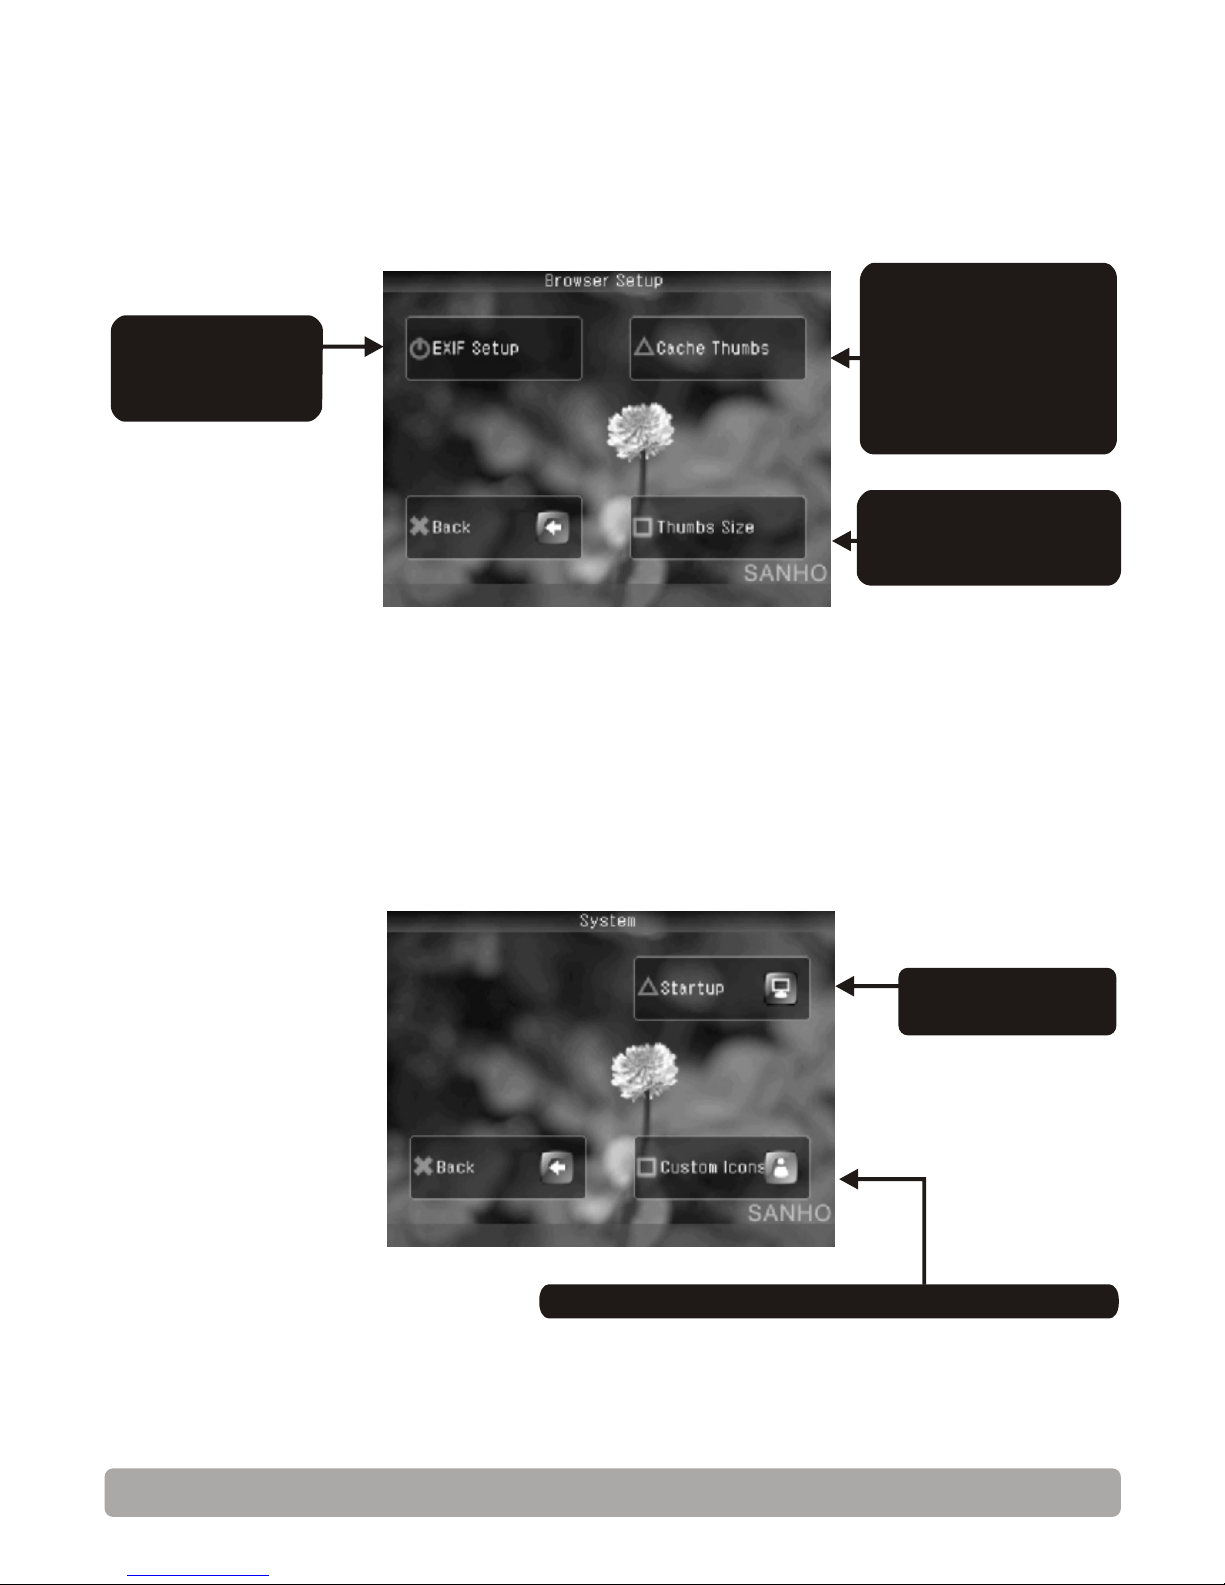
Interface Setup
From the main menu, select More>Settings>Interface.
Change startup
options
Change background image and button icons
22
Setup
Browser Setup
From the main menu, select Photo>Settings>Browser.
Change EXIF
information
display options
Create optimized
252k “thumb”
versions of every
image within a
folder or the entire
COLORSPACE
Adjust number of
thumbnails per
page
Page 23
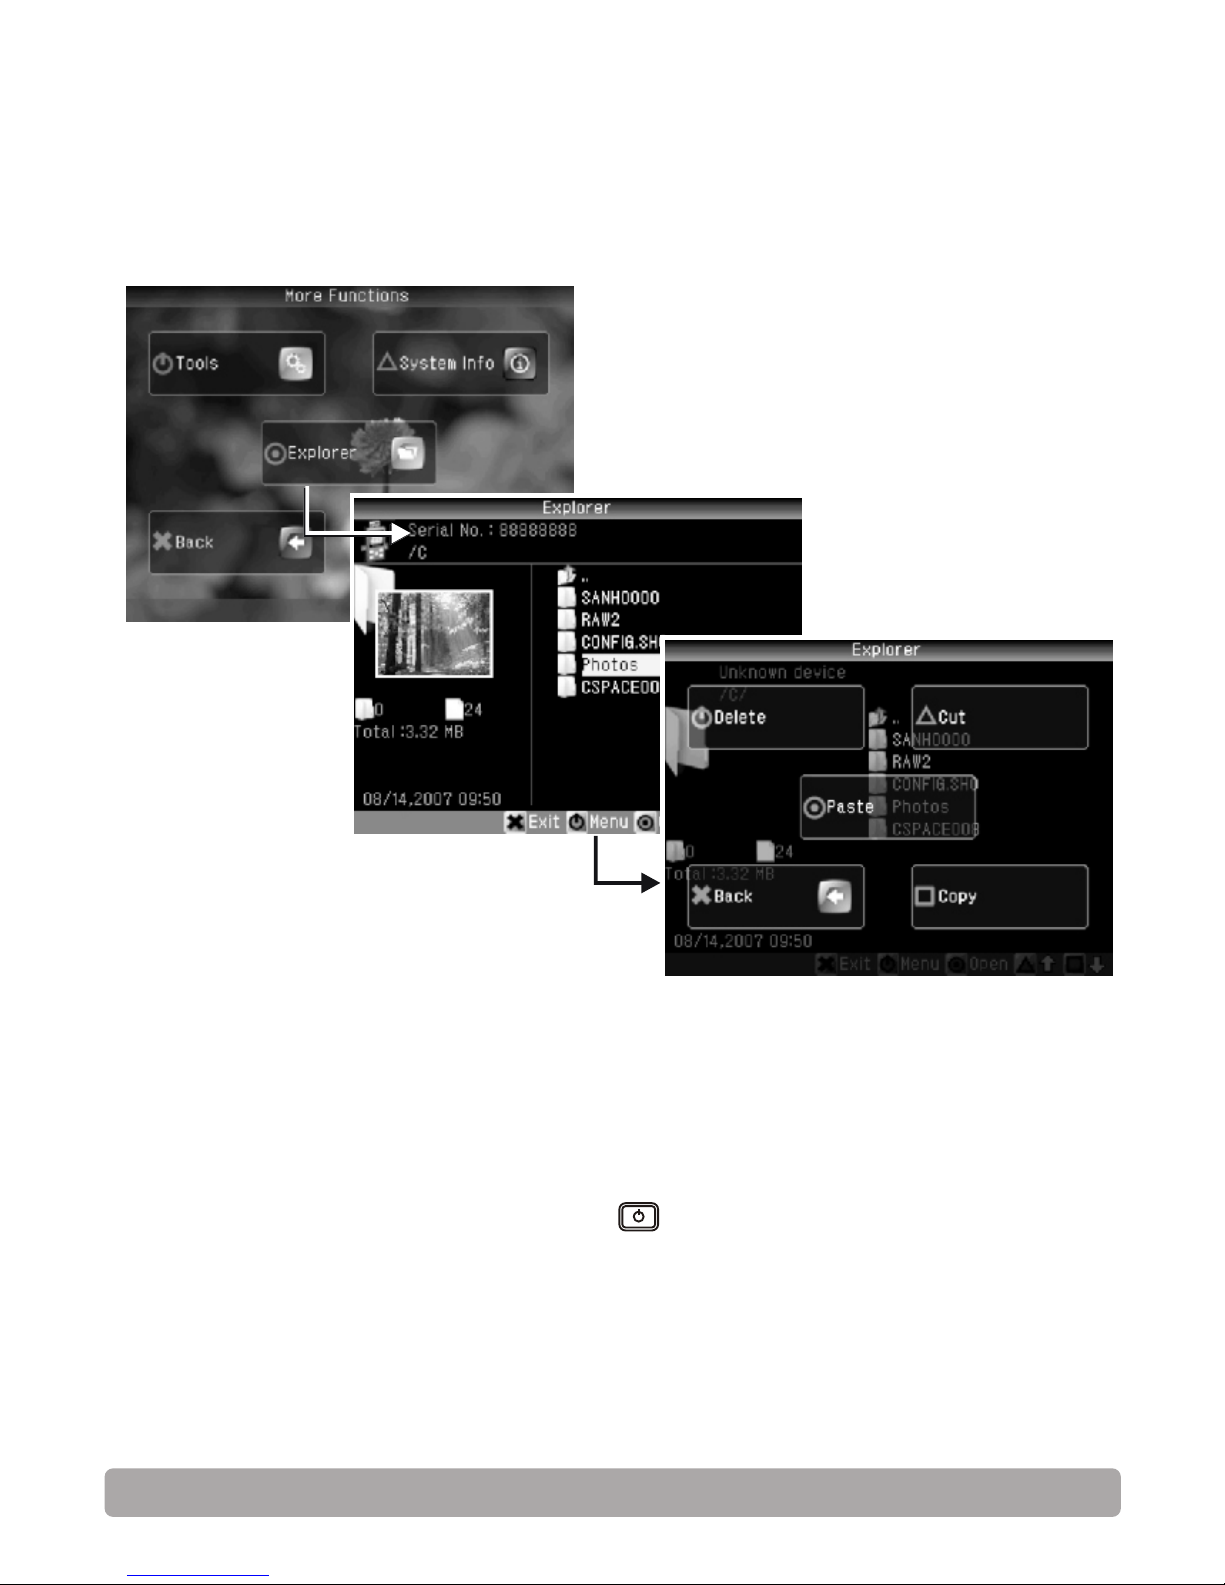
File Management
23
Advanced Functions
From the main menu, select More>Explorer
The COLORSPACE is able to display the contents (files, folders) of
the internal hard drive, the contents of any inserted memory card,
file/folder path names, sizes and creation dates. For image files,
the COLORSPACE will also display image previews.
To perform an operation on any file or folder (e.g. copy, cut, paste,
delete), just highlight it and press to access the operation menu.
Advanced Functions
Page 24
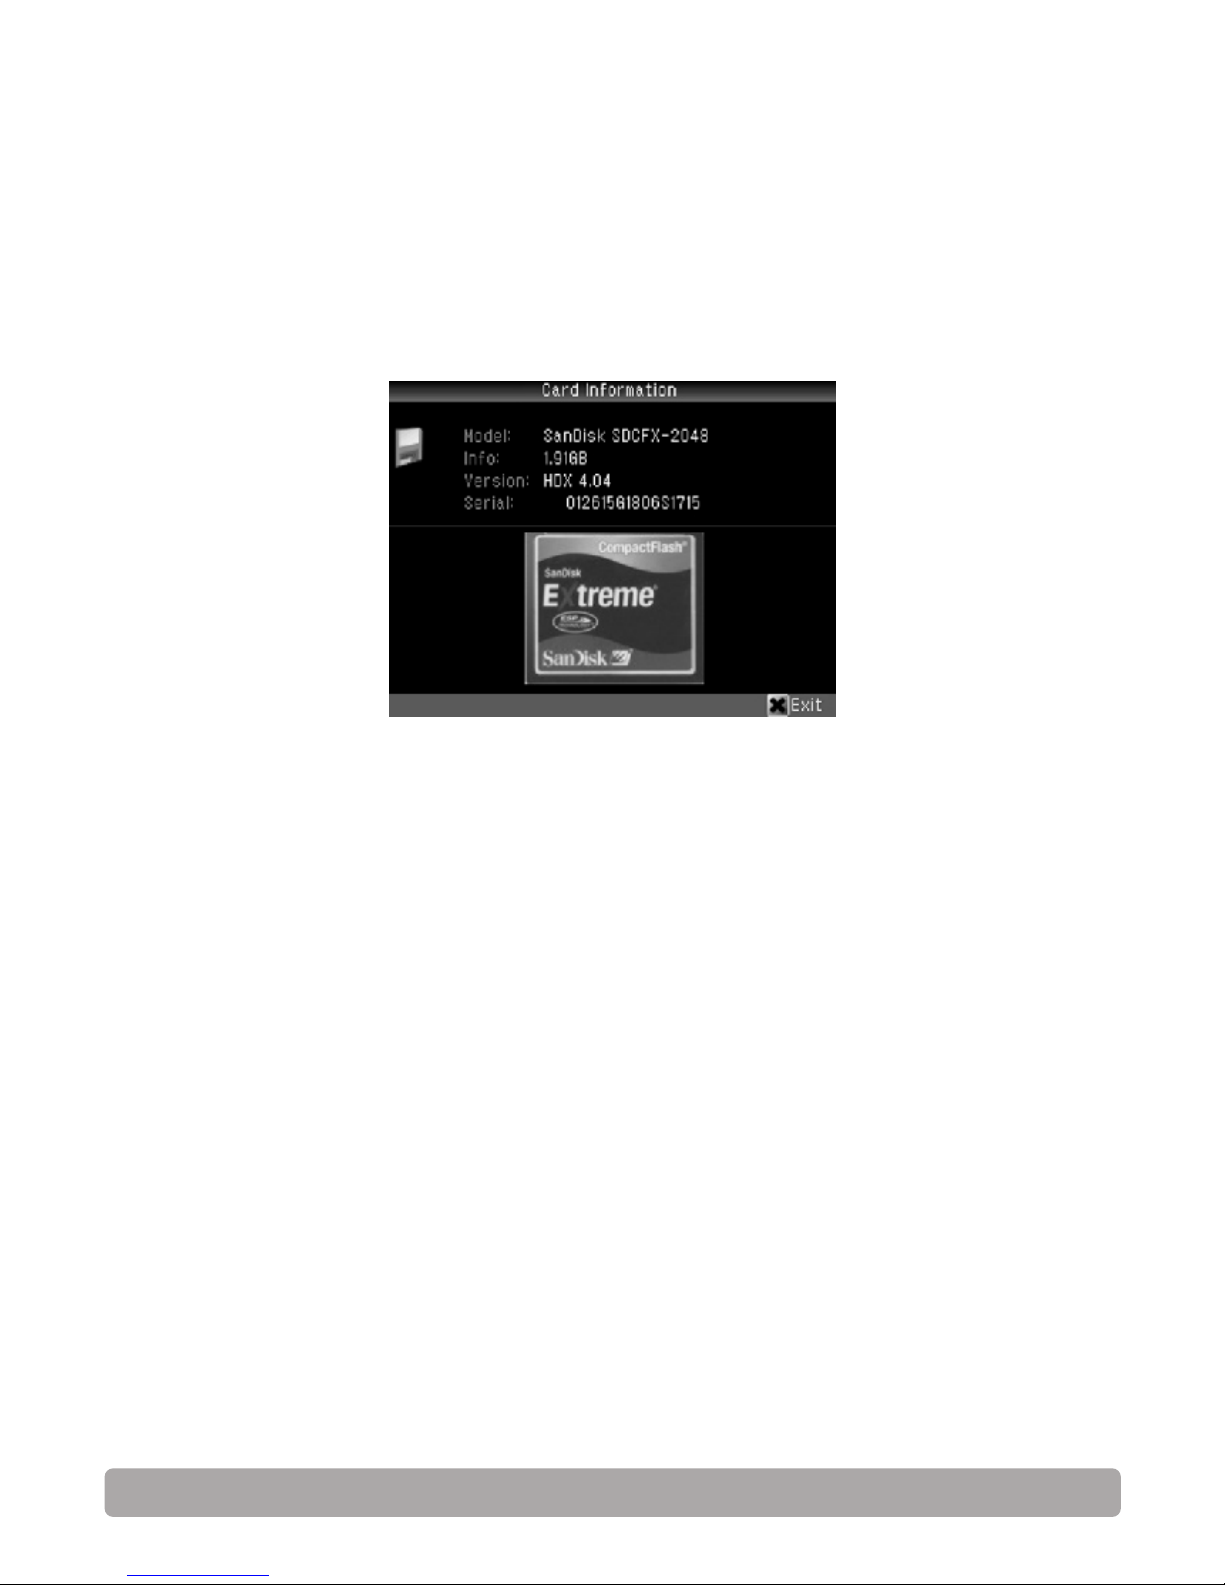
CF Card Authenticity Verification
24
COLORSPACE can verify a CF (CompactFlash) memory card for
authenticity to ensure that the card is made by the original
manufacturer and not an imitation.
Insert a CF card into the COLORSPACE.
From the main menu, select More>Tools>Card Tools>Card Info.
If COLORSPACE identifies the CF card, an image of the card will
appear on the screen. Refer to www.hyperdrive.com for a list of CF
cards that COLORSPACE can verify for authenticity.
Advanced Functions
Page 25
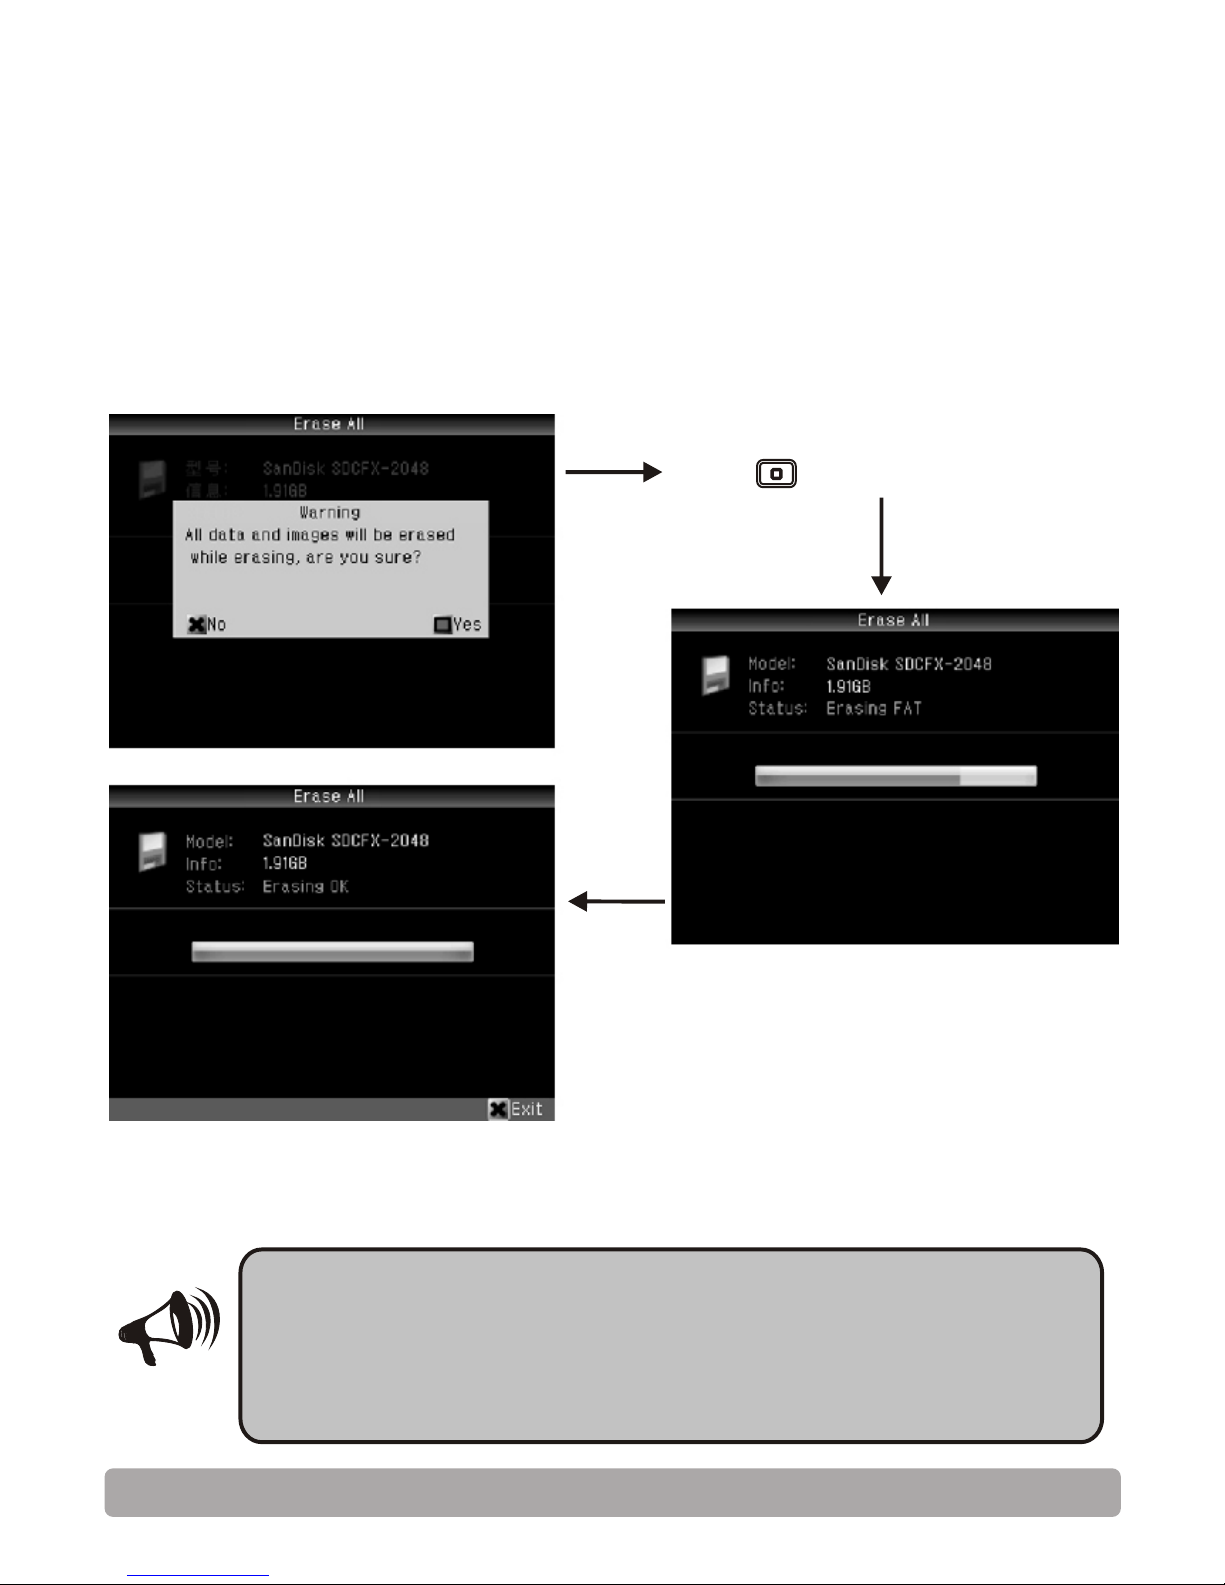
Press to begin
COLORSPACE can erase all the contents of a memory card.
From the main menu, select More>Tools>Card Tools>Erase Card.
Card Erase
25
Note: COLORSPACE cannot erase memory cards
formatted to FAT12. In addition, erasing a card
only erases all the data in the FAT table and all
records of root folders. Erasing does not format a
card.
Note
Advanced Functions
Page 26
Memory Card Scan/Repair
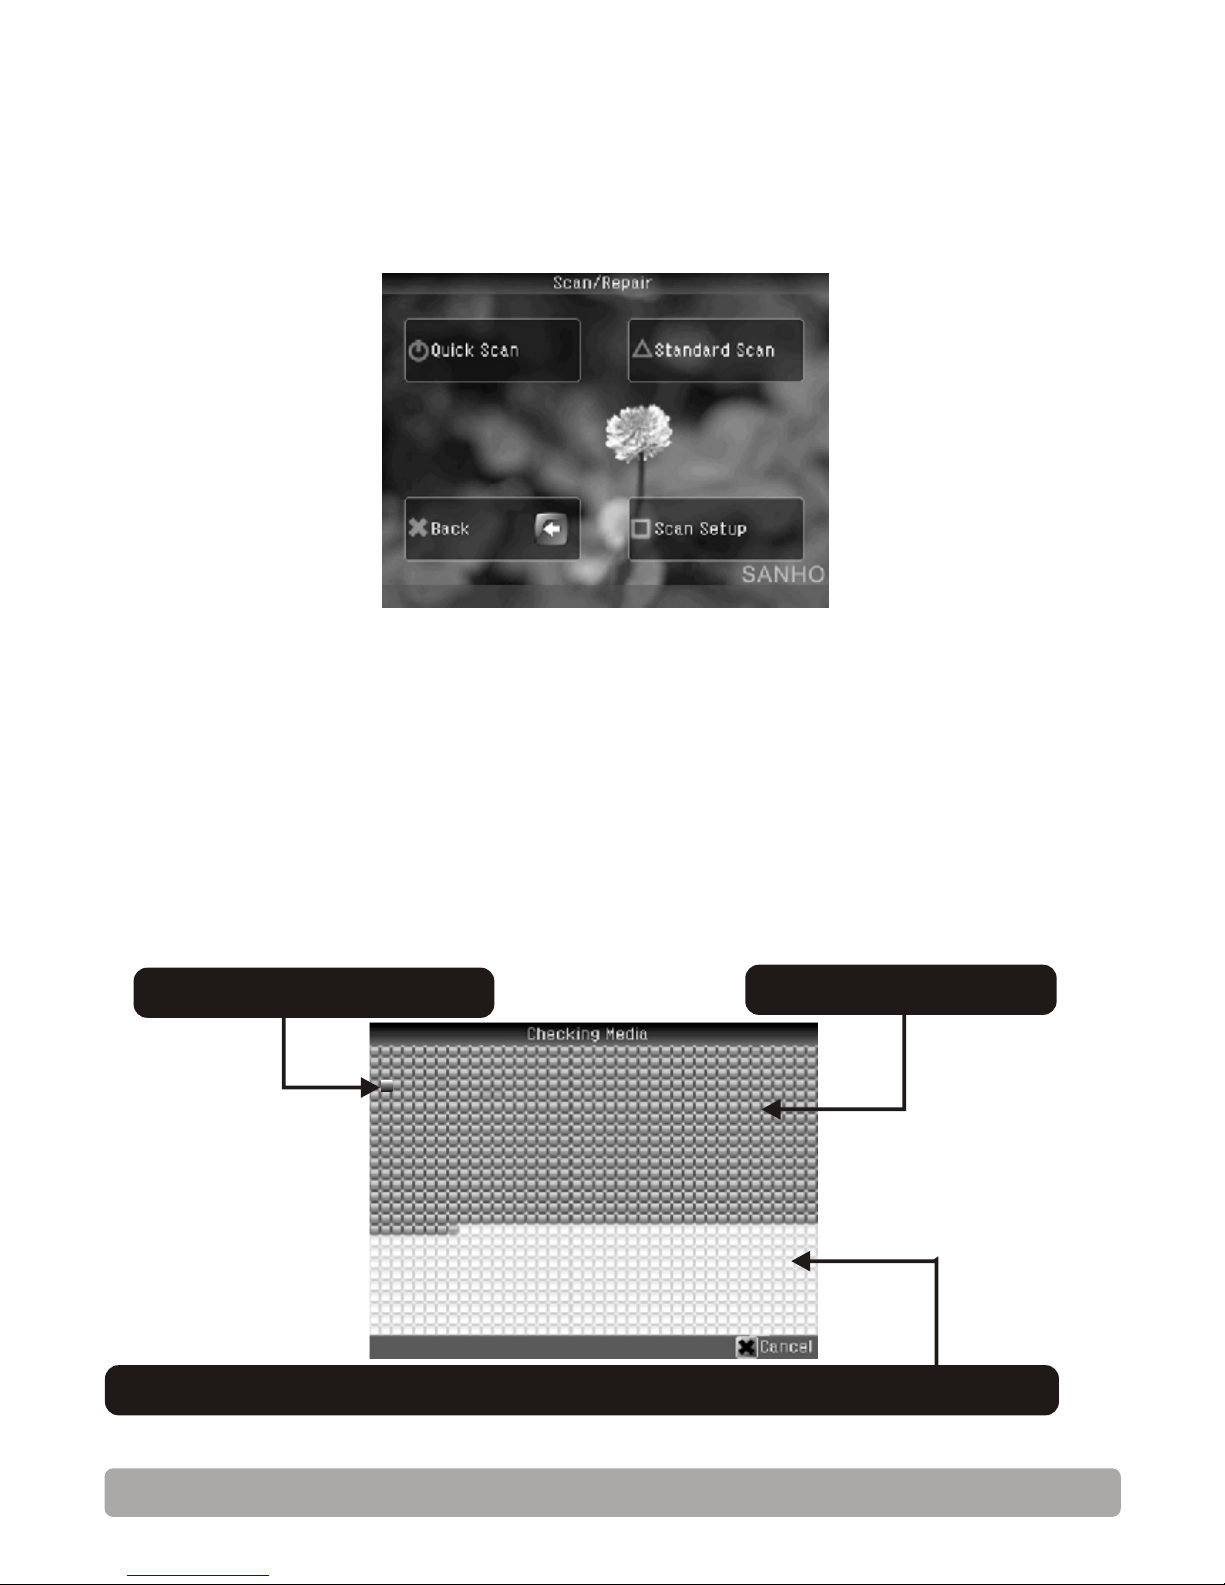
COLORSPACE has the ability to scan memory cards for errors and
repair them if necessary. From the main menu, select
More>Tools>Card Tools>Scan/Repair.
26
Quick Scan:
Quick Scan scans and repairs a memory card at high speed.
However the memory card will be formatted in process and all data
will be deleted. Before you do a Quick Scan, make sure that the
memory card does not contain any data that you might need.
Standard Scan:
Standard Scan scans and repairs a memory card at a much slower
speed. It will, however, preserve all data on the memory card.
Standard Scan is recommended over Quick Scan.
Red: Damaged sector
Blue: Good sector
Grey: Sector that has not yet been scanned and repaired
At the end of scan/repair,COLORSPACE will give an overall report.
Advanced Functions
Page 27

Hard Drive Formatting
27
You must format the COLORSPACE hard drive before you can use it.
From the main menu, select More > Tools > Drive Tools > Format
and then follow the on-screen instructions.
Warning!
Formatting a hard drive will completely
delete all data on the drive. If the drive
has multiple partitions, they will all be
removed.
Warning!
Only format the COLORSPACE internal hard
drive with the device itself. Using a computer
or other means to format the COLORSPACE
hard drive may cause to device to malfunction
and/or result in data loss.
Advanced Functions
Page 28
Firmware Updates
28
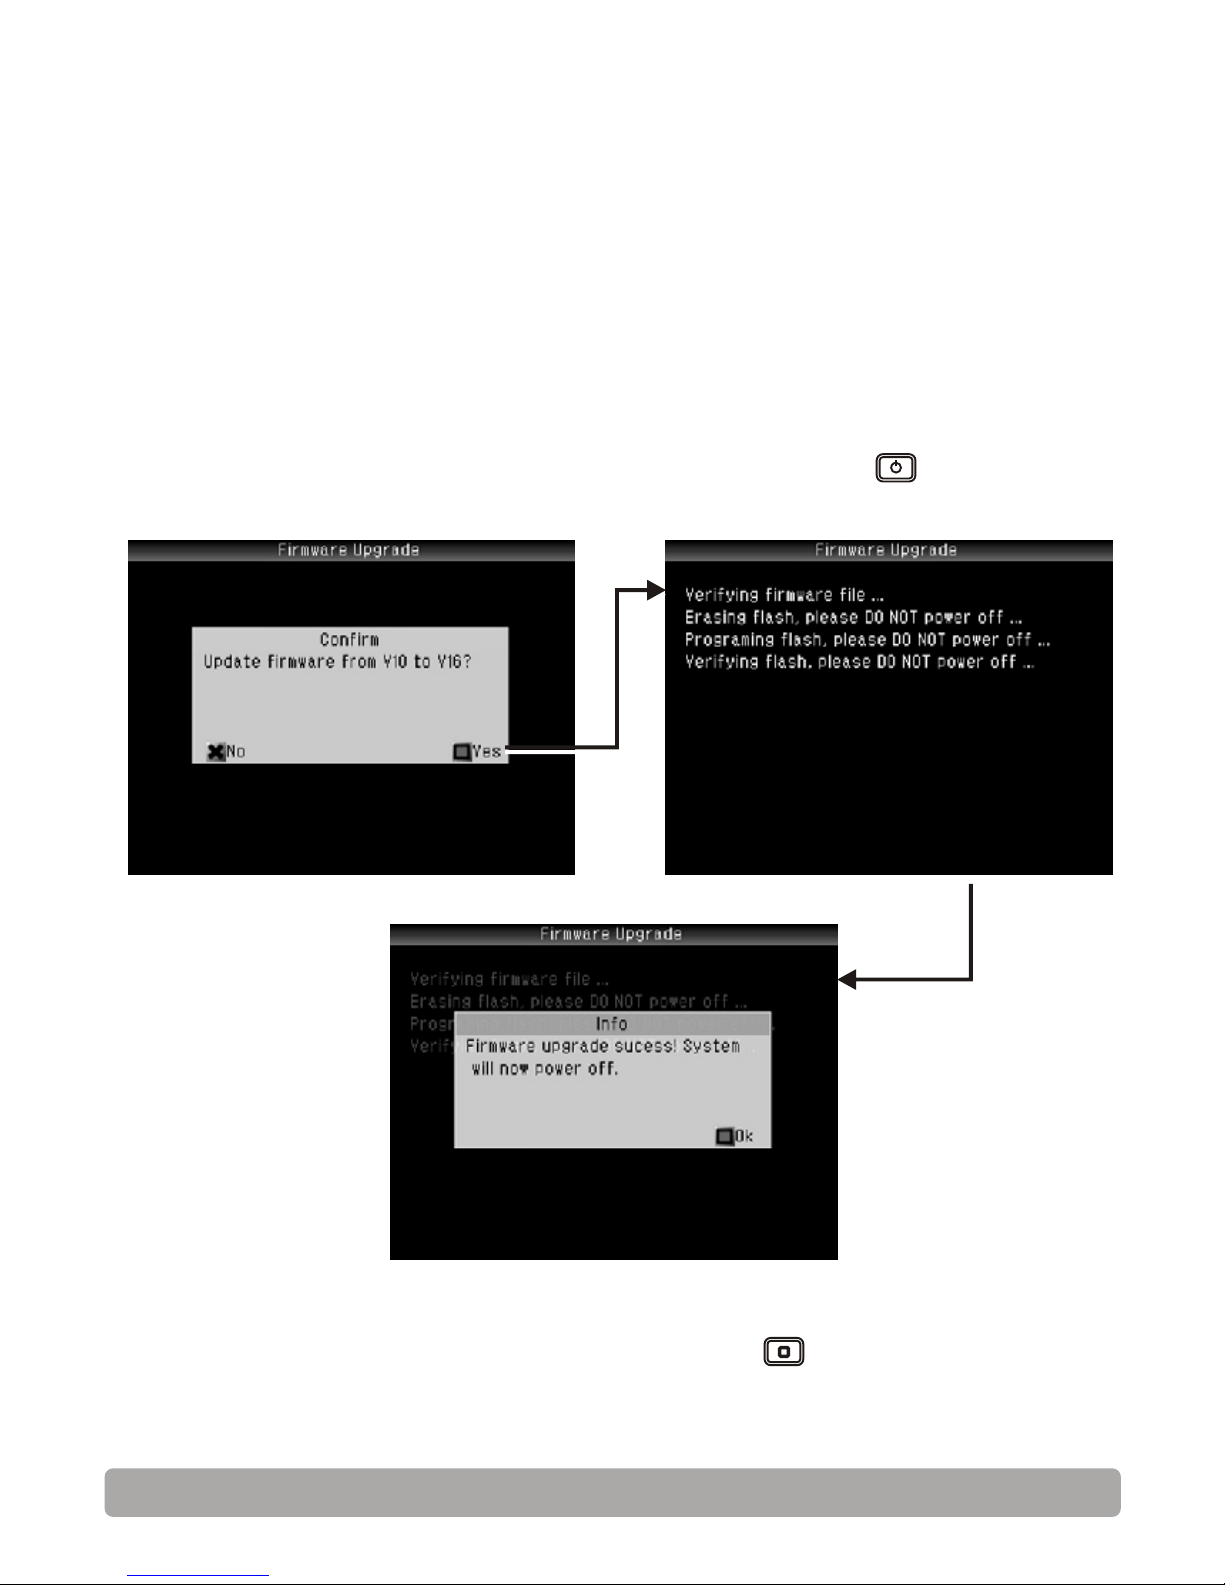
From time to time, firmware updates will be released to improve
the functionality and performance of the COLORSPACE.
Download the latest firmware update file from
www.hyperdrive.com and copy the file to COLORSPACE.
From the main menu, select More>Settings>Firmware
Browse to the firmware update file and press press .
Once the firmware has been updated, press to turn off the
COLORSPACE. COLORSPACE will use the new firmware the next
time you turn it back on.
Advanced Functions
Page 29

29
Wallpaper Setup
If you wish to use your own graphics for the COLORSPACE wallpaper and
button icons, you will need to enable this feature.
From the main menu,
select More>Settings>Interface Setup>Custom Icon>On
COLORSPACE wallpaper image must be a 320 x 240 pixels bitmap BMP file.
Button icon images must be 32 x 32 pixels bitmap BMP file. Refer to the
following table for the filenames of the respective wallpaper and button icon
images.
File name Location
001_COPY. bmp
002-START.bmp
Main menu>Backup
Main menu>More>Settings>Interface>Startup
Main menu>More
Main menu>More>Tools
Main menu>More>Tools>Drive Tools
Main menu>Photo
Main menu>More>Settings
Main menu>More>Settings>Backup>Speed
Main menu>More>Tools>Card Tools
Main menu>More>Settings>Backup>Verify
Main menu>More>Explorer
Main menu>Shutdown
Main menu>More>System Info
Main menu>More>Settings>Backup>Visual Backup
Main menu>More>Settings>Interface
003-MORE.bmp
004-FUN.bmp
005-DISK.bmp
006-PHOTO.bmp
007-SETUP.bmp
008-SPEED.bmp
009-CARD.bmp
010-VERIFY.bmp
011- SYSSET.bmp
012-EXPLORER.bmp
013-VISUAL.bmp
014-OFF.bmp
015-SYSINFO.bmp
Main menu>USB
016-USB.bmp
Main menu>More>Tools>Card Tools>Card Info
018-FORMART.bmp
019-CARDINFO.bmp
BG.bmp
Wallpaper image
Advanced Functions
Main menu>More>Tools>Drive Tools>Format
Page 30

30
021-CARDSCAN.bmp
Main menu>More>Tools>Card Tools>Scan/Repair
Main menu>More>Tools>Recover
Main menu>Photo>Browser
Main menu>Photo>Search
Main menu>Photo>Settings
Main menu>More>Settings>Reset
Main menu>More>Settings>Interface>Custom Icon
Back
Main menu>Photo>Settings>Firmware
022-RECOVER.bmp
023-BROWSER.bmp
024-SEARCH.bmp
025-PREVSET.bmp
029-RESTORE.bmp
038-USERICON.bmp
040-RETURN.bmp
055-UPDATE.bmp
059-COPYSET.bmp
070-THUMBS.bmp
Main menu>Photo>Build Thumbs
Main menu>Photo>Settings>Backup
Name your custom image files accordingly and copy them to
/C/CONFIG.SHO/USERICON/ directory. The customized graphics
will appear after you restart the COLORSPACE.
Main menu>More>Tools>Card Tools>Erase Card
020-EARSE.bmp
Advanced Functions
File name Location
Page 31

Specifications
31
Specifications
Operating Environment:
Temperature: 5 degree Celsius ~ 40 degree Celsius
Relative humidity: 8% ~ 90% non condensing
Temperature rate of change: <20 degree Celsius/Hour
Technical Specifications:
Memory Card Slot: First slot: CF Type I & II, MicroDrive
Second slot: SD, MMC
Third slot: MS, MS Pro, MS Duo/Pro
Hard Drive Capacity: 5.0V (+/-5%) 1A power supply
44Pin 2.5" IDE/PATA/ATA-6
Support 48bits LBA mode
Computer Interface: USB2.0 High Speed/Full Speed,
USB1.1 Compatible
Data Transfer Modes: Transfer from memory card to hard drive (stand-alone)
Transfer from hard drive to memory card (stand-alone)
From hard drive to computer (via USB)
Data Transfer Speed: Stand alone mode sustained rate: 25MBytes/S
USB 2.0 sustained transfer rate: 28MBbytes/S
(based on internal testing)
LCD Display: 2.2” TFT COLOR LCD
Operation Controls: 5 Buttons
Battery : Internal 18650 Li-ion battery (3.7V 2200mAh)
Battery Autonomy: Up to approximately 120GB of data transfer
(based on internal testing)
Built-In Battery Charger: Intelligent quick charger,
Charging current 500mA ~ 900mA (+/- 10%)
Dimension: 133mm x 75mm x 25mm
 Loading...