

Page 1

S-Series VoIP Multiline
Telephone
User Guide
Rev. 1, April, 2017
1
Page 2

OVERVIEW:
PBXact IP-PBX
PBXact is a product of Sangoma, a leader in creating PBX platforms. With PBXact, Sangoma has more than one million systems in
production across the globe, with 20,000 new systems added each month. As an open source, web-based PBX solution, PBXact is
easy to customize and adapt to your changing needs. PBXact can run in the cloud or on-site, and is currently being used to manage the
business communications of all sizes and types of businesses from small one person SOHO businesses, to multi-location corporations
and call centers. The PBXact EcoSystem provides you with the Freedom and Flexibility to custom design business communications
around your needs.
Sangoma S700 & S500 a next generation enterprise grand IP Phone that features up to 6 lines, 4.3 inch LCD, 4 XML programmable
context-sensitive soft keys, dual Gigabit network ports, integrated PoE, 3-way conference, and Electronic Hook Switch(EHS). The
S700 & S500 also supports automated provisioning for easy deployment, advanced security protection for privacy, and broad
interoperability with most 3rd party SIP devices and leading SIP/NGN/IMS platforms. S700 & S500 is the perfect choice for
enterprise users looking for a high quality, feature rich multiline executive IP phone with advanced functionalities and performance.
2
Page 3

Table of Contents
Meaning of Keys ................................................................................................................................................................. 3
Using Your Phone ............................................................................................................................................................... 6
Handset ........................................................................................................................................................................ 6
Speakerphone ............................................................................................................................................................. 6
Headset ........................................................................................................................................................................ 6
Call History .......................................................................................................................................................................... 6
Detail .............................................................................................................................................................................. 3
Add to Contacts .............................................................................................................................................................. 3
Add to Blacklist ............................................................................................................................................................... 4
Delete All ........................................................................................................................................................................ 4
Dialing a Number ............................................................................................................................................................ 4
From the List .................................................................................................................................................................. 4
From the Call Detail Screen ............................................................................................................................................ 4
Call Parking ......................................................................................................................................................................... 4
Parking a Caller ............................................................................................................................................................... 4
Viewing and Retrieving Parked Calls ............................................................................................................................ 4
Setting up a Park Button on your Phone ........................................................................................................................ 5
Checking Voicemail ............................................................................................................................................................. 6
How to Know a New Voicemail is Available ................................................................................................................... 6
Icon and Message on Screen .......................................................................................................................................... 6
Message Waiting Indicator (MWI) Light ......................................................................................................................... 7
Dial Tone ....................................................................................................................................................................... 7
How to Check your Voicemails ....................................................................................................................................... 7
Voicemail Button .......................................................................................................................................................... 7
Feature Codes ............................................................................................................................................................. 7
Visual Voicemail ............................................................................................................................................................. 7
Setting up a Visual Voicemail Button on your Phone ..................................................................................................... 7
Conference Calling .............................................................................................................................................................. 9
Adding Additional Callers to a Conference................................................................................................................... 10
Splitting a Conference Call ........................................................................................................................................... 10
Ending a Call ..................................................................................................................................................................... 10
Handset ....................................................................................................................................................................... 10
Speakerphone ............................................................................................................................................................. 11
Headset ....................................................................................................................................................................... 11
Headset ............................................................................................................................................................................. 11
What is Headset Mode? ............................................................................................................................................... 11
3
Page 4

Enabling/Disabling Headset Mode ............................................................................................................................... 11
Adjusting the Headset Volume ..................................................................................................................................... 11
Muting the Microphone ............................................................................................................................................... 12
Switching from Headset Mode to Another Mode During a Call................................................................................... 12
Switching from Another Mode to Headset Mode During a Call................................................................................... 12
Hold .................................................................................................................................................................................. 12
To Place a Caller on Hold: ............................................................................................................................................. 12
To Resume a Call: ......................................................................................................................................................... 13
Intercom Call..................................................................................................................................................................... 13
Overview of Intercom Feature ..................................................................................................................................... 13
Using Intercom Button to Intercom a User .................................................................................................................. 13
Setting up a Intercom Button on your Phone .............................................................................................................. 14
Using a Feature Code to Intercom ............................................................................................................................... 15
Muting .............................................................................................................................................................................. 15
To Mute the Microphone: ............................................................................................................................................ 15
To Un-Mute the Microphone: ...................................................................................................................................... 16
Setting Ring Volume ......................................................................................................................................................... 16
Change Volume or Mute Ringer ................................................................................................................................... 16
Mute the Ringer Temporarily (for One Incoming Call) ................................................................................................. 16
Speakerphone ................................................................................................................................................................... 16
Turning the Speakerphone On or Off ........................................................................................................................... 17
Manual Toggle .......................................................................................................................................... 17
Automatic Activation ............................................................................................................................... 17
Adjusting the Speakerphone Volume ........................................................................................................................... 17
Muting the Microphone ............................................................................................................................................... 17
Switching from Speakerphone Mode to Another Mode During a Call ......................................................................... 18
Switching from Another Mode to Speakerphone Mode During a Call ......................................................................... 18
Transferring Calls .............................................................................................................................................................. 18
Blind Transfer ............................................................................................................................................................... 18
Attended Transfer ........................................................................................................................................................ 18
Paging & Intercom Module ............................................................................................................................................... 19
What is the Paging & Intercom used for? .................................................................................................................... 19
To Page throughout the Office. .................................................................................................................................... 19
To Intercom another extension on the system. ............................................................................................................. 20
Call/Night Flow App .......................................................................................................................................................... 20
4
Page 5

Overview ...................................................................................................................................................................... 20
Viewing and Changing a Toggle .................................................................................................................................. 20
Call Forward App .............................................................................................................................................................. 21
Enabling Call Forward ................................................................................................................................................. 21
Setting Presets .............................................................................................................................................................. 21
Conference Room App ...................................................................................................................................................... 22
Viewing Conference Rooms ........................................................................................................................................ 22
Managing Conference Attendees ................................................................................................................................. 22
Contacts App..................................................................................................................................................................... 23
Viewing Contact Groups .............................................................................................................................................. 23
Dialing Contacts ........................................................................................................................................................... 23
Searching For Users ..................................................................................................................................................... 24
Do Not Disturb App (DND) ................................................................................................................................................ 24
Queue Agents App ............................................................................................................................................................ 25
Overview ...................................................................................................................................................................... 25
Logging Into a Queue ................................................................................................................................................... 25
Logging Out of a Queue ............................................................................................................................................... 25
Pausing Yourself In a Queue ........................................................................................................................................ 26
Unpausing Yourself In a Queue ................................................................................................................................... 26
Call Queues App................................................................................................................................................................ 27
Viewing Details of a Queue ......................................................................................................................................... 27
Viewing Callers Waiting in Queue .............................................................................................................................. 27
Managing Agents in a Queue ....................................................................................................................................... 28
Find Me App ..................................................................................................................................................................... 28
Overview ...................................................................................................................................................................... 28
Press the Follow Me button. ............................................................................................................................................ 28
Enabled ......................................................................................................................................................................... 29
Adding Phone Numbers to a Follow Me List ............................................................................................................... 29
Initial Ring Time .......................................................................................................................................................... 30
Managing Confirm Calls .............................................................................................................................................. 30
Login and Logout App ....................................................................................................................................................... 30
Logging Out a User from Your Phone ......................................................................................................................... 31
Logging In a User from Your Phone ............................................................................................................................ 31
Parked Calls App ............................................................................................................................................................... 31
Viewing and Retrieving Parked Calls .......................................................................................................................... 31
5
Page 6

Parking a Caller into your Default Lot ......................................................................................................................... 32
Presence App .................................................................................................................................................................... 32
Viewing your Current Status ........................................................................................................................................ 32
Changing your Current Status ...................................................................................................................................... 32
Changing your Preferences for When a Status is Active .............................................................................................. 33
Time Conditions App ........................................................................................................................................................ 34
Overview ...................................................................................................................................................................... 34
Sample Use Cases ........................................................................................................................................................ 34
Viewing Time Conditions ............................................................................................................................................ 34
Overriding Time Conditions ........................................................................................................................................ 35
COS to Restrict Which Toggles a User Can See .......................................................................................................... 35
Transfer to Voicemail App ................................................................................................................................................ 36
Transferring Calls to the Voicemail of Another Extension .......................................................................................... 36
Visual Voicemail App ........................................................................................................................................................ 36
Setting Up Your Voicemail .......................................................................................................................................... 36
Press the Voicemail button. .............................................................................................................................................. 36
To Record You’re Unavailable Greeting ..................................................................................................................... 36
To Record you’re Busy Greeting ................................................................................................................................. 36
Viewing Voicemails ..................................................................................................................................................... 36
Press the Voicemail button. .............................................................................................................................................. 36
Listening to Voicemails ............................................................................................................................................... 37
User Control Panel ............................................................................................................................................................ 37
Home Page ................................................................................................................................................................... 38
Call History .................................................................................................................................................................. 38
Usage ............................................................................................................................................................................ 38
Conferences – UCP ........................................................................................................................................................... 38
Usage ............................................................................................................................................................................ 38
Users Present ................................................................................................................................................................ 39
Mute User ..................................................................................................................................................................... 39
Kick User ..................................................................................................................................................................... 39
Settings ......................................................................................................................................................................... 39
User Pin ........................................................................................................................................................................ 39
Admin Pin .................................................................................................................................................................... 39
Join Message ................................................................................................................................................................ 39
Leader Wait .................................................................................................................................................................. 39
6
Page 7

Music On Hold ............................................................................................................................................................. 40
Music On Hold Class ..................................................................................................................................................... 40
Allow Menu .................................................................................................................................................................. 40
Record Conference ....................................................................................................................................................... 40
Mute on Join ................................................................................................................................................................. 40
Fax - UCP ........................................................................................................................................................................... 40
Viewing Faxes ............................................................................................................................................................... 40
Sending Faxes .............................................................................................................................................................. 40
Fax Settings .................................................................................................................................................................. 42
Presence - UCP .................................................................................................................................................................. 42
Changing your status .................................................................................................................................................... 42
Usage ............................................................................................................................................................................ 42
Available ....................................................................................................................................................................... 43
Chat .............................................................................................................................................................................. 43
Away ............................................................................................................................................................................. 43
DND .............................................................................................................................................................................. 43
Extended Away ............................................................................................................................................................. 43
Follow Me Settings - UCP.................................................................................................................................................. 43
Usage ............................................................................................................................................................................ 43
Enable ........................................................................................................................................................................... 43
Ring <Exten> First For ................................................................................................................................................... 44
Ring Follow-Me List For ................................................................................................................................................ 44
Use Confirmation ......................................................................................................................................................... 44
Remote Announce ........................................................................................................................................................ 44
Too-Late Announce ...................................................................................................................................................... 44
Call Forwarding ............................................................................................................................................................ 44
Call Forward Ring Timer ............................................................................................................................................... 44
Unconditional ............................................................................................................................................................... 44
Unavailable ................................................................................................................................................................... 44
Busy .............................................................................................................................................................................. 44
Do Not Disturb ............................................................................................................................................................. 45
Call Waiting .................................................................................................................................................................. 45
SMS - UCP ......................................................................................................................................................................... 45
Enabling a User to send or receive SMS's .................................................................................................................... 45
Sending an SMS ............................................................................................................................................................ 45
7
Page 8

Receiving SMS Messages ............................................................................................................................................ 46
Viewing SMS History .................................................................................................................................................. 47
Voicemail - UCP .......................................................................................................................................................... 47
Managing Voicemail Settings. ..................................................................................................................................... 48
Managing Voicemail Greetings. ................................................................................................................................... 49
8
Page 9
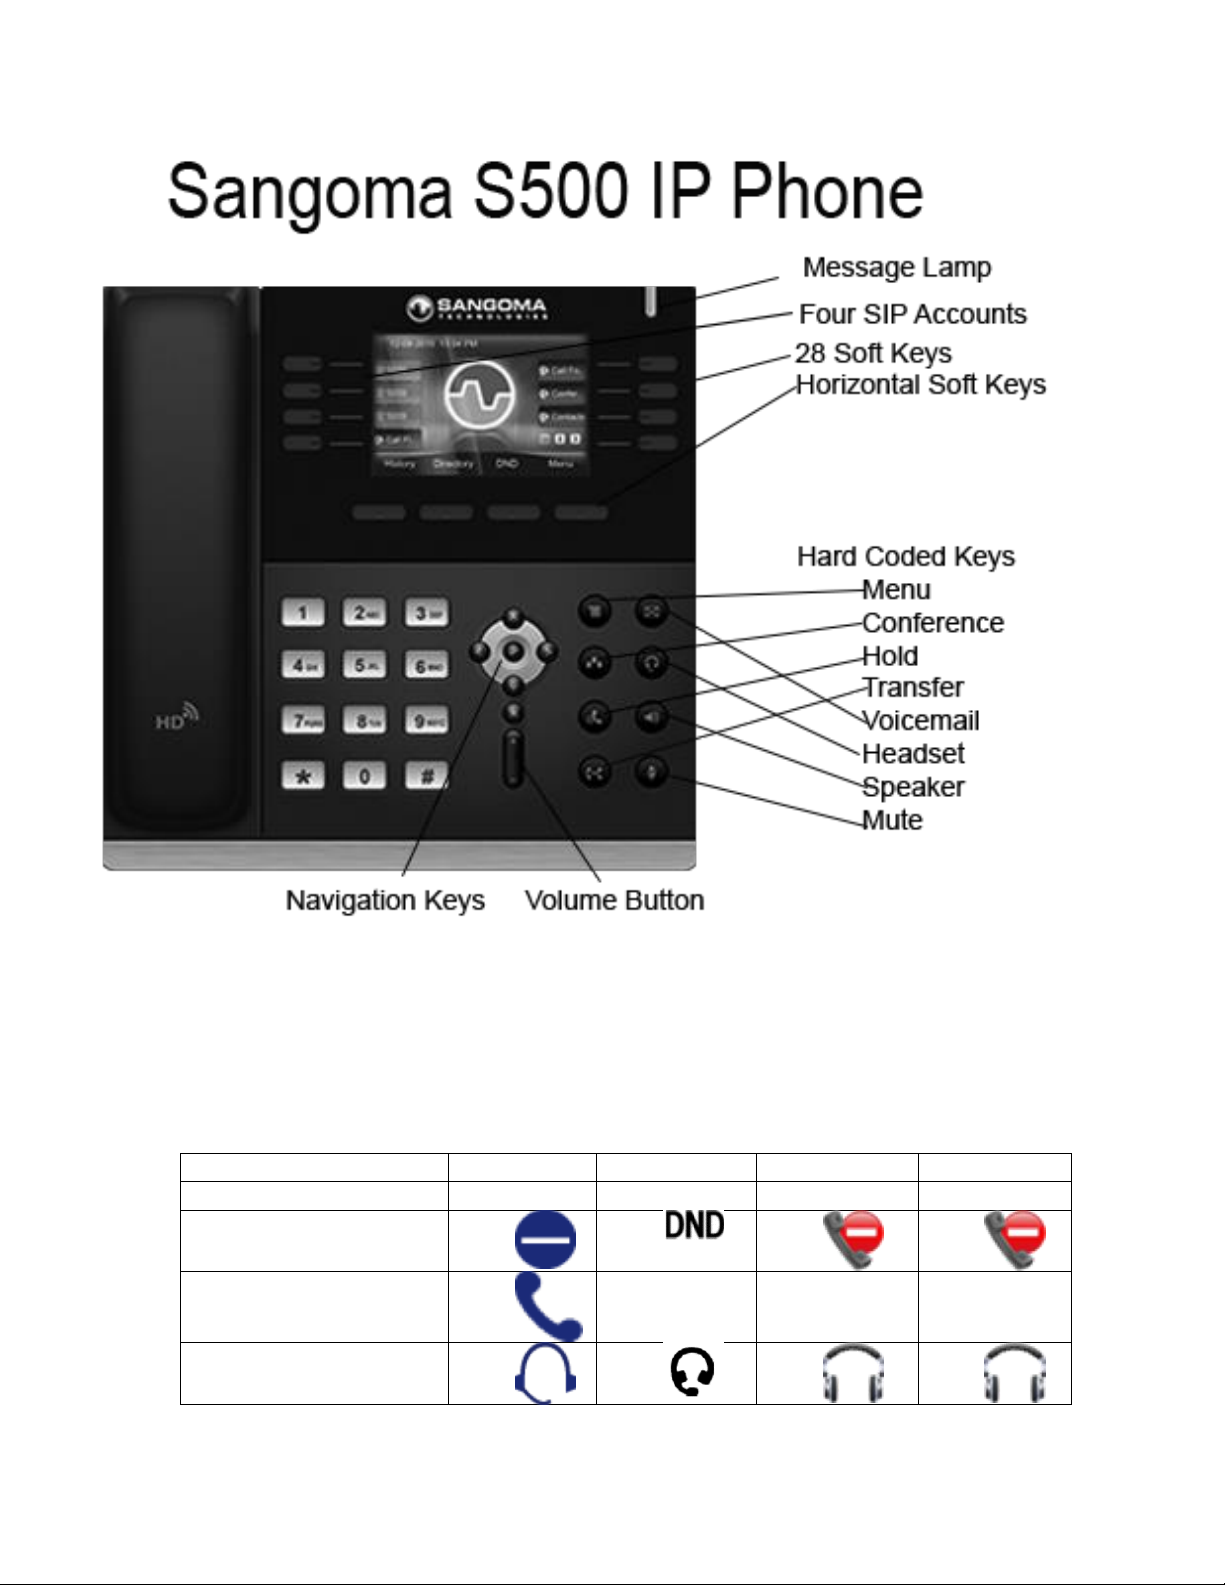
Meaning of Keys
Meaning
S300
S400
S500
S700
DND (Non Phone
App)
Handset Mode
Headset Enabled
3
Page 10

Missed Call
Muted
Network Down
Phone Locked
Ringer Muted
Speaker Phone
SRTP active for Call
Voicemail Waiting
VPN Enabled and
Active
ZRTP active for Call
S500 Phone Features
Voice Codecs Features
G.729AB, G.726-32
IP-PBX Features
Physical Features
100~240V input and DC 5V/1.2A output
Management
provision
Network and Security
4
Page 11

Display and Indicator
information
Feature keys
features (4-page view)
mute, transfer, call list, conference
DSCP
Interface
5
Page 12
Using Your Phone
c. = Dialed
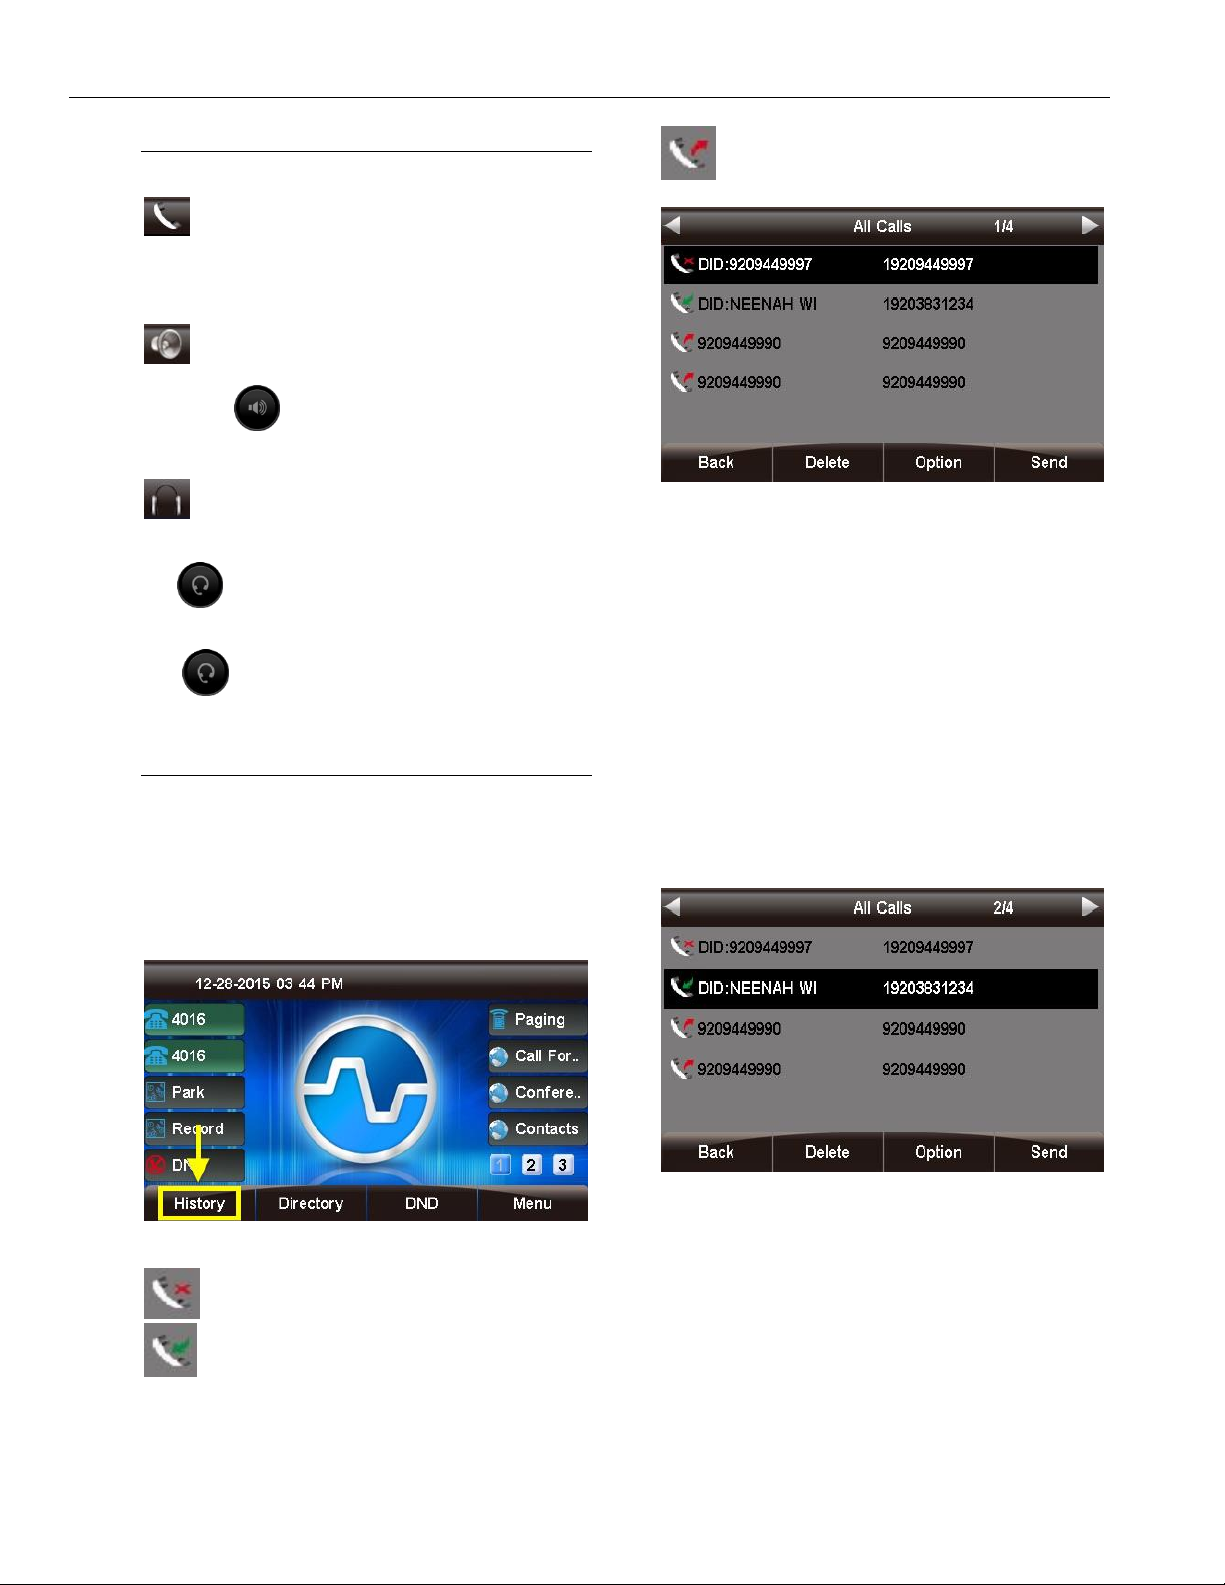
Handset
Pick up the handset.
Speakerphone
Press the (speaker) button.
Headset
If the phone is not in headset mode: Press
the (headset) button.
If the phone is in headset mode: Either press
the (headset) button on the phone, or the
button on the headset itself.
Call History
The Call History section allows you to view missed,
received, and dialed calls, as well as add the number
to your contacts list, blacklist the number, or call the
number. Viewing Calls
1. Press the History soft key.
You can use the < and > (left and right arrow) buttons
to filter by call type: All Calls, Missed
Calls, Received Calls, and Dialed Calls. The current
filter option is shown at the top of the screen.
Deleting Calls Individually
1. Use the Λ or V (up and down arrow) buttons to
select a call from the list.
2. Press the Delete soft key to remove the call from
the call history.
Options
1. Use the Λ or V (up and down arrow) buttons to
select a call from the list.
2. "All Calls" will be shown by default.
a. = Missed
b. = Received
2. Press the Option soft key.
6
Page 13
can be entered.
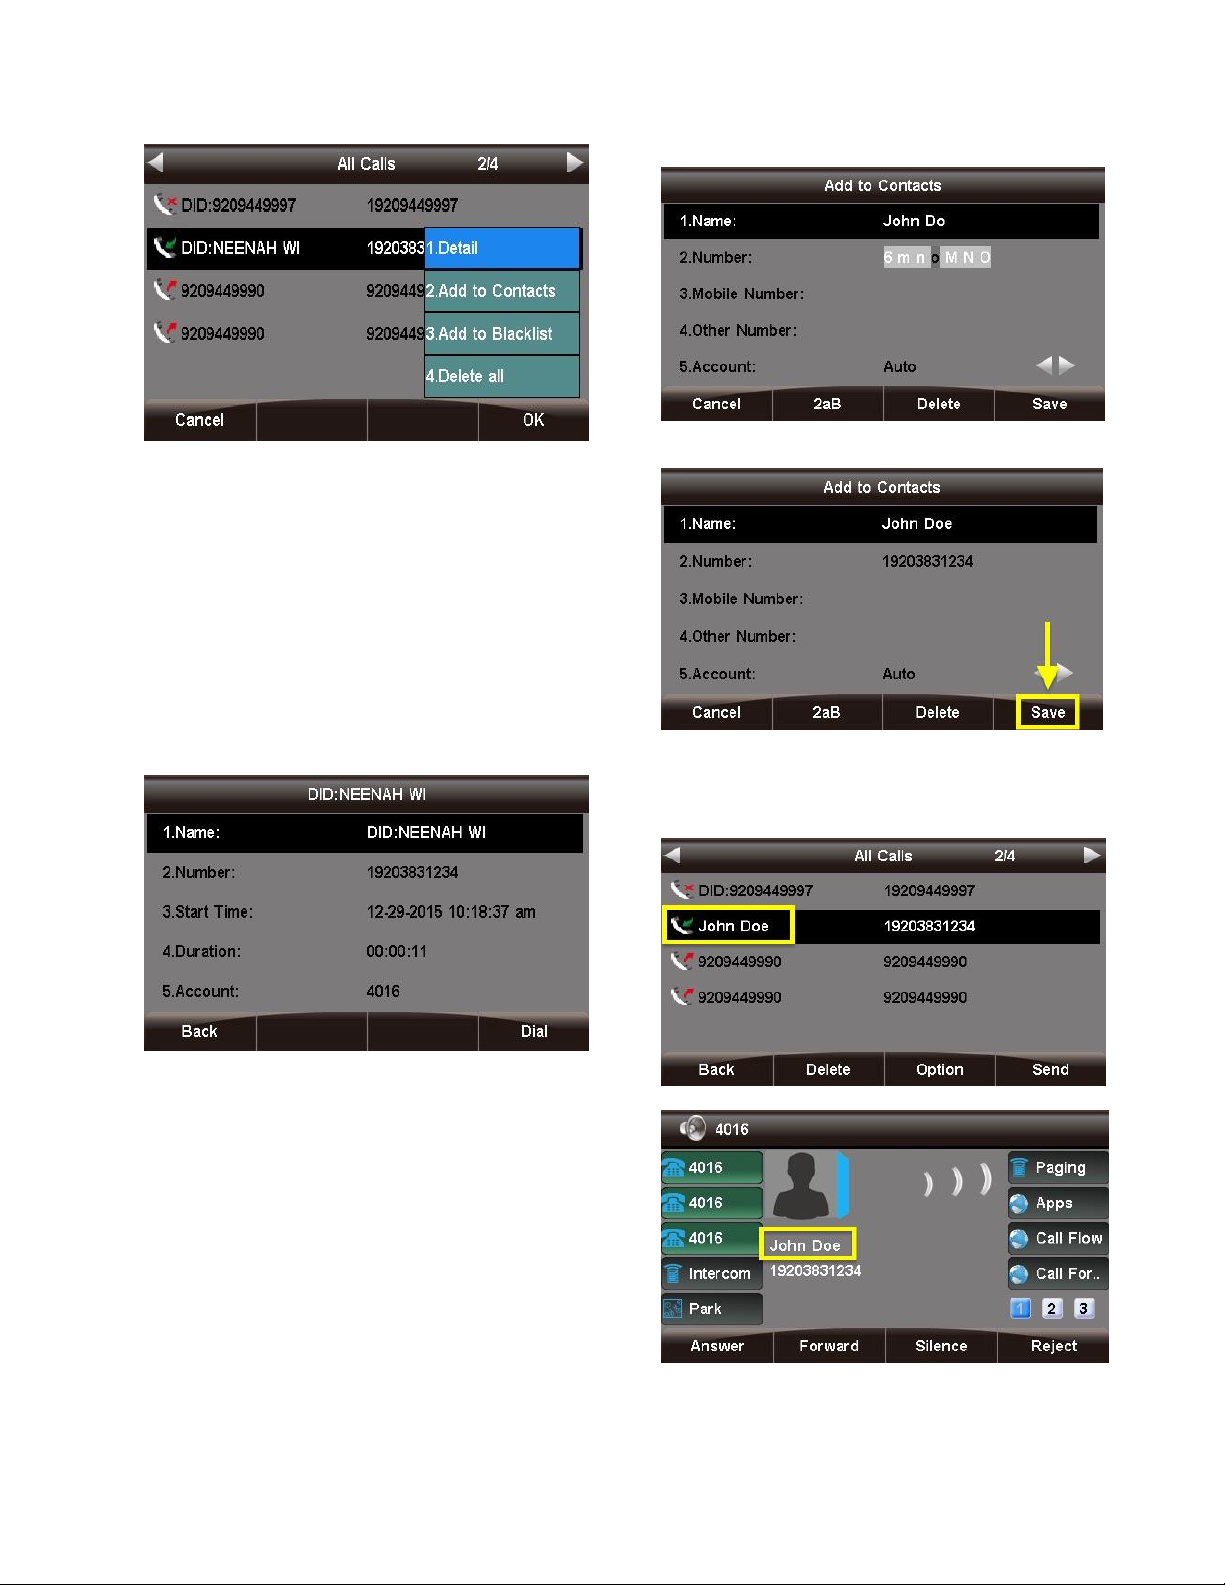
3. Use the Λ or V (up and down arrow) buttons to
highlight an option, then press the OK soft key or
the √ (checkmark) button to select the option.
Detail
This screen provides details of the call such
as Name, Number, Start Time, Duration, and
Account.
Press the Back soft key to go back to the
previous screen, or the Dial soft key to call the
number shown. (You are not required to highlight
the number first.)
2. Press the Save soft key when done.
Now, any call history for this caller, as well as new
inbound calls from this caller, will display the
name you entered.
Add to Contacts
You can save contact information such
as Name, Number, Mobile Number, Other
Number, Account, Ring Tone, Group,
and Photo.
1. Use the < > Λ V (arrow) buttons to navigate and
the phone keypad to enter text and numbers. To
cycle between the numbers/letters/symbols
available for each key, press the key multiple
times or use the < and > (left and right arrow)
buttons. Tip: The "space" option is found under
the "0" (zero) key. You can use the 2ab soft key
to cycle among 2ab, 123, abc, and ABC, which
are various input options limiting which characters
3
Page 14
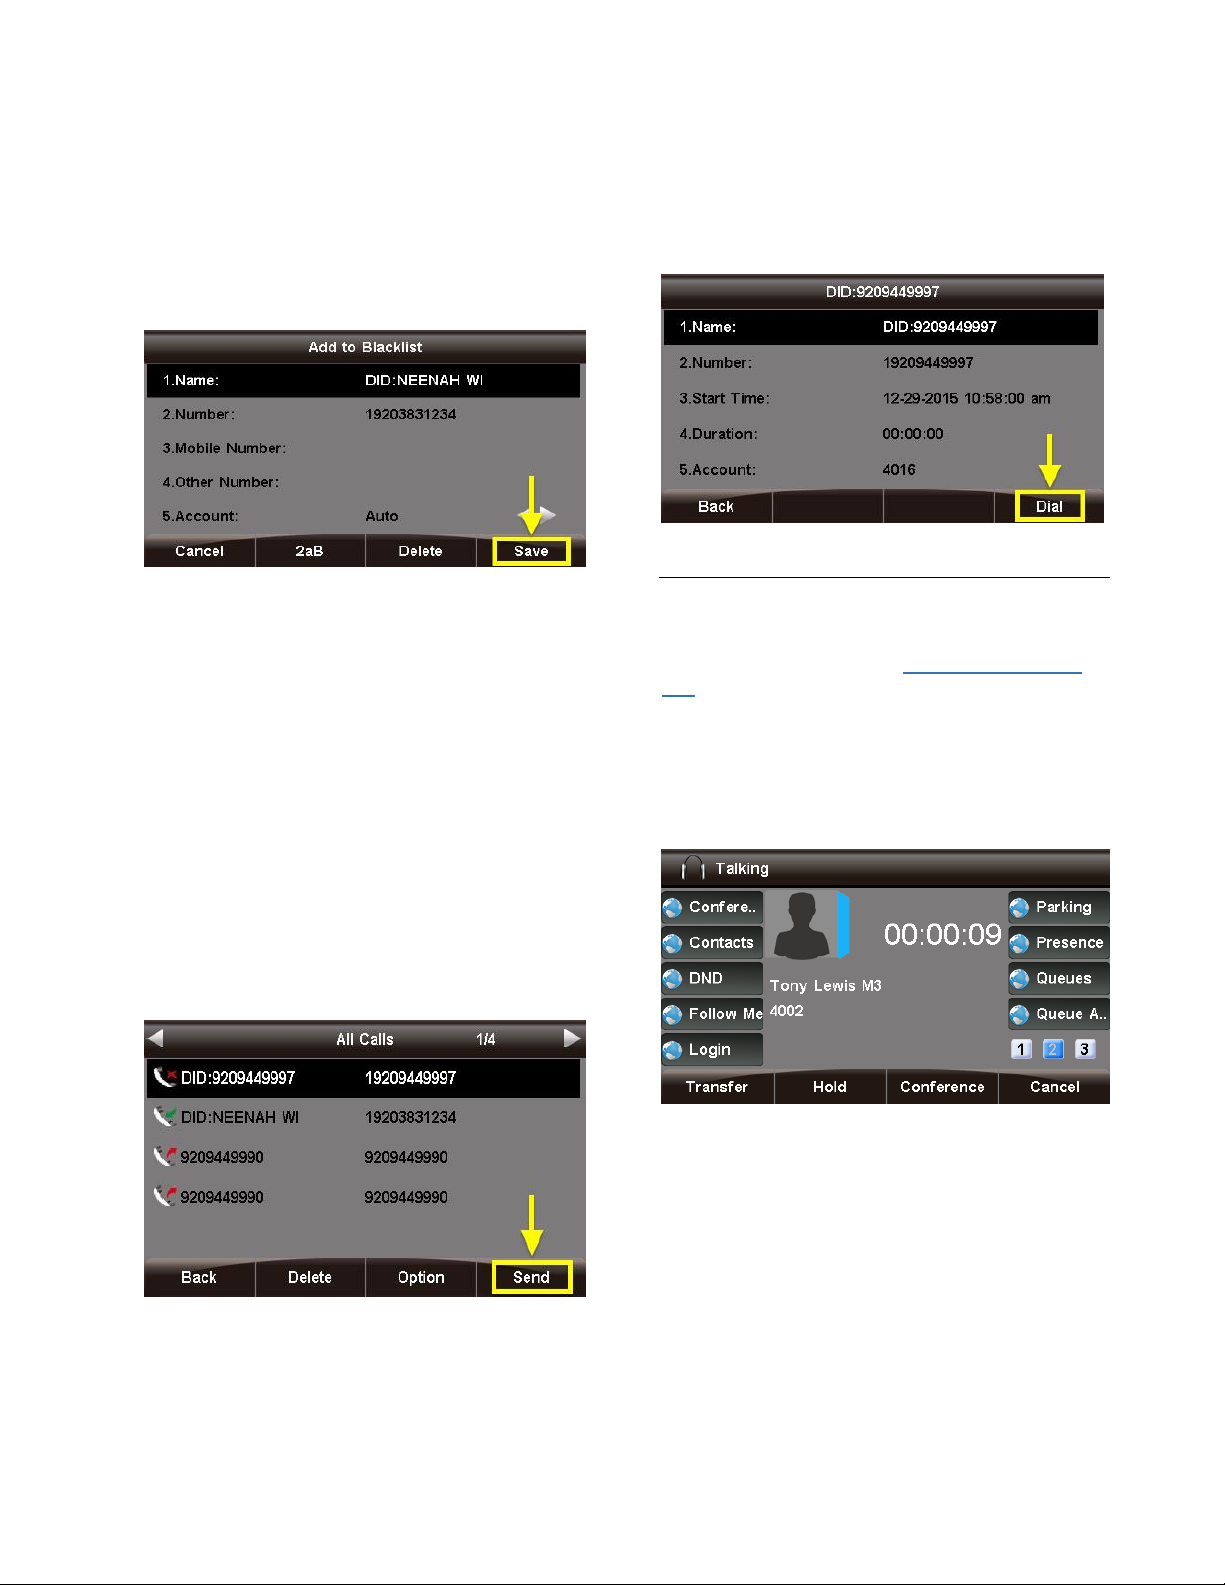
Add to Blacklist
From the Call Detail Screen
This option adds the caller to the blacklist,
preventing you from receiving further calls from
this caller ID.
To add the number to the blacklist, press
the Save soft key.
Delete All
This option deletes all of the calls associated with
list that you are currently viewing (All
Calls, Missed Calls, Received Calls,
or Dialed Calls, as shown at the top of the
screen).
For example, if you are viewing the Missed
Calls page, all of the missed calls would be
deleted from the call history, and they will no
longer show up here or on the All Calls page.
However, the other calls (received and dialed) will
still appear in the call history.
Dialing a Number
Press the Dial soft key or the √ (checkmark)
button. An outbound call will be placed
immediately.
Call Parking
Call Parking allows you to park a caller so that
another extension can retrieve the caller held in
the parking lot. Please see Call Parking module
wiki for more information on how Parking Lots can
be configured on your PBX.
Parking a Caller
If you have a Park Button setup on your Sangoma
Phone you can press it at anytime while on a call
with someone.
From the List
1. Use the Λ or V (up and down arrow) buttons to
select a call from the list.
2. Press the Send soft key or press
the √ (checkmark) button. An outbound call will be
placed immediately.
The caller will be parked and the slot number will
be played back to you where the caller was
parked.
Viewing and Retrieving Parked Calls
Pressing the Park button while not on a call will
display a list of parked calls. You can see the
caller ID of the person parked and how long they
have been parked for.
4
Page 15
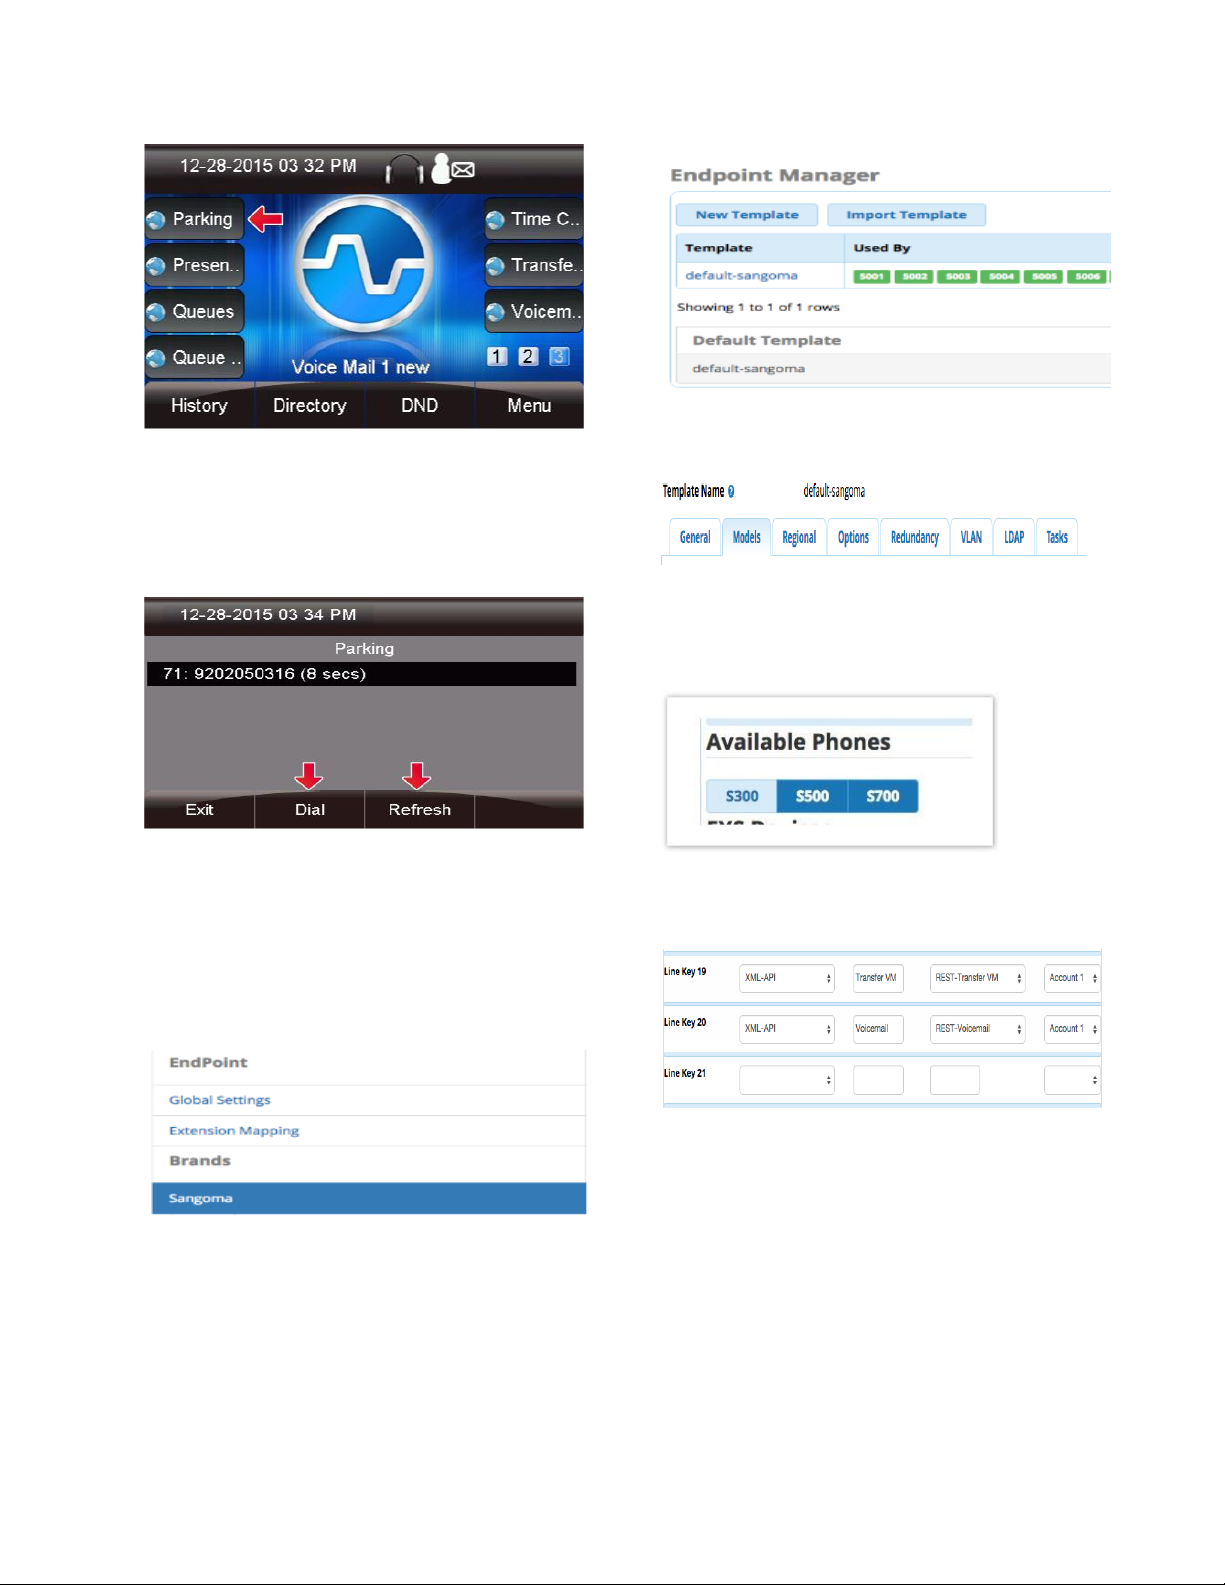
From here you can pick up any specific parked
call by using the up/down arrow keys and and
pressing Dial. You can also use
the Refresh button to update the list.
Click on the Models menu tab at the top
Select a model number you want to add a Park
Button for
Setting up a Park Button on your Phone
You can setup a Park Button on your phone using
the PBX End Point Manager by modifying your
button layout for your Sangoma s500 or s700
Phones.
Go into End Point Manager in your PBX and pick
on the Sangoma Brand on the left menu bar.
Click on the template in End Point Manager that
you want to change a button for.
Scroll down the your first available Line Key that
is not used
5
Page 16
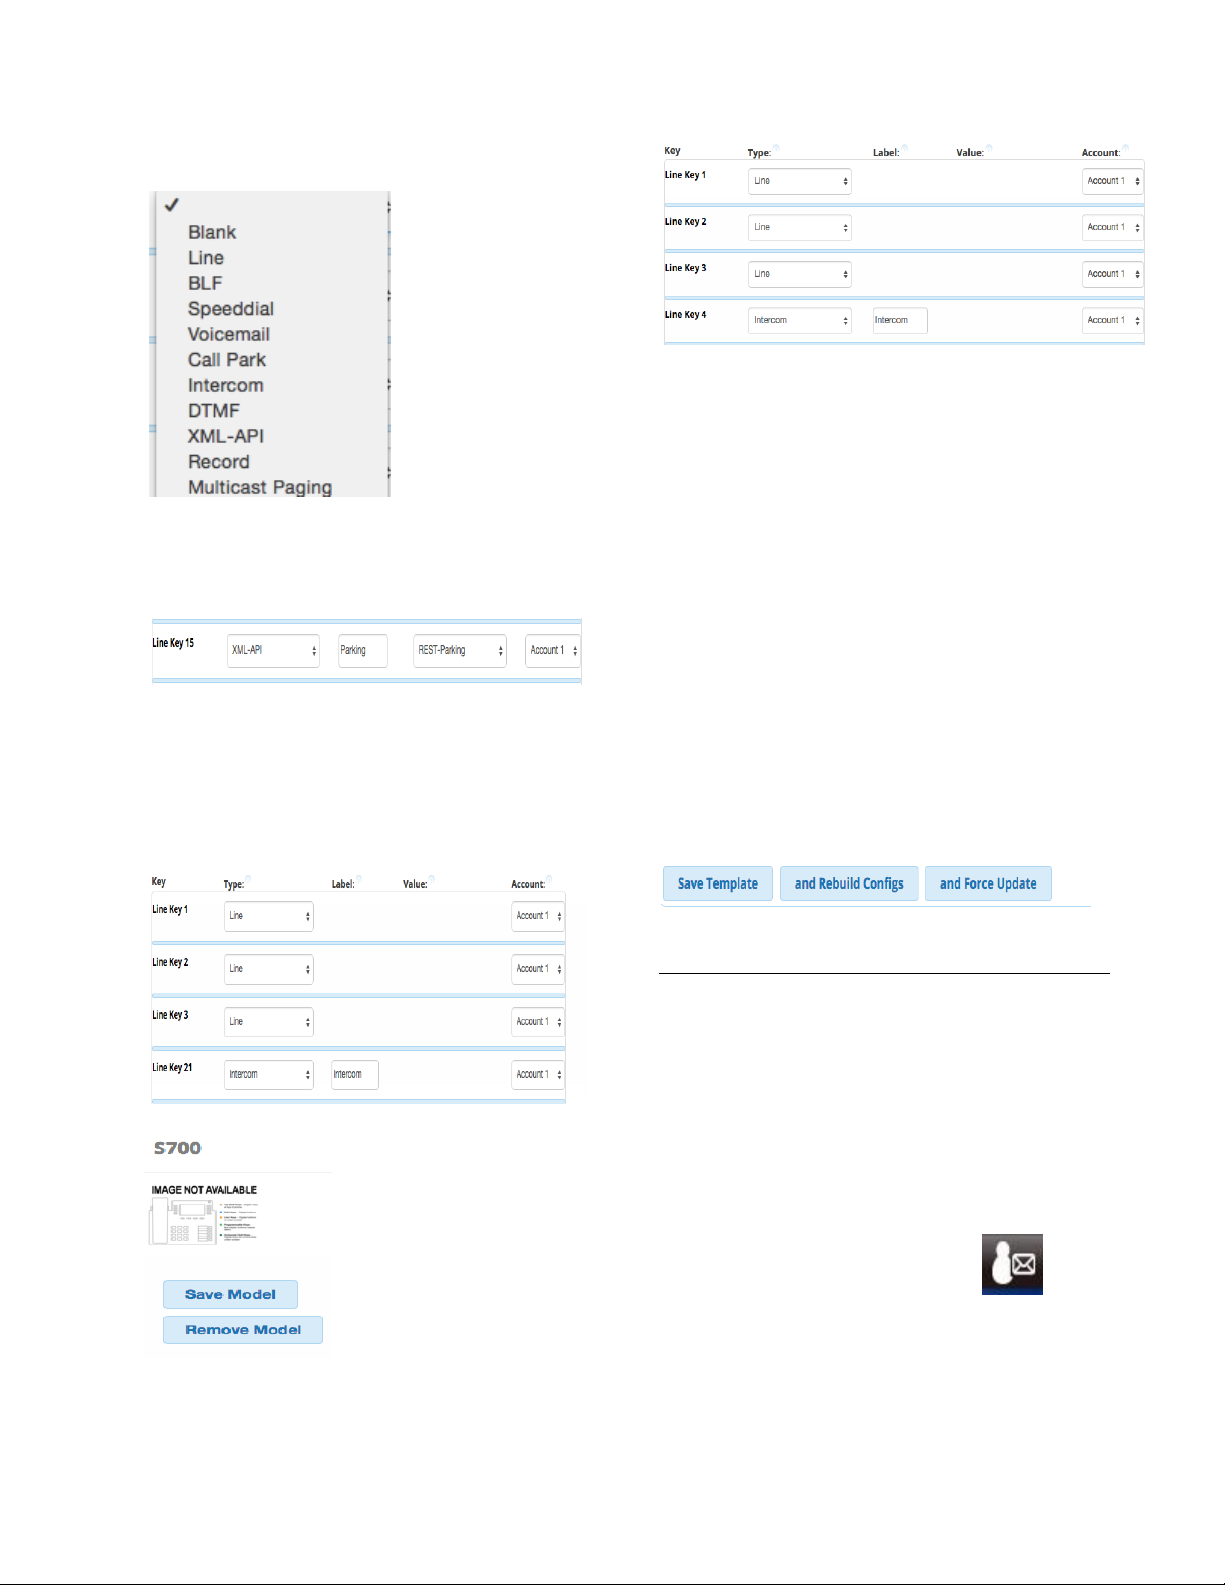
From the Drop Down of button types pick XML-
API
You can optionally change the label name to be
something different then Parking if you want. The
Label is the name that will be shown on your
Phone Screen for that button.
You can now drag the button to be in a different
spot. In our example we will drag Button 21 that
we just setup as a Intercom button up toward the
top to make it button 4 on the phone. Left click on
the button and while holding down your left mouse
drag the button to a different spot and release it.
We now need to update the phone config. Our 3
options at the bottom of the template are
Save Template- This will only save your changed
into the PBX Database but will not write out new
config files for the phones that are using this
template as mapped in Extension Mapping
section of End Pint Manager.
and Rebuild Configs- This will save your
changes to the PBX Database and will also write
out new config file for the phones that are using
this template as mapped in Extension Mapping
section of End Pint Manager but the phones will
need to be rebooted for it to retrieve the changes.
and Force Update- Will do both the Rebuild
Configs option above but also update any phones
that are mapped to use this template and
currently registered to the PBX immediately with
no need to reboot the phones.
Save the Model using the
If you go back into the model number it will show
Intercom as button 4 now.
Checking Voicemail
How to Know a New Voicemail is Available
The phone alerts you of new voicemail messages
on your screen, with a flashing light, and with a
special dial tone.
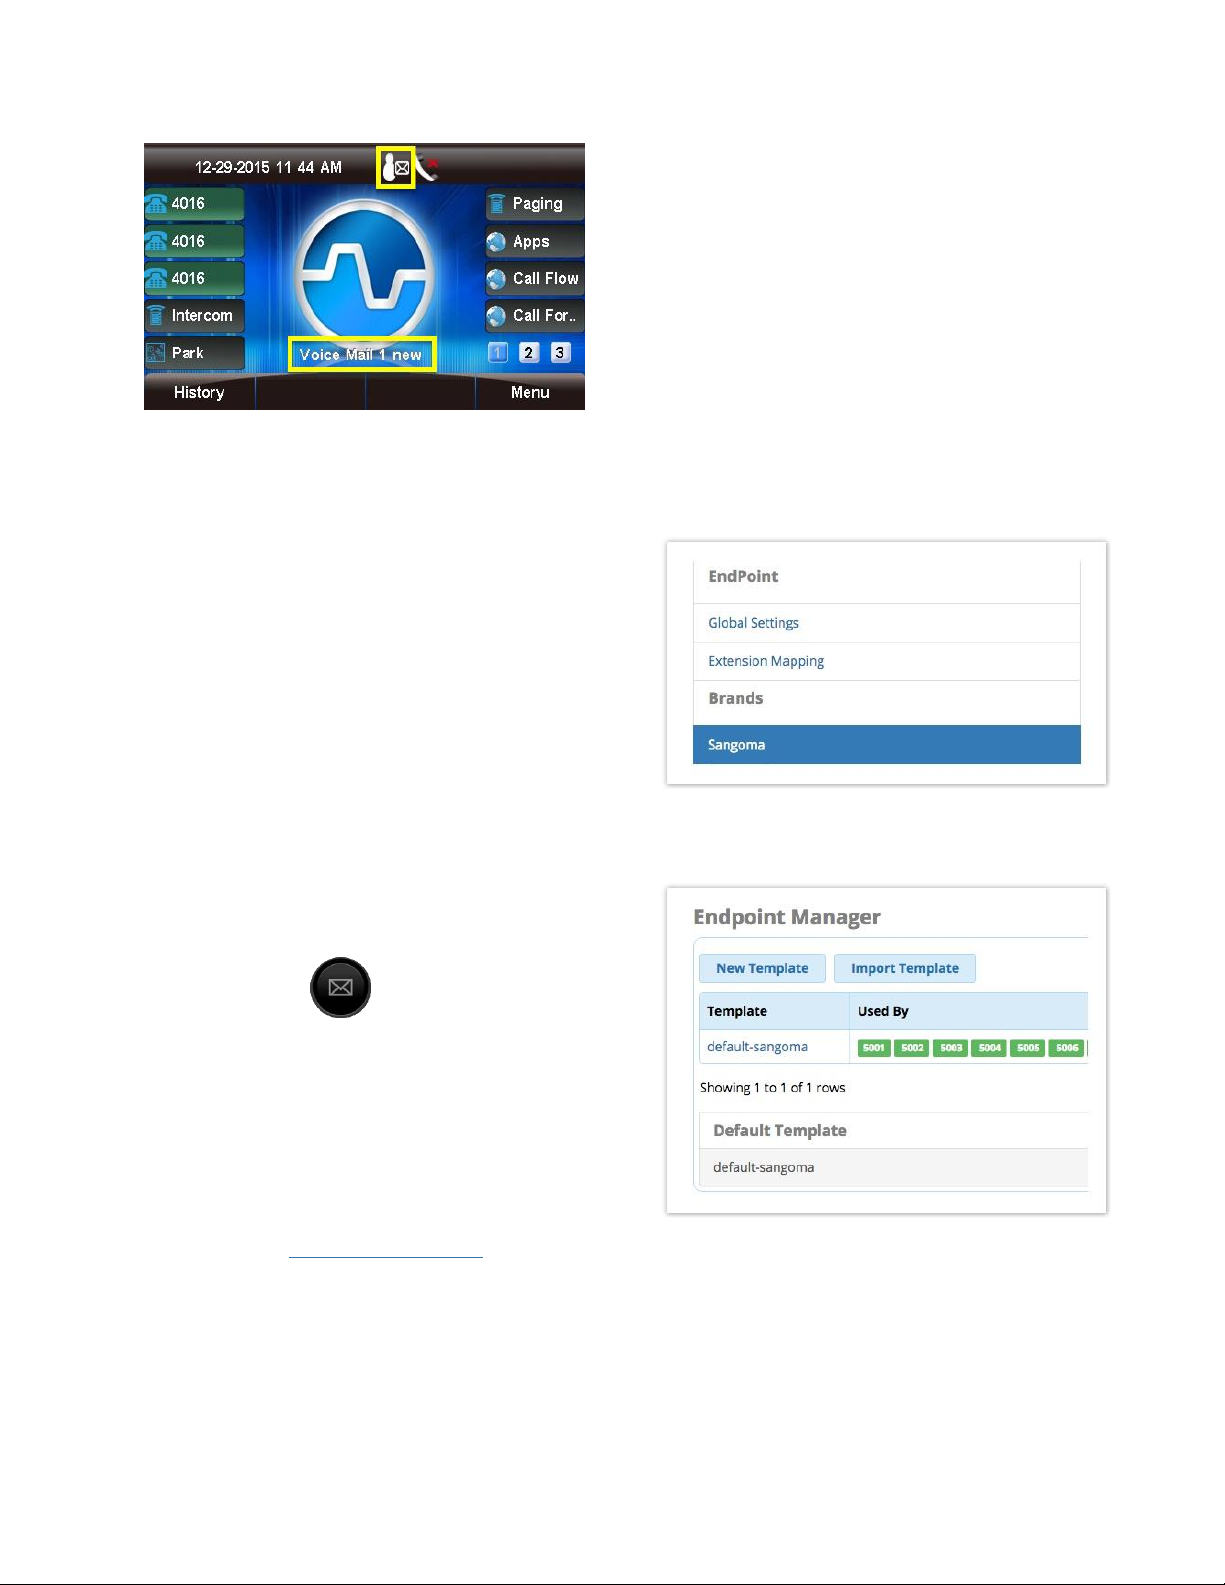
Icon and Message on Screen
If a new voicemail is available in your inbox, the
phone will display the voicemail icon at the
top of the screen. The quantity of new voicemails
will also show in an alert message near the
bottom of the screen.
6
Page 17
Message Waiting Indicator (MWI) Light
The message waiting indicator light at the top
right corner of the phone will flash.
Dial Tone
Your dial tone will be a series of short bursts
followed by a steady tone, instead of only a
steady tone.
Visual Voicemail
The Voicemail application (REST App) allows
you to manage your voicemail messages from
your phone.
Setting up a Visual Voicemail Button on your Phone
You can set up a Visual Voicemail button on your
phone using the PBX EndPoint Manager by
modifying your button layout for your Sangoma
s500 or s700 Phones.
Go into End Point Manager in your PBX and
choose the Sangoma brand in the menu.
How to Check your Voicemails
You can use the voicemail button, dial a feature
code, or use the voicemail REST app to check
your voicemail.
Voicemail Button
You can press the (voicemail) button on
your phone any time to check your voicemails.
Feature Codes
Dial one of the following feature codes to access
voicemail. The feature codes below are the
default feature codes setup on your PBX. If you
have changed your feature codes please review
the wiki here on Feature Code module of your
PBX.
*97: Access your own voicemail.
*98: Access your voicemail or another extension's
voicemail. You will be prompted to enter a
mailbox number.
Click on the template in End Point Manager that
you want to change a button for.
Click on the Models menu tab at the top
7
Page 18
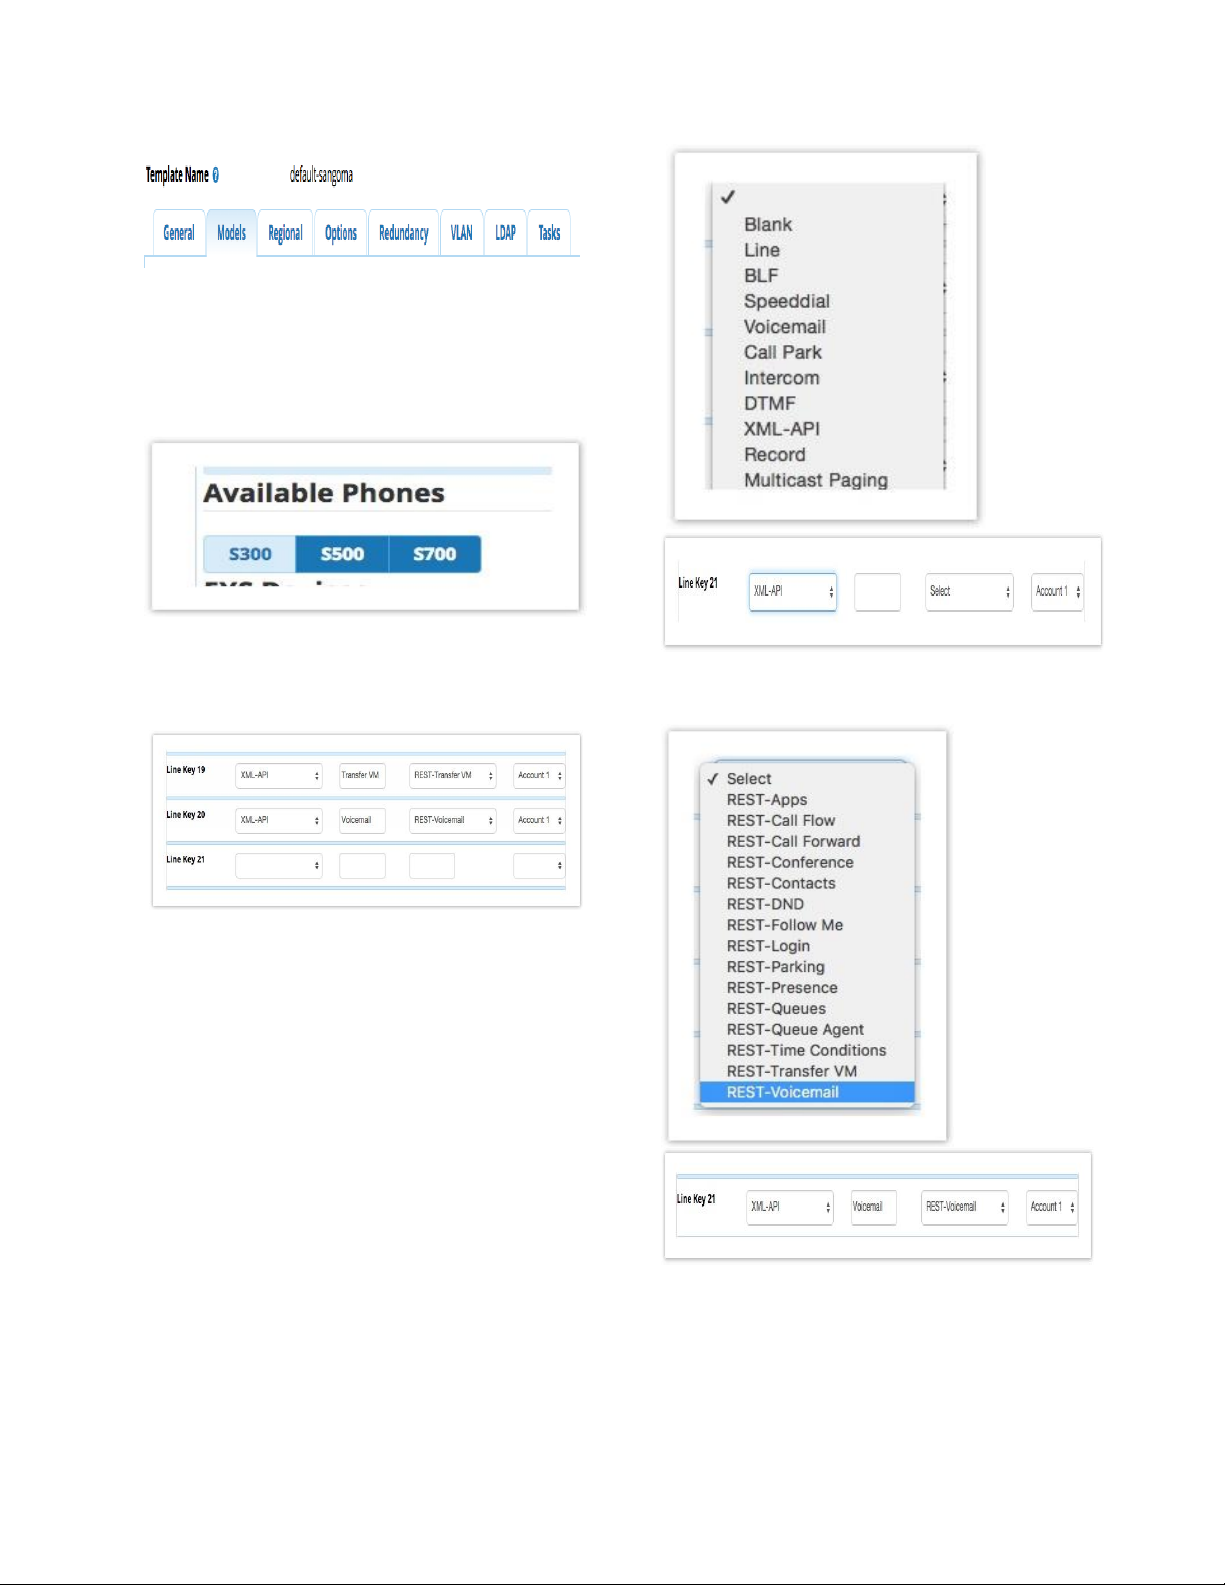
Select a model number you want to add a Visual
Voicemail Button for
|
Scroll down to the first available Line Key that is
not used.
From the drop-down menu of button Types,
select XML-API.
From the Value drop-down menu, select REST-
Voicemail.
The Label is the name that will be shown for that
button on the phone's screen. By default, the
REST-Voicemail button's label is "Voicemail." You
can optionally change the label name to be
something different.
8
Page 19

You can also move the button to a different
position if desired. To do this, click on the line key
name, and while holding the mouse button down,
drag the row to a new position (up or down). Then
drop the button in the new position by releasing
the mouse button.
The line key numbers will not update until after
you save the model.
In our example, we have moved Line Key 21 to
position 4. The original Line Key 4 appears below
it, and the numbering sequence will update after
we save the model.
and Rebuild Configs- This will save your
changes to the PBX Database and will also write
out new config files for the phones that are using
this template as mapped in the Extension
Mapping section of End Point Manager. The
phones will need to be rebooted in order to
retrieve the changes.
and Force Update- This will do both the "Save
Template" and the "and Rebuild Configs"
options above, and it will also immediately update
any phones that are mapped to use this template
and currently registered to the PBX, with no need
to reboot the phones.
Conference Calling
Assuming you are in a call with person "A" and
you want to add person "B" to the call:
1. Press the Line 2 key. Person "A" is put on hold.
Save the model using the Save Model button.
You now need to update the phone configuration
file. The three options at the bottom of the
template are:
Save Template- This will only save your changes
into the PBX database. It will not write out new
config files for the phones that are using this
template as mapped in the Extension Mapping
section of End Point Manager.
2. Enter the number of person "B."
3. Press the Send soft key or #, and wait for person
"B" to answer.
9
Page 20

4. Press the (conference) button or
the Conference soft key. Person "A" and person
"B" are now in a conference call with you.
Splitting a Conference Call
1. Press the Split soft key during a conference call
to separate the conference call into individual
calls. Each conference participant will be put on
hold.
2. You can now press the line key for any of the on-
hold calls to pick one up. The other caller(s) will
remain on hold.
Adding Additional Callers to a Conference
You can repeat the process above, using
additional line keys, to add more callers to a
conference. The conference participants are put
on hold while you call each additional participant.
Note
The number of available lines limits the maximum
number of conference participants.
Ending a Call
Handset
A) Hang up the handset, OR
B) Press the Cancel soft key.
10
Page 21

What is Headset Mode?
Headset mode allows you to make and receive
calls through a headset instead of the phone's
handset or speakerphone as the default audio
method.
You can switch to and from headset mode at any
time, even during an active call.
Enabling/Disabling Headset Mode
Speakerphone
A) Press the (speaker) button, OR
B) Press the Cancel soft key.
Headset
Press the Cancel soft key.
Press the (headset) button to toggle
headset mode on or off.
If headset mode is enabled, the phone's home
screen will show a headset icon at the top of the
screen and a "Headset mode!" text alert at the
bottom.
Adjusting the Headset Volume
Headset volume is affected by a combination of
the headset's own setting and the phone's setting.
If you adjust the volume directly on the headset,
this does not change the setting on the phone
itself. You may need to adjust both in order to
achieve the desired result.
Headset
While the headset is in use, press
the + or - buttons on the phone to
increase/decrease the phone's volume setting.
11
Page 22

Switching from Headset Mode to Another Mode During
a Call
Headset to Handset: Pick up the handset.
Headset to Speakerphone: Press
the (speaker) button.
Note
If you are using the headset and press
the (headset) button without doing either
of the above, the call will go to the handset if it is
off-hook, or the speakerphone if the handset is
on-hook.
Switching from Another Mode to Headset Mode During
a Call
Muting the Microphone
To mute your microphone so that the other party
cannot hear you, press your headset's built-in
mute button, if available, or press
the (mute) button on the phone.
To un-mute the microphone, press headset's built-
Press the (headset) button.
Hold
To Place a Caller on Hold:
Press the (hold) button or press
the Hold soft key.
in mute button or the (mute) button on the
phone again.
12
Page 23

To Resume a Call:
Press the (hold) button again or press
the Resume soft key.
Using Intercom Button to Intercom a User
If you have a Intercom Button setup on your
Sangoma Phone you can press it at anytime.
The phone will then wait for you to enter in the
extension you want to intercom
Intercom Call
Overview of Intercom Feature
Intercom Calling allows you to dial another
extension but have the extension you are dialing
"auto answer" instead of ringing.
Enter in the extension you want to Intercom and
press the Dial button
Your Intercom will be initiated to that user.
13
Page 24

Select a model number you want to add a
Intercom Button
Setting up a Intercom Button on your Phone
You can setup a Intercom Button on your phone
using the PBX End Point Manager by modifying
your button layout for your Sangoma s500 or s700
Phones.
Go into End Point Manager in your PBX and pick
on the Sangoma Brand on the left menu bar.
Click on the template in End Point Manager that
you want to change a button for.
Scroll down the your first available Line Key that
is not used
From the Drop Down of button types pick
Intercom
Click on the Models menu tab at the top
You can optionally change the label name to be
something different then Intercom if you
want. The Label is the name that will be shown
on your Phone Screen for that button.
You can now drag the button to be in a differnt
spot. In our example we will drag Button 21 that
we just setup as a Intercom button up toward the
14
Page 25

top to make it button 4 on the phone. Left click on
the button and while holding down your left mouse
drag the button to a different spot and release it.
Save the Model using the
currently registered to the PBX immediately with
no need to reboot the phones.
Using a Feature Code to Intercom
You can Intercom a user at anytime by dialing the
PBX Intercom feature code and the extension
number.
The default intercom feature code is *80 s to
intercom extension 4000 you would dial *804000
from your phone.
If you go back into the model number it will show
Intercom as button 4 now.
We now need to update the phone config. Our 3
options at the bottom of the template are
Save Template- This will only save your changed
into the PBX Database but will not write out new
config files for the phones that are using this
template as mapped in Extension Mapping
section of End Pint Manager.
and Rebuild Configs- This will save your
changes to the PBX Database and will also write
out new config file for the phones that are using
this template as mapped in Extension Mapping
section of End Pint Manager but the phones will
need to be rebooted for it to retrieve the changes.
and Force Update- Will do both the Rebuild
Configs option above but also update any phones
that are mapped to use this template and
Muting
To Mute the Microphone:
During a call, press the (mute) button. The
button will turn red and a red microphone will
show up on the phone's screen.
15
Page 26

To Un-Mute the Microphone:
Press the (mute) button again. The button
will no longer be red, and the red microphone icon
will disappear from the screen.
Setting Ring Volume
Change Volume or Mute Ringer
To change the ringer volume, use
the + and - (plus and minus) buttons on your
phone. Press repeatedly to change to different
volume levels (1 through 14).
Mute the Ringer Temporarily (for One Incoming Call)
During an incoming call, press the Silence soft
key.
This will silence (mute) the ringer for this call only.
The inbound call will still be "ringing" to your
phone, giving you the option to answer, forward,
reject, or ignore it.
To mute the ringer, press the - (minus) button
repeatedly until the mute symbol appears at
the top of the screen.
Speakerphone
Speakerphone mode allows you to make and
receive calls using the full-duplex speaker and
16
Page 27

microphone built into the phone's base, rather
than the handset or a headset.
You can switch to and from speakerphone mode
at any time, even during an active call.
Turning the Speakerphone On or Off
Speakerphone is the "default" audio mode unless
you are using a handset or headset.
Manual Toggle
At any time, you can activate/deactivate the
speakerphone by pressing the (speaker)
button. Think of this as taking the speakerphone
"off-hook" or hanging it up (like a handset). If the
speakerphone is in use, the speaker button will be
lit and a speaker icon will appear on the
screen.
If you activate the speakerphone while the phone
is idle, you will be presented with a dial tone.
If you are on an active call using the
speakerphone, and you deactivate the
speakerphone, you will hang up the call.
Automatic Activation
Assuming you are not using a handset, and the
phone is not in headset mode:
If you place a call, either by dialing a number or
by selecting a number from the contact list or call
history, the call will be made in speakerphone
mode.
If you press the Answer soft key during an
incoming call, the call will be answered in
speakerphone mode.
Incoming page/intercom messages will be played
over the speaker.
The new volume setting will persist for future
speakerphone calls unless you change it again.
Muting the Microphone
To mute your microphone while on an active call,
so that the other party cannot hear you, press
the (mute) button.
Adjusting the Speakerphone Volume
While the speakerphone is active (in-use), press
the + or - buttons to increase or decrease the
volume.
Press the (mute) button again to un-mute
the microphone.
17
Page 28

Switching from Speakerphone Mode to Another Mode
During a Call
Speakerphone to Handset: Pick up the handset.
Speakerphone to Headset: Press
the (headset) button.
Switching from Another Mode to Speakerphone Mode
During a Call
Press the (speaker) button.
Transferring Calls
This wiki describes how to transfer a call using the
following methods:
2. Enter the number to transfer the call to.
3. Press the (transfer) button or
the Transfer soft key again to complete the
transfer.
Blind: The caller is placed on hold while you
transfer the call to a new recipient. You do not
speak to the new recipient first.
Attended: The caller is placed on hold while you
speak to (or attempt to speak to) the new
recipient. If the new recipient can accept the call,
you can transfer it when ready. If the new
recipient does not answer, or is otherwise
unavailable, you can return to the on-hold call in
progress and/or try to reach a different recipient.
Blind Transfer
1. Press the (transfer) button or
the Transfer soft key during a call. The caller is
placed on hold.
Attended Transfer
1. Press the (transfer) button or
the Transfer soft key during a call. The caller is
placed on hold.
18
Page 29

2. Enter the number to transfer the call to. In the
next step, you will be placing a call to this
recipient while the caller is still on hold.
3. Press # or the Send soft key.
4. Speak with the recipient, if able, then either
complete the transfer or cancel it:
a. To complete the transfer: Press
the (transfer) button or the Transfer soft
key.
i. You will be taken to a screen showing that the
inbound call is still on hold. At this point, you can
either press the Transfer soft key to keep the
caller on hold and dial a new recipient, or press
the Resume key to speak to the caller.
Paging & Intercom Module
What is the Paging & Intercom used for?
The Paging & Intercom Module is used to set-up an
extension number that your users can dial in order to
place an intercom call to multiple phones on your
system at the same time.
b. To cancel the transfer: Press the Cancel soft
key.
For example, in a small office you might set-up a Page
Group with extension number "00." When 00 is dialed
by a local user, all of the phones in the office would go
off-hook, and you could speak to everyone at every
extension at the same time. Alternatively, you could
set-up Page Groups with different extension numbers
for each department in the office, i.e. 100 for Sales,
110 for Service, and so on.
To Page throughout the Office.
Take handset off hook; or
19
Page 30

Press Speaker button; or
Press Headset button with headset plugged in; or
Press an available LINE key to activate speaker;
Dial “4” from the dial pad.
Press SEND key or # to complete the page.
To Intercom another extension on the system.
Take handset off hook; or
Press Speaker button; or
Press Headset button with headset plugged in; or
Press an available LINE key to activate speaker;
Dial *80 + extension number.
Press SEND key or # to complete the page.
On some systems all you have to do is press the
associated DSS/BLF key of the extension you wish to
reach.
Call/Night Flow App
Overview
Viewing and Changing a Toggle
Pressing the Call Flow button will bring up a list of all
call flows on your system. For each toggle, you can see
the following:
Name: This is the name of the Call Flow Control that
you defined in your PBX GUI.
Index used: In your GUI, when creating a Call Flow
toggle, you define an index from 0-99 for each one.
This index identifies the specific call flow and can be
used in conjunction with a feature code. The call flow
control toggle feature is *28 followed by the index. For
example, if the index is "0," you would dial a feature
code of *280 to toggle the call flow. If the index is
"99," you would dial *2899.
Current State: Either "Normal" or "Override." This
determines whether the call is routed to the normal
destination or override destination.
Call Flow Controls allow you to change the destination
of the call flow. A good example of this would be
setting up a call flow control on your main number. In
normal mode, the calls flow to a "Business Hours"
IVR, but in override mode, the calls flow to a "Night"
IVR. Since you don't hold regular hours, it's not
possible to program an automated Time Condition for
this, so you'll want to manually control this with a Call
Flow toggle button. You could use this button to
switch the phone system into override mode after hours
and back to normal mode during business hours. When
one or more of your call flows is in override mode, the
light next to the programmed button will be red.
Pressing the Change button will let you toggle the
mode between "Normal" and "Override."
You can optionally use the Set All: Normal and Set
All: Override options at the bottom to set all your call
20
Page 31

flow controls to either "Normal" or "Override" mode.
Call Forward App
Enabling Call Forward
Press the Call Forward button.
From here, enter a number that you want calls
forwarded to and press the Done button.
You can now see that Call Forward is enabled with the
number you just defined. You can press
the Change button to toggle this back to
disabled.
As you can see, the Call Forward option is currently
disabled. You can press the Select button to change
this.
Setting Presets
Inside the "Call Forward" application, press
the Presets button.
From here, you can highlight options for Home, Cell
and Office. Then, press the Change button to edit or
21
Page 32

define your presets.
view.
Enter in the number and press
the Done button.
From here you can choose any specific conference
room to manage by using the up/down arrow keys and
pressing the Select soft key.
You can also see at a glance how many callers are in
any specific conference room and use the Dial soft key
to call in to the conference room.
Conference Room App
Viewing Conference Rooms
Pressing the Conference soft key will bring up a list of
all conference rooms that you have permissions to
Managing Conference Attendees
Once you enter a conference room to manage it, you
should see a screen like this. From here you'll see a list
22
Page 33

of callers that are in the conference room.
You can then kick or Mute the caller who is currently
highlighted. You can also unmute a muted caller.
Viewing Contact Groups
Pressing the Contacts button will bring up a list of all
contact groups created inside the Contact Manager
module.
From here you can see there are 3 groups:
Employees- In this example, this is an "Internal
Group".
Vendors- In this example, this is an "External
Group".
User Manager- This is a default group that provides
all users and cannot be deleted or modified.
Now you can see this caller has been muted by the
appearance of "(M)" in front of the caller's name.
Additionally, pressing the Refresh soft key will update
the list of callers in the conference room from your
PBX.
Contacts App
Dialing Contacts
You can press the Select button to view the users in
that group. In this example, we are selecting
"Employees."
23
Page 34

You can now view information like his or her title,
company and email address.
search criteria.
Searching For Users
From the home page of the Contacts application, press
the “Search” button.
Next, enter in your search criteria and press “Done”.
Complete the call or view details similar to the
example above.
Do Not Disturb App (DND)
Press the DND button on your phone.
From here you can see the Enabled field is set to "No."
You'll then see all of the users that start with your
24
Page 35

Pressing the Change button will change
the Enabled field to "Yes."
Queue Agents App
Overview
Pressing the Queue Agents button will show you a list
of queues you can log into and log out of. Only queues
in which you are set up as a dynamic agent will be
displayed. The PBX GUI Queues module is used to
configure static vs. dynamic agents.
For each queue you can see the following options:
Logging Into a Queue
You will see a” (-)" in front of any queue you are
allowed to log into. This means the queue is set up to
allow you to log in as a dynamic agent, but you are not
currently logged in.
Highlighting that queue and pressing
the Login/out button will log you in.
(-) - Not logged into queue.
(+) - Logged into queue as a dynamic agent, which
means you can also log out at any time.
(X) - Logged in as a static agent, which means you
cannot log out.
(P) - Logged into queue, but paused.
Logging Out of a Queue
You will see a "(+)" in front of any queue that you can
log out of. This means the queue is set up to allow you
to log in as a dynamic agent, and you are currently
25
Page 36

logged in as a dynamic agent.
Highlighting that queue and pressing
the Login/out button will log you out.
Highlighting that queue and pressing the (Un)
Pause button will pause you.
Unpausing Yourself In a Queue
Any queue you are logged in to, in which you are
currently paused, will be shown with a "(P)" in front of
the queue.
Pausing Yourself In a Queue
In any queue you are logged into, whether as a
dynamic or static agent, you can pause yourself at any
time. This would be any queue that currently shows
a "(+)" or "(X)" next to the queue.
Highlighting that queue and pressing
the (Un)Pause button will unpaused you.
When the All Queues option is highlighted, when you
press either the Login/out or (Un)Pause button, the
action will affect all queues. So to pause yourself in all
queues, highlight All Queues and press
26
Page 37

the (Un)Pause button.
Call Queues App
Press the Queues button on your phone.
With the Queues Application, you can see the
following details for each queue:
Callers - Number of callers waiting in queue.
Members - Number of agents logged into the queue.
Hold Time - Average hold time for callers since last
reset of queue stats as defined in the Queues module of
your PBX GUI.
Completed - Number of calls that were completed to
an agent since last reset of queue stats as defined in
the Queues module of your PBX GUI.
Abandoned - Number of calls that were abandoned by
the caller since last reset of queue stats as defined in
the Queues module of your PBX GUI.
Viewing Details of a Queue
Pressing the Queues button will bring up a list of
queues that you are allowed to view and manage.
Pressing the Details button for any queue will bring up
the details of the queue.
You can then press the Callers or Members button to
view information about waiting callers or logged in
members.
Viewing Callers Waiting in Queue
Pressing the Callers button for a queue will bring up a
list of all callers waiting in queue.
27
Page 38

Pressing the Pickup button will allow you to steal that
specific caller that is highlighted out of the queue.
Your phone will then ring.
Managing Agents in a Queue
Pressing the Members button will show you a list of
all agents who are logged into the queue.
Pressing the Logout button will log out the highlighted
agent from the queue.
Any member with a "(X)" or "(+)" can be paused.
Any member that is currently paused will be marked
with a "(P)" and can be unpaused.
Any member with a "(+)" can be logged out of the
queue, since they are a dynamic member.
Any member with a "(X)" cannot be logged out, as
they are a static agent and can only be paused or
unpaused.
Pressing the (Un) Pause button will toggle the
highlighted agent between paused and unpaused.
Find Me App
Overview
Press the Follow Me button.
Here, you can manage the following Follow Me
settings:
Enabled: Yes or No
Group List: The list of numbers that will be called as
part of your Follow Me
28
Page 39

Initial Ring Time: How long to ring your extension
directly before calling the list of numbers in your
Follow Me phone numbers list
Ring Time: How long to ring the numbers in your
Follow Me phone numbers list
Confirm Calls: If you are going to be dialing external
numbers and want to make sure a voicemail or
answering machine does not answer the call, enable
this option
option.
You can scroll through the group list and see all the
numbers that will be called as part of your Follow Me.
You can then add a new number by pressing the Add
New button.
Enabled
You can select the Enabled option and press
the Change button to toggle between Yes or No. If set
to No, inbound calls to your extension will NOT be
sent to your Follow Me.
Adding Phone Numbers to a Follow Me List
You can edit and add any numbers you want to be
dialed when activating your Follow Me. Select
the Group List option and press the Change button to
edit this
You'll be prompted with a text box to enter the number.
Enter the number the same way you would dial it from
your phone and press the Done button when done.
You should now see the number you just added to your
Group List. Press the Back button to return to the
previous
29
Page 40

screen.
Managing Confirm Calls
Below Confirm Calls is not enabled. Highlight this
option and press the Change button to enable it.
Initial Ring Time
Highlight the Initial Ring Time option and press
the Change button.
Here you can choose how long you want the PBX to
call your normal extension (up to 60 seconds) before it
calls the phone numbers in your Group List. Set this
to 0 if you do NOT want the system to call your desk
phone first. Remember, you can include your own
extension in your Group List of numbers to be dialed.
Enter a value between 1 and 60 seconds.
When "Confirm Calls" is enabled, the system will
prompt any external numbers that are dialed from your
Follow Me with an option to press 1 to accept the call.
This will prevent your cell phone's voicemail from
answering the
call.
Login and Logout App
You would use Login and Logout to Hot Desk you
extension to a desk you share with someone else, or
you have moved to a different desk. Hot Desk only
works with similar phone types, S500 to S500, S700 to
S700.
Once the time is entered, press the Done button.
30
Page 41

Logging Out a User from Your Phone
Press the Login/Logout application button on the
device.
You'll then see options to "Login" or
Logout".
Logging In a User from Your Phone
Highlight the Login option and press the Select button
to log another user in as a new device.
You will be prompted for your extension and
password. The password by default is your voicemail
password. If you do not have a voicemail box set up on
your account, you would use the "User Password" as
defined in the End Point Manger Global Settings,
(111111). You can also optionally use the Admin
password as defined in the End Point Manger Global
Settings, (222222), to log in any phone without
knowing the voicemail password.
Highlight Logout and press Select to log the user out
of the phone.
Press the Done button when you're finished.
Parked Calls App
Viewing and Retrieving Parked Calls
Pressing the Park button while not on a call will
display a list of parked calls. You can see the caller ID
of the person parked and how long they have been
31
Page 42

parked for.
From here you can pick up any specific parked call by
using the up/down arrow keys and pressing Dial. You
can also use the Refresh button to update the list.
Presence App
Viewing your Current Status
Press the Presence Application on your phone.
You will be shown your currently active status. In our
example below, you can see this user's status is set
to Available.
Parking a Caller into your Default Lot
While on an active call, you can press the "Park"
button to park the caller. The caller will be parked into
the default parking lot for your user.
Changing your Current Status
Press the Select button to change your current status.
32
Page 43

Here, you can see the currently active status has a * in
front of the text, such as *Available.
Scroll down to the status you want to set and press
the Select button. This will change your status to your
newly selected status.
Nothing: The system will not enable DND or Follow
Me, and calls will route no differently than if you had
no status set.
Follow Me: The system will enable your Follow Me
until you change to a status that is told to "Do Nothing"
or enable "DND."
DND: The system will enable your Do Not Disturb
until you change to a status that is told to "Do Nothing"
or enable "Follow Me."
Pressing the Prefs button will bring up a list of all
statuses, along with the current preference for each
status.
You can now see your presence is set to Away.
Changing your Preferences for When a Status is
Active
In our example, you can see that Away is told to
enable Follow Me, and DND is told to enable DND.
Scroll to the status you would like to set a preference
for, and press
Inside the Presence Application, you can control your
preferences for what will happen when you set a status.
For each status type you can set:
33
Page 44

the Change button.
In this example, we are going to highlight the Follow
Me preference and press the Select button.
scheduled time change. From there on, the time
condition schedule will take over. In our example the
override would kick in until 5:00PM, then at 5:00PM
the normal schedule will keep the system in
Unmatched mode, since that is what the schedule was
set up to do.
Permanent Override (Matched or Un-Matched) For example, it's 4:00 PM on a Thursday. Your normal
time condition rule says to put the system in
Unmatched (night) mode at 5:00PM, but you want to
leave early, and tomorrow is a holiday. Your business
will be closed all day on Friday. Setting a "Permanent
Override" (Unmatched) will put the system into
Unmatched (night) mode and leave it in that mode until
you go back into the application and tell it to reset the
override, which will then force the system to use the
automated schedule you created.
Viewing Time Conditions
Press the Time Conditions button on your
phone.
Now the next time you toggle to that status the action
you defined will be taken.
Time Conditions App
Overview
The purpose of the Time Conditions application is to
let you override your normal time condition rules to in
order force a matched or unmatched state. (i.e. "Open
for Business" vs. "Closed for Business" or "Day" vs.
"Night.")
There are two types of
overrides, Temporary and Permanent.
Sample Use Cases
Temporary Override (Matched or UnMatched) -
For example, it's 4:00 PM on a Friday. Your normal
time condition rule says to put the system in
Unmatched (night) mode at 5:00PM, but you want to
leave early. Setting a "Temporary Override" will put
the system into Unmatched mode (night) until the next
After launching this application, you can see a list of
all the time conditions you have permissions for. It will
show the name and feature code, and current override
state of the time condition (if set).
34
Page 45

Overriding Time Conditions
For any time condition, you can pick from the
following options:
Reset Override - Use this option to remove any
overrides currently set. This will tell the system to go
back to the automated schedule immediately.
Temporary Matched - This forces the system to send
all calls to the "Matched" destination of this time
condition that you set up until the next scheduled
automatic change. Once the new automatic scheduled
change happens, this time condition will be back on the
normal schedule that you set up moving forward, and
will not be in override anymore.
Permanent Matched - This forces the system to send all
calls to the "Matched" destination of this time
condition that you set up indefinitely until you
manually tell it to "Reset Override" from this
application or from the Time Condition PBX GUI
module.
Temporary Unmatched - This forces the system to send
all calls to the "Unmatched" destination of this time
condition that you set up until the next scheduled
automatic change. Once the new automatic scheduled
change happens, this time condition will be back on the
normal schedule that you set up moving forward, and
will not be in override anymore.
Permanent Unmatched - This forces the system to send
all calls to the "Matched" destination of this time
condition that you set up indefinitely until you
manually tell it to "Reset Override" from this
application or from the Time Condition PBX GUI
module.
To edit the highlighted Time Condition, press
the Change button.
small
Scroll to the new option you would like and press
the Select button.
To change the override for all time conditions globally,
you can use the Set All button and the change will be
applied to all the time conditions you have access to.
From here, you can see this Time Condition is
currently set to Reset Override as indicated by the
COS to Restrict Which Toggles a User Can See
If you purchased and set up Class of Service
restrictions, then the user will only be presented with
Call Flow controls that they have permissions to see
when they press the Call Flow button. Please see
35
Page 46

the Class of Service-Admin Guide for more
information on using COS.
Press Select to change your password, then exit when
finished.
Transfer to Voicemail App
Transferring Calls to the Voicemail of Another
Extension
While on a call, press the Transfer to
Voicemail button to transfer the call to the voicemail
of another extension.
Enter in the Extension number and press
the Done button.
To Record You’re Name
Arrow down to Name then the Select key. Use Play
key to hear, the Change key re-record it, and the
Delete key to delete it. Press the Done key to go back
to the previous Menu, or Exit to exit Voicemail
settings
To Record You’re Unavailable Greeting
Arrow down to Unavailable Greeting then the Select
key. Use Play key to hear, the Change key re-record it,
and the Delete key to delete it. Press the Done key to
go back to the previous Menu, or Exit to exit
Voicemail settings.
To Record you’re Busy Greeting
Arrow down to Busy Greeting then the Select key.
Use Play key to hear it, the Change key re-record it,
and the Delete key to delete it. Press the Done key to
go back to the previous Menu, or Exit to exit
Voicemail settings.
Viewing Voicemails
This icon at the top of your phone screen will show
you that you have a voicemail(s)
The call will now be transferred to the voicemail of the
extension number you defined.
Visual Voicemail App
Setting Up Your Voicemail
Press the Voicemail button.
Then settings. You are presented with a list of options
and Password is automatically selected.
Press the Voicemail button.
From here you can quickly see who left
you voicemails and choose which
messages to listen to first.
A (+) in front of the message indicates the message is
new.
A (-) in front of the message indicates the message is
old.
36
Page 47

If you press the More button, additional options will
appear.
Listening to Voicemails
You can press Select to find out more information
about the voicemail message that was left.
The following will be displayed on this screen:
Name and number of who left the message.
Length of voicemail message.
Date the message was left.
Time of day the message was left.
You now see options to Toggle this voicemail from
unread to read or vice versa, and an option to
edit Settings.
Lastly, you can press the Play button to listen to your
voicemail.
The message will now play over your device.
User Control Panel
The user control panel is a way for users to control call
handling and personal settings from a web
37
Page 48

browser. You can login to the User Control Panel by
pointing your browser to the IP Address of your PBX
and picking the User Control Panel
Option. Administrators can login using the admin
username and password that is used to access the
FreePBX Administration section. Individual users can
login using their extension number and voicemail
password.
Usage
The Login Screen is where you enter your user name
and password. Normally your extension number and
voice mail password.
Home Page
The Home page is where we land each time we log into
UCP. From here you can access your Call History,
Conference Rooms, Device Management, FAX
management, Presence setting for your extension,
Settings like Follow Me and DND, and Voice Mail
messages. To the top right of your Home Page
For each Call record we have the following
Date- Date and Time call was received or placed.
Description-For each call we have the following icons
under the Description
Duration- Length of call in Hours- Minutes-Seconds
Controls- If the call has a Call Recording associated
with it you will get a play and download icon for the
Call Recording.
You can search for any call by using the Search bar at the
top and putting in the number of the person you called or
who called you and pressing GO Duration- Length of call
in Hours- Minutes-Seconds
You can search for any call by using the Search bar at
the top and putting in the number of the person you
called or who called you and pressing GO
Call History
The Call History section allows you to see all inbound
and outbound calls for your user and listen to any call
recordings that are associated with that call.
Conferences – UCP
Usage
Empty
When the conference room is empty you will see the
page below
38
Page 49

Users Present
When users are present you will see users and be able
to perform various actions on those users
Mute User
To mute a user click the "speaker" icon next to their
name.
Kick User
To remove a user from the conference click the "X"
next to their name. The system will inform them they
have been kicked then drop them.
Settings
Leader Wait
On this tab you can change settings for the chosen
conference room.
User Pin
You can require callers to enter a password before they
can enter this conference. Leave this blank for none
Admin Pin
Enter a PIN number for the admin user.
Join Message
Wait until the conference leader (admin user) arrives
before starting the conference.
Talker Optimization
Turns on talker optimization. With talker optimization,
Asterisk treats talkers who are not speaking as being
muted, meaning that no encoding is done on
transmission and that received audio that is not
registered as talking is omitted, causing no buildup in
background noise
Talker Detection
Sets talker detection. Asterisk will sends events on the
Manager Interface identifying the channel that is
talking. The talker will also be identified on the output
of the meetme list CLI command.
Quiet Mode
Quiet mode (do not play enter/leave sounds)
A message to be played to the caller before joining the
conference.
User Count
Announce user(s) count on joining conference
39
Page 50

User Join/Leave
Announce user join/leave
Music On Hold
Enable Music On Hold when the conference has a
single caller
Inbox- These are faxes that have not been viewed yet.
Archived- These are faxes that you have viewed but
not deleted.
Outgoing- Faxes that are in progress of being sent.
Sent- Faxes that have successfully sent.
Failed- Faxes that were sent and failed out.
For each fax we can see the following;
Date- Date Fax was received to sent.
From- The Caller ID who sent the fax
To- The number or extension the fax was sent to.
Status- The status as reported by Asterisk of the fax.
Pages- Number of pages Asterisk reports the fax is.
Controls- Controls for this fax
View the fax
Music On Hold Class
Music (or Commercial) played to the caller while they
wait in line for the conference to start. Choose "Inherit"
if you want the MoH class to be what is currently
selected, such as by the inbound route.
Allow Menu
Present Menu (user or admin) when '*' is received
('send' to menu)
Record Conference
Record the conferences.
Mute on Join
Mute users when they enter the conference
Fax - UCP
Viewing Faxes
Download the fax onto your computer
Forward the fax to another number
Delete the fax from the system.
Sending Faxes
To send a fax choose the "Send New Fax" option at the
top
Faxes can be filed under the following Folders
40
Page 51

From here define the Fax Number we are sending the
Fax to.
We can now optionally include the Fax Cover
sheet. Please see the Fax Configuration module in
your PBX Admin GUI on how to setup the
Company wide Cover Sheet.
Either drag the documents you want to fax or use the
"UPLOAD DOCUMENT" button. You can upload 1
or more documents and as they are uploaded they will
be listed under the Files Section.
Press Send when done to send the fax. To view the
status of any pending outbound fax click on the
Outgoing mailbox.
41
Page 52

When a Fax has successfully been sent it will be
moved to the Sent Folder. If it fails to send after all the
retries have been exhausted it will be moved to the
Failed Folder.
Fax Settings
To manage the Fax settings related to your user press
the Settings Option in Fax.
1- Try 1 time resending a failed fax.
2- Try up to 2 times to resend a failed fax.
3- Try up to 3 times to resend a failed fax.
Use Global- Use the settings that is defined globally in
the Fax Module in the PBX Admin G
Coversheet Name- Your personal name to be
displayed on the Coversheet as to who the fax came
from.
Coversheet Email- Your personal email to be
displayed on the coversheet as who the fax came from.
Email Results- On outbound fax do you want a email
of the results.
Never- Never send email on results of outbound fax
Always- Always send email on results of outbound fax
On Success-Only send email if fax is successful
On Failure- Only send email if the fax fails on sending
after all retires have been exhausted.
Use Global- Use the settings that is defined globally in
the Fax Module in the PBX Admin GUI.
Retries- If a outbound fax fails to get confirmation on
being successful how many times do you want to retry
to send the fax.
0- Don't try and retry sending the fax.
Presence - UCP
Changing your status
View the wiki here on how to change your presence on
the fly anytime.
Usage
For any given setting you can automatically set a
presence state or choose to do nothing.
Available states are set by the PBX administrator in
the Presence State Module.
42
Page 53

On UCP Login Set Status To
When you log in to the User Control Panel perform the
selected action
DND
When in DND do the following
On Browser Close or UCP Logout Set Status To
When you close your browser (or tab) for the User
Control Panel or Log off perform the selected action
Automatic Actions based on status type
On a change to the selected status type you can have
the system enable certain modes such as "Do Not
Disturb" or "Find Me/Follow Me"
Extended Away
When Extended Away do the following
Unavailable
Follow Me Settings - UCP
Usage
Find Me/Follow Me
Available
When available do the following
Chat
When in Chat do the following
Away
When Away do the following
Enable
Should Find Me/Follow Me be enabled for this user
Follow Me List
List extensions to ring, one per line. You can include
an extension on a remote system, or an external
43
Page 54

number by suffixing a number with a pound (#). ex:
2448089# would dial 2448089.
Announcement
Message to be played to the caller before dialing this
group.
Ring <Exten> First For
This is the number of seconds to ring the primary
extension prior to proceeding to the follow-me list. The
extension can also be included in the follow-me list. A
0 setting will bypass this.
Ring Follow-Me List For
Time in seconds that the phones on the follow me list
will ring. The number of rings will depend on region.
Example: If a phone rings for 1 second then waits 2,
each ring is 3 seconds.
Call Forwarding
Whether or not to forward calls in a given state. Check
the box and enter the destination in the text field.
Use Confirmation
Enable this if you're calling external numbers that need
confirmation - eg, a mobile phone may go to voicemail
which will pick up the call. Enabling this requires the
remote side push 1 on their phone before the call is put
through. Example "Press 1 to accept.
Remote Announce
Message to be played to the person RECEIVING the
call, if 'Confirm Calls' is enabled
Too-Late Announce
Message to be played to the person RECEIVING the
call, if the call has already been accepted before they
push 1.
Call Forward Ring Timer
Number of seconds to ring prior to going to voicemail
or other fail over destinations that may be setup by an
administrator on this account. The Always setting will
ring the call forward destination until answered or the
caller hangs up. The Default setting will use the value
set in Ring Time. Your setting here will be forced to
Always if there is no Voicemail or alternative fail over
destination for a call to go to.
Unconditional
Forward calls immediately regardless of current state
of line/PBX to the number entered.
Unavailable
Preconfigured number to which calls are forwarded if
the customer endpoint becomes unresponsive due to an
Internet outage or software/configuration failure of
endpoint
Busy
Preconfigured number to which calls are forwarded if
the customer endpoint is busy, usually due to being on
an active call
44
Page 55

Do Not Disturb
Used to indicate that this user does not wish to be
disturbed.
In their settings you will see SIPStation SMS DIDs,
Check the box next to the desired numbers
Click Submit at the bottom
Call Waiting
A weather this user making a telephone call should be
notified of an incoming call and is able to place the
first call on hold while answering the second.
Where is save button?
All settings are updated and applied in real time. No
need to press save.
SMS - UCP
Sending an SMS
Login to the User Control Panel
On the top right click on the colored dot.
Click New SMS
A pop-up will appear
This feature requires SIPStation Service
This feature requires FreePBX 12 and UCP
This feature requires the SIPStation module
This feature requires the SMS module
Enabling a User to send or receive SMS's
Log in to the FreePBX UI
On the top menu click Admin
In the drop down click User Management
In the right navigation pane click on the user you wish
to edit.
45
Page 56

In the From drop down there will be a list of numbers
available to this user
Choose the number you wish to send your SMS from.
In the To box put in the Destination number.
Press INITIATE
This will open a chat box. Note: this box will also
appear if you receive a SMS while logged in.
Receiving SMS Messages
When a user sends a TXT message to a number that is
assigned to you. You will get a chat style box when
logged in.
You may now interact with the message as if it were
any other chat.
You can then respond as any other chat conversation
and the user will receive your message as a text
message.
46
Page 57

If you are Not logged in your messages will be under
the SMS tab
You can click the eye icon to view the message
View (eye) the history of the message
Delete (trash) the message
Voicemail - UCP
Managing Voicemail Messages
You can click on the number under To, to open up the
chat window and respond.
You can click the trash can to delete.
Viewing SMS History
Your SMS History is available in the SMS tab.
SMS Information
In the SMS tab you can do see the following for each
message
Date
Date of when the last SMS was sent or received for this
thread
For each extension we can see all our voicemails.
For each voicemail we can see the following;
Date- Date voicemail was left
Time- Time voicemail was left
CID- Caller ID of who left the voicemail if supplied
Mailbox- Extension number where voicemail was left
Length- Length in Mins and Seconds of the message
Controls- For each message we can choose any of the
following Controls
While playing a voicemail you can use normal player
controls to pause, fast-forward and rewind the message
inside your browser.
From
What DID of yours the SMS thread was from
To
Who the message thread was to. Clicking on the To
Number will bring up the SMS box to allow you to
reply to the SMS.
Controls
On the left side are a list of folders that voicemails can
be moved to. Clicking on any folder will bring up the
47
Page 58

voicemails inside that folder.
Settings is where we can manage the following options
for our voicemail box.
Pin/Password- The password for our voicemail box.
Email Address- Email address if defined where to
send voicemails to.
Play CID- Play the Caller ID of who left the voicemail
anytime you listen to the voicemail
Play Envelope- Play the date and time stamp of when
the voicemail was left anytime you listen to the
voicemail.
At any time you can drag a voicemail from any folder
into any other folder and the message count next to
each folder will auto update.
Managing Voicemail Settings.
On the left side of our voicemail section we have a
option called Settings.
Anytime you make a change there is no save button. All
changes are instant and a greenbox will show up informing
48
Page 59

you your changes have been saved
Managing Voicemail Greetings.
On the left side of our voicemail section we have a
option called for Greetings
Busy- The greeting that is played to callers when
you are not available to take their call and you are
on another call already.
Name- This is a recording of your name and used
mainly for things like the Company Directory and
other modules.
Temp- A Temp greeting when recorded will be
played instead of the Unavailable or Busy
greeting. When you delete the greeting your other
greetings will be played again.
For each greeting you can press the Play button to
listen to the Greeting.
Greetings are where we can control the
announcement that is played to callers with our
personal message. Your PBX has the following
types of greetings.
Unavailable- The greeting that is played to callers
when you are not available to take their call and
they go to your voicemail box.
You can press the Green "UPLOAD GREETING"
button to upload a new audio file for your greeting or
you can drag your audio file from your computer into
the "Drag A NEW GREETING HERE" box to upload
a new greeting.
Pressing the red "DELTE" button will delete the
voicemail greeting.
Pressing the Red "RECORD GREETING" button will
prompt you to enable your Mic on your compute and
let you record your greeting.
Press Save once done recording and your new greeting
will be saved.
49
Page 60

If you would like to copy your unavailable greeting to
also be your busy greeting simply drag the Unavailable
Greeting to the "Drag Box" of the Busy greeting as
shown below.
50
Page 61

References
Lewis, Tony. Phone Apps. 27 December 2016. 21 April 2017.
Schilleman, Mike. Sangoma Phone User Guide. 06 April 2016. April 2017.
2
 Loading...