

Page 1

http://www.elastix.org
Sangoma Europa Vega 50 BRI
and Elastix Server
Setup Guide
http://www.elastix.org
and Elastix Server
Setup Guide
Page 2
1.0
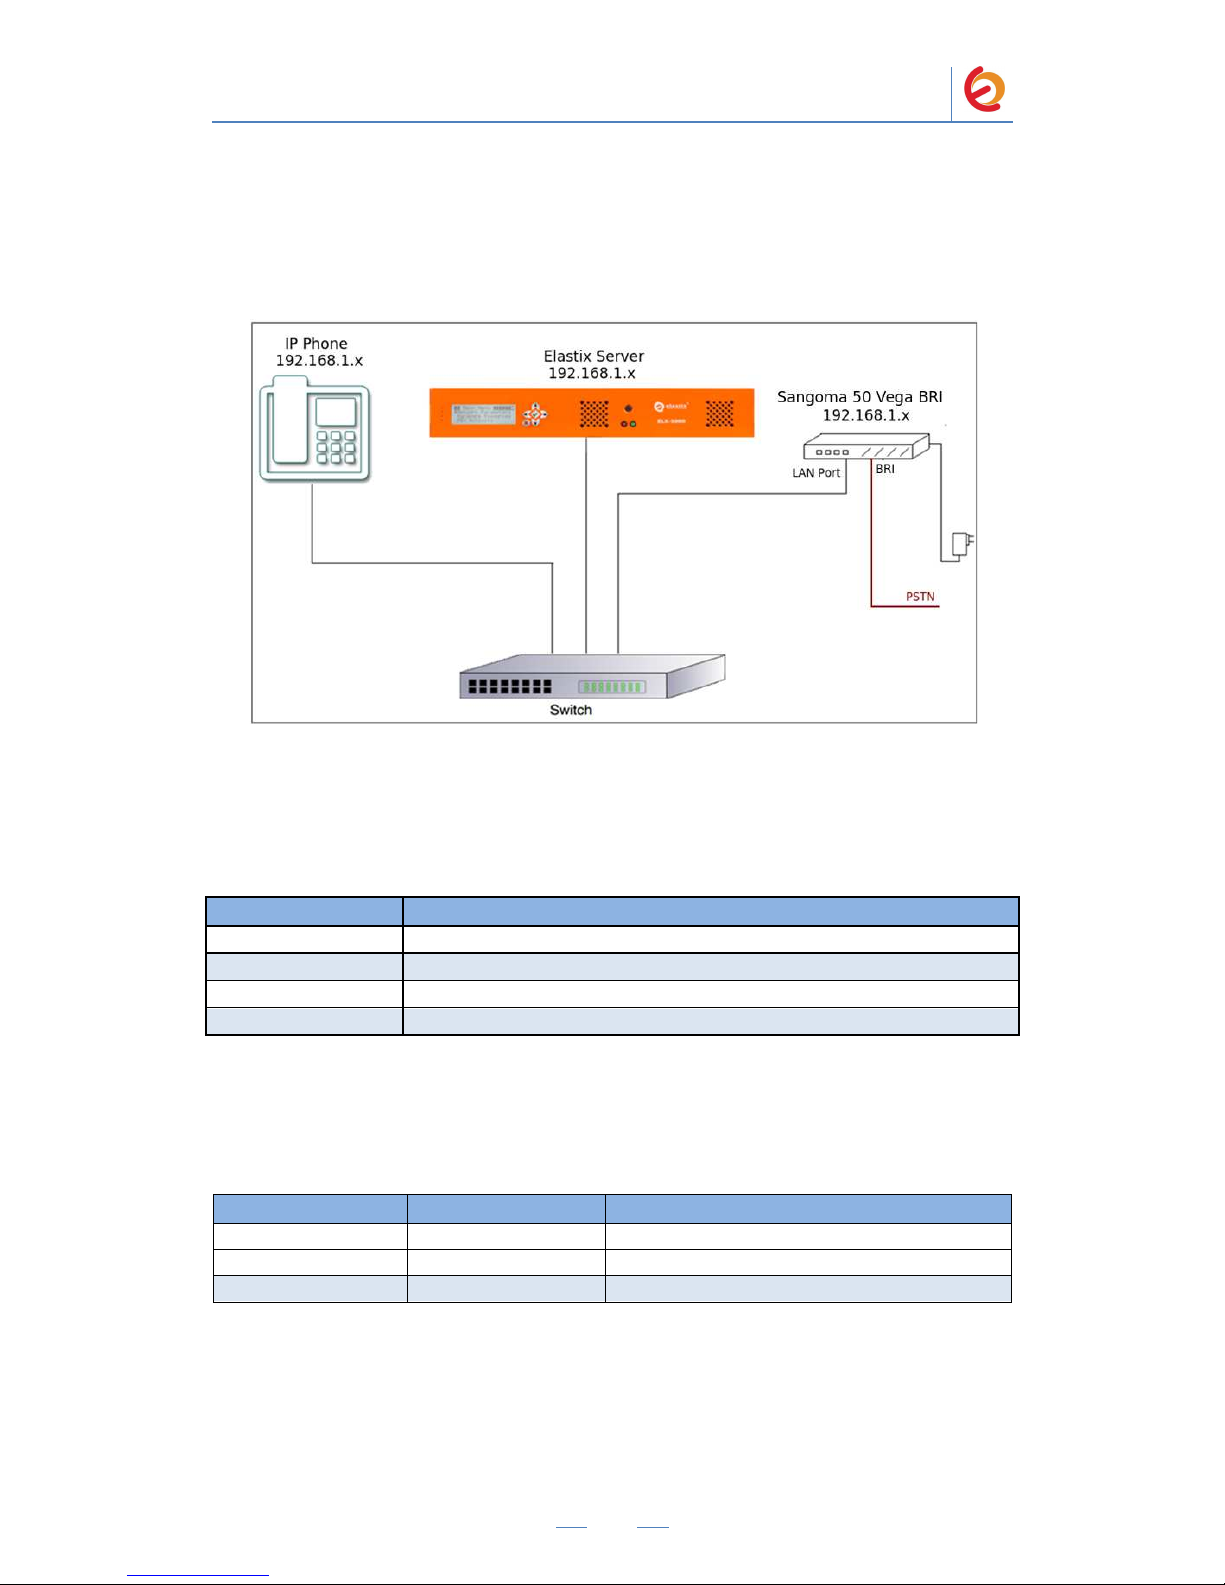
Setup Diagram
Figure 1-1
is a setup diagram for a single
going to
configure a SIP Trunk for communication between the IP Phone
2.0
Host PC Environment
Table 2
Hardware Type
Hardware Version
Software Type
Software Version
3.0
Test Setup Equipment
Equipment
IP
(SIP)
Phone
Sangoma
Switch
PaloS
anto Solutions
Sangoma Europa Vega 50 BRI Server Setup Guide
2
Vega 50 BRI gateway
configuration.
Figure 1-1. Setup Diagram
-1. Host Server Environment Details
Description
Elastix Appliance ELX
-
Series
ELX-3000
Elastix
2.3
Table 3-1. Test Setup Equipment
Model Version
N/A N/A
Vega 50
FW:
R086S031
N/A N/A
We’re
and PSTN.
Page 3
PaloSanto Solutions
Sangoma Europa Vega 50 BRI Server Setup Guide
3
4.0 Setup Procedure
To set up the Elastix Server for the Vega 50
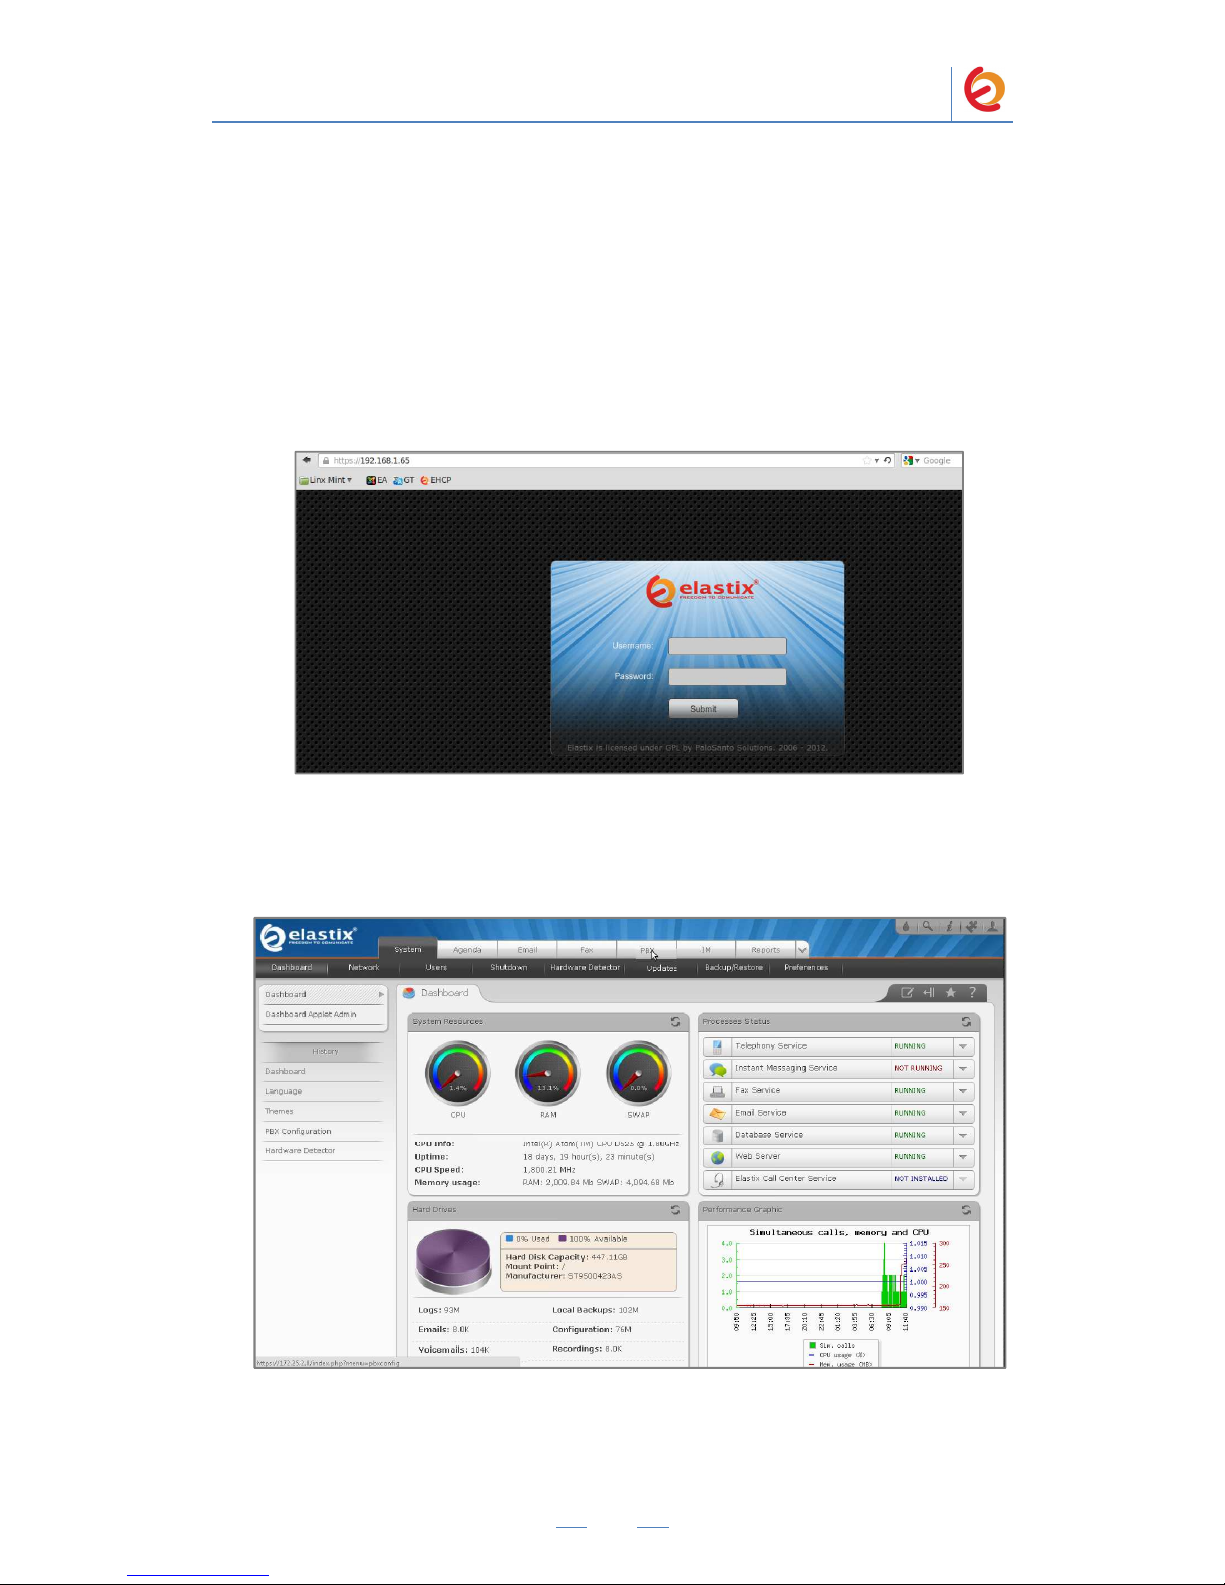
1. Go to the web address of the Elastix Server Login page. The web address is
determined by the customer, for this guide we have used the IP address 192.168.1.65
2. On the Login page, type the username and password for an administrative user into
the Username and Password fields, see Figure 4-1. The username and password are
determined by the customer.
Figure 4-1. Login
3. Press Enter or click on the Submit button to go to Elastix’s Dashboard
4. Once inside, click on the PBX tab on the menu at the top of the screen
Figure 4-2. Dashboard
Page 4
PaloSanto Solutions
Sangoma Europa Vega 50 BRI Server Setup Guide
4
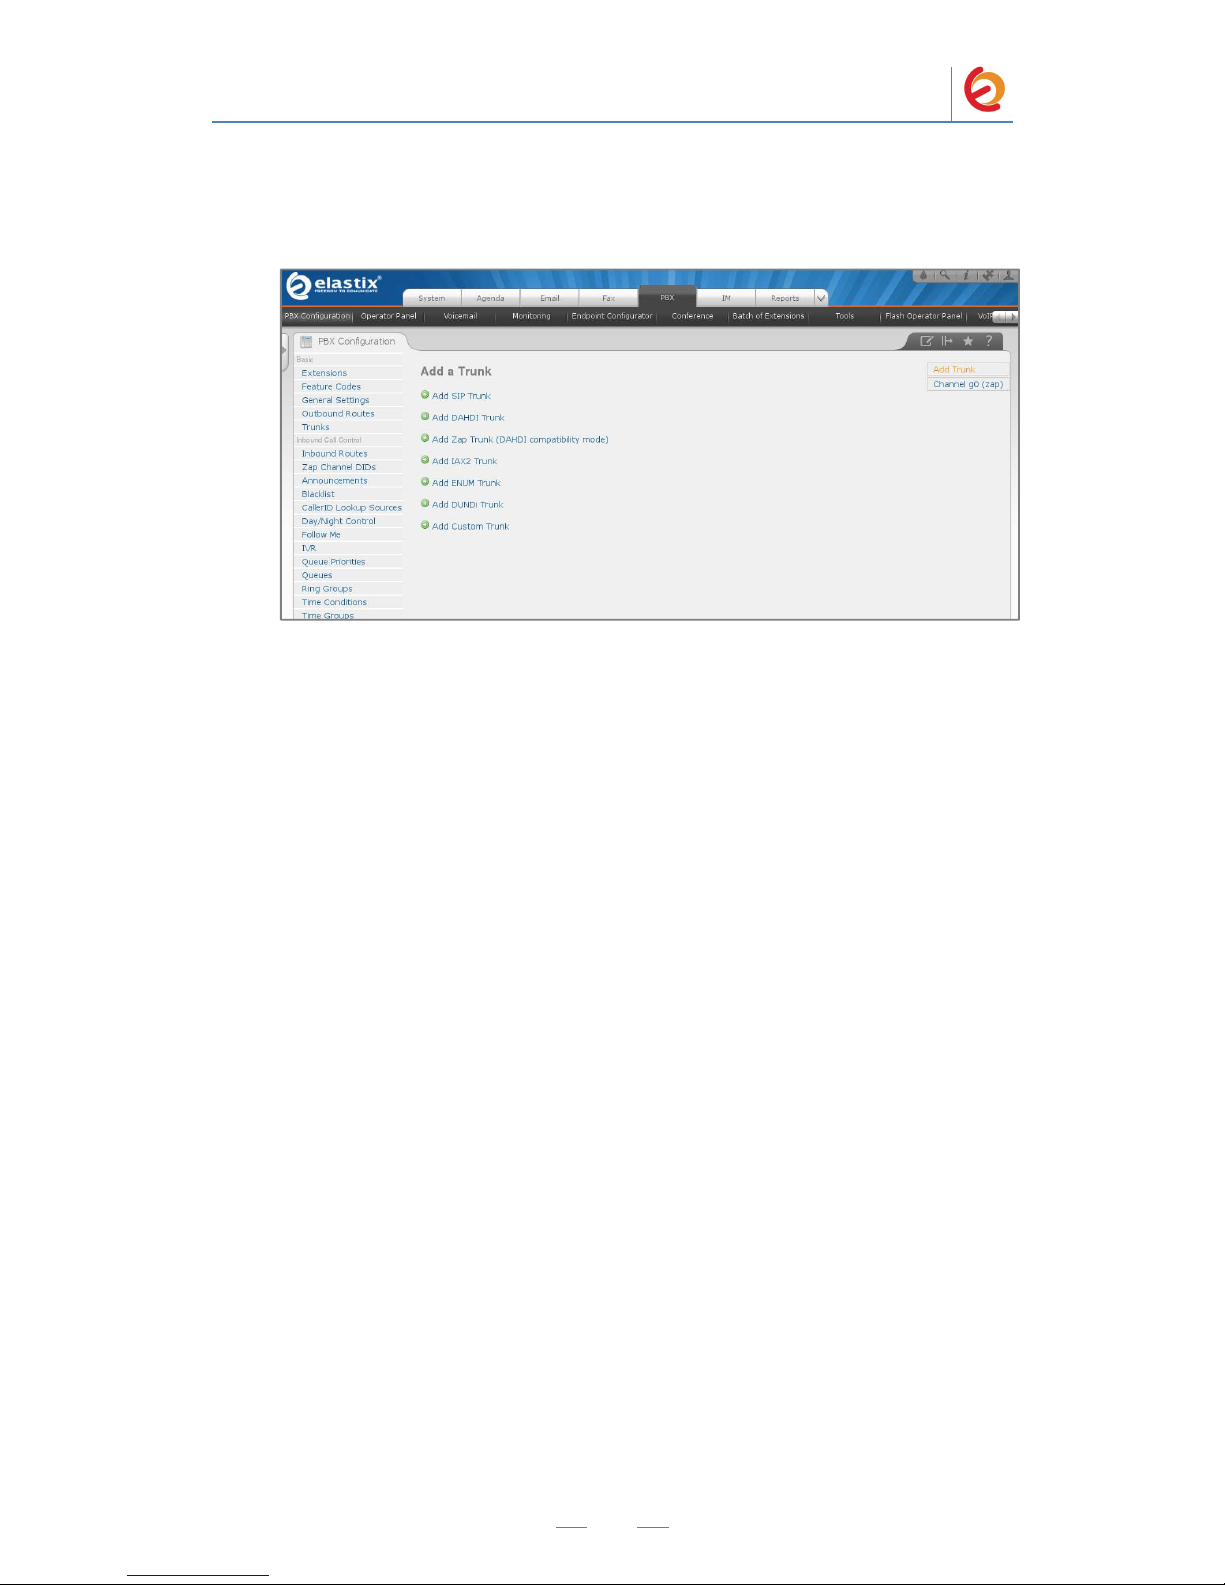
5. Go to “PBX Configuration => Trunks => Add SIP Trunk”, see Figure 4-3. This will
take you to configure a SIP Trunk.
Figure 4-3. Add a SIP Trunk
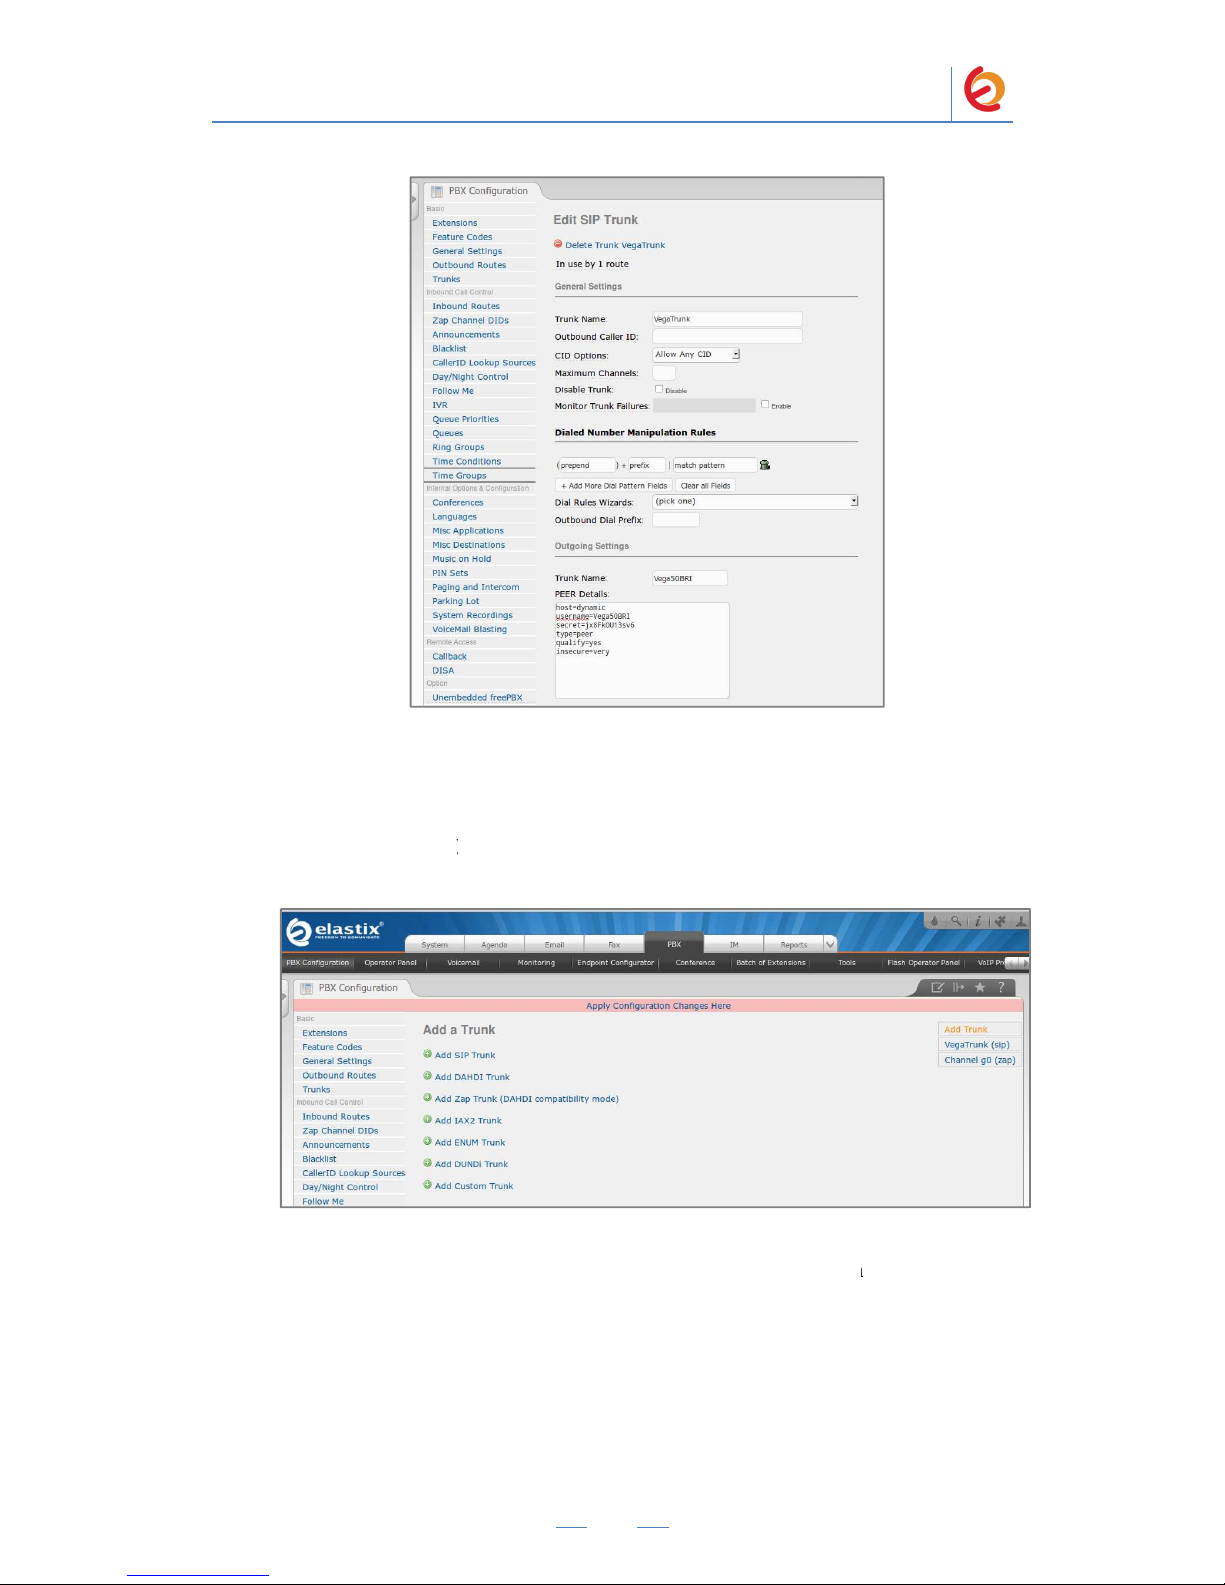
6. On the “Add SIP Trunk” page (Figure 4-4), fill in the following information:
General Settings
• Trunk Name: (VegaTrunk in this example)
Outgoing Settings
• Trunk Name: (Vega50BRI in this example)
• Peer Details:
host=dynamic
username=(Vega50BRI in this example)
secret=( jx8FkOU13sv6 in this example)
qualify=yes
type=peer
insecure=very
Page 5
7.
Click on the ‘Submit’ button at the end of the page
and you will see the page on Figure 4
Here” pink ribbon
on top of the screen.
8. Click o
n the “Apply Configuration Changes Here” link
Figure 4
9. With this you have finished creating a SIP
register with the Elastix Server.
Routes” to configure the outbound route to
information: (
Figure 4
Route Settings
PaloS
anto Solutions
Sangoma Europa Vega 50 BRI Server Setup Guide
5
Figure 4-4. Add SIP Trunk
. The
SIP Trunk
-5 displaying the “
Apply Configuration Changes
-5. Apply Configuration Changes Here
Trunk
that will be used by the
Now, go to “PBX =>
PBX Configuration =>
the Vega 50 Gateway.
Fill in the following
-6)
will be created
Vega 50 to
Outbound
Page 6

•
Route Name:
Dial patterns
• Prefix: (“8
” in this example) |
Trunk Sequence for Matched Routes
• 0: (“Vega
Trunk
10. Click on “
Submit
extension for an IP Phone. Go to “PBX =>
click on “Submit” having the “Generic SIP Device” option selected. (Figure 4
11. Fill in the following information on the Add SIP Extension page (Figure 4
PaloS
anto Solutions
Sangoma Europa Vega 50 BRI Server Setup Guide
6
(“8_Vega” in this example)
Match pattern:
(“.” in this example)
” in this example)
Figure 4-6. Add Route
” at the end of the page and Apply changes
. Now, we’ll create an
PBX Configuration => Extensions” and
Figure 4-7. Add SIP Extension
-7)
-8):
Page 7

•
User Extension
•
Display Name
• secret (‘
h7Dka3Rf9si0t
12. Click on “Submit” at the end of the page and Apply changes. C
incoming calls to Elastix.
Click on “Add IVR” link (Figure 4.
• Name:
Name of IVR (WelcomeIVR in this example)
•
Announcement:
• Options:
o * - P
hone book
o 0 -
302 Ext
o t -
Repeat the options of IVR (Add this option by modifying the IVR
after creation)
PaloS
anto Solutions
Sangoma Europa Vega 50 BRI Server Setup Guide
7
(302 in this example)
(‘IPPhone’ in this example)
’ in this example)
Figure 4-8. Add SIP Extension
reate an IVR for the
To do this, g
o to “PBX => PBX Configuration => IVR”.
9). Set the following:
Voice prompt which will be played for incoming calls.
.
ension
Page 8

13
. Click on “Save” and Apply changes by clicking on the pink ribbon that appears at
the top of the page. Now go to “PBX => PBX Configuration
on “Add Incoming Route” link (Figure 4.
• Description:
•
Set destination:
example)
PaloS
anto Solutions
Sangoma Europa Vega 50 BRI Server Setup Guide
8
Figure 4-9. IVR
=> Inbound Routes”. Click
10). Set the following:
Name of inbound route (“Incoming_Calls” in this example)
Where the call will be routed. (“WelcomeIVR” IVR in this
Page 9

PaloSanto Solutions
Sangoma Europa Vega 50 BRI Server Setup Guide
9
Figure 4-10. Incoming Route
14. Click on “Submit” and apply changes. Now when we receive calls the
“WelcomeIVR” IVR will play to the caller giving him choices to interact with Elastix
Server.
15. To configure the gateway, you will need to enter the information from the trunk
created on the Elastix Server into the Vega 50 and set other parameters by logging into
the WebUI.
Go to the Vega 50’s WebUI by pointing your browser to the Vega’s IP address (Figure
4-11).
Figure 4-11. Vega 50’s WebUI
For the initial configuration, refer to the Vega 50 Admin Guide found at:
http://wiki.sangoma.com/Vega-50-Technical-Documentation
Page 10

PaloSanto Solutions
Sangoma Europa Vega 50 BRI Server Setup Guide
10
Factory default settings
LAN1 IP Address
DHCP
LAN1 IP Address (If DHCP no available)
169.254.xxx.yyy
Web Access Administrator User
admin
Web Access Administrator Password
admin
16. When the WebUI is loaded, go to “Quick Configuration” located on the left side of
the page and click on “Continue” button (Figure 4-12).
Figure 4-12. Quick Config
17. Once there, go to “Basic Config” tab and set the following (Figure 4-13):
General
• Country: US
LAN – Physical
• Duplex: Full
Page 11

PaloSanto Solutions
Sangoma Europa Vega 50 BRI Server Setup Guide
11
Figure 4-13. Quick Config – Basic Config
18. Go to “VOIP” tab and set the following (Figure 4-14):
VoIP Routing Mode
• Send calls via a VoIP Service Provider/Proxy (Selected)
VoIP Device Configuration
• Proxy Address: Elastix Server’s IP Address (192.168.1.65 in this example)
• Registrar Address: Elastix Server’s IP Address
• Registration Mode: Gateway
• Registration and Authentication ID: (Vega50BRI in this example)
• Authentication Password: (jx8FkOU13sv6 in this example)
Figure 4-14. Quick Config – VOIP
19. Go to “BRI” tab and click on Ports to see the options. Here you can select which
ports will be set as TE or NT. Every single port has an ID, they are also shown here.
(Figure 4-15).
Figure 4-15. Quick Config –BRI
Page 12

PaloSanto Solutions
Sangoma Europa Vega 50 BRI Server Setup Guide
12
20. To apply the changes click on “Submit” button next to the tabs menu. (Figure 4-
16):
Figure 4-16.Applying changes
21. Click on “Accept”. Now, go to “Status” located on the left side of the page to check
whether the registration was successful (Figure 4-17).
Figure 4-17. Status
22. If the gateway is not registered check you have entered the right information. If it’s
registered, go to “Expert Config” menu on the left side, and click on “SIP”. (Figure 4-
18).
Page 13

PaloSanto Solutions
Sangoma Europa Vega 50 BRI Server Setup Guide
13
Figure 4-18. Expert Config - SIP
23. In the “SIP Profiles” section click on “Modify”, and set From header user info
parameter to Calling party option (Figure 4-19).
Figure 4-19. SIP
24. Click on “Submit” button. Apply changes and save by clicking on the red buttons
(Figure 4-20).
Figure 4-20. SIP
Page 14

PaloSanto Solutions
Sangoma Europa Vega 50 BRI Server Setup Guide
14
25. Once you have save the changes, go to “Dial Plan” located on the “Expert Config”
section (Figure 4.21)
Figure 4-21. Dial Plan
26. Click on “Modify” for “To_SIP” profile. Make the following changes (Figure 4-22):
Source: IF:0301,TEL:<.*>,TELC:<.*>
Destination: IF:9901,TEL:<1>,TELC:(<2>)
This means everything coming from the interface with ID 0301 (see figure 4-15) will be
redirected to interface with ID 9901 (SIP Interface, see figure 4-19). TEL is the called
number and TELC is the calling number. The characters “.*” means that any number is
accepted. In this example we are using only the Interface 1 in the Vega 50 BRI. You can
add more routes as you need.
Figure 4-22. To_SIP Profile
27. For more help using expressions you can take a look on the Regular Expression
Help and Token Help section located below the plans. Once you have edited the plan,
click on “Submit” button and then apply and save changes. Go back to “Dial Plan”, and
Page 15

PaloSanto Solutions
Sangoma Europa Vega 50 BRI Server Setup Guide
15
click on “Modify” button for “To_BRI” profile. Once there, delete the last 3 entries,
keep the first one and make the following changes (Figure 4-23):
Source: IF:9901,TEL:<.*>
Destination: IF:0301,TEL:<1>
This means everything coming from the interface with ID 9901 (SIP Interface, see
figure 4-19) will be redirected to interface with ID 0301 (see figure 4-15). TEL is the
called number. The characters “.*” means that any dialed number is accepted. In this
example we are using only the Interface 1 in the Vega 50 BRI. You can add more routes
as you need.
Figure 4-23. To_BRI Profile
28. Once you have edited the plan, click on “Submit” button and then apply and save
changes.
29. We just need to set the line type for BRI ports. To set this, go to “Expert Config”
and click on “BRI” option. There’s a parameter called Line Type that should be set as
“pp” (Point-to-Point) (Figure 4.24).
Figure 4-24. BRI
Page 16

PaloSanto Solutions
Sangoma Europa Vega 50 BRI Server Setup Guide
16
30. Configure the other IP (SIP) Phone with the correct parameters.
31. At this point, Sangoma Vega 50 BRI Gateway is ready for using. This step
completes the procedure.
 Loading...