

Page 1

Consigli pratici e guida all’uso
del vostro elettrodomestico.
99637441 italien et anglais.qxd 07/07/2005 10:44 Page 1
Page 2

2
99637441 italien et anglais.qxd 07/07/2005 10:44 Page 2
Page 3

Lungo tutto il manuale,
indica le disposizioni per la sicurezza,
segnala i consigli e le astuzie
Come si presenta il suo forno
Descrizione dell’apparecchio P.4
Accessori P.5
Consigli per la sicurezza P.6
Come installare il forno
Collegamento elettrico P.7-8
Dimensioni utili per incastrare il forno P.9
Come utilizzare il forno
Il programmatore nel dettaglio P.10
Come impostare l’ora all’orologio del forno P.11
Come fare una cottura immediata
P.12
Come fare una cottura programmata
P.13
Come fare una cottura ritardata (ora finale selezionata)
P.14
Come fare una cottura Risparmio
P.15
Come utilizzare la funzione “Grill
+
” ?
P.16
Come utilizzare il timer
P.17
Come regolare la luminosità del display
P.17
Modalità di cottura del forno
P.18-19
Come pulire la cavità del forno
Cos’è una pirolisi ? P.20
Quando è necessario effettuare una pirolisi ? P.20
Come fare una pirolisi immediata P.21
Come fare una pirolisi ritardata P.22
Come sostituire la lampadina P.22
Cosa fare in caso di anomalie di funzionamento
P.23
EASY COOK
P.24-30
3
Sommario
IT
99637441 italien et anglais.qxd 07/07/2005 10:44 Page 3
Page 4

4
1
2
3
4
5
T˚
c
1 2 3
5
6
8
7
4
Come si presenta il suo forno
1
2
5
6
7
3
4
Selettore di modalità
Programmatore
Pulsante di regolazione
Selettore di funzioni.
Lampadina
Indicatore di gradino
Foro per girarrosto
Contatto di rilevamento
apertura della porta
DESCRIZIONE DELL’APPARECCHIO
8
99637441 italien et anglais.qxd 07/07/2005 10:44 Page 4
Page 5
5
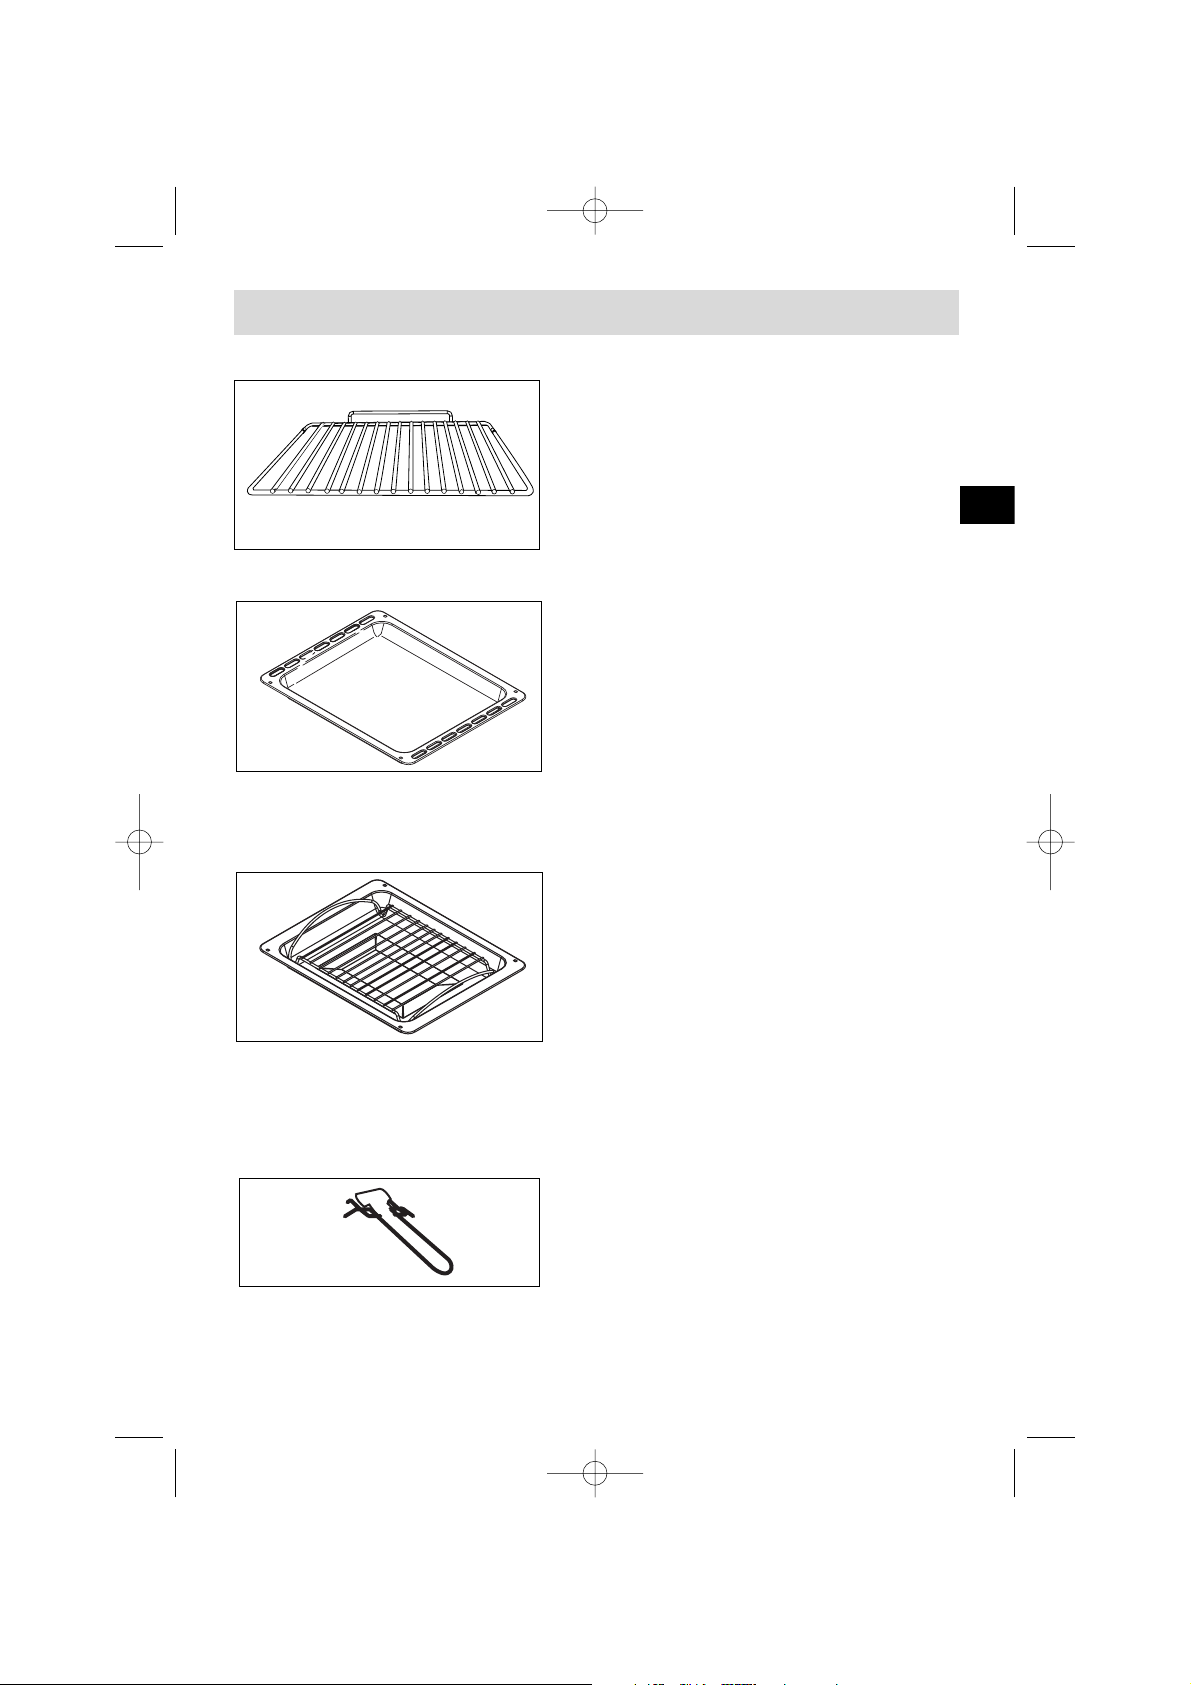
Accessori
Griglia sicurezza
anti ribaltamento
La griglia può essere utilizzata come base
per tutti i piatti e pirofile contenenti alimenti
da cuocere o gratinare. Può essere utilizzata
per le grigliate (da posare direttamente
sopra)
Vassoio multiuso
(dolci)
Serve da teglia per dolci e possiede un bordo
inclinato. E’ da utilizzare per cuocere dolci
come i choux alla crema, le meringhe, i
biscotti, le paste sfoglie...
Evitare di posare direttamente in questo piatto arrosti o carni perchè facilmente
si produrranno degli schizzi sulle pareti del forno.
Vassoio fondo
dotato di griglia supporto
specifica per le grigliate
Serve per raccogliere i sughi e i grassi di
cottura prodotti con il grill forte o grill
ventilato.
Può essere utilizzato come piatto di cottura adattando le dimensioni del pezzo da
cuocere (es: un pollo con le verdure attorno, a temperatura moderata).
Non posare mai questo vassoio direttamente sulla base, se non in posizione
GRILL.
AR
AV
Manico per vassoio fondo
IT
99637441 italien et anglais.qxd 07/07/2005 10:44 Page 5
Page 6

6
Consigli per la sicurezza
La preghiamo di leggere attentamente questi consigli prima di installare
e utilizzare il suo forno. Questo forno è stato progettato per essere utilizzato
per uso domestico e non professionale. E’ destinato esclusivamente alla cottura di
derrate alimentari e non contiene alcun componente a base di amianto
PRIMO UTILIZZO:
Quando utilizza il forno per la prima volta, abbia cura di riscaldarlo a vuoto, a porta
chiusa, per circa 15 minuti su posizione max al fine di “rodare” l’apparecchio La
prima volta può succedere che la lana minerale che avvolge la cavità del forno
sprigioni un particolare odore dovuto alla sua composizione. E’ possibile anche che
fuoriesca una certa quantità di fumo. Non si preoccupi perchè tutto ciò è normale.
UTILIZZI SUCCESSIVI:
- Si assicuri che la porta del forno sia ben chiusa affinchè la guarnizione svolga
correttamente la sua funzione.
Non permetta a nessuno di appoggiarsi o sedersi sulla porta del forno aperta.
- In caso di utilizzo del grill con porta semichiusa, le parti accessibili o le
superfici possono diventare calde. E’ pertanto consigliato tenere lontani
i bambini.
- Durante l’ utilizzo, l’apparecchio diventa caldo. Faccia attenzione a non toccare gli
elementi caldi situati all’interno del forno.
- Dopo una cottura, non prenda a mani nude gli elementi estraibili (griglia,
girarrosto, leccarda, supporto per il girarrosto...), utilizzi una presina o un tessuto
isolante.
- Non ricopra il forno di fogli di alluminio. Altrimenti
si potrebbe creare un accumulo di calore che influenzerebbe in maniera scorretta il
risultato della cottura e danneggerebbe lo smalto.
- Prima di effettuare la pulizia pirolitica del suo forno, tolga tutti gli elementi
estraibili ed elimini lo sporco più grosso.
- Non utilizzare pulitori a vapore o ad alta pressione.
- Durante una pirolisi, le superfici accessibili diventano più calde rispetto al normale
funzionamento. Allontanare i bambini.
- Per qualsiasi intervento di pulizia nella cavità del forno, il forno deve
essere spento.
- Per la sua incolumità il suo forno è dotato di ARRESTO AUTOMATICO
se per sbaglio si dimentica di spegnere il forno. Dopo 10 ore di funzionamento , la
funzione AS (Automatic Stop) si attiva e il forno smette di scaldare. AS viene
visualizzato al posto dell’ora e si udirà una serie di 2 bip successivi per un po’ di
tempo.
Bisogna rimettere il selettore di funzione sullo 0 per riutilizzare
il forno.
99637441 italien et anglais.qxd 07/07/2005 10:44 Page 6
Page 7
7
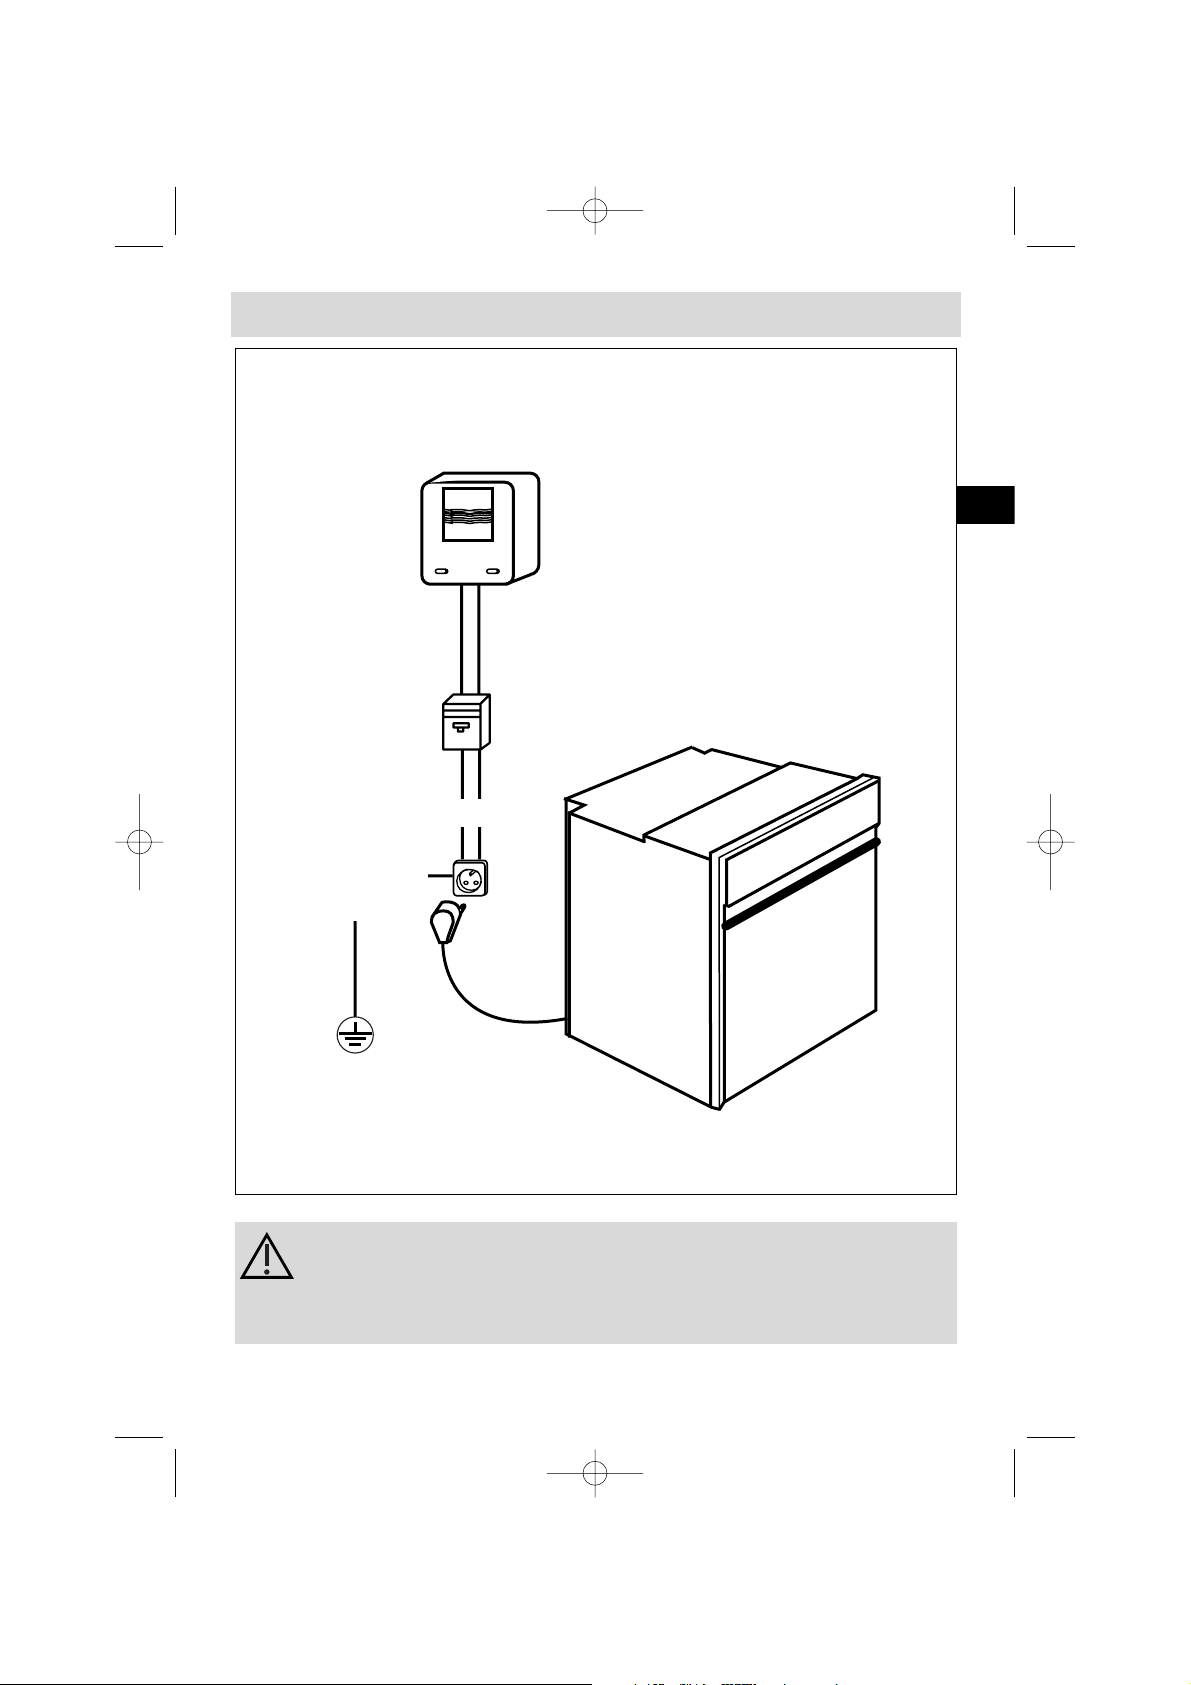
Contatore 20A Mono
220-240 V ~ 50 Hz
Presa di corrente
2 poli + terra
norma CEI 83
Linea Mono 220-240 V ~
Collegamento elettrico
Cavo
d’alimentazione
lunghezza circa
1,50 m
Interruttore differenziale
o Fusibile 16A
Prima di effettuare il collegamento, si assicuri che i fili del suo
impianto elettrico siano di una sezione sufficiente per
alimentare normalmente l’apparecchio (sezione almeno uguale
a quella del cavo di alimentazione).
Il fusibile del suo impianto deve essere di 16 Ampères.
Come installare il forno
IT
99637441 italien et anglais.qxd 07/07/2005 10:44 Page 7
Page 8

8
Come install
In caso di incidente conseguente a inesistente, difettosa o
errata messa a terra, la nostra responsabilità non è coinvolta.
• Il cavo di alimentazione (H05 RR-F, H05 RN-F o H05 VV-F) deve essere abbastanza
lungo per essere collegato al forno ad incastro posto per terra davanti al mobile.
Per fare ciò l’apparecchio deve essere scollegato alla rete:
• Aprire la scatoletta situata in basso a destra del coperchio del retro svitando le
2 viti e facendo roteare la scatola.
• Spelare ogni filo del nuovo cavo di alimentazione per 12mm.
• Torcere accuratamente i fili.
• Svitare le viti dalla morsettiera ed eliminare il cavo di alimentazione da sostituire.
• Introdurre il cavo di alimentazione dalla parte del coperchio nel serra-cavo
situato a destra della morsettiera.
• Collegare i fili del cavo conformemente ai riferimenti riportati sulla morsettiera.
• Tutti i fili del cavo di alimentazione devono essere bloccati sotto le viti.
• Il filo della fase sul morsetto L.
• Il filo di terra colore verde-giallo deve essere collegato al morsetto .
• Il filo del neutro (blu) sul morsetto N.
• Avvitare a fondo le viti della morsettiera e verificare il collegamento tirando ogni filo.
• Fissare il cavo alla metà del serracavo situato a destra della morsettiera.
• Richiudere la scatoletta con le 2 viti.
Installazione e/o sostituzione del cavo di alimentazione
L’allacciamento elettrico va effettuato prima della collocazione dell’apparecchio nel
mobile.
• Il forno deve essere collegato con un cavo d’alimentazione normalizzato a
3 conduttori da 1,5 mm
2
(neutro, fase e terra ) che devono essere collegati ad una
rete di 220-240 V monofasica tramite presa di corrente fase-neutro-terra
normalizzata CEI 83 o da un dispositivo ad interruzione onnipolare con distanza di
apertura dei contatti di almeno 3 mm. Il filo di protezione (verde-giallo) è collegato al
terminale di terra dell’apparecchio e deve essere collegato al terminale di terra
dell’apparecchio e deve essere collegato a terra dall’installazione.
• In caso di collegamento con presa di corrente, questa deve rimanere
accessibile dopo l’installazione dell’apparecchio.
• Il neutre del forno (filo blu) deve essere collegato al neutro della rete.
99637441 italien et anglais.qxd 07/07/2005 10:44 Page 8
Page 9
9
are il forno
Per essere sicuri di avere un’installazione conforme, non esiti a
chiamare un tecnico specializzato in elettrodomestici.
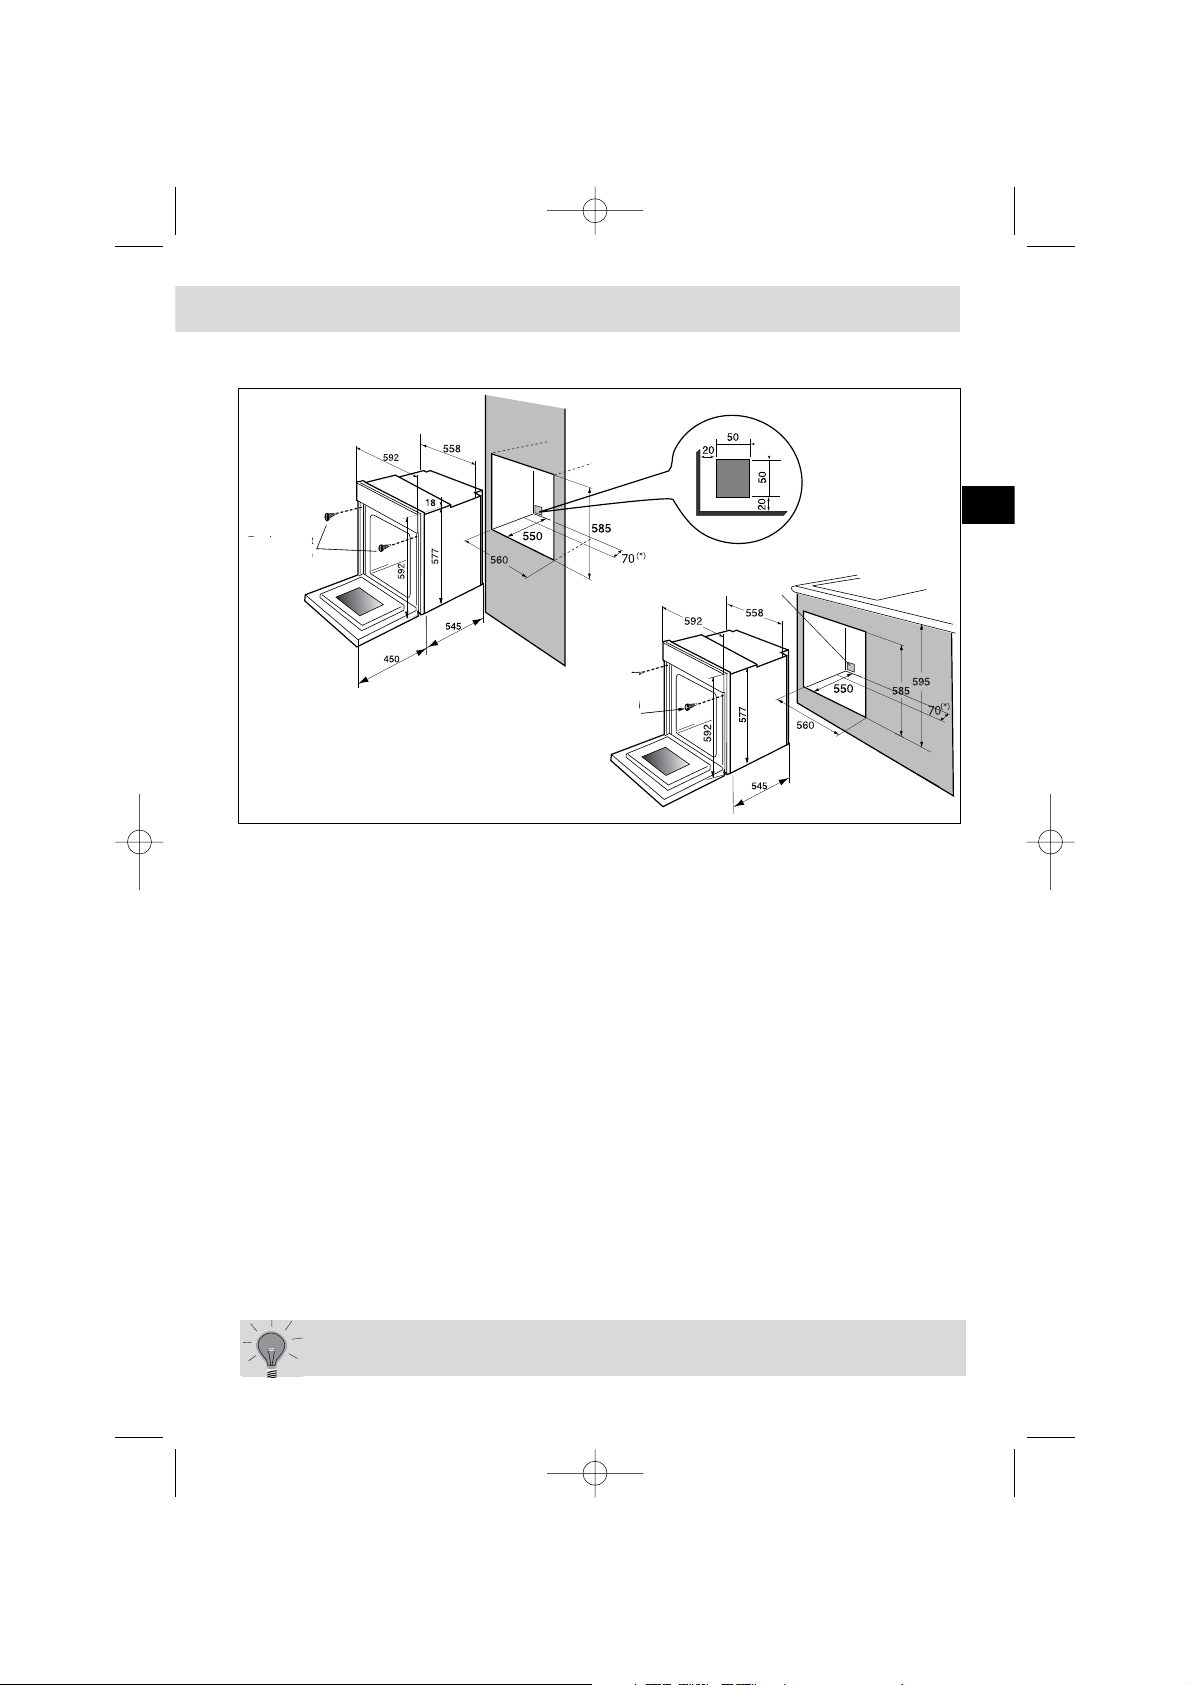
Dimensioni utili per incastrare il forno
Il forno può essere installato indifferentemente sotto un piano di lavoro
o in un mobile a colonna (aperto* o chiuso) con dimensioni d’incastro
adattate (vedi schema a fianco).
Il suo forno possiede una circolazione d’aria ottimizzata che permette di ottenere
risultati di cottura e di pulizia notevoli se sono rispettati i seguenti elementi:
• Centrare il forno nel mobile in modo da garantire una distanza minima di 5 mm
con il mobile vicino.
• Il materiale del mobile d’incastro deve resistere al calore (o essere rivestito in
tal modo).
• Per una maggiore stabilità, fissare il forno nel mobile con due viti passanti dai
fori previsti a tal scopo sui montanti laterali (cfr schema).
Per fare ciò:
1) Togliere i nascondi-vite in gomma per accedere ai fori di fissaggio.
2) Effettuare un foro da Ø 3 mm nella parete del mobile per evitare che il legno si spacchi.
3) Fissare il forno con le 2 viti.
4) Rimettere i nascondi-vite in gomma (che servono anche per attutire la chiusura
della porta del forno).
(*) se il mobile è aperto, la sua apertura deve essere di 70 mm (max).
IT
Posizione
della vite di
fissaggio
Posizione
della vite di
fissaggio
taglio 50x50mm
99637441 italien et anglais.qxd 07/07/2005 10:44 Page 9
Page 10
10
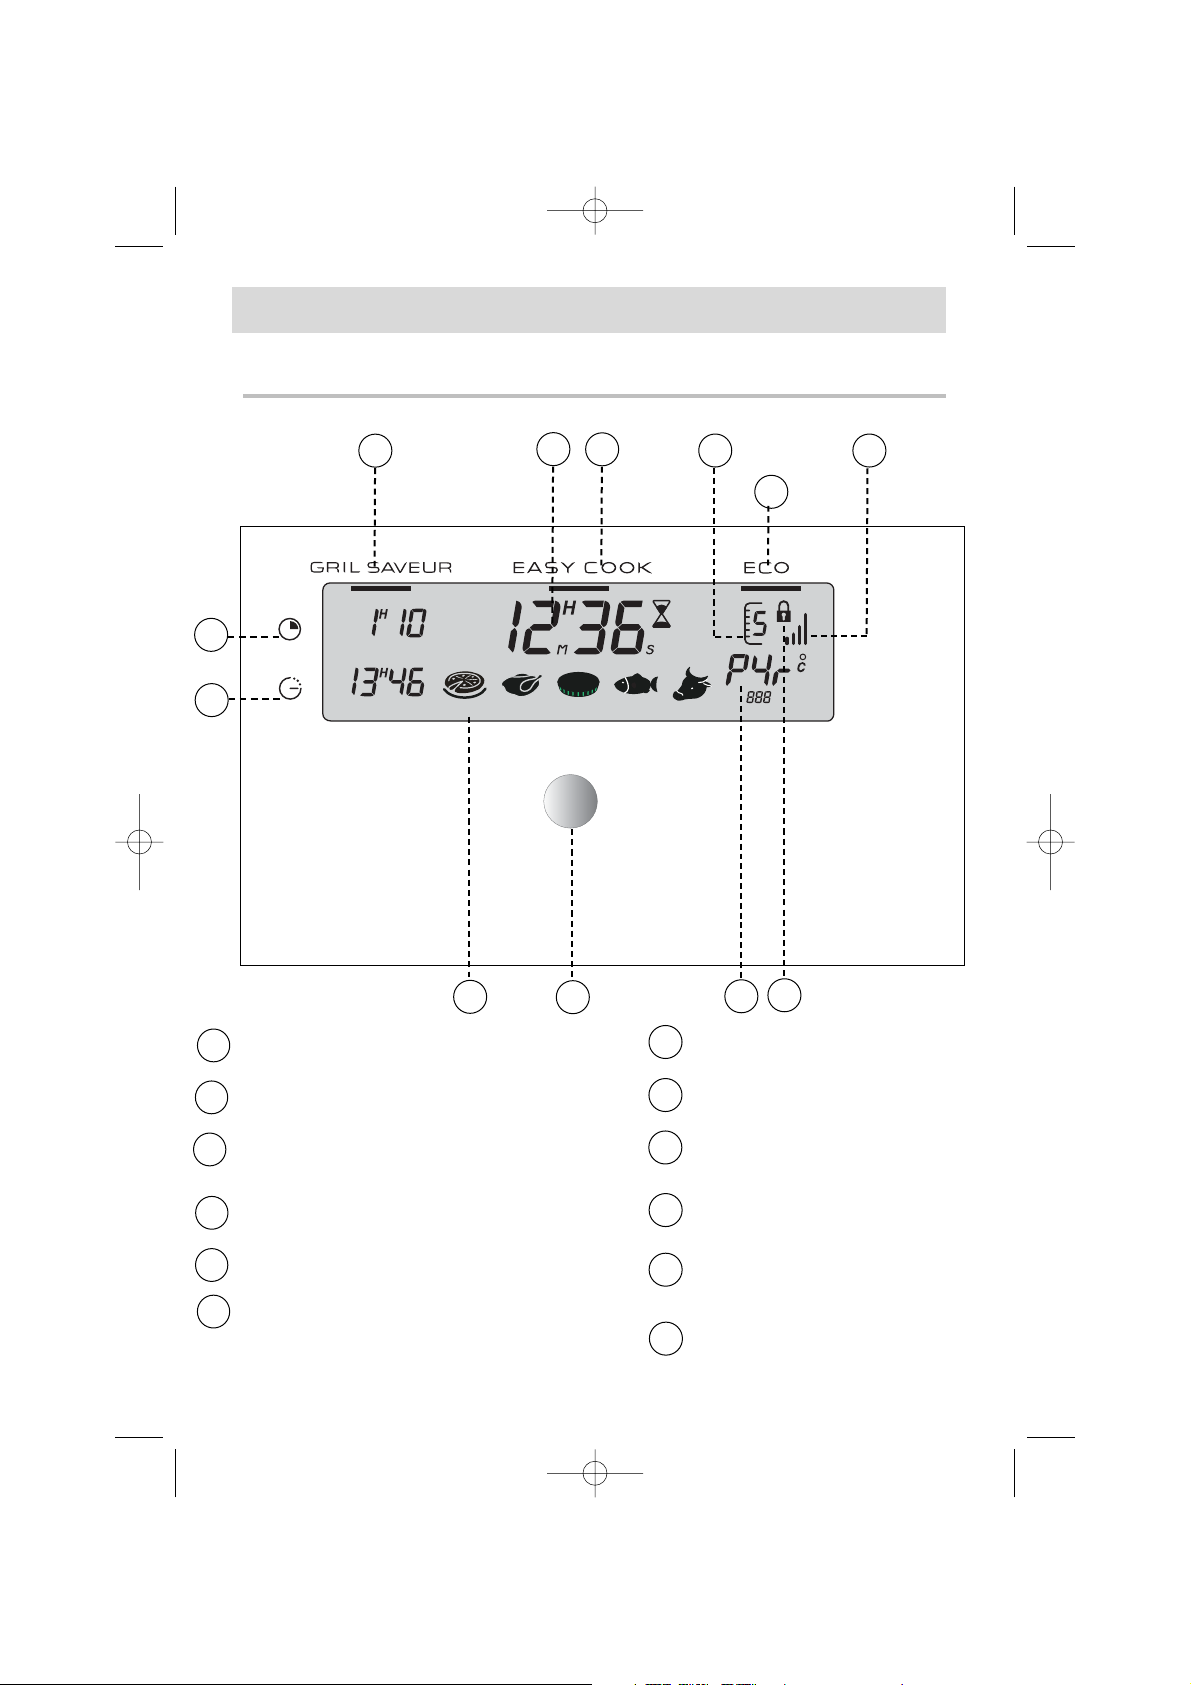
1. Il suo programmatore nel dettaglio
13
5
7
8
9
6
2
4
10
11
12
Indicatore di aumento di temperatura
Indicatore della funzione ECO
Numero del gradino su cui si consiglia
di infornare il piatto
Indicatore della funzione EASY COOK
Visualizzazione dei tempi (ora/minuti)
Indicatore GRILL
+
1
3
4
5
6
2
Durata della cottura
Ora di fine cottura
Indicatore dei piatti
EASYCOOK disponibili
Pulsante di regolazione
Temperatura del
forno/indicatore pirolisi
Indicatore di porta
bloccata
7
9
10
8
11
12
Come si presenta il forno
99637441 italien et anglais.qxd 07/07/2005 10:44 Page 10
Page 11
11
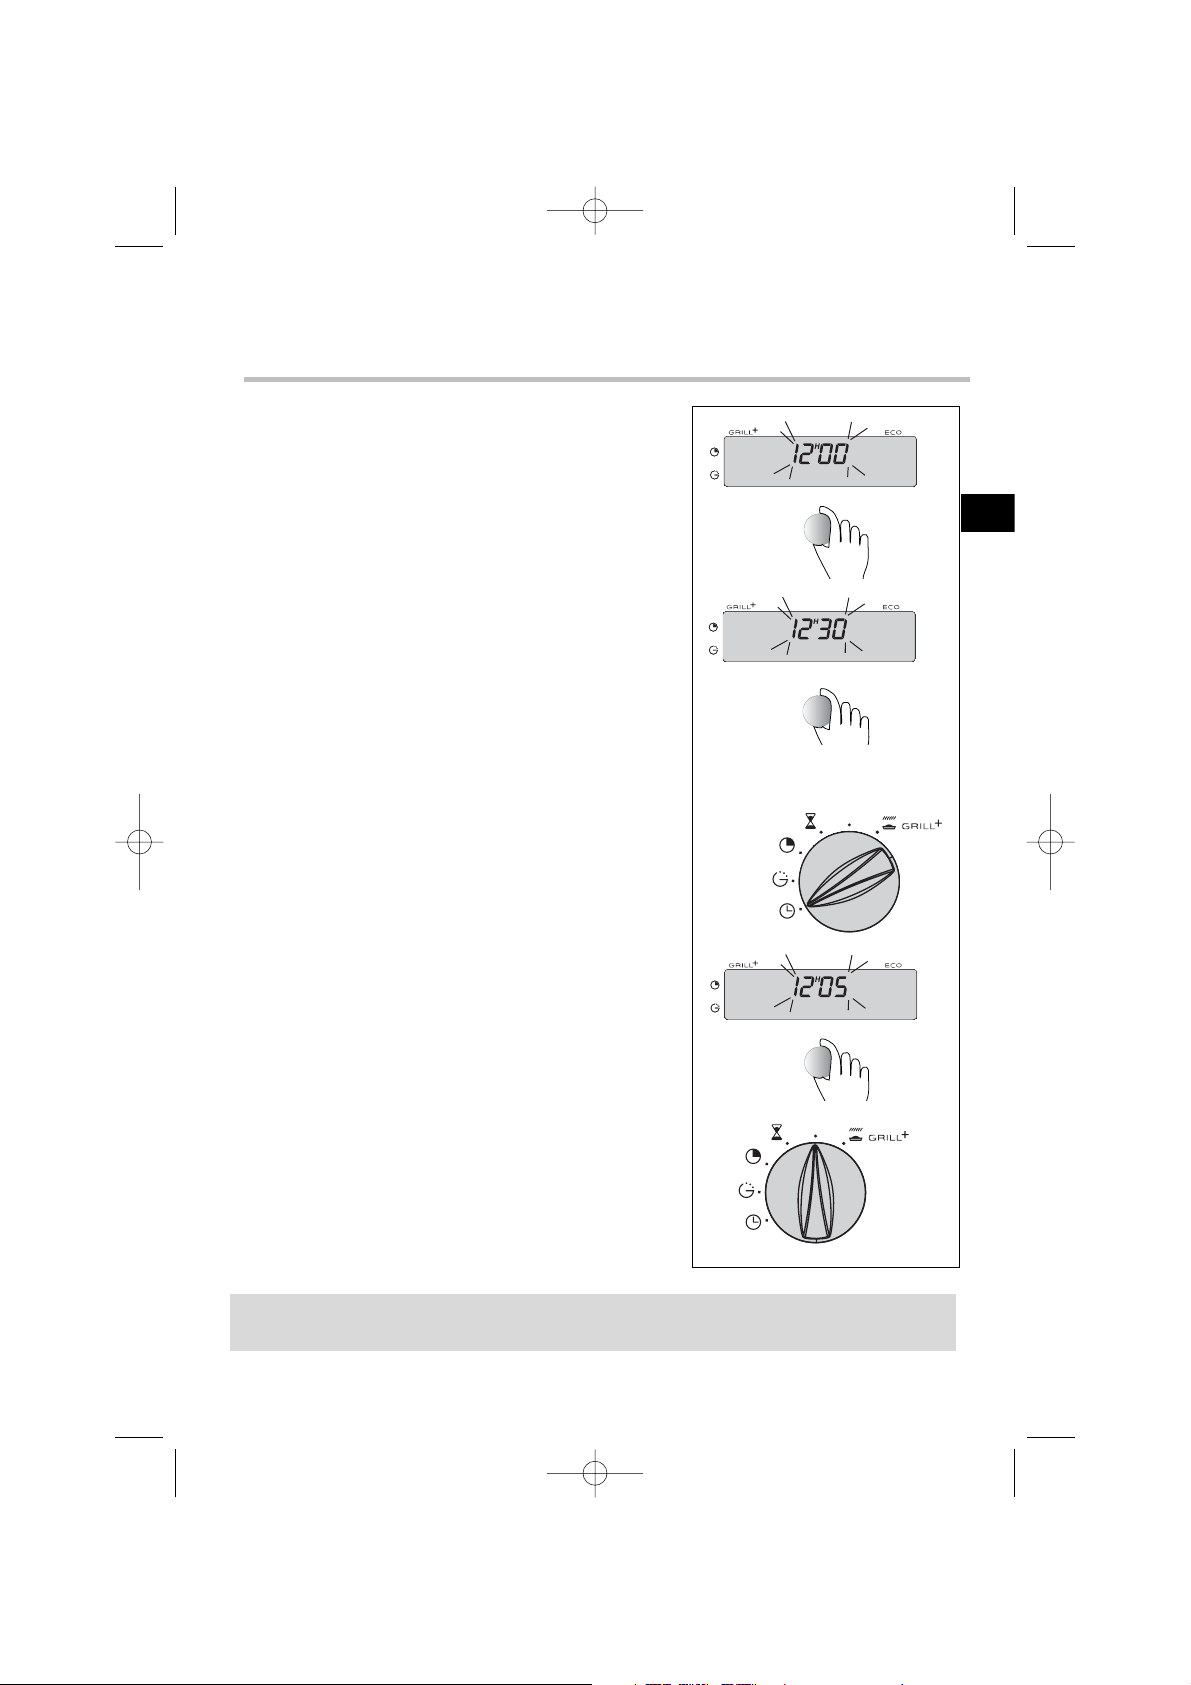
a) All’ accensione
• Regolare l’ora girando il pulsante. (La velocità di
rotazione del pulsante fa variare la velocità di
regolazione dell’ora.)
• La registrazione dell’ora impostata è automatica
dopo pochi secondi -> la visualizzazione dell’ora
non lampeggia più.
Esempio: 12.30.
B) Impostazione dell’ora dell’orologio
• Posizionare il selettore di programma sulla
posizione “Impostazione ora”.
• La visualizzazione dell’ora lampeggia per indicare
che è possibile modificarla.
•
Per la regolazione, girare il pulsante in modo da
aumentare o diminuire l’ora visualizzata.
• Dopo aver impostato l’ora scelta,
posizionare il selettore sulla posizione ”T°C”
(regolazione della temperatura) -> la visualizzazione
dell’ora non lampeggia più.
Se non c’è conferma la registrazione avviene automaticamente dopo
alcuni secondi.
2. Come impostare l’ora all’orologio del forno
Timer
Durata di
cottura
Fine
cottura
Impostazione
dell’ora
Descrizione della manopola
IT
Come utilizzare il forno
99637441 italien et anglais.qxd 07/07/2005 10:44 Page 11
T˚
c
T˚
c
Page 12
12
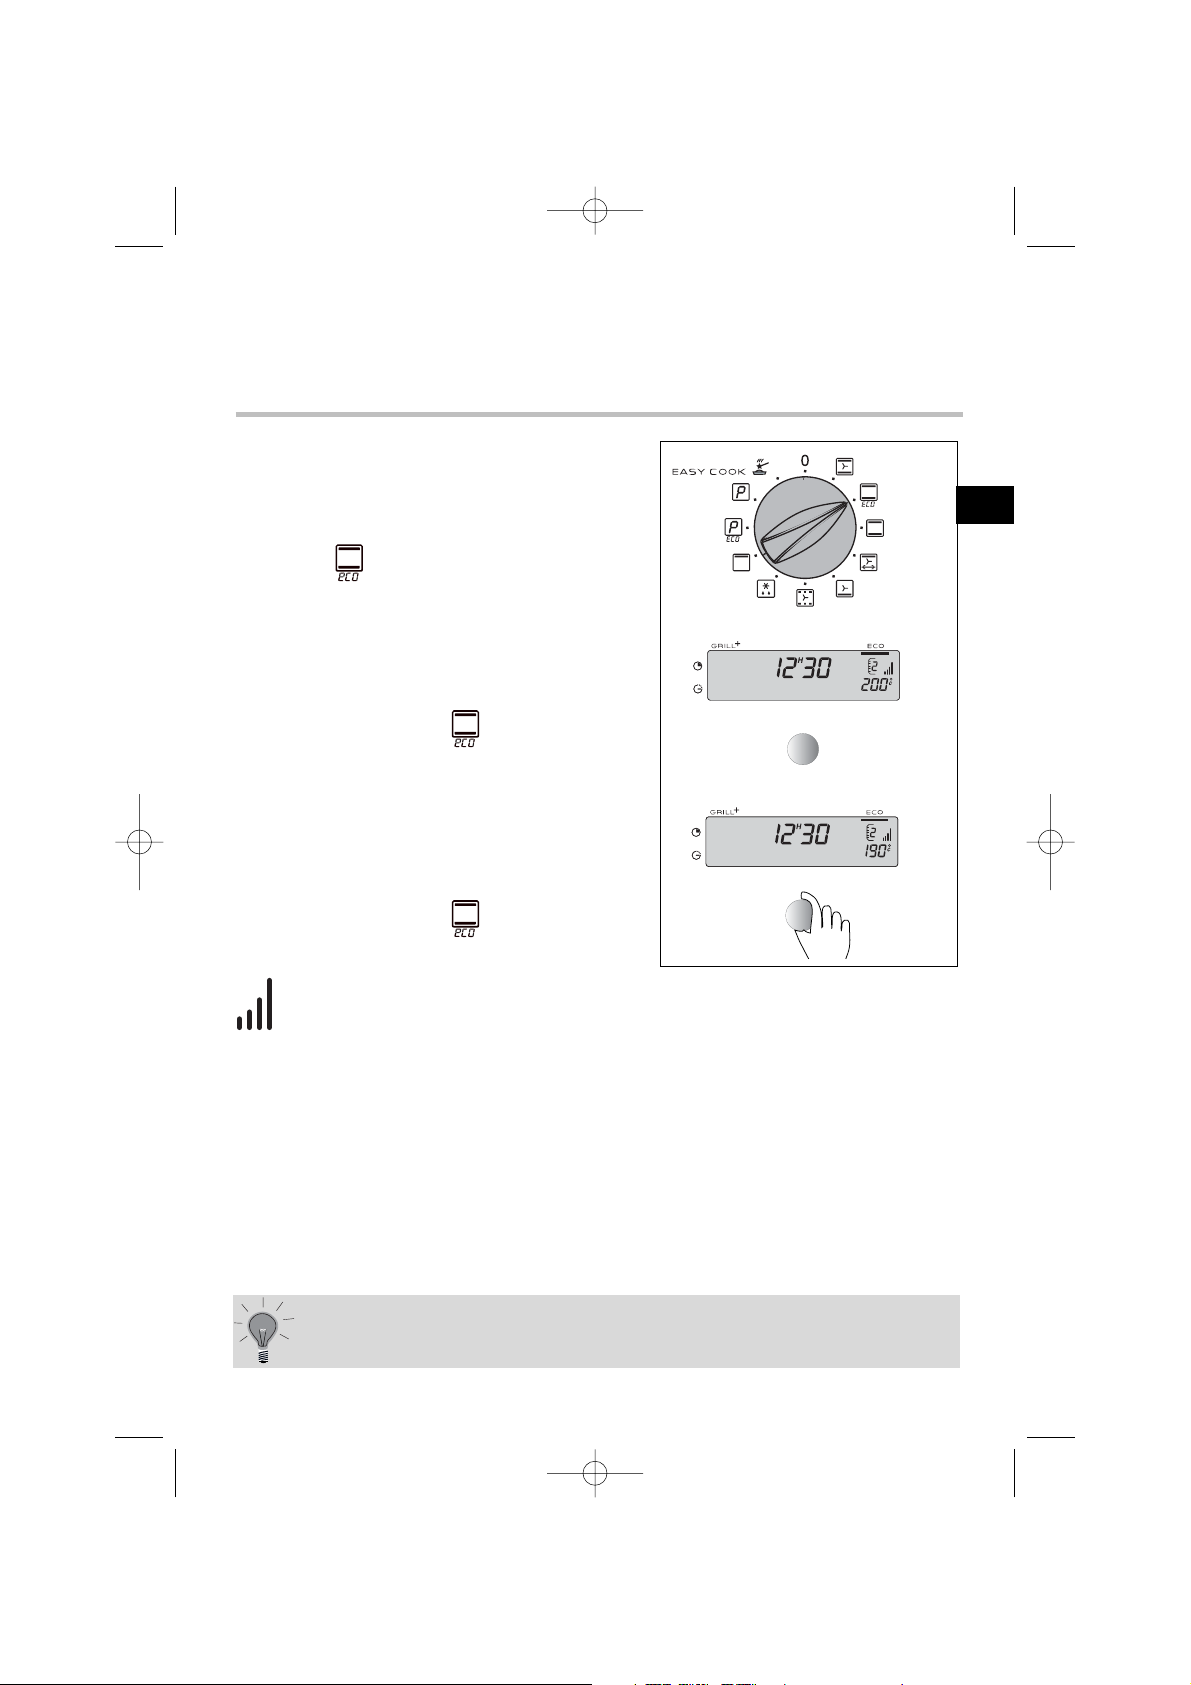
Come utilizzare il forno
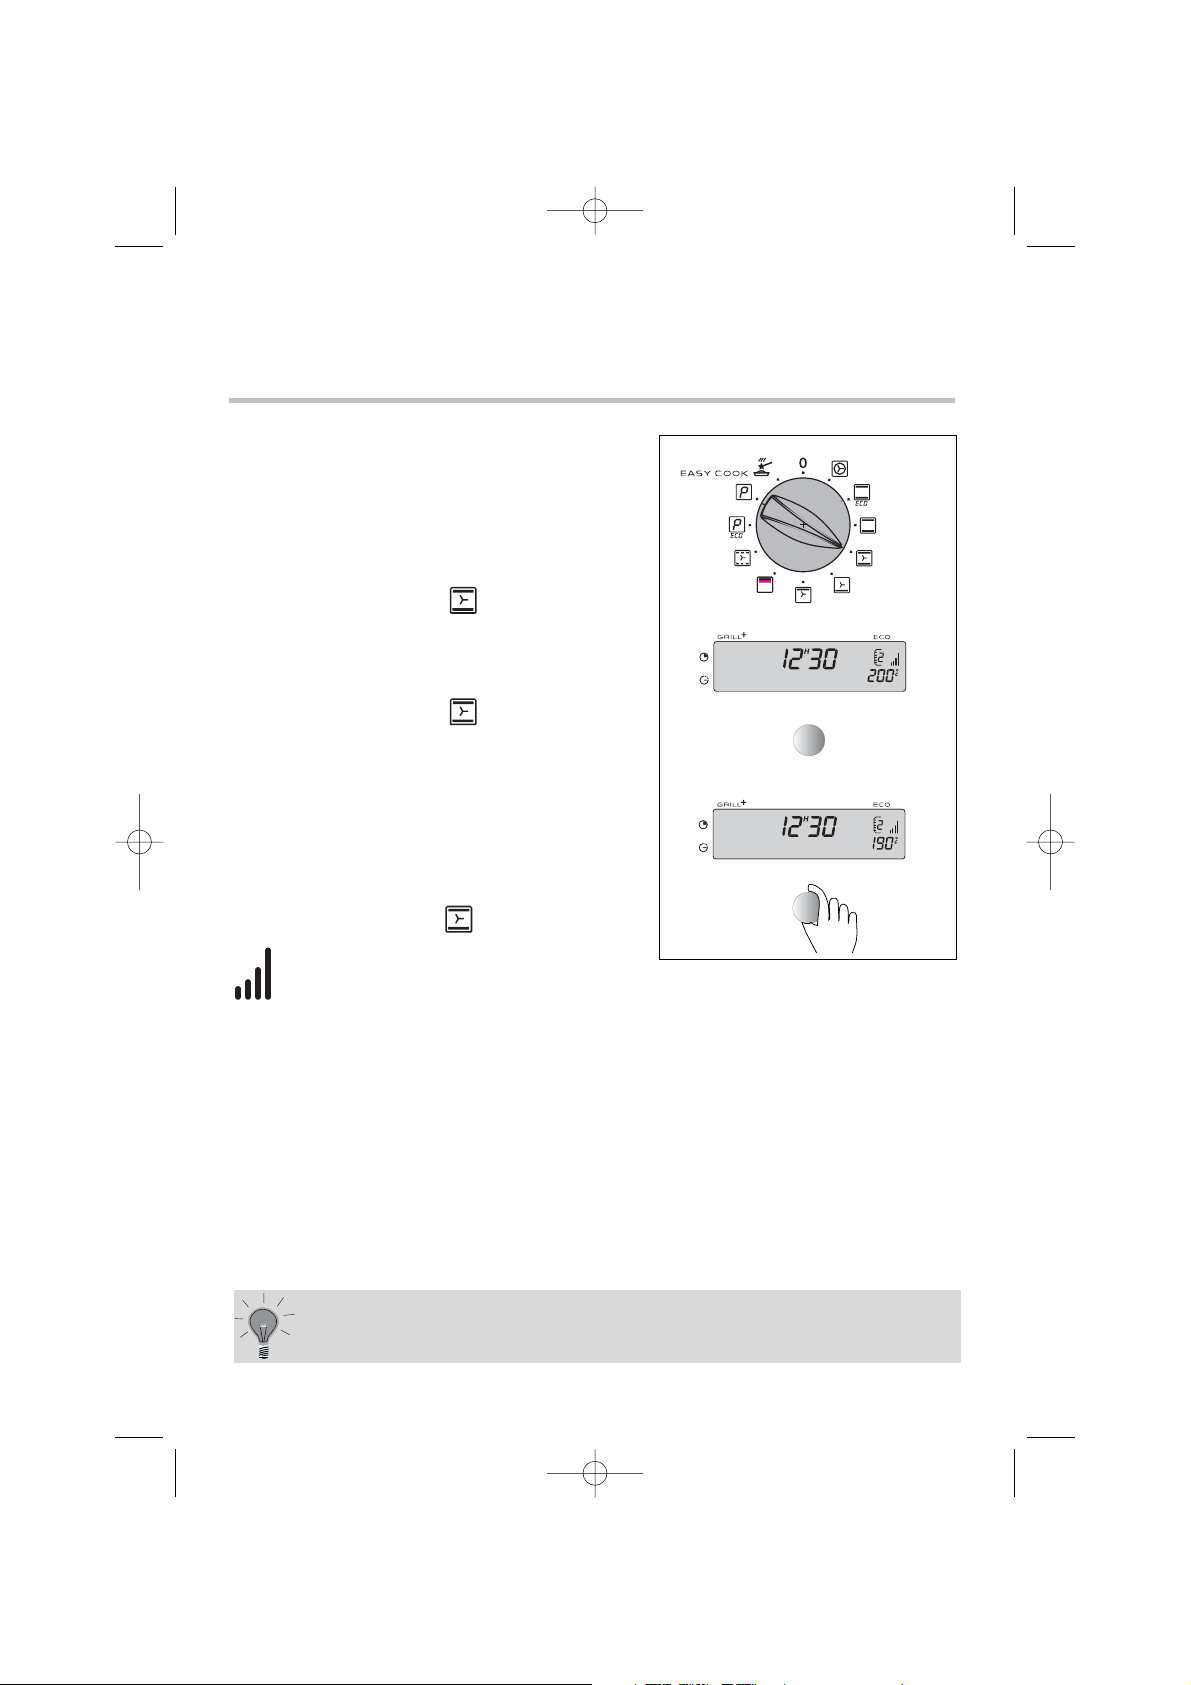
Il programmatore deve visualizzare solo l’ora;
l’ora non deve lampeggiare.
• Scegliere la modalità di cottura:
Girare il selettore di funzioni sulla posizione
scelta.
Esempio: posizione “ ”.
• Posizionare il piatto nel forno come consigliato
nel display.
Esempio: posizione “ ” -> consigliati
gradini 1 o 2.
• Il suo forno le propone una temperatura
ottimale per la modalità di cottura scelta:
200°C.
E’ tuttavia possibile modificarla utilizzando il
pulsante situato sotto il display.
Esempio: posizione “ ” regolata a 190°C.
Dopo tali operazioni il forno si riscalda:
L’indicatore di aumento della temperatura si accende e segnala la
progressione della temperatura all’interno del forno.
3 bip indicano che la temperatura è stata raggiunta.
Dopo un ciclo di cottura, la ventola del forno continue a girare
per un po’, in modo da garantire il corretto raffreddamento
degli elementi.
3. Come fare una cottura immediata
99637441 italien et anglais.qxd 07/07/2005 10:45 Page 12
Page 13
13
Come utilizzare il forno
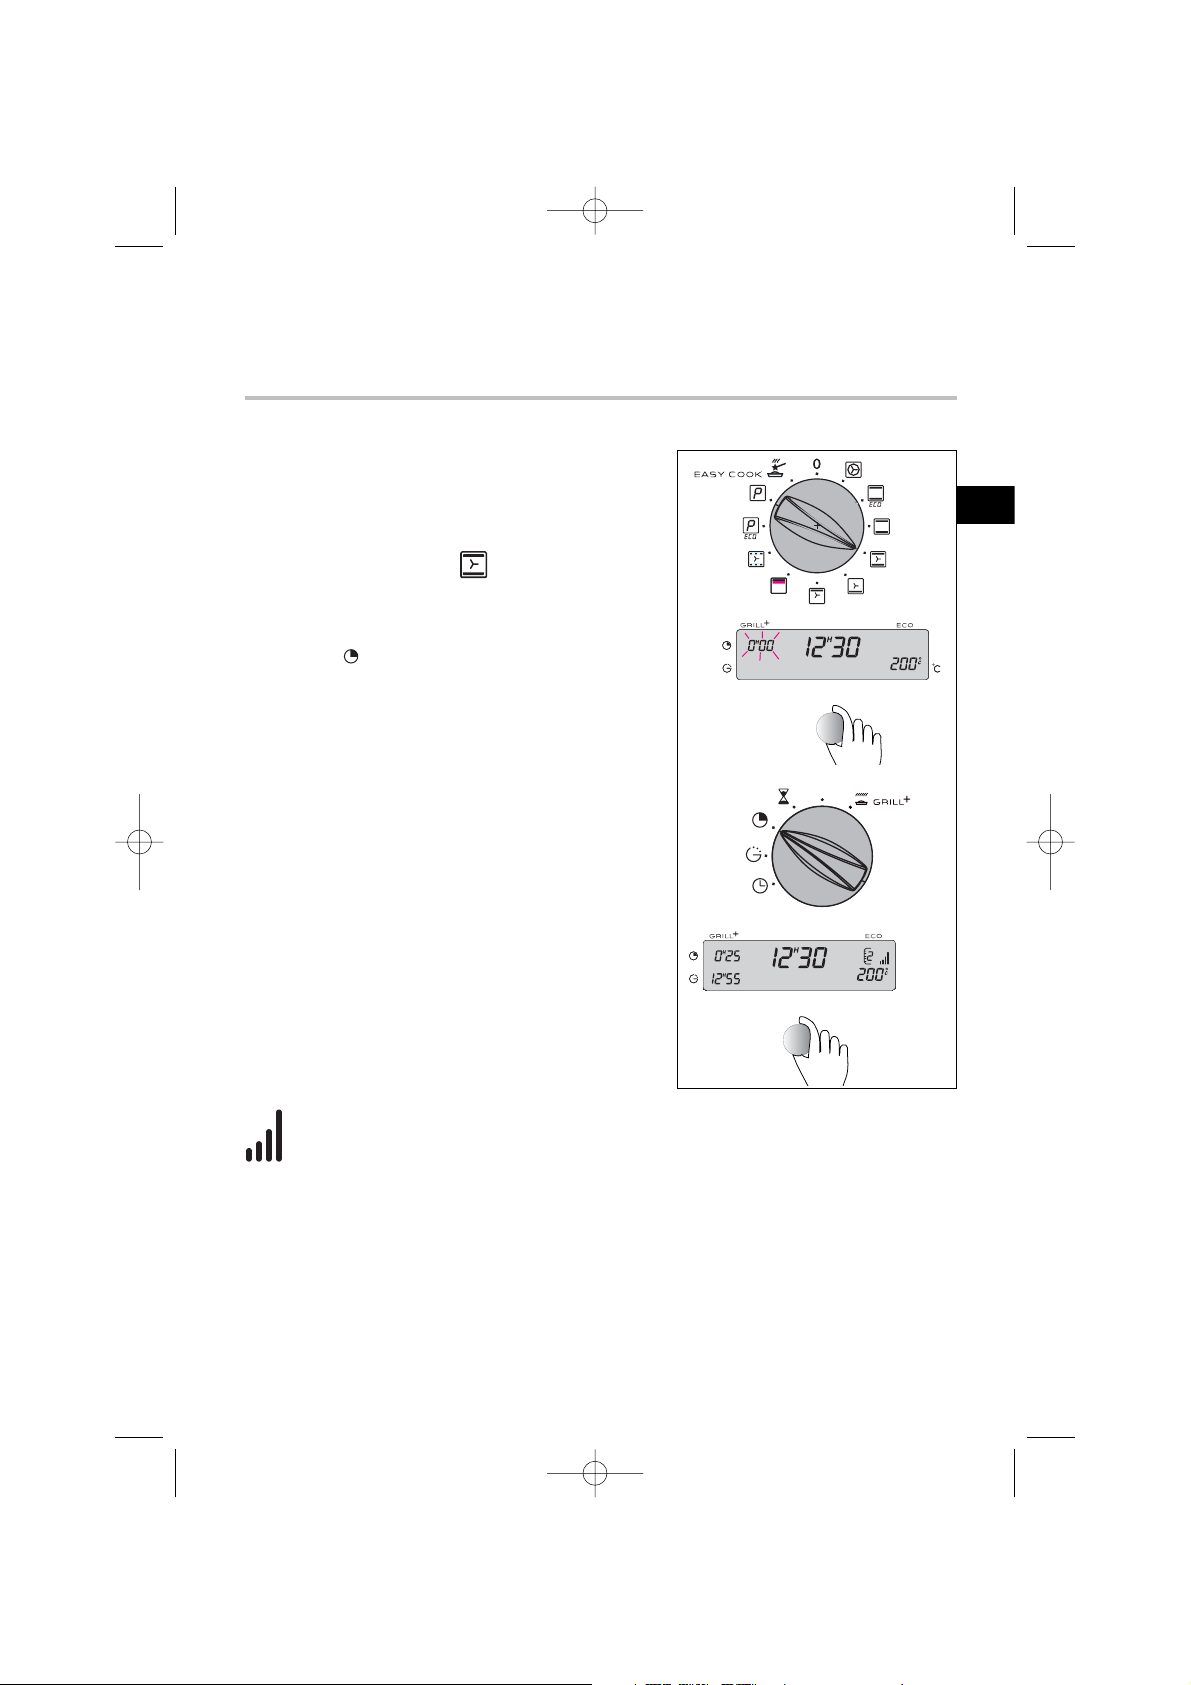
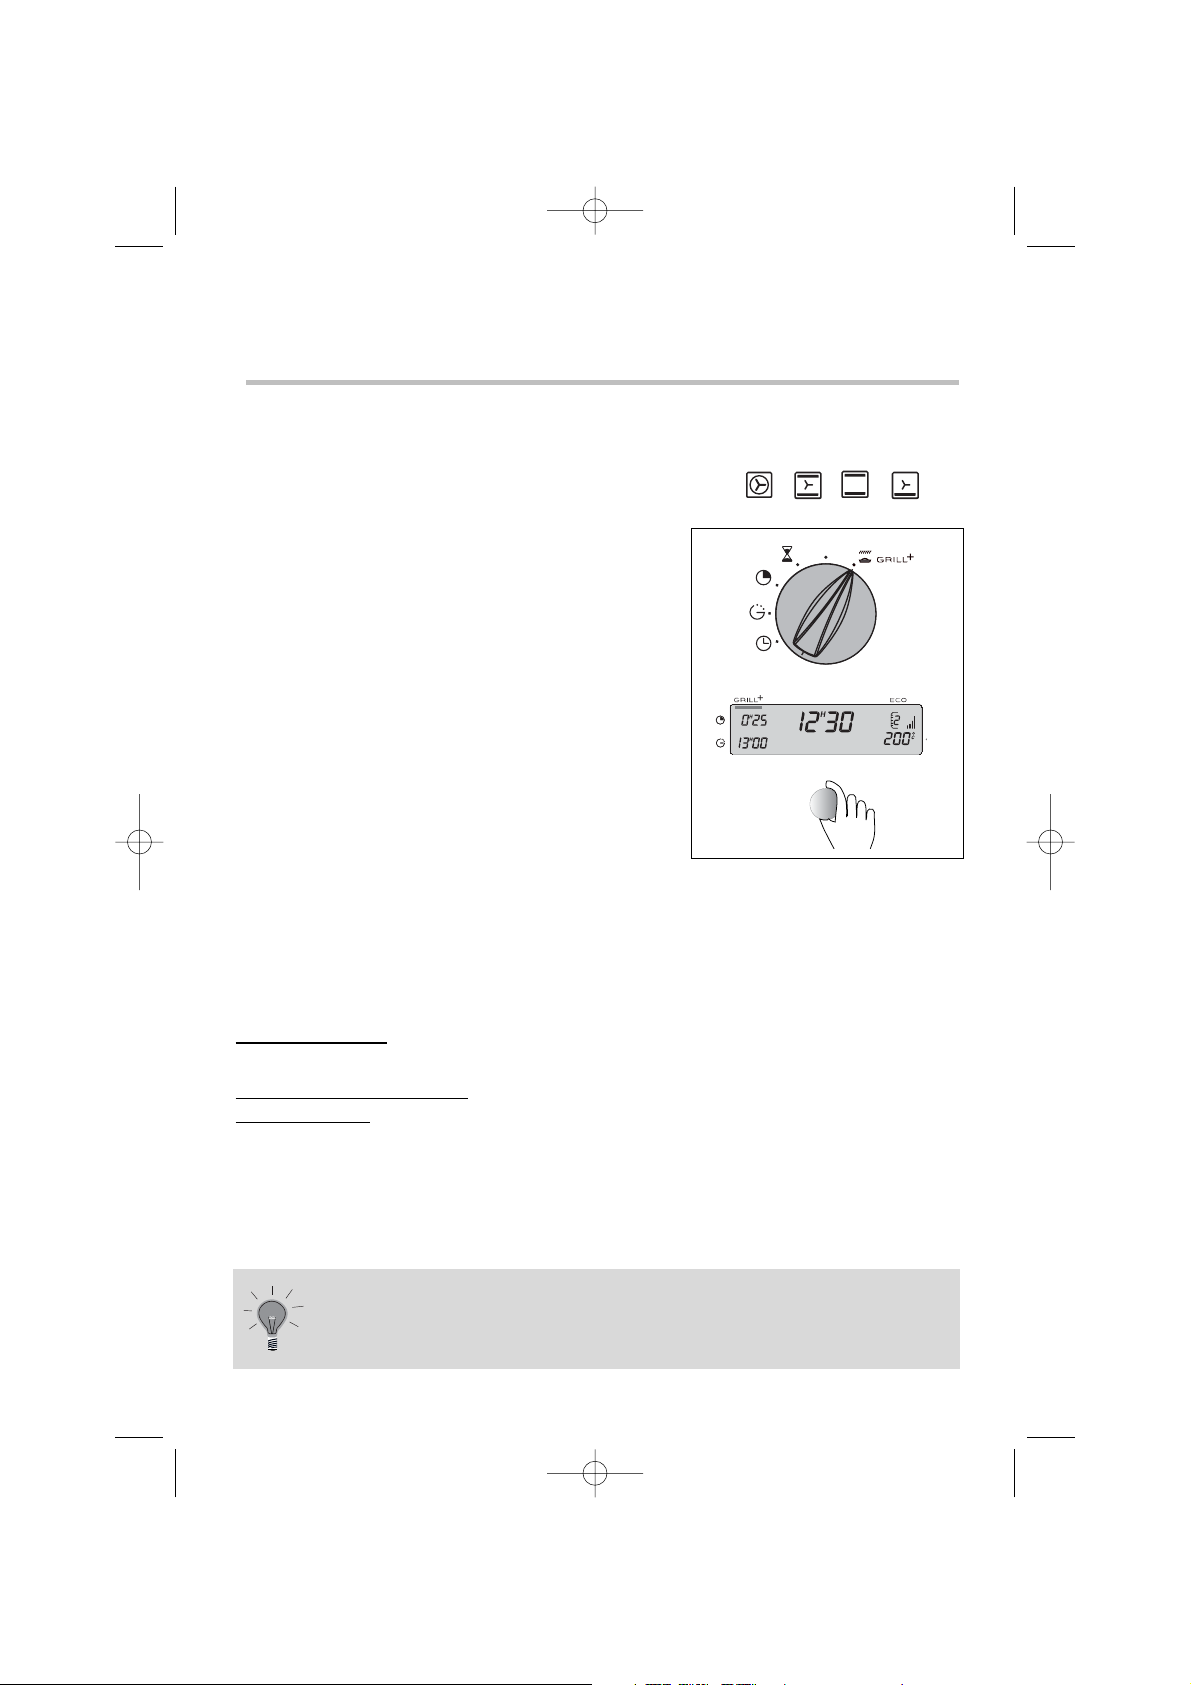
a) Fare una cottura con una durata
definita
• Regolare la modalità di cottura scelta ed
eventualmente aggiustare la temperatura.
Esempio: posizione “ ”
temperatura 200°C
• Posizionare il selettore di programma sulla
posizione “ ”
La durata di cottura lampeggia a 0.00 per
indicare che la regolazione è possibile.
• Girare il pulsante per regolare il tempo di cottura
desiderato.
Esempio: 25 min
La registrazione dell’ora regolata avviene
automaticamente dopo alcuni secondi
-> il display non lampeggia più.
Il conto alla rovescia parte immediatamente
dopo la regolazione.
L’ora di fine di cottura (ora di partenza +
ora di cottura viene visualizzata
automaticamente.
In quest’esempio:
fine cottura alle 12.55min
Dopo queste operazioni il forno si riscalda:
L’indicatore di aumento della temperatura si accende e segnala la progressione
della temperatura all’interno del forno.
3 bip indicano che la temperatura è stata raggiunta.
A fine cottura, una serie di bip viene emessa per alcuni minuti.
L’arresto dei bip si effettua posizionando il selettore sulla regolazione “T°C” e
riportando la manopola su “0”.
4. Come programmare una cottura
IT
99637441 italien et anglais.qxd 07/07/2005 10:45 Page 13
T˚
c
Page 14
14
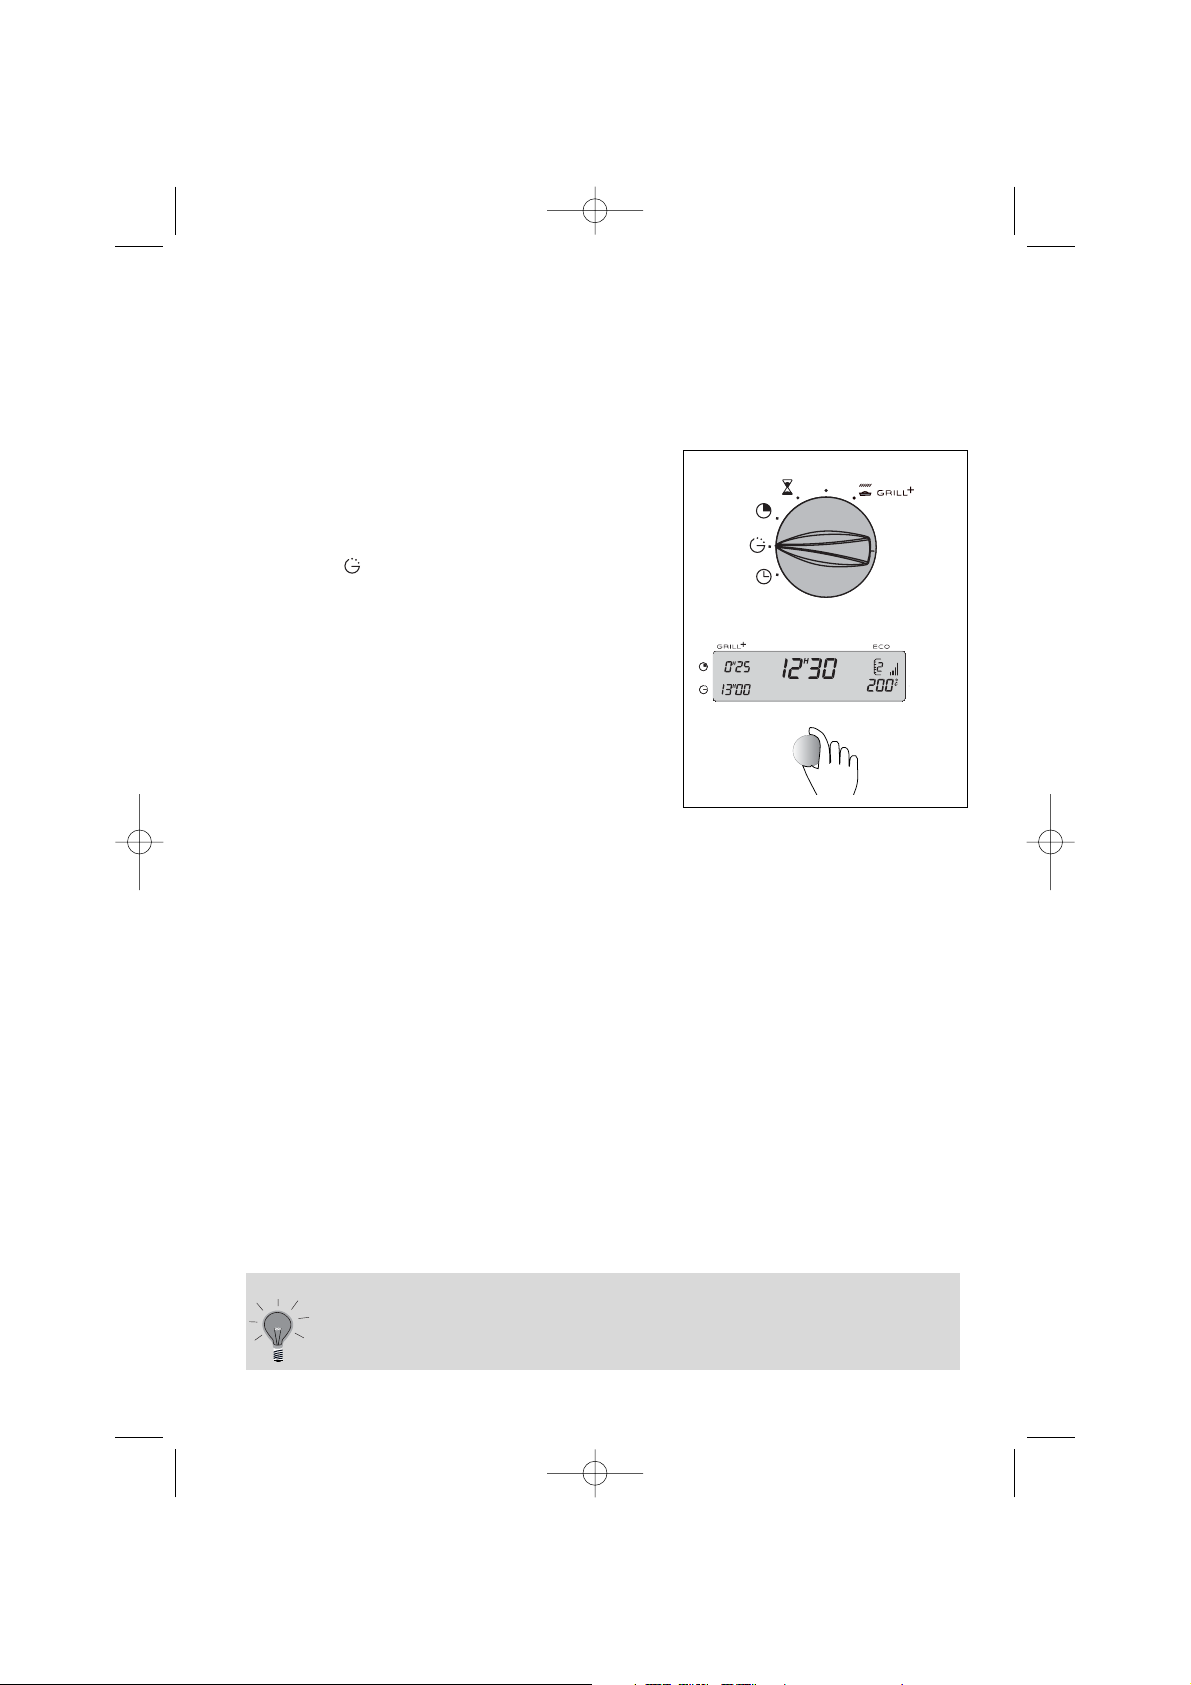
b) Ritardare una cottura con una durata definita
(ora finale selezionata)
• Procedere come in a) e poi, dopo la
regolazione della durata di cottura,
Posizionare il selettore di modalità sulla
posizione “ ”.
l’ora di fine di cottura lampeggia per indicare
che la regolazione è possibile.
• Regolare l’ora di fine cottura desiderata
girando il pulsante sotto il display.
Esempio qui di fianco: fine cottura
desiderata alle 13.00
Dopo queste operazioni l’inizio del riscaldamento viene differito affinchè la
cottura finisca alle 13.00. Quando la cottura è terminata, verrà emessa una serie
di bip e il selettore di cottura va riportato su “0”.
Come utilizzare il forno
E’ possibile
- modificare in qualsiasi momento la durata di cottura.
- annullare in qualsiasi momento la programmazione riportando
il valore della durata a 0.00.
99637441 italien et anglais.qxd 07/07/2005 10:45 Page 14
T˚
c
Page 15
Come utilizzare il forno
5. Come fare una cottura risparmio ?*
15
Il programmatore deve mostrare solo
l’ora; l’ora non deve lampeggiare.
• Girare il selettore delle funzioni sulla
posizione “ ”. L’indicatore “ECO” si accende
nel display.
• Posizionare il piatto nel forno come consigliato
nel display.
Esempio: posizione “ ” -> consigliati i
gradini 1 o 2.
• Il suo forno le propone una temperatura
ottimale per la modalità di cottura scelta 200°C.
Tuttavia è possibile modificarla utilizzando il
pulsante situato sotto il display.
Esempio: posizione “ ” regolata a
190°C.
Dopo tali azioni il forno si riscalda:
L’indicatore di aumento della temperatura si accende e segnala la
progressione della temperatura all’interno del forno.
3 bip indicano che la temperatura è stata raggiunta
Per ottimizzare la cottura ECO, non effettuare preriscaldamento e non aprire la
porta.
*Questa posizione permette di risparmiare energia fino al 20% pur
ottenendo risultati di cottura identici.
La posizione ECO è utilizzata ai fini dell’etichetta energetica.
Dopo un ciclo di cottura, la ventola del forno continua a
funzionare per un po’, in modo da garantire un corretto
raffreddamento degli elementi.
IT
99637441 italien et anglais.qxd 07/07/2005 10:45 Page 15
Page 16
16
Come utilizzare il forno
6. Come utilizzare la funzione GRILL
+
E’ possibile attivare o disattivare questa funzione in qualsiasi
momento della cottura attraverso la manopola di regolazione.
E’ anche possibile attivare questa funzione in una cottura
ritardata.
Questa funzione permette di unire alla sequenza di cottura scelta una funzione
“Doratura” del piatto a fine cottura, che avviene mediante l’accensione del grill negli
ultimi 5 minuti della sequenza.
Tale funzione è possibile solo con i seguenti tipi di cottura: .
Tale funzione può essere programmata a inizio
cottura aggiungendo 5 minuti al tempo di
cottura o semplicemente a fine cottura
posizionando il selettore di funzione su
“GRILL+”.
• Regolare la modalità di cottura scelta ed
eventualmente regolare la temperatura
• Posizionare il selettore di programma sulla
posizione “GRILL+”, la durata di cottura lampeggia a
0.05 (questo valore di durata corrisponde al tempo
minimo necessario per attivare la funzione “GRILL+”
nella sequenza di cottura scelta).
• Girare il pulsante di regolazione per regolare la
durata di cottura totale. La registrazione della durata
è automatica dopo pochi secondi e il display non
lampeggia più.
• Dopo queste 3 operazioni il forno si scalda e si accende una barra orizzontale nel
display, sotto il testo “GRILL+” che indica che la funzione è attivata.
Cinque minuti prima della fine della cottura l’indicatore “GRILL+” lampeggia.
Non posizionare mai i piatti troppo vicini al grill altrimenti la doratura è
troppo rapida. Tenere il 1
°
o il 2° gradino (partendo dal basso).
Esempi di piatti:
• Gratin di pasta, di cavolfiori, indivia, frutti di mare, crumble..
Esempi di pr
ogrammazione:
Zuppa di cipolle:
• Selezionare la sequenza di cottura
• Selezionare la temperatura: 180°C
• Selezionare il programma: “GRILL+”
• Selezionare il tempo: 25 minuti.
Il brodo si scalderà per 20 minuti e la gratinatura per i restanti 5 minuti.
99637441 italien et anglais.qxd 07/07/2005 10:45 Page 16
T˚
c
Page 17
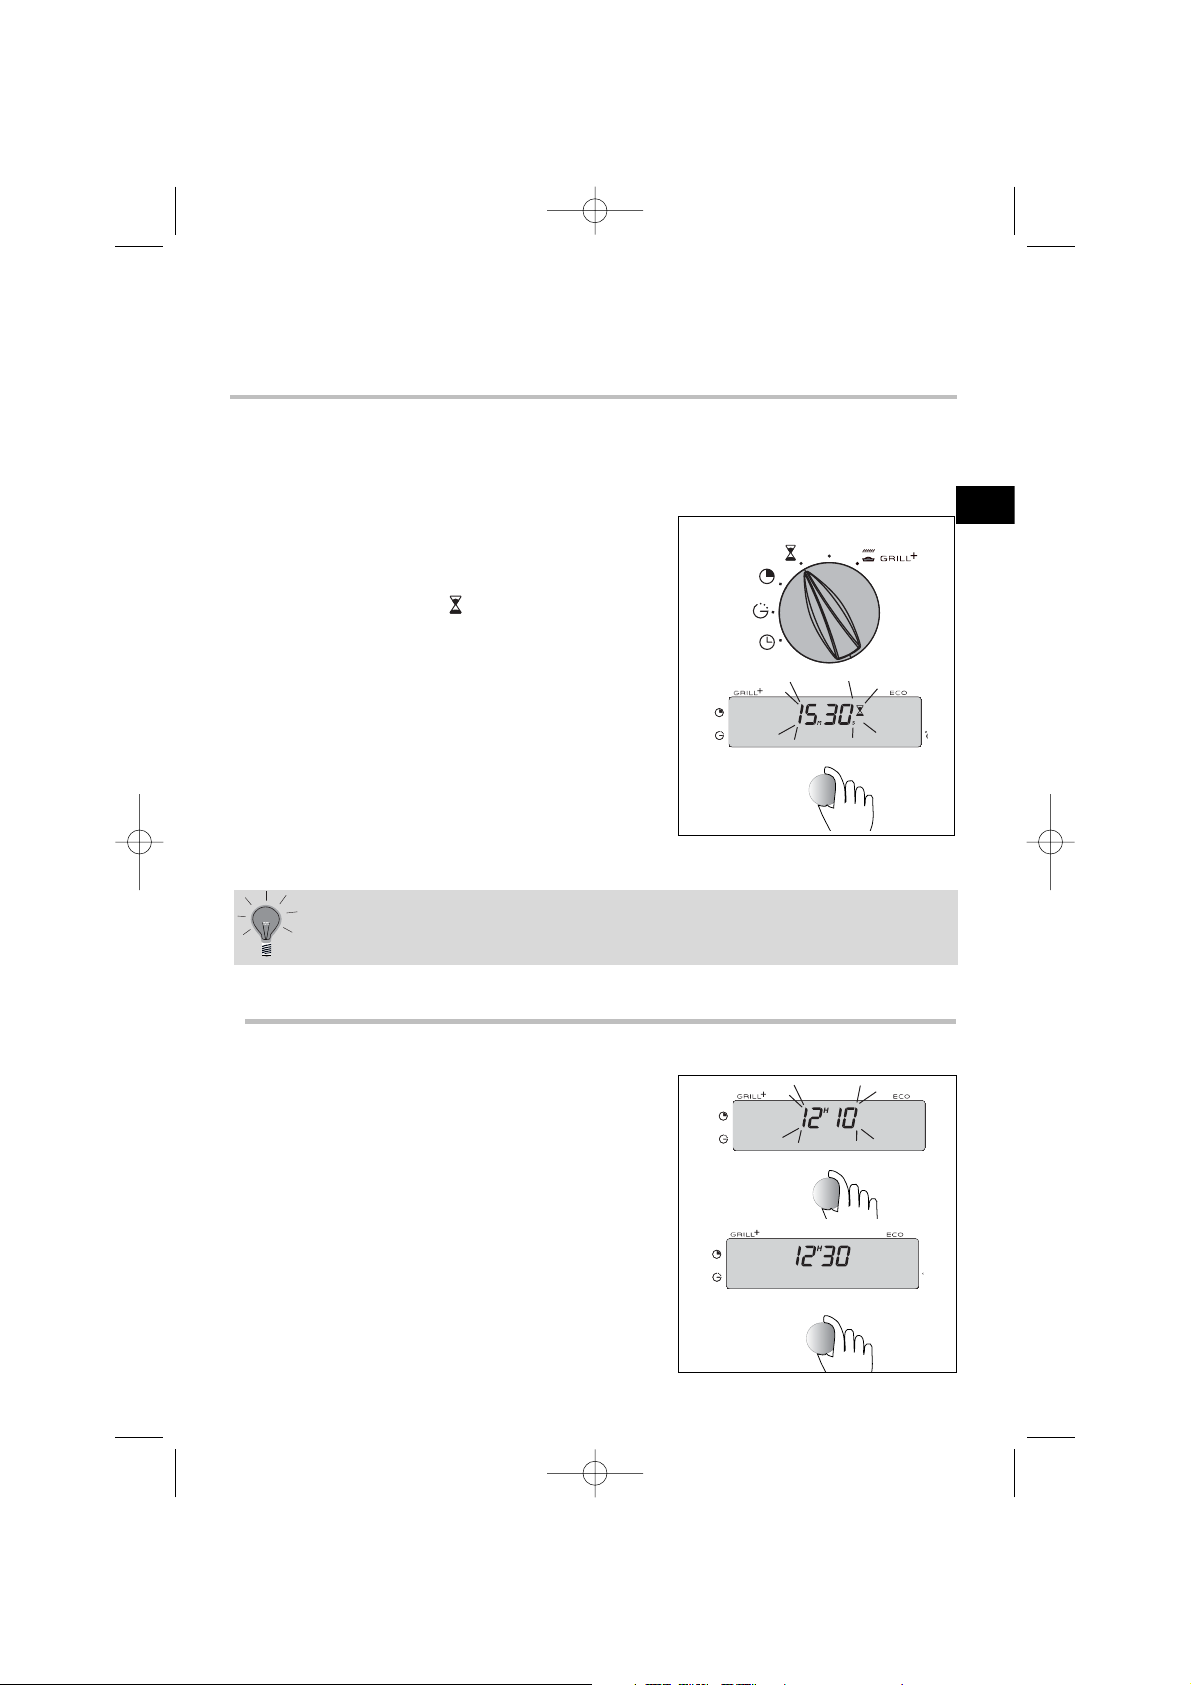
Il suo forno è dotato di un timer elettrico indipendente dal funzionamento
del forno che permette di contare il tempo alla rovescia.
Questa funzione può essere utilizzata anche per il funzionamento del forno. In
questo caso, la visualizzazione del timer prevale sulla visualizzazione dell’ora del
giorno.
• Posizionare il selettore di programmazione del
tempo sulla posizione “ ” -> il display
lampeggia e si accende una piccola clessidra.
• Girare il pulsante di regolazione fino ad ottenere
la durata desiderata ( max 59 minuti 59 secondi )
Esempio 15 minuti 30 secondi
Il display smette di lampeggiare dopo alcuni
secondi e il timer inizia a contare il tempo un
secondo dopo l’altro. Una volta trascorsa la
durata, il timer emette dei bip sonori per avvertirvi.
7. Come utilizzare il timer
Come utilizzare il forno
E’ possibile modificare o annullare in qualsiasi momento la
programmazione del timer
17
8. Come regolare la luminosità del display
La luminosità del display può essere modificata in questo modo:
• Regolare l’ora del programmatore a 12.10
• Tenere premuto il pulsante mentre effettua una
rotazione, fino ad ottenere la luminosità
desiderata.
Dopo aver regolato la luminosità, rimettere il
programmatore all’ora del giorno.
IT
99637441 italien et anglais.qxd 07/07/2005 10:45 Page 17
T˚
c
Page 18
18
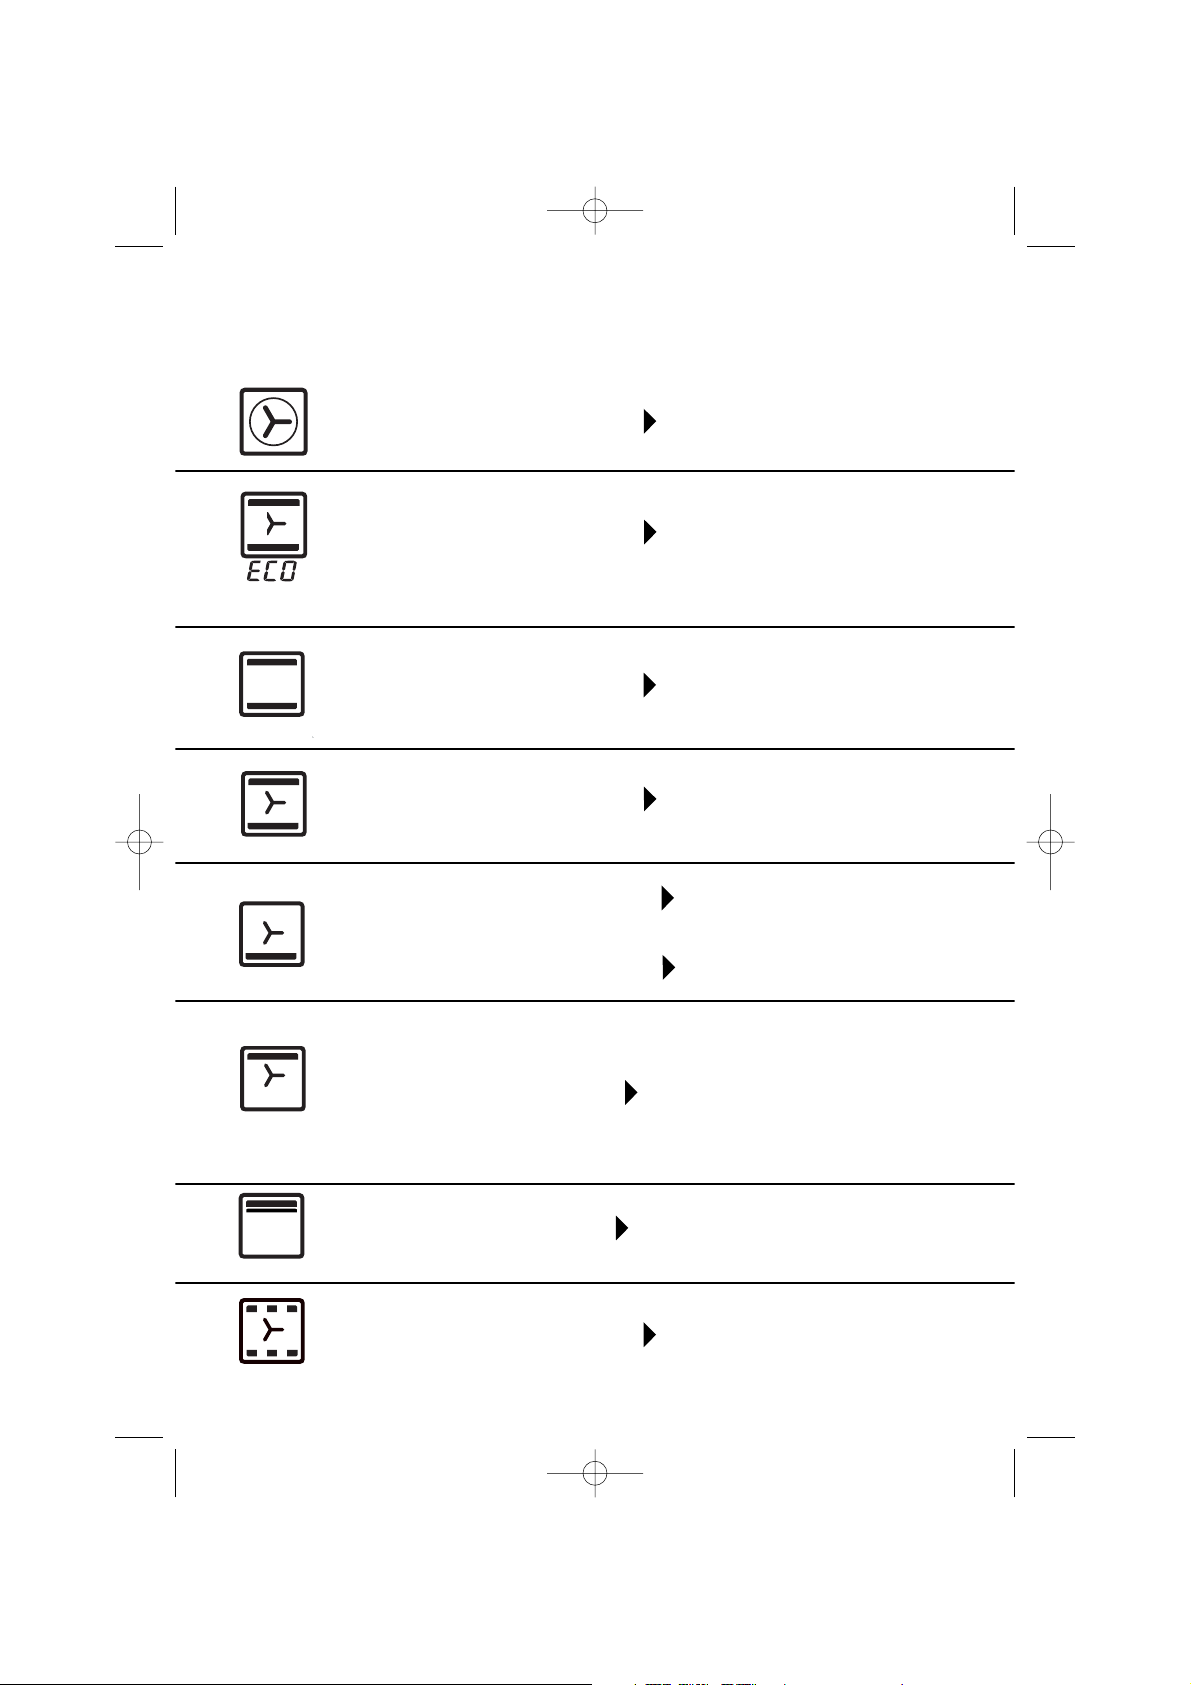
T
radizionale ventilato
La cottura avviene grazie
all’elemento inferiore e superiore
e alla ventola dell’aria.
Tradizionale
La cottura avviene grazie
all’elemento inferiore e superiore
senza ventilazione dell’aria.
Elemento inferiore ventilato
La cottura avviene grazie
all’elemento inferiore associato ad
un grill leggero e la ventola
dell’aria.
Mantenimento al caldo
Equilibrio dell’elemento
superiore e inferiore unito alla
ventola.
Aumento rapido della
temperatura. Alcuni piatti possono
essere infornati a forno caldo.
Richiede un preriscaldamento
prima di infornare il piatto.
Mantiene al caldo.
Cottura da sotto con leggero
riscaldamento sopra.
Posizionare la griglia sul
gradino inferiore.
Questa posizione permette di
risparmiare circa il 20% di
energia pur mantenendo le
qualità di cottura. la posizione
ECO viene utilizzata ai fini
dell’etichetta energetica.
Simbolo
Nome della funzione Descrizione della funzione
Tradizionale ECO
La cottura avviene grazie
all’elemento inferiore e superiore
senza ventilazione dell’aria.
Modalità di cottura del forno
Calore circolante
La cottura avviene grazie alla
resistenza posta nel fondo del
forno e dalla ventola dell’aria.
Preriscaldamento inutile se non
per cotture con tempi di
cottura molto brevi (doratura
su più livelli).
Grill variabile
La cottura avviene grazie
all’elemento superiore senza
ventola.
Grill ventilato
La cottura avviene
alternativamente grazie
all’elemento superiore e la
ventola dell’aria.
Preriscaldamento inutile
Pollame e arrosti sugosi e rosolati su
tutti i lati.
Possibilità di arrostire un grosso
pezzo di carne collocato sulla griglia,
inserendo il vassoio multi uso nel 1°
gradino per raccogliere il sugo di
cottura.
Effettuare un preriscaldamento di 5 min.
Inserire il vassoio multiuso sul gradino
inferiore.
* Sequenze utilizzate per la menzione scritta sull’etichetta energetica conformemente
*
*
*
99637441 italien et anglais.qxd 07/07/2005 10:45 Page 18
Page 19
Consigliato per carni, pesci e verdure, collocare in un piatto di
terracotta preferibilmente.
Consigliato per le cotture lente e delicate: selvaggina tenera.
Per ottenere un arrosto con la carne rossa dentro.
per cuocere a fuoco lento in pirofile chiuse i piatti prima fatti rosolare
sul fuoco (pollo al vino, coniglio in scivet...).
Consigliato per fare lievitare la pasta di pane...non superando i 40°C
(per scaldare i piatti, scongelare)
Consigliato per i piatti che devono restare umidi (quiche, crostate di
frutta..
La pasta rimarrà ben cotta sotto.
Consigliato per le preparazioni che lievitano (brioche, kouglof...) e
per i soufflé che non verranno mai bloccati da una crosta sopra.
Risparmierà energia durante tutta la cottura anche
se il tempo può essere più lungo.
Raccomandazioni
Modalità di cottura del forno
Consigliato per tenere morbida la carne, per le verdure,
pesce e per le cotture multiple fino a 3 livelli.
La potenza è regolabile da 30 a 100% (posizioni da 1 a 4 nel
display). per un’efficacia massima, le consigliamo di utilizzare le
potenze superiori.
Consigliato per fare lievitare la pasta di pane...non superando i
40°C (per scaldare i piatti, scongelare).
Consigliato per il pollame o arrosti.
Per cuocere al centro cosciotti, costate di manzo.
Per non fare asciugare il fondo nei piatti di pesce.
19
IT
99637441 italien et anglais.qxd 07/07/2005 10:45 Page 19
Page 20
20
- Il suo forno si pulisce tramite eliminazione ad alta temperatura dello sporco
proveniente dagli schizzi o dalle fuoriuscite. I fumi e gli odori vengono distrutti
attraverso il passaggio di un catalizzatore.
- La pirolisi non è necessaria dopo ogni cottura, ma solo se il grado di sporco lo
richiede.
-.Per adattarsi ad ogni situazione, questo forno dispone di 2 cicli di pulizia
pirolitica.
- Un ciclo economico ( PYRO ECO) che dura circa 1 ora e 30 (considerato
il tempo di raffreddamento del forno, il forno sarà bloccato per 2 ore) questo ciclo
consuma circa il 25% rispetto al ciclo piro standard. Azionato regolarmente (ogni
2 o 3 cotture di carne) il ciclo permette di tenere pulito il forno in qualsiasi
circostanza.
- Un ciclo standard ( PYRO ) con durata 2 ore (considerato il tempo di
raffreddamento del forno, il forno sarà bloccato per 2 ore) garantirà una pulizia
efficace per un forno molto sporco.
- Per sicurezza, la porta si blocca non appena la temperatura all’interno del forno
supera la temperatura di cottura. Sarà impossibile aprire la porta anche
posizionando la manopola "selettore delle funzioni" su 0.
1. C
os’è una pirolisi ?
C ome pulire la c
2. In quale caso bisogna effettuare una pirolisi ?
COTTURE POCO Biscotti, verdure, pasticceria Cotture senza schizzi
SPORCHE quiche, soufflé non necessaria la pirolisi
COTTURE Carne, pesce, Pirolisi può essere necessaria
SPORCHE (in un piatto) verdure farcite tutte le 3 cotture
COTTURE MOLTO Grossi pezzi di carne La pirolisi si può fare dopo
SPORCHE alla spiedo 1 cottura di questo tipo se
gli schizzi sono notevoli
Il suo forno fuma durante un preriscaldamento o fuma parecchio durante una
cottura. Il suo forno sprigiona a freddo un odore fastidioso dopo determinate
cotture (agnello, pesce, grigliate...).
Non bisogna aspettare che il forno sia pieno di grasso per
effettuare questa pulizia.
99637441 italien et anglais.qxd 07/07/2005 10:45 Page 20
Page 21

3. Come fare una pirolisi immediata
21
Togliere tutti gli elementi estraibili dal forno ed eliminare lo
sporco più grosso.
• Verificare che il programmatore mostri l’ora del
giorno e che quest’ultima non lampeggi.
• Posizionare la manopola “selettore delle
funzioni” sulla posizione “PYRO” o “PYRO ECO”.
La durata della pirolisi è di 2 ore in “PYRO
ECO” o 2 ore e 30 in “PYRO”. Il tempo
comprende la durata di raffreddamento fino allo
sblocco della porta.
Il display indica l’ora in cui il forno sarà
nuovamente disponibile.
Segnala che è in ciclo di pirolisi (o
PYRO eco).
Durante il ciclo di pirolisi, nel display compare
un lucchetto per indicare che la porta è
bloccata.
A fine ciclo della pirolisi, il display
indica...........................................................>
Quando il lucchetto scompare dal display, è’
possibile aprire la porta.
• Riportare il selettore di funzioni sulla
posizione 0.
• Quando il forno è freddo, utilizzi un panno
umido per eliminare la cenere bianca.
Il forno è pulito e nuovamente utilizzabile
per effettuare la cottura desiderata.
IT
99637441 italien et anglais.qxd 07/07/2005 10:45 Page 21
T˚
c
Page 22

Come sostituire la lampadina
• La lampadina è situata nel soffitto del forno.
a) Girare la base verso
sinistra di 90 gradi.
b) Svitare la lampadina nello
stesso senso.
Caratteristiche della lampadina:
- 15 w
- 220-240 V
- 300°C
- zoccolo E 14
c) Cambiare la lampadina, rimontare la base e ricollegare il forno.
Portalampada
Svitare
Base
per svitare la base e la lampadina, utilizzare un guanto
di gomma che faciliterà lo smontaggio.
Scollegare il forno prima di qualsiasi intervento sulla lampadina
per evitare di prendere la scossa, e lasciare raffreddare
l’apparecchio se del caso.
22
Seguire le istruzioni riportate nel paragrafo ”fare una pirolisi immediata”, poi
• Posizionare il selettore di programmazione
del tempo sulla posizione “ ”.
La fine cottura lampeggia per indicare che la
regolazione è possibile.
• Girare il pulsante per regolare l’ora di fine
cottura desiderata.
Esempio: fine PYRO alle 4.
Dopo queste azioni, la partenza della pirolisi è
ritardata in modo tale da concludersi alle 4.
Quando la pirolisi è terminata, rimettere il
selettore di cottura su “ 0 ”.
4. Come ritardare una pirolisi
99637441 italien et anglais.qxd 07/07/2005 10:45 Page 22
T˚
c
Page 23

23
Cosa fare in caso di anomalie di
funzionamento ?
Se ha un dubbio sul corretto funzionamento del suo forno, anche se
non necessariamente ciò significa un guasto.
In ogni caso verifichi
i seguenti punti:
Ha riscontrato che...
Possibili cause Cosa fare ?
Il forno non riscalda.
• Il forno non è collegato.
• Il fusibile del suo impianto è rotto.
• la temperatura selezionata è troppo
bassa.
• Il sensore è difettoso
• Il forno si è surriscaldato e si è
messo in sicurezza.
- Collegare il forno.
- Cambiare il fusibile dell’impianto e
verificarne il valore (16A).
- Aumentare la temperatura
selezionata.
-Chiamare il Servizio Post-Vendita.
-Chiamare il Servizio Post-Vendita.
-Chiamare il Servizio Post-Vendita.
L’indicatore di T°C lampeggia.
• Mancato blocco della porta.
• Sensore di temperatura difettoso.
-Chiamare il Servizio Post-Vendita.
-Chiamare il Servizio Post-Vendita.
La lampadina del forno non
funziona più.
• La lampadina non funziona.
• Il forno non è collegato o il
fusibile non funziona.
- Sostituire la lampadina.
- Collegare il forno o sostituire il
fusibile.
La ventola di raffreddamento
continua a girare dopo l’arresto
del forno.
• La ventola funziona massimo per
1 ora dopo la cottura o quando la
temperatura del forno è superiore
a 125°C.
• Se non si ferma dopo 1 ora
- Aprire la porta del forno per
accelerare il raffreddamento del
forno.
-Chiamare il Servizio Post-Vendita.
La pulizia per pirolisi non parte.
• la porta è chiusa male.
• Il sistema di blocco è difettoso.
• Il sensore di T° è difettoso.
• Il contatto di rilevamento “porta
chiusa” è difettoso.
- Verificare la chiusura della porta.
-Chiamare il Servizio Post-Vendita.
-Chiamare il Servizio Post-Vendita.
-Chiamare il Servizio Post-Vendita.
IT
99637441 italien et anglais.qxd 07/07/2005 10:45 Page 23
Page 24

Vantaggio e principio
TUTTE LE COTTURE SI EFFETTUANO SENZA PRERISCALDAMENTO DEL FORNO
24
1. Vantaggio e principio
Con la funzione “EASY COOK” non ha più bisogno di selezionare la temperatura
e il tempo di cottura.
Questi due parametri sono calcolati automaticamente dal suo forno al fine di
ottenere la cottura migliore.
La modalità di cottura “EASY COOK” si effettua in 2 fasi:
1) una prima fase (acquisizione) durante la quale il forno registra, grazie ai suoi
sensori elettronici, i dati della cottura specifici del suo piatto.
Questa fase viene visualizzata mediante un’animazione nella zona destra del
display può durare da 5 a 40 minuti a seconda della cottura scelta.
NON APRIRE LA PORTA DURANTE QUESTA FASE per non disturbare la
registrazione dei dati.
2) in una seconda fase (calcolo), il forno determina il tempo di cottura necessario.
Il simbolo dell’animazione “Auto” scompare. Il forno indica il tempo di cottura
restante e l’ora reale di fine cottura. Si può aprire se si desidera intervenire sul
piatto (per irrorare o girare l’alimento...).
3) A fine cottura, si udiranno una serie di bip.
2. M
odalità d’uso
a) Cottura immediata:
Posizionare il selettore di cottura sulla funzione
“EASY COOK”.
La scelta dei vari piatti scorre sul display.
Mediante il pulsante, scegliere il piatto.
Inserirlo sul gradino consigliato nel display.
Chiudere la porta. Il forno inizia la sua cottura.
La fase di ricerca comincia, e viene segnalata con la
visualizzazione nel display: viene proposto un tempo.
A cottura conclusa, il forno emette vari bip.
99637441 italien et anglais.qxd 07/07/2005 10:45 Page 24
Page 25

b) Cottura ritardata:
Posizionare il selettore di cottura su “EASY COOK”.
Scegliere la griglia mediante il pulsante di selezione.
Infornare il piatto e chiudere la porta
Posizionare il selettore di modalità su “ ”.
Girare il pulsante di regolazione + o - per regolare l’ora
di fine di cottura desiderata.
Es.: Fine cottura 13.00.
Dopo tali operazioni, la partenza della cottura viene
ritardata.
La fine cottura è stimata a partire del tempo medio di
base. Come in una cottura immediata, questo tempo verrà ottimizzato nel corso
della cottura e quindi l’ora può variare di alcuni minuti (in + o in -) rispetto alla
selezione iniziale.
Vantaggio e principio
25
3. Consigli
Non appena scompare il simbolo “Auto” si potrà aprire
la porta del forno.
Se tuttavia si apre la porta mentre il simbolo è acceso,
il forno emette un bip di avvertimento e i simboli dei
piatti lampeggiano.
La cottura in modalità “EASY COOK” DEVE INIZIARE
CON IL FORNO FREDDO, è meglio quindi aspettare il raffreddamento completo
prima di effettuare una seconda cottura nella stessa modalità (in caso contrario i
simboli “°C” e piatti lampeggiano nel display impedendo di iniziare la cottura).
4. Cosa fare in caso di anomalie?
Ha riscontrato che... Possibili cause Cosa fare ?
bip+simboli
• Ha aperto la porta per la fase di
ricerca: il programma è annullato.
- Lasciare raffreddare il forno per
far ripartire la cottura.
Il simbolo —- lampeggia nel
display.
• Il forno cerca di determinare il
tempo di cottura ideale.
- E’ una fase normale.
Viene visualizzato “Auto”
• Il forno ha determinato ora il
tempo di cottura appropriato.
- E’ normale.
Il selettore delle funzioni su
“EASY COOK” simboli+ bip + °C
lampeggiano
• Il forno è troppo caldo per
effettuare una cottura “EASY
COOK”.
- Attendere che il forno raffreddi
o utilizzare una funzione di
cottura classica.
IT
99637441 italien et anglais.qxd 07/07/2005 10:45 Page 25
T˚
c
Page 26

26
GUIDA ALLE FUNZ
Pizza
• pizza gastronomia fresca
• pizza pasta pronta all’uso
• pizza pasta “in casa”
• pizza surgelata
• rotoli al formaggio
• pagnottelle
• pollo da 1 kg a 1,800 kg
• anatra, faraona...
• Torte fresche
• Torte surgelate
• Quiche
• Sfoglie alla carne surgelate
• Cannelloni, lasagne, rigatoni gratinati
• Pesci interi
(orata, nasello...)
o interi singoli
(trote, sgombri)
con aromi e vino bianco
pesce arrosto
• Arrosto di manzo
(cottura al sangue al centro)
Pollo
Torte
Arrosto di
Manzo
Pesci
99637441 italien et anglais.qxd 07/07/2005 10:45 Page 26
Page 27

27
• CONSIGLI:
- Posizionare sulla griglia per ottenere una bella crosta
- Posizionare nel piatto smaltato per ottenere una pasta tenera.
• CONSIGLI:
- Cottura allo spiedo: non dimenticare di collocare la leccarda nel
1° gradino per recuperare il grasso.
- Cottura in un piatto: in terracotta preferibilmente per evitare gli
schizzi di grasso.
- Bucherellare la pelle del pollame per evitare gli schizzi.
• CONSIGLI:
- Utilizzare una forma in alluminio antiaderente:
la pasta sarà più croccante sotto.
- Torte e quiche surgelate in commercio: Togliere la barchetta di
alluminio prima di posarle sulla griglia.
• CONSIGLI:
- Riservare questa funzione per i pesci interi, cucinati nel piatto (i
pesci grigliati richiedono un preriscaldamento del forno).
• CONSIGLI:
- Se si desidera una carne ben cotta, optare per una funzione di
cottura tradizionale.
- Fare uscire l’arrosto dal frigo almeno 1 ora prima di cominciare la
cottura (vedere consigli pagina seguente).
Togliere il più possibile il grasso, sistemare l’arrosto in una pirofila
con un po’ d’acqua e un cucchiaino d’olio.
Salare solo a fine cottura.
IT
99637441 italien et anglais.qxd 07/07/2005 10:45 Page 27
Page 28

Consigli e astuzie
28
Pizza
Per evitare al formaggio o alla salsa di pomodoro di colare nel forno,
sistemare un foglio di carta forno tra la griglia e la pizza.
Pollo
Adattare il piatto alla dimensione del pollo in modo che non bruci.
Torte / Quiche:
Evitare i piatti in vetro, in porcellana: se troppo spessi prolungano il tempo di
cottura e il fondo della torta non rimane croccante.
Con la frutta il fondo della torta rischia di inzupparsi: è sufficiente allora
depositare pochi cucchiai di semola fine, biscotti triturati, mandorle tritate o
tapioca, che cuocendo assorbiranno i liquidi.
Con le verdure umide o surgelate (porri, spinaci, broccoli o pomodori) si può
cospargere un cucchiaio di farina di mais.
Pesci:
All’acquisto l’odore deve essere gradevole e leggermente marino.
Il corpo sodo e rigido, le squame ben aderenti alla pelle, l’occhio vivo e
le branchie brillanti ed umide.
Manzo (CARNE IN GENERALE)
Tirare fuori la carne dal frigo molto prima della cottura: lo choc freddo/caldo
indurisce la carne, mentre così si otterrà un arrosto ben dorato attorno e
rosso dentro. Non salare prima di cuocere: il sale assorbe il sangue e secca
la polpa. Rigirare la carne con una spatola: se la si punzecchia il sangue
fuoriesce. Lasciare sempre riposare la carne dopo la cottura per 5-10 minuti:
avvolgerla in un foglio d’alluminio e posarla all’ingresso del forno caldo: in
questo modo il sangue attirato verso l’esterno durante la cottura rifluisce e
irrora l’arrosto.
Utilizzare pirofile in terracotta: il vetro favorisce gli schizzi di grasso.
Non cuocere mai nella leccarda smaltata.
99637441 italien et anglais.qxd 07/07/2005 10:45 Page 28
Page 29

29
Alcune ricette
Pizza Base: 1 pasta per pizza
*al
le verdur
e: 6 cucchiai di salsa di pomodoro + 100 g di zucchine
tagliate a dadini + 50 g di peperoni tagliati a dadini + 50 g di
melanzane a fette +2 pomodorini a rondelle + 50 g di gruviera
grattugiato + origano + sale + pepe.
*al r
oquefort, pancetta affumicata: 6 cucchiai di salsa di pomodoro +
100 g di pancetta + 100 g di Roquefort a dadini + 50 g di noci + 60 g
di gruviera grattugiato.
*al
la salsic
cia, al formaggio bianco: 200 g di formaggio bianco molle
scolato e steso sulla pasta + 4 salsicce a rondelle + 150 g di prosciutto
a listarelle + 5 olive + 50 g di gruviera grattugiato + origano + sale
+ pepe.
Torte / Quiche Forma in alluminio antiaderente diametro 30 cm.
Torta sfoglia pralinata alle mele:
1 pasta sfoglia con il foglio di carta, bucherellata con la forchetta.
200 ml di crema fatta bollire con una stecca di vaniglia.
2 uova sbattute con 30 g di zucchero, aggiungere la crema raffreddata.
2 mele tagliate a dadini passate in 70 g di praline.
Posare crema + mele. Infornare.
Quiche: Base: 1 forma in alluminio diam. 27 - 30 cm
1 Pasta brisè pronta all’uso
3 uova sbattute + 50 cl di panna spessa
sale, pepe, noce moscata.
Farce varie: 200 g di lardo precotto,
o - 1 kg d’indivia cotta + 200 g di gouda grattugiato
o - 200 g di broccoli, + 100 g di pancetta + 50 g di gorgonzola
o - 200 g di salmone+ 100 g di spinaci cotti e scolati
IT
99637441 italien et anglais.qxd 07/07/2005 10:45 Page 29
Page 30

30
Alcune ricette
Pesce
Orata al sidro 1 orata da 1,5 kg.
500 g di champignon.
2 mele acide.
2 scalogni.
2 cucchiai di panna spessa.
100 g di burro.
1/2 litro di sidro. Sale, pepe.
Eviscerare e squamare il pesce. Collocarlo in un piatto imburrato sugli scalogni
tritati fini e i funghi a lamelle. Aggiungere il sidro, sale e pepe e alcune noci di
burro. Infornare e cuocere nel burro le mele a spicchi non spelate.
A fine cottura sistemare il pesce in un piatto caldo, filtrare il sugo e versare la
crema.
Aggiungere la crema al sugo, servire con le mele e i funghi.
Pollo
Farcire il pollo con un mazzo di dragoncello fresco, o irrorare con un
composto di 6 spicchi d’aglio spelati e una presa di sale grosso, alcuni
grani di pepe.
Arrosto di manzo Salse d’accompagnamento
Salsa SAUTERNE AROMATIZZATA al ROQUEFORT:
Fare stufare 2 cucchiai di scalogno tritato al burro.
Aggiungere 10 cl di Sauterne, lasciare evaporare.
Aggiungere 100 g di Roquefort e fare fondere dolcemente.
Aggiungere 20 cl di panna liquida, sale, pepe. Fare bollire.
Salsa COGNAC al PEPE
ROSA:
Fate stufare 2 cucchiai di scalogno tritato.
Aggiungere 15 cl di vino rosso, lasciare evaporare.
Aggiungere 1 tuorlo d’uovo, 1 cucchiaio di Ketchup, 200 g di burro. Sale,
pepe.
Rigirando versare 3 cucchiai di Cognac e 1 cucchiaino di bacche rosa
schiacciate.
Salsa FRUT
TATA alla pera e al crescione:
Fare cuocere 1 pera, ricoperta di vino bianco. Scolare e mescolare
Sbollentare 1/2 mazzo di crescione, scolare, tritare.
Fare stufare 1 cucchiaio di scalogno tritato al burro
Bagnare con il vino della cottura. Fare evaporare.
Aggiungere la pera, il crescione acquatico e 20 cl di panna liquida.
Salare, pepare e fare sobbollire.
99637441 italien et anglais.qxd 07/07/2005 10:45 Page 30
Page 31

99637441 italien et anglais.qxd 07/07/2005 10:45 Page 31
Page 32

32
99637441 italien et anglais.qxd 07/07/2005 10:45 Page 32
Page 33

Throughout this manual,
indicates safety recommendations,
indicates advice to help you make the
best use of your oven
Your oven
O
ven features P.34
A
ccessories
P.35
Safety recommendations
P.36
How to install your oven
Electrical connections P.37-38
Dimensions for installation use P.39
How to use your oven
The oven programmer
P.40
How to set the clock
P.41
How to cook straightaway
P.42
How to programme the cooking
P.43
How to delay cooking (pre-selected end time)
P.44
How to cook economically
P.45
How to use the Grill+ feature
P.46
How to use the timer
P.47
How to adjust the brightness of the display panel
P.47
Cooking methods
P.48-49
Cleaning the oven cavity
Pyrolysis explained P.50
When to clean by pyrolysis P.50
Starting pyrolysis straightway P.51
Delaying cleaning by pyrolysis P.52
Changing a bulb
P.52
Troubleshooting
P.53
EASY COOK P.54-60
33
Contents
GB
99637441 italien et anglais.qxd 07/07/2005 10:45 Page 33
Page 34

34
1
2
3
4
5
T˚
c
1 2 3
5
6
8
7
4
Your oven
1
2
5
6
7
3
4
Method selector
Programme selector
Control knob
Function selector
Light
Shelf positions
Hole for rotisserie
Door-open detector
plate
OVEN FEATURES
8
99637441 italien et anglais.qxd 07/07/2005 10:45 Page 34
Page 35

35
Accessories
Anti-tip safety shelf
Food can either be placed on the shelf in a
dish or cake tin for cooking or browning, or
may be placed directly on the shelf itself.
Multi-purpose baking tray
This tray has a raised edge and can be used
for baking pastries (choux buns, meringues,
small cakes, flaky pasties, etc).
Joints should not be cooked in this tray
uncovered because fat could spit all over the oven sides.
Grill pan
With special trivet for grilling
The pan can be used for collecting juices
when cooking with the grill element by itself
or with the oven set to pulsed grill (grill and
fan) orwhen roasting on Easycook.
It is particularly useful as a large roasting tray for meat and vegetables.
When using Easycook or a function with a base element never cook with the grill
tray sitting on the bottom of the oven as this could the enamel
BACK
FRONT
Grill pan handle
GB
99637441 italien et anglais.qxd 07/07/2005 10:45 Page 35
Page 36

36
Safety recommendations
Please read these instructions before installing and using your oven.
The oven has been designed for domestic use only for cooking food. No asbestos
has been used in its construction.
USING FOR THE FIRST TIME:
Before you use your oven for the first time, leave it empty and, with the door
closed, turn it on to maximum temperature and let it heat up for 15 minutes. This
"burns off the newness of the oven". During this time there may be some smell
from the mineral wool that insulates the oven and there could be some smoke.
This is perfectly
normal.
NORMAL USE:
- Always close the door properly. The oven is fitted with a seal designed to
work with a closed door.
- Never lean or let anyone sit on the oven door when it is open.
- The oven parts and accessories can become hot when the door is
left partially open and the grill on. Always keep children at a safe distance.
- When the oven is on it will get hot. Take care not to touch the heating
elements inside the oven.
- Always protect your hands with oven gloves or something similar when
removing food, accessories or containers from the oven.
- Do not line your oven or grill pan with kitchen foil. The metal will increase
the heat produced and could ruin the food and damage the enamel.
- Never use a spray or a high-pressure washer to clean the oven.
- During self-cleaning, surfaces can become hotter than in normal use.
Children must be kept at a distance.
During the action of pyrolysis, accessible surfaces become much hotter than
during normal cooking. Keep children at a distance.
Always check that the oven is off before you clean the inside.
- For your safety your oven is equipped with an AUTOMATIC STOP should
you inadvertently forget to turn off your oven. After 10 hours' operation, the AS
(Automatic Stop) function is activated and your oven stops heating. AS is
displayed in place of the time and a series of 2 successive pips is sounded for a
certain time.
Ensure that the function selector is returned to 0 to re-use your
oven.
99637441 italien et anglais.qxd 07/07/2005 10:45 Page 36
Page 37

37
Electricity meter (mains)
(20A, single-phase
220-240 V alternating
current 50 Hz)
Socket
2 -pin with earth
220-240 V single phase
alternating current supply
Electrical connections
Connecting cable
approx 1.50 m.
long
Fused 16A or differential
circuit breaker
Before connecting your oven, make sure you are using the correct size cable. The cross-section should be the same as the cable
connected to the oven. Use a 16-amp fuse.
How to install your oven
GB
99637441 italien et anglais.qxd 07/07/2005 10:45 Page 37
Page 38

38
How to insta
We cannot accept any liability in the event of an accident
resulting from non-existent or faulty earthing.
• The supply cable (H05 RR-F, H05 RN-F or H05 W-F) must be long enough to allow
the oven to rest on the floor in front of its housing.
With the oven sitting on the floor and disconnected:
• Open the trapdoor at the bottom right hand side at the back of the oven by
removing the 2 screws and swinging the door away.
• Remove the sheath from each wire in the new cable up to 12 mm.
• Twist the ends carefully together.
• Unscrew the terminal screws and remove the wires that need changing.
• Pass the new cable through the wire clamp to the right of the terminals.
• Connect the wires up in accordance with the markings on the terminals.
• Make sure all wires are trapped under the screws.
• The brown wire (live) going to terminal marked L.
• The green and yellow wire (earth) going to the one marked .
• The blue wire (neutral) going to the terminal marked N.
• Tighten the screws and check, by tugging on each wire, that they are firmly connected.
• Tighten the clamp to hold the cable.
• Close the trapdoor using the two screws.
Fitting new wiring and/or changing cables.
The electrical connections are made before the oven is installed in its housing.
• The oven must be connected using an approved 3-core cable (live, neutral and
earth
) with 1.5 mm square conductors. This should be connected via a 3- pin-
socket (live, neutral, and earth to the main supply which should be should be a
220-240V, alternating single-phase current. If the oven is not connected using a
plug and socket, it must be connected to a multi-pole switch with a minimum gap
of 3 mm between contacts. The earth wire (green and yellow) should be connected
to the terminal marked with the earth symbol on the appliance and to the earth
in the switch.
• Where the oven is connected using a separate plug and socket this must be
accessible after the oven has been installed.
• The neutral wire (blue) of the oven must be connected to the neutral in the main supply.
99637441 italien et anglais.qxd 07/07/2005 10:45 Page 38
Page 39

39
If you are unsure about fitting this oven yourself please use a
qualified electrician.
Dimensions for installation use
The oven may be housed either under a work surface or built into a
column that is open* or closed with a suitable opening.
Your oven works at its best and produces excellent results when cooking and cleaning itself, if its air circulation is not compromised:
• The oven must be centred in the unit so that there is a minimum distance of 5
mm between it and the surrounding unit.
• The housing unit or its outer surface must be capable of withstanding heat.
• To ensure the oven rests firmly in the housing, screw it to the housing unit using
the holes on the side uprights provided (see diagram).
To do this:
1) Remove the rubber stoppers masking the fixing holes.
2) To prevent the housing unit splintering, drill two holes 3 mm in diameter in the wall of the
housing unit opposite the fixing holes.
3) Attach the oven using the two screws.
4) Conceal the hole using the rubber stoppers. (These also help to cushion the
closing of the oven door).
(*) If the housing unit is open at the back, the gap must not be more
than 70 mm.
GB
99637441 italien et anglais.qxd 07/07/2005 10:45 Page 39
Page 40

40
1. The oven programmer
13
5
7
8
9
6
2
4
10
11
12
Temperature increase indicator
ECO (economical) cooking indicator
Recommended shelf position for dish
EASY COOK indicator
Time display (time of day and timer)
Grill+ indicator
1
3
4
5
6
2
Length of cooking time
End of cooking time
EASY COOK dishes indicator
Control knob
Oven temperature and
pyrolysis indicator
Door locked indicator
7
9
10
8
11
12
Your oven
+
99637441 italien et anglais.qxd 07/07/2005 10:45 Page 40
Page 41

41
a) When the oven is first
switched on at the mains
• Set the time of day by turning the knob (the
faster you turn the knob the quicker the time is
displayed).
• The oven assumes the time is correct a few seconds after you stop turning the knob -> The
display stops blinking.
Time chosen is 12.30.
b) Altering the clock
• Turn the programme selector to the re-set posi-
tion “ ”
• The time display blinks and you can alter the time.
• Turn the knob to obtain the correct time (back or
forwards).
• When the correct time is shown, turn the selector
to ”T°c” (temperature control) -> and the display
will stop blinking.
If you omit the last step, the oven will automatically assume the time
after a few seconds.
2. How to set the clock
Timer
Cooking
time
End of
cooking
Altering
the clock
Knob description
GB
How to use your oven
99637441 italien et anglais.qxd 07/07/2005 10:45 Page 41
T˚
T˚
c
c
Page 42

42
How to use your oven
The timer display only shows the time of day.
It should not be blinking.
• Choose how you want to cook your food:
Turn the dial until it is indicating your choice.
Example : position " ".
• Place your dish in the oven at the shelf
position recommended in the display.
E.g" " -> means shelves 1 or 2.
• Your oven will suggest the best temperature
for the method chosen. In this case 200ºC.
However, you can override the suggestion by using
the knob below the display.
E.g " " is now at 190ºC.
After this, the oven heats up, the
temperature increase indicator is busy
and reflects how hot the oven is.
When the oven has reached the right temperature, it gives 3 beeps.
After cooking the fan continues to work for a while to ensure
the elements cool right down.
3. How to cook straightaway
99637441 italien et anglais.qxd 07/07/2005 10:46 Page 42
Page 43

43
How to use your oven
a) To turn on the oven manually but
programme the oven to turn off (delayed
cooking)
• Choose the method of cooking and adjust the
temperature if necessary.
The example is " "
Temperature 200°C
• Turn the programme selector to
“”
The cooking time display shows 0:00 and blinks.
You can now set how long to cook for.
•
Turn the knob until the time is displayed.
E.g. 25 minutes
The oven will automatically assume this time is
correct after a few seconds
-> The display will stop blinking.
Immediately the display stops blinking the
countdown starts.
The time cooking will finish (start time +
cooking time) is shown in the display panel.
For this example:
cooking will end at 12:55 pm
After this, the oven heats up,
the temperature increase indicator is busy and reflects how hot
the oven is.
When the oven has reached the right temperature, it gives 3 beeps.
At the end of the cooking time, the oven gives a series of beeps for some
minutes. To switch the beeps off, turn the method selector to TºC and the
feature selector to 0.
4. How to programme the cooking
GB
99637441 italien et anglais.qxd 07/07/2005 10:46 Page 43
T˚
c
Page 44

44
b) Delayed cooking with a pre-selected cooking time (you decide
how long the food will cook for and when the cooking will stop)
• As for a), choose the method and the
temperature and select the length of time to
cook for.
Now, immediately turn the method selector to
“”.
The end of cooking time will blink in the display
panel.
• To postpone this, turn the knob until the
time you want appears.
In the example shown, cooking will stop
at 1 pm (13:00)
When you have done this, cooking is delayed and will start later and finish at
13:00. When cooking finishes the oven gives a series of beeps until you turn the
feature switch to “0”.
How to use your oven
After you have programmed in the times you can still:
- Change the length of cooking time
- Cancel the programme at any time by re-setting the cooking
time to 0:00
99637441 italien et anglais.qxd 07/07/2005 10:46 Page 44
T˚
c
Page 45

How to use your oven
5. How to cook economically*
45
The programme display must be showing the
time of day without blinking.
• Turn the feature selector to " ".
and the ECO indicator will appear in the
panel.
• Place your dish in the oven according to the
suggestion.
E.g " " -> means shelves 1 or 2 are the best
• Your oven will now display the best
temperature to cook at for your method. E.g.
200ºC. If you want to change this, use the knob
beneath the display panel.
The display shows " " at 190ºC.
After this, the oven heats up,
the temperature increase indicator is busy and reflects how hot
the oven is.
When the oven has reached the right temperature, it gives 3 beeps.
To optimise ECO cooking, do not preheat and do not open the door.
*This setting is designed to reduce the energy required for cooking by
up to 20%, while still producing the same results.
ECO means it is energy-efficient as stated on the label.
After cooking the fan continues to work for a while to ensure
the elements cool right down.
GB
99637441 italien et anglais.qxd 07/07/2005 10:46 Page 45
Page 46

46
How to use your oven
6. How to use the Grill+ feature
You can either switch this feature on or off during the main cooking period. Simply turn the knob below the display.
You can also use this feature during a delayed cooking cycle.
This feature enables you to brown the top of the dish after it has been cooked by
another method. For the last 5 minutes of cooking time, the grill switches on.
It will only operate in conjunction with the following functions: .
After selecting one of the above functions GRIL+ is selected by adding 5 minutes
to the cooking time or turning the feature selector to GRILL+ when cooking
ends.
• Set the cooking method and alter the
temperature if required.
• Turn the programme selector to GRILL+, the
cooking time will blink 0:05 (this is the minimum
time this feature operates for when used with
another cooking method).
• Turn the knob to add the normal cooking time.
After a few seconds, the display will stop
blinking.
• When you have done all three, the oven will
warm up and a horizontal bar will light up in the
display panel under the word GRILL+ to indicate
it is working. 5 minutes after the main cooking
ends the GRILL+ indicator will start blinking.
Never place dishes too close to the grill element or the food will burn
rather than brown gently. Always use a shelf position at the bottom of
the oven (1 or 2).
Sui
table dishes:
• Cheese-topped pasta, leeks in cheese sauce, fish in sauces, fruit crumble etc..
Typical example of this feature in use :
Cauliflower cheese sprinkled with extra cheese:
• 1.Select cooking method
• 2.Select temperature (180ºC)
• 3.Select GRILL+
• 4.Select time: 25 minutes.
The sauce will heat for 20 minutes and then the cheese topping will brown for 5.
99637441 italien et anglais.qxd 07/07/2005 10:46 Page 46
T˚
c
Page 47

Your oven is fitted with a separate minute timer. It is not connected to the
oven's programmes. You can use it just like a kitchen timer.
This feature can be used even when the oven is working. Using the minute
minder will cause the time of day to disappear temporarily from the display.
• Turn the method selector to “ ” -> the
display blinks and a small egg-timer lights up.
• Turn the knob until the time you want is
displayed (up to 59 minutes 59 seconds)
E.g.: 15 minutes 30 secs
A few seconds later the display stops blinking
and you will see the countdown taking place.
When the minute minder reaches 0, it will
beep to let you know.
7. How to use the minute minder
How to use your oven
You can alter or switch the minute minder off at any time.
47
8. How to adjust the brightness of the display panel
To adjust the brightness of the display panel:
• Set the time of day to 12:10
• Keep hold of the knob and continue turning
until the light is as you want it.
Once you have adjusted the brightness you will
need to reset the time of day.
GB
99637441 italien et anglais.qxd 07/07/2005 10:46 Page 47
T˚
c
Page 48

48
P
ulsed conventional oven
Food is cooked by a top and
bottom element and the fan.
C
onventional oven
Food is cooked by a top and
bottom element. No fan.
Pulsed bottom oven
Food is cooked by the
bottom element with gentle
heat from the grill and the
pulsed-air fan.
Warming oven
Heating from top and bottom
elements with pulsed air.
Temperature rises rapidly.
Some food can be started off
in a cold oven
Pre-heating needed to reach
the required temperature.
Stays warm
Food is cooked from
underneath.
Place the wire shelf on the first
shelf from the base.
This programme allows about
20% saving with no preheating.
The ECO feature is used to label
the oven.
Symbol
Feature Description
C
onventional oven ECO
Food is cooked by a top and
bottom element. No fan.
Cooking methods
F
an oven
A heating element at the
back of the oven and the
fan help cook the food.
No pre-heating necessary except
for food with a relatively short
cooking time (e.g. small biscuits
on several shelves).
Adjustable grill
Cooking is done by the top
element only. No fan.
Pulsed grill
Cooking is done
alternately by the top
element and by the fan.
No pre-heating required. Suitable for
poultry and succulent joints that have
a spit-roasted appearance. Large
joints can be accommodated by
placing directly on the shelf and
using the multi-purpose baking tray
on the bottom rail to catch the juices.
Warm up for 5 minutes.
Slide the grill pan onto the shelf
beneath the grill.
* ·Cooking methods referred to in the information about energy labelling in accor
*
*
*
99637441 italien et anglais.qxd 07/07/2005 10:46 Page 48
Page 49

Recommended for meat, fish and vegetables, preferably in a
earthenware dish. Do not place any trays, shelves on the base as
there is an element under the enamel.
Recommended for food requiring slow, careful cooking such as game
and braising joints. Ideal for sealing red meat joints and simmering
covered casseroles whose contents have been partially cooked on the
hob first.
Donot place any trays, shelves on the base as there is an element
under the enamel.
Recommended for leaving breads to rise (keeping temperature below
40ºC), keeping dishes warm and thawing food.
Recommended for dishes with a lot of liquid (quiches and fruit pies) as
the pastry base is cooked through. Use also for food that rises (bread
and cakes) and uncovered soufflés.
You will save energy during cooking but the cooking time may be
longer. Do not keep opening the door. Do not place any trays, shelves
on the base as there is an element under the enamel.
Recommendations
Cooking methods
For cooking on one shelf time will be the same.
Recommended to prevent meat drying out, and for cooking vegetables
and fish and food placed on up to 3 shelves, where cooking time will be
longer. Reduce temperatures by 20°C-30°C
The power is adjustable from 30 to 100% (positions 1 to 4 on the
display). For efficient cooking, we recommend using higher power levels.
To seal and cook through lamb chops and sides of beef. To keep fish
in their
49
GB
99637441 italien et anglais.qxd 07/07/2005 10:46 Page 49
Page 50

50
-Your oven is self-cleaning. It does this by burning off the spatters and drips
produced, at high temperature. The smoke and smells that this produces are
removed as the air passes through a catalyst.
- It is not necessary to run the pyrolysis feature after every use of the oven,
simply when the oven is dirty.
- To make it more efficient, this oven has 2 pyrolytic cleaning cycles.
- An energy-saving one (PYRO ECO) lasting 90 minutes (plus cooling
down time means the oven is locked for 2 hours) and consuming 25% less
energy than the standard cycle. Used after the second or third time you cook
meat, this feature will ensure your oven stays clean.
- Standard cycle (PYRO) lasting 2 hours (plus cooling down time means
the oven is locked for 2½ hours) and suitable for cleaning a really dirty oven.
- As a safety measure, once the temperature is higher than normal use the door
automatically locks. You cannot unlock it even by turning the pyrolysis feature
off.
1. Pyrolysis explained
C leaning the
2. When to clean by pyrolysis
FOOD WITH LITTLE Biscuits, vegetables, cakes You do not need to use
SPATTERING quiches, soufflés pyrolysis feature
FOOD THAT Meat, fish (in an open dish) Use the pyrolysis feature
SPATTERS stuffed vegetables after 3 oven uses
FOOD THAT Large pieces of If a lot of spitting occurs,
SPITS BADLY meat on the spit run the pyrolysis feature
afterwards.
If your oven smokes when the pre-heat feature is on or if there is a lot of
smoke during a cooking cycle run the pyrolysis cycle. You can also use this
feature if there is an unpleasant smell of cooking when the oven is cold.
Do not wait until the oven is coated in dirt before cleaning it.
99637441 italien et anglais.qxd 07/07/2005 10:46 Page 50
Page 51

3. Starting pyrolysis straightway
51
Before embarking on pyrolytic cleaning, make sure there are no cooking
pots in the oven and you have removed any large splashes or drips.
• Check that the time of day is glowing steadily
in the display panel (not blinking).
• Turn the feature selector to PYRO or PYRO
ECO.
• The
The time for the pyrolysis to work is 2 hours
(PYRO ECO) or 2 ½ (PYRO). This includes the
cooling-down time until the door is unlocked.
The display will show you when you can use
your oven again.
When it shows
on the display, the pyrolytic
cycle (or the energy-saving pyrolytic cycle) is working.
During the cycle, a padlock
appears on the
display to remind you the door is locked.
At the end of the cycle the display
shows..........................................................
>
When the disappears you can open the door.
• Move the function selector back to 0.
• When the oven is completely cold use a damp
cloth to remove the white ash and the oven will
once more be ready for you to cook in.
GB
99637441 italien et anglais.qxd 07/07/2005 10:46 Page 51
T˚
c
Page 52

Changing a bulb
• The light bulb is housed in the ceiling of your oven.
a) Turn the shade a quarter of a turn
to the left
b) Unscrew the bulb in the same
direc tion.
The bulb used is a:
- 15 W
- 220-240 V
- 300°C
- E 14 screw-fitting bulb
c) Change the bulb, replace the shade and switch your oven back on at the mains.
bulb fitting
unscrew
cover
It is easier to unscrew the shade and bulb if you wear a rubber glove.
Warning! Switch off the power at the main switch before
attempting to change the bulb. Leave the oven to cool if
necessary.
52
Follow the instruction on how to carry out a pyrolitic cleaning straightway then
• Set the method selector to “ ”.
The end of cooking time blinks and you can now
adjust the time.
• Turn the knob until the finish time is shown.
E.g. pyrolysis will finish at 4 am.
After this the start of pyrolytic cleaning is delayed
and will finish at 4 am.
When the cleaning is finished, turn all the
selectors to the off position.
4. Delaying cleaning by pyrolysis
99637441 italien et anglais.qxd 07/07/2005 10:46 Page 52
T˚
c
Page 53

53
Troubleshooting
If you're not sure that your oven is working properly, it doesn't necessarily
mean that there's a problem.
In all cases, check the following points:
If you realize that..
Possible causes what should you do?
The oven isn't heating.
• The oven isn't connected to the
power supply.
• The fuse has blown.
• The temperature selected is too
low.
• The sensor is faulty
• The oven has overheated. It has
been put out of use for safety
reasons
- Connect to power supply.
- Change the fuse, checking that it is
16A.
- Increase the temperature selected.
- Contact the After-Sales Service.
- Contact the After-Sales Service.
- Contact the After-Sales Service.
The temperature light does not
go out.
• The door lock is faulty.
• The temperature sensor is faulty.
- Contact the After-Sales Service.
- Contact the After-Sales Service.
The light inside the oven isn't
working.
• The lamp is unusable.
• The oven isn't connected to the
power supply or the fuse has
blown.
- Change the bulb.
- Connect to power supply or change fuse.
The cooling fan keeps working
after the oven is turned off.
• The fan can keep working for up
to an hour after the oven switches
off if is over 125ºC.
• If it has not stopped after 1 hour
- Open the door to help the oven
cool down more
quickly.
- Contact the After-Sales Service.
Cleaning by pyrolysis has not occurred.
• The door is not shut properly.
• The door-locking system is faulty.
• The temperature sensor is faulty.
• The plate that detects when the
door is shut is faulty.
- Check the door is properly closed.
- Contact the After-Sales Service.
- Contact the After-Sales Service.
- Contact the After-Sales Service.
GB
99637441 italien et anglais.qxd 07/07/2005 10:46 Page 53
Page 54

Advantages and operating method
ALL COOKING IS DONE WITHOUT PREHEATING THE OVEN
54
1. Advantages and working principle
The “EASY COOK” feature means you no longer have to set the temperature or
the cooking method.
Your oven automatically works these out for you to give the best results.
The “EASY COOK” method is done in two stages:
1) Input. The oven uses its electronic scanners to record the cooking details of
each thing you want to cook.
You will notice the oven carrying out this operation because the right-hand end
of the display panel will become busy. This may take between 5 and 40 minutes
to complete.
DO NOT OPEN THE OVEN DOOR DURING THIS STAGE: it will give a faulty
reading.
2) Calculation. The oven works out the cooking time required. The AUTO symbol
appears on the display panel. The oven shows the amount of cooking time
remaining as well as the actual time of day it will finish. If you want to open the
door to rearrange the food, add more liquid etc, you can.
3) When cooking finishes a series of beeps is heard.
2. I
nstructions for use
a) Cooking straightaway:
Set the selector to “EASY COOK”.
In the display, you will see a selection of dishes.
Using the button choose the one you want
Place the dish in the oven at the level suggested in
the display.
Close the door. The oven starts the cooking cycle as
the oven's sensors start working and the display
panel becomes busy. The cooking time is displayed.
When cooking ends the oven beeps several times.
99637441 italien et anglais.qxd 07/07/2005 10:46 Page 54
Page 55

Avantage et principe
55
b) Delayed cooking:
Turn the selector to “EASY COOK”.
Choose which dish you are going to cook from the
display panel using the button.
Place your dish in the oven and shut the door.
Turn method selector to
“”
.
Turn the knob + or - to set the time you want the
food cooked by.
E.g. 1 pm (13:00).
When you have done this the start of cooking will be
delayed. The cooking time is worked out
automatically. As when cooking straightaway, the
time allowed may be adjusted by the oven during cooking and the end result
may vary by a couple of minutes (+ or -) compared with the initial time given.
3. Tips
Once the “Auto symbol” appears in the display panel,
you can open the oven door.
Once it starts flashing however, if you open the oven
door, it will make a warning sound and the dishes
symbol will blink.
The “EASY COOK” feature MUST START WITH A COLD OVEN. You must wait for
the oven to cool down completely before using the Easy Cook method again. If
the oven is not cool enough, the temperature and the dish symbols will blink in
the display panel and you will not be able to cook.
4. Troubleshooting
If you realize that...
Possible causes What should you do?
Beeps and symbols
• You have opened the door while
the oven is scanning. The programme has been cancelled.
- Let the oven cool down and try
again.
The symbol --- is flashing in the
display panel.
• The oven is calculating the best
cooking time.
- This is perfectly normal.
"Auto" is displayed
• The oven has now worked out the
appropriate cooking time.
- This is perfectly normal.
The “EASY COOK” feature selector, symbols and temperature are
blinking and a beep is audible.
• The oven is too hot to use the
“EASY COOK” feature.
- Either wait for the oven to cool
down or use a different cooking
method.
GB
99637441 italien et anglais.qxd 07/07/2005 10:46 Page 55
T˚
c
Page 56

56
EASY COOK FE
• Bought freshly made pizza
• Pizza base ready for use
• Home-made pizza
• Frozen pizza
• with grated cheese in top
• petits pains (in package)
• Chicken weighing 1 to 1.8 kg
• Duckling, pheasant etc
• Freshly made flans
• Frozen flans
• Quiches
• Frozen uncooked meat in pastry
• Whole fish
(Sea bream, hake etc)
Served individually
(trout and mackerel)
with flavourings and white wine
baked fish
• Roast joints
(left very pink in the middle)
Roast
Beef
Pizza
Poultry
Flans
Fish
99637441 italien et anglais.qxd 07/07/2005 10:46 Page 56
Page 57

57
ATURES GUIDE
• TIPS:
- Place them directly on the shelf to make the dough base crispy
- Place on the enamelled tray to have a softer base.
• TIPS:
- Use the spit. Remember to place the grill pan underneath
to catch the juices.
- Cook in a chicken brick to avoid fat splashes.
- Prick the skin to prevent splattering.
• TIPS:
- Use a non-stick aluminium flan tin: the pastry:
the pastry on the bottom will be crisper.
- For bought frozen flans and quiches, take them out of their
aluminium container before placing on the shelf.
• TIPS:
- Only use this feature for whole fish cooked flat. Fish wrapped in
pastry or grilled needs a pre-heated oven for best results.
• TIPS:
- If you prefer your beef well cooked, use a conventional cooking method.
- Remove the joint from the fridge at least 1 hour before cooking is
to start (see tips on the next page).
Remove as much basting fat from the joint as possible. Place the
joint in an earthenware dish with a little water and a teaspoon of oil.
Do not sprinkle with salt until cooking is over.
GB
99637441 italien et anglais.qxd 07/07/2005 10:46 Page 57
Page 58

Handy Hints and Tips
58
Pizza
To ovoid having cheese and tomato sauce dripping in the oven, place the
pizza on a sheet of baking parchment directly on the shelf.
Poultry
Make sure the dish in which the chicken cooks is big enough to prevent
fat burning.
Flans / Quiches:
Metal trays are better than glass or porcelain, which are often too thick and
food takes longer to cook. Metal also gives a crisper finish to the pastry.
When cooking fruit tarts, to prevent the juice soaking into the pastry and
leaving it soggy, sprinkle the base with some semolina, crushed biscuits,
grounds almonds or tapioca to absorb the excess. When cooking savoury
flans with vegetables containing a high-water content (leaks, spinach brocco
li or tomatoes) or frozen, sprinkle with a tablespoon of cornflour.
Fish :
Check when buying that the fish has a pleasant smell and if it is a sea
fish, with a faint salty tang. The fish should be firm and solid and the
scales well attached to the skin. The eyes should be shiny and raised
and the gills bright and moist.
Beef (AND MEAT IN GENERAL)
Always remove meat from the fridge well in advance of cooking. The sudden
change in temperature from cold to hot can toughen meat. Ideally beef
should be well browned on the outside, red in the middle but hot throu
ghout. Do not sprinkle with salt before cooking as this draws out the blood
and dries out the meat. Try to turn meat using spoons rather than a fork to
keep the blood in the joint. Always leave the cooked joint for 5 to 15 minu
tes after cooking to recover. Wrap it in kitchen foil and leave in the open
warm oven. During this time the juices, which were drawn out, can soak
back into the meat.
Use earthenware dishes to roast joints; glass ones tend to make the meat spit.
Do not use the enamel grill tray for roasting.
99637441 italien et anglais.qxd 07/07/2005 10:46 Page 58
Page 59

59
Recipes
Pizza (using a ready-prepared dough base for each pizza)
*V
egetable pizza: 6 tbsp. tomato sauce; 1 large courgette, diced; half a
pepper diced; half a small aubergine, sliced; 2 tomatoes, sliced; 50 g
grated Gruyère cheese, oregano, salt and pepper
*Roquefort cheese and smoked bacon: 6 tbs. tomato sauce, 4 rashers
smoked back bacon; 100 g Roquefort, diced; 50 g walnuts; 60 g grated Gruyère.
*Sausage and cot
tage cheese: 200 g cottage cheese, sieved, drained
and spread on the dough base; 4 sausages sliced in rounds; 150 g ham
in strips; 5 olives; 50 g grated Gruyère; oregano, salt and pepper.
Flans / Quiches Using a non-stick aluminium flan tin 30 cm diam.
Flaky pastry apple praline flan:
Line a flan tin with flaky pastry and prick all over with a fork.
Bring 200 ml cream with a vanilla pod in it to the boil. Leave to cool.
Beat together 2 eggs and 30 g sugar and add the cooled cream. Dice
two eating apples and roll in 70 g praline. Spoon the cream and apples
into the flan case and cook in the oven.
Quiches : Use an aluminium flan tin 27 to 30 cm diam
Ready-made shortcrust pastry
Beat together 3 eggs and 500 ml thick cream
Salt, pepper and nutmeg.
Choice of toppings: 8 rashers bacon cooked and chopped,
or 1 kilo cooked chicory and 200 g grated Gouda
or 200 g broccoli, 4 rashers bacon in bits and 50 g
Stilton cheese
or 200 g salmon and 100 g spinach cooked and drained
GB
99637441 italien et anglais.qxd 07/07/2005 10:46 Page 59
Page 60

60
Recipes
Fish
Sea bream with dry cider: 1 sea bream weighing 1.5 kg.
500 g mushrooms.
2 cooking apples.
2 shallots.
2 tbsp thick cream.
100g butter.
500 ml cider; salt and pepper
Gut and clean the fish and remove the scales. Chop the shallots, slice the
mushrooms, place them in a dish and lay the fish on top. Pour in the cider, add
salt, pepper and a few knobs of butter and place in the oven. Fry the unpee
led, quartered apples in the remaining butter. When the fish is cooked, remove
it from its dish and place on a warm plate. Sieve the liquid off, save the mush
rooms and reduce the stock. Add the cream to the juices and serve with the
apples and mushrooms.
Poultry
Stuff with a handful of fresh tarragon or coat with a mix made from 6
gloves of garlic crushed with a pinch of rock salt and several peppercorns.
Roast beef Sauces to go with beef.
SAUTERNES and ROQUEFORT Sauce:
Sweat 2 tbsp finely chopped shallots in butter.
Add 100 ml Sauternes and allow to reduce.
Add 100 g Roquefort cheese and let it melt slowly.
Add 200 ml thin cream, salt, pepper and bring to the boil.
BRAND
Y and PINK PEPPERCORNS Sauce:
Sweat 2 tbsp chopped shallots.
Add 150 ml red win and leave to reduce.
Add the yolk of an egg, 1 tbsp tomato ketchup, 200 g butter, salt and pepper.
Whisk together, while pouring in 3 tbsp brandy and 1 tsp crushed pink
peppercorns.
PEAR
and WATERCRESS Sauce :
Cook a pear in enough white wine to cover it. Drain the wine into a jug
and mash the pear.
Blanch a small bunch of watercress, drain and chop.
Braise 1 tbsp chopped shallots in butter.
Add the drained wine and reduce.
Add the pear, watercress and 200 ml thin cream.
Add salt and pepper and bring lightly to the boil .
99637441 italien et anglais.qxd 07/07/2005 10:46 Page 60
Page 61

Notes
61
99637441 italien et anglais.qxd 07/07/2005 10:46 Page 61
Page 62

62
Notes
99637441 italien et anglais.qxd 07/07/2005 10:46 Page 62
Page 63

63
Notes
99637441 italien et anglais.qxd 07/07/2005 10:46 Page 63
Page 64

99637441 07/05
Rif. apparecchio: GFM10XEP
SANGIORGIO vi offre un servizio di assistenza tecnica rapido ed
efficace grazie ad un numero unico per tutta l’italia. Componendo
questo numero sarete immediatamente in contatto con il centro di
assistenza tecnica del distretto telefonico da cui state chiamando.
Il servizio non è attivo dai telefoni cellulari.
Brandt italia spa Viale Europa, 5/7 - 25028 Verolanuova (BS) - Tel.030 9367.1 - Fax 030 932859
99637441 italien et anglais.qxd 07/07/2005 10:46 Page 64
 Loading...