

Page 1
SR801W6360
Page 2
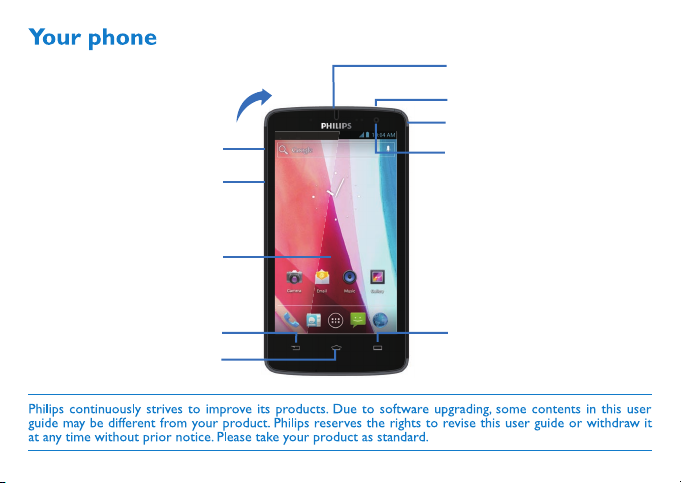
Back of the phone:
5.0Mpix AF camera
Power key
Side volume key
To uch screen
Charger/micro USB port
connector
Headphone jack
DTV antenna
Front camera
Back
Home
Recent
Page 3
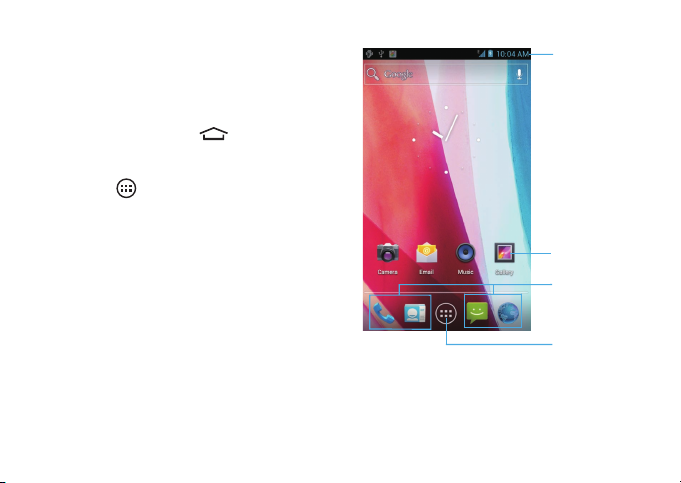
Home screen
You may acti vat e functi ons of this devi ce by
operations on the touch screen. There are five
main screens, which could be switched by sliding
to the left or the right. Tap
go back to the main screen. Tap an application icon
on the main screen to start that application. Tap
[Apps Panel
] to find all applications.
Your phone’s home screen consists of the following
areas:
in any interface to
Status Bar
Application icons
Shortcut icons
Apps Panel
1Your Phone
Page 4

Keys
Learn about the main keys:
Key Definition Function
Power key -Press to turn on/off the
Home key -Return to the home screen.
Back key -Back to the previous screen
Menu key -Open options menu available
2
Your Phone
screen display.
-Press and hold to access the
Phone options, choose Silent,
Airplane mode, Power off or
Mobile Data.
-Press and hold to open the
list of recent applications.
or exit.
-Hide the onscreen keyboard
while it’s opened.
on the current screen.
-Hide the onscreen options
menu while it's opened.
Key Definition Function
Volume key -Volume up/down.
-Press to turn to silent mode
while there is a call.
Shortcuts
Learn about the shortcuts:
Key Definition Function
Message Quick access to message.
Dial Quick access to dial phone.
Contacts Quick access to phonebook.
Browser Quick access to browser.
Apps Panel Tap to into the applications
screen.
Page 5
Notification Panel
When you get a new notification, you can open the
Notifications panel to see what event notification
or new inf ormat ion you hav e received. T he
Notifications panel lets you quickly switch between
recently-opened apps.
To open the Notifications panel, press and hold the
status bar, then slide your finger downward.
If you have several notifications, you can scroll
down the screen to see them all.
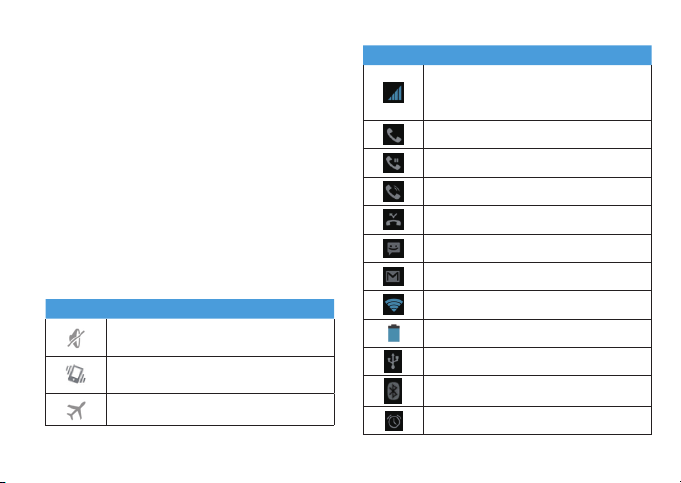
Status Icon
Learn about the status icons on the screen.
Icons Function
Your phone will not ring when
receiving a call.
Your phone will vibrate when receiving
a call.
Flight mode activated.
Icons Function
Your phone is connected to a GSM/
WCDMA network. The more bars are
shown the better the reception is.
Call in progress.
Call on hold.
Speakerphone activated.
You have a missed call.
New SMS or MMS.
New Email.
WLAN is activated.
The bars indicate the battery level.
Connected to PC.
Bluetooth is activated.
The alarm clock is activated.
Your Phone
3
Page 6

Icons Function
The headset is plugged into the phone.
Error occurred or caution required.
4
Your Phone
Page 7

Table of contents
Getting started-----------------------------------6
Assembling and Charge---------------------------------6
Insert a Micro SD card (Memory card)--------------8
Personalize your phone---------------------------------9
Basic function-----------------------------------10
Calls------------------------------------------------------10
Messaging------------------------------------------------11
Email------------------------------------------------------11
Multimedia---------------------------------------13
Camera--------------------------------------------------13
Music-----------------------------------------------------14
FM Player-------------------------------------------------15
Digital television (DTV) ------------------------------15
Search and Web--------------------------------16
Search settings------------------------------------------16
Web browser-------------------------------------------16
Internet connections--------------------------17
Bluetooth------------------------------------------------17
Wi-Fi-----------------------------------------------------18
Settings-------------------------------------------19
Sound setting--------------------------------------------19
Screen settings------------------------------------------19
Factory data reset--------------------------------------20
Safety & Precaution----------------------------21
5Table of contents
Page 8
Getting started
Congratulations on your purchase and welcome to
Philips!
To ge t the most of your product and enjoy all
Philips has to offer, register your product at:
www.philips.com/mobilephones
More details about your product, please access:
www.philips.com/support
Note:
Please read the safety instructions in the "Safety & •
Precaution" section before use.
Assembling and Charge
Learn about installing SIM card and charging the
battery for the first use.
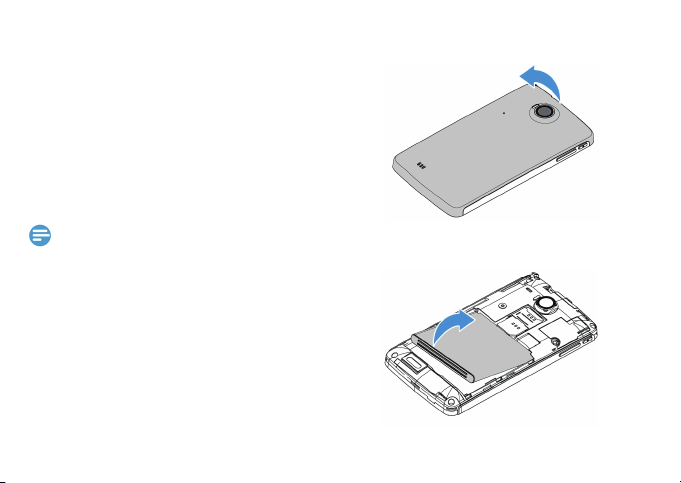
Insert SIM card
Follow the steps below to insert your SIM card.
Remember to turn off your mobile phone before
removing the back cover.
6
Getting started
Remove the back cover.1.
Take out the battery.2.
Page 9
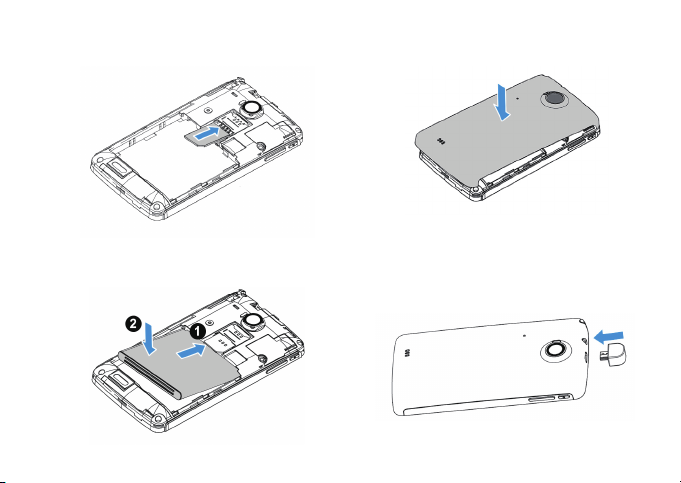
Insert the SIM card.3.
Replace the back cover.5.
Charge the battery
A new battery is partially charged. The battery icon
Install the battery.4.
in the upper-right corner shows the batter y level
of charging status.
7Getting started
Page 10
Tips
You can use the phone while it is charging.•
Keeping the charger plugged to the mobile phone when •
the battery is fully charged will not damage the battery.
The only way to turn off the charger is to unplug it, so it is
advisable to use an easily accessible power socket.
If you do not intend to use your phone for several days, •
we recommend that you remove the battery.
If a fully charged battery left unused, it will lost its charge •
over time.
If a battery is being used for the first time or the batter y •
has not be en used for a prolo nged p eriod, it may take
longer time to recharge.
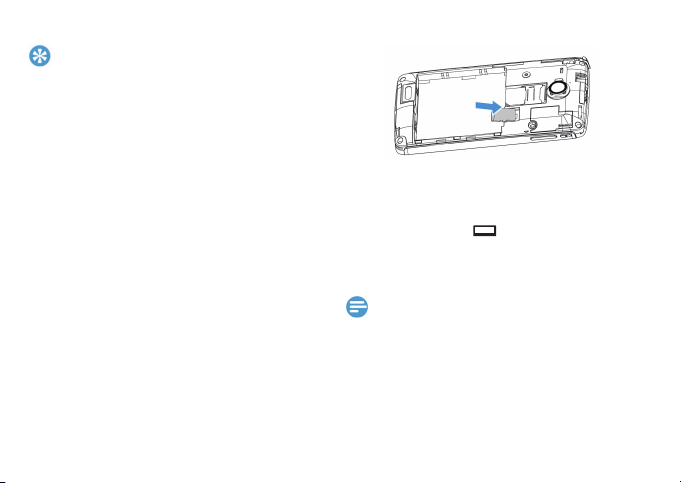
Insert a Micro SD card (Memory
card)
Insert a memory card
Inser t into the slot with the side of the golden
contacts facing down, push in the direction as
indicated in the picture.
See the image below for additional information:
8
Getting started
Remove the memory card
Before removing a memory card, first unmount it
for safe removal.
In idle screen, tap 1.
> System settings >
Storage > Unmount SD card.
Press down the card holder and push out the 2.
memory card.
Note:
Do n ot rem ove a mem ory c ard w hil e the d evic e •
is transferring or accessing information to prevent
corrupting or damaging the files in the memory card.
Format the memory card
Formatting your memory card on a PC may cause
Page 11

incompatibilities with your device, please format
the memory card only on the device.
In idle screen tap
> System settings >
Storage > Unmount SD card > Erase SD
card > Erase everything to format the memory
card.
Note:
Before for matting the memory card, remember to make •
backup copies of all important data stored on your device.
The manufacturer’s warranty does not cover loss of data
resulting from user actions.
Use as mass storage
Memory card can be used as mass storage when
con nect ed wit h PC. You can synchroni ze data
between your computer and memory card.
Connect the phone and PC with USB cable.1.
Drag down the Notification panel, and tap 2. USB
connected > Turn on USB storage.
On your computer, then you can check/edit the 3.
content of memory card.
Note:
Bef ore turni ng on USB stora ge, m ake sure you have •
mounted the memory card to your phone.
Personalize your phone
Make t he phone look and sou nd just the way
you want it to. Personalize it with a different
wallpaper, skin, ringtone, and notification sound for
events such as incoming text, email, and calendar
reminders.
Change the wallpaper: Tap 1.
to choose the one you want, or press and hold
the blank area of the home screen to change.
Add widgets/shortcuts to the home screen: Tap 2.
, press and hold the widget or icon you want
to add, drag it to a location.
Rearrange or remove widgets and icons: Press 3.
and hold the widget or icon you want to move,
drag it to a new location.
Delete the widgets and icons: Press and hold 4.
the widget or icon, drag it to the deletion area
on the top of the screen.
> Wallpaper
9Getting started
Page 12

Basic function
Calls
Make a call from Dialer
Ta p 1. in the home screen to enter di aler
interface.
Input the phone number you want to dial in the 2.
interface, tap
Note:
• can be used to delete mistake number.
Answer/Reject a call
Answer a call: when a call comes in, slide the 1.
phone button
Reject a call: when a call comes in, slide the 2.
phone button
Reject a call with message: when a call comes 3.
in, slide the phone button
call with message.
10
Basic function
to make a call.
right to answer the call.
left to reject the call.
top to reject the
Tips
When a call is in progress, use the buttons onscreen •
to mute or un mute the mi croph one or to turn the
speakerphone on or off.
When a call is in progress, you can tap • Hold and then
tap Add call to add a new call, the first call will be hold
automatically.
Call a phone number in a text message or
email
Tap and hold the phone number within the 1.
message or email to have menu options.
Select to call with the SIM card you want.2.
Make an emergency call
Tap in the ma in scr een to enter diale r
interface, and dial the emergency number for your
locale, and then tap
.
Page 13

Messaging
Send a SMS/MMS message
In the idle mode, tap 1. > .
to edit o r add t he recei ver from
Ta p 2.
Contacts.
Tap the text box to edit the text message.3.
to add Pictures/Videos/Audio/ VCard/
Ta p 4.
Slideshow if you want to sent an MMS message.
to send message or tap to save
Ta p 5.
the message as a draft.
Note:
There is a limit on the number of characters for a single •
text message. If you exceed the limit, your text message
will be delivered as one but will be billed as more than
one message.
Your text message automatically becomes a multimedia •
message if you enter an email address as the recipient, add
a message subject, attach an item, or compose a very long
message.
Message setting options
You can set storage, delivery reports, message
ringtone etc. by tapping Messaging >
>Settings.
Email
You may receive and send emails via Email.
Set up Email
In the applications menu, tap 1. Email.
Input email address and password, tap 2. Next,
give this account a name, your name (displayed
on outgoing messages) , tap Next.
You may also use Manual setup for the email
account:
Input email address and password.1.
Tap 2. Manual setup to selec t th e type of
account.
Finish details like server. 3.
Tap 4. Next to complete the setup.
11Basic function
Page 14

Note:
When you are finishe d setting up the email account, the •
email messages are downloaded to your device.
Consult your mail se rvice provider for the mail server •
configuration.
Send emails
You may send emails to one or more recipients.
Before sending, add the recipient email address, or
select from Contacts.
In the applications menu, tap 1. Email.
for the editing interface.
Tap 2.
Ta p 3. To and input the recipient’s email address.
If necessar y, tap
other recipient’s email address for cc or bcc.
Tap 4. Subject and input the subject.
Tap 5. Compose email and input the text.
> Attach file to insert the file as
Ta p 6.
needed.
to send the email.
Tap 7.
12
Basic function
>Add Cc/Bcc to input
Receive emails
In the applications menu, tap 1. Email.
to refresh the email list.
Tap 2.
The devic e will conn ect to the server and 3.
download emails. All emails re ceived wi ll be
saved in the Inbox.
Tap the email to read.4.
During reading, tap 5.
sender; tap
the email to others; tap
to reply to all contacts in the email.
to reply the email to the
and tap Forward to forward
and tap Reply all
Page 15

Multimedia
Camera
Learn about camera function. Let you take photos
as desired by using your phone.
Take a photo/Record a video
In the application menu, tap 1. Camera.
Tap 2. Settings menu to set t he cam era i f
necessary.
Tap 3. Cam era /C am co rd er /Pan ar am a
switcher to switch between camera,
camcorder and panorama mode.
Gallery
Shutter button
Camera/Camcorder/
Panorama switcher
Settings menu
Touch the preview screen to focus.4.
to start taking photos in camera mode.
Tap 5.
to start recording videos in camcorder
Tap 6.
mode.
After taking photos/ recording videos, select 7.
Gallery to view.
Camera settings
Before taking photos/recording videos, customize
your camera settings in Settings menu.
to select camera (front or back
Tap 1.
camera).
and scroll the bar to zoom.
Tap 2.
Tap 3.
to enter more settings menu, include
White balance, Exposure, Store location,
Picture size, Color effect, Saturation,
Contrast, Anti banding, Touch AF/AEC,
Focus mode, Sharpness etc..
Multimedia
13
Page 16

Music
You can play your favorite music through music
player.
Note:
Please install the memory c ard with music saved before •
playing music.
Function Definition
Play and resume playback.
Pause playback.
Select previous track.
Play Music
In the application menu, tap 1. Music. Select the
song you want to start playback.
In now playing screen, tap 2.
playlist, you can place the song in current
playlist, or create a new playlist.
In now playing screen, tap 3.
ringtone, you can set the current music as
ringtone.
14
Multimedia
>Add t o
>Use as
Select next track.
Select the play mode:
• Repeating current song.
• Repeating all song.
Activate Shuffle mode, play current in
randomly.
Select to enter into playlist.
Tips
When listening to music, adjust the volume to a moderate •
level. C ontinuous exposure to high volume may impair
your hearing.
Page 17

FM Player
To liste n to the FM Playe r, you must connect
headset, which serves as the radio antenna.
Press to turn on/off radio
Headset/Speaker switcher
Switch next / previous radio
Tap '+' to add a new frequency;
Tap preset frequency to select
the frequency.
, you can find more menu:
Tap
Scan1. : Tap to search the radio frequency
automatically.
Start recording/Stop recording2. : Ta p to
record FM radio.
Settings3. : Set Regional band, Audio output
mo de, Alter na te fr eq ue nc y, Re co rd
duration and Revert to factory defaults.
Sleep4. : Tap select Auto-off sleep time.
All channels5. : Tap to view all channels.
Digital television (DTV)
Your phone suppor ts dig ital televis ion b ased
on Terrest rial Integrated Ser vices Digital
Broadcasting (ISDB-T).
15
Multimedia
Page 18

Search and Web
You can search for information on the phone and
on the Web by using Google Search.
Search settings
Tap Search widget in home screen or tap 1. >
Search to enter search screen.
> Search settings.
Tap 2.
Ta p 3. Searchable items to select items you
want included when doing a search.
Ta p 4. Clear shortcuts to clear shortc uts to
recently chosen search suggestions.
Tips
Tap • in search screen to quickly select search range(all/
web/apps/people).
16
Search and Web
Web browser
Open the web browser and start surng the Web.
Going to a webpage
Ta p 1. Browser to enter the wap, then tap URL
fiel d on top of the screen to input the web
address.
Note:
URL bar will auto-disappear, and will auto-appear when •
slide down on the screen.
Tap 2. button on URL bar, to open multiple
browser windows or switch among them.
>Bookmarks to view bookmarks list.
Tap 3.
>Save to bookmarks to add the
Ta p 4.
current web as a bookmark.
Tips
You can swipe your finge r on the screen to navigate and •
view other areas of the webpage or pinch to zoom in/out.
Page 19

Internet connections
Bluetooth
The device supports wireless Bluetooth connection
to create wireless connections between the device
and the Bluetooth earphone, hands free vehiclemounted phone equipment, computer or other
devices for data exchange.
Turn on/ off Bluetooth
In the applications menu, tap 1. Settings.
Ta p 2. Bluetooth to select or clear Bluetooth
check box.
Note:
Turn off Bluetooth when not in use to save battery power, •
or in places where using a wireless device is prohibited,
such as on board an aircraft and in hospitals.
Receive data via Bluetooth
Turn o n the B luetooth functi on, then tap 1.
Settings> Bluetooth, tap the device name on
the top to make the device visible.
Note:
You can set the device visibility timeout by tap • >
Visibility timeout.
Ta p2. Search for devices on the bottom.
Select a device, enter a pair password and select 3.
Pair to pair with the other device.
On the receiving device, accept the file.4.
Note:
Some devices, especially headsets or hands-free car kits, •
may have a fixed Bluetooth PIN, such as 0000. If the other
device has a PIN, you must enter it.
Send data via Bluetooth
Select a file or item, such as a contact or media 1.
file from an appropriate application or file.
> Share>Bluetooth.
Tap 2.
Select a paired Bluetooth device on the list, 3.
then the file will be sent directly.
Internet connections
17
Page 20

Wi-Fi
You may connect to Wi-Fi for wireless internet
and download.
Connect to Wi-Fi
In the applications menu, tap 1. Settings>Wi-Fi.
Select or clear Wi-Fi check box.2.
Wi-Fi search and connection
In the applications menu, tap 1. Settings>Wi-Fi.
If W-Fi is on, tap 2. Scan. The device will list the
networks in the range being searched.
Select the network to be connected, and tap 3.
Connect.
Note:
If nece ssary, input th e w irele ss passw ord and other •
information, then tap Connect. The wireless indicator
will show in the status line after the device reaches the
network.
18
Internet connections
Page 21

Settings
Sound setting
Volume
In the applications menu, tap 1. Settings> Sound
>Volumes.
Scroll the volume indicator to adjust, select and 2.
tap OK to save.
In the main screen, press the volume on the 3.
side to adjust the ring tone & notific ations
volume. Press the volume down key to set as
vibration mode and silent mode.
Note:
Press the• [Power Key] for a while, and tap the silent
mode/ vibration mode/ normal mode in this option menu
as a short cut to activate the corresponding mode.
Ringtone Settings
You can select the ringt one you like to set as
incoming ringtone.
In the applications menu, tap 1. Settings>Sound
>Phone ringtone.
Scroll the ringtone list up and down, tap the 2.
ringtone name to listen; select one and tap OK
to save.
Screen settings
Set wallpaper
In the main screen, tap 1. to open the options.
Tap 2. Wallpaper and select from Gallery, Live
wallpapers or Wallpapers.
Scroll the wallpaper thumbnails to select the 3.
wallpaper you like and tap Set wallpaper.
Live wallpaper
You may set the screen with live wallpaper.
In the main screen, tap 1.
options.
Ta p 2. Wallpaper and select from Live wallpapers.
Select the wallpaper you like and tap 3. Set
wallpaper.
to open the menu
Settings
19
Page 22

Brightness setting
In the applications menu, tap 1. Settings >
Display > Brightness.
Scroll to adjust the brightness, tap 2. OK to save.
Screen timeout setting
You can set the screen timeout time to adjust the
time before the screen automatically locks.
In the applications menu, tap 1. Settings >
Display > Sleep.
Select and tap the screen timeout time to finish 2.
the settings.
Factory data reset
In the applications menu, tap 1. Settings>
Backup & reset.
Tap 2. Factory data reset.
Tap 3. Reset phone.
Ta p 4. Erase everything and the phone will
restart and reset to the factory data.
20
Settings
Page 23

Safety & Precaution
Precaution
Keep your phone away from small children
Keep your phone and al l accessories o ut of the reach of
small children. Small parts may cause choking or serious
injury if swallowed.
Radio Waves
Your phone tra nsmits/receives radio waves in the GSM
frequency (850/900/1800/1900MHz) and WCDMA
frequency (850/1900MHz).
Check with the vehicle manufacturer that electronic
equipment used in your vehicle will not be affected by
radio energy.
Switch off your phone
Turn off the phone when in an aircraft. The use of mobile
phones in an aircraft may be dangerous for the operation
of the airc raft, disrupt the mobile p hones ne twork an d
may be illegal.
In h ospi tals , clin ics, oth er hea lth car e cent ers and
anywhere else where you may be in the close vicinity of
medical equipment.
In areas with a potentially explosive atmosphere (e.g.
petrol stations and also areas where the air contains dust
particles, such as metal powders).In a vehicle transporting
flamma ble products or a vehicle powered b y lique fied
petrole um gas (LPG) .In qu arries or ot her are as whe re
blasting operations are in progress.
Your mobile phone and your car
Avo id usin g your pho ne whil e d rivi ng and obey al l
regulations that restrict the use of mobile phones while
driving. Use hands free accessories to increase your safety
when possible. Ensure that your phone and car kit do not
block any air bags or other security devices fitted in your
car.
Handle your phone carefully and sensibly
For the optimal and satisfactor y operation of the phone
you are recomme nded to use th e phone in the normal
operating position.
Do not immerse the phone in any liquid; if your phone •
is damp, switch it off, remove the battery and let them
dry for 24hrs before using them again.
To clean the phone , wipe it with a soft cloth.•
In hot weat her or after prolonged exposure to the •
sun (e .g., b ehind a window or a winds creen) , the
temperature of your phone's casing might increase. Be
very careful in this case when picking up your phone
and also avoid using it with an ambient temper ature
over 40° C.
Protect batteries from damage
You should only use Phil ips Authentic Accessories, as the
use of any other accessories may damage your phone and
may be dangerous, and will make al l guarantees for your
Philips phone null and void. The use of an unspecified type
of battery may also cause an explosion.
Safety & Precaution
21
Page 24

Make sure damaged parts are replaced immediately by
a qualified technician and that they are replaced with
genuine Philips replacement parts.
Your phone is powered by a rechargeable battery. •
Use specied charger only. •
Do not incinerate. •
Do not deform or open the battery.•
Do not allow metal object s (s uch as ke ys i n you r •
pocket) to short circuit the battery contacts.
Avoid exposure to excessive heat (>60° C or 140° F), •
moisture or caustic environments.
Environmental care
Remember to observe the local regulations regarding the
disposal of the packaging materials, exhausted batteries
and old phone and please promote their recycling.
Philips has marked the batter y and packaging with
standard symbol s designed to promote the recycling and
appropriate disposal of your eventual waste.
: The labeled packaging material is recyclable.
: A financial contribution has been made to the associated
national packaging recovery and recycling system.
: The plastic material is recyclable (also identifies the type
of plastic).
WE EE Mar kin g in th e DFU : “ Inf orm ati on to th e
Consumer” Disposal of your old product
You r product is desi gned and manufactured with hig h quality
materials and components, which can be recycled and reused.
22
Safety & Precaution
When this crosse d-out wh eeled bin symbol is att ached
to a pr oduct it means the product is covered by the
European Directive 2002/96/EC
Please inform yourself about the local separate collection system
for electrical and electronic products.
Please act according to your local rules and do not dispose
of your old products with your normal household waste. The
correct disposal of your old product will help prevent potential
negative consequences for the environment and human health.
This device may contain commodities, technology or software
subject to export laws a nd regulations from the US and other
countries. Diversion contrary to law is prohibited.
Tips
Pacemakers
If you have a pacemaker:
Always keep the phone more than 1 5 cm f rom your •
pacemaker when the phone is switched on, in order to
avoid potential interference.
Do not carry the phone in a breast pocket.•
Use the ear opposite to the pacemaker to minimize •
the potential interference.
Switch off your phone if you suspect that interference •
is taking place.
Hearing aids
If you are a user of a hearing aid, consult your physician and
hearing aid manufacturer to learn whether your particular device
is susceptible to cellular phone interference.
Page 25

How to prolong the battery life of your phone
To have your mobile phone function properly, sufficient batter y
power is important. For the power-saving purpose, do the
following, if applicable:
Turn off the Bluetooth function of your phone.•
Set the backlight level and duration of your phone to a •
low value.
Turn on the auto keypad lock; turn off the key sounds, •
tap vibration, or vibration alerts.
Establish GPRS connection when needed. Otherwise, •
your phone will keep searching for GPRS connection,
and drain your battery power.
Turn off your phone if there is no coverage. Otherwise , •
the phone will keep searching for network, and drain
your battery power.
Troubleshooting
The phone does not switch on
Remove/reinstall the battery. Then charge the phone until the
battery icon stops scrolling. Unplug the charger and try to switch
the mobile on.
The display shows BLOCKED w hen you switch on the
phone
Somebody tried to use your phone but didn’t know the PIN
code or the unblocking code (PUK). Contact your service
provider.
The display shows IMSI failure
This prob lem i s rel ated to yo ur su bscript ion. Co ntact your
operator.
Your phone doesn’t return to home screen
Long press the Power key or switch off the phone, check that
the SIM card and the battery are installed correctly and switch it
on again.
The network symbol is not displayed
The network connection is lost. Either you are in a radio shadow
(in a tunnel or between tall buildings) or you are outside the
network coverage area. Try from another place to reconnect to
the network(Especially when abroad), check that the antenna is
in place if your mobile has an external antenna, or contact your
network operator for assistance/information.
The display doesn’t respond (or t he di splay re sponds
slowly) to key presses
The display responds more slowly at very low temperatures. This
is normal and does not affect the operation of the phone. Take
the phone to a warmer place and tr y again. In other cases please
contact your phone supplier.
Your battery seems to over heat
You might be using a charger that was not intended for use
with your phone. Make sure you always use the Philips authentic
accessory shipped with your phone.
Your pho ne doesn ’t d ispl ay t he phone nu mber s of
incoming calls
This feature is network and subscription dependent. If the
network doesn’t send the caller’s number, the phone will display
Call 1 or Withheld instead. Contact your operator for detailed
Safety & Precaution
23
Page 26

information on the subject.
You can’t send text messages
Some net works don’t allow messag e e xchange s wi th other
networks. First check that you have entered the number of your
SMS ce ntre, or contact your operator for detailed information
on this subject.
You can’t receive and/or store JPEG pictures
A picture may not be accepted by your mobile phone if it is too
large, if its name is too long, or if it doesn’t have the correct file
format.
You feel that you have missed some calls
Check your call forwarding options.
When cha rging, the battery icon shows n o bar and the
outlines ashing
Only charge the battery in an environment where the
temperature does not go below 0°C (32°F) or above 50°C (113°F).
In other cases please contact your phone supplier.
The display shows SIM failure
Check that the SIM card has been inserted correctly. If the
problem persists, your SIM card may be damaged. Contact your
operator.
When att empting to use a fea ture in th e me nu, the
display shows NOT ALLOWED
Some features are network dependent. They are only available,
therefore, if the network or your subscription supports them.
Contact your operator for detailed information on this subject.
24
Safety & Precaution
The display shows INSERT YOUR SIM CARD
Check that the SIM card has been inserted correctly. If the
problem persists, your SIM card may be damaged. Contact your
operator.
Th e aut ono my of yo ur ph one s eem s lowe r tha n
indicated on the user guide
The autonomy is linked to your settings (e.g., ringer volume,
backlight duration) and the features you use. To increase the
autonomy, and whenever possible, you must deactivate features
you do not use.
Your phone doesn’t work well in your car
A car contains many metallic parts that absorb electromagnetic
waves which can affect the phone’s performance. A car kit is
available to provide you with an external antenna and enables
you to make and receive phone calls without handling the
handset.
Note:
Check with the local authorities whether or not you are •
allowed to use the phone while driving.
Your phone is not charging
If the battery is completely flat, it might take several minutes of
precharge (up to 5 minutes in some cases) before the charging
icon is displayed on the screen.
The pictu re c aptured with the phone camer a is not
clear
Make sure that the camera lens on both sides is clean.
Page 27

Trademark Declaration
Android Android is a trademark of Google, Inc.
Bluetooth™ Bl uet oot h™ is a tr ade -ma rk ow ned b y
Philips PHILIPS and PHILIPS’ Shield Emblem are
telefonaktiebolaget L M Ericsson, Sweden and
licensed to Philips.
registered trademarks of Koninklijke Philips
Elect ronics N.V. man ufactured by Shenzhen
Sang Fei Consumer Communications Co.,
Ltd. Under license from Koninklijke Philips
Electronics N.V..
Limited warranty
1. What Does This Limited Warranty Cover?
Philips warrants to the original retail purchaser (“Consumer”
or “You”) that this Philips cellular product and all accessories
originally provided by Philips in the sales package (“Product”) is
free from defects in material s, design and workmanship under
normal use in accordance with the operating instructions and
pursuant to the following terms and conditions. This limited
warranty extends only to the Consumer for Products purchased
and used in the original country of purchase. The limited
warranty is valid only in Philips’ intended country of sales of the
product.
2. How Long is The Limited Warranty Period?
The limited warranty period for the Product extends for ONE (1)
YEAR from the date of purchase of the Product, documented by
valid proof of purchase. The limited warranty for original Philips
rechargeable battery extends for six (6) months from the date
of purchase.
3. What Will Philips do if The Product is Not Free from
Material Defects in Materials and Workmanship duri ng
the Limited Warranty Period?
During the limited warranty period, Philips or its authorized
service representative will, at its option either repair or replace,
without charge for parts or labour, a materially defective
Product with new or refurbished parts or Product and return
su ch repa ired or re plac ed Prod uct to the Co nsum er in
working condition. Philips will retain defective parts, modules
or equipment. Repaired or replaced Product will be covered
by this limited warranty for the balance of the original limited
warran ty per iod or ninet y (90) days from th e date of repair
or replacement wh ichever is longer. Repair or replacement o f
Product, at Philips’ option is your exclusive remedy.
4. What is Not Covered by This Limited Warranty?
This limited warranty does not cover:
a) Product that has been subjected to misuse, accident, shipping
or othe r p hysica l d amage , impro per instal latio n, abnor mal
opera tion h andling, negl ect, inund ation, fi re, water or other
liquid intrusion; or
b) Product that h as been damaged due to repair, alteration, or
modification by anyone not authorized by Philips; or
c) Product that has reception or operation problems caused by
signal conditions, network reliability or cable or antenna systems;
or
Safety & Precaution
25
Page 28

d) Product defects or problems caused by uses with non-Philips
products or accessories; or
e) Produ ct which war ranty /qual ity sticke rs, pr oduct se rial
number or electronic serial number has been removed, altered
or rendered illegible; or
f) Product purchased, used, ser viced, or shipped for repair from
outside the original country of purchase, or used for commercial
or institutional purposes (including but not limited to Products
used for rental purposes); or
g) P roduct returned without valid proof of purchase or which
proof of purchase has been altered or is illegible.
h) Normal wear and tear or Force Majeure.
5. How Do You Get Warranty Service?
a) Return the Product to an authorized service center of Philips.
You may contact the local Philips office for the location of the
nearest authorized service center.
b) The SIM card must be removed from the Product before it is
given to Philips. Philips assumes no liability for damaged or loss
of the SIM card or the data contained therein.
c) If the Product failure is not covered by this limited warranty,
or this limited warranty is inapplicable, void or invalid due to
any terms and conditions stated herein, the Consumer will be
charged for the cost repair or replacement of the Product and all
other related cost incurred in repairing or replacing the Product.
d) IMPORTANT - you are required to return the Product
together a valid proof of purchase which must identify the point
of purchase , of purchase , Product mode l and Prod uct serial
number clearly.
26
Safety & Precaution
6. O ther Li mita tion : Th is Wa rran ty is Th e Enti re
Agreement.
EXCEPT FOR THE EXPRESS WARRANTIES SET FORTH
ABOVE AND THOSE IMPLIED BY LAW AND WHICH
CANNOT BE EXCLUDED OR MODIFIED BY AGREEMENT,
PHILIPS PROVIDES NO OTHER WARRANTY WHETHER
EXPRESS OR IMPLIED (WHETHER BY STATUTE, UNDER THE
OPERATION OF LAW OR OTHERWISE) AND SPECIALLY
DISCLAIMS ANY WARRANTY OF SATISFACTORY QUALITY
MERCHANTABILITY OR FITNESS FOR A PARTICULAR
PURPOSE.
PHIL IPS’ TOTAL LI ABILITY FOR DAMAGE S REL AT ING TO
OR A RISIN G OU T OF THE PURCHA SE OR U SE OF THE
PRODUCT, REGARDLESS OF THE TYPE OR CAUSE OF SUCH
DAMAGE OR THE FORM OR CHARACTERISATION OF THE
CLAIM ASSERTED (E.G. CONTRACT OR TOPIT), SHALL NOT
EXCEED THE ORIGINAL P URCHASE PRIC E PAID FOR THE
PRODUCT.
HOW EVE R IN NO EV ENT S HAL L PHI LIP S BE LIA BLE
FOR ANY PUNITIVE, SPECIAL, INCIDENTAL, INDIRECT
OR CONSEQUENTIAL DAMAGES (INCLUDING BUT
NOT LIMITED TO THE LOSS OF USE, LOSS OF TIME,
INCONVENIENCE, COMMERIAL LOSS, LOST PROFITS, LOST
BUSINESS OPPORTUNITIES, COST OF SUBSTITUTION
OF GOOD S O R S ERVICES , INVE STMEN TS, DA MAGE TO
GOODW ILL OR R EPUTATION , OR LOSS OF DATA AND
CLAIMS BY THIRD PARTIES) RESULTING FROM P URCHASE
OR USE OF THE PRODUCT, TO THE FULLEST EXTENT
ALLOWED BY LAW, WHETHER OR NOT PHILIPS HAS BEEN
Page 29

ADVISED OF THE POSSI BILTY OF SUCH DAMAGES. THESE
LIM ITAT IONS SH ALL A PPLY NOTWI THSTAND ING T HE
FAILUR E OF T HE ES SENTIAL PURP OSE OF ANY LIMITED
REMEDY.
This limited warranty represents the complete and exclusive
ag re eme nt b et wee n th e Co ns ume r an d Ph ili ps w it h
resp ect to t his cellul ar P roduct and it s uperse des all prior
agreements between the parties, oral or wr itten, and all other
communications between the parties relating to the subject
matter of this limited warranty. No carrier, retailer, agent, dealer,
employee, thereof, or employee of Philips is authorized to make
modifications to this limited warranty and you should not rely
on any such representation.
This limited warranty does not affect the Consumer’s statutory
rights under applicable national laws in force.
FCC Regulations
This mobile phone complies with part 15 of the FCC Rules.
Operation is subject to the following two conditions: (1) This
device may not cause harmful interference, and (2) this device
must accept any interference received, including interference that
may cause undesired operation.
Thi s m obile ph one has been te sted and fo und to compl y
with the limits for a Class B digital device, pursuant to Part
15 of the FCC Rules. These limits are designed to provide
reasonable protection against harmful interference in a
residential installation. This equipment generates u ses and can
radiated radio frequency energy and, if not installed and used in
accordance with the instructions, may cause harmful interference
to radio communications. However, there is no guarantee that
interference will not occur in a particular installation If this
equipment does cause harmful interference to radio or television
reception, which can be determined by turning the equipment off
and on, the user is encouraged to try to correct the interference
by one or more of the following measures:
-Reorient or relocate the receiving antenna.
-Increase the separation between the equipment and receiver.
-Connect the equipment into an outlet on a circuit different
from that to which the receiver is connected.
-Consult the dealer or an experienced radio/TV technician for
help.
Changes or modifications not expressly approved by the party
responsible for compliance could void the user‘s authority to
operate the equipment.
The antenna(s) used for this transmitter must not be colocated or operating in conjunction with any ot her antenna or
transmitter.
RF Exposure Information (SAR)
This mobile phone me ets the government’s requirements for
exposure to radio waves.
This phone is designed and manufactured not to exceed the
emissi on lim its for expos ure to radio frequency (RF) e nergy
set by the Federal Communications Commission of the U.S.
Government.
The exposure standard for wireless mobile phones employs a
unit of measurement known as the Specific Absorption Rate, or
Safety & Precaution
27
Page 30

SAR. The SAR limit set by the FCC is 1.6W/kg. *Tests
for SAR are conducted using standard operating positions
accepted by the FCC with the phone transmitting at its highest
certif ied power level in all tested frequency bands. Althou gh
the SAR is determined at the highest certified power level, the
actual SAR level of the phone while operating can be well below
the maximum value. This is because the phone is designed to
operate at mult iple power levels so as to use only the poser
required to reach the network. In general, the closer you are to
a wireless base station antenna, the lower the power output.
The highest SAR value for the model phone as reported to the
FCC when tested for use at the ear is 0.448 W/kg and when
worn on the body, as described in this user guide, is 1.254
W/kg (Body-worn measurements differ among phone models,
depending upon available accessories and FCC requirements.)
Whil e th ere may be di fference s be tween the SAR levels of
various phones and at various positions, they all meet the
government requirement.
The FCC has granted an Equipment Authorization for this model
phone with all reported SAR levels evaluated as in compliance
with the FCC RF exposure guidelines. SAR information on this
model phone is on file with the FCC and can be found under the
Display Grant section of www.fcc.gov/oet/ea/fccid after searching
on FCC ID: VQR-W6360
For body worn operation, this phone has been tested and meets
the FCC RF exposure guidelines for use with an accessor y that
contains no metal and the positions the handset a minimum of
1.0 cm from the body. Use of other accessories may not ensure
compliance with FCC RF exposure guidelines. If you do no t use
28
Safety & Precaution
a body-worn accessory and are not holding the phone at the ear,
position the handset a minimum of 1.0 cm from your body when
the phone is switched on.
Please make sure the temperature for production unit will be
between -10~50 ˚C.
Page 31

 Loading...