

Page 1

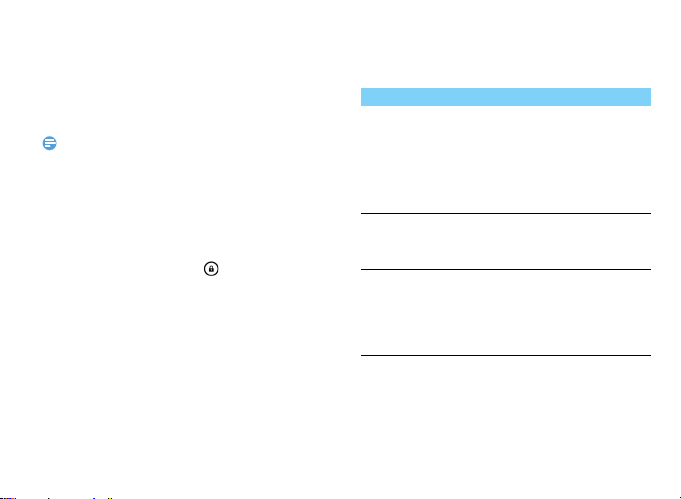
Touch screen
Side volume key
Home key
Option key
Back key
Power key /Lock key
Headphone jack
Charger/Micro USB port
Your phone
Philips continuously strives to improve its products. Due to software upgrading, some contents in this user guide
may be different from your product. Philips reserves the rights to revise this user guide or withdraw it at any
time without prior notice. Please take your product as standard.
Page 2
Turn your phone on and off
Note:
1
Press and hold power key to turn on your
phone.
2
To turn off your device, press and hold power
key and then select
•
If you are turning on your phone for the first time, follow the
on-screen instructions to set up your device.
Power off.
Lock/unlock the touch screen
You can lock the touch screen and keys to prevent
any unwanted device operations.
1
To lock, press power key.
2
To unlock, press the icon , and then flick your
finger in any direction.
Keys
Learn about the main keys.m
Key Definition Function
Power - Press and hold to power on/off.
P
M
O
- Press to turn on/off the screen
display.
- Hold to access the Phone
options, choose Silent or
Airplane mode.
Home
- Return to the home screen.
key
- Hold to open the list of recent
applications.
Option
- Open a list of options available
key
on the current screen.
- On the home screen, open the
Wallpapers, Widgets and
Settings.
Your phone 1
Page 3
B
Back key - Return to the previous screen
or exit.
- Hide the onscreen keyboard
when it is opened.
Side
-Adjust the ringer volume while in
volume
standby mode or adjust the voice
key
volume during a call.
-When receiving an incoming call,
briefly press down either volume
key to mute the ringtone.
Use the touch screen
Learn basic actions to use the touch screen.
Function Operation
Tap
Tap and
hold
Drag
Double-tap
2 Your phone
Touch once to select or launch a menu,
option, or application.
Tap an item and hold it for more than
2 seconds.
Tap an item and move it to a new
location.
Tap an item twice quickly.
Flick
Briskly scroll up, down, left, or right to
move through lists or screens.
Pinch
Place two of your fingers far apart, and
then pinch them together. In some
apps, like web browser, you can pinch
the screen using two fingers(for
example, thumb and index finger) to
zoom in or zoom out when viewing a
picture or a web pages.
Customize home screen
You can customize the home screen to match your
preferences.
Function Operation
Add items
Slide the screen to enter into menu
screen, tap and hold an item, and then
drag it to home screen.
Move items
Tap and hold an item, and then drag it
to a new location.
Page 4
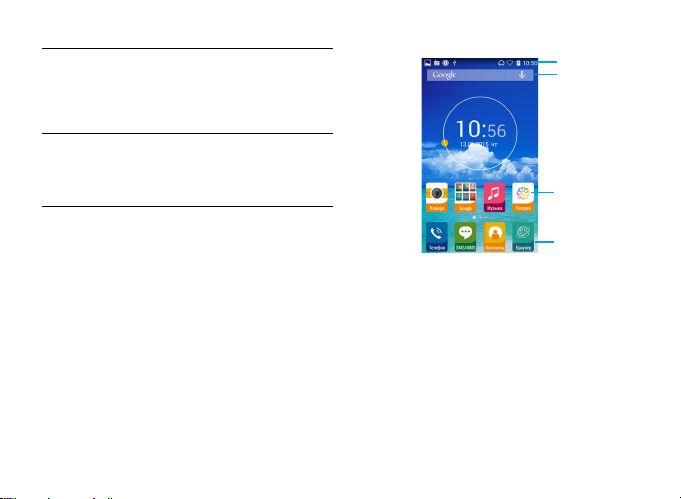
Remove
Status Bar
Shortcut icons
Search input
window
Widgets and
applications
items
Tap and hold an item till the Remove
icon appears at the top of the home
screen. Drag the item to the Remove
area to delete it.
Select a
wallpaper
In home screen, press
O>Wallpapers or tap and hold the
blank area in home screen, select an
image from options.
Home screen
From the Home screen, you can view your device’s
status and access applications.
The Home screen has multiple panels. Scroll left or
right to view the panels on the Home screen. There
are 5 extended home screen, slide your finger
horizontally to the left and right to check each one.
Your phone 3
Page 5
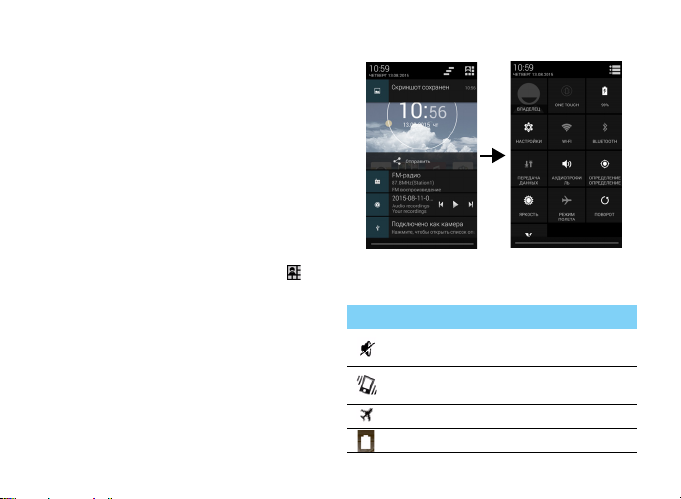
Notifications panel
When you get a new notification, you can open the
Notifications panel to see what event notification or
new information you have received.
-
To open the Notifications panel,press and hold
the status bar, then slide one finger downward. If
you have several notifications, you can scroll
down the screen to see them all.
-
To hide the panel, drag the bottom of the panel
upwards.
From the notifications panel, you can also view your
phone's current status and use the each options.
-
Open the notifications panel and then tap
to open the phone's status panel.
-
Place two fingers on the status bar, then slide
your fingers downward.
4 Your phone
Icons and symbols
Learn about the icons and symbols on the screen.
Icons Function
Your phone will not ring when receiving a
call.
Your phone will vibrate when receiving a
call.
Flight mode activated.
The bars indicate the battery level.
Page 6
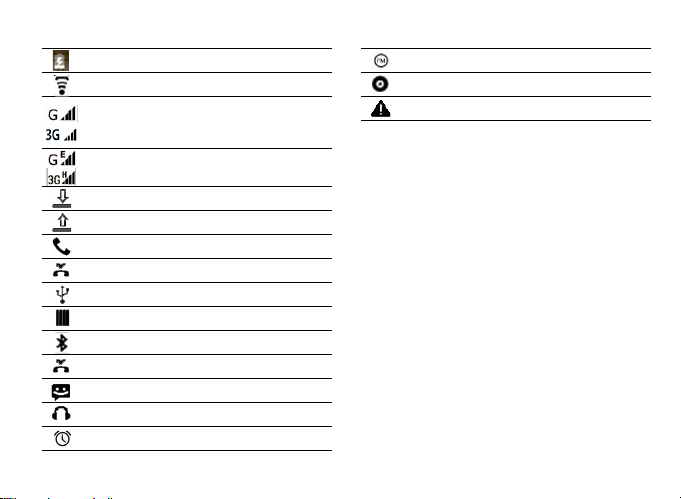
Normal charging.
WLAN activated.
Your phone is connected to a GSM
network. The more bars are shown the
better the reception is.
Your phone is connected to network.
Downloading data.
Uploading data.
Call in progress.
You have a missed call.
Connected to PC.
USB debugging connected.
Bluetooth is activated.
You have a missed call.
New SMS.
The headset is plugged into the phone.
The alarm clock is activated.
FM radio turned on in the background.
Music is playing in the background.
Error occurred or caution required.
Your phone 5
Page 7

Table of contents
Getting started . . . . . . . . . . . . . . . . . . . . . . . . 7
Assembling and Charge . . . . . . . . . . . . . . . . . . . . . 7
Insert a Micro SD card (Memory card) . . . . . . . . . 9
Personalize your phone . . . . . . . . . . . . . . . . . . . . . 10
Basic function . . . . . . . . . . . . . . . . . . . . . . . . .13
Calls . . . . . . . . . . . . . . . . . . . . . . . . . . . . . . . . . . . . 13
Messages . . . . . . . . . . . . . . . . . . . . . . . . . . . . . . . . . 14
Email . . . . . . . . . . . . . . . . . . . . . . . . . . . . . . . . . . . . 14
Manage your phonebook . . . . . . . . . . . . . . . . . . . . 15
MultiMedia. . . . . . . . . . . . . . . . . . . . . . . . . . . . 17
Music. . . . . . . . . . . . . . . . . . . . . . . . . . . . . . . . . . . . 17
Camera . . . . . . . . . . . . . . . . . . . . . . . . . . . . . . . . . . 18
Sound Recorder . . . . . . . . . . . . . . . . . . . . . . . . . . . 20
FM radio . . . . . . . . . . . . . . . . . . . . . . . . . . . . . . . . . 21
Google play. . . . . . . . . . . . . . . . . . . . . . . . . . . . . . . 21
Business applications . . . . . . . . . . . . . . . . . . . . 24
Manage your calendar . . . . . . . . . . . . . . . . . . . . . . 24
Clock. . . . . . . . . . . . . . . . . . . . . . . . . . . . . . . . . . . . 24
File management. . . . . . . . . . . . . . . . . . . . . . . . . . . 24
Search . . . . . . . . . . . . . . . . . . . . . . . . . . . . . . . . . . . 25
Calculator . . . . . . . . . . . . . . . . . . . . . . . . . . . . . . . . 25
Connections . . . . . . . . . . . . . . . . . . . . . . . . . . 26
Bluetooth . . . . . . . . . . . . . . . . . . . . . . . . . . . . . . . . 26
Wi-Fi. . . . . . . . . . . . . . . . . . . . . . . . . . . . . . . . . . . . 26
6
VPN . . . . . . . . . . . . . . . . . . . . . . . . . . . . . . . . . . . . .27
Mobile network sharing. . . . . . . . . . . . . . . . . . . . . .27
PC connections . . . . . . . . . . . . . . . . . . . . . . . . . . . .28
Settings. . . . . . . . . . . . . . . . . . . . . . . . . . . . . . .29
Wireless&Networks . . . . . . . . . . . . . . . . . . . . . . . .29
Device . . . . . . . . . . . . . . . . . . . . . . . . . . . . . . . . . . .30
Personal . . . . . . . . . . . . . . . . . . . . . . . . . . . . . . . . . .30
Account . . . . . . . . . . . . . . . . . . . . . . . . . . . . . . . . . .30
System . . . . . . . . . . . . . . . . . . . . . . . . . . . . . . . . . . .31
Safety & Precaution . . . . . . . . . . . . . . . . . . . . .32
Precaution . . . . . . . . . . . . . . . . . . . . . . . . . . . . . . . .32
Tips . . . . . . . . . . . . . . . . . . . . . . . . . . . . . . . . . . . . .33
Troubleshooting . . . . . . . . . . . . . . . . . . . . . . . . . . .33
Trademark Declaration. . . . . . . . . . . . . . . . . . . . . .35
Specific Absorption Rate Information. . . . . . . . . . .35
Limited Warranty . . . . . . . . . . . . . . . . . . . . . . . . . .35
Declaration of Conformity . . . . . . . . . . . . . . . . . . .38
Page 8

Getting started
Note:
Congratulations on your purchase and welcome to
Philips!
To get the most of your product and enjoy all
Philips has to offer, register your product at:
www. philips. com/mobilephones
More details about your product, please access:
www.philips.com/support
•
Please read the safety instructions in the "Safety & Precaution"
section before use.
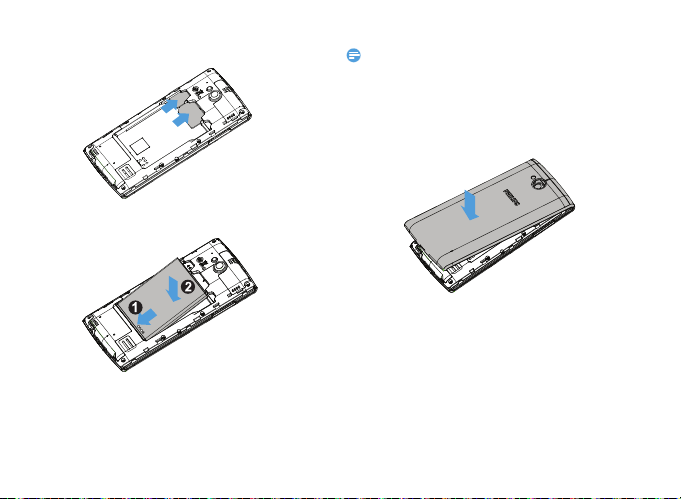
Assembling and Charge
Learn about installing SIM card and charging the
battery for the first use.
Insert SIM card
Follow the steps below to insert your SIM card.
Remember to turn off your mobile phone before
removing the back cover.
1
Remove the back cover.
2
Remove the battery.
Getting started 7
Page 9
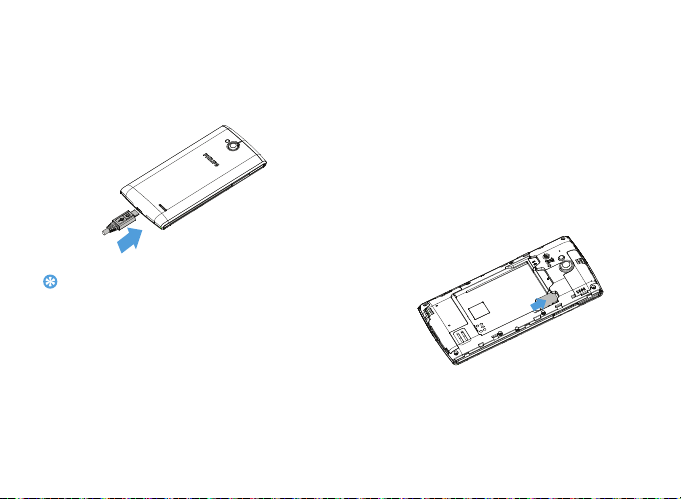
3
Note:
Insert the SIM card.
4
Install the battery.
8 Getting started
•
SIM1/SIM2 both support 3G&2G network. Based on the
default settings of your phone, it will connect 3G network by
SIM1 directly. Also you can enter into
networks>Mobile networks>3G service
settings.
5
Replace the back cover.
Settings>Wireless &
to get your personal
Page 10
Charge the battery
Tips:
The new phone is partially charged. The battery
icon in the upper-right corner shows the battery
level of charging status.
•
You can use the phone while it is charging.
•
Keeping the charger plugged to the mobile phone when the
battery is fully charged will not damage the battery. The only
way to turn off the charger is to unplug it, so it is advisable to
use an easily accessible power socket.
•
If a fully charged phone left unused, it will lost its charge over
time.
•
If the phone is being used for the first time or the phone has
not been used for a prolonged period, it may take longer time
to recharge.
Insert a Micro SD card (Memory
card)
Insert a memory card
You can expand the memory of your phone and
store more additional multimedia files by adding a
micro-SD card.
1
Remove the back cover.
2
Align your micro-SD card with the slot. Put it in
place.
Getting started 9
Page 11

Remove the memory card
Note:
Note:
Ensure that the phone is not currently accessing the
memory card. Before removing a memory card, first
unmount it for safe removal.
1
In Idle screen, select O> Settings> Storage
>Unmount SD card.
2
Push the memory card gently until it disengages
from the phone.
3
Remove the memory card.
•
Do not remove a memory card while the device is transferring
or accessing information to prevent corrupting or damaging
the files in the memory card.
Format the memory card
Formatting your memory card on a PC may cause
incompatibilities with your device. Format the
memory card only on the device.
In Idle screen, select O
>Erase SD card.
10 Getting started
> Settings> Storage
•
Before formatting the memory card, remember to make
backup copies of all important data stored on your device. The
manufacturer’s warranty does not cover loss of data resulting
from user actions.
Personalize your phone
Time and Date
In idle screen, tapO> Settings> Date&time to
control how time and date appears on your device.
•
Automatic date & time: Set to receive time
information from the network and update the
time and date automatically.
•
Automatic time zone: Set to receive time zone
information from the network when you move
across time zones.
•
Set date: Set the current date manually.
•
Set time: Set the current time manually.
•
Select time zone: Select a time zone.
•
Use 24-hour format: Set to show the time in
24-hour format or 12-hour format.
•
Choose date format: Select a date format.
Page 12

Tips:
•
Note:
Tips:
If the battery remains fully discharged, the time and date will
be reset.
Set a screen lock
You can lock your device by activating the screen
lock feature.
In idle screen, tapO
Personal>Security>Screen lock.
•
None: Disable the screen lock.
•
Slide: Choose slide to unlock the screen.
•
Pattern: Draw a pattern to unlock the screen.
•
PIN: Unlock the screen by enter the PIN code.
•
Password: Create your private password to
unlock the screen.
Lock your SIM card
You can lock your phone with the PIN that is
supplied with your SIM card.
1
In idle screen, tapO> Settings> Security>
Set up SIM card lock> Lock SIM card
>Settings>
.
2
Select the SIM card, enter your PIN and select
OK.
•
If you enter an incorrect PIN too many times, your SIM card
will be blocked. You must enter a PIN unlock key (PUK) to
unblock the SIM card.
•
If you block your SIM card by entering an incorrect PUK, take
the SIM card to your service provider to unblock it.
Access applications
•
Scroll left or right to another screen, select an
application.
•
Press B to return to the previous screen,
press
M to return to the Home screen.
•
Access recently-used applications: Press and
hold
M to view the applications you have
accessed recently.
•
Your device has a built-in motion sensor that detects its
orientation. If you rotate the device while using some
features, the interface will automatically switch to landscape
view. To set the interface to keep the orientation when you
rotate the device, select
screen.
Settings>Display>Auto -rotate
Getting started 11
Page 13

Manage applications
learn about how to view the running apps, and
•
In idle screen, tap O>Settings>Apps.
•
Ta p Running, you can view all the running apps,
tap this app to enter it, you can tap Stop to
choose stop running.
•
Ta p Downloaded, you can view all the
downloaded apps, tap this app to enter it, you
can check the detailed information of this app,
tap Uninstall to choose unloading it.
•
Ta p SD card, you can view the apps
downloaded on the SD card, you can choose to
move these apps to the phone.
12 Getting started
Page 14

Basic function
Tips:
Note:
Calls
Learn to use calling functions, such as making and
answering calls, using options available during a call
or customizing and using call-related features.
Make a call
1
In the application list, tap .
2
Dial the number directly or choose one number
from the filtered list that have matching digits.
3
Make a voice call or a video call.
4
Tap to end the call.
•
The phone dialer’s Smart dial features makes it quick and easy
for you to make a call. Simply enter the phone number or first
few letters of the person’s name you want to call. Smart dial
automatically searches and filters your stored contacts and
the phone numbers from the call history.
•
For international calls, long press 0 to enter the “+” sign for
the international prefix.
•
It is illegal in many areas to record a call without permission.
Always ask the other party for permission before recording
a call.
Answer/Reject a call
1
During an incoming call, press and hold and
then drag your finger right to answer the call,
drag left to reject the call.(Press the side
volume key to adjust the volume).
2
Tap to turn on loudspeaker.
3
Ta p to hang up.
Make a conference call
If network applicable, you can handle two or more
calls, or make a conference call.
1
During a call, tap to enter a phone number,
and then tap
number is dialled.
2
The first call is put on hold at this time.
3
To end the call, tap to hang up.
to dial the number. The second
Make an emergency call
Without a SIM card in phone, you can make the
emergency call.
Basic function 13
Page 15

In Europe, the standard emergency number is 112;
Tips:
Note:
in the UK, it is 999.
•
If you've enabled but forgot your lock password or lock
pattern, you can still make emergency calls by tapping
Emergency call on the screen.
Messages
You can use your phone to send text message and
multimedia messages.
Send a message
1
In the application list, tap .
2
Tap New message .
3
Enter the number or tap to select the
number from phonebook.
4
Select the text field and enter your message
text.
5
PressO>Add subject and add a subject for
the message.
6
Tap and attach a file. (Pictures, Videos, Audio
or Slideshow)
7
Tap to send the message.
14 Basic function
•
Copyright protected pictures and sound cannot be sent by
MMS.
Email
Set up an email account
1
Ta p O>Settings >Accounts>Add account,
then follow the onscreen instruction to add
account.
2
Or in the application list, tap / to choose
to set up an google account or email account.
3
You can add more than one gmail account and
email account.
View you email inbox
1
Display drafts, sent messages, and other labels:
Tap inbox at the top bar and then tap another
label (such as Sent, Drafts, or your created
label) to view its messages and conversations.
2
Switch to other account: Tap inbox at the top
bar, then tap the account you want to switch to.
Page 16

Send an email
Note:
Tips:
1
Ta p at the top bar to start to edit the
email.
2
Enter the message recipient’s email address in the
To field. If you are sending the email to several
recipients, separate the email addresses with a
comma.
3
Select the subject field and text input field to
enter a subject and your email text.
4
Ta p O>Attach file/Add Cc/Bcc and others
to do other operations.
5
Tap to send the mail.
Reply an email
1
In the inbox, tap the email message or
conversation.
2
Tap to reply to the sender, tap and
choose whether to reply all or forward.
•
If you choose to reply the sender or reply all, enter your reply
message.
•
If your choose to forward, specify the recipients.
Manage your phonebook
Learn about basic phonebook function.
Add a new contact
1
Tap to enter the Contacts.
2
Ta p and select a memory location.
3
Add phone number and details as desired.
4
Ta p Done to finish saving.
•
You can create contacts from the dialling screen by selecting
Add to contacts.
•
For contacts on the smart phonebook, you can add detailed
information, like home number, office number, contact
pictures and ringtones.
Find a contact
1
On the home screen, tap to enter the
Contacts.
2
Scroll up or down the contact list.
3
Tap and enter the first few letters of the
name in the search bar. (For example “John
Henry” enter JH)
4
Select the contact from the option list.
Basic function 15
Page 17

Use Fast dial
1
In the application list, tap > >Fast dial
settings
2
3
.
Select a location number and add contact.
You can call a speed dial number by tapping and
holding the location number on the dialling
screen.
Create your namecard
1
In the application list, tap > .
2
Select Set up my profile at the top of the
contact list.
3
Enter your personal details.
4
Ta p Done.
You can send your namecard to others or share it
by pressing O and selecting
Share.
Create a group of contacts
By creating groups of contacts, you can manage
multiple contacts and send a message to an entire
group.
1
In the application list, tap > .
16 Basic function
2
Tap and select a memory location.
3
Enter a name and customize the settings for the
group.
4
Add members to the group.
5
Ta p Do ne.
Import/Export your contacts
You can import contact files from a memory card to
your device and export contacts from your device
to a memory card.
1
In the application list, tap .
2
Press O> Import/export.
3
Select a memory location.
4
Select contacts to copy.
5
Ta p OK to confirm.
Page 18

MultiMedia
Note:
Music
Listen to your favorite music while go with the
music player.
Play music
1
Ta p tto open the music screen.
2
Select a music category.
3
Using the following keys to control playback.
Function Definition
Play and resume playback.
Pause the playback.
Select previous track.
Select next track.
Select the play mode:
• Repeat once (play current file
repeatedly)
• Repeat all (play all the files in the
folder repeatedly)
Activate Shuffle mode, play current
file randomly.
M Return to the home screen.
Select to enter into playlist.
Music settings
Press to Choose:
•
Library: Return to music category.
•
Party shuffle: Play all the files in the folder
randomly.
•
Add to playlist : Add new music to your playlist.
•
Delete: Delete the music from playlist.
•
Equalizer: Set the equalizer.
•
Use as ringtone: Choose music as ringtone.
•
Quit: Quit from playing music.
•
When listening to music, adjust the volume to a moderate
level. Continuous exposure to high volume may impair your
hearing.
MultiMedia 17
Page 19

Camera
View
photos
Camera
setting
Take a photo/
video/
panoram
photo
camera
shotcuts
Learn about camera function. Let you take photos
as desired by using your phone.
Take a ph ot o / v id e o
1
In the application list, select .
2
Ta p Photo/Video to switch to take a photo/
video.
3
Aim the camera lens at the subject and make
any necessary adjustments.
4
To zoom in, place two fingers on the screen and
slowly spread them apart. To zoom out, pinch
them together.
5
Tap where you want to focus on the preview
screen.
6
Select Photo/Video to take a photo/video.The
photo/video is saved automatically.
18 MultiMedia
Page 20

Camera shortcuts
Option Function
Switch Switch to the front camera to
take a photo of yourself.
Flash
setting
You can turn on or off the
flash manually, or set the
camera to use the flash when
needed.
HDR
Take three photos with
different exposures and then
combine them to improve
the contrast ratio.
Camera settings
Option Function
FullPreview
Picture size
Scene mode
Burst
Turn on/off full preview.
Select the size of picture.
Change the scene mode.
Select the burst time.
Countdown
timer
White
balance
Color effect
Store
location
Storage path
Advanced
Settings
Antibanding
Exposure
Brightness
Select the duration before taking
photo.
White balance enables the camera
to capture colors more accurately
by adjusting to your current lighting
environment.
Apply a special effect, such as sepia
or black and white tones.
Set the camera to include location
information for your photos. To use
this feature, you must activate
location services.
Select the path to store photos/
videos.
Set the advanced settings.
Set the value of antibanding.
Adjust the exposure value to change
the brightness.
Set the brightness value.
MultiMedia 19
Page 21

Contrast
Saturation
Restore
defaults
Set the contrast value.
Set the saturation value.
Restore to default settings.
View photos
After taking photos, select the image viewer icon to
view the taken photos.
•
To view more photos, scroll left or right.
•
To zoom in or out, place two fingers on the
screen and slowly spread them apart or pinch
them together. To return to the original size,
double-tap the screen.
•
To send a photo to others, tap .
•
Press the Option key O to access the
following options:
-
Delete: delete the photo.
-
Edit: To edit the photo with the image editor.
-
Rotate left: To rotate the photo anti-
clockwise.
-
Rotate right: To rotate the photo clockwise.
-
Crop:To add the photo to the clipboard.
20 MultiMedia
-
Set picture as: To set the photo as your
wallpaper or a contact image.
-
Details: To view the detailed information of
this photo.
Sound Recorder
Learn to operate your device’s voice recorder.
Record a voice memo
1
Open the application list and tap .
2
Tap to start recording.
3
Tap to finish recording and choose to save/
discard it. (Tap to listen to the voice memo
before saving or discarding)
Play a voice memo
1
Tap >Playlists>My recordings to access the
voice memo list.
2
Select a voice memo to listen.
Page 22

FM radio
Tips:
Note:
Learn to listen to music and news on the FM radio.
To listen to the FM radio, you must connect a
headset, which serves as the radio antenna.
Listen to the FM radio
1
Plug a headset into your phone.
2
Tap to enter into FM radio.
3
Tap / , The FM radio scans and saves
available stations automatically.
4
Tap to Search, Record the FM voice, view
the radio list.
5
Tap to close the radio.
Google play
Google Play is the place to go to find new apps for
the phone. Choose from a wide variety of free and
paid apps ranging from productivity apps,
entertainment, to games.
•
A Google Wallet™ payment service is required to purchase a
paid app. You will beasked to confirm method of payment
when you purchase an app.
Download an app
1
Open the application list and tap .
2
Browse or search for an app.
3
When you find the app that you like, tap it and
read its description and userreviews.
4
To download or purchase the app, tap
Download (for free apps) or the pricebutton
(for paid apps).
5
Ta p Accept & download or Accept & buy,
this app will be on the application list when
finished downloaded.
Uninstall an app
•
You can uninstall an app for a refund within a limited time after
your purchase. Toknow more about the refund policy for pa id
apps, please visit the Google Play Helpsite (http://
support.google.com/googleplay/).
1
Open the application list and tap .
MultiMedia 21
Page 23

2
Ta p O>My apps, tap the app you want to
uninstall, and then tap Uninstall.
3
If you need help or have questions about Google
Play, tap
O> Help.
22 MultiMedia
Page 24

Business applications
Manage your calendar
You can create your to-do list and make a plan on
your calendar.
View the calendar
1
In the application list, tap .
2
Tap the date at the top of the screen.
3
Select a view mode:
-
Day: Hourly blocks for one full day.
-
Week: Hourly blocks for the days in one full
week.
-
Month: A full month in one view.
-
Agenda: A list of all the events and tasks
scheduled for a specific period.
Create an event
1
In the application list, tap .
2
Ta p O >New event.
3
Enter the details of the event and select Done.
24 Business applications
4
While viewing an event, tap to edit events
you have created, tap
Done to save the update.
Clock
In application list, tap . to enter the clock.
1
Tap to set alarm.
2
Tap to choose to show the time of different
cities.
3
Tap to set countdown time.
4
Tap to set stopwatch.
File management
Learn about how to use and manage your files and
folders.
Share your files
You can share your photos, audio or video files with
others via MMS, E-mail or Bluetooth.
1
Tap , then choose to open your files from the
phone or SD card.
Page 25

2
Tips:
Long press the selected file, then select one or
multiple files to share/copy/delete/move.
Search
1
In the idle screen, you can input the text on the
srearching bar or tap to enter text by
speaking.
2
When you see the microphone image, speak out
the words you want to type.
3
You can choose to search from the phone, SD
card or Internet.
4
Select a search result.
•
Ta p O>Settings>Voice>Language to choose one or
more languages. Available languages depend on the voice input
languages supported by Google.
•
If a word doesn’ t match what you’ ve spoken and it’ s
underlined, tap the underlined word to delete it or see more
choices.
Calculator
Learn to perform calculations with your phone.
•
Use the keys on the screen to perform basic
calculations. (Scroll the screen to view the
scientific calculator).
•
Press O>C to clear the calculation history.
Business applications 25
Page 26

Connections
Note:
Note:
Bluetooth
Your phone can connect to a compatible Bluetooth
device for exchanging data.
Tur n o n/ of f B lu et oo th
1
From the Home screen, tap O>
Settings>
2
Select to turn on/off the Bluetooth.
3
Tap the Bluetooth to enter into it for other
bluetooth settings.
•
Turn off Bluetooth when not in use to save battery power, or
in places where using a wireless device is prohibited, such as
on board an aircraft and in hospitals.
Receive data via Bluetooth
1
Turn on the Bluetooth firstly, it will search for
and save devices automatically.
2
Then tap Oto set Visibility timeout.
3
Select a device, the screen will show a
password. Firstly make sure the device you
26 Connections
Wireless & Networks>Bluetooth.
want to connect also shows the same password,
then press Pair to start pairing.
4
On the receiving device, accept the file.
•
Some devices, especially headsets or hands-free car kits, may
have a fixed Bluetooth PIN, such as 0000. If the other device
has a PIN, you must enter it.
Send data via Bluetooth
1
Select a file or item, such as a contact, calendar
event, memo, or media file, from an appropriate
application or My files.
2
Select an option for sending data via Bluetooth.
3
Search for and pair with a Bluetooth-enabled
device.
Wi-Fi
You can connect to the Internet or other network
devices anywhere an access point or wireless
hotspot is available.
Page 27

Turn on Wi-Fi and connect to a Wi-Fi
Tips:
1
From the Home screen, tap O>Settings
>Wireless & Networks>Wi-Fi.
2
Drag the Wi-Fi switch to the right, turn Wi-Fi
on.
3
Your device searches for available Wi-Fi APs
automatically.
4
Select an AP.
5
If you selected a secured network, you'll be
asked to enter the network key or password.
6
Select Connect.
VPN
Learn to create virtual private networks (VPNs) and
connect
Set up a VPN profile
1
From the Home screen, tap O>Settings
>Wireless & Networks>More>VPN.
2
Ta p + to enter a name for the VPN server and
select a VPN type.
3
Change the options as required.
4
When you are finished, select Save.
•
The options available may vary depending on the VPN type.
•
Your device should already be configured with Internet
access. If you have trouble accessing the Internet, you must
edit the connections. If you are not sure what information to
enter, ask your VPN administrator.
•
To use this feature, you must activate the screen lock feature.
Connect to a VPN
1
In the application list, tapO>Wireless &
Networks>More>VPN
2
Select a private network.
3
Enter the user name and password, and then
select
Connect.
.
Mobile network sharing
Learn to set your device as a wireless modem or
wireless access point for PCs or other devices, and
share your device's mobile network connection.
Share mobile network via USB
1
Using a USB cable, connect the multifunction
jack on your device to a PC.
Connections 27
Page 28

2
From the Home screen, tap O>Settings
>Wireless & Networks>More>Tethering &
portable hotspot.
3
Select USB tethering to activate the USB
tethering feature. Your device shares the mobile
network connection on your PC.
4
To stop sharing the network connection, tap to
turn off USB tethering.
PC connections
Learn to connect your phone to a PC with a USB
cable in USB connection modes.
1
Connect your phone to a computer with a USB
cable.
2
When connected, select OK to allow USB
debugging.
3
Ta p O>Settings>System>About phone,
then tap Build number on and off until you get
Developer options.
4
Ta p O>Settings>System>Devoloper
options,
then select USB Debugging.
28 Connections
5
You phone act as a removable disk. If you insert
a memory card in the device, you can also
access the file directory of the memory card by
using the device as a memory card reader.
6
Copy files from the PC to the memory card.
7
When you are finished, select Turn off USB
storage
.
Page 29

Settings
Wireless&Networks
Function
Wi-Fi
Bluetooth
Data usage
Airplane mode
Default SMS app
Definition .
Activate the Wi-Fi feature to
connect to a Wi-Fi AP and access
the Internet or other network
devices.
Activate the Bluetooth feature to
exchange information over short
distances.
Keep track of your data usage
amount, and customise the
settings for the limitation.
Activate Flight mode to disable all
wireless functions on your
device. You can use only nonnetwork features.
Select a SMS app for your phone.
Tethering&
portable hotspot
VPN
Mobile networks
Select primary
card
•Set to use your device as a
wireless modem by making a
USB connection with a
computer.
•Set to use your device as a
wireless access point for other
devices.
•Activate the Bluetooth
tethering feature to share your
mobile network with
computers via Bluetooth.
Set up and manage virtual private
networks (VPNs).
•Set to use data connections on
any mobile network.
•Set to use data connections
when you are roaming.
Select the primary SIM card.
Settings 29
Page 30

Device Personal
Function
Lock settings
Audio profiles
Display
Storage
Battery
Apps
30 Settings
Definition .
•Turn on/off lock screen new
event content or screen album
content.
•Select the profiles of the phone.
•Set the volume and type for
ringtong, alarm and notification.
Change the settings to control
the display and backlight on your
device.
View memory information for
your device and memory
card.You can also format the
memory card.
View the amount of battery
power consumed by your device.
Manage running applications,
move applications to or from the
storage card, and install or
uninstall programs.
Function
SIM
management
Location
Security
Language&input
Backup&reset
Timer switch
machine
Account
Add your email accounts.
Definition .
Set the dual SIM card
information/set the SIM card for
data connection, call, message.
Select the sources to use when
determining your location.
Set a screen lock or manage the
credential storage.
Set the operating system language
and region. You can also set
onscreen keyboard options.
Reset your settings to the factory
defaults and delete all your data.
Turn on/off timer switch
machine.
Page 31

System
Function
Date&time
Accessibility
Printing
Definition .
•Set the date and time, time
zone, and date or time format.
•Choose the time and date
formats that suit you.
Use these settings when you’ve
downloaded and installed an
accessibility tool, such as a screen
reader that provides voice
feedback. You can turn
accessibility functions or services
on or off.
Set to print the picture or text
file.
Developer
options
About phone
Tap About phone>Build
number
for seven times, you can
open the Developer Options.
Activate and change the settings
for application development..
View different information about
the phone, such as the battery,
legal information, model number,
software version, base band
version and build number.
If the network is available, tap
System updates to update the
system to latest version.
Settings 31
Page 32

Safety & Precaution
Precaution
Keep your phone away from small children
Keep your phone and all access ories out of the reach of small
children. Small parts may cause choking or serious injury if
swallowed.
Radio Waves
Your phone transmits/receives radio waves in the GSM frequency
(850/900/1800/1900MHz)/WCDMA(900/2100).
Check with the vehicle manufacturer that electronic equipment
used in your vehicle will not be affected by radio energy.
Switch off your phone...
Turn off the phone when in an aircraft. The use of mobile phones in
an aircraft may be dangerous for the operation of the aircraft,
disrupt the mobile phones network and may be illegal.
In hospitals, clinics, other health care centers and anywhere else
where you may be in the close vicinity of medical equipment.
In areas with a potentially explosive atmosphere (e.g. petrol stations
and also areas where the air contains dust particles, such as metal
powders).In a vehicle transporting flammable products or a vehicle
powered by liquefied petroleum gas (LPG).In quarries or other areas
where blasting operations are in progress.
Your mobile phone and your car
Avoid using your phone while driving and obey all regulations that
restrict the use of mobile phones while driving. Use hands free
accessories to increase your safety when possible. Ensure that your
phone and car kit do not block any air bags or other security devices
fitted in your car.
Handle your phone carefully an d sensibly
For the optimal and satisfactory operation of the phone you are
recommended to use the phone in the normal operating position.
32 Safety & Precaution
•
Do not expose your phone to extreme temperatures.
•
Do not immerse the phone in any liquid; if your phone is damp,
switch it off, remove the battery and let them dry for 24hrs before
using them again.
•
To clean the phone, wipe it with a soft cloth.
•
In hot weather or after prolonged exposure to the sun (e.g., behind a
window or a windscreen), the temperature of your phone's casing
might increase. Be very careful in this case when picking up your
phone and also avoid using it with an ambient temperature over 40°
C.
Protect batteries from damage
You should only use Manufacturer Authentic Ac cessories, as the
use of any other accessories may damage your phone and may be
dangerous, and will make all guarantees for your Philips phone null and
void. The use of an unspecified ty pe of battery may also cause an
explosion.
Make sure damaged parts are replaced immediately by a qualified
technician and that they are replaced with genuine manufacturer
replacement parts.
•
Your phone is powered by a re chargeable battery.
•
Use specified charger only.
•
Do not incinerate.
•
Do not deform or open the battery.
•
Do not allow metal objects (such as keys in your pocket) to short
circuit the battery contacts.
•
Avoid exposure to excessive heat (>60° C or 140° F), moisture or
caustic environments.
Environmental care
Remember to observe the local regulations regarding the disposal
of the packaging materials, exhausted batteries and old phone and
please promote their recycling.Manufacturer has marked the battery and
Page 33

packaging with standard symbols designed to promote the recycling and
appropriate disposal of your eventual waste.
:The labeled packaging material is recyclable.
:A financial contribution has been made to the associated national
packaging recovery and recycling syst em.
:The plastic material is recyclable (also identifies the type of plastic).
Hearing Protection
When listening to music, adjust the volume to a moderate
level.
Continuous exposure to high volume may impair your hearing.
it is recommended to keep it away from your body and head at least
15mm during operation.
WEEE Marking in the DFU: “Information to the Consumer”
Disposal of your old product
Your product is designed and manufacture d with high quality materials
and components, which can be recycled and reused.
When this crossed-out wheeled bin symbol is attached to a
product it means the product is covered by the European
Directive 2002/96/EC
Please inform yourself about the local separate collection system
for electrical and electronic products.
Please act according to your local rules and do not dispose of your old
products with your no rmal household waste. The correct disposal o f
your old product will help prevent potential negative consequ ences for
the environment and human health.
This device may contain commoditie s, technology or software subject to
export laws and regulations from the US and other countries. Diversion
contrary to law is prohibited.
Tips
Pacemakers
If you have a pacemaker:
•
Always keep the phone more than 15 cm from your pacemaker
when the phone is switched on, in order to avoid potential
interference.
•
Do not carry the phone in a breast pocket.
•
Use the ear opposite to the pacemaker to minimize the potential
interference.
•
Switch off your phone if you suspect that interference is taking place.
Hearing aids
If you are a user of a hearing aid, consult your physician and hearing aid
manufacturer to learn whether your particular device is susceptible to
cellular phone interference.
How to prolong the battery life of your phone
To have your mobile phone function properly, sufficient battery power
is important. For the power-saving purpose, do the follo wing, if
applicable:
•
Turn off the Bluetooth function of your phone.
•
Set the backlight level and duration of your phone to a low value.
•
Turn on the auto keypad lock, turn off the key sounds, tap vibration,
or vibration alerts.
•
Establish GPRS connection when needed. Otherwise, your phone
will keep searching for GPRS connection, and drain your battery
power.
•
Turn off your phone if there is no coverage. Otherwise, the phone
will keep searching for network, and drain your battery power.
Troubleshooting
The phone does not switch on
Remove/reinstall the battery. Then charge the phone until the battery
icon stops scrolling. Unplug the charger and try to switch the mobile on.
The display shows BLOCKED w hen you switch on the phon e
Somebody tried to use your phone but didn’t k now the PIN code nor
the unblocking code (PUK). Contact your s ervice provider.
Safety & Precaution 33
Page 34

The display shows IMSI failure
This problem is related to your subscription. Contact your operator.
Your phone doesn’t return to idle screen
Long press the hang-up key or switch off the phone, check that the SIM
card and the battery are installed correctly and switch it on again.
The network symbol is not d isplayed
The network connection is lost. Either you are in a radio shadow (in a
tunnel or between tall buildings) or you are outside the network
coverage area. Try from anoth er place, try to reconnect to the network
(especially when abroad), check that the antenna is in place if your mobile
has an external antenna, or contact your network operator for
assistance/information.
The display doesn’t resp ond (or the display responds slowly) to
key presses
The display responds more slowly at very low temperatures. This is
normal and does not affect the operation of the phone. Take the phone
to a warmer place and try again. In other cases please contact your
phone supplier.
Your battery seems to over heat
You might be using a charger that was not intended for use with your
phone. Make sure you always use the manufacturer authentic accessory
shipped with your phone.
Your phone doesn’t display the phone numbers of incoming
calls
This feature is network and subscription dependent. If the network
doesn’t send the caller’s number, the phone will display Call 1 or
Withheld instead. Contact your operator for detailed information on
this subject.
You can’t send text messages
Some networks don’t allow message exchanges with other networks.
First check that you have entered the number of your SMS centre, or
contact your operator for detailed information on this subject.
34 Safety & Precaution
You can’t receive and/or store JPEG pictures
A picture may not be accept ed by your mobile phone if it is too large, if
its name is too long, or if it doesn’t have the correct file format.
You feel that you have missed some calls
Check your call divert options.
When charging, the battery icon shows no bar and the outline
is flashing
Only charge the battery in an environment where the temperature does
not go below 0°C (32°F) or above 50°C (113°F).
In other cases please contact your phone supplier.
The display shows SIM failure
Check that the SIM card has been inserted correctly. If the problem
persists, your SIM card may be damaged. Contact your operator.
When attempting to use a feature in the menu, the display
shows NOT ALLOWED
Some features are network dependent. They are only available,
therefore, if the network or your subscription supports them. Contact
your operator for detailed information on this subject.
The display shows INSERT YOUR SIM CARD
Check that the SIM card has been inserted correctly. If the problem
persists, your SIM card may be damaged. Contact your operator.
The autonomy of your phone seems lower than indicated on
the user guide
The autonomy is linked to your settings (e.g., ringer volume, backlight
duration) and the features you use. To increase the autonomy, and
whenever possible, you m ust deactivate features y ou do not use.
Your phone doesn’t work well in your car
A car contains many metal lic parts that absorb electromagnetic waves
which can affect the phone’s p erformance. A car kit is available to
provide you with an external antenna and enables you to make and
receive phone calls without handling the handset.
Page 35

Note:
•
Check with the local authorities whether or not you are allowed to
use the phone while driving.
Your phone is not charging
If the battery is completely flat, it might take several minutes of precharge (up to 5 minutes in some cases) before the charging icon is
displayed on the screen.
The picture captured with the phone camera is not clear
Make sure that the camera lens on both sides is clean.
Trademark Declaration
Android Android is a trademark of Google, Inc.
Bluetooth™ Bluetooth™ is a trade-mark owned by
Philips PHILIPS and PHILIPS’ Shield Emblem are registered
FCC Compliance
This device complies with part 15 of the FCC Rules. Operation is subject
to the condition that this device does not cause harmful interference.
Caution: Changes or modifications not expressly approved by the
manufacturer could void the user’s authority to operate the equipment.
Note: This equipment has been tested and found to comply with the
limits for a Class B digital device, pursuant to part 15 of the FCC Rules.
These limits are designed to provi de reasonable protection against
harmful interference in a residential installation. This equipment
generates, uses and can radiate radio frequency energy and, if not
telefonaktiebolaget L M Ericsson, Sweden and licensed
to Philips.
trademarks of Koninklijke Philips N.V. manufactured by
Shenzhen Sang Fei Consumer Communications Co.,
Ltd. Under license from Koninklijke Philips N.V..
installed and used in accordance with the instructions, ma y cause harmful
interference to radio communications. However, there is no guarantee
that interference will not occur in a particular installation. If this
equipment does cause harmful interference to radio or television
reception, which can be determined by turning the equipment off and on,
the user is encouraged to try to correct the interference by one or more
of the following measures:
—Reorient or relocate the receiving antenna.
—Increase the separation between the equipment and receiver.
—Connect the equipment into an outlet on a circuit different from that
to which the receiver is connected.
—Consult the dealer or an experienced radio/ TV technician for help.
This device complies with Part 15 of the FCC Rules. Operation is subject
to the following two conditions:
•This device may not cause harmful interfere nce.
•This device must accept any interferen ce received, including
interference that may cause undesired operation.
Health and safety information
Radio Frequency (RF) Energy
This model phone meets the government’s requirements for exposure
to radio waves.
This phone is designed and manufactured not to exceed the emission
limits for exposure to radio frequency (RF) energy set by the Federal
Communications Commission of the U.S. Government:
The exposure standard for wireless mobile phones employs a unit of
measurement known as the Specific Absorption Rate, or SAR. The SAR
limit set by the FCC is 1.6W/kg. Tests for SAR are conducted using
standard operating positions accepted by the FCC with the phone
transmitting at its highest certified power level in all tested frequency
bands. Although the SAR is determined at the highest certified power
level, the actual SAR level of the phone while operating can be well below
Safety & Precaution 35
Page 36

the maximum value. This is because the phone is designed to operate at
multiple power levels so as to use only the poser required to reach the
network. In general, the closer you are to a wireless base station
antenna, the lower the power output.
The highest SAR value for the model phone as reported to the FCC
when tested for use at the ear is 0.75 W/kg and when worn on the
body, as described in this user guide, is 1.21 W/kg (Body-worn
measurements differ among phone models, depending upon available
enhancements and FCC requirements).
While there may be differences between the SAR levels of various
phones and at various positions, they all meet the government
requirement.
The FCC has granted an Equipme nt Authorization for this model phone
with all reported SAR levels evaluated as in compl iance with the FCC RF
exposure guidelines. SAR information on this model phone is on file with
the FCC and can be found under the Display Grant section of http://
www.fcc.gov/oet/fccid after searching on
FCC ID: VQRCTS307
For body worn operation, this phone has been tested and meets the FCC
RF exposure guidelines for use with an accessory that contains no metal
and the positions the handset a minimum of 1 cm from the body. Use of
other enhancements may not ensure compliance with FCC RF exposure
guidelines. If you do not use a body-worn accessory and are not holding
the phone at the ear, positio n the handset a minimum of 1 cm from your
body when the phone is switched on.
36 Safety & Precaution
 Loading...