

Page 1
WR-16
FM / AM / Bluetooth Receiver
GB
F
E
01 - 14
00 - 00
00 - 00
3A81cX0S10000
Page 2

The Bluetooth® word mark and logos are registered trademarks owned by Bluetooth SIG, Inc. and any
use of such marks by SANGEAN ELECTRONICS INC. is under license.
01
Page 3

Important safety instructions
Read these instructions.
1.
Keep these instructions.
2.
Heed all warnings.
3.
Follow all instructions.
4.
Do not use this apparatus near water.
5.
Clean only with clean dry cloth.
6.
Do not block any ventilation openings. Install in accordance with the manufacturer’s instruc-
7.
tions.
Do not install near any heat sources such as radiators, heat registers, stoves, or other appara-
8.
tus (including ampliers) that produce heat.
Do not defeat the safety purpose of the polarized or grounding-type plug. A polarized plug has
9.
two blades with one wider than the other. A grounding type plug has two blades and a third
grounding prong. The wide blade or the third prong are provided for your safety. If the provided
plug does not t into your outlet. consult an electrician for replacement of the obsolete outlet.
Protect the power cord from being walked on or pinched particularly at the power cords ends,
10.
wall outlet and where the power cord comes out of the radio.
Only use attachments / accessories specied by the manufacturer.
11.
12.
Use only with the cart, stand, tripod, bracket, or table specied by the manufacturer, or sold with
the apparatus. When a cart is used, use caution when moving the cart / apparatus combination
to avoid injury from tip-over.
13.
Unplug this apparatus during lightning storms or when unused for long periods of time.
14.
Refer all servicing to qualied service personnel. Servicing is required when the apparatus has
been damaged in any way, such as power-supply cord or plug is damaged, liquid has been
spilled or objects have fallen into the apparatus, the apparatus has been exposed to rain or
moisture, does not operate normally, or has been dropped.
15.
To Reduce the Risk of Fire or Electric Shock, Do not Expose This Appliance To Rain or Mois-
ture.
02
Page 4
Important safety instructions
The Shock Hazard Marking and Associated Graphical Symbol is provided on the back of unit.
16.
Apparatus shall not be exposed to dripping or splashing liquids and no objects lled with liquids
17.
should be placed on the radio.
Excessive sound pressure on your ears with or without headphones could impair your hearing
18.
ability.
For United States:
Cautions to the user
The changes or modications not expressly approved by the party responsible for compliance
could void the user’s authority to operate the equipment.
RF exposure statements
IMPORTANT NOTE:
To comply with the FCC RF exposure compliance requirements, the antenna(s) used for this
transmitter must be installed to provide a separation distance of at least 20cm (8 inches) from all
persons and must not be co-located or operating in conjunction with any other antenna or transmitter. No change to the antenna or the device is permitted. Any change to the antenna or the device could result in the device exceeding the RF exposure requirements and void user’s authority
to operate the device.
Note:
This equipment has been tested and found to comply with the limits for a Class B digital device,
pursuant to part 15 of the FCC Rules. These limits are designed to provide reasonable protection
against harmful interference in a residential installation. This equipment generates, uses and can
radiate radio frequency energy and, if not installed and used in accordance with the instructions,
may cause harmful interference to radio communications. However, there is no guaranty that
interference will not occur in a particular installation. If this equipment does cause harmful interference to radio or television reception, which can be determined by turning the equipment off
and on, the user is encouraged to try to correct the interference by one or more of the following
measures:
● Reorient or relocate the receiving antenna.
● Increase the separation between the equipment and receiver.
● Connect the equipment into an outlet on a circuit different from that to which the receiver is
connected.
● Consult the dealer or an experienced radio / TV technician for help.
03
Page 5
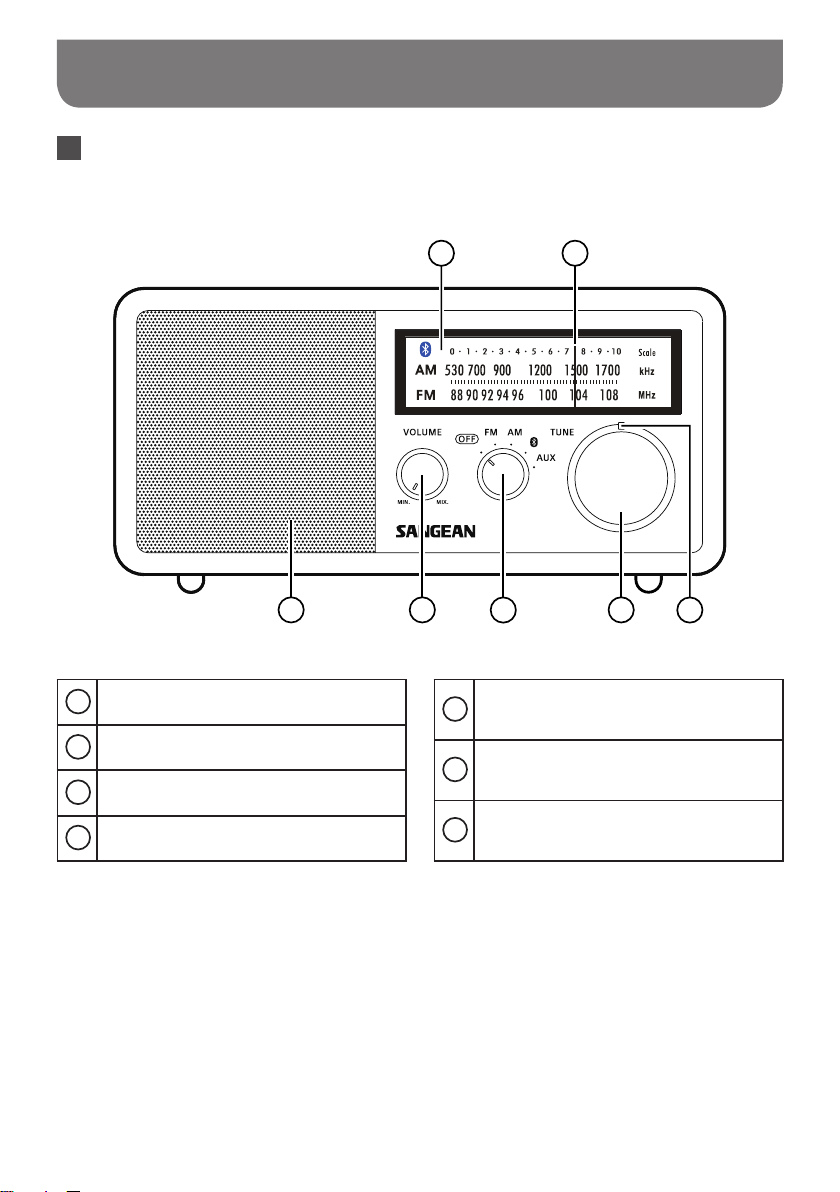
Controls and connections
Front view
1 Tuning LED indicator
2 Tuning Control knob
3 Power and Band selecting knob
4 Volume Control knob
6
45
3
5 Speaker
6 Dial scale
7 Dial indicator
7
2
1
04
Page 6

Controls and connections
Back view
14
13 12 11 10 9 8
8 12V DC input socket
9 Headphone socket
REC out socket
10
11 Aux in socket
15
13 External / Internal antenna switch
14 F-type external antenna terminal
AM external antenna terminal
15
(USA version only)
16
12 USB charging socket
16 AC power cord socket
05
Page 7

Controls and connections
Top view
17
06
17 NFC detection area
Page 8

Power your radio
AC operation
Before you plug the AC cord into the radio, be sure the AC voltage is correct. Insert the plug on the
end of the supplied power cord into the AC power socket on the back of the radio.
DC operation
For outdoor use, you can power the radio by using a 12V DC input socket from a DC power supply (not
included) (example, from the power supply of vehicles or boats). An AC power adaptor with 1 Ampere
and center positive in polarity can also power the radio in house.
Operating your radio FM
Connect the Antenna
1.
The radio comes with a built-in AM / FM antenna. To improve FM reception, insert the end of the
supplied FM wire antenna into the F-type antenna terminal and adjust the wire for best reception.
A 75 ohm coaxial cable to an outdoor antenna may also be attached to the terminal. Be sure to
switch external / internal antenna switch to external position while using the supplied wire anten-
na or connected to an outdoor antenna. In some European countries, you may have to connect
the supplied antenna terminal adaptor to connect with an outdoor antenna.
Turn on your radio by rotating the Power knob to the FM position.
2.
Rotate the Tuning Control knob to select the desired station. On FM, the tuning scale is marked in
3.
MHz (Megahertz). The tuning LED indicator will appear brightest when the best tuning has been
achieved.
Adjust the Volume Control knob for comfortable listening.
4.
5.
To switch off the radio,turn the Power knob to the OFF position.
07
Page 9

Operating your radio AM
Connecting the antenna
1.
The radio comes with a built-in AM antenna which should be enough for normal listening. To improve
the AM reception, you may connect an outdoor AM antenna (not included) to the AM antenna terminal
(USA version only).
Turn on your radio by switching the Power knob to the AM position.
2.
Rotate the Tuning Control knob to select the desired station. On AM, the tuning scale is marked
3.
in kHz (Kilohertz). The tuning LED will appear brightest when best tuning has been achieved.
Rotate your radio for best reception.
4.
Adjust the Volume Control knob for comfortable listening.
5.
To switch off your radio, turn the power knob to the OFF position.
6.
Listening to Bluetooth music
You need to pair your Bluetooth device with your radio before you can auto-link to play / stream Blue-
tooth music through your WR-16. Paring creates a ‘bond’ so two devices can recognize each other.
Pairing your Bluetooth device for the rst time
Rotate the Band selecting knob to select the Bluetooth function.
1.
The Bluetooth icon on the panel will ash blue.
Activate Bluetooth on your device according to the device’s user man ual to link t o you r
2.
Some smartp hones that are equipped with earlier Bluetooth versions older than BT2.1 may
need to input the pass code “0000”.
Once connected, there will be a beep sound and the Bluetooth icon will remain illuminated
3.
blue. You can now play the music from your Bluetooth-enabled device to the WR-16.
08
WR-16
.
Page 10

NOTE
● If there are 2 Bluetooth devices searching for WR-16, it will show its availability on both
devices. However, if one device links with the WR-16 first, then the other Bluetooth device
won’t nd the WR-16 on its list.
● If you take your source device out of range, the connection will be temporarily disconnected to
your radio. Your radio will automatically reconnect if the source device is brought back in range
within 3 minutes. Otherwise you need to manually reconnect your device again to the radio. Be
aware that during the period of disconnection, no other Bluetooth device can pair or link with
your radio.
● If ‘SANGEAN WR-16 shows in your Bluetooth device list but your device cannot connect with
it, please delete the Sangean WR-16 item from your list and pair the device with the WR-16
again following the steps described previously.
● The effective operation range between the WR-16 and your paired device is approxi-
mately 10 meters (30 feet). Any obstacle between the system and the device can reduce the
operational range.
● Bluetooth / NFC connectivity performance may vary depending on the connected Bluetooth
devices. Please refer to the Bluetooth capabilities of your device before connecting to your
radio. All features may not be supported on some paired Bluetooth devices.
● With some mobile phones, making / receiving calls, text messages, e-mails or any other
activities unrelated to audio streaming may mute the Bluetooth audio streaming or even
temporarily disconnect from your device. Such behavior is a function of the connected device
and does not indicate a fault with your radio.
Playing a previously-paired Bluetooth source device
The WR-16 can memorize up to 2 paired Bluetooth source devices, when the memory exceeds this
amount, the earliest paring device will be over written from the device.
If your Bluetooth source device was already paired with the WR-16 previously, the unit will memorize
your Bluetooth source device and will attempt to reconnect with a Bluetooth source device in the
memory that was last connected. If the last connected Bluetooth source device is not available, the
WR-16 will try to connect to the second last Bluetooth source device.
Disconnecting your Bluetooth device
Rotate the Band selecting knob to any other band or off position or disconnect the Bluetooth-enabled
device. The LED light for Bluetooth icon will then start to ash indicating deactivation of Bluetooth.
09
Page 11

Pairing and playing your device via NFC
The WR-16 is equipped with wireless NFC (Near Field Communication) feature which allows NFC-
enabled devices to pair and play music to the WR-16. For non-NFC devices, please refer to the above
section for standard Bluetooth pairing.
Rotate the Band selecting knob to the Bluetooth setting.
1.
The Bluetooth icon on the panel will ash blue.
Turn on your NFC feature on your device.
2.
Touch the NFC area of your playing device against the NFC area of the radio. The WR-16 will au-
3.
tomatically pair your device. If you are pairing with the WR-16 for the first time, your NFC-en-
abled device will be asked for the permission to link with the WR-16. Once paired with a device,
there will be a beep sound and the Bluetooth icon will remain illuminated blue.
Use the controls on your device to play / pause and navigate tracks.
4.
NOTE
● If you would like to link another Bluetooth device via NFC, disconnect the existing linked
Bluetooth device rst.
● The location of the NFC detection area is not the same on all devices. When connecting
with other Bluetooth device via NFC, refer to the User guide of the your device for more
information.
● Some metallic cases or covers for mobile phones may reduce the sensitivity of NFC. Make
sure you remove it, before activating the NFC.
Disconnecting your NFC-enabled device
To disconnect your device, simply touch it again on the top of the unit. The LED light for Bluetooth icon
will then start to ash blue indicating deactivation of Bluetooth.
10
Page 12

Headphone use
Headphone use with this radio should be tted with a 3.5 mm connector. Insert the headphones con-
nector into the socket marked on the back side of the radio. When the headphones are plugged in,
the loudspeaker is automatically disconnected.
AUX IN socket
A 3.5mm Auxiliary Input socket is provided on the back of your radio to permit an audio signal to be fed
into the unit from an external audio device such as iPod, MP3 or CD player.
Rotate the Band selecting knob to select “AUX”.
1.
Connect an external audio source (for example, iPod, MP3 or CD player) to the Auxiliary
2.
Input socket.
Adjust the volume setting on your iPod, MP3 or CD player to ensure an adequate signal
3.
level from the player, and then rotate the Volume control knob on the radio as needed for
comfortable listening.
REC Out socket
The radio can be used as a separate tuner by connecting this output to a stereo receiver or pre-
amplier or you can use this output to make recordings in mono from audio programs.
11
Page 13

Charging with USB socket
Your radio has a USB socket which is intended for charging an iPhone, smart phone or similar devices.
Charge time may vary and in some cases may take longer to charge than when using the manufac-
turers charging unit supplied with the smart phone. The radio can charge the iPhone, smart phone or
similar devices when the radio is in power off mode.
IMPORTANT
● The USB jack can only provide power to USB devices with a 1A 5V maximum input. It does not
support external Hard disk drives, and some mobile phones or electronic devices.
● The charger may not supply power to some USB devices.
● Do not connect a power source to the USB port. Otherwise there is a risk of re. The USB port
is only intended for charging lower voltage devices.
● Do not insert a nail, wire, etc. into USB power supply port. Otherwise a short circuit may cause
smoke or re.
● Do not connect this USB socket with your PC USB port, as it is highly possible that it may cause
breakdown of both units.
● Never use the USB socket in rainy or moist conditions to prevent moisture from entering the
radio.
12
Page 14
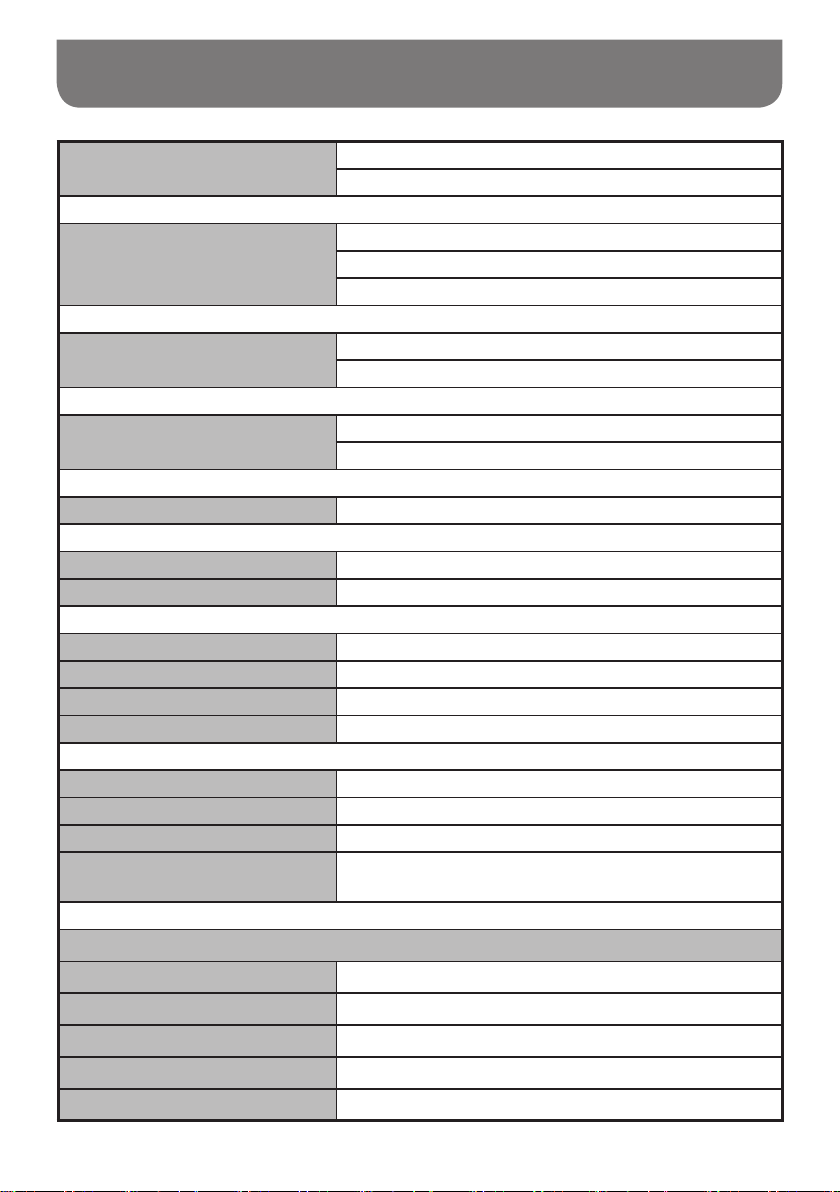
Specications
Frequency Coverage:
Power:
Internal Antenna System:
External Antenna Terminal:
Output Power:
Headphones Socket:
Output:
Aux In Socket:
Input Sensitivity:
Input Impedance:
REC OUT:
6.5W 10% T.H.D. @ 100Hz
3.5mm dia. Stereo jack.
47kohm
FM 87.50 - 108 MHz
AM 520 - 1710 kHz
AC 120V / 60Hz / 25W (USA version)
AC 230V / 50Hz / 25W (European version)
(For actual power requirement please refer to the back panel)
AM Built-in ferrite antenna
FM Built-in wire antenna
AM antenna terminal (USA version only)
FM F-type antenna terminal
3.5mm dia. Stereo jack
3mW + 3mW
IN 300mV Output 7W @ 100Hz
output impedance: 2.2kohm
DC IN:
12V / 1A center pin positive (operational voltage 9-14V)
External Diameter:
Internal Diameter:
Maximum Supplying Power of
USB Socket:
Bluetooth
Bluetooth Specication Bluetooth® Ver 4.1
Prole Support A2DP
Bluetooth Audio CODEC SBC
Transmitting Power Specication Power Class 2
Line of Sight Range 10meters / 30feet
5.5mm
2.0mm
5V, 1A
13
Page 15

Specications
Operating Temperature Range:
Accessories:
Dimension:
Weight:
0°C to +35°C
FM F-terminal antenna wire
AC Power Cord
F to PAL terminal adapter (European version only)
240 (W) x 119 (H) x 168 (D) mm
9.44” (W) x 4.68” (H) x 6.61” (D)
2.375kg.
5.23lbs.
14
Sangean reserves the right to amend the specication without notice.
If at any time in the future you should need to dispose of this product please note that:
Waste electrical products should not be disposed of with household waste. Please recycle
where facilities exist. Check with your Local Authority or retailer for recycling advice. (Waste
Electrical and Electronic Equipment Directive)
 Loading...