

Page 1
381S101-A
Operating instruction
Mode d’emploi
Instruccions de ma ne jo
Gebruiksaa nwijzing
Bedienungsanleitung
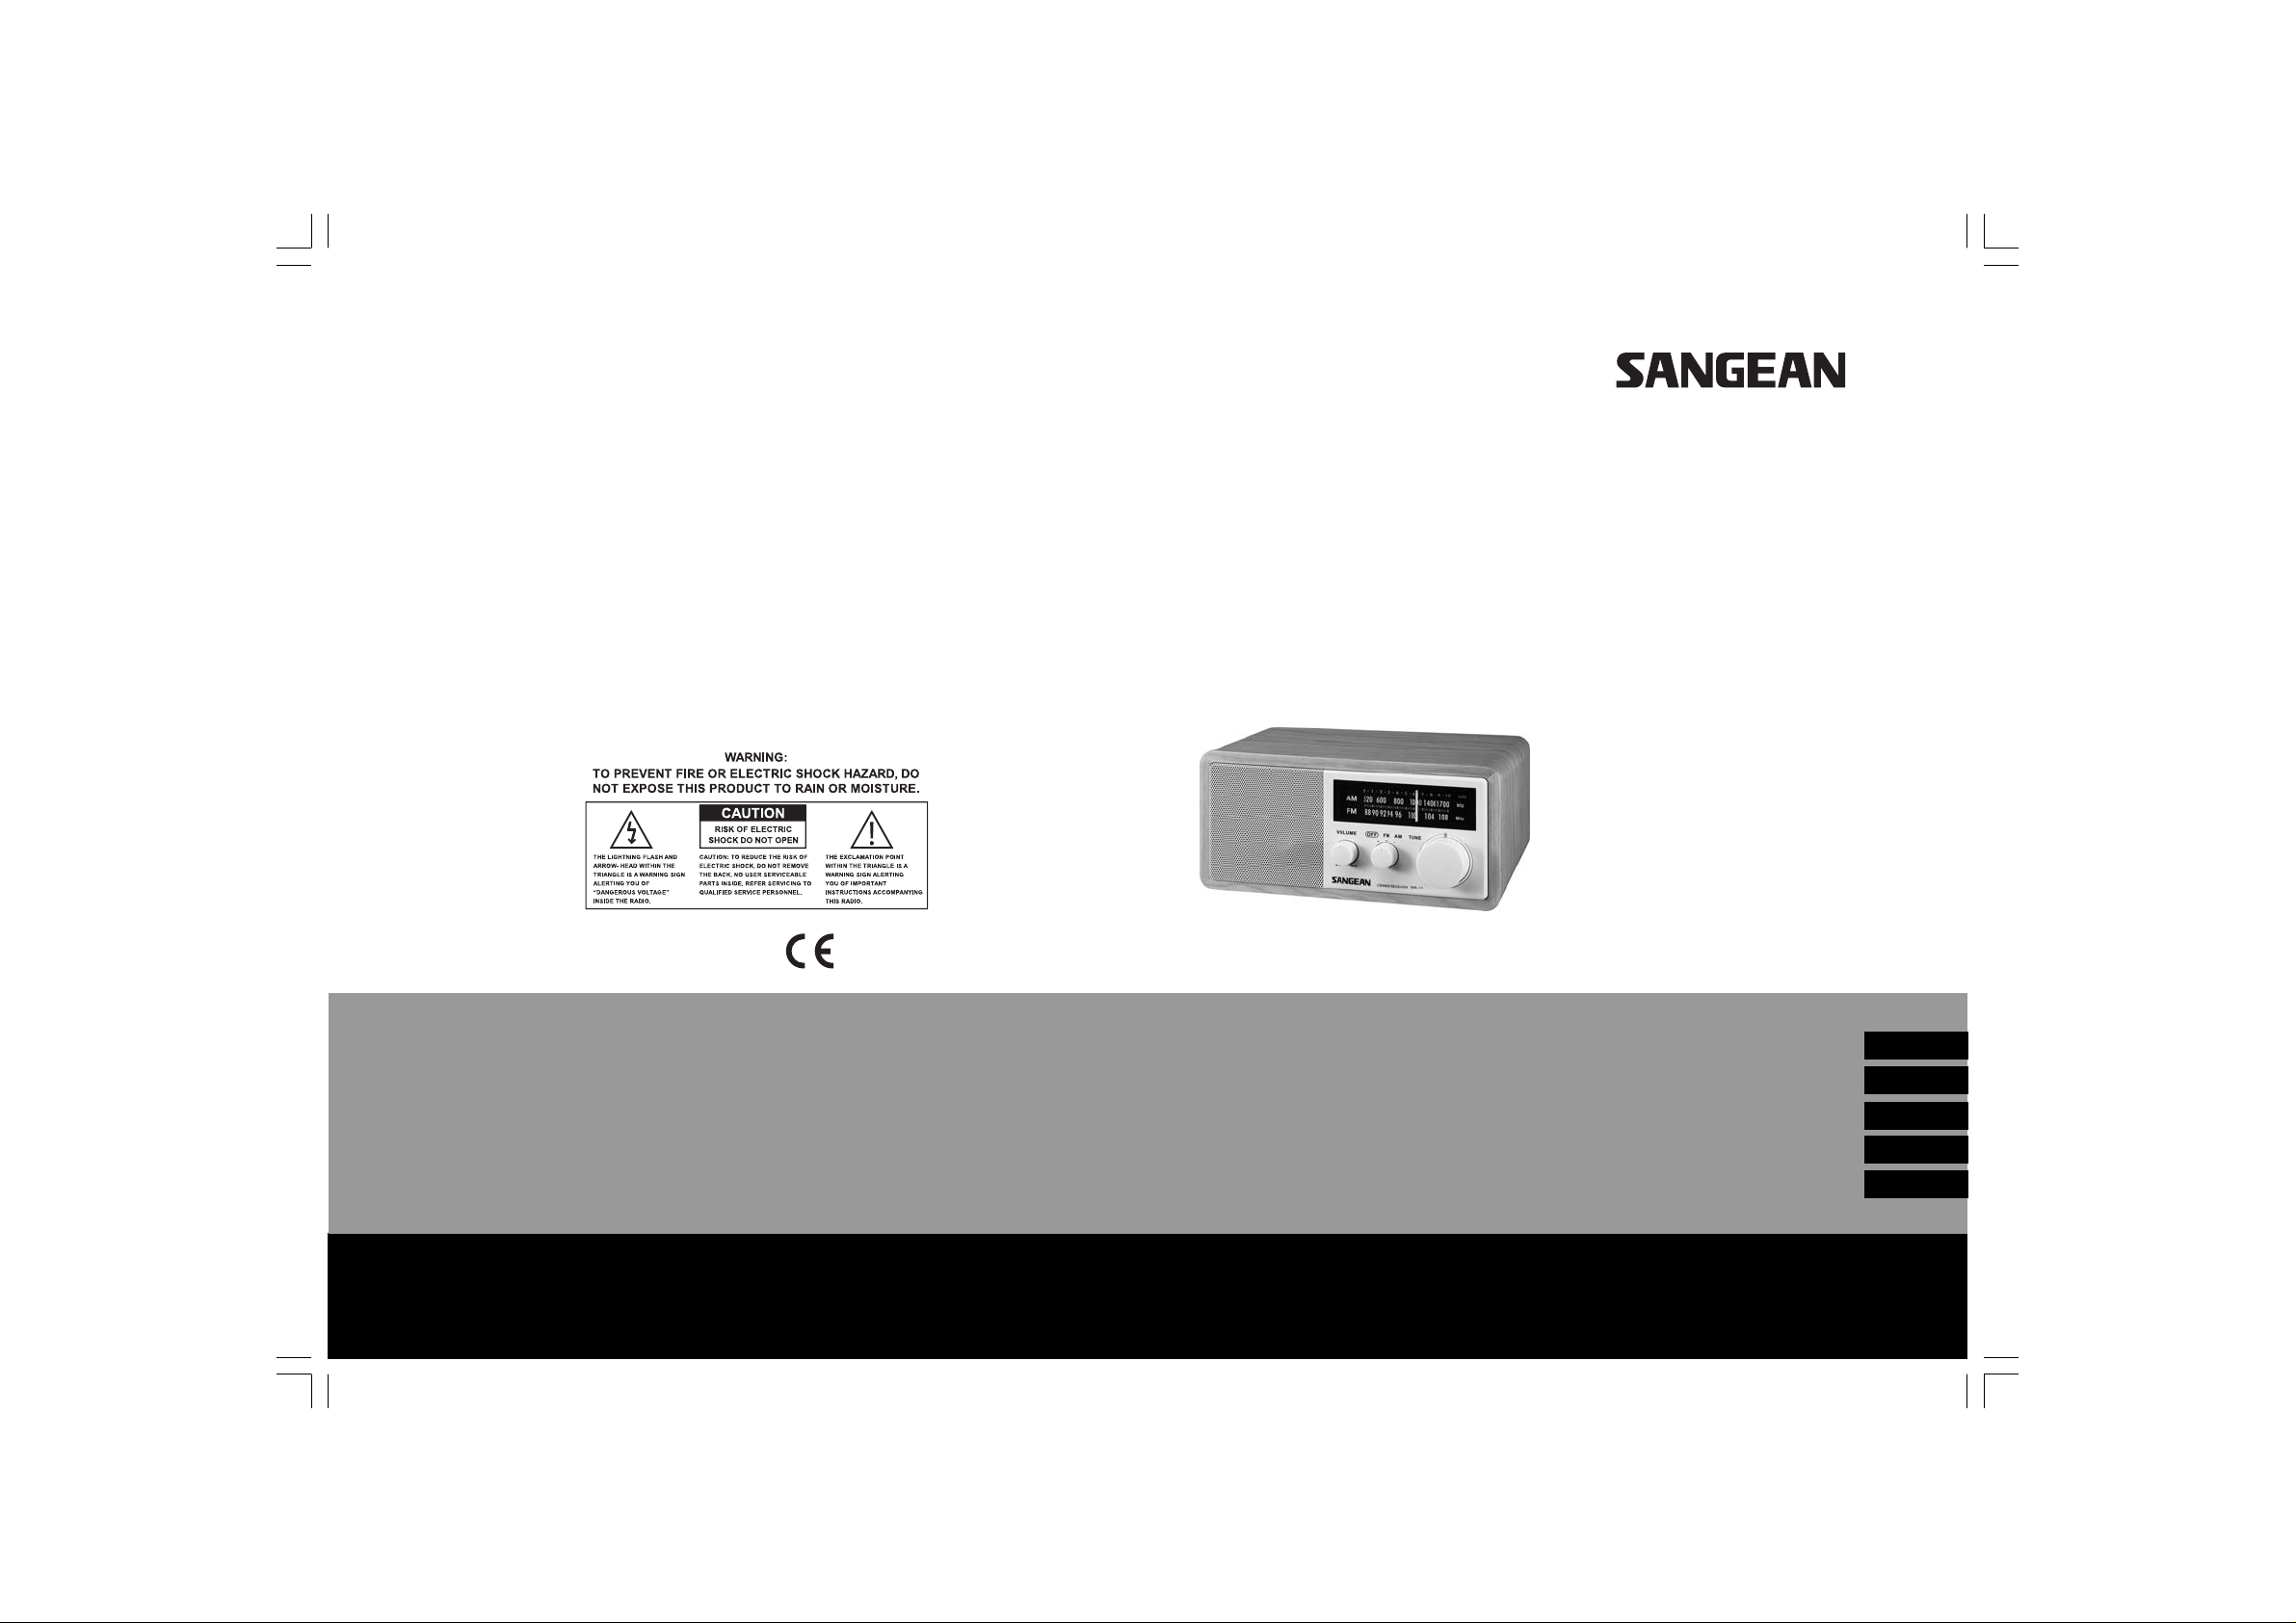
WR-11
GB
F
E
NL
D
Page 2

IMPORTANT SAFETY INSTRUCTIONS
1. Read these instructions.
2. Keep these instructions.
3. Heed all warnings.
4. Follow all instructions.
5. Do not use this apparatus near water .
6. Clea n only with dry cloth.
7. Do not block a ny ventilation openings. Install in a ccorda nce with
the manufa cturer’s instructions.
8. Do not install near any heat sources such as radi ators,
heat registers, stoves, or other a pparatus (including amplifiers)
that produce heat.
9. Do not defe at the safety purpose of the polarized or
grounding-type plug. A polarized plug ha s two blade s with one
wider than the other. A grounding type plug has two blades a nd a
third grounding prong. The wide blade or the third prong are
provided for your safety. If the provided plug does not fit into your
outlet. consult a n electrician for replacement of the obsolete outlet.
1
Page 3

10. Protect the power cord from being walked on or pinched
particularly at plugs, convenience recepta cles, a nd the point
where they exit from the a pparatus.
1 1. Only use atta chments/a ccessories specif ied by the ma nufa cturer .
12. Use only with the cart, stand, tripod, bracket, or table specif ied by
the manufa cturer, or sold with the a pparatus. When a cart is
used, use caution when moving the cart/a pparatus combination
to avoid injury from tip-over.
13. Unplug this apparatus during lightning storms or when unused f or
long periods of time.
14. Refer all servicing to qualified service personnel. Servicing is
required when the a pparatus has been da maged in a ny way,
such a s power-supply cord or plug is damaged. liquid ha s been
spilled or objects have fallen into the a pparatus, the apparatus
ha s been exposed to rain or moisture, does not operate
normally , or has been dropped.
15. To Reduce the Risk of Fire or Ele ctric Shock, Do not Expose
This Appliance To Rain or Moisture.
16. The Shock Hazard Marking a nd Associated Gra phical Symbol is
provided on the bottom panel of unit.
17. Apparatus shall not be exposed to dri pping or splashing a nd no
objects filled with liquids, shall not be pla ced on the a pparatus.
GB
2
Page 4

Features
(1) AM/FM 2 ba nds.
(2) Wooden cabinet made of MDF in real cherry or walnut or other
optional wood veneer.
(3) Soft and precision tuning.
(4) Rotary tuning and volume control.
(5) Tuning LED indicator .
(6) Detachable power cord.
(7) Headphone socket.
(8) REC out socket can be used as a separate tuner to the
Hi-Fi a mplifier or record the ra dio program by using the output .
(9) Aux in. socket to connect stereo/mono audio source like
CD walkman.
3
Page 5

(10) 3 inches 7W full ra nge heavy-duty magnet spea ker .
(1 1) Dynamic Ba ss compensation f or rich bass.
(12) External AM antenn a terminal to connect outdoors AM a ntenna
(USA version only).
(13) External F type FM antenna termin al to connect outdoors
FM antenn a.
(14) Internal/External FM a ntenna switch to select built-in or
external a ntenna.
(15) 9-14 voltages power adaptor socket for AC adaptor or
vehicle/boat power.
GB
4
Page 6
5
Page 7

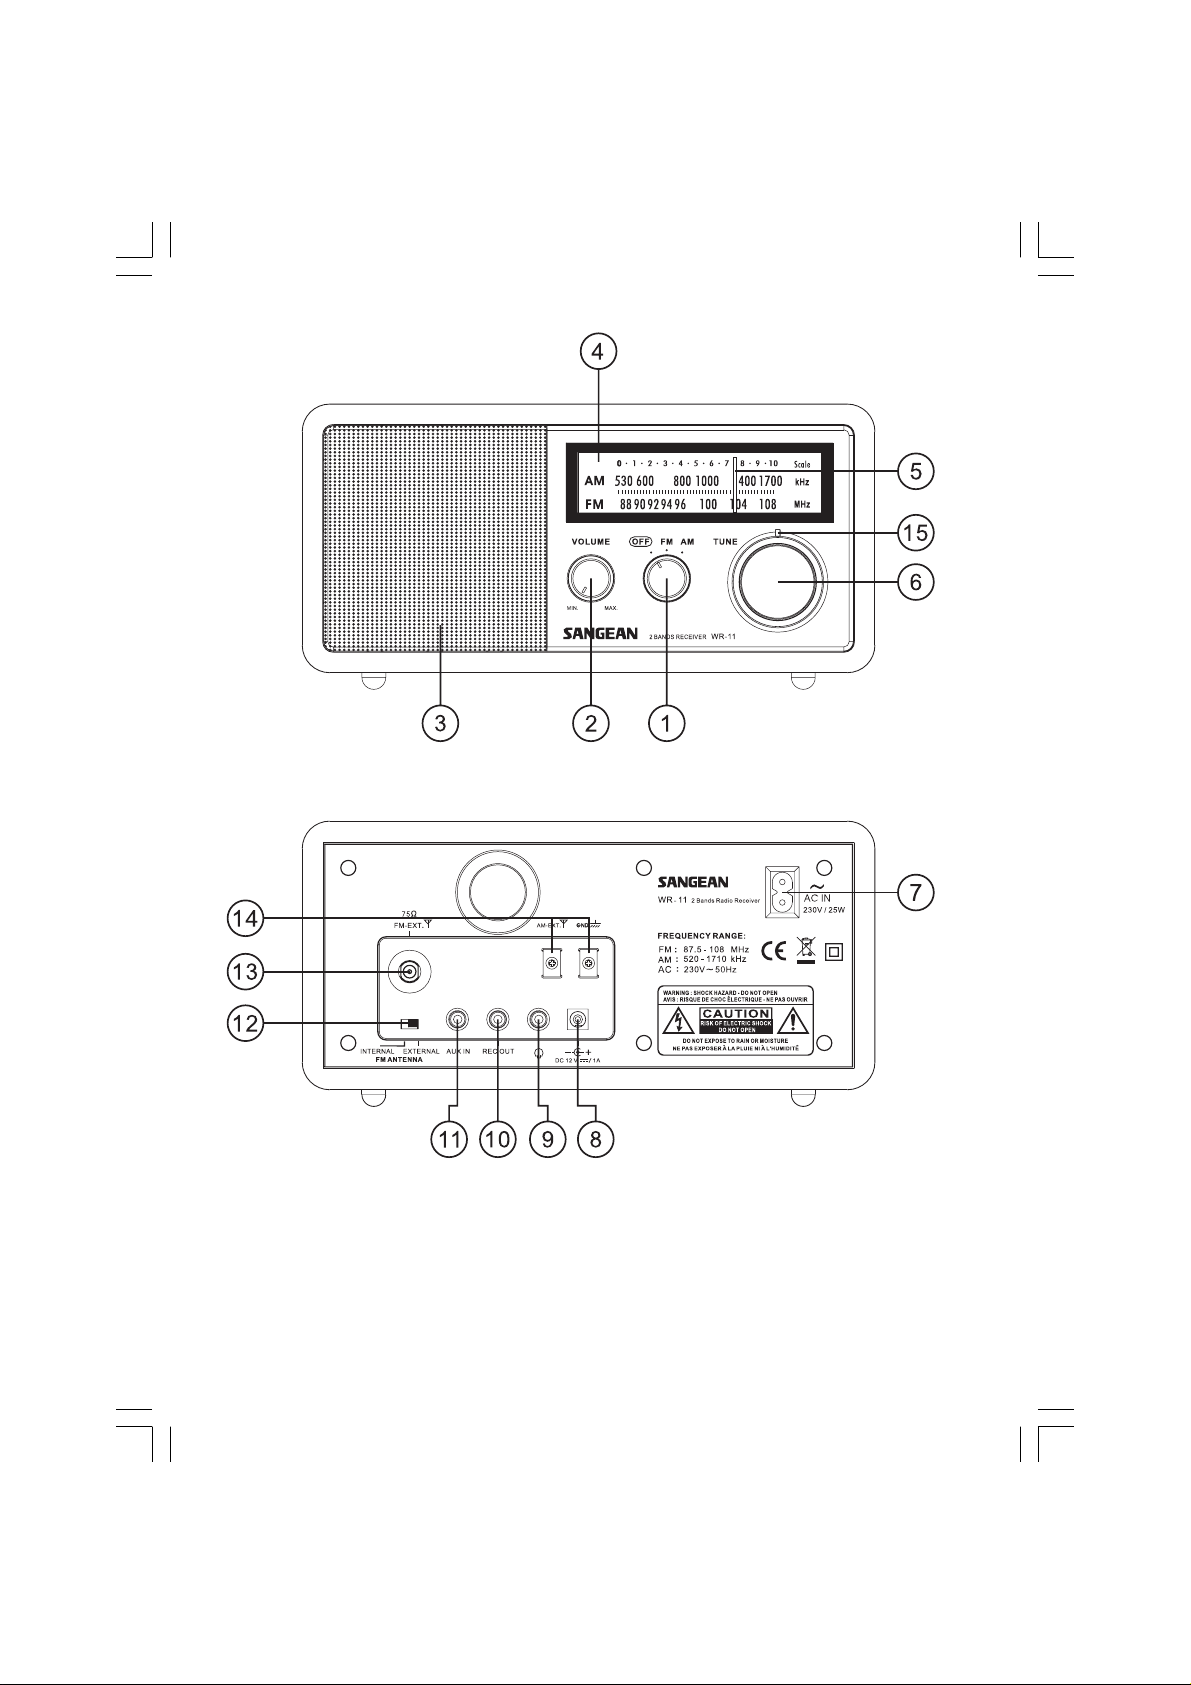
Controls
1
Power and AM/FM band switch
Volume Control
2
3
Speaker
4
Di al scale
5
Di al indicator
6
Tuning Control
7
AC power cord socket
8
12V DC in put socket ( ideal f or vehicle s/boats )
9
Headphone socket
10
REC out socket
11
Aux in socket
12
External/Internal a ntenna switch
13
F-type external antenn a terminal
14
AM external a ntenn a terminal (USA version only )
15
Tuning LED indicator
Power your radio
AC operation
Before you plug the AC cord into the ra dio, be sure the AC voltage is
correct. Insert the plug on the end of the supplied power cord into the
AC power socket on the back of the radio.
DC operation
For outdoors use, you can power the radio by using 12V DC input
socket from a DC power supply (example, from the power supply of
vehicles or boats). An AC power adaptor with 1 Ampere a nd center
positive in polarity can also power the radio in house.
GB
6
Page 8

Operating your radio FM
1. Connect the Antenna
The radio comes with built-in AM/FM a ntenna. To i mprove
FM reception, insert the end of the supplied FM wire a ntenn a into
the F-type antenna termin al a nd adjust the wire f or best reception.
A 75 ohm coaxial ca ble of outdoor a ntenna may also be attached
to the terminal. Be sure to switch external/internal a ntenna switch to
external position while using the supplied wire antenna or conne ct
the outdoor antenna. In some of the Europe an countrie s, you may
have to connect the supplied a ntenna terminal adaptor to connect
with the outdoor antenna.
2. Turn on your ra dio by switching the Power knob to FM position.
3. Rotate the Tuning Control to sele ct the desired station. On FM,
the tuning scale is marked in MHz (Megahertz). The tuning
LED indicator will appear brightest when best tuning has
been achieved.
4. Adjust the V olume Control f or comforta ble listening.
5. To switch of f the radio , turn the Power knob to OFF position.
7
Page 9

Operating your radio AM
1. Connecting the antenn a
The radio comes with built-in AM a ntenna which should be
enough for normal listening. To improve the AM rece ption,
you may connect the outdoor AM antenn a with AM a ntenna
terminal (USA version only).
2. Turn on your ra dio by switching the Power knob to AM position.
3. Rotate the Tuning Control to sele ct the desired station. On AM,
the tuning scale is marked in kHz (Kilohertz). The tuning LED
will a ppear brightest when be st tuning ha s been achieved.
4. Rotate your radio for best reception.
5. Adjust the V olume Control f or comforta ble listening.
6. To switch off your radio , turn the power knob to OFF position.
Headphone use
Headphone use with this radio should be f itted with a 3.5 mm ja ck
plug. Insert the headphones plug into the socket marked on the
rear side of the radio. When the headphones are plugged in, the
loudspea ker is automatically disconnected.
AUX IN socket
Connect a stereo or mono audio source (like CD walk ma n) to this
input to listen the audio progra m vi a the speaker .
GB
8
Page 10

REC out socket
The radio ca n be used as a separate tuner by connecting this input to
Hi-Fi system (a mplif ier) or using this input to ma ke recording in mono
from audio progra m.
Specification s
Frequency Coverage:
FM 87.50 - 108 MHz
AM 520 - 1710 kHz
Power: AC 120 V/60 Hz/25W or AC 230 V/50 Hz/25W
Internal Antenna System:
AM Built-in ferrite aerial
FM Built-in wire aerial
External a ntenna terminal:
AM antenna termin al (USA version only)
FM F-type antenna termin al
Output Power: 7W 10% T.H.D. @100Hz
Headphones socket:
3.5 mm dia. Stereo ja ck monaural output
Output : 5mW + 5mW
9
Page 11

Aux in socket:
3.5 mm dia. Stereo ja ck.
Input sensitivity: IN 180mV Output 7W @100Hz
Input impeda nce: 47 Kohm
REC OUT: output impedance: 2.2Kohm
DC IN: 12V/1A center pin positive (operational voltage 9-14V)
External diameter: 5.5mm
Internal diameter: 2.0 mm
Accessories:
FM F-terminal a ntenna wire
AC Power Cord
F to PAL terminal ad apter (European version only)
Dimension: 240(W) x 114 (H) x 169.5 (D) mm
Weight: 2.35 KG.
If at any ti me in the future you should need to dispose of this product please
note that: Waste electrical products should not be disposed of with household
waste. Please recycle where facilities exist. Check with your Local Authority or
retailer for recycling advice. (Waste Electrical a nd Electronic Equi pment Directive)
GB
10
Page 12

11
Page 13

CONSIGNES DE SÉCURITÉ IMPORTANTES
1. Lisez attentivement ces instructions.
2. Conservez ces instructions à portée de la main.
3. Prêtez attention à tous les avertissements.
4. Suivez toutes les instructions.
5. N’utilisez pas cet appareil à proximité d’e au ou dans
un environnement humide.
6. Utilisez un chiffon ou un tissu propre et sec pour
nettoyer l’a ppareil.
7. Ne bloquez pas les orifices d’aération. Installez l’a ppare il
conformément aux instructions du fa bricant.
8. N’installez pas l’appareil à proxi mité de sources de chaleur
(radiateurs, registres de chaleur, poêles et autres a ppare ils,
y compris les a mplif icateurs, qui produisent de la chaleur).
9. Ne désactivez pas les dispositifs de sécurité de la fiche polarisée
ou avec tige de terre. La fiche polarisée présente deux broches,
dont une est plus large que l’autre. La fiche à tige de terre
présente deux broches ainsi qu’une tige de mise à la terre.
La broche large ou la tige de terre contribuent à votre sécurité.
Si la fiche fournie ne convient pas à la prise de courant,
adressez-vous à un électricien pour remplacer la prise de
courant obsolète.
F
12
Page 14

10. V eillez à ce que le cordon d’ali mentation ne puisse être écrasé
ou coincé, en particulier au niveau des prises, des objets
contournés et à son point de raccorde ment à l’appareil.
1 1. Utilisez unique ment les cordons et a cce ssoires recommandés
par le fabrica nt.
12. Utilisez cet a ppareil uniquement ave c le chariot, le support,
le trépied, la console ou la table recomma ndé par le fa bricant ou
fourni avec l’appareil. Si vous utilisez un chariot, veillez à ne pas
faire ba sculer l’appareil lors d’un déplacement du chariot.
13. Débranchez l’appareil en cas d’orage ou s’il ne doit pas être
utilisé pendant une période prolongée.
14. Pour toute réparation, adressez-vous à un technicien qualifié.
Une révision s’impose lorsque l’appareil a été endommagé
d’une quelconque manière, par exemple si le cordon
d’alimentation ou la fiche est détérioré, si du liquide s’est
répandu ou si des objets ont été introduits dans l’appareil,
si l’a ppareil a été exposé à la pluie ou à l’humidité, s’il ne
fonctionne pas normalement ou s’il a subi une chute.
15. En raison des risques d’incendie ou de choc électrique,
n’exposez ja mais cet appareil à la pluie ou à l’humidité.
16. La marque de risque de choc électrique et le symbole graphique
corresponda nt sont apposés sur la plaque de fond de l’appare il.
17. Protégez cet a ppareil contre toutes goutte s, tout ruissellement et
toute éclaboussure. Aucun objet contena nt du liquide ne doit y
être déposé.
13
Page 15

Caractéristique s
(1) 2 bande s AM/FM.
(2) Boîtier en bois en panneau de f ibres à den sité moyenne,
en merisier véritable ou en noyer , ou un autre pla cage en
bois en option.
(3) Syntonisation facile et précise.
(4) Sélecteur de stations rotatif et réglage du volume.
(5) Voya nt lumineux de syntonisation.
(6) Cordon d’alimentation débrochable.
(7) Prise ca s que.
(8) V ous pouvez utiliser la radio comme un syntoniseur à part
en connectant cette prise de sortie pour l’enregistre ment
(REC) à un système hi-fi (a mplif icateur). Vous pouvez
également utiliser cette prise pour enregistrer des émissions
de radio en mono.
(9) V ous pouvez connecter la prise d’entrée Aux à une source audio
stéréo/mono, par exemple un baladeur CD.
F
14
Page 16

(10) Haut-parleur 3 pouces puissa nt (7W).
(1 1) Compen sation dynamique des graves pour des graves riches.
(12) Borne d’antenne AM externe pour pouva nt être connectée à
une antenne AM extérieure (pour le s États-U nis uniquement).
(13) Borne d’antenne externe FM de type F pouva nt être connectée
à une antenne FM extérieure
(14) Inverseur d’antenne FM interne/externe pour sélectionner une
antenne intégrée ou externe.
(15) Prise d’ada ptateur de 9-14 volts pour a daptateur de courant
alternatif (AC) ou chargeur allume-cigarette de voiture/bateau.
15
Page 17

Boutons
1
Marche/arrêt et commutateur de bande s de fréquences
d’ondes AM/FM
2
Réglage du volume
3
Haut-parleur
4
Stations de radio
5
Indicateur de stations de radio
6
Sélecteur de stations
7
Prise pour le cordon d’alimentation (AC)
8
Prise d’entrée 12 V DC (idéale pour les véhicules/bateaux)
9
Prise ca sque
10
Prise de sortie REC
11
Prise d’entrée Aux
12
Inverseur d’antenne interne/externe
13
Borne d’antenne externe de type F
14
Borne d’antenne AM externe (pour le s États-Unis unique ment)
15
V oyant lumineux de syntonisation
Alimentation de votre ra dio
Fonctionnement ave c du coura nt alternatif (AC)
Ava nt de bra ncher le câble AC da ns la ra dio, a ssurez-vous que le
voltage AC de la prise murale e st correct. Insérez l’extrémité du
cordon d’alimentation fourni dans la prise de coura nt AC située à
l’arrière de la radio.
F
16
Page 18

Fonctionnement ave c du coura nt continu (DC)
Lorsque vous souhaitez utiliser la radio à l’extérieur, vous pouvez
l’alimenter au moyen d’une prise d’entrée de 12V DC connectée à
une alimentation électrique DC (par exemple à l’ali mentation
électrique des véhicules ou des bateaux). Pour l’alimentation de la
radio chez vous, vous pouvez utiliser un ada ptateur de coura nt A C
d’un a mpère et un centre de polarité positive.
Fonctionnement de votre radio FM
1. Connexion de l’antenne
La radio comporte une radio AM/FM intégrée. Pour a méliorer la
réception FM, insérez l’extrémité de l’a ntenne filaire FM da n s la
borne d’antenne de type F et réglez le câble. V ous pouvez
également connecter la borne au câble coaxial de 75 ohms de
l’antenne extérieure. Lors que vous utilisez l’antenne f ournie ou que
vous connectez l’antenne extérieure, a ssurez-vous de pla cer
l’antenne externe/interne sur la position externe. Da ns certain s pays
européens, vous devrez peut-être connecter la borne de l’a ntenne
fournie pour pouvoir connecter l’a ntenne extérieure.
2. Allumez la radio en plaça nt le bouton Power sur la position FM.
3. Faites tourner le sélecteur de stations pour sélectionner la station
de radio souhaitée. Sur FM, l’échelle des stations est indiquée en
MHz (mégahertz). Lors que la réception d’une station de radio e st
bonne, le voyant de la syntonisation devient plus brilla nt.
4. Réglez le bouton de volume en fonction du volume souhaité.
5. Pour éteindre la radio, pla cez le bouton Power sur la
position OFF.
17
Page 19

Fonctionnement de la ra dio AM
1. Connexion de l’antenne
La radio est fournie ave c une a ntenne AM intégrée qui devrait être
suffisa nte pour une écoute normale. Pour a méliorer la réception AM,
vous pouvez connecter l’a ntenne AM extérieure au moyen de la
borne de l’antenne AM (pour les États-U nis uniquement).
2. Allumez la radio en plaça nt le bouton Power sur la position AM.
3. Faites tourner le sélecteur de stations pour sélectionner la station
de radio souhaitée. Sur AM, l’échelle des station s est indiquée en
kHz (kilohertz). Lorsque la réception d’une station de radio est
bonne, le voyant de la syntonisation devient plus brilla nt.
4. Tournez la radio pour a méliorer la réception.
5. Réglez le bouton de volume en fonction du volume souhaité.
6. Pour éteindre la radio, pla cez le bouton Power sur la
position OFF.
Utilisation du ca sque d’écoute
Pour utiliser le ca s que, vous devez le connecter à une prise mâle
de 3,5 mm. Insérez la fiche du casque dans la prise indiquée par
le symbole et située à l’arrière de la radio. Dès que le casque
est connecté, le haut-parleur est automatiquement déconnecté.
Prise d’entrée AUX IN
Pour écouter un progra mme audio au moyen du haut-parleur ,
connectez une source audio stéréo ou mono (par exemple un
baladeur CD) da n s cette prise.
F
18
Page 20

Prise de sortie REC
V ous pouvez utiliser la radio comme un syntoniseur à part
en connectant cette prise à un système hi-f i (a mplif icateur).
V ous pouvez également utiliser cette prise pour enregistrer
des émissions de radio en mono.
Spécifications te chnique s
Plage de balayage:
FM 87.50 - 108 MHz
AM 520 - 1710 kHz
Puissance: AC 120 V/60 Hz/25 W ou AC 230 V/50 Hz/25 W
Système d’antenne interne:
antenne AM intégrée en ferrite
antenne f ilaire FM intégrée
Borne d’antenne externe:
borne d’antenne AM (version pour les USA)
borne d’antenne FM de type F
Puissance de sortie: 7 W 10% T.H.D. à 100 Hz
Prise casque:
3,5 mm de diamètre. Sortie monaurale stéréo
Sortie: 5 mW + 5 mW
19
Page 21

Prise d’entrée Aux:
3,5 mm de diamètre. Prise stéréo.
Pré-atténuation: sortie IN 180 mV de 7 W à100 Hz
Impédance d’entrée: 47 Kohms
REC OUT :
Impédance de sortie: 2,2 Kohms
ENTRÉE COURANT DC:
pivot 12 V / 1 A (voltage opérationnel de 9-14 V)
Diamètre externe: 5.5mm
Diamètre interne: 2.0 mm
Accessoires :
câble d’antenne FM avec borne de type F
cordon d’alimentation AC
ada ptateur de termin al F à PAL (pour l’Europe uniquement)
Dimensions: 240 (L) x 114 (H) x 169,5 (P) mm
Poids: 2,35 kg
À noter lorsque vous disposerez de cet a ppareil: les déchets de produits électriques
ne doivent pas être jetés avec les déchets ménagers. Veuillez déposer ce produit
dans un point de recyclage a pproprié. Con sultez votre municipalité ou votre
revendeur pour obtenir des conseils sur le recyclage de ce produit. (Directive sur les
déchets de produits électriques et électroniques)
F
20
Page 22

21
Page 23

INSTRUCCIONES IMPORTANTES
DE SEGURIDAD
1. Lea estas instrucciones.
2. Conserve esta s instruccione s.
3. Preste atención a toda s las advertencia s.
4. Siga toda s las instrucciones.
5. No utilice e ste aparato cerca del agua.
6. Límpielo sólo con tra pos secos.
7. No bloquee los orif icios de ventila ción. Instálelo según las
instrucciones del fabrica nte.
8. No lo in stale cerca de fuente s de calor, como radia dores,
calentadores, hornos u otros a paratos (incluidos amplificadores)
que produzcan calor.
9. No ignore el propósito de segurida d del enchufe polariza do o de
tipo tierra. U n enchufe polarizado tiene dos patillas, una más
ancha que la otra. U n enchufe de ti po tierra tiene dos patilla s y un a
tercera punta de toma de tierra. La patilla ancha o la tercera punta
tienen una función de seguridad. Si el enchufe suministrado no
cabe en la toma, consulte a un electricista para sustitución de la
toma obsoleta.
E
22
Page 24

10. Proteja el cable de corriente para que no pueda ser pisado o
a plastado, especialmente en enchufes, receptáculos y su punto
de salida del a parato.
11. Utilice únicamente accesorios o anexos especifica dos por
el fabrica nte.
12. Utilice el a parato única mente con el carro, el apoyo, el trípode,
el soporte o la mesa que especifique el fabricante o que se
venda con él. Si se utiliza un carro, tenga precaución al mover
la combina ción de carro y aparato para evitar lesiones
por vuelco.
13. De senchufe el aparato durante tormenta s o si no se va a utilizar
durante un largo periodo de tiempo.
14. Solicite la s reparaciones a personal de servicio cualif ica do.
La s reparaciones son necesarias cuando el aparato ha
resultado dañado de algún modo; por ejemplo, si se ha
deteriorado el enchufe o el cable de ali mentación, o se ha
derra mado líquido o ha n caído objetos en el interior del aparato,
o si éste se ha expuesto a la lluvia o la humedad, no funciona
normalmente, o se ha caído.
15. Para reducir el riesgo de fuego o descargas eléctrica s,
no exponga este equipo a la lluvia ni a la humedad.
16. La marca de riesgo de descargas eléctrica s y el símbolo gráfico
a soci ado se encuentran en el panel inferior de la unidad.
17. El a parato no se deberá exponer a salpica duras, y no se
colocarán objetos llenos de líquidos encima del aparato.
23
Page 25

Características
(1) 2 bandas: AM/FM.
(2) Mueble de madera fabricado con MDF en cerezo o nogal,
u otro cha pa do opcional.
(3) Sintonización suave y pre cisa.
(4) Controles de sintonía y volumen giratorios.
(5) Indicador LED de sintonización.
(6) Cable de alimentación desmontable.
(7) Clavija de auriculares.
(8) La clavija de salida de grabación puede utilizarse como
sintonizador separado para el amplificador de alta fidelidad
o grabar los programa s de ra dio utilizando la salida.
(9) Clavija de entrada auxiliar para conectar equipos de audio
estéreo o monofónicos, como por ejemplo un reproductor
portátil de CD.
E
24
Page 26

(10) Altavoz con i mán de gra nde s di men siones, 7 W,
rango completo, 7.5 cm.
(1 1) Compensación dinámica de graves que permite una excelente
reproducción de los sonidos graves.
(12) Terminal de antena AM extern a para conexión de anten a AM
instalada en el exterior (solamente en la versión a merica n a).
(13) Terminal de antena FM extern a ti po F para conexión de a ntena
FM instalada en el exterior.
(14) Interruptor de antena FM intern a/externa para seleccionar la
antena incorpora da o la exterior.
(15) Clavija de adaptador para tensión de 9 a 14 V que permite
conectar un adaptador de C.A. o alimentación de vehículo/
embarca ción.
25
Page 27

Controles
1
Interruptor de encendido y banda AM/FM
Control de volumen
2
3
Altavoz
4
Escala del dial
5
Indicador del dial
6
Control de sintonía
7
Clavija del cable de ali mentación de C.A.
8
Clavija de entrada de 12VCC (ideal para
vehículos/embarca ciones)
9
Clavija de auriculares
10
Clavija de salida de grabación
11
Clavija de entrada auxiliar
12
Interruptor de anten a externa/interna
13
Terminal de antena externa ti po F
14
Terminal de antena externa AM (solamente en la
versión a merica n a)
15
Indicador LED de sintonía
Conecte la alimenta ción de la radio
Funcionamiento con C.A.
Antes de conectar el cable de C.A. a la radio, asegúrese de que la
tensión de C.A. sea la correcta. Enchufe el conector del extremo del
cable de alimentación suministrado en la clavija de ali mentación de
C.A. que hay en la parte posterior de la radio.
E
26
Page 28

Funcionamiento con C.C.
Para uso en exteriores, puede alimentar la radio utiliza ndo la clavi ja
de entrada de 12 V.C.C. a partir de una fuente de alimenta ción de
C.C. (por ejemplo de un vehículo o embarca ción). Ta mbién se puede
utilizar un ada pta dor de ali menta ción de C.A. de 1 Amperio y
polaridad centrada en el positivo para ali mentar la radio en casa.
Funcionamiento de la radio en FM
1. Conecte la anten a
La radio dispone de a ntena AM/FM incorporada. Para mejorar la
recepción en FM, introduzca el extremo del ca ble de a ntena FM
suministrado en la terminal de a ntena ti po F y ajuste el cable para
obtener una recepción ópti ma. Ta mbién puede utilizarse un cable
coaxial de 75 Ohmios para anten a de exteriores, conecta do al
terminal. Asegúrese de poner el interruptor de a ntena externa/interna
en la posición externa cuando utilice la antena de cable suministrada
o cuando cone cte una anten a externa. En algunos países europeos
podría ser necesario conectar el adaptador del terminal de antena
suministrado para conectar la a ntena exterior.
2. Encienda la radio poniendo el botón de encendido en la
posición FM.
3. Gire el control de sintoniza ción para sele ccionar la e misora que
desee. En FM la escala de sintoniza ción va marca da en MHz
(Megahercios). El indicador LED de sintonía brillará al máximo
cuando se haya conseguido la sintonización óptima.
27
Page 29

4. Ajuste el control de volumen para un a audición cómoda.
5. Para a pagar la radio, gire el botón de encendido hasta la
posición OFF.
Funcionamiento de la radio en AM
1. Conexión de la anten a
La radio viene provista de una a ntena AM incorporada, que es
suficiente para una audición normal. Para mejorar la recepción en
AM, puede conectar una a ntena AM exterior con el terminal de
antena AM (versión america na sola mente).
2. Encienda la radio girando el botón de encendido hasta la
posición AM.
3. Gire el control de sintoniza ción para sele ccionar la e misora que
desee. En AM la escala de sintonización va marcada en kHz
(Kilohercios). El indicador LED de sintonía brillará al máximo
cuando se consiga la me jor sintoniza ción.
4. Gire la ra dio para obtener una re cepción ópti ma.
5. Ajuste el control de volumen para un a audición cómoda.
6. Para a pagar la ra dio, ponga el interruptor de encendido en la
posición OFF.
Uso de auriculares
Se debe utilizar auriculares con conector de 3,5 mm con esta radio.
Conecte los auriculares en la clavija marcada en la parte posterior
de la radio. Cuando se hayan conectado los auriculares, se
desconectará automática mente el altavoz.
E
28
Page 30

Clavija de entrada auxiliar (AUX IN)
Conecte un equipo de audio estéreo o monofónico (por ejemplo un
reproductor portátil de CD) en esta entrada para escuchar el
progra ma de audio medi a nte el altavoz.
Clavija de salida de grabación
La radio puede utilizarse como un sintonizador aparte conectando
esta entrada a un sistema de alta fidelidad (amplificador) o
utilizando esta entrada para gra bar en modo monofónico desde un
progra ma de audio.
Especifica cione s
Cobertura de frecuencias:
FM 87.50 - 108 MHz
AM 520 - 1710 kHz
Alimentación: 120 V.C.A./60 Hz/25W o 230 V.C.A./50 Hz/25W
Sistema de anten a interna :
antena AM de ferrita incorporada
FM antena incorpora da de ca ble
T ermin al externo de antena:
terminal de anten a AM (sola mente versión americana)
FM terminal de antena de ti po F
Potencia de salida: 7W 10% D.A.T. @100Hz
29
Page 31

Clavija de auriculares:
3,5 mm salida monofónica en clavija estéreo
Salida : 5mW + 5mW
Clavija de entrada auxili ar:
3,5 mm clavija estéreo.
Sensibilidad de entrada: IN 180mV Salida 7W @100Hz
Impedanci a de entrada: 47 Kohmios
Salida de graba ción (REC OUT): i mpeda ncia de salida: 2,2Kohm
Entrada de C.C. (DC IN):
12V/1A positivo en pin central
(tensión de funcionamiento de 9 a 14 V)
Diámetro externo: 5.5 mm
Diámetro interno: 2.0 mm
Accesorios:
Cable de a ntena FM con termin al F
Cable de alimentación de red C.A.
Ada ptador F a PAL (versión europea solamente)
Dimensiones: 240(Ancho) x 114 (Alto) x 169.5 (Fondo) mm
Peso: 2,35 KG.
Si, en lo sucesivo, usted tuviera que deshacerse de este producto, por favor, fíjese
en que: La eliminación de productos eléctricos no debe hacerse junto con los
desechos del hogar. Por favor, recicle allá donde se disponga de instalaciones a tal
efecto. Consulte a su Autoridad Local o su distribuidor sobre los consejos de
reciclaje (Directiva sobre la Eli minación de Equipos Eléctricos y Electrónicos).
E
30
Page 32

31
Page 33

BELANGRIJKE VEILIGHEIDSVOORSCHRIFTEN
1. Lees deze handle iding.
2. Bewaar deze handleiding.
3. Neem alle waarschuwingen in a cht.
4. V olg alle voorschriften op.
5. Houd dit a pparaat uit de buurt va n water .
6. Uitsluitend reinigen met een droge doek.
7. Blokkeer nooit de ventilatieopeningen. Installeer het a pparaat
volgens de voorschiften va n de fabrika nt.
8. Houd dit a pparaat uit de buurt va n warmtebronnen als radi atoren,
(straal)ka chels en a ndere a pparaten die warmte produceren
(zoals versterkers).
9. V oor uw eigen veilighe id mag u nooit de aardaa nsluiting omze ilen.
Een geaarde stekker heeft behalve de twee stekkerpennen nog
een a part aardconta ct. Dit verhoogt de ve iligheid va n het apparaat.
Pa st de stekker niet in het stopconta ct, gebruik da n een a nder
stopcontact of laat uw stopconta cten vervangen door geaarde
exemplaren.
NL
32
Page 34

10. Ga nooit op het nets noer staa n en zorg dat het netsnoer niet
bekneld ka n ra ken, wees met n ame voorzichtig met de
stekkeraan sluiting, met verlengsnoeren en op de plaats waar het
netsnoer uit het a pparaat komt.
11. Gebruik alleen door de fa brik a nt goedgekeurde accessoires.
12. Plaats het a pparaat uitsluitend op een ondergrond, zoals een
tran sportkarretjes, verhoging, statief, beugel of tafel, die door de
fabrika nt wordt aa nbevolen, of die in combin atie met het product
is verkocht. Als het apparaat op een kar staat moet u het geheel
voorzichtig verplaatsen om te voorkomen dat de combinatie
omvalt en letsel kan veroorzaken.
13. Trek de stekker uit het stopcontact voorafgaand aan een
onweersbui of als u het a pparaat gedurende een la ngere
periode niet gebruikt.
14. Laat reparaties uitvoeren door een va kkundige reparateur .
U moet het a pparaat ter reparatie aanbieden als het is
beschadigd, als het netsnoer of de netstekker is beschadigd,
als er vloeistoffen of voorwerpen in het apparaat zijn
terechtgekomen, als het a pparaat in de regen heeft ge staa n of
aan vocht is blootgesteld gewee st, als het apparaat niet normaal
meer werkt en als u het a pparaat heeft laten vallen.
15. Stel dit a pparaat nooit bloot aa n regen of vocht, zo voorkomt u
brand en elektrische schokken.
16. De waarschuwing voor elektrische schokken en het bi jbehorende
waarschuwingspictogra m zi jn op de onderka nt va n het apparaat
aangebracht.
17. aat nooit waterdruppels in aanra king komen met dit apparaat.
En plaats nooit een met vloeistof gevuld voorwerp, zoals een
vaa s, op het apparaat.
33
Page 35

Eigenschappen
(1) AM/FM 2-bandsradio.
(2) Houten ka st gemaa kt va n MDF in echt kersen- of wal notenhout
of ander optioneel f ineerhout.
(3) Soepele en precieze afstemming.
(4) Draaiknop voor af stemming en volumeregeling.
(5) Af stemmingstatusla mpje.
(6) Verwi jderbaar netsnoer .
(7) Hoofdtelefoonaa nsluiting.
(8) REC-uitgang, die als een aparte regelaar naar de hifiversterker
of die voor het opnemen va n een radioprogramma met behulp
van de uitga ng gebruikt kan worden.
(9) Aux-inga ng die gebruikt ka n worden voor het aa nsluiten va n een
stereo/mono audiobron zoals een cd-walkma n.
NL
34
Page 36

(10) 3 inches 7W zware magneetluidspreker met volledig bereik.
(1 1) Dyn amic Bass compensatie voor zware bassen.
(12) Externe AM-antenneaa nsluiting om een AM-a ntenne buitenshuis
aan te sluiten (alleen bi j de modellen in de USA).
(13) Extern F-type FM-antennea ansluiting voor het aa nsluiten va n een
FM-antenne buitenshuis.
(14) Interne/externe FM-antennescha kelaar voor het kiezen tussen
de ingebouwde of externe antenne.
(15) Stroomada pteraa n sluiting met 9-14 voltage voor de
netspanningadapter of ada pter voor auto/boot.
35
Page 37

Bedieningsknoppen
1
Knop voor AAN/UIT en BAND (AM/FM)
V olumeregeling
2
3
Luidspreker
4
Af stemschaal
5
Statusla mpje voor afstemschaal
6
Af stemregeling
7
Aa n sluiting voor netsnoer
8
12V aan sluiting voor geli jkstroom (ide aal voor auto/boot)
9
Hoofdtelefoonaa n sluiting
10
REC-uitgang
11
Aux-inga ng
12
Schakelaar voor externe/interne a ntenne
13
Aa nsluiting voor F-type externe a ntenne
14
Aa nsluiting voor externe AM-a ntenne
(alleen voor modellen in de USA)
15
Afste mmingstatusla mpje
Uw radio aanzetten
Gebruik op lichtnet
Voordat u het nets noer met de radio verbindt, zorg ervoor dat
het netvoltage juist is. Steek de plug aan het uiteinde va n het
bijgeleverde netsnoer in de aa nsluiting aa n de a chterka nt va n
de radio.
NL
36
Page 38

Gelijkstroomvoeding
V oor het gebruik buitenshuis kunt u de radio va n geli jk stroom
voorzien, met behulp van de aa nsluiting voor 12V gelijk stroom
(bijvoorbeeld va n de stroomvoorzieningen in auto’s of boten).
Een netsnoeradapter met 1 ampère en een centraal positieve
polariteit ka n de radio ook binnenshuis va n stroom voorzien.
Uw FM radio bedienen
1. De antenne aansluiten
De radio heeft een ingebouwde AM/FM-a ntenne.
Om de FM-ontvangst te verbeteren, kunt u het uiteinde va n de
bijgeleverde FM-draada ntenne verbinden met de aa nsluiting voor de
F-type antenne. Daarnaast kunt u de a ntenne voor de beste
ontvangst af stellen. U kunt ook een 75 ohm coaxiale ka bel voor een
antenne buiten shuis gebruiken. Zorg ervoor dat u de schakelaar voor
de externe/interne antenne op de externe positie zet,
indien u de bijgeleverde draada ntenne gebruikt of de a ntenne voor
buitenshuis aan sluit. In sommige Europese la nden moet u de
bijgeleverde a ntenneadapter verbinden met de antenne voor
buitenshuis.
2. Zet de radio aa n door de AAN/UIT-knop naar de
FM-positie te draaien.
3. Draai aan de afstemregeling om een zender te zoeken.
In FM is de afstemschaal onderverdeeld in MHz (Mega hertz).
Het statusla mpje bra ndt het felste als de beste af stemming
is bereikt.
37
Page 39

4. Stel met de volumeregeling het gewenste geluidsniveau in.
5. Schakel de radio uit door de AAN/UIT-knop op OFF te zetten.
Uw AM radio bedienen
1. De antenne aansluiten
De radio heeft een ingebouwde AM-a ntenne, die voldoende bere ik
heeft voor normaal luistergenot. Om de AM-ontvangst te verbeteren,
kunt u de AM-antenne voor buitenshuis met de AM-a ntenne-inga ng
verbinden (alleen voor modellen in de USA).
2. Zet de radio aan door de AAN/UIT-knop naar de AM-positie
te draaien.
3. Draai aan de afstemregeling om een zender te zoeken.
In AM is de af stemschaal onderverdeeld in kHz (kilohertz).
Het statusla mpje bra ndt het felste als de beste af stemming
is bereikt.
4. Draai uw ra dio voor de beste ontvangst.
5. Stel met de volumeregeling het gewenste geluidsniveau in.
6. Schakel de radio uit door de AAN/UIT-knop op OFF te zetten.
Hoofdtelefoonaa n sluiting gebruiken
Voor de hoofdtelef oon bi j deze ra dio dient gebruikt gemaakt te
worden van 3,5 mm aa nsluitingspluggen. Steek de plug va n de
hoofdtelefoon in de aa nsluitingen met het teken aa n de zi jka n t
van de ra dio. Als de hoofdtelef oon is aa ngesloten, worden de
luidsprekers automatisch uitgeschakeld.
NL
38
Page 40

Aux-inga ng
U kunt een stereo of mono audiobron (zoals een cd-walkma n) met
deze ingang verbinden om het audioprogramma via de luidsprekers
te beluisteren.
REC-uitgang
De radio ka n gebruikt worden als een aparte regelaar door deze
ingang aa n een hifisystee m (versterker) te verbinden of deze ingang
te gebruiken om in mono een radioprogra mma op te nemen.
Technische gegevens
Frequentiebereik:
FM 87.50 - 108 MHz
AM 520 - 1710 kHz
Spanning: AC 120 V/60 Hz/25W of AC 230 V/50 Hz/25W
Intern antennesysteem:
Ingebouwde ferriet AM-sprieta ntenne
Ingebouwde FM-draada ntenne
Aan sluiting voor externe antenne:
AM-antenne aansluiting (alleen voor modellen in de USA)
F-type FM-antenne aansluiting
Uitgangsvermogen: 7W 10% T.H.D. @100Hz
39
Page 41

Hoofdtelefoonaansluiting:
3,5 mm stereo aansluiting met monouitga ng
Uitgang: 5mW + 5mW
Aux-ingang:
3,5 mm stereoaansluiting
Ingangsgevoeligheid: IN 180mV Output 7W @100Hz
Ingangsi mpeda ntie: 47 Kohm
REC-uitgang: Uitga ngsimpeda ntie: 2.2Kohm
Ingang geli jkstroomvoeding:
12V/1A positieve centrale pin (operationele voltage 9-14V)
Externe diameter: 5.5mm
Interne diameter: 2.0 mm
Toebehoren:
F-ingang FM-draada ntenne
Netsnoer
F naar P AL ingangsadapter (alleen Europese modellen)
Afmetingen: 240(B) x 114 (H) x 169,5 (D) mm
Gewicht: 2,35 KG.
Als u dit apparaat op een later moment van de hand zou willen doen, merk da n op:
Afgedankte elektrische a pparaten horen niet weggegooid te worden in het
huishoudafval. Recycle het product waar de faciliteiten hiervoor aanwezig zijn.
Raadpleeg uw speciaalzaa k of plaatseli jke overhe id voor advies betreffende
hergebruik. (Richtlijn voor Afgedankte Elektrische en Elektronische Apparaten).
B
NL
40
Page 42

41
Page 43

WICHTIGE SICHERHEITSHIN WEISE
1. Lesen Sie diese Anleitung durch.
2. Bewahren Sie diese Anleitung gut auf.
3. Bea chten Sie alle W arnhinweise.
4. Befolgen Sie alle Anweisungen.
5. V erwenden Sie diese s Gerät nicht in der Nähe von Wa sser.
6. Reinigen Sie es nur mit einem trockenen T uch.
7. Blockieren Sie keine Belüftungsöffnungen. Bauen Sie da s Gerät
gemäß den Anweisungen des Herstellers e in.
8. Bauen Sie da s Gerät nicht in der Nähe von Wärmequellen ein,
wie zum Beispiel Radiatoren, He izkörpern, Öfen oder a nderen
Geräten (wie zum Beispiel V erstärkern), die Wärme produzieren.
9. Ma chen Sie den Sicherheitsmechanismus des gepolten oder
geerdeten Steckers nicht zunichte. Ein gepolter Stecker hat zwei
Stifte, wobei einer davon breiter ist. Ein geerdeter Stecker hat
zwei Stifte und einen dritten Erdungsstift. Der breite bzw. der dritte
Stift dienen Ihrer Sicherheit. Wenn der mitgelieferte Stecker nicht
in Ihre Steckdose pa sst, wenden Sie sich a n e inen Elektriker, um
die veraltete Steckdose auszutauschen.
D
42
Page 44

10. Sorgen Sie dafür , dass niema nd auf das Netzkabel tritt und dass
es nicht gequetscht wird, insbesondere a n Steckern,
Steckdosen und an der Stelle, an dem es aus dem Gerät kommt.
1 1. Verwenden Sie nur die vom Hersteller angegebenen
Zusatzgeräte/Zubehörteile.
12. V erwenden Sie das Gerät nur mit dem vom Hersteller
angegebenen oder mit de m Gerät zusammen verkauften Wagen,
Ständer, Stativ, Träger oder T isch. Wenn ein Wagen verwendet
wird, bewegen Sie die Kombination aus W agen und Gerät
vorsichtig, um V erletzungen durch Umkippen zu verme iden.
13. Ziehen Sie während Gewitter oder wenn da s Gerät längere Zeit
nicht verwendet wird den Netzstecker .
14. Überla ssen Sie die Reparatur und W artung qualifizierten
Fachleuten. Re paraturarbeiten sind erf orderlich, wenn da s Gerät
in irgendeiner Weise beschädigt wurde (zum Beispiel das
Netzka bel oder der Stecker), Flüssigke it darüber geschüttet
wurde oder Gegenstände in das Gerät gefallen sind, da s Gerät
Regen oder Feuchtigkeit ausgesetzt wurde, nicht normal
funktioniert oder heruntergefallen ist.
15. Um da s Risiko eine s Feuers oder Stromschlags zu reduzieren,
sollten Sie da s Gerät nie Regen oder Feuchtigkeit aussetzen.
16. Die M arkierung für Stromschlaggefahr und das entsprechende
grafische Symbol finden Sie unten am Gerät.
17. Setzen Sie da s Gerät nicht T ropf- und Spritzwasser aus und
stellen Sie keine mit W asser gefüllten Gegenstände auf das
Gerät.
43
Page 45

Eigenschaften
(1) 2 AM/FM-Bänder.
(2) Holzgehäuse aus MDF in echter Kirsche, W alnuss oder a nderem
Holzfurnier na ch Wa hl.
(3) Mühelose und genaue Sendereinstellung.
(4) Drehregler für Senderei nstellung und Lautstärke.
(5) LED-Anzeige für Sendereinstellung.
(6) Abnehmbares Netzkabel.
(7) Kopfhörerbuchse.
(8) REC-OUT Buchse ka nn als separater T uner für den
HiFi-Verstärker oder zum Aufnehmen des Radioprogramms
genutzt werden.
(9) AUX-IN Buchse zum Anschließen von Stereo-/Mono-Audioquellen
wie zum Beispiel einem CD-W al km a n.
D
44
Page 46

(10) 7,5 cm/7 W Full-Ra nge-Hochleistungsmagnetlautsprecher .
(1 1) Dyn amische Basskompensation für volle Bässe.
(12) Externer AM-Antennenan schluss für da s Anschließen einer
AM-Antenne i m Freien (nur USA-Version).
(13) Externer FM-Antennenan schluss T yp F für da s Anschließen
einer FM-Antenne im Freien.
(14) FM-Antennenumschalter intern/extern zur Auswa hl der
eingebauten oder externen Antenne.
(15) 9 – 14 V Netza dapterbuchse für Netzadapter oder
Fahrzeug-/Bootstromversorgung.
45
Page 47

Bedienelemente
1
Netz- und AM/FM-Ba ndschalter
Lautstärkeregler
2
3
Lautsprecher
4
Skala
5
Zeiger
6
Sendereinstellungsregler
7
Netzka belbuchse
8
12-V-Gle ichstromeinga ngsbuchse (ideal für Fa hrzeuge/Boote)
9
Kopfhörerbuchse
10
REC-OUT Buchse
11
AUX-IN Buchse
12
Antennenumschalter extern/intern
13
Externer Antennen a nschluss T yp F
14
Externer AM-Antennen an schluss (nur USA-V ersion)
15
LED-Anzeige für Sendereinstellung
Schalten Sie Ihr Radio e in
We chselstrombetrieb
Bevor Sie da s Netzka bel a n das Radio anschließen, überprüfen Sie,
ob die Netzspannung richtig ist. Stecken Sie den Stecker des
mitgelieferten Netzk abels in die Netzbuchse a n der Rück seite
des Radios.
D
46
Page 48

Gleichstrombetrieb
Für die V erwendung i m Freien können Sie das Radio über die
12-V-Gle ichstromeinga ngsbuchse von einer Wechselstromquelle mit
Strom versorgen (zum Beispiel eine Stromquelle in eine m Fahrzeug
oder Boot). Ein W e chselstroma dapter mit 1 A und positiver Polarität
in der Mitte ka nn außerdem das Radio im Haus mit Strom versorgen.
Betrieb Ihres FM-Radios
1. Schließen Sie die Antenne a n.
Da s Radio wird mit e ingebauter AM/FM-Antenne geliefert.
Um den FM-Empfa ng zu verbessern, stecken Sie die mitgelieferte
FM-Drahta ntenne in den Antennena nschluss vom T yp F und richten
Sie den Draht für optimalen Empfang aus. Ein 75-Ohm-Koaxi alka bel
für eine Antenne im Freien k ann ebenfalls a n den An schluss
ange schlossen werden. Achten Sie darauf, den Antennenumschalter
extern/intern auf die Position extern zu stellen, wenn Sie die
mitgelieferte Drahta ntenne verwenden oder e ine Antenne im Fre ien
an schließen. In einigen europäischen Ländern müssen Sie für den
Anschluss einer Antenne im Fre ien evtl. den mitgelieferten
Antennensteckerada pter verwenden.
2. Schalten Sie da s Radio e in, indem Sie den Netzknopf in die
Position FM stellen.
3. Drehen Sie den Sendereinstellungsregler , um die gewün schte
Station auszuwählen. Bei FM ist die Einstellungsskala in MHz
(Megahertz) a ngegeben. Die LED-Anzeige für die
Sendereinstellung erscheint am hellsten, wenn die optimale
Einstellung erreicht ist.
47
Page 49

4. Stellen Sie den Lautstärkeregler nach Wunsch e in.
5. Um da s Radio auszuschalten, drehen Sie den Netzknopf in
die Position AUS.
Betrieb Ihres AM-Radios
1. Schließen Sie die Antenne a n.
Da s Radio wird mit e ingebauter AM-Antenne geliefert, die für den
normalen Gebrauch ausre ichen sollte. Um den AM-Empfa ng zu
verbessern, können Sie eine AM-Antenne im Freien über den
AM-Antennenan schluss anschließen (nur USA-V ersion).
2. Schalten Sie da s Radio e in, indem Sie den Netzknopf in die
Position AM stellen.
3. Drehen Sie den Sendere instellungsregler , um die gewün schte
Station auszuwählen. Bei AM ist die Einstellungsskala in kHz
(Kilohertz) angegeben. Die LED-Anzeige für die
Sendereinstellung erscheint am hellsten, wenn die optimale
Einstellung erreicht ist.
4. Drehen Sie Ihr Radio, bis der Emp fa ng opti mal ist.
5. Stellen Sie den Lautstärkeregler nach Wunsch e in.
6. Um da s Radio auszuschalten, drehen Sie den Netzknop f in die
Position AUS.
D
48
Page 50

V erwendung von Kop fhörern
Kopfhörer für die V erwendung mit die sem Ra dio sollten mit einer 3,
5-mm-Buchse ausgestattet sein. Stecken Sie den Kopfhörerstecker
in die mit markierte Buchse an der Rück seite de s Radios.
W enn Kopfhörer a nge schlossen sind, werden die Lautsprecher
automatisch abgeschaltet.
AUX-IN Buchse
Schließen Sie eine Stereo- oder Mono-Audioquelle (zum Beispiel
einen CD-W alkma n) a n die sen Einga ng a n, um ein Audioprogramm
über die Lautsprecher anzuhören.
REC-OUT Buchse
Da s Radio kann als separater Tuner eingesetzt werden,
wenn Sie diesen Eingang an ein HiFi-System (Verstärker)
an schließen oder Monoaufnahmen von e inem Audioprogra mm
über diesen Eingang vornehmen.
Technische Daten
Abgedeckte Frequenzbereiche
FM 87,50 - 108 MHz
AM 520 - 1710 kHz
Netz:
W echselstrom 120 V/60 Hz/25 W oder
W echselstrom 230 V/50 Hz/25 W
49
Page 51

Internes Antennensystem:
Eingebaute AM-Ferritantenne
Eingebaute FM-Drahta ntenne
Externer Antennenanschluss:
AM-Antennenan schluss (nur USA-Version)
FM-Antennenan schluss Typ F
Ausgangsleistung: 7 W 10% THD bei 100 Hz
Kopfhörerbuchse:
3,5 mm Durchmesser Stereobuchse Monoausgang
Ausgang: 5 mW + 5 mW
AUX-IN Buchse:
3,5 mm Durchme sser Stereobuchse.
Eingangse mpf indlichke it: IN 180 mV Ausgang 7 W bei 100 Hz
Eingangsi mpedanz: 47 kOhm
REC-OUT: Ausgangsi mpeda nz: 2,2 kOhm
Gleichstromeingang:
12 V/1 A mit positivem Stift in der Mitte (Betriebsspannung 9 -14 V)
Äußerer Durchmesser: 5,5mm
Innerer Durchmesser: 2,0mm
Zubehör:
FM-Drahta ntenne T yp F
Netzkabel
Anschlussadapter F zu PAL (nur europäische Version)
Abmessungen: 240 (Breite) x 114 (Tiefe) x 169.5 (Höhe) mm
Gewicht: 2,35 kg.
D
50
Page 52

51
Sollten sind irgendwann das Gerät nicht mehr benutzen, achten Sie bei der
Entsorgung bitte auf folgendes: Altgeräte sollten nicht zusammen mit dem
Hausmüll entsorgt werden. Geben Sie das Gerät zum Recycling, soweit das möglich
ist. Wenden Sie sich bitte an Ihre lok alen Behörden oder Ihren Händler für mehr
Informationen zur Entsorgung dieses Geräts. (WEEE-Richtlinie - Waste Electrical
and Electronic Equipment Directive).
Page 53

52
 Loading...