

Page 1

Operating instructions
Mode d’emploi
Instrucciones de manejo
RS-332 HIGH-FIDELITY CLOCK RADIO STEREO SPEAKER
RS-332_381B201.p65 2003/6/18, 下午 02:35Page 24 Adobe PageMaker 6.5C/Win
Page 2
RS-332_381B201.p65 2003/6/18, 下午 02:35Page 25 Adobe PageMaker 6.5C/Win
Page 3
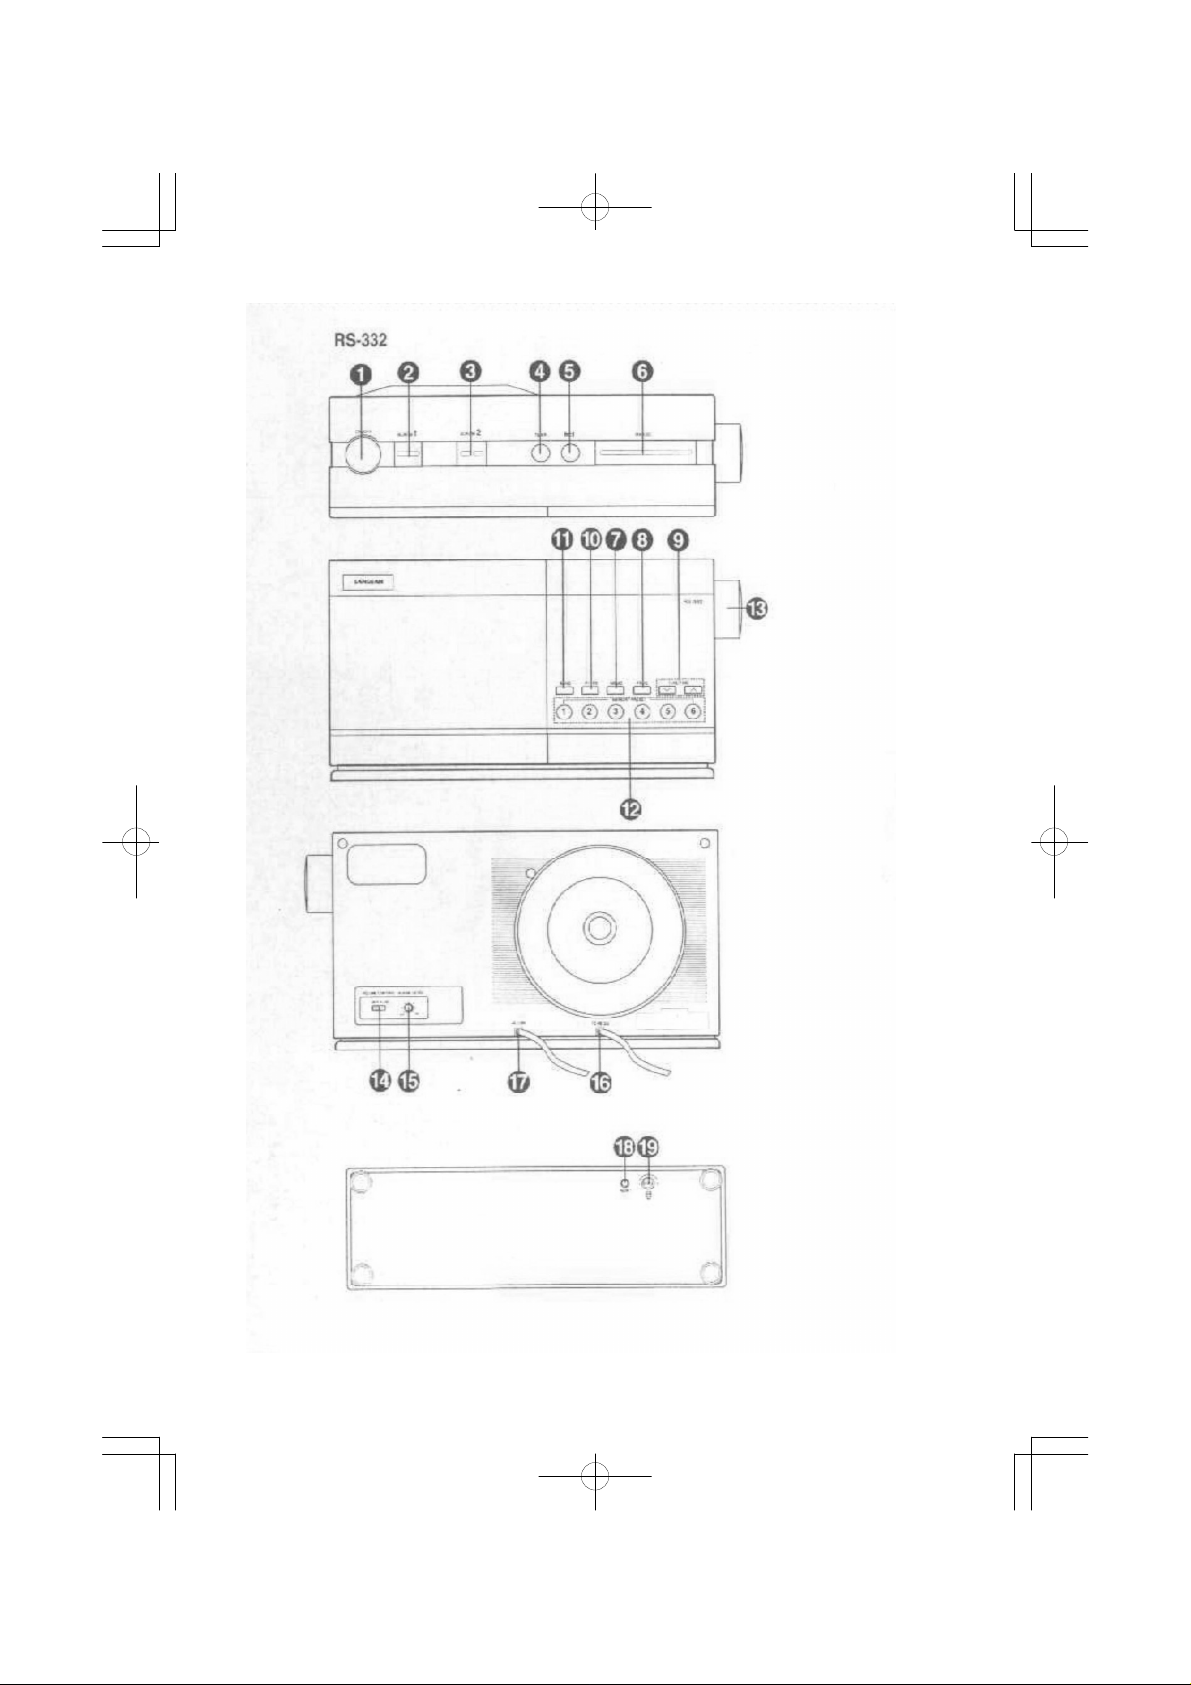
CONTROL LOCATIONS
E
Power On/Off
1
Alarm 1 On/Off
2
Alarm 2 On/Off
3
Timer Set
4
Sleep Timer Set
5
Snooze
6
7
Memory Set
8
Frequency Display
9
Tuning Frequency Stations and Time Adjustment
10
Memory Page 1/Page 2
11
FM/AM Band select
12
Station Preset
13
Volume control knob
14
Volume Control switch
15
Alarm Level control knob
16
RS-330 Control Cable
17
AC Cable
18
Reset
19
Display brightness adjustment
1
RS-332_381B201.p65 2003/6/18, 下午 02:35Page 1 Adobe PageMaker 6.5C/Win
Page 4
WARNING
WARNING: To reduce the risk of fire or electric shock, do not expose this
appliance to rain or moisture.
CAUTION: To prevent the risk of electric shock, do not remove cover (or back);
no user serviceable parts inside. Refer servicing to qualified service personnel.
The lightning flash with arrowhead symbol, within an equilateral triangle,
is intended to alert the user to the presence of uninsulated “dangerous
voltage” within the product’s enclosure that may be of sufficient magnitude to constitute a risk of electric shock to persons.
The exclamation point, within an equilateral triangle, is intended to alert
!
the user to the presence of important operating and maintenance
(servicing) instructions in the literature accompanying the appliance.
. TO PREVENT ELECTRIC SHOCK, DO NOT USE THIS (POLARIZED) PLUG
WITH AN EXTENSION CORD, RECEPTACLE OR OTHER OUTLET UNLESS THE PRONGS CAN EASILY BE FULLY INSERTED TO PREVENT
PRONG EXPOSURE.
SAFETY INSTRUCTIONS
READ INSTRUCTIONS
All the safety and operating instructions should be read before the appliance is
operated.
E
RETAIN INSTRUCTIONS
The safety and operating instructions should be retained for future use.
HEED WARNINGS
All warnings on the appliance and in the operating instructions should be adhered
to.
FOLLOW INSTRUCTIONS
All operating and use instructions should be followed.
WATER AND MOISTURE
The appliance should not be used near water, for example, near a bathtub,
washbowl, kitchen sink, laundry tub, in a wet basement, or near a swimming pool,
etc.
2
RS-332_381B201.p65 2003/6/18, 下午 02:35Page 2 Adobe PageMaker 6.5C/Win
Page 5
VENTILATION
E
The appliance should be situated so that its location or position does not interfere
with its proper ventilation. For example, the appliance should not be situated on a
bed, sofa, rug, or similar surface that may block the ventilation openings; or,
placed in a built-in installation, such as a bookcase or cabinet that may impede
the flow of air through the ventilation openings.
HEAT
The appliance should be situated away from heat sources such as radiators, heat
registers, stoves, or other appliances (including amplifiers) that produce heat.
POWER SOURCES
The appliance should be connected to a power supply only of the type described
in the operating instructions or as marked on the appliance.
GROUNDING OR POLARIZATION
Precautions should be taken so that the grounding or polarization means of an
appliance is not defeated.
POWER CORD PROTECTION
Power-supply cords should be routed so that they are not likely to be walked on
or pinched by paying particular attention to cords at plugs, convenience
receptacles, and the point where they exit from the appliance.
CLEANING
The appliance should be cleaned only as recommended by the manufacturer.
POWER LINES
An outdoor antenna should be located away from power lines.
NON-USE PERIODS
The power cord of the appliance should be unplugged from the outlet when left
unused for a long period of time.
3
RS-332_381B201.p65 2003/6/18, 下午 02:35Page 3 Adobe PageMaker 6.5C/Win
Page 6

OBJECT AND LIQUID ENTRY
Care should be taken so that objects do not fall and liquids are not spilled into the
enclosure through openings.
DAMAGE REQUIRING SERVICE
The appliance should be serviced by qualified service personnel when:
. The power-supply cord or the plug has been damaged; or
. Objects have fallen, or liquids have spilled into the appliance; or
. The appliance has been exposed to rain; or
. The appliance does not appear to operate normally or exhibits a marked
change in performance; or
. The appliance has been dropped, or the enclosure damaged.
SERVICING
The user should not attempt to service the appliance beyond that described in the
operating instructions. All other servicing should be referred to qualified service
personnel.
E
4
RS-332_381B201.p65 2003/6/18, 下午 02:35Page 4 Adobe PageMaker 6.5C/Win
Page 7
E
FEATURES
. Permits stereo listening with the RS-330 Digital FM/AM Stereo Clock Radio.
. Duplicates power, preset station selection, countdown timer, and sleep/
snooze functions of the RS-330.
. Second alarm of the RS-330 works through the RS-332, with separate volume
setting.
. Bright, easily read fluorescent digital display duplicates the RS-330’s display,
showing current time, station frequency, alarm settings, and operational
modes.
. Light sensor automatically adjusts display brightness for ambient light,
independently of the RS-330’s light sensor.
. Front-panel control buttons are back-lit for ease of use in a darkened room.
. Four-watt amplifier and high-quality baffled five-inch full-range speaker provide
clean, clear sound.
OPERATION
UNPACKING AND SETTING UP
The operation of the RS-332 High-Fidelity Clock Radio Stereo Speaker is largely
self-explanatory. Most of its functions duplicate those of the RS-330. The RS332 is described in detail only where its operation differs from that of the RS330’s.
After unpacking the RS-332, plug the power cord into an appropriate AC power
17
outlet. 120 volt AC power is standard throughout most of North America. Voltage
varies in other parts of the world. The RS-332 may emit a “thump” when first
plugged in; this is normal.
5
RS-332_381B201.p65 2003/6/18, 下午 02:35Page 5 Adobe PageMaker 6.5C/Win
Page 8
The RS-332 has an 18' 6" (5.64 meters) control cable that attaches to the RS-330.
Align the cable’s plug with the matching jack on the rear of the RS-330, then
gently push it into place.
There is an FM MODE switch next to the control cable jack on the RS-330. Set
this switch to STEREO, so that stereo broadcasts will be heard in stereo. If
stereo reception is noisy or distorted, and reorienting the antenna does not provide
acceptable reception (this may mean that the broadcast signal is too weak), move
the switch to the MONO position.
POSITIONING THE RS-332
The RS-332 should be placed where it is not exposed to high temperatures or
humidity.
The RS-332 provides high-fidelity stereo sound when paired with the RS-330
Clock Radio. Position the RS-330 and RS-332 for the best stereo sound. They
should be about equally distant from your usual listening position. The farther you
separate the RS-330 and RS-332, the more spacious the sound becomes.
Front-panel control buttons are back-lit for ease of use in a darkened room.
THE DISPLAY
The fluorescent display shows the current time, station frequency, alarm settings,
and most operational modes. Please read the owner’s manual of the RS-330
which describes each element of the display.
E
A light sensor at the base of the display automatically adjusts the display’s
brightness to compensate for a change in room lighting. This sensor works
independently of the sensor on the RS-330. You can modify the automatic setting
with the knob on the bottom of the RS-332 . Turn this knob clockwise to make
19
the display brighter, counter-clockwise to make it dimmer.
The display shows either the station frequency, or the current time, but not both
simultaneously. Whenever you turn on the radio, or select a new station, the
display automatically switches to the station frequency. The display will automatically return to the time after seven seconds. If you want to view the frequency
on the RS-332, press the FREQ (frequency) button on the RS-332.
8
CONTROLS
The VOLUME control adjusts only the level of the RS-332. Set the RS-332’s
13
volume so that both units are equally loud. Use an announcer’s voice for this
setting. If you are midway between the RS-330 and RS-332, the voice should
appear to be centered when both units are playing at the same volume.
6
RS-332_381B201.p65 2003/6/18, 下午 02:35Page 6 Adobe PageMaker 6.5C/Win
Page 9

You can adjust the volume level of the RS-330 and RS-332 by using the RS-330
E
VOLUME knob when the VOLUME CONTROL switch (on the back of the RS-332)
is in the OFF position. The VOLUME knob on the RS-332 is only func-
14
tional when the VOLUME CONTROL switch is in the ON position. The volume of
the RS-330 must be turned up before the RS-332 can control its own volume.
The POWER ON/OFF , ALARM 1 ON/OFF , ALARM 2 ON/OFF ,
TIMER SET ,SLEEP TIMER SET , SNOOZE , MEMORY SET ,
FREQ (frequency) , TUNE/TIME (tuning frequency station and time adjustment)
, P1/P2 (Memory Page 1/Page 2) , BAND (FM/AM band select) ,
9
VOLUME knob , ALARM LEVEL , RESET buttons, and the DISPLAY
BRIGHTNESS ADJUSTMENT knob work exactly as they do on the RS-330.
Each press of a PRESET button advances to that preset station. The display
shows the band and frequency selected.
When the RS-332 is paired with your RS-330 Clock Radio, the RS-330’s second
alarm works through the RS-332. The ALARM LEVEL control knob sets the
volume of Alarm 2 independent of Alarm 1’s volume on the RS-330.
MAINTENANCE
No maintenance is required. The black knit grille cover can be cleaned with a
vacuum cleaner’s upholstery nozzle. The cabinet can be cleaned with a slightly
damp cloth. If stubborn dirt remains, apply a small amount of a general-purpose
cleanser (such as Endust for Electronics) directly to the cleaning cloth. NEVER
SPRAY ANY LIQUIDS DIRECTLY ON THE UNIT and do not use solvents such as
alcohol or benzene.
4
13
1
5 6
8
10
15 18
19
12
13
2
15
3
7
11
TECHNICAL SPECIFICATIONS
Power AC 117 V 60 Hz
Frequency Range FM: 87.5 - 108 MHz (100 kHz/tuning step)
AM: 520-1710 kHz (10 kHz/tuning step)
THD FM: < 1%
Aux. In: < 0.2%
Output Power more than 4 W into 8 ohm speaker
Frequency Response FM: 50 Hz - 15 kHz, ± 3 dB
AM: 200 Hz - 3 kHz, ± 6 dB
Aux.In: 35 Hz - 20 kHz, ± 3 dB
S/N Ratio > 65 dB (Aux.In)
Dimensions W x H x D (inch) 11 1/2" x 6" x 3 1/4"
7
RS-332_381B201.p65 2003/6/18, 下午 02:35Page 7 Adobe PageMaker 6.5C/Win
Page 10

EMPLACEMENT DES COMMANDES
Touche d’alimentation é lectrique (marche/arrêt)
1
Activation du premier signal d’éveil
2
Activation du deuxième signal d’éveil
3
Réglage de la minuterie
4
Réglage de la minuterie d’arrêt automatique
5
Sommeil supplémentaire (Snooze)
6
7
Programmation de la mémoire
8
Bouton d’affichage de la fré quence radio
9
Boutons de réglage de l’heure et de syntonisation des fré quences radio
10
Mémoire page 1/page 2
11
Sélecteur de bande AM/FM
12
Boutons des stations préréglées
13
Bouton de commande du volume
14
Interrupteur de commande du volume
15
Bouton de réglage du volume du signal d’éveil
16
Câble de commande du RS-330
17
Câble d’alimentation c.a.
18
Bouton de réinitialisation
19
Réglage de la luminosité de l’écran
F
8
RS-332_381B201.p65 2003/6/18, 下午 02:35Page 8 Adobe PageMaker 6.5C/Win
Page 11

F
AVERTISSEMENT
AVERTISSEMENT : Pour réduire les risques d’incendie et d’électrocution, ne
pas exposer cet appareil à la pluie ou à l’humidité .
ATTENTION : Pour éviter une électrocution, ne pas enlever le couvercle (ni
l’arrière) de l’appareil. L’intérieur de l’appareil ne comporte aucune pièce
réparable par l’utilisateur. Faire effectuer les ré parations par du personnel
qualifié.
Le triangle équilatéral renfermant une flèche en forme d’éclair avertit
l’utilisateur que le boîtier de ce produit renferme une « tension
dangereuse » non isolée d’une puissance suffisante pour constituer un
risque de blessure par électrocution.
Le point d’exclamation dans un triangle équilatéral avertit l’utilisateur de
!
la présence d’instructions d’utilisation ou d’entretien importantes dans la
documentation accompagnant l’appareil.
. POUR ÉVITER UNE ÉLECTROCUTION, NE PAS BRANCHER CETTE
FICHE (POLARISÉE) DANS UNE RALLONGE ÉLECTRIQUE, UNE PRISE
OU AUTRE SORTIE ÉLECTRIQUE SI LES BROCHES NE S’INSÈRENT
PAS FACILEMENT JUSQU’AU FOND ET DEMEURENT VISIBLES.
CONSIGNES DE SÉ CURITÉ
LIRE LES INSTRUCTIONS
Avant d’utiliser cet appareil, lire le mode d’emploi et toutes les consignes de
sécurité.
CONSERVER LES INSTRUCTIONS
Le mode d’emploi et les consignes de sécurité doivent être conservés pour
référence future.
TENIR COMPTE DES AVERTISSEMENTS
Respecter tous les avertissements figurant sur l’appareil et dans le mode
d’emploi.
SUIVRE LES INSTRUCTIONS
Suivre toutes les instructions d’utilisation du mode d’emploi.
9
RS-332_381B201.p65 2003/6/18, 下午 02:35Page 9 Adobe PageMaker 6.5C/Win
Page 12

EAU ET HUMIDITÉ
L’appareil ne doit pas être utilisé à proximité d’eau, par exemple une baignoire, un
lavabo, un évier de cuisine, un bac à lessive, un sous-sol humide, une piscine,
etc.
AÉ RATION
Cet appareil doit être placé de façon à ne pas en gêner l’aération. Par exemple,
l’appareil ne doit pas être placé sur un lit, un divan, un tapis ou une surface
moelleuse pouvant bloquer les ouvertures d’aération. Il ne doit également pas être
placé dans un meuble, comme une étagère ou une armoire, pouvant gêner la
circulation d’air à travers les ouvertures d’aération.
CHALEUR
L’appareil doit être placé à distance de toute source de chaleur telle que radiateur,
bouche d’air chaud, cuisinière ou tout autre appareil produisant de la chaleur (y
compris un amplificateur).
ALIMENTATION É LECTRIQUE
L’appareil ne doit être connecté qu’à une source d’alimentation électrique
conforme aux indications figurant sur l’appareil ou dans le mode d’emploi.
POLARISATION OU MISE À LA TERRE
F
Des précautions doivent être prises pour que le dispositif de polarisation ou de
mise à la terre de l’appareil ne soit pas rendu inopérant.
PROTECTION DES CORDONS D’ALIMENTATION
Les cordons d’alimentation doivent être disposés de sorte qu’ils ne risquent pas
d’être piétinés ou écrasés par un objet. Faire particulièrement attention au cordon
à l’endroit où il sort de l’appareil, ainsi qu’au niveau des fiches et prises
électriques.
NETTOYAGE
L’appareil doit être nettoyé uniquement selon les recommandations du fabricant.
CÂ BLES É LECTRIQUES
Toute antenne extérieure doit être installée à distance des câbles électriques.
10
RS-332_381B201.p65 2003/6/18, 下午 02:35Page 10 Adobe PageMaker 6.5C/Win
Page 13

PÉ RIODES D’INUTILISATION
F
Lorsque l’appareil demeure inutilisé pendant une longue période, le cordon
d’alimentation devrait être débranché de la prise électrique.
INFILTRATION D’EAU ET PÉ NÉ TRATION DE PETITS OBJETS
Des précautions doivent être prises pour empêcher la pénétration d’eau ou de
petits objets par les ouvertures du boîtier.
DOMMAGES NÉ CESSITANT UNE RÉ PARATION
L’appareil doit être réparé par un technicien qualifié dans les cas suivants:
. Dommages au cordon d’alimentation ou à la fiche de branchement.
. Péné tration de liquide ou d’un petit objet dans l’appareil.
. Exposition de l’appareil à la pluie.
. Fonctionnement anormal ou changement notable au niveau de la performance
de l’appareil.
. Chute de l’appareil ou endommagement de son boîtier.
RÉ PARATION
L’utilisateur ne doit pas tenter de réparer l’appareil au-delà des instructions
fournies dans le mode d’emploi. Toutes les autres réparations doivent être
effectuées par un technicien qualifié.
11
RS-332_381B201.p65 2003/6/18, 下午 02:35Page 11 Adobe PageMaker 6.5C/Win
Page 14

CARACTÉ RISTIQUES
. Permet d’é couter le radio-réveil à affichage numérique AM/FM stéréo RS-330
en stéréo.
. Comprend des touches de marche/arrêt, de stations préréglées, de minuterie
à compte à rebours et d’arrê t automatique/sommeil répliquant celles du radioréveil RS-330.
. Le deuxième signal d’éveil du poste RS-330 fonctionne par l’intermédiaire du
haut-parleur RS-332 avec un réglage séparé du volume.
. Comprend un affichage numérique lumineux et facile à lire semblable à celui
du RS-330, indiquant l’heure, la station choisie, les réglages de réveil et les
modes de fonctionnement.
. Un capteur de lumière fonctionnant indépendamment du capteur du radio-réveil
RS-330 règle automatiquement la luminosité de l’affichage en fonction de la
lumière ambiante
. Les boutons de commande du panneau avant sont rétroéclairés pour en
faciliter l’utilisation dans une pièce sombre.
. Un amplificateur de quatre watts et un haut-parleur pleine gamme de cinq
pouces à écran acoustique procurent un son net et clair.
MODE D’EMPLOI
F
DÉ BALLAGE ET INSTALLATION
Le haut-parleur stéréo haute-fidélité Proton RS-332 pour radio-réveil s’utilise de
façon très intuitive. La plupart de ses fonctions sont similaires à celles du radioréveil RS-330. Le fonctionnement du haut-parleur RS-332 est décrit de façon
détaillée uniquement lorsqu’il diffère de celui du RS-330.
12
RS-332_381B201.p65 2003/6/18, 下午 02:35Page 12 Adobe PageMaker 6.5C/Win
Page 15

Après avoir déballé le haut-parleur RS-332, brancher le cordon d’alimentation
F
sur une prise électrique c.a. approprié e. Le courant alternatif sous 120 volts est
standard dans la majeure partie de l’Amérique du Nord. La tension électrique peut
être différente dans d’autres régions du monde. Lors de son branchement initial, il
est possible que le haut-parleur RS-332 produise un bruit sourd. Ce phénomène
est normal. Le RS-332 est fourni avec un câble de commande de 5,64 mètres (18,
5 pieds) àrelier au radio-réveil RS-330. Aligner la fiche du câble avec la
prisecorrespondante à l’arrière du RS-330, puis enfoncer délicatement la fiche.
Un commutateur FM MODE est situé à côté de la prise du câble de commande
sur le radio-réveil RS-330. Placer ce commutateur sur STEREO pour entendre les
émissions en stéréo. Si la réception stéré o est brouillée ou déformée et qu’une
réorientation de l’antenne ne produit pas de réception satisfaisante (ceci peut
signifier que le signal est trop faible), placer le commutateur sur MONO.
EMPLACEMENT DU HAUT-PARLEUR RS-332
Le haut-parleur RS-332 doit être placé à l’abri de l’humidité et des températures
élevées.
Lorsqu’il est utilisé avec un radio-réveil RS-330, le haut-parleur RS-332 procure un
son stéréo haute-fidélité. Placer le radio-réveil RS-330 et le haut-parleur RS-332
de façon à obtenir le meilleur son stéréo. Il doivent être à une distance
approximativement égale de la position d’écoute habituelle. Plus le radio-réveil et
le haut-parleur sont écartés, plus le son devient vaste.
Les boutons de commande du panneau avant sont rétroéclairés pour en faciliter
l’utilisation dans une pièce sombre.
17
É CRAN D’AFFICHAGE
L’affichage fluorescent indique l’heure, la fréquence radio choisie, les réglages
d’éveil et la plupart des modes de fonctionnement. Le manuel d’utilisation du
radio-réveil RS-330 fournit une description de chaque élément de l’affichage.
Un capteur de lumière à la base de l’écran règle automatiquement la luminosité de
l’affichage pour compenser les variations de la lumière ambiante. Ce capteur
fonctionne indépendamment de celui du radio-réveil RS-330. Le réglage par défaut
peut être modifié à l’aide du bouton à la base du haut-parleur RS-332 . Tourner
19
ce bouton dans le sens horaire augmenter la luminosité de l’affichage ou dans le
sens anti-horaire pour la diminuer.
L’affichage indique la fréquence radio ou l’heure, mais pas les deux en même
temps. Chaque fois que la radio est allumée ou que la fréquence est modifiée,
l’affichage indique automatiquement la fréquence radio, puis retourne à l’heure
après sept secondes. Pour que le haut-parleur RS-332 affiche la fréquence radio
écoutée, appuyer sur le bouton FREQ (fréquence) du haut-parleur RS-332.
13
RS-332_381B201.p65 2003/6/18, 下午 02:35Page 13 Adobe PageMaker 6.5C/Win
8
Page 16

COMMANDES
F
La commande de volume règle uniquement le volume du haut-parleur RS-332.
Régler le volume du RS-332 de façon à ce qu’il soit égal à celui du radio-réveil.
Effectuer ce réglage avec la voix d’un animateur. À mi-chemin entre le radio-réveil
et le haut-parleur, lorsque les deux sont réglés au même volume, la voix devrait
donner l’impression de venir du centre.
Le volume du radio-réveil et du haut-parleur peuvent être réglés simultanément
avec le bouton VOLUME du radio-réveil si le commutateur de volume VOLUME
CONTROL (à l’arrière du haut-parleur RS-332) est placé sur OFF. Le bouton
VOLUME du haut-parleur RS-332 ne fonctionne que si le commutateur de
volume est sur ON. Le son du radio-réveil doit être allumé avant de pouvoir
contrôler séparément le volume du haut-parleur RS-332.
La touche d’alimentation électrique POWER ON/OFF , la touche d’activation
du premier signal d’éveil ALARM 1 ON/OFF , la touche d’activation du
deuxième signal d’é veil ALARM 2 ON/OFF , le bouton de réglage de la
minuterie TIMER SET , le bouton de réglage de la minuterie d’arrêt
automatique SLEEP TIMER SET , la touche de sommeil supplémentaire
SNOOZE , le bouton de réglage de la mémoire MEMORY SET , le bouton
d’affichage de la fréquence radio FREQ , le bouton de réglage de l’heure et
de syntonisation des fréquences radio TUNE/TIME , le bouton de mémoire
page 1/page 2 , le commutateur de bande AM/FM BAND , le bouton de
commande du volume VOLUME , le bouton de réglage du volume du signal
d’éveil ALARM LEVEL , le bouton de réinitialisation RESET et le bouton
de réglage de la luminosité de l’affichage DISPLAY BRIGHTNESS ADJUSTMENT
fonctionnent exactement comme sur le radio-réveil RS-330.
19
13
6
10
4
15
13
14
1
2
3
5
7
8
9
11
13
18
Chaque fois qu’un bouton PRESET est pressé, la station préré glée
correspondante est sélectionnée. L’écran indique la bande et la fréquence
choisies.
Lorsque le haut-parleur est combiné au radio-réveil RS-330, le deuxième signal
d’é veil du radio-réveil se fait entendre par le haut-parleur RS-332. Le bouton de
réglage du volume du signal d’éveil permet de régler le volume du deuxième
signal d’éveil indépendamment de celui du premier signal d’éveil sur le radio-réveil
RS-330.
RS-332_381B201.p65 2003/6/18, 下午 02:35Page 14 Adobe PageMaker 6.5C/Win
12
15
14
Page 17

ENTRETIEN
F
Aucun entretien spécial n’est requis. L’élément grillagé noir peut être nettoyé
avec la brosse à épousseter d’un aspirateur. Le boîtier peut être nettoyé avec un
chiffon légèrement humide. Pour enlever les taches tenaces, appliquer une petite
quantité de nettoyant universel (par exemple le produit Endust pour appareils
électroniques) directement sur le chiffon de nettoyage. NE JAMAIS VAPORISER
DE LIQUIDE DIRECTEMENT SUR L’APPAREIL. En outre, ne jamais utiliser de
solvant comme de l’alcool ou du benzène.
SPÉ CIFICATIONS TECHNIQUES
Alimentation électrique Courant Alternatif (c.a.) 117 volts, 60 Hz
Plages de fréquence FM: 87.5 à 108 MHz (échelons de 100 kHz)
AM: 520 à 1710 kHz (échelons de 10 kHz)
Distorsion harmonique totale FM: < 1%
Entrée auxiliaire : <0.2%
Puissance de sortie plus de 4 W par haut-parleur de 8 ohms
Réponse en fréquence FM: 50 Hz - 15 kHz, ± 3 dB
AM: 200 Hz - 3 kHz, ± 6 dB
Entrée aux. : 35 Hz - 20 kHz, ±3 dB
Rapport signal/bruit > 65 dB
Dimensions, L x H x P (cm) 29.2 x 15.2 x 8.3
15
RS-332_381B201.p65 2003/6/18, 下午 02:35Page 15 Adobe PageMaker 6.5C/Win
Page 18

LOCALIZACION DE CONTROLES
Botón de Encender/Apagar
1
Alarma 1 Encender/Apagar
2
Alarma 2 Encender/Apagar
3
Programar Hora
4
Programar Hora de Dormir
5
Snooze (Siesta)
6
Memoria Programar
7
Botón de Frecuencia
8
Botón de Frecuencia de Emisoras y Ajuste de Tiempo
9
10
Memoria Pagina 1-2
Botón para Seleccionar FM/AM
11
12
Botones de Programar Emisoras
13
Botón de Volúmen
14
Interruptor del Control del Volúmen
15
Botón de Nivel de Alarma
16
RS-330 Cable de Control
S
17
Cable AC
18
Botón de Empezar
19
Ajuste del Brillo
16
RS-332_381B201.p65 2003/6/18, 下午 02:35Page 16 Adobe PageMaker 6.5C/Win
Page 19

S
ADVERTENCIA
AVISO: Para reducír el riesgo de incendio o descarga eléctrica, no se debe
exponer este aparato a lluvia o humedad.
¡CUIDADO!: Para prevenír el riesgo de descarga eléctrica, no remueva la
tapadera (de atrás); no usar partes de adentro. Remita para servicio al personal calificado de servicio.
La luz relampageando con un símbolo de flecha, dentro del triángulo,
está intensionalmente para prevenír al usuario de la presencia de no
insulado «voltaje peligroso», dentro del producto puede haber una
magnitud de descarga eléctrica suficiente que constituya un riesgo a
una persona.
El punto de admiración, dentro del triá ngulo, está intencionado para
!
prevenir al usuario de la presencia del funcionamiento importante e
instrucciones de mantenimiento o (reparacìón) en la literatura siguiente
a este aparato.
. PARA PREVENIR DESCARGA ELECTRICA, NO USE ESTE ENCHUFE
CON UN CORDON DE EXTENSION, RECEPTOR U OTRO TOMA DE
CORRIENTE A MENOS QUE LAS CLAVIJAS PUEDAN SER FACILMENTE
Y COMPLETAMENTE INTRODUCIDAS PARA PREVENIR QUE LAS
CLAVIJAS SE EXPONGAN.
INSTRUCCIONES DE SEGURIDAD
LEA LAS INSTRUCCIONES
Todas las instrucciones de seguridad y funcionamiento deben ser leídas antes de
funcionar el aparato.
CONSERVAR INSTRUCCIONES
Las instrucciones de seguridad y funcionameinto deben ser conservadas, para
uso en el futuro.
HAGA CASO DE LAS ADVERTENCIAS
Todas las advertencias en el aparato e instrucciones del funcionamiento deben ser
observadas.
SIGA LAS INSTRUCCIONES
Todo el funcionamiento y uso de instrucciones deben ser seguidos.
17
RS-332_381B201.p65 2003/6/18, 下午 02:35Page 17 Adobe PageMaker 6.5C/Win
Page 20

AGUA Y HUMEDAD
El aparato no debe ser usado cerca de agua, por ejemplo: en la bañera, en
lavaplatos, la tina de lavar, un sótano mojado, o cerca de una piscina, etc.
VENTILACION
El aparato debe ser situado para que su exterior o posició n no interfiera con su
ventilación. Por ejemplo, el aparato nó debe estar sobre una cama, sofa, alfombra
o cosas similares que pueden tapar la abertura de ventilación, o colocar en
repisas o gabinetes que puedan impedir el flujo de aire por las aberturas de
ventilación.
CALOR
El aparato debe estar lejos de fuentes calientes como rayos solares,
registradores de calor, estufasm, u otros aparatos que produzcan calor.
FUENTES DE ENERGIA
El aparato debe ser conectado a suministro de energía solo del tipo descrito en
las instrucciones de operación o como se señale en el aparato.
CONECTAR CON TIERRA
La precaución debe ser tomada al conectar con tierra el aparato.
S
PROTECCION DEL CORDON DE ENERGIA
El cordón de suministro de energía debe ser recorrido por lugares donde nó se
camine sobre él o se pueda machucar, poniendo especial atención al enchufe, a
la toma de corriente y al punto de donde sale del aparato.
LIMPIEZA
El aparato puede ser limpiado solo como recomienda el fabricante.
LINEAS DE ENERGIA
Una antena de afuera debe estar lejos de lineas de energía.
CUANDO NO SE USE
El cordón de energía del aparato debe ser desconectado de la toma de corriente
cuando no se use por largos tiempos.
18
RS-332_381B201.p65 2003/6/18, 下午 02:35Page 18 Adobe PageMaker 6.5C/Win
Page 21

S
ENTRADA DE LIQUIDOS U OBJETOS
Tenga cuidado para que ningún objeto o liquido caiga dentro del aparato por las
aberturas.
DAÑ OS QUE REQUIEREN MANTENIMIENTO
El aparato debe recibír mantenimiento por una persona calificada de
mantenimiento cuando:
. El cordón de energía o el enchufe han sido dañados, o
. Objetos o líquidos han caido dentro del aparato;
. El aparato ha sido expuesto a lluvia; o
. El aparato parece no estar funcionando normalmente, demuestra cambio en su
funcionamiento; o
. El aparato se ha caído; o los interiores han sido dañadós.
MANTENIMIENTO
El usuario no debe intentar darle mantenimiento al aparato fuera de lo
mencionado en las instrucciones. Todos los demás servicios deben ser hechos
por una persona calificada.
19
RS-332_381B201.p65 2003/6/18, 下午 02:35Page 19 Adobe PageMaker 6.5C/Win
Page 22

CARACTERISTICAS:
. Permite escuchar el stereo con el RS-330 FM/AM estereo radio reloj digital.
. Poder Duplicado, selección de emisoras programadas, interruptor de conteo
regresivo, función para dormir/snooze del RS-330.
. Segunda alarma del RS-330 que trabaja por medio del RS-332, con volúmen
separado.
. Un luminoso y fluorescente “display” digital que duplica la visibilidad del RS-
330, muestra la hora, fecuencia de emisora, alarma, y funcionamiento.
. Sensor de luz, ajusta el brillo del “display” automáticamente a la luz del
ambiente, independientemente del sensor de luz del RS-330’s.
. Los Botones de control tienen luz para uso más facil en cuartos obscuros.
. Amplificador de cuatro-watts, con bocinas de cinco pulgadas de alta calidad y
de alto rango proporcionan sonido claro y limpio.
INSTRUCCIONES DE FUNCIONAMIENTO
DESEMPACAR Y MONTAJE
Esta parte del RS-332 alta-fidelidad radio reloj estereo es fácil. Todas las
funciones duplican las del RS-330. El RS-332 a sido descrito en detalle solo en
las funciones en las cuales el aparato son diferentes a las del RS-330’s.
Después de desempacar el RS-332, conecte el cordón de energía a una toma
17
de corriente AC apropiada. En Norte America la energía normal es de 120 volts.
El voltaje varía en otras partes del mundo. El RS-332 puede producír un «sonido
seco» cuando sea conectado esto es normal.
S
20
RS-332_381B201.p65 2003/6/18, 下午 02:35Page 20 Adobe PageMaker 6.5C/Win
Page 23

S
El RS-332 tiene un cable de control 18’6" (5.64 metros) que se conecta al RS-
330. Alínea el enchufe del cable con la toma correspondiente atras del RS-330,
empuje hacia dentro suavemente para ponerlo en su lugar.
Hay un interruptor para el FM a un lado del enchufe del cable del control del RS-
330. Mueva este interruptor a la posición STEREO para que las emisoras con
sonido stereo sean escuchadas. Si la recepción en sonido estereo es ruidoso o
distorcionada, y si al acomodar la antena no se arregla (esto significa que la
señal de la emisoras esta débil) mueva el interruptor a la posición MONO.
POSICION DEL RS-332
El RS-332 debe ser colocado donde nó este expuesto a altas temperaturas o
humedad.
El RS-332 proporciona un sonido de alta-fidelidad del stereo cuando hace par con
el RS-330 y el RS-332 para mejor sonido del stereo. Deben estar a distancia
igual de su posición normal. Entre más lejos estan el RS-330 y el RS-332, el
sonido es má s amplio.
Los botones del control del panel del frente tienen una luz para fácil uso en
cuartos obscuros.
EL DISPLAY
El “display” luminoso fluorescente muestra la hora, frecuencia de emisoras,
alarma, y funciones. Por favor lea el manual del RS-330 que describe todos los
elementos del display.
El sensor de luz en la base del “display” ajusta automáticamente el brillo del
“display” para compensar los cambios de luz en el cuarto. Este sensor trabaja
independiente de el sensor en el RS-330. Usted puede modificar el ajuste
automático con el botón que esta abajo del RS-332 . Dele vuelta al botón en
19
el sentido de las manecillas del reloj para que el brillo aumente, y a el contrario de
las manecillas para opacarlo.
El “display” muestra la frecuencia de las emisoras o la hora, no los dos al mismo
tiempo. Cuando prenda el radio, o seleccione la nueva emisora la pantalla se
cambia automáticamente a la frecuencia de la emisora. El display regresará
automáticamente a la hora despues de siete segundos. Si usted quiere ver la
frecuencia en el RS-332, presione el FREQ (frecuencia) botón en el RS-332.
21
RS-332_381B201.p65 2003/6/18, 下午 02:35Page 21 Adobe PageMaker 6.5C/Win
8
Page 24

CONTROLES
S
El control de volúmen ajusta solo el nivel del RS-332. Ajuste el RS-332 a un
volúmen en que los dos aparatos esten igual de altos. Para ajustar el volúmen
use una voz locutora. Si usted esta entre medio de el RS-330 y el RS-332 la voz
debe parecer que esta centrada en medio de los dos aparatos cuando estan
prendidos, y al mismo volúmen.
Usted puede usar el botón de volúmen del RS-330 para ajustar el nivel de volúmen
de el RS-330 y el RS-332 cuando el interruptor de volúmen (por detrás del RS-
332) está en la posición de apagar. El botón de volúmen solo funciona
cuando el interruptor del RS-332 esta en la posición de prender. El volúmen del
RS-330 tiene que ser subido antes de que el RS-332 puede controlar su volúmen.
El botón de ENCENDER/APAGAR POWER ON/OFF , ALARMA 1
ENCENDER/APAGAR ALARM 1 ON/OFF , ALARMA 2 ENCENDER/APAGAR
ALARM 2 ON/OFF , PROGRAMAR HORA TIMER SET , PROGRAMAR
HORA DE DORMIR SLEEP TIMER SET , SEISTA SNOOZE
, MEMORIA PROGRAMAR MEMORY SET , FREQ (frecuencia) ,
6
AJUSTE/TIEMPO (frecuencia de emisoras y ajuste de tiempo) TUNE/TIME ,
Memoria página1-2 P1/P2 , Botón para seleccionar FM/AM BAND , Botón
de Volúmen VOLUME , Botón de nivel de alarma ALARM LEVEL , Botón
de empezar RESET , y ajuste del brillo DISPLAY BRIGHTNESS
ADJUSTMENT funcionan igual que en el RS-330.
Cada que presione uno de los botones de emisoras memorizadas avanzará a la
emisora memorizada. La pantalla mostrará la frecuencia seleccionada.
Cuando el RS-332 y el RS-330 radio reloj estan conectados, la segunda alarma
del RS-330 trabaja desde el RS-332. El botón de control de nivel de alarma
programa el volúmen de la alarma 2 independiente del volúmen de la alarma en el
RS-330.
14
19
18
13
13
10
14
1
2
3
4
5
7
8
9
11
15
15
MANTENIMIENTO
No requiere mantenimiento. La tapa negra como parrilla puede ser limpiada con
una aspiradora. El gabinete puede ser limpiado con una toalla húmeda. Si
continua sucio, limpie con un limpiador de uso general (por ejemplo Endust para
Electronicos) poniendo el líquido a la toalla. NUNCA ROCIE LIQUIDOS
DIRECTOS A LA UNIDAD Y NO USE SOLVENTES COMO ALCOHOL.
22
RS-332_381B201.p65 2003/6/18, 下午 02:35Page 22 Adobe PageMaker 6.5C/Win
Page 25

S
ESPECIFICACIONES TECNICAS
Energía AC 117 V 60 Hz
Frecuencia FM: 87.5 - 108 MHz
AM: 520 - 1710 k Hz
THD FM: < 1%
Aux.In: < 0.2%
Salida de Energía mas de 4 W con bosinas 8 ohm
Respuesta de Frecuencia FM: 50 Hz - 15 kHz, ± 3dB
AM: 200 Hz - 3 kHz, ± 6dB
Aux.In: 35 Hz - 20 kHz, ± 3dB
S/N > 65 dB (Aux. In)
Dimensión WxHxD (pulgadas) 11 1/2" x 6" x 3 1/4"
23
RS-332_381B201.p65 2003/6/18, 下午 02:35Page 23 Adobe PageMaker 6.5C/Win
Page 26

381B201
RS-332_381B201.p65 2003/6/18, 下午 02:35Page 26 Adobe PageMaker 6.5C/Win
 Loading...