

Page 1
381S501-A
Wi-Fi Clock Radio
Radio-réveil Wi-Fi
Radio reloj Wi-Fi
Internet Klok Radio
Wi-Fi-Radiowecker
Operating instruction
Mode d’emploi
Instruccions de manejo
Gebruiksaanwijzing
Bedienungsanleitung
GB
F
E
NL
D
Page 2

Contents
Important safety instructions...........................................2-4
Controls ..........................................................................5-8
Before you can use this product ........................................9
Connecting your radio to your network ............................ 10
Operating controls ...........................................................13
Selecting an Internet radio station................................... 14
Volume control ................................................................18
Audio setting (tone control) .............................................18
Internet radio station preset .............................................18
Listening to previously broadcast material .....................19
Customizing your radio on website..................................2 0
Media Player ...................................................................21
Window Shares ................................................................2 2
UPnP server ....................................................................23
USB and SD — Local Media operation
(For RCR-7 only) ..................................................................25
Operation after you set up for Window Shares,
UPnP or USB/SD card ........................................................ 26
FM Ra dio .........................................................................2 9
Auxiliary input socket ...................................................... 30
Clock Setting ...................................................................30
Backlight ..........................................................................34
Network configuration (For RCR-7 only) ........................... 34
Troubleshooting...............................................................36
Factory reset ....................................................................37
Upgrade firmware.............................................................37
Headphone socket...........................................................38
Line out socket (3.5mm Jack) .........................................38
Specifications .................................................................. 38
1
Page 3

Important safety instructions
1. Read and understand all safety and operating instructions before the
radio is operated.
2. Retain instruction: The safety and operating in struction s should be
retained for future reference.
3. Heed warnings. All warnings on the appliance a nd operating
instructions should be followed.
4. Follow all operations and use instructions.
5. Only use attachments/accessories specified by the manufacturer.
6. Use only a dry cloth for clea ning the exterior of the radio.
7. Ventilation: This radio should be situated so that its location or
position does not interfere with its proper ventilation. For example,
the radio should not be used on a bed, sofa, rug or other soft
surfaces that may block the ventilation openings. It should not be
placed in a built-in situation like a cabinet that may reduce airflow
through the ventilation openings. Also keep 10cm space on the back
of the radio.
8. Water a nd moisture: The applia nce should not be used ne ar water.
Do not use near a bathtub, washbowl, laundry tub, kitchen sink,
wet basement, swimming pool, etc.
WARNING! Do not expose this product to rain or moisture.
9. Do not expose this product to splashing or dripping.
Objects containing liquid, such as vases or drinking glasses,
should not be placed on top of this product.
10. Do not install near any heat sources such as radiators,
heat registers, stoves, or other apparatus (including amplifiers)
that produce heat.
11. Do not place the radio on an unstable cart, sta nd, bracket or table.
The radio may fall, causing serious personal injury and damage to
the radio.
12. Do not atte mpt to service the receiver yoursel f. Removing the cover
may expose you to dangerous voltage, a nd will void the warranty.
Refer all servicing to authorized service personnel.
13. Unplug the ra dio from the AC power outlet before cleaning. Use only
a dry cloth for cleaning the exterior of the radio.
14. Do not plug the AC lead into the AC outlet if the outlet is still wet.
Make sure that the outlet is dry before and after use.
15. Power sources: The radio should be operated only from the type of
power source indicated on the marking label. If you are not sure of
the type of power supply to your home, consult your radio dealer or
power company.
GB
2
Page 4

16. Power cords: The power cord should be positioned so it is not
walked on, pinched, or items placed on top of it. Pay particular
attention to cords at plugs, convenience receptacles, and the point
where they exit from the unit. Unplug the power cord by gripping
the power plug, not the cord. Operate the radio using only the
current type of power source indicated. If you are not sure of the
type of power supply to your home, consult your dealer or local
power company.
17. Do not defeat the safety purpose of the polarized or grounding-type
plug. A polarized plug has two blades with one wider than the other.
A grounding type plug has two blades and a third grounding prong.
The wide blade or the third prongs are provided for your safety.
If the provided plug does not fit into your outlet, consult an
electrician for replacement of the obsolete outlet.
21. Unplug this product from the wall outlet and refer servicing to
qualified service personnel under the following conditions:
When the power supply cord or plug is damaged.
a.
If liquid has been spilled or objects have fallen into the product.
b.
If the product has been exposed to water or rain.
c.
If the product does not operate normally by following the
d.
operating instructions.
If the product has been dropped or damaged in any way.
e.
When the product exhibits a distinctive change in performance.
f.
22. If the LCD becomes cracked and damaged, do not touch the liquid.
23. The changes or modif ications not expre ssly approved by the party
responsible for compliance could void the user’s authority to
operate the equipment.
18. Do not overload wall outlets or exten sion cords. This can result in a
risk of fire or electrical shock. Never insert objects of any kind into
the radio through opening.
19. The power plug should be close to the radio, and easy to be
approached that in case of emergency, to disconnect the power
from the radio, just unplug the power plug from the AC power slot.
20. Object and Liquid Entry – Never push objects of any kind into this
radio through openings as they may touch dangerous voltage points
or short –out parts that could result in a fire or electric shock.
Never spill liquid of a ny kind on the product.
3
24. To comply with the FCC RF exposure complia nce require ments,
no change to the antenna or the device is permitted. Any change
to the antenna or the device could result in the device exceeding
the RF exposure requirements and void user’s authority to operate
the device.
Page 5

25. FCC INFORMATION
The Federal Communication Commission Radio Frequency Interference
Statement includes the following paragraph:
The equipment has been tested and found to comply with the limits
for a Cla ss B Digital Device, pursuant to part 15 of the FCC Rules.
These limits are designed to provide reasonable protection against
harmful interference in a residential installation. This equipment
generates, uses and can radiate radio frequency energy and, if not
installed and used in accordance with the instruction, may cause
harmful interference to radio communication. However, there is no
grantee that interference will not occur in a particular installation.
If this equipment dose cause harmful interference to radio or television
reception, which can be determined by turning the equipment of f and on,
the user is encouraged to try to correct the interference by one or more
of the following mea sure s:
- Reorient or relocate the receiving antenna .
- Increa se the separation between the equipment a nd re ceiver.
- Connect the equipment into an outlet on a circuit different from that to
which the receiver is connected.
- Consult the dealer or an experienced radio/TV te chnici an for help.
The user should not modify or change this equipment without written
approval f orm SANGEAN ELECTRONICS INC. Modification could void
authority to use this equipment.
26. Excessive sound pressure on ear- and headphone s could i mpair the
hearing ability.
Higher setting that idle on the equalizer leads to higher signal
voltages on the output for ear- and headphones.
GB
4
Page 6
Controls
(Front)
1.
Alarm 1 button
2.
Alarm 2 button
3.
Nap button
4.
Time Set/Sleep button
5.
Power button
Band button
6.
RDS button
7.
Dimmer button
8.
LCD display
9.
5
Page 7
Controls
(TOP)
10.
Tuning +/- and Snooze button
11.
Back button
12.
Preset 1 / Shuffle/Repeat button
13.
Preset 2 / Queue button
14.
Preset 3 / Backward button
Preset 4 / Fast-Forward button
15.
Preset 5 / Play / Pause button
16.
Volume Up/Down buttons
17.
Select/T one button
18.
GB
6
Page 8
Controls
(Rear)
19.
WiFi antenna
20.
FM antenna
21.
Main Power input socket
22.
Headphone socket
Line Out socket
23.
Auxiliary Input socket
24.
RJ-45 socket (Ethernet)
25.
7
Page 9
Controls
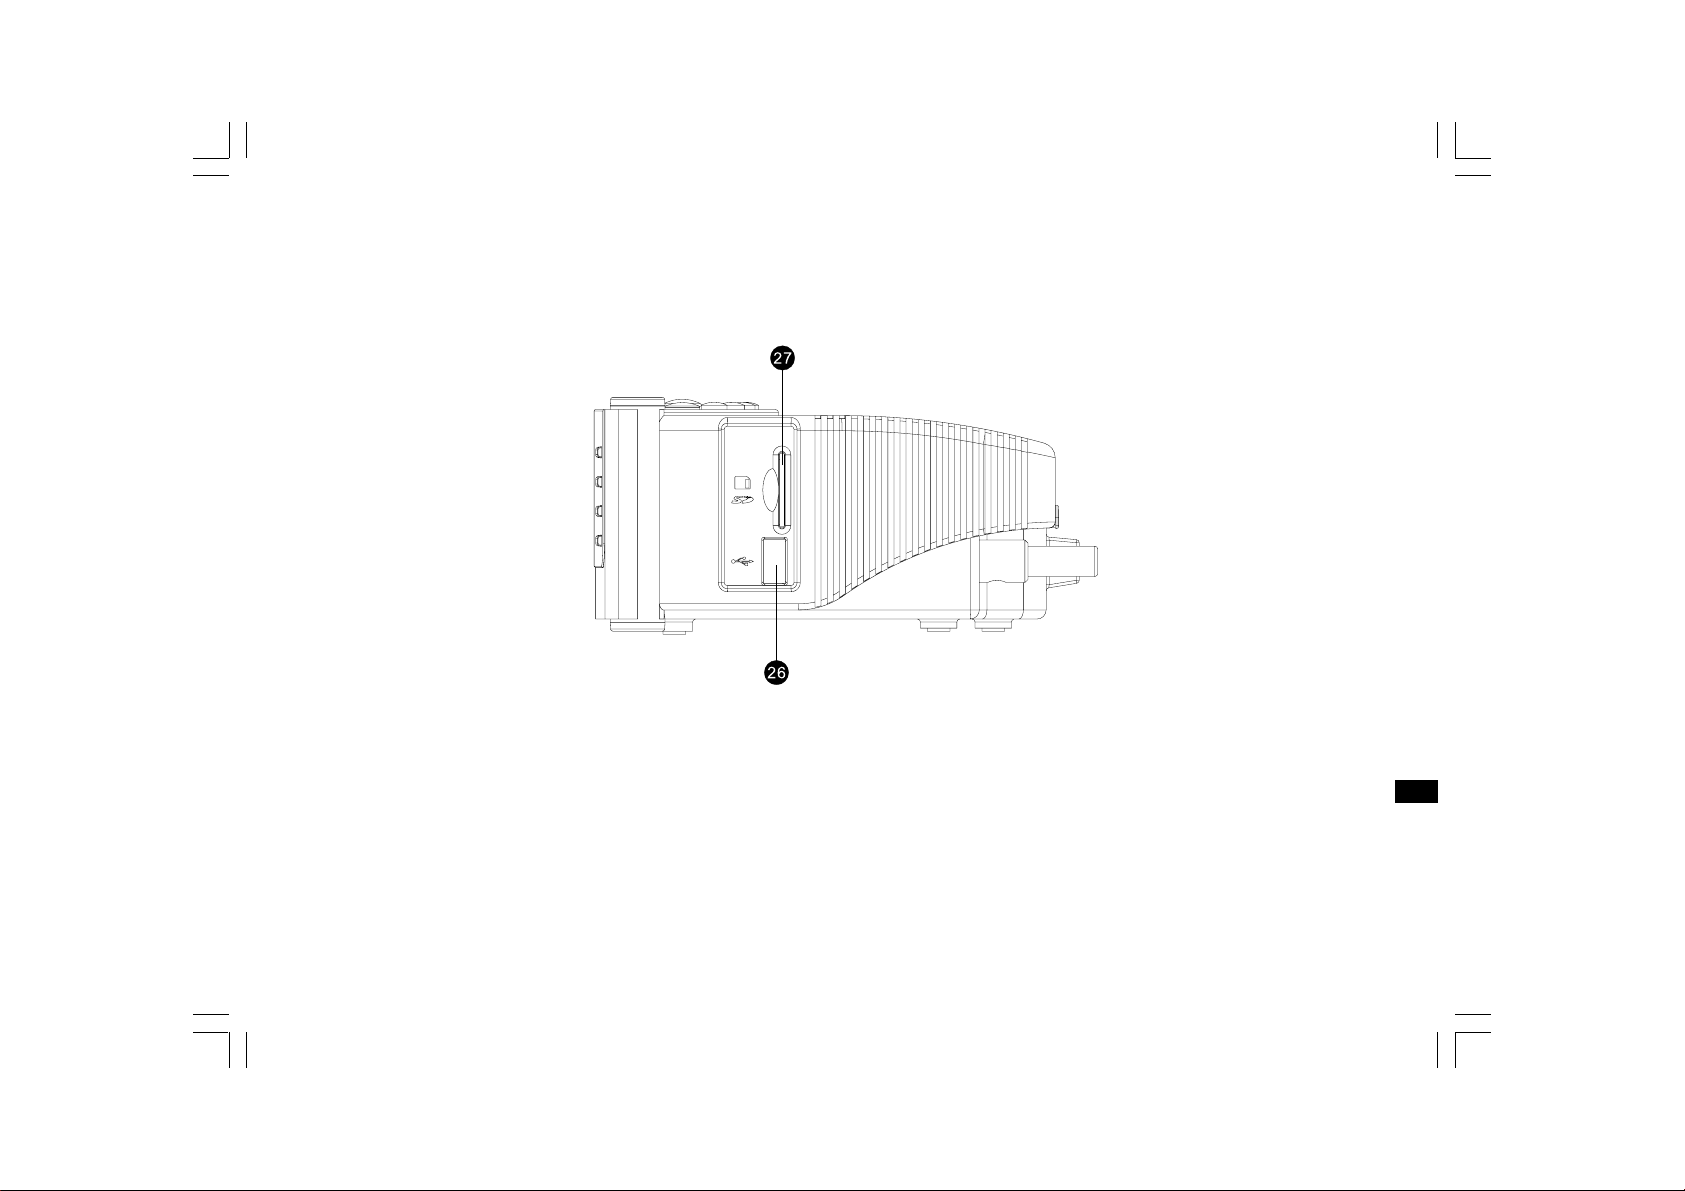
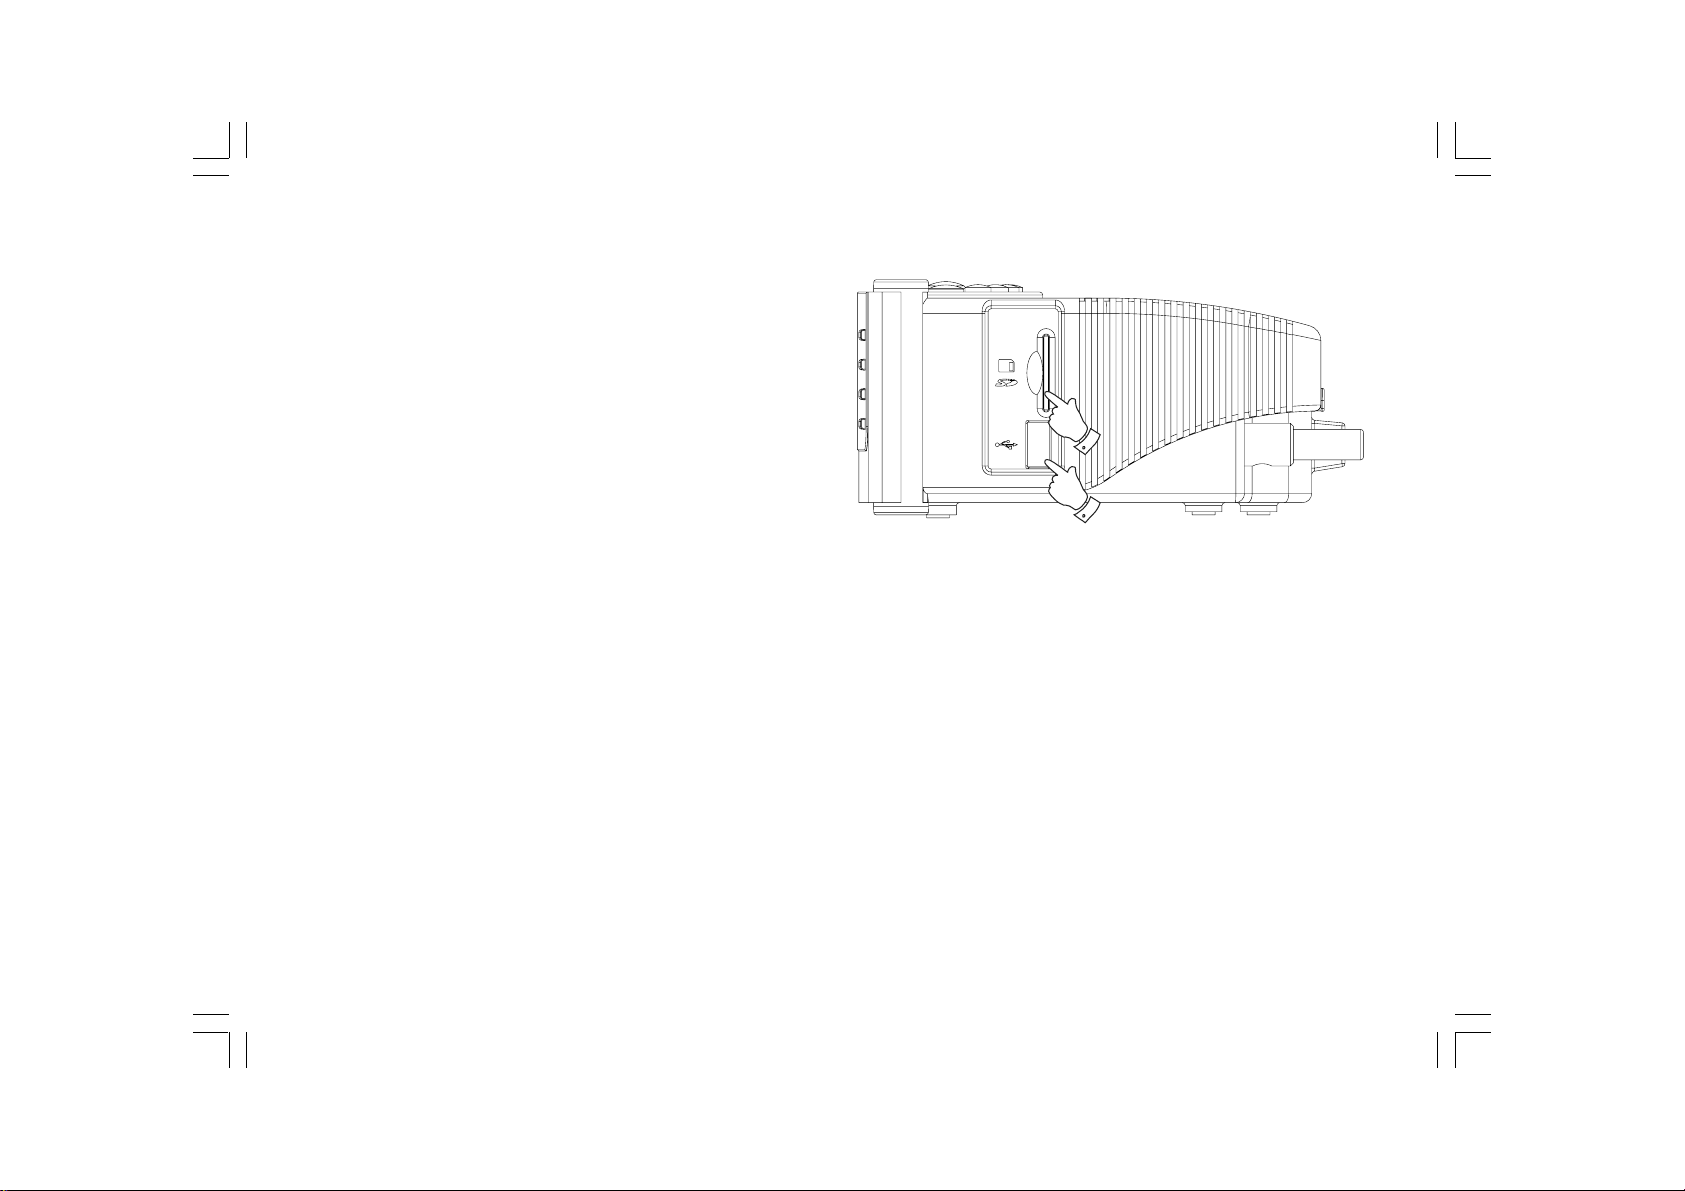
(Right hand side)
26. USB slot (RCR-7 only) SD card slot (RCR-7 only)
27.
GB
8
Page 10

Before you can use this product
Before you can use your Internet ra dio, you must have the f ollowing:
A broadband Internet connection.
A wireless access point (Wi-Fi) or a wired Ethernet connection
(10 or 100 Mbits/sec with RJ45 connection; For RCR-7 only)
connected to your broadband Internet, prefera bly via a router.
In many cases the broadband modem, router and wireless access
point will be a single combined unit supplied by your Internet Service
Provider or bought from a computer store.
If your wireless network is configured to use Wired Equivalent
Privacy (WEP) or Wi-Fi Protected Access (WPA) data encryption
then you need to know the WEP or WPA key so you can get the
Internet radio to communicate with the network.
The Internet radio will typically work within a 10-20 meter radius from
your wireless access point. The actual range a chieved will depend upon
the building type, other nearby wireless networks, and possible
interference sources.
IMPORTANT:
Before you continue, make sure that your wireless access point or
router is powered up and working with your broadba nd Internet service
(use your computer to verify this). To get this part of the system working
you must read the instructions supplied with the wireless access point
or router.
9
Page 11
Connecting your radio to your network
1. Place your radio on a surface and plug the mains lea d into the M ains
input socket located on the rear of your radio (marked ) ensuring
that the plug is pushed fully into the socket.
2. Plug the other end of the mains lead into a wall socket and switch on
the wall socket.
There are 2 days of connecting your radio to the network,
wired and wireless:
When using a wired (LAN) network (For RCR-7WF only)
1. Connect the Ethernet cable into the RJ-45 socket at the ba ck of
the radio. If a wired connection is present then the radio will use this
in preference to a wireless connection.
There are two indicator lights incorporated into the RJ-45 connector.
If you have problems with your wired connection, they may help you
to identify the possible cause of the problem.
Green ON = Link established, Flashing = Data transfer
Yellow ON = 100M bps link, OFF = 10M bps link.
2. Turn on the radio by pressing the Power button, and you can start to
operate the radio. And the display will show <Internet Ra dio>.
GB
10
Page 12
When using a wireless network (Ignore this section if wired LAN
Internet connection is used with RCR-7WF)
1. Turn on the radio by pressing the Power button.
2. The display will show “Starting” and then “Initializing Network”,
followed by showing “Scanning”
* If the radio cannot find a network then the display will say
‘No Wireless Networks Found’. If this happens then you will have to
get your wireless access point working - please see the instructions
supplied with it.
11
Page 13
3. There may be more than 1 wireless network s that your radio finds.
The display now shows “Select networks”. Press the Tuning+/ buttons to search your wireless network. This is a name that is
allocated to the access point by the person who set up the
network -for example: ‘My Home Network’.
When you find your wireless network, press the Select button.
Few seconds later, the display will show <Internet Radio>, then you
have successfully connected your radio to your network, so please
ignore the following steps.
4. If your wireless Internet access (router) has been set the pa ssword,
the display will show either ‘Enter WEP key’ or ‘Enter WPA key’.
You therefore need to enter the correct WEP or WPA key into the
radio to allow it to communicate with your network.
If you do not have the WEP or WPA key, then you should obtain it
from the person who set your network. Some Wi-Fi routers may
come with a key already set up by the supplier, in which case you
should refer to the user documentation provided with it.
5. After 3 seconds, the display goes into the key entry mode. To enter
the key, use the Tuning+/- buttons to select each character of the
key in turn, pressing the Select button after each character.
Remember, WEP keys only use the numbers 0 - 9 and letters A - F.
WP A keys are sensitive to upper and lower case characters so you
must enter them exactly.
GB
12
Page 14

6. If you make a n error, press the Back button to delete the
character entered. Use the left and right arrows to move the block
cursor to access incorrectly entered characters.
7. After the final character of the WEP or WPA key has been entered,
locate the ‘END’ symbol and press the Select button. The radio
should now be able to connect to the network. And the display will
show <Internet Radio>.
Operating controls
1. The majority of function s on your radio may be perf ormed by using
the Tuning +/- and Select buttons on the top panel. Press Tuning +/ to highlight the desired function, and then press on the Select button
to select that function. In this instruction booklet, press always
means press and release. Where a long press is needed to perform
an operation this is specifically stated in the text.
2. If an error is made when operating the menus, it is generally possible
to go back to the previous menu by pressing the Back button on the
top panel.
13
Page 15
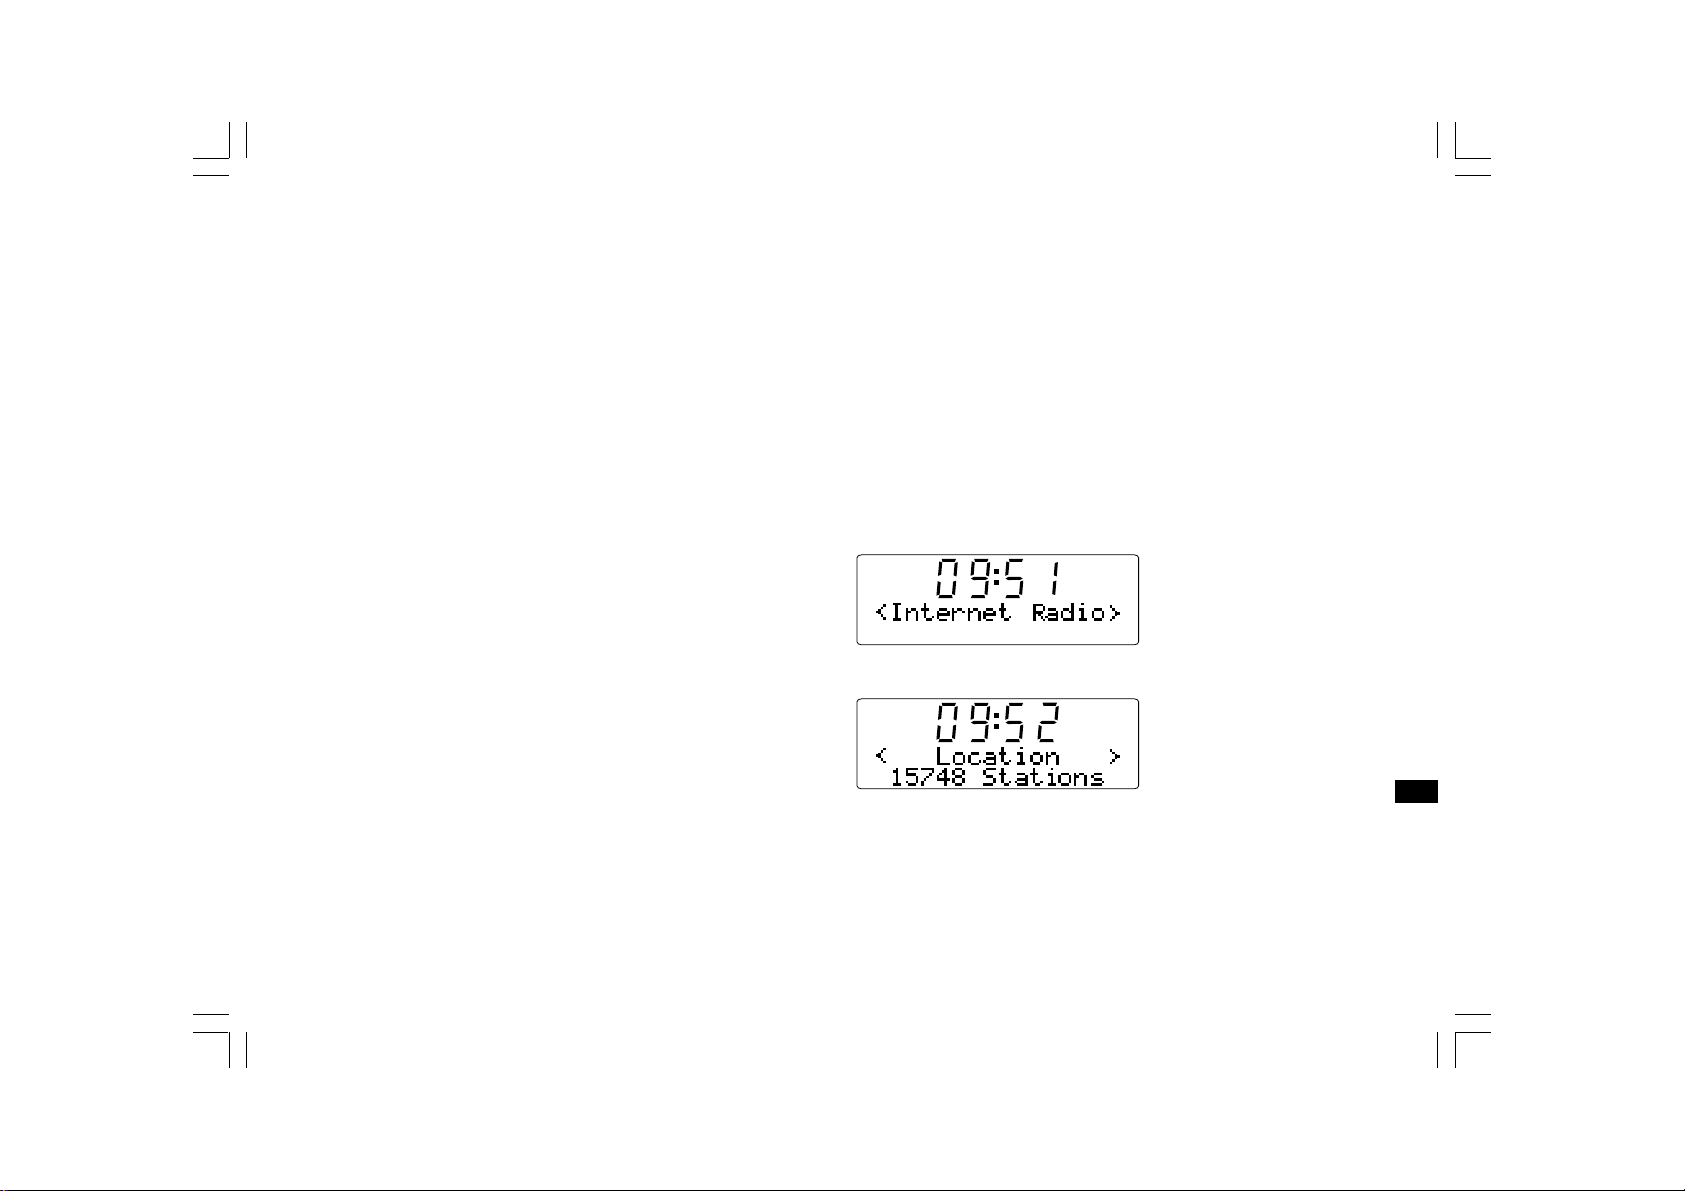
Selecting an Internet radio station
There are several thousand Internet radio stations to sele ct, a nd there
are 3 ways of selecting ways which are by Location, Genre and Search.
Location:
enables you to choose a radio station from the list first by geographic
region and then by country.
Genre:
enables you to choose radio stations according to their content,
for example Classic, Rock, Sport, News, etc.
Search:
enables you to choose a radio station by input the key word of radio
station na me, and the radio will sort out the radio stations.
1. After the radio is conne cted to the Internet as says above, the display
shows <Internet Radio>. If the radio is not on the Internet Radio
band, press the Band button until “Internet Radio” shows.
2. Press the Select button.
3. Press the Tuning+/- buttons to choose between <Location>,
<Genre>, or <Search>
4. Follow 1 of the 3 days as the instructions below:
GB
14
Page 16

Selecting an Internet radio station by location
1. Press the Tuning+/- buttons until the display shows <Location>,
and then press the Select button to enter the Location search.
2. Press the Tuning+/- buttons until the country is shown on
the display. Press the Select button to confirm your choice.
The station list for that country will appear on display.
3. Press the Tuning+/- buttons. It will show all the Internet radio
stations from the country you select.
4. When you find the radio station you would like to listen to, press the
Select button. In few seconds the radio will connect to the selected
radio station.
* Should you be unable to connect to a particular station, please note
that some radio stations do not broadcast 24 hours per day, and some
stations are not always on-line.
15
Page 17
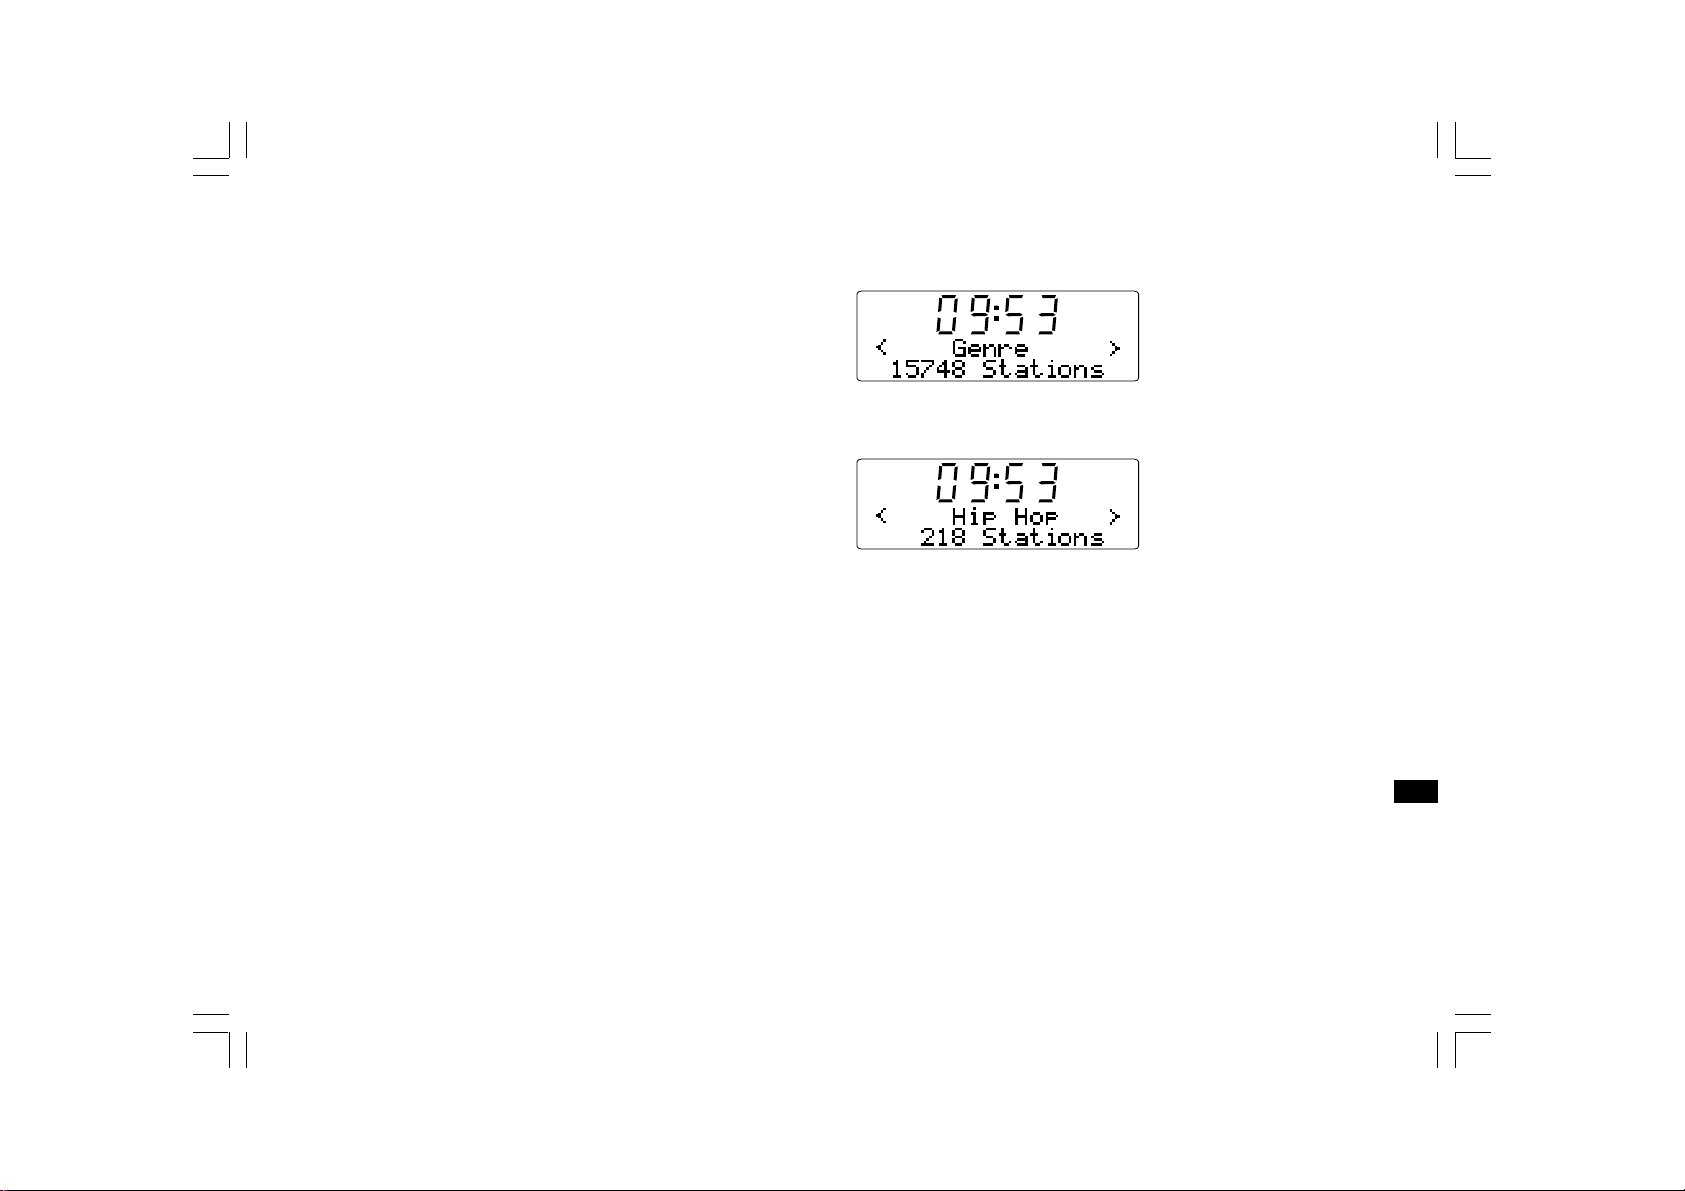
Selecting an Internet radio station by genre
1. Press the Tuning+/- buttons until the display shows <Genre>,
and then press the Select button to enter the Genre search.
2. Press the Tuning+/- buttons until the genre you would like to
choose is shown on the display. Press the Select button to confirm
your choice.
3. Press the Tuning+/- buttons. It will show all the Internet radio
stations from the genre you select.
4. When you find the radio station you would like to listen to, press the
Select button. In few seconds the radio will connect to the selected
radio station.
* Should you be unable to connect to a particular station, please note
that some radio stations do not broadcast 24 hours per day, and some
stations are not always on-line.
GB
16
Page 18
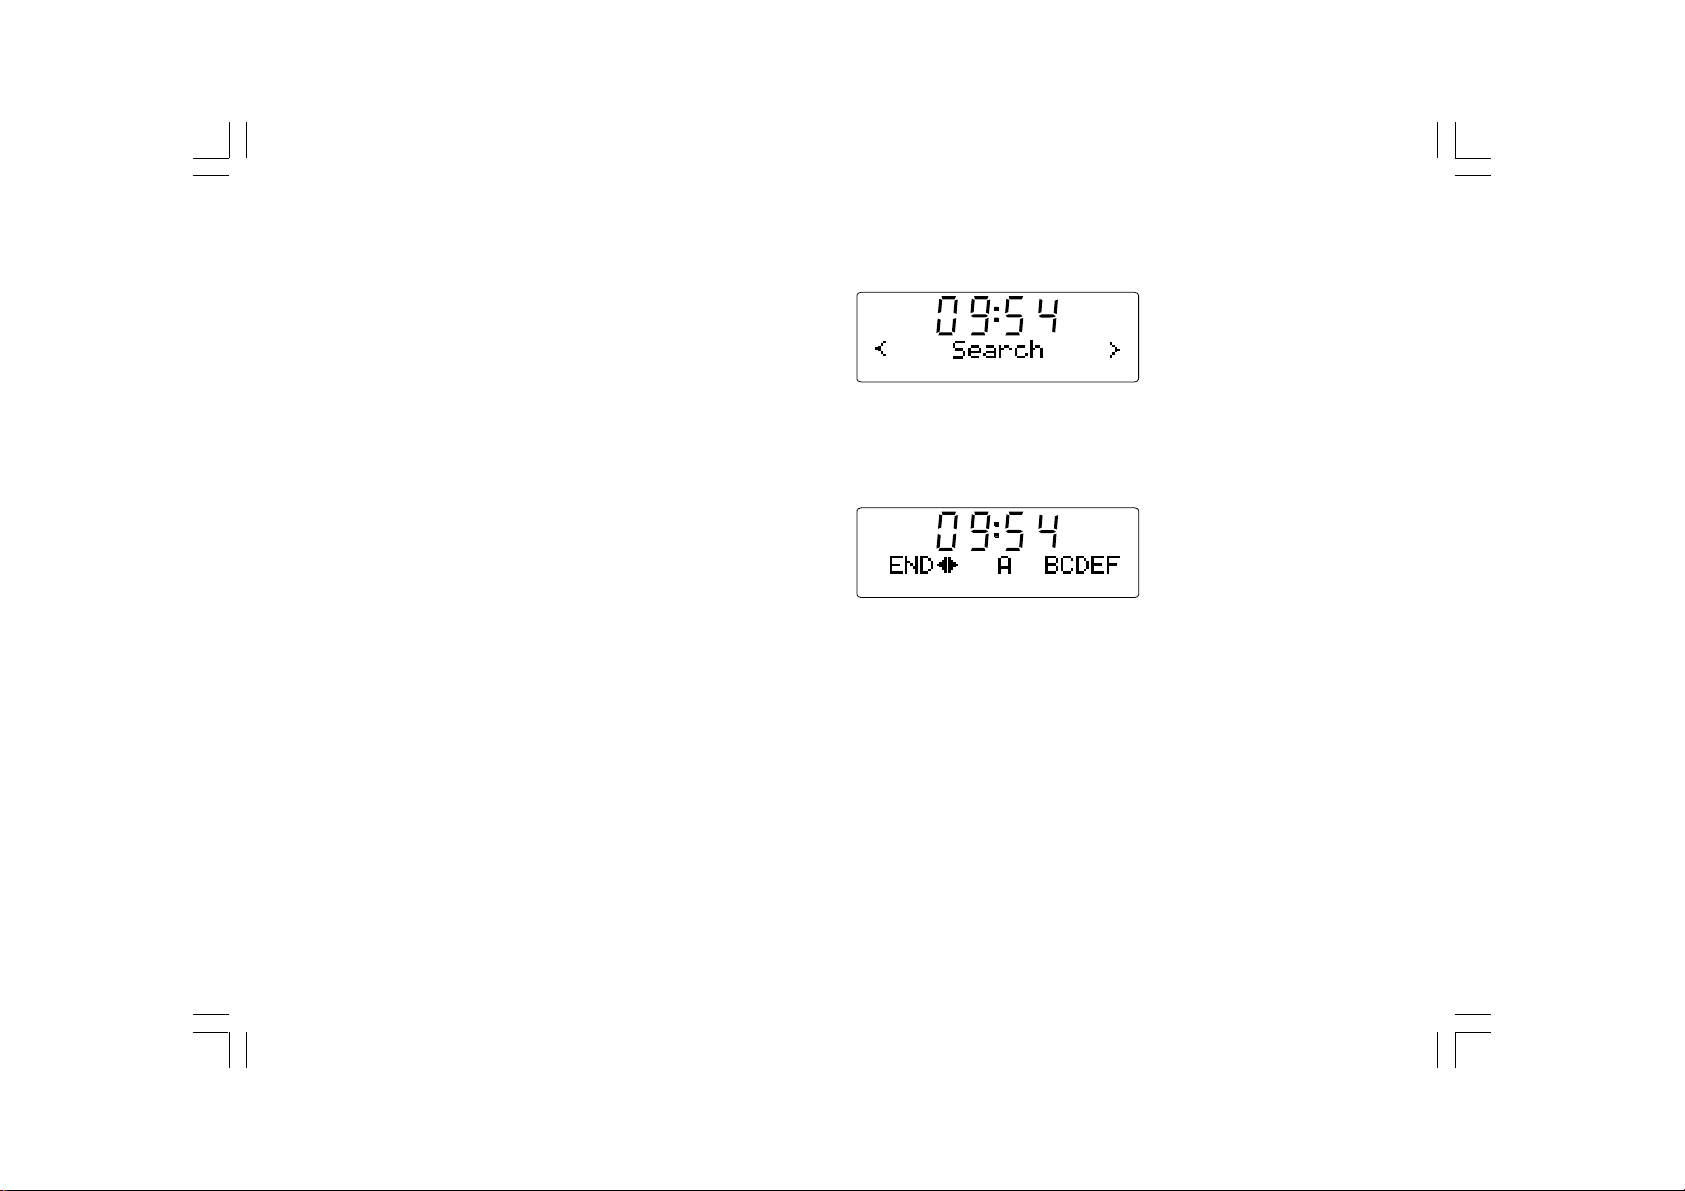
Selecting an Internet radio station by Search
1. Press the Tuning+/- buttons until the display shows <Search>,
and then press the Select button to enter the Search.
2. Use the Tuning+/- button and the Select button to enter the key word
of the radio station na me you would like to search. If there is an error,
press the Back button to backspace your input.
3. When you finish the key word, press the Tuning+/- button to find the
word “END”. And then press the Select button.
4. In a moment, the radio will show all the radio stations related to
your search.
5. Press the Tuning+/- buttons to find the radio station you would like
to choose, then press the Select button, and the radio will connect to
the radio station you choose.
* Should you be unable to connect to a particular station, please note
that some radio stations do not broadcast 24 hours per day, and some
stations are not always on-line.
17
Page 19

V olume control
While the radio station is playing, you can change the volume by
pressing V olume+/- buttons on the top panel.
Internet radio station pre set
Storing an Internet radio station in a preset
There are 5 memory presets available.
Audio setting (tone control)
Y our radio has bass and treble characteristics of the sound can be
adjusted to your personal ta ste.
1. Long press (press and hold) the Sele ct button (the blue button) until
the display shows “ < off > ”.
2. If adjusting selecting ba ss (or treble), press Tuning +/- buttons until
‘’Bass” (or “T reble”) is shown. Then press the Select/Tone button and
the display will show the current Bass (or treble) level.
3. Press the Tuning+ or Tuning – button to adjust the desired level
(between -7 and +7 for base; +5 ~ -5 for treble) and press the Select
button to confirm selection.
4. Under this catalog, except for base and treble, there is <Flat>.
When Flat is selected, treble and base will be set to zero, and the
display will show “Equalization level rest”.
1. Select the required station as previously de scribed.
2. When the radio is playing, press and hold 1 of the 5 preset buttons
that you wish you store. The station will be stored under this
chosen preset.
3. Repeat this procedure for a ny other preset memories that you wish
to configure.
Recalling an preset Internet radio station
When the radio is playing, press 1 of the 5 preset buttons that you wish
to recall. The radio will connect to the station stored in preset memory.
Note:
If you have not previously stored a radio station in the selected preset,
your current radio station will continue to play.
GB
18
Page 20

Listening to previously broadca st material
Some radio stations allow you listen to progra ms that have alrea dy
been broadcast. When you select a radio station that has this facility,
the station does not start playing immediately, but instead the display
shows the options ‘Live’ and ‘On dema nd’.
1. Press the Tuning+/- buttons a nd it will show ‘Live’ or ‘On Demand’.
2. Press the Select button to select:
‘Live’ - plays the current output from the station as normal.
‘On Demand’ - lets you listen to previous broadcasts.
The options will depend on the station you have chosen.
7. To listen from the beginning of the program, press the Select
button again. Alternatively, choose the required start time to start
the program playing.
Fa st-forward / Rewind broa dca sts
Stations which enable you to listen to previously broadcast program
also allow you to fast-forward and rewind to any point within the progra m.
1. When the display shows 00:00:00 , Press the Fast-Forward or
the Rewind button on the top panel of the radio to program the
starting time. It is in 30 second increments.
3. When you choose ‘On Demand’, the display shows the names of the
programs availa ble.
4. Again, use the Tuning+/- and the Select button to select the program
that you wish to listen.
5. When you have chosen the progra m you want to listen to, either it will
start to play, or the display may show a list of days for you to
choose from, or it may show you a playback start time of 00:00.
Note that this is not the time that the original broadcast took place.
It is the time after the start of the progra m from which the radio will
start playing. If a start time is displayed, skip to step 7.
6. Use the Tuning+/- and the Select button to select the day the
program was broadcast. The display will then show a program start
time of 00:00:00.
19
2. When the required time into the program is reached, press the
Select button. and the program will resume from that point.
Play / Pause function
When listening to previously broadca st material, it is possible to
temporarily pause the program if needed.
To pause playback press the Play / Pause button on the remote control.
To resume playback press the Play / Pause button again.
Page 21

Customizing your radio on website
In addition to storing your favorite radio stations in the radio presets,
your radio allows you to create a customized list of stations which can
appe ar in a special menu on the radio called ‘My Stuff’.
Y our radio use s Internet Radio has been programmed by a
British company, Reciva Limited. Reciva allow you to register your radio
on their web site, and then to associate a choice of radio stations with
your radio. These stations ca n be selected from the large selection
already listed. Additionally, if you find a radio station that is not listed
then you may also add the Internet address (URL) of the station’s audio
stream to your selection.
Configure My Stations
1. Using Reciva’s website at http://www.reciva.com, it is possible
to search for radio stations that are available in Reciva’s
stations database. Whenever stations are searched for on
the website, they will be displayed in a list of search results
together with a link to Add to My Stations.
2. Clicking on the Add to My Stations link, will add the station to your
account’s My Stations list. This list can be edited by clicking on My
Stations under the My Account section on the website.
Registering an account on Reciva’s website
1. Open the website, http://www.reciva.com, using the Internet browser
on your computer. Click on the ‘My Account’ link and follow the
on-screen instructions to register an account. Plea se note, during the
registration process, a validation code will be sent to you via email.
Please enter this code when prompted to do so.
2. After logging into your account, you will be able to edit your
information for ‘My Stations’, ‘My Streams’, ‘My Details’ and
‘My Radios’ from the ‘My Account’ section.
3. You can now add your Internet Radio to your account on the website
by accessing the ‘My Radios’ link. From the ‘My Radios’ section,
you will need to enter in your radio’s eight-digit serial number,
which can be found from the “ Setting > Version>Serial Number ”
menu on the radio, and you will also need to enter in your ra dio’s
registration code - which can be found from the ‘Setting > Version>’
menu on the radio.
3. Once you have Internet stations available in your My Stations list,
you may play these stations from your Internet Radio.
These stations will be available on your radio from the menu item:
‘My Stuff > My Stations’.
Please note, the My Stuff menu item and your personal selection of
radio stations (My Stations) will only be available on your radio once
your radio has downloaded a new radio stations list. To cause the radio
to download a new list of stations immediately, please remove and
reconnect the power to your radio.
If a radio station is not listed
If you want to listen to a particular ra dio station which is currently not
listed in your radio or on Reciva’s web site, you ca n enter a request for
them to add the radio station to their data base.
GB
20
Page 22

Configure My Streams
1. Once logged into your Reciva website account, you can add your own
Internet radio streams to the My Streams section, which is listed
under the My Account section. Typically, these will be Internet radio
stations that you will have found using your computer.
2. Clicking on My Streams will prompt you to enter the station’s name
and its media stream URL. The media stream URL should be a link
to a website’s actual audio stream. If you have any doubt about
locating the media stream URL from a webpage, then plea se refer
to the FAQs section on Reciva’s website, http://www.reciva.com.
3. Once you have Internet radio strea ms availa ble in your My
Streams list, you may play these stations from your Internet Radio.
These stations will be available on your radio from the menu item:
‘My Stuff > My Streams’.
Please note, the My Stuff menu item and your personal selection of
radio strea ms (My Stre ams) will only be available on your radio once
your radio has downloa ded a new radio stations list. To cause the radio
to download a new list of stations immediately, please remove and
reconnect the power to your radio.
Media Player
The Media Player allows you to play audio files which are stored on a
computer on your network, or USB and SD card. Supported file f ormats
are MP3 and WMA (Even the Internet radio supports MP3, WMA,
AAC, Real Audio). Note that the playback of DRM protected content is
not supported.
When using Windows Shares, music selection is by Artist, by Album
and optionally by track within an Album. When using a UPnP server,
the search and selection criteri a are determined by the server,
but typically include additional options such as Genre. Many server
applications also allow you to access files according to the folders
within which they are stored.
Note that the references to ‘PC’ in this section refer to any computer
device that may be sharing content on your network, whether it is a
Windows device, an Apple computer, a Linux device, or any other.
We use the generic term ‘PC’ simply because it is short
and convenient.
21
Page 23

Window Shares
Set up the PC to allow your radio to access your audio files via
Window Shares (make the music file shared)
1. Plea se ensure that your PC is availa ble on the same network as your
Internet radio. Using Windows Explorer, locate the folder where your
audio files are stored.
2. Right click on the folder.
3. Select ‘Properties’.
4. Click on ‘Sharing’.
5. Select ‘Share this folder on the network’ and ‘Allow network users to
change my files’.
Please note, do not try to make your ‘My Documents’ or any of its
sub-folders (e.g. ‘My Music’) shareable.
Some updated Window version may have different way of ma king the
file shared.
Locate the shared audio files using the radio
1. Use the Tuning+/- and the Select buttons to enter the menu direction
“Media Player> Windows Shares> Scan for PCs. If needed,
press the Back button.
2. The radio will now display “Finding PCs”. If a ny PCs are sharing
folders on the network they will be shown. When the search
is complete, use the Tuning+/- and the Select buttons to select
your PC. If your PC does not appear, check its file sharing and
firewall settings.
3. The radio will then search the selected PC for shared folders. If the
PC’s security settings require it, the radio may ask for a user name
and password. Enter these according to your PC’s settings.
4. Use the Tuning+/- and the Select buttons to choose the share folder.
The radio will display ‘File Scan…’ as it scans through the media files
in the shared folder. If you have a large number of audio files this
could take several minutes to complete.
5. Once the radio has finished scanning, it will display “By Album”,
“By Artist”, etc. Use the Tuning+/- buttons to scroll through the
scanned medi a files, which will now be organized ‘By Album’,
‘By Artist’ and ‘Playlists’ – if available.
And refer to “Operation after you set up for Window Shares ,
UPnP or USB/SD card” below for the operation.
GB
22
Page 24

UPnP server
Set up a Windows PC to allow the radio to access your audio files
via a UPnP server
1. If your PC is running Microsoft Windows XP or Windows Vista then
you can use Microsoft’s Windows Media Player 11 (WMP 11) to act
as your UPnP (Universal Plug and Play) media server. If not already
installed on your PC, Windows Media Player 11 may be downloaded
from Microsoft’s website and installed by following the in struction s
detailed in its installation wizard, or by using Microsoft’s Windows
Update facility.
2. Once installed, WMP 11 can create a library from all the media f iles
available to it on your PC. To add new media files to the library,
select ‘File > Add to Library… > Advanced Options’, click ‘Add’ and
choose the files you wish to add and click ‘OK’.
Y ou will now need to connect your Internet ra dio to Windows Medi a
Player 11 and configure it to allow the radio to access your media
library. In order to this, you will need to follow these next steps.
Connecting the radio using UPnP
1. Use the Tuning+/- and the Select buttons to enter the menu direction
“Media Player> UPNP Servers”.
If needed, press the Back button.
Note, this may take a few seconds for the radio to complete its scan
and before the scan has completed, the ra dio will display
‘No PC Found’. The radio will continue to display “No PC Found” if no
UPnP servers are found.
2. After scanning, select your UPnP server (press the Tuning+/- and the
Select button if more than one UPnP server is f ound), and then press
the Select control. Your radio will normally display ‘Access Denied’
at this stage.
3. Your PC may now prompt you that a device has attempted to
connect to your UPnP server. Whether you are prompted or not,
in order to allow the radio to have access to the media files, you will
need to click the ‘Library’ tab in WMP 11 and select the
‘Media Sharing…’ item to open the ‘Media Sharing’ window.
4. From the ‘Media Sharing’ window, the radio will be listed as an
unknown device. Click on the unknown device shown to select it,
then click the ‘Allow’ button and then click ‘OK’.
23
Note:
If you are using Microsoft Windows’ firewall software, this should be
correctly configured by WMP 11. If you are using third party firewall
software you may need to manually configure it to allow your radio a nd
WMP 11 to communicate.
Page 25

5. Select the named server again using the Tuning+/- and the
Select buttons. If WMP 11 is now able to communicate with your
radio you will be presented with some media selection options by
the server software.
Note:
In UPnP mode the search criteria offered a nd the f ile type s ma de
available to the radio are a function of the UPnP server software
installed on your PC.
Locating and playing media files when using UPnP
Once the UPnP server has been conf igured to share media f iles with
your Internet radio, you select the files that you wish to play as follows:
1. Turn on your radio and to access the menu dire ction “ Media Player >
UPnP Servers “. If needed, press the Back button.
2. Press the Select button and the radio will scan for all available
UPnP servers. Note that it may take a few seconds for the radio to
complete its scan, a nd that before the scan has completed the radio
may display ‘Empty’. The radio will continue to display ‘Empty’ if no
UPnP servers are found.
3. After a successful scan, press the Tuning+/- buttons to highlight your
UPnP server and then press the Select button.
4. The radio will now list the media categories which are made available
by the UPnP server - for example, “Music” and “Playlists”.
Press the Tuning+/- and the Select button to make your choice on
the category.
5. Use the same way to make your choice. For example, you could
select “Music” and then select “Albums”.
6. Use the same way to make the choice on the media files that you
wish to play.
Do not worry if not all of your media appear in the menus immediately.
Windows Media Player needs to look inside each file to identify the
artist, album and tra ck information from ‘tags’ embedded in each file.
Additionally, Windows Media Player may take time to access the
Internet to obtain additional information such as ‘album art’ which it can
display when you examine your music library on your PC.
7. The radio will display “Add to Queue”. Press the Select button a nd
the radio will add all the tracks in the album to its queue and begin
playing them automatically.
And refer to “Operation after you set up for Window Shares,
UPnP or USB/SD card” below for the operation.
GB
24
Page 26
USB and SD — Local Media operation
(For RCR-7 only)
1. Turn on the radio by pressing the Power button.
2. Slot in an audio USB or SD card on the side of the radio. And refer to
“Operation after you set up for Window Shares, UPnP or
USB/SD card” below for the operation.
Note:
1. When USB and SD card are slotted into the radio together,
Local Media will combine all the music as one.
2. When Slot in or un-slot either USB or SD card while the music
is playing, the radio will stop playing.
3. Fast f orward and rewind functions don’t work in Local Media.
25
Page 27

Operation after you set up for Window Shares,
UPnP or USB/SD card
Whether you access your file s using Windows Shares, UPnP or USB
and SD card, the file selection mechanisms are the same. The only
difference is that when using UPnP you will generally have a wider
choice of search criteria, as determined by the UPnP server software on
your computer. Some third party server applications allow customization
of the search criteria and indexing methods, which can be useful if you
have a very large collection of stored music files.
The selection mechanism allows you to se arch by a given inf ormation
type (Album, Artist, etc.) and then to narrow the search, either just to
an album or to a particular track within an album. The selected album or
track is then added to a queue of tracks to be played. You can add more
albums or tracks to the queue while music is playing, or you can jump
between tracks in the queue. You can also clear the queue if you wish
to make a fresh selection. The se arches described here are examples
of the possibilities available.
Listening to a complete album
1. Now the radio is under either <Windows Shares> or <UPnP> or
<Local Media> under <Media Player>.
2. Press the Tuning+/- buttons until <By Artist>. And the press the
Select button.
3. Press the Tuning+/- buttons until the required artist is shown on
the display. Press the Select button.
4. Press the T uning+/- button s until the album name is shown on
the display. Press the Select button.
“<[Add to Queue]>” will be shown on the display.
5. Press the Select button. The album will begin playing and all of the
tracks in the album will be stored in the queue.
Queuing up albums for playback later
While the Media Player is playing, you may add additional albums or
tracks to the medi a queue.
1. Press the Tuning+/- buttons (with the Back button as needed) to
search for the required album.
2. Press the Select button to choose the album.
3. Press the Tuning+/- buttons until the display shows
“<[Add to Queue]>” and then press the Select button. “Tracks Added
to Queue” will be displayed. And the album is a dded to Queue.
GB
26
Page 28

Queuing up tracks for playback later
1. If you wish to add only particular tracks from an album to the queue,
first choose the album as described.
Browsing the list of tracks currently queued up for playback
1. Press the Queue button, the currently playing track name will
be displayed.
2. Press the Tuning+/- button to search f or the required track, and then
press the Select button.
3. Press the Select button. “Track Added To Queue” will show on
the display. And the track is added to Queue.
Controlling playback
1. When the music is playing, press the Play / Pause button to pause
the playback of the current track. If you press the button again,
playback will resume from the beginning of the same track.
2. Press the Rewind button to start playback of the previous track in
the queue.
3. Press the Fast-f orward button to start playback of the next track in
the queue.
2. Press the Tuning+/- buttons to see which tracks are queued up
for playback. If you want to jump to a particular track in the queue,
press the Select button when the required track is displayed.
Playback will then continue from the beginning of that track.
Clearing the media player queue
1. Under the main menu (if needed, press the Back button), press the
Tuning+/- button until “<Media Player>” is shown. And then press
the Select button.
2. Press the Tuning+/- buttons until “<Clear Queue>” is displayed.
3. Press the Select button and the display will then show
“Queue cleared” and all tracks will be erased from the media queue.
27
Page 29

Playing tracks in the queue repeatedly
1. When the radio is playing, press the Back button to go back to the
main Mode menu.
Playing tracks in random (Shuffle) order
1. When the radio is playing, press the Back button to go back to the
main Mode menu.
2. Press the Tuning+/- buttons until “Media Player” is shown on the
display then press the Select button to enter the Media Player menu.
3. Press the Tuning+/- buttons until “Playback Mode” is displayed then
press the Select button.
4. Press the Tuning+/- buttons until “Repeat” is shown.
Press the Select button. The display will show “Enable” with a
YES/NO option.
5. Press the Tuning+/- buttons to select ‘YES’, then press the
Select button to confirm that Repeat mode should be enabled.
If you do not wish to enable Repeat mode select ‘NO’.
If Repeat mode has previously been ena bled, then the display will show
‘Disable’ with a YES/NO option after step 4. Select ‘YES’ to cancel
Repeat mode.
2. Press the Tuning+/- buttons until “Media Player” is shown on the
display then press the Select button to enter the Media Player menu.
3. Press the T uning+/- button s until “Playback Mode” is displayed then
press the Select button.
4. Press the Tuning+/- buttons until “Shuffle” is shown.
Press the Select button. The display will show “Enable” with a
YES/NO option.
5. Press the Tuning+/- buttons to select ‘YES’, then press the
Select button to confirm that Shuffle mode should be enabled.
If you do not wish to enable Shuffle mode select ‘NO’.
If Shuffle mode ha s previously been ena bled, then the display will show
‘Disable’ with a YES/NO option after step 4. Select ‘YES’ to cancel
Shuffle mode.
GB
28
Page 30

FM Radio
To listen to the FM radio
1. Turn on the radio by press the Power button.
2. Press the Band button until the display shows <FM>.
To change FM stations
1. Press the Tuning+/- buttons to change the frequency.
2. Long press the Tuning+/- buttons to search for the next available
radio station.
Storing a FM radio station in a preset
There are 5 memory presets available.
1. Select the required station as previously described.
2. When the radio is playing, press and hold 1 of the 5 preset buttons
that you wish you store. The station will be stored under this
chosen preset.
FM RDS
The Radio Data System (R DS) is a system in which inaudible digital
information in addition to the normal FM radio program is transmitted.
Also the RDS radio station corrects the real time when it provides
this service.
The information display is only available when the station provides
R.D.S. service.
Press the REPL Y/RDS button, to cycle through the various modes,
and wait for 2 seconds to see the inf ormation. The information in the
various modes are
1. Frequency: Displays frequency of the station.
2. Program Service: Displays name of station.
3. Radio Text : Displays ratio text messages such as news items etc.
4. Program Type: Displays the program type.
29
3. Repeat this procedure for any other preset me mories that you wish
to configure.
Recalling an preset Internet radio station
When the radio is playing, press 1 of the 5 preset buttons that you wish
to recall. The radio will connect to the station stored in preset memory.
Note:
If you have not previously stored a radio station in the selected preset,
your current radio station will continue to play.
Page 31

Auxiliary input socket
Y our radio has a 3.5mm stereo jack socket for connection to external
audio sources. This can be configured to two sensitivity levels to suit
the output level of the connected device.
1. Connect an external audio source, such as an MP3 or CD player to
the Aux In socket on the back of the radio.
2. Turn on the radio and press the Band button on the front of the radio
until the display shows <Auxiliary Input>.
3. Now the radio will play the external audio source s.
Clock Setting
Setting the clock time
1. Long press Tine Set button until “Set Time/Date” is shown on
the display. (If it is not on the display, press Tuning+/- buttons until
“Set Time/Date ” is shown).
2. Press Select button and then press Tuning+/- buttons to set
the hour.
3. Press Select button and then press Tuning+/- buttons to set
the minute.
4. Press Select button and then press Tuning+/- buttons to set
the date, month and year.
5. Press Select button to finish the setting.
Setting the clock format
The clock display can be set to 12 or 24 hour format. The selected
format is then also used when setting the alarms.
1. Long press the Tine Set button until <Set Time/Date> is shown on
the display.
2. Press Tuning+/- buttons until <Clock Format> is shown.
GB
3. Press Select button and then press Tuning+/- buttons to select 12 or
24 hour.
4. Press Select button to confirm the setting.
30
Page 32

DST(Auto time set by Internet)
This is the function that real time set by Internet
These are options available:
Auto(US) – Sets your radio to the US time
Auto(EU) – Sets your radio to the EU time
None – Disable the auto ti me set
Manual – ma nually set up
1. Press the Power button to switch on your radio.
Setting the alarm clock
Y our radio has 2 separate alarms which can be set to wake you to either
FM radio, buzzer , Aux In, or Internet Radio. Each alarm can be set to
sound either once, everyday, weekly, weekdays or at weekends. In the
event of a power interruption your radio ha s built in memory chi p that
will retain your alarm settings.
Note: If no buttons are pressed for 10 seconds the radio will exit the
alarm setup. If you make a mista ke at any point, press the Back button
to go back to the previous screen.
2. Press the tuning+/- button until the display shows <Setting>.
Press the Select button to enter the configure settings.
3. Press the tuning+/- button until the display shows <Clock Setup>.
Press the Select button to enter the clock setup menu.
4. Press the tuning+/- button until the display shows <DST>. Press the
Select button to enter it, then you will be able to set the DST.
* Go to the direction of Setting > Clock Setup > Local Time Zone,
to forward or backward 30 mins/step to set up your time difference
from the DST provided by Internet.
31
1. Long Press Alarm1 (or Alarm2) button until it shows “Enable Alarm”,
YES/NO selection.
2. Press the Tuning+/- buttons and the Select buttons to select “YES”.
And the display will show “ Set Alarm”.
3. Press the Tuning+/- buttons to set the hour, then press the
Set button.
4. Press the Tuning+/- buttons to set the minute, then press the
Set button.
Page 33

5. Press the Tuning+/- buttons to set whether the alarm is for once,
everyday, weekly, weekdays or at weekends. Then press the
Set button.
Once - will sound at one time only
Everyday - will sound everyday.
Weekly - will sound once every week.
Weekdays - will sound on weekdays only.
Weekends - will sound on weekends only.
6. Press the Tuning+/- buttons to set whether the Alarm will sound with
FM radio, buzzer, Aux In, or Internet Radio.
When the Alarm sound is set for FM radio or Internet Radio, the lat
played station will be turned on to be the sounding. When the Alarm
sound is set for Aux In, please make sure there is a sound source
playing and connecting to the Aux In of this radio.
7. Press the Select button to finish the setting.
When the alarm sounds
1. The radio alarm will sound at the selected times for up to 60 minutes
unless cancelled. The volume for the radio alarm will be the same
as the volume previously used when listening to the radio or
media player. If for any reason the radio cannot connect to the
requested radio station at the time that the alarm is due, the buzzer
alarm will be used instead.
2. The buzzer alarm sounds for 60 minutes a nd the volume will gradually
increase from a low level.
3. If a radio alarm sounds and the radio is already playing, the radio will
change to the station specified for the alarm.
Activate and deactivate alarms
1. When Alarm 1 is activated, “ ” is shown on the display, same as
Alarm 2.
2. When the mark “ ” is shown on the display, press the Alarm 1
button to deactivate the Alarm 1, and “ ” will disappear. Same as
Alarm 2.
3. To re-activate Alarm 1, press the button Alarm 1, and “ ”will be
shown on the display, also the Alarm 1 information will be shown
as well.
GB
32
Page 34

Sleep timer
Y our ra dio can be set to turn off after a preset time has elapsed.
The sleep setting can be adjusted between 15 a nd 3 hours 15 minute s
in 15-minute increments.
1. Make sure the radio is on and playing.
2. Press the Time Set button, and the display shows “Sleep Timeout”.
3. Press Tuning+/- buttons to set the required sleep time setting is
selected between 15 and 3 hours 15 minutes or to Off.
4. Press the Set button to confirm the setting. The display will show
‘Zzz’. Your radio will switch off after the preset time has elapsed.
5. To cancel the sleep time before the preset time has elapsed,
just press the Power button to turn off the radio.
Nap timer
It is a countdown alarm which will sound after the time period that
you set. And the time period can be set from 10 to 1 hour 30 minutes in
10 minutes steps.
1. Touch the NAP key button the required time period is shown on
the display.
2. Press the Tuning+/- buttons to select the countdown alarm time.
3. Press the Select button to set the Nap timer. And the “ ” mark
is shown on the display.
4. While the Nap timer is alarming, press the Power button to make
it silent.
5. To cancel the Nap timer before the time Nap time is elapsed,
press the NAP button, and long press it again until the mark “ ”
is disappeared on the display.
33
Page 35

Backlight
Press the Dimmer button to adjust the display backlight settings to suit
your needs.
Separate settings are available for Active mode (while operating
the radio), Inactive mode (when listening), a nd Standby mode (when the
radio is off with just the clock display showing).
Network configuration (For RCR-7 only)
This menu enables you to configure your radio’s network settings,
scan for a connection to an alternative wireless network, or to
manually configure the network parameters. This can be useful if you
take the Internet radio to another location where there is a different
network setup.
Language selection
This facility allows you to cha nge the display language for the menus.
1. Press the Tuning+/- buttons until it shows “Setting”, and then press
the Select button.
2. Press the Tuning+/- buttons until it shows “La nguage”, and then
press the Select button.
3. Press the Tuning+/- buttons until it shows the language you would
like to select, and then press the Select button.
Software version display
The software version display is provided for your reference only.
1. Press the Tuning+/- buttons until it shows “Setting”, and then press
the Select button.
2. Press the Tuning+/- buttons until it shows “Version”, and then press
the Select button.
3. The display will show the version of the software.
4. Use the Back button to exit.
Configuring the radio only to use a wired Ethernet connection
(For RCR-7 only)
1. Turn on the radio, and press the Tuning+/- button until the display
shows <Setting>. (If necessary, press the Back button). Then press
the Select button.
2. Press the Tuning+/- buttons until it shows <Network Config>.
Then press the Select button.
3. Press the Tuning+/- buttons until it shows <Wired/Wireless>.
Then press the Select button.
4. Press the Tuning+/- buttons until it shows <Wired Only>.
Then press the Select button. And it will allow cause the radio to
restart and then to use only its Ethernet connection to communicate
with the network. The radio will also disable its wireless network
capabilities. This will require your radio to be physically connected
to a wired Ethernet using the RJ-45 socket on the rear panel.
GB
34
Page 36

Configuring the radio to use either an Ethernet or a
Wi-Fi connection
1. Turn on the radio, and press the Tuning+/- button until the display
shows <Setting>. (If necessary, press the Back button).
Then press the Select button.
2. Press the Tuning+/- buttons until it shows <Network Config>.
Then press the Select button.
3. Press the Tuning+/- buttons until it shows <Auto>. Then press the
Select button.
It will then attempt to establish an Ethernet connection to
the network. If no Ethernet connection is available the radio will
attempt to establish a Wi-Fi connection to the network.
Having established a particular type of connection to the network,
this connection will remain in use while the radio is on.
The Network Configuration menu also allows you to choose whether or
not the Internet radio displays a warning message when the Wi-Fi
signal strength is low. You can enable this feature by selecting
<Signal Warning> and then selecting “Y e s”.
Configuring the radio only to use a Wi-Fi connection
1. Turn on the radio, and press the Tuning+/- button until the display
shows <Setting>. (If necessary, press the Back button).
Then press the Select button.
2. Press the Tuning+/- buttons until it shows <Network Config>.
Then press the Select button.
3. Press the Tuning+/- buttons until it shows <Wired/Wireless>.
Then press the Select button.
4. Press the Tuning+/- buttons until it shows <Wireless Only>.
Then press the Select button. And it will allow cause the radio to
restart and then to use only its WiFi connection to communicate with
the network. The radio will also disable its wired network capabilities.
Selecting the ‘Wireless Only’ option will allow cause the radio to
restart and then only to use only its Wi-Fi connection to communicate
with the network. The radio will also disable its Ethernet connection.
35
Page 37

Troubleshooting
If you have difficulty connecting the radio to your wireless network,
some of these steps may help to resolve the problem:
1. Confirm that a Wi-Fi connected PC can access the Internet
(i.e. can browse the web) using the same network.
2. Check that a DHCP server is available, or that you have configured a
static IP address on the radio. You can configure a static IP address
on the radio using the menu item “ Setting -> Network Config ->
Edit Config” , and then select ‘No’ f or ‘Auto (DHCP)’.
(by pressing the Tuning+/- and the Select buttons)
5. If you have an encrypted network, check that you have entered the
correct key or pa ss-phrase into the radio. Remember that text-format
WPA keys are case sensitive. If your radio displays ‘Wireless error’
when attempting to connect to an encrypted network f ollowed by a
5-digit number, then please ensure that you enter the correct
pass-phrase for the network. If the problem persists, then you may
need to consult your network configuration.
If your radio can connect to the network successfully, but is unable to
play particular stations, it may be due to one of the following causes:
1. The station is not broadcasting at this time of the day
(remember it may be located in a different time zone).
3. Check that your network’s firewall is not blocking any outgoing ports.
As a minimum, the radio needs access to UDPand TCPports 80,
554, 1755, 5000 and 7070. The use of Windows Shares require s
access to UDP and TCP ports 135 - 139 and 445. Windows Media
Player 11 will allocate a port number for UPnP media sharing and
will configure Microsoft’s Windows built-in firewall appropriately.
Other firewall software may require configuration for UPnP or to
allow particular IP addresses to have trusted access.
4. Check that your access point does not restrict connections to
particular MAC addresses. You can view the radio’s MAC address
using the menu item “ Setting -> Network Config -> View Config ->
MAC address” . Note that the radio has both wired and wireless
MAC addresses.
2. The station ha s re ached the maximum allowed number of
simultaneous listeners.
3. The Internet connection between your radio a nd the server
(often located in a different country) is slow.
4. The station is not broadcasting any more.
5. The link to the audio stream used by the radio is out of date.
6. The radio station is broadcasting using an audio format which is not
playable by your radio (although your radio does play almost all
formats used by regular broadcasters).
Try using a PC to play back the stream via the broa dcaster’s web site.
If you can play back the station with a PC, use the form at
http://www. reciva.com to notify Reciva so that they can update the
station data that is used by the radio.
GB
36
Page 38

Factory reset
If you wish to completely reset your radio to its initial state this may
be performed by following this procedure.
1. Press the Tuning+/- buttons on the main menu (Pre ss the Back
button if necessary), until it shows <Setting>.
2. Press the Back button.
3. Press the Tuning+/- buttons until it shows <Factory Reset>.
And then press the Select button.
4. The display will show “Are you sure?” Press the Tuning+/- buttons to
select “YES”. And then press the Select button. Now the radio is
factory reset.
Upgrade firmware
From time to time, new software features for your radio may be
developed. For example, a new audio de coder may be added to allow
an alternative audio format to be supported. You radio has therefore
been designed to allow its internal software to be upgraded using your
Internet connection.
Upgrading the software will remove all network settings, radio station
presets and alarm settings from your radio. Do not attempt this
procedure unless you have a good Internet connection and a relia ble
mains power supply. If you connect to your router using a Wi-Fi
connection, make sure that this is also reli able before proceeding.
The Upgrade Firmware option allows your radio to download new
internal software from the Reciva portal on the Internet. If there is
new software available, then the radio will ask whether you want to
download it or not. Selecting No or using the Back button will cancel
the operation.
1. On the main menu (press the Back button if necessary), Press the
Tuning+/- buttons until it shows < Setting >. And then press the
Select button.
2. Press the Tuning+/- buttons until it shows <Upgrade Firmware>,
and then press the Select button.
3. If there is a new software different from the software your
radio installed, you will be able to upgrade the software.
Or it will show “No upgrade available”.
A software upgrade may take several minutes.
IMPORT ANT:
Do not switch off the power to the radio until the upgrade operation is
complete and the radio has restarted, otherwise the radio may become
permanently da maged.
37
Page 39

Headphone socket
1. A 3.5mm Headphone Socket located on the rear of your radio is
provided for use with headphones. Inserting a plug automatically
mutes the internal loudspeaker.
IMPORT ANT:
Excessive sound pressure from earphones a nd hea dphones ca n cause
hearing loss.
Line out socket (3.5mm Jack)
A 3.5mm Line Out socket located on the rear of your radio is provided
for connecting the audio signal to a n external amplifier. Inserting an
audio cable into this socket will not mute the internal loudspeaker.
Set the volume control on the radio to minimum if desired.
Specifications
Power AC 100 ~ 240 volts, 50 ~ 60 Hz.
Connectivity Wired Ethernet Wi-Fi 10/100M bits/sec via RJ-45 802.11b
and 802.1 1g supported WEP and WPA encryption supported
Notice:
The changes or modif ications not expre ssly approved by the party
responsible for compliance could void the user’s authority to operate
the equipment.
GB
38
Page 40

If at any time in the future you should need to dispose of this product please note that: Waste electrical products should not
be disposed of with household waste. Please recycle where facilities exist. Check with your Local Authority or retailer for
recycling advice. (Waste Electrical and Electronic Equipment Directive)
394041
Page 41

Page 42

Sommaire
CONSIGNES DE SECURITE IMPORTANTES ......... 42-44
Commandes .................................................................... 45-48
Avant de pouvoir utiliser ce produit .................................... 49
Connexion de la radio au rése au ........................................ 50
Présentation des commande s ............................................ 53
Sélection de stations ra dio Internet .................................... 54
Réglage du volume .............................................................. 58
Paramètres audio (réglage du son) .................................... 58
Présélection de stations radio Internet ............................... 58
Ecouter des programm es déjà diffusés ............................. 59
Personnalisez votre radio sur le site Internet .................... 60
Lecteur média ........................................................................ 61
Partages Windows ................................................................ 62
Serveur UpnP ....................................................................... 63
Lecture de contenu local USB et SD
(pour RCR-7 seulement) ..................................................... 65
Après avoir configuré Partages Windows,
Réglage de l’horloge ............................................................ 70
Rétro éclairage ...................................................................... 74
Configuration du réseau (pour RCR-7 seulement) .......... 74
Dépann age ............................................................................ 76
Réinitialisation d’usine ......................................................... 77
Mise à jour logicielle ............................................................ 77
Connecteur écouteurs .......................................................... 78
Connecteur Line out (connecteur 3.5 mm) ........................ 78
Spécifications ........................................................................ 78
UpnP ou USB/SD ................................................................. 66
Radio FM ............................................................................... 69
Connecteur d’entrée auxiliaire ............................................ 70
Page 43

Consigne s de sécurité importa ntes
1. Lire et comprendre toutes les consignes de sécurité et d’utilisation
avant d’allumer l’appareil.
2. Les consignes de sécurités doivent êtres conservées pour une
éventuelle consultation ultérieure.
3. Toutes les consignes d’utilisation et avertissements concernant
l’appareil devraient être s suivies.
4. Suivre toutes les consignes et instructions d’utilisation.
5. utilisez seulement les pièces/a ccessoires spécifiées par le fabricant.
6. utilisez seulement un chiffon doux et sec pour nettoyer le boîtier
externe de la radio.
9. N’exposez pas ce produit à des éclaboussures et égouttements.
Les objets contenant des liquides, tels que les vases ou verres,
ne doivent pas être posés sur l’unité.
10. N’in stallez pas cet appareil près de sources de chaleur telles
qu’un radiateur , conduit d’air chaud, poêle ou autres appareils
(en incluant les amplificateurs) qui produisent de la chaleur.
11. Ne pas placer la radio sur un support instable, table, chariot etc.
La radio risquerait de tomber ce qui pourrait gravement
l’endommager.
12. Ne pas essayer d’entretenir l’appareil vous-même. Retirer le ca pot
vous exposerait à des tensions électriques dangereuses et annulera
la garantie. Adressez-vous à un réparateur qualifié.
7. Ventilation: Cette ra dio devrait être située de sorte que son
emplacement n’interfère pas avec sa propre ventilation. Exemple,
la radio ne doit pa s être utilisée sur un lit, sofa, couverture ou autre s
surfaces qui risqueraient de bloquer les orif ices de ventilation. Ne pas
placer l’appareil dans des endroits clos comme un coffre ce qui
réduirait le débit d’air nécessaire à sa propre ventilation.
Maintenez 10 cm d’espace à l’arrière de radio.
8. Eau et humidité: L’appare il ne doit pas être utilisé près de l’eau.
Ne pas utiliser près d’une baignoire, cuvette, évier, sous-sol humide,
piscine, etc.
AVERTISSEMENT ! n’exposez pas cette unité à la pluie
ou l’humidité.
13. Débrancher la radio du secteur avant nettoyage.
Employer seulement un tissu humide pour le nettoyage extérieur
de la radio.
14. Ne raccordez pas le cordon d’alimentation Ca à une prise de courant
CA mouillée. Assurez-vous que la prise de courant est sèche avant
et après utilisation.
F
15. Source d’énergie: La radio devrait être utilisée seulement avec la
source d’énergie indiquée sur l’étiquette de l’appareil. Si vous n’êtes
pas sûr du type d’alimentation dans votre habitation, consultez votre
revendeur ou la compagnie d’électricité.
42
Page 44

16. Cordon électrique: Le cordon électrique devrait être placé de
manière à ne pas marcher dessus, pincer ou placer des objets
sur celui-ci. Prêter une attention particulière au cordon électrique
et à la prise, surtout à la sortie de l’appare il. Débrancher l’appareil
en saisissant la prise et non pas le cordon lui-même. Utiliser la
radio seulement avec le type d’alimentation indiqué sur l’appareil.
Si vous n’êtes pas sûr de la source d’énergie présente à votre
domicile, consultez votre revendeur ou la compagnie d’électricité.
17. Ne désassemblez pas le dispositif de sécurité de la fiche de mise à
la terre ou de polarisation. Une prise polarisée possède deux
broches, une étant plus large que les deux autres. Une fiche de
mise à la terre dispose d’une troisième broche. Cette troisième
broche permet votre sécurité. Cette fiche s’adapte seule ment à une
prise de courant mise à la terre. Si la fiche fournie ne s’adapte pas
à votre prise de courant, consultez un électricien pour le
remplacement de la prise de courant obsolète.
18. Ne pas surcharger les prises murales ou les rallonges électriques.
Ceci peut avoir comme conséquence un risque d’incendies ou
d’électrocution. Ne jamais insérer d’objet d’aucune sorte dans la
radio ni dans les ouvertures.
19. la prise de courant doit se trouver près de la radio, et simple
d’accès durant un cas d’urgence, pour mettre la radio hors tension,
déconnectez la fiche du cordon de la prise de courant CA.
20. Insertion d’objets et de liquides-Ne jamais insérer d’objet d’aucune
sorte dans la radio ni dans les ouvertures. L’objet pourrait entrer en
contact avec des parties électrifiées et créer des surtensions,
chocs électriques ou des incendies. Ne renversez jamais de
liquides sur l’unité.
21. Débra nchez ce produit de la prise de courant puis contactez un
personnel qualifié dans les condition s suivantes :
Le cordon d’alimentation ou la prise est endommagé.
a.
un liquide a été renversé ou si un objet est tombé dan s l’appareil.
b.
La radio a été exposée à de la pluie ou à de l’eau.
c.
si l’appareil ne f onctionne pas normalement même en suivant les
d.
instructions d’utilisation.
L’appareil a subi une chute ou e st endommagé.
e.
La radio semble fonctionner de ma nière a normale ou vous
f.
remarquez un changement da ns son f onctionne ment.
22. En cas de f issures présentes sur l’écran LCD, ne le laissez pas
entrer en contact avec des liquides.
23. Les modifications non expressément a pprouvée s par la partie
responsable de la conformité peuvent annuler le droit de l’utilisateur
d’utiliser l’unité.
24. Pour se conformer aux exigences de conformité aux expositions
RF de la FCC, aucune modification de l’antenne ou de l’équipe ment
n’est permise. Toute modification apportée à l’antenne ou à
l’équipement peut se résulter par une exposition aux RF et annuler
le droit de l’utilisateur d’utiliser l’unité.
43
Page 45

25. INFORMATIONS FCC
La déclaration sur les interférences de fréquences radio de la Federal
Communication Commission inclut les points suivants:
Cet équipement a été testé et déclaré conforme aux limites des
appareils numériques de Classe B; en accord avec les règles de
la FCC, chapitre 15.
Ces limites ont pour objectif de fournir une protection raisonnable
contre les interférences nuisibles dan s une installation résidentielle.
Cet équipement génère, utilise et rayonne de l’énergie de fréquence
radio et peut nuire aux communications radio s’il n’e st pas installé et
utilisé en accord avec le mode d’e mploi. Cependant, il n’est pa s garanti
que des interférences surviendront dans une in stallation particulière.
Si l’équipement cause des interférences nuisibles à la réception radio
ou télévision, qui peuvent être localisées en allumant ou en éteigna n t
l’équipement, l’utilisateur est encouragé à corriger les interférences en
employant une ou plusieurs des mesures suivantes:
- Réorienter ou déplacer l’a ntenne de réception.
- Séparer davantage l’équipement et le récepteur.
- Connecter l’équipement à une prise de coura nt située sur un circuit
différent de celui du récepteur.
- Dema ndez assistance à un revendeur ou un technicien expérimenté
dans le domaine ra dio/TV.
L’utilisateur ne doit pas modifier cet équipe ment sans accord écrit
préalable de SANGEAN ELECTRONICS INC. Toute modification peut
annuler le droit de l’utilisateur d’utiliser cet équipement.
26. Une pression sonore excessive proven a nt des écouteurs peut
affecter votre ouïe.
Un paramètre plus élevé que l’égaliseur à une tension de signal de
la sortie vers les oreilles – et les écouteurs.
F
44
Page 46

Commande s
(Panneau ava nt)
1.
2.
3.
4.
5.
T ouche Alarm 1
T ouche Alarm 2
T ouche Nap
T ouche T i me Set/Sleep
T ouche Power
T ouche Band
6.
T ouche RDS
7.
T ouche Dimmer
8.
Ecran LCD
9.
45
Page 47

Commande s
(PANNEAU SUPERIEUR)
10.
T ouche T uning+/- et Snooze
11.
T ouche Ba ck
12.
T ouche Preset 1/Shuf fle/Répétition
13.
T ouche Pre set 2/Queue
14.
T ouche Preset 3/Ba ckward
T ouche Preset 4/Fast-Forward
15.
T ouche Preset 5/Play/Pause
16.
T ouches V olume Up/Down
17.
T ouche Select/Tone
18.
F
46
Page 48

Commande s
(Panneau arrière)
19.
20.
21.
22.
Antenne WiFi
Antenne FM
Connecteur d’alimentation
Connecteur Ecouteurs
Connecteur de sortie Line Out
23.
Connecteur d’entrée Aux In
24.
Connecteur RJ-45 (Ethernet)
25.
47
Page 49

Commande s
(Panneau latéral droit)
26. Connecteur USB (RCR-7 seulement) Emplacement pour carte mémoire SD
27.
(RCR-7 seulement)
F
48
Page 50

Ava nt de pouvoir utiliser ce produit
Avant d’utiliser cette radio Internet, vous devez être équi pé de la
manière suiva nte:
Une connexion Internet haut débit.
Un point d’accès sans fil (Wi-Fi) ou connexion filaire Ethernet
(10 ou 100 Mbits/sec avec connexion RJ45) relié à votre connexion
Internet haut débit, de préférence via un routeur . Dans la plupart des
cas un modem haut débit, le routeur ou point d’accès sans fil sera
un boîtier unique fourni par votre fournisseur d’a ccès Internet ou
acheté da ns une boutique d’inf ormatique.
Si votre réseau sans fil est configuré pour utiliser le cryptage
“Filaire Equivalent Privacy” (WEP) ou “Wi-Fi Protected Access”
(WPA) il vous sera nécessaire de connaître la clé de cryptage
de manière à ce que la radio Internet puisse communiquer avec
le réseau.
La Radio Internet fonctionne dan s un rayon de 10-20 mètres de
votre point d’accès sans fil. La portée dépend du type de bâtiment,
des réseaux wifi environnants et des sources d’interférence s possible s.
IMPORTANT:
Avant de continuer , assurez-vous que votre point d’accès sans fil ou
routeur est sous tension et qu’il marche parfaitement avec votre réseau
informatique existant (utilisez votre ordinateur pour vous en assurer).
Pour que cette partie de votre système fonctionne, vous devez lire
les instructions fournies avec votre point d’accès sans fil ou de
votre routeur.
49
Page 51

Connexion à un réseau
1. Installez votre radio sur une surface plane puis raccordez une
extrémité de l’adaptateur de courant au connecteur d’alimentation de
l’unité situé sur le panneau arrière de votre radio (marqué ) en vous
assurant que la fiche est fermement connectée.
2. Raccordez l’autre extrémité à une fiche de courant murale.
Il existe 2 manières de ra ccorder votre ra dio au rése au, avec un câble
ou sans fil:
Lorsque vous utilisez un réseau filaire (LAN)
(pour RCR-7WF seulement)
1. Branchez un câble Ethernet à la sortie RJ-45 située à l’arrière de
la radio. Si une connexion filaire est présente, la radio utilisera
celle-ci en préférence à une connexion sans fil.
Deux témoins lumineux figurent près du Conne cteur RJ-45. En cas
de problème avec votre connexion filaire, ceux-ci vous permettent
d’identifier la cause du problème.
Vert ON= connexion établie, clignotant = trans fert de donnée s
Jaune ON= liaison à 100 Mbps, OFF= liaison à 10 Mbps.
2. Mettez en marche la radio en appuyant sur la touche Power,
vous pouvez commencer à utiliser la radio. L’écran aff ichera
<Radio Internet>
F
50
Page 52

Lorsque vous utilisez un réseau sans fil (ignorez cette section si
vous utilisez un réseau filaire Internet avec le RCR-7WF)
1. Mettez en marche la radio en appuyant sur la touche Power
2. L’écran affichera “Démarrage” puis “Initializing Network”,
suivi de “Scanning”
* If la radio ne peut trouver de réseau, l’écran af f iche ensuite
“No Réseau sans fil Found”. Dans ce cas, vérifiez que votre point
d’accès sa ns fil fonctionne. Veuillez con sulter la documentation
fournie avec votre matériel.
51
Page 53

3. Plus d’un réseau sans fil peut être disponible. L’écran affiche
“Sélectionnez networks”. Appuyez sur les touches Tuning+/- pour
rechercher votre réseau sans fil. C’e st le nom qui a été donné au
point d’accès sa ns fil par l’administrateur du réseau -par exemple:
My Home Network.
Lorsque vous avez trouvé votre réseau sa n s fil, appuyez sur la
touche Select.
Au bout de quelques se condes, l’écran affichera <Radio Internet>,
est le nom qui a été donné au point d’accès sans fil par
l’administrateur du réseau, veuillez donc ignorer les étapes suivantes.
4. Si votre accès Internet san s f il (Routeur)est conf iguré ave c un mot
de passe, l’écran affichera soit «Enter WEP key» ou “Enter WPA
key”. Vous devez cependant saisir la correcte WEP ou WPA sur la
radio afin que celle-ci puisse communiquer avec votre réseau.
Si vous n’avez pas la clé de cryptage WEP ou WPA, l’administrateur
de votre réseau pourra vous la communiquer. Certains routeurs Wi-Fi
sont fournis avec une clé par défaut, da ns ce cas reportez-vous à la
documentation fournie avec votre routeur.
5. Après 3 secondes, vous serez invité à entrer la clé de cryptage.
Pour cela, utilisez la touche Tuning+/- pour sélectionner les
caractères un par un, appuyez sur la touche Select après chaque
caractère. Rappelez-vous, le cryptage WEP utilise seulement des
chiffres entre 0 et 9 et des lettres entre A - F. Les clés WPA sont
sensibles à la casse, c’est-à-dire aux majuscules et aux minuscules,
vous devez les respecter pour que la clé soit valide.
F
52
Page 54

6. En cas d’erreur, utilisez la touche BACK de la télécommande pour
effacer le caractère ou appuyez longuement sur la touche Select.
Utilisez les flèches gauche et droite pour déplacer le curseur sur le
caractère à corriger.
7. Une fois le dernier caractère de votre clé WEP ou WPA entré,
repérez le symbole “END” puis appuyez sur la touche Select.
La radio devrait être cap able de se conne cter au réseau.
L’écran affiche <Radio Internet>
Présentation des commande s
1. La majorité des f onction s de votre radio peuvent être utilisée s vi a le s
touches Tuning +/- et Select du panneau supérieur de l’unité.
Appuyez sur la touche Tuning +/ pour mettre en surbrillance la
fonction de votre choix, a ppuyez ensuite sur la touche Sele ct pour
sélectionner cette fonction. Dans ce manuel d’utilisation, appuyez sur
la touche signifie toujours appuyer sur la touche puis relâchez-la.
Lorsque vous devez presser et maintenir enfoncée al touche,
cette opération est spécifiquement dans le texte.
2. En cas d’erreur lorsque vous utilisez les menus, il est généralement
possible de revenir au menu précédent en appuyant sur la touche
Back du panneau supérieur de l’unité.
53
Page 55

Sélection de stations radio Internet
Plusieurs milliers de Stations radio Internet peuvent être sélectionnées,
il existe 3 manières de sélectionner une station: Emplacement,
Genre et Recherche.
Location:
Cette option vous permet de choisir une station radio à partir de la liste
continent et pays.
Genre:
Cette option vous permet de choisir une station radio selon le contenu,
par exemple Classique, Rock, Sport, Actualités, etc.
Rechercher:
Cette option vous permet de rechercher une station en entrant le nom
ou un mot clé, la radio triera les stations radio.
1. Une fois la ra dio conne ctée à Internet comme précéde mment indiqué,
l’écran affiche <Ra dio Internet>. Si la radio ne setrouve pas sur la
bande de la radio Internet, appuyez sur la touche Band jusqu’à ce
que “Radio Internet” s’affiche.
2. Appuyez sur la touche Select
3. Appuyez sur les touches Tuning+/- pour choisir une option parmi
<Emplacement>, <Genre> ou <Recherche>
4. Sélectionnez une des 3 manières en vous référant aux instructions
ci-dessous:
F
54
Page 56

Sélection de stations radio Internet par emplacement
1. Appuyez sur les touches Tuning+/- jusqu’à ce que l’écran affiche
<Location>, puis appuyez sur la touche Select pour accéder à la
recherche par emplacement.
2. Appuyez sur les touches Tuning +/- jusqu’à ce que le pays s’affiche.
Appuyez sur la touche Select pour confirmer votre sélection. La liste
des stations pour ce pays s’affiche.
3. Appuyez sur les touches Tuning+/-. L’écran affiche toutes les
Stations radio Internet du pays que vous sélectionnez.
4. Lorsque vous avez trouvé la station radio que vous souhaitez écouter,
appuyez sur la touche Select. Au bout de quelques secondes,
la radio se connectera à la station radio sélectionnée.
* Lorsqu’il vous est impossible de vous connecter à une
station particulière, veuillez noter que certaines stations radio ne
transmettent pas 24 heures par jour, et certaines stations ne sont
pas toujours actives.
55
Page 57

Sélection de stations radio Internet par genre.
1. Appuyez sur les touche s Tuning+/- jusqu’à ce que l’écran affiche
<Genre>, puis appuyez sur la touche Sele ct pour accéder à la
recherche par Genre.
2. Appuyez sur les touches Tuning +/- jusqu’à ce que le genre s’affiche.
Appuyez sur la touche Select pour confirmer votre séle ction.
3. Appuyez sur les touches Tuning+/-. L’écran affiche toutes les
Stations radio Internet selon le genre que vous sélectionnez.
4. Lorsque vous avez trouvé la station radio que vous souhaitez écouter,
appuyez sur la touche Select. Au bout de quelques secondes,
la radio se connectera à la station radio sélectionnée.
* Lorsqu’il vous est impossible de vous connecter à une
station particulière, veuillez noter que certaines stations radio ne
transmettent pas 24 heures par jour, et certaines stations ne sont pas
toujours actives.
F
56
Page 58

Sélection de stations radio Internet par Recherche.
1. Appuyez sur les touches Tuning+/- jusqu’à ce que l’écran affiche
<Recherche>, puis appuyez sur la touche Select pour accéder
à la Recherche.
2. En utilisant les touches Tuning +/- et Select pour saisir le mot clé du
nom de la station radio que vous recherchez. En cas d’erreurs,
appuyez sur la touche Back pour effacer votre entrée.
3. Lorsque vous avez terminé la saisie du mot clé, appuyez sur les
touches Tuning+/- pour rechercher le mot FIN. Puis appuyez sur
la touche Select.
4. Au bout d’un instant, la radio affiche toutes les stations radio
correspondant à votre recherche.
5. Appuyez sur les touches Tuning +/- pour rechercher la station radio
de votre choix, appuyez ensuite sur la touche Select, et la radio se
connectera à la station radio sélectionnée.
* Lorsqu’il vous est impossible de vous connecter à une
station particulière, veuillez noter que certaines stations radio ne
transmettent pas 24 heures par jour, et certaines stations ne sont pas
toujours actives.
57
Page 59

Réglage du volume
En cours d’écoute d’une station radio, vous pouvez modifier le volume
en appuyant sur la touche Volume +/- du panneau supérieur de l’unité.
Présélection de stations radio Internet
Mémorisation de stations radio Internet
5 emplacements de présélection sont disponible s
Paramètre s audio (réglage du son)
Votre radio possède un mode de réglage des basses et des aigus.
1. Restez appuyé sur la touche (pressez et maintenez enfoncée la
touche) Select (la touche bleue) jusqu’à ce que l’écran affiche <off>.
2. Pour régler les basses (ou aigus), appuyez sur les touches Tuning+/ jusqu’à ce que “Bass” (ou Treble) s’affiche. Appuyez ensuite sur la
touche Select/Tone et l’écran affichera le niveau de basse s actuel
(ou aigus).
3. Appuyez sur la touche T uning + ou Tuning- pour régler le niveau
(entre -7 et +7 pour les basses; +5~-5 pour les aigus) et appuyez
sur la touche Select pour confirmer votre sélection.
4. Sous ce mode, à l’exception des basses et des aigus, il existe
l’option <Plat>. Lorsque Plat est sélectionné, les aigus et les basses
seront définis sur zéro, l’écran affichera “Equalization level rest”.
1. Sélectionnez la station de votre choix tel que décrit précédemment.
2. En cours de lecture d’une station radio, pressez et maintenez
enfoncée une des cinq touches de présélection que vous souhaitez
mémoriser. La station sera mémorisée sous cette présélection.
3. Répétez cette procédure pour les autres présélections.
Ra ppel de stations ra dio Internet
En cours de lecture d’une station radio, appuyez sur une des 5 touches
de présélection que vous souhaitez rappeler. La radio se connectera à
la station enregistrée sur l’emplacement de présélection.
Remarque:
Si vous n’avez pas précéde mment mémorisé de station ra dio da n s
l’emplacement de présélection sélectionné, la station ra dio continuera
d’être diffusée.
F
58
Page 60

Ecouter un programme déjà diffusé
Quelques stations de radio vous permettent d’écouter des progra mmes
qui ont déjà été diffusés. Lorsque vous choisissez une radio qui offre ce
service la station ne démarre pas i mmédi atement, mais à la place le
message ‘Live’ et ‘A la de ma nde’ apparaissent à l’écran
1. Appuyez sur les touches Tuning+/- et l’écran aff iche “Direct” ou
“A la dema nde”
2. Appuyez sur la touche Select pour sélectionner:
Dire ct— Pour écouter la radio normalement et en direct
A la demande- Pour écouter des émissions déjà diffusées
Les options disponibles dépendent d’une station de radio à l’autre.
7. Pour démarrer la lecture du programme de puis le début, appuyez une
nouvelle fois sur la touche Select. Alternativement, sélectionnez le
moment ou vous souhaitez démarrer la lecture.
Effectuer une avance rapide/rembobinage sur une diffusion
Les stations qui vous proposent d’écouter des émissions déjà diffusées
vous permettent également les retours et avances rapides à tout
moment dans le progra mme.
1. Lorsque l’écran aff iche 00:00:00, appuyez sur la touche Fast-Forward
ou Rewind du panneau supérieur de l’unité de la radio à l’heure de
début du programme. L’incrément est de 30 secondes.
3. Lorsque vous sélectionnez “A la dem a nde”, l’écran affiche les noms
des programmes disponibles.
4. À nouveau, Utilisez la touche Tuning+/- et Select pour sélectionner
le programme que vous souhaitez écouter.
5. Une fois le programme choisi, soit la diffusion va commencer,
soit une liste d’émissions par date vous sera proposée, sinon l’écran
affichera un compteur et la lecture débutera à 00:00. Ceci ne
représente pas l’heure réelle de diffusion du programme, mais plutôt
le temps depuis lequel vous écoutez la retransmission. Si le
compteur est affiché, passez à l’étape 7.
6. Utilisez les touches Tuning+/- et Select pour sélectionner le jour de
diffusion du programme. L’écran affiche ensuite une heure de
démarrage du programme 00:00:00.
59
2. Lorsque vous arrivez au moment souhaité, a ppuyez sur la
touche Select. Le programme reprendra à partir de ce point.
Fonction Play/Pause
Lorsque vous écoutez des programmes déjà diffusés, il est possible
d’arrêter temporairement l’émission en cours si vous le souhaitez.
Pour mettre la lecture en pause, a ppuyez sur la touche Play/Pause de
la télécommande.
Pour reprendre la lecture, a ppuyez sur la touche Play/Pause à nouveau.
Page 61

Personnalisez votre radio sur le site Internet
En plus de mémoriser vos stations préférées, votre radio vous permet
de créer une liste personnalisée de vos stations qui seront enregistrées
dans un menu spécial appelé “My Stuff”
Votre radio utilise une technologie développée par la société Anglaise
Reciva Limited située près de Ca mbridge. Reciva vous permet
d’enregistrer votre radio sur son site Web puis d’associer certaines
stations de radio avec votre appareil. Des stations peuvent être
sélectionnées parmi un grand nombre de radios. De plus, au cas où une
radio ne serait pa s disponible da n s cette liste, vous pouvez ajouter
l’adresse Internet de celle-ci (URL) à votre sélection.
Créer un compte sur le site Web de Reciva.
1. Connectez-vous sur le site http://www.reciva.com, à l’aide de votre
navigateur internet. Cliquez sur ‘‘My Account’ et suivez les
instructions à l’écran pour créer votre compte. Veuillez noter que
pendant le processus de création du compte, un code de validation
vous sera envoyé par email. Veuillez entrer ce code lorsqu’il vous
sera demandé.
2. Une fois conne cté à votre compte vous pourrez modifier vos
informations pour les rubriques “Mes stations”, “My Streams”,
“My Details” et “My Radios” à partir de la section “Mon compte”.
Configuration de My stations
1. Connectez-vous sur http://www.reciva.com, vous aurez accès à
toutes les radios disponibles dans la base de données de Reciva.
Pour chaque recherche effectuée sur le site Web, une liste sera
affichée ainsi qu’un lien pour ajouter la ou les nouvelles radios à
My stations.
2. Cliquer sur le lien Add to My stations pour ajouter la nouvelle station
à votre liste de radios présentent dans ‘My Stations list’.
Vous pouvez modif ier cette liste en cliquant sur ‘My Stations’ dans la
section ‘My Account’ du site Web Reciva.
3. Une f ois vos nouvelles ra dios enregistrée s dans la liste de
‘My Stations list’, vous aurez la possibilité de les lire à partir de votre
radio internet. Les stations seront disponibles da n s le menu de votre
radio dans la section: My Stuff-My stations.
Veuillez noter que le contenu de ‘My Stuff’ sera disponible une fois
que votre radio aura téléchargé une nouvelle fois la liste des stations.
Vous pouvez forcer le télécharge ment de la liste en débranchant et
rebrancha nt votre ra dio de la prise secteur.
3. Vous pourrez ajouter votre radio Internet à votre compte sur le site
Web en cliquant sur le lien ‘My Radios’. Une fois dans la section
‘My Radios’, vous devrez entrer le numéro de série à 8 chiffres de
votre appareil qui se trouve dans le menu de votre radio. Allez dans
‘Configure > V ersion’, vous aurez égale ment besoin d’entrer le code
d’enregistrement de votre radio qui se trouve dans le menu
‘Configure > Register’ de la radio.
Si une station de radio n’apparaît pas dans la liste.
Si vous souhaitez voir apparaître une station de ra dio qui ne figure pas
dans votre ra dio ni sur le site web de Reciva, vous pouvez faire une
demande pour que celle-ci soit ajoutée à leur base de données.
F
60
Page 62

Configuration de My Streams
1. Une fois sur votre compte Re civa, vous pouvez ajouter vos streams
radio Internet à ‘Mes streams’, qui se situent dans la section
‘Mon compte’. En général ce sont des stations de radios que vous
aurez trouvées à l’aide de votre ordinateur en parcourant internet.
2. Cliquez sur ‘My Streams’ et vous serez invité à entrer le nom de la
station et son adresse Internet ou URL. Le lien doit être celui du
Stream lui-même, non pas celui du site web. En cas de doute pour
reconnaître une adresse de stream et une adresse Internet normale,
vous pouvez vous connecter sur le site de Reciva
http://www.reciva.com et consulter notre foire aux
questions/réponses.
3. Une fois les streams radio Internet disponibles dans la liste
‘Mes streams’, vous pouvez écouter ces stations avec votre
radio internet. Ces stations seront disponibles on votre radio depuis
l’option du menu: My Stuff-My Streams.
Veuillez noter que le nouveau contenu de ‘My Stuf f’ sera présent
dans votre radio seule ment après avoir téléchargé une nouvelle fois
la liste des stations de radios. V ous pouvez forcer le téléchargement
de cette nouvelle liste en débrancha nt et rebra ncha nt votre ra dio de la
prise secteur.
Lecteur média
Le lecteur Windows média vous permet de lire les fichiers audio
stockés sur votre ordinateur ou un autre ordinateur du réseau, à partir
d’un équipement USB et d’une carte mémoire SD. Les formats de
fichiers supportés sont le MP3 et WMA (la radio Internet supporte
même le MP3, WMA, AAC, audio arrière). Les fichiers protégés par le s
DRM ne sont pas pris en charge.
Lorsque vous utilisez le partage Windows, vous pouvez trier votre
musique par artiste, par album et éventuellement par titre. Lorsque vous
accédez à un serveur UPnP, les critères de recherches seront
déterminés par le serveur, mais généralement des options
complémentaires comme le tri par genre sont disponibles. Un certain
nombre de serveurs vous permettent d’accéder aux dossiers où sont
stockés les fichiers.
Veuillez noter que la référence au mot ‘PC’ da ns cette section
s’adresse à tout ordinateur pouvant partager du contenu sur un rése au
informatique, qu’il utilise un système Windows, Apple, Linux ou autre.
Nous utilisons le terme ‘PC’ car il est court et pratique.
61
Page 63

Partages Windows
Configurez votre ordinateur Windows afin d’autoriser la radio à a ccéder
à vos fichiers audio par l’intermédiaire de Partages Windows
(partager des musiques)
1. Vérifiez que votre ordinateur se trouve sur le même réseau que la
radio internet. En utilisant l’Explorateur Windows, repérez le
répertoire contenant vos fichiers audio.
2. Effectuez un clic droit sur le répertoire
3. Sélectionnez “Propriétés”.
4. Cliquez sur “Partage”
5. Sélectionnez “Partager ce répertoire sur le réseau” et “Autoriser les
utilisateurs du réseau à modifier mes fichiers”
N’essayez pas de partager le dossier ‘Mes documents’ ou un de ses
sous dossiers comme ‘ma musique’.
Le mode opératoire de partage des fichiers peut varier sous certaines
versions récentes de Windows.
Localiser les dossiers audio partagés en utilisant la radio.
1. Utilisez les touches Tuning+/- et Select pour accéder à:
Media player-Windows Shares-Scan for PCs. Si besoin, appuyez sur
la touche Back.
2. La radio doit afficher le message ‘Finding PCs’. Si un ordinateur
partage des dossiers sur le réseau où ils seront affichés. Lorsque la
recherche est terminée, utilisez la touche Tuning+/- et Select pour
sélectionner votre PC. Si votre PC n’a pparaît pas, vérifiez le partage
des fichiers ainsi que les réglages du pare-feu.
3. La radio cherchera les dossiers partagés sur le PC sélectionné.
Si les para mètres de sécurité du PC l’exigent, la radio vous
demandera un nom d’utilisateur et un mot de passe.
Entrez-les suivant la configuration de votre PC.
4. Utilisez la touche Tuning+/- et Select pour sélectionner le
répertoire partagé. La radio affichera le message ‘File Scan…’ elle
va donc parcourir le dossier partagé et rechercher des fichiers audio.
La recherche peut durer plus ou moins longtemps en fonction du
nombre de fichiers audio présents dans votre dossier de partage.
5. Une f ois le scan terminé, les éléments suivants s’affichent:
“Par album”, “Par artiste”, etc. Utilisez la touche Tuning+/- pour
naviguer parmi les fichiers qui sont maintena nt organisés par
“Par album”, ”Par artiste” et “Listes de lecture”-si disponible.
Référez-vous à la section “Après avoir configuré Partages
Windows,UpnP ou USB/SD” ci-dessous pour un mode
opératoire détaillé.
F
62
Page 64

Serveur UpnP
Configurer un PC sous Windows pour autoriser la radio à accéder à
vos fichiers audio via un serveur UPnP
1. Si vous êtes sous Microsoft Windows XP ou Windows Vista,
vous pouvez utiliser Windows Lecteur média 11(WMP11) pour
simuler un votre serveur de média UpnP (Universal Plug et Play).
S’il n’est pas installé sur votre PC, Windows Lecteur média 11 peut
être téléchargé à partir du site Internet Microsoft et installé en
suivant les instructions de l’assistant d’installation, ou en utilisant le
service Windows update de Microsoft.
2. Une fois in stallé, Windows Lecteur média 11 crée une bibliothèque de
tous les fichiers média disponibles sur votre PC. Pour ajouter de
nouveaux fichiers média à la bibliothèque, sélectionnez ’ Fichier >
Ajouter à la bibliothèque…> Options avancées’, cliquez sur ‘Ajouter’
et sélectionnez les fichiers à ajouter, cliquez ensuite sur ’ OK’
Vous devez maintena nt connecter votre Ra dio Internet à Windows
Lecteur média 1 1 et le conf igurer pour permettre à la radio d’accéder à
votre bibliothèque multimédia. Pour cela, vous devez effectuer les
opérations suivantes.
Connexion de la radio en utilisant UpnP
1. Utilisez la touche Tuning+/- et Select pour accéder à:
Media player-UPNP Servers
Si besoin, appuyez sur la touche Back.
Remarque, la recherche peut prendre quelques secondes, ava nt que
la recherche se termine, la radio affichera ‘[Vide]’. La radio
continuera à afficher ‘[Vide]’ si aucun serveur UPnP n’a été trouvé.
2. Après une recherche fructueuse. Sélectionnez votre serveur Up nP
(appuyez sur les touches Tuning+/- et Select s’il y a plus d’un
serveur UPnP), puis appuyez sur la touche Select. La radio
affichera ’ Accès refusé’ à ce moment.
3. Votre ordin ateur vous inf ormera qu’un périphérique tente de se
connecter à votre serveur UPnP. Pour permettre à la radio d’accéder
aux fichiers média, vous devrez cliquer sur l’onglet ‘Bibliothèque’ de
Windows Lecteur média 11 et de sélectionner l’option ‘Partage de
média s…’ pour ouvrir la fenêtre ‘Partage de médi as’
4. à partir de la fenêtre ‘Partage de média s’, la ra dio est listée en tant
que périphérique inconnu. cliquez sur le périphérique inconnu,
puis cliquez sur la touche ‘Autoriser’ et cliquez enfin sur ‘OK’
Remarque:
Si vous utilisez le pare-feu fourni avec Windows celui-ci devrait déjà
être paramétré par WMP 11. Si vous utilisez un pare-feu autre que celui
de Microsoft, vous devrez le paramétrer ma nuelle ment pour autoriser la
radio et WMP 11 à communiquer.
63
Page 65

5. Choisissez le serveur à nouveau en utilisant les touches T uning+/ et Select. Si WMP 11 peut communiquer avec votre radio,
une sélection de nouveaux fichiers vous sera proposée par le serveur.
Recherche et lecture de fichiers média lors de l’utilisation de UPNP
Une fois le serveur UPnP configuré pour partager de s fichiers médi a
avec la radio Internet, vous pouvez lire les fichiers en effe ctua nt les
opérations suivantes:
1. Mettez en marche votre radio et accédez à: Media player- Up np
Servers. Si besoin, appuyez sur la touche Back.
2. Appuyez sur la touche Select, la ra dio va re chercher les serveurs
UpnP disponibles. Remarque, la recherche peut prendre quelques
secondes, la radio affichera ‘[Vide] jusqu’à ce que la recherche se
termine. La radio continuera à afficher ‘[Vide] si aucun serveur UPnP
n’a été trouvé.
3. Après une recherche fructueuse, sélectionnez votre Serveur UPnP,
en appuya nt sur la touche Tuning+/- pour mettre en surbrillance un
Serveur UpnP puis appuyez ensuite sur la touche Select.
Remarque:
En mode UPnP, les critères de recherche proposés ainsi que les
types de fichiers disponibles pour la radio varient en fonction du
logiciel installé sur le pc faisant of fice de serveur UPnP.
6. Utilisez même manière pour mettre en surbrilla nce le s fichiers média
que vous souhaitez lire.
Ne soyez pas inquiet si tous le s f ichiers n’apparaissent pas
immédiatement dans le menu. Windows Media Player an alyse
chaque fichier pour identifier le nom de l’artiste, de l’album ainsi que
des informations sur le titre contenu da ns l’id tag de chaque fichier.
Accessoirement, Windows Media Player peut mettre du temps à
accéder à Internet pour obtenir ces inf ormations comme la jaquette
affichée da ns la bibliothèque sur votre PC.
7. La radio affichera le message ‘[Add to Queue]’ ce qui signifie ajouté à
la liste de lecture. Appuyez sur la touche Select pour ajouter les
titres à la liste de lecture et démarrer la lecture automatiquement.
Référez-vous à “Après avoir configuré Partages Windows,
UPNP ou USB/carte SD” ci-dessous pour un mode opératoire.
4. La radio va maintenant lister le s catégorie s de médi a disponibles sur
le serveur UPnP, par exemple: ‘Musique’, ‘Listes de lecture’ etc.
Appuyez sur la touche Tuning+/- et Select pour sélectionner
la catégorie.
5. Utilisez la touche de la même manière pour effectuer votre sélection.
Par exemple, vous pouvez sélectionner “Music” puis “Albums”
F
64
Page 66

Mode opératoire USB et SD (pour RCR-7 seulement)
1. Mettez en marche la radio en appuyant sur la touche Power.
2. Connectez un périphérique USB ou carte mémoire SD sur le panneau
latéral de la radio. Référez-vous à la section “Après avoir configuré
Partages Windows, UPNP ou USB/SD”.
Remarque:
1. Lorsqu’un périphérique USB et une carte mémoire SD sont tous deux
raccordés à la radio, le Media local combinera les musiques.
2. Lorsque vous connectez/déconnectez un périphérique USB ou
carte mémoire SD en cours de lecture d’une musique, la radio arrête
la lecture.
3. Les fonctions d’avance rapide et de rembobinage ne fonctionnent pas
sur le média local
65
Page 67

Après avoir configuré Partages W indows,
UPNP ou USB/carte mémoire SD.
Que vous accédiez à vos dossiers en utilisa nt le partage de
Windows ou via un serveur UPnP ou USB et une carte mémoire SD,
le mécanisme de sélection de dossiers est identique. La seule
différence est que lorsque vous utilisez UPNP, vous aurez généralement
un choix plus important dans vos critères de recherches, ceci étant
déterminé par le logiciel installé sur le serveur UPnP. Certains logiciels
tierce partie permettent une personnalisation des critères de recherches
et des méthodes d’indexations qui peuvent se révéler utiles si vous avez
une grande collection de titres stockée sur votre PC.
Les mécanismes de séle ctions vous permettent la re cherche d’une
information donnée (Album, Artiste, etc.) en suite d’affiner la recherche,
soit par l’album ou par un titre particulier contenu dans l’album.
L’album choisi est ensuite ajouté à la liste de lecture pour être lu.
Vous pouvez ajouter d’autres albums ou titres dans la liste de le cture en
même temps que vous écoutez votre musique et même sauter d’une
chanson à l’autre contenue dans la liste de lecture. Vous pouvez aussi
vider la liste de lecture si vous souhaitez faire une nouvelle sélection.
Les recherches décrites ci-dessus sont données à titre d’exemples,
d’autres possibilités sont tout à fait envisageables.
Ecouter un album complet.
1. La radio est désormais sous <Windows Shares> ou <UPNP> ou
<Local Media> sous <Lecteur média>
2. Appuyez sur les touches Tuning+/- jusqu’à ce que <Par artiste>
s’affiche. Puis appuyez sur la touche Select
3. Appuyez sur le s touches Tuning+/-jusqu’à ce que l’artiste requis
s’affiche. Appuyez sur la touche Select.
4. Appuyez sur les touches Tuning+/-jusqu’à ce que le nom de l’album
s’affiche. Appuyez sur la touche Select. Le message
‘[Add to Queue]’ sera affiché.
5. Appuyez sur la touche Sele ct. La lecture de l’album commencera
et toutes les pistes de l’album seront lues et stockées dans la liste
de lecture.
Ajouter des albums pour les lire plus tard.
Pendant que vous écoutez de la musique avec le Medi a Player,
vous pouvez ajouter d’autre s albums ou titres à la suite dans votre liste
de lecture.
1. Appuyez sur les touches Tuning+/- (avec la touche Ba ck si besoin)
pour rechercher l’album souhaité.
2. Appuyez sur la touche Select pour sélectionner l’album.
3. Appuyez sur les touche s Tuning+/- jusqu’à ce que l’écran affiche
<Add to Queue> puis appuyez sur la touche Select.
“Tracks Added to Queue” s’affiche. L’album est ajouté à la
file d’attente.
F
66
Page 68

Ajouter des titres à la liste de lecture
1. Si vous souhaitez ajouter certains titres en particulier à partir d’un
album et les ajouter à la liste de lecture, choisissez l’album souhaité
comme expliqué
2. Appuyez sur les touches Tuning+/- pour rechercher la piste de
votre choix, puis appuyez sur la touche Select.
3. Appuyez sur la touche Recherche. “Track Added To Queue” s’affiche.
La piste est ajoutée à la file d’attente.
Contrôle de la lecture
1. Lorsque la musique est en cours de lecture, appuyez sur la touche
Play/Pause pour mettre la lecture en pause. Si vous appuyez sur la
touche à nouveau, la lecture reprendra depuis le début de la piste.
2. Appuyez sur la touche Rewind pour démarrer la lecture à partir de la
piste précédente de la file d’attente.
3. Appuyez sur la touche Fast-Forward pour démarrer la lecture à partir
de la prochaine piste de la file d’attente.
Naviguer dans la liste de file d’attente des pistes
1. Appuyez sur la touche Quene, le nom de la piste en cours de
lecture s’affiche.
2. Appuyez sur les touches Tuning+/- pour afficher les pistes en
file d’attente. Pour sélectionner une piste de la file d’attente,
appuyez sur la touche Select lorsque la piste de votre choix
s’affiche. La lecture continue ensuite depuis le début de cette piste.
Effacer la file d’attente.
1. Sous le menu principal (si besoin, appuyez sur la touche Back),
appuyez sur les touches Tuning+/- jusqu’à ce que <Lecteur média >
s’affiche. Puis appuyez sur la touche Select.
2. Appuyez sur les touches Tuning+/- jusqu’à ce que <Clear Queue>
s’affiche.
3. Appuyez sur la touche Select et l’écran affiche ensuite
“Queue cleared”, toutes les fiches seront effa cées de la file
d’attente des médias.
67
Page 69

Lecture continue des pistes de la file d’attente
1. En cours de lecture d’une station radio, appuyez sur la touche
Back pour revenir au menu Mode principal.
Lecture des pistes dans l’ordre aléatoire (Shuffle)
1. En cours de lecture d’une station radio, appuyez sur la touche
Back pour revenir au menu Mode principal.
2. Appuyez sur les touches Tuning+/- jusqu’à ce que “Lecteur média”
s’affiche, appuyez ensuite sur la touche Select pour accéder au
menu Lecteur média.
3. Appuyez sur les touche s Tuning+/- jusqu’à ce que “Mode de lecture”
s’affiche, appuyez ensuite sur la touche Select.
4. Appuyez sur les touches Tuning+/- jusqu’à ce que “Répétition”
s’affiche.
Appuyez sur la touche Select. L’écran affichera “Activer” avec un
choix YES/NO.
5. Appuyez sur les touches Tuning+/- pour sélectionner ‘YES’,
appuyez en suite sur la touche Select pour confirmer que le mode
Répétition est activé.
Si vous ne souhaitez pas activer le mode Répétition,
sélectionnez ‘NO’.
Si le mode Répétition a précédemment été activé, l’écra n af fichera
ensuite ‘Deactivate’ avec un choix YES/NO après l’étape 4.
Sélectionnez ‘OUI’ pour désactiver le mode Répétition.
2. Appuyez sur les touche s Tuning+/- jusqu’à ce que “Lecteur média”
s’affiche, appuyez ensuite sur la touche Select pour accéder au
menu Lecteur média.
3. Appuyez sur le s touches Tuning+/- jusqu’à ce que “Mode de lecture”
s’affiche, appuyez ensuite sur la touche Select.
4. Appuyez sur les touches Tuning+/- jusqu’à ce que “Shuffle” s’affiche.
Appuyez sur la touche Select. L’écran affichera “Activer” avec un
choix OUI/NON.
5. Appuyez sur les touches Tuning+/- pour sélectionner ‘OUI’,
appuyez ensuite sur la touche Select pour confirmer que le mode
Shuffle est activé.
Si vous ne souhaitez pas activer mode Shuffle, sélectionnez ‘NON’.
Si le mode Shuffle a précédemment été a ctivé, l’écra n af fichera alors
‘Désactiver’ avec un choix OUI/NON après l’étape 4. Sélectionnez ‘OUI’
pour annuler le mode Shuffle.
F
68
Page 70

Radio FM
Pour écouter la radio FM
1. Mettez en marche la radio en appuyant sur la touche Power.
2. Appuyez sur la touche Band jusqu’à ce que l’écran affiche <FM>.
Sélection de stations radio FM
1. Appuyez sur les touche s T uning+/- pour changer de fréquence.
2. restez appuyé sur les touches T uning+/- pour rechercher la prochaine
station radio disponible.
Mémorisation de présélections
5 emplacements de présélection sont disponibles.
1. Sélectionnez la station de votre choix tel que décrit précédemment.
2. En cours de lecture d’une station radio, pressez et maintenez
enfoncée une des 5 touches de présélection que vous souhaitez
utiliser. La station sera mémorisée sous cette présélection.
FM RDS
Le radio Data System (RDS) est un système dans lequel des
informations numériques inaudibles se joignent au programme
radio FM normal.
La station radio RDS corrige l’heure réelle lorsque ce service est offert.
Les informations s’affichent seulement lorsque la station offre un
service R.D.S.
Appuyez sur la touche REPLY/R DS pour sélectionner un mode,
patientez 2 secondes pour voir les informations. Les informations des
nombreux modes sont
1. Fréquence: Aff iche la fréquence de la station.
2. Service de programmes: Affiche le nom de la station.
3. Texte radio: affiche les messages radio texte tels que les actualités,
etc.
4. Type de programme: affiche le type de programme.
69
3. Répétez la même procédure pour toute nouvelle station que vous
souhaitez mettre en mémoire.
Ra ppel de station ra dio Internet présélectionnée
En cours de lecture d’une station radio, appuyez sur une des 5 touches
de présélection que vous souhaitez rappeler. La radio se connectera à
la station mémorisée.
Remarque:
Si la mémoire sélectionnée ne contient aucune station préalablement
mémorisée, vous continuerez d’écouter la station en cours.
Page 71

Connecteur d’entrée auxiliaire
Votre radio possède une prise jack de 3.5mm stéréo pour le
raccordement de sources audio externes. Celle-ci peut être conf igurée
avec deux niveaux de sensibilité pour correspondre à la puissa nce de
sortie du matériel connecté.
Réglage de l’horloge
Réglage de l’horloge
1. Restez a ppuyé sur la touche Tine Set jusqu’à ce que “Set Time/Date”
s’affiche. (Si celui-ci ne s’affiche pas, appuyez sur les touches
Tuning+/- jusqu’à ce que “Set Time/Date ” s’affiche).
1. Connecter une source audio externe à la radio, comme un lecteur
mp3 ou un lecteur CD au connecteur labellisé ‘Aux in’ situé à l’arrière
de votre radio.
2. Mettez en marche la radio et a ppuyez sur la touche Band située sur
le panneau avant de la ra dio jus qu’à ce que l’écran affiche
<Auxiliary Input>.
3. La radio lit les sources audio externes.
2. Appuyez sur la touche Select puis appuyez sur les touches
Tuning+/- pour régler les heures.
3. Appuyez sur la touche Select puis appuyez sur les touches
Tuning+/- pour régler les minutes.
4. Appuyez sur la touche Select puis appuyez sur les touches
Tuning+/- pour régler la date, le mois et l’année.
5. Appuyez sur la touche Select pour terminer les réglage s.
Réglage de l’horloge
L’affichage de l’horloge peut être réglé au format 12 ou 24 h. Le format
choisi sera conservé pour le réglage des alarmes.
1. restez appuyé sur la touche Tine Set jusqu’à ce que
<Set Time/Date> s’affiche.
2. Appuyez sur le s touches Tuning+/- jusqu’à ce que <Clock Format>
s’affiche.
3. Appuyez sur la touche Select puis appuyez sur les touches
Tuning+/- pour sélectionner le format 12 ou 24 heures.
4. Appuyez sur la touche Select pour confirmer le réglage.
F
70
Page 72

DST (heure automatiquement réglée via Internet)
Ceci permet de régler l’heure par Internet
Les options suivantes sont disponibles:
Auto(US) – Pour activer l’heure des Etats-U nis
Auto(EU) – pour activer l’heure de l’Europe
None – Désa ctiver le réglage automatique de l’heure
Manual – réglage ma nuel de l’heure
Réglage de l’alarme
Votre radio possède 2 alarmes individuelle s pouva nt être déf inies pour
vous réveiller au son de la radio FM radio, buzzer, Aux In, ou Ra dio
Internet. Chaque alarme peut-être paramétrée pour retentir soit:
une fois, tous les jours, chaque semaine, seulement en semaine ou le
week-end. En cas de coupure de coura nt, votre ra dio e st équipée d’une
mémoire intégrée qui conservera vos préférences.
1. Appuyez sur la touche Power pour mettre en marche votre radio.
2. Appuyez sur les touches Tuning+/- jusqu’à ce que l’écran affiche
<Setting>.
Appuyez sur la touche Select pour accéder aux paramètres
de configuration.
3. Appuyez sur les touches Tuning+/- jusqu’à ce que l’écran affiche
<Clock Setup>.
Appuyez sur la touche Select pour accéder au menu de réglage
de l’horloge.
4. Appuyez sur les touches Tuning+/- jusqu’à ce que l’écran affiche
<DST>. Appuyez sur la touche
Select pour y accéder, vous pouvez régler le DST.
* Accédez à Setting > Clock Setup > Local Time Zone, pour avancer ou
reculer de 30 mins/pa s pour régler votre décalage depuis l’heure d’été
fournie par Internet.
71
Remarque: Si vous ne touchez à aucun bouton pendant 10 secondes
la radio sortira automatiquement du menu. En cas d’erreur vous
pouvez à tout moment utiliser la touche ‘BACK’ pour retourner au
menu précédent.
1. Long Appuyez sur la touche Alarm1 (ou Alarm2) jusqu’à ce que
“Activer Alarm” s’affiche, la sélection OUI/NON.
2. Appuyez sur les touches Tuning+/- et Select pour sélectionner “OUI”.
L’écran affichera “ Set Alarm”.
3. Appuyez sur les touches Tuning+/- pour régler les heures,
appuyez ensuite sur la touche Set.
4. Appuyez sur les touche s Tuning+/- pour régler les minutes,
appuyez ensuite sur la touche Set.
Page 73

5. Appuyez sur les touche s T uning+/- pour déf inir l’alarme pour un jour,
tous les jours, une fois par semaine, tous les jours de la semaine ou
tous les week-ends. Appuyez ensuite sur la touche Set.
Once – Une seule fois
Everyday – Tous les jours.
Weekly – Une fois par semaine.
Weekdays – Seulement en semaine.
Weekends – Seulement les week-ends
6. Appuyez sur les touches Tuning+/- pour définir la source d’alarme
Radio FM, buzzer, Aux In ou Radio Internet.
Lorsque le son de l’alarme est défini sur Radio FM ou Radio Internet,
la dernière station écoutée s’activera. Lorsque la source de l’arme
est défini sur Aux In, veuillez vous assurer qu’une source audio est
en cours de lecture et raccordée au connecteur Aux In de cette radio.
7. Appuyez sur la touche Select pour terminer les réglages.
Lorsque l’alarme retentit
1. L’alarme sonnera à l’heure prévue pendant 60 minutes si elle n’est
pas interrompue. Le volume de la radio sera de la même intensité
que le volume précédemment utilisé lors de l’écoute de la radio ou du
Lecteur média. Si pour une quelconque raison la radio était
indisponible au moment où l’alarme doit retentir, le buzzer serait
utilisé à la place de la radio.
2. Le buzzer sonnera pendant 60 minutes et le volume augmentera
progressivement.
3. Si l’alarme retenti alors que la radio est déjà allumée. La radio
changera automatiquement de station comme spécif iée lors de la
programmation de l’alarme.
Activer et désactiver les alarmes
1. Lorsque l’Alarme 1 est activée, “ ” s’affiche, identique à l’Alarme 2.
2. Lorsque l’indicateur “ ” s’affiche, appuyez sur la touche Alarm 1
pour désactiver l’alarme 1, et “ ” disparaît. Identique à l’Alarme 2.
3. Pour réactiver l’alarme 1, appuyez sur la touche Alarm 1,
“ ”s’affiche, les informations de l’alarme 1 s’affichent également.
F
72
Page 74

Minuterie Sommeil
Votre radio peut être définie pour s’arrêter au bout d’une période définie.
La minuterie sommeil peut être réglée de 15 à 3 heures 15 minutes,
par incréments de 15 minutes.
Minuterie Nap
Ceci est un compte à rebours qui retentira une fois la période
définie écoulée. La période peut être définie de 10 minutes à 1 heure
30 minutes par incréments de 10 minutes.
1. Assurez-vous que la radio est en marche et en cours de lecture.
2. Appuyez sur la touche Time Set, l’écran affiche “Sleep Timeout”.
3. Appuyez sur les touches Tuning+/- pour régler la durée sommeil
requise de 15 à 3 heures 15 minutes ou sur Off.
4. Appuyez sur la touche Set pour confirmer les paramètres.
L’écran affichera ‘Zzz’. Votre radio s’éteint une foi la durée écoulée.
5. Pour annuler la minuterie sommeil ava nt l’expiration de la
durée prédéfinie, appuyez sur la touche Power pour éte indre la ra dio.
1. Appuyez sur la touche NAP, la période requise s’affiche.
2. Appuyez sur les touches Tuning+/- pour sélectionner le compte
à rebours.
3. Appuyez sur la touche Select pour définir la minuterie Nap.
L’indicateur “ ” s’affiche.
4. lorsque l’alarme Nap retentit, appuyez sur la touche Power pour
la couper.
5. Pour annuler la minuterie Nap avant l’expiration de la durée Na p,
appuyez sur la touche NAP et restez appuyé sur la touche à nouveau
jusqu’à ce que l’indicateur “ ” disparaît.
73
Page 75

Rétro éclairage
Appuyez sur la touche Dimmer pour régler le nive au de rétro éclairage
de votre choix.
Plusieurs paramètres sont disponibles pour le mode Actif (lorsque vous
utilisez la radio), le mode Inactif (en cours d’écoute) et le mode Attente
(lorsque la radio est éteinte et l’horloge affichée).
Configuration du réseau (pour RCR-7 seulement)
Ce menu vous permet de configurer les para mètre s réseaux de
votre radio, rechercher des réseaux sa n s fil à proximité ou de configurer
manuellement le s paramètres réseaux de votre radio. Ceci peut être
utile lorsque vous déplacez votre radio ou que vous souhaitiez intégrer
votre radio dan s un autre réseau informatique.
Sélection de la langue
Cette option vous permet de changer la langue utilisée dans les menus.
1. Appuyez sur les touches Tuning+/- jusqu’à ce que “Setting” s’affiche,
puis appuyez sur la touche Select.
2. Appuyez sur les touches Tuning+/- jusqu’à ce que “Language”
s’affiche, puis appuyez sur la touche Select.
3. Appuyez sur les touches Tuning+/- jusqu’à ce que la langue que vous
souhaitez sélectionner s’affiche, puis appuyez sur la touche Select.
Affichage de la version logicielle
L’affichage de la version logicielle est fourni à titre de
référence seulement.
1. Appuyez sur les touches Tuning+/- jusqu’à ce que “Setting” s’affiche,
puis appuyez sur la touche Select.
2. Appuyez sur les touches Tuning+/- jusqu’à ce que “Version” s’affiche,
puis appuyez sur la touche Select.
3. L’écran affichera la version logicielle.
4. Utilisez la touche Back pour quitter.
Configuration de la radio pour seulement utiliser une connexion
Ethernet filaire (pour RCR-7 seulement)
1. Mettez en marche la radio, et appuyez sur les touches Tuning+/ jusqu’à ce que l’écran affiche <Setting>. (Si nécessaire,
appuyez sur la touche Back). Appuyez ensuite sur la touche Select.
2. Appuyez sur les touches Tuning+/- jusqu’à ce que <Network Config>
s’affiche.
Appuyez ensuite sur la touche Select.
3. Appuyez sur les touches Tuning+/- jusqu’à ce que
<Wired/Wireless> s’affiche.
Appuyez ensuite sur la touche Select.
4. Appuyez sur les touches Tuning+/- buttons jusqu’à ce que
<Wired Only> s’affiche.
Appuyez en suite sur la touche Sele ct. La radio redémarrera puis
utilisera uniquement le mode de connexion filaire Ethernet pour
communiquer avec le réseau. La radio aura également désactivé
la fonction sans fil intégrée à la radio. Il est nécessaire que la radio
soit physiquement connectée à la prise RJ-45 située à l’arrière
de l’appare il.
F
74
Page 76

Configuration de la radio pour utiliser une connexion
Ethernet ou Wi-Fi
1. Mettez en marche la radio, et a ppuyez sur les touches Tuning+/ jusqu’à ce que l’écran affiche <Setting>. (Si nécessaire,
appuyez sur la touche Back).
Appuyez ensuite sur la touche Select.
2. Appuyez sur les touches Tuning+/- jusqu’à ce que <Network Config>
s’affiche.
Appuyez ensuite sur la touche Select.
3. Appuyez sur les touches Tuning+/- jusqu’à ce que <Auto> s’affiche.
Appuyez ensuite sur la touche Select.
La radio essayera en priorité d’établir une connexion par le
port Ethernet. Si aucune connexion Ethernet n’est disponible,
la radio essayera d’établir une connexion WI-FI pour se connecter
au réseau. Une fois la connexion éta blie celle-ci restera active tant
que la radio sera allumée.
Le menu de configuration réseau permet également de choisir si oui ou
non la radio doit afficher un avertissement lorsque la force du signal
WI-FI est faible. V ous pouvez a ctiver cette f onction en validant la
fonction ‘Signal W arning’ dans le menu puis en sélectionnant “Yes”.
Configuration de la radio pour utiliser une connexion Wi-Fi
1. Mettez en marche la radio et appuyez sur les touches Tuning+/ jusqu’à ce que l’écran affiche <Setting>. (Si nécessaire,
appuyez sur la touche Back).
Appuyez ensuite sur la touche Select.
2. Appuyez sur les touches Tuning+/- jusqu’à ce que <Network Config>
s’affiche.
Appuyez ensuite sur la touche Select.
3. Appuyez sur les touches Tuning+/- jusqu’à ce que
<Wired/Wireless> s’affiche.
Appuyez ensuite sur la touche Select.
4. Appuyez sur les touches Tuning+/- jusqu’à ce que <Wireless Only>
s’affiche.
Appuyez ensuite sur la touche Select. La radio redémarrera en
utilisant seulement la connexion sa n s f il WI-FI pour communiquer avec
le réseau. La fonction Ethernet sera par la même occasion désactivée.
Sélectionner l’option ‘Wireless Only’ entraînera un redémarrage de la
radio puis la sélection de la connexion Wi-Fi pour communiquer avec
le réseau. La radio désa ctivera également sa connexion Ethernet.
75
Page 77

Dépannage
Si vous rencontrez des difficultés pour connecter votre radio à votre
réseau sans f il, les étapes suivantes peuvent vous aider à résoudre
le problème:
1. Assurez-vous que votre connexion WI-FI f onctionne correcte ment
(c.-à-d. possibilité de surfer sur Internet) en utilisant le même réseau.
2. Vérifiez qu’un serveur DHCP est disponible et que vous avez
configuré une adresse IP statique sur la ra dio. Vous pouvez spécifier
une adresse IP statique en vous dirigea nt dans le menu “ Setting ->
Network Config -> Edit Config” , puis en choisissant ‘No’ pour
‘Auto (DHCP)’.
(en appuyant sur les touches Tuning+/- et Select)
3. Vérifiez que votre pare-feu ne bloque pas les ports sortants.
Au minimum, la radio à besoin d’accéder aux ports UDP et TCP 80,
554, 1755, 5000 et 7070. Vérifiez que votre pare-feu ne bloque pa s
les ports sortants. Au minimum, la radio à besoin d’accéder aux
ports UDP et TCP 135 - 139 et 445. Le lecteur Windows Media 11 va
allouer un port pour le partage UPnP et configurera automatiquement
le pare-feu intégré de Windows.
D’autres pare-feu logiciels peuvent nécessiter de spécifier les
adresses IP autorisées à accéder au serveur UPnP dans leur
liste blanche.
4. Vérifiez que votre point d’a ccès sans fil ne refuse pas l’accès aux
adresses MAC inconnues. L’adre sse MAC de la Radio figure dans le
menu “Setting -> Network Config -> View Config ->MAC address”.
Notez que la ra dio possède deux adresses MAC, une filaire et
une sans fil.
5. Si votre réseau utilise un cryptage, vérifiez que vous ayez entré la
bonne clé de cryptage ou le mot de passe dans la radio.
Souvenez-vous que la clé WPA est sensible à la casse,
respectez les majuscules et minuscules. Si le message
‘Wireless error’ suivi d’un nombre à 5 chiffres apparaît lorsque vous
essayez de vous connecter au réseau crypté, vérifiez que le mot
de passe est correct. Si le problème persiste, vérifier votre
configuration réseau.
Si votre radio est connectée au réseau, mais que vous ne pouvez pas
écouter certaines stations, vérifiez les points suiva nts:
1. La station peut ne diffuser aucun progra mme à cette heure-ci
(ex: fuseau horaire différent).
2. La station a atteint le nombre maximum autorisé d’auditeurs
simultanés.
3. La connexion entre votre radio est le serveur est lente
(Pays différent.)
4. La station n’émet plus du tout.
5. Le lien Internet vers le strea m audio et mort ou n’est plus à jour.
6. Le format de diffusion de la Station n’est pas compatible avec votre
radio (toutefois, votre radio peut lire la majorité des formats utilisés
par les diffuseurs de radios Internet).
Utilisez un PC pour vérifier via le site web de la station radio si la
diffusion fonctionne.
Si vous pouvez écouter la station de radio à partir de votre PC via le site
Web de la Station, remplissez le formulaire qui se trouve sur le site
http://www. reciva.com pour signaler à Reciva de mettre à jour les
données de la station de radio.
F
76
Page 78

Réinitialisation d’usine
Lorsque vous souhaitez rétablir la configuration d’origine de la radio,
suivez les instructions suivante s.
1. Appuyez sur les touches Tuning+/- sur le menu principal
(appuyez sur la touche Back si nécessaire), jusqu’à ce que
<Setting> s’affiche.
2. Appuyez sur la touche Back.
3. Appuyez sur les touches Tuning+/- jusqu’à ce que
<Réinitialisation d’usine> s’affiche.
Appuyez ensuite sur la touche Select.
4. L’écran affichera “Are you sure?” Appuyez sur les touches Tuning+/ pour sélectionner “OUI”. Puis a ppuyez sur la touche Select.
La réinitialisation d’usine est effectuée.
Mise à jour logicielle
De temps en temps de nouvelles fonctionnalités pour votre radio vont
être développées. Par exemple, un nouveau décodeur peut-être a jouté
pour permettre à un nouveau format audio d’être pris en charge par la
radio. V otre ra dio a été conçue pour que son logiciel intégré puisse être
mis à jour via votre connexion internet.
La mise à jour du logiciel effacera tous les paramètres réseau,
les stations mémorisées, et les alarmes que vous aurez progra mmées.
Ne pas procéder à la mise à jour si votre connexion Internet est
perturbée ou que l’installation électrique est mauvaise. Si vous utilisez
une connexion Wi-Fi via un routeur , assurez-vous que le signal soit
excellent avant d’effectuer l’opération.
La mise à jour du logiciel sera téléchargée sur le site de Reciva.
Lorsqu’une nouvelle version du logiciel est disponible, votre radio vous
demandera si vous souhaitez la télécharger ou non. Choisissez ‘No’ ou
utilisez la touche ‘BACK’ pour ne pas ef fe ctuer la mise à jour. La mise à
jour peut durer plusieurs minutes suivant votre connexion internet.
1. Dans le menu principal (appuyez sur la touche Back si nécessaire),
appuyez sur les touches Tuning+/- jusqu’à ce que <Setting>
s’affiche. Puis appuyez sur la touche Select.
2. Appuyez sur les touches Tuning+/- jusqu’à ce que
<Mise à jour logicielle> s’affiche, puis appuyez sur la touche Select.
3. Si une mise à jour différente de la version installée sur votre radio,
vous pourrez mettre à niveau la version logicielle.
Ou l’écran aff iche “Aucune mise à nive au disponible”.
La mise à niveau logicielle peut nécessiter plusieurs minutes.
IMPORT ANT:
Ne pas éte indre la ra dio ou débra ncher la prise se cteur tant que la
mise à jour n’est pas terminée et que la radio a redémarré, sinon la
radio sera inutilisable.
77
Page 79

Connecteur écouteurs
1. Un connecteur de 3.5 mm situé à l’arrière de votre radio est
conçu pour l’utilisation des écouteurs. Lorsque vous insérez la fiche,
les haut-parleurs internes seront désa ctivés automatique ment.
IMPORT ANT:
Ecouter de la musique à un niveau sonore trop important peut altérer
votre audition.
Sortie Ligne (connecteur 3.5mm)
Une sortie ligne de 3.5mm est située à l’arrière de l’appareil, celle-ci est
prévue pour connecter la radio à un a mplificateur externe. Bra ncher le
câble audio dans la prise ne désa ctivera pas les haut-parleurs internes.
Réglez simplement le volume au minimum si vous le souhaitez.
Spécifications
Alimentation CA 100 ~ 240 volts, 50 ~ 60 Hz.
Connectivité: Ethernet filaire, Wi-Fi 10/100M bits/sec via RJ-45 802.11b
et 802.11g , clés de cryptage WEP et WPA supportées
Remarque:
Les modifications non expressément a pprouvée s par la partie
responsable de la conf ormité peuvent a nnuler le droit de l’utilisateur
d’utiliser l’équipement.
F
78
Page 80

Si à l’avenir vous devez vous débarrasser de ce produit merci de noter ceci: Vous ne devez pas vous débarrasser des déchets
d’équipements électriques et électroniques par les ordures ménagères ou autres déchets municipaux non triés. Le consommateur
devra apporter ses équipe ments usagés, soit en déchetterie, soit chez un distributeur lors de l’achat d’un produit neuf, soit le
donner à une association d’économie solidaire
79
Page 81

80
Page 82

T a bla de contenido
IMPORTANTES INSTRUCCIONES
DE SEGURIDAD ............................................................. 82-84
Controles .......................................................................... 85-88
Antes de usar este producto ................................................ 89
Conexión de la radio a su red ............................................. 90
Controles de operación ........................................................ 93
Selección de una emisora de ra dio de Internet ................ 94
Control del volumen ............................................................. 98
Ajustes de audio (control del tono) ..................................... 98
Pre sintonización de emisoras de radio de Internet ......... 98
Escuchar material transmitido anteriormente ................... 99
Personalización de su radio en el sitio web .................... 100
Reproductor de medios ..................................................... 101
Compartir en Windows ....................................................... 102
Servidor UpnP ..................................................................... 103
USB y SD—Uso de medios locales
(Sólo para RCR-7) .............................................................. 105
T oma para entra da auxiliar ................................................ 110
Ajuste del reloj .................................................................... 1 10
Luz de fondo ........................................................................ 1 14
Configuración de la red (sólo para RCR-7) ..................... 114
Solución de problemas ...................................................... 116
Restablecer los valores predeterminados de fábrica ..... 117
Actualización firmware ........................................................ 1 17
T oma para auriculares ....................................................... 1 18
Toma para línea de salida (enchufe de 3.5mm) ............. 118
Especificaciones ................................................................. 1 18
Funcionamiento después de configurar Compartir
en Windows, UpnP o tarjeta USB/SD ............................... 106
Radio FM ............................................................................. 109
81
Page 83

Importante s instrucciones de seguridad
1. Lea y entienda todas las instrucciones de seguridad y funcionamiento
antes de hacer uso de la radio.
2. Conserve estas instrucciones. Para futura s consultas, es conveniente
mantener las instrucciones de funcionamiento.
3. Preste atención a todas las advertencias. Todas la s a dvertenci as del
producto y de las instruccione s operacionales deben ser atendidas.
4. Siga todas las instrucciones de uso y funcionamiento.
5. Solo use acoples y accesorios especificados por el fabrica nte.
6. Solo use un paño seco para limpiar el exterior de la radio.
7. Ventilación: Esta radio deberá colocarse de modo que su posición o
ubicación no interfiera con su a decua da ventilación. Por ejemplo,
no debe usar la radio sobre una ca ma, un sofá, un a al fombra
u otras superficies blandas que pudieran bloquear las aberturas
de ventilación. No deberá colocarse en una instalación empotrada
tal como un estante, ya que la circulación del aire por las a berturas
de ventilación podría verse reducida. También ma ntenga 10cm de
espacio en la parte posterior de la radio.
8. Agua y humedad - No use este producto cerca del agua, junto a
una tina, lavabo, tambor de lavadora; lavaplatos, en un sótano
húmedo, cerca de una piscina, etc.
ADVERTENCIA: no exponga este producto a la lluvia o la humedad.
9. No exponga este producto a salpica duras o goteo.
Objetos que contengan líquidos, tales como jarrones o vasos,
no deben ser ubicados cerca de este producto.
10. No instale el producto cerca de fuentes de calor, tales como
radiadores, genera dore s de calor, hornos, u otros aparatos
(incluyendo amplif ica dores) que produzcan calor.
11. No coloque la radio en un carrito, base, soporte o mesa inestable.
La radio podría caerse causando seri as lesiones personales y
daños al producto.
12. No intente hacerle mantenimiento al receptor por usted mismo.
El quitar la tapa puede exponerle a un voltaje peligroso,
e invalidará la garantía. Remita todo ma ntenimiento a personal
de servicio autorizado.
13. Desconecte la radio de la toma de corriente AC antes de limpiarla.
Solamente use un paño se co para li mpiar el exterior de la radio.
14. No conecte el ca ble AC en la toma si esta está todavía húmeda.
Asegúrese que la toma está seca antes y después de usar.
15. Fuentes de alimenta ción: la ra dio debe funcionar únicamente con el
tipo de fuente de alimentación que está señalada en la etiqueta.
Si no está seguro del tipo de fuente de alimentación de su hogar,
consulte con el distribuidor de la radio o la compañía eléctrica.
E
82
Page 84

16. Cables de alimentación: El cable de alimenta ción deberá ser gui a do
de modo que se evite el ser pisado o pellizcado por elementos
colocados sobre o contra este, especialmente en enchufes,
distribuidores, y el lugar en el que este sale del aparato.
Desenchufe el cable de alimentación tomándolo por la clavija,
no por el cable. Use la radio únicamente con el tipo de fuente de
alimentación indicada. Si no está seguro del tipo de fuente de
alimentación de su hogar, consulte con el distribuidor de la radio o
la compañía eléctrica.
17. No fuerce la característica de seguridad del enchufe tipo a tierra
o polarizado. Un enchufe polariza do tiene dos contactos, uno más
ancho que el otro. U n enchufe de tipo redondeado tiene dos
contactos y una tercera punta como polo a tierra. El contacto más
ancho o la tercera punta son para su seguridad. Si el enchufe
suministrado no encaja en su tomacorriente, consulte un
electricista para el cambio del tomacorriente obsoleto.
20. Objetos y entrada de líquidos-No introduzca nunca objetos de
ningún tipo en esta radio a través de las aberturas, puesto que
podrían llegar a tocar puntos en los que hay un voltaje peligroso o
partes que pueden hacer corto circuito y de esta manera producir
un incendio o una descarga eléctrica. Nunca derrame líquidos de
ningún tipo sobre el producto.
21. Descone cte el producto del toma corriente y re mítalo a reparación
por personal de servicio calificado bajo las siguientes condiciones:
a.
Cuando el cable de alimentación o el enchufe estén averiados.
b.
Si se ha derram ado líquido, o algún objeto ha caído sobre
la radio.
c.
La radio ha sido expuesta a la lluvia o al agua.
d.
Si el producto no funcionara con normalidad al seguir la s
instrucciones de funciona miento.
e.
Si la radio se hubiese caído o sufriera cualquier clase de daño
f.
Cuando la radio muestre un cambio es su desempeño evidente.
18. No sobrecargue los tomacorrientes o cables de extensión ya que
podría conducir a un riesgo de incendio o descarga eléctrica.
No introduzca nunca objetos de ningún tipo en la radio a través
de sus aberturas.
19. El tomacorriente deberá estar cerca a la radio y ser de fácil acceso
para casos de emergencia, para desconectar la radio, tan solo
desconecte el enchufe del zócalo de alimentación AC.
83
22. Si el LCD se agrieta o avería, no toque el líquido.
23. Los cambios o modificaciones que no han sido aprobadas de
manera expresa por la parte responsa ble de conformidad pueden
invalidar la autoridad del usuario para usar el equipo.
24. Para cumplir con los requerimientos de exposición FCC RF,
ningún cambio a la antena o dispositivo está permitido.
Cualquier cambio puede hacer que el dispositivo exceda los
requerimientos de exposición RF e invaliden la autoridad del
usuario para usar el equipo.
Page 85

25. INFORMACIÓN FCC
El Radio Frequency Interference Statement (Comunicado sobre
Interferencia s de Radiofrecuenci as) de la Federal Communications
Commision (Comisión Federal de Comunicaciones) incluye el
siguiente párrafo:
El equipo ha sido probado y cumple con las restricciones
correspondientes a un equipo digital de Clase B, según la Parte 15 del
Reglamento FCC. Estas restricciones están diseñadas para
proporcionar protección razonable contra interferencia s perjudici ales en
una instalación re sidenci al. Este equipo genera, utiliza y puede irradiar
energía de ondas de radio y, si no se instala y usa de acuerdo a las
instrucciones, podría causar interferencias perjudiciales en la s
comunicaciones de radio. Sin e mbargo, no hay gara ntía de que las
interferencia s no ocurrirán en un a instalación determinada. Si el equipo
causa interferencia s que perjudiquen la re cepción de ra dio o televisión,
que puede determinarse encendiendo y a paga ndo el equipo,
se recomienda al usuario que intente solucionar la s interferenci as
tomando una o más de las siguientes medidas:
- Cambie la orientación o posición de la antena receptora.
- Aumente la distancia entre el equipo y el receptor.
- Conecte el equipo a una toma de un circuito diferente del que está
conectado con el receptor.
- Consulte al proveedor o a un técnico de radio/TV con experiencia para
recibir ayuda.
El usuario no debe modificar o alterar este equipo sin aprobación escrita
por parte de SANGEAN ELECTRONICS INC. La modifica ción puede
anular la autoridad para usar este equi po .
26. Una excesiva presión del sonido sobre el oído por parte de los
auriculares podrían perjudicar la habilidad de escucha.
Un ajuste más alto en la ecualización puede llevar a voltajes de
señal más altos para la salida al oído y auriculares.
E
84
Page 86

Controles
(Vista frontal)
1.
Botón de alarma 1
2.
Botón de alarma 2
3.
Botón NAP (siesta)
4.
Botón para ajuste de la hora/función de sueño
5.
Botón de encendido
Botón BAND (selección de ba nda)
6.
Botón RDS
7.
Botón DIMMER (regula ción del volta je)
8.
Pantalla LCD
9.
85
Page 87

Controles
(VIST A SUPERIOR)
10.
11.
12.
13.
14.
Botón de sintonizado Tuning +/- y Snooze (siesta)
Botón Back (atrás)
Botón pre sintonizado 1/Aleatorio/Repetir
Botón pre sintonizado 2/Cola
Botón pre sintonizado 3/Atrasar
Botón pre sintonizado 4/Avance rápido
15.
Botón pre sintonizado 5/Reproducir/Detener
16.
Botones de volumen Subir/Ba jar
17.
Botón Seleccionar/Tono
18.
E
86
Page 88

Controles
(Vista posterior)
19.
Antena WiFi
20.
Antena FM
21.
T oma de entra da para fuente de alimenta ción
22.
T oma para auriculares
T ama de línea de salida
23.
T oma de líne a auxiliar
24.
T oma RJ-45 (Ethernet)
25.
87
Page 89

Controles
(Vista lateral derecha)
26. Ranura USB (Solo en RCR-7) Ranura para tarjeta SD (Solo en RCR-7)
27.
E
88
Page 90

Antes de usar este producto
Antes de que usted pueda usar este producto usted debe tener
lo siguiente:
Una conexión banda ancha a Internet.
Un punto de acceso inalámbrico (Wi-Fi) o una conexión de cable
Ethernet (10 o 100 Mbits/seg con conexión RJ45; solo para RCR-7)
conectada a su Internet de banda ancha, preferiblemente a través de
un enrutador. En muchos casos el modem de banda ancha,
enrutador y punto de acceso será una única unidad combin ada
suministrada por el proveedor del servicio de Internet o comprado
en una tienda especializada.
Si su red inalámbrica está configurada para usar Privacidad
equivalente a cableado (WEP por sus siglas en inglés) o cifrado de
datos por Acceso protegido Wi-Fi (WPA por sus siglas en inglés)
entonces usted necesitará conocer la clave WEP o WPA para
conseguir que la radio de Internet se comunique con la red.
La radio de Internet típica mente funcionará dentro de un ra dio de
10 a 20 metros desde su punto de acceso inalámbrico. El alcance
actual logrado dependerá del ti po de edificación, otras redes
inalámbricas cercanas y posibles fuentes de interferencia.
IMPORTANTE:
Antes de proseguir, asegúrese de que su punto de acceso inalámbrico
o enrutador están activados y funcionando con su servicio de Internet
banda a ncha (utilice su ordenador para verif icarlo). Para ha cer que e sta
parte del sistema funcione, deberá leer las instrucciones suministrad as
junto con el punto de acceso inalámbrico o enrutador.
89
Page 91

Conectar la radio a su red
1. Coloque su radio en una superficie pla na y conecte el cable en la
toma de entrada de suministro eléctrico situada en la parte posterior
de su radio (marcada como ), asegurándose de que el enchufe ha
sido completamente introducido en la toma
2. Enchufe el otro extremo del cable en un toma corriente.
Hay 2 forma s de conectar su radio a la red, con cable e inalámbrica:
Cuando use una red de cable (LAN) (solo para RCR-7WF)
1. Conecte el cable Ethernet en la toma RJ-45 en la parte trasera de
la radio. Si hay una conexión de cable presente, la radio preferirá
esta opción a la inalámbrica.
Hay dos luces indicadoras integradas en la toma RJ-45. Si tiene
problemas con su conexión de cable, esas pueden ayudarle a
identificar la posible causa del problema.
Verde ENCENDIDA = enlace establecido,
Intermitente = transferencia de datos
Amarillo ENCENDIDA = enlace a 100Mbps,
APAGADA= enlace a10Mbps.
2. Encienda la radio presionando el botón de encendido y entonces
podrá empezar a usar la radio. Luego la pantalla mostrará
<Internet Radio> (radio de Internet)
E
90
Page 92

Cuando use una red inalámbrica (ignore esta sección si la
conexión a Internet LAN por cable está siendo usada en
el RCR-7WF)
1. Encienda la radio presionando el botón de encendido
2. La pantalla mostrará “Starting” (Inicia ndo) y luego
“Initializing Network” (Inici alizando red), seguido por “Scanning”
(Explorando)
* Si la radio no puede encontrar una red la pantalla mostrará
“No Wireless Network Found” (No se ha n encontra do
redes inalámbricas). Si e sto sucede, usted tendrá que hacer funcionar
su punto de acceso inalámbrico – Revise las instrucciones
suministradas con él.
91
Page 93

3. La radio puede encontrar más de una red inalámbrica. La pa ntalla
entonces mostrará “Select networks” (Seleccionar redes).
Presione los botones de sintonizado +/- para buscar su red
inalámbrica. Esto es un nombre que se le ha asignado al punto
de acceso por la persona que conf iguró la red – por eje mplo:
“Mi red casera”.
Cuando encuentre su red inalámbrica, presione el botón Seleccion ar.
Unos segundos después la pantalla mostrará <Internet Radio>
(radio de Internet), lo que indica que usted ha conectado la radio
satisfactoriamente a su red, en ese caso ignore los pasos siguientes.
4. Si a su acceso inalámbrico a Internet (enrutador) se le ha puesto
una clave, la pantalla mostrará “Enter WEP key” (Introduzca la
clave WEP) o “Enter WPA key” (Introduzca la clave WPA).
Necesitará, por lo tanto, introducir la clave WEP o WPA correcta en
la radio para permitir que esta se comunique con su red.
Si no tuviera la clave WEP ni WPA, deberá en ese caso obtenerla de
la persona que configuró su red. Algunos enruta dore s Wi-Fi podrían
venir con una clave ya instalada por el distribuidor, en cuyo caso
debería consultar la documentación del usuario que se a djunta.
5. Pasa dos 3 segundos la pantalla pasará al modo de introducción
de clave. Para entrar la clave, use los botones de sintonizado +/ para seleccionar cada carácter de la clave uno por uno,
presionando el botón Seleccionar después de cada carácter.
Recuerde que las claves WEP solo usan números 0-9 y letras A-F.
Las claves WPA son sensibles a las mayúsculas así que deberá
introducirlas exactamente.
E
92
Page 94

6. Si ha cometido un error, presione el botón “Back” (Atrás) para
eliminar el carácter introducido. Use las flechas izquierda y derecha
para mover el bloque del cursor y acceder a los caracteres
introducidos incorrectamente
7. Una vez introducido el ultimo carácter de la clave WEP o WP A,
ubique el símbolo END (Terminar) y presione el botón Seleccionar.
La radio debería ahora poder conectarse a la red y la pantalla
mostrará <Internet Radio> (radio de Internet)
Controles de operación
1. La mayoría de las funciones en su ra dio pueden realizarse usando
los botones de sintonizado +/- y Seleccionar en el panel superior.
Presione los botones de sintonizado +/ para destacar las
funciones deseadas, y luego Seleccionar para escoger esa función.
En este librillo de instrucciones, “presione” siempre significará
presionar y soltar. Cuando se requiera de una presión prolongada
para una función determinada esto será descrito específicamente
en el texto.
2. Si se comete un error al operar los menús, generalmente es posible
regresar al menú anterior presionando el botón “Back” (Atrás) en el
panel superior.
93
Page 95

Selección de una emisora de radio de Internet
Hay cientos de emisora s de radio en Internet para escoger, y hay tres
forma s para sele ccion arlas: por ubicación, género y búsqueda.
Ubicación:
Le permite escoger una emisora de radio desde una lista organizada
por regiones geográfica s y luego por países.
Género:
Le permite escoger una emisora de radio según su contenido, como por
ejemplo Clásica, Rock, Deportes, Noticias, etc.
Búsqueda:
Le permite escoger una emisora de radio introduciendo una palabra
clave del nombre de la emisora de radio, y esta orga nizará las emisoras
que cumplen con el criterio de búsqueda.
1. Después de que la ra dio esté conectada a Internet como se
mencionó anteriormente, la pa ntalla mostrará <Internet Radio>
(radio de Internet). Si la radio no está en la banda de Radio
de Internet, presione el botón Band (Banda) hasta que se muestre
“Internet Radio” (radio de Internet).
2. Presione el botón Seleccionar
3. Presione los botones de sintonizado +/- para escoger entre
<Location> (Ubicación), <Genre> (Género) o <Search> (Búsqueda)
4. Siga una de las 3 secciones de instrucciones a continuación:
E
94
Page 96

Seleccionar de una emisora de radio de Internet por su ubicación
1. Presione los botones de sintonizado +/- hasta que se muestre en la
pantalla <Location> (Ubicación), y luego presione el botón
Seleccionar para pasar a la búsqueda de la ubicación.
2. Presione los botones de sintonizado +/- ha sta que el país deseado
se muestre en la pantalla, luego presione el botón Seleccionar para
confirmar su elección. La lista de las e misoras de radio para ese
país aparecerán en la pantalla.
3. Presione los botones de sintonizado +/-. Esto mostrará todas las
emisora s de radio para el país que usted seleccionó.
4. Cuando encuentre la emisora de radio que desea escuchar,
presione el botón Seleccionar. En pocos segundos la radio se
conectará con la emisora de radio seleccionada.
* Si no fuera posible conectarse con una emisora determinada,
tenga en cuenta que algunas emisoras de radio no tra nsmiten las
24 horas del día, y que otras no están siempre en línea.
95
Page 97

Selección de una emisora de radio de Internet por género.
1. Presione los botones de sintonizado +/- hasta que la pantalla
muestre <Genre> (Género), y luego presione el botón Seleccionar
para entrar el género de su búsqueda.
2. Presione los botones de sintonizado +/- hasta que el género sea
mostrado en la pantalla. Presione el botón Seleccion ar para
confirmar su selección.
3. Presione los botones de sintonizado +/-. Esto le mostrará todas las
emisoras de radio de Internet del género que usted seleccionó.
4. Cuando encuentre la emisora de radio que desea escuchar,
presione el botón Seleccionar. En pocos segundos la radio se
conectará con la emisora de radio seleccionada.
* Si no fuera posible conectarse con una emisora determinada,
tenga en cuenta que algunas emisoras de radio no tra nsmiten las
24 horas del día, y que otras no están siempre en línea.
E
96
Page 98

Selección de una emisora de radio de Internet por Búsqueda.
1. Presione los botones de sintonizado +/- hasta que se muestre en la
pantalla <Search> (Búsqueda), y luego presione el botón
Seleccionar para pasar a la Búsqueda.
2. Use los botones de sintonizado +/- y el botón seleccionar para
introducir la palabra clave del nombre de la emisora de radio que
desea buscar. Si cometió un error, presione el botón “Back” (Atrás)
para retroceder en su entrada.
3. Cuando termine la palabra clave presione los botone s de sintonizado
+/- para encontrar la palabra END (Terminar) y luego presione el
botón Seleccionar.
4. En un momento, la radio le mostrará todas las emisoras de radio
relacionadas a su búsqueda.
5. Presione los botones de sintonizado +/- para encontrar la emisora de
radio que le gustaría escoger, luego presione el botón Seleccionar,
y la radio se conectará a la emisora de radio de su elección.
* Si no fuera posible conectarse con una emisora determinada,
tenga en cuenta que algunas emisoras de radio no tra nsmiten las
24 horas del día, y que otras no están siempre en línea.
97
Page 99

Control del volumen
Mientra s la emisora de radio esté re produciéndose, puede regular el
volumen presionando los botones de volumen +/- en el panel superior.
Ajustes de audio (control del tono)
Su radio cuenta con la capacidad para a justar las características de
graves y agudos del sonido a su gusto personal.
1. Presione prolongada mente (presione y sostenga) el botón
Seleccionar (el botón azul) ha sta que se muestre en la pantalla <off>
(desactivar).
Pre sintonización de e misoras de radio de Internet
Guardar una emisora de radio de Internet en una memoria
de pre sintonizado
Hay 5 espacios de memori a de pre sintoniza do disponible s
1. Seleccione la emisora deseada de la ma nera de scrita anteriormente.
2. Cuando la radio este reproduciéndola, presione y mantenga 1 de los
5 botones de pre sintonizado en la que desee guardar la emisora.
Esta será guardada en la posición de pre sintonizado escogida.
2. Si desea ajustar los graves (o agudos), presione los botones de
sintonizado +/- hasta que se muestre en pantalla “Bass” graves
(o “Treble” agudos). Luego presione el botón Seleccionar/Tono y la
pantalla le mostrará el nivel a ctual de los grave s (o agudos).
3. Para ajustar al nivel deseado presione los botones de sintonizado +/ (entre -7 y +7 para graves; +5~-5 para agudos) y presione el botón
Seleccionar para confirmar su selección.
4. Bajo este catálogo, a de más de graves y agudos también
se encuentra <Flat> (Plano). Cua ndo e ste es seleccionado,
el valor para graves y agudos será 0 y la pantalla mostrará
“Equalization level rest” (Descan so del nivel de e cualización).
3. Repita este procedimiento para las otras memorias de pre
sintonizado que desee configurar.
Recuperación de una emisora de radio pre sintonizada
Cuando la radio este re produciendo, presione cualquiera de los
5 botones de pre sintonizado que desee recuperar. La radio se
conectará con la emisora guardada en la memoria de pre sintonizado.
Nota:
Si usted no ha guardado una emisora de radio en el pre sintonizado
seleccionado, la emisora de radio actual continuará reproduciéndose.
E
98
Page 100

Escuchar material tran smitido a nteriormente
Algunas emisoras de radio le permiten escuchar programa s que ya han
sido emitidos. Cuando seleccione una e misora de ra dio que ofrezca
este servicio, la emisora no empezará a reproducirse inmediat amente,
y la pantalla mostrará las opciones “Live” (En directo) y “On demand”
(A petición).
1. Presione los botones de sintonizado +/- y se mostrará “Live”
(En directo) o “On Demand” (A petición)
6. Use los botones de sintonizado +/- y Seleccionar para escoger el día
en que el programa fue transmitido. La pantalla mostrará entonces la
hora de comienzo del programa 00:00.
7. Para escuchar el programa desde el principio, pulse de nuevo el
botón Seleccionar . De forma alternativa, elija el tiempo de inicio
deseado desde donde se iniciará la re producción del programa.
2. Presione el botón Seleccionar para seleccionar:
Live – reproduce la salida de la emisora de radio actual de
forma normal
On Demand – le permite escuchar transmisiones anteriores
Las opciones dependerán de la emisora que haya escogido.
3. Cuando seleccione “On Dem and”, la pantalla le mostrará los nombres
de los programas disponibles.
4. De nuevo, use los botones de sintonizado +/- y Sele ccion ar para
escoger el programa que desea escuchar.
5. Cuando haya elegido el programa que quiere escuchar, es posible
que empiece a reproducirse o que se muestre en la pantalla una lista
de días para elegir, luego se mostrará un contador de reproducción
desde el principio (00:00). Tenga en cuenta que esta no es la hora a
la que la emisión original tuvo lugar, sino que se trata de la hora
posterior al comienzo del programa desde el que la ra dio empezará
a reproducir. Si se muestra una hora de comienzo,
pase directamente al paso 7.
99
Avance rápido y retroceso de transmisiones
Las emisoras que le permitan escuchar programas de radio emitidos
anteriormente ta mbién le permitirán ava nzar rápido y retroceder la
reproducción ha sta cualquier punto del programa.
1. Cuando la pa ntalla muestre 00:00:00, presione el botón Avance rápido
o retroceso en el panel superior de la radio para programar el tiempo
de inicio. Esto en incrementos de 30 segundos.
2. Cuando alca nce el tiempo requerido del programa, presione el botón
Seleccionar y el programa seguirá desde ese punto.
Función de Reproducir/Detener
Cuando escuche material tra n smitido a nteriormente, será posible
detener temporalmente su reproducción en caso de ser ne cesario.
Para detener la reproducción, presione el botón Reproducir/Detener del
mando a dista ncia.
Para reanudar la re producción, presiónelo de nuevo.
 Loading...