

Page 1
AM/FM 2 bands Digital
Clock Radio
Radio réveil avec tuner
digital AM/FM
Radio Reloj Digital de
2 bandas AM/FM
Digitale W ekkerra dio met
AM/FM
MW/UKW 2-Band-
381Q901-A
Digital-Radiouhr
Operating instruction
Mode d’emploi
Instruccions de ma ne jo
Gebruiksaa nwijzing
Bedienungsanleitung
RCR-3
GB
F
E
NL
D
Page 2

Important safety in struction s
1. Read and understand all safety and operating instructions before
the radio is operated.
2. Retain instruction: The safety a nd operating instruction s should
be retained for future reference.
3. Heed warnings. All warnings on the appli ance a nd operating
instructions should be followed.
4. Follow all operations and use in struction s.
5. Water and moisture: The appliance should not be used near
water. Do not use near a bathtub, washbowl, laundry tub,
kitchen sink, wet ba sement, swimming pool, etc.
6. Un plug the ra dio from the AC power outlet before cle aning.
Use only a da mp cloth for cleaning the exterior of the radio.
7. Do not place the radio on an unstable cart, stand, bracket or
table. The radio may fall, causing serious personal injury and
damage to the radio.
8. Ventilation: This radio should be situated so that its location
or position does not interfere with its proper ventilation.
For example, the radio should not be used on a bed, sofa, rug or
other soft surfaces that may block the ventilation openings.
It should not be placed in a built-in situation like a ca binet that
may reduce air flow through the ventilation openings.
9. Power sources: The radio should be operated only from the type
of power source indicated on the marking label. If you are not
sure of the type of power supply to your home, consult your
radio dealer or power company.
1
Page 3

10. Power cords: The power cord should be positioned so it is not
walked on, pinched, or items placed on top of it. Pay particular
attention to cords at plugs, convenience receptacles, and the
point where they exit from the unit. Unplug the power cord by
gripping the power plug, not the cord. Operate the radio using
only the current type of power source indicated. If you are not
sure of the type of power supply to your home, consult your
dealer or local power company.
11. Do not overload wall outlets or extension cords. This can result
in a risk of fire or electrical shock. Never insert objects of any
kind into the radio through opening. The objects may touch
dangerous voltage points or short out parts. This could cause
a fire or electrical shock.
12. If the radio is left attended a nd unused for long periods of time,
unplug it form the wall outlet. This will prevent damage caused
by lightning or power line surges.
13. If the radio is left unattended and unused for a long period of
time, remove the batteries. The batteries may leak and damage
furniture of your radio.
14. Do not attempt to service the receiver yourself. Removing the
cover may expose you to dangerous voltage, and will void the
warranty. Refer all servicing to authorized service personnel.
15. Object and Liquid Entry-Never push obje cts of any kind into this
radio through opening as they may touch dangerous voltage
points or short-out parts that could result in a fire or electric
shock. Never spill liquid of any kind of product.
16. The appliance should be serviced by qualified service personnel
when:
The power supply cord or the plug has been damaged.
A.
Objects have fallen or liquid had been spilled into the radio.
B.
The radio has been exposed to rain or water.
C.
The radio does not appear to operate normally or exhibits a
D.
marked change in perf ormance.
The radio has been dropped, or the enclosure damaged.
E.
GB
2
Page 4

3
Page 5

Controls
1
Power button and Sleep timer
2
Alarm 2 button
3
Alarm 4 button
4
Light button
5
Time set button
Date set button
6
7
Alarm 1 button
8
Alarm 3 button
9
Nap button
10
Tuning Up/Down a nd Snooze button
11
SET and Light Saving Time button
12
Station presets
13
FM/AM/AUX band selection
14
Clock
15
LCD display
16
Headphones socket
17
Volume control
18
Tone control
19
Light level control
20
Alarm sound level control
21
Time zone switch
22
Reset
23
AUX-IN
24
Power In
GB
4
Page 6
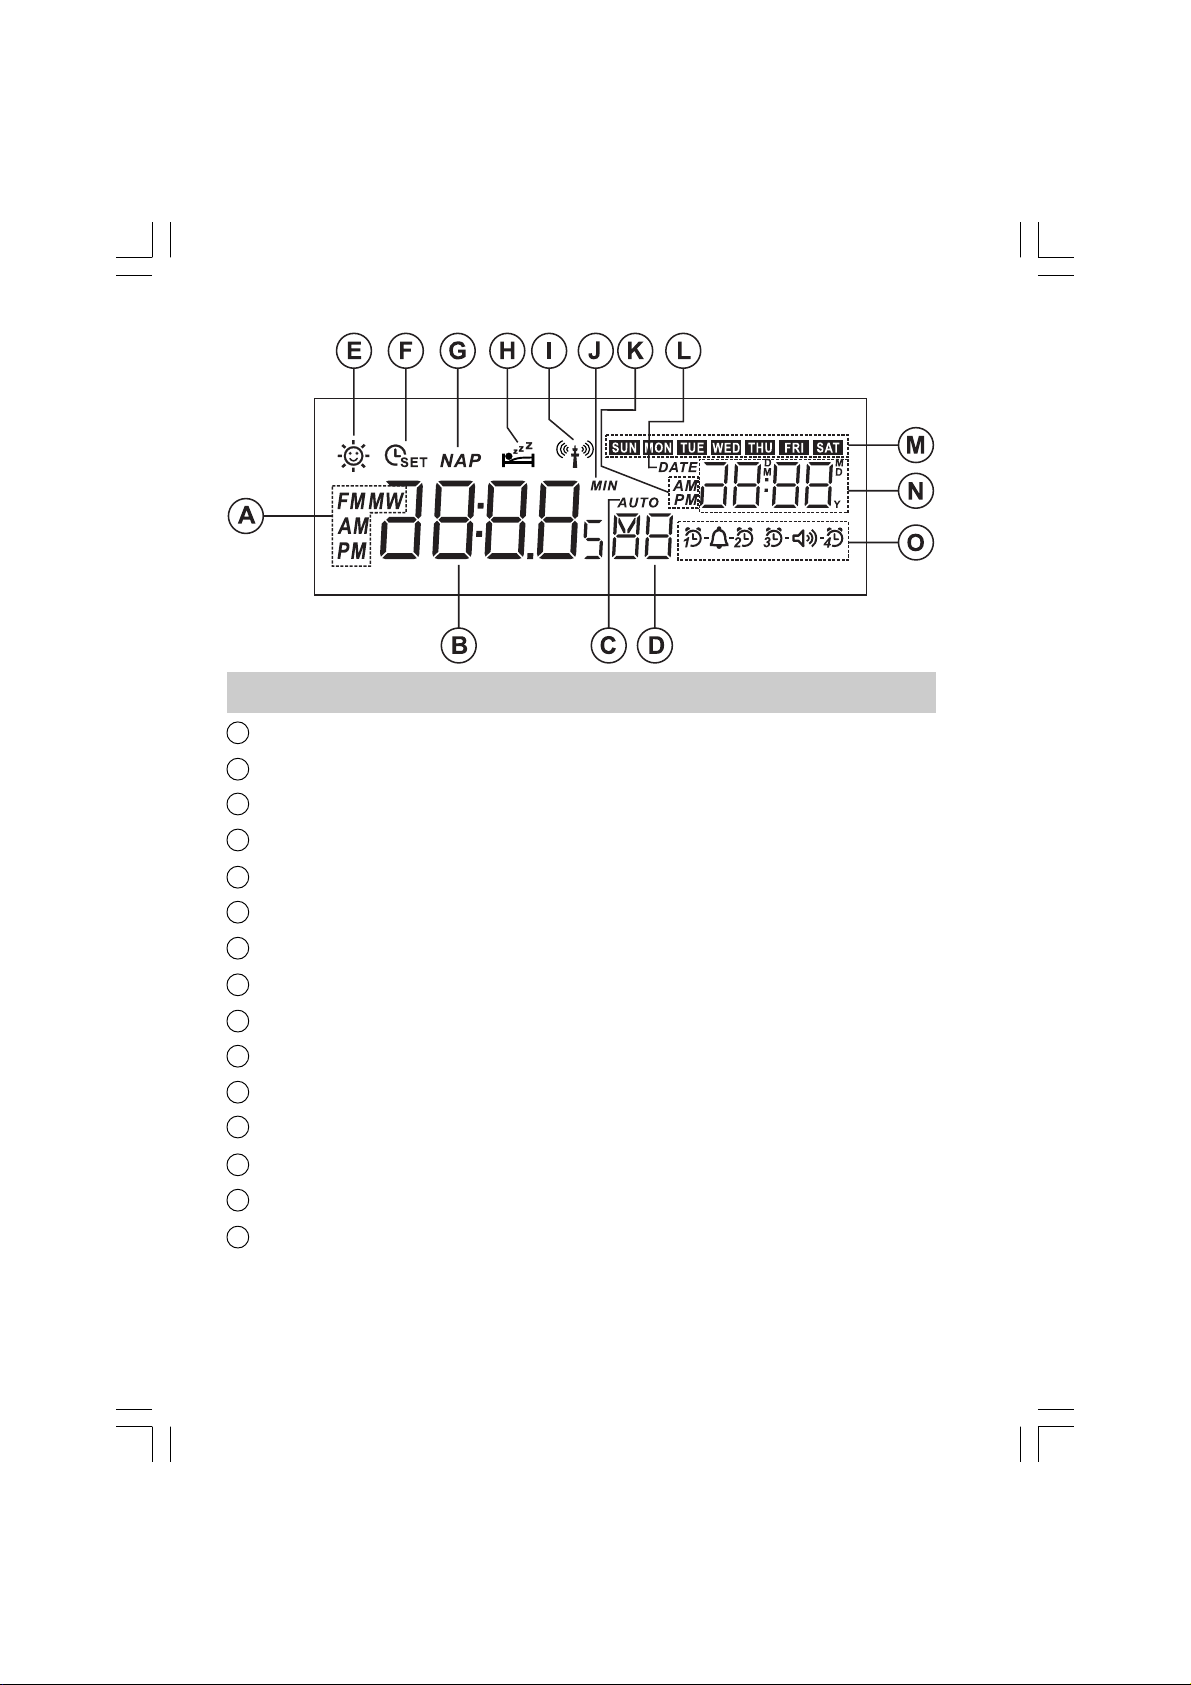
LCD display
A
Radio band and clock AM/PM display
B
T ime indicator/Frequency
C
Auto tuning indicator
D
Memory and se conds indicator
E
Daylight Saving Time indicator
F
Time set indicator
G
Nap indicator
H
Sleep indicator and Snooze indicator
I
Radio controlled time signal
J
Minute indicator
K
Alarm AM/PM indicator
L
Date indicator
M
Day of week indicator
N
Month/Date/Year/alarm time indicator
O
Alarm indicator
5
Page 7

Operation
Power On
Automatic radio station presetting and clock setting
1. Connect the plug to a wall socket at the first time, the radio will
automatically preset AM and FM stations. 7 highest frequency
stations from both AM and FM.
2. Then your clock radio will display -:- and the indicator will
flash on the display. The time will be set if the auto time set
service is available.
3. When the radio is off, press and hold Time button for more
than 4 seconds to rece ive Auto Time Set signal.
Clock
Manual clock setting (only if automatic setting fails)
1. Press the TIME button, and the display will show .
2. Press the SET button, and the hour digits will flash on
the display.
3. Press the TUNING up or down button to adjust the hours.
4. Then press the SET button, and the minute digits will flash on
the display.
5. Press the TUNING up or down button to adjust the minutes.
6. Press SET button to complete the ti me setting.
* You can also stop the process a nd save the setting anytime
by pressing TIME button.
GB
6
Page 8

Manual date setting (only if automatic setting fails)
1. Press the DATE button then press SET button, the year digits
will flash.
2. Press the TUNING up or down button to adjust the year.
3. Press the SET button again a nd the month digits will flash.
4. Press the TUNING up or down button to adjust the month.
5. Press the SET button again and the date digits will flash.
6. Press the TUNING up or down button to adjust the date.
7. Preset SET button to complete the ti me setting.
* You can also stop the process a nd save the setting anytime by
pressing DATE button.
Change 12/24 hour clock format
1. Press TIME button, and then press SET button.
2. To set 12 hour clock format, press Station preset 1, or, to set
24 hours clock format, press Station preset 2.
3. Press TIME button to finish the setting.
D.S.T. (Daylight Saving Time)
1. When the display shows the ti me, press the SET button for more
than 4 seconds to set the clock 1 hour faster, and the display
will show .
2. To set the clock back from D.S.T., press the SET button for
more than 4 seconds, the symbol will disappear.
7
Page 9

Radio operation
Tuning into radio stations
There are 3 ways of tuning your radio:
A. Manual tuning
1. Press the Power button to turn on your radio.
2. Press the BAND button repeatedly to select AM (MW) or
FM waveband.
3. Press the TUNING up or down button to change the frequency.
4. Press the Power button again to turn off your radio.
B. Scan tuning
1. Press the Power button to turn on your radio.
2. Press the BAND button repeatedly to select AM (MW) or
FM waveband.
3. Press the TUNING up or down button for more 0.5 second
and release, it will tune into the next frequency with reception.
4. Press the Power button again to turn off your radio.
C. Presetting and recalling station s
Presetting stations:
1. Press the Power button to turn on your radio.
2. Press the BAND button repeatedly to select AM (MW) or
FM waveband.
3. T une into the station that you would like to pre set.
4. There are 7 preset buttons from 1 to 7. Press 1 of them and
hold for more than 2 seconds until the radio beeps, and the
station frequency will be saved into the chosen preset.
5. Repeat the procedure for the remaining presets. Your radio has
7 presets for each AM and FM.
6. The preset can be overwritten by following the above procedure.
GB
Recalling stations:
1. Press the BAND button for AM or FM.
2. Simply press 1 of the PRESET button s (from 1 to 7) you would
like to tune into. And the preset number and frequency will
appear on the display.
8
Page 10

Alarm operation
There are 4 alarms which can be set independently. Alarm 1 and
Alarm 2 can be set to wake you by buzzer, and Alarm 3 a nd Alarm
4 can be set with radio alarm. When the alarm light is on, it mean s
the indicated alarm will active in 24 hours.
How to set Buzzer Alarm (Alarm 1 and Alarm 2)
The buzzer beep increases in volume every 15 seconds. It beeps
1 minute, followed by 1 minute silence a nd re p eat the cycle.
The buzzer will beep for 1 hour, or stop by pressing the
Power button.
The buzzer alarm volume may be adjusted through the Alarm sound
level control button on the bottom of the radio.
1. Press the Alarm 1 (or Alarm 2) button and Alarm 1 time
(or Alarm 2) time will show on the display.
2. Press the SET button, the alarm hour will show on the display.
3. Press TUNING up or down button to adjust the hour.
4. Press the SET button again a nd a djust the minute by pre ssing
TUNING up or down button.
5. Select required days of week on which the alarm will beep by
pressing day of week buttons. (press the day buttons again to
deactivate the days)
6. Press the SET button again a nd press TUNING up or down
button until the mark or is shown.
7. Press the SET button to complete the setting.
8. When it is buzzing, the or mark is blinking.
Press the Power button to stop the buzzer. And the or
mark will stop blinking.
* You can press the Alarm 1(or Alarm 2) button anytime to complete
the setting.
9
Page 11
How to set Radio Alarm (Alarm 3 and Alarm 4)
The Radio Alarm will sound for 1 hour, or stop by pressing the
Power button. The Radio Alarm volume may be adjusted through
the Alarm sound level control button on the bottom of the ra dio.
1. Press the Alarm 3 (or Alarm 4) button and Alarm 3 time
(or Alarm 4) time will show on the display.
2. Press the SET button, the alarm hour will show on the display.
3. Press TUNING up or down button to adjust the hour.
4. Press the SET button again a nd a djust the minute by pre ssing
TUNING up or down button.
5. Select required days of week on which the alarm will beep by
pressing day of week buttons. (press the day buttons again to
deactivate the days)
6. Press the SET button again a nd press TUNING up or down
button until the or is shown.
7. Press the SET button again and press BAND button to select
FM or AM (MW), and press TUNING up or down button to tune
into the station that you wish to wake up and adjust volume.
8. Press the SET button to complete the setting.
9. Press the Power button to switch off the radio.
10. When it is buzzing, the or mark is blinking.
Press the Power button to stop the buzzer. And the or
mark will stop blinking.
11. When the radio signal is weak, the radio alarm will be
buzzer alarm.
* You can press the Alarm 3(or Alarm 4) button anytime to complete
the setting.
* When it is AUX-IN, and the radio band is not set, the alarm will be
buzzer alarm.
GB
10
Page 12

Snooze function
1. To interrupt the alarm signal (radio alarm or buzzer alarm),
press any button on the top side of the radio (up/ down/SET/
PRESET 1-7/band button). The alarm will stop for 5 minutes and
the display will show . The snooze function can be repeat
during the period of the alarm is active.
2. Press the Power button to cancel the s nooze and alarm function.
How to dea ctivate alarms
1. Press and continue to hold the Alarm 1 (or Alarm 2, 3, 4 button)
that you wish to cancel for more than 2 seconds.
2. The symbol or or or will disappear from the display.
And the alarm you press will be cancelled.
3. To reactive the alarm, press and hold Alarm 1 or
Alarm 2,3,4 button that you wish to reactive, and the symbol
or or or will appear on the display and it will
be reactive.
Nap timer
1. It is a countdown alarm which will sound after the time period
that you set. And the time period can be set from 10 to
120 minutes in 10 minutes steps.
2. Press the NAP button until the required time period is shown
on the display.
3. The word NAP will be shown on the display a nd the Nap timer
is set.
4. While the Nap timer is alarming, press the Power button to
silence the alarm.
5. To cancel the Nap timer bef ore the time Nap time is elapsed,
press a nd release the NAP button until the OFF word is
appeared on the display.
11
Page 13

Sleep timer – radio auto shut off
The Sleep timer can be set from 15-120 min. The radio will be
switch off after the time you set has elapsed.
1. When the radio is off, press and continue to hold the button,
the radio will be switched on a nd the display will show the timer
minutes in turn, and release the button when the required
time is appeared. Then the Sleep timer is set.
2. To cancel the Sleep timer, press the Power button a nd the
symbol will be gone.
Time zone setting
Set TIME ZONE switch (on the bottom of the radio) to 0 position
for regular case.
For some countries where don’t provide radio controlled time
facility but able to receive radio controlled time sign al from
nearby countries a nd the time zone is different, you may use the
TIME ZONE switch to correct the time.
For exa mple, in Turkey which is one hour ahead of Central
Europea n ti me but still can receive radio controlled time signal from
Germany (Central European time), you may use this TIME ZONE
switch to correct the local time.
Display backlight adjustment
Press the button to switch the display backlight to be brighter
or darker. When it is switched to darker, you can turn the LIGHT
LEVEL CONTROL button to adjust the display light to be the
most dark.
GB
12
Page 14

Headphone socket
Plus in a headphone to the Headphone socket for headphone
function, and the built-in ra dio speaker will be muted.
AUX IN socket
Plug in external audio devices such as CD player to the AUX IN
socket (on the side of the radio), then play your device and press
the Band button repe atedly until you see “AU” on the display.
The radio will amplify and play out the signal form your device.
Reset the ra dio
If your radio doesn’t operate correctly, or some display digits are
missing, press the RESET button (on the bottom of the radio) with
suitable implement for more than 2 seconds, the whole me mory will
be reset as a brand-new one.
13
Page 15

Technical data
Power supply:
120 V olt/60 Hz (USA version);
230 V olt/50 Hz (Europe version)/ADAPT OR DC OUT 12V/0.7A
Output power: 1.2 W (max)
Power consumption: 7W (max)@120V, 8W (max)@230V
Frequency coverage:
FM 87.5 – 108.0 MHz
AM 520 – 1710 kHz (USA version);
AM 522 – 1629 kHz (Europe version)
If at any time in the future you should need to dispose of this product please
note that: Waste electrical products should not be disposed of with household
waste. Please recycle where facilities exist. Check with your Local Authority or
retailer for recycling a dvice. (W aste Electrical and Electronic Equipment Directive)
GB
14
Page 16

15
Page 17

Consigne s de sécurité i mportantes
1. Lisez et comprenez toutes les consignes de sécurité et
d’utilisation avant d’utiliser la ra dio.
2. Conservez ce ma nuel : Les consignes de sécurité et le mode
d’emploi doivent être conservés pour consultations ultérieures.
3. A vertissements. Tous les avertissements situés sur l’appareil
ainsi que les consignes d’utilisation doivent être observés.
4. Suivez toutes les opérations en vous référa nt au mode d’e mploi.
5. Eau et humidité : L’a ppareil ne doit pa s être utilisé près de
points d’eau. Ne l’utilisez pas près d’une baignoire, d’un lavabo,
d’un baquet de blanchisserie, d’un évier de cuisine, dans un
sous-sol humide, ou encore près d’une piscine, etc.
6. Débranchez la radio de la prise secteur avant de procéder au
nettoyage. Utilisez seulement un chiffon humide pour nettoyer
l’extérieur de l’appareil.
7. Ne placez jamais la radio sur un chariot, un stand, support de
fixation ou une table instable. La radio pourrait tomber,
s’endommager et causer de sérieuses blessures.
8. Aération: Cette radio doit être installée de façon à permettre une
bonne circulation de l’air . La radio ne doit pas par exemple être
utilisée sur un lit, un canapé, un tapis ou d’autres surfaces molles
qui pourraient obstruer les orifices de ventilation. Celle-ci ne doit
également pas être installée dans un endroit confiné, comme une
étagère, ce qui pourrait réduire la circulation du flux d’air.
F
16
Page 18

9. Sources d’alimentation: La radio doit être utilisée avec les
sources d’alimentation figura nt sur la plaque sign alétique.
Si vous n’êtes pas sûr de la tension de votre installation,
consultez votre revendeur ou compagnie d’électricité.
10. Cordon d’alimentation : Le cordon d’ali mentation doit être
positionné de façon à ce qu’il ne puisse pa s être piétiné ou
pincé, ou encore qu’un autre objet soit placé dessus.
Accordez une attention toute particulière aux f iches,
raccorde ments et aux points de raccordements situés sur
l’a ppare il. Débranchez le cordon d’alimentation en saisissant la
fiche, et non le cordon lui même. Utilisez la radio seulement
sous le type de tension indiqué. Si vous n’êtes pas sûr du type
de tension de votre installation, consultez votre revendeur ou
compagnie d’électricité.
11. Ne surchargez pas prises murales et les rallonges. Car ceci
pourrait se résulter par un incendie ou une électrocution.
Ne jamais insérer d’objets étrangers dans le boîtier de
l’appareil. Les objets pourraient entrer en contact avec des
points de tension dangereux et provoquer un court circuit.
Il y a également risque d’incendie et d’électrocution.
12. Lorsque vous n’utilisez pas la radio pendant de longues
périodes, débranchez-la de la prise murale. Ceci
permettra d’empêcher les dommages liés à des surtensions
lors d’orages.
17
Page 19

13. Lorsque la radio est laissée sans surveillance et inutilisée
pendant de longues périodes, retirez les piles. Les piles
peuvent fuir et endommager le meuble sur lequel la radio
est installée.
14. N’e ssayez pas de réparer le récepteur vous-même. Enlever le
couvercle pourrait vous exposer de dangereuses ten sions,
et annuler la garantie. Confiez l’entretien de votre radio à du
personnel qualifié.
15. Insertion d’objets et de liquides – N’in sérez jamais d’objets à
travers les orifices de ventilation, car ceux-ci pourraient entrer
en contact avec de dangereux points de tension. Ce qui
pourrait provoquer un court-circuit et se résulter par un
incendie ou une électrocution. Ne versez jamais de liquides
sur la radio.
16. L’a ppare il devrait être conf ié à un te chnicien qualif ié lors que :
A.
Le cordon d’alimentation ou sa fiche a été endommagé.
B.
Des objets sont tombés à l’intérieur du boîtier de l’appareil,
ou un liquide a été renversé sur la radio.
C.
La radio a été exposée à la pluie ou à l’eau.
D.
La radio ne semble pas fonctionner normalement ou vous
constatez une baisse de performa nce s.
E.
La radio a subi une chute, ou son boîtier a été endommagé.
F
18
Page 20

Commande s
1
Commutateur d’alimentation et Minuterie sommeil
Touche Alarme 2
2
Touche Alarme 4
3
Touche Lumière
4
Touche Heure
5
Touche Date
6
Touche Alarme 1
7
Touche Alarme 3
8
9
Touche Nap
Touche de réglage du tuner UP/DOWN et Snooze
10
Touche SET et Heure d’été
11
Touches de présélection
12
13
Sélecteur de ba nde FM/AM/AUX
14
Horloge
15
Écran LCD
16
Prise casque
Commande de réglage du Volume
17
18
Commande de la tonalité
Commande de réglage du niveau de luminosité
19
20
Commande de réglage du volume de l’alarme
21
Sélecteur de fuseau horaire
22
Remise à zéro
23
Connecteur AUX-IN
24
Connecteur d’alimentation
19
Page 21
Écran LCD
A
Affichage de l’horloge et de la bande sélectionnée.
B
Indicateurs V eille et Snooze
C
Indicateur de réglage automatique de l’heure par la radio
D
Indicateur de réglage automatique des stations
E
Date
F
Jour de la semaine
G
Indicateur de réglage de l’heure
H
Minutes
I
Mémoire et secondes
J
Indicateur Alarme AM/P.M.
K
Horloge
L
Heure de l’alarme Mois/Date/Année
M
Indicateur minuterie Nap
N
Fréquence radio, heure
O
Indicateur de l’Alarme
Mode Opératoire
Mise en marche de la radio
Préréglage de station et arrangement par radio automatiques
d’horloge
1. Raccordez tout d’a bord le cordon d’ali mentation à une prise
secteur, la radio effectuera automatiquement la recherche
de stations sur les bandes AM et FM.
2. L’écran LCD affichera ensuite - : - ainsi que l’indicateur qui
clignotera. L’heure sera réglée automatiquement si le service de
réglage de l’heure automatique est disponible.
3. Lorsque la radio est éte inte, appuyez et maintenez enfoncée la
touche pendant plus de 4 seconde s pour recevoir un signal
de réglage automatique de l’heure.
F
20
Page 22

Horloge
Réglage manuel de l’horloge (seulement si le réglage
automatique échoue)
1. Appuyez sur la touche TIME, l’écran affiche .
2. Appuyez sur la touche SET, les chiffres des heures clignotent.
3. Appuyez sur la touche TUNING up ou down pour régler l’heure.
4. Appuyez ensuite sur la touche SET, les chiffres des
minutes clignotent.
5. Appuyez sur la touche TUNING up ou down pour régler
les minutes.
6. Appuyez sur la touche SET pour terminer le réglage de l’horloge.
* Vous pouvez à tout moment arrêter le processus et sauvegarder
les paramètres de l’horloge en appuyant sur la touche TIME.
Réglage manuel de la date (seulement si le réglage
automatique échoue)
1. Appuyez sur la touche DATE, puis sur la touche SET, les chiffres
de l’année clignotent.
2. Appuyez sur la touche TUNING up ou down pour régler l’année.
3. Appuyez une nouvelle f ois sur la touche SET, les chiffres du
mois clignotent.
4. Appuyez sur la touche TUNING up ou down pour sélectionner
le mois.
5. Appuyez une nouvelle f ois sur la touche SET, les chiffres de la
date clignotent.
6. Appuyez sur la touche TUNING up ou down pour régler la date.
7. Appuyez sur la touche SET pour terminer le réglage de la date.
* Vous pouvez à tout moment arrêter le processus et sauvegarder
les paramètres de date en appuyant sur la touche DATE.
21
Page 23

Modifier le format de l’heure : 12/24 heures
1. Appuyez sur la touche TIME, puis appuyez sur la touche SET.
2. Pour définir le format de l’horloge sur 12 heures, appuyez sur la
touche Station preset 1, puis appuyez sur la touche Station
preset 2 pour définir le format de l’horloge en 24 heures.
3. Appuyez sur la touche TIME pour terminer le réglage du format
de l’horloge.
D.S.T. (Heure d’été)
1. Lorsque l’écra n af fiche l’heure, appuyez et maintenez enfoncée
la touche SET pendant plus de 4 se condes pour ajouter une
heure, l’écran af f iche alors l’indicateur .
2. Pour reculer d’une heure, a ppuyez et maintenez enf oncée
la touche SET pendant plus de 4 se condes, l’indicateur
disparaît.
Fonctionnement de la ra dio
Réglage des stations ra dio
Il y a 3 manières de régler votre radio:
A. Réglage manuel
1. Appuyez sur le Commutateur d’ali mentation pour mettre en
marche votre radio.
2. Appuyez de façon répétée sur la touche BAND pour sélectionner
la bande AM(MW) ou FM.
3. Appuyez sur la touche TUNING up ou down pour changer
de fréquence.
4. Appuyez une nouvelle f ois sur le Commutateur d’ali mentation
pour arrêter votre radio.
F
22
Page 24

B. Réglage en mode scan
1. Appuyez sur le Commutateur d’ali mentation pour mettre en
marche votre radio.
2. Appuyez de façon répétée sur la touche BAND pour sélectionner
la bande AM(MW) ou FM.
3. Appuyez et maintenez enfoncée la touche TUNING up ou down
pour rechercher la prochaine fréquence disponible.
4. Appuyez une nouvelle f ois sur le Commutateur d’ali mentation
pour arrêter votre radio.
C. Mémorisation et rappel de stations
Préréglage des stations:
1. Appuyez sur le Commutateur d’ali mentation pour mettre en
marche votre radio.
2. Appuyez à plusieurs re prises sur la touche BAND pour
sélectionner la bande AM (MW) ou FM.
3. Sélectionnez la station radio que vous souhaitez mémoriser.
4. 7 touches de présélection sont disponibles. Appuyez et
maintenez enfoncée la touche 1 jusqu’à ce que la ra dio émette
un bip. La fréquence de la station radio sera mémorisée sur
cette touche.
5. Répétez les étapes précédentes pour les boutons de
préréglages restants. Votre radio dispose de 7 présélections
pour chaque bande: AM et FM.
6. Les stations radio mémorisées peuvent être remplacées par de
nouvelles, il vous suffit de répéter les étapes ci-dessus.
Rappel des stations:
1. Appuyez sur la touche BAND pour sélectionner une bande:
AM ou FM.
2. Appuyez si mple ment sur la touche PRESET (de 1 à 7) de
votre choix. Le numéro de préréglage et la fréquence s’affichent
à l’écran.
23
Page 25

Fonctionnement de l’Alarme
4 alarmes indépenda ntes sont disponible s. L’Alarme 1 et
l’Alarme 2 peuvent être réglées pour vous réveiller avec le buzzer,
et l’Alarme 3 et l’Alarme 4 peuvent être réglées avec l’alarme radio.
Lorsque la lumière d’alarme est allumée, cela signifie que l’alarme
est active en format 24 heures.
Comment régler l’alarme Buzzer (Alarme 1 et Alarme 2)
Le volume sonore du buzzer augmente toutes les 15 secondes.
Il émet un bip penda nt une minute, suivie d’une minute de silence,
puis répète ce cycle. Le buzzer émettra des bips pendant une
heure, vous pouvez le désactiver à tout moment en appuyant sur
le Commutateur d’alimentation.
Le volume du buzzer peut être réglé avec par la commande
de réglage du volume de l’Alarme situé sur la partie inférieure
de la radio.
1. Appuyez sur la touche Alarme 1 (ou Alarme 2), l’heure de
l’Alarme 1 (ou de l’Alarme 2) s’affiche à l’écran.
2. Appuyez sur la touche SET, les heures clignotent.
3. Appuyez sur la touche TUNING up ou down pour régler l’heure.
4. Appuyez une nouvelle f ois sur la touche SET puis réglez le s
minutes en appuyant sur la touche TUNING up ou down.
5. Sélectionnez les jours de la semaine pour le squels l’alarme sera
activée en appuyant sur les touches Jour et Se maine.
(a ppuyez à nouve au sur ces touches pour désactiver les jours)
6. Appuyez une nouvelle fois sur la touche SET puis sur la touche
TUNING up ou down jusqu’à ce que le symbole ou
soit affiché.
7. Appuyez sur la touche SET pour terminer le s réglages.
8. Lorsque le buzzer retentit, le symbole ou clignote.
Appuyez sur le commutateur d’ali mentation pour arrêter l’alarme.
Le symbole ou s’arrête de clignoter.
* V ous pouvez appuyer à n’importe quel moment sur la touche
Alarme 1 (ou Alarme 2) pour terminer les réglages.
F
24
Page 26

25
Page 27

10. Lorsque l’alarme retentit, le symbole ou clignote.
Appuyez sur le commutateur d’alimentation pour arrêter
l’alarme. Le symbole ou s’arrête de clignoter.
11. Lorsque le signal radio est faible, l’alarme radio est remplacée
par l’alarme buzzer.
* V ous pouvez appuyer à n’importe quel moment sur la touche
Alarme 3 (ou Alarme 4) pour terminer les réglages.
* Lorsque la source audio est AUX-IN, et que la bande radio n’a
pa s été séle ctionnée, l’alarme activée sera l’alarme buzzer.
Fonction Snooze
1. Pour interrompre l’alarme (l’alarme radio ou le buzzer), a ppuyez
sur n’importe quelle touche du côté supérieur de la radio
(haut/ba s/Touchede SET/PRESET 1-7/band). L’alarme
s’arrêtera pendant 5 minutes et l’écran affichera le symbole .
La fonction Snooze peut être répétée penda nt la période où
l’alarme est active.
2. Appuyez sur le Commutateur d’ali mentation pour désactiver la
fonction Snooze et l’alarme.
Comment désactiver les alarme s
1. Appuyez et maintenez enf oncée pendant 2 secondes la touche
Alarme de votre choix (Alarme 1 ou Alarme 2, 3, 4) .
2. Le symbole ou ou ou disparaît. L’alarme que vous
sélectionnez sera désactivée.
3. Pour réactiver l’alarme, appuyez et maintenez enfoncée la
touche d’alarme que vous souhaitez activer, Alarme 1 ou
Alarme 2, 3, 4. Le symbole ou ou ou apparaît à
l’écran, l’alarme sélectionnée est alors réactivée.
F
26
Page 28

Minuterie Nap
1. Cette fonction est un compte à rebours après lequel l’alarme
retentit. La durée est réglable de 10 à 120 minutes par
incrément de 10 minutes.
2. Appuyez sur la touche NAP jusqu’à ce que durée souhaitée soit
affichée à l’écran.
3. Le mot NAP sera affiché à l’écra n signifia nt que le compte à
rebours est actif.
4. Lorsque l’alarme retentit, appuyez sur le Commutateur
d’alimentation pour éteindre l’alarme.
5. Pour annuler la minuterie Nap ava nt que la durée déf inie ne soit
écoulée, a ppuyez et relâchez la touche NAP jusqu’à ce que
OFF s’affiche à l’écran.
Minuterie somme il – arrêt automatique de
la radio
La minuterie sommeil peut être réglée de 15 -120 mn.
La radio s’éteint automatiquement lors que la durée programmée
est écoulée.
1. Lorsque la radio e st éteinte, appuyez et maintenez enfoncée
la touche , la radio se met en marche puis l’écran affiche
successivement les durées disponibles de la minuterie sommeil,
relâchez la touche lorsque la durée souhaitée apparaît.
La minuterie sommeil est alors définie.
2. Pour annuler la minuterie sommeil, appuyez sur le Commutateur
d’alimentation, le symbole disparaît.
27
Page 29

Fuseau horaire
Positionnez le sélecteur de FUSEAU HORAIRE (situé sur le côté
bas de la radio) sur la position 0 dans le ca s normal.
Si vous vous situez dans un pays où le service d’heure contrôlé
par la radio n’est pas disponible, il est toujours possible de
recevoir le service d’un pays voisin ayant un fuse au horaire
différent. V ous pouvez utiliser le séle cteur de FUSEAU HORAIRE
pour régler l’heure.
Par exemple, la T urquie e st avance d’une heure par rapport
à l’Europe centrale mais peut encore recevoir le signal radio
d’Allemagne (heure d’Europe centrale), vous pouvez utiliser ce
sélecteur de FUSEAU HORAIRE pour corriger l’heure locale.
Réglage du rétro éclairage de l’écran
Appuyez sur la touche pour modifier le contraste de l’écran.
Lorsque le contraste est sur la position sombre, vous pouvez
tourner la COMMANDE DE REGLAGE DE LA LUMIERE
pour positionner le niveau de rétro éclairage sur le niveau le
plus sombre.
Prise Casque
Raccordez votre casque d’écoute à la prise Ca sque pour une
écoute privée. Le son émis par le haut-parleur intégré de la radio
sera coupé.
F
28
Page 30

Connecteur AUX IN
Connectez des périphérique s audio externes comme un le cteur
CD au conne cteur AUX IN (situé sur le côté de la radio).
Lancez ensuite la le cture sur le périphérique audio et appuyez de
façon répétée sur la touche BAND jusqu’à ce que le message
« AU » s’affiche à l’écran. La radio amplifiera et diffusera la
musique émise par le périphérique externe.
Remise à zéro de la radio
Si votre radio ne fonctionne pas correctement, ou si vous constatez
un problème avec l’affichage des chif fres, appuyez pendant deux
secondes sur la touche RESET (situé au bas de la radio) en
utilisant un objet pointu, la mémoire sera effacée et les paramètres
reconfigurés par défaut.
29
Page 31

Donnée s techniques
Alimentation:
120 V olt/60 hertz (version américaine);
230 volt/50 hertz (version européenne)/
ADAPT A TEUR DE COURANT 12V/0.7A
Puissance: 1.2 W (maxi mum)
Consommation d’énergie:
7W (maximum) @120V, 8W (maximum) @230V
Ga mme de fréquence s:
FM 87.5 - 108.0 MHz
AM 520 - 1710 kHz (version américaine);
AM 522 - 1629 kHz (version européenne)
A Noter lors de la disposition de cet a ppareil : Les appareils électriques ne doivent
en aucun cas être disposés avec les déchets ménagers. Disposez de cet appareil
dans un point de recyclage. Consultez votre municipalité ou votre revendeur pour
obtenir des conseils sur la disposition de l’appareil. (Directive concernant la
Disposition des Equipements Electriques et Electroniques)
F
30
Page 32

31
Page 33

Instruccione s de seguridad importantes
1. Lea y comprenda todas las instrucciones de seguridad y
funcionamiento antes de utilizar la radio.
2. Guarde las instrucciones: las instrucciones de seguridad y
funcionamiento deben ser guardadas para una futura referenci a.
3. Siga toda s las advertencias. Debe seguir todas las advertencias
e instrucciones de seguridad cuando vaya a utilizar la unidad.
4. Siga toda s las instrucciones de uso y funcionamiento.
5. Agua y humeda d: la unida d no debe utilizarse cerca del agua.
No la utilice cerca de cañerías de baño, recipientes con agua,
cañerías de la lavadora, fregadero, superficies húmedas,
piscinas, etc.
6. Desenchufe la ra dio de la salida del suministro de corriente
ante s de limpiarla. Utilice únicamente un trapo seco y limpio
para limpiar el acabado de la radio.
7. No e mplace la radio en una superficie en movimiento, o bases,
monturas o mesas inestables. La radio podría caer y causar
daños personales o daños en la radio.
8. V entilación; la radio se debe situar de manera que la localización
o posición no interfiera con su adecuada ventilación. Por
ejemplo; la radio no debe colocarse sobre un sofá, alfombra u
otras superficies suaves que puedan bloquear las aperturas de
ventilación. No deberá tampoco situarla en un lugar cerrado ya
que puede reducir el flujo de aire de la s aperturas de ventilación.
E
32
Page 34

9. Fuentes de energía: sólo deberá utilizar la radio con el tipo de
fuente indicada en el cuadro de espe cificaciones. Si no está
seguro del tipo de suministro de energía de su casa, consulte
con su compañía de electricidad.
10. Cables de corriente: deberá emplazar el cable de corriente de
manera que nadie ande alrededor de este o lo pisen, tampoco
coloque objetos encima de los cables. Preste especial atención
a los cables enchufes, y al emplazamiento de la unidad.
De senchufe el cable tirando del enchufe y no del cable.
Utilice la radio usando únicamente el tipo de corriente de la
fuente de energía indicado. Si no está seguro del ti po de
suministro de corriente de su ca sa, con sulte con su compañía
de electricidad.
11. No sobrecargue las paredes de salida de electricidad o los
adaptadores para corriente. Esto puede provocar un incendio
o electrocución. No inserte objetos en las aperturas de la radio.
Los objetos podrían entrar en contacto con puntos de voltaje
peligrosos o cortar piezas. Esto podría provocar un incendio
o electrocución.
12. Si la radio no se va a utilizar durante largos períodos,
desenchufe el enchufe de la pared de suministro de corriente.
Esto prevendrá que la unidad pueda dañarse debido a subidas
de corriente o ilumina ción.
33
Page 35

13. Si no va a utilizar la radio durante un largo período, quite las
pilas. Las pilas pueden perder sustancias químicas y dañar
el acabado de la radio.
14. No intente arreglar la unidad por si solo. Al quitar la cobertura
de la radio puede exponerse a un voltaje peligroso y anulará la
garantía. Acuda a personal con servicio autorizado para
reparar la radio.
15. Nunca introduzca objetos o líquidos en la entrada de la unida d
ya que puede entrar en contacto con puntos de voltaje
peligrosos o puede romper piezas y esto podría resultar en un
incendio o electrocución. No derrame líquido de ningún tipo
sobre la unidad.
16. La unidad deberá ser reparada por personal con servicio
cualificado cuando:
A.
El cable o el enchufe del suministro de corriente está dañado.
B.
Han caído objetos o se han derramado líquidos sobre
la unidad.
C.
La radio se ha expuesto a la lluvi a o agua.
D.
La radio no funciona con normalidad o muestra cambios en
su funciona miento.
E.
La radio se ha caído o la superficie está dañada.
E
34
Page 36

Controles
1
Botón de corriente y temporizador de hibernación
2
Botón 2 para alarma
3
Botón 4 para alarma
4
Botón de ilumina ción
Botón de ajuste de la hora
5
Botón de ajuste de la fecha
6
7
Botón 1 para alarma
8
Botón 3 para alarma
9
Botón de modo siesta
10
Botón de sintonización arriba/aba jo y botón de repetición
11
Botón de AJUSTE para guardar el tie mpo de ilumin ación
12
Programación de las estaciones
13
Selección de la banda FM/AM/AUX
14
Reloj
15
Pantalla LCD
16
Entrada para auriculares
Control de volumen
17
18
Control del tono
19
Control del nivel de iluminación
20
Control del nivel del sonido de la alarma
21
Interruptor de cambio horario
22
Reajustar
23
AUX-IN
24
Entrada de Corriente
35
Page 37

Pantalla LCD
A
Banda de la radio y pantalla reloj AM/PM
B
Indicador Hibernación e Indicador repetición
C
Señal horaria que controla la radio
D
Indicador sintonizador de audio
E
Indicador de fecha
F
Indicador día de la semana
G
Indicador de ajuste de hora
H
Indicador de minutos
I
Memoria e indicador de segundos
J
Indicador de alarma AM/PM
K
Indicador para ahorrar energía durante el día
L
Indicador hora alarma Mes/Día/Año
M
Indicador modo siesta
N
Indicador Hora/Frecuencia
O
Indicador de alarma
Funcionamiento
Encendido
Programación automática de las estacione s de radio y a justes
del reloj
1. Conecte por primera vez el enchufe a la pared de suministro de
corriente, la radio programará automáticamente las estaciones
AM y FM. Las estaciones con mayor señal de frecuencias tanto
AM como FM quedarán guardadas.
2. A continuación, el reloj mostrará -:- y el indicador parpadeará
en la pantalla. La hora quedará ajustada si el servicio de a juste
de hora automática está disponible.
3. Cuando la radio está a pagada, mantenga presion a do durante
cuatro segundos el botón de hora para recibir la señal de
hora de forma automática.
E
36
Page 38

Reloj
Ajuste manual del reloj (solo si el ajuste automático falla)
1. Presione el botón de HORA, la pantalla mostrará .
2. Presione el botón de AJUSTE, y los dígitos de las horas
parpadearán en la pantalla.
3. Presione el botón de SINTONIZACIÓN arriba/abajo para ajustar
las horas.
4. A continuación, presione el botón de AJUSTE y los dígitos de los
minutos parpadearán en la pantalla.
5. Presione el botón de SINTONIZACIÓN arriba/abajo para ajustar
los minutos.
6. Presione el botón de AJUSTE para f in alizar el ajuste de la hora.
* Ta mbién puede parar el proceso y guardar los a justes en
cualquier momento presionando el botón de HORA.
Ajuste manual de la fecha (sólo si el ajuste automático falla)
1. Presione el botón de FECHA, a continuación pre sione el botón
de AJUSTE, los dígitos de los años parpadearán.
2. Presione el botón de SINTONIZACIÓN arriba/abajo para ajustar
el año.
3. A continuación, presione el botón de AJUSTE y los dígitos de los
meses parpadearán en la pantalla.
4. Presione el botón de SINTONIZACIÓN arriba/abajo para ajustar
los meses.
5. Presione el botón de AJUSTE y los dígitos de los día s
parpadearán.
6. Presione el botón de SINOTNIZACIÓN arriba/abajo para ajustar
los días.
7. Presione el botón de AJUSTE para finalizar el proceso.
* Ta mbién puede parar el proceso y guardar los a justes en
cualquier momento presiona ndo el botón de FECHA.
37
Page 39

Cambio del formato del reloj 12/24
1. Presione el botón de HORA y presione el botón de AJUSTE.
2. Para ajustar el formato de reloj de 12 horas, presione Estación
programada 1, para ajustar el formato del reloj en 24, presione
Estación programada 2.
3. Presione el botón de HORA para f inalizar el a juste.
D.S.T. (Ahorro de Iluminación durante el Día)
1. Cuando la pantalla muestra la hora, presione durante más de
4 segundos el botón de AJUSTE para adelantar el reloj una
hora y la pantalla mostrará .
2. Para retrasar el reloj de DST, presione el botón de AJUSTE y
desaparecerá el símbolo de .
Funcionamiento de la radio
Sintonización de las esta ciones de radio
Hay 3 formas para sintonizar la radio:
A. Sintonización Manual
1. Presione el botón de Corriente para encender su radio.
2. Presione repetidamente el botón de BANDA para seleccionar
AM (NW) o FM.
3. Presione el botón de SINTONIZACIÓN arriba/abajo para
cambiar la frecuencia.
E
E
4. Presione de nuevo el botón de Corriente para apagar la radio.
38
Page 40

B. Sintonización por escaneado
1. Presione el botón de corriente para encender la radio.
2. Presione repetidamente el botón de BANDA para seleccionar
AM (NW) o FM.
3. Presione durante mas de 0,5 seg el botón de SINTONIZACIÓN
arriba/abajo y sintonizará la próxima frecuencia con recepción.
4. Presione de nuevo el botón de Corriente para apagar su radio.
C. Programación y reprogramación de las estaciones
Programación de las estaciones:
1. Presione el botón de Corriente para encender la radio.
2. Presione repetidamente el botón de BANDA para seleccionar
AM (NW) o FM.
3. Sintonice la esta ción que de see programar.
4. Hay 7 botones de programación. Desde el 1 hasta el 7.
Presione uno de ellos y mantenga pre sionado durante más de
2 segundos ha sta que la radio hace un tono Bi p, la fre cuencia de
la estación quedará guardada en la programación seleccion ada.
5. Repita el procedimiento par alas programaciones restantes.
Su radio tiene 7 programaciones para AM y FM.
6. Se puede sobrescribir sobre la programación a través del
siguiente procedimiento.
Reprogramación de las estaciones:
1. Presione el botón de BANDA para AM o FM.
2. Presione una de los botones PROGRAMADOS (del 1 al 7)
para poder reprogramar. A continuación, presione el número y
la frecuencia aparecerá en la pantalla.
389
Page 41

Funcionamiento de la Alarma
Existen 4 alarma s que se pueden ajustar de forma independiente.
Ala Alarma 1 y 2 se activan a través del timbre, mientras que las
alarma s 3 y 4 se pueden activar a través de la radio. Cuando la
iluminación dela alarma se active, quiere decir que la alarma
indicada se a ctivará en 24 horas.
Cómo ajustar la alarma por timbre (Alarma 1 y 2)
El bip por timbre aumenta el volumen cada 15 segundos.
Suena durante un minuto, seguido por un minuto de silencio y re pite
el ciclo. El timbre sonará durante una hora o se desactivarán al
presionar el botón de Corriente.
El volumen de la alarma del timbre se puede ajustar a través
del botón de control del sonido de la alarma en la parte inferior de
la radio.
1. Presione el botón de Alarma 1 (o Alarma 2) y la hora de la
Alarma 1 (o alarma 2) aparecerá en la pantalla.
2. Presione el botón de AJUSTE y la hora de la alarma aparecerá
en la pantalla.
3. Presione el botón de SINOTNIZACIÓN arriba/abajo para ajustar
la hora.
4. Presione de nuevo el botón de AJUSTE y ajuste los minutos
presiona ndo el botón de SINT ONIZACIÓN.
5. Seleccione los días de la semana requeridos para que se active
la alarma presionando el botón de día s de la semana (presione
de nuevos los botones de los días para desactivar la alarma).
6. Presione de nuevo el botón de AJUSTE y pre sione el botón de
SINTONIZACIÓN arriba/abajo hasta que aparezca el símbolo
de o .
7. Presione el botón de AJUSTE para finalizar el ajuste.
8. Cuando la alarma esté sonando, los símbolos de o
parpadearán. Presione el botón de Corriente para detener el
timbre. Y el símbolo de o dejará de parpadear.
* Puede presionar el botón de Alarma 1(o Alarma 2) en cualquier
momento para finalizar el ajuste.
E
40
Page 42

Cómo instalar la radio alarma (Alarma 3 y Alarma 4)
La radio alarma sonará durante una hora, o se parará al presionar
el botón de Corriente. El volumen de la radio alarma se puede
ajustar al presionar el botón de control del nivel de sonido de la
alarma situado en la parte inferior de la radio.
1. Presione el botón de Alarma 3 (o Alarma 4) y la hora de la
alarma 3 (o alarma 4) aparecerá en la pantalla.
2. Presione el botón de AJUSTE, y la hora de la alarma aparecerá
en la pantalla.
3. Presione el botón de SINTONIZACIÓN arriba/abajo para ajustar
la hora.
4. Presione de nuevo el botón de AJUSTE para ajustar los minutos
al presionar el botón de SINTONIZACIÓN arriba/abajo.
5. Seleccione los días de la sema na en los que desea activar la
alarma presiona ndo los botones de los días de la semana
(presione de nuevo los botones del los días para desactivar
los días).
6. Presione de nuevo el botón de AJUSTE y presione el botón de
SINTONIZACIÓN arriba/abajo hasta que aparezca el símbolo
de o .
7. Presione de nuevo el botón de AJUSTE y presione el botón de
BANDA para seleccionar FM o AM (NW), y presione el botón
de SINTONIZACIÓN arriba/abajo para sintonizar la estación
con la que desea despertarse y ajuste el volumen.
8. Presione el botón de AJUSTE para finalizar el ajuste.
9. Presione el botón de Corriente para apagar la radio.
41
Page 43

10. Cuando esté sonando, el símbolo de o parpadeará.
Presione el botón de Corriente para detener el timbre y el
símbolo de o dejará de parpadear.
42
E
Page 44

Temporizador modo sie sta
1. Es una alarma modo cuenta atrás en el que la alarma sonará
tras el período de tiempo establecido. El período de tiempo
se puede ajustar desde 10 hasta 120 minutos en fases de
10 minutos.
2. Presione el botón modo SIESTA hasta que aparezca el período
de tiempo deseado en la pantalla.
3. La palabra SIESTA aparecerá en la pa ntalla y el temporizador
modo siesta quedará ajustado.
4. Mientras que el temporizador modo Siesta e stá sonando,
presione el botón de Corriente para silenciar la alarma.
5. Para cancelar el temporizador modo Siesta antes de que suene,
presione el botón SIESTA hasta que la palabra APAGADO
a parezca en al pantalla.
Temporizador modo hibern ación – Apagado de la
radio de forma automática
El temporizador de hibernación se puede ajustar desde 15 minutos
ha sta 120 minutos. La radio se apagará una vez tran scurrido e se
período de tiempo.
1. Cuando la radio esté a paga da, mantenga presionado el
botón , la radio se encenderá y la pantalla mostrará los
minutos del temporizador, suelte el botón de una vez que
haya obtenido el período de tiempo deseado. A continua ción
se habrá ajustado el temporizador de hibernación.
2. Para cancelar el temporiza dor de hibern ación, presione el
botón de Corriente y el símbolo de desaparecerá.
43
Page 45

Ajustes de la zona horaria
Ajuste el interruptor de ZONA HORARIA (en la parte inferior de la
radio) en la posición 0.
Para aquellos países donde la radio no proporciona la función de
control de la hora pero puede recibir la señal de la zona horaria de
otros países, deberá utilizar el interruptor de ZONA HORARIA para
corregir la hora.
Por ejemplo, en T urquía que están un a hora a delantados de la
zona horaria de Europa Central pero que todavía puede recibir la
señal horaria de Alemania (Hora de Europa Central), deberá utilizar
el interruptor de ZONA HORARIA para corregir la hora local.
Ajuste de la luz de de fondo de la pantalla
Presione el botón de para cambiar la luz de fondo de la pantalla
para obtener mayor brillo u oscuridad. Cuando sele ccion a mayor
oscuridad, puede girar el botón de CONTROL DEL NIVEL DE
ILUMINACIÓN para ajustar la iluminación de la pantalla para que
a parezca más oscura.
Entrada de los auriculares
Inserte los auriculares en la entrada de los auriculares para la
función de los auriculares, y los altavoces incorporados quedarán
en silencio.
E
44
Page 46

Entrada AUX IN
Inserte los dispositivos de audio externos como reproductor de CD
en la entrada AUX IN (situado en uno de los laterales de la radio) a
continuación re produzca su dispositivo y presione el botón de
Banda hasta que vea “AU” en la pantalla. La radio reproducirá la
señal desde su dispositivo.
Reajuste de la radio
Si la radio no funciona correctamente o algunos dígitos de la
pantalla no aparecen, presione durante más de 2 segundos el
botón de REAJUSTAR (situado en la parte inferior de la radio) y la
memoria quedará reajustada como una nueva.
45
Page 47

Datos Técnicos
Suministro de corriente:
120 V olt/60 Hz (versión USA);
230 V olt/50 Hz (versión Europa)/
SALIDA ADAPTADOR CC 12V/0.7A
Salida de corriente: 1,2 W (máx)
Consumo de corriente: 7W (máx)@ 120V, 8W (máx)@230V
Cobertura de frecuencia:
FM 87,5 – 108,0 MHz
AM 520 – 1710 kHz (versión USA);
AM 522 – 1629 kHz (versión Europa)
Si en cualquier momento en el futuro necesita desechar este producto tenga en
cuenta que: el desecho de los productos eléctricos no deben desecharse con la
basura doméstica. Recicle este dispositivo si existe un centro de reciclaje. Acuda a
sus autoridades locales para comprobar si se dispone de un centro de reciclaje
adecua do. (Directivo de de sechos de equipos eléctricos y electrónicos).
E
46
Page 48

47
Page 49

Belangri jke veiligheidsvoorschriften
1. Lees en begrijp alle veiligheids- en gebruik svoorschriften vóór u
de radio gaat gebruiken.
2. Bewaar instructies: bewaar deze veiligheids- en
gebruiksvoorschriften voor latere naslag.
3. Volg waarschuwingen: alle waarschuwingen op het apparaat en
in de gebruiksaanwi jzing moeten gevolgd worden.
4. Volg alle instructies: volg alle gebruiksvoorschriften.
5. Water en vochtigheid: dit a pparaat hoort niet gebruikt te worden
in de buurt van water. Gebruik het niet in de buurt van ba den,
waskommen, wasbakken, in vochtige kelders, bij zwembaden,
enz.
6. Haal, voor u de radio schoonmaakt, de stekker uit het
stopcontact. Gebruik voor het schoonmaken va n de buitenk ant
van de ra dio alleen een lichtvochtige doek.
7. Plaats de radio niet op wankele tafels, karretjes, boekenpla nken
of beugels. De radio zou kunnen vallen en ernstig letsel of
schade kunnen veroorza ken.
8. Ventilatie: deze radio moet neergezet worden op een plek waar
er voldoende ruimte is voor goede ventilatie. Zet de radio
bijvoorbeeld niet op een bed, bank, kleed of op andere zachte
ondergronden die de ventilatieopeningen kunnen blokkeren.
De ra dio hoort ook niet ingebouwd te worden in bijvoorbeeld een
kast als zo de luchtstroom door de ventilatieopeningen
verminderd zou worden.
NL
48
Page 50

9. Voedingsbronnen: de radio hoort alleen gebruikt te worden met
het type voedingsbron dat aangegeven is op het apparaat.
Als u niet zeker weet wat voor type voedingsbron uw huis heeft,
raadpleeg dan uw radiowinkel of uw elektriciteitsbedrijf.
10. Stroomsnoeren: het stroomsnoer moet zo geplaatst worden
dan men sen er niet op kunnen lopen en er geen voorwerpen
opgeplaatst kunnen worden. Wees vooral voorzichtig bij
stekkers, stekkerdozen en op de plek waar het snoer het
apparaat verlaat. Haal de stekker uit het stopcontact door aan
de stekker te trekken, niet aan het snoer. Gebruik de radio
alleen met het aangegeven type voedingsbron. Als u niet zeker
weet wat voor type voedingsbron uw huis heeft, raadpleeg dan
uw radiowinkel of elektriciteitsbedrijf.
11. Voorkom overbela sting van stopcontacten en verlengsnoeren.
Dit k an resulteren in brandgevaar of elektrische schok.
Steek nooit voorwerpen in de radio door één van de openingen.
De voorwerpen zouden onderdelen onder gevaarlijke spanning
kunnen aanraken of kortsluiting kunnen veroorzaken. Dit kan
brand of elektrische schok veroorzaken.
12. Haal de stekker uit het stopcontact als de radio lange tijd
onbeheerd gelaten wordt en niet gebruikt wordt. Dit voorkomt
schade door blikseminslagen of plotselinge stroompieken.
49
Page 51

13. Verwijder de batterijen als de radio lange tijd onbeheerd gelaten
wordt en niet gebruikt wordt. De batterijen kunnen lekken en
uw radio en meubelen beschadigen.
14. Probeer niet zelf onderhoud aa n de ontvanger uit te voeren.
Als u de buitenkant openmaakt kunt u uzelf blootstellen aa n
gevaarlijke spa nning en de garantie vervalt automatisch.
Laat onderhoud alleen doen door geauthorizeerd
onderhoudspersoneel.
15. Binnendringen van voorwerpen en vloeistoffen: duw nooit
voorwerpen door de openingen in de radio omdat ze
onderdelen, die onder hoge spanning staan, kunnen aanraken
en kortsluiting kunnen veroorzaken. Dit kan bra nd of elektrische
schok veroorzaken. Mors nooit vloe istoffen van wat voor soort
dan ook, in het product.
16. Gekwalif iceerd onderhoudspersoneel moet onderhoud
uitvoeren indien:
het stroomsnoer of de stekker beschadigd zi jn.
A.
voorwerpen in de radio gevallen zijn, of vloeistof erin
B.
gemorst is.
de radio blootgesteld geweest is aan regen of water.
C.
de radio niet normaal schij nt te werken, of plotseling duideli j k
D.
anders dan normaal werkt.
de radio gevallen is, of de behuizing beschadigd is.
E.
NL
50
Page 52

Regelknoppen
1
Aan/uit-knop en Slaaptimer
2
Wekker 2 knop
3
Wekker 4 knop
4
Lichtknop
5
Tijdknop (TIME)
6
Datumknop (DATE)
7
Wekker 1 knop
8
Wekker 3 knop
9
Timerknop voor dutjes (NAP)
10
Afstem- en Snooze knop (TUNING)
11
INSTEL en Zomer/winterti jdknop (SET)
12
V oorkeurzenderknoppen
13
FM/AM/AUX bandselectie (BAND)
14
Klok
15
LCD-scherm
16
Koptelefoonaansluiting
17
Volumeregelaar
18
Geluidstoonregelaar (TONE)
19
Lichtniveauregelaar
20
Geluids niveauregelaar van wekker
21
Tijdzonescha kelaar (TIME ZONE)
22
Terugzetten (RESET)
23
AUX-IN
24
Voeding IN
51
Page 53

LCD-scherm
A
Radioband en AM/PM-aanduiding van klok
B
Slaap- en Snooze-indicator
C
Radio-aa ngestuurd tijdsignaal
D
Autom. Afstemmingsindicator
E
Datum
F
Dag van de week
G
Tijd instelindicator
H
Minutenaa nduiding
I
Geheugen en seconden aanduiding
J
AM/PM-aanduiding van wekker
K
Winter/zomertijdindicator
L
Maand/Dag/Jaar/Wekkertijd
M
Dutje indicator
N
Tijd/Frequentie
O
Wekkeraanduiding
Gebruik
Aa nzetten
Automatisch radiozenders afstemmen en klok instellen
1. Als u de eerste keer de stekker in het stopcontact steekt scant
de radio automatisch AM- en FM zenders af. De 7 zenders van
zowel AM als FM met het sterkste signaal worden onder de
7 voorkeurzenderknoppen opgeslagen.
2. Uw wekkerradio toont dan -:- en de indicator knippert op uw
scherm. De tijd wordt ingesteld als de automatische instelservice
voor de tijd beschikbaar is.
3. Houd, als de radio uitstaat, de TIME knop meer dan
4 seconden ingedrukt om het Automatisch In stelsignaal voor
de Tijd te ontvangen.
NL
52
Page 54

Klok
Handmatig de ti jd instellen (alleen als automatisch
instellen mislukt)
1. Druk op de TIME knop, en het scherm toont .
2. Druk op de SET knop, en het urengetal gaat knipperen op
het scherm.
3. Druk op de TUNING op of neer knop om de uren aan te passen.
4. Druk dan op de SET knop, en het minutengetal gaat knipperen
in het scherm.
5. Druk op de TUNING op of neer knop om de minuten aan
te passen.
6. Druk op de SET knop om het instellen van de tijd af te sluiten.
* U kunt ook op elk moment het proces stoppen en de tijd bewaren
door op de TIME knop te drukken.
Handmatig de datum instellen (alleen als automatisch
instellen mislukt)
1. Druk op de DA TE knop en dan op de SET knop, het jaar gaat
knipperen in het scherm.
2. Druk op de TUNING op of neer knop om het jaar aan te passen.
3. Druk nogmaals op de SET knop en de maand gaat knipperen in
het scherm.
4. Druk op de TUNING op of neer knop om de maand aan
te passen.
5. Druk weer op de SET knop en de dag van de maand gaat
knipperen in het scherm.
6. Druk op de TUNING op of neer knop om de dag van de maand
aan te passen.
7. Druk op de SET knop om het in stellen van de datum af te sluiten.
* U kunt ook op elk moment het proces stoppen en de datum
bewaren door op de DATE knop te drukken.
53
Page 55

Afwisselen tussen 12/24 uur tijdsaa nduiding
1. Druk op de TIME knop, en vervolgen s op de SET knop.
2. Druk voor het instellen van een 12 uren tijdsaanduiding op
V oorkeurzenderknop 1, of, voor het in stellen van een 24 uren
tijdsaa nduiding, op Voorkeurzenderknop 2.
3. Druk op de TIME knop om het instellen af te sluiten.
Zomer/Wintertijd
1. Druk, als het scherm de ti jd toont, langer dan 4 seconden op
de SET knop om de klok 1 uur vooruit te zetten; het scherm
toont .
2. Druk voor het terugzetten van de tijd weer langer dan 4 seconden
op de SET knop; het symbool verdwijnt weer.
Gebruik van de radio
Op radiozenders afstemmen
Er zijn 3 manieren om uw radio af te stemmen:
A. Handmatig afste mmen
1. Druk op de Aan/Uit-knop om uw radio aan te zetten.
2. Druk herhaaldelijk op de BAND knop om AM (MW) of FM
te selecteren.
3. Druk op de TUNING op of neer knop om de frequentie
te wijzigen.
4. Druk nogmaals op de Aan/Uit-knop om de radio weer uit
te zetten.
NL
54
Page 56

B. Afstemmen door sca nnen
1. Druk op de Aan/Uit-knop om uw radio aan te zetten.
2. Druk herhaaldelijk op de BAND knop om AM (MW) of FM
te selecteren.
3. Druk meer dan 0,5 seconde op de TUNING op of neer knop en
laat hem weer los; de radio stemt af op de volgende frequentie
met een ontvangstsignaal.
4. Druk nogmaals op de Aan/Uit-knop om de radio weer uit
te zetten.
C. Voorkeurzenderknoppen instellen en weer oproepen
Voorkeurzenderknoppen instellen:
1. Druk op de Aan/Uit-knop om uw radio aan te zetten.
2. Druk herhaaldelijk op de BAND knop om AM (MW) of FM
te selecteren.
3. Stem af op de radiozender die u wilt opslaan onder een
voorkeurzenderknop.
4. De radio heeft 7 voorkeurzenderknoppen, genummerd van 1
tot 7. Druk één van de knoppen meer dan 2 seconden in,
totdat u een piepgeluid hoort. De frequentie van de zender
wordt opgeslagen onder de gekozen voorkeurzenderknop.
5. Herhaal de procedure voor de andere voorkeurzenderknoppen.
U kunt de 7 voorkeurzenderknoppen voor zowel AM als
FM programmeren.
6. U kunt de voorkeurzenderknoppen overschrijven door nogmaals
dezelfde procedure te volgen.
Voorkeurzenderknop oproepen:
1. Druk op de BAND knop om AM of FM te selecteren.
2. Druk eenvoudigweg op één van de VOORKEURZENDER
knoppen (van 1 tot 7); het nummer en de frequentie verschi j nen
op het scherm.
55
Page 57

Gebruik van de wekker
Er zijn 4 wekkers die onafha nkeli jk van elkaar ingesteld kunnen
worden. Wekker 1 en Wekker 2 kunnen ingesteld worden om u
wakker te maken met een zoemgeluid. Wekker 3 en Wekker
4 kunnen ingesteld worden om u wakker te maken met de radio.
Als het wekkerlichtje brandt, wordt de aangegeven wekker binnen
24 uur actief.
Hoe kunt u een wekker met een zoemgeluid instellen
(Wekker 1 en Wekker 2)
Elke 15 seconden wordt het volume va n het zoemgeluid vergroot.
De wekker zoemt 1 minuut en is daarna 1 minuut stil. Vervolgens
wordt deze cyclus herhaald. De wekker blijft zo 1 uur zoemen
totdat u op de Aan/Uit-knop drukt.
U kunt het volume van de zoemer aanpassen met de
volumeregelaar voor de wekker aan de onderkant van de radio.
1. Druk op de Wekker 1 (of Wekker 2) knop en de tijd voor
Wekker 1 (of Wekker 2) wordt in het scherm getoond.
2. Druk op de SET knop, en het urengetal van de wekker wordt op
het scherm getoond.
3. Druk op de TUNING op of neer knop om het urengetal aan
te passen.
4. Druk nogmaals op de SET knop en pas het minutengetal aan
door op de TUNING op of neer knop te drukken.
5. Selecteer de dagen van de week waarop deze wekker moet
werken, door op de dagen van de week knoppen te drukken.
(Druk nogmaals op de knoppen om dagen ina ctief te maken.)
6. Druk nogmaals op de SET knop en druk op de TUNING op of
neer knop totdat het of symbool verschijnt.
7. Druk op de SET knop om het in stellen af te sluiten.
8. Als de wekker zoemt, knippert het of symbool. Druk op
de Aan/Uit-knop om de zoemer uit te zetten. Het of
symbool stopt met knipperen.
* U kunt op elk moment op de Wekker 1 (of Wekker 2) knop
drukken om het instellen af te sluiten.
NL
56
Page 58

Hoe kunt u de radio als wekker instellen
(Wekker 3 en Wekker 4)
De radio blij ft één uur aan, totdat u op de Aan/Uit-knop drukt.
Het volume van de Wekkerradio ka n aangepast worden met de
V olumeregelaar voor de wekker onder op de radio.
1. Druk op de Wekker 3 (of Wekker 4) knop en de tijd voor
Wekker 3 (of Wekker 4) wordt in het scherm getoond.
2. Druk op de SET knop, en het urengetal van de wekker wordt op
het scherm getoond.
3. Druk op de TUNING op of neer knop om het urengetal aan
te passen.
4. Druk nogmaals op de SET knop en pas het minutengetal aan
door op de TUNING op of neer knop te drukken.
5. Selecteer de dagen van de week waarop deze wekker moet
werken, door op de dagen van de week knoppen te drukken.
(Druk nogmaals op de knoppen om dagen ina ctief te maken.)
6. Druk nogmaals op de SET knop en druk op de TUNING op of
neer knop totdat het of symbool verschijnt.
7. Druk nogmaals op de SET knop en druk op de BAND knop om
FM of AM (MW) te selecteren. Druk nu op de TUNING op of
neer knop om de radiozender waarbij u wilt wakker worden,
af te stemmen, en pas het volume aan n aar wens.
8. Druk op de SET knop om het instellen af te sluiten.
9. Druk op de Aan/Uit-knop om de radio uit te zetten.
10. Als de wekker gaat, knippert het of symbool.
Druk op de Aan/Uit-knop om de wekker te stoppen.
Het of symbool stopt met knipperen.
11. Als het radiosignaal zwak is wordt in plaats van de ra dio een
zoemgeluid afgegeven.
* U kunt op elk moment op de Wekker 3 (of Wekker 4) knop
drukken om het instellen af te sluiten.
* Bij AUX-IN, als de radioband niet ingesteld is, geeft de wekker
een zoemgeluid af.
57
Page 59

Snooze functie
1. Druk voor het onderbreken van het wekkersignaal (zowel radio
als zoemgeluid) op een willekeurige knop bovenop de radio
(op/neer/SET/VOORKEURZENDER 1-7/BAND knop).
De wekker stopt 5 minuten en het scherm toont . De snooze
functie kan herhaald worden als de wekker weer afgaat.
2. Druk op de Aan/Uit-knop om de snooze functie en de wekker
te stoppen.
Hoe kunt u de wekkers uitzetten
1. Houd de Wekker 1 (of Wekker 2, 3, 4) knop die u wilt uitzetten
meer dan 2 seconden ingedrukt.
2. Het symbool of of of verdwijnt van het scherm.
De bijbehorende wekker wordt uitgezet.
3. Houd de wekkerknop (Wekker 1, 2, 3 of 4 knop ) die u wilt
uitzetten ingedrukt en het symbool of of of verschijnt
weer op het scherm en de wekker is weer actief.
Timer voor Dutjes
1. Dit is een aftelwekker die afgaat nadat de periode die u
ingesteld hebt afgelopen is. De tijdsperiode kan ingesteld
worden van 10 tot 120 minuten met stappen van 10 minuten.
2. Druk op de NAP knop totdat de gewenste tijdsperiode op het
scherm getoond wordt.
3. Het woord NAP wordt op het scherm getoond en de Dutjestimer
is actief.
4. Druk, als de Dutjestimer afgaat, op de Aan/Uit-knop om hem uit
te zetten.
5. Druk, voor het uitzetten van de Dutjestimer voordat de
tijdsperiode afgelopen is, op de NAP knop totdat het woord
OFF in het scherm verschijnt.
NL
58
Page 60

Slaaptimer – radio automatisch uitschakelen
De Slaa ptimer kan ingesteld worden op 15-120 minuten. De radio
schakelt uit na dat de tijd, die u ingesteld hebt, afgelopen is.
1. Houd, als de radio uit staat, de knop ingedrukt; de radio
schakelt aan en het scherm toont de oplopende timer. Laat de
knop los als de vereiste tijdsperiode in het scherm
verschijnt. De Slaaptimer is dan ingesteld.
2. Druk voor het uitzetten van de Slaapti mer op de Aan/Uit-knop;
het symbool verdwijnt weer.
Tijdzone instellen
Zet voor normale gevallen de TIME ZONE schakelaar (onder op
de radio) in de 0 stand.
In sommige landen die geen radio-aangestuurde tijdservice hebben,
maar waar de radio het signaal va n een ander land kan ontvangen,
kunt u, als dit land zich in een andere tijdzone bevindt, de TIME
ZONE schakelaar gebruiken om de ti jd te corrigeren.
U kunt bijvoorbeeld in Turkije, dat één uur vooruit loopt op de
Centraal Europese tijdzone, maar waar de radio het sign aal uit
Duitsland (Centraal Europe se tijdzone) kan ontvangen, de TIME
ZONE schakelaar gebruiken om de plaatseli jke tijd te corrigeren.
Aa n passen achtergrondlicht
Druk op de knop om het achtergrondlicht lichter of donkerder
te maken. Als de knop ingesteld is op donker, kunt u aan de
LICHT NIVEAUREGELAAR draaien om het a chtergrondlicht nog
donkerder te maken.
59
Page 61

Koptelefoonaansluiting
Steek een koptelefoon in de Koptelefoonaan sluiting om
de koptelefoon te gebruiken; de ingebouwde radioluidspreker
wordt uitgeschakeld.
AUX IN
Sluit een externe geluidsbron, zoals een CD-speler, aan op de AUX
IN (aan de zijkant van de radio). Laat het apparaat spelen en druk
herhaaldelijk op de BAND knop totdat “AU” in het scherm verschijnt.
De radio versterkt en speelt het geluid dat uit de externe
geluidsbron komt.
De radio resetten
Als uw radio niet naar behoren werkt, of als er wat nummers niet
weergegeven worden in het scherm, druk dan met een passend
voorwerp, meer dan 2 seconden op de RESET knop (aan de
onderkant van de radio); het hele geheugen van de radio wordt
weer teruggezet alsof de radio nieuw was.
NL
60
Page 62

Technische gegevens
Stroomvoorziening:
120 Volt/60 Hz (V.S. versie);
230 V olt/50 Hz (Europa versie)/ADAPTER DC UIT 12V/0,7A
Uitgangsvermogen: 1,2 W (max)
Stroomverbruik: 7W (max)@120V, 8W (max)@230V
Frequentiebereik:
FM 87,5 – 108,0 MHz
AM 520 – 1710 kHz (V.S. versie);
AM 522 – 1629 kHz (Europa versie)
61
Als u op een later moment dit product van de hand zou doen, let dan op: Afgedankte
elektrische producten horen niet in het huisafval. Recycle het apparaat als dat
enigszins mogelijk is. Raadpleeg uw plaatseli j ke overheid of leverancier voor advies
betreffende hergebruik. (Richtlijnen voor Afgedankte Elektrische en Elektronische
Apparatuur)
Page 63

62
Page 64

Wichtige Sicherheitshinwe ise
1. Lesen und verstehen Sie vor der Inbetriebnahme alle
Sicherheits- und Bedienungshinweise.
2. Bewahren Sie die Anleitung auf: Die Sicherheitshinweise und
die Bedienungsanleitung sollten Sie für den späteren
Gebrauch aufbewahren.
3. Bea chten Sie die W arnhinwe ise. Alle Warn- und
Bedienungshinweise auf dem Gerät sollten unbedingt
befolgt werden.
4. Befolgen und benutzen Sie alle Anweisungen.
5. W asser und Feuchtigkeit: Das Gerät sollte nicht in der Nähe von
Wasser benutzt werden. Benutzen Sie das Gerät nicht in der
Nähe von Ba dewa nnen, W aschbecken, Spülen, feuchten
Kellerräumen, Swimmingpools etc.
6. Ziehen Sie vor der Reinigung des Gerät immer den Stecker aus
der Steckdose. Benutzen Sie zur Reinigung der Außense ite
lediglich ein feuchtes T uch.
7. Benutzen Sie zur Auf stellung de s Geräts keine instabilen Wagen,
Ge stelle, Haltevorrichtungen oder Tische. Das Gerät kann
herunterfallen und da mit zu Verletzungen oder Beschädigungen
am Gerät führen.
63
Page 65

8. Ventilation: Das Gerät sollte so aufgestellt werden, dass die
Luftzirkulation nicht beeinträchtigt wird. D as Gerät sollte z. B.
nicht auf ein Bett, Sofa, Bettvorleger oder eine andere weiche
Unterlage gestellt werden, be i der die Ventilationsöffnungen
blockiert werden könnten. Das Gerät sollte nicht an Orten
aufgestellt werden, an denen die Luftzufuhr zu den
V entilationsöffnungen bee inträchtigt werden könnte.
9. Stromversorgung: Das Gerät sollte nur a n Stromnetze
angeschlossen werden, die den Spezifik ationen auf de m
Typen schild entsprechen. Falls Sie sich nicht sicher über die
Spezifikationen Ihres Stromnetzes sind, wenden Sie sich bitte
an Ihren Händler oder Ihren Stromnetzbetreiber.
10. Netzkabel: Da s Netzkabel sollte so verlegt werden, dass
niema nd darauf treten kann oder Objekte darauf gestellt
werden. Achten Sie insbesondere auf den Stecker, bei
Steckdosen oder am Ausgangspunkts des Kabels am Gerät.
Ziehen Sie den Stecker aus der Steckdose, indem Sie am
Stecker ziehen und nicht am Kabel. Benutzen Sie das Gerät
nur mit dem auf dem Gerät angegebenen Netzstrom. Falls Sie
sich nicht sicher über die Spezifikationen Ihres Stromnetzes
sind, wenden Sie sich bitte an Ihren Händler oder Ihren
Stromnetzbetreiber.
D
64
Page 66

11. Überlasten Sie die Wandsteckdosen und Verlängerungska bel
nicht. A nson sten kann erhöhte Feuer- und Stromschlaggefahr
bestehen. Stecken Sie niemals Gegenstände in die Öffnungen
des Geräts. Mit den Gegenständen könnten
Hochspannungspunkte innerhalb des Geräts berührt werden
oder Kurzschlüsse verursacht werden. Dies kann zu erhöhter
Feuer- und Stromschlaggefahr führen.
12. Wenn das Gerät für längere Zeit nicht benutzt wird, ziehen Sie
bitte den Stecker aus der Steckdose heraus. Dadurch werden
eventuelle Schäden durch Spannungsschwa nkungen oder
Gewitter vermieden.
13. Wenn das Gerät für längere Zeit nicht benutzt wird, nehmen Sie
bitte die Batterien heraus. Die Batterien können auslaufen und
zu Schäden an Mobiliar und Gerät führen.
14. V ersuchen Sie nicht das Gerät selbst zu reparieren. Be i Öffnen
des Gehäuse s setzen Sie sich gefährlicher Hochspannung aus
und machen die Garantie nichtig. Wenden Sie sich nur an
ausgebildetes W artungsperson al.
15. Fremdgegenstände – Versuchen Sie niemals Gegenstände
irgendwelcher Art in das Gerät zu stecken. Hochspannungsteile
könnten berührt werden und zu Feuer oder Stromschlag
führen. Lassen Sie niemals Flüssigkeiten irgendwelcher Art auf
das Gerät kommen.
65
Page 67

16. La ssen Sie das Gerät durch ausgebildetes Wartungspersonal
reparieren, wenn...:
A.
Das Netzk a bel oder der Netzstecker beschädigt sind.
B.
Gegenstände oder Flüssigkeiten in das Gerät gelangt sind.
C.
Wenn das Gerät Regen oder Wasser ausgesetzt wurde.
D.
Da s Gerät nicht normal funktioniert oder einen starken
Leistungsabfall zeigt.
E.
Das Gerät ist heruntergefallen oder das Gehäuse beschädigt.
66
D
Page 68

Bedienelemente
1
Ein-/Ausschalter und Einschlaffunktionstaste
2
Alarmtaste 2
3
Alarmtaste 4
4
Lichtschalter
Uhrzeiteinstellungstaste
5
Datume in stellungstaste
6
7
Alarmtaste 1
8
Alarmtaste 3
9
Countdown-Taste
10
Frequenz verändern / Schlummerfunktion
11
Einstellungstaste und Sommerzeittaste
12
Senderspeicher
13
Frequenzbandschalter (UK W/MW/AUX)
14
Uhr
15
LCD-Display
16
Kopfhörerausgang
Lautstärkeregelung
17
18
Tonausgleich
Licht-Dimmer
19
20
Alarm-Lautstärkeregler
21
Zeitzonenschalter
22
Reset
23
AUX-Eingang
24
Stromversorgungsanschluss
67
Page 69

LCD-Display
A
Frequenzband und Uhrze ita nze ige (AM/PM)
B
Schlaf- und Schlummerfunktion
C
Radiogesteuertes Zeitsignal
D
Automatische Sendersuche
E
Datumanzeige
F
Wochentagsa nze ige
G
Zeiteinstellung
H
Minutena nze ige
I
Speicherplatznummer und Sekundena nzeige
J
Alarmze itanzeige (AM/PM)
K
Sommerzeitanze ige
L
Anzeige für Monat / Datum / Jahr / Alarm
M
Countdown-Anzeige
N
Uhrzeit / Frequenz
O
Alarmanzeige
Bedienung
Einschalten
Automatische Senderspeicherung und Uhrze ite instellung
1. Wenn das Gerät bei der Inbetriebnahme an einer Steckdose
angeschlossen wird, führt es e ine automatische Sendersuche
na ch UKW- und MW-Sendern durch. Die jeweils 7 stärksten
UKW- und MW-Sender werden gespeichert.
2. Danach erscheint in der Anzeige -:- und das Symbol fängt an
zu blinken. Die Uhrzeit wird automatisch e inge stellt, wenn e in
Zeitsignal von einem Sender emp fangen wird.
3. Wenn das Radio ausgeschaltet ist, halten Sie die TIME-Taste
für mehr als 4 Sekunden gedrückt, um das Zeitsignal zu
empfangen.
D
68
Page 70

Uhrzeit
Einstellen der Uhrzeit per Hand (nur notwendig, wenn die
automatische Einstellung fehlschlägt)
1. Betätigen Sie die TIME-Taste und in der Anze ige erscheint .
2. Betätigen Sie die SET-Taste und die Stundenziffern blinken i m
Display auf.
3. Benutzen Sie die TUNING-Tasten zum Ein stellen der
Stundenuhrzeit.
4. Betätigen Sie dann erneut die SET-T aste und die Minutenziffern
blinken im Display auf.
5. Benutzen Sie die TUNING-Tasten zum Ein stellen der
Minutenuhrzeit.
6. Betätigen Sie die SET -Taste, um die Zeiteinstellung
abzuschließen.
* Sie können diesen V organg jederzeit vorzeitig stoppen und die
Einstellungen speichern, indem Sie die TIME-Taste betätigen.
Einstellen des Datum per Hand (nur notwendig, wenn die
automatische Einstellung fehlschlägt)
1. Betätigen Sie die DATE-Taste gefolgt von der SET-Taste und die
Jahre sza hl beginnt zu blinken.
2. Benutzen Sie die TUNING-Ta sten zum Einstellen der Ja hre sza hl.
3. Drücken Sie auf die SET-Taste und die Monatsza hl beginnt
zu blinken.
4. Benutzen Sie die TUNING-Ta sten zum Einstellen
der Monatszahl.
5. Drücken Sie erneut auf die SET-Taste und die Datumszahl
beginnt zu blinken.
69
Page 71

6. Benutzen Sie die TUNING-Ta sten zum Einstellen des Datums.
7. Betätigen Sie die SET-Taste, um die Zeite instellung
abzuschließen.
* Sie können diesen V organg jederzeit vorzeitig stoppen und die
Einstellungen speichern, indem Sie die DATE-Taste betätigen.
Einstellen des Stundenformats (12/24-Stunden)
1. Betätigen Sie TIME-Taste gefolgt von der SET-Taste.
2. Zum Einstellen des Stundenformats auf das 12-Stundenformat,
betätigen Sie die Taste Station preset 1 bzw. zum Einstellen des
Stundenformats auf das 24-Stundenformat, betätigen Sie die
Taste Station preset 2.
3. Betätigen Sie dann die TIME-Taste, um die Einstellung
abzuschließen.
Sommerzeit (D.S.T. – Daylight Saving Time)
1. Wenn im Display die Uhrzeit angezeigt wird, betätigen Sie die
SET -Taste für mehr als 4 Sekunden, um die Uhrzeit um eine
Stunde nach vorne zu stellen. In der Anzeige erscheint dann
das Symbol .
2. Um die Sommerzeit wieder auszustellen, betätigen Sie die
SET -Taste erneut für mehr als 4 Sekunden und das Symbol
verschwindet.
D
70
Page 72

Radiobetrieb
Suchen von Radiosendern
Es stehen 3 verschiedene Arten zum Suchen von Radiosendern
zur V erfügung:
A. Manuelle Sendersuche
1. Betätigen Sie den Ein-/Ausschalter zum Einschalten des Radios.
2. Betätigen Sie die BAND-Taste zur Auswahl des Frequenzbands
(FM/UKW oder AM/MW).
3. Benutzen Sie die TUNING-Ta sten zum Einstellen der Frequenz.
4. Betätigen Sie den Ein-/Ausschalter erneut, um da s Ra dio wieder
auszuschalten.
B. Automatische Suche
1. Betätigen Sie den Ein-/Ausschalter zum Einschalten des Radios.
2. Betätigen Sie die BAND-Taste zur Auswahl des Frequenzbands
(FM/UKW oder AM/MW).
3. Halten Sie die TUNING-Ta sten für mehr als eine halbe
Sekunde gedrückt und da s Gerät sucht automatisch nach dem
nächsten Sender.
4. Betätigen Sie den Ein-/Ausschalter erneut, um da s Ra dio
wieder auszuschalten.
C. Sender speichern und gespeicherte Sender aufrufen
Sender speichern:
1. Betätigen Sie den Ein-/Ausschalter zum Einschalten des Radios.
2. Betätigen Sie die BAND-Taste zur Auswahl des Frequenzbands
(FM/UKW oder AM/MW).
3. Suchen Sie nach de m gewün schten Sender.
71
Page 73

4. Es stehen 7 Ta sten zum Speichern der Sender zur Verfügung
(1-7). Halten Sie die gewünschte Speichertaste für mehr als
2 Sekunden gedrückt bis Sie einen Signalton hören.
Der jeweilige Sender wird dann unter des betreffenden
Taste gespeichert.
5. Wiederholen Sie den Vorgang f¨¹r die verbleibenden
Speichertasten. Für jedes Frequenzband (UKW/MW) stehen
Ihnen jeweils 7 Speicherplätze zur Verfügung.
6. Bereits gespeicherte Sender können mit der oben beschriebenen
Methode überschrieben werden.
Abruf gespeicherter Sender:
1. Betätigen Sie die BAND-Taste zur Auswahl des Frequenzbands
(FM/UKW oder AM/MW).
2. Betätigen Sie einfach die gewünschte PRESET-Taste (1 bis 7),
um einen gespeicherten Sender aufzurufen.
Die Speicherplatznummer und die Sendefrequenz ersche inen
dann im Display.
Alarmbetrieb
Es stehen 4 Alarmspeicher zur Verfügung, die unabhängig
voneina nder programmiert werden können. Alarm 1 und Alarm 2
D
72
Page 74

Einstellen des Summeralarms (Alarm 1 und Alarm 2)
Die Summerlautstärke wird alle 15 Sekunden erhöht. Der Alarm
bleibt für eine Minute an und fängt nach einer Minute Pause erneut
an. Nach einer Stunde oder durch Betätigung des Ein-/Ausschalters
stoppt der Alarm.
Die Lautstärke des Summeralarms ka nn mithil fe de s
Alarm-Lautstärkereglers an der Unterseite des Geräts
eingestellt werden.
1. Betätigen Sie die Alarm 1 (oder Alarm 2) Taste und im Display
erscheint die entsprechende Alarmzeit.
2. Betätigen Sie die SET -Taste und die Stundenziffern der Alarmzeit
blinken im Display auf.
3. Benutzen Sie die TUNING-Ta sten zum Einstellen der Stunden.
4. Betätigen Sie die SET-Taste erneut und stellen Sie die Minuten
mithilfe der TUNING-Tasten ein.
5. Wählen Sie die gewünschten Wochentage, indem Sie die
entsprechenden Wochentagtasten betätigen (erneute Betätigung
deaktiviert den Wochentag wieder).
6. Betätigen Sie die SET -Taste erneut und betätigen Sie die
TUNING-Tasten bis oder in der Anzeige erscheint.
7. Betätigen Sie die SET-Taste, um die Einstellung zu übernehmen.
8. Wenn der Summeralarm anfängt, blinkt im Display bzw.
auf. Betätigen Sie den Ein-/Ausschalter zum Ausschalten
des Summers. Das Symbol bzw. hört dann auf
zu blinken.
* Sie können jederzeit die Alarm 1 (oder Alarm 2) Taste betätigen,
um Ihre Einstellung vorzeitig zu übernehmen und zu speichern.
73
Page 75

Einstellen des Radioalarms (Alarm 3 und Alarm 4)
Nach e iner Stunde oder durch Betätigung des Ein-/Ausschalters
stoppt der Radioalarm. Die Lautstärke des Radioalarms kann
mithilfe des Alarm-Lautstärkereglers an der Unterseite des Geräts
eingestellt werden.
1. Betätigen Sie die Alarm 3 (oder Alarm 4) Taste und im Display
erscheint die entsprechende Alarmzeit.
2. Betätigen Sie die SET -Taste und die Stundenziffern der Alarmzeit
blinken im Display auf.
3. Benutzen Sie die TUNING-Ta sten zum Einstellen der Stunden.
4. Betätigen Sie die SET-Taste erneut und stellen Sie die Minuten
mithilfe der TUNING-Tasten ein.
5. Wählen Sie die gewünschten Wochentage, indem Sie die
entsprechenden Wochentagtasten betätigen (erneute Betätigung
deaktiviert den Wochentag wieder).
6. Betätigen Sie die SET-Taste erneut und betätigen Sie die
TUNING-Tasten bis oder in der Anzeige erscheint.
7. Betätigen Sie die SET-Taste erneut und betätigen Sie die
BAND-Taste zur Auswahl des Frequenzba nds (FM/UK W
oder AM/MW). Benutzen Sie dann die TUNING-Tasten zur
Auswahl des gewünschten W eck senders und zum Einstellen
der Lautstärke.
8. Betätigen Sie die SET-Taste, um die Einstellung zu übernehmen.
9. Benutzen Sie den Ein-/Ausschalter zum Ausschalten de s Radios.
10. Wenn der Alarm anfängt, blinkt im Display bzw. auf.
Betätigen Sie den Ein-/Ausschalter zum Ausschalten des
Alarms. Das Symbol bzw. hört dann auf zu blinken.
11. Wenn das Radiosignal zu schwach ist, wird der Summer
benutzt.
* Sie können jederzeit die Alarm 3 (oder Alarm 4) Taste betätigen,
um Ihre Einstellung vorzeitig zu übernehmen und zu speichern.
* Wenn das Frequenzband auf AUX ge stellt ist oder die Batterie
nicht über genügend Strom verfügt, wird der Summer als
Alarm benutzt.
D
74
Page 76

Schlummerfunktion (Snooze)
1. Wenn Sie das Alarmsignal unterbrechen wollen (egal ob
Radio- oder Summeralarm) können Sie eine beliebige Taste a n
der Oberseite des Radios betätigen (TUNING-Tasten/SET/
PRESET 1-7/BAND). Der Alarm geht für etwa 5 Minuten aus.
Im Display wird zur gle ichen Zeit angezeigt. Sie können die
Schlummerfunktion beliebig oft wiederholen, solange die
Alarmfunktion aktiviert ist.
2. Betätigen Sie den Ein-/Ausschalter, um die Schlummer- und
die Alarmfunktion zu stoppen.
Dea ktivieren des Alarms
1. Halten Sie die Alarm 1 (oder Alarm 2, 3, 4) Taste für mehr
als 2 Sekunden gedrückt, um den entsprechenden Alarm
zu dea ktivieren.
2. Das entsprechende Symbol ( / / / ) verschwindet von
der Anzeige. Der entsprechende Alarm ist damit ausgestellt.
3. Wenn Sie den Alarm wieder einschalten wollen, halten die
entsprechende Alarm 1 (oder Alarm 2, 3, 4) Taste gedrückt
und das dazugehörige Symbol ( / / / ) erscheint
erneut in der Anze ige.
75
Page 77

Countdown-Timer
1. Es handelt sich hierbei um e inen Countdown-Alarm, der nach
einem festgelegten Zeitraum an geht. Sie können den
Countdown auf 10 bis 120 Minuten (in 10-Minuten-Schritten)
einstellen.
2. Benutzen Sie die NAP-Taste zum Einstellen der gewünschten
Zeitdauer.
3. Im Display erscheint da s Wort NAP und zeigt damit an, dass der
Countdown gesetzt ist.
4. Wenn der Countdown-Alarm an geht, können Sie ihn mithilfe des
Ein-/Ausschalters wieder ausstellen.
5. Wenn Sie den Countdown-Alarm vorzeitig deaktivieren möchten,
halten Sie die NAP-Taste solange gedrückt bis in der Anze ige
das Wort OFF erscheint.
Einschlaffunktion – Selbstausschaltung
Sie können die Einschlaffunktion auf 15-120 Minuten einstellen.
Da s Ra dio wird nach Erreichen der eingestellten Zeit automatisch
ausgeschaltet.
1. Wenn das Radio ausgeschaltet ist, halten Sie die T aste
gedrückt. Das Radio wird eingeschaltet und im Display erscheint
die verbleibende Zeit. Lassen Sie dann die Taste wieder los.
Die automatische Abschaltung ist damit aktiviert.
2. Zum Abschalten der Schlaf funktion, betätigen Sie bitte den
Ein-/Ausschalter. Das Symbol verschwindet vom Display.
D
76
Page 78

Zeitzone einstellen
Stellen Sie den TIME ZONE-Schalter (auf der U nterse ite de s
Radios) im Normalfall auf 0.
Bei ma nchen Ländern, in denen keine Zeiteinstellungssign ale
gesendet werden, ka nn das Zeiteinstellungssignal von
Radiosendern aus Na chbarländern zum Einstellen der Uhrzeit
verwendet werden. Mit dem TIME ZONE-Schalter können Sie da n n
die Zeitzone korrigieren.
Die Zeitzone der Türkei liegt z. B. eine Stunde vor der
Mitteleuropäischen Zeit. Es können allerdings Radiozeitsignale aus
Deutschland emp fangen werden (Mitteleuropäische Zeit), die dann
über den TIME ZONE-Schalter korrigiert werden.
Einstellung der Hintergrundbeleuchtung
Benutzen Sie den Regler , um die Hintergrundbeleuchtung des
Display heller oder dunkler zu machen. Wenn die Helligkeit dunkel
gestellt wurde, können Sie die LIGHT LEVEL CONTROL-Taste
benutzen, um die Hintergrundbeleuchtung auf den niedrigsten W ert
zu stellen.
Kopfhörerausgang
Sie können a m Kop fhörerausgang Kopfhörer anschließen. Zur
gleichen Zeit werden die eingebauten Lautsprecher ausgestellt.
AUX-Einga ng
Schließen Sie ein externes Audiogerät, wie z. B. einen CD-Player,
an den AUX IN-Eingang (an der Seite de s Geräts). Schalten Sie
dann Ihr externes Audiogerät ein und betätigen Sie die BAND-Taste
bis in der Anzeige „AU“ a ngezeigt wird. Das Gerät gibt da s Signal
des externen Audiogeräts verstärkt über die Lautspre cher aus.
77
Page 79

Reset des Radios
W enn das Radio nicht richtig funktioniert oder in der Anzeige Zif fern
fehlen, betätigen Sie bitte die RESET -Taste (an der Unterseite de s
Radios) für mehr als zwei Sekunden (es wird dazu ein Hilfsmittel
benötigt). Das Gerät wird dadurch in den Originalzustand versetzt
und der Speicher wird gelöscht.
Technische Daten
Stromversorgung:
120 V olt/60 Hz (US-Version);
230 V olt/50 Hz (Europa-Version)/NETZTEIL DC OUT 12V/0,7A
Ausgangsleistung: 1,2 W (max)
Stromverbrauch: 7W (Max)@120V, 8W (Max)@230V
Frequenzbereich:
UKW 87,5 – 108,0 MHz
MW 520 – 1710 kHz (US-Version);
MW 522 – 1629 kHz (Europa-Version)
Sollten sind irgendwann da s Gerät nicht mehr benutzen, achten Sie bei der
Entsorgung bitte auf folgendes: Altgeräte sollten nicht zusammen mit dem
Hausmüll entsorgt werden. Geben Sie da s Gerät zum Recycling, soweit da s
möglich ist. Wenden Sie sich bitte a n Ihre lokalen Behörden oder Ihren Händler für
mehr Informationen zur Entsorgung dieses Geräts. (WEEE-Richtlinie - Waste
Electrical and Electronic Equipment Directive).
D
78
 Loading...