

Page 1

RCR-1
Operating instruction
Instruccions de manejo
WARNING:
TO PREVENT FIRE OR ELECTRIC SHOCK HAZARD, DO
NOT EXPOSE THIS PRODUCT TO RAIN OR MOISTURE.
CAUTION
RISK OF ELECTRIC
SHOCK DO NOT OPEN
!
GB
E
THE LIGHTNING
FLASH AND ARROWHEAD WITHIN THE
TRIANGLE IS A WARNING SIGN ALERTING
YOU OF “DANGEROUS
VOLTAGE” INSIDE THE
RADIO.
CAUTION: TO REDUCE THE
RISK OF ELECTRIC
SHOCK, DO NOT REMOVE
THE BACK, NO USER SERVICEABLE PARTS INSIDE.
REFER SERVICING TO
QUALIFIED SERVICE PERSONNEL.
THE EXCLAMATION
POINT WITHIN THE
TRIANGLE IS A WARNING SIGN ALERTING
YOU OF IMPORTANT
INSTRUCTIONS
ACCOMPANYING THIS
RADIO.
Page 2

IMPORTANT SAFETY INSTRUCTIONS
1. Read these instructions.
2. Keep these instructions.
3. Heed all warnings.
4. Follow all instructions.
5. Do not use this apparatus near water.
6. Clean only with dry cloth.
7. Do not block any ventilation openings. Install in accordance with
the manufacturer’s instructions.
8. Do not install near any heat sources such as radiators,
heat registers, stoves, or other apparatus (including amplifiers)
that produce heat.
9. Do not defeat the safety purpose of the polarized or
grounding-type plug. A polarized plug has two blades with one
wider than the other. A grounding type plug has two blades and a
third grounding prong. The wide blade or the third prong are
provided for your safety. If the provided plug does not fit into your
outlet. consult an electrician for replacement of the obsolete outlet.
1
Page 3

10. Protect the power cord from being walked on or pinched
particularly at plugs, convenience receptacles, and the point
where they exit from the apparatus.
11. Only use attachments/accessories specified by the manufacturer.
12. Use only with the cart, stand, tripod, bracket, or table specified by
the manufacturer, or sold with the apparatus. When a cart is
used, use caution when moving the cart/apparatus combination
to avoid injury from tip-over.
13. Unplug this apparatus during lightning storms or when unused for
long periods of time.
14. Refer all servicing to qualified service personnel. Servicing is
required when the apparatus has been damaged in any way,
such as power-supply cord or plug is damaged. liquid has been
spilled or objects have fallen into the apparatus, the apparatus
GB
has been exposed to rain or moisture, does not operate
normally, or has been dropped.
15. To Reduce the Risk of Fire or Electric Shock, Do not Expose
This Appliance To Rain or Moisture.
16. The Shock Hazard Marking and Associated Graphical Symbol is
provided on the bottom panel of unit.
17. Apparatus shall not be exposed to dripping or splashing and no
objects filled with liquids, shall not be placed on the apparatus.
2
Page 4

Main features
(1) LW/MW/FM radio
With automatic station memory programming (ATS)
(2) Analog clock with radio controlled time device
(3) 21 station memories
(4) Digital radio controlled clock w ith date display
Date and time displays are checked and if necessary corrected daily
with an exact radio controlled time antenna signal
(5) Nap timer
Adjustable from 10-120 minutes
(6) Alarm with H umane Wake System ( HWS )
The alarm begins quietly and gradually becomes louder before
switched off
(7) Radio alarm
Woken up by the favorite station
(8) Two independent alarm functions
(9) Alarm week day selection
3
Page 5

(10) Adjustable alarm level
(11) Display brightness adjustment
(12) Headphone jack
(13) Tone Control
(14) Time Zone adjustment (-1 , 0 , +1 , +2 )
GB
4
Page 6
5
Page 7

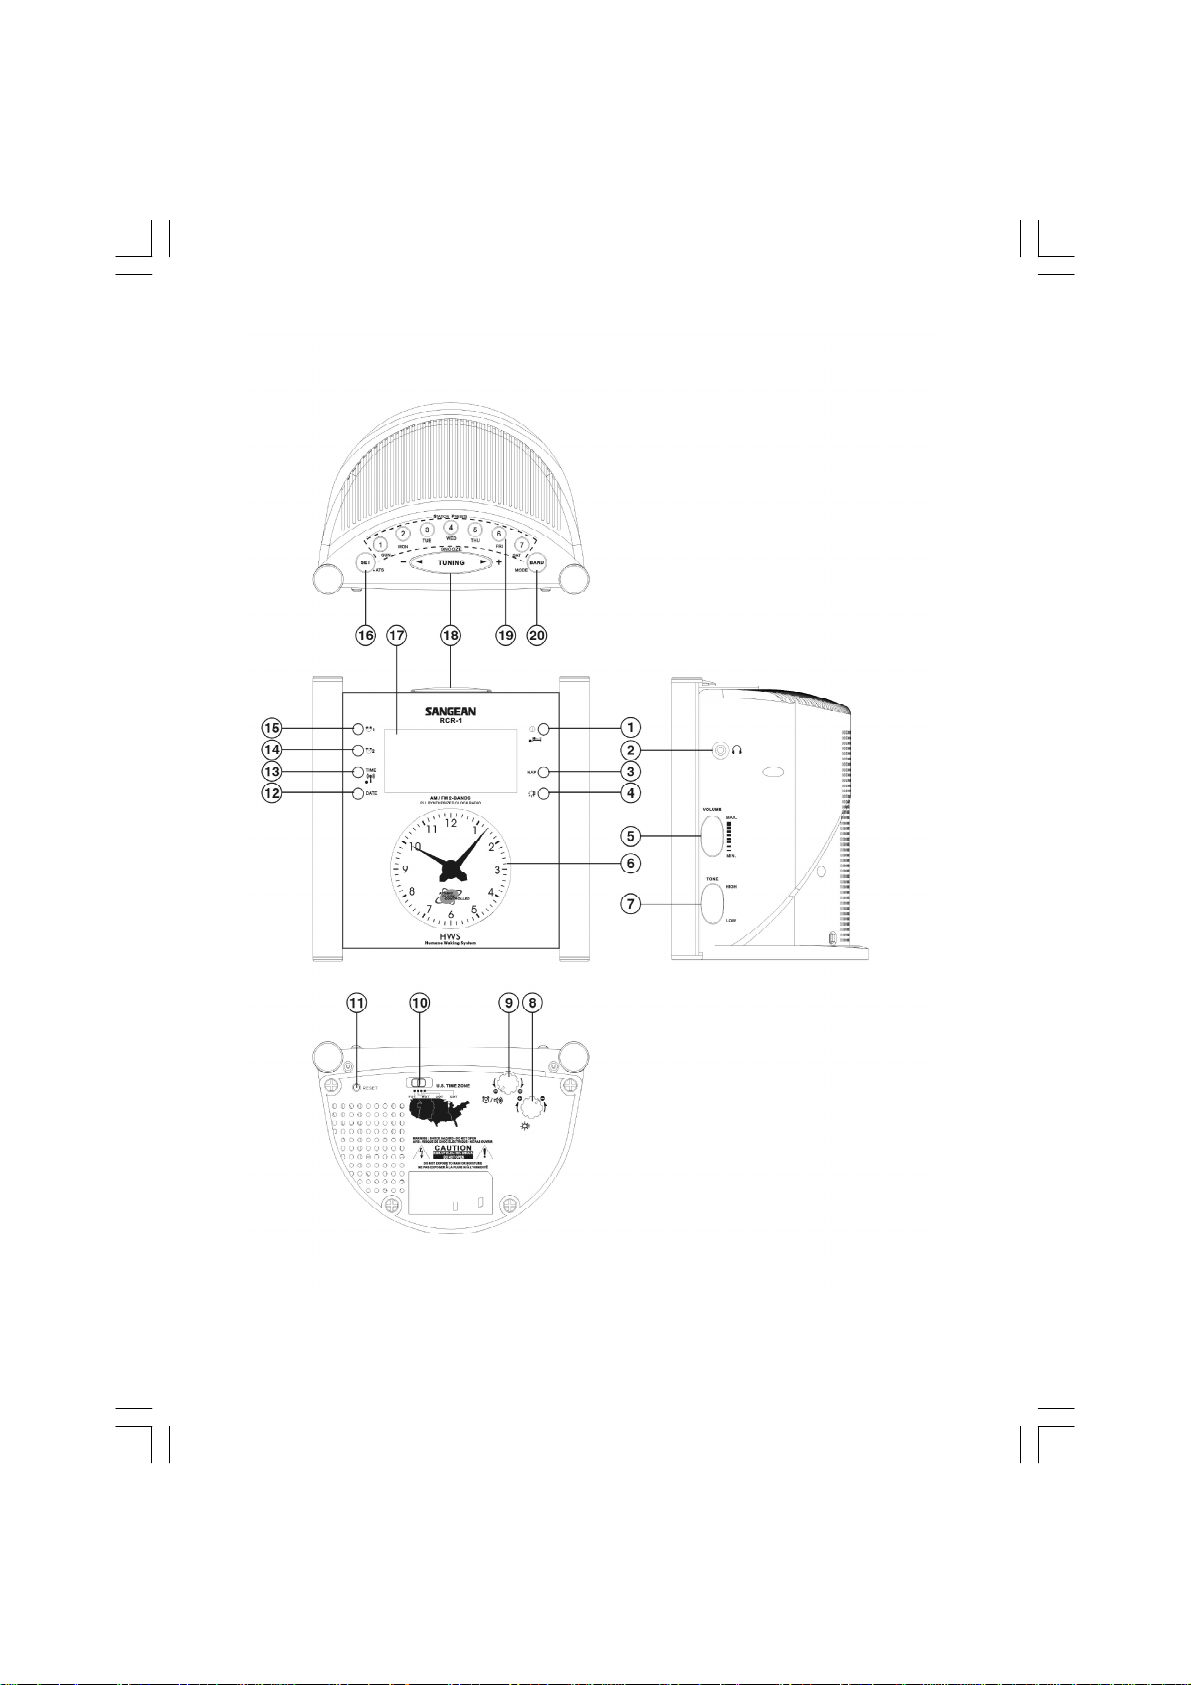
Controls
1
Power on/off and Sleep timer
Headphones socket
2
3
Nap timer
4
Display backlight control
5
Volume Control
6
Analog clock
7
High/Low tone control
8
Display brightness adjustment
9
Alarm level adjustment ( radio and buzzer )
10
Time Zone adjustment
11
RESET
12
Date adjustment
13
Time adjustment
14
Alarm 2 button
15
Alarm 1 button
16
Time/Date/Alarm set and ATS function button
17
Display
18
Tuning Up/Down and SNOOZE button
19
Station memories and alarm week days selection
20
LW/MW/FM band and alarm mode selection also Daylight Saving
GB
Time (D.S.T.) set
6
Page 8
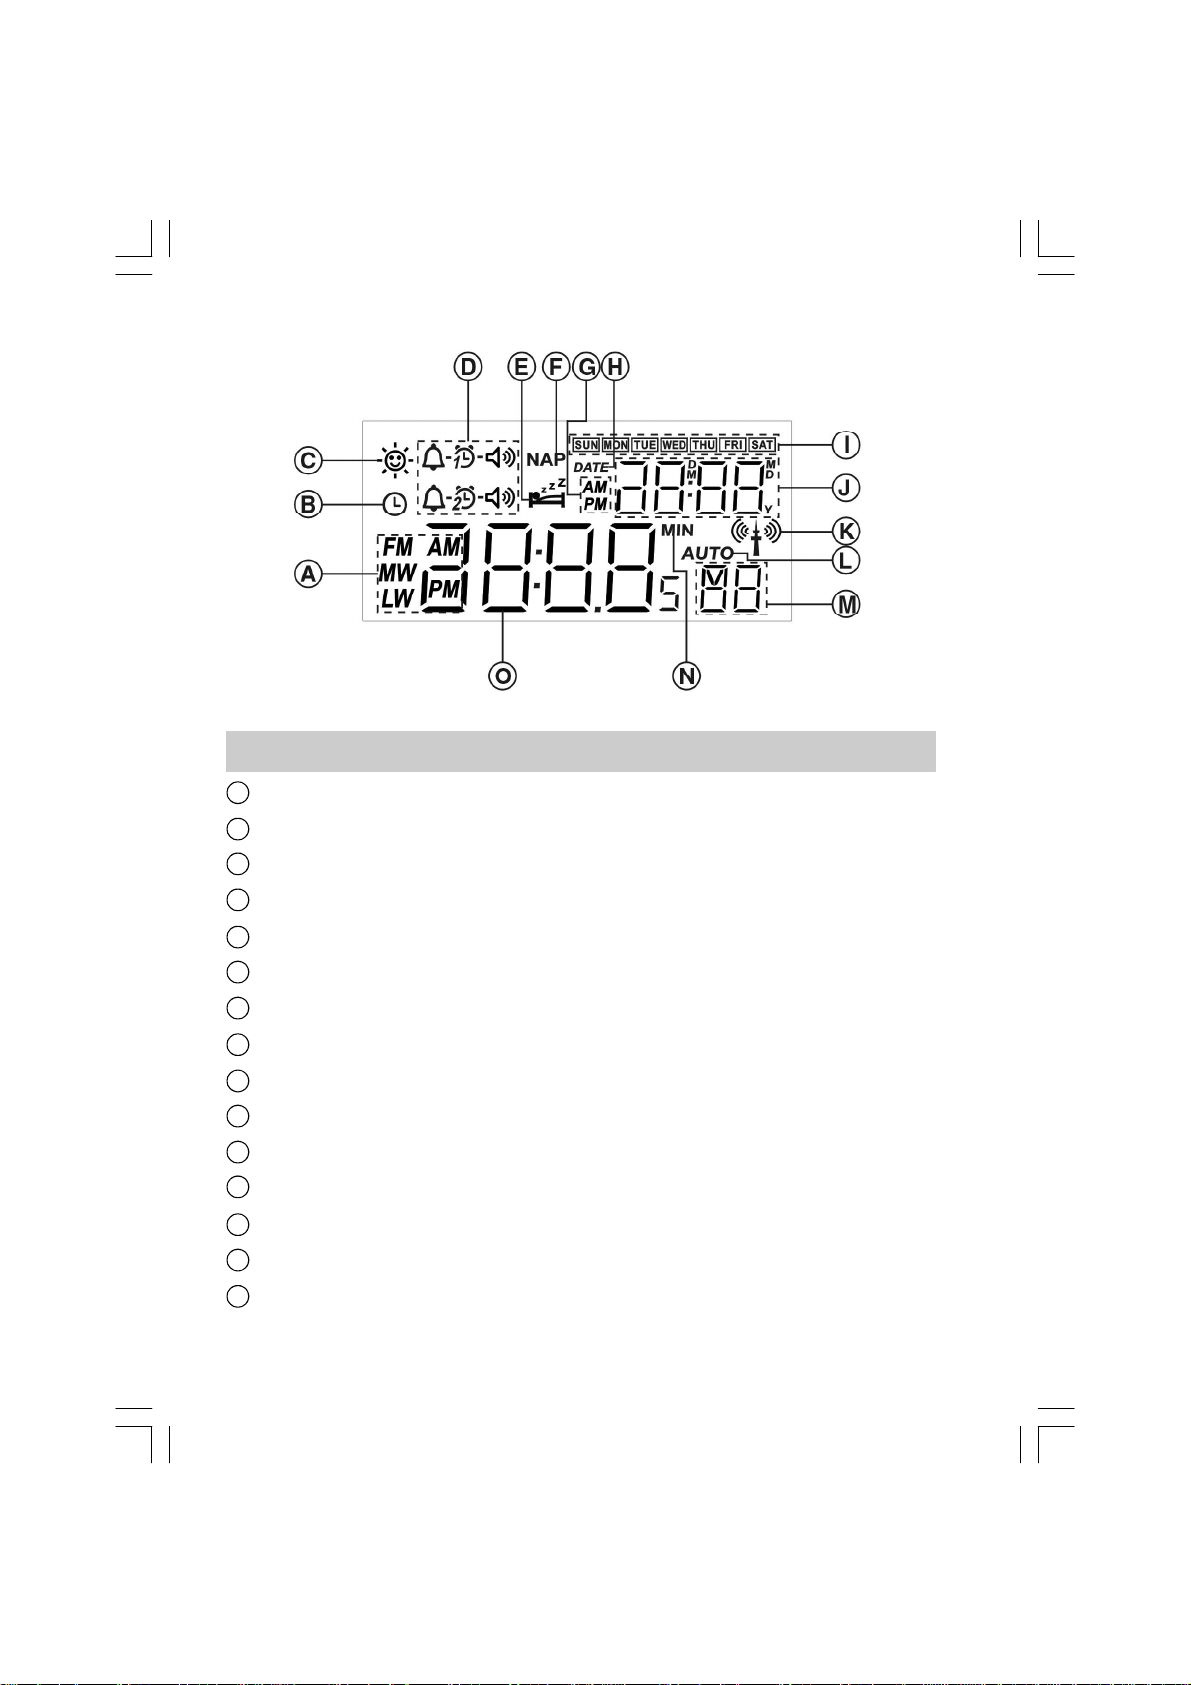
LCD display
A
Radio band and a.m./p.m. display
B
Time set
C
Daylight Saving Time (D.S.T.)
D
Alarm indicator
E
Sleep timer
F
Nap timer
G
Alarm a.m./p.m. indicator
H
Date
I
Week day
J
Month/Date/Year/alarm time
K
Radio controlled symbol
L
ATS ( Auto Tuning System ) status
M
Station memory number and second indicator
N
Minute ( for Nap and Sleep timer )
O
Frequency/Time display
7
Page 9

NOTES ON SAFETY
THIS PRODUCT OPERATES ON 110-120 VOLT/50-60 Hz power
source. If this product will not be used for any extended period of
time it is suggested that the power cord be removed from the AC
power supply.
Protect this product from excessive heat and moisture.
If this product should ever require servicing please return to an
authorized Sangean Service center. Do not open this product
yourself or allow it to be opened by an unauthorized service facility.
CLOCK RADIO OPERATION
Automatic Station Memory Programming (ATS)
Upon initial connection to an AC power source the ATS system will
automatically move the analog clock to 12:00 and automatically set
GB
up all the 7 AM and 7 FM memory presets based upon the signal
strength of the incoming stations.
8
Page 10

ATOMIC CLOCK OPERATION
The Sangean RCR1 consists of a crystal controlled clock movement
which includes a very special AM radio receiver that is tuned to
receive the 60kHz WWVB time signal broadcast from the U.S.
Government’s Atomic Clock in Boulder, Colorado. The signal is an
AM radio signal and as such is susceptible to weather conditions,
electrical interferences, solar conditions and the position of the
clock’s antenna all of which effects the receiver’s reception. As a
general rule, best reception is at night and just before or after sunrise
or sunset. Although the clock can work in most locations the number
of times that it adjusts itself to the U.S. Atomic Clock’s time signal
may depend on its location. Under certain weather conditions or in
areas of poor reception it may take 48 hours or more to receive a
signal for the correct time. In some cases it may be necessary to
seek another location in order to receive a useable time signal.
Set time Zone Switch [10] located on bottom of clock to your correct
zone as illustrated.
After the ATS program completes the AM/FM frequency set up the
following display — : — will appear and the symbol will blink
indicating the radio is searching for the radio controlled signal.
Once the radio receives the radio controlled signal the correct time
and date will be set automatically. Once the correct time and date
have been set, the symbol will stop blinking but the symbol will
remain on the display indicating that the time and date have been
set utilizing the radio controlled signal. The analog clock will follow
the radio controlled signal.
9
Page 11

MANUAL TIME ADJUSTMENT
Press Time [13] button and display will flash and previous time
will be displayed.
Press Set [16] button, the hour digits on the display will begin to
flash.
Set the hour using the + or – key [18]
Press the Set [16] button once again and the minutes digits will start
to blink on the display. Set minutes as you set hour.
Press Time [13] button to confirm time setting with a beep.
The analog clock will now adjust to the digital time displayed and the
seconds start to count. The symbol will appear indicating that this
time has not been set by the Atomic Clock but is a manual setting.
Note: If your area is on Daylight Saving Time press the Mode
[20] button once to advance the time seting 1 hour. Display will
show indicating D.S.T. time.
GB
DATE ADJUSTMENT
Press Date button [12], date display will blink.
Press Set button [16], display will blink with the current year setting,
a beep and a small y at the end of the blinking year.
Set the year with + or – key [18]
Press Set button once again for month and date setting.
Set month and date as you set year.
Press Date button again to confirm setting.
The display should now show the correct time, date, week day,
second and the symbol should again appear showing that you
have set the clock manually.
10
Page 12

RADIO OPERATION
Turn on the radio by pressing the Power on/off key [1]
Tuning Desired Stations
Manual Station Selection… ..
Using + or - Tuning Button [18] tune to the desired station.
Automatic Station Selection… ..
Press and hold + or – Tuning Button [18] for more then ½ second and
release. The radio will search for the next active station.
Automatic Station Memory Programming (ATS)
When the radio is first activated the ATS feature will automatically
select, based upon signal strength, 7 AM and 7 FM stations and
automatically position them into the associated presets.
If you wish to repeat this process, select the desired band by
pressing band selection button [20] and then pressing and holding
the ATS button [16] for more then 4 seconds.
Manual Station Memory Programming
Select desired frequency using Manual Station Selection
Press and hold desired preset button for more then 2 seconds until
a beep is heard and M stops blinking
The selected station is now stored in the desired preset position.
When you store a new station in a preset memory slot, the station
previously in that slot is automatically erased.
11
Page 13

Recalling Memor y Presets
Select band by pressing Band selector button [20]
Select memory preset buttons 1-7 for desired station
Vol ume
Volume can be adjusted using Volume control [5]
Tone Control
Adjust desired tone using Tone Control [7]
ALARM CLOCK OPERATION
Alarm settings can be made with clock/radio on or off.
The Alarm Clock/Radio is equipped with two independent alarm
systems each of which can activate the Human Wake System Buzzer
or turn on a preselected radio station.
GB
12
Page 14

Using Alarm with a Preselected Radio Station
Select desired station using + or – Tuning Button [18] or select one
of the 1-7 presets.
Set the desired volume level using Alarm Level Adjustment [9]
Select alarm system 1 or 2 by pressing the alarm button [14] or [15].
Display will blink with selected alarm
Press alarm set button [16]
Display will blink showing selected alarm hour and alarm mode
and beep
Press alarm Mode button [20] to select alarm mode
Use + or – button [18] to set alarm time hours.
Press set button [16] to set minutes using + or – button to
set minutes.
Press alarm days selections 1-7 (Sunday-Saturday) to select
alarm days.
Display will show the days on which you wish to be awoken by the
radio alarm.
Pressing alarm button 1 or 2 will confirm settings and a beep and
display indicates radio alarm is set.
Note:
If alarm days or alarm mode are not selected display will blink
all the days for a few seconds indicating the alarm is not set
and the alarm will not be activated.
If you would like to be awoken to the station you are presently
listening to press alarm button 1 or 2 for more then 2 seconds.
This allows the station you are listening to be stored into
memory. Then follow above procedures
13
Page 15

Using Alarm with HWS Alarm Beep
Select alarm system 1 or 2 by pressing the alarm button [14] or [15].
Display will blink with selected alarm Press alarm set button [16]
Display will blink showing selected alarm hour and alarm mode
and beep
Press alarm Mode button [20] to select alarm mode
Use + or – button [18] to set alarm time hours.
Press set button [16] to set minutes using + or – button to
set minutes
Press alarm days selections 1-7 (Sunday-Saturday) to select
alarm days.
Display will show the days on which you wish to be awoken by the
buzzer humane alarm
Pressing alarm button 1 or 2 will confirm settings and a beep and
display indicates buzzer humane alarm is set.
Note:
If alarm days or alarm mode are not selected display will blink
GB
all the days for a few seconds indicating the alarm is not set
and the alarm will not be activated.
14
Page 16

Cancel ling Alarm Setting
Alarm functions can be cancelled:
Select alarm system 1 or 2 by pressing the alarm button [14] or [15].
Display will blink with selected alarm
Press alarm set button [16]
Display will blink showing selected alarm hour and alarm mode
and beep
Press alarm Mode button [20] one or two times (depending if you
were in the alarm radio or alarm buzzer mode) till display blinks.
Press alarm 1 or 2 button again to confirm alarm cancellation.
The symbol will stay on the display for about 2 seconds
and disappear.
You may also select days you wish to be or not to be woken after
pressing the Set button while display is blinking. Press 1-7
(Sunday-Saturday) of button [19] to make a selection.
SNOOZE CONTROL
Pressing the Snooze button [19] interrupts the radio or beep tone/
HWS alarm for 5 minutes. The alarm will start up after 5 minutes and
will continue unless interrupted again. The alarm will continue for 1
hour if not interrupted.
CANCELLING THE ALARM SIGNAL
To cancel an alarm totally it is only necessary to press power button
[1]
15
Page 17

NAP TIMER
The Nap timer button [3] allows you to adjust the interval from 10-120
minutes in 10 minute steps before the alarm signal starts. If you wish
to turn off the Nap timer before the time is up simply adjust the
number of remaining minutes by pressing NAP key to off and
release. NAP will disappear from the display. The NAP timer may be
turned off by pressing Power key [1]
SLEEP AUTO SHUT OFF
Pressing and holding the power button [1] will activate the sleep
function. This function steps in 15 minute increments. This Sleep
function will turn off the radio at the pre-selected time. Pressing the
power button [1] will turn off function.
HEADPHONES
A jack is provided to allow headphone usage. When headphones are
GB
used the internal speaker is disconnected.
ALARM LEVEL ADJUSTMENT
An alarm level control [9] is provided on the bottom of the radio.
DISPLAY BACKLIGHT CONTROL
Button [4] allows two step adjustment of display brightness
DISPLAY BRIGHTNESS ADJUSTMENT
With display backlight control in dark position, Display Brightness
Adjustment [8] may be used to fine tune display brightness.
16
Page 18

TIME ZONE SWITCH
Time Zone Switch [10] should be set to zone where clock/radio is to
be used.
TROUBLESHOOTING/RESET
If the radio fails to operate correctly or some of the digits on the
display are missing or incomplete the following may correct the
problem:
Using a suitable implement (the end of a paper clip), press the
RESET button [11] for a few seconds. This will reset the
microprocessor, clock time and clear all the stations stored in preset
memory.
TECHNICAL DATA
Power Supply 110-120 Volt/50-60 Hz, 800mW max
Frequency Coverage FM 87.50 - 108.0 MHz
17
AM 520 - 1710 kHz
Page 19

18
Page 20

Instrucciones de seguridad importantes
1. Lea estas instrucciones.
2. Guarde estas instrucciones.
3. Preste atención a todas las advertencias.
4. Siga todas las instrucciones.
5. No haga ningún uso este aparato cerca del agua.
6. Limpie solamente con el paño seco.
7. No bloquee ninguna aberturas de la ventilación. Instale de acuerdo
con las instrucciones del fabricante.
8. No instale cerca de ninguna fuentes de calor tales como
radiadores, registros del calor, estufas u otros aparatos que
produzcan calor, incluyendo los amplificadores.
9. No derrote el propósito de seguridad de la haber polarizado o del
poner un enchufe tipo a tierra. Un enchufe polarizado tiene dos
láminas con una más ancha que la otra. Un enchufe de tierra tiene
dos láminas y un tercer diente. La lámina ancha o el tercer diente
se proporciona para su seguridad. Él que el enchufe
proporcionado no cabe en su enchufe, consulta a electricista para
el reemplazo del enchufe obsoleto.
19
Page 21

10. Proteja el cable eléctrico contra ser caminado encendido o
sejeción en el enchufe, receptáculos de la conveniencia o en el
punto donde salen del aparato.
11. Utilice solamente accesorios especificado por el fabricante.
12. Utilice solamente con el carro, el soporte, el trípode, o la tabla
especificados por el fabricante o vendidos con el aparato.
Al usar un carro, tenga cuidado al mover el carro para evitar
lesión de una extremidad encima.
13. Desenchufe el aparato durante tormentas de la iluminación o
cuando es inusitado por períodos del tiempo largos.
14. Refiera todos servicios de mantenimiento al personal cualificado
de servicio. Se requiere el servicio de mantenimiento cuando el
aparato se ha dañado de cualquier manera, tal como cuerda de
la fuente de alimentación, enchufe, se ha derramado el líquido,
los objetos han caído en el aparato, el aparato se ha expuesto a
la lluvia o a la humedad, no funciona normalmente o se ha caído.
15. Para reducir el riesgo del fuego o del choque eléctrico,
no exponga esta aplicación a la lluvia o a la humedad.
E
16. La marca del peligro de choque y el símbolo gráfico asociado
se proporciona en el panel del fondo del te de la unidad.
17. El aparato no será expuesto al goteo o no se pondrá el salpicar.
Ningunos objetos llenados de los líquidos en el aparato.
20
Page 22

Caracteristicas principales
(1)Radio OL/AM/FM
Con programación automatica de la memoria de estaciones (ATS)
(2)Reloj analógico con dispositivo de tiempo controlado
por radio
(3)21 memorias de astaciones
(4)Reloj conrolado mediante radio digital con
visualización de fecha
Se comprueban y, si fuera necesario, se corrigen diariamente las
visualizaciones de fecha y hora mediante senal de antena exacta
de control de tiempo por radio.
(5)Temporizador Nap
Ajustable de 10 a 120 minutos
(6)Alarma con sistema de despertar humando (HWS)
La alrma empieza suavemente y va aumentado gradualmente de
volumen antes de desconectarse.
(7)Alarma de radio
El usuario puede despertar con la estación preferida
(8)Dos funciones de alarma independientes
21
Page 23

( 9 ) Selección de alarma por dia de la semana
(10) Nivel de alarma ajustable
(11) Ajuste de brillo de pantalla
(12) Clavija de auriculares
(13) Control de tonos
(14) Ajuse de zona horario (-1,0,+1,+2)..
E
22
Page 24

Controles
1
Encendido/Apagado y temporizador para dormir
Clavija de auriculares
2
3
Temporizador Nap
4
Control de iluminación posterior de pantalla
5
Control de volumen
6
Reloj analógico
7
Control de tono alto/bajo
8
Ajuste de brillo de pantalla
9
Ajuste de nivel de alarma (radio y zumbador)
10
Ajuste de zona horaria
11
RESET
12
Ajuste de fecha
13
Ajuste de hora
14
Botón de alarma 2
15
Botón de alarma 1
16
Programación de hora/fecha/alarma y botón de función ATS
17
Pantalla
18
Sjntonia arriba/abajo y botón SNOOZE (Dormitar)
19
Memorias de staciones y selección de alarma por dia de
la semana
20
Bandas OL/AM/FM y selección de modo de alarma,
también programación DST (hora de ahorro de luz diurna)
23
Page 25

Pantalla LCD
A
Banda de radio y pantala a.m./p.m.
B
Programación de hora
C
(D.S.T.= Hora de ahorro de luz diurna)
D
Indicador de alarma
E
Temporizador de dormir
F
Temporizador Nap
G
Indicador de alarma a.m./p.m.
H
Fecha
I
Dia de la semana
J
Mes/Fecha/Año/Hora de alarma
K
Simbolo controlado por radio
L
Estado ATS (sistema de sintonización automática)
M
Número de memoria de la estación e indicador de segundos
N
Minuto ( para el temporizador Nap y temporizador de dormir)
O
Presentación de frequencia/hora
E
24
Page 26

Notas sobre seguridad
Este equipo sólo debe funcionar con una fuente de alimentación
de 110-120 Voltios/50-60 Hz. Si no va a utilizar el equipo durante
un periodo de tiempo largo (por ejemplo: en vacaciones),
desconecte el cable de la red eléctrica para asegurar una
separación completa de la fuente de alimentación.
Proteja el equipo del calor y la humedad.
Si este producto requiere siempre el mantenimiento, vuelva por
favor a un centro de servicio autorizado de Sangean. No abra el
equipo si necesita servicio técnico, por favor consulte a un taller
eléctrico certificado.
Funcionamiento
Programación automática della memoria de estaciones (ATS) Si el
equipo se conecta a la fuente de alimentación por primera vez o si
ha estado separado de la fuente de alimentación durante un periodo
largo de tiempo, la radio activará automáticamente el reloj analógico
y se dentedrá a las 12:00, a continuación buscará las estaciones
(ATS), empezando por la banda de FM, siguiendo por la de AM.
25
Page 27

Operación De Reloj Atómico
El Sangean RCR1 consiste en un movimiento del sincronismo de
oscilador a cristal que incluya un receptor de radio muy especial de
la que se temple para recibir la difusión de la señal del tiempo de
60kHz WWVB del reloj Atómico del gobierno de los E.E.U.U. en
Boulder, Colorado. La señal es una señal AM de radio, y como tal,
es susceptible a las condiciones atmosféricas, a interferencias
eléctricas, a las condiciones solares y a la posición de la antena del
reloj que efectúan la recepción del receptor. Como regla general, la
mejor recepción está en la noche y momentos antes o después de
salida del sol o de puesta del sol. Aunque el reloj puede trabajar en
la mayoría de las localizaciones, el número de épocas que la señal
del tiempo de reloj Atómico de E.E.U.U. puede variar depeding en
su localización. Bajo ciertas condiciones atmosféricas o en áreas de
la recepción pobre, puede tomar 48 horas o más para recibir una
señal por el tiempo correcto. En algunos casos puede ser necesario
intentar otra localización para recibir una señal usable del tiempo.
E
Fije el interruptor de la zona de tiempo [ 10 ], situado en el fondo del
reloj, a su zona de tiempo correcta según lo ilustrado. Después de
que el programa del ATS termine de instalar la frecuencia de AM/
FM, la exhibición siguiente aparecerá y el símbolo centelleo
indicar que la radio está buscando para la señal controlada de
radio. Una vez que la radio reciba la señal controlada de radio, la
hora y la fecha correctas serán fijadas automáticamente. Una vez
que se hayan fijado la hora y la fecha correctos, el símbolo parará
el centelleo pero seguirá habiendo el símbolo en la exhibición que
indica que se han fijado la hora y la fecha utilizando la señal
controlada del readio. El reloj análogo seguirá la señal controlada
de radio.
26
Page 28

Programación manual de hora
Hora
Pule el botón TIME (Hora) [13] y aparecerá el simbolo y la hora
previamente asignada. Pulse el botón SET (Progrmar) [16] y los
digitos de hora empezarán a parpadear en la pantalla junto con
un bip.
Programe la hora con las teclas + o – [18].
Pulse el botón SET (Programar) [16] nuevamente para confirmar la
hora, ahora los digitos de minutos emperzarán a parpadear en la
pantalla. Programe los minutos como lo hizo con la hora:
Programe los minutos con las teclas + o -.
Pulse el botón TIME (Hora) [13] una vez más para confirmar la
programción de la hora junto con un bip.
El movimiento del reloj analógico empieza y detiene en la posición
de la hora correcta, los segundos empiezan a contar. El simbolo
aparacerá indicando que ésta no es una hoa controlada por radio.
Nota:
Si existe un sistema D.S.T. (Hora de ahorro de luza de dia) en
su zona después de pulsar el botón Mode (Modo) [20] una vez
oara avanzar una hora en la programación horaria. La pantalla
mostrará ahora el simbolo indicando que la hora está en el
etstado D.S.T.
27
Page 29

FECHA
Pulse el botón DATE (Fecha) [12] y la palabra DATE parpadeará en
pantalla.
Pulse el botón SET (Programar) [16], y la pantalla parpadeará con el
año junto con un bip y una Y (año) pequeña
Programe el año junto con las teclas + o – [18].
Pulse el botón SET (Programar) nuevamente y continúe con la
programción del año para establecer el mes y la fecha.
Confirme la programación de la FECHA pulsando el botón DATE
(Fecha) nuevamente.
Ahora la pantalla mostará la hora, fecha, dia de la semana, egundos,
el simbolo.
Siempre podrá programar la hora manuelmente cuando sea
necesario mediante los procedimientos anteriores.
E
Funcionamiento de la radio
Encienda la radio con la tecla de encendido/ apagado (1).
Sintonice la estaciones deseadas
Selecci ón manual de estaciones
1. Con la tecla [18], Sintonización + y -, podrá sintonizar la
frecuencia de las estaciones que desee.
Selección automática de estaciones
Pulse y mantenga pulsada la tecla [18] + o – durante más de 0,5
segundos y libérla, la radio buscará la próxima estación.
28
Page 30

Programación automática de la memoria de
estaciones (ATS)
Si utiliza la radio por primera vez, la función ATS se iniciará
automáticamente y guardará en total las 21 estaciones que
transmiten con mayor protencia en los botones de Presintonia
1 a 7 (7 para cada una de las bandas AW/FM/OL).
Si desea repetir este proceso, encienda la radio, seleccione la
banda requerida pulsando el botón de selección de banda y pulse
el botón ATS [16] durante mas de 4 segundos para ejuectar la
función ATS.
Almacenami ento de las estaciones presintonizadas
Sintonice la estaciones.
Seleccione un botón de presintonia de moria y púlselo durante mas
de 2 segundos hasta que suene un bip de confirmación y la M en
pantalla deje de parpadear. Ahora la estación ha sido almacenada.
Nota:
Si almacena una estación nueva en una posicion de meoria, se
borrara la estacion previamente almacenada en dicha posición.
Reuperación de las memoria de estaciones
Recupere las meorias de estaciones simplemente seleccionando
las bandas [20] requeridas y pulse los botones de posiciones de
memoria de estaciones 1 a 7.
29
Page 31

Volumen
Puede seleccionar el volumen que desee mediante el botón de
control de volumen [5].
Control de tonos
Puede seleccionar el tono que desee mediante el botón de control
de tonos [7].
Reloj de alarma
La programación de la alarma se puede realizar mientras el equipo
está encendido o apagado.
El reloj de la alarma cuenta con dos sistemas de alarma que pueden
funcionar de manera independiente una de otra biend sea con el
zumbador des sistema de despertar humano o con la radio (reloj de
alarma de radio).
E
Alarma con l a radio
1. Seleccione la estación que desee mediante uno de los botones
[18] de memorias de estaciones 1 a 7.
2. Fije el volumen de la alarma de la radio que desea utilzando el
ajuste llano del alarmar [9].
3. Seleccione el sistema de alarma 1 o 2 pulsando el botón de
alarma [14] o [15]. La pantalla parpadeará con el simbolo del
sistema de alarma selccionado.
4. Pulse el botón SET (Programar) [16] y la pantalla parpadeará con
la hora de la alarma y el modo de alarma, junto con un bip.
30
Page 32

5. Pulse el botón Modo de alarma [20] para selccionar el modo de
radio de alarma .
6. Pulse los botones + o – [18] para programar la hora de la alarma
y pulse el botón SET nuevamente, los digitos de minutos
parpadearán en pantalla. Pulse los botones + o – para
programar el minuto de la alarma que desee.
7. Pulse la selección del dia de la semana 1 a 7 (Domingo a
Sábado) para selccionar los dias de la semana que desea con
alarma. La pantalla mostrará ahora los dias de la seman en los
que desea despertar mediante la alarma.
8. Pulse el botón de alarma 1 o 2 para confirmar todo la
programación de la alarma mediante un bip. La pantalla mostrará
indicando que la alarma de radio ha quedado progamada.
Nota:
Si no se slecciona el dia (los dias) de la semana con alarma o el
modo de alarma, la pantalla parpadeará con todos los dias de
la semana o mostará durante unos cuantos segundos, indicando
que la alarma no ha sido programada y desaparecerá, la alarma
no se activará.
Nota:
Si desea despertar mediante una estación de radio que escuche,
pulse el sistema de Alarma 1 o 2 durante más de 2 segundos,
el equipo guardará la estación de la alarma de radio y a
continuación siga los procedimientos de 2 a 8 para programar
la alarma de radio.
31
Page 33

Alarma con el bip de alarma del sistema de
despertar humano
1. Seleccione el sistema de alarma 1 o 2 pulsando el botón de
alarma ( 15 o 14 ). La pantalla parpadeará con el simbolo del
sistema de alarma seleccionado.
2. Pulse botón SET (Programar) (16) y la pantalla parpadeará con
la hora de la alarma y el modo de alarma, junto con un bip.
3. Pulse el botón Modo de alarma (20) para seleccionar el modo
zumbador de alarma hasta que la pantalla muestre .
4. Pulse los botones + o – para programar la hora de la alarma que
desee y pulse el botón SET nuevamente, los digitos de minutos
parpadeará en pantalla. Pulse los botones + o – para progrmar
el minuto de la alarma que desee.
5. Pulse la selección del dia de la semana 1 a 7 (Domingo a
Sábado) para seleccionar los dias de la semana que desee con
alarma. La pantalla mostrará los dias de la semana en los que
E
desea despertar mediante la alarma zumbador.
6. Pulse el botón de alarma 1 o 2 para confirmar todo la
programación de la alarma mediante um bip. La pantalla
mostrará que la alarma zumbador del sistema de
despertar humano ha sido programada.
Nota:
Si no se selecciona el dia/los dias de la semana con alarma,
la pantalla parpadeará con todos los dias la alarma no
se activará.
32
Page 34

Cancelación de la programación de alarma
Si no desea pespertar con la alarma a la hora programada puede
concelar la función de alarma.
1. Seleccione el sistema de alarma 1 o 2 pulsando el botón de
alarma (teclas 15 o 14).
2. Pulse el botón SET [16], el simbolo de modo de alarma
parpadeará junto con un bip.
3. Pulse el botón de MODO de alarma 20 una o dos veces
(despendiendo de si está en el estado de alarma de radio
alarma con zumbador) hasta que aparezca parpadeando
el icono .
4. Pulse el botón de alarma. El simbolo permanecerá
encendido en pantalla durante aproximadamente 2 segundos
y desaparecerá.
Nota:
Puede también seleccionar los dias de la semana que desea
despertarse o no después de pulsar el botón SET (Programar)
mientras aparecen los dias de la semana parpadeando en pantalla.
Pulse los botones de 1 a 7 (Domingo a Sábado) del botón 19
para seleccionarlo.
Snooze (Dormitar)
Para interrumpir la señal de alarma (de radio o tono de bip/sistema
de despertar humano) pulse el botón Sooze (Dormitar) (18).
La alarma se detiene y empieza nuevamente con intervalos de
5 minuos. La alarma continuará sonando durante una hora si
no se interrumpe.
33
Page 35

Cómo detener la señal de alarma
Para dentener la señal de alarma totalmente, pulse el botón [1],
encendido/apagado.
Temporizador Nap
Con la tecla [3], puede seleccionar el periodo para una alarma de
corta duración en pasos de 10 minutos, desde 10 a 120 minutos.
El temporizador Nap se inicia cuando se liera la tecla. Aparecerá
en pantalla la palabra NAP, la señal de la alarma suena después
del periodo de tiempo que se ha programado. Si desea drsactivar
el temporizador Nap antes de consumir el tiempo, simplemente
programe el número de minutos cambiando la posición de la
tecla Nap a OFF y soltándola. Desaparecerá la palabra NAP
de la pantalla.
Cuando la señal del temporizador Nap está activada, desactive la
señal del temporizador pulsando la tecla [1], encendido/apagado.
Puede también activar la función snooze (dormitar) como se ha
descito anteriormente.
DORMIR- apagado automático
Pulsando de forma continua el botón 1 de encendido se activará la
E
función Dormir, la radio se apagará automáticamente en pasos de
15 minutos, desde 15 hasta 120.
El control de dormir empieza cuando se suelta la tecla y la pantala
mostrará luego los minutos seleccionados, la radio se apaga
automáticamente. Si desea apagar la radio antes, pulse el botón de
Encendido/Apagado (1).
34
Page 36

Auriculares
La radio cuenta con un conector de auriculares. Cuando conecte
los auriculares se desconectará el altavoz.
Ajuste del nivel de alarma
Con el inerruptor de ajuste de nivel de alarma (9) podrá seleccionar
el nivel de señal de alarma requerido.
Control de iluminación posterior de pantalla
La tecla [4] le permite ajustar el brillo de la pantalla, más oscurro o
más brillante con sólo pulsar la tecla.
Ajuste de brillo de pantalla
Mientras el control de iluminación de la pantalla está en la posición
más oscurra, con el interruptor de ajuste de la pantalla (8) podrá
seleccionar de forma precisa el brillo de la pantalla. En el minimo,
la pantalla quedará totalmente oscurecida, sin illuminación.
35
Page 37

Interruptor de zona horaria
En el caso normal, por favor programe la zona horaria poniendo
el interruptor en la posición 0.
En algunos paises que no proporcionan la posibilidad de control
de hora a través de la radio, se podrá recibir la señal horaria
controlada por la radio desde paises cercanos. Si la zona horaria
fuese distinta, podria utilizar el interruptor de zona horaria para
corregir la diferencia. En Turquia, que está una hora por delante
del horario Centro Europeo se puede recibir la señal horaria
controlada por radio desde Alemania; podria utilizar este
interruptor de zona horaria para corregir la hora local (hora
controlado por la radio). Sugerimos programar el interruptor
en la posción 0 en el caso normal.
Solución de problemas/RESET
Si la radio no funciona correctamente o algunos digitos de la
E
pantalla no aparecen o están incompletos, lleve a cabo los
procedimientos siguientes.
1. Con la ayuda de una herramienta adecuanda ( el extremo de un
clip de papel), pulse el botón RESET (11) durante algunos
segundos, esto hará un reset al microprocesador, la hora
de reloj y se borrarán todas las estaciones en la memoria
de presintonias.
36
Page 38

Datos técnicos
Fuente de alimentación 110-120 volt/50-60 Hz
Potencia 800 mW máx.
Cobertuna de frecuencias FM 87.50 - 108.0 MHz
AM 520 - 1710 kHz
37
Page 39

381H112A
 Loading...