

Page 1
381P701A-A
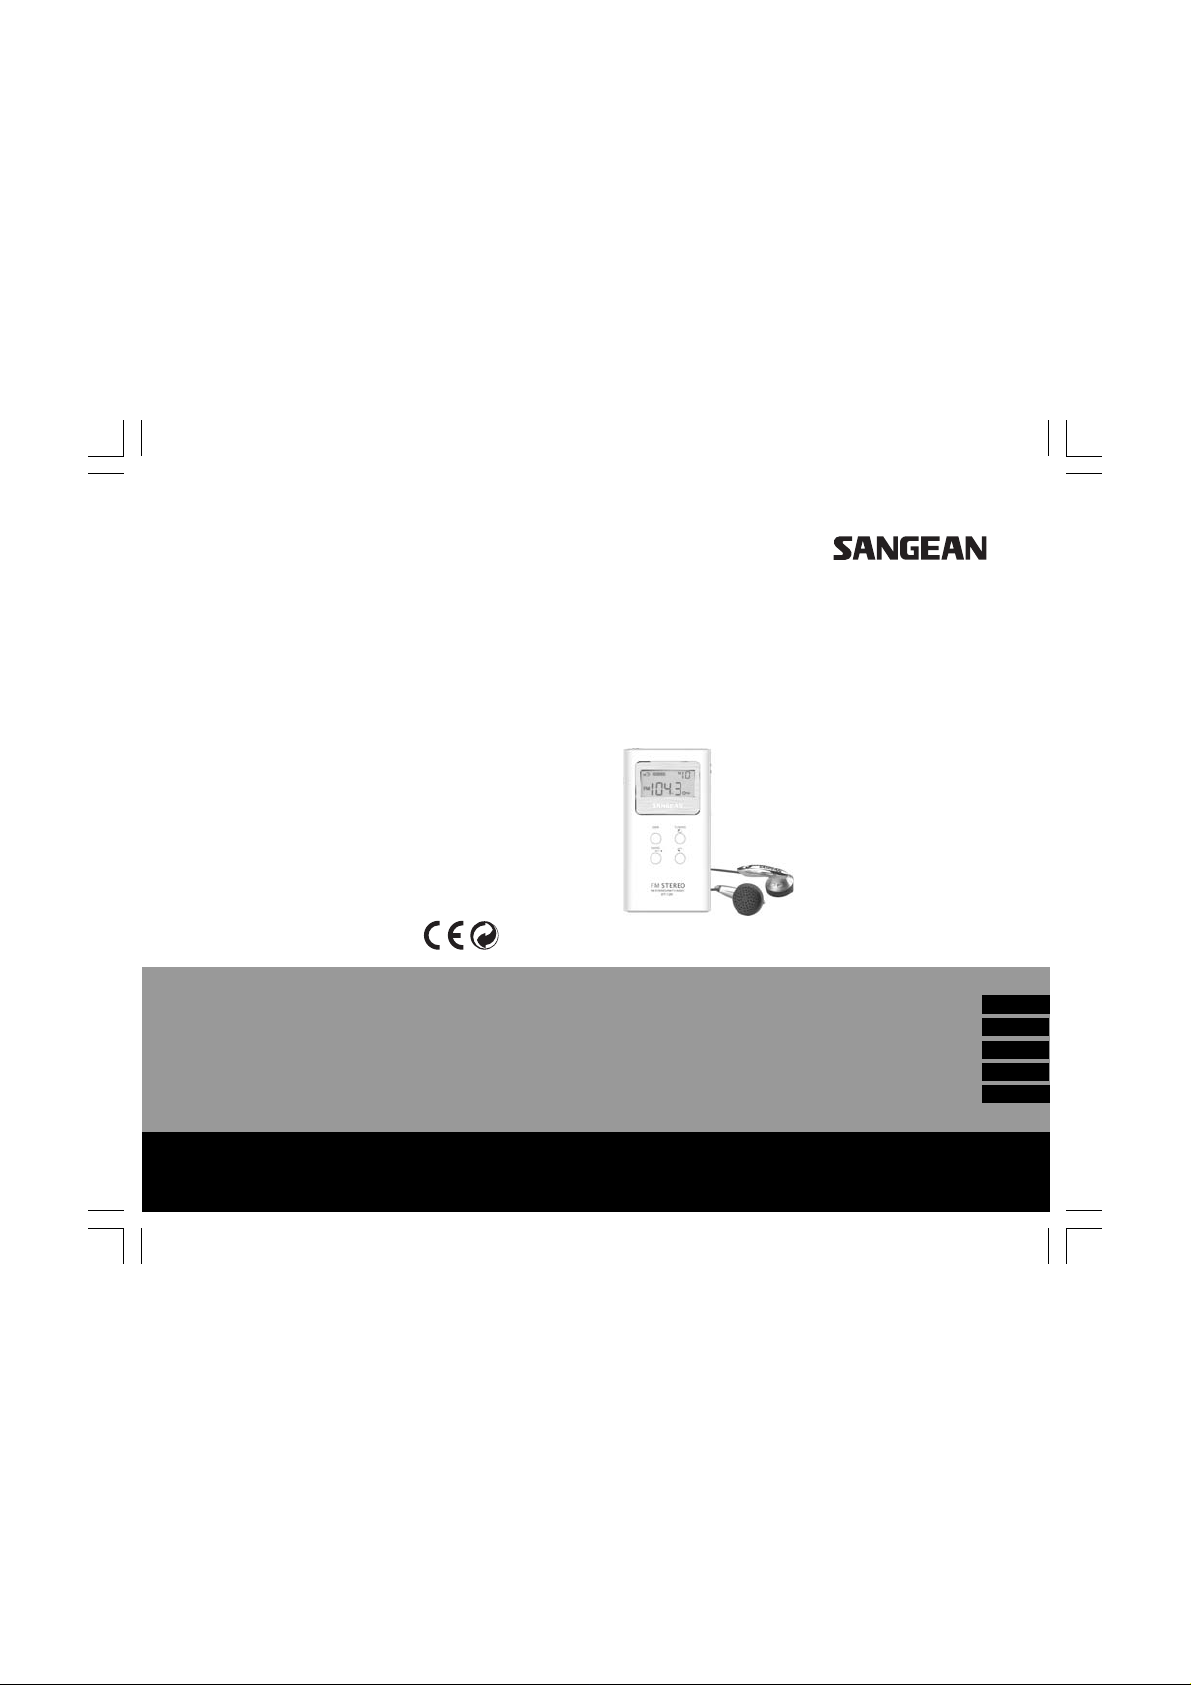
FM-stereo/AM/TV (DT-180V)
Digital Personal Receiver
PDR Poste récepteur stéréo
Radio FM/AM/TV (DT-180V)
FM-stereo/AM/TV (DT-180V)
Digital Personal Receiver
Receptor Digital Personal
FM-estéreo/AM/TV (DT-180V)
(DT-180V) Digitalempfänger
FM-stereo/AM/TV
Operating instruction
Mode d’emploi
Instruccions de manejo
Gebruiksaanwijzing
Bedienungsanleitung
DT-120 / 180V / 180
GB
F
E
NL
D
Page 2
A
BC D E F
G
1
H
Page 3

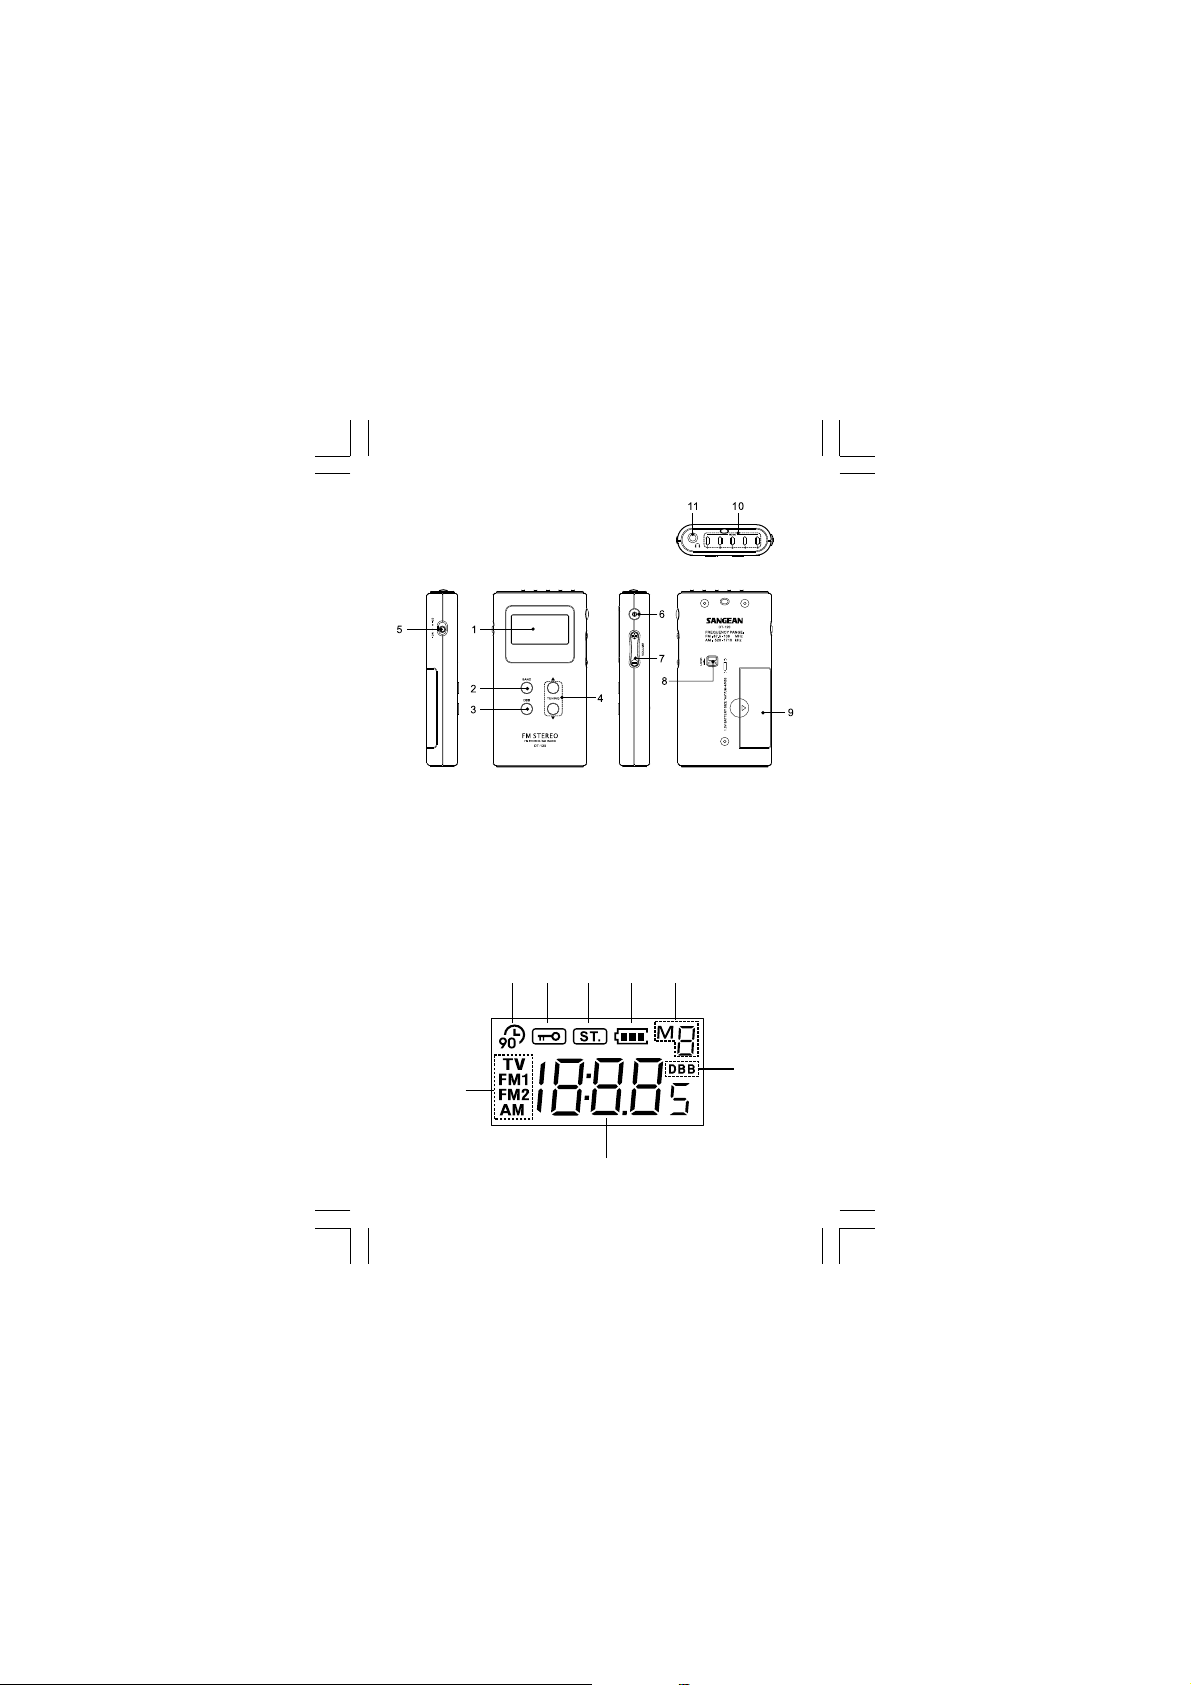
Controls
1
LCD display
2
Band selection
3
DBB (Deep Bass Booster) On/Off
4
Tuning Control
5
Stereo/Mono switch
6
Power On/Off
7
Volume Control
8
Lock Switch
9
Battery Compartment
10
Memory button
11
Earphone Jack
Display
A
Selected Band
B
90 minutes auto shut off
C
System lock
D
FM stereo indicator
E
Battery power indicator
F
Memory presets
G
DBB on
H
Frequency
GB
2
Page 4

Battery Installation
Battery cover is located on the back of the
unit. Slide the cover in the direction of the
arrow to gain access to the battery
compartment. Insert one AAA (UM-4) battery
into the compartment. Make sure that the
battery is positioned in accorda nce with the
indicated diagra m. Repla ce cover.
Note:
1. You can always monitor the battery power
from LCD display battery icon.
When battery power becomes very low
and una ble to operate the ra dio,
low battery indicator will flash together
with an “ E “ appears on the LCD display.
The radio will be shut off.
2. Make sure to replace the battery within
3 minutes. This will prevent any me mory
presets from being lost during the battery
replacement.
3
Page 5

Antenna/Earphone
Insert the earphone into the earphone ja ck.
The cord connecting the earphone to the
receiver a cts as an a ntenna during FM a nd TV
(DT-180V) audio rece ption and should be
extended as much as possible to increase
the sensitivity.
A built-in ferrite bar a ntenn a is provided for
AM reception and it is only necessary to
rotate the radio for maximum signal strength
during AM listening.
Important Note:
The radio will be auto shut off within
10 seconds when you unplug the earphone
from earphone jack f or battery power saving.
Volume Control
Using the volume control knobs to adjust
volume level. Display will show the cha nge s
when you operate the volume control.
GB
4
Page 6

Tuning the radio
Band
Frequency
DT-120/DT-180 522 - 1629 kHz (9 kHz)
DT-120/DT-180 520 - 1710 kHz (10 kHz)
DT-180V 522 - 1629 kHz (9 kHz)
DT-180V 520 - 1710 kHz (10 kHz)
AM
Antenna
Band
Frequency
Antenna
Band
Frequency
Antenna
5
Internal/Rotate radio for
bes reception
FM
87.50 - 108 MHz
External/Make sure the e arphone
in plugged into earphone ja ck
TV
TV channels 2-13 (DT-180V)
External/Make sure the e arphone
is plugged into earphone jack
Page 7

90 Minutes auto shut off device
For saving battery power, this radio is
designed to auto shut off after 90 minutes
operation, LCD display shows .
For continuous listening if necessary,
pressing Power On/Off button for more tha n
2 seconds until LCD display disappears.
Scan Tuning
Turn on the radio, sele ct required ba nd by
pressing Band Sele ction button.
Press and hold down the T uning Control
buttons for more tha n hal f a second a nd
relea se the button to commence Sca n
Tuning. The ra dio will scan and stop
automatically when a station is found.
GB
6
Page 8

Manual tuning
Turn on the radio, select required band by
pressing Band Selection button.
Desired station may be selected by pressing
the Tuning Control buttons intermittently until
the desired station is reached.
Or pressing and holding the T uning Control
until the desired station is reached.
Memory Tuning (Station Preset)
Turn on the radio by pressing Power On/Off
button. Select required band by pressing
Band Selection button. T une to the de sired
station using the Scan or Ma nual tuning
described above. When the desired station is
reached, press and hold Memory button for
more than 2 seconds until display M x stop
flashing f ollowed with a beep (via e arphone).
It will repla ce previous memory station.
You may store 5 memory stations each band
(AM, FMI, FMII and TV).
7
Page 9

Recall memory stations
Turn on the radio, select required band then
simply press and release Memory station
button. LCD display will show Memory preset
and radio frequency.
Stereo/Mono switch
The radio is designed to receive FM stereo
broadca stings. For we ak FM station,
switch Stereo/Mono to Mono position.
LCD display Stereo icon will disappear.
GB
8
Page 10

Change AM band tuning step
For Northern American countries and some
South America n countries, AM tuning step is
10 kHz. On other countries is 9 kHz.
To change AM ba nd tuning step, ple ase follow
below steps.
1. Change the AM ba nd tuning ste p from
9 kHz to 10 kHz When radio is OFF,
press and hold Tuning UP button then
switch on radio by pressing Power On/Off
button until LCD display flashes 10 and
then 520, indicating AM step has been
changed to 10 kHz tuning step.
2. Change the AM ba nd tuning ste p from
10 kHz to 9 kHz When radio is OFF,
press and hold Tuning DOWN button then
switch on radio by pressing Power On/Off
until LCD display flashes 9 and then 522,
indicating AM step has been changed to
9 kHz tuning step.
Note:
To change AM ste p will erase all the AM
Memory preset stations.
9
Page 11

System Lock
To prevent accidental changing of any of the
radio settings. Switch the Lock switch to
Lock position. LCD display lock icon will
a ppear. To release, simply switch the Lock
switch to its opposite position, LCD display
lock icon will disappear.
It’s important to make sure Lock switch is in
its off position when radio is to be operated,
as radio is completely inoperative until Lock
Switch is released.
GB
10
Page 12

Specifications
Battery: 1 x AA A (LR03, UM-4)
Frequency Coverage:
FM: 87.50 – 108 MHz
AM:
522 – 1629 kHz ( DT-120/DT-180 9 kHz)
520 – 1710 kHz ( DT-120/DT-180 10 kHz)
522 – 1629 kHz (DT-180V 9 kHz)
520 – 1710 kHz (DT-180V 10 kHz)
TV: 2 – 13 channel (DT -180V)
Output Power: 1.0 mW + 1.0 mW
Earphone Jack: 3.5 mm di ameter (stereo)
The company reserve s the right to a mend
the specifications without notice.
11
Page 13

If at any time in the future you should need to
dispose of this product please note that:
Waste electrical products should not be disposed
of with household waste. Please recycle where
facilities exist. Check with your Local
Authority or retailer for recycling advice.
(Waste Electrical and Electronic Equipment
Directive)
GB
12
Page 14

13
Page 15

Commande s
1
Aff ichage LCD
2
Sélecteur de bandes
3
DBB (Activateur basses profondes) On/Off
4
Commande syntoniseur
5
Sélecteur Stéréo/Mono
6
Mise sous tension On/Off
7
Réglage volume
8
Verrouillage
9
Compartiment à pile
10
Touche mémoire
11
Prise écouteurs
Affichage
A
Bande sélectionnée
B
Arrêt automatique 90 minutes
C
Verrouillage système
D
Voyant Stéréo FM
E
Voyant de charge pile
F
Préréglages mémoires
G
DBB On
H
Fréquence
F
14
Page 16

Installation de la pile
Le couvercle du compartiment à pile se
trouve au dos de l’a ppareil. Faites glisser
le couvercle dans le sen s de la flèche af in
d’accéder au comparti ment à pile.
Insérez une pile A AA dans le comparti ment.
Faites attention à insérer la pile,
comme indiqué sur le schéma.
Refermez le couvercle.
Note:
1. V ous pouvez à tout moment contrôler le
niveau de charge de la pile grâce à l’icône
affichée sur l’écra n LCD. Qua nd le niveau
de la pile est si faible qu’il empêche le bon
fonctionnement de la radio, le voyant
clignote et la lettre “E” apparaît sur
l’écran LCD. La radio s’arrête.
2. V eillez à re mplacer la pile dans un délai
de 3 minutes. Ceci afin d’éviter de perdre
les réglages mémorisés au moment du
remplacement de la pile.
15
Page 17

Antenne/Ecouteurs
Branchez les écouteurs da ns la prise prévue
à cet effet. Le câble de ra ccorde ment des
écouteurs fait office d’a ntenne pour la
réception audio FM et TV (DT-180V).
Vous devez le déplier le plus possible af in
d’optimiser son efficacité.
Une a ntenne métallique est intégrée pour la
réception AM. Vous devez la faire pivoter en
cours de réception AM pour obtenir un
meilleur signal.
Remarque importa nte:
Afin d’économiser la pile, la radio est arrêtée
automatiquement 10 secondes après que les
écouteurs aient été débranchés.
Réglage du volume
Utilisez le bouton de réglage du volume
pour régler le niveau sonore. L’écran aff iche
les modifications qua nd vous effe ctuez le
réglage du volume.
F
16
Page 18

Recherche radio
Bande
Fréquence
DT-120/DT-180 522 - 1629 kHz (9kHz)
DT-120/DT-180 520 - 1710 kHz (10kHz)
DT-180V 522 - 1629 kHz (9kHz)
DT-180V 520 - 1710 kHz (10kHz)
AM
Antenne
Bande
Fréquence
Antenne
Bande
Fréquence
Antenne
17
Intégrée/Tournez la radio pour un
fonctionnement optimum
FM
87.50 - 108 MHz
Externe/Assurez-vous que les
écouteurs soient correctement
branchés
TV
Canaux TV 2-13 (DT -180V)
Externe/Assurez-vous que les
écouteurs soient correctement
branchés.
Page 19

Arrêt automatique 90 minutes
Afin d’économiser la pile, cette radio est
conçue pour s’éteindre automatiquement
a près 90 minutes de f onctionnement.
L’écran LCD affiche .
Pour que l’écoute ne soit pa s interrompue,
appuyez plus de 2 se conde s sur le bouton
de mise sous tension On/Off jusqu’à ce
que l’icône disparaisse.
Recherche de stations
Allumez la radio, sélectionnez la ba nde
désirée en a ppuya nt sur le bouton de
sélection de bande. Appuyez et maintenez
enfoncés plus d’une demie secondes les
boutons de commandes du syntoniseur pour
démarrer la recherche. La radio parcourt les
fréquences et s’arrête automatiquement
quand elle détecte une station.
F
18
Page 20

Recherche manuelle
Allumez la radio, sélectionnez la bande
désirée en a ppuyant sur le bouton de
sélection de bandes. Vous pouvez
sélectionner la station voulue en a ppuya nt
sur les boutons de commande du
syntoniseur par intermittence jusqu’à avoir
atteint la station voulue, ou en a ppuyant et
maintenant enf oncés les boutons de
commande du syntoniseur jusqu’à avoir
atteint la station recherchée.
Mémorisation syntoniseur
(Présélection des station s )
Allumez la radio en a ppuyant sur le bouton
de mise sous tension On/Off. Sélectionnez
la bande voulue en a ppuya nt sur le bouton de
sélection de bande. Allez jusqu’à la station
voulue en utilisant la recherche automatique
ou manuelle comme décrit ci-dessus. Une
fois la station voulue atteinte, a ppuyez et
maintenez enfoncé le bouton Mémoire plus
de deux secondes jusqu’à ce que l’affichage
M x cesse de clignoter et qu’un signal
sonore retentisse (dans les écouteurs).
La précédente station mémorisée est
remplacée.
19
Page 21

Vous pouvez enregistrer 5 station s en
mémoire sur chaque bande (AM, FMI, FMII
et TV).
Ra ppel de s stations mémorisées
Allumez la radio, sélectionnez la ba nde,
appuyez puis libérez si mplement le bouton
Mémoire. L’écran LCD aff iche la mémoire
présélectionnée ainsi que la fréquence radio.
Sélecteur Stéréo/Mono
La radio est conçue pour recevoir les
diffusions FM en stéréo. Pour les stations
FM les plus faibles, positionnez le sélecteur
Stéréo/Mono sur Mono. L’icône Stéréo
disparaît de l’écran LCD.
F
20
Page 22

Modification des intervalles de
recherches AM
Pour les pays d’Amérique du Nord et
certains pays d’Amérique du Sud,
l’intervalle de recherche AM e st de 10 kHz
Pour les autres pays, il est de 9kHz.
Pour modifier l’intervalle de recherche sur la
bande AM, veuillez suivre les étapes
suivantes:
1. Modifier l’intervalle de recherche de la
bande AM de 9 kHz à 10 kHz
Quand la radio e st éteinte, appuyez et
maintenez enfoncé le bouton UP (HAUT)
tout en allumant la radio grâce au bouton
de mise sous tension On/Off jusqu’à ce
que le nombre 10 puis 520 clignotent sur
l’écran LCD pour indiquer que l’intervalle
de recherche AM est passé à 10 kHz.
21
Page 23

2. Modifier l’intervalle de recherche de la
bande AM de 10 kHz à 9 kHz
Quand la radio est éteinte, appuyez et
maintenez enfoncé le bouton DOWN
(BAS) tout en allumant la ra dio grâce au
bouton de mise sous tension On/Off
jusqu’à ce que le nombre 9 puis
522 clignotent sur l’écran LCD pour
indiquer que l’intervalle de recherche
AM est passé à 9 kHz.
Note:
La modification de l’intervalle de recherche
de la bande AM supprime la mémorisation
de toutes les stations AM.
F
22
Page 24

Verrouillage système
Afin d’éviter les modifications intempestives
des paramètres de votre ra dio.
Positionnez le bouton de verrouillage sur la
position V errouillage. L’icône de verrouillage
apparaît sur l’écra n LCD. Pour suppri mer
le verrouillage, positionnez simplement le
bouton de verrouillage dans la position
inverse. L’icône de verrouillage disparaît de
l’écran LCD.
Il est important de penser à déverrouiller la
radio au moment de s’en servir car le
verrouillage empêche la radio de fonctionner
23
Page 25

Caractéristique s te chniques
Pile: 1 x AAA (LR03, UM-4)
Couverture fréquences:
FM: 87.50 – 108 MHz
AM:
522 – 1629 kHz ( DT-120/DT-180 9 kHz)
520 – 1710 kHz ( DT-120/DT-180 10 kHz)
522 – 1629 kHz (DT-180V 9 kHz )
520 – 1710 kHz (DT- 180V 10 kHz )
TV: 2 – 13 canaux (DT-180V)
Alimentation externe: 1.0 mW + 1.0 mW
Prise écouteurs: Di amètre 3.5mm (stéréo)
Notre société se réserve le droit de
modifier les cara ctéristique s techniques
sans avis préalable.
F
24
Page 26

Si vous souhaitez vous débarrasser ultérieurement
du produit, veuillez noter que: les déchets
électriques ne doivent pas être jetés avec les
déchets domestiques. Veuillez les faire déposer
dans les centres de recyclage existants.
Contactez les autorités locales ou
distributeurs pour obtenir de plus amples
informations. (Directive de l’équipement
électronique et des déchets électriques).
25
Page 27

26
Page 28

Controles
1
Pantalla LCD
2
Selección de Banda
3
DBB (‘Deep Bass Booster’: Aumento de
Bajos) On/Off
4
Control de Sintonía
5
Interruptor Estéreo/Mono
6
Encendido/Apagado
7
Control de V olumen
8
Interruptor de Bloqueo
9
Compartimento para Batería
10
Botón de Memoria
11
Clavija para Auriculares
Pantalla
A
Banda Seleccion a d a
B
Apaga do automático tras 90 minutos
C
Bloqueo del sistema
D
Indicador FM estéreo
E
Indicador de batería
F
Preselección de memoria
G
DBB activado
H
Frecuencia
27
Page 29

Instala ción de la Batería
La ta pa de la batería está situa da en la parte
trasera de la unida d. Deslice la tapa en la
dirección de la flecha para a cceder al
compartimento para batería. Inserte una
batería AAA (UM-4) en el compartimento.
Asegúrese de que la batería está colocada
de acuerdo al diagrama indicado. V uelva a
colocar la tapa en su sitio.
Nota:
1. Usted puede controlar la batería siempre
con el icono de batería en la pantalla LCD.
Cuando la pila se esté gastando y no
pueda hacer funcionar la ra dio,
el indicador de batería baja parpadeará
junto con una “ E “ en la pantalla LCD.
La radio se a pagará.
E
2. Procure cambiar la batería en 3 minutos.
Esto prevendrá la pérdida de
preselecciones durante el cambio
de batería.
E
28
Page 30

Antena/Auriculare s
Inserte los auriculares en la clavija para
auriculares. El cable de conexión a la radio
actúa como a nten a dura nte la recepción de
FM y audio de TV (DT -180V) y debe ser
extendido cuanto sea posible para aumentar
la sensibilidad.
Se incluye una antena de barra de ferrito
incorporada para la recepción AM y sólo se
necesita rotar la radio para obtener una
potencia máxima de señal dura nte la
escucha en AM.
Nota Importante:
La radio se a pagará automática mente
10 segundos después de desconectar los
auriculares de la clavija para ahorrar energía
de la batería.
Control de Volumen
Utilice los botones de control de volumen
para ajustar el nivel del volumen. La pa ntalla
indicará los cambios cuando usted utilice el
control de volumen.
29
Page 31

Sintonizar la radio
Banda
Frecuencia
DT-120/DT-180 522 - 1629 kHz (9kHz)
DT-120/DT-180 520 - 1710 kHz (10kHz)
DT-180V 522 - 1629 kHz (9kHz)
DT-180V 520 - 1710 kHz (10kHz)
AM
Antena
Banda
Frecuencia
Antena
Banda
Frecuencia
Antena
Interna/Rote la radio para mejor
recepción
FM
87.50 - 108 MHz
Externa/Asegúrese de que los
auriculares están conectados en
la clavija para auriculares
TV
canales TV 2-13 (DT-180V)
Externa/Asegúrese de que los
auriculares están conectados
en la clavija para auriculares
E
E
30
Page 32

Dispositivo de apagado
automático tras 90 minutos
Para ahorrar energía de la batería,
esta radio está diseñada para apagarse
automáticamente tras 90 minutos de
funciona miento, la pantalla LCD indica .
Para una escucha continuada si es
necesaria, apriete el botón de Encendido/
Apagado durante más de 2 segundos hasta
que desa parezca de la pantalla LCD.
Sintonización por Escaneo
Encienda la radio, seleccione la banda
deseada apretando el botón de Selección de
Banda. Apriete y mantenga presionados los
botones de Control de Sintonía durante más
de medio segundo y suelte el botón para
iniciar la Sintonización por Escaneo. La radio
escaneará y se detendrá automáticamente
cuando encuentre una emisora.
31
Page 33

Sintonización M anual
Encienda la radio, seleccione la banda
deseada apretando el botón de Selección
de Banda. La emisora desea da puede
seleccionarse a pretando los botones de
Control de Sintonía intermitentemente ha sta
alcanzar la emisora dese a da. O apretando y
manteniendo presiona do el Control de
Sintonía hasta alcanzar la emisora deseada.
Sintonización por Memoria
(Preselección de Emisoras)
Encienda la radio a preta ndo el botón de
Encendido/Apagado. Seleccione la banda
deseada apretando el botón de Selección de
Banda. Sintonice la emisora de sea da usa ndo
la sintonización por Escaneo o Manual
descrita s anteriormente. Cua ndo alca nce la
emisora deseada, apriete y mantenga
presionado el botón de Memoria dura nte más
de 2 segundos ha sta que en la pantalla M x
deje de parpadear seguido de un bip
(a través de los auriculares). Esto ca mbi ará
la emisora memorizada previamente.
Puede memorizar 5 emisora s en ca da ba nda
(AM, FMI, FMII y TV).
E
E
32
Page 34

Sintonizar emisoras memorizadas
Encienda la radio, seleccione la banda
deseada y luego simple mente apriete y
suelte el botón de Memoria de emisora.
La pantalla LCD indicará la preselección de
Memoria y la frecuencia de la radio.
Interruptor Estéreo/Mono
La radio está diseñada para recibir
transmisiones de FM estéreo. Para las
emisora s de débil rece pción en FM,
cambie el interruptor Estéreo/Mono a la
posición Mono. En la pantalla LCD el icono
de Estéreo desapare cerá.
Ca mbiar el ancho de banda de AM
En los países nortea merica nos y en algunos
suda merica nos, el a ncho de banda de AM es
de 10 kHz. En otros países es de 9 kHz.
33
Page 35

Para cambiar el ancho de ba nda de AM,
por favor siga los pa sos siguientes:
1. Ca mbiar el a ncho de banda de AM de
9 kHz a 10 kHz
Cuando la radio e sté AP AGADA, apriete y
mantenga presionado el botón de Sintonía
SUPERIOR y encienda la radio a pretando
el botón de Encendido/Apagado ha sta que
en la pantalla LCD parpadee 10 y
después 520, indicando que el ancho
de banda AM ha sido cambiado a 10 kHz.
2. Ca mbiar el a ncho de banda de AM de
10 kHz a 9 kHz
Cuando la radio e sté AP AGADA, apriete y
mantenga presionado el botón de Sintonía
INFERIOR y encienda la radio a preta ndo
el botón de Encendido/Apagado ha sta que
en la pantalla LCD parpadee 9 y después
522, indicando que el a ncho de banda AM
ha sido cambiado a 9 kHz.
Nota:
Al cambiar el ancho de banda de AM se
borrarán toda s la s e misoras
preseleccionadas en Memoria en AM.
E
E
34
Page 36

Bloqueo del Sistema
Para prevenir el cambio accidental de las
configuracione s de la radio. Ponga el
interruptor de Bloqueo en posición ‘Lock’
(bloqueo). El icono de bloqueo apare cerá
en la pantalla LCD. Para desbloquear,
simplemente cambie el interruptor de
Bloqueo a la posición contraria, el icono de
bloqueo desa parecerá de la pa ntalla LCD.
Es importante asegurarse de que el
interruptor de Bloqueo esté en su posición
de apaga do cua ndo se vaya a utilizar la
radio, ya que la radio está completamente
inactiva hasta que el interruptor de Bloqueo
se desconecte.
35
Page 37

Especifica cione s
Batería: 1 x AAA (LR03, UM-4)
Cobertura de Frecuencia:
FM: 87.50 – 108 MHz
AM:
522 – 1629 kHz (DT-120/DT-180 9 kHz)
520 – 1710 kHz (DT-120/DT-180 10 kHz)
522 – 1629 kHz (DT-180V 9 kHz)
520 – 1710 kHz (DT-180V 10 kHz)
TV: 2 – 13 canale s (DT -180V)
Salida de Corriente: 1.0 mW + 1.0 mW
Clavija de Auriculares:
3.5 mm de diámetro (estéreo)
E
La compañía se reserva el derecho a
modificar la s e spe cificaciones sin
previo aviso.
E
36
Page 38

Si en el futuro necesita deshacerse de este
producto, tenga en cuenta lo siguiente: no debe
deshacerse de los residuos de productos eléctricos
como si fueran residuos domésticos. Por favor,
recicle en los sitios en los que esto sea posible.
Acuda a las autoridades locales o al
vendedor en busca de asesoramiento
sobre reciclaje. (Directiva sobre residuos
eléctricos y equipos electrónicos).
37
Page 39

38
Page 40

Bedieningselementen
1
LCD display
2
Frequentieband-selectie
3
DBB (Deep Bass Booster) Aan/Uit
4
Afstemtoets
5
Stereo/Mono schakelaar
6
Aan-/Uitschakelaar
7
Volumeregelaar
8
V ergrendeling
9
Batterijhouder
10
Geheugentoets
11
Koptelefoonaa n sluiting
Display
A
Geselecteerde frequentieba nd
B
90 minuten automatische uitschakeling
C
Systeemvergrendeling
D
FM stereo indicator
E
Indicator batterijvermogen
F
Voorselecties
G
DBB aan
H
Frequentie
39
Page 41

Batterij plaatsen
Het batterijdeksel bevindt zich aan de
achterk ant van het toestel. Gli jd het dek sel in
de richting van de pi jl om toega ng tot het
batterijva k te kri jgen. Plaats één AAA (UM-4)
batterij in het va k. Zorg ervoor dat de batterij
geplaatst is zoals aangegeven op het
diagram. Plaats het deksel terug.
Opmerking:
1. U kunt het batterijvermogen altijd
controleren via het batterijicoon op het
LCD display. Als het vermogen van de
batterij heel laag wordt en de radio niet
kan aandrijven, zal de lage batterij
indicator flikkeren en verschijnt er een
“E” op het LCD display. De radio zal
uitgeschakeld worden.
NL
2. Zorg ervoor dat u de batterij binnen de
3 minuten vervangt. Zo voorkomt u dat de
voorselecties gewist worden tijdens het
vervangen va n de batterij.
NL
40
Page 42

Antenne/Koptelefoon
Steek de koptelefoon in de
koptelefoonaan sluiting. De draad tussen
de koptelefoon en de ontva nger werkt als
een antenne tijden s de FM en TV (DT -180V)
audio ontvangst en moet zoveel mogeli jk
uitgestrekt worden om de gevoeligheid
te verhogen.
Er is een ingebouwde ferriet staafantenne
voorzien voor AM ontva ngst en enkel tijden s
het luisteren naar de AM-frequentie moet de
radio gedraaid worden voor maximale
signaalkracht.
Belangrij ke opmerking:
De radio zal automatisch uitgeschakeld
worden binnen 10 seconden wanneer u de
koptelefoon uit de aan sluiting trekt om
batterijenergie te sparen.
Volumeregelaar
Gebruik de volumeregelaarknoppen om het
volume aan te passen. Op het display ziet
u de veranderingen als u de volumeregelaar
bedient.
41
Page 43

De radio afstemmen
Band
Frequentie
DT-120/DT-180 522 – 1629 kHz (9kHz)
DT-120/DT-180 520 – 1710 kHz (10kHz)
DT-180V 522 – 1629 kHz (9kHz)
DT-180V 520 – 1710 kHz (10kHz)
AM
Antenne
Band
Frequentie
Antenne
Band
Frequentie
Antenne
Intern/Draai radio voor beste
ontvangst
FM
87.50 – 108 MHz
Extern/Zorg ervoor dat de
koptelefoon in de aa nsluiting zit
TV
TV kanalen 2 – 13 (DT-180V)
Extern/Zorg ervoor dat de
koptelefoon in de aan sluiting zit.
NL
NL
42
Page 44

90 minuten automatische
uitschakeling
Om de batterij te sparen, is deze radio
ontworpen om na 90 minuten automatisch
uit te schakelen, LCD display toont .
Als u onafgebroken naar de radio wilt
luisteren, druk dan la nger da n 2 seconden op
de aan-/uitscha kelknop tot het LCD display
verdwijnt.
Digitale afste mming
Zet de radio aan, sele cteer de gewenste
frequentieband door op de frequentieba ndkeuzeschakelaar te drukken. Druk op de
afstemtoetsen en houd ze langer da n een
halve seconde ingedrukt, laat de toets los
en de digitale afstemming wordt gestart.
De radio scant en stopt automatisch als
er een zender gevonden is.
43
Page 45

Manuele afstemming
Zet de radio aan, sele cteer de gewen ste
frequentieband door op de frequentieba ndkeuzeschakelaar te drukken. De gewenste
zender kan geselecteerd worden door met
tussenpozen op de afstemtoetsen te
drukken tot de gewenste zender gevonden is.
Of druk en houd de afstemtoets ingedrukt tot
de gewenste zender gevonden is.
Geprogrammeerde afstemming
(zendervoorselectie)
Zet de radio aan door op de aa n-/
uitschakelaar te drukken. Selecteer de
gewenste frequentieband door op de
frequentieband-keuzescha kelaar te drukken.
Stem af op de gewenste zender door de
digitale of manuele afstemming te gebruiken
zoals hierboven beschreven. Als u de
gewenste zender gevonden heeft, druk op de
geheugenknop en houd deze langer da n
2 seconden ingedrukt tot het display M x niet
meer flikkert en u een bliep (via de
koptelefoon) hoort. Het zal een vorige zender
in het geheugen vervangen.
Per frequentieband (AM, FMI, FMII en TV)
kunt u 5 zenders in het geheugen opslaan.
NL
NL
44
Page 46

Roep de zenders in het
geheugen op
Zet de radio aan, sele cteer de gewenste
frequentieband en druk gewoon op de
geheugentoets voor de zenders en laat
deze terug los. Het LCD display toont het
voorselectiegeheugen en de radiofrequentie.
Stereo/Mono schakelaar
De radio is ontworpen om FM stereo
uitzendingen te ontvangen. Bij een zwa kke
ontvangst va n een FM zender , scha kel
stereo/mono over op de mono-stand/ Het
LCD display stereo-icoon zal verdwijnen.
Veranderen naar
AM frequentieba nd
Voor Noord-Amerikaa nse la nden en voor
sommige Zuid-Amerikaanse la nden is de
AM-afstemming 10 kHz. V oor a ndere la nden
is dit 9 kHz.
45
Page 47

Om de AM frequentieba nd aa n te pa ssen,
doe het volgende.
1. V era nder de af stemming va n 9 kHz n aar
10 kHz
Als de radio UIT staat, druk op Tuning
Up-toets en houd deze ingedrukt.
Zet dan de radio aan door op de aan-/
uitschakeltoets te drukken tot de LCD
display 10 en dan 520 flikkert. Dit betekent
dat de AM frequentie veranderd is naar
10 kHz.
2. V era nder de af stemming va n 10 kHz naar
9 kHz
Als de radio UIT staat, druk op Tuning
Up-toets en houd deze ingedrukt.
Zet dan de radio aan door op de aan-/
uitschakeltoets te drukken tot de LCD
display 9 en dan 522 flikkert. Dit betekent
dat de AM frequentie veranderd is naar
9 kHz.
NL
Opmerking:
Als u de AM frequentie vera ndert, worden alle
geprogra mmeerde zenders in het AM
geheugen gewist.
NL
46
Page 48

Systeemvergrendeling
Om te vermijden dat de radio-instellingen
per ongeluk worden veranderd. Schakel de
vergrendeltoets naar de vergrendelpositie.
Het LCD display vergrendelicoon zal
verschijnen. Om vrij te geven, scha kel de
vergrendeltoets naar de tegenovergestelde
positie, het LCD display vergrendelicoon
zal verdwijnen.
Het is belangrij k dat de vergrendeltoets
uitgeschakeld is als u de radio wilt bedienen.
De radio werkt namelijk niet zolang de
vergrendeltoets ingeschakeld is.
47
Page 49

Specificatie s
Batterij: 1 x AAA (LR03, UM-4)
Frequentiespectrum:
FM: 87.50 – 108 MHz
AM:
522 – 1629 kHz (DT-120/DT-180 9 kHz)
520 – 1710 kHz (DT-120/DT-180 10 kHz)
522 – 1629 kHz (DT-180V 9 kHz)
520 – 1710 kHz (DT-180V 10 kHz)
TV: 2 – 13 kan aal (DT-180V)
Output-vermogen: 1.0 mW + 1.0 mW
Koptelefoonaa nsluiting :
3.5 mm dia meter (stereo)
Het bedrijf behoudt de rechten om de
specificaties te verbeteren zonder
kennisgeving.
NL
NL
48
Page 50

Indien u zich in de toekomst van dit toestel wenst te
ontdoen, let er dan op dat elektrisch afvalmateriaal
niet met het huishoudelijk afval mag worden
verwijderd. Breng het toestel naar een
kringloopwinkel of anderevoorziening voor recycling.
Neem contact op met uw plaatselijke autoriteit
of winkelier indien u meer informatie wenst
over recycling. (Richtlijn voor Afval van
Elektrische en Elektronische Apparaten,
AEEA).
49
Page 51

NL
50
Page 52

Bedienelemente
1
LCD Display
2
Frequenzbereichswahl
3
DBB (Deep Bass Booster –
Bassverstärker) An/Aus
4
Sendereinstellung
5
Stereo/Mono Schalter
6
Power (Storm) An/Aus
7
Lautstärkeregelung
8
Schließschalter
9
Batteriefach
10
Speichertaste
11
Ohrhörerbuchse
Display
A
Gewählter Frequenzbereich
B
N ach 90 Minuten Selbstabschaltung
C
Systemabschaltung
D
FM Stereoanzeige
E
Anzeige des Batterieladungszustandes
F
Speichervorwahl
G
DBB an
H
Frequenz
51
Page 53

Batteriein stallation
Die Batterieabdeckung befindet sich auf der
Rückseite des Gerätes. Schieben Sie die
Abdeckung in Richtung des Pfeils, um an
da s Batteriefa ch zu gela ngen. Fügen Sie
eine AAA (UM-4)-Batterie in da s Fach ein.
Vergewissern Sie sich, dass die Batterie
in Übereinstimmung mit dem a ngezeigten
Diagramm eingelegt ist. Schließen Sie
die Abdeckung wieder.
Anmerkung:
1. Sie können den Ladezustand der Batterie
immer mit dem Batteriesymbol auf dem
LCD Display überwachen. Wenn der
Ladezustand der Batterie sehr niedrig wird
und da s Ra dio nicht funktionieren k ann,
blinkt die Anze ige des niedrigen
Ladungszustandes der Batterie
zusa mmen mit einem „E“ auf de m LCD Display auf. Das Radio schaltet sich aus.
2. Stellen Sie sicher, dass die Batterie
innerhalb von 3 Minuten ersetzt wird.
Die s bewahrt die Speichereinstellungen
davor verloren zu gehen, während die
Batterie ausgetauscht wird.
NL
D
D
52
Page 54

Antenne/Ohrhörer
Führen Sie den Ohrhörer in die
Ohrhörerbuchse ein. Das Kabel, da s den
Ohrhörer mit dem Empfänger verbindet,
dient als Antenne für den Hörempfa ng von
FM und TV (DT-180V) und sollte so weit
wie möglich ausgestreckt werden,
um die Empfangsstärke zu verbe ssern.
Eine eingebaute Stabantenne aus Ferrit
ist für den AM-Empfa ng vorgesehen und
ist nur für die Ausrichtung des Ra dios
nach der größten Sign alstärke bei m
AM-Hörempfang nötig.
Wichtige Anmerkung:
Das Ra dio stellt sich innerhalb von
10 Sekunden selbst aus, wenn Sie den
Ohrhörer aus der Ohrhörerbuchse ziehen,
um den Batteriestrom zu sparen.
53
Page 55

Lautstärkeregelung
Durch Betätigen der Lautstärketa ste wird
die Lautstärke reguliert. Das Display
zeigt die Änderungen, wenn Sie die
Lautstärkeregelung betätigen.
Radioe instellung
Bandbreite
Frequenz
DT-120/DT-180 522 - 1629 kHz (9kHz)
DT-120/DT-180 520 - 1710 kHz (10kHz)
DT-180V 522 - 1629 kHz (9kHz)
DT-180V 520 - 1710 kHz (10kHz)
Antenne
AM
Innenantenne/ Geben Sie de m
Radio die beste
Empfangsausrichtung
D
Bandbreite
Frequenz
Antenne
Bandbreite
Frequenz
Antenne
FM
87.50 - 108 MHz
Außenantenne/Stellen Sie
sicher, dass der Ohrhörer in die
Ohrhörerbuchse eingeführt ist.
TV
TV-Kanäle 2-13 (DT-180V)
Außenantenne/Stellen Sie
sicher, dass der Ohrhörer in die
Ohrhörerbuchse eingeführt ist.
D
54
Page 56

Vorrichtung zur
Selbstausschaltung nach
90 Minuten
Um den Batteriestrom zu sparen, ist dieses
Radio so ausgestattet, dass es sich nach
90 Minuten Spielzeit ausschaltet, der LCD
Display zeigt .
Falls der Hörempfang f ortgesetzt werden soll,
drücken Sie die Power-Ta ste On/Off
(Ein/Aus) mehr als 2 Sekunden lang,
bis das LCD-Display verschwindet.
Automatische Sendere instellung
Drehen Sie das Radio an, wählen Sie den
erforderlichen Frequenzbereich durch
Drücken der Ta ste für die W ahl des
Frequenzbereiches. Halten Sie die
Taste für die Senderei nstellung mehr als
0,5 Sekunden und lassen da n a ch die T aste
los, um mit der Sendersuche zu beginnen.
Da s Radio sucht ab und hält automatisch an,
wenn ein Sender gefunden ist.
55
Page 57

Ma nuelle Sendere in stellung
Drehen Sie da s Ra dio an, wählen Sie den
erforderlichen Frequenzbereich durch
Drücken der Taste für die Wahl des
Frequenzbereiches. Der gewünschte
Sender kann durch unterbrochenes
Drücken der Taste für die Sendereinstellung
gewählt werden, bis der gewünschte Sender
erreicht ist.
Sender speichern
(Sendervorwahl)
Stellen Sie da s Ra dio ein, indem Sie die
Taste Power On/Off (Ein/Aus) drücken.
Wählen Sie den gewünschten
Frequenzbereich durch Drücken der
Frequenzbereichsta ste. Stellen Sie den
gewünschten Sender ein, indem Sie die
automatische oder manuelle
Sendereinstellung, wie oben beschrieben,
benutzen. Wenn der gewünschte Sender
erreicht ist, drücken und halten Sie die
Speicherta ste länger als 2 Sekunden,
bis da s Aufleuchten des M x aufhört,
gefolgt von einem Piepton (im Ohrhörer).
Dies ersetzt den vorher gespeicherten
Sender.
D
D
Sie können pro Frequenzbereich 5 Sender
abspeichern (AM, FMI, FMII und TV).
56
Page 58

Senderabruf
Stellen Sie das Radio ein, wählen Sie
den erforderlichen Frequenzbereich, dann
drücken Sie einfach die Senderspeichertaste
und lassen sie wieder los. Da s LCD-Display
zeigt die Sendervorwahl und Radiofrequenz.
Stereo/Mono Schalter
Das Ra dio ist darauf eingerichtet,
FM Stereosendungen zu empfangen.
Bei schwachem FM Sender schalten Sie die
T aste von Stereo/Mono auf Mono um. Da s
LCD Display Stereosymbol verschwindet.
Die We chselschritte de s
AM-Frequenzbereichs
In nordamerik anischen Ländern und einigen
süda merika nischen Ländern ändert sich bei
AM die Frequenz in 10-kHz-Schritten. In
anderen Ländern sind es 9 -kHz-Schritte.
57
Page 59

Um einen AM-Frequenz-Ein stellungsschritt
zu ändern, folgen Sie bitte den unten
aufgeführten Schritten.
1. Ändern des AM-Frequenz Einstellungsschrittes von 9 kHz auf
10 kHz
Wenn das Ra dio AUS ist, drücken und
halten Sie die UP (Oben)-Taste, dann
schalten Sie das Radio an, indem Sie
die Taste On/Off (Ein/Aus) drücken bis
10 und dann 520 auf dem LCD Display
aufblinkt, was anzeigt, dass der
AM-Frequenz-Ein stellungsschritt auf
10 kHz geändert wurde.
2. Ändern AM-Frequenz Einstellungsschrittes von 10 kHz auf
9 kHz
Wenn das Ra dio AUS ist, drücken und
halten Sie die DOWN (Unten)-T aste,
dann schalten Sie das Radio an,
indem Sie die Taste On/Off (Ein/Aus)
drücken bis 9 und dann 522 auf dem
LCD Display aufblinkt, wa s anzeigt,
da ss der AM-Frequenz-Einstellungsschritt
auf 9 kHz geändert wurde.
D
Anmerkung:
Das Ändern de s AM-FrequenzEinstellungsschrittes löscht alle
vorgewählten AM Speichersender.
D
58
Page 60

Systemschließung
Um ungewollten Änderungen von jeglichen
Radioeinstellungen vorzubeugen.
Schalten Sie den Schließschalter in die
Schließposition. Das Schließsymbol
erscheint im LCD-Display. Um die
Schließposition zu lösen, schalten Sie den
Schließschalter einfach in seine entgegen
gesetzte Position, das Schließsymbol
verschwindet im LCD-Display.
Es ist wichtig sicher zu stellen, dass der
Schließschalter auf AUS gestellt ist,
wenn das Ra dio bedient werden soll,
da da s Ra dio vollkommen funktion slos ist,
bis der Schließschalter gelöst ist.
59
Page 61

Beschre ibung
Batterie: 1 x AAA (L03, UM-4)
Frequenzbereiche:
FM: 87.50 – 108 MHz
AM:
522 – 1629 kHz ( DT-120/DT-180 9 kHz)
520 – 1710 kHz ( DT-120/DT-180 10 kHz)
522 – 1629 kHz ( DT-180V 9 kHz)
520 – 1710 kHz ( DT-180V 10 kHz)
TV : 2-13 Ka nal (DT -180V)
Ausgangsleistung 1.0 mW + 1.0 mW
Ohrhörbuchse 3.5 mm Durchmesser (Stereo)
Die Gesellschaft behält sich das Recht vor ,
die technischen Daten ohne
Benachrichtigung zu ändern.
D
D
60
Page 62

Sollten Sie irgendwann zu späterer Zeit dieses
Produkt entsorgen wollen, beachten Sie bitte
Folgendes: Elektroschrott sollte nicht mit dem
Haushaltsmüll entsorgt werden. Bitte recyceln Sie
ihn, sofern Ihnen entsprechende Möglichkeiten zur
Verfügung stehen. Setzen Sie sich mit Ihren
kommunalen Behörden oder Ihrem Einzelhändler
in Verbindung und fragen Sie diese um
Rat bezüglich der Wiederverwertung.
(Elektro- und Elektronik-Altgeräte-Richtlinie
(WEEE))
61
 Loading...