

Page 1
Cordless Job Site Speaker Instruction manual
EN
FRCA
ESMX
Enceinte de chantier sans fil Manuel d’utilisation
Altavoz Inalámbrico de Trabajo Manual de instrucciones
XRM07
Makita Corporation
3-11-8, Sumiyoshi-cho,
Anjo, Aichi 446-8502 Japan
3A81b35Z20000
XRM07(12VMAX)-NA3-1604 www.makita.com
SJN
IIMPORTANT: Read Before Using
IMPORTANT : Lisez les instructions avant l’utilisation.
MPORTANTE: Leer antes de usar.
Page 2
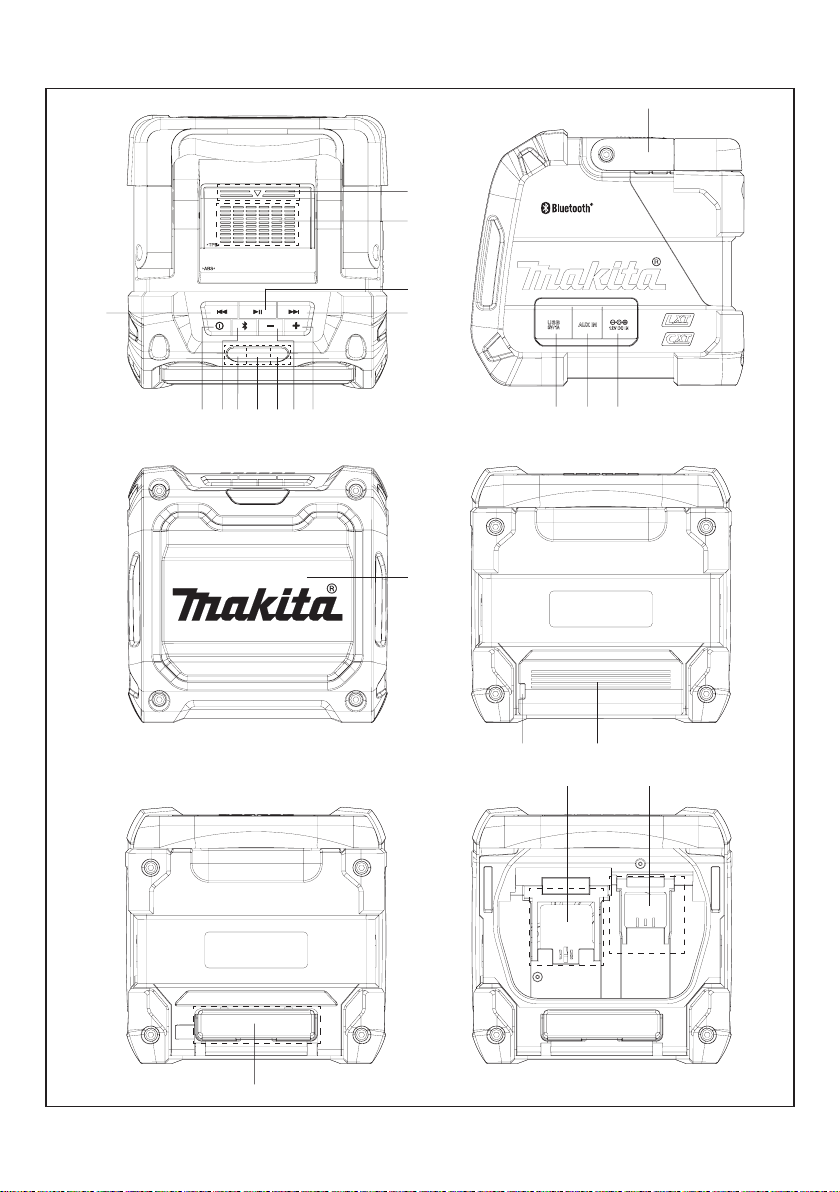
Explanation of general view
14
1
2
3
12
8 71011
569
4
13
18
1617
25
20 21
15
19
1
1
Page 3
1
24
23
22
2
23
4 5
3
16
17
15
2
Page 4

IMPORTANT SAFETY
ENGLISH (Original instructions)
Symbols
The following show the symbols used for the equipment.
Be sure that you understand their meaning before use.
Read instruction manual.
INSTRUCTIONS
WARNING:
When using electric tools, basic safety precautions should
always be followed to reduce the risk of fire, electric
shock, and personal injury, including the following:
1.
Read this instruction manual and the charger
instruction manual carefully before use.
2.
Clean only with dry cloth.
3.
Do not install near any heat sources such as radiators,
heat registers, stoves, or other apparatus (including
ampliers) that produce heat.
4.
Only use attachments/accessories specified by the
manufacturer.
5.
Unplug this apparatus during lighting storms or when
unused for long periods of time.
6.
A battery operated speaker with integral batteries or a
separate battery pack must be recharged only with the
specied charger for the battery. A charger that may be
suitable for one type of battery may create a risk of re
when used with another battery.
7.
Use battery operated speaker only with specifically
designated battery packs. Use of any other batteries
may create a risk of re.
8.
When battery pack is not in use, keep it away from
other metal objects like: paper clips, coins, keys, nails,
screws, or other small metal objects that can make a
connection from one terminal to another. Shorting the
battery terminals together may cause sparks, burns, or
a re.
9.
Avoid body contact with grounded surfaces such
as pipes, radiators, ranges and refrigerators. There
is an increased risk of electric shock if your body is
grounded.
10.
Under abusive conditions, liquid may be ejected from
the battery; avoid contact. If contact accidentally
occurs, flush with water. If liquid contacts eyes,
additionally seek medical help. Liquid ejected from the
battery may cause irritation or burns.
11.
The MAINS plug is used as the disconnect device, and
it shall remain readily operable.
If electrolyte gets into your eyes, rinse them out with
4.
clear water and seek medical attention right away. It
may result in loss of your eyesight.
Do not short the battery cartridge:
5.
Do not touch the terminals with any conductive
(1)
material.
Avoid storing battery cartridge in a container with
(2)
other metal objects such as nails, coins, etc.
Do not expose battery cartridge to water or
(3)
rain.A battery short can cause a large current
flow, overheating, possible burns and even a
breakdown.
Do not store the tool and battery cartridge in locations
6.
where the temperature may reach or exceed 50 °C(122°F)
Do not incinerate the battery cartridge even if it is
7.
severely damaged or is completely worn out. The
battery cartridge can explode in a re.
Be careful not to drop or strike battery.
8.
Do not use a damaged battery.
9.
Tips for maintaining maximum battery life
Charge the battery cartridge before completely
1.
discharged. Always stop tool operation and charge the
battery cartridge when you notice less tool power.
Never recharge a fully charged battery cartridge.
2.
Overcharging shortens the battery service life.
Charge the battery cartridge with room temperature
3.
at 10 °C - 40 °C (50 °F - 104 °F). Let a hot battery
cartridge cool down before charging it.
Charge the battery cartridge if you do not use it for a
4
long period (more than six months).
SAVE THESE INSTRUCTIONS
SPECIFIC SAFETY RULES
FOR BATTERY CARTRIDGE
1.
Before using battery cartridge, read all instructions and
cautionary markings on (1) battery charger, (2) battery,
and (3) product using battery.
2.
Do not disassemble battery cartridge.
3.
If operating time has become excessively shorter,
stop operating immediately. It may result in a risk of
overheating, possible burns and even an explosion.
3
Page 5
For United States:
Cautions to the use
The changes or modications not expressly approved
by the party responsible for compliance could void the
user’s authority to operate the equipment.
RF exposure statements
IMPORTANT NOTE:
exposure compliance requirements, the antenna(s)
used for this transmitter must be installed to provide a
separation distance of at least 20 cm from all persons
and must not be co-located or operating in conjunction
with any other antenna or transmitter. No change to the
antenna or the device is permitted. Any change to the
antenna or the device could result in the device
exceeding the RF exposure requirements and void
user’s authority to operate the device.
Note:
This equipment has been tested and found to
comply with the limits for a Class B digital device,
pursuant to part 15 of the FCC Rules. These limits are
designed to provide reasonable protection against
harmful interference in a residential installation. This
equipment generates, uses and can radiate radio
frequency energy and, if not installed and used in
accordance with the instructions, may cause harmful
interference to radio communications. However, there
is no guarantee that interference will not occur in a
particular installation. If this equipment does cause
harmful interference to radio or television reception,
which can be determined by turning the equipment off
and on, the user is encouraged to try to correct the
interference by one or more of the following measures:
•
Reorient or relocate the receiving antenna.
•
Increase the separation between the equipment
and receiver.
•
Connect the equipment into an outlet on a circuit
different from that to which the receiver is
connected.
•
Consult the dealer or an experienced radio/TV
technician for help.
To comply with the FCC RF
Volume down button
6.
Aux in indicator
7.
Volume max. or min. indicator/ Low battery indicator
8.
Bluetooth indicator
9.
Bluetooth pairing button
10.
Power button
11.
Previous track button/ Rewind button
12.
Speaker
13.
Handle
14.
DC in socket
15.
Auxiliary input socket
16.
USB charging socket
17.
Cable hole
18.
Mobile (Cell phone) storage cabinet
19.
14.4 V/18V battery terminal
20.
10.8 V battery terminal
21.
Battery cover
22.
Battery cartridge
23.
Button
24.
Mobile storage cabinet cover
25.
Power
The speaker can be powered by Makita battery packs or a
standard wall outlet.
Explanation of general view (Fig.1)
1.
Battery compartment locker
2.
Mobile (Cell phone) placing panel
3.
Play/Pause button
4.
Next track button/Fast-forward button
5.
Volume up button
4
Page 6

Power by battery
The following table indicates the operating time on a
single charge.
Battery Cartridge Voltage
Battery
capacity
1.3Ah
1.5Ah
2.0Ah
3.0Ah
4.0Ah
5.0Ah
6.0Ah
10.8V
-12Vmax
BL1016
BL1021B
BL1041B
14.4V 18V AUX IN Bluetooth
BL1415 7.5 7.0
BL1415N
BL1430/
BL1430B
BL1440
BL1450
BL1460B
BL1815
BL1815N
BL1820/
BL1820B
BL1830/
BL1830B
BL1840/
BL1840B
BL1850/
BL1850B
BL1860B
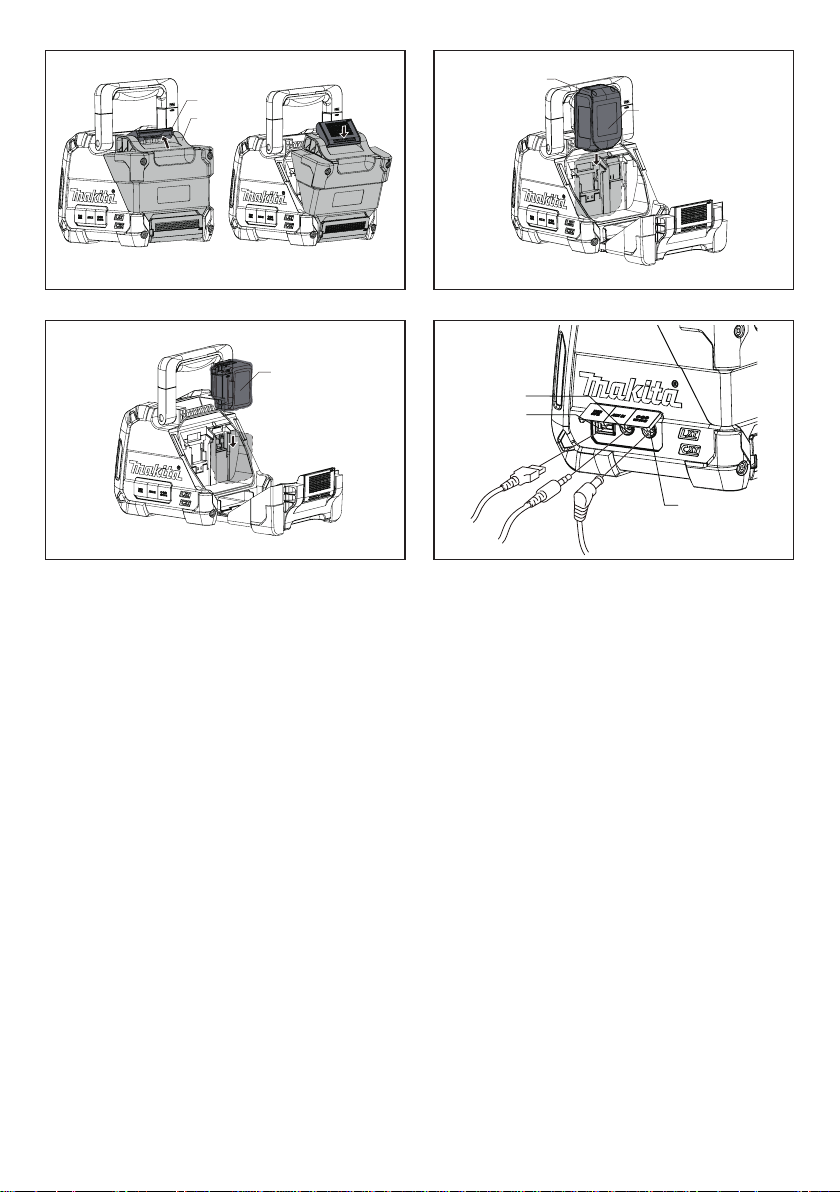
Installing or removing slide battery
cartridge (Fig. 3 and 4)
To install the battery cartridge, align the tongue on
•
the battery cartridge with the groove in the housing
and slip it into place. Always insert it all the way until it
locks in place with a little click.
If you can see the red indicator on the upper side of
•
the button, it is not locked completely. Install it fully
until the red indicator cannot be seen. If not, it may
accidentally fall out of the tool, causing injury to you or
someone around you.
Do not use force when inserting the battery cartridge.
•
If the cartridge does not slide in easily, it is not being
inserted correctly.
To remove the battery cartridge, sliding it from the tool
•
while pressing the button on the front of the cartridge.
Note:
When the speaker is in low battery, the middle LED
will ash in red.
AT SPEAKER OUTPUT = 100mW (unit: Hour)
12
10
9.5
15
13
31
26
32
34
39
(Approximately)
AUX IN
+USB(2.1A)
11
9.0
9.0
14
12
15 2.016
17 3.018
28
24
24 4.025
29 3.531
31
32
37
Bluetooth
+USB(2.1A)
1.0
1.0
1.0
1.5
1.0
2.0
2.5
3.0
5.5
4.0
6.5
Indicating the remaining battery
capacity
Only for battery cartridges with "B" at the end of the
model number
1
2
1. Indicator lamps 2. Check button
Press the check button on the battery cartridge to
indicate the remaining battery capacity. The indicator
lamps light up for few seconds.
5
Page 7

Indicator lamps
Lighted Off Blinking
NOTE: Depending on the conditions of use and the
ambient temperature, the indication may differ slightly
from the actual capacity.
Remaining
capacity
75% to 100%
50% to 75%
25% to 50%
0% to 25%
Charge the
battery
The battery
may have
malfunctioned
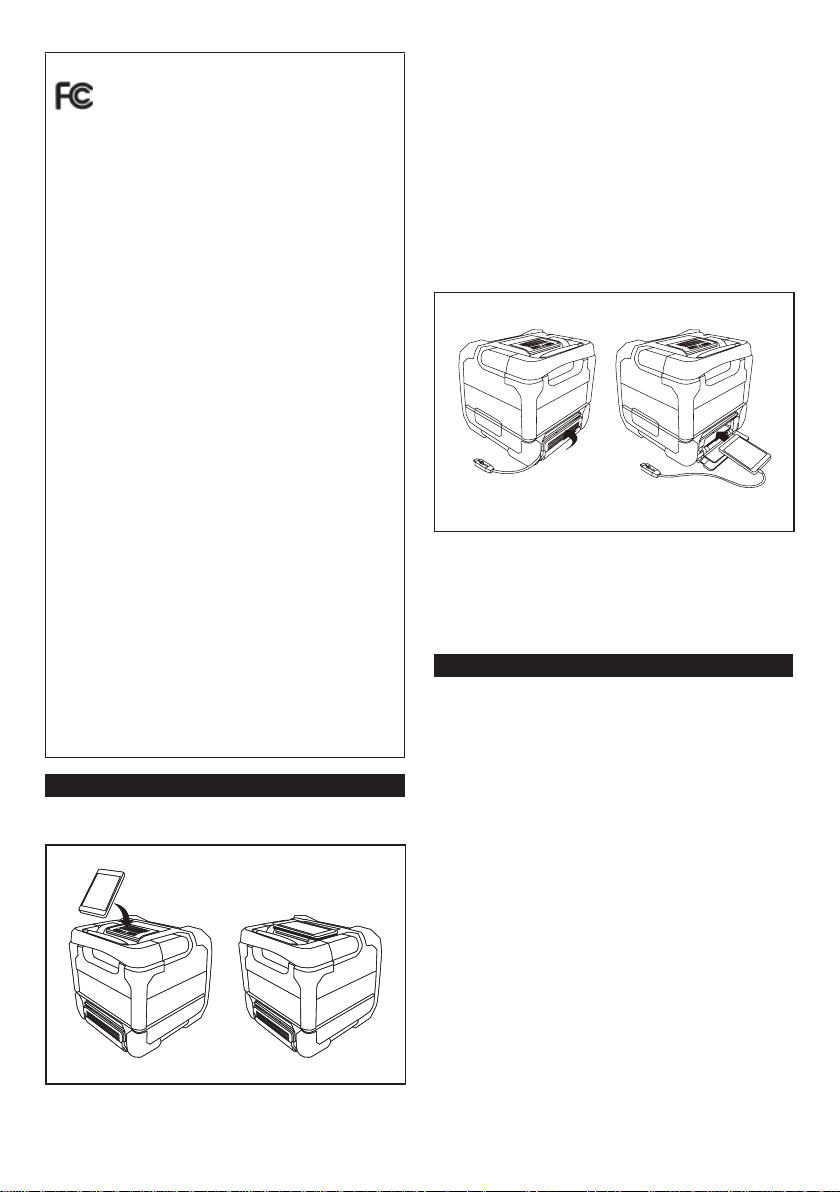
Using Supplied AC power adaptor
(Fig. 5)
Remove the rubber protector and insert the adaptor plug
into the DC socket on the right side of the speaker. Plug
the adaptor into a standard mains socket outlet. Whenever
the adaptor is used, the battery pack is automatically
disconnected. The AC adaptor should be disconnected
from the main supply when not in use.
IMPORTANT:
The mains adaptor is used as the means of connecting
the speaker to the mains supply. The mains socket used
for the speaker must remain accessible during normal
use. In order to disconnect the speaker from the mains
completely, the mains adaptor should be removed from
the mains outlet completely.
USB power supply socket
This jack can be used to charge a mobile phone or any
other device that uses less than 2.1A of DC current.
Charging will only occur when the speaker is switched on.
Note: Ensure the specification of your external device
such as mobile phone, mp3 player or iPod is compatible
with the speaker. Please read instruction manual of your
external device before charging.
IMPORTANT:
Before connecting USB device to the charger, always
•
backup your data of USB device. Otherwise your data
may lose by any possibility.
The charger may not supply power to some USB
•
devices.
When not using or after charging, remove the USB
•
cable and close the cover.
Do not connect power source to USB port. Otherwise
•
there is risk of re. The USB port is only intended for
6
charging lower voltage device. Always place the cover
onto the USB port when not charging the lower voltage
device.
•
Do not insert a nail, wire, etc. into USB power supply
port. Otherwise a circuit short may cause smoke and
re.
•
Do not connect this USB socket with your PC
USB port, as it is highly possible that it may cause
breakdown of the units.
Pairing and connecting a device to
the speaker
You need to pair your Bluetooth device with the speaker
before you can auto-link to play/stream Bluetooth music
through the speaker. Paring creates a `bond' so two
devices can recognize each other.
Pairing and playing your Bluetooth
device for the rst time
1.
Press the Power button to turn on the speaker and
the Bluetooth indicator will ash in blue. The indicator
flashes fast flashing blue indicating the speaker is
discoverable.
2.
Activate Bluetooth on your device according to the
device's user manual to link to the speaker. Locate the
Bluetooth device list and select the device named
‘XRM07.’ With some mobiles (which are equipped with
earlier versions than BT2.1 Bluetooth device), you
may need to input the pass code “0000”.
3.
Once connected, there will be a beep sound and the
Bluetooth indicator will remain in solid blue. You can
simply select and play any music from your source
device. Volume control can be adjusted from your
source device, or directly from the speaker.
4.
Use the controls on your Bluetooth-enabled device or
on the speaker to play/pause and navigate tracks.
Note:
1.
If 2 Bluetooth devices, pairing for the rst time, both
search for the speaker, it will show its availability on
both devices. However, if one device links with this
unit rst, then the other Bluetooth device won't nd it
on the list.
2.
If your Bluetooth device is temporarily disconnected
to the speaker, then you need to manually reconnect
your device again to the speaker.
3.
If ‘XRM07” shows in your Bluetooth device list but your
device cannot connect with it, please delete the item
from your list and pair the device with the speaker
again following the steps described previously.
4.
The effective operation range between the system and
the paired device is approximately 10 meters (30 feet).
Any obstacle between the system and the device can
reduce the operational range.
5.
Bluetooth connectivity performance may vary
depending on the connected Bluetooth devices.
Please refer to the Bluetooth capabilities of your
device before connecting to the speaker. All features
may not be supported on some paired Bluetooth
devices.
Page 8

Playing audio les in Bluetooth
MAINTENANCE
mode
When you have successfully connected the speaker with
the chosen Bluetooth device you can start to play your
music using the controls on your connected Bluetooth
device.
1.
Once playing has started adjust the volume to the
required setting using the Volume buttons on
the speaker or on your enabled Bluetooth device.
When you press the Volume up/down button,
th e volume indicator will ash in fast ashing red. If
the indicator light in solid red, it indicates the volume is
in maximum volume or minimum volume.
2.
Use the controls on your device to play/pause and
navigate tracks. Alternatively, control the playback
using Play/Pause ( ), Next track ( ) , Previous
track buttons ( ) on the speaker.
3.
Press and hold the Next track or Previous button
to fast-forward/Rewind the current track. Release
the button when the desired point in the track is reached.
Note:
1.
That not all player applications or devices may
respond to all of these controls.
2.
Some mobile phones may temporarily disconnect from
the speaker when you make or receive calls. Some
devices may temporarily mute their Bluetooth audio
streaming when they receive text messages, emails or
for other reasons unrelated to audio streaming.Such
behaviour is a function of the connected device and
does not indicate a fault with the speaker.
Speaker memory and reconnecting
a device
The speaker can memorize up to 8 sets of paired device,
when the memory exceed this amount, the oldest pairing
history will be over written. If your Bluetooth device
already paired with the speaker previously, the unit
will memorize your Bluetooth device and it attempts
to reconnect with a device in memory which is last
connected. If the last connected device is not available,
the speaker will be discoverable.
Disconnecting your Bluetooth
device
Press and hold the Bluetooth pairing button for 2-3
seconds to disconnect with your Bluetooth device. The
Bluetooth indicator ashes in blue indicating the speaker
is discoverable again for pairing.
player to ensure an adequate signal and then adjust
the volume on the speaker for comfortable listening.
Note:
When Aux in socket is connected an audio device,
Bluetooth function will be disabled to minimize power
consumption.
MAINTENANCE
CAUTION:
•Never use gasoline, benzine, thinner, alcohol or the
like. Discoloration, deformation or cracks may result.
Specication
Amplier
Output power 10.8V:3.5W
14.4V:6W
18V:10W
Frequency response 50Hz~20kHz
Aux In
Input sensitivity 250mVrms @100Hz
Speaker
Main speaker 101.6mm 8 ohm 10W
Tweeter speaker 36mm 8ohm 10W
Bluetooth
Bluetooth version 4.0
Bluetooth proles A2DP/ SCMS-T/ AVRCP
Transmission power Bluetooth specication
power Class 2
Transmission range Max. 10m (varies according
to usage conditions)
Supported codec SBC
Compatible Bluetooth prole A2DP
General
AC power adaptor DC in 12V 1.5A, center pin
positive
Battery Slide battery: 10.8V-12Vmax /
14.4 V/ 18 V
Weight 2.7KG (without battery)
The company reserves the right to amend the specication
without notice.
Playing music via auxiliary input
socket
A 3.5mm Auxiliary input socket is provided on the right
side of the unit to permit an audio signal to be fed into the
unit from any devices that features a headphone or audio
output, such as an iPod, MP3 or CD player.
1.
Connect a stereo or mono audio source (for example,
iPod, MP3 or CD player) to the Auxiliary input socket
(marked 'AUX') and the Aux in indicator turns green
indicating the speaker is in auxiliary input mode.
2.
Adjust the Volume control on your iPod, MP3 or CD
7
Page 9

FRANCAIS (Instructions d’origine)
Symboles
Les symboles utilisés pour l'équipement sont affichés
ci-dessous.Soyez sûr de tout comprendre avant toute
utilisation.
Lisez le manuel d’utilisation.
INSTRUCTIONS IMPORTANTES DE
SECURITE
AVERTISSEMENT :
Lorsque vous utilisez des outils électriques, des
précautions de base devraient toujours être suivies
pour réduire le risque d'incendie, d'électrocution et de
blessures, notamment les précautions suivantes :
1.
Lisez ce manuel d'utilisation attentivement ainsi que
le manuel d'utilisation du chargeur avant de l'utiliser.
2.
Nettoyez avec un chiffon sec.
3.
N’installez pas à proximité de sources de chaleur
telles que radiateurs, registre de chaleur, poêle ou
autres appareils (y compris les amplificateurs) qui
produisent de la chaleur.
4.
N’utilisez que les extensions/accessoires spécifiés
par le fabricant.
5.
Débranchez cet appareil lors des orages ou lorsqu’il
est inutilisé pendant une longue période.
6.
Un haut-parleur commandé par une batterie avec
batteries intégrées ou par une batterie externe doit
être rechargé qu'avec le chargeur spécifié pour la
batterie. Un chargeur qui est adaptée pour un type de
batterie peut provoquer un risque d'incendie lorsqu'il
est utilisé avec une autre batterie.
7.
Utilisez le haut-parleur commandé par la
batterie uniquement avec des batteries externes
spécifiquement désignées. L'utilisation d'autres
batteries peut provoquer un risque d'incendie.
8.
Lorsque la batterie externe n’est pas utilisée, veuillez
le tenir éloigner des autres objets métalliques tels que
: les trombones, les pièces de monnaie, les clés, les
clous, les vis ou les autres petits objets métalliques
qui peuvent établir une connexion d'une borne à un
autre. Court-circuiter les bornes de la batterie peut
provoquer des étincelles, des brûlures ou un incendie.
9.
Évitez tout contact corporel avec des surfaces reliées
à la terre telles que les tuyaux, les radiateurs, les
cuisinières et les réfrigérateurs. Il y a un risque accru
de choc électrique si votre corps est relié à la terre.
10.
Dans des conditions extrêmes, du liquide peut être
éjecté depuis la batterie; évitez tout contact avec le
liquide. En cas de contact accidentel, rincez avec de
l'eau. Si le liquide rentre en contacte avec les yeux,
consultez un médecin. Le liquide éjecté depuis la
batterie peut causer des irritations ou des brûlures.
11.
Les prises SECTEUR sont utilisées comme dispositif
de déconnexion, et elles doivent rester facilement
accessible.
1.
Avant d'utiliser la cartouche de batterie, lire toutes les
instructions et les avertissements concernant (1) le
chargeur de batterie, (2) la batterie, et (3) l’équipement
utilisant la batterie.
2.
Ne démontez pas la cartouche de batterie
3.
Si le temps de fonctionnement devient excessivement
court, cessez immédiatement l’utilisation. Il peut en
résulter un risque de surchauffe, de brûlures et même
d’explosion.
4.
Si l'électrolyte pénètre dans vos yeux, rincez-les à
l'eau claire et consultez un médecin immédiatement.
Cela peut entraîner une perte de la vue.
5.
Ne court-circuitez pas la cartouche de la batterie :
(1)
Ne touchez pas les bornes avec un matériau
conducteur.
(2)
Évitez de ranger la cartouche de la batterie dans
un conteneur avec d'autres objets métalliques tels
que des clous, des pièces de monnaie, etc.
(3)
N’exposez pas la cartouche de la batterie à l'eau
ou à la pluie. Un court-circuit de la batterie peut
provoquer un fort courant, une surchauffe, des
brûlures et même une panne.
6.
Ne rangez pas l'outil ou la cartouche de la batterie
dans des endroits où la température peut atteindre ou
dépasser 50 ° C (122 ° F)
7.
N’incinérez pas la cartouche de la batterie même si elle
est sérieusement endommagée ou complètement usée.
La cartouche de la batterie peut exploser dans un feu.
8.
Veillez ne pas laisser tomber ou heurter la batterie.
9.
N’utilisez pas de batterie endommagée.
Conseils pour maintenir la durée de vie de la batterie au maximum
1.
Chargez la cartouche de la batterie avant qu’elle
ne soit complètement déchargée. Arrêtez toujours
le fonctionnement de l'équipement et rechargez la
cartouche de la batterie lorsque vous remarquez que
la puissance de l'équipement est faible.
2.
Rechargez jamais une cartouche de batterie qui est
déjà complètement chargée. La surcharge réduit la
durée de vie de la batterie.
3.
Rechargez la cartouche de batterie à une température
ambiante de 10 °C - 40 °C (50 °F - 104 °F) Lais sez la car touch e
de batterie chaude se refroidir avant de la charger.
4.
Rechargez la cartouche de batterie si vous ne l'utilisez
pas pendant une longue période (plus de six mois).
ENREGISTRER SES INSTRUCTIONS
REGLES SPECIFIQUES DE SECURITE
POUR LA CARTOUCHE DE BATTERIEE
8
Page 10

Pour les États-Unis:
Attention à l’intention de l’utilisateur
Tout changement ou modication non expressément
approuvés par la partie responsable de la conformité
peut entraîner l’annulation du droit de l’utilisateur à
utiliser cet appareil.
Énoncé sur l’exposition aux RF
NOTE IMPORTANTE:Pour répondre aux exigences
de conformité à l’exposition RF FCC, l’antenne utilisée
avec l’émetteur doit être installée pour permettre une
distance de séparation d’au moins 20cm de toute
personne et ne doit pas être placée à côté ou
fonctionner conjointement avec une autre antenne ou
un autre émetteur. Aucun changement sur l’antenne ou
sur l’appareil n’est autorisé. Tout changement sur
l’antenne ou l’appareil pourrait amener l’appareil à
dépasser les exigences d’exposition RF et annuler le
droit de l’utilisateur d’utiliser l’appareil.
REMARQUE : cet équipement a été testé et déclaré
conforme aux limites des appareils numériques de
Classe B ; en accord avec le chapitre 15 du règlement
de la FCC. Ces limites ont pour objectif de fournir une
protection raisonnable contre les interférences
nuisibles dans une installation résidentielle.
Cet équipement génère, utilise et rayonne de l’énergie
de fréquence radio et peut nuire aux communications
radio s’il n’est pas installé et utilisé en accord avec les
instructions du mode d’emploi. Cependant, il n’est pas
garanti que des interférences surviennent dans une
installation particulière. Si l’équipement cause des
interférences nuisibles à la réception radio ou
télévision, qui peuvent être localisées en allumant ou
en éteignant l’équipement, l’utilisateur est encouragé à
corriger les interférences en employant une ou
plusieurs des mesures suivantes:
•
Réorienter ou déplacer l’antenne de réception.
•
Séparer davantage l’équipement et le récepteur.
•
Connecter l’équipement à une prise de courant
située sur un circuit différent de celui du récepteur.
•
Demandez assistance à un revendeur ou un
technicien expérimenté dans le domaine radio/TV.
3.
Bouton Lecture/Pause
4.
Bouton piste suivante/Bouton avance rapide
5.
Bouton Augmenter le volume
6.
Bouton Diminuer le volume
7.
Voyant d'entrée auxiliaire
8.
Voyant max. et min.du volume/ V oyant de batterie faible
9.
Voyant de Bluetooth
10.
Bouton de couplage du Bluetooth
11.
Bouton d’alimentation
12.
Bouton piste précédente/ Bouton reculer
13.
Haut-parleur
14.
Poignée
15.
Prise en DC
16.
Prise d'entrée auxiliaire
17.
Prise de recharge USB
18.
Trou du cable
19.
Armoire de rangement pour portable (téléphone cellulaire)
20.
Borne de batterie 14.4 V/18V
21.
Borne de batterie 10.8 V
22.
Couvercle de la batterie
23.
Cartouche de batterie
24.
Bouton
25.
Couvercle de l'armoire de stockage du portable
Alimentation
Le haut-parleur peut être alimenté par des blocs batteries
Makita ou par une prise murale standard.
Interprétation de la vue générale
(Fig.1)
1.
Casier du compartiment pour batterie
2.
Panneau pour placer le portable (téléphone cellulaire)
9
Page 11

Alimentation par batterie
Le tableau suivant indique le temps de fonctionnement
sur une seule charge.
Capacité de
la batterie
1.3Ah
1.5Ah
2.0Ah
3.0Ah
4.0Ah
5.0Ah
6.0Ah
Tension de la cartouche de batterie
10.8V
-12Vmax
BL1016
BL1021B
BL1041B
14.4V 18V AUX IN Bluetooth
BL1415 7.5 7.0
BL1415N
BL1430/
BL1430B
BL1440
BL1450
BL1460B
BL1815
BL1815N
BL1820/
BL1820B
BL1830/
BL1830B
BL1840/
BL1840B
BL1850/
BL1850B
BL1860B
Installation ou retrait de la cartouche
de batterie amovible (g. 3 et 4)
•
Pour installer la cartouche de batterie, alignez la
languette de la cartouche de batterie avec la rainure
dans le boîtier et faites le glisser en place. Insérez-la
toujours complètement jusqu'à ce qu'elle se verrouille
•
en place avec un petit clic.
Si vous pouvez voir le voyant rouge sur la face
supérieure du bouton, cela signie qu’elle n’est pas
parfaitement verrouillée. Installez-la entièrement
jusqu'à ce que le voyant rouge ne soit plus visible.
•
Sinon, elle risque de tomber accidentellement de
l'équipement, causant un préjudice à vous ou à
quelqu'un d’autre autour de vous.
•
N’utilisez pas la force lors de l'insertion de la
cartouche de batterie. Si la batterie ne glisse pas
facilement, elle n’est pas insérée correctement.
Pour retirer la batterie, faites-la glisser de
l'équipement tout en appuyant sur le bouton sur la
face avant de la cartouche.
Remarque :
Lorsque le haut-parleur a un niveau de batterie faible,
la LED centrale clignotera en rouge.
Indiquant la capacité restante de la
batterie
Uniquement pour les cartouches de batterie avec "B"
à la n du numéro de modèle
10
A la sortie du Haut-Parleur = 100 mW (unité: Heure)
12
10
9.5
15
13
31
26
32
34
39
1. Voyant des Lampes 2. Bouton de vérication
Appuyez sur le bouton de vérication sur la cartouche de
batterie pour indiquer la capacité restante de la batterie.
Les voyants sont allumés pendant quelques secondes.
Lighted Off Blinking
(Approximativement)
11
9.0
9.0
14
12
15 2.016
17 3.018
28
24
24 4.025
29 3.531
31
32
37
Indicator lamps
AUX IN
+USB(2.1A)
1
Bluetooth
+USB(2.1A)
1.0
1.0
1.0
1.5
1.0
2.0
2.5
3.0
5.5
4.0
6.5
2
Remaining
capacity
75% to 100%
50% to 75%
Page 12

25% to 50%
0% to 25%
Charge the
battery
The battery
may have
malfunctioned
REMARQUE : Selon les conditions d'utilisation et
la température ambiante, le voyant peut différer
légèrement de la capacité réelle.
En utilisant l'adaptateur secteur
fourni (g. 5)
Retirez la protection en caoutchouc et insérez l'adaptateur
dans la prise DC sur le côté droit de haut-parleur.
Branchez l'adaptateur dans une prise secteur standard.
Chaque fois que l'adaptateur est utilisé, la batterie est
automatiquement déconnectée. L'adaptateur secteur doit
être déconnecté de l'alimentation principale en cas de non
utilisation.
IMPORTANT:
La prise secteur est utilisée comme moyen de connecter
la radio à l’alimentation secteur. La prise secteur utilisée
pour la radio doit rester accessible durant l’utilisation
normale. Afin de déconnecter la radio du secteur, la
prise secteur doit être enlevée complètement de la prise
d’alimentation secteur.
Prise d'alimentation USB fournie
Cette prise peut être utilisée pour charger un téléphone
mobile ou tout autre appareil qui utilise moins de 2,1 A de
courant continu. La recharge ne se fera que lorsque le
haut-parleur est allumé.
Remarque : Vériez la spécication de votre périphérique
externe tel que le téléphone portable, le lecteur mp3 ou
iPod est compatible avec le haut-parleur.Veuillez lire le
manuel d'utilisation de votre appareil externe avant de le
charger.
IMPORTANT :
•
Avant de connecter un périphérique USB au chargeur,
toujours sauvegarder vos données du périphérique
USB. Sinon, vous pourriez perde tout vos données.
•
Le chargeur peut ne pas alimenter certains
périphériques USB.
•
En cas de non utilisation ou après la charge, retirez le
câble USB et fermez le couvercle.
•
Ne branchez pas la source d'alimentation au port
USB. Sinon, il y a risque d'incendie. Le port USB est
destiné uniquement à la charge de dispositif à faible
tension. Placez toujours le couvercle sur le port USB
lorsque vous ne rechargez pas un l'appareil de faible
•
tension.
N’insérez pas de clou, de l de fer, etc., dans le port
d'alimentation USB. Sinon, un court-circuit peut
•
provoquer de la fumée et du feu.
Ne branchez pas cette prise USB avec votre port USB
du PC, car il est très possible que cela peut provoquer
une panne des unités.
Coupler et connecter un appareil
avec l'enceinte
Vous devez coupler votre appareil Bluetooth avec votre
XRM07 avant de pouvoir relier et lire / diffuser de la
musique en Bluetooth sur votre enceinte portable. Le
couplage crée un lien permettant aux deux appareils de
se reconnaître mutuellement.
Coupler et utiliser votre appareil
Bluetooth pour la première fois
1.
Appuyez sur le bouton d'alimentation pour allumer
le haut-parleur et le voyant Bluetooth clignotera bleu.
L'indicateur clignote rapidement en bleu pour indiquer
que l'enceinte peut être détectée.
2.
Activez le Bluetooth sur votre appareil conformément
au manuel d’instruction pour le relier à votre enceinte.
Situez la liste des appareils Bluetooth et choisissez
l'appareil nommé ' XRM07.'. Avec certains portables
(équipés de versions antérieures aux appareils
Bluetooth BT2.1), vous devrez saisir un mot de passe
« 0000 ».
3.
Une fois connecté, il y’aura un bip sonore et l’icône
Bluetooth restera allumée en bleu. Vous pouvez
simplement sélectionner et jouer une musique depuis
votre appareil source. Le contrôle de volume peut
être réglé depuis votre appareil source ou directement
depuis l'enceinte.
4.
Utilisez les commandes de l'appareil avec la fonction
Bluetooth ou de votre enceinte pour lire / mettre en
pause et naviguer entre les pistes.
Remarque :
1.
Si 2 appareils Bluetooth, effectuent le couplage
pour la première fois, les deux à la fois recherchent
XRM07, il sera affiché la disponibilité sur les deux
appareils. Toutefois, si l'un des d'appareils se lie avec
cet appareil d'abord, l'autre appareil Bluetooth ne la
trouvera pas sur la liste.
2.
Si votre périphérique Bluetooth est temporairement
déconnecté de votre haut-parleur, alors vous devez
reconnecter manuellement votre appareil à nouveau
avec le haut-parleur.
3.
Si « XRM07 » est afché dans votre liste d'appareils
Bluetooth, mais que votre appareil ne peut pas se
connecter avec elle, veuillez supprimer l'élément
de votre liste et couplez de nouveau l'appareil
avec le haut-parleur en suivant les étapes décrites
précédemment.
4.
La portée de fonctionnement effective entre le
système et l’appareil couplé est d’environ 10 mètres
(30 pieds). Tout obstacle entre le système et l’appareil
risque de réduire la portée de fonctionnement.
5.
La performance de connectivité Bluetooth peut varier
en fonction des appareils Bluetooth connectés.
Référez-vous aux fonctionnalités Bluetooth de votre
appareil avant de connecter votre radio. Toutes les
fonctions ne seront peut-être pas compatibles sur
certaines appareils Bluetooth.
11
Page 13

Lire des chiers audio en mode
Bluetooth
Lorsque vous avez correctement connecté votre radio
avec l'appareil Bluetooth de votre choix, vous pouvez
commencer à lire votre musique en utilisant les contrôles
sur votre appareil Bluetooth connecté.
1.
Une fois que la lecture a commencé, réglez le volume
sur la valeur souhaitée en utilisant les boutons
de volume de votre haut-parleur ou sur votre appareil
avec Bluetooth activé. Lorsque vous appuyez sur
le bouton Volume haut / bas, le voyant de volume
clignote rouge. Si le voyant est rouge permanent, il
indique que le volume est au maximum ou minimum.
2.
Utilisez les commandes de votre appareil pour
la lecture / pause et naviguez parmi les pistes.
Alternativement, contrôlez la lecture en utilisant
Lecture / Pause ( ) , le bouton Piste suivante ( ),
le bouton Piste précédente ( ) sur le haut-parleur.
3.
Appuyez et maintenez le bouton Piste Suivante ( )
ou ( ) Piste précédente pour avancer rapidement
/ reculer la piste actuelle. Relâchez le bouton lorsque
le point souhaité dans la piste est atteint.
Remarque :
1.
Toutes les applications de lecture ou périphériques
peuvent répondre à l'ensemble de ces contrôles.
2.
Certains téléphones mobiles peuvent se déconnecter
temporairement de votre haut-parleur lorsque vous
donnez ou recevez des appels. Certains appareils
peuvent couper temporairement leur streaming
audio Bluetooth quand ils reçoivent des messages
texte, e-mails ou pour d'autres raisons non liées au
comportement du streaming audio. Ce comportement
est une fonction de l'appareil connecté et ne constitue
pas un défaut de votre haut-parleur.
Mémoire du haut-parleur et
reconnexion d'un appareil
Votre haut-parleur peut mémoriser jusqu'à 8 appareils
couplés, lorsque la mémoire dépasse ce nombre,
le premier appareil couplé sera remplacé. Si votre
appareil Bluetooth a déjà été couplé avec le hautparleur précédemment, l'unité mémorisera votre appareil
Bluetooth et essaiera de se reconnecter avec l'appareil
qui a été le dernier connecté enregistré en mémoire. Si
le dernier appareil connecté n'est pas disponible, le hautparleur ne sera pas détectable.
Déconnecter votre appareil
Bluetooth
Tenez la touche Bluetooth 2-3 secondes pour
déconnecter votre appareil Bluetooth. L'indicateur
Bluetooth clignote en bleu pour indiquer que l'enceinte est
détectable de nouveau pour le couplage.
lecteur MP3 ou CD.
1.
Connectez une source audio stéréo ou mono (par
exemple, iPod, MP3 ou lecteur de CD) à la prise
auxiliaire d'entrée (marqué «AUX») et l’indicateur
AUX IN devient vert, indiquant que le haut-parleur est
en mode d'entrée auxiliaire.
2.
Réglez le volume de votre iPod, lecteur MP3 ou
lecteur CD pour assurer un niveau de volume
suffisant, utilisez ensuite la commande de réglage
Volume de l’unité pour régler le volume sur un niveau
d’écoute confortable.
Remarque :
Afin de réduire la consommation d’énergie, la fonction
Bluetooth est automatiquement désactivée lors de la
connexion d’un appareil audio au connecteur audio Aux in.
ENTRETIEN
AVERTISSEMENT :
•
N’utilisez jamais d'essence, de benzène, de diluant,
d'alcool ou produits similaires. Des décolorations,
déformations ou des ssures peuvent en résulter.
Spécication
Amplicateur
Puissance de sortie
Fréquence de réponse
Aux In
Sensibilité d’entrée
Haut-parleur
Haut-parleur principal
Haut-parleur tweeter
Bluetooth
Version Bluetooth
Proles du Bluetooth
Puissance de Transmission
Porté de transmission
Codec pris en charge
Prole Bluetooth Compatible
Général
Adaptateur secteur
Batterie de type amovible
Poids
La société se réserve le droit de modier les spécications
sans préavis.
18V:10W
14,4V:6W
10,8V:3,5W
50 Hz ~ 20kHz
250 mVrms @ 100Hz
101,6 mm 8 ohms 10W
36mm 8ohm 10W
4.0
A2DP/ SCMS-T/ AVRCP
Bluetooth de spécication
de puissance de Classe 2
10m max. (varie selon les
conditions d'utilisation)
SBC
A2DP
DC 12V 1.5A, broche de
centrale positif
10,8V-12Vmax /
14,4 V / 18 V
2.7KG(sans batterie)
Lire de la musique par l'intermédiaire
de la prise d’entrée auxiliaire
Une prise d'entrée auxiliaire de 3,5 mm est prévu sur
le côté droit de l'appareil pour permettre l’entrée d’un
signal audio dans l’appareil de tous les périphériques qui
dispose d'une sortie casque ou audio, comme un iPod,
12
Page 14

ESPAÑOL (Instrucciones originales)
Símbolos
Lo siguiente muestra los símbolos usados por el equipo.
Asegúrese de que entiende su signicado, antes de usar
el equipo.
Lea el manual de instrucciones.
INSTRUCCIONES IMPORTANTES DE
SEGURIDAD
ADVERTENCIA:
Cuando utilice herramientas eléctricas, para reducir
el riesgo de incendio, descarga eléctrica y lesiones
personales, siga siempre las precauciones básicas de
seguridad, incluyendo lo siguiente:
1.
Lea el manual de instrucciones y el manual de
instrucciones del cargador detenidamente antes de
usarlos.
2.
Limpie el equipo solo con un paño seco.
3.
No instale cerca de fuentes de calor, como radiadores,
estufas, fuegos de cocina u otros aparatos (incluyendo
amplicadores) que produzcan calor.
4.
Utilice únicamente accesorios especificados por el
fabricante.
5.
Desenchufe este aparato durante las tormentas o
cuando no vaya a usarlo por un periodo prolongado.
6.
Un altavoz que funcione por medio de baterías
bien integradas o bien independientes, solo debe
cargarse con el cargador especíco para la batería.
Un cargador adecuado para un tipo de batería, puede
crear riesgo de incendio cuando se usa con otra
batería.
7.
Use un altavoz que funcione por medio de baterías
solo con baterías especícamente diseñadas. El uso
de otras baterías podría crear riesgo de incendio.
8.
Cuando la batería no esté en uso, manténgala alejada
de otros objetos metálicos como: clips, monedas,
llaves, clavos, tornillos u otros objetos metálicos
pequeños que pudieran crear conexiones de un
terminal a otro. El contacto entre sí de los terminales
de las baterías puede provocar chispas, quemaduras
o fuego.
9.
Evite contacto corporal con superficies conectadas
a tierra como tuberías, radiadores, estufas y
refrigeradores. Hay un incremento del riesgo de
descarga eléctrica si su cuerpo está conectado a
tierra.
10.
En condiciones abusivas, puede que de la batería
se expulse líquido, evite el contacto. Si de forma
accidental entra en contacto con el líquido, enjuague
con agua. Si el líquido entrase en contacto con los
ojos, busque ayuda médica. El líquido expulsado de
la batería puede causar irritación o quemaduras.
11.
El enchufe principal de la red eléctrica se utiliza como
dispositivo de desconexión, y debe estar siempre
disponible
Antes de utilizar el cartucho de batería, lea todas las
1.
instrucciones y advertencias en (1) el cargador de
la batería, (2) la baterías, (3) el producto que usa la
batería.
No desmonte el cartucho de batería.
2.
Si el tiempo de funcionamiento se ha vuelto
3.
excesivamente corto, pare inmediatamente Puede
haber riesgo de sobrecalentamiento, posibles
quemaduras o incluso una explosión.
Si el electrolito entra en contacto con los ojos,
4.
lávelos con agua limpia y busque atención médica de
inmediato. Podría dar como resultado la pérdida de
visión.
No haga un cortocircuito con el cartucho de batería.
5.
(1)
No toque los terminales con un material conductor.
(2)
Evite almacenar el cartucho de batería en
recipientes con otros objetos metálicos como
clavos, monedas, etc.
(3)
No exponga la batería al agua o lluvia. Un
cortocircuito en la batería puede producir un gran
ujo, sobrecalentamiento, posibles quemaduras e
incluso una avería.
No guarde la herramienta ni el cartucho de batería
6.
en lugares donde la temperatura pueda llegar a o
superar los 50 °C (122 °F).
No incinere el cartucho de batería incluso si está muy
7.
dañado o completamente desgastado. El cartucho de
batería podría explotar en el fuego.
Tenga cuidado de no dejar caer o golpear la batería.
8.
No use una batería dañada.
9.
Consejos para mantener al máximo la vida útil de la batería
Cargue el cartucho de batería antes de que
1.
se descargue completamente. Deje de usar la
herramienta y cargue la batería cuando note que la
batería tiene menos potencia.
Nunca cargue un cartucho de batería que esté
totalmente cargado. La sobrecarga reduce la vida útil
2.
de la batería.
Cargue el cartucho de batería con una temperatura
ambiente de entre 10 y 40 grados centígrados (50 °F-
3.
104 °F). Antes de cargarla, deje que una batería que
esté caliente se enfríe.
Cargue el cartucho de batería si no lo usa durante un
4.
largo periodo de tiempo (más de seis meses).
GUARDE ESTAS INSTRUCCIONES
REGLAS ESPECÍFICAS DE SEGURIDAD
PARA EL CARTUCHO DE BATERÍA
13
Page 15

Para Estados Unidos:
Precauciones para el usuario
Los cambios o modicaciones que no hayan sido
expresamente autorizados por la entidad responsable
por el cumplimiento de las regulaciones podrían anular
la autoridad del usuario de utilizar este equipo.
Declaraciones sobre la exposición de
radiofrecuencia (RF)
NOTA IMPORTANTE: Para cumplir con los requisitos
de exposición humana a los campos de
radiofrecuencia (RF) de la FCC, la o las antenas
usadas para este transmisor deben instalarse a una
distancia mínima de 20 centímetros de cualquier
persona y no deben ser colocadas ni funcionar junto a
otras antenas o transmisores. No se permite ningún
cambio en la antena o dispositivo. Cualquier cambio en
la antena o dispositivo podría resultar en el dispositivo
excediendo los requisitos de exposición humana a los
campos de radiofrecuencia y anular la autoridad del
usuario para operar el dispositivo.
NOTA: Este equipo ha sido probado y cumple con los
límites correspondientes a un equipo digital de Clase
B, según lo señalado en la Parte 15 de las Normas
FCC (la Comisión Federal de Comunicaciones de EE.
UU.). Estos límites están diseñados para proporcionar
protección razonable contra interferencias perjudiciales
en una instalación residencial. Este equipo genera,
utiliza y puede emitir energía de frecuencias de radio y,
si no es instalado y usado de acuerdo a las
instrucciones, puede causar interferencias
perjudiciales en las comunicaciones de radio. Sin
embargo, no hay garantía de que no ocurrirán las
interferencias en una instalación determinada. Si este
equipo causa interferencias perjudiciales en la
recepción de radio o televisión, que se pueden
identicar encendiendo y apagando el equipo,
recomendamos al usuario que intente solucionar las
interferencias tomando una o más de las siguientes
medidas:
•Cambiar la orientación o posición de la antena
receptora.
•Aumentar la separación entre el equipo y el
receptor.
•Conectar el equipo a una toma de un circuito
diferente del conectado con el receptor.
•Consultar al proveedor o a un técnico de radio/TV
con experiencia para recibir ayuda.
Explicación de la vista general
(Fig. 1)
1.
Compartimento de la batería
2.
Panel para colocar el teléfono móvil (celular)
3.
Botón Reproducción/pausa
4.
Botón pista siguiente/avance rápido
5.
Botón subir volumen
6.
Botón bajar volumen
7.
Indicador de entrada auxiliar
8.
Indicador de volumen máximo o mínimo/indicador batería baja
9.
Indicador de Bluetooth
10.
Botón de vinculación Bluetooth
11.
Botón de encendido
12.
Botón pista anterior/rebobinar
13.
Altavoz
14.
Asa
15.
Toma de entrada CC
16.
Toma de entrada auxiliar
17.
Toma de carga USB
18.
Agujero para cable
19.
Compartimento para guardar el teléfono móvil (celular)
20.
Terminal de la batería 14.4 V/18 V
21.
Terminal de la batería 10.8 V
22.
Cubierta de la batería
23.
Cartucho de batería
24.
Botón
25.
Cubierta del compartimento donde se guarda el móvil
Alimentación
El altavoz puede funcionar por medio de baterías Makita
o por medio de una toma de corriente estándar.
14
Page 16

Alimentación por batería
La siguiente tabla indica el tiempo de uso con una sola
carga.
Capacidad de
la batería
1.3Ah
1.5Ah
2.0Ah
3.0Ah
4.0Ah
5.0Ah
6.0Ah
Voltaje del cartucho de batería
10.8V
-12Vmax
BL1016
BL1021B
BL1041B
14.4V 18V Bluetooth
BL1415 7.5 7.0
BL1415N
BL1430/
BL1430B
BL1440
BL1450
BL1460B
BL1815
BL1815N
BL1820/
BL1820B
BL1830/
BL1830B
BL1840/
BL1840B
BL1850/
BL1850B
BL1860B
Instalación o retirada del cartucho
de batería (g. 3 y 4)
•
Para instalar el cartucho de batería, alinee la lengüeta
en el cartucho de batería con la ranura en la carcasa
y deslícela a su lugar. Siempre insértela hasta que
encaje en su sitio con un pequeño clic.
•
Si puede ver el indicador rojo en la parte superior
del botón, no está ajustada completamente.
Instálela completamente hasta que el indicador
rojo no se pueda ver. De lo contrario, podría caerse
accidentalmente de la herramienta, lesionándole a
usted o a alguien a su alrededor.
•
No use la fuerza al insertar el cartucho de batería.
Si el cartucho no se desliza fácilmente es que no se
está insertando correctamente.
•
Para retirar el cartucho de batería, deslícelo de la
herramienta mientras presiona el botón en la parte
frontal del cartucho.
Nota:
Cuando el altavoz está en batería baja, el LED central
parpadeará en rojo.
CON SALIDA DE ALTAVOZ = 100 mW (unidad: Hora)
Entrada
auxiliar
12
10
9.5
15
13
31
26
32
34
39
(aproximadamente)
Entrada auxiliar
+USB(2.1A)
11
9.0
9.0
14
12
15 2.016
17 3.018
28
24
24 4.025
29 3.531
31
32
37
Bluetooth
+USB(2.1A)
1.0
1.0
1.0
1.5
1.0
2.0
2.5
3.0
5.5
4.0
6.5
Indicaciones de la batería restante
Solo para cartuchos de batería que tengan una "B" al
nal del número de modelo
1
2
1. Luces indicadoras 2. Botón de comprobación
Presione el botón en el cartucho de batería para mostrar
la batería restante. Las luces indicadoras se encenderán
por unos segundos.
Luces indicadoras
Iluminado Apagado Parpadeando
Capacidad
restante
del 75% al 100%
15
Page 17

del 50% al 75%
del 25% al 50%
del 0% al 25%
Cargue la
batería
La batería
puede haber
funcionado
mal
NOTA: Dependiendo de las condiciones de uso y de
la temperatura ambiente, la indicación puede diferir
ligeramente de la capacidad real.
Usando el adaptador de CA
suministrado (Fig. 5)
Retire el protector de goma e inserte la clavija del
adaptador en la toma de CC en la parte derecha del
altavoz. Enchufe el adaptador a una toma de corriente
estándar. Cuando el adaptador se usa, la batería se
desconecta automáticamente. Cuando no lo use,
el adaptador de CA debe ser desconectado de la
alimentación principal.
IMPORTANTE:
El adaptador de corriente se emplea como medio de
desconexión de la radio de la toma de alimentación.
La toma de alimentación usada con la radio deberá
permanecer accesible durante su uso. Para desconectar
completamente la radio de la red de suministro, el
adaptador deberá ser desenchufado.
Toma de corriente USB
Esta toma puede usarse para cargar un teléfono móvil o
cualquier otro dispositivo que use menos de 2.1 A de CC.
Solo se cargará cuando el altavoz esté encendido.
Nota: Asegúrese de que la especificación de su
dispositivo externo como un teléfono móvil, reproductor
de mp3 o iPod es compatible con el altavoz. Lea el
manual de instrucciones de su dispositivo externo antes
de cargar.
IMPORTANTE:
•
Antes de conectar el dispositivo USB al cargador,
haga siempre una copia de seguridad de los datos
del dispositivo USB. De lo contrario, su información
podría perderse.
•
El cargador puede que no suministre energía a
algunos dispositivos USB.
•
Cuando no lo use, o tras cargar, retire el cable USB y
cierre la cubierta.
•
No conecte la fuente de alimentación al puerto USB.
De lo contrarío puede haber riesgo de fuego. El
puerto USB es solo para cagar dispositivos de bajo
voltaje. Cuando no esté cargando el dispositivo de
bajo voltaje, coloque siempre la cubierta en el puerto
USB.
16
No inserte un clavo, cable, etc. en el puerto de
•
alimentación USB. De lo contrario, un cortocircuito
podría causar humo y fuego.
No conecte esta toma USB al puerto USB del PC, ya
•
que es muy probable que esto pueda causar daños
en las unidades.
Emparejamiento y conexión de un
dispositivo al altavoz
Tendrá que emparejar su dispositivo Bluetooth con su
XRM07 antes de poder autoenlazar para reproducir /
transmitir música de Bluetooth mediante su altavoz con
Bluetooth. El emparejamiento creará un `vínculo' de modo
que ambos dispositivos se reconozcan entre ellos.
Emparejamiento y reproducción de su
dispositivo Bluetooth por vez primera
1.
Presione el Botón de encendido para encender el
altavoz y el Indicador de Bluetooth parpadeará en
azul. El indicador parpadeará rápido en azul para
indicar que el altavoz es reconocible.
2.
Active el Bluetooth de su dispositivo según su manual
del usuario para enlazar con el altavoz. Localice la
lista de dispositivos Bluetooth y seleccione el que
lleve por nombre ‘XRM07.’ Algunos dispositivos
móviles (equipados con versiones de Bluetooth
anteriores a la BT2.1), puede que sea necesario
introducir las contraseña “0000”.
3.
Una vez conectado, se oirá un pitido y el indicador
de Bluetooth permanecerá encendido en azul. Podrá
seleccionar y reproducir música desde su dispositivo
fuente. El volumen podrá ser ajustado desde su
dispositivo fuente o directamente desde el altavoz.
Use los controles de su dispositivo con función de
4.
Bluetooth o los del altavoz para reproducir / dejar en
pausa y navegar por las pistas.
Nota:
1.
Si dos dispositivos Bluetooth, vinculándose por
primera vez, buscan el XRM07, este se mostrará
disponible para ambos dispositivos. Sin embargo,
si un dispositivo se enlaza con esta unidad primero,
entonces el otro dispositivo Bluetooth no lo encontrará
en la lista.
2.
Si su dispositivo Bluetooth se desconecta
temporalmente de su altavoz, entonces, deberá
reconectar su dispositivo al altavoz de forma manual.
Si "XRM07" aparece en la lista de su dispositivo
3.
Bluetooth, pero no puede conectarse a él, borre el
elemento de la lista y vincule de nuevo el dispositivo
con el altavoz, siguiendo los pasos descritos
anteriormente.
El alcance efectivo de uso entre el sistema y el
dispositivo emparejado es de aproximadamente 10
4.
metros (30 pies). Cualquier obstáculo interpuesto
entre el sistema y el dispositivo podrá reducir el
alcance operativo.
5.
La capacidad de la conectividad Bluetooth podría
variar dependiendo del dispositivo Bluetooth
que se haya conectado. Por favor, consulte las
especificaciones Bluetooth de su dispositivo antes
de conectarlo a su radio. Puede que no todas
las funciones estuvieran disponibles en algunos
Page 18

dispositivos Bluetooth.
Reproducción de archivos de audio
en el modo Bluetooth
Cuando haya conectado su altavoz con el dispositivo
Bluetooth que haya elegido, ya podrá comenzar a reproducir
su música usando los controles del dispositivo Bluetooth
al que se haya conectado.
1.
Una vez que la reproducción haya comenzado, ajuste
el volumen al nivel deseado usando los botones
de volumen en su altavoz o en su dispositivo
Bluetooth. Cuando presione el botón de subir o
bajar volumen, el indicador de volumen parpadeará
rápidamente en rojo de forma intermitente. Si el
indicador de luz muestra una luz roja continua, esto
indica que el volumen está al máximo o al mínimo.
Use los controles en su dispositivo para reproducir,
2.
pausar y navegar por las pistas. De forma alternativa,
controle la reproducción usando los botones
Reproducir/pausar ( ), Pista siguiente ( ), Pista
anterior ( ) en el altavoz..
Mantenga presionado el botón de Pista siguiente
( ) o ( ) Pista anterior para avanzar rápidamente
3.
o rebobinar la pista actual. Suelte el botón cuando
llegue al punto de la pista deseado.
Nota:
1.
Que puede que no todos los reproductores o
dispositivos respondan a todos los controles.
2.
Algunos teléfonos móviles puede que se desconecten
temporalmente de su altavoz al realizar o recibir
llamadas. Algunos dispositivos puede que
silencien temporalmente su transmisión de audio
por Bluetooth cuando reciben mensajes de texto,
correos electrónicos o por otros motivos ajenos a la
transmisión de audio. Ese comportamiento es una
función del dispositivo conectado y no indica un fallo
en su altavoz.
Memoria del altavoz y reconexión
de un dispositivo
XRM07 puede memorizar hasta 8 dispositivos
emparejados. Cuando la memoria exceda esta cantidad,
el primero de los dispositivos emparejados será
sobrescrito.
Si su dispositivo Bluetooth hubiera sido emparejado
con el altavoz anteriormente, la unidad memorizará su
dispositivo Bluetooth e intentará reconectarse con el
dispositivo de la memoria con el que se conectó por
ultima vez. Si el último dispositivo con el que se conectó
no estuviera disponible, el altavoz será reconocible.
Desconexión de su dispositivo
Bluetooth
Mantenga pulsado el botón de Bluetooth 2-3 segundos
para desconectarse de su dispositivo Bluetooth. El
indicador Bluetooth parpadeará en azul indicando que el
altavoz es reconocible de nuevo para el emparejamiento.
Reproducción de música por medio
de la toma de entrada auxiliar
Para permitir que la unidad reciba una señal de audio de
cualquier dispositivo que cuente con auriculares o salida
de audio como un iPod, MP3 o reproductor de CD, el
lateral derecho de la unidad está provisto con una toma
de entrada auxiliar de 3,5 mm.
1.
Conecte una fuente de audio estéreo o mono
(por ejemplo, un iPod, MP3 o reproductor de CD)
a la toma de audio auxiliar (marcada como "AUX")
y el indicador de entrada de audio se volverá verde,
indicando que el altavoz está en modo de entrada
auxiliar.
2.
Ajuste el volumen de su iPod, reproductor de MP3 o
CD para garantizar una buena señal y después ajuste
el volumen del altavoz a su gusto.
Nota:
Cuando la toma Aux in esté conectada a un dispositivo
de audio, la función de Bluetooth estará desactivada para
minimizar el consumo de batería.
MANTENIMIENTO
PRECAUCIÓN:
•
Nunca use gasolina, bencina, diluyentes, alcohol o
similares. Podría dar como resultado decoloración,
deformaciones o roturas.
Especicaciones
Amplicador
Potencia de salida
Frecuencia de respuesta
Entrada auxiliar
Sensibilidad de entrada
Altavoz
Altavoz principal
Tweeter
Bluetooth
Versión Bluetooth
Perles Bluetooth
Potencia de transmisión
Alcance de transmisión
Codec compatible
Perl Bluetooth compatible
General
Adaptador de corriente CA
Batería
Peso
La compañía se reserva el derecho para modificar las
especicaciones sin previo aviso.
18V:10W
14,4V:6W
10,8V:3,5W
50 Hz~20 kHz
250 mVrms a 100 Hz
101,6 mm 8 ohm 10 W
36 mm 8 ohm 10 W
4.0
A2DP/SCMS-T/AVRCP
Bluetooth de clase 2
Máximo 10 m (varía en
función de las condiciones
de uso)
SBC
A2DP
CC en 12V 1.5 A,
pin central positivo
10,8V-12Vmax/
14,4 V/18 V
2,7KG(sin batería)
17
 Loading...