

Page 1

SYSROCK BR 10
GB
Instruction manual
IMPORTANT: Read all
instructions before using!
F
Manual d‘instruction
IMPORTANT: Lire toutes
les instructions avant de
démarrer les travaux!
E
Manual de instrucciones
IMPORTANTE: Lea todas
las instrucciones antes
707564_002/ 10.16
de usar.
www.festoolusa.com
Festool GmbH
Wertstraße 20
D-73240 Wendlingen
Page 2
1-2
1-3
1-1
1-4
1-5
1-9
1-6
1-7
1-8
d e
c
b
AUX
14:15
Radio
Bluetooth
a
f
g
h
k j i
Page 3
2B
2A
1
2
2-1
2
PRESS
1
Page 4

Original operating manual
For United States:
Cautions to the user
The changes or modifications not expressly approved by the party responsible for compliance could void the
user’s authority to operate the equipment.
RF exposure statements
IMPORTANT NOTE:
To comply with the FCC RF exposure
compliance requirements, the antenna(s) used for this transmitter must
be installed to provide a separation
distance of at least 20cm (8 inches)
from all persons and must not be colocated or operating in conjunction
with any other antenna or transmitter. No change to the antenna or the
device is permitted. Any change to
the antenna or the device could result
in the device exceeding the RF exposure requirements and void user’s
authority to operate the device.
Note:
This equipment has been tested and
found to comply with the limits for a
Class B digital device, pursuant to
part 15 of the FCC Rules. These limits
are designed to provide reasonable
4
protection against harmful interference in a residential installation. This
equipment generates, uses and can
radiate radio frequency energy and, if
not installed and used in accordance
with the instructions, may cause
harmful interference to radio communications. However, there is no
guarantee that interference will not
occur in a particular installation. If
this equipment does cause harmful
interference to radio or television reception, which can be determined by
turning the equipment off and on, the
user is encouraged to try to correct
the interference by one or more of the
following measures:
– Reorient or relocate the receiving
antenna.
– Increase the separation between
the equipment and receiver.
– Connect the equipment into an
outlet on a circuit different from
that to which the receiver is connected.
– Consult the dealer or an experi-
enced radio/TV technician for
help.
This transmitter must not be
co-located or operating in
conjunction with any other
antenna or transmitter.
Page 5
1Symbols
Symbol Significance
Warning of general danger
Risk of electric shock
Read operating instructions and safety notices!
Do not dispose of as
domestic waste.
Do not tip over!
Do not listen at high volume levels!
Vvolts
hint, tipp
°C degree centigrade
AAmpere
lb. pounds
kg kilograms
in. ’’ Inch
Symbol Significance
ft. ’ foot
Wwatts
mm millimeter
ΩOhm
2 Safety instructions
1. Read these instructions.
2. Keep these instructions.
3. Heed all warnings.
4. Follow all instructions.
5. Do not use this device near water.
6. Clean only with dry cloth.
7. Do not install near any heat
sources such as radiators, heat
registers, stoves, or other device
(including amplifiers) that produce heat.
8. Protect the cables and switching
adapter from being walked on or
pinched particularly the plugs,
convenience receptacles, and the
point where the cable exits from
the switching adapter.
9. Only use attachments/accessories specified by the manufacturer.
10. Use only with stands,
tripods, or brackets
specified by the manufacturer, or sold with
5
Page 6

the device. When a cable is used,
use caution when moving the cable/device combination to avoid
injury from tip-over.
11. Unplug the switching adapter and
device during lightning storms or
when the device is not in use for
longer periods of time.
12. Leave all maintenance to qualified service personnel. Maintenance is required when the device
has been damaged in any way,
such as switching adapter is
damaged, liquid has been spilled,
the device has been exposed to
rain or moisture, does not operate normally, or fell down.
13. To Reduce the Risk of Fire or Electric Shock, Do not Expose This Appliance To Rain or Moisture.
14. The Shock Hazard Marking and
Associated Graphical Symbol is
provided at the bottom of the device.
15. The device shall not be exposed to
dripping or splashing. No objects
filled with liquids may be placed
on the device.
16. The switching adapter should not
be removed far from the radio,
and remain easily accessible so
that during an emergency, the
power source can be easily removed.
17. Where the MAINS plug or an appliance coupler is used as the disconnect device, the disconnected
device shall remain readily operable.
18. The battery pack shall not be exposed to excessive heat such as
direct sunlight, fire etc.
For more information read the
safety instructions provided with
your battery pack.
19. To prevent possible
hearing loss, do not
listen at high volume
levels for extended periods of time periods.
CAUTION:
To reduce the risk of electric shock, do not perform any maintenance other than that detailed in
the operating instructions unless you
are qualified to do so.
WARNING! Warranty becomes void
once the radio housing has been
opened or any modifications or alterations to the radio have been
made!
6
Page 7

3Technical data
Radio SYSROCK BR 10
Power requirements switching adapter Output: DC 19V/1A center
Frequency coverage FM 87.50 - 108 MHz
Bluetooth® version 4.1 EDR compliant
profiles HFP, A2DP, AVRCP profiles
transition power
max.
transition range max. 32-13/16 ft.
Supported codec SBC/ACC
Circuit feature Loudspeaker 2.5" 8 Ω x1
Output power 19V:10W 3%THD
Input terminal 3.5 mm dia. (AUX IN)
Permitted operating temperature range -10 °C to +45 °C
Dimension (W x H x D) 3-15/16 x 4-9/16 x 4-3/16 in.
Weight (without external battery pack) 1.54 lb. (0.7 kg)
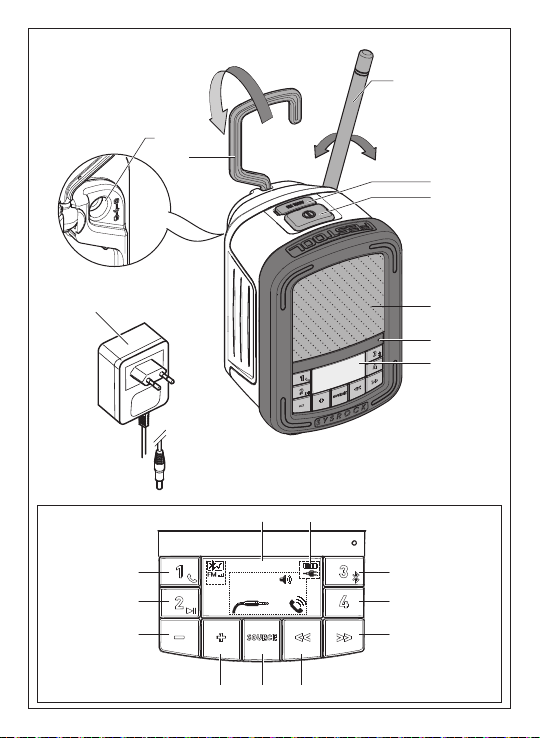
4 Functional description
The pictures for the functional description are on a fold-out page at the
beginning of the instruction manual.
While reading the manual you can
fold out the page for comparison and
quick reference.
Radio - SysRock
[1-1]
[1-2]
[1-3]
+4dBm Class 2 output
(10 m) (varies according to
(100 x 150 x 105 mm)
Folding attachment handle
Connecting socket for switch-
ing adapter
Antenna
pin positive
power
usage conditions)
7
Page 8
[1-4]
Auxiliary input (AUX-IN)
[1-5]
Power button
[1-6]
Speaker
[1-7]
Built-in microphone
[1-8]
Display
[1-9]
Switching adapter
[2-1]
Threaded socket for tripod
UNC 1/4"-20
Menu buttons and display
[a]
Volume control -
[b]
Preset button 2
Bluetooth mode: Play and
pause
[c]
Preset button 1
Bluetooth mode: Call button
[d]
Clock time (only with RDS)
[e]
Battery status indicator
[f]
Preset button 3
Bluetooth mode: Pair button
[g]
Preset button 4
Bluetooth mode: Reset button
for Bluetooth pairings
[h]
Tuning control - up
Bluetooth mode: next track
8
[i]
Tuning control - down
Bluetooth mode: previous track
[j]
Source button
[k]
Volume control +
5Commissioning
5.1 Operating with switching
adapter
Plug in switching adapter
[1-9]
in connecting sock-
et
[1-2]
and power outlet.
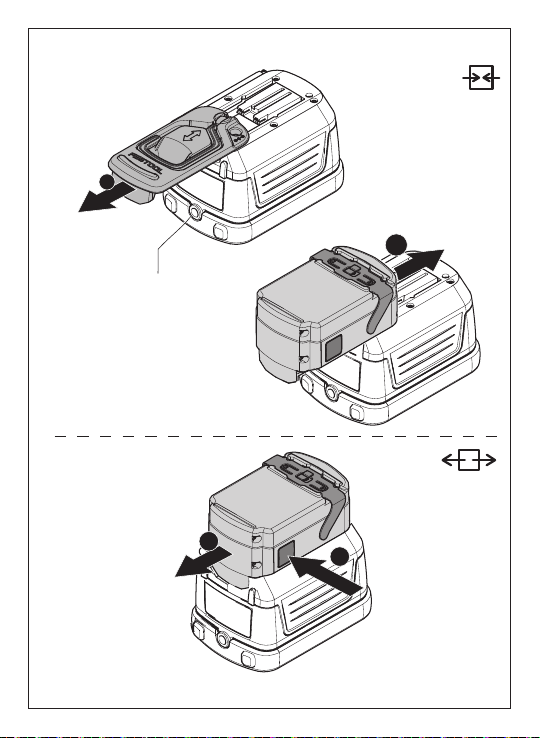
5.2 Operating with external Festool battery pack [2A] + [2B]
The device can operate with Festool
battery packs from the BP or BPC series. When connected to the external
Festool battery pack, the device only
consumes power from this battery
pack.
CAUTION
pack completely. If not, it may accidentally fall out of the battery bay,
causing injury to you or someone
around you.
CAUTION
tery pack. If the battery pack does not
slide in smoothly and does not engage, it is not being inserted correctly.
CAUTION
we recommend connecting to an 18V
Li-Ion battery pack.
Always attach the battery
Do not force attach the bat-
For optimal performance,
Page 9
5.3 Switch on/off
To switch on: Press the power but-
[1-5]
.
ton
The radio is ready for operation.
To switch off: Press and hold the
power button
5.4 Volume control
For a better sound quality using
an external device, adjust the
volume on the external device
to maximum 70%.
5.5 Checking battery status
To check the current battery level,
press the power button
switch on the radio. The battery status indicator
battery level (only with Li-Ion battery
pack).
[1-5]
for a second.
Press the volume control
and
[k]
to adjust the desired
volume.
[1-5]
[e]
will show the current
Battery is fully charged
Battery is partially
charged
Battery low - charging
required
battery critical - alternative power source
required immediately.
[a]
to
5.6 Operating your radio - FM
Straighten up the antenna
Press the source but-
ton
[j]
until the FM mode
is selected.
FM auto-tune
Press and hold (~1 sec.) the Tuning
control
[i], [h]
tune.
to carry out an auto-
[1-3].
Your radio will stop scanning when it
finds a station of sufficient strength.
The display will show the frequency
of the signal found. If the signal is
strong enough and there is RDS data
present, the radio may display the
station name, radio text and clock
time.
Finding other stations
Press the Tuning control
before.
[i], [h]
as
When the end of the waveband is
reached, your radio will restart tuning from the opposite end of the
waveband.
If you find that FM reception is
poor, try repositioning the antenna.
Manual tuning -FM
Press the Tuning control
tune to a station.
[i], [h]
to
9
Page 10

The frequency will change in steps of
0.1 MHz.
5.7 Using preset stations
You may store your preferred FM radio stations to the preset stations.
There are four memory presets in
your radio.
Press and hold (~1 sec.) the Preset
[b], [c], [f]
button
display show <SET MEMO>.
or
[g]
until the
The station will be accessible via the
chosen preset button. The preset
number P1 to P4 will be shown in the
display.
Repeat this procedure as required for
the remaining presets. Stations
stored in preset memories may be
overwritten by retracing the steps
above.
Recalling preset stations
Press the required Preset button
[b], [c], [f]
tion stored in preset memory.
5.8 Clock time - Radio Data Sys-
Your radio will synchronize and display clock time
to a radio station using RDS with CT
signals. If the station has sufficient
signal strength the clock will automatically synchronize within one or
tem
or
[g]
to tune to the sta-
[d]
whenever it tunes
two minutes. The radio clock time
will be valid for 24 hours each time
the radio time is synchronized with
RDS CT.
If no RDS-signal is received, the
clock time is not shown.
5.9 Listening to music via Bluetooth streaming
You need to pair your Bluetooth devi ce with your SysR ock b efore you c an
auto-link to play/stream Bluetooth
music through your SysRock. Pairing
creates a "bond" so two devices will
recognize each other and establish a
link that enables data transfer.
Pairing your Bluetooth device for the
first time
Press the Source button
lect the Bluetooth mode.
[j]
to se-
The Bluetooth status icon
flashes to show the SysRock
is discoverable.
Activate Bluetooth on your mobile
device according to the device's
user manual to link up to the SysRock.
Locate the Bluetooth device list
and select <SysRock>. Some mobile devices (which are equipped
with bluetooth interfaces older
than the BT2.1 standard.), require
entering the pass code “0000”.
10
Page 11

Once the connection is established, the Bluetooth
icon will cease flashing and
display a check mark next to it. Simply select and play any music from
your source device.
NOTE:
– If two Bluetooth devices, which
are not yet paired to the SysRock
both simultaeneously search for
your SysRock, it will show its
availability on both devices. However, if one device establishes a
connection with the SysRock first,
then the other Bluetooth device
won't find it on its list.
– If you take your source device out
of range, the connection will be
temporarily lost. Your SysRock
will automatically reconnect, if
the source device is brought back
in range. Be aware that while the
connection is lost, no other Bluetooth device can pair or link with
your SysRock.
– If <SysRock> shows in your Blue-
tooth device’s list but your device
cannot connect with it, please delete the item from your list and
pair up the device with the Sys-
Rock again following the steps
described previously.
– The effective operation range be-
tween the system and the paired
device is approximately 10 meters
(30 feet). Any obstacle between
the system and the device can reduce the operational range.
– Bluetooth connectivity perfor-
mance may vary depending on the
connected Bluetooth devices.
Please review the Bluetooth capabilities of your device before
connecting to your SysRock.
Some features may not be supported on your Bluetooth device.
Playing audio files in Bluetooth
mode
As soon as your SysRock is successfully connected with the chosen Bluetooth device, you can start to play
your music using the controls on your
connected Bluetooth device.
Once the SysRock plays adjust the
volume to the desired level using
the Volume control
ther your SysRock or your connected Bluetooth device.
[a], [k]
on ei-
11
Page 12

Use the controls on your device to
play/pause and navigate tracks. Alternatively, control the playback
using Play/Pause
[h]
, Previous track buttons
the SysRock.
[b]
, Next track
[i]
on
The currently-played track information (i.e. the track name /the artist
name) will be displayed as scrolling
text at the bottom of display.
NOTE:
– Some player applications or de-
vices may not respond to all of
these controls.
– Some mobile phones may tempo-
rarily disconnect from your SysRock when you make or receive
calls. Some devices may temporarily mute their Bluetooth audio
streaming when they receive text
messages, emails or for other
reasons unrelated to audio
streaming. Such behaviour is a
function of the connected device
and does not indicate a fault with
your SysRock.
Playing previously-paired devices
This unit can save up to 8 sets of
paired devices. When the amount is
exceeded, the earliest device will be
over written. If your Bluetooth device
has already been paired with the SysRock previously, the unit will recog-
nize your Bluetooth device and will
automatically attempt to reconnect
with the device it was last connected
with. If the last connected device is
not available, the SysRock will try to
connect to the second last device, and
so forth.
Deleting Bluetooth device pairings
To delete all Bluetooth device pairings, press and hold the Preset 4
button
[g]
shows on the display. The SysRock
will turn off automatically after the
memory is cleared.
Disconnecting your Bluetooth device
Press the Source button
lect any mode other than Bluetooth
mode.
Alternatively, press (~2 sec.) the
Bluetooth pair button
nect the link.
until <BT-RESET>
[j]
to se-
[f]
to discon-
If you disconnect the Bluetooth device when you are in Bluetooth mode,
the Bluetooth icon will then start to
flash, indicating Bluetooth is available again for pairing.
Using your hands-free call feature
Your unit can be used as a
hands-free accessory for
your phone. When music is
12
Page 13

playing through your SysRock and
you receive a call on your phone it can
pause the music automatically to allow you to answer your phone.
If you receive a call while playing
music through your SysRock, press
and release the Call button
answer your phone call.
Speak in direction of the built-in
microphone
Press and release the Call button
[c]
5.10 Auxiliary input (AUX-IN)
top panel of your SysRock to permit
an audio signal to be fed into the unit
from an external audio device such as
an MP3 or CD player.
Connect a stereo or mono audio
source (for example MP3 or CD
player) to the Auxiliary input
Press the Source button
lect the Aux mode.
Adjust the Volume control on your
MP3 or CD player (max. 80%) to ensure an adequate signal and then
adjust the volume on the SysRock
for comfortable listening.
[1-7]
.
Note that a very high volume
setting may decrease sound
quality.
to end the phone call.
A 3.5 mm Auxiliary input
[1-4]
is provided on the
[j]
[c]
to
[1-4]
to se-
Never use the Aux-In socket in
rainy or moist conditions to prevent moist from entering the
SysRock. Make sure that the
rubber cover on top fits thightly
when operating in a moist environment.
5.11 Setup options
Attachment handle [1-1]
The folding attachment handle allows
you to hang the device from scaffolding or similar structures.
If you decide to power the device
with an external Festool battery
pack, the attachment handle
must be detached beforehand
[2A]
.
Trip od
A standard photographic tripod with
UNC 1/4"-20 thread can be attached
to the threaded tripod socket [2-1].
6Service and maintenance
WARNING
work that requires opening the hous-
.
ing may only be carried out by an authorised Customer Service Centre
(name supplied by your dealer)!
Maintenance or repair work carried
out by an unauthorised person can
Any maintenance or repair
13
Page 14

EKAT
1
2
3
5
4
lead to the wrong connection of the
power cord or other components,
which in turn can lead to accidents
with serious consequences
Customer service and re-
only through manufac-
pair
turer or service workshops:
Please find the nearest address at:
www.festoolusa.com/service
Use only original Festool
spare parts! Order No. at:
www.festoolusa.com/ser-
vice
–Always clean the display
and speaker grill
[1-6]
[1-8]
on the
SysRock using a soft, dry cloth to
prevent any damage. Do not use
solvents.
– Keep the contacts on the SysRock
and battery pack clean.
7 Environment
Do not dispose of the device as domestic waste!
accessories and packaging at an environmentally responsible recycling
centre. Observe the respective national regulations.
Dispose of machines,
The company reserves the right to
amend the specification without notice.
"The Bluetooth®" word mark and logos are registered trademarks
owned by Bluetooth SIG, Inc. and any
use of such marks by Festool GmbH
is under license.
14
Page 15

Notice d'utilisation d'origine
Pour les États-Unis :
Avertissements pour
l'utilisateur
Toute transformation ou modification
n'ayant pas été expressément approuvée par la partie responsable de
la conformité pourrait annuler le
droit de l'utilisateur à se servir de
l'appareil.
Déclarations relatives à l'exposition
aux radiofréquences RF REMARQUE
IMPORTANTE :
Pour satisfaire aux exigences de
conformité de la Commission fédérale des communications FCC en matière d'exposition aux radiofréquences RF, l'antenne/les antennes
utilisée(s) pour cet émetteur doit/
doivent être installée(s) de manière à
ce que soit maintenue une distance
de séparation d'au moins 20 cm (8
pouces) entre l'antenne et toute personne, et ne doit/doivent pas être
placée(s) ni fonctionner à proximité
d'une autre antenne ou d'un émetteur. Aucune modification sur l'antenne ou l'appareil n'est autorisée.
Toute modification effectuée sur l'antenne ou l'appareil pourrait entraîner
un dépassement des limites définies
par les exigences de conformité en
matière d'exposition aux RF et annuler le droit de l'utilisateur à se servir
de l'appareil.
Remarque :
Cet appareil a été testé et jugé
conforme aux limites imposées aux
appareils numériques de classe B, en
vertu de la partie 15 des réglementations de la FCC. Ces limites ont été
instaurées pour fournir une protection raisonnable contre toute interférence nuisible dans une installation
résidentielle. Cet appareil génère,
utilise et est apte à émettre de l'énergie de fréquence radio et peut, en cas
d'installation ou d'utilisation non
conforme aux instructions, engendrer des interférences nuisibles aux
communications radio. Cependant, il
n'est pas garanti que des interférences ne se produiront pas dans une
installation particulière. Si cet appareil cause des interférences nuisibles
à la réception des signaux radio ou de
télévision, ce qui peut être déterminé
en éteignant et en rallumant l’appareil, l'utilisateur est encouragé à essayer de corriger les interférences
par l'une ou plusieurs des mesures
suivantes :
– Réorienter ou déplacer l'antenne
réceptrice.
15
Page 16

– Augmenter l'espace entre l'appa-
reil et le récepteur.
– Brancher l'appareil sur une prise
de courant d'un circuit différent
de celui sur lequel le récepteur
est branché.
– Consulter le revendeur ou un
technicien radio/TV expérimenté.
1Symboles
Symbole Signification
Avertissement de danger
Avertissement contre le
risque d'électrocution
Notice d'utilisation, lire
les consignes de
sécurité !
Ne pas jeter l'appareil
avec les ordures ménagères.
Ne pas incliner !
Ne pas faire fonctionner à
plein volume !
Vvolts
16
Symbole Signification
astuce, conseil
°C degré centigrade
Aampère
lb livres
kg kilogrammes
in ’’ pouce
ft pied
Wwatts
mm millimètre
Ωohm
2 Consignes de sécurité
1. Lisez ces instructions.
2. Conservez ces instructions.
3. Respectez tous les avertisse-
ments.
4. Suivez toutes les instructions.
5. N'utilisez pas cet appareil à proxi-
mité d'eau.
6. Nettoyez cet appareil uniquement
avec un chiffon sec.
7. Ne pas installer à proximité d'une
source de chaleur comme les radiateurs, les accumulateurs de
chaleur, les poêles ou autres appareils (y compris les amplifica-
Page 17

teurs) pouvant générer de la
chaleur.
8. Protégez le câble et l'adaptateur
secteur contre toute contrainte
mécanique (pincement, etc.), en
particulier au niveau du connecteur et de la prise et le raccord
sur lequel le câble sort de l'adaptateur secteur.
9. Utilisez uniquement les périphériques/accessoires spécifiés par
le fabricant.
10. Utilisez uniquement
des bâtis, trépieds ou
supports spécifiés par
le fabricant ou vendus
avec l'appareil. En cas d'utilisation d'un câble, faites attention en
déplaçant le câble/l'appareil afin
d'éviter les blessures en cas de
chute.
11. En cas d'orage ou de non utilisation prolongée, débranchez la
fiche secteur.
12. Confiez toutes les opérations
d'entretien à du personnel qualifié. Une réparation est nécessaire
lorsque l'appareil a été endommagé d'une façon quelconque,
comme par exemple lorsque
l'adaptateur secteur est endommagé, du liquide a été renversé,
l'appareil a été exposé à la pluie
ou à l'humidité, ne fonctionne pas
normalement ou est tombé.
13. Pour éviter tout incendie ou choc
électrique, n'exposez pas l'appareil à la pluie ou à l'humidité.
14. Le marquage du risque de choc
électrique et les icônes correspondants sont présents sur le bas
de l'appareil.
15. L'appareil ne doit pas être mouillé ou exposé à des éclaboussures.
Aucun objet rempli de liquide ne
doit être posé sur l'appareil.
16. L'adaptateur secteur doit être
branché à proximité de la radio et
être facilement accessible. Pour
débrancher la radio du courant en
cas de panne, retirer l'adaptateur
secteur de la prise.
17. Si l'adaptateur secteur ou la prise
de l'appareil doit être utilisée
pour la mise hors service, celui/
celle-ci doit rester accessible.
18. Ne pas exposer la batterie à des
températures élevées, comme le
soleil, le feu ou autre.
Pour plus d'informations, lire les
consignes de sécurité de la batterie.
19. Afin d'éviter d'éventuelles lésions auditives, ne laissez pas la
17
Page 18

radio à un volume sonore élevé
pendant une durée prolongée.
ATTENTION :
Pour éviter les chocs
électriques, ne réaliser aucune autre
AVERTISSEMENT ! La garantie est
annulée si vous ouvrez le boîtier de
la radio ou si vous entreprenez
d'autres modifications sur la radio !
opération de réparation que celles
décrites dans la présente notice
d'utilisation, à moins d'y être formé.
3 Caractéristiques techniques
Radio SYSROCK BR 10
Alimentation Adaptateur réseau Sortie: DC 19V/1A
Borne positive
Plage de fréquence FM (UKW) 87.50 - 108 MHz
Bluetooth
Circuit Haut-parleur 2.5" 8 Ω x1
Plage de température admissible de -10 °C à +45 °C
Dimensions (l x h x p) 3-15/16 x 4-9/16 x 4-3/16
®
Vers ion conforme 4.1 EDR
Profils Profils HFP, A2DP, AVRCP
Rendement de conver-
de sortie
sionmax.
max. 32-13/16 ft.
(10 m) (selon les condi-
tionsde fonctionnement)
Codec pris en charge SBC/ACC
Puissance de sortie 19V:10W 3%THD
Pôle d'entrée 3.5 mm dia. (AUX IN)
in. (100 x 150 x 105 mm)
18
Page 19

Radio SYSROCK BR 10
Poids (sans batterie externe) 1.54 lb. (0.7 kg)
4 Description fonction-
nelle
Des eléments fournis sont disponi bles sur le vo let q ui se trou ve au dé but de cette notice d'utilisation. Vous
pouvez ainsi déplier cette page et visualiser en permanence les différentes parties de l'outil lorsque vous
lisez la notice.
Radio - SysRock
[1-1]
Poignée de fixation rabattable
[1-2]
Entrée pour adaptateur secteur
[1-3]
Antenne
[1-4]
Prise AUX (AUX-IN)
[1-5]
Interrupteur marche/arrêt
[1-6]
Haut-parleur
[1-7]
Microphone intégré
[1-8]
Affichage
[1-9]
Adaptateur réseau
[2-1]
Prise filetage trépied UNC 1/
4"-20
Touches de menu et écran
[a]
Réglage du volume, plus faible
[b]
Présélection de station 2
Mode Bluetooth : lecture/pause
[c]
Présélection de station 1
Mode Bluetooth : touche
d'appel
[d]
Heure (uniquement avec RDS)
[e]
Affichage du niveau de charge
de la batterie
[f]
Présélection de station 3
Mode Bluetooth : connexion
[g]
Présélection de station 4
Mode Bluetooth : réinitialisa-
tion de toutes les connexions
[h]
Recherche automatique - en
amont
Mode Bluetooth : piste suivante
[i]
Recherche automatique - en
aval
Mode Bluetooth : piste précédente
[j]
Source
[k]
Réglage du volume, plus élevé
5 Mise en service
19
Page 20

5.1 Utilisation avec adaptateur
secteur
Brancher l'adaptateur
secteur
[1-9]
[1-2]
dans l'arri-
et la prise.
[1-5]
.
vée
5.2 Utilisation avec batterie externe Festool [2A] + [2B]
L'appareil peut être utilisé avec batterie Festool des séries BP ou BPC.
Relié à la batterie, l'appareil puise
uniquement dans la capacité de la
batterie Festool externe.
ATTENTION
terie entièrement. Sinon, la batterie
peut tomber de l'interface et vous
blesser ou blesser toute autre personne à proximité.
ATTENTION
mise en place de la batterie. Si la batterie n'est pas facile à insérer et à encliqueter, c'est qu'elle est mal installée.
ATTENTION
manceoptimale, nous recommandons d'utiliser une batterie 18V LiIon.
5.3 Marche/Arrêt
Pour allumer : appuyer sur l'interrupteur marche/arrêt
Insérez toujours la bat-
Ne forcez pas lors de la
Pour une perfor-
La radio est prête à fonctionner.
Pour éteindre : appuyer et maintenir enfoncé (~1s) l'interrupteur
marche/arrêt
20
[1-5]
.
5.4 Réglage du volume
Appuyer sur le réglage du vo-
[a]
et
[k]
lume
volume souhaité.
Pour une qualité de musique
optimale avec le lecteur externe, régler le volume sur l'appareil externe à un maximum
de 70 %.
5.5 Vérification du niveau de
charge de la batterie
Pour afficher l'état actuel de la batterie, appuyer sur l'interrupteur
marche/arrêt
radio. L'indicateur de l'état de la batterie
[e]
affiche l'état actuel de la
batterie (uniquement avec batterie
Li-Ion).
La batterie est chargée
entièrement
La batterie est chargée
partiellement
Niveau de batterie faible rechargement recommandé
La batterie peut être
déchargée entièrement à
tout moment, remplacer
immédiatement la batterie
pour régler le
[1-5]
pour allumer la
Page 21

5.6 Utilisation de la radio - FM
(UKW)
Ajuster l'antenne
Recherche de station automatique
FM (UKW)
Appuyer et maintenir enfoncé (~1s)
Recherche automatique
pour lancer la recherche automatique.
[1-3]
.
Appuyer sur Source
jusqu'à ce que le mode
FM soit sélectionné.
[j]
[i], [h]
La recherche automatique se termine automatiquement lorsqu'une
station avec une puissance de signal
suffisante est trouvée.
L'écran indique la fréquence. Si la
puissance du signal est suffisante et
si les informations RDS sont disponibles, l'écran indique le nom de la
station, le texte de la radio et l'heure.
Recherche d'autres stations
Appuyer sur Recherche automatique
[i], [h]
dessus.
, comme indiqué ci-
À la fin de la bande d'ondes, la recherche automatique revient au début de la bande d'ondes.
En cas de mauvaise réception,
réajuster l'antenne.
Recherche de station manuelle - FM
(UKW)
Appuyer plusieurs fois sur Recherche automatique
jusqu'à atteindre la fréquence souhaitée.
[i], [h]
Les pas de fréquence font 0,1 MHz.
5.7 Utilisation de la présélection
de stations
Les stations radio préférées peuvent
être mémorisées dans la présélection de stations. Quatre présélections
de stations sont disponibles.
Appuyer et maintenir enfoncé (~1s)
la présélection de stations
[f]
ou
[g]
jusqu'à ce que l'écran in-
dique <SET MEMO>.
[b], [c]
La station est mémorisée sous la
présélection souhaitée. L'écran indique le numéro de présélection de
P1 à P4.
Répéter ces étapes pour les autres
présélections. De la même façon, les
présélections peuvent être écrasées
par de nouvelles stations.
Appel d'une présélection
Appuyer sur la présélection souhaitée
[b], [c], [f]
der à la station mémorisée.
ou
[g]
pour accé-
,
21
Page 22

5.8 Heure - système de données
radio
La radio synchronise l'heure et l'indique sur l'écran
tion est sélectionnée, les informations RDS avec signaux CT sont disponibles. En cas de puissance de
signal suffisante, l'heure est actualisée en une à deux minutes. L'heure
de la radio est mise à jour les 24
heures suivantes lorsque la radio est
synchronisée avec RDS-CT.
En l'absence de signal RDS,
l'heure n'est pas affichée.
5.9 Écoute de musique par flux
Bluetooth
Le SysRock et l'équipement Bluetooth doivent être connectés pour restituer de la musique via l'équipement
Bluetooth. Deux appareils peuvent
être détectés par cette "liaison".
Première connexion de l'appareil
Bluetooth
Appuyer sur Source
tionner le mode Bluetooth.
[d]
, lorsqu'une sta-
[j]
pour sélec-
L'icône Bluetooth clignote
sur l'écran et indique que le
SysRock est disponible.
Activer le Bluetooth sur l'appareil
Bluetooth comme expliqué dans la
notice d'utilisation de l'appareil
Bluetooth.
Afficher la liste des appareils Bluetooth et sélectionner l'appareil
<SysRock>. Avec certains téléphones mobiles (qui disposent de
versions plus anciennes comme
BT2.1 Bluetooth), il convient de
saisir un mot de passe ("0000").
Si la connexion Bluetooth
est active, l'icône Bluetooth
apparaît coché sur le côté.
Toute la musique peut maintenant
être sélectionnée sur l'appareil Bluetooth et restituée.
REMARQUE :
– Lorsque deux appareils Bluetoo-
th doivent être connectés pour la
première fois et recherchent la
connexion au SysRock en même
temps, le SysRock est affiché
pour la connexion sur les deux
appareils. Après la liaison avec un
appareil, le SysRock n'est plus affiché dans la liste de connexion de
l'autre appareil.
– Si l'appareil Bluetooth se trouve
en dehors de la portée, la
connexion au SysRock est interrompue par intermittence. Le
SysRock active automatiquement
la connexion dès que l'appareil
Bluetooth est à nouveau à sa portée. Pendant l'interruption, aucun
22
Page 23

autre appareil Bluetooth ne peut
être connecté au SysRock.
– Si <SysRock> apparaît dans la
liste d'appareils de l'appareil
Bluetooth, mais qu'une
connexion est impossible : supprimer l'appareil de la liste et rétablir la connexion de l'appareil
Bluetooth avec le SysRock
comme décrit ci-dessus.
– La portée effective entre le Sys-
Rock et l'appareil Bluetooth est
d'environ 10 mètres (30 pieds). Le
moindre obstacle entre SysRock
et l'appareil Bluetooth peut réduire la portée.
– La performance de la connectivité
Bluetooth peut varier en fonction
de l'appareil Bluetooth connecté.
Veuillez prendre en compte les
fonctions Bluetooth de l'appareil
connecté avant la connexion au
SysRock. Il est possible que certaines fonctions ne soient pas
prises en charge sur les appareils
Bluetooth connectés.
Lecture des fichiers audio en mode
Bluetooth
En cas de connexion réussie entre le
SysRock et l'appareil Bluetooth sélectionné, la musique peut être lue à
l'aide des fonctions de l'appareil
Bluetooth.
Lorsque la lecture démarre, régler
le volume souhaité sur le réglage
du volume
sur l'appareil Bluetooth.
Sélectionner Lecture/pause et
Piste suivante sur les commandes
de l'appareil Bluetooth connecté.
Ou avec les touches sur le SysRock
: Lecture/pause
[h]
[a], [k]
sur SysRock ou
, Piste précédente
[b]
, Piste suivante
[i]
.
Les informations sur la piste en
cours de lecture (par ex. nom de la
piste/interprète) s'affichent sous la
forme de texte défilant en bas sur
l'écran.
REMARQUE :
– Toutes les applications et tous les
appareils ne répondent pas à ces
commandes.
– Certains téléphones mobiles se
déconnectent temporairement du
SysRock lors de la réception ou
de l'émission d'appels. Certains
téléphones mobiles passent en
muet lors de la réception de SMS,
e-mails ou autres. Cela fait partie
du fonctionnement de l'appareil
Bluetooth connecté et n'indique
pas une panne du SysRock.
23
Page 24

Lecture d'appareils déjà connectés
Ce SysRock peut mémoriser jusqu'à
huit appareils connectés. Si la mémoire dépasse ce nombre, l'appareil
le plus ancien est écrasé. Si l'appareil Bluetooth a déjà été connecté au
SysRock, le SysRock mémorise cet
appareil Bluetooth et cherche à se
connecter au dernier appareil
connecté. Si le dernier appareil Bluetooth associé n'est pas disponible, le
SysRock cherche à se connecter à
l'avant-dernier appareil, et ainsi de
suite.
Effacement de la mémoire des appareils Bluetooth connectés
Pour effacer la mémoire des appareils Bluetooth dans le SysRock :
appuyer et maintenir enfoncée
(<1s) la touche mémoire 4
jusqu'à ce que <BT-RESET> apparaisse sur l'écran. Le SysRock
s'éteint automatiquement après
que la mémoire ait été effacée.
Déconnexion d'un appareil Bluetooth connecté
Appuyer sur Source
tionner un autre mode que le mode
Bluetooth.
Sinon, appuyer sur Connecter
(~2 s) pour rompre la connexion.
[j]
[g]
et sélec-
[f]
Si l'appareil Bluetooth est déconnecté en mode Bluetooth, l'icône Bluetooth recommence à clignoter sur
l'écran et indique que le SysRock est
à nouveau disponible pour une nouvelle connexion.
Utilisation du kit mains libres
Ce SysRock peut être utilisé
comme kit mains libres pour
un téléphone mobile.
Lorsque de la musique est lue via le
SysRock et que vous recevez un appel
sur le téléphone mobile, la musique
s'arrête automatiquement afin que
vous puissiez répondre à l'appel.
En cas de réception d'appel pendant la lecture de musique via le
SysRock, appuyer brièvement sur
la touche d'appel
pondre.
Parler en direction du microphone
interne
[1-7]
Attention : un volume très élevé
sur le SysRock peut affecter la
qualité du son.
Appuyer sur la touche d'appel
et relâcher pour mettre fin à l'appel.
[c]
pour ré-
.
[c]
24
Page 25

5.10 Prise AUX (AUX-IN)
Une prise AUX 3,5 mm
sente sur le dessus du SysRock et
permet la lecture d'un signal audio
d'un appareil audio externe, comme
par ex. un lecteur MP3 ou CD.
Sur la prise AUX
une source audio stéréo ou mono
(comme un lecteur MP3 ou CD).
Appuyer sur Source
tionner le mode AUX.
Régler le volume sur le lecteur
MP3 ou CD (max. 70%) afin de garantir un signal suffisant, ajuster
ensuite le volume sur le SysRock
pour une écoute confortable.
N'utilisez jamais la prise AUX
en cas de pluie ou dans des
conditions humides afin d'éviter
que l'humidité ne s'infiltre dans
le SysRock. Dans de telles
conditions, maintenez bien fermée la protection en caoutchouc sur l'arrière.
5.11 Positionnements possibles
Poignée de fixation [1-1]
La poignée de fixation rabattable permet d'accrocher l'appareil à un échafaudage, par exemple.
La poignée de fixation doit être
retirée pour une utilisation avec
une batterie Festool externe
[2A]
[1-4]
est pré-
[1-4]
, connecter
[j]
pour sélec-
.
Trépi ed
Un filetage standard de trépied d'appareil photo UNC 1/4"-20 peut être
vissé à la prise de filetage de trépied
[2-1]
.
6 Entretien et mainte-
nance
AVERTISSEMENT
maintenance ou de réparation, quinécessite l'ouverture du carter d'engrenages doit uniquement être effectué par un centre serviceclient autorisé (nom fourni par votre revendeur)!
Les travaux de maintenance ou de réparation effectués par un personnel
non autorisé peuvent conduire à la
mauvaise connexion de câbles d'alimentation ou d'autres composants,
ce qui peut entraîner à son tour des
accidents avec des conséquences
graves.
mité sont disponibles sur: www.festoolusa.com/service
Tou t tra vail de
Seuls le fabricant et un atelier
homologué sont
habilités à effectuer
toute réparation ou service
. Les
adresses à proxi-
25
Page 26

EKAT
1
2
4
5
3
Utilisez uniquement des pièces
de rechange
Festool d‘origine. Référence
sur: www.festoolusa.com/service
– Pour éviter les dommages, net-
toyer l'écran
parleurs
[1-8]
[1-6]
sur la radio avec
et les haut-
un chiffon doux et sec. Ne pas utiliser de solvant.
– Maintenir les contacts sur le Sys-
Rock et la batterie propres.
7 Environnement
Ne jetez pas l'appareil avec les ordures ménagères !
reil, les accessoires et les emballages de façon compatible avec l'environnement. Respectez les
prescriptions nationales en vigueur.
Festool se réserve le droit de modifier les spécifications sans préavis.
La marque verbale et les logos
"Bluetooth®" sont des marques déposées de la Bluetooth SIG, Inc. et
toute utilisation de ces marques par
la Festool GmbH se fait sous licence.
Eliminez l'appa-
26
Page 27

Manual de instrucciones ori-
ginal
Para Estados Unidos:
Advertencias para el
usuario
Los cambios o modificaciones efectuados sin la aprobación expresa de la
parte responsable del cumplimiento
de la normativa puede anular el derecho del usuario para utilizar el equipo.
Declaración de exposición a radiofrecuenciaAVISO IMPORTANTE:
Para cumplir con los requisitos de
exposición a radiofrecuencia de la
FCC, la(s) antena(s) empleadas para
este transmisor se deben instalar
con una distancia de separación mínima de 20 cm (8 pulgadas ) de cualquier persona y no deben instalarse o
manejarse junto con cualquier otra
antena o transmisor. No está permitido realizar cambios en la antena o el
dispositivo. Cualquier cambio efectuado en la antena o dispositivo puede provocar que se excedan los parámetros de exposición a radiofrecuencia y, como consecuencia, la
anulación del derecho del usuario
para utilizar el dispositivo.
Observación:
Este equipo ha sido sometido a comprobaciones que demuestran que
cumple con los límites establecidos
para los dispositivos digitales de clase B, de acuerdo con el apartado 15
de las normas de la FCC. Estos límites se han establecido para ofrecer
una protección razonable contra interferencias cuando el aparato funcione en un entorno residencial. Este
equipo genera, utiliza y puede irradiar
energía de radiofrecuencia y, si no se
instala y se utiliza de acuerdo con las
instrucciones suministradas, podría
ocasionar interferencias perjudiciales para las comunicaciones por radio. Sin embargo, no existe garantía
de que no se produzcan interferencias
en alguna instalación concreta. Si
este equipo ocasiona interferencias
perjudiciales en la recepción de radio
o televisión (lo cual puede comprobarse encendiendo y apagando el
equipo), se recomienda que intente
corregir la interferencia mediante
una de las siguientes acciones:
– Vuelva a orientar o a colocar la
antena de recepción.
– Aumente la separación entre el
equipo y el receptor.
– Conecte el equipo en una toma de
corriente ubicada en un circuito
distinto al del receptor.
27
Page 28
– Póngase en contacto con el distri-
buidor o con un técnico de radio y
televisión.
1Símbolos
Símbolo Significado
Aviso de peligro general
Peligro de electrocución
¡Leer el manual de instrucciones y las indicaciones de seguridad!
No depositar en la basura
doméstica.
¡No inclinar!
¡No utilizar al volumen
máximo!
V voltios
pista, consejo
°C grados centígrados
Aamperios
28
Símbolo Significado
lb. libras
kg kilogramos
in. ’’ pulgadas
ft. ’ pies
Wvatios
mm milímetros
Ωohmios
2 Indicaciones de seguri-
dad
1. Lea estas instrucciones.
2. Guarde estas instrucciones.
3. Tenga en cuenta todas las advertencias.
4. Siga todas las indicaciones.
5. No utilice este dispositivo cerca
del agua.
6. Limpie este dispositivo solo con
un paño seco.
7. No instalar cerca de fuentes de
calor como radiadores, acumuladores de calor, hornos u otras
máquinas (incluidos amplificadores) que puedan generar calor.
8. Proteja el cable y el adaptador de
red frente a cargas mecánicas
(aplastamiento y similares), especialmente en las zonas del conector, del enchufe y de la
Page 29

conexión por la que sale el cable
del adaptador de red.
9. Utilice exclusivamente accesorios recomendados por el fabricante.
10. Utilice únicamente
soportes o trípodes
indicados por el fabricante o que se vendan
con el dispositivo. Si se utiliza un
cable, tenga cuidado al mover el
cable/el dispositivo para evitar
que vuelque y provoque lesiones.
11. Extraiga el enchufe cuando haya
tormenta o si no se va a utilizar
durante un largo período de tiempo.
12. Encomiende los trabajos de mantenimiento a personal del servicio
técnico cualificado. El mantenimiento es necesario cuando el
dispositivo se haya dañado de alguna forma, por ejemplo, si hay
daños en el adaptador de red, se
ha vertido algún líquido, ha estado bajo la lluvia o algún otro líquido, no funciona con normalidad o
se ha caído.
13. Para evitar incendios o descargas
eléctricas, impida que caiga lluvia
o líquidos sobre el dispositivo.
14. La identificación de peligro de
descarga eléctrica y los símbolos
gráficos correspondientes se indican en la parte inferior del dispositivo.
15. No debe humedecerse ni pulverizarse el dispositivo con líquidos.
No deben colocarse sobre el dispositivo objetos que contengan líquidos.
16. El adaptador de red debe enchufarse cerca de la radio y en un lugar de fácil acceso. Para
desconectar la radio de la corriente en caso de emergencia,
extraer el adaptador de red del
enchufe.
17. Si se va a utilizar el adaptador de
red o el enchufe del dispositivo
para desconectarlo, este debe ser
totalmente accesible.
18. No someter la batería a altas
temperaturas, p. ej., a radiación
solar, fuego o similares.
Lea las indicaciones de seguridad
de la batería para encontrar más
información.
19. Para evitar eventuales
daños en el oído, no
utilice la radio durante
períodos largos con el
volumen al máximo.
29
Page 30

ATE NC IÓN :
descarga eléctrica, no realizar trabajos de reparación distintos de los
Para evitar recibir una
ADVERTENCIA. La garantía se extinguirá si abre la carcasa de la radio o
la modifica de cualquier otra forma.
descritos en este manual de instrucciones, a menos que haya recibido la
formación pertinente.
3Datos técnicos
Radio SYSROCK BR 10
Suministro de tensión Adaptador de red Salida: CC 19 V/1 A
Ter minal po siti vo
Gama de frecuencias FM (VHF) 87.50 - 108 MHz
Bluetooth® Versión Conforme con 4.1 EDR
Perfiles Perfiles HFP, A2DP,AVRCP
Máx. eficacia de con-
versión
Máx. intervalo de
conversión
Códec compatible SBC/AAC
Circuito Altavoz 1 ud. de 2,5" y 8 Ω
Potencia de salida 19 V : 10 W 3 % THD
Terminal de entrada 3,5 mm diám. (AUX IN)
Rango de temperatura permitido -10 °C a +45 °C
Dimensiones (An x Al x P) 3-15/16 x 4-9/16 x 4-3/16 in.
Peso (sin batería externa) 1.54 lb. (0.7 kg)
+4 dBm potencia de salida-
clase 2
32-13/16 ft.
(10 m) (en función de las-
condiciones de uso)
(100 x 150 x 105 mm)
30
Page 31

4 Descripción de las fun-
ciónes
Las imágenes con la dotación de suministro se encuentran en una hoja
desplegable al comienzo de este manual de instrucciones. Cuando lea
este manual, le recomendamos que
despliegue esta página para disponer
fácilmente de una vista general de la
máquina.
Radio - SysRock
[1-1]
Estribo de sujeción deslizable
[1-2]
Entrada para adaptador de red
[1-3]
Antena
[1-4]
Entrada AUX (AUX-IN)
[1-5]
Tecla de encendido/apagado
[1-6]
Altavoz
[1-7]
Micrófono integrado
[1-8]
Pantalla
[1-9]
Adaptador de red
[2-1]
Casquillo con rosca UNC 1/4"20 para trípode
Teclas de menú y pantalla
[a]
Regulación del volumen, más
bajo
[b]
Memoria de emisoras 2
Modo Bluetooth: reproducción/
pausa
[c]
Memoria de emisoras 1
Modo Bluetooth: tecla de lla-
mada
[d]
Hora (solo con RDS)
[e]
Indicador de estado de la batería
[f]
Memoria de emisoras 3
Modo Bluetooth: acoplamiento
[g]
Memoria de emisoras 4
Modo Bluetooth: restablecer
todas las conexiones
[h]
Búsqueda de emisoras: ascendente
Modo Bluetooth: título
siguiente
[i]
Búsqueda de emisoras: descendente
Modo Bluetooth: título anterior
[j]
Source/origen
[k]
Regulación del volumen, más
alto
5 Puesta en servicio
31
Page 32

5.1 Utilización con adaptador de
red
Introducir el adaptador
de red
[1-9]
[1-2]
5.2 Utilización con una batería externa de Festool [2A] + [2B]
El dispositivo puede utilizarse con las
baterías Festool de las series BP o
BPC. Una vez conectada a la batería
externa de Festool, el dispositivo funciona solo con la capacidad de dicha
batería.
ATE NC IÓN
siempre por completo. En caso contrario, la batería puede caerse del
compartimento y herirle a usted o a
personas que estén cerca.
ATE NC IÓN
con brusquedad. Si no es posible introducir y encajar la batería con facilidad, la colocación no es correcta.
ATE NC IÓN
miento se recomienda utilizar una
batería de litio de 18 V.
5.3 Conexión y desconexión
Encendido: pulsar la tecla de encendido/apagado
Introduzca la batería
No introduzca la batería
Para un óptimo rendi-
en la entrada
y en el enchufe.
[1-5]
.
La radio está operativa.
Apagado: mantener pulsada la tecla de encendido/apagado
(~1 s).
32
[1-5]
5.4 Ajuste del volumen
Pulsar las teclas de regulación del volumen
para ajustar el volumen deseado.
Para alcanzar una óptima calidad de la música al conectar un
reproductor externo, ajustar el
volumen de ese reproductor
como máximo al 70 %.
5.5 Comprobación del estado de
la batería
Para mostrar el estado actual de la
batería, pulsar la tecla de encendido/
apagado
[1-5]
dio. El indicador de estado de la batería
[e]
con baterías de litio).
5.6 Utilización de la radio: FM
Orientar la antena
para encender la ra-
muestra su estado actual (solo
Batería completamente
cargada
Batería parcialmente cargada
Carga baja de la batería:
se recomienda cargar
La batería puede descargarse por completo en
cualquier momento, cambiarla inmediatamente
(VHS)
[1-3]
[a]
y
[k]
.
Page 33

Pulsar la tecla Source/
[j]
origen
seleccione el modo FM.
Búsqueda automática de emisoras
FM (VHS)
Mantener pulsada alguna de las
teclas de búsqueda de emisoras
[i], [h]
(~1 s) para iniciar la búsque-
da automática de emisoras.
hasta que se
La búsqueda de emisoras finaliza automáticamente cuando se encuentra
una emisora cuya señal tiene suficiente fuerza.
En la pantalla se muestra la frecuencia. Cuando la señal es suficientemente fuerte y hay disponibles datos
RDS, en la pantalla se muestra el
nombre de la emisora, el radio texto y
la hora.
Localización de otras emisoras
Pulsar las teclas de búsqueda de
emisoras
más atrás.
[i], [h]
, como se describe
Cuando se alcanza el final de la banda de ondas, el explorador salta al
inicio de la banda, en el extremo
opuesto.
Si la recepción es mala, volver a
orientar la antena.
Búsqueda manual de emisoras: FM
(VHS)
Pulsar varias veces las teclas de
búsqueda de emisoras
ta alcanzar la frecuencia deseada.
[i], [h]
has-
La frecuencia avanza en intervalos de
0,1 MHz.
5.7 Utilización de la memoria de
emisoras
Las emisoras de radio favoritas pueden guardarse en la memoria de
emisoras. La radio dispone de cuatro
posiciones de memorización.
Mantener pulsada una posición de
memorización (
durante ~1 s hasta que en la pantalla se muestre <SET MEMO>.
[b], [c], [f]
o
[g]
La emisora se guarda en la posición
seleccionada. En la pantalla se
muestra el número de posición P1 a
P4.
Para utilizar el resto de posiciones,
seguir este mismo paso. De la misma
forma, puede guardarse una nueva
emisora sobre otra guardada anteriormente.
Acceso a la memoria de emisoras
Pulsar la posición deseada
[f]
o
[g]
para acceder a la emisora
memorizada.
[b], [c]
)
,
33
Page 34

5.8 Hora: Radio Data System
Si se ha seleccionado una emisora
que ofrece datos RDS con señales CT,
la radio sincroniza la hora y la muestra en la pantalla
la intensidad suficiente, la hora se
actualiza en uno o dos minutos. Si la
radio está sincronizada con RDS-CT,
la hora de la radio estará actualizada
durante las 24 horas siguientes.
Si no se recibe una señal RDS,
no se muestra la hora.
5.9 Música mediante transmisión
por Bluetooth
La SysRock y el dispositivo Bluetooth
deben acoplarse entre sí para poder
reproducir música mediante el dispositivo Bluetooth. Esta «unión» hace
que ambos dispositivos se reconozcan entre sí.
Primera conexión del dispositivo
Bluetooth
Pulsar la tecla Source/origen
para seleccionar el modo Bluetooth.
[d]
. Si la señal tiene
[j]
El símbolo de Bluetooth parpadea en la pantalla e indica
que la SysRock es visible.
Activar el Bluetooth en el dispositivo Bluetooth tal como se explica en
el manual de instrucciones del dispositivo.
34
Visualizar la lista de dispositivos
Bluetooth y seleccionar el dispositivo <SysRock>. En algunos teléfonos móviles, equipados con versiones de Bluetooth anteriores a la
BT2.1, debe introducirse una contraseña («0000»).
Una vez que se ha activado
la conexión Bluetooth, se
muestra el símbolo de Bluetooth con una marca de verificación.
Ahora puede seleccionarse cualquier
música con el dispositivo Bluetooth y
reproducirse.
NOTA:
– Cuando se desea acoplar dos dis-
positivos Bluetooth por primera
vez y los dos buscan la conexión
con SysRock al mismo tiempo, en
ambos dispositivos se muestra la
conexión disponible a SysRock.
Una vez que se ha conectado a un
dispositivo, SysRock no vuelve a
mostrarse en la lista de conexiones del otro.
– Si el dispositivo Bluetooth se en-
cuentra fuera de alcance, se interrumpe temporalmente la
conexión con SysRock. SysRock
activa automáticamente la conexión cuando el dispositivo Bluetooth vuelve a estar al alcance. En
el tiempo que dura la interrupción, ningún otro dispositivo
Page 35

Bluetooth puede acoplarse con la
SysRock.
– Si en la lista del dispositivo Blue-
tooth se muestra <SysRock> pero
no es posible realizar la conexión:
borrar el dispositivo de la lista y
volver a conectar el dispositivo
con la SysRock, tal como se describe anteriormente.
– El alcance efectivo entre la Sys-
Rock y el dispositivo Bluetooth es
de aproximadamente 10 metros
(30 pies). Cualquier obstáculo entre la SysRock y el dispositivo
Bluetooth puede reducir este alcance.
– La conectividad Bluetooth puede
variar en función del dispositivo
conectado. Tenga en cuenta las
funciones Bluetooth del dispositivo que va a acoplar antes de conectarlo a la SysRock. Es posible
que no todas las funciones sean
compatibles en algunos dispositivos Bluetooth conectados.
Reproducción de archivos de audio
en modo Bluetooth
Si la SysRock está correctamente
acoplada con el dispositivo Bluetooth
seleccionado, es posible reproducir
la música con las funciones del dispositivo acoplado.
Tan pronto comienza la reproducción, puede ajustarse el volumen
deseado mediante las teclas de regulación de volumen
SysRock o mediante el dispositivo
Bluetooth.
Seleccionar Reproducción/Pausa y
Cambio de título en los elementos
de mando del dispositivo Bluetooth
acoplado. O bien con las teclas de
la SysRock: Reproducción/Pausa
[b]
, Título siguiente
terior
[i]
.
[a], [k]
[h]
, Título an-
de la
La información del tema que se está
reproduciendo (p. ej. título/intérprete) se muestra como texto continuo
en la parte inferior de la pantalla.
NOTA:
– No todas las aplicaciones ni dis-
positivos reaccionan a estos elementos de control.
– Algunos teléfonos móviles se
desconectan temporalmente de
la SysRock cuando entran o salen
llamadas. Algunos teléfonos móviles detienen la reproducción
cuando entran SMS, correos
electrónicos o similares. Este
comportamiento es una función
del dispositivo Bluetooth acoplado y no i ndic a nin gún p roble ma en
la SysRock.
35
Page 36

Reproducción desde dispositivos ya
acoplados
Esta SysRock puede guardar hasta
ocho dispositivos acoplados. Cuando
la memoria sobrepasa este número,
se sobrescribe el primer dispositivo
acoplado. Si el dispositivo Bluetooth
ya estaba acoplado a la SysRock, la
radio guarda este dispositivo e intenta acoplarse al último dispositivo con
el que estaba conectada. Si el último
dispositivo Bluetooth acoplado no
está disponible, la SysRock intenta
acoplarse al penúltimo dispositivo
acoplado, y así sucesivamente.
Borrado de la memoria de dispositivos Bluetooth acoplados
Para borrar la memoria de dispositivos Bluetooth en la SysRock:
mantener pulsada la tecla de memoria 4
[g]
muestre <BT-RESET> en la pantalla. La SysRock se apaga automáticamente una vez que se ha borrado
la memoria.
Desacoplamiento del dispositivo
Bluetooth acoplado
Pulsar la tecla Source/origen
para seleccionar otro modo que no
sea Bluetooth.
(<1 s) hasta que se
[j]
Como alternativa, pulsar la tecla
de acoplamiento
nalizar la conexión.
[f]
(~2 s) para fi-
Si se desacopla el dispositivo Bluetooth estando en modo Bluetooth, el
símbolo Bluetooth comienza a parpadear de nuevo en la pantalla e indica
que la SysRock vuelve a estar visible
para su conexión.
Utilización del dispositivo de manos
libres
Esta SysRock puede utilizarse como dispositivo de ma-
nos libres para teléfonos
móviles. Si se está reproduciendo
música mediante la SysRock y entra
una llamada en el teléfono móvil, se
interrumpe automáticamente la música para que pueda atender la llamada.
Si durante la reproducción de música mediante la SysRock entra
una llamada, pulsar brevemente la
tecla de llamada
la.
Hablar en la dirección del micrófono interno
Atención: Un volumen muy alto
en la SysRock puede afectar negativamente a la calidad del sonido.
[1-7]
[c]
para atender-
.
36
Page 37

Pulsar y soltar la tecla de llamada
[c]
para finalizar la llamada.
5.10 Entrada AUX (AUX-IN)
En la parte superior de la SysRock
existe una entrada AUX de 3,5 mm
4]
que permite la transmisión de una
señal de audio desde un dispositivo
de audio externo, como p. ej. un reproductor de MP3 o de CD.
Conectar una fuente de audio estéreo o mono (como un reproductor
de MP3 o de CD) en la entrada AUX
[1-4]
.
Pulsar la tecla Source/origen
para seleccionar el modo AUX.
Ajustar el volumen en el reproductor de MP3 o de CD (máx. 70 %)
para garantizar una señal suficiente y, a continuación, adaptar el volumen en la SysRock para escuchar cómodamente.
No utilice la entrada AUX bajo la
lluvia o en condiciones de humedad para evitar que esta penetre en la SysRock. Si se dan
estas condiciones, mantenga
bien cerrada la cubierta de
goma de la parte trasera.
5.11 Opciones de emplazamiento
Estribo de sujeción [1-1]
El estribo de sujeción deslizable permite colgar la herramienta en andamios o puntos similares.
[1-
Para el funcionamiento con una
batería externa de Festool es
necesario retirar el estribo de
sujeción
[2A]
.
Tríp ode
El casquillo con rosca del trípode
1]
admite una rosca UNC 1/4"-20 es-
tándar para trípode de fotografía.
6 Mantenimiento y cuidado
ADVERTENCIA
mantenimiento o reparación que requiera abrir el motor o la carcasa del
engranaje deberá ser realizado úni-
[j]
camente por un Centro de Atención al
Cliente (nombre proporcionado por
su concesionario). Los trabajos de
mantenimiento o reparación realizados por una persona no autorizada
podrían provocar la conexión incorrecta de los conductores de alimentación u otros componentes, lo que a
su vez podría provocar accidentes
con consecuencias graves.
Cualquier trabajo de
Servicio de
El
atención al
cliente y reparaciones
disponible por
[2-
solo está
37
Page 38

parte del fabricante o de los talleres
de reparación:encuentre la dirección
más próxima a usted en:
www.festoolusa.com/service
EKAT
1
2
4
5
3
Utilice únicamente piezas de
recambio Festool originales.
Referencia en:
www.festoolusa.com/service
– Para evitar daños, limpiar la pan-
talla
[1-8]
y el altavoz
[1-6]
de la
radio con un paño suave y seco.
No utilizar disolventes.
– Mantener limpios los contactos
de la SysRock y de la batería.
7 Medio ambiente
No deseche la herramienta junto con
los residuos domésticos.
herramientas, accesorios y embalajes de forma respetuosa con el medio
ambiente. Respete la normativa vigente del país.
Festool se reserva el derecho de modificar las especificaciones sin previo
aviso.
Recicle las
La marca denominativa y el logotipo
de Bluetooth® son marcas registradas de Bluetooth SIG, Inc. Por lo tanto, todo uso que Festool GmbH haga
de dicha marca está sujeto a un contrato de licencia.
38
Page 39

Page 40

 Loading...