

Page 1
Connecting the radio using UPnP
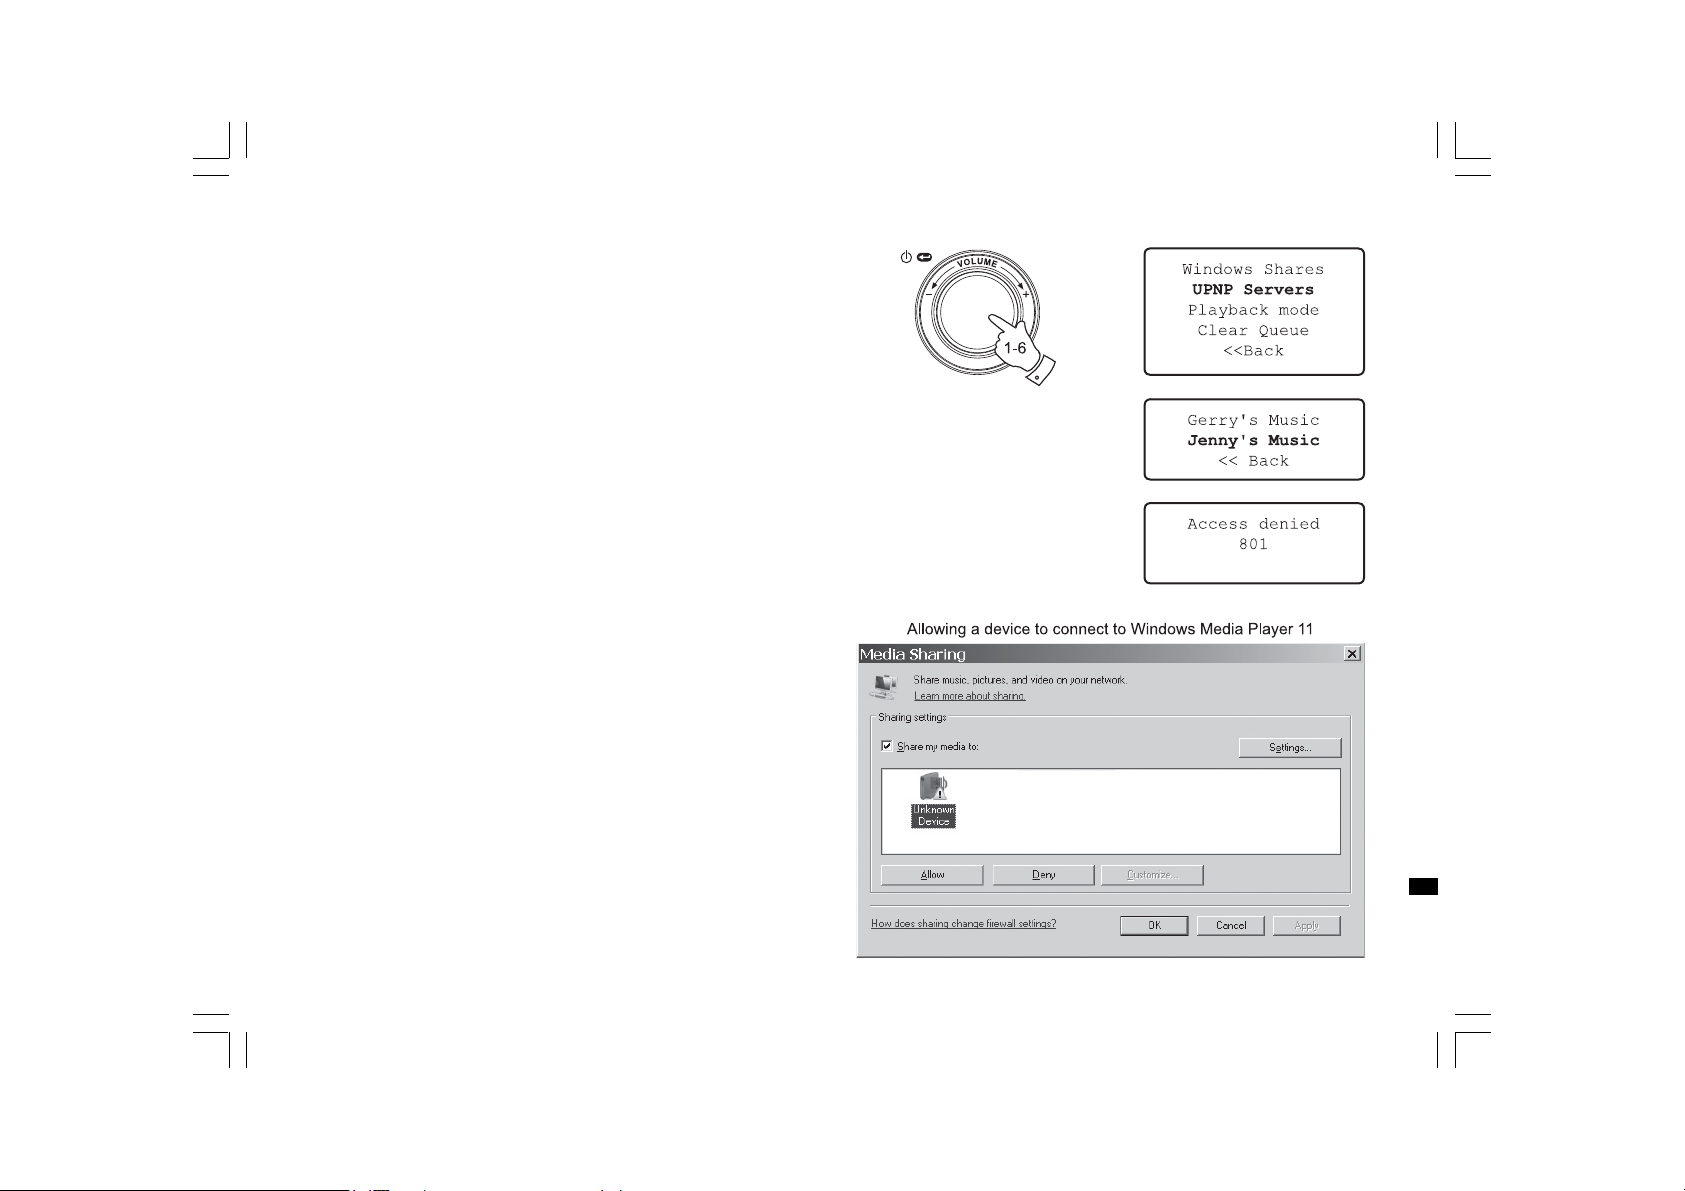
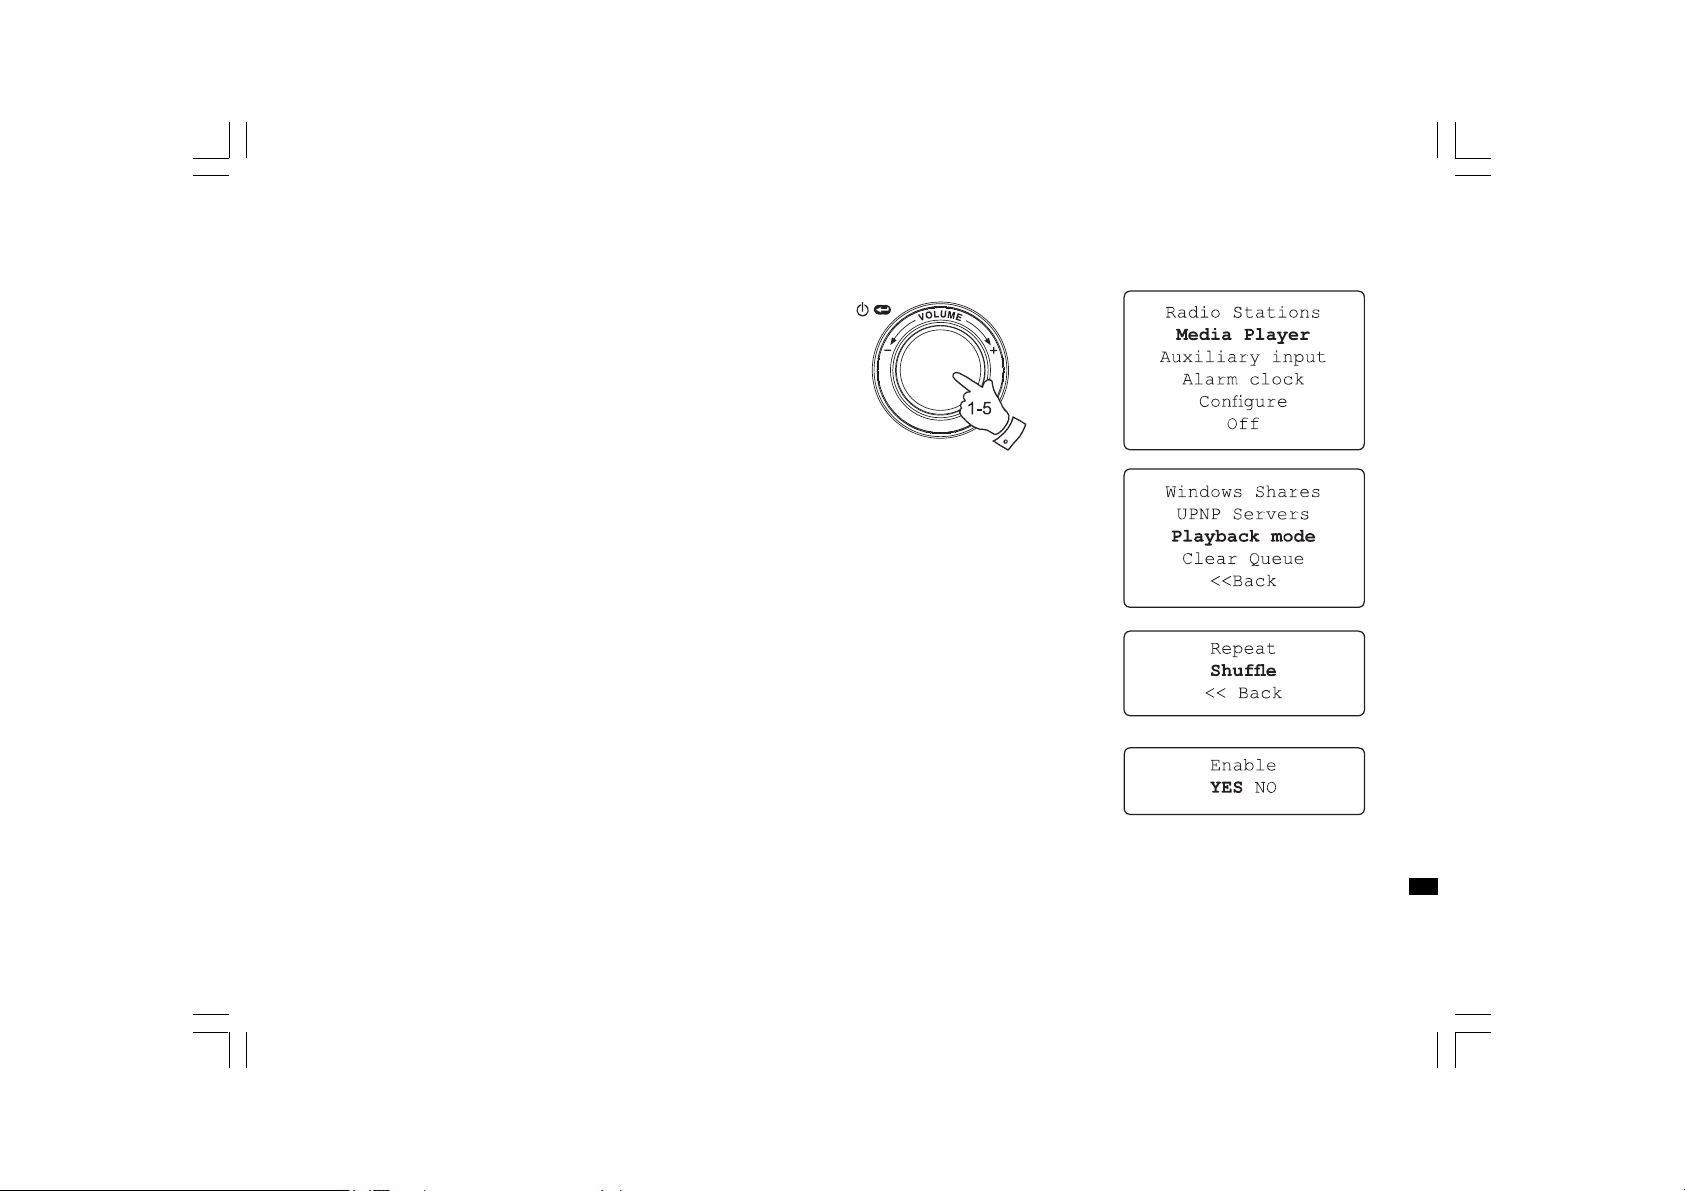
1. Usethe Select controltoswitchonyourradioandtoa ccessthemenus.
If needed, use the Back option. Select the Media Player menu.
Rotate the Select control to highlight ‘UPNP Servers’.
2. Press and release the Select control a nd the radio will scan for all
available UPnP servers. Note, this may take a few seconds for the
radio to complete its scan and before the scan has completed,
the radio will display ‘Empty’. The radio will continue to display
‘Empty’ if no UPnP servers are found.
3. After scanning, select your UPnP server (rotate the Select control
if more than one UpnP server is found), and then press the
Select control. Your radio will normally display ‘Access Denied’
at this stage.
4. Your PC may now prompt you that a device has attempted to
connect to your UPnP server. Whether you are prompted or not,
in order to allow the radio to have access to the media files,
you will need to click the ‘Library’ tab in WMP 11 and select the
‘Media Sharing…’ item to open the ‘Media Sharing’ window.
5. From the ‘Media Sharing’ window, the radio will be listed as an
unknown device. Click on the unknown device shown to select it,
then click the ‘Allow’ button and then click ‘OK’.
Note:
If you are using Microsoft Windows’ firewall software, this should be
correctly configured by WMP 11. If you are using third party firewall
software you may need to manually configure it to allow your radio
and WMP 11 to communicate (see ’Trouble shooting’).
6. Select the na med server again using the Select control. If WMP 11 is
now able to communicate with your radio you will be presented with
some media selection options by the server software.
20070830_WFR-20_381R101-A_GB.p65 2007/9/6, ¤U¤È 05:1733
GB
30
Page 2
Locating and playing media file s when using UPnP
Once the UPnP server ha s been configured to share media f iles with
your Internet radio, you select the files that you wish to play as follows:
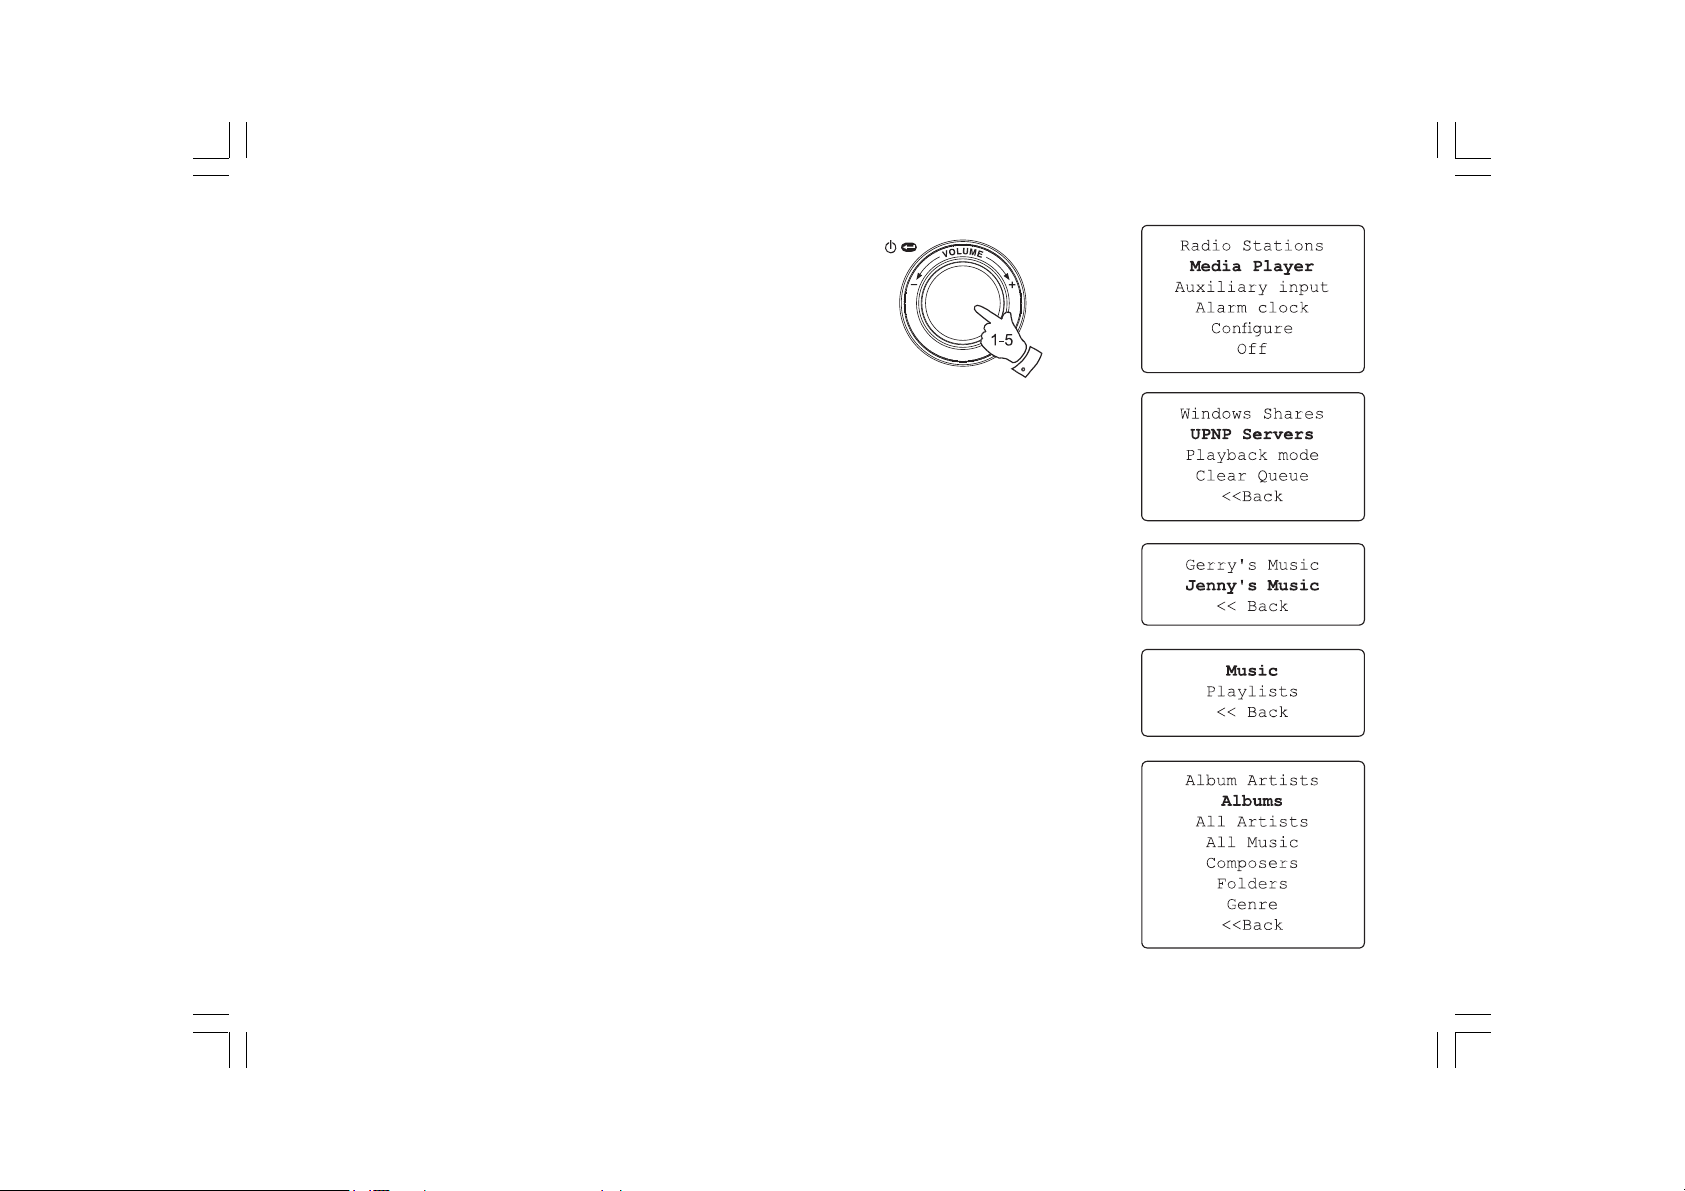
1. Use the Select control to switch on your radio and to access the
menus. If needed, use the Back option. Select the Media Player
menu. Rotate the Select control to highlight ‘UPnP Servers’.
2. Press Select control a nd the radio will scan for all available UPnP
servers. Note that it may take a few seconds for the radio to
complete its scan, a nd that before the scan has completed the
radio may display ‘Empty’. The radio will continue to display
‘Empty’ if no UPnP servers are found.
3. After a successful scan, rotate the Select control to highlight your
UPnP server and then press the Select control.
4. The radio will now list the media categories which are made available
by the UPnP server - for example, ‘Music’ and ‘Playlists’. Rotate the
Select control to highlight which category you wish to browse,
then press the Select control to confirm your choice.
5. Rotate the Select control to highlight a category and press the Select
control again. For example, you could select ‘Music’ and then select
‘Albums’.
Note:
In UPnP mode the search criteria offered a nd the f ile types made
available to the radio are a function of the UPnP server software
installed on your PC.
31
20070830_WFR-20_381R101-A_GB.p65 2007/9/6, ¤U¤È 05:1734
Page 3
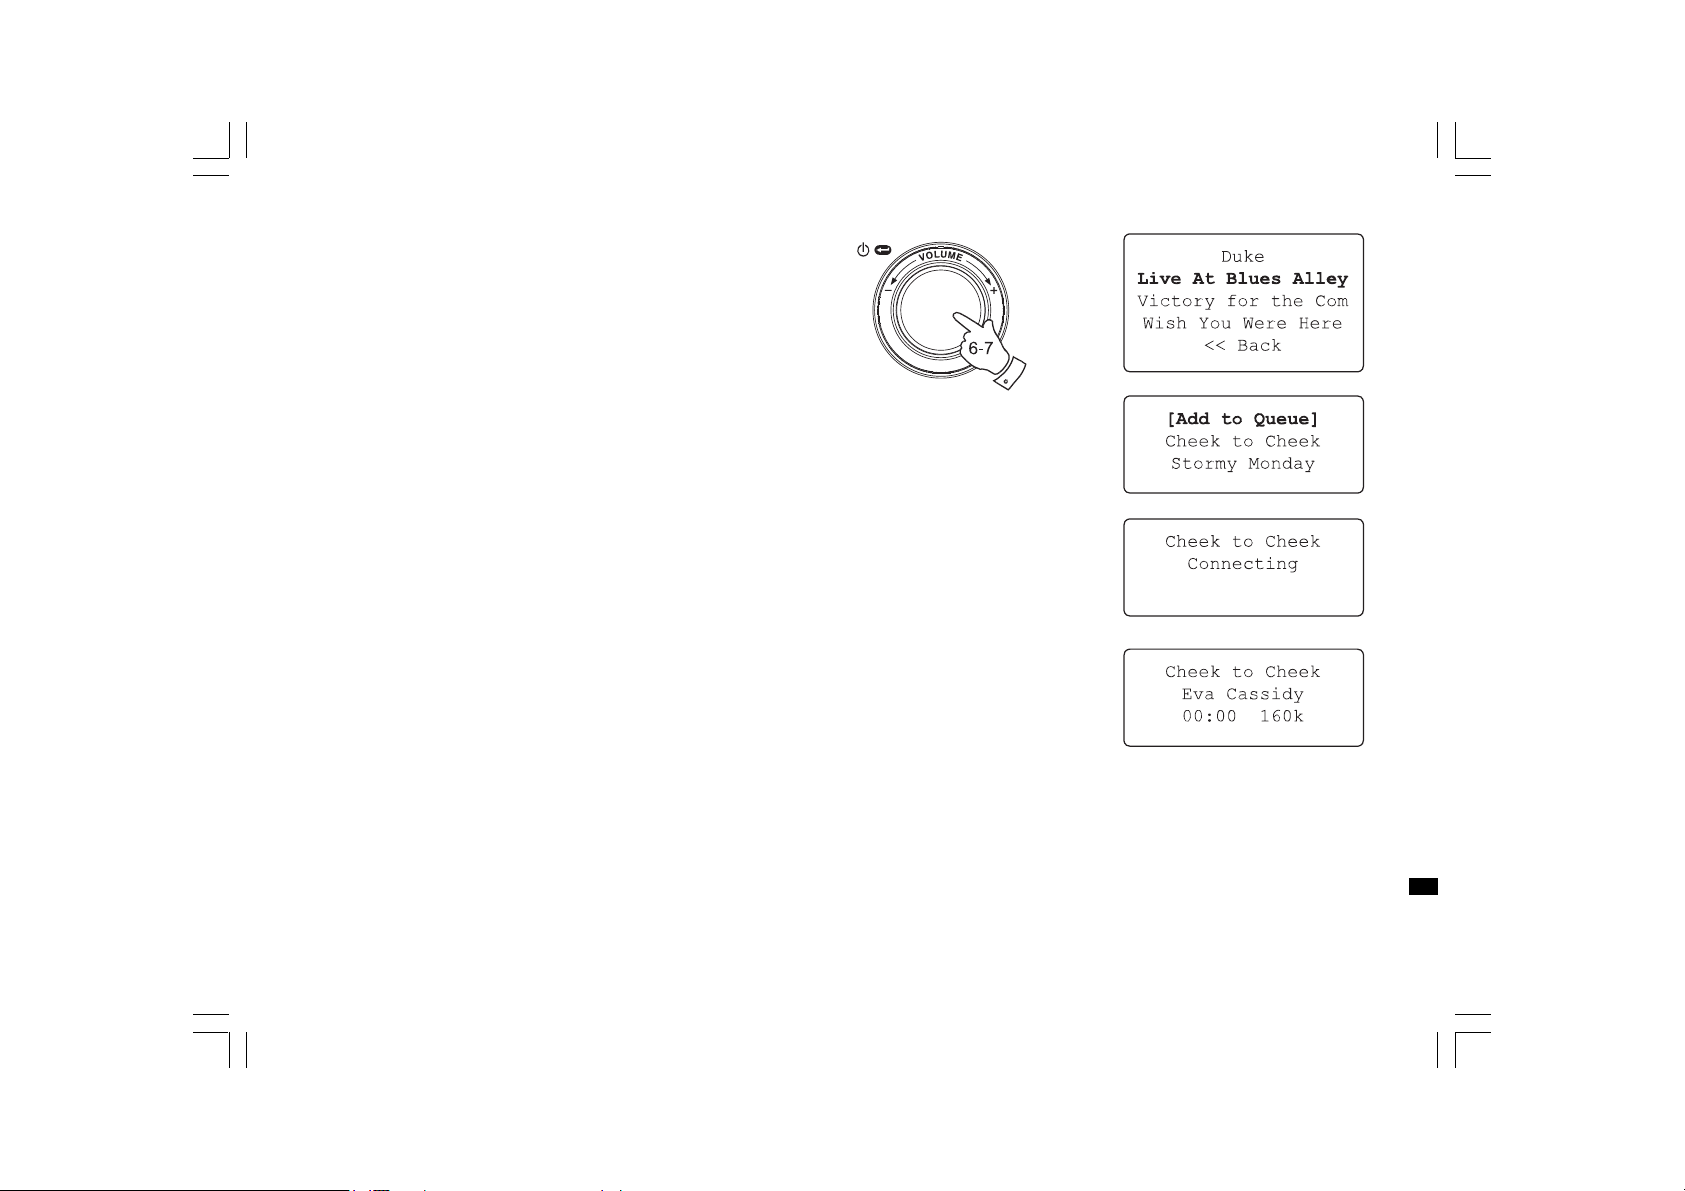
6. Rotate the Select control to highlight the media files that you wish
to play and then press the Select control.
Do not worry if not all of your media appear in the menus
immediately. Windows Media Player needs to look inside each file
to identify the artist, album and track information from ‘tags’
embedded in each file. Additionally, Windows Media Player may
take time to access the Internet to obtain additional information
such as ‘album art’ which it can display when you examine your
music library on your PC.
7. The radio will display ‘[Add to Queue]’. Press the Select control and
the radio will add all the tracks in the album to its queue and begin
playing them automatically.
20070830_WFR-20_381R101-A_GB.p65 2007/9/6, ¤U¤È 05:1735
GB
32
Page 4
Media selection
Whether you access your files using Windows Shares or using UPnP,
the file selection mecha nisms are the same. The only difference
between the two methods is that when using UPnP you will generally
have a wider choice of search criteria, a s determined by the UPnP
server software on your computer. Some third party server applications
allow customisation of the search criteria and indexing methods, which
can be useful if you have a very large collection of stored music files.
The selection mechanism allows you to se arch by a given inf ormation
type (Album, Artist, etc.) and then to narrow the search, either just to an
album or to a particular track within a n album. The selected album or
track is then added to a queue of tracks to be played. You can a dd more
albums or tracks to the queue while music is playing, or you can jump
between tracks in the queue. You can also clear the queue if you wish
to make a fresh selection. The searches described here are examples of
the possibilities available.
Listening to a complete album
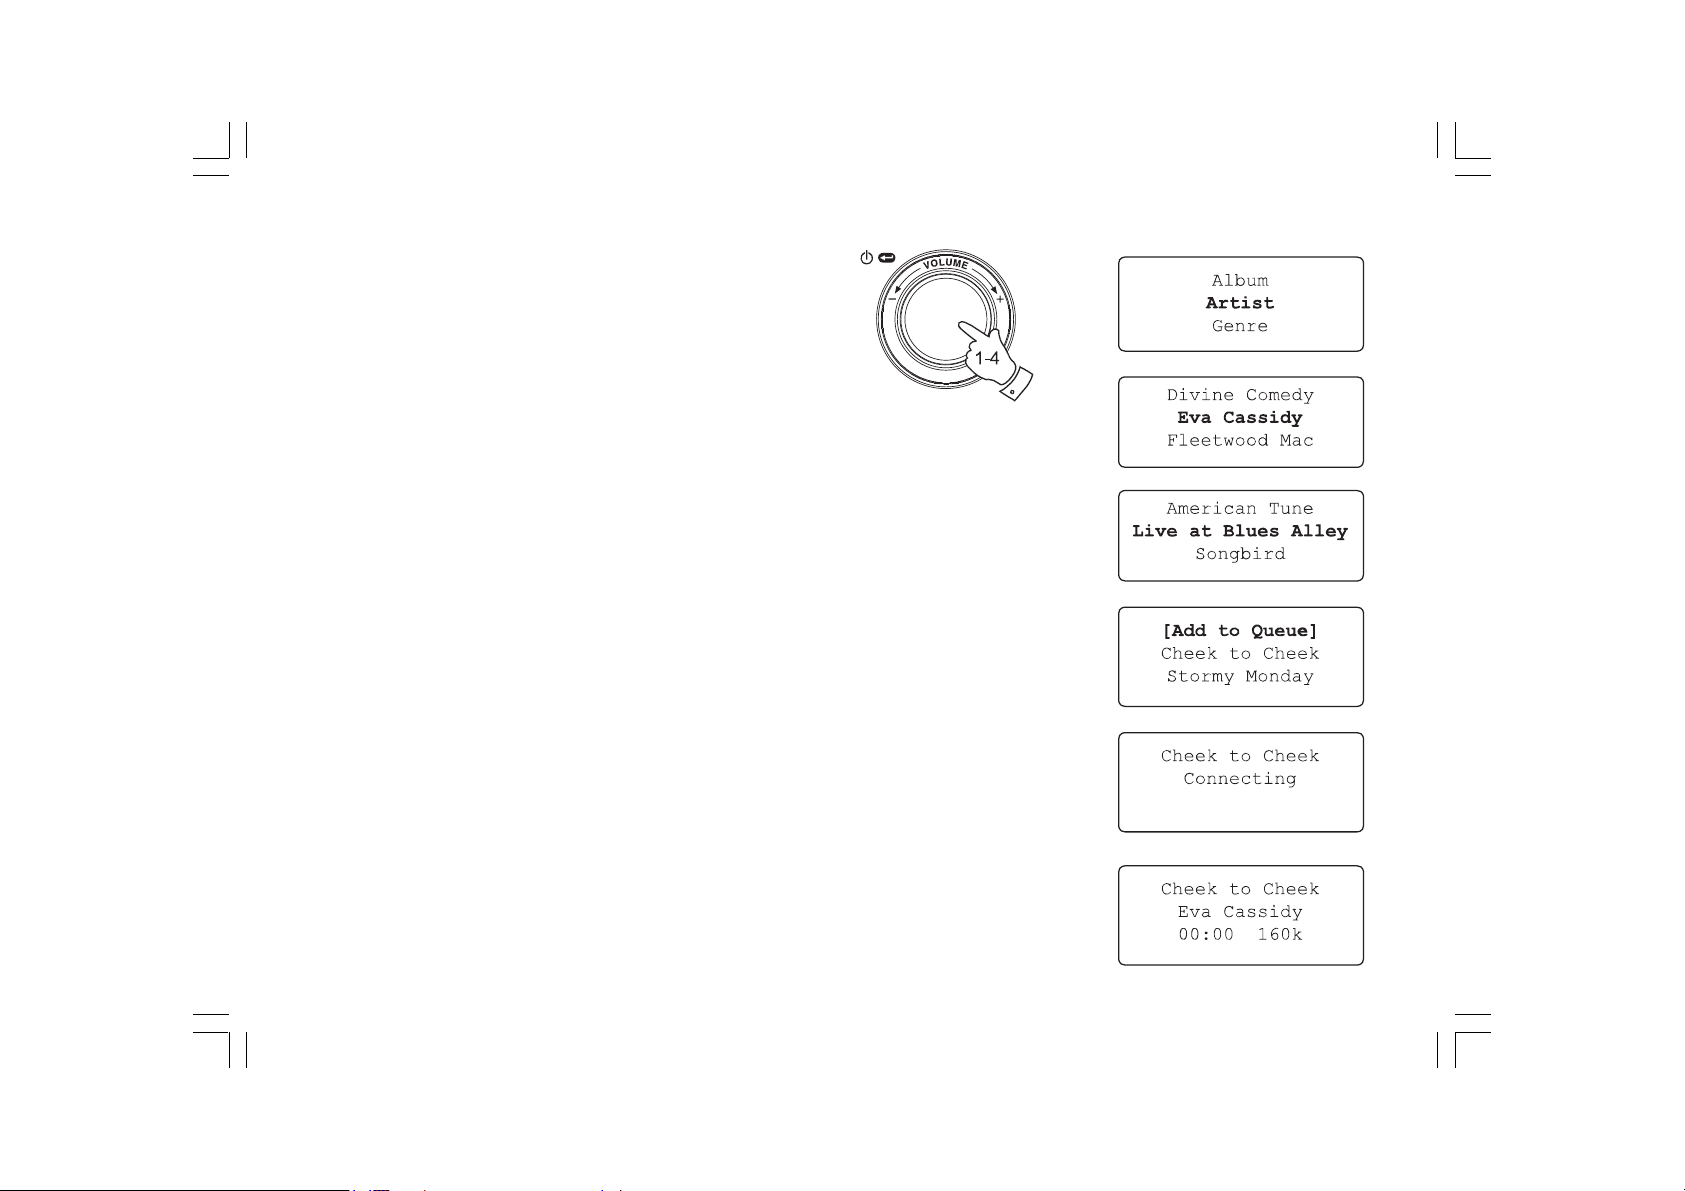
1. Rotate the Select control until ‘By Artist’ is highlighted on the
display. Press the Select control.
2. Rotate the Select control until the required artist is highlighted on
the display. Press the Select control.
3. Rotate the Select control until the required album na me is highlighted
on the display. Press the Select control. ‘[Add to Queue]’ will be
highlighted at the head of a list of tracks.
4. Press the Select control. The album will begin playing a nd all of the
tracks in the album will be stored in the queue.
33
20070830_WFR-20_381R101-A_GB.p65 2007/9/6, ¤U¤È 05:1736
Page 5
Listing to a single track
1. If you wish to play only a particular tracks from an album, first choose
the album as described in steps 1 - 3 on the preceding section
(section ‘Listening to a complete album’).
2. ‘[Add to Queue]’ will be highlighted at the head of a list of track s.
3. Rotate the Select control until the required track is highlighted.
4. Press and release the Select control. The track will begin playing.
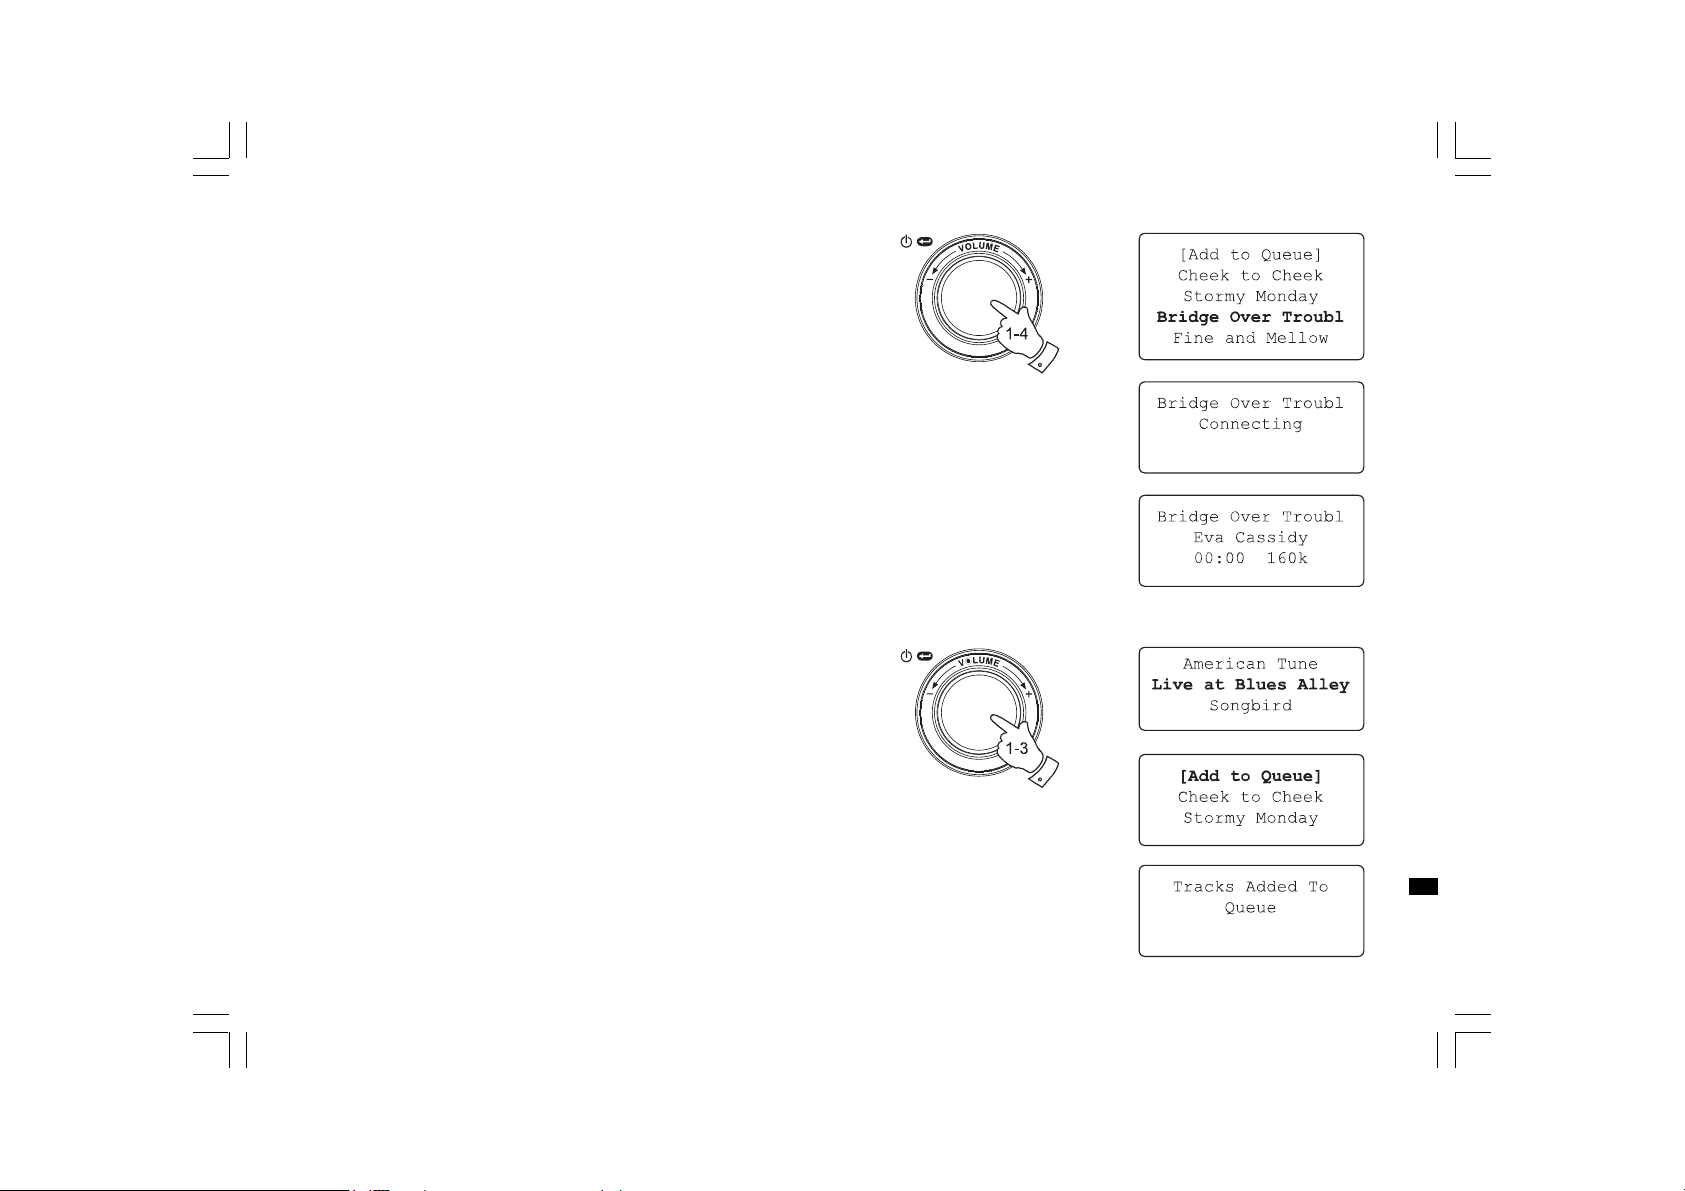
Queuing up albums for playback later
While the Media Player is playing, you may add additional albums or
tracks to the media queue.
1. Use rotary control (with the back option as needed) to search for and
highlight the required album (or use the Select, Back and Menu up
and Menu down buttons on the remote control).
2. Press the Select control (or button) to choose the album. The list of
tracks for the album will be displayed, he aded by ‘[Add to Queue]’.
3. If needed, rotate the Select control or the Menu up button on the
remote control so that ‘[Add to Queue]’ is highlighted. Press and
relea se the Select control. ‘Tracks Added to Queue’ will be displayed.
20070830_WFR-20_381R101-A_GB.p65 2007/9/6, ¤U¤È 05:1737
GB
34
Page 6
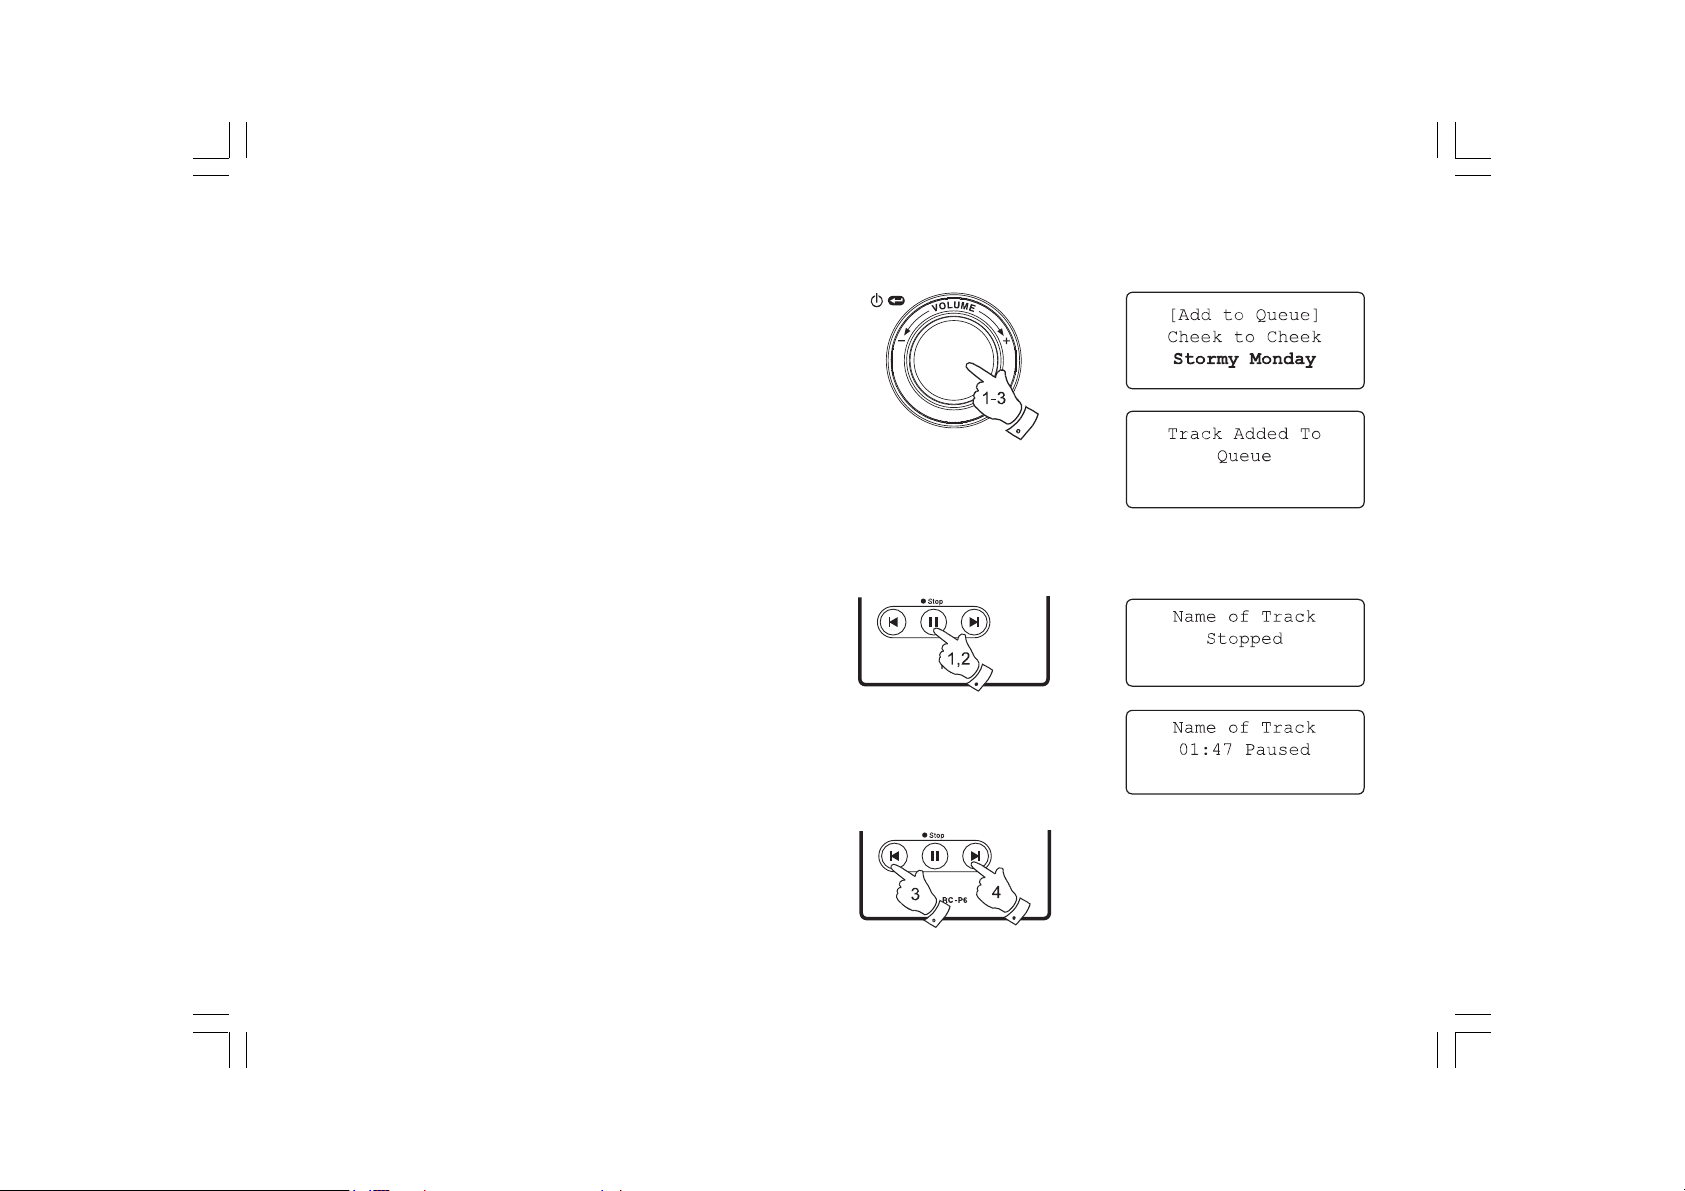
Queuing up tracks for playback later
1. If you wish to add only particular tracks from an album to the queue,
first choose the album as described in ste ps 1 - 3 on the preceding
section (section ‘Queuing up albums for playback later’).
2. Use the Rotary control (or use the Menu up and Menu down buttons
on the remote control) to search for a nd highlight the required track.
3. Press the Select control (or button). ‘Track Added To Queue’will
show on the display.
Controlling playback
1. Press and hold the Play / Pause buttonon the remote control to stop
playback of the current tra ck. If you press and release the button
again, playback will resume from the beginning of the same track
2. Press and release the Play / Pause button to pause playback of the
current track.
If you press and release the button again, playback will resume from
the point where it was paused.
3. Press the Rewind button to start playback of the previous track in
the queue.
4. Press the Fast-f orward button to start playback of the next track in
the queue.
35
20070830_WFR-20_381R101-A_GB.p65 2007/9/6, ¤U¤È 05:1738
Page 7
Browsing the list of track s currently queued up
for playback
1. Press the Queue button on the remote control. The currently playing
track name will be displayed, along with its position in the queue.
2. Use the Menu up or Menu down buttons (or rotate the Select control)
to see which tracks are queued up for playback.
3. If you want to jump to a particular tra ck in the queue, press the
Select button (or the rotary control) when the required track is
displayed. Playback will then continue from the beginning of
that track.
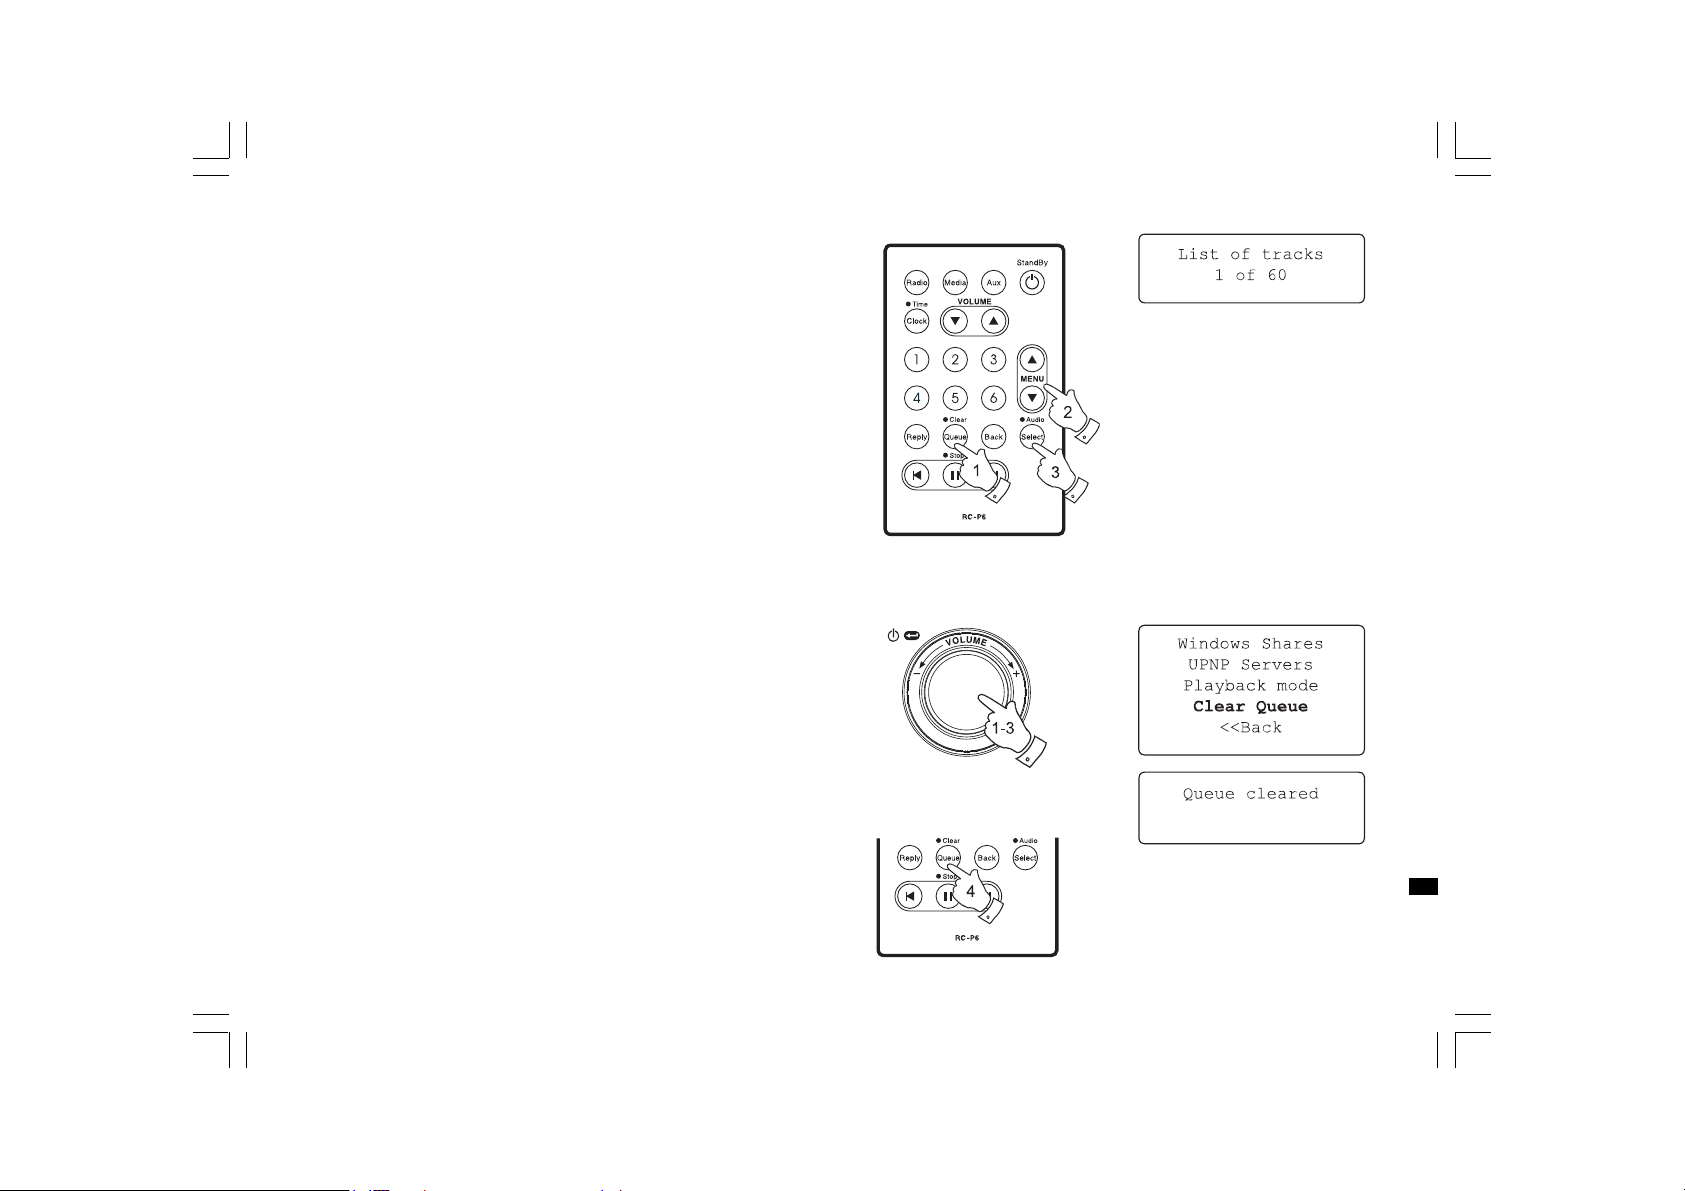
Clearing the media player queue
1. When the radio is playing press the Select control to access
the menus. If needed, use the Back option to access the main
Media Player menu.
2. Press the Select control and rotate the Select control until
‘Clear Queue’ is displayed.
3. Press the Select control. The display will then show ‘Queue cleared’
and all tra cks will be erased from the medi a queue.
4. Alternatively, a long press of the Queue button can be used to clear
the queue from any point in the Media Player without any need to
navigate the menus.
20070830_WFR-20_381R101-A_GB.p65 2007/9/6, ¤U¤È 05:1739
GB
36
Page 8
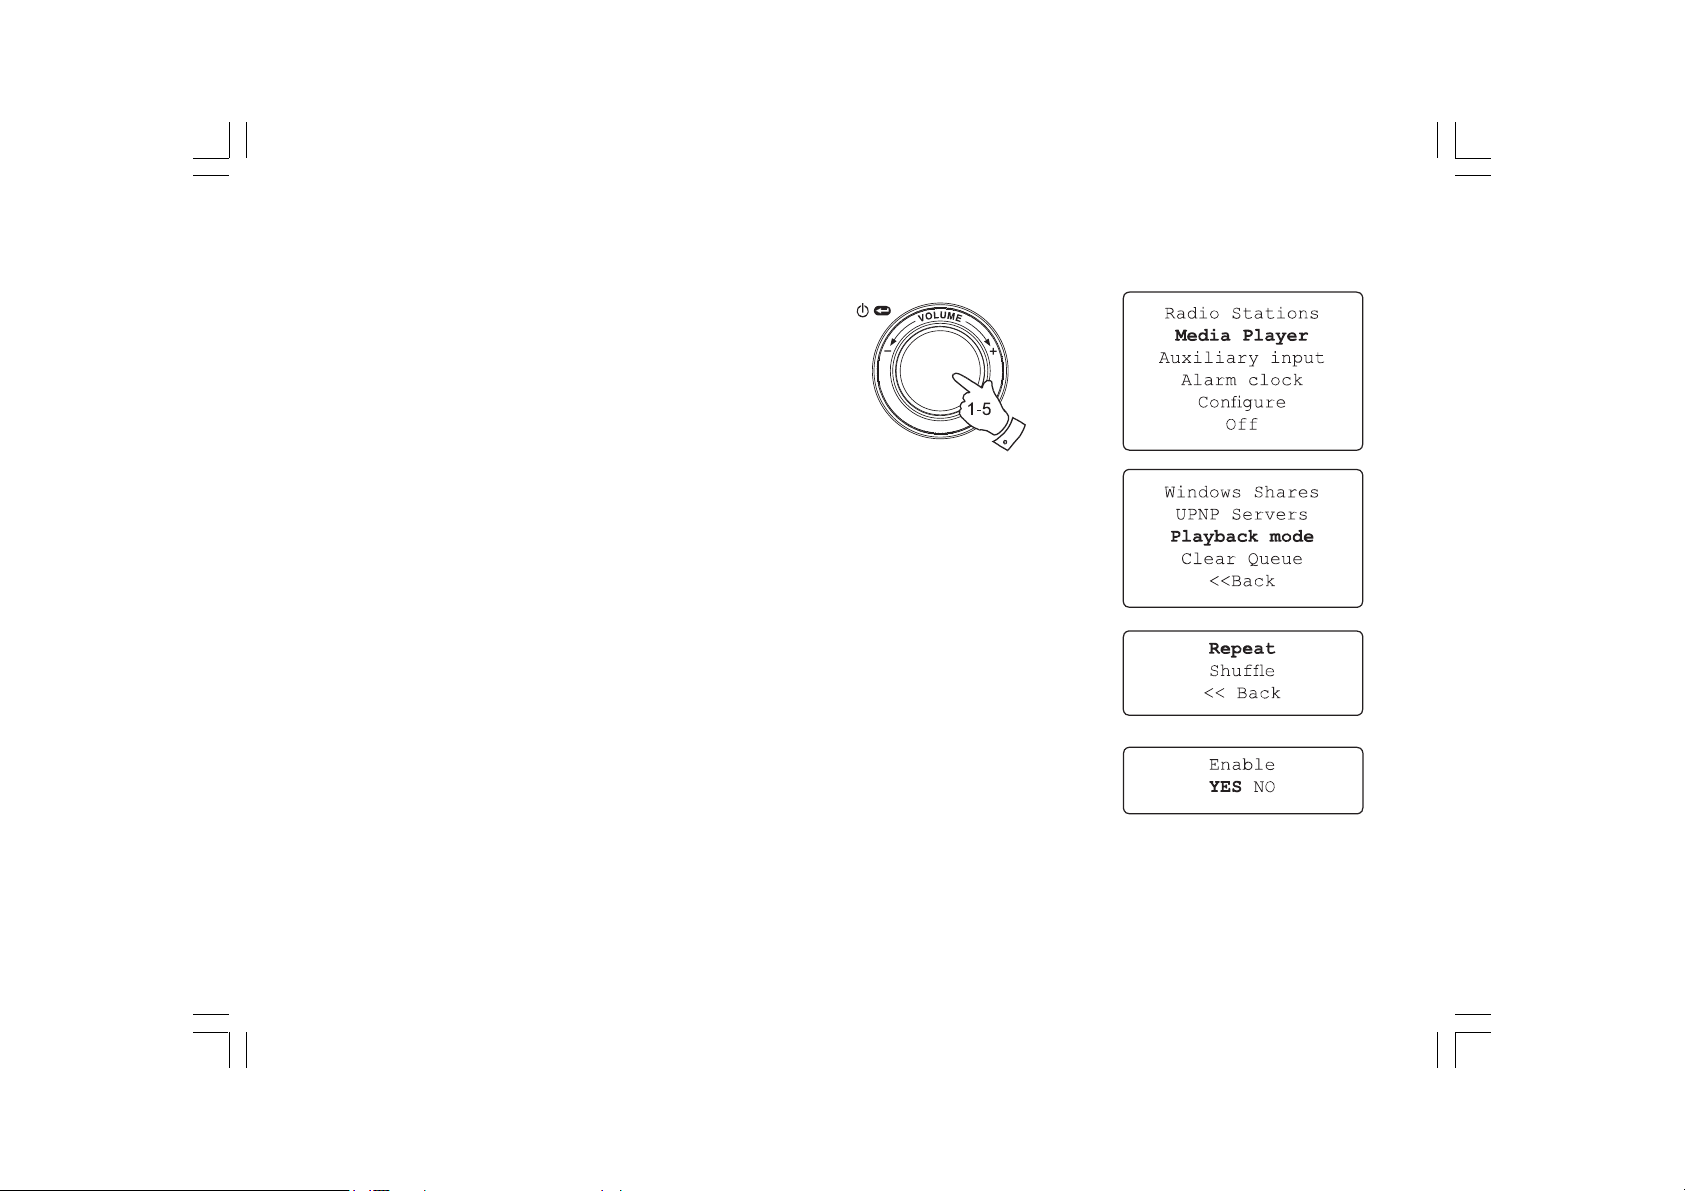
Playing track s in the queue repeatedly
1. When the radio is playing, press the Select control to access
the menus. If needed, use the Back option to access the main
Mode menu.
2. Rotate the Select control until ‘Media Player’ is highlighted on
the display then press the Select control to enter the Media Player
menu. Alternatively press the Medi a button on the remote control.
3. Rotate the Select control until ‘Playback Mode’ is displayed then
press the Select control.
4. Rotate the Select control until ‘Repeat’ is high lighted. Press and
release the Select control. The display will show ‘Enable’ with a
YES / NO option.
5. Rotate the Select control to select ‘YES’, then press the Select
control to confirm that Repeat mode should be enabled. If you do
not wish to enable Repeat mode select ‘NO’.
If Repeat mode has previously been ena bled, then the display will show
‘Disable’ with a YES / NO option after step 4. Select ‘YES’ to cancel
Repeat mode.
37
20070830_WFR-20_381R101-A_GB.p65 2007/9/6, ¤U¤È 05:1740
Page 9
Playing track s in random order
1. When the radio is playing, press the Select control to access
the menus. If needed, use the Back option to access the main
Mode menu.
2. Rotate the Select control until ‘Media Player’ is highlighted on
the display then press the Select control to enter the Media Player
menu. Alternatively press the Medi a button on the remote control.
3. Rotate the Select control until ‘Playback Mode’ is displayed then
press the Select control.
4. Rotate the Select control until ‘Shuffle’ is highlighted.Press and
release the Select control. The display will show ‘Enable’ with a
YES / NO option.
5. Rotate the Select control to select ‘YES’, then press the Select
control to confirm that Shuffle mode should be enabled. If you do
not wish to enable Shuffle mode select ‘NO’.
If Shuffle mode ha s previously been ena bled, then the display will show
‘Disable’ with a YES / NO option after step 4. Select ‘YES’ to cancel
shuffle mode.
20070830_WFR-20_381R101-A_GB.p65 2007/9/6, ¤U¤È 05:1741
GB
38
Page 10

Auxiliary input socket
Y our ra dio has a 3.5mm stereo jack socket for connection to external
audio sources. This can be configured to two sensitivity levels to suit
the output level of the connected device.
1. Connect an external audio source, such as an MP3 or CD player to
the Aux In socket on the back of the radio.
2. Use the Select control to switch on you radio and to access
the menus. If needed, use the Back option to access the main
Mode menu.
3. Rotate the Select control until Auxiliary Input is highlighted on
the display.
4. Press the Select control. The display will then show ‘Aux In’ and the
external source will be selected. Alternatively, simply press the Aux
button on the remote control.
5. If you are using a headphone output on the connected player,
adjust the volume control on the player to a mid-level and then
use the volume control on your Internet radio to set a comfortable
listening level.
Note:
In the event that the sound is either too quiet, or loud and distorted,
it may be that you need to adjust the Auxiliary Input level
setting - plea se see the following section.
39
20070830_WFR-20_381R101-A_GB.p65 2007/9/6, ¤U¤È 05:1742
Page 11

Setting the auxiliary input level
Different audio sources can vary quite significantly in the strength of
the signals which they provide to other equipment such as your
Internet radio. In particular, some headphone outputs are at a much
lower level than others, a nd almost all headphone outputs are at a
lower level than so called ‘Line-level’ outputs.
So that you may use your radio with a range of external audio source s,
the input sensitivity of the Auxiliary Input may be configured to suit
either Headphone or Line-level outputs. The Headphone Level setting
is the more sensitive of the two.
1. When the radio is playing press the Select control to access
the menus. If needed, use the Back option to access the main
Mode menu. Rotate the Select control until ‘Configure’ is highlighted
on the display.
2. Press the Select control to show the Configure menu on the display.
Rotate the Select control until ‘Auxiliary input level’ is highlighted.
3. Rotate the Select control until either ‘Headphone level’ or ‘Line Input
Level’ is highlighted on the display, and then press the Select control
to activate the desired setting.
4. If needed, select the Back option to exit the menu.
20070830_WFR-20_381R101-A_GB.p65 2007/9/7, ¤W¤È 09:2643
GB
40
Page 12

Setting the clock
Normally the WFR-20 Internet radio will set its clock automatically
to UK time after a connection to the Internet has been established.
Should you need to set the time manually, please follow this procedure.
1. Use the Select control to switch on your radio and to access
the menus. If needed, use the Back option to access the main
Mode menu.
2. Rotate the Select control until the display says ‘Configure’.
Press the Select control to enter the configure menu.
3. Rotate the Select control until ‘Clock Setup’ appears on the display.
Press the Select control to enter the clock setup menu.
4. Rotate the Select control until ‘Set Time/Date’ is highlighted on
the display. Press the Select control to highlight the hour digits
on the display.
5. Rotate the Select control to select the hour. Press the Select control
to highlight the minute digits on the display.
6. Rotate the Select control until the correct date is highlighted on
the display. Press the Select control enter the date and to highlight
the month on the display.
7. Rotate the Select control to select the correct month.
Press the Select control enter the month and to highlight the year
on the display.
8. Rotate the Select control to select the year. Press the Select control
to confirm the clock setting. The display will show ‘Time and Date
Set’ and will then return to the radio station display.
41
20070830_WFR-20_381R101-A_GB.p65 2007/9/6, ¤U¤È 05:1744
Page 13

Setting the clock format
The clock display can be set to 12 or 24 hour format. The sele cted
format is then also used when setting the alarms.
1. Usethe Select control to switch on your radio and to access
the menus. If needed, use the Back option to access the main
Mode menu.
2. Rotate the Select control until the display says ‘Configure’.
Press and release the Select control to enter the configure menu.
3. Rotate the Select control until ‘Clock Setup’ is highlighted on
the display. Press the Select control to enter the clock setup menu.
4. Rotate the Select control until ‘Clock format’ is highlighted on
the display. Press the Select control to enter the clock format menu.
5. Rotate the Select control to select either 24 hour or 12 hour format.
Press the Select control to confirm your choice of clock format.
20070830_WFR-20_381R101-A_GB.p65 2007/9/6, ¤U¤È 05:1745
GB
42
Page 14

Setting daylight saving/summer time
These 4 options are available:
European – Sets DST by European rule s.
DST On – Sets Daylight Saving Time (offset +1 hour)
DST Of f – Ca ncels Daylight Saving Time.
Local time zone – manually forward or backward by 30 mins/step.
Reset clock – removes any user set time, time-sonze or DST offset
and sets them back to the factory state.
1. Press the Select control to switch on your radio and to access
the menus.
2. Rotate the Select control until the display says ‘Configure’.
Press the Select control to enter the configure settings.
3. Rotate the Select control until ‘Clock Setup’ appears on the display.
Press the Select control to enter the clock setup menu.
4. Rotate the Select control until ‘DST’ or ‘Local time zone’ a ppears
on the display. Press the Select control to enter it, then you will
be able to set the summer time.
43
20070830_WFR-20_381R101-A_GB.p65 2007/9/6, ¤U¤È 05:1746
Page 15

Setting the alarm clock
Y our radio has four separate alarms which can be set to wa ke you to
either a radio station or a buzzer alarm. Each alarm can be set to sound
either once, everyday, weekly, weekdays or at weekends. In the event
of a power interruption your radio ha s built in memory chip that will
retain your alarm settings.
Note:
If no buttons are pressed for 10 seconds the radio will exit the alarm
setup. If you make a mistake at any point, use the Back option to go
back to the previous screen.
1. Usethe Select control to switch on your radio and to access
the menus. If needed, use the Back option to access the main
Mode menu.
2. Rotate the Select control until the ‘Alarm clock’ is highlighted on
the display. Press the Select control to enter the alarm settings.
3. Rotate the Select control until ‘Set Alarms’ is highlighted on the
display then press the Select control. The display willshow the
status of alarms 1-4. It will also offer a ‘Disable All’ option.
4. Rotate the Select control until the desired alarm 1 - 4 is highlighted
on the display. Alarms which are not highlighted show the time of the
next alarm (if any) a nd the day of the week on which they will occur.
The currently highlighted entry will scroll through the full alarm details
including whether the alarm is daily, weekly, etc. and the details of
the alarm type (buzzer or radio station na me).
5. To change the setting for the highlighted alarm press the Select
control. The alarm hour will be highlighted. The 12 hour or 24 hour
clock format will be used according to the currently selected clock
format option.
20070830_WFR-20_381R101-A_GB.p65 2007/9/6, ¤U¤È 05:1747
GB
44
Page 16

Setting the alarm cont.
6. Rotate the Select control to choose the hour for the alarm.
Press the Select control to store this setting and the minute digits
will be highlighted.
7. Rotate the Select control to choose the minute for the alarm.
Press and Select control to store this setting. The alarm day
option will be highlighted on the display: Once - will sound at one time only
Everyday - will sound everyday.
Weekly - will sound once every week.
Weekdays - will sound on weekdays only.
Weekends - will sound on weekends only.
8. Rotate the Select control to choose one of the above options for
the alarm. Press the Select control to store this setting. If setting the
alarm to everyday, weekdays or weekends please skip to point 10.
9. Rotate the Select control until the required day of the week for the
alarm is highlighted on the display. Press the Select control to store
this setting. The radio will enter the alarm mode option.
10. The alarm can be set to a radio station or a buzzer alarm. The radio
station alarm may be set to any of the stations which have been
stored as presets or to the station currently being listened to.
Rotate the Select control to select either Buzzer or the required
radio station.
11. Press the Select control to confirm the alarm settings. Your radio
will show ‘Alarm Set’ and will go back to the list of alarms with the
new alarm setting shown in the display.
45
20070830_WFR-20_381R101-A_GB.p65 2007/9/6, ¤U¤È 05:1748
Page 17

When the alarm sounds
The radio alarm will sound at the selected times for up to 60 minutes
unless cancelled. The volume for the radio alarm will be the same as
the volume previously used when listening to the radio or media player.
If for any reason the radio cannot connect to the requested radio station
at the time that the alarm is due, the buzzer alarm will be used instead.
The buzzer alarm sounds for 10 minutes and the volume will gra dually
increa se from a low level. If the ra dio is playing at the time that the
buzzer sounds, then the buzzer volume is based on the radio
volume setting.
1. If the radio alarm sounds when the radio is in standby, the display
will show ‘Turn on Radio’ with a YES / NO option. If no action is
taken the radio will switch off at the end of the alarm period. If you
select NO, the radio will switch off immediately. If you wish to listen
to the radio, or to be able to select alternative stations, then select
YES using the Select control.
2. If a radio alarm sounds and the radio is already playing, the radio will
change to the station specified for the alarm, and the display will
show ‘Stop alarm’ with a YES / NO option. Selecting YES will revert
to the previous radio station or the media player. Selecting NO will
allow the radio station from the alarm to continue.
3. If the buzzer alarm sounds when the radio is in standby, the display
will show ‘Turn on Radio’ with a YES / NO option. If no action is
taken, the buzzer will stop after 10 minutes. If you select NO,
the alarm will switch off immediately. If you wish to listen to the radio
or media player, then select YES using the Select control.
4. If the buzzer alarm sounds when the radio is already playing,
the display will show ‘Alarm’. If no action is taken, the buzzer will
stop after 10 minutes. If you wish to go back to the radio station
press the Select control.
20070830_WFR-20_381R101-A_GB.p65 2007/9/6, ¤U¤È 05:1749
GB
46
Page 18

Disabling alarms
1. To Disable all alarms enter the alarm setup menu and Rotate the
Select control until ‘Disable all’ is highlighted on the display.
Press the Select control to confirm. The display will show ‘All alarms
disabled’ for 3 seconds then return to the alarms list display.
2. To Disable a single alarm enter the alarm setup menu and rotate the
Select control until the desired alarm is highlighted on the display.
Press the Select control. The display will show ‘Enable Alarm
YES / NO’.
If NO is selected alarm is cancelled and the display returns to the
alarm list.
If YES is selected the alarm details may be changed by modifying
any or all of the alarm options.
47
20070830_WFR-20_381R101-A_GB.p65 2007/9/6, ¤U¤È 05:1750
Page 19

Sleep timer
Y our ra dio can be set to turn off after a preset time has elapsed.
The sleep setting can be adjusted between 15 and 120 minutes in
15 minute increments.
1. When the radio is playing, press the Select control to access
the menus. If needed, use the Back option to access the main
Mode menu.
2. Rotate the Select control until the ‘Alarm clock’ is highlighted on
the display then press the Select control.
3. Rotate the Select control until ‘Sleep timer’ is highlighted on the
display then press the Select control.
4. Rotate the Select control until the required sleep time setting is
selected between 15 and 120 minutes or to Off. Press the Select
control to confirm the setting.
5. The display will show ‘Sleep timer’ set. Your radio will switch off after
the preset time has elapsed.
6. To cancel the sleep time before the preset ti me has elapsed and to
turn off the radio, use the Select control (or the remote control) to
turn the radio off manually. To cancel the sleep timer and leave the
radio playing, go back into the sleep timer settings (steps 1 to
4 above) and sele ct the Off option in step 4.
During the last two minutes of the sleep timer period, the radio will
gradually reduce the volume before switching off.
GB
20070830_WFR-20_381R101-A_GB.p65 2007/9/6, ¤U¤È 05:1751
48
Page 20

Backlight
This option allows you to alter the radio’s display backlight settings
to suit your needs. Separate settings are available for Active mode
(while using the menu system), Inactive mode (when listening),
and Standby mode (when the radio is off with just the clock
display showing).
1. Usethe Select control to switch on your radio and to access
the menus. If needed, use the Back option to access the main
Mode menu.
2. Rotate the Select control until ‘Configure’ is highlighted on the
display. Press the Select control to enter the Configure menu.
3. Rotate the Select control until ‘Backlight’ is highlighted on the
display. Press the Select control to enter the Backlight menu.
4. The backlight setting can be adjusted for‘Active’,‘Inactive’a nd‘Sta ndby’
modes. Rotate the Select control to highlight the desired backlight
option then press the Select control.
5. The radio will now display the setting for the selected backlight
option. You can alter this value by rotating the Select control to
increase or decrease it according to your needs.
6. When the desired value is reached, pre ss the Select control to store
the setting. If the value is not modi.ed or stored after .ve seconds,
the radio exit the Backlight menu and will return to its previous
display.
49
20070830_WFR-20_381R101-A_GB.p65 2007/9/6, ¤U¤È 05:1852
Page 21

Language selection
This facility allows you to cha nge the display language for the menus.
1. Use the Select control to switch on your radio and to access
the menus. If needed, use the Back option to access the main
Mode menu. Rotate the Select control until ‘Configure’ is
highlighted on the display then press the Select control to enter
the Configure menu.
2. Rotate the Select control until ‘Language’ is highlighted then press
the Select control to access the list of available languages (English,
French, Spanish, German, Danish, Italia n, Dutch, Portuguese,
Finnish, Swedish and Norwegian).
3. Rotate the Select control to highlight the desired menu language.
Press the Select control confirm your choice and to restart the
radio using the chosen language.
Software version display
The software version display is provided for your reference only.
1. Use the Select control to switch on your radio and to access
the menus. If needed, use the Back option to access the main
Mode menu. Rotate the Select control until ‘Configure’ is
highlighted on the display.
2. Press and rele ase the Select control to enter the Configure menu.
Rotate the Select control until ‘Version’ is highlighted.
3. Press and release the Select control to show the current software
version on the display. Rotating the control will display additional
information. Use the Back option to exit.
20070830_WFR-20_381R101-A_GB.p65 2007/9/6, ¤U¤È 05:1853
GB
50
Page 22

Network configuration
This menu enables you to configure your radio’s network settings,
scan for a connection to an alternative wireless network, or to
manually configure the network parameters. This can be useful if you
take the Internet radio to a nother location where there is a different
network setup.
It is possible to configure your radio to connect to your network via an
available Ethernet connection (RJ-45) or via a Wi-Fi router.
Configuring the radio only to use a wired
Ethernet connection
1. From the radio’s Network Configuration menu, select ‘Wired /
Wireless’. This menu will present you with three options:
‘Wireless Only’, ‘Wired Only’and’Auto’. Selecting ‘Wired Only’ will
allow cause the radio to restart and then to use only its Ethernet
connection to communicate with the network. The radio will also
disable its wireless network capabilities. This will require your radio
to be physically connected to a wired Ethernet using the RJ-45
socket on the rear panel.
Configuring the radio only to use a Wi-Fi connection
2. Selecting the ‘Wireless Only’ option from the ‘Wired / Wireless’
menu will allow cause the radio to restart and then only to use only
its Wi-Fi connectiontocommunicatewiththenetwork.
Theradiowillalsodisable its Ethernet connection.
51
20070830_WFR-20_381R101-A_GB.p65 2007/9/6, ¤U¤È 05:1854
Page 23

Configuring the radio to use either an Ethernet or a
Wi-Fi connection
3. Selecting the ‘Auto’ option from the ‘Wired / Wireless’ menu will
cause the radio to restart. It will then attempt to establish an
Ethernet connection to the network. If no Ethernet connection
is available the radio will attempt to establish a Wi-Fi connection
to the network.
Having established a particular type of connection to the network,
this connection will remain in use while the radio is on.
The Network Configuration menu also allows you to choose whether
or not the Internet radio displays a warning message when the Wi-Fi
signal strength is low. You can enable this feature by selecting
‘Signal Warning’ and then selecting ‘Yes’.
Entering the network na me manually
If your network is configured with a hidden ESSID, then you will need to
enter the network name manually.
1. In the Network Configuration menu, sele ct ‘Enter network name’.
A string of characters will be displayed. You can scroll through this
list by turning the rotary control or by pressing the Menu up or
Menu down buttons. The centre character will be entered into the
network name each time that you press Select.
If you make an error, either use the Back button on the remote
control, or give a long press on the rotary control.
2. When the name has been entered, locate the END symbol in the
string of characters and then press Select. The radio will then try
to connect to the named network.
GB
20070830_WFR-20_381R101-A_GB.p65 2007/9/6, ¤U¤È 05:1855
52
Page 24

Troubleshooting
If you have difficulty connecting the radio to your wireless network,
some of these steps may help to resolve the problem:
1. Confirm that a Wi-Fi connected PC can access the Internet
(i.e. can browse the web) using the same network.
2. Check that a DHCP server is available, or that you have conf igured a
static IP address on the radio. You can configure a static IP address
on the radio using the menu item ‘Configure -> Network Config ->
Edit Config’, and then select ‘No’ for ‘Auto (DHCP)’.
3. Check that your network’s firewall is not blocking any outgoing ports.
As a minimum, the ra dio needs access to UDPand TCPports 80, 554,
1755, 5000 and 7070. The use of Windows Share s require s access
to UDP and TCP ports 135 - 139 and 445. Windows Media Player
11 will allocate a port number for UPnP media sharing and will
configure Microsoft’s Windows built-in firewall appropriately.
Other firewall software may require configuration for UPnP or to
allow particular IP addresses to have trusted access.
4. Check that your access point does not restrict connections to
particular MAC addresses. You can view the radio’s MAC address
using the menu item ‘Configure -> Network Config -> View Config ->
MAC address’. Note that the WFR-20 radio has both wired and
wireless MAC addresses.
5. If you have an encrypted network, check that you have entered the
correct key or pa ss-phrase into the radio. Remember that text-format
WPA keys are case sensitive. If your radio displays ‘Wireless error’
when attempting to connect to an encrypted network followed by a
5-digit number, then please ensure that you enter the correct
pass -phrase for the network. If the problem persists, then you may
need to consult your network configuration.
If your radio can connect to the network successfully, but is unable to
play particular stations, it may be due to one of the following causes:
1. The station is not broadcasting at this time of the day
(remember it may be located in a different time zone).
2. The station ha s re ached the maximum allowed number of
simultaneous listeners.
3. The Internet connection between your radio a nd the server
(often located in a different country) is slow.
4. The station is not broadcasting any more.
5. The link to the audio stream used by the radio is out of date.
6. The radio station is broadcasting using an audio format which is not
playable by your radio (although the WFR-20 does play almost all
formats used by regular broadcasters).
Try using a PC to play back the stream via the broadca ster’s web site.
If you can play back the station with a PC, use the form at
http://www. reciva.com to notify Reciva so that they can update the
station data that is used by the radio.
53
20070830_WFR-20_381R101-A_GB.p65 2007/9/6, ¤U¤È 05:1856
Page 25

Factory reset
If you wish to completely reset your radio to its initial state this may be
performed by following this procedure.
1. Use the Select control to switch on your radio and to access
the menus. If needed, use the Back option to access the main
Mode menu. Rotate the Select control until ‘Configure’ is highlighted
on the display.
2. Press the Select control to enter the Configure menu. Rotate the
Select control until ‘Factory Reset’ is highlighted on the display.
3. Press the Select control again and the display will show
‘Are you sure?’. Rotate the Select control to highlight ‘Yes’ if you
wish to carry out a system reset or highlight ‘No’ if wish to return
to the previous screen. Then press the Select control again.
4. A full reset will be performed, the station list together with any preset
stations will be erased and your wireless network connection details
will be lost. All configuration settings will be restored to the ir defaults,
and the la nguage used for menus will be reset to English.
In the event that you are unable to access the menus (or if the language
setting has accidentally been changed to a language that you cannot
understand) the Factory Re set may also be performed as follows:
1. Remove all power from the unit and wait 30 seconds.
2. Then, re-a pply power while simulta neously pre ssing a nd holding the
front panel rotary control. Keep this pressed as the radio powers up
and until it displays ‘Factory Reset Complete’. This should normally
only take between 10 a nd 15 few seconds. Then, release the control
while the radio restarts.
3. If this is not successful, please remove power for one minute,
and then repeat the operation.
GB
20070830_WFR-20_381R101-A_GB.p65 2007/9/6, ¤U¤È 05:1857
54
Page 26

Upgrade firmware
From time to time, new software features for your radio may be
developed. For example, a new audio decoder may be a dded to
allow an alternative audio format to be supported. You radio has
therefore been designed to allow its internal software to be upgraded
using your Internet connection. The upgrade mecha nism is accessible
via the Configure menu.
Upgrading the software will remove all network settings, radio station
presets and alarm settings from your radio. Do not attempt this
procedure unless you have a good Internet connection and a relia ble
mains power supply. If you connect to your router using a Wi-Fi
connection, make sure that this is also reli a ble before proceeding.
The Upgrade Firmware option allows your radio to download new
internal software from the Reciva portal on the Internet. If there is new
software available, then the radio will a sk whether you want to download
it or not. Selecting No or using the Back optionwill cancel the operation.
A software upgrade may take several minutes.
IMPORTANT:
Do not switch off the power to the radio until the upgrade operation is
complete and the radio has restarted, otherwise the radio may become
permanently da maged.
Once the software upgrade is completed your radio will restart.
If you use a Wi-Fi connection, you will need to re-enter all network
settings in order to be able reconnect to your network. A firmware
update also erases all radio station presets, alarm settings,
and configuration options.
55
20070830_WFR-20_381R101-A_GB.p65 2007/9/6, ¤U¤È 05:1858
Page 27

Headphone socket
A 3.5mm Headphone Socket located on the rear of your radio is
provided for use with headphones. Inserting a plug automatically
mutes the internal loudspeaker.
IMPORT ANT:
Excessive sound pressure from earphones and
headphones can cause hearing loss.
Line out socket (3.5mm Jack)
A 3.5mm Line Out socket located on the rear of your radio is provided
for connecting the audio signal to a n extern al ampli.er. Inserting an
audio cable into this socket will not mute the internal loudspeaker.
Set the volume control on the radio to minimum if desired.
20070830_WFR-20_381R101-A_GB.p65 2007/9/6, ¤U¤È 05:1859
GB
56
Page 28

Specifications
Power Requirements
Mains
Battery (Remote control)
Connectivity
Wired Ethernet
Wi-Fi
AC 230 volts, 50 Hz, or AC 110 volts, 60 Hz
CR2032 only
10/100M bits/sec via RJ-45
802.1 1b a nd 802.11g supported WEP and
WPA encryption supported
Circuit feature s
Loudspeaker
Output Power
Headphone socket
Auxiliary In socket
Line Out socket
2 x 75 mm
5 Watts RMS per channel
3.5mm dia
3.5mm dia
3.5mm dia
If at any time in the future you should need to dispose of this product please note that: Waste electrical products should not
be disposed of with household waste. Please recycle where facilities exist. Check with your Local Authority or retailer for
recycling advice. (Waste Electrical and Electronic Equipment Directive)
57
20070830_WFR-20_381R101-A_GB.p65 2007/9/6, ¤U¤È 05:1860
Aerial System
External Wi-Fi Antenna
Page 29

Notice : The changes or modifications not expressly approved by the party responsible for compliance could void the
user’s authority to operate the equipment.
IMPORTANT NOTE: To comply with the FCC RF exposure compliance requirements, no change to the antenna or the
device is permitted. Any change to the antenna or the device could result in the device exceeding the RF exposure
requirements and void user’s authority to operate the device.The antenna used for this transmitter must be installed to
provide a separation distance of at least 20cm from all persons and must not be co-located or operating in conjunction with
any other antenna or transmitter.
FCC INFORMATION
•The Federal Communication Commission Radio Frequency Interference. Statement includes the following paragraph:
•The equipment has been tested and found to comply with the limits for a Class
B Digital Device, pursuant to part 15 of the FCC Rules. These limits are designed
to provide reasonable protection against harmful interference in a residential
installation. This equipment generates, uses and can radiate radio frequency
energy and, if not installed and used in accordance with the instruction, may cause
harmful interference to radio communication. However, there is no grantee that
interference will not occur in a particular installation. If this equipment dose cause
harmful interference to radio or television reception, which can be determined by
turning the equipment off and on , the user is encouraged to try to correct the
interference by one or more of the following measures:
--Reorient or relocate the receiving antenna.
--Increase the separation between the equipment and receiver.
--Connect the equipment into an outlet on a circuit different from that to which the
receiver is connected.
--Consult the dealer or an experienced radio/TV technician for help.
The user should not modify or change this equipment without written approval
form SANGEAN ELECTRONICS INC. Modification could void authority to use this equipment.
20070830_WFR-20_381R101-A_GB.p65 2007/9/6, ¤U¤È 05:1861
58
 Loading...