


S10GC13E
Instruction Manual
Coee Machine
GB
Instruksjonsmanual
Kaetrakter
Instruktionsbok
Kaebryggare
Käyttöopas
Kahvinkeitin
Brugervejledning
Kaemaskine
Návod K Použití
Kávovar
Návod S Pokynmi
Kávovar
NO
SE
FI
DK
CZ
SK


Contents
GB
Innehållsförteckning
SE
Safety Warnings ...................................................... 5
Unpacking ............................................................... 9
Jug Use and Care ...................................................10
Product Overview ................................................. 10
Control Panel ........................................................11
Display Window .................................................... 11
First Time Use ........................................................ 12
Setting the Clock .................................................. 12
Funnel Assembly ..................................................12
Operation .............................................................. 13
Making Coee with Whole Beans ............................... 13
Making Coee with Ground Coee ........................... 16
Program Operation ..............................................18
Cleaning and Maintenance .................................. 18
Cleaning the Grinding Compartment ....................... 19
Descaling the Coee Maker ................................. 19
Hints and Tips........................................................ 20
Specications ........................................................ 20
Innhold
Sikkerhetsadvarsler ............................................... 5
Pakke opp ..............................................................21
Bruk og vedlikehold av kanne ............................. 22
Produktoversikt .................................................... 22
Kontrollpanel ........................................................ 23
Skjermvindu ..........................................................23
Førstegangsbruk .................................................. 24
Stille inn klokken .................................................. 24
Montering av trakt ...............................................24
Betjening ............................................................... 25
Lage kae med hele bønner ........................................ 25
Lage kae med malt kae ............................................. 28
Programmering .................................................... 30
Rengjøring og vedlikehold .................................. 30
Rengjøring av kaekvernen ......................................... 31
Fjerne kalk fra kaetrakteren.............................. 31
Råd og tips ............................................................ 32
Spesikasjoner ..................................................... 32
NO
Säkerhetsvarningar ................................................ 6
Packa upp .............................................................. 33
Behandling av kannan ......................................... 34
Produktöversikt .................................................... 34
Kontrollpanel ........................................................ 35
Displayfönster ......................................................35
Första användning ...............................................36
Inställning av klockan .......................................... 36
Trattmontering .....................................................36
Hantering .............................................................. 37
Brygga kae med hela bönor ...................................... 37
Brygga kae med malet kae ...................................... 40
Programhantering ................................................ 42
Rengöring och underhåll ..................................... 42
Rengöring av malningsfacket. ..................................... 43
Avkalkning av kaebryggaren ............................ 43
Tips och råd ........................................................... 44
Specikationer...................................................... 44
Sisältö
Turvallisuusvaroitukset ......................................... 6
Pakkauksesta purkaminen .................................. 45
Kannun käyttö ja kunnossapito .......................... 46
Tuotteen yleiskatsaus ..........................................46
Ohjauspaneeli ....................................................... 47
Näyttöikkuna ........................................................ 47
Ensimmäisellä käyttökerralla .............................. 48
Kellon asettaminen .............................................. 48
Suppilokokoonpano............................................. 48
Käyttö .................................................................... 49
Kahvin valmistaminen kokonaisista pavuista ........ 49
Kahvin valmistus kahvijauheesta................................ 52
Ohjelmakäyttö ...................................................... 54
Puhdistus ja kunnossapito .................................. 54
Jauhamisosaston puhdistaminen .............................. 55
Kahvinkeittimen kalkinpoisto ............................. 55
Vihjeitä ja vinkkejä ............................................... 56
Tekniset tiedot ......................................................56
FI
3

Indholdsfortegnelse
DK
Obsah
SK
Sikkerhedsadvarsler .............................................. 7
Udpakning ............................................................ 57
Brug og vedligeholdelse af kanden .................... 58
Produktoversigt .................................................... 58
Kontrolpanel ......................................................... 59
Skærm.................................................................... 59
Ved første brug ..................................................... 60
Indstilling af uret .................................................. 60
Tragtsamling .........................................................60
Betjening ............................................................... 61
Kaebrygning med hele bønner ................................ 61
Kaebrygning med malet kae .................................. 64
Brug af program ................................................... 66
Rengøring og vedligeholdelse ............................ 66
Rengøring af kaekværnen .......................................... 67
Afkalkning af kaemaskinen .............................. 67
Gode råd ................................................................ 68
Specikationer...................................................... 68
Obsah
Bezpečnostní upozornění ...................................... 7
Vybalení ................................................................ 69
Použití konvice, péče o ni .....................................70
Přehled výrobku ................................................... 70
Ovládací panel ...................................................... 71
Okénko displeje .................................................... 71
První použití .......................................................... 72
Nastavení hodin ....................................................72
Sestavení nálevky ................................................. 72
Provoz .................................................................... 73
Příprava kávy s použitím celých zrn ........................... 73
Příprava kávy z mleté kávy ............................................ 76
Programování ....................................................... 78
Čištění a údržba .................................................... 78
Čištění mlecí přihrádky ................................................... 79
Odstraňování vodního kamene z kávovaru .......79
Tipy a triky .............................................................80
Specikace ............................................................ 80
CZ
Bezpečnostné výstrahy .......................................... 8
Vybalenie .............................................................. 81
Používanie kanvice a starostlivosť ......................82
Prehľad výrobku ................................................... 82
Ovládací panel ...................................................... 83
Displej .................................................................... 83
Prvé použitie ......................................................... 84
Nastavenie hodín ..................................................84
Zostava lievika ...................................................... 84
Prevádzka ..............................................................85
Varenie kávy z celých kávových zŕn .......................... 85
Varenie kávy z mletej kávy ............................................ 88
Programovanie prevádzky ..................................90
Čistenie a údržba .................................................. 90
Čistenie priehradky s mlynčekom na kávu.............. 91
Odvápnenie kávovaru .......................................... 91
Rady a tipy ............................................................. 92
Špecikácie ........................................................... 92
4

Safety Warnings
Please follow all the safety precautions listed below
for safety and to reduce the risk of injury or electrical
shock.
• Read all the instructions carefully before using this
appliance and keep them for future reference.
• Retain the manual. If you pass the appliance on to a
third party, make sure to include this manual.
• Make sure that your outlet voltage corresponds
to the voltage stated on the rating label of the
appliance.
• Unplug the appliance from the mains socket
when not in use, or before cleaning any part of the
appliance.
• Do not operate any appliance with a damaged mains
cable or mains plug, or in an abnormal state. If the
mains cable is damaged it must be replaced by the
manufacturer, its service agent, or similarly qualied
persons in order to avoid a hazard.
• Do not use an extension cable, it may result in re,
electrical shock and/or personal injuries.
• Do not let the mains cable hang over the edge of the
table or counter, or touch hot surfaces.
• To disconnect, remove the mains plug from the
mains socket. Never pull the mains cable to remove
the mains plug from mains socket.
• Do not immerse the appliance, mains cable or mains
plug in water or other liquids.
• Be careful not to get scalded by the steam.
• Use handles or oven gloves. Accessible surfaces may
get hot.
• Do not touch the appliance whilst in use as there are
hot surfaces on this appliance.
• Never use the appliance if the jug shows any signs of
cracks. Only use the jug supplied with this appliance.
Handle the jug with caution as it is very fragile.
• Never leave an empty jug on the warming plate
otherwise the jug is liable to crack.
• Never switch your appliance on without water in it.
• Stand the appliance on a stable at surface before
use.
• This appliance is intended for household use only.
Do not use outdoors.
• This appliance is not intended for use by persons
(including children) with reduced physical, sensory
or mental capabilities, or lack of experience and
knowledge, unless they have been given supervision
or instruction concerning the use of the appliance by
a person responsible for their safety.
• Children should be supervised to ensure that they do
not play with the appliance.
GB
Sikkerhetsadvarsler
Følg alle forholdsreglene som er oppført nedenfor, for
å redusere risikoen for personskade eller elektrisk støt.
• Les alle anvisningene nøye før du tar i bruk
apparatet, og oppbevar dem for fremtidig referanse.
• Ta vare på håndboken. Hvis du gir apparatet videre
til noen andre, må du sørge for at denne håndboken
følger med.
• Kontroller at spenningen i stikkontakten tilsvarer
spenningen angitt på strømkravetiketten til
apparatet.
• Trekk støpslet ut av stikkontakten når apparatet ikke
brukes og før noen del av det rengjøres.
• Ikke bruk et apparat hvis strømledningen eller
støpslet er skadet eller i ikke virker ordentlig.
Hvis strømledningen er skadet, må den skiftes av
produsenten, av produsentens servicerepresentant
eller av en tilsvarende kvalisert person for å unngå
fare.
• Ikke bruk en skjøteledning, fordi dette kan føre til
brann, elektrisk støt og/eller personskade.
• Ikke la strømledningen henge over kanten av bordet
eller benken eller komme nær varme overater.
• Trekk støpslet ut av stikkontakten for å koble fra. Du
må ikke holde i ledningen når du trekker støpslet ut
av stikkontakten.
• Apparatet, strømledningen eller støpslet må ikke
dyppes i vann eller andre væsker.
• Vær forsiktig for å unngå å bli skåldet av dampen.
• Bruk håndtak eller grytekluter. Tilgjengelige
overater kan bli varme.
• Ikke ta på apparatet mens det er i bruk – dette
apparatet har varme overater.
• Apparatet må ikke brukes hvis kannen viser tegn til
sprekker. Bruk bare kannen som leveres med dette
apparatet. Kannen må håndteres med forsiktighet,
fordi den er meget skjør.
• Ikke la en tom kanne stå på varmeplaten; dette kan
få kannen til å sprekke.
• Du må aldri slå på apparatet når det er tomt for vann.
• Sett apparatet på en at og stabil overate før bruk.
• Dette apparatet er kun beregnet på
husholdningsbruk. Må ikke brukes utendørs.
• Dette apparatet er ikke beregnet for bruk av
personer (inkludert barn) med reduserte fysiske-,
sensoriske- eller mentale evner, eller mangel på
erfaring og kunnskap, med mindre de er under tilsyn
eller har mottatt anvisning om bruk av apparatet
av en person som er ansvarlig for vedkommendes
sikkerhet.
• Barn må ha tilsyn for å sikre at de ikke leker med
apparatet.
NO
5

Säkerhetsvarningar
Var vänligt följ de säkerhetsföreskrifter som uppges
nedan för din säkerhet och för att minska risken för
elstötar.
• Läs alla instruktioner noggrant innan du använder
denna produkt och spara dem för framtida referens.
• Behåll manualen. Om du överlåter produkten till en
tredje part, se till att inkludera den här manualen.
• Se till att spänningen i uttaget korresponderar med
den volt som uppges på produktmärkningen.
• Se till att ha kaebryggaren urkopplad från
vägguttaget när den inte är i bruk eller vid rengöring.
• Använd inte produkten om strömkabeln eller
stickkontakten är skadade eller benner sig i ett
onormalt tillstånd. Om strömkabeln är skadad måste
den bytas ut av tillverkaren, dess ombud eller av
kvalicerade personer för att undvika fara.
• Använd dig inte av en förlängningssladd, det kan
resultera i brand, elstötar eller personskador.
• Låt inte strömkabeln hänga fritt över kanten på ett
bord eller en köksbänk eller komma i kontakt med
varma ytor.
• Dra ut stickkontakten från väggutaget för att koppla
ifrån apparaten. Dra aldrig i själva sladden för att
frigöra stickkontakten från vägguttaget.
• Se till att apparaten, strömkabeln eller stickkontakten
inte kommer i kontakt med vatten.
• Se till att inte bli bränd av ångan.
• Använd handtagen eller ugnsvantar. Åtkomliga ytor
kan bli varma.
• Rör inte bryggaren medan den är i bruk, då vissa ytor
kan vara heta.
• Använd aldrig bryggaren om du nner sprickor på
kannan. Använd enbart den kanna som levererats
med denna produkt. Hantera kannan varsamt, den
är väldigt skör.
• Lämna aldrig en tom kanna på värmeplattan då den
lätt kan spricka.
• Sätt aldrig på bryggaren utan att först ha hällt i
vatten.
• Se till att bryggaren står på en plan och stabil yta
innan användning.
• Bryggaren är enbart till för att användas inomhus.
Använd den inte utomhus.
• Bryggaren är inte avsedd för personer (inklusive
barn) med reducerade fysiska, sensoriska eller
mentala förmågor, ej heller av personer som saknar
erfarenhet och kunskap, såvida inte de är under
översyn eller har givits instruktioner för bruk av
bryggaren av en person som ansvarar för deras
säkerhet.
• Föräldrar bör se till att barn inte leker med
bryggaren.
SE
Turvallisuusvaroitukset
Noudata kaikkia alla lueteltuja turvallisuusvarotoimia
turvallisuuden vuoksi ja vahingoittumisen tai
sähköiskun vaaran pienentämiseksi.
• Lue huolellisesti kaikki ohjeet ennen tämän laitteen
käyttöä ja pidä ne tallessa tulevaa käyttöä varten.
• Säilytä käyttöopas. Jos luovutat laitteen kolmannelle
osapuolelle, varmista, että tämä käyttöopas seuraa
mukana.
• Varmista, että käyttämäsi sähköjännite vastaa
laitteen arvokilvessä ilmoitettua jännitettä.
• Irrota laite verkkovirrasta aina, kun sitä ei käytetä tai
ennen laitteen minkään osan puhdistusta.
• Älä käytä laitetta, jonka virtajohto tai pistoke on
vahingoittunut tai muuten epänormaalissa tilassa.
Jos verkkokaapeli on vaurioitunut, valmistajan tai
huoltoedustajan tai vastaavasti pätevien henkilöiden
täytyy se vaihtaa vaaran välttämiseksi.
• Älä käytä jatkokaapelia, seurauksen voi olla tulipalo,
sähköisku ja/tai henkilövahinkoja.
• Älä anna virtakaapelin roikkua pöydän tai tason
reunan yli tai koskettaa kuumia pintoja.
• Irrota laite verkkovirrasta irrottamalla pistoke
seinäpistorasiasta. Älä koskaan irrota pistoketta
pistorasiasta kaapelista vetämällä.
• Älä upota laitetta, virtajohtoa tai pistoketta veteen
tai muuhun nesteeseen.
• Varo, ettei höyry aiheuta palovammoja.
• Käytä käsineitä tai uunikintaita. Kosketeltavat pinnat
voivat kuumentua.
• Älä kosketa laitetta, kun se on käytössä, sillä
laitteessa on kuumia pintoja.
• Älä koskaan käytä laitetta, jos kannussa on
halkeilemisen merkkejä. Käytä vain tämän laitteen
toimitukseen kuuluvaa kannua. Käsittele kannua
varovasti, sillä se on helposti särkyvä.
• Älä koskaan jätä tyhjää kannua lämmityslevylle, sillä
se lisää halkeamisen todennäköisyyttä.
• Älä koskaan kytke laitetta päälle ilman vettä.
• Aseta laite ennen käyttöä vakaalle, tasaiselle
alustalle.
• Tämä laite on tarkoitettu vain kotitalouskäyttöön. Älä
käytä laitetta ulkona.
• Tätä laitetta ei ole tarkoitettu (lapset mukaan
lukien) sellaisten henkilöiden käyttöön, joilla on
vähentyneet fyysiset, aistimelliset tai henkiset
kyvyt, tai joilla ei ole kokemusta tai tietoutta laitteen
käytöstä, jollei heidän turvallisuudestaan vastaava
henkilö valvo heitä ja anna ohjeita laitteen käytöstä.
• Lapsia on valvottava, jotta varmistetaan, etteivät he
leiki laitteella.
FI
6

Sikkerhedsadvarsler
For at nedsætte risikoen for personskade og
elektrisk stød skal du følge alle nedenstående
sikkerhedsforholdsregler.
• Læs alle instruktionerne, inden du bruger kedlen, og
gem dem til senere brug.
• Gem brugervejledningen. Hvis du giver kedlen
videre til tredjemand, skal du huske at give
brugsvejledningen med.
• Sørg for, at spændingen i stikkontakten svarer til
spændingen, der er angivet på apparatets typeskilt.
• Fjern kedlen fra stikkontakten, når den ikke bruges,
og inden den rengøres.
• Brug ikke apparater med beskadiget el-ledning
eller stik, eller som er i en unormal tilstand. Hvis
el-ledningen er blevet beskadiget, skal den, for
at undgå fare, udskiftes af fabrikanten, hans
serviceagent eller lignende kvaliceret person.
• Undgå, at bruge en forlængerledning, da dette
kan resultere i brand, elektrisk stød og/eller
personskader.
• Undgå, at ledningen hænger ud over bordkanten
og undgå at den kommer i kontakte med varme
overader.
• Træk ledningen ud af stikkontakten for at afbryde.
Undgå, at trække i selve ledningen, når du skal tage
den ud af stikkontakten.
• Du må aldrig dyppe apparatet, ledningen eller
stikket i vand eller andre væsker.
• Vær forsigtig med ikke at skolde dig selv på dampen.
• Brug håndtag eller ovnhandsker. Tilgængelige
overfalder kan biive meget varme.
• Undgå, at røre ved apparatet mens det er i brug, da
der er varme overader på det.
• Du må aldrig bruge apparatet, hvis du kan se revner
på kanden. Brug kun kanden, som følger med
apparatet. Vær forsigtig med kanden, da den er
meget skrøbelig.
• Du må aldrig efterlade en tom kande på en varm
plade, ellers kan den revne.
• Du må aldrig tænde for apparatet, hvis der ikke er
vand i det.
• Stil apparatet på en stabil og plan overade før brug.
• Dette apparat er kun beregnet til husholdningsbrug.
Apparatet må ikke bruges udendørs.
• Dette apparat er ikke beregnet til brug af
personer (herunder børn) med nedsatte fysiske,
følelsesmæssig eller mentale evner eller manglende
erfaringer eller viden, med mindre de er under opsyn
eller er blevet vejledt i brugen af dette apparat af en
person ansvarlig for deres sikkerhed.
• Børn skal være under opsyn for, at sikre at de ikke
leger med apparatet.
DK
Bezpečnostní upozornění
Dodržujte veškeré bezpečnostní zásady uvedené
níže, aby se omezilo nebezpečí zranění nebo úrazu
elektrickým proudem.
• Před používáním tohoto spotřebiče si přečtěte
veškeré pokyny a uschovejte je pro budoucí použití.
• Uschovejte tento návod. Předáváte-li spotřebič třetí
straně, nezapomeňte předat také tento návod.
• Zkontrolujte, zda napětí uvedené na typovém štítku
odpovídá napětí ve vaší elektrické zásuvce.
• Pokud spotřebič nepoužíváte nebo před čištěním
některé jeho části odpojte spotřebič od elektrické
zásuvky.
• Nepoužívejte troubu, pokud má poškozený napájecí
kabel nebo je v jakkoli nenormálním stavu. Dojde-li
k poškození napájecího kabelu, musí výměnu
provést výrobce, autorizovaný servis nebo osoba s
odpovídající kvalikací, aby se zabránilo ohrožení.
• Nepoužívejte žádný prodlužovací kabel – mohl by
způsobit požár, úraz elektrickým proudem a/nebo
zranění osob.
• Nenechávejte viset napájecí kabel přes stolu nebo
linky a zabraňte, aby se dotýkal horkých povrchů.
• K úplnému odpojení od napájení vytáhněte
koncovku napájecího kabelu ze zásuvky. Při
odpojování zástrčky napájecího kabelu z elektrické
zásuvky nikdy netahejte za kabel.
• Neponořujte přístroj, napájecí kabel nebo zástrčku
do vody nebo jiných tekutin.
• Postupujte opatrně, abyste zabránili opaření.
• Používejte rukojeti nebo kuchyňské rukavice.
Přístupné povrchy se mohou silně zahřívat.
• Nedotýkejte se přístroje během provozu, protože
některé jeho povrchové části se silně zahřívají.
• Pokud džbánek vykazuje stopy prasknutí, nikdy
přístroj nepoužívejte. Používejte pouze džbánek
dodaný s tímto přístrojem. Se džbánkem manipulujte
opatrně, protože je velmi křehký.
• Nikdy nenechávejte prázdný džbánek na ohřevné
desce, protože by mohl prasknout.
• Nikdy nezapínejte přístroj bez vody.
• Před používáním umístěte přístroj na stabilní a rovné
místo.
• Tento přístroj je určen pouze pro domácí použití.
Přístroj není určen pro venkovní používání.
• Přístroj není určen pro používání osobami (včetně
dětí) se sníženými fyzickými, senzorickými nebo
duševními schopnostmi, nedostatkem zkušeností
nebo znalostí, pokud nejsou při použití spotřebiče
pod dozorem nebo vedením osoby odpovědné za
jejich bezpečnost.
• Dohlédněte, aby si děti s přístrojem nehrály.
CZ
7

Bezpečnostné výstrahy
Dodržiavajte bezpečnostné pokyny uvedené nižšie.
Zníži sa tým riziko zranenia alebo úrazu elektrickým
prúdom.
• Dôkladne si prečítajte všetky pokyny pred tým, ako
začnete používať tento spotrebič auschovajte ich,
aby ste si ich mohli pozrieť neskôr.
• Uschovajte návod na použitie. Ak dáte spotrebič
tretej osobe, nezabudnite jej odovzdať aj tento
návod.
• Uistite sa, či sa napätie vo vašej elektrickej sieti
zhoduje s napätím, ktoré je uvedené na údajovom
štítku tohto spotrebiča.
• Spotrebič odpojte od siete elektrického napájania,
keď ho nepoužívate, alebo pred každým čistením
akejkoľvek jeho časti.
• Žiadny spotrebič nepoužívajte, keď má
poškodený napájací kábel, zástrčku alebo keď sú v
abnormálnom stave. Ak je napájací kábel poškodený,
musí ho vymeniť výrobca, jeho servisný zástupca
alebo podobná kvalikovaná osoba, aby sa zabránilo
nebezpečenstvu.
• Nepoužívajte predlžovací kábel, môže dôjsť k
požiaru, úrazu elektrickým prúdom a/alebo k
zraneniu osôb.
• Napájací kábel nesmie visieť cez okraj stola alebo
pracovnú plochu alebo sa dotýkať horúcich
povrchov.
• Pri odpájaní vytiahnite zástrčku z elektrickej zásuvky.
Ak chcete zástrčku napájacieho kábla odpojiť od
elektrickej zásuvky, nikdy neťhajte napájací kábel.
• Spotrebič, napájací kábel alebo zástrčku nikdy
neponárajte do vody alebo inej kvapaliny.
• Dávajte pozor, aby nedošlo k obareniu parou.
• Používajte rukoväte alebo chňapky. Prístupné
povrchy môžu byť horúce.
• Nedotýkajte sa spotrebiča, pokiaľ je v prevádzke,
pretože sú na ňom horúce povrchy.
• Tento spotrebič nikdy nepoužívajte, ak kanvica
vykazuje akékoľvek známky prasklín. Používajte iba
kanvicu dodanú s týmto spotrebičom. S kanvicou
zaobchádzajte opatrne, pretože je veľmi krehká.
• Prázdnu kanvicu nikdy nenechávajte na ohrievacej
doske, v opačnom prípade môže kanvica prasknúť.
• Spotrebič nikdy nezapínajte bez toho, aby bola v
ňom voda.
• Spotrebič postavte počas používania na stabilný a
rovný povrch.
• Tento spotrebič je určený len na použitie
vdomácnosti. Spotrebič nepoužívajte vonku.
• Tento spotrebič nie je určený na používanie osobami
(vrátane detí) so zníženými fyzickými, zmyslovými
alebo mentálnymi schopnosťami, alebo osobami
s nedostatočnými skúsenosťami a znalosťami, a to
dokiaľ nepracujú pod dozorom alebo na základe
pokynov o používaní spotrebiča vydaných od osoby
zodpovednej za ich bezpečnosť.
• Vprípade detí je treba dohliadať na to, aby sa so
zariadením nehrali.
SK
8

Unpacking
Thank you for purchasing your new Sandstrøm Coee Machine.
We recommend that you spend some time reading this instruction manual in order
to fully understand all the operational features it oers.
Read all the safety instructions carefully before use and keep this instruction
manual for future reference.
Remove all packaging from the unit. Retain the packaging. If you dispose of it please do so
according to local regulations.
The following items are included:
2-10
Start/Stop
GB
The Main Unit
Filter
Jug Funnel
Coee Bean
Measuring Spoon
Compartment Lid
Brush and Grinding
Compartment Key
Instruction Manual
9

GB
Start/Stop
2-10
Jug Use and Care
The jug may break if the following instructions are not followed:
1. Do not set a hot jug on a wet or cold surface.
2. Do not use a cracked jug or a jug with a loose or weakened handle.
3. Do not clean the jug with cleaners, steel wool pads or other abrasive materials.
4. Discard the jug immediately if it has boiled dry.
5. Avoid sharp blows, scratches or rough handling.
To reduce the risk of re or electrical shock, do not remove any service covers. There are no user
serviceable parts inside. Repairs should be done by qualied personnel only.
Product Overview
1
7
10
8
6
4
2
3
4
8
9
10
11
12
13
2
14
15
5
6
1. Filter
2. Funnel
3. Ground Coee Fineness Dial
4. Control Panel
5. Funnel Holder
6. Warming Plate
7. Coee Bean Container Lid
8. Coee Bean Container
10
16
9. Water Tank Cover
10. Grinding Compartment
11. Steam Vent
12. Open Button
13. Water Level Indicator
14. Overow
15. Mains Cable
16. Jug

Control Panel
GB
2 - 10
1 62 73 4 5
1. Strength Button
2.
Cups Button
3. Hour Button
4. Program Button
Display Window
1
Start/Stop
5. Min Button
6.
7. Start/Stop Button
Pre-Ground Button
FILTER
2
3
4
5
1. Keep Warm Indicator
2. Cups Indicator
3. Clock Display
4. Filter indicator - ashes to remind
you to clean the lter
6
5. Grinding Compartment Cleaning
Indicator
6. Coee Strength Indicator
11
GB
First Time Use
1. Fill the water tank with clean water up to the maximum level (MAX 10). Do not over ll
the water tank. If you over ll the water tank, water will ow out of the overow on the
back of the unit.
2. Plug the unit in and switch on at the mains. Follow the steps in the section
“Operation - Making Coee with Ground Coee” (without adding ground coee)
once or twice, then discard the hot water.
3. Clean the jug, coee compartment lid and lter thoroughly with warm water. You may
now use your coee maker.
4. Wipe the appliance’s exterior surface with a soft, damp cloth. Do not use strong
detergents or aggressive cleaners.
Setting the Clock
1. Plug the mains cable into the mains socket, the display window will light up blue and
“12:00” will ash in the display. The clock has a 24 hour display.
2. Press the Hour or Min buttons repeatedly or hold down to adjust the hour or minute
digits. The time is now set and will no longer ash in the display.
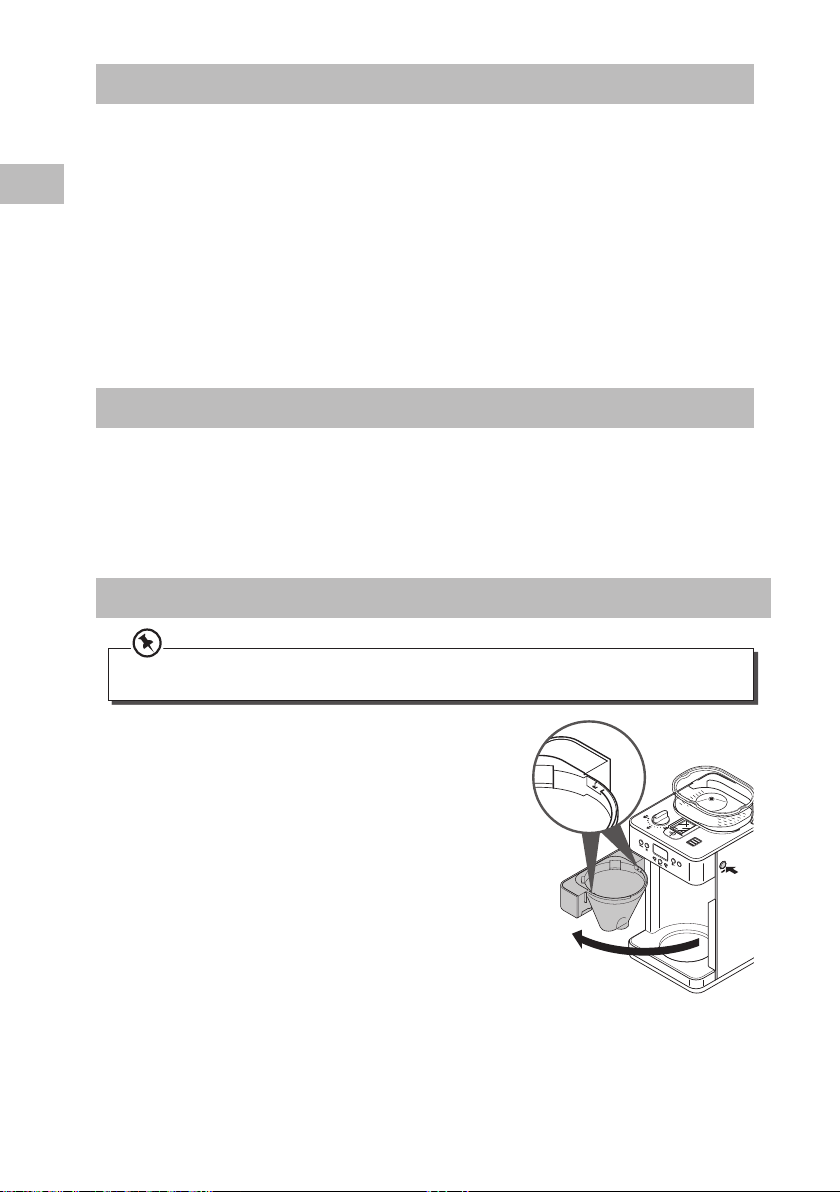
Funnel Assembly
• Water will spill out of the funnel if the funnel is not locked rmly and properly.
• The funnel should not move when locked properly.
1. Press the Open button to open the funnel
door. Locate the slot on both sides of the
coee maker.
12
2-10
Star
t/Stop

2. Locate the tabs and position the funnel as
Star
t/Stop
Start/Stop
shown. Lower the funnel into the coee maker
with the handle upright.
3. Lower the handle. The lter then ts inside the
funnel.
Operation
Making Coee with Whole Beans
1. Open the water tank cover and ll with the correct
amount of cold water. The water level should be
between minimum level “2” and maximum level
“MAX 10”. Close the water tank cover.
2-10
GB
2-10
Fill the water tank with the exact amount of water
you need. For example if you want to make 4 cups
of coee only add 4 cups of water in the tank. The
coee maker will keep making coee until is runs out
of water.
2. Lift the coee bean container lid, ll the container
completely with beans. Be sure that you have a
sucient amount of beans in your container for
the amount of coee you intend to brew. Firmly
close the lid.
Do not put any water in the coee grinding container.
If water gets into the grinder motor, the motor may
be damaged and malfunction.
2-10
13

3. Turn the Ground Coee Fineness dial to set the
required neness of the ground coee.
GB
4. Press the Open button to open the funnel door.
Place the lter in the funnel and then place
the funnel in the funnel holder, make sure it is
assembled correctly, see the section “Funnel
Assembly” for details. Close the lter door until it
clicks into place.
5. Place the jug on the warming plate horizontally.
Coarse Fine
2-10
Start/Stop
2-10
Start/Stop
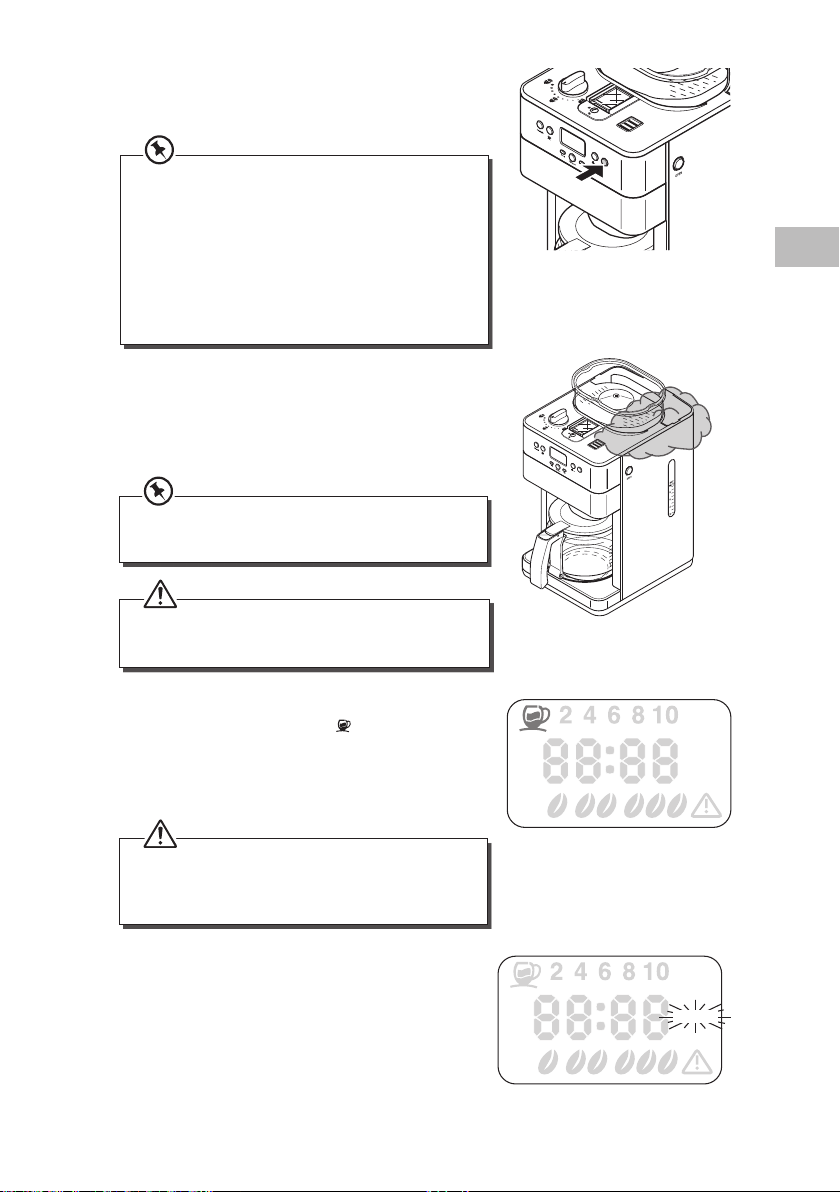
6. Press the Cups button repeatedly to select the
required coee quantity 2, 4, 6, 8 or 10 cups. The
coee quantity indicator will light up.
7. Press the Strength button repeatedly to set the
required coee strength, mild, medium or strong.
The coee strength indicator will light up.
14
mild
medium
FILTER
strong

8. Press the Start/Stop button to start the coee
maker the indicator will light up. The grinder will
start and the coee maker will start brewing coee.
• The grinder should automatically switch on, if not
you may have the Pre-Ground button selected,
switch this o.
• Press the Start/Stop button again to interrupt the
process. The indicator light will go out.
• You can remove the jug, pour and serve at any time
once the coee is made. The coee maker will stop
dripping automatically. The jug must be replaced within
15 seconds as the water will accumulate in the funnel
which may overow if the jug is not replaced shortly.
• Do not open the water tank cover while the coee
maker is brewing.
9. When the brewing cycle is complete, the unit
will beep 5 times. You can remove the jug when
brewing is nished (about one minute after the
coee stops dripping into the jug). The steam will
come out from the steam vent.
The amount of coee you get will be less than the water
you have put in the tank, as some water is absorbed by
the ground coee.
• Never block the steam vent.
• The steam coming out from the coee maker is very
hot. Do not touch the vent.
2
10
Star
t/Stop
GB
2-10
Start/Stop
10. The coee maker will keep your coee hot for 2
hours. The
Keep Warm indicator will blink, then
automatically go out. Press the Start/Stop button
to stop the grinding and brewing function. Always
turn the coee maker o when it is not in use.
• Keep the lid of the jug closed when pouring.
• The brewed coee in the jug and the grounds in the
lter are very hot. Handle with care to avoid scalding.
11. Don’t forget to empty the ground coee beans
out of the lter. The word FILTER will ash in the
display to remind you.
FILTER
FILTER
15

GB
Making Coee with Ground Coee
1. Open the water tank cover of the coee maker
and ll with the correct amount of water. The
water level should be between minimum level “2”
and maximum level “MAX 10”.
2. Press the Open button to open the funnel door.
Place the ground coee in the lter.
Place both the lter and ground coee in the
funnel and then place the funnel in the funnel
holder. Make sure it is assembled correctly, see the
section “Funnel Assembly”for details. Close the
lter door until it clicks into place.
3. Place the jug on the warming plate horizontally.
2-10
Start/Stop
4. Press the Pre-Ground button to switch to
pre-ground coee mode. The Pre-Ground
indicator will light up blue.
16
2-10
Start/Stop
2-10
Start/Stop

5. Press the Start/Stop button to start the coee
maker the indicator will light up. The coee maker
will start to brew the coee.
• Press the Start/Stop button again to interrupt the
process. The indicator light will go out.
• You can remove the jug, pour and serve at any time
once the coee is made. The coee maker will stop
dripping automatically. The jug must be replaced
within 15 seconds as the water will accumulate in the
funnel which may overow if the jug is not replaced
shortly.
• Do not open the water tank cover while the coee
maker is brewing.
6. When the brewing cycle is complete, the unit
will beep 5 times. You can remove the jug when
brewing is nished (about one minute after the
coee stops dripping into the jug). The steam will
come out from the steam vent.
The amount of coee you get will be less than the water
you have put in the tank, as some water is absorbed by
the ground coee.
• Never block the steam vent.
• The steam coming out from the coee maker is very
hot. Do not touch the steam vent.
2
10
Star
t/Stop
GB
2-10
Start/Stop
7. The coee maker will keep your coee hot for 2
hours. The Keep Warm indicator will blink, then
automatically go out. Press the Start/Stop button
to stop the Keep Warm function. Always turn the
coee maker o at the mains when it is not in use.
• Keep the lid of the jug closed when pouring.
• The brewed coee in the jug and the grounds in the
lter are very hot. Handle with care to avoid scalding.
8. Don’t forget to empty the ground coee beans
out of the lter. The word FILTER will ash in the
display to remind you.
FILTER
FILTER
17

GB
Program Operation
You can programme your coee maker to switch on at a set time using the Program
operation. For example if you want to wake up and have your coee ready you can set the
coee maker to switch on at 7:30 am or any other time.
Ensure the clock has been set to the correct time. Remember it’s a 24 hour clock. Please refer to the
section “Setting the Clock” for details.
1. Press and hold the Program button until the programme indicator ashes.
2. Select the time you want coee to start brewing by using the Hour button, then the
Minute button, following the same instructions for setting the clock.
3. If you want to make coee with whole beans, set the coee bean quantity and
strength. Please refer to the section “Operation - Making Coee with Whole Beans”
steps 6-7.
OR
If you want to make coee with ground coee, press the
switch to pre-ground coee mode.
4. Press the Program button to conrm the setting. The programme indicator will light
up solidly.
5. After setting the Program start time, prepare coee following the section “Operation”
steps 1 to 5.
6. The coee maker will automatically begin brewing at the preset time.
7. To reset the Program time for the same preset time for the next day, simply press the
Program button.
Pre-Ground button to
Cleaning and Maintenance
Be sure to unplug and allow this appliance to cool down before cleaning. To protect against electrical
shock, do not immerse the mains cable, mains plug or the appliance in water or liquids. After each use,
always make sure the mains plug is removed from the mains socket.
1. Clean the lter, jug and jug lid after each use in hot, soapy water. They are NOT
dishwasher proof.
2. Wipe the appliance’s exterior surface with a soft, damp cloth to remove stains. Do not
use strong detergents or aggressive cleaners.
3. Water droplets may build up in the area above the lter and drip onto the product
base during brewing. To control the dripping, wipe o the area with a clean, dry cloth
after use.
4. Use a damp cloth to gently wipe the warming plate. Never use abrasive cleaners to
clean it.
18

Cleaning the Grinding Compartment
When grinding coee beans, coee powder can clog the grinding mechanism. The grinding
compartment must be cleaned when the Grinding Compartment Cleaning indicator
is shown on the display. The grinding compartment should be cleaned regularly to prevent
the grinding mechanism from being clogged.
Be sure to unplug the appliance before cleaning. Remove the jug from the warming plate. Place the lter
and funnel in the funnel support and close the funnel door.
1. Use the grinding compartment key to unlock the
grinding compartment.
2. Open the grinding compartment cover.
3. Use the brush to clean the grinding compartment.
4. Close the grinding compartment cover, then
use the grinding compartment key to lock the
grinding compartment .
Descaling the Coffee Maker
GB
Depending on the hardness of the water in your area, limescale may be deposited inside
the coee maker. The coee maker may need descaling from time to time.
1. Open the water tank cover and ll with descaling solution (following the
manufacturers instructions) and water to the maximum level “MAX 10”.
2. Place the jug on the warming plate.
3. Make sure NO coee is in the coee maker. Press the Start/Stop button, let the coee
maker run until 1/3 of the descaling solution is in the jug.
4. Press the Start/Stop button to stop the unit. Let the descaling solution work for
approximately 30 minutes.
5. Press the Start/Stop button again and let the unit run until the remaining descaling
solution is in the jug.
6. Pour fresh water into the water tank to the maximum level “MAX 10” (do not place
any coee in the appliance). Repeat steps 3-6 in the section “Operation - Making
Coee with Ground Coee”. Repeat this process 3-4 times (or refer to the descaler
manufacturers instruction) with fresh water each time to ensure that the descaling
liquid has been thoroughly rinsed through. Clean the lter, funnel, jug and jug lip with
hot soapy water.
19

GB
Hints and Tips
Question Answer
Why doesn’t the Start/Stop
button light up?
Why doesn’t the coee brew? The funnel is not properly inserted, or there is a power
Why does the coee maker
only brew water?
Why does the coee taste bad? Maybe you did not use the coee grind recommended
Why do grounds appear in the
coee?
None of the buttons are
working?
Why does the grinder not
work?
Check that you have plugged your coee maker into the
mains socket.
outage, or the water tank is empty.
There is no coee in the lter, check that you have
added the desired amount of coee.
for automatic drip coee makers. The ground coee-towater ratio was unbalanced. The coee maker needs to
be cleaned.
The lter is not properly seated in the funnel or the lter
has collapsed.
You may be in program mode. To switch this mode o
switch the coee maker o and back on again.
You have selected Pre-Ground coee mode, switch this
o.
Specifications
Model S10GC13E
Voltage Rating 240V
Power Consumption Grinding: 120W
Brewing: 1.07KW
Standby: 0.59W
Features and specications are subject to change without prior notice.
20

Pakke opp
Takk for at du kjøpte den nye Sandstrøm-kaetrakteren.
Vi anbefaler at du tar deg tid til å lese gjennom hele bruksanvisningen for å bli
fortrolig med alle funksjonene.
Les alle sikkerhetsanvisningene nøye før bruk og oppbevar bruksanvisningen for
fremtidig referanse.
Fjern all emballasje fra enheten. Ta vare på emballasjen. Ta hensyn til lokale forskrifter om
avfallshåndtering hvis du må kaste den.
Følgende elementer er vedlagt:
2-10
Start/Stop
NO
Hovedenheten
Filter
Kanne Trakt
Lokk til
Måleskje
kaebønnerommet
Børste og nøkkel til
kaekvern
Instruksjonsmanual
21

NO
Start/Stop
2-10
Bruk og vedlikehold av kanne
Kannen kan knuses dersom de følgende anvisningene ikke følges:
1. Ikke sett en varm kanne på en våt eller kald overate.
2. Ikke bruk en kanne med sprukket glass eller et håndtak som er løst eller svakt.
3. Ikke rengjør kannen med sterke rengjøringsmidler, stålull eller andre skurende
materialer.
4. Kast kannen umiddelbart hvis den har tørrkokt.
5. Unngå harde slag, riper og hardhendt behandling.
For å redusere risikoen for brann og elektrisk støt må ingen servicedeksler ernes. Det er ingen innvendige
deler som kan vedlikeholdes av brukeren. Reparasjoner må kun utføres av kvalisert personell.
Produktoversikt
1
7
10
8
6
4
2
3
4
8
9
10
11
12
13
2
14
15
5
6
1. Filter
2. Trakt
3. Hjul for å velge nhet av kvernet kae
4. Kontrollpanel
5. Traktholder
6. Varmeplate
7. Lokk til kaebønnerommet
8. Kaebønnerommet
22
16
9. Deksel til vanntank
10. Kaekvern
11. Dampventilator
12. Åpne-knapp
13. Utvendig indikator for vannivå
14. Overløp
15. Strømledning
16. Kanne

Kontrollpanel
1 62 73 4 5
1. Styrke-knapp
2.
Kopper-knapp
3. Time-knapp
4. Program-knapp
Skjermvindu
1
2 - 10
Start/Stop
5. Min-knapp
6.
7. Start/stopp-knapp
Ferdigmalt-knapp
FILTER
NO
2
3
4
5
1. Hold-varm-lampe
2. Kopper-indikator
3. Klokke
4. Filterindikator – blinker for å minne
deg på å rengjøre lteret
6
5. Rengjøringsindikator for
kaekvern
6. Indikator for kaestyrke
23

NO
Førstegangsbruk
1. Fyll vanntanken med rent vann opp til maksimumsnivået (MAX 10). Ikke fyll for mye
vann i tanken. Hvis vanntanken blir for full, vil vann strømme ut av overyten på
baksiden av enheten.
2. Koble enheten til, og slå på på strømmen. Følg trinnene i «Betjening – lage kae med
malt kae» (uten å tilføre malt kae) én eller to ganger, og hell deretter ut det varme
vannet.
3. Rengjør kannen, lokket til kaebønnerommet, og ltrer grundig med varmt vann.
Kaetrakteren er nå klar til bruk.
4. Tørk apparatet utvendig med en myk, fuktig klut. Ikke bruk sterke vaskemidler eller
aggressive rengjøringsmidler.
Stille inn klokken
1. Plugg strømkabelen inn i stikkontakten. SKjermen vil vise lyse blått og «12:00» blinker
på skjermen. Klokken har en 24-timers-visning.
2. Trykk på Time eller Min gjentatte ganger eller hold nede for å justere time eller minutt.
Klokken er nå satt, og vil ikke lenger blinke på skjermen.
Montering av trakt
• Vannet søles utenfor trakten hvis den ikke er satt ordentlig fast.
• Trakten skal ikke kunne beveges når den sitter ordentlig fast.
1. Trykk på Åpne -knappen for å åpne
diskluken. Finn sporene på hver sin side av
kaetrakteren.
24
2-10
Start/Stop

2. Finn tappene, og monter trakten som vist.
Start/Stop
Start/Stop
Senk trakten ned i kaetrakteren med
håndtaket vendt oppover.
3. Legg ned håndtaket. Filteret passer deretter
inne i trakten.
Betjening
Lage kae med hele bønner
1. Åpne dekselet til vanntanken , og fyll på med
riktig mengde kaldt vann. Vannstanden skal være
mellom minimumsnivå «2» og maksimalt nivå
«MAX 10». Lukk dekslet til vanntanken.
2-10
NO
2-10
Fyll vannbeholderen med den nøyaktige mengden
vann du trenger. Hvis du for eksempel ønsker å lage
re kopper kae, legger du bare re kopper vann i
tanken. Kaetrakteren vil fortsette å lage kae til den
går tom for vann.
2. Løft lokket til kaebønnerommet, og fyll
beholderen helt med bønner. Vær sikker på at du
har en tilstrekkelig mengde bønner i beholderen
din for mengden kae du har tenkt å lage. Lukk
lokket godt.
Ikke legg vann i kaekvernen. Hvis det kommer vann
inn i kvernemotoren, kan motoren bli skadet og
svikte.
2-10
25

3. Vri hjulet for nhet av kvernet kae for å stille
nheten til den malte kaen.
Grov Fin
NO
4. Trykk på Åpne-knappen for å åpne traktdøren.
Plasser lteret i trakten, og plasser trakten i
traktbeholderen. Sørg for at den er riktig montert;
se avsnittet «Montering av trakt» for detaljer.
Lukk lterdøren til den klikker på plass.
5. Sett kannen horisontalt på varmeplaten.
2-10
Start/Stop
2-10
Start/Stop
6. Trykk på kopper-knappen gjentatte ganger
for å velge ønsket kaemengde: 2, 4, 6, 8 eller 10
kopper. Kaemengdeindikatoren vil lyse opp.
7. Trykk Styrke gjentatte ganger for å stille inn
ønsket kaestyrke: mild, medium eller sterk.
Indikator for kaestyrke lyser opp.
26
mild
medium
FILTER
sterk

8. Trykk på Start/Stopp-knappen for å starte
kaetrakteren. Indikatoren lyser opp. Kaekvernen
starter, og kaetrakteren vil begynner å trakte kae.
• Kvernen vil automatisk slås på. Hvis dette ikke er
tilfelle, kan du ha valgt Ferdigmalt-knappen. Du må
slå denne av.
• Trykk på Start/Stopp-knappen igjen for å avbryte
prosessen. Indikatorlampen slukker.
• Du kan bruke kannen til å helle og servere kae så
snart tilberedningen er ferdig. Kaetrakteren slutter
automatisk å dryppe. Kannen må settes på plass innen
15 sekunder, fordi vannet vil samles i trakten og denne
kan oversvømmes hvis kannen ikke settes på plass
straks.
• Dekslet til vanntanken må ikke åpnes mens
kaetrakteren er i gang.
9. Når traktingen er fullført, piper det 5 ganger. Du
kan erne kannen når traktingen er ferdig (cirka
ett minutt etter at kaen slutter å dryppe ned i
kannen). Damp vil komme ut fra dampventilen.
Du får ut mindre vann i form av ferdig kae enn det du
helte i beholderen, fordi noe av vannet absorberes av
den malte kaen.
• Aldri blokker dampventilen.
• Dampen som kommer ut av kaetrakteren er meget
varm. Ikke berør ventilen.
2-10
Start/Stop
NO
2-10
Start
/Stop
10. Kaetrakteren vil holde kaen varm i 2 timer, og
deretter automatisk slå seg av.
Hold-varm-
lampen blinker, og slukker deretter automatisk.
Trykk på Start/Stopp-knappen for å stoppe
funksjonen for kverning og trakting. Slå alltid
kaetrakteren av når den ikke er i bruk.
• Hold kannelokket lukket mens du heller.
• Den traktede kaen i kannen og kaegruten i lteret
har høy temperatur. Vær forsiktig for å unngå å bli
skåldet.
11. Ikke glem å tømme malte kaebønner ut av
lteret. Ordet FILTER vil blinke på skjermen for å
påminne deg.
FILTER
FILTER
27

NO
Lage kae med malt kae
1. Åpne dekslet til kaetrakterens vanntank, og fyll
på riktig mengde vann. Vannstanden skal være
mellom minimumsnivået «2» og maksimalt nivå
«MAX 10».
2. Trykk på Åpne-knappen for å åpne traktdøren.
Plasser den malte kaen i lteret.
Plasser både lter og kae i trakten, og plasser
trakten i traktholderen. Sørg for at den er riktig
montert; se avsnittet «Montering av trakt» for
detaljer. Lukk lterdøren til den klikker på plass.
3. Sett kannen horisontalt på varmeplaten.
2-10
Start/Stop
4. Trykk på Ferdigmalt-knappen for å bytte til
modus for forhåndskvernet kae. Ferdigmaltindikatoren vil lyse blått.
28
2-10
Start/Stop
2-10
Start/Stop
5. Trykk på Start/Stopp-knappen for å starte
kaetrakteren. Indikatoren lyser opp.
Kaetrakteren vil starte å trakte kae.
• Trykk på Start/Stopp-knappen igjen for å avbryte
prosessen. Indikatorlampen slukker.
• Du kan bruke kannen til å helle og servere kae så
snart tilberedningen er ferdig. Kaetrakteren slutter
automatisk å dryppe. Kannen må settes på plass innen
15 sekunder, fordi vannet vil samles i trakten og denne
kan oversvømmes hvis kannen ikke settes på plass
straks.
• Dekslet til vanntanken må ikke åpnes mens
kaetrakteren er i gang.
6. Når traktingen er fullført, piper det 5 ganger. Du
kan erne kannen når traktingen er ferdig (cirka
ett minutt etter at kaen slutter å dryppe ned i
kannen). Damp vil komme ut fra dampventilen.
Du får ut mindre vann i form av ferdig kae enn det du
helte i beholderen, fordi noe av vannet absorberes av
den malte kaen.
• Aldri blokker dampventilen.
• Dampen som kommer ut av kaetrakteren er meget
varm. Ikke berør dampventilen.
2-10
Start/Stop
NO
2-10
Start
/Stop
7. Kaetrakteren vil holde kaen varm i 2 timer, og
deretter automatisk slå seg av. Hold-varm-
lampen blinker, og slukker automatisk. Trykk
på Start/Stopp-knappen for å stoppe Holdvarm-funksjonen. Alltid slå av kaetrakteren ved
stikkontakten når den ikke er i bruk.
• Hold kannelokket lukket mens du heller.
• Den traktede kaen i kannen og kaegruten i lteret
har høy temperatur. Vær forsiktig for å unngå å bli
skåldet.
8. Ikke glem å tømme malte kaebønner ut av
lteret. Ordet FILTER vil blinke på skjermen for å
påminne deg.
FILTER
FILTER
29

Programmering
Du kan programmere kaetrakteren til å slå seg på ved et angitt tidspunkt ved å
programmere den. Hvis du for eksempel ønsker å våkne opp og ha kaen klar, kan du sette
kaetrakteren til å slå på kl. 7:30 eller til et annet tidspunkt.
NO
Sørg for at klokken er stilt inn på riktig tid. Husk at det er en 24-timers-klokke. Se avsnittet «Stille inn
klokken» for mer informasjon.
1. Trykk og hold på Program-knappen til programlampen blinker.
2. Velg tidspunktet du vil at kaetrakteren skal starte ved hjelp av Time-knappen, og
deretter Minutt-knappen, ved å følge de samme instruksjonene som for å stille
klokken.
3. Hvis du ønsker å lage kae med hele bønner, setter du mengde og styrke for
kaebønner. Vennligst se avsnittet "Betjening «Betjening – Lage kae med hele
bønner» trinn 6–7.
ELLER
Hvis du ønsker å lage kae med forhåndskvernet kae, trykker du på
knappen for å bytte til modus for ferdigmalt kae.
4. Trykk på Program-knappen for å bekrefte innstillingen. Programindikatoren vil lyser
fast.
5. Når du har stilt inn programmets starttidspunkt, tilbereder du kaen ifølge avsnittet
«Betjening» trinn 1 til 5.
6. Kaetrakteren vil automatisk begynne å trakte kae ved det forhåndsinnstilte
tidspunktet.
7. For å stille programtiden til samme forhåndsinnstilte tidspunkt neste dag, trykker du
bare på Program-knappen.
Ferdigmalt-
Rengjøring og vedlikehold
Pass på å koble fra og la apparatet avkjøles før rengjøring. Ikke la strømledningen, støpslet eller apparatet
komme under vann eller i andre væsker, fordi dette kan føre til elektrisk støt. Husk å trekke støpslet ut av
stikkontakten etter bruk hver gang.
1. Rengjør lteret, kannen og kannelokket etter hver bruk i varmt såpevann. De kan IKKE
vaskes i oppvaskmaskin.
2. Tørk apparatet utvendig med en myk, fuktig klut for å erne ekker. Ikke bruk sterke
vaskemidler eller aggressive rengjøringsmidler.
3. Det kan samle seg vanndråper i området ovenfor lteret, og disse kan dryppe ned på
produktbasen under tilberedningen. Dryppingen kan begrenses ved å tørke området
med en ren, tørr klut etter bruk.
4. Bruk en fuktig klut til å tørke varmeplaten forsiktig. Du må aldri bruke skuremidler til
rengjøringen.
30

Rengjøring av kaekvernen
Ved du kverner kaebønner, kan kaepulver tilstoppe kvernemekanismen. Kvernen må
rengjøres når rengjøringsindikatoren vises på skjermen. Kvernen bør rengjøres
regelmessig for å unngå at kvernemekanismen blir tilstoppet.
Husk å trekke støpslet ut av stikkontakten før rengjøring. Fjern kannen fra varmeplaten. Plasser lteret og
trakten i traktstøtten, og lukk traktdøren.
1. Bruk nøkkelen til kaekvernen for å låse den opp.
2. Åpne kaekvernen.
3. Bruk børsten til å rengjøre kaekvernen.
4. Lukk dekselet på kaekvernen, og bruk nøkkelen
for å låse kaekvernen.
Fjerne kalk fra kaffetrakteren
Avhengig av hvor hardt vannet i ditt område, kan kalk deponeres inne i kaetrakteren.
Kaetrakteren må avkalkes fra tid til annen.
1. Åpne dekslet til vanntanken, og fyll den med avkalkingsmiddel (etter produsentens
instruksjoner) og vann til maksimumsnivået «MAX 10».
2. Sett kannen på varmeplaten.
3. Sørg for at INGEN kae er i kaetrakteren. Trykk på Start/Stopp-knappen, og la
kaetrakteren kjøre til 1/3 av avkalkingsmidlet er i kannen.
4. Trykk på Start/Stopp-knappen for å stoppe enheten. La avkalkingsmidlet fungere i
cirka 30 minutter.
5. Trykk på Start/Stopp-knappen igjen, og la enheten kjøre til det gjenværende
avkalkingsmidlet er i kannen.
6. Hell friskt vann i vannbeholderen til maksimumsnivået «MAX 10» (ikke legg kae i
apparatet). Gjenta trinn 3–6 i avsnittet «Betjening - Lage kae med malt kae».
Gjenta denne prosessen 3-4 ganger (eller instruksjonene til produsenten av
avkalingsmidlet) med nytt vann hver gang for å sikre at avkalingsvæsken har blitt
grundig spylt. Rengjør lteret, trakten, kannen og kannelokket med varm såpevann.
NO
31

NO
Råd og tips
Spørsmål Svar
Hvorfor lyser ikke Start/Stoppknappen opp?
Hvorfor tilberedes ikke kaen? Trakten er ikke satt helt på plass, strømmen er gått eller
Hvorfor tilbereder
kaetrakteren bare rent vann?
Hvorfor smaker ikke kaen
godt?
Hvorfor ser jeg kaegrut i
kaen?
Ingen av knappene fungerer? Du kan være i program-modus. For å gå ut av denne
Hvorfor fungerer ikke kvernen? Du har valgt modus for ferdigmalt kae, slå av dette.
Kontroller at du har satt støpslet inn i stikkontakten.
vanntanken er tom.
Det er ingen kae i lteret – se etter om du har fylt på
ønsket mengde kae.
Kanskje du ikke har brukt en type kae som anbefales
for automatiske kaetraktere med drypplter.
Forholdet mellom malt kae og vann kan ha vært feil.
Kaetrakteren må rengjøres.
Filteret sitter ikke ordentlig i trakten eller er
sammenklemt.
modusen, kan du kaetrakteren av og på igjen.
Spesifikasjoner
Modell S10GC13E
Merkespenning 240V
Strømforbruk Kaekvern: 120W
Trakte: 1.07KW
Ventemodus: 0.59W
Funksjoner og spesikasjoner kan endres uten varsel.
32

Packa upp
Tack för att du valt att köpa din nya Sandstrøm kaebryggare.
Vi rekommenderar att du tar dig tid till att läsa igenom den här manualen så att du
får en grundlig förståelse för dess egenskaper.
Läs noga igenom alla säkerhetsinstruktioner före användning och behåll sedan den
här bruksanvisningen för framtida bruk.
Ta bort allt förpackningsmaterial från enheten. Behåll förpackningsmaterialet. Om du kastar
det, gör det i enlighet med lokala bestämmelser.
Följande delar medföljer:
2-10
Start/Stop
SE
Huvudenheten
Filter
Kanna Tratt
Lock till fack för
Mätsked
Kaebönor
Borste och nyckel till
malningsfacket
Instruktionsbok
33

Behandling av kannan
Start/Stop
2-10
Kannan kan gå sönder om följande instruktioner inte följs:
1. Ställ aldrig en varm kannan på en våt eller kall yta.
2. Använd inte en sprucken kanna eller en kanna med ett löst eller försvagat handtag.
3. Rengör inte kannan med rengöringsmedel, stålull eller andra slipande material.
4. Kasta genast kannan om den kokat utan vatten.
5. Hantera kannan varsamt.
SE
För att minska risken för brand eller elektrisk stöt, ta inte bort några serviceskydd. Det nns inga delar
som kan repareras av användaren på insidan. Reparationer bör endast utföras av kvalicerade personer.
Produktöversikt
1
7
10
8
6
4
2
3
4
8
9
10
11
12
13
5
6
2
14
15
16
1. Filter
2. Tratt
3. Ratt för ninställning av
kaemalning
4. Kontrollpanel
5. Tratthållare
6. Värmeplatta
7. Lock till behållare för kaebönor
8. Behållare för kaebönor
34
9. Lock till vattenbehållare
10. Malningsfack
11. Ångventil
12. Öppnings-knapp
13. Indikator vattennivå
14. Överrinning
15. Nätsladd
16. Kanna

Kontrollpanel
2 - 10
1 62 73 4 5
1. Styrka-knappen
2.
Koppar-knappen
3. Tim-knapp
4. Program-knapp
Displayfönster
1
Start/Stop
5. Minut-knapp
6.
7. Start/Stopp-knapp
Förmalnings-knapp
2
3
FILTER
4
5
SE
1. Indikator varmhållning
2. Koppindikator
3. Klockdisplay
4. Filterindikator – blinkar för att
påminna dig om att rengöra ltret
6
5. Rengöringsindikator
malningsfacket
6. Indikator kaestyrka
35

SE
Första användning
1. Fyll vattenbehållaren med rent vatten upp till maxnivån (MAX 10). Överfyll inte
vattenbehållaren. Om du överfyller vattenbehållaren kommer vatten att rinna ut ur
överrinningen på baksidan av enheten.
2. Koppla in enheten och slå på strömmen. Följ stegen i avsnittet “Hantering – Brygga
kae med malet kae” (utan att lägga till malet kae) en eller två gånger, häll sedan
ut det heta vattnet.
3. Rengör kannan, locket till kaefacket och ltret noggrant med varmvatten. Du kan nu
använda kaebryggaren.
4. Torka av kaebryggarens utsida med en fuktig mjuk trasa. Använd inte starka eller
slipande rengöringsmedel.
Inställning av klockan
1. Koppla in elkabeln i eluttaget, displayfönstret kommer att lysa blått och “12:00”
kommer att blinka på displayen. Klockan har en 24-timmars display.
2. Tryck på Tim eller Minut-knappen upprepade gånger eller håll ned för att ställa
in timmar och minuter. Tiden är nu inställd och kommer inte längre att blinka på
displayen.
Trattmontering
• Vatten kommer att droppa från tratten om inte tratten är korrekt isatt.
• Tratten ska inte kunna yttas när den är korrekt isatt.
1. Tryck på Öppnings-knappen för att öppna
trattluckan. Leta reda på öppningarna på båda
sidor av kaebryggaren.
36
2-10
Start/Stop

2. Leta reda på ikarna och placera tratten såsom
Start/Stop
Start/Stop
visas. Sänk ner tratten i kaebryggaren med
handtaget upprätt.
2-10
3. Sänk handtaget. Filtret passar sedan inuti
tratten.
Hantering
Brygga kae med hela bönor
1. Öppna locket till vattenbehållaren och fyll på
korrekt mängd kallt vatten. Vattennivån bör vara
mellan miniminivån “2” och maxnivån “MAX 10”.
Stäng locket till vattenbehållaren.
Fyll vattenbehållaren med exakt den mängd vatten
som behövs. Exempelvis om du skall brygga 4 koppar
kae, häll endast i 4 koppar vatten i behållaren.
Kaebryggaren fortsätter att brygga kae tills vattnet
tar slut.
SE
2-10
2. Lyft på locket till behållaren för kaebönor, fyll
behållaren full med bönor. Se till att det nns
tillräcklig mängd bönor i behållaren för den
mängd kae som du avser att brygga. Stäng
locket ordentligt.
Häll inte i något kae i kaemalningsbehållaren. Om
vatten kommer in i kvarnmotorn kan mortorn skadas
får få funktionsfel.
2-10
37

SE
3. Vrid på ratten för Fininställning av kaemalning
för att ställa in önskad nhet hos det malda kaet.
4. Tryck på Öppnings-knappen för att öppna
trattluckan. Placera ltret i tratten i tratthållaren, se
till att den sitter korrekt, se avsnittet “Montering
av tratten ” för detaljer. Stänger lterluckan tills
den klickar på plats.
5. Placera kannan på värmeplattan horisontellt.
Grov Fin
2-10
Start/Stop
2-10
Start/Stop
6. Tryck på Koppar-knappen upprepade gånger
för att välja önskad kaemängd 2, 4, 6, 8 eller 10
koppar. Indikator för kaemängd börjar att lysa.
7. Tryck på Styrka-knappen upprepade gånger för
att ställa in önskad kaestyrka, mild, medium eller
stark. Indikator för kaestyrkan börjar att lysa.
38
mild
medium
FILTER
stark

8. Tryck på Start/Stopp-knappen för att starta kae
bryggaren, indikatorn börjar lysa. Kvarnen startar
och kaebryggaren börjar brygga kae.
• Kvarnen skall slås på automatiskt, om inte
har du valt Förmalnings-knappen, stäng av denna.
• Tryck på Start/Stopp-knappen igen för att avbryta
processen. Indikatorlampan släcks.
• Du kan ta bort kannan och servera kaet när som helst
när kaet har bryggts klart. Kaebryggaren kommer
sluta att droppa automatiskt. Kannan måste sättas
tillbaka inom 15 sekunder då vattnet som samlats i
tratten kan svämma över om inte kannan sätts tillbaka
snarast.
• Öppna inte locket till vattenbehållaren medan kaet
bryggs.
9. När bryggningscykeln är klar kommer enheten
att pipa 5 gånger. Du kan ta bort kannan när
bryggningen är färdig (ungefär en minut efter att
kaet slutat droppa ned i kannan). Ångan kommer
att komma ut från ångventilen.
Mängden kae som bryggs blir alltid mindre än andelen
vatten i vattenbehållaren, då en del av vatten tas upp av
kaepulvret.
• Blockera aldrig ångventilerna.
• Ångan som kommer ut från kaebryggaren är mycket
het. Rör inte ventilerna.
2-10
Start/Stop
SE
2-10
Start
/Stop
10. Kaebryggaren kommer att hålla kaet varmt i
två timmar.
Varmhållnings-indikatorn kommer
att blinka och sedan automatiskt slockna. Tryck på
Start/Stopp-knappen för att stoppa malningsoch bryggningsfunktionen. Stäng alltid av
kaebryggaren när den inte används.
• Ha kannlocket stängt när du serverar.
• Det bryggda kaet i kannan och kaepulvret i ltret
är väldigt hett. Hantera varsamt för att undvika
brännskador.
11. Glöm inte att tömma ur det malda kaet från
ltret. Ordet FILTER kommer att blinka på
displayen för att påminna dig.
FILTER
FILTER
39

Brygga kae med malet kae
1. Öppna locket till kaebryggarens vattenbehållare,
och fyll behållaren med önskad mängd vatten.
Vattennivån bör vara mellan miniminivån “2” och
maxnivån “MAX 10”.
SE
2. Tryck på Öppnings-knappen för att öppna
trattluckan. Lägg i malet kae i ltret. Placera
både ltret och det malda kaet i tratten
och placera sedan tratten i tratthållaren. Se
till att den är korrekt monterad, se sektionen
“Trattmontering”för detaljer. Stänger lterluckan
tills den klickar på plats.
3. Placera kannan på värmeplattan horisontellt.
2-10
Start/Stop
2-10
Start/Stop
4. Tryck på Förmalnings-knappen för att
växla till läget förmalet kae. Förmalnings
indikatorn lyser blå.
40
2-10
Start/Stop

5. Tryck på Start/Stopp-knappen för att
starta kaebryggaren, indikator börjar lysa.
Kaebryggaren börjar brygga kaet.
• Tryck på Start/Stopp-knappen igen för att avbryta
processen. Indikatorlampan släcks.
• Du kan ta bort kannan och servera kaet när som
helst när kaet har bryggts klart. Kaebryggaren
kommer sluta att droppa automatiskt. Kannan måste
sättas tillbaka inom 15 sekunder då vattnet som
samlats i tratten kan svämma över om inte kannan
sätts tillbaka snarast.
• Öppna inte locket till vattenbehållaren medan kaet
bryggs.
6. När bryggningscykeln är klar kommer enheten
att pipa 5 gånger. Du kan ta bort kannan när
bryggningen är färdig (ungefär en minut efter att
kaet slutat droppa ned i kannan). Ångan kommer
att komma ut från ångventilen.
Mängden kae som bryggs blir alltid mindre än andelen
vatten i vattenbehållaren, då en del av vatten tas upp av
kaepulvret.
• Blockera aldrig ångventilerna.
• Ångan som kommer ut från kaebryggaren är mycket
het. Rör inte ångventilerna.
2-10
Start/Stop
SE
2-10
Start
/Stop
7. Kaebryggaren kommer att hålla kaet varmt
i två timmar. Varmhållnings-indikatorn
kommer att blinka och sedan automatiskt
slockna. Tryck på Start/Stopp-knappen för att
stoppa varmhållningsfunktionen. Stäng alltid av
kaebryggaren vid uttaget när den inte används.
• Ha kannlocket stängt när du serverar.
• Det bryggda kaet i kannan och kaepulvret i ltret
är väldigt hett. Hantera varsamt för att undvika
brännskador.
8. Glöm inte att tömma ur det malda kaet från
ltret. Ordet FILTER kommer att blinka på
displayen för att påminna dig.
FILTER
FILTER
41

Programhantering
Du kan programmera din kaebryggare att slås på vid en förinställd tid med
Programhanteringen. Exempelvis om du vill vakna och ha kaet färdigt kan du ställa in att
kaebryggaren slås på 07.30 eller vid någon annan tidpunkt.
Se till att klockan har ställts in på korrekt tid. Kom ihåg att det är en 24-timmars klocka. Se avsnittet
“Inställning av klockan” för detaljer.
SE
1. Tryck på och håll kvar Program-knappen till programindikatorn blinkar.
2. Välj vilken tid du vill börja brygga kae genom att använda Tim-knappen, därefter
Minut-knappen, följ samma instruktioner som för att ställa in klockan.
3. Om du vill brygga kae med hela bönor, ställ in mängden kaebönor och styrka. Se
sektionen “Hantering – brygga kae med hela bönor ” steg 6-7.
ELLER
Om du vill brygga kae med malet kae, tryck på
växla till läget förmalet kae.
4. Tryck på Program-knappen för att bekräfta inställningen. Programindikatorn börjar att
lysa med fast sken.
5. Efter inställning av Programstarttiden, förbered kaet genom att följa avsnittet
“Hantering ” steg 1 till 5.
6. Kaebryggaren börjar automatiskt att brygga vid den förinställda tiden.
7. För att återställa programtiden till samma förinställd tid nästa dag, tryck på Programknappen.
Förmalnings-knappen för att
Rengöring och underhåll
Se till att koppla ur och låt apparaten svalna innan rengöring. För att skydda dig mot elstötar, se till
att inte strömkabeln eller stickkontakten eller bryggaren kommer i kontakt med vatten. Efter varje
användning, se alltid till att stickkontakten är utdragen ur strömuttaget.
1. Rengör ltret, kannan och kannlocket efter varje användning i varmt vatten med
diskmedel. De är INTE diskmaskinssäkra.
2. Torka av kaebryggarens yttre med en mjuk, våt trasa för att ta bort äckar. Använd
inte starka eller slipande rengöringsmedel.
3. Kondensvattendroppar kan bildas ovanför tratten och falla ned till värmeplattan under
bryggning. För att förhindra detta, torka av området med en ren, torr trasa efter varje
användning.
4. Använd en fuktig trasa för att varsamt torka av värmeplattan. Använd aldrig slipande
rengöringsmedel.
42

Rengöring av malningsfacket.
Vid malning av kaebönor kan kaepulver sätta igen malningsmekanismen.
Malningsfacket måste rengöras när indikatorn Rengöring av malningsfacket
visas på displayen. Malningsfacket bör rengöras regelbundet för att förhindra att
malningsmekanismen täpps igen.
Se till att du kopplar ur apparaten innan rengöring. Placera kannan på värmeplattan. Placera ltret i
trattstödet och stäng trattlocket.
1. Använd malningsfacknyckeln för att låsa upp
malningsfacket.
2. Öppna locket till malningsfacket.
3. Använd borsten för att göra rent i malningsfacket.
4. Stäng locket till malningsfacket, använd nyckeln
till malningsfacket för att låsa malningsfacket.
Avkalkning av kaffebryggaren
Beroende på vilken hårdhet vattnet har i ditt område kan kalkavlagringar samlas inuti
kaebryggaren. Kaebryggaren kan behöva avkalkas då och då.
1. Öppna locket till vattenbehållaren och fyll den med avkalkningsmedel (följ
tillverkarens instruktioner) och vatten till max nivån “MAX 10”.
2. Placera kannan på värmeplattan.
3. Se till att det INTE nns något kae i kaebryggaren. Tryck på Start/Stopp-knappen,
låt kaebryggaren köra tills 1/3 av avkalkningslösningen runnit ned i kannan.
4. Tryck på Start/Stopp-knappen för att stoppa enheten. Låt avkalkningslösningen verka
i ungefär 30 minuter.
5. Tryck på Start/Stopp-knappen igen och låt kaebryggaren köra tills den resterande
avkalkningslösningen runnit ned i kannan.
6. Häll i färskt vatten i vattenbehållaren till max nivån “MAX 10” (häll inte i något kae i
apparaten). Upprepa steg 3-6 i avsnittet “Hantering – Brygga kae med malet kae”.
Upprepa denna process 3-4 gånger (eller följ avkalkningstillverkarens instruktioner)
med färskt vatten varje gång för att se till att avkalkningslösningen helt sköljts bort.
Rengör ltret, tratten, kannan och kannlocket med diskmedel.
SE
43

SE
Tips och råd
Fråga Svar
Varför lyser inte Start/Stopp-
knappen?
Varför brygger inte kokaren? Tratten är inte korrekt isatt, eller så är det problem med
Varför brygger kaebryggaren
endast vatten?
Varför smakar kaet illa? Du kanske inte använde en kaetyp för kaebryggare
Varför kommer det kaepulver
i kaet?
Ingen av knapparna fungerar? Du kan vara i programläge. För att stänga av detta läge,
Varför fungerar inte kvarnen? Du har valt förmalet kaeläget, stäng av detta.
Kontrollera att kaebryggaren är ansluten till ett
vägguttag.
strömtillförseln, eller så är vattenbehållaren tom.
Det nns inget kae i ltret, kontrollera att du fyllt på
med en tillräcklig mängd kae.
med automatiskt dropp. Det fanns inte tillräckligt med
kae i förhållande till andelen vatten eller vice versa.
Kaebryggaren behöver rengöras.
Filtret sitter inte korrekt isatt i tratten eller så har ltret
kollapsat.
stäng av kaebryggaren och slå på den igen.
Specifikationer
Modell S10GC13E
Märkspänning 240V
Strömförbrukning Malning: 120W
Brygga: 1.07KW
Vänteläge: 0.59W
Funktioner och specikationer kan ändras utan vidare meddelande.
44

Pakkauksesta purkaminen
Kiitos, kun valitsit uuden Sandstrøm-kahvinkeittimen.
Suosittelemme, että vietät hetken tämän käyttöoppaan parissa, jotta ymmärtäisit
täysin kaikki laitteen tarjoamat toiminnalliset ominaisuudet.
Lue huolellisesti kaikki turvaohjeet ennen käyttöä ja säilytä tämä käyttöopas
tulevaa käyttöä varten.
Poista kaikki pakkausmateriaali laitteesta. Säilytä pakkaus. Jos hävität pakkauksen, tee se
paikallisten säädösten mukaisesti.
Seuraavat nimikkeet kuuluvat toimitukseen:
2-10
Start/Stop
FI
Laite
Suodatin
Kannu Suppilo
Kahvipapu
Mittalusikka
-lokeron kansi
Harja ja jauhamisosaston
avain
Käyttöopas
45

FI
Start/Stop
2-10
Kannun käyttö ja kunnossapito
Kannu voi särkyä, jos seuraavia ohjeita ei noudateta:
1. Älä aseta kuumaa kannua märälle tai kylmälle pinnalle.
2. Älä käytä halkeillutta kannua, tai jos kannun kädensija on löysällä tai heikentynyt.
3. Älä puhdista kannua puhdistusaineilla, teräsvillatupoilla tai muilla hankaavilla
materiaaleilla.
4. Poista kannu heti käytöstä, jos se on kiehunut tyhjäksi.
5. Vältä teräviä iskuja, naarmuttamista tai kovakouraista käsittelyä.
Vähentääksesi tulipalon tai sähköiskun vaaraa, älä irrota mitään kansia. Sisällä ei ole käyttäjän huollettavia
osia. Korjauksia saa tehdä vain pätevä huoltohenkilöstö.
Tuotteen yleiskatsaus
1
7
10
8
6
4
2
3
4
8
9
10
11
12
13
2
14
15
5
6
1. Suodatin
2. Suppilo
3. Kahvijauheen hienousasteen valitsin
4. Ohjauspaneeli
5. Suppilonpidike
6. Lämmityslevy
7. Kahvipapusäiliön kansi
8. Kahvipapusäiliö
46
16
9. Vesisäiliön kansi
10. Jauhamisosasto
11. Höyryntuuletus
12. Avaa -painike
13. Veden tason ilmaisin
14. Ylivuoto
15. Virtajohto
16. Kannu

Ohjauspaneeli
1 62 73 4 5
1. Voima -painike
2.
Kuppi -painike
3. Tunti -painike
4. Ohjelma -painike
Näyttöikkuna
1
2 - 10
Start/Stop
5. Minuutti -painike
6.
7. Käynnistä/Pysäytä -painike
Esijauhettu -painike
2
3
FILTER
4
5
FI
1. Pidä lämpimänä -merkkivalo
2. Kuppi-ilmaisin
3. Kellonäyttö
4. Suodatinilmaisin - muistuttaa
vilkkumalla suodattimen
puhdistamisesta
6
5. Jauhamisosaston puhdistuksen
ilmaisin
6. Kahvin vahvuuden ilmaisin
47

FI
Ensimmäisellä käyttökerralla
1. Täytä säiliö puhtaalla vedellä enintään maksimitasomerkintään saakka (MAX 10). Älä
täytä säiliötä liikaa. Jos täytät säiliötä liikaa, vesi valuu pois laitteen takana olevasta
ylivuotoreiästä.
2. Liitä laite verkkovirtaan. Toimi "Käyttö - Kahvin valmistus jauhetusta kahvista"-osan
ohjeiden mukaisesti (lisäämättä kahvijauhetta) kerran tai kaksi ja kaada kuuma vesi
pois.
3. Puhdista kannu, kahviosaston kansi ja suppilo huolellisesti lämpimällä vedellä. Nyt voit
käyttää kahvinkeitintä.
4. Pyyhi laitteen ulkopinta pehmeällä, kostealla liinalla. Älä käytä voimakkaita pesuaineita
tai puhdistusaineita.
Kellon asettaminen
1. Liitä pistoke pistorasiaan, näyttöikkuna näkyy sinisenä valaistuna ja "12:00" vilkkuu
näytössä. Kellossa on 24-tuntinen näyttö.
2. Paina Tunti - tai Minuutti -painiketta toistuvasti tai pidä painettuna säätääksesi tunti-
tai minuuttinumerot. Aika on nyt asetettu eikä se enää vilku näytössä.
Suppilokokoonpano
• Vettä vuotaa suppilosta, jos sitä ei ole lukittu lujasti ja oikein.
• Suppilo ei liiku, kun se on asetettu oikein paikalleen.
1. Avaa suppilon luukku painamalla Avaa
-painiketta. Paikallista aukko molemmin
puolin kahvinkeitintä.
48
2-10
Start/Stop

2. Paikallista korvakkeet ja aseta suppilo
Start/Stop
Start/Stop
paikalleen kuten kuvassa. Laske suppilo
kahvinkeittimeen kahva pystyasennossa.
3. Laske kädensija. Suodatin asettuu tällöin
suppilon sisään.
Käyttö
Kahvin valmistaminen kokonaisista pavuista
1. Avaa vesisäiliön kansi ja täytä se oikealla määrällä
kylmää vettä. Veden tason on oltava minimitason
"2" ja maksimitason "Maks. 10" välillä. Sulje
vesisäiliön kansi.
2-10
2-10
FI
Täytä vesisäiliö täsmälleen tarvitsemallasi määrällä
vettä. Jos haluat valmistaa esimerkiksi 4 kupillista
kahvia, lisää säiliöön vain 4 kupillista vettä.
Kahvinkeitin valmistaa kahvia, kunnes vesi on loppu.
2. Nosta kahvipapuosaston kantta ja täytä säiliö
kokonaan kahvipavuilla. Varmista, että säiliössä
on riittävä määrä kahvipapuja keitettäväksi
tarkoitettua määrää varten. Sulje kansi tiukasti.
Älä kaada vettä kahvin jauhamissäiliöön. Jos
vettä joutuu jauhamislaitteen moottoriin, se voi
vahingoittua ja mennä epäkuntoon.
2-10
49

FI
3. Kierrä Kahvijauheen hienousasteen valitsinta
asettaaksesi kahvijauheelle halutun hienouden.
4. Avaa suppilon luukku painamalla Avaa
-painiketta. Aseta suodatin suppilon pidikkeessä
olevaan suppiloon ja varmista, että se on koottu
oikein. Katso lisätietoja "Suppilokokoonpano"osasta. Sulje suodattimen luukku niin, että se
naksahtaa paikalleen.
5. Aseta kannu vaakasuoraan lämmityslevylle.
Karkea Hieno
2-10
Start/Stop
2-10
Start/Stop
6. Paina Kuppi -painiketta toistuvasti valitaksesi
kahvin määräksi 2, 4, 6, 8 tai 10 kupillista. Kahvin
määrän merkkivalo syttyy.
7. Paina Voima -painiketta toistuvasti asettaaksesi
kahvin voimakkuudeksi miedon, keskitason tai
vahvan. Kahvin voimakkuuden merkkivalo syttyy.
50
mieto
keskitaso
FILTER
vahva

8. Paina Käynnistä/Pysäytä -painiketta käynnistääksesi
kahvinkeittimen. Merkkivalo syttyy. Jauhajalaite
käynnistyy ja kahvinkeitin alkaa tiputtaa kahvia.
• Jauhamislaitteen tulisi kytkeytyä automaattisesti
päälle. Jos ei, Esijauhettu -painike saattaa olla
valittuna. Kytke se pois.
• Paina Käynnistä/Pysäytä -painiketta uudelleen
keskeyttääksesi toimenpiteen. Merkkivalo sammuu.
• Voit poistaa kannun, kaataa ja tarjota kahvia heti, kun
kahvi on valmistunut. Kahvinkeittimen tippuminen
loppuu automaattisesti. Kannu on laitettava takaisin
paikalleen 15 sekunnissa, koska suppiloon kertyvä vesi
voi vuotaa yli, jollei kannua aseteta ajoissa paikalleen.
• Älä avaa vesisäiliön kantta, kun kahvinkeitto on
kesken.
9. Kun kahvi on valmista, laitteesta kuulu
äänimerkki 5 kertaa. Voit poistaa kannun, kun
kahvi on valmista (noin minuutin kuluttua,
kun kahvi on lakannut tippumasta kannuun).
Höyryntuuletusaukosta nousee höyryä.
Saamasi kahvin määrä on pienempi kuin säiliöön
kaatamasi veden, koska hieman vettä imeytyy
kahvijauheeseen.
• Älä koskaan tuki höyryntuuletusaukkoa.
• Kahvinkeittimestä nouseva höyry on hyvin kuumaa.
Älä koske tuuletusaukkoa.
2-10
Start/Stop
FI
2-10
Start
/Stop
10. Kahvinkeitin pitää kahvin kuumana 2 tuntia.
Pidä lämpimänä -merkkivalo vilkkuu, jonka
jälkeen se sammuu automaattisesti. Paina
Käynnistä/Pysäytä -painiketta pysäyttääksesi
jauhamis- ja valmistustoiminnon. Sammuta
kahvinkeitin aina, kun sitä ei käytetä.
• Pidä kannun kantta suljettuna kaataessasi kahvia.
• Kannussa oleva kahvi ja kahvijauhe suodattimessa
ovat hyvin kuumia. Käsittele näitä varoen
palvovamman välttämiseksi.
11. Muista tyhjentää kahvipavuista jauhettu jauhe
suodattimesta. SUODATIN -ilmoitus vilkkuu
näytössä muistuttamassa asiasta.
FILTER
FILTER
51

FI
Kahvin valmistus kahvijauheesta
1. Avaa kahvinkeittimen vesisäiliön kansi ja täytä
säiliö oikealla määrällä vettä. Veden tason on
oltava minimitason "2" ja maksimitason "MAX 10"
(Maks. 10) välillä.
2. Avaa suppilon luukku painamalla Avaa
-painiketta. Lisää kahvijauhetta suodattimeen.
Aseta suodatin kahvijauheineen suppiloon ja
aseta suppilo suppilon pidikkeeseen. Varmista,
että suppilokokoonpano on koottu oikein. Katso
lisätietoja "Suppilokokoonpano"-osasta. Sulje
suodattimen luukku niin, että se naksahtaa
paikalleen.
3. Aseta kannu vaakasuoraan lämmityslevylle.
2-10
Start/Stop
4. Paina Esijauhettu -painiketta, kytkeäksesi
laitteen Esijauhettu kahvi -tilaan. Esijauhettu
-merkkivalo syttyy sinisenä.
52
2-10
Start/Stop
2-10
Start/Stop

5. Paina Käynnistä/Pysäytä -painiketta
käynnistääksesi kahvinkeittimen. Merkkivalo
syttyy. Kahvinkeitin alkaa valmistaa kahvia.
• Paina Käynnistä/Pysäytä -painiketta uudelleen
keskeyttääksesi toimenpiteen. Merkkivalo sammuu.
• Voit poistaa kannun, kaataa ja tarjota kahvia heti, kun
kahvi on valmistunut. Kahvinkeittimen tippuminen
loppuu automaattisesti. Kannu on laitettava takaisin
paikalleen 15 sekunnissa, koska suppiloon kertyvä vesi
voi vuotaa yli, jollei kannua aseteta ajoissa paikalleen.
• Älä avaa vesisäiliön kantta, kun kahvinkeitto on
kesken.
2-10
Start/Stop
6. Kun kahvi on valmista, laitteesta kuulu
äänimerkki 5 kertaa. Voit poistaa kannun, kun
kahvi on valmista (noin minuutin kuluttua,
kun kahvi on lakannut tippumasta kannuun).
Höyryntuuletusaukosta nousee höyryä.
Saamasi kahvin määrä on pienempi kuin säiliöön
kaatamasi veden, koska hieman vettä imeytyy
kahvijauheeseen.
• Älä koskaan tuki höyryntuuletusaukkoa.
• Kahvinkeittimestä nouseva höyry on hyvin kuumaa.
Älä koske höyryntuuletusaukkoa.
7. Kahvinkeitin pitää kahvin kuumana 2 tuntia.
Pidä lämpimänä -merkkivalo vilkkuu, jonka
jälkeen se sammuu automaattisesti. Paina
Käynnistä/Pysäytä -painiketta pysäyttääksesi
Pidä lämpimänä -toiminnon. Irrota kahvinkeitin
aina verkkovirrasta, kun sitä ei käytetä.
• Pidä kannun kantta suljettuna kaataessasi kahvia.
• Kannussa oleva kahvi ja kahvijauhe suodattimessa
ovat hyvin kuumia. Käsittele näitä varoen
palvovamman välttämiseksi.
8. Muista tyhjentää kahvipavuista jauhettu jauhe
suodattimesta. SUODATIN -ilmoitus vilkkuu
näytössä muistuttamassa asiasta.
FI
2-10
Start
/Stop
FILTER
FILTER
53

FI
Ohjelmakäyttö
Voit ohjelmoida Ohjelmakäytöllä kahvinkeittimen kytkeytymään päälle asetettuna aikana.
Jos esimerkiksi haluat herätä niin, että kahvi on valmiina, voit asettaa kahvinkeittimen
kytkeytymään päälle aamulla 7:30 tai muuhun haluamaasi aikaan.
Varmista, että kello on asetettu oikeaan aikaan. Muista, että kyseessä on 24-tuntinen kello. Katso
lisätietoja "Kellon asettaminen"-osasta.
1. Pidä Ohjelma -painiketta painettuna, kunnes ohjelma-merkkivalo alkaa vilkkua.
2. Valitse Tunti -painikkeella tunti, jolloin haluat aloittaa kahvinkeiton, ja sen jälkeen
Minuutti -painikkeella minuutit noudattaen samaa ohjetta kuin kelloa asetettaessa.
3. Jos haluat valmistaa kahvia kokonaisista pavuista, aseta kahvipapujen määrä ja
voimakkuus. Katso lisätietoja "Käyttö - Kahvin valmistaminen kokonaisista
pavuista"-osan vaiheista 6–7.
TAI
Jos haluat valmistaa kahvia valmiista kahvijauheesta, paina
-painiketta vaihtaaksesi esijauhettu kahvi -tilaan.
4. Vahvista asetus painamalla Ohjelma -painiketta. Ohjelman merkkivalo palaa tasaisesti.
5. Kun olet asettanut ohjelman alkamisajan, valmistele kahvi "Käyttö"-osan vaiheiden
1–5 mukaisesti.
6. Kahvinkeitin aloittaa kahvinkeiton automaattisesti esiasetettuna aikana.
7. Voit asettaa ohjelma-ajan uudelleen samaan esiasetettuun aikaan seuraavana päivänä
painamalla Ohjelma -painiketta.
Esijauhettu
Puhdistus ja kunnossapito
Varmista, että irrotat pistokkeen pistorasiasta ja annat laitteen jäähtyä ennen puhdistusta. Sähköiskulta
välttyäksesi älä koskaan upota virtakaapelia, pistoketta tai laitetta veteen tai muuhun nesteeseen.
Varmista jokaisen käytön jälkeen, että virtapistoke on irrotettu pistorasiasta.
1. Puhdista suodatin, säiliö ja säiliön kansi jokaisen käytön jälkeen kuumalla
pesuaineliuoksella. Osat EIVÄT ole konepesunkestäviä.
2. Pyyhi laitteen ulkopinta pehmeällä, kostealla liinalla tahrojen poistamiseksi. Älä käytä
voimakkaita pesuaineita tai puhdistusaineita.
3. Vesipisaroita saattaa kertyä suodattimen yläpuolelle ja tippua tuotteen alustalle kahvin
valmistuksen aikana. Hallitaksesi tippumista, pyyhi alue puhtaalla, kuivalla liinalla
käytön jälkeen.
4. Pyyhi lämmityslevy varovasti kostealla liinalla. Älä koskaan käytä hiovia liinoja sen
puhdistamiseen.
54

Jauhamisosaston puhdistaminen
Jauhaessasi kahvipapuja kahvijauhe saattaa tukkia jauhamismekanismin. Jauhamisosasto
on puhdistettava, kun Jauhamisosaston puhdistaminen -ilmaisin näkyy näytössä.
Jauhamisosasto tulee puhdistaa säännöllisesti jauhamisosaston tukkiutumisen estämiseksi.
Varmista, että irrotat laitteen sähköjohdon pistorasiasta ennen puhdistusta. Poista kannu lämmityslevyltä.
Aseta suodatin ja suppilo suppilon tukeen ja sulje suppilon luukku.
1. Avaa jauhamisosasto jauhamisosaston avaimella.
2. Avaa jauhamisosaston kansi.
3. Puhdista jauhamisosasto harjalla.
4. Sulje jauhamisosaston kansi ja lukitse
jauhamisosasto jauhamisosaston avaimella.
Kahvinkeittimen kalkinpoisto
FI
Alueesi veden kovuuden mukaan kahvinkeittimen sisään saattaa kertyä kalkkikiveä.
Kahvinkeittimessä on ehkä suoritettava ajoittain kalkinpoisto.
1. Avaa vesisäiliön kansi ja täytä säiliö kalkinpoistoliuoksella (valmistajan ohjeita
noudattaen) ja vedellä maksimitasoon "Maks. 10" saakka.
2. Aseta kannu lämmityslevylle.
3. Varmista, että kahvinkeittimessä EI ole kahvia. Paina Käynnistä/Pysäytä -painiketta,
anna kahvinkeittimen tiputtaa 1/3 kalkinpoistonesteestä kannuun.
4. Pysäytä laite painamalla Käynnistä/Pysäytä -painiketta. Anna kalkinpoistoliuoksen
vaikuttaa noin 30 minuuttia.
5. Paina Käynnistä/Pysäytä -painiketta uudelleen, anna kahvinkeittimen tiputtaa loput
kalkinpoistonesteestä kannuun.
6. Kaada puhdasta vettä vesisäiliöön maksimitasoon "Maks. 10" saakka (älä lisää kahvia
laitteeseen). Toista "Käyttö - Kahvin valmistus kahvijauheesta"-osan vaiheet 3–6.
Toista tämä toimenpide 3–4 kertaa (tai toimi kalkinpoistoaineen valmistajan ohjeiden
mukaisesti) joka kerta puhtaalla vedellä varmistaaksesi, että kalkinpoistoneste on
huuhtoutunut kokonaisuudessaan läpi. Tyhjennä suodatin, suppilo, kannu ja kannun
kaatonokka kuumalla pesuaineliuoksella.
55

FI
Vihjeitä ja vinkkejä
Kysymys Vastaus
Miksi Käynnistä/Pysäytä
-kytkin ei syty?
Miksi kahvi ei valmistu? Suppiloa ei ole kiinnitetty oikein, on sähkökatkos tai
Miksi kahvinkeitin keittää vain
vettä?
Miksi kahvi maistuu pahalta? Voi olla, että käytät kahvijauhetta, joka ei
Miksi kahvijauhetta tulee
kahviin?
Yksikään painike ei toimi? Voit olla ohjelmatilassa. Kytke tämä tila pois kytkemällä
Miksi jauhajalaite ei toimi? Olet valinnut Esijauhettu kahvi -tilan. Kytke se pois.
Tarkista, oletko kytkenyt kahvinkeittimen pistorasiaan.
vesisäiliö on tyhjä.
Suodattimessa ei ole kahvia. Varmista, että olet lisännyt
siihen halutun kahvimäärän.
ole sopivaa valmistettavaksi automaattisella
tiputuskahvinkeittimellä. Kahvijauheen ja veden suhde
voi olla epätasapainossa. Kahvinkeitin on puhdistettava.
Suodatin on asetettu väärin suppiloon tai suodatin on
mennyt rikki.
kahvinkeitin pois päältä ja uudelleen päälle.
Tekniset tiedot
Malli S10GC13E
Nimellisjännite 240V
Virrankulutus Jauhami: 120W
Valmistaa: 1.07KW
Valmiustilan: 0.59W
Ominaisuudet ja tekniset tiedot voivat muuttua ilman erillistä ilmoitusta.
56

Udpakning
Tak for købet af din nye kaemaskine fra Sandstrøm.
Vi anbefaler, at du bruger lidt tid på at læse denne brugsvejledning, så du forstår
alle betjeningsfunktionerne fuldt ud.
Læs alle sikkerhedsinstruktionerne omhyggeligt før brug, og behold denne
brugsvejledning til senere brug.
Fjern al emballagen fra apparatet. Behold emballagen. Hvis du ønsker at bortskae
emballagen, bedes du venligst gøre dette i henhold til den lokale lovgivning.
Følgende dele er inkluderet:
2-10
Start/Stop
DK
Hovedenheden
Filter
Kande Tragt
Låg til
Måleske
kaerum
Børste og nøgle til
kaekværn
Brugervejledning
57

Brug og vedligeholdelse af kanden
Start/Stop
2-10
Kanden kan gå i stykker, hvis du ikke følger disse instruktioner:
1. Stil ikke den varme kande på en våd eller kold overade.
2. Brug ikke kanden, hvis den er revnet eller har løst eller svækket håndtag.
3. Du må ikke rengøre kanden med skurepulver, stålsvamp eller andre slibende
materialer.
4. Tag øjeblikkeligt kanden af varmen, hvis den er kogt tør.
5. Undgå at udsætte kanden for hårde stød, ridser eller voldsom behandling.
For at mindske risikoen for brand eller elektrisk stød, må du ikke erne nogen af delene i enheden.
Maskinen har ingen dele i sig, som brugeren selv an reparerer. Reparationer bør kun udføres af en
kvaliceret tekniker.
DK
Produktoversigt
1
2
3
4
5
6
1. Filter
2. Tragt
3. Formalingsgrad-vælger
4. Kontrolpanel
5. Tragtholder
6. Varmeplade
7. Låg til kaebønnerum
8. Kaebønnerum
58
7
10
8
6
4
2
8
9
10
11
12
13
9. Vandbeholderdæksel
10. Kaekværn
11. Dampventil
12. Åbn-knap
13. Vandstand-indikator
14. Overløb
15. El-ledning
16. Kande
14
15
16

Kontrolpanel
1. Styrke-knap
2.
Kopper-knap
3. Time-knap
4. Program-knap
Skærm
2 - 10
1 62 73 4 5
5. Minut-knap
6.
7. Start/Stop -knap
1
Start/Stop
For-malet-knap
FILTER
DK
2
3
4
5
1. Indikator for Hold varm
2. Kopper-indikator
3. Ur
4. Filterindikator - blinker, når du skal
rense lteret
6
5. Renseindikator for kaekværn
6. Kaestyrkeindikator
59

DK
Ved første brug
1. Fyld vandbeholderen op til dens maksimalniveau (Maks. 10) med rent vand. Fyld ikke
for meget vand i vandbeholderen. Hvis du overfylder vandbeholderen, vil det yde ud
over overløbet bag på apparatet.
2. Sæt stikket i stikkontakten og tænd for strømmen. Gennemgå trinene i afsnittet
"Betjening - Kaebrygning med malet kae" (uden at tilføje kaepulver) en eller to
gange, og hæld herefter det varme vand ud.
3. Rengør kanden, låget og tragten ordentligt med varmt vand. Din kaemaskine er nu
klar til brug.
4. Aftør ydersiden med en blød og fugtig klud. Undgå, at bruge stærke og skrappe
rengøringsmidler.
Indstilling af uret
1. Slut strømkablet til stikkontakten, hvorefter der blinker "12:00" på skærmen. Dette er
et 24-timers ur.
2. Tryk på Time og Minut-knapperne gentagne gange for at indstille timerne og
minutterne. Uret er nu indstillet og blinker ikke længere.
Tragtsamling
• Hvis tragten ikke sidder ordentligt fast, vil der spilde vand ud af den.
• Tragten må ikke kunne bevæge sig, når den sidder ordentligt fast.
1. Tryk på Åbn-knappen for at åbne tragten. Find
indstikket på begge sider af kaemaskinen.
60
2-10
Start/Stop

2. Find fanerne og anbring tragten som vist. Put
Start/Stop
Start/Stop
tragten i kaemaskinen med håndtaget opad.
3. Sænk håndtaget. Filteret passer i tragten.
Betjening
Kaebrygning med hele bønner
1. Åbn låget til vandbeholderen og fyld den op med
den ønskede mængde koldt vand. Vandniveauet
bør være imellem niveau "2" og maks. "MAX 10".
Luk vandbeholderlåget.
2-10
2-10
DK
Fyld vandbeholderen med nøjagtigt den mængde
vand, du skal bruge. Hvis du f.eks. skal bruge 4 kopper
kae, skal du kun hælde 4 kopper vand i beholderen.
Kaemaskinen vil blive ved med at brygge kae,
indtil der ikke er mere vand.
2. Løft låget af kaebønnerummet og fyld rummet
helt med bønner. Sørg for at have tilstrækkeligt
med bønner i rummet til den mængde kae, du vil
brygge. Luk låget godt til.
Hælæd ikke vand i kaekværnen. Hvis der kommer
vand i kværnens motor, kan den beskadiges.
2-10
61

3. Drej på Formalingsgrad-vælgeren for at indstille,
hvor nt bønnerne skal males.
4. Tryk på Åbn-knappen for at åbne for tragten. Put
lteret i tragten og sæt herefter tragten i holderen
og sørg for, at det er samlet korrekt, som kan ses i
afsnittet "Tragtsamling". Luk lterlåget fast indtil
det klikker på plads.
Grov Fin
DK
5. Stil kanden på varmepladen.
6. Tryk på Kopper-knappen gentagne gange for
at vælge kaemængde, 2, 4, 6, 8 eller 10 kopper.
Kaemængdeindikatoren lyser.
7. Tryk på Styrke-knappen gentagne gange for
at vælge mellem mild, mellem eller stærk kae.
Kaestyrkeindikatoren lyser.
2-10
Start/Stop
2-10
Start/Stop
FILTER
62
mild
medium
stærk

8. Tryk på Start/Stop-knappen for at starte kaemaskinen. Indikatoren lyser. Kværnen vil
starte, og kaemaskinen vil brygge kae.
• Kaekværnen tænder selv. Gør den ikke det,
har du måske slået For-malet-funktionen til.
Slå den fra.
• Tryk på Start/Stop-knappen igen for at afbryde
processen. Indikatoren slukker.
• Du kan altid erne kanden og bruge den så snart kaen
er færdig. Kaemaskinen holder automatisk op med at
dryppe. Kanden skal sættes på plads igen inden for 15
sek., da der ellers samles så meget kae i tragten, at den
kan løbe over.
• Pas på ikke at åbne for vandbeholderen, mens
kaemaskinen brygger.
2-10
Start/Stop
9. Når brygningen er færdig, bipper apparatet 5
gange. Det er muligt at ytte kanden når kaen
er blevet brygget (ca. et minut efter kaen holder
op med at dryppe ned i tragten). Der vil komme
damp ud af dampventilen.
Du får mindre kae i forhold til hvor meget vand du har
fyldt på, da noget af vandet absorberes af pulverkaen.
• Bloker aldrig for dampventilen.
• Dampen fra kaemaskinen er meget varm. Rør ikke
ved ventilen.
10. Kaemaskinen holder kaen varm i 2 timer.
Hold varm-indikatoren blinker og slukker så
automatisk. Tryk på Start/Stop-knappen for at
stoppe kværn og brygning. Sørg altid for at slukke
for kaemaskinen, når du ikke bruger den.
• Sørg for at holde låget lukket, når du hælder.
• Den færdigbryggede kae i kanden samt
kaegrumset i lteret er meget varmt. Håndter dette
forsigtigt, så du ikke brænder dig.
11. Glem ikke at tømme de malede kaebønner ud
af lteret. Ordet FILTER blinker på skærmen for at
minde dig om det.
DK
2-10
Start
/Stop
FILTER
FILTER
63

DK
Kaebrygning med malet kae
1. Åbn låget til vandbeholderen på kaemaskinen,
og fyld den op med den ønskede mængde vand.
Vandniveauet bør være imellem niveau "2" og
maks. "MAX 10".
2. Tryk på Åbn-knappen for at åbne for tragten.
Hæld den malede kae i lteret.
Sæt lter med malet kae i tragten og sæt tragten
i tragtholderen. Sørg for at det er sat korrekt i. Se
afsnit "Tragtsamling" for yderligere oplysninger.
Luk lterlåget fast indtil det klikker på plads.
3. Stil kanden på varmepladen.
2-10
Start/Stop
4. Tryk på For-malet-knappen for at gå i
formalet-tilstand. For-malet-indikatoren lyser
blå.
64
2-10
Start/Stop
2-10
Start/Stop

5. Tryk på Start/Stop-knappen for at starte
kaemaskinen. Indikatoren lyser. Kaemaskinen
vil brygge kae.
• Tryk på Start/Stop-knappen igen for at afbryde
processen. Indikatoren slukker.
• Du kan altid erne kanden og bruge den så snart
kaen er færdig. Kaemaskinen holder automatisk
op med at dryppe. Kanden skal sættes på plads igen
inden for 15 sek., da der ellers samles så meget kae i
tragten, at den kan løbe over.
• Pas på ikke at åbne for vandbeholderen, mens
kaemaskinen brygger.
6. Når brygningen er færdig, bipper apparatet 5
gange. Det er muligt at ytte kanden når kaen
er blevet brygget (ca. et minut efter kaen holder
op med at dryppe ned i tragten). Der vil komme
damp ud af dampventilen.
Du får mindre kae i forhold til hvor meget vand du har
fyldt på, da noget af vandet absorberes af pulverkaen.
• Bloker aldrig for dampventilen.
• Dampen fra kaemaskinen er meget varm. Rør ikke
ved dampventilen.
2-10
Start/Stop
2-10
Start
/Stop
DK
7. Kaemaskinen holder kaen varm i 2 timer.
Hold varm-indikatoren blinker og slukker så
automatisk. Tryk på Start/Stop-knappen for at
stoppe Hold varm-funktionen. Sørg altid for at
slukke for kaemaskinen på stikkontakten, når du
ikke bruger den.
• Sørg for at holde låget lukket, når du hælder.
• Den færdigbryggede kae i kanden samt
kaegrumset i lteret er meget varmt. Håndter dette
forsigtigt, så du ikke brænder dig.
8. Glem ikke at tømme de malede kaebønner ud
af lteret. Ordet FILTER blinker på skærmen for at
minde dig om det.
FILTER
FILTER
65

DK
Brug af program
Du kan programmere kaemaskinen til at starte på et bestemt tidspunkt ved hjælp af
Programdrift. Hvis du f.eks. vil vågne og have kaen klar, kan du indstille kaemaskinen til
at tænde på et bestemt tidspunkt.
Sørg for at uret er indstillet korrekt. Husk på, at det er et 24-timers ur. Se venligst afsnittet “Sådan
indstilles uret” for yderligere oplysninger.
1. Hold Program-knappen nede indtil programindikatoren blinker.
2. Vælg hvornår kaemaskinen skal begynde at brygge kaen, ved brug af Timeknappen, og herefter med Minut-knappen, ligesom når du indstiller uret.
3. Hvis du vil brygge kae med hele bønner, skal du indstille mængden af kaebønner
samt styrken. Der henvises til afsnit "Betjening - Kaebrygning med hele bønner"
trin 6-7.
ELLER
Hvis du vil brygge kae med malet kae, trykker du på
slå formalet-funktionen til.
4. Tryk på Program-knappen for at bekræfte dine indstillinger. Programindikatoren lyser.
5. Når du har indstillet starttidspunktet, kan du lave kae ved at følge trin 1-5 i afsnittet
"Betjening".
6. Kaemaskinen begynder automatisk at brygge kae på det forudindstillede tidspunkt.
7. For at nulstille Programtiden til samme forudindstillede tidspunkt dagen efter, skal du
blot trykke på Program-knappen.
For-malet-knappen for at
Rengøring og vedligeholdelse
Sørg for at trække stikket ud af stikkontakten og lade kaemaskinen køle af inden rengøringen. For at
beskytte mod elektrisk stød må ledningen, stikket og apparatet ikke komme i kontakt med nogen form
for væske. Efter hver brug skal du altid sørge for at trække stikket ud af stikkontakten.
1. Rengør lteret, kanden og låget i varmt sæbevand efter hvert brug. De kan IKKE
komme i opvaskemaskinen.
2. Aftør ydersiden med en blød og fugtig klud, fo at erne de sidste pletter. Undgå, at
bruge stærke og skrappe rengøringsmidler.
3. Vanddråber kan ophobe sig i området over lteret, og dryppe ned på varmepladen
under brygningen. For at kontrollere drypningen, skal du tørre efter med en tør klud.
4. Aftør forsigtigt en fugtig klud, så du kan tørre varmeladen. Brug aldrig slibende
rengøringsmidler til at rengrøre mede.
66

Rengøring af kaekværnen
Når du kværner kaebønner, kan der sætte sig kaepulver i kværnen. Kaekværnen skal
rengøres, når Rengøring af kaekværn-indikatoren vises på skærmen. Kaekværnen
bør rengøres jævnligt for at undgå, at kværnmekanismen blokeres.
Sørg for at trække stikket ud af stikkontakten før rengøringen. Tag kanden af varmepladen. Læg tragt
med lter i tragtholder og luk for tragtlåget.
1. Brug kaekværnnøglen til at låse op for
kaekværnen.
2. Åbn låget til kaekværnen.
3. Brug børsten til at rengøre kaekværnen.
4. Luk låget til kaekværnen og brug nøglen til at
låse igen.
Afkalkning af kaffemaskinen
DK
Afhængigt af vandets hårdhed i dit område kan der dannes kedelsten i kaemaskinen.
Kaemaskinen skal afkalkes en gang imellem.
1. Åbn låget til vandbeholderen og fyld afkalkningsmiddel (i henhold til producentens
instrukser) og vand i til maks. niveauet "MAX 10".
2. Stil kanden på varmepladen.
3. Der må IKKE være kae i kaemaskinen. Tryk på Start/Stop-knappen og lad
kaemaskinen køre, indtil 1/3 af afkalkningsmidlet er i kanden.
4. Tryk på Start/Stop -knappen for at stoppe. Lad afkalkningsmidlet fungere i ca. 30 min.
5. Tryk på Start/Stop-knappen igen og lad kaemaskinen køre, indtil resten af
afkalkningsmidlet er i kanden.
6. Hæld frisk vand i vandbeholderen til maks. niveauet "MAX 10" (undgå at putte
kaepulver i maskinen). Gentag trin 3-6 i afsnittet "Betjening - Kaebrygning
med malet kae". Gentag denne proces 3-4 gange (eller se instrukserne fra
producenten vedrørende afkalkningsmidlet) med rent vand hver gang for at sikre, at
al afkalkningsmidlet er helt væk. Rengør lteret, tragten, kanden og låget med varmt
sæbevand.
67

DK
Gode råd
Spørgsmål Svar
Hvorfor lyser Start/Stopknappen ikke?
Hvorfor brygger kaemaskinen
ikke?
Hvorfor brygger kaemaskinen
kun vand?
Hvorfor smager kaen dårligt? Måske har du ikke brugt en kae med en
Hvorfor er der kaegrums i
kaen?
Ingen af knapperne virker? De er måske i programmeringstilstand. Slå denne
Hvorfor fungerer kaekværnen
ikke?
Kontroller at du har sat stikket til kaemaskinen i
stikkontakten.
Filterholderen er ikke sat ordentlig i, der er strømsvigt
eller vandbeholderen er tom.
Der er ingen kae i lteret. Kontroller, at du har hældt
den ønskede mængde kae på.
formalingsgrad, der anbefales til automatiske
kaemaskiner. Mængden af kaepulver i forhold til
vandmængden er ikke korrekt. Kaemaskinen skal
rengøres.
Filteret er ikke sat ordentligt i lterholderen, eller lteret
er faldet sammen.
funktion fra ved at slukke og tænde for kaemaskinen.
Du har valgt formalet kae-funktion. Slå denne fra.
Specifikationer
Model S10GC13E
Spænding 240V
Strømforbrug Kværn: 120W
Brygge: 1.07KW
Standby: 0.59W
Egenskaber og specikationer kan ændres uden varsel.
68

Vybalení
Děkujeme vám za zakoupení tohoto nového kávovaru Sandstrøm.
Doporučujeme věnovat dostatek času přečtení tohoto návodu na používání, abyste
se plně seznámili se všemi funkcemi, které tento spotřebič nabízí.
Před používáním si důkladně přečtěte všechny bezpečnostní pokyny a uschovejte
tento návod pro případné budoucí použití.
Sejměte z přístroje veškeré obaly. Obaly si ponechte. Pokud je likvidujete, učiňte tak prosím
v souladu s místními předpisy.
Dodávku tvoří následující díly:
2-10
Start/Stop
Hlavní jednotka
Filtr
Konvice Nálevka
Víko přihrádky na
Odměrka
kávová zrna
Kartáček a klíč k mlecí
přihrádce
Návod K Použití
CZ
69

Použití konvice, péče o ni
Start/Stop
2-10
Při nedodržení následujících pokynů hrozí rozbití konvice.
1. Horkou konvici nestavte na vlhký nebo studený povrch.
2. Nepoužívejte prasklou konvici ani konvici s uvolněnou nebo oslabenou rukojetí.
3. Nečistěte konvici chemickými čističi, ocelovou vlnou ani abrazivními materiály.
4. Pokud jste konvici vyvařili dosucha, okamžitě ji vyměňte.
5. Chraňte před nárazy, poškrábáním a hrubou manipulací.
V zájmu omezení rizika požáru nebo zásahu elektrickým proudem nesnímejte kryty. Spotřebič
neobsahuje součásti, které by uživatel mohl opravit. Opravy musí provádět kvalikovaný personál.
Přehled výrobku
CZ
1
2
3
4
5
6
1. Filtr
2. Nálevka
3. Regulátor Jemnost mleté kávy
4. Ovládací panel
5. Držák nálevky
6. Ohřevná deska
7. Víko zásobníku na kávová zrna
8. Zásobník na kávová zrna
70
7
10
8
6
4
2
8
9
10
11
12
13
9. Kryt nádrže vody
10. Mlecí přihrádka
11. Parní ventil
12. Tlačítko Otevřít
13. Indikátor hladiny vody
14. Přetečení
15. Síťový kabel
16. Konvice
14
15
16

Ovládací panel
2 - 10
1 62 73 4 5
1. Tlačítko Síla
2. Tlačítko
3. Tlačítko Hodina
4. Tlačítko Program
Šálky
Okénko displeje
1
Start/Stop
5. Tlačítko Min
6.
7. Tlačítko Spustit/Zastavit
Tlačítko Mletá káva
FILTER
2
3
4
5
CZ
1. Indikátor přihřívání
2. Indikátor šálků
3. Zobrazení hodin
4. Indikátor ltru – blikáním
upozorňuje na nutnost vyčistit ltr
6
5. Indikátor čištění mlecí přihrádky
6. Indikátor síly kávy
71

CZ
První použití
1. Naplňte zásobník pitnou vodou po značku maximální hladiny (MAX 10). Zásobník vody
nepřeplňujte. Pokud zásobník vody přelijete, voda vyteče přepadem na zadní straně
přístroje.
2. Připojte síťový kabel přístroje do elektrické zásuvky. Jednou nebo dvakrát postupujte
podle pokynů v části „Používání – příprava kávy z mleté kávy“ (bez přidání mleté
kávy) a potom horkou vodu vylijte.
3. Důkladně omyjte džbánek, víčko přihrádky na kávu a ltr teplou vodou. Váš kávovar je
nyní připraven k použití.
4. Měkkým vlhkým hadříkem otřete vnější povrch přístroje. Nepoužívejte silné
detergenty nebo agresivní čističe.
Nastavení hodin
1. Po připojení síťového kabelu do elektrické zásuvky se okno displeje rozsvítí modře a na
displeji bliká indikátor „12:00“. Hodiny se zobrazují ve 24hodinovém formátu.
2. Opakovaným stisknutím nebo podržením tlačítek Hodina nebo Min upravte číslice
hodin nebo minut. Čas je nastaven a nebliká na displeji.
Sestavení nálevky
• Není-li nálevka pevně a řádně zajištěná, bude z ní unikat voda.
• Řádně zajištěná nálevka se nesmí hýbat.
1. Stisknutím tlačítka Otevřít otevřete dvířka
nálevky. Vyhledejte otvor na obou stranách
kávovaru.
72
2-10
Start/Stop

2. Vyhledejte západky a polohu nálevky (viz
Start/Stop
Start/Stop
obrázek). Vložte nálevku do kávovaru s
rukojetí směrem vzhůru.
3. Sklopte rukojeť. Potom ltr sedí v nálevce.
Provoz
Příprava kávy s použitím celých zrn
1. Otevřete kryt zásobníku na vodu a naplňte
správným množstvím vody. Hladina vody se musí
nacházet mezi minimální úrovní „2“ a maximální
úrovní „MAX 10“. Zavřete kryt zásobníku na vodu.
2-10
2-10
CZ
Naplňte zásobník na vodu přesným požadovaným
množstvím vody. Například chcete-li připravit 4
šálky kávy, nalijte do zásobníku pouze 4 šálky vody.
Kávovar bude vařit kávu, dokud nedojde voda.
2. Zvedněte víko zásobníku na kávová zrna a zcela
zásobník naplňte zrny. Zkontrolujte, zda zásobník
obsahuje dostatečné množství zrn pro množství
kávy, které chcete připravit. Pevně zavřete víko.
Nelijte žádnou vodu do mlýnku na kávu. Vnikne-li
voda do motoru mlýnku, může dojít k jeho poškození
a závadě.
2-10
73

CZ
3. Otáčením regulátoru Jemnost mleté kávy
nastavte požadovanou jemnost mleté kávy.
4. Stisknutím tlačítka Otevřít otevřete dvířka
nálevky. Vložte ltr do nálevky a potom vložte
nálevku do držáku nálevky a zkontrolujte správné
sestavení podle podrobných pokynů v části
„Sestavení nálevky“. Zavřete dvířka ltru tak, aby
zacvakla na místo.
5. Džbánek umístěte vodorovně na ohřevnou desku.
Hrubá Jemná
2-10
Start/Stop
2-10
Start/Stop
6. Opakovaným stisknutím tlačítka Šálky vyberte
požadované množství 2, 4, 6, 8 nebo 10 šálků kávy.
Rozsvítí se indikátor množství kávy.
7. Opakovaným stisknutím tlačítka Síla nastavte
požadovanou sílu kávy: mírnou, střední nebo
silnou. Rozsvítí se indikátor síly kávy.
74
jemná
střední
FILTER
silná

8. Stisknutím tlačítka Spustit/Zastavit spusťte
kávovar; rozsvítí se indikátor. Spustí se
mlýnek a kávovar začne vařit kávu.
• Mlýnek se spouští automaticky; pokud se tak neděje,
pravděpodobně jste stiskli tlačítko Mletá káva;
vypněte jej.
• Dalším stisknutím tlačítka Spustit/Zastavit přerušíte
proces. Indikátor zhasne.
• Po uvaření můžete kdykoli vyjmout džbánek, nalít a
podávat kávu. Kávovar přestane odkapávat automaticky.
Džbánek je nutné vyměnit do 15 sekund, protože jinak
by voda nashromážděná v nálevce mohla přetéct.
• Neotevírejte kryt zásobníku na vodu, když kávovar vaří.
9. Když je káva připravena, přístroj 5krát pípne.
Po uvaření (asi minutu poté, co káva přestane
odkapávat do džbánku) můžete džbánek vyjmout.
Z parního ventilu vystupuje pára.
Množství připravené kávy bude menší, než množství
vody nalité do zásobníku, protože část vody je
absorbována mletou kávou.
• Neblokujte parní ventil.
• Pára vycházející zkávovaru je velmi horká. Nedotýkejte
se ventilu.
2-10
Start/Stop
2-10
Start
/Stop
CZ
10. Kávovar bude udržovat kávu horkou po dobu
2 hodin. Indikátor
Přihřívání bliká a potom
automaticky zhasne. Stisknutím tlačítka Spustit/
Zastavit zastavíte mletí a vaření. Pokud kávovar
nepoužíváte, vždy jej vypněte.
• Při nalévání musí být víko džbánku zavřené.
• Uvařená káva v konvici a vyluhovaná káva ve ltru
jsou velmi horké. Postupujte opatrně, aby se zabránilo
opaření.
11. Nezapomeňte odstranit rozemletá kávová
zrna z ltru. Na displeji bliká slovo FILTR jako
připomenutí.
FILTER
FILTER
75

CZ
Příprava kávy z mleté kávy
1. Otevřete kryt zásobníku na vodu kávovaru a
naplňte správným množstvím vody. Hladina vody
se musí nacházet mezi minimální úrovní „2“ a
maximální úrovní „MAX 10“.
2. Stisknutím tlačítka Otevřít otevřete dvířka
nálevky. Vložte mletou kávu do ltru. Vložte ltr s
mletou kávou do nálevky a potom vložte nálevku
do držáku. Zkontrolujte, zda je sestava správně
sestavena, podle podrobných pokynů v části
„Sestavení nálevky“. Zavřete dvířka ltru tak, aby
zacvakla na místo.
3. Džbánek umístěte vodorovně na ohřevnou desku.
2-10
Start/Stop
4. Stisknutím tlačítka Mletá káva přepněte na
režim mleté kávy. Rozsvítí se modrý indikátor
Mletá káva.
76
2-10
Start/Stop
2-10
Start/Stop

5. Stisknutím tlačítka Spustit/Zastavit spusťte
kávovar; rozsvítí se indikátor. Kávovar začne vařit
kávu.
• Dalším stisknutím tlačítka Spustit/Zastavit přerušíte
proces. Indikátor zhasne.
• Po uvaření můžete kdykoli vyjmout džbánek,
nalít a podávat kávu. Kávovar přestane odkapávat
automaticky. Džbánek je nutné vyměnit do 15 sekund,
protože jinak by voda nashromážděná v nálevce
mohla přetéct.
• Neotevírejte kryt zásobníku na vodu, když kávovar
vaří.
6. Když je káva připravena, přístroj 5krát pípne.
Po uvaření (asi minutu poté, co káva přestane
odkapávat do džbánku) můžete džbánek vyjmout.
Z parního ventilu vystupuje pára.
Množství připravené kávy bude menší, než množství
vody nalité do zásobníku, protože část vody je
absorbována mletou kávou.
• Neblokujte parní ventil.
• Pára vycházející zkávovaru je velmi horká. Nedotýkejte
se parního ventilu.
2-10
Start/Stop
2-10
Start
/Stop
CZ
7. Kávovar bude udržovat kávu horkou po dobu
2 hodin. Indikátor Přihřívání bliká a potom
automaticky zhasne. Stisknutím tlačítka Spustit/
Zastavit zastavíte funkci přihřívání. Pokud kávovar
nepoužíváte, vždy jej odpojte od elektrické
zásuvky.
• Při nalévání musí být víko džbánku zavřené.
• Uvařená káva v konvici a vyluhovaná káva ve ltru
jsou velmi horké. Postupujte opatrně, aby se zabránilo
opaření.
8. Nezapomeňte odstranit rozemletá kávová
zrna z ltru. Na displeji bliká slovo FILTR jako
připomenutí.
FILTER
FILTER
77

CZ
Programování
Můžete naprogramovat zapnutí kávovaru ve stanovenou dobu. Například chcete-li vstávat
a mít připravenou kávu, můžete nastavit zapnutí kávovaru na 7:30 dopoledne nebo v
libovolný čas.
Zkontrolujte, zda jsou správně nastaveny hodiny. Nezapomeňte, že hodiny ukazují čas ve 24hodinovém
formátu. Podrobné pokyny viz „Nastavení hodin“.
1. Stiskněte a podržte tlačítko Program, dokud nezačne blikat indikátor programování.
2. Pomocí tlačítka Hodina a potom tlačítka Minuta nastavte požadovaný čas zahájení
přípravy kávy podle stejných pokynů, jako pro nastavování hodin.
3. Chcete-li připravit kávu z celých kávových zrn, nastavte kvalitu zrn a sílu. Viz část
„Používání – příprava kávy z použitím celých zrn“, kroky 6 - 7.
NEBO
Chcete-li připravit kávu z mleté kávy, stisknutím tlačítka
režim mleté kávy.
4. Potvrďte nastavení stisknutím tlačítka Program. Indikátor programování svítí.
5. Po nastavení času zahájení programu připravte kávu podle kroků 1 – 5 v části
„Používání“.
6. V přednastaveném čase kávovar automaticky začne vařit.
7. Chcete-li zopakovat program ve stejnou dobu následující den, stiskněte tlačítko
Program.
Mletá káva přepněte na
Čištění a údržba
Před čištěním přístroj odpojte od elektrické zásuvky a nechte vychladnout. Aby se zabránilo nebezpečí
úrazu elektrickým proudem, neponořujte napájecí kabel, zástrčku napájecího kabelu ani přístroj do vody
ani jiných kapalin. Po každém použití vždy odpojte zástrčku napájecího kabelu z elektrické zásuvky.
1. Po každém použití omyjte ltr, džbánek a víko džbánku horkou vodou a prostředkem
na mytí nádobí. NEJSOU určeny k mytí v myčce na nádobí.
2. Měkkým vlhkým hadříkem odstraňte skvrny z vnějšího povrchu přístroje. Nepoužívejte
silné detergenty nebo agresivní čističe.
3. V prostoru nad ltrem se během vaření mohou vytvářet kapky vody, které mohou
padat do základny přístroje. Aby se kapání omezilo, po použití otřete prostor čistý a
suchým hadříkem.
4. Ohřevnou desku opatrně otřete vlhkým hadříkem. Nikdy ji nečistěte abrazivními čističi.
78

Čištění mlecí přihrádky
Při mletí kávových zrn může kávový prach ucpat mlecí mechanizmus. Když se na displeji
zobrazí indikátor Čistění mlecí přihrádky, je nezbytné vyčisti mlecí přihrádku. Mlecí
přihrádku je třeba čistit pravidelně, aby se zabránilo ucpání mlecího mechanizmu.
Před čištěním nezapomeňte přístroj odpojit z elektrické zásuvky. Sejměte džbánek z ohřevné desky.
Vložte ltr a nálevku do držáku a zavřete dvířka nálevky.
1. Odemkněte mlecí přihrádku příslušným klíčem.
2. Otevřete kryt mlecí přihrádky.
3. Vyčistěte mlecí přihrádku kartáčkem.
4. Zavřete kryt mlecí přihrádky a zjistěte jej klíčem.
Odstraňování vodního kamene z kávovaru
CZ
Vzávislosti na tvrdosti vody ve vaší oblasti se uvnitř kávovaru může usazovat vodní kámen.
Vodní kámen je nezbytné z kávovaru pravidelně odstraňovat.
1. Otevřete kryt zásobníku na vodu a naplňte roztokem pro odstranění vodního kamene
(podle pokynů výrobce) a vodou na maximální úroveň „MAX 10“.
2. Umístěte džbánek na ohřevnou desku.
3. Přesvědčte se, že v kávovaru ŽÁDNÁ káva. Stiskněte tlačítko Spustit/Zastavit a
počkejte, až kávovar vypustí do džbánku 1/3 roztoku pro odstranění vodního kamene.
4. Vypněte přístroj stisknutím tlačítka Spustit/Zastavit. Nechte roztok pro odstranění
vodního kamene působit přibližně 30 minut.
5. Znovu stiskněte tlačítko Spustit/Zastavit a počkejte, až kávovar vypustí do džbánku
zbytek roztoku pro odstranění vodního kamene.
6. Naplňte zásobníku na vodu pitnou vodou do maximální úrovně „MAX 10“ (nedávejte
do přístroje žádnou kávu). Zopakujte kroky 3 - 6 v části „Používání – příprava kávy
z mleté kávy“. Tento postup 3 - 4 zopakujte (nebo postupujte podle pokynů výrobce
roztoku pro odstraňování vodního kamene) pokaždé s čerstvou pitnou vodou, aby
se roztok pro odstraňování vodního kamene důkladně vypláchl. Omyjte ltr, nálevku,
džbánek a víko džbánku horkou vodou a prostředkem na mytí nádobí.
79

CZ
Tipy a triky
Otázka Odpověď
Proč tlačítko Spustit/Zastavit
nesvítí?
Proč se káva nevaří? Nálevka není vložena správně, nejde elektrický proud
Proč kávovar vaří pouze vodu? Ve ltru není káva, zkontrolujte, zda jste na ltr nasypali
Proč má káva nepříjemnou
chuť?
Proč se v kávě objevují zrnka? Filtr není správně usazen vnálevce nebo se zbortil.
Žádné tlačítko nefunguje? Pravděpodobně se nacházíte v režimu programu. Tento
Proč mlýnek nefunguje? Pokud jste vybrali režim mleté kávy, vypněte jej.
Zkontrolujte, zda je kávovar připojen k elektrické
zásuvce.
nebo je zásobník na vodu prázdný.
potřebné množství kávy.
Možná jste nepoužili mletou kávu doporučovanou pro
automatické překapávací kávovary. Poměr kávy a vody
není správný. Nebo kávovar potřebuje vyčistit.
režim ukončíte vypnutím a zapnutím kávovaru.
Specifikace
Model S10GC13E
Jmenovité napětí: 240V
Příkon Mletí: 120W
Vařit: 1.07KW
Pohotovostním: 0.59W
Funkce a specikace se mohou měnit bez předchozího upozornění.
80

Vybalenie
Ďakujeme vám, že ste si zakúpili nový kávovar od spoločnosti
Sandstrøm.
Odporúčame vám, aby ste tomuto návodu na obsluhu venovali viac času s cieľom
dôkladne pochopiť všetky prevádzkové funkcie, ktoré tento výrobok ponúka.
Pred použitím tohto kávovaru si pozorne prečítajte všetky bezpečnostné pokyny a
uschovajte tento návod na obsluhu pre potreby v budúcnosti.
Zo zariadenia odstráňte všetok obalový materiál. Obalový materiál si uložte. Ak obalový
materiál likvidujete, postupujte v súlade s miestnymi predpismi.
Súčasťou dodávky sú nasledujúce položky:
2-10
Start/Stop
SK
Hlavné zariadenie
Filter
Kanvica Lievik
Veko násypky
Odmerná lyžica
na zrnkovú kávu
Štetec a kľúč priehradky s
mlynčekom na kávu
Návod S Pokynmi
81

Používanie kanvice a starostlivosť
Start/Stop
2-10
Kanvica sa môže rozbiť pri nedodržiavaní nasledovných pokynov:
1. Horúcu kanvicu neklaďte na vlhký alebo studený povrch.
2. Nepoužívajte prasknutú kanvicu alebo takú, ktorá má uvoľnenú alebo oslabenú
rukoväť.
3. Na čistenie kanvice nepoužívajte čistiace prostriedky, drôtenky alebo iné brúsne
materiály.
4. Kanvica sa musí okamžite odhodiť, ak sa zohrievala bez vody.
5. Vyhýbajte sa prudkým úderom, škrabancom alebo hrubému zaobchádzaniu.
Aby sa znížilo nebezpečenstvo úrazu elektrickým prúdom, neodstraňujte žiadne servisné kryty. Toto
zariadenie neobsahuje žiadne diely opraviteľné používateľom. Opravy sa musia zveriť len kompetentným
pracovníkom.
Prehľad výrobku
SK
1
2
3
4
5
6
1. Filter
2. Lievik
3. Voliaci kotúč jemnosti mletia kávy
4. Ovládací panel
5. Držiak lievika
6. Ohrievacia doska
7. Veko násypky na zrnkovú kávu
8. Násypka na zrnkovú kávu
82
7
10
8
6
4
2
8
9
10
11
12
13
9. Kryt zásobníka na vodu
10. Priehradka s mlynčekom na kávu
11. Ventil na vypúšťanie pary
12. Tlačidlo Otvoriť
13. Ukazovateľ hladiny vody
14. Pretečenie
15. Sieťový kábel
16. Kanvica
14
15
16

Ovládací panel
1 62 73 4 5
1. Tlačidlo Sila
2.
Tlačidlo Šálky
3. Tlačidlo Hodiny
4. Tlačidlo Program
Displej
1
2 - 10
Start/Stop
5. Tlačidlo Minúty
6.
7. Tlačidlo Spustiť/Zastaviť
Tlačidlo Predmletie
FILTER
2
3
4
5
SK
1. Indikátor udržiavania tepla
2. Indikátor počtu šálok
3. Displej hodín
4. Indikátor ltra - bliká, aby vám
pripomenul nutnosť vyčistiť lter
6
5. Indikátor čistenia priehradky s
mlynčekom na kávu
6. Indikátor sily kávy
83

SK
Prvé použitie
1. Do zásobníka nalejte čistú vodu až po značku maximálnej hladiny (MAX 10). Zásobník
na vodu nepreplňujte. Ak zásobník na vodu preplníte, voda bude vytekať z prepadu na
zadnej strane zariadenia.
2. Zariadenie zapojte do elektrickej zásuvky a zapnite vypínač. Raz alebo dvakrát
zopakujte kroky v časti „Prevádzka - Varenie kávy z mletej kávy“ (bez pridania mletej
kávy) a potom horúcu vodu vylejte.
3. Kanvicu, veko násypky na kávu a lter dôkladne vyčistite a opláchnite teplou vodou.
Teraz môžete začať používať svoj kávovar.
4. Vonkajší povrch spotrebiča utrite mäkkou vlhkou handričkou. Nepoužívajte silné alebo
agresívne čistiace prostriedky.
Nastavenie hodín
1. Napájací kábel zapojte do elektrickej zásuvky, okno displeja sa rozsvieti namodro a na
displeji začne blikať „12:00“. Hodiny sa zobrazujú v 24-hodinovom formáte.
2. Ak chcete nastaviť čísla hodín alebo minút, stlačte tlačidlá Hodiny alebo Minúty. Čas
je teraz nastavený a na displeji prestane blikať.
Zostava lievika
• Keď lievik nie je pevne a správne zaistený, vyleje sa z neho voda.
• Keď je lievik správne zaistený, nemal by sa hýbať.
1. Ak chcete otvoriť dvierka lievika, stlačte
tlačidlo Otvoriť. Vyhľadajte otvor na obidvoch
stranách kávovaru.
84
2-10
Start/Stop

2. Vyhľadajte pútka a lievik umiestnite podľa
Start/Stop
Start/Stop
vyobrazenia. Lievik vložte do kávovaru s
rukoväťou vo vzpriamenej polohe.
3. Rukoväť spustite dolu. Filter potom zapadne
do lievika.
2-10
2-10
Prevádzka
Varenie kávy z celých kávových zŕn
1. Otvorte kryt zásobníka na vodu a naplňte
správnym množstvom studenej vody. Hladina
vody by mala byť medzi značkami minimálnej
hladiny „2“ a maximálnej hladiny „MAX 10“.
Zatvorte kryt zásobníka na vodu.
Zásobník na vodu naplňte presným množstvom vody,
ktorú potrebujete. Napríklad, ak chcete uvariť 4 šálky
kávy, do zásobníka na vodu nalejte iba 4 šálky vody.
Kávovar bude variť kávu, až kým sa spotrebuje všetka
voda.
2. Zdvihnite veko násypky na zrnkovú kávu a úplne
naplňte zrnkovou kávou. Uistite sa, že v násypke
na kávu je dostatočné množstvo zrnkovej kávy
na množstvo kávy, ktoré chcete variť. Veko pevne
zatvorte.
Do priehradky s mlynčekom na kávu nenalievajte
žiadnu vodu. Ak sa voda dostane do motorčeka
mlynčeka na kávu, môže sa poškodiť alebo zlyhať.
SK
2-10
85

SK
3. Otočením voliaceho kotúča jemnosti mletia kávy
do príslušnej polohy nastavte jemnosť mletia kávy.
4. Dvierka lievika otvorte stlačením tlačidla
Otvoriť. Filter umiestnite do lievika a potom
lievik vložte do držiaka na lievik a uistite sa, že je
správne zostavený. Podrobnosti si pozrite v časti
„Zostavenie lievika“. Dvierka ltra zatvorte, kým
nezacvaknú na miesto.
5. Kanvicu položte na ohrievaciu dosku vo zvislej
polohe.
Hrubá Jemná
2-10
Start/Stop
2-10
Start/Stop
6. Opakovaním stláčaním tlačidla Šálky vyberte
požadované množstvo šálok kávy - 2, 4, 6, 8 alebo
10. Rozsvieti sa ukazovateľ množstva kávy.
7. Opakovaným stlačením tlačidla Sila vyberte
požadovanú silu kávy - slabá, stredná alebo silná.
Rozsvieti sa ukazovateľ sily kávy.
86
slabá
stredne silná
FILTER
silná

8. Stlačením tlačidla Spustiť/Zastaviť zapnite kávovar
a rozsvieti sa svetelný indikátor. Spustí sa mlynček na
kávu a kávovar začne variť kávu.
• Mlynček na kávu by sa mal automaticky zapnúť, ak
nie, možno ste stlačili tlačidlo Predmletie,vypnite túto
funkciu.
• Opätovným stlačením tlačidla Spustiť/Zastaviť
zastavte tento proces. Zhasne svetelný indikátor.
• Keď je káva vyrobená, kanvicu môžete kedykoľvek
vybrať a kávu naliať a servírovať. Kávovar automaticky
zastaví prekvapkávanie. Kanvica sa musí znovu vložiť do
15 sekúnd, pretože v lieviku sa nahromadí voda, ktorá
môže pretiecť, ak sa kanvica čím skôr nevloží späť.
• Počas varenia v kávovare neotvárajte kryt zásobníka
na vodu.
9. Po skončení cyklu varenia kávovar pípne 5-krát.
Kanvicu môžete odstrániť po ukončení varenia
(asi jednu minútu po tom, keď káva prestane
odkvapkávať do kanvice). Z ventila na vypúšťanie
pary bude vychádzať para.
Množstvo kávy, ktorú získate, bude menšie, ako
množstvo vody, ktorú ste do zásobníka naliali, pretože
časť vody absorbuje mletá káva.
• Ventil na vypúšťanie pary nikdy neblokujte.
• Para vychádzajúca z kávovaru je veľmi horúca.
Nedotýkajte sa ventilu na vypúšťanie pary.
2-10
Start/Stop
2-10
Start
/Stop
SK
10. Kávovar udrží kávu horúcu 2 hodiny. Blikať
bude indikátor
Udržiavať teplo a potom
automaticky zhasne. Stlačením tlačidla Spustiť/
Zastaviť zastavte mletie kávy a funkciu varenia.
Kávovar vždy vypnite, keď sa nepoužíva.
• Pri nalievaní musí byť veko kanvice zatvorené.
• Uvarená káva v kanvici a zrnká kávy v sitku sú veľmi
horúce. Manipulujte s nimi opatrne, aby sa zabránilo
obareniu.
11. Z ltra nezabudnite odstrániť pomleté zrnká kávy.
Upozorní vás na to slovo FILTER, ktoré bliká na
displeji.
FILTER
FILTER
87

SK
Varenie kávy z mletej kávy
1. Otvorte kryt nádržky na vodu v kávovare a naplňte
správnym množstvom vody. Hladina vody by
mala byť medzi značkami minimálnej hladiny „2“ a
maximálnej hladiny „MAX 10“.
2. Dvierka lievika otvorte stlačením tlačidla
Otvoriť. Do ltra vložte mletú kávu. Filter spolu
s mletou kávou vložte do lievika a potom lievik
vložte do držiaka na lievik. Uistite sa, že je
správne zostavený. Podrobnosti si pozrite v časti
„Zostavenie lievika“. Dvierka ltra zatvorte, kým
nezacvaknú na miesto.
3. Kanvicu položte na ohrievaciu dosku vo zvislej
polohe.
2-10
Start/Stop
2-10
Start/Stop
4. Stlačením tlačidla Predmletie prepnite
do režimu predmletia kávy. Rozsvieti sa modrý
svetelný indikátor Predmletie.
88
2-10
Start/Stop

5. Stlačením tlačidla Spustiť/Zastaviť zapnite
kávovar a rozsvieti sa svetelný indikátor. Kávovar
začne variť kávu.
• Opätovným stlačením tlačidla Spustiť/Zastaviť
zastavte tento proces. Zhasne svetelný indikátor.
• Keď je káva vyrobená, kanvicu môžete kedykoľvek
vybrať a kávu naliať a servírovať. Kávovar automaticky
zastaví prekvapkávanie. Kanvica sa musí znovu vložiť
do 15 sekúnd, pretože v lieviku sa nahromadí voda,
ktorá môže pretiecť, ak sa kanvica čím skôr nevloží
späť.
• Počas varenia v kávovare neotvárajte kryt zásobníka
na vodu.
6. Po skončení cyklu varenia kávovar pípne 5-krát.
Kanvicu môžete odstrániť po ukončení varenia
(asi jednu minútu po tom, keď káva prestane
odkvapkávať do kanvice). Z ventila na vypúšťanie
pary bude vychádzať para.
Množstvo kávy, ktorú získate, bude menšie, ako
množstvo vody, ktorú ste do zásobníka naliali, pretože
časť vody absorbuje mletá káva.
• Ventil na vypúšťanie pary nikdy neblokujte.
• Para vychádzajúca z kávovaru je veľmi horúca.
Nedotýkajte sa ventilu na vypúšťanie pary.
2-10
Start/Stop
2-10
Start
/Stop
SK
7. Kávovar udrží kávu horúcu 2 hodiny. Blikať bude
indikátor Udržiavať teplo a potom automaticky
zhasne. Stlačením tlačidla Spustiť/Zastaviť
vypnite funkciu Udržiavať teplo. Kávovar vždy
odpojte od elektrickej siete, keď sa nepoužíva.
• Pri nalievaní musí byť veko kanvice zatvorené.
• Uvarená káva v kanvici a zrnká kávy v sitku sú veľmi
horúce. Manipulujte s nimi opatrne, aby sa zabránilo
obareniu.
8. Z ltra nezabudnite odstrániť pomleté zrnká kávy.
Upozorní vás na to slovo FILTER, ktoré bliká na
displeji.
FILTER
FILTER
89

SK
Programovanie prevádzky
Pomocou funkcie Programovanie prevádzky môžete kávovar naprogramovať tak, aby sa
zapol v nadstavenom čase. Napríklad, ak po prebudení chcete mať svoju kávu pripravenú,
kávovar môžete nastaviť tak, aby sa zapol o 7:30 ráno alebo kedykoľvek inokedy.
Uistite sa, že hodiny sú nastavené na správny čas. Nezabúdajte, že sú to hodiny s 24-hodinovým
formátom. Podrobnosti si pozrite v časti „Nastavenie hodín“.
1. Stlačte a podržte tlačidlo Program, kým nezačne blikať svetelný indikátor Program.
2. Ak chcete zvoliť čas, kedy chcete začať variť kávu, stlačte tlačidlo Hodiny a potom
podľa rovnakých pokynov pre nastavenie hodín stlačte tlačidlo Minúty.
3. Ak chcete kávu variť z celých kávových zŕn, nastavte množstvo zrnkovej kávy a silu.
Pozrite si časť „Prevádzka - Varenie kávy z celých kávových zŕn“, kroky č. 6 až 7.
ALEBO
Ak chcete kávu variť z mletej kávy, stlačením tlačidla
režimu predmletia kávy.
4. Stlačením tlačidla Program potvrďte nastavenie. Rozsvieti sa svetelný indikátor
Programme.
5. Keď je nastavený čas spustenia programu, kávu pripravte podľa krokov č. 1 až 5 v časti
„Prevádzka“.
6. Kávovar začne automaticky variť kávu vo vopred nastavenom čase.
7. Ak chcete vynulovať čas programu pre rovnaký vopred nadstavený čas na budúci deň,
jednoducho stlačte tlačidlo Program.
Predmletie prepnite do
Čistenie a údržba
Kávovar odpojte od elektrickej siete a pred čistením ho nechajte vychladnúť. Na ochranu pred úrazom
elektrickým prúdom sa napájací kábel, zástrčka alebo tento spotrebič nesmie ponárať do vody a iných
kvapalín. Po každom používaní sa vždy musí odpojiť zástrčka od elektrickej zásuvky.
1. Po každom použití lter, kanvicu a veko vyčistite v horúcej mydlovej vode. Filter
NEMOŽNO umývať v umývačke riadu.
2. Vonkajší povrch spotrebiča utrite mäkkou vlhkou handričkou, aby sa odstránili škvrny.
Nepoužívajte silné alebo agresívne čistiace prostriedky.
3. V mieste nad ltrom sa môžu vytvárať kvapky vody a počas varenia môžu kvapkať
do produktu. Ak chcete odkvapkávaniu zabrániť, po skončení používania utrite toto
miesto čistou suchou handričkou.
4. Ohrievaciu platňu jemne vyutierajte vlhkou handričkou. Na čistenie ohrievacej platne
nikdy nepoužívajte abrazívne prostriedky.
90

Čistenie priehradky s mlynčekom na kávu
Pri mletí zrnkovej kávy môže kávový prášok upchávať mlecí mechanizmus. Priehradka s
mlynčekom na kávu sa musí vyčistiť, keď na displeji svieti svetelný indikátor Čistenie
priehradky s mlynčekom na kávu. Priehradka s mlynčekom na kávu by sa mala pravidelne
čistiť, aby sa zabránilo upchávaniu mlecieho mechanizmu.
Pred čistením kávovar odpojte od elektrickej zásuvky. Kanvicu odstráňte z ohrievacej dosky. Zostavu ltra
a lievika s držiakom vložte do kávovaru a zatvorte dvierka lieviku.
1. Priehradku s mlynčekom na kávu odomknite
pomocou kľúča priehradky s mlynčekom na kávu.
2. Otvorte kryt priehradky s mlynčekom na kávu.
3. Priehradku s mlynčekom na kávu vyčistite
pomocou štetca.
4. Zatvorte kryt priehradky s mlynčekom na kávu a
potom pomocou kľúča priehradky s mlynčekom
na kávu zamknite priehradku s mlynčekom na
kávu.
Odvápnenie kávovaru
SK
Vo vnútri kávovaru sa môže usadzovať vodný kameň v závislosti na tvrdosti vody vo vašej
oblasti. Kávovar môže byť nutné občas odvápniť.
1. Otvorte kryt zásobníka na vodu a nalejte odvápňovací roztok (podľa návodu od
výrobcu) a vodu po značku maximálnej hladiny „MAX 10“.
2. Kanvicu položte na ohrievaciu dosku.
3. V kávovare NESMIE byť žiadna káva. Stlačte tlačidlo Spustiť/Zastaviť a kávovar
nechajte zapnutý, kým v kanvici nezostane 1/3 odvápňovacieho roztoku.
4. Stlačením tlačidla Spustiť/Zastaviť zastavte kávovar. Odvápňovací roztok nechajte
pôsobiť približne 30 minút.
5. Znovu stlačte tlačidlo Spustiť/Zastaviť a kávovar nechajte zapnutý, kým sa v kanvici
nespotrebuje zvyšný odvápňovací roztok.
6. Do zásobníka na vodu nalejte čerstvú vodu po značku maximálnej hladiny „MAX
10“ (do kávovaru nevkladajte žiadnu kávu). Zopakujte kroky č. 3 až 6 podľa časti
„Prevádzka - Varenie kávy z mletej kávy“. Tento postup zopakujte 3 až 4-krát (alebo
si prečítajte návod na odvápňovanie od výrobcu) s čerstvou vodou a vždy sa uistite, že
odvápňovacia tekutina je dôkladne vypláchnutá. Filter, lievik, kanvicu a veko kanvice
umyte teplou mydlovou vodou.
91

SK
Rady a tipy
Otázka Odpoveď
Prečo sa tlačidlo Spustiť/
Zastaviť nerozsvieti?
Prečo kávovar nevarí? Lievik je nesprávne vložený alebo došlo k výpadku
Prečo kávovar prevára len
vodu?
Prečo má káva zlú chuť? Možno ste pre automatické kávovary na prekvapkávanú
Prečo sú v káve zrnká kávy? Filter je nesprávne vložený do lievika alebo lter sa
Nereaguje žiadne z tlačidiel? Kávovar môže byť v režime Program. Ak chcete tento
Prečo nefunguje mlynček na
kávu?
Skontrolujte, či ste kávovar zapojili do elektrickej
zásuvky.
elektrického prúdu alebo zásobník na vodu je prázdny.
V sitku nie je žiadna káva; uistite sa, či ste do sitka vložili
požadované množstvo kávy.
kávu nepoužili odporúčanú mletú kávu. Nevyvážený
pomer mletej kávy k množstvu vody. Kávovar sa musí
vyčistiť.
zvinul.
režim vypnúť, kávovar vypnite a znovu zapnite.
Vybrali ste režim Predmletie kávy, vypnite ho.
Špecifikácie
Model S10GC13E
Menovité napätie 240V
Spotreba elektrickej energie Mletie: 120W
Variť: 1.07KW
Pohotovostnom: 0.59W
Funkcie a technické parametre podliehajú zmenám bez predchádzajúceho oznámenia.
92

GB
This symbol on the product or in the instructions means that
your electrical and electronic equipment should be disposed at
the end of its life separately from your household waste. There
are separate collection systems for recycling in the EU.
For more information, please contact the local authority or your
retailer where you purchased the product.
NO
Dette symbolet på produktet eller i instruksjonene betyr at det
elektriske og elektroniske utstyret ikke skal kastes sammen med
husholdningsavfallet ved endt levetid.
I EU-landene nnes det separate innsamlingssystemer til
resirkulering.
Kontakt lokale myndigheter eller forhandleren du kjøpte
produktet av for ytterligere informasjon.
SE
Den här symbolen på produkten eller i instruktionerna
betyder att den elektriska och elektroniska utrustningen ska
slängas separat från annat hushållsavfall när den inte fungerar
längre.
Inom EU nns separata återvinningssystem för avfall.
Kontakta lokala myndigheter eller din återförsäljare för mer
information.
FI
Tämä tuotteeseen tai ohjeisiin merkitty symboli tarkoittaa,
että sähkölaitteet ja elektroniikka on hävitettävä käyttöikänsä
päättyessä erillään kotitalousjätteestä.
EU:ssa on kierrätystä varten erilliset keruujärjestelmät.
Jos haluat lisätietoja, ota yhteys paikallisiin viranomaisiin tai
tuotteen myyneeseen liikkeeseen.
DK
Dette symbol på produktet eller i vejledningen betyder, at det
udtjente elektriske eller elektroniske udstyr ikke må bortskaes
sammen med husholdningsaald.
I EU-lande ndes der separate indsamlingssystemer til
genbrug.
Kontakt de lokale myndigheder eller forhandleren for at få
yderligere information.
CZ
Tato značka na přístroji nebo v instrukcích pro použití znamená,
že se přístroj nesmí po skončení životnosti likvidovat s
domovním odpadem. V EU jsou speciální sběrné střediska pro
recyklaci.
Pro více informací kontaktujte místní správu nebo obchodníka,
u kterého jste přístroj zakoupili.
SK
Tento symbol na zariadení alebo v návode znamená, že vaše
elektrické a elektronické zariadenia nesmú byť po uplynutí ich
životnosti likvidované spolu s domácim odpadom. V EÚ existujú
systémy oddeleného zberu na recykláciu.
Ďalšie informácie vám poskytnú miestne úrady alebo predajca,
u ktorého ste zariadenie zakúpili.


Maylands Avenue, Hemel Hempstead, Herts., HP2 7TG, UK
DSG Retail Ltd. (co. no. 504877)
(IB-S10GC13E-130228V1)
 Loading...