


Quick Start Manual
Welcome to your new freesat+ 500GB satellite recorder.
How to set up and use your
SHDFSAT12
Connect to a Dish
2
To receive freesat, you must
connect your unit to an appropriate
satellite dish.
For safety reasons and to
provide reliable reception,
we strongly recommend
that the satellite dish is
professionally installed. If you
have any questions about the
satellite dish, please consult
your installer.
Place your unit on a firm, level surface close to your TV, a mains electricity socket, and the cables from the satellite dish.
1. Connect the cables from your satellite dish to the sockets on the back of the unit. For full functionality of your freesat+ recorder you will
need to connect two cables from your satellite dish. If you only have one cable, please consult your retailer or installer for advice.
Remove the battery
compartment cover from
the back of the remote
control by lifting it up while
pushing the catch. Insert the
two AAA sized batteries as
shown on the inside of the
compartment. Replace the
compartment cover.
Unpack
1
The Unit
Power Rec
CH+ CH- R
Remote Control
Batteries
HDMI Cable
Mains Adapter
Mains Cable
Instruction Manual
Connection
4
Switch On
5
Turn on your TV set and choose the HDMI input
(see your TV’s instruction manual).
Switch on the mains socket the unit
is connected to. After a few seconds,
the first freesat installation screen
will show on the TV screen.
If you do not see this screen on the
TV screen, see the Hints and Tips
section in the main instruction manual.
Connection Overview
3
TUNER 2 TUNER 1
LNB in
14/19V
350mA Max
ETHERNET USB HDMI
TV VCR
DC 12V 2.5A
S/PDIF
These cables only need to be hand tightened, overtightening could result in damage to the unit.
To access On Demand TV you will have to connect an Ethernet cable (not supplied) to your Freesat box.
Satellite Dish Mains PowerTV
OR
Connecting the two cables
This allows you to watch one TV station and record another. Connect the two separate cables from your satellite dish to each of the
TUNER 1 (LNB IN) and TUNER 2 sockets. For this your Satellite Dish must be fitted with a Low Noise Block (LNB) that has at least two
outputs. Please check with your installer if you are not certain about this.
2. Ensure your TV is turned o, then connect the HDMI cable
supplied to the HDMI socket at the back of the unit and an HDMI
socket on your TV. There may be more than one HDMI socket
on your TV. If you are not sure which one to use, check the TV’s
instruction manual. If your TV does not have an HMDI socket, you
can connect the unit using a SCART cable (not supplied), but will
not be able to view freesat channels in high definition.
3. Connect the mains cable to the mains adapter and then connect
to the power socket at the back of the unit.
For help with set-up or for more information about
freesat please visit www.freesat.co.uk or call 0845 313 0051.
For specific queries about this box and handy hints and tips
please visit www.knowhow.com/knowledgebank
or call 0844 5611234.
(QSG-SHDFSAT12-130613V3)
SHDFSAT12_Quick Start Guide.indd 1 13/06/2013 12:13
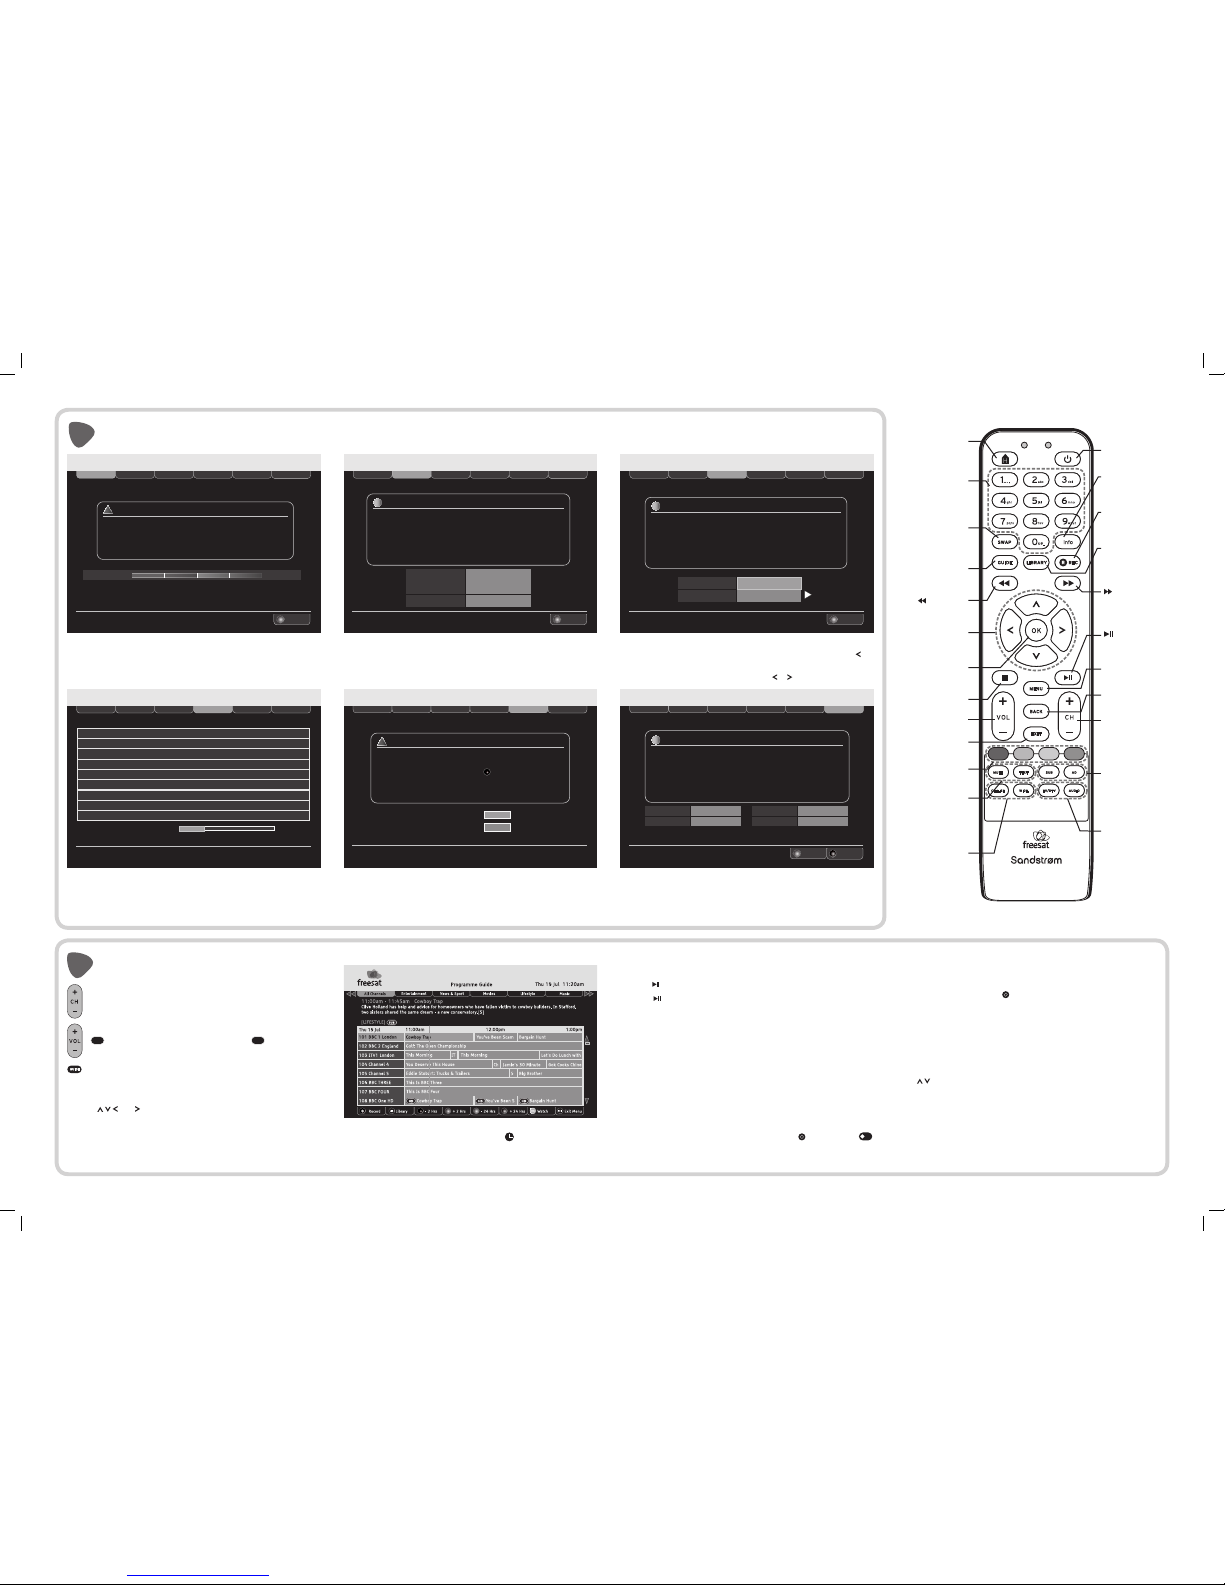
Step 1 of 6
Step 2 of 6
Step 3 of 6 Step 4 of 6
Step 5 of 6
OK
Continue
WARNING
!
Make sure that your freesat+ receiver has been connected correctly
before continuing the installation
If signal strength is less than 50%
please check the dish alignment and connections
Signal Strength
100%
50%25% 75%
Step 6 of 6
First Time Installation
Step 1 of 6
Step 2 of 6
Step 3 of 6 Step 4 of 6
Step 5 of 6
OK
Continue
Step 6 of 6
First Time Installation
INFORMATION
i
Network ID
Your freesat+ receiver has found the Network ID and Transport ID
Press OK to Continue
Transport ID
Lock Indicator
003b
090b
OK
Step 1 of 6
Step 2 of 6
Step 3 of 6 Step 4 of 6
Step 5 of 6
OK
Continue
Step 6 of 6
First Time Installation
INFORMATION
i
Postcode
Enter your postcode using the number buttons
Please note that the space is automatically entered in the postcode
Press OK and then select your screen type using the right arrow
TV Screen Size
- - - - - - -
Widescreen (16:9)
Step 1 of 6
Step 2 of 6
Step 3 of 6 Step 4 of 6
Step 5 of 6
Exit Menu
Step 6 of 6
First Time Installation
OK
Watch TV
EXIT
TV
Radio
80 Found
22 Found
INFORMATION
Installation Complete
You can record these details in the space provided on
the back of your instruction book
i
Postcode
Guidance PIN
CM77 7AT
6542
Step 1 of 6
Step 2 of 6
Step 3 of 6 Step 4 of 6
Step 5 of 6
Step 6 of 6
First Time Installation
Please wait while scanning for channels 32% Complete
300 Film Four
108 BBC HD
124 More Four
104 Channel 4
113 ITV2
602 CITV
117 ITV4
103 ITV1 Central W
105 Five
TV
TV
TV
TV
TV
TV
TV
TV
TV
Step 1 of 6
Step 2 of 6
Step 3 of 6 Step 4 of 6
Step 5 of 6
Step 6 of 6
First Time Installation
Some programmes contain guidance information which tell you that the
programme contains scenes that may be unsuitable for some viewers
Programmes with guidance information have a
You need to setup your guidance PIN to allow these programmes and
recordings to be viewed
WARNING
!
New guidance PIN
_ _ _ _
Conrm your guidance PIN
_ _ _ _
G
The guidance PIN can be disabled in the parental settings
Tune In
6
Change the channel by entering the three-digit channel
number using the remote control’s number buttons. Or press
+
or
-
buttons to step through the channels in order.
Press these buttons to turn the volume up or down. Press
MUTE
to turn o the sound completely. Press
MUTE
again or press
the volume + or - buttons to bring back the sound.
The programme guide shows a table of eight channels per page
over a two-hour period. A full synopsis of the highlighted programme
will be shown whilst in the Programme Guide.
Use the and buttons to navigate through the programmes
showing at dierent times. or allow you to select channels
by Genre.
Press OK to switch to the channel and programme highlighted. If the
programme is currently showing, the unit will immediately switch to it.
If it is scheduled for later, the clock symbol ( ) will be shown next
to a programme and the unit will automatically switch to the
chosen channel when the programme starts.
Watch TV
7
Use Live TV Functions
1. Press on the remote control to pause (also called “time shifting”).
2. Press again to continue watching from where you paused.
3. Press or to fast forward, or fast rewind.
4. Press n to leave time shifting mode and return to Live TV.
Use the Library
1. To access the library, press the LIBRARY button on the remote control.
2. This will show all of the programmes that have been recorded
and scheduled.
Record freesat Programmes
You can record 2 programmes at the same time:
1. Select a programme to be recorded and press R on the unit or
REC
R
on the remote control, a red light appears on the unit when recording.
2. If the programme is part of a series, open the Library menu,
then select Series.
3. When a recording is set, R is shown before the programme name.
4. While recording, you also can change channels/programmes.
5. To stop a recording, press LIBRARY, select the recording and
press n.
Watch a Recording
Press LIBRARY on the remote control to access your recording list, then use
the buttons to select the desired programme. Press OK to confirm.
Action Status
Recording a programme “Recording”
Finished recording a programme “Recorded”
Already viewed a programme “Viewed”
Watching a programme at any time “Playing”
STANDBY
Switches the unit
on and o
INFO
Displays channel and
programme information
REC
Records programme and
scheduled recordings
LIBRARY
Displays the library menu
where your programmes
are recorded
FORWARD
Allows fast forwarding
of the recorded
programmes
SUBTITLE displays the
subtitles menu to select
a subtitle language
AUDIO DESCRIPTION
switches audio
description on or o
MUTE
silences the unit’s sound
TEXT
displays interactive and
digital text services
(where available)
RED, GREEN, YELLOW,
BLUE chooses options
within menus
0-9
Select channels, enter
values and postcode
in the set-up menus
SWAP
Switches back to the
last channel watched
GUIDE Displays the
programme guide
BACKWARDS
Allows fast reversing of
the recorded programmes
UP, DOWN, LEFT,
RIGHT navigates menus
and programme guides
OK confirms the
selection on a menu
screen
STOP stops playback
MENU displays
the main menu
VOL+, VOL- adjusts the
volume up and down
HOME
Exits all menus and
returns to live TV
CH LIST displays
the channel list
WIDE switches
between available
screen display modes
TV/DTV switches the
TV SCART output
between freesat and
the TV’s tuner
AUDIO displays the
available audio menu
to choose between
normal sound and
audio description
PLAY/PAUSE
Plays/pauses/
resumes playback
CH+, CH-
Switches to the next
or previous channel
Moves one page up or
down in the channel list
EXIT exits a menu
and returns to normal
TV viewing
BACK returns to the
previous menu
1. The above screen will appear, this may take a couple of minutes.
If signal strength is below 50% switch o the unit and try
swapping the cables round, if the connection is NOT OK, then
consult your dealer or installer. Press OK to continue.
2. The receiver will automatically seek and find the Network ID
and Transport ID boxes. This may take a couple of minutes.
Press OK to continue.
5. To use the parental guidance function, hide adult channels,
lock online content or channels, you need to create a PIN. Enter
your chosen PIN using the remote control’s number buttons.
Make a note of your PIN number and keep it safe.
4. The unit will find and store the available freesat channels and
radio stations, and list them as the scan progresses. The progress
bar will also show how far the scan has to go. This process will
take a couple of minutes.
3. Enter your postcode using the number buttons on the remote
control, no space is needed. If you press the wrong key, press to
delete it. Press OK to continue. Select the screen format (16:9
Widescreen; 4:3 Traditional) by pressing or . Press OK to continue.
freesat digital TV is now ready to watch. You can press the EXIT
button or OK to exit the menu.
SHDFSAT12_Quick Start Guide.indd 2 13/06/2013 12:13
 Loading...